November 2008, Version 6.0 Revised by the JPAS Industry …€¦ · Revised by the JPAS Industry...
126
JCAVS User Guide, Version 6.0 November 2008 i November 2008, Version 6.0 Revised by the JPAS Industry Team
Transcript of November 2008, Version 6.0 Revised by the JPAS Industry …€¦ · Revised by the JPAS Industry...

JCAVS User Guide, Version 6.0 November 2008
i
November 2008, Version 6.0 Revised by the JPAS Industry Team

JCAVS User Guide, Version 6.0 November 2008
ii
Introduction The Joint Personnel Adjudication System (JPAS) represents a major technological leap for Department of Defense (DOD) security professionals worldwide. It is a DOD system that uses the internet to connect security personnel around the world with a database managed by DOD Central Adjudication Facilities (CAFs).
The National Industrial Security Program Operating Manual (NISPOM) paragraph 2-200.b. states that:
“When the CSA [Cognizant Security Agency] has designated a database as the system of record for contractor eligibility and access, the contractor shall be responsible for annotating and maintaining the accuracy of their employees’ access records. Procedures Governing Use of JPAS by Cleared Contractors can be found at Appendix J. The Department of Defense (DOD), acting as a CSA, has designated the Joint Personnel Adjudication System (JPAS) as the DOD system of record for contractor eligibility and access.
This “How-To Book” provides detailed instructions on the use of the JCAVS. It is an instructional tool only and is not meant to dictate policy. Future enhancements will be announced on the JPAS website at http://www.dss.mil
JPAS is the DOD personnel security migration system for:
1. The virtual consolidation of the DOD CAFs
2. Use by non-SCI security program managers and Special Security Officers
3. Special Access Program (SAP) program managers
4. DOD contractor security officers
5. Providing a centralized database with centralized computer processing and application programs for standardized DOD personnel security processes.
JPAS provides "real-time" information regarding eligibility, access, and investigative status to authorized DOD security personnel and other interfacing organizations, such as Defense Security Service, Defense Manpower Data Center, Defense Civilian Personnel Management System, Office of Personnel Management, and Air Force Personnel Center.
JPAS is comprised of two major sub systems, the Joint Clearance and Access Verification System (JCAVS) and the Joint Adjudication Management System (JAMS).
JCAVS + JAMS = JPAS JAMS provides the CAFs with a single information system to assist in the adjudication process and standardizes core DOD adjudication processes. JAMS is used by adjudicators to record eligibility determinations and command access decisions, and promotes reciprocity between the DOD CAFs. JCAVS provides security personnel the ability to update eligibility and access information in real time to ensure that the most current personnel security information is available throughout DOD. JCAVS promotes interoperability/interconnectivity with the following information systems:
Defense Security Service (DSS) Office of Personnel Management (OPM)
JCAVS User Guide, Version 6.0 November 2008
iii
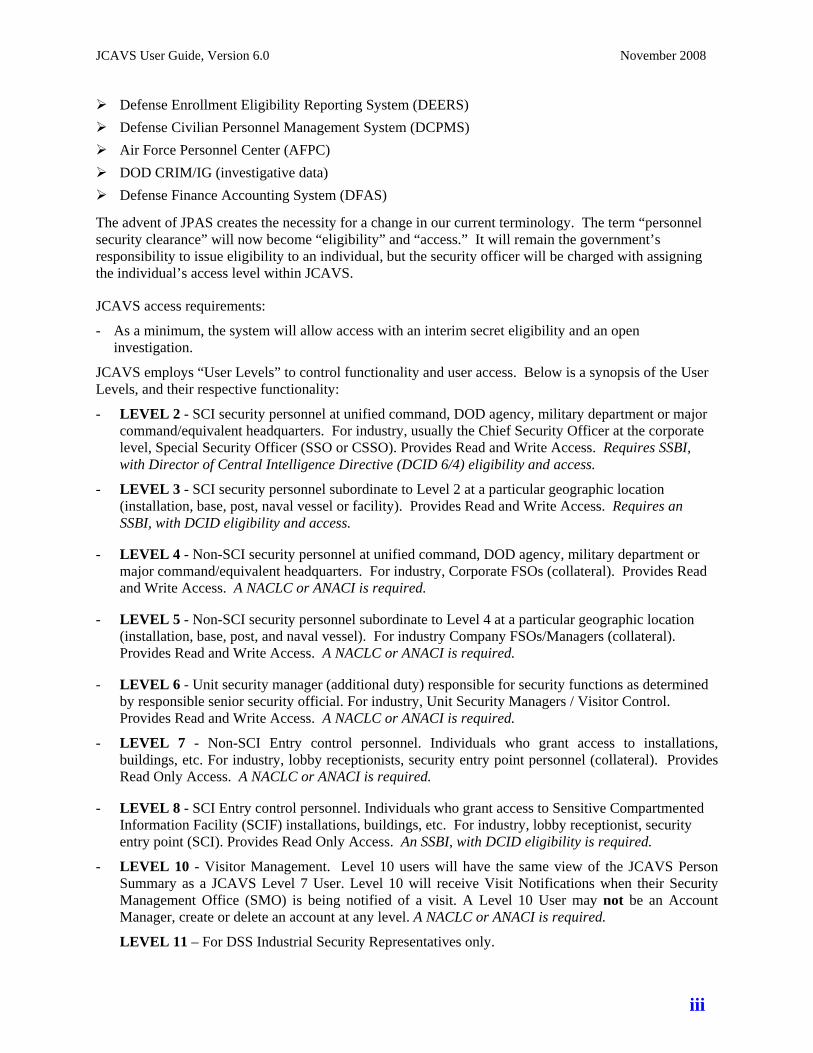
Defense Enrollment Eligibility Reporting System (DEERS) Defense Civilian Personnel Management System (DCPMS) Air Force Personnel Center (AFPC) DOD CRIM/IG (investigative data) Defense Finance Accounting System (DFAS)
The advent of JPAS creates the necessity for a change in our current terminology. The term “personnel security clearance” will now become “eligibility” and “access.” It will remain the government’s responsibility to issue eligibility to an individual, but the security officer will be charged with assigning the individual’s access level within JCAVS.
JCAVS access requirements:
- As a minimum, the system will allow access with an interim secret eligibility and an open investigation.
JCAVS employs “User Levels” to control functionality and user access. Below is a synopsis of the User Levels, and their respective functionality:
- LEVEL 2 - SCI security personnel at unified command, DOD agency, military department or major command/equivalent headquarters. For industry, usually the Chief Security Officer at the corporate level, Special Security Officer (SSO or CSSO). Provides Read and Write Access. Requires SSBI, with Director of Central Intelligence Directive (DCID 6/4) eligibility and access.
- LEVEL 3 - SCI security personnel subordinate to Level 2 at a particular geographic location (installation, base, post, naval vessel or facility). Provides Read and Write Access. Requires an SSBI, with DCID eligibility and access.
- LEVEL 4 - Non-SCI security personnel at unified command, DOD agency, military department or major command/equivalent headquarters. For industry, Corporate FSOs (collateral). Provides Read and Write Access. A NACLC or ANACI is required.
- LEVEL 5 - Non-SCI security personnel subordinate to Level 4 at a particular geographic location (installation, base, post, and naval vessel). For industry Company FSOs/Managers (collateral). Provides Read and Write Access. A NACLC or ANACI is required.
- LEVEL 6 - Unit security manager (additional duty) responsible for security functions as determined by responsible senior security official. For industry, Unit Security Managers / Visitor Control. Provides Read and Write Access. A NACLC or ANACI is required.
- LEVEL 7 - Non-SCI Entry control personnel. Individuals who grant access to installations, buildings, etc. For industry, lobby receptionists, security entry point personnel (collateral). Provides Read Only Access. A NACLC or ANACI is required.
- LEVEL 8 - SCI Entry control personnel. Individuals who grant access to Sensitive Compartmented Information Facility (SCIF) installations, buildings, etc. For industry, lobby receptionist, security entry point (SCI). Provides Read Only Access. An SSBI, with DCID eligibility is required.
- LEVEL 10 - Visitor Management. Level 10 users will have the same view of the JCAVS Person Summary as a JCAVS Level 7 User. Level 10 will receive Visit Notifications when their Security Management Office (SMO) is being notified of a visit. A Level 10 User may not be an Account Manager, create or delete an account at any level. A NACLC or ANACI is required.
LEVEL 11 – For DSS Industrial Security Representatives only.

JCAVS User Guide, Version 6.0 November 2008
iv
The Table of Contents
INTRODUCTION ......................................................................................................................................................II
SECTION 1 GETTING STARTED...................................................................................................................1 1.1 ESTABLISHING A JPAS ACCOUNT ...............................................................................................................1 1.2 LOGGING INTO JPAS...................................................................................................................................1 1.3 CREATING A PERMANENT PASSWORD .........................................................................................................4 1.4 CHOOSING A CATEGORY/LEVEL..................................................................................................................4 1.5 JCAVS WELCOME SCREEN AND MAIN MENU ............................................................................................5
1.5.1 Welcome Screen.....................................................................................................................................5 1.5.2 Main Menu.............................................................................................................................................6
1.6 OFFICE INFORMATION .................................................................................................................................6 1.6.1 Entering Office Information...................................................................................................................6
SECTION 2 THE BASICS..................................................................................................................................8 2.1 WHAT DOES ELIGIBILITY MEAN? ...............................................................................................................8 2.2 WHAT DOES ACCESS MEAN?.......................................................................................................................9 2.3 WHAT IS A SECURITY MANAGEMENT OFFICE?............................................................................................9 2.4 ESTABLISHING A PERSONNEL SECURITY MANAGEMENT NET (PSM NET) ................................................10
2.4.1 Adding by Organization.......................................................................................................................10 2.4.2 Adding by Social Security Number ......................................................................................................13 2.4.3 Adding by “In/Out Process” link.........................................................................................................14
2.5 HOW TO LOOKUP A RECORD .....................................................................................................................14 2.6 HOW TO ADD A RECORD ...........................................................................................................................16 2.7 HOW TO MODIFY PERSONAL INFORMATION DATA....................................................................................18
SECTION 3 MAINTAINING YOUR PSM NET/SMO .................................................................................19 3.1 HOW TO ADD A PERSON CATEGORY .........................................................................................................19 3.2 DELETING A PERSON CATEGORY TAB.......................................................................................................21 3.3 HOW TO MODIFY A CATEGORY .................................................................................................................22 3.4 HOW TO IN-PROCESS.................................................................................................................................25 3.5 HOW TO INDOCTRINATE ............................................................................................................................26 3.6 NON-SCI INDOCTRINATION.......................................................................................................................26 3.7 SCI INDOCTRINATION ...............................................................................................................................29 3.8 VERIFYING NDAS......................................................................................................................................31 3.9 ORAL ATTESTATIONS................................................................................................................................31 3.10 WHAT IS LOSS OF JURISDICTION?..............................................................................................................33 3.11 RECIPROCITY.............................................................................................................................................33
SECTION 4 REMOVING PERSONNEL FROM YOUR SMO ...................................................................34 4.1 HOW TO DEBRIEF ......................................................................................................................................34
4.1.1 Debrief Non-SCI Accesses ...................................................................................................................34 4.1.2 Debrief SCI Accesses ...........................................................................................................................36
4.2 HOW AND WHEN TO SEPARATE.................................................................................................................37 4.3 HOW TO OUT-PROCESS .............................................................................................................................38
4.3.1 Person Summary Method.....................................................................................................................38 4.3.2 PSM Net Method..................................................................................................................................40
SECTION 5 MASS PERSONNEL MODULE ................................................................................................41 5.1 INTRODUCTION..........................................................................................................................................41 5.2 MASS PERSONNEL CHANGES SCREEN DESCRIPTION .................................................................................41 5.3 INSTRUCTIONS (SEPARATION ONLY).........................................................................................................42 5.4 INSTRUCTIONS (SEPARATION AND TRANSFER – MFO)..............................................................................45

JCAVS User Guide, Version 6.0 November 2008
v
5.5 INSTRUCTIONS (SEPARATION AND TRANSFER – NON MFO) .....................................................................49 5.6 INSTRUCTIONS (TRANSFER ONLY – NON MFO)........................................................................................54
SECTION 6 VISIT NOTIFICATIONS ...........................................................................................................60 6.1 DETERMINING NEED-TO-KNOW ................................................................................................................60 6.2 CREATING OUTGOING VISITS ....................................................................................................................60 6.3 MODIFYING AN EXISTING OUTGOING VISIT ..............................................................................................62 6.4 CANCELING AN EXISTING OUTGOING VISIT ..............................................................................................63 6.5 VIEWING INCOMING VISITS.......................................................................................................................63
SECTION 7 INVESTIGATION REQUESTS.................................................................................................65 7.1 NISPOM PROCEDURES FOR COMPLETING THE SF86 ................................................................................65 7.2 SF86 RETENTION ......................................................................................................................................65 7.3 FINGERPRINT CARDS.................................................................................................................................65
7.3.1 Where do Fingerprint Cards Go?........................................................................................................66 7.4 ELECTRONIC FINGERPRINTING - SECURE WEB FINGERPRINT TRANSMISSION (SWFT) .............................66 7.5 HOW TO INITIATE AN INVESTIGATION REQUEST........................................................................................67 7.6 REVIEWING THE PSQ ................................................................................................................................71 7.7 E-QIP TIMELINE .......................................................................................................................................72 7.8 ATTACHING SIGNATURE PAGES ................................................................................................................72 7.9 SUBMITTING PSQ TO DISCO ....................................................................................................................74
7.9.1 DOD Organizations Only Processes ...................................................................................................75 7.9.2 Industry and DOD Organizations Processes.......................................................................................76
SECTION 8 REQUEST TO RESEARCH/UPGRADE ELIGIBILITY .......................................................77 8.1 WHAT IS AN RRU USED FOR?....................................................................................................................77 8.2 HOW TO GENERATE AN RRU ....................................................................................................................77
SECTION 9 ADVERSE INFORMATION/INCIDENT REPORTS .............................................................79 9.1 INCIDENT REPORT NOTIFICATIONS VIA JPAS............................................................................................80
SECTION 10 NOTIFICATIONS .......................................................................................................................81 10.1 NOTIFICATIONS LINK DEFINITIONS ...........................................................................................................82
SECTION 11 HOW TO GENERATE A REPORT..........................................................................................85
SECTION 12 SPECIAL INVESTIGATIVE INDEX .......................................................................................88
SECTION 13 HOW TO SUBMIT A TEST PROBLEM REPORTS (TPRS) ................................................90
SECTION 14 HELPFUL TIPS AND TRICKS.................................................................................................92
APPENDIX A - TERMS AND DEFINITIONS ......................................................................................................93
APPENDIX B - ACRONYMS ..................................................................................................................................94
APPENDIX C – INVESTIGATION TYPES ..........................................................................................................96
APPENDIX D – TERMINATION/TRANSFER FLOWCHART .........................................................................98
APPENDIX E – JCAVS STEP MATRIX................................................................................................................99
APPENDIX F – JCAVS STEP MATRIX REMARKS.........................................................................................101
JCAVS User Guide, Version 6.0 November 2008
vi
APPENDIX G – E-QIP APPLICANT INFORMATION SHEET ......................................................................102
APPENDIX H – SF86 REVIEWING INSTRUCTIONS......................................................................................106
APPENDIX I – IDENTIFYING THE GOVERNMENT CUSTOMER .............................................................111
APPENDIX J – DSS INDUSTRY RULES ............................................................................................................115
APPENDIX K – PSM NET VALIDATION ..........................................................................................................117
APPENDIX L – JPAS REPORTS..........................................................................................................................118

JCAVS User Guide, Version 6.0 November 2008
Section 1 – Getting Started 1
Section 1 Getting Started 1.1 Establishing a JPAS Account Before you are able to log into JPAS, you must have a User ID and password. If your company has already established a corporate account, contact your corporate Account Manager to establish your User ID and password.
If you do not have a corporate JPAS account, you must first contact the JPAS Help Desk (888-282-7682) to establish one. The JPAS Help Desk will establish your corporate JPAS account and provide a User ID and password. The corporate Account Manager will then establish user accounts and provide system-generated User IDs and passwords for all employees within their corporation.
User ID and temporary passwords are system generated when user accounts are first established. User IDs consist of the first five letters of your last name followed by your first and middle initial. User IDs are always all lower case. If a User ID has been previously used, or is in use, it will include a numeric character at the end.
Go to the following website for a copy of the System Access Request (SAR) form in order to apply for a JPAS account: https://www.dss.mil/GW/ShowBinary/DSS//diss/documents/sar.pdf.
NOTE: Personally Identifiable Information (PII) Training. All personnel, DoD employees and on/off-site contractors, accessing DSS Systems containing PII (JPAS, ISFD, DCII, ENROL, and SWFT) are required to complete the "Personally Identifiable Information (PII)" eLearning course. The DISA PII training is available on the Defense Security Service (DSS) ENROL system: https://enrol.dss.mil/enrol/lang-default/SYS_login.asp. The course will provide the participant a basic level of understanding of current DoD PII-related information security principles and requirements. The Defense Information Systems Agency (DISA) produced the PII training to ensure that all personnel accessing PII are adequately trained for handling PII and reporting any theft, loss, or compromise of this information. Click the following link for instructions on how to register and start the course: "access_pii_course.pdf"
1.2 Logging into JPAS To log into JPAS, open browser and enter the DSS Gateway address: http://www.dss.mil/.
The DSS Gateway currently consists of five applications: SWFT, JPAS, DCII, ISFD, and Enrol. Go to Applications, scroll up and click on JPAS and you will be directed to the JPAS Home page with Login screen.

JCAVS User Guide, Version 6.0 November 2008
Section 1 – Getting Started 2
Figure 1. DSS Gateway screen
Click the “JPAS LOGIN” button and you will be directed to the JPAS disclosure screen.
Figure 2. JPAS Home Page with Login Screen
The JPAS disclosure screen contains a message informing you that JPAS is a highly secure system available only to authorized users. You must agree to the requirements stated in the message in order to gain access to the system. To consent to these requirements and proceed to the next step, select the Agree button. If you are unable to comply with these requirements for any reason, select the Disagree button.
Click “AGREE” when the JPAS log in screen appears.

JCAVS User Guide, Version 6.0 November 2008
Section 1 – Getting Started 3
Figure 3. JPAS Disclosure screen.
User ID and temporary passwords are system generated when user accounts are first established. User IDs generally consist of the first five letters of your last name followed by your first and middle initial. User IDs are always all lower case. If you’ve had a previous JPAS account, your User ID may include a numeric character at the end.
Figure 4. JPAS Log In screen
1. Enter your User ID and Password in the appropriate text boxes.
Remember that passwords are case-sensitive.
2. Click LOG IN.
A “Password Expired” message will appear the first time you log in.
3. Select OK to open the “Change Password” dialog box.

JCAVS User Guide, Version 6.0 November 2008
Section 1 – Getting Started 4
1.3 Creating a Permanent Password New Password - The following guidelines will help you create a proper Password:
Passwords must contain at least two different lowercase letters, two different uppercase letters, two different numbers, and two different special characters.
The following special characters may be used as part of your Password: @#$%^&*[ ] { }.
Passwords must be changed every 60 days.
The new password can not be the same as any of the previous 10 passwords.
The new password can not be any password used in the previous 18 months.
NOTE: When you first establish your JPAS account, your Account Manager will provide you with your User ID and “temporary” password. The first time you log into JPAS, you will automatically be taken to the “Change Password” screen. You will have to create your Permanent Password at that time before you can continue.
Figure 5. Change password screen.
1. Enter the current (temporary) password in the “Current Password” text box field.
2. Enter a new password in the “New Password” text box
3. Retype the new password you just entered in the “Verify New Password” text box
4. Click Save – to save the password and continue logging in to JPAS.
The system will automatically notify you if your new password meets the password requirements for the JPAS system.
Once you’ve established your Permanent Password, you can at any time change your password by clicking on the “Chg Password” link in the Main Menu. The JPAS system requires you to change you Permanent Password every 60 days.
1.4 Choosing a Category/Level The JCAVS “Choose Category/Level” screen is where you select the category or level that has been assigned to you. Your assigned level and category determine the menu options available to you. You will ONLY be required to “choose a category and/or level” if you have multiple categories. Your account manager will determine if you require more than one category or level.

JCAVS User Guide, Version 6.0 November 2008
Section 1 – Getting Started 5
If you are assigned only one “category” and one “level,” you will automatically be taken to the “Welcome” screen and Main Menu.
If you are assigned multiple categories or multiple levels, you will be automatically taken to the “Choose Category/Level” screen where you’ll be required to choose the category and level you want to log in as.
Figure 6. Choose category and level screen.
1. Click the Person Category drop-down arrow and select your category. 2. Click the Level drop-down arrow and select your user level. 3. Click OK. The “Welcome” screen and Main Menu appears.
After logging in at the determined category/level, you can also change your category and/or level by clicking on the “Change Category/Level” link from the Main Menu.
1.5 JCAVS Welcome Screen and Main Menu The JCAVS “Welcome” screen and Main Menu indicates you have successfully logged into JCAVS.
1.5.1 Welcome Screen User ID and access level are displayed.
A link to display the Current Time Zone and Office Symbol or Phone Number is displayed.
Last Successful and Unsuccessful Logins are displayed.
Figure 7. JPAS Welcome Screen

JCAVS User Guide, Version 6.0 November 2008
Section 1 – Getting Started 6
1.5.2 Main Menu From the Main Menu, you can navigate to different system functions using the options listed on the Main Menu displayed to the left of the “Welcome” screen. Menu selection will vary depending on your level of access.
Figure 8. Main menu screen.
NOTE: Never use the red “X” button to logout of JPAS and do not use the back button to navigate to the previous screen. This is an invalid log off and you will have to contact your account manager to get you back into the system.
1.6 Office Information You can change or update office information for a user’s Person Category by selecting the Change current Time Zone, Office Symbol or Phone Number link located in the middle of the “Welcome” screen.
1.6.1 Entering Office Information 1. Click on the “Change Current Time Zone Office Symbol or Phone Number” link. The “Change
Office Symbol/Telephone Number/Time Zone” screen appears.
Figure 9. Change office symbol/telephone number/time zone screen
2. In the New Office Symbol textbox, type in the office symbol. For industry, leave blank.
Main Menu

JCAVS User Guide, Version 6.0 November 2008
Section 1 – Getting Started 7
3. From the User’s Current Time Zone drop-down list select the correct Time Zone. The Current Time Zone is automatically populated with the selected time zone.
4. Type the appropriate information in the text boxes across the Commercial row under the headings: Country Code, Area Code, Prefix and Exchange, and Extension.
5. If applicable, type the appropriate information in the text boxes across the DSN row under the headings Country Code, and Prefix and Exchange.
6. Click SAVE. The JCAVS “Welcome” screen and Main Menu appears.

JCAVS User Guide, Version 6.0 November 2008
Section 2 – The Basics 8
Section 2 The Basics 2.1 What Does Eligibility Mean?
Eligibility is defined as an administrative determination that an individual is eligible for access to classified information. This determination is based on investigation and review of available personal data and a finding that access is clearly consistent with national interests.
The Defense Industrial Security Clearance Office (DISCO) is the CAF for industry. DISCO adjudicates collateral personnel clearances (PCLs). A PCL is an administrative determination that an individual is eligible, from a security point of view, for access to classified information of the same or lower category as the level of the personnel clearance being granted.
Collateral means Confidential, Secret or Top Secret eligibility. SCI eligibility is granted by a user agency CAF, such as the Air Force CAF (AFCAF), the Department of the Navy CAF (DoNCAF), etc.
For user Levels 2 through 6, eligibility is found under the “Adjudication Summary” header on the person summary page and should look like this:
Determined Eligibility of Confidential or Secret on 2005 06 30 DISCO
OR
Determined Eligibility of Top Secret on 2005 06 30 DISCO
OR
Determined Eligibility of SCI - DCID 6/4 on 1999 06 22 DoNCAF
For user Levels 7, 8, and 10, which are primarily used for visitor control purposes, the eligibility is located in the top section of the person summary screen:
Figure 10. Person Summary screen for levels 7, 8 & 10

JCAVS User Guide, Version 6.0 November 2008
Section 2 – The Basics 9
If the person is not eligible for access, you may see one of the following adjudication determinations: Determined Eligibility of Loss of Jurisdiction on 2004 09 10 DISCO
OR Access Suspended/Revoked/Denied on 2003 07 10
If an interim eligibility is denied, DISCO will post that information in JPAS. In this circumstance, the individual's eligibility will not be updated. You will be able to tell that an interim eligibility has been denied if a review of the employee's JPAS record shows an open investigation but no interim eligibility is granted. Interim eligibility may be granted between one and three days.
2.2 What does Access Mean? Access means that the subject has been properly briefed by the FSO and officially indoctrinated in JPAS.
Figure 11. US access screen.
2.3 What is a Security Management Office?
A Security Management Office (SMO) is established by a JPAS Account Manager and may contain one or more organizations. A SMO operates at a specified level (Levels 2 through 6) and can be connected to other SMOs in ways that mirror chain of command or organizational relationships. Each SMO may have at least one superior SMO (the parent) and may have an unlimited number of subordinate SMOs (the children). These organizational relationships should reflect real-world associations.
Each SMO must have a unique identification code. The SMO office name and other identifying characteristics (such as phone and fax numbers and email addresses) are available to help users locate and contact one another.
SMO search capability is based on the SMO code and name, so both of these identifiers should be standardized and recognizable. In this way, you can easily identify and locate other SMOs, and they can find you when needed.
Every JCAVS User must be associated with a SMO in order to use JCAVS.
The JCAVS SMO Maintenance screen allows Account Managers to create, deactivate, and delete SMOs. It also allows Account Managers to update office information, view all associated users for a SMO and maintain its parental (superior) relationships.
An Account Manager must have the proper user level and be within the same Service/Agency to establish and maintain a SMO. Account Managers are responsible for maintaining and updating the information contained on each SMO.

JCAVS User Guide, Version 6.0 November 2008
Section 2 – The Basics 10
2.4 Establishing a Personnel Security Management Net (PSM Net) Establishing, validating, and maintaining your Personnel Security Management (PSM) Net is probably one of the most important responsibilities of a JPAS user. Before you begin establishing your PSM Net, it is recommended that you start with an accurate listing of all eligible personnel. It is also recommended that this list be in alphabetical order.
The FSO is responsible for annotating and maintaining the accuracy of the employee access records they own within their SMO.
There are several different ways to establish your PSM Net:
1) Add by organization (via the PSM Net screen).
2) Add by Social Security Number (SSN) (via the PSM Net screen).
3) Add by in/out process link (via the Person Summary screen).
NOTE: The first time you access your PSM Net it will more than likely be empty and not contain any names listed under the “Person Category.” Once you start “adding” personnel to your PSM Net, they will be listed in alphabetical order under Person Category.
2.4.1 Adding by Organization
Instructions: 1. Log in as a User for the SMO you want to establish the PSM Net for.
2. Click on “PSM Net” (Main Menu).
3. Before you begin, check to make sure that the correct SMO and level are indicated in the top left corner under “JCAVS Maintain PSM Net.”
a. If not, click on the gray “Select SMO” button.
b. Under the “SMO Code” column, click on the correct SMO from the list provided. You must click on one of the SMO link(s) listed.
c. Once you click on the correct SMO, it should take you back to the “JCAVS Maintain PSM Net” page displaying all personnel “In Processed” to that SMO.
4. Now to search the JPAS database, click on the radio button for the “Persons Category by Organization.”
5. Click the gray “Add” button.
6. You should now be on the “PSM Net Add Organization Person Categories” page.
JCAVS User Guide, Version 6.0 November 2008
Section 2 – The Basics 11
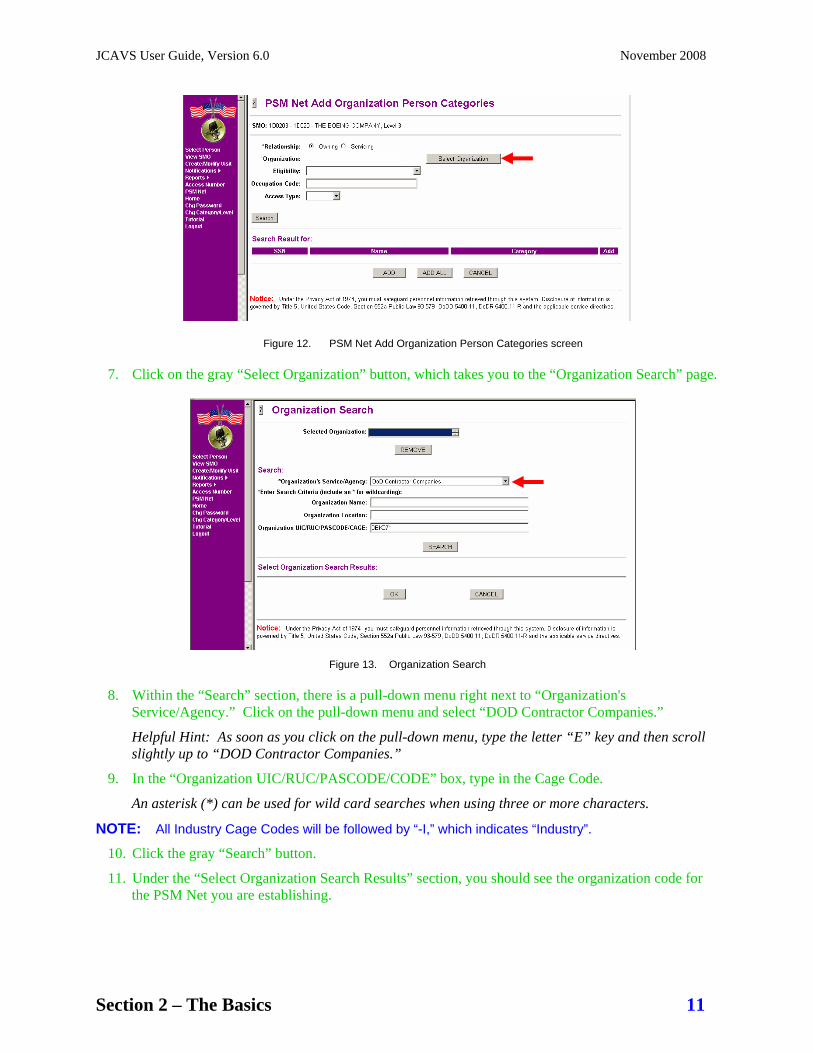
Figure 12. PSM Net Add Organization Person Categories screen
7. Click on the gray “Select Organization” button, which takes you to the “Organization Search” page.
Figure 13. Organization Search
8. Within the “Search” section, there is a pull-down menu right next to “Organization's Service/Agency.” Click on the pull-down menu and select “DOD Contractor Companies.”
Helpful Hint: As soon as you click on the pull-down menu, type the letter “E” key and then scroll slightly up to “DOD Contractor Companies.”
9. In the “Organization UIC/RUC/PASCODE/CODE” box, type in the Cage Code. An asterisk (*) can be used for wild card searches when using three or more characters.
NOTE: All Industry Cage Codes will be followed by “-I,” which indicates “Industry”.
10. Click the gray “Search” button.
11. Under the “Select Organization Search Results” section, you should see the organization code for the PSM Net you are establishing.

JCAVS User Guide, Version 6.0 November 2008
Section 2 – The Basics 12
Figure 14. Organization Search screen.
12. Click on the organization code link listed. The organization code will populate in the Selected Organization field at top of screen.
13. Click on the gray “OK” button.
14. This should take you back to the “PSM Net Add Organization Person Categories” page. The organization code you selected should now be listed after “Organization.”
Figure 15. PSM Net Add Organization Person Categories screen
15. Click the gray “Search” button.
16. Under the search results section, you will see everyone that, according to the JPAS database, has an “ACTIVE” Person Category for the organization code you searched for.
17. Using your list of cleared personnel, you have two options to add personnel to your PSM Net:
a. Option 1 - Check the “Add” box at the far right after each name. Once you’ve completed a page, make sure you click on the “Add” button at the bottom of the page BEFORE you move to the next page – if you don’t, the names will not be added to the PSM Net. Once you’ve added everyone you want from the first page, continue on with the remaining page(s) until you’ve added everyone to your SMO, in creation of your PSM Net. This is the recommended method when you “initially” establish your PSM Net.

JCAVS User Guide, Version 6.0 November 2008
Section 2 – The Basics 13
b. Option 2 - Click the “Add All” button at the bottom of the screen. This adds all categories associated with your facility code. When using the Add All option, JPAS will add all persons currently associated with your CAGE code, as well as those “previously” associated with your CAGE code. Previous associations include anyone who may have transferred, terminated, or no longer require access. Review each record and ensure past associations have valid separation dates/separation codes; then out-process the person from your PSM Net.
For additional information on PSM Net validation, see Appendix K.
Figure 16. Add personnel to your PSM Net screen.
18. If you didn’t find everyone on your list during this process, most likely it’s because the missing people were not assigned a category within your organization. What you have to do now is “add” those missing records to your PSM Net.
19. Go to the section on “How to Add a Person Category.”
2.4.2 Adding by Social Security Number
Instructions: 1. Log in as a User for the SMO you want to establish the PSM Net for.
2. Click on “PSM Net” (Main Menu).
3. Click on the radio button for the “Persons Category by SSN.”
4. Click the gray “Add” button.
5. Select “Owning” or “Servicing” organization
6. Enter SSN, and then hit “Search” (your selection will appear under Search Result) 7. Select the “Add” box for the correct person category (the person may have multiple categories) 8. Hit “Save” and a “Reason” box will appear for the selection you just made. Click the “Reason”
box and you will see that an existing relationship has been established. 9. Click on “PSM Net” again and you see that the person has been added to your PSM Net.
Option 2 Option 1

JCAVS User Guide, Version 6.0 November 2008
Section 2 – The Basics 14
2.4.3 Adding by “In/Out Process” link
Instructions: 1. Log in as a User for the SMO you want to establish the PSM Net for.
2. Enter SSN of the person you wish to add, then hit “Display”
3. Check to make sure the correct Person Category is selected
4. If not, select the correct Category from the Person Category drop down menu
5. Go to the Person Category Information section and select the “In/out Process” link. (This will take you to the “View/Modify In/Out” Screen.
Figure 17. Person category information screen.
6. At the “Add New Relationship” section, enter the “In” date (must be current date) and select a Relationship. Then scroll down to the bottom and hit the “Save” button.
7. Hit “Cancel” to take you back to the “Person Category” screen.
2.5 How to Lookup a Record Within JCAVS, you’ll be able to look up any individual as long as you have their SSN.
Instructions: 1. Log in as a User.
2. From main menu column on the left, Click on “Select Person,” Select Person screen will appear.

JCAVS User Guide, Version 6.0 November 2008
Section 2 – The Basics 15
Figure 18. Select person screen.
3. Enter the SSN.
4. Click the “Display Person Summary” radio button (this is the default button).
5. Click the gray “Display” button.
6. The Person Summary screen will appear. The top section displays Personal Information Data (PID).
Figure 19. Person Summary screen
7. The next section displays access information and available actions. This section can contain one or more categories depending on how many companies a person may be associated with. These categories remain on the Person Summary screen until two years and one day after the separation date has been entered. Hyperlinked actions are only available if you have a relationship with a specific person category.

JCAVS User Guide, Version 6.0 November 2008
Section 2 – The Basics 16
8. The Person Category Information section displays the facility information for each category the person is associated with. You can view the category information (for each Cage Code) by clicking on the pull down menu at the top of the page and selecting the category you want to view.
Figure 20. Person category information screen.
9. For each category you select, the Person Category Information section will change to provide you with the information associated with that particular category. Some of the information you’ll see when you change a category are: category classification, organization, organization status, the Non-SCI SMO and/or SCI SMO for that category, as well as the separation status and date.
10. The bottom of the Person Summary screen shows the Investigation Summary, Adjudication Summary, and External Interfaces.
11. To get out of the Person Summary screen, make a new selection from the main menu.
2.6 How to Add a Record If you attempt to “look-up” a person’s record in JCAVS and you receive an error message that the person does not exist then there is no record within JPAS for that person. Verify that you entered the correct SSN. If you still receive the error message that the person does not exist, you’ll have to create a record within JPAS for this person.
Instructions: 1. Log in as a User.
2. Click on “Select Person” (Main Menu).
3. Enter the person’s SSN.
4. Click the “Display Add/Modify Non-DOD Person” radio button.
5. Click the gray “Display” button.
6. The “Add/Modify Non-DOD Person” screen will appear.

JCAVS User Guide, Version 6.0 November 2008
Section 2 – The Basics 17
7. First you will need to enter all the PID on the person in the blank fields. Fields with an asterisk are mandatory and must have an entry to continue building the record.
Figure 21. Add/modify Non-DoD person screen
8. Click the gray “Save” button.
9. Now you will need to create a “category” for the person.
10. From the “Available Category Types” pull-down, select “Industry.”
11. Click “Add Category” button.
NOTE: “Industry ()” will populate in the Person Category type box.
12. In the “Category Classification” pull-down menu, select one of the three options: Contractor, Key Management Personnel or Consultant.
13. In the “Service/Agency” pull-down menu, scroll down until you reach the appropriate organization Agency, select “DOD Contractor Companies.” Helpful Hint: As soon as you click on the pull-down menu, type the letter “E” key and then scroll slightly up to “DOD Contractor Companies.”
14. Click on the gray “Modify Organization” button, which takes you to the “Organization Search” page.
15. Within the “Search” section, there is a pull-down menu right next to “Organization's Service/Agency.” Click on the pull-down menu and select “DOD Contractor Companies.”
16. In the “Organization UIC/RUC/PASCODE/CODE” box, type in the organization code. An asterisk (*) can be used for wild card searches when using three or more characters.
17. Click the search button.
18. Select the organization link and it will populate to the “Selected Organization” box at the top of the screen.
19. Clicking the OK button returns you to the Add/Modify screen.
20. Validate that correct organization information is populated in the lower left screen.
21. Then click the “Save” button.
22. To return to the Person Summary page, click the “Person Summary” link at the bottom of the page.

JCAVS User Guide, Version 6.0 November 2008
Section 2 – The Basics 18
NOTE: If you receive the following dialog box: “The Person Category does not have any Owning/Servicing Relationship and no Notification based on Owning/Servicing Relationship will be sent.” Ensure that the correct person category is showing in the pull-down box.
2.7 How to Modify Personal Information Data Within Industry, you can change a person’s PID if you have an owning or servicing relationship with their JPAS record.
If a person has an active DOD Person Category, you will not be able to change their PID data. For additional guidance, please contact the JPAS Help Desk at 888-282-7682.
Instructions: 1. Click on “Select Person.”
2. Enter the person’s SSN.
3. Click the “Display Add/Modify Non-DOD Person” radio button.
4. Click the gray “Display” button. Information you’re able to change includes:
Last name, First name, Middle name, Cadency, DOB, Citizenship, Date of Death, State of Birth, Country of Birth, Marital status, Foreign Relatives, AKA info
Figure 22. Add/modify PID data screen.
5. Update the appropriate PID data.
6. Click the “Save” button.
NOTE: Click on the “Person Summary” hyperlink at the bottom of the page to take you back to the Person Summary screen. The Person Summary screen should reflect the changes that you just made.
PID Data

JCAVS User Guide, Version 6.0 November 2008
Section 3 – Maintaining Your PSM Net/SMO 19
Section 3 Maintaining your PSM Net/SMO
3.1 How to Add a Person Category If you want to add a person to your PSM Net, the first thing you need to ensure is that the person has the correct Person Category that you want to add to your PSM Net. If the person does not have the correct Person Category for your organization, then you’ll need to add a new Person Category to the person’s record.
Instructions: 1. Log in as a User.
2. Click on “Select Person” (purple menu bar).
3. Enter the person’s SSN.
4. Click the “Display Add/Modify Non-DOD Person” radio button.
5. Click the gray “Display” button.
6. In the “Available Category Types” pull-down menu, select “Industry.”
7. Click “Add Category” button.
8. In the “Category Classification” pull-down menu, select one of the three options: Contractor, Key Management Personnel or Consultant.
9. In the “Service/Agency” pull-down menu, scroll down until you reach the appropriate organization Agency, select “DOD Contractor Companies.” Helpful Hint: As soon as you click on the pull-down menu, type the letter “E” key and then scroll slightly up to “DOD Contractor Companies.”
10. Click on the gray “Modify Organization” button, which takes you to the “Organization Search” page.
11. Within the “Search” section, there is a pull-down menu right next to “Organization's Service/Agency.” Click on the pull-down menu and select “DOD Contractor Companies.”
12. In the “Organization UIC/RUC/PASCODE/CODE” box, type in the organization code. An asterisk (*) can be used for wild card searches when using three or more characters.

JCAVS User Guide, Version 6.0 November 2008
Section 3 – Maintaining Your PSM Net/SMO 20
Figure 23. Organization search screen
13. Click the search button.
14. Select the organization link and it will populate to the “Selected Organization” box at the top of the screen.
Figure 24. Organization search results screen
15. Clicking the OK button returns you to the Add/Modify screen.
16. Validate that correct organization information is populated in the lower left screen.

JCAVS User Guide, Version 6.0 November 2008
Section 3 – Maintaining Your PSM Net/SMO 21
Figure 25. Modify organization results
17. Then click the “Save” button.
18. To return to the Person Summary page, click the “Person Summary” link at the bottom of the page.
3.2 Deleting a Person Category Tab With the implementation of Version 2.3.0, you can now “Delete” a Person Category tabs that you make by mistake. This information can only be deleted if there is no associated data for that Person Category. Associated data includes, but is not limited to: Access, Incidents, JCAVS Interim, Presidential Support Program, Access Numbers, Positions of Trust, Remarks, Assistance Request, Suspense Item, Visit or a JPAS User.
Instructions: 1. Log in as a User.
2. Click on “Select Person.”
3. Enter the person’s SSN.
4. Click the “Display Add/Modify Non-DOD Person” radio button.
5. Click the gray “Display” button.

JCAVS User Guide, Version 6.0 November 2008
Section 3 – Maintaining Your PSM Net/SMO 22
Figure 26. Deleting a category screen
6. In the “Person Category” box, make sure the Person Category tab that you want to delete is visible in the box. If not, click on the pull-down menu and highlight the Person Category tab you want to delete.
7. Click on the “Delete Category” box.
8. Click the gray “Save” button.
3.3 How to Modify a Category You can modify an existing Person Category tab for various reasons, such as Multiple Facility Transfers (MFTs) or changes in the person category (KMP, Contractor or Consultant).
If an employee transfers from one organization to another organization within the same Multiple Facility Organization (MFO), instead of creating a new category for the gaining organization, you should “modify” the existing category for the losing organization. This process can be performed by either the losing or gaining organization. If for some reason the losing organization out-processes a person before modifying the existing tab, the gaining organization can in-process the person and then change the losing organization tab to reflect the gaining organization tab.
Instructions: 1. Log in as a User.
2. Click on “Select Person.”
3. Enter the person’s SSN.
4. Click the “Display Add/Modify Non-DOD Person” radio button.
5. Click the gray “Display” button.
6. In the “Person Category” pull-down menu, ensure you choose the category for the organization for which you are going to modify. This is a critical step – you must ensure that the correct category is showing before you proceed.
Category to be deleted
Click check box
JCAVS User Guide, Version 6.0 November 2008
Section 3 – Maintaining Your PSM Net/SMO 23
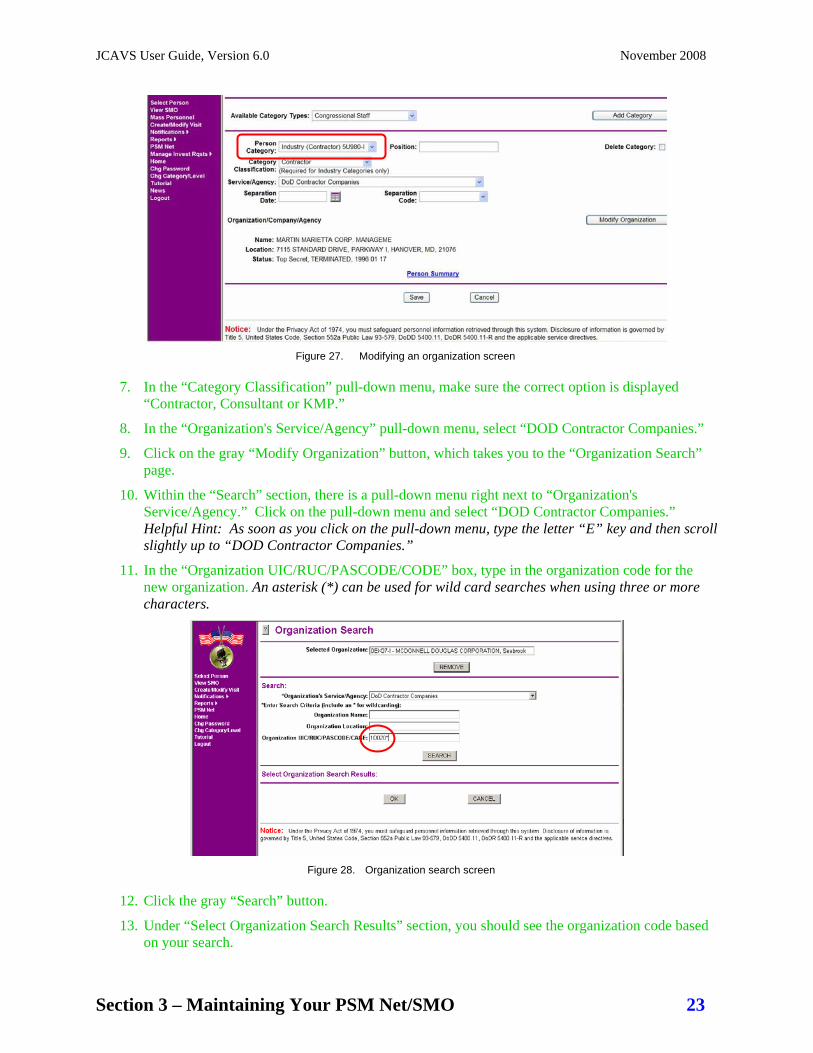
Figure 27. Modifying an organization screen
7. In the “Category Classification” pull-down menu, make sure the correct option is displayed “Contractor, Consultant or KMP.”
8. In the “Organization's Service/Agency” pull-down menu, select “DOD Contractor Companies.”
9. Click on the gray “Modify Organization” button, which takes you to the “Organization Search” page.
10. Within the “Search” section, there is a pull-down menu right next to “Organization's Service/Agency.” Click on the pull-down menu and select “DOD Contractor Companies.” Helpful Hint: As soon as you click on the pull-down menu, type the letter “E” key and then scroll slightly up to “DOD Contractor Companies.”
11. In the “Organization UIC/RUC/PASCODE/CODE” box, type in the organization code for the new organization. An asterisk (*) can be used for wild card searches when using three or more characters.
Figure 28. Organization search screen
12. Click the gray “Search” button.
13. Under “Select Organization Search Results” section, you should see the organization code based on your search.

JCAVS User Guide, Version 6.0 November 2008
Section 3 – Maintaining Your PSM Net/SMO 24
Figure 29. Organization search results screen
14. Click on the appropriate organization code hyperlink. This will populate in the “Selected Organization” field.
Figure 30. Selected organization screen
15. Click on the gray “OK” button.
16. The organization code you selected should now be listed in the “Organization/Company/ Agency” section.
Figure 31. Organization/company/agency screen

JCAVS User Guide, Version 6.0 November 2008
Section 3 – Maintaining Your PSM Net/SMO 25
17. Click on the gray “Save” button.
18. The newly established code is displayed in the “Person Category” pull-down menu.
3.4 How to In-Process When you in-process a person, you are adding them to your PSM Net. There are several instances when you would need to in-process a person into your PSM Net, such as:
When you first establish your PSM Net.
When an employee transfers from one SMO to another SMO.
When a new hire or current employee requires a PCL.
NOTE: The most important thing to remember when in-processing a person is to make sure you in- process the correct Person Category. If not, you will in-process this person into your PSM Net under the wrong Person Category tab.
Instructions: 1. Log in as a User for the appropriate SMO.
2. Click on “Select Person."
3. Enter person’s SSN.
4. Click the “Person Summary” radio button.
5. Click the gray “Display” button.
6. When the Person Summary screen appears, ensure the appropriate category is displayed.
7. Click the “In/Out Process” hyperlink (this will take you to view/modify in/out screen).
8. Enter today’s date in the “In Date” box, or click the calendar, and choose the date (the correct format is: YYYY MM DD).
9. Under “Relationship,” click the “Owning” or “Servicing” radio box.
10. Click the gray “Save” button.
11. Under the “View/Modify Active Relationship(s)” section, the newly established organization code should be listed along with organization information and the in date and relationship. The out date box will remain empty until the person has been out processed.
NOTE: You can also take on a one-day relationship by entering both the in and out date at the same time in the Add New Relationship section. This relationship will go away at midnight eastern time.

JCAVS User Guide, Version 6.0 November 2008
Section 3 – Maintaining Your PSM Net/SMO 26
Figure 32. View/modify active relationships screen
12. Click the gray “Cancel” button to take you back to the Person Summary screen.
NOTE: You can also in-process someone into your PSM Net via the “JCAVS Maintain PSM Net” screen. Follow instructions in “Establishing a PSM Net” to use this method.
3.5 How to Indoctrinate The term “indoctrinate” within JPAS means to assign an access level based on current eligibility. You will only grant “access” to personnel with the appropriate eligibility and investigation type. For example, if a person needs access to Top Secret information, they must have Top Secret eligibility with an SSBI investigation. You can indoctrinate a person into the following categories: US Access, NATO, SIOP, and Nuclear. Once a person is indoctrinated at an access level, they will remain at that level until you debrief them within JPAS.
Each person within your PSM Net can be indoctrinated at an access level once they have eligibility, or an interim approval.
NOTE: Just because a person has a current final SSBI doesn’t mean you have to indoctrinate them at the Top Secret level. It all depends on the level of information they are going to be accessing in the performance of their job as well as on the level of the facility clearance.
Eligible personnel can be indoctrinated into other accesses by clicking on the Indoctrinate Non-SCI/SCI hyperlink on the Person Summary screen.
NOTE: A person MUST have an SF 312, Non-disclosure Agreement (NdA) date annotated before you can indoctrinate them at any level.
3.6 Non-SCI Indoctrination
Instructions:
1. Log in as a User for the appropriate SMO.
2. Click on “Select Person.”

JCAVS User Guide, Version 6.0 November 2008
Section 3 – Maintaining Your PSM Net/SMO 27
3. Enter the person’s SSN.
4. Click on the “Person Summary” radio button.
5. Click on the gray “Display” button.
6. When the Person Summary appears, ensure the appropriate category is displayed.
7. Scroll down to the “Accesses” section of the screen and you will see the hyperlink “Indoctrinate Non-SCI” in the “Available Actions” column.
8. To indoctrinate a person, click on the “Indoctrinate Non-SCI” hyperlink, which will take you to the Indoctrinate Non-SCI screen.
NOTE: If the “indoctrinate” link does not appear, then most likely the person you are trying to indoctrinate has not been in-processed into your PSM Net or does not have a current eligibility. For instructions on how to add a person to your PSM Net, go to section on “How to In-Process.” Once you’ve added the person to your PSM Net, the indoctrinate link should appear.
Figure 33. Non-SCI indoctrinate screen.
9. There must be a date in the NdA block before JPAS will allow you to grant a person any level of access. On the Indoctrinate Non-SCI screen, only enter a date in the “An NdA was signed on:” box if it is blank.
NOTE: If there is already a date in the NdA block, it must not be changed.
Figure 34. Indoctrinate non-SCI access screen

JCAVS User Guide, Version 6.0 November 2008
Section 3 – Maintaining Your PSM Net/SMO 28
10. Below the NdA data field, you’ll see four (4) tabs identified as “US,” “NATO,” “SIOP” and “Nuclear.” If you click on any one of these tabs, the entry fields for that particular tab will appear. For example, when you click on the “US” tab, you will be provided with the entry fields that are appropriate for that tab based on that person’s eligibility.
NOTE: If a person has been granted access to Restricted Data (RD) or Critical Nuclear Weapon Design Information (CNWDI) click on the “Nuclear” tab and enter the date.
Figure 35. Granting access date screen
11. Select the appropriate access level and enter the date.
12. Click on the “Save” button.
13. Once you click the “Save” button, the only way you can change this date is to “debrief” the person from that access level (see “How to Debrief).
14. Click on the gray “Cancel” button and this will take you back to the “Person Summary” screen. If you scroll down to the “Non-SCI Access” section, you will see the accesses.
Mandatory

JCAVS User Guide, Version 6.0 November 2008
Section 3 – Maintaining Your PSM Net/SMO 29
Figure 36. Post indoctrination US access screen
15. You can use this same process for indoctrinating personnel who have been granted access to NATO, CNWDI, SIGMA 16, SIOP or RD.
NOTE: Before you can grant access to someone into CNWDI, they MUST be indoctrinated into RD first.
3.7 SCI Indoctrination
Instructions:
1. Log in as a User for the appropriate SMO.
NOTE: - Users MUST have customer indoctrination approval prior to entering any SCI access. - SCI Indoctrination requires the User to be logged in as Level 2 or 3. A User must have SCI DCID 6/4 eligibility and be indoctrinated into an SCI program prior to being granted Level 2 or 3 accesses. Levels 2, 3 and 8 will see the SCI caveats. Levels 4, 5, 6, and 7 will see “Yes” if a person has SCI access or “N/A” if they do not.
2. Click on “Select Person.”
3. Enter the person’s SSN.
4. Click on the “Person Summary” radio button.
5. Click on the gray “Display” button.
6. When the Person Summary appears, ensure the appropriate category is displayed.
7. Scroll down to the “Accesses” section of the screen and you will see the hyperlink “Indoctrinate SCI” in the “Available Actions” column.
8. To indoctrinate a person, click on the “Indoctrinate SCI” hyperlink, which will take you to the Indoctrinate SCI screen.

JCAVS User Guide, Version 6.0 November 2008
Section 3 – Maintaining Your PSM Net/SMO 30
Figure 37. SCI indoctrination link
NOTE: If the “indoctrinate” hyperlink does not appear, the person you are trying to indoctrinate has not been assigned to your SMO or does not meet eligibility requirements.
9. Before you can indoctrinate a person into an SCI program, you must first ensure that the person has signed both the NdA and the Non-Disclosure Statement (NdS). Enter the dates in which the person signed both the NdA and NdS in the appropriate entry field.
If there is a date already populating the appropriate entry fields, then both the NdA and the NdS have already been registered.
Figure 38. NdA/NdS screen
10. Below the NdA and NdS date fields, you will see SCI designators listed. Each designator has an entry field immediately to the right. Enter the date in the entry field for the compartments for which the person has been indoctrinated.

JCAVS User Guide, Version 6.0 November 2008
Section 3 – Maintaining Your PSM Net/SMO 31
Figure 39. SCI compartments screen
11. Click on the “Save” button.
12. Once you click the “Save” button, the only way you can change this date is to “debrief” the person and then re-indoctrinate (see “How to Debrief”).
13. Click on the gray “Cancel” button and this will take you back to the “Person Summary” screen. If you scroll down to the “SCI Access” section, you will see the accesses.
3.8 Verifying NdAs The National Industrial Security Program Operating Manual (NISPOM) 3-105 requires that an individual issued an initial PCL execute an SF312 prior to being granted access to classified information and that the completed form is forwarded to the Cognizant Security Agency for retention. The completed original SF-312 should be submitted to the DISCO for retention.
If JPAS reflects an SF-312 was previously executed, it is not necessary to complete another form.
The date entered in JPAS should be the date the employee signed the form and it should not be changed since DISCO uses this date to file and retrieve the SF-312 from the archives.
The form should be mailed to:
Defense Industrial Security Clearance Office 2780 Airport Drive, Suite 400 Columbus, Ohio 43219-2268
You will be notified and a new SF-312 will be required for any SF-312 that doesn’t meet the following criteria:
Employee SSN is incomplete or omitted
Signature of employee is typed or omitted
Witness signature is typed or omitted
Employee and witness signature dates must be the same
3.9 Oral Attestations The DOD desires for all our folks who are accessed to Top Secret information, working on Special Access Programs (SAPs), or accessed to SCI to "verbally attest" that they understand the contents of their non-disclosure agreement and take their responsibilities seriously. Different customers may ask you to

JCAVS User Guide, Version 6.0 November 2008
Section 3 – Maintaining Your PSM Net/SMO 32
implement this "oral attestation" in different ways. The DOD has levied the requirement on DOD contractors by including the following dictates in the Defense Federal Acquisition Supplement (DFARs):
Contractor employees cleared for access to Top Secret (TS), Special Access Program (SAP), or Special Compartmented Information (SCI) shall attest orally that they will conform to the conditions and responsibilities imposed by law or regulation on those granted access. Reading aloud the first paragraph of SF 312, Classified Information Nondisclosure Agreement, in the presence of a person designated by the Contractor for this purpose, and a witness, will satisfy this requirement. Contractor employees currently cleared for access to TS, SAP, or SCI may attest orally to their security responsibilities when being briefed into a new program or during their annual refresher briefing. There is no requirement to retain a separate record of the oral attestation.
Oral attestation dates are recorded in JPAS under the Indoctrinate non-SCI tab. Should the employee refuse to attest orally to security responsibilities, the Contractor shall deny the employee access to classified information and shall submit an adverse action report via JPAS.
Instructions: 1. Log in as a User for the SMO where you’re indoctrinating the employee.
2. Click on “Select Person.”
3. Enter the person’s SSN.
4. Click on the “Person Summary” radio button.
5. Click on the gray “Display” button.
6. When the Person Summary appears, ensure the appropriate category is displayed.
7. Select Indoctrinate Non-SCI.
8. Enter date of oral attestation right under NdA date.
9. Save and cancel to return to the Person Summary screen.
000-00-0000
Figure 40. Oral attestation screen

JCAVS User Guide, Version 6.0 November 2008
Section 3 – Maintaining Your PSM Net/SMO 33
3.10 What is Loss of Jurisdiction? The eligibility term “Loss of Jurisdiction” will be used in the following circumstances:
An interim eligibility had been issued but then it is withdrawn until the final determination may be rendered.
Subject has a final eligibility but an incident report was submitted and there is no longer an active DOD association where subject requires eligibility.
• The incident report will not be adjudicated until there is an active DOD association.
A CAF denies or revokes eligibility for a subject with an industrial association.
• If the subject still requires the collateral eligibility, the FSO must notify DISCO that the collateral is required.
A change of CAF due to a subject’s termination/separation or retirement and there is an open investigation or incident report:
• The CAF no longer has the authority to make any additional investigative/adjudicative decisions regarding the eligibility.
To resolve any of the above problems, an R/R/U should be submitted to DISCO. All related information should be included in the message.
NOTE: If you receive a “Loss of Jurisdiction” notice on an employee who has been indoctrinated, you need to immediately debrief the employee from any and all accesses.
3.11 Reciprocity NISPOM 2-200.e. states that:
"The contractor shall not submit a request for a PCL to one agency if the applicant is cleared or is in process for a PCL by another agency." Accordingly, the Office of the Secretary of Defense has advised that current clearances or accesses issued by another U.S. Government agency are valid for access to Department of Defense (DOD) classified information without conversion to a DOD PCL. These instructions explain the supporting circumstances and administrative requirements; they neither change nor replace the contractor’s responsibilities under the NISPOM.
For additional information and specifics on reciprocity, please visit the DSS website.

JCAVS User Guide, Version 6.0 November 2008
Section 5 – Removing Personnel from your SMO 34
Section 4 Removing Personnel from Your SMO 4.1 How to Debrief The term “debrief” within JPAS means you are going to remove the “access” level from a person category. For example, if a person no longer requires access to Top Secret information and only requires access at the Secret level, then you will “debrief” that person from the Top Secret access level and then indoctrinate that person at the Secret level. Reasons for Debrief are:
1 – Downgrade 2 – Separation/Transfer A – Access Rescinded B – Access Suspended C – Administratively Debriefed D – For Cause Discharge E – Language School F – Leave without pay – civilian G – No Longer Has need to Know H – Normal Discharge I – Permanent Change of Station J – Previous Indoctrination K – Reserves L – Retired M – Transfer in Status N – Interim Suspension O – See Remarks P – Separation X – Upgrade to Higher Level Access Y – Final Eligibility Granted Z – Removed by System – Org Change
4.1.1 Debrief Non-SCI Accesses
Instructions: 1. Log in as a User for the SMO where you’re debriefing the employee.
2. Click on “Select Person.”
3. Enter the person’s SSN.
4. Click on the “Person Summary” radio button.
5. Click on the gray “Display” button.
6. When the Person Summary appears, ensure the appropriate category is displayed.
NOTE: When the “Person Summary” screen first appears, if you see the error message “The Person Category does not have any Owning/Servicing Relationship and no Notification based on Owning/Servicing Relationship will be sent,” then most likely the default organization listed is not the correct organization.

JCAVS User Guide, Version 6.0 November 2008
Section 5 – Removing Personnel from your SMO 35
7. Scroll down to the “Accesses” section of the screen and you will see the hyperlink “Debrief Non-SCI” in the “Available Actions” column.
8. To debrief a person, click on the “Debrief Non-SCI” hyperlink. A list will appear containing all the “accesses” the person is currently indoctrinated. If there are no accesses assigned, this hyperlink will not appear.
Figure 41. Debrief non-SCI hyperlink
Figure 42. Debrief non-SCI access screen
9. You will then enter a “Debrief Date” and select a “Reason for Debrief” from the drop down menu. You must enter a reason or the system will not perform the debriefing.
10. Click the gray “Save” button and the access is immediately removed.
11. Click on the gray “Cancel” button to return to the “Person Summary” screen.
12. You will see under the “Access” section that the person no longer has the access you just removed.

JCAVS User Guide, Version 6.0 November 2008
Section 5 – Removing Personnel from your SMO 36
4.1.2 Debrief SCI Accesses
Instructions: NOTE: Users may need customer debrief approval prior to debriefing any SCI accesses.
1. Log in as a User for the SMO where you’re debriefing the employee.
2. Click on “Select Person.”
3. Enter the person’s SSN.
4. Click on the “Person Summary” radio button.
5. Click on the gray “Display” button.
6. When the Person Summary appears, ensure the appropriate category is displayed.
NOTE: When the “Person Summary” screen first appears, if you see the error message “The Person Category does not have any Owning/Servicing Relationship and no Notification based on Owning/Servicing Relationship will be sent,” then most likely the default organization listed is not the correct organization.
7. To debrief a person, click on the “Debrief SCI” hyperlink. A list will appear containing all the “accesses” the person is currently indoctrinated. If there are no accesses assigned, this hyperlink will not appear.
Figure 43. Debrief SCI hyperlink
Figure 44. Debrief SCI access screen
8. You will then enter a “Debrief Date” and select a “Reason for Debrief” from the drop down menu. You must enter a reason or the system will not perform the debriefing.
9. Click the gray “Save” button and the access is removed.
10. Click on the gray “Cancel” button to return to the “Person Summary” screen.

JCAVS User Guide, Version 6.0 November 2008
Section 5 – Removing Personnel from your SMO 37
4.2 How and When to Separate Separate a person when they no longer require access or when they leave your company. This date serves as the date the Person Category is to be separated from JPAS. A Separation Notice is generated and sent to the DISCO CAF when the Separation Date is entered for Industry Person Categories and the Person has an open investigation.
Once you separate an employee from your organization, they will maintain your industry category tab for two years and one day from the date of separation. After two years and one day if you don’t reinstate them back into your organization, the industry category tab associated with your organization will drop off the person summary screen. If your industry category tab is the only tab this employee possesses, then after the two year, one day period their record will be removed from JPAS and placed in the JPAS “archive.”
If they return to your organization within the two year, one day timeframe you can remove the separation date and code and indoctrinate them as long as their investigation date is still current. If the investigation is out of scope, you can still indoctrinate them but you must initiate a new investigation.
Separation codes include: Deceased, Facility Termination, Invalid Entry, Not Applicable, and Separation. Separation consists of three steps: Debrief, Separate, and Out Process.
Instructions: 1. Log in as a User for the appropriate SMO.
2. Click on “Select Person.”
3. Enter person’s SSN.
4. Click the “Display Add/Modify Non-DOD Person” radio button.
5. Click the gray “Display” button.
6. When the “Display Add/Modify Non-DOD Person” screen appears, ensure the appropriate category is displayed in the “Person Category” pull-down window.
Figure 45. Person category in the add/modify screen
7. Enter a date in the “Separation Date” entry field.
NOTE: The actual separation date should be entered; this starts the two year, one day clock.
8. Click on the “Separation Code” pull-down menu; highlight the appropriate reason code.

JCAVS User Guide, Version 6.0 November 2008
Section 5 – Removing Personnel from your SMO 38
Figure 46. Separation date/code.
9. Click the gray “Save” button.
Follow steps 1 through 9 above for administrative terminations.
4.3 How to Out-Process When a person is no longer assigned to your SMO, you will need to “debrief” the person from all accesses, then “out-process” that person from your PSM Net.
There are two ways in which you can “out-process” a person. The first is by selecting the person by their SSN and then using the “in/out process” hyperlink from the Person Summary screen. The second way is to out-process them through your PSM Net. Both ways work about the same, but if you have several people to out-process, then using the PSM Net method would be the easiest.
4.3.1 Person Summary Method
Instructions: 1. Log in as a User for the SMO that you are going to out-process the person from.
2. Click on “Select Person.”
3. Enter the person’s SSN.
4. Click the “Display Person Summary” radio button.
5. Click the gray “Display” button.
6. When the Person Summary appears, ensure the appropriate category is displayed.

JCAVS User Guide, Version 6.0 November 2008
Section 5 – Removing Personnel from your SMO 39
Figure 47. In/out process screen
7. Click the “In/Out Process” hyperlink and the “View/Modify In/Out” screen will populate. Ensure you are at the section that reads “View/Modify Active Relationship.” Do not use the Add New Relationship.
8. Enter the date in the “Out Date” box or click on the calendar and choose the appropriate date. (Format: YYYY MM DD)
Figure 48. View/modify in/out screen
9. Click on the gray “Save” button and the screen will refresh with the out process date appearing solid.
10. Click the gray “Cancel” button to return to the “Person Summary” screen.

JCAVS User Guide, Version 6.0 November 2008
Section 5 – Removing Personnel from your SMO 40
4.3.2 PSM Net Method
Instructions: 1. Log in as a User for the SMO that you are going to out-process the person from.
2. Click on “PSM Net.”
3. Locate the person within your PSM Net (you can search by last name or SSN).
4. Check the box in the “Remove” column.
5. Click the gray “Save” button at the bottom of the page. When the screen refreshes, you will see “Pending Removal” in the “Remove” column.
NOTE: If you look in your PSM Net, you will see “Pending Removal” in the “Remove” column. The system will update at midnight eastern time and that person will be removed from your PSM Net.
Figure 49. Pending removal screen

JCAVS User Guide, Version 6.0 November 2008
Section 5 – Removing Personnel from your SMO 41
Section 5 Mass Personnel Module
5.1 Introduction • Separation and Transfer: Non MFO: This transaction will replace the Person Category
information from the loosing organizations with the Person Category information for the gaining organization. The subjects Access will remain, the Access will not be debriefed from the losing organization. A Separation Type is not allowed when using this Action. The losing organization needs to out process and the gaining organization needs to in process the Person Category.
• Transfer Only: Non MFO: The transaction will automatically create a new Person Category tab for the selected gaining organization. It is not allowed to select a “Separation Type” when using this transaction. It is required to select a losing organization and gaining organization. The Access will be automatically indoctrinated in the new Person Category. The gaining organization will need to In Process the Person Category into its PSM Net. The gaining organization should verify the appropriate accesses are indoctrinated. The losing organization if needed will need to debrief access, enter a separation date and code and remove the person category from their PSM Net.
5.2 Mass Personnel Changes Screen Description • "Action" Drop Down-Menu: This is a mandatory field. Highlight and select the appropriate
action to be taken from the "Action" drop-down menu. • "Separation Type" Drop-Down Menu: Highlight and select the appropriate Separation Type
from the "Separation Type" drop-down menu. Separation Types include: Facility Termination, Invalid Entry, Not Applicable, and Separation.
• Losing Organization "Select Organization" Button: Single-click with your mouse pointer over the Losing Organization "Select Organization" button to display the JPAS Organization Search screen. Select the Losing Organization from the JPAS Organization Search screen. Once you have selected the Losing Organization, the JPAS Manage Personnel Changes screen displays with the Losing Organization information.
• Gaining Organization "Select Organization" Button: Single-click with your mouse pointer over the Gaining Organization "Select Organization" button to display the JPAS Organization Search screen. Select the Gaining Organization from the JPAS Organization Search screen. Once you have selected the Gaining Organization, the JPAS Manage Personnel Changes screen displays with the Gaining Organization information.
• "Display Eligible Personnel" Button: Single-click with your mouse pointer over the "Display Eligible Personnel" button. The screen refreshes with selected Person Category records eligible for update.
• "Display Ineligible Personnel" Button: Click with your mouse pointer over the "Display Ineligible Personnel" button. The screen refreshes with selected Person Category records ineligible for update. Here are just a few examples of ineligible reasons:
o Access suspended o Open incident o KMP and separation type not compatible o Deceased

JCAVS User Guide, Version 6.0 November 2008
Section 5 – Removing Personnel from your SMO 42
NOTE: Any changes to the selections in any of these fields may cause any selected lists generated at the bottom of the screen to be "refreshed.”
5.3 Instructions (Separation Only) 1. Log in as a User for the SMO you are going to separate from.
2. Click on “Mass Personnel” button from the navigation menu on the left.
Figure 50. Selecting Mass Personnel button
3. Click on the “Action” pull-down menu; Choose “Separate Only.”
4. Click on the “Separation Type” pull-down menu; Choose from the five available separation options. You MUST pick one of the options.
Figure 51. Separate only/choose separation screen shot
5. Identify the “Losing Organization.”
a. Click “Select Organization.”
6. In the “Organization's Service/Agency” pull-down box, scroll down until “DOD Contractor Companies” is highlighted. Helpful Hint: As soon as you click on the pull-down menu, type the letter “E” key and then scroll slightly up to “DOD Contractor Companies.”
Action: Choose “Separate Only”
Separation Type: Choose Separation

JCAVS User Guide, Version 6.0 November 2008
Section 5 – Removing Personnel from your SMO 43
a. In the “Organization UIC/RUC/PASCODE/CAGE” box, type in the Organization code for the losing organization. You must have the first three letters or numbers of the cage code followed by an asterisk “*.”
Figure 52. UIC/RUC/PASCODE/CAGE search
b. Click the gray “Search” button.
c. Under “Select Organization Search Results” section, you should see the Organization code for the losing organization.
Figure 53. Organization search results
d. Click on the Organization code that is listed. (In this example the search discovered Organization code “0EK07-I.”)
e. The Organization code you selected should now be listed in the “Selected Organization” pull-down at the top of the screen.
f. Click on the gray “OK” button.
g. The Organization code you selected should now be listed in the “losing organization” section.

JCAVS User Guide, Version 6.0 November 2008
Section 5 – Removing Personnel from your SMO 44
Figure 54. Losing organization
7. Click on the gray “Display Eligible Personnel” button.
8. Identify those people who you want to separate. For those who you want to separate, click on the box in the column titled “Select.”
NOTE: Under certain circumstances, some people will NOT be eligible for the type of transaction you are attempting. If you click on the “Display Ineligible Personnel” button, it will list everyone within your PSM Net who is ineligible for the type of transaction you are attempting. It will also indicate as to the reason why they are ineligible. You can use the gray “Select All on Page” button. If you have selected all you can remove the selection one at a time by using the gray “Select” tab or by using the gray “De-Select All On Page” button.
NOTE: More than 50 notification entries will engage the JPAS Paging Functionality. For a further explanation of paging see Related Topics: "JPAS Paging Functionality.”
Figure 55. Select person categories attached to losing organization
9. Click on the gray “Save” button.
10. Everyone who you identified should now have a Separation Date and Code for your organization Person Category. They will automatically be removed from the Displayed Eligible Person list.
11. Everyone should be automatically “debriefed” from all indoctrinations.
12. Remember to “Out Process” the person from your PSM Net.
NOTE: DISCO will be notified of the separation and will notify OPM to stop the investigation for anyone with an “open” investigation.

JCAVS User Guide, Version 6.0 November 2008
Section 5 – Removing Personnel from your SMO 45
5.4 Instructions (Separation and Transfer – MFO) NOTE: This transfer can only be performed if both the losing organization and the gaining organization
are within the same Parent Organization (they should both have a Child relationship to the Parent.)
1. Log in as a User for the SMO you are going to transfer the personnel from.
2. Click on “Mass Personnel” (Main Menu).
Figure 56. Mass personnel transfer screen
3. Click on the “Action” pull-down menu; Choose “Separation and Transfer – MFO.”
Figure 57. Separation and transfer MFO
4. Identify the “losing organization”
a. Click “Select Organization”
13. In the “Organization's Service/Agency” pull-down box, scroll down until “DOD Contractor Companies” is highlighted. Helpful Hint: As soon as you click on the pull-down menu, type the letter “E” key and then scroll slightly up to “DOD Contractor Companies.”
a. In the “Organization UIC/RUC/PASCODE/CAGE” box, type in the Organization code for the losing organization. You are required to have the first three number or letters to perform an organization search, place an asterisk “*”immediately after the last number or letter of the organization code when conducting a search.
Choose “Separation and Transfer - MFO”

JCAVS User Guide, Version 6.0 November 2008
Section 5 – Removing Personnel from your SMO 46
Figure 58. Losing organization search screen
b. Click the gray “Search” button.
c. Under “Select Organization Search Results” section, you should see the Organization code for the losing organization.
Figure 59. Losing organization code
d. Click on the Organization code that is listed. (In this example the search discovered Organization code “0EK07-I.”)
e. The Organization code you selected should now be listed in the “Selected Organization” pull-down at the top of the screen.
f. Click on the gray “OK” button.
g. The Organization code you selected should now be listed in the “losing organization section.

JCAVS User Guide, Version 6.0 November 2008
Section 5 – Removing Personnel from your SMO 47
Figure 60. Losing/gaining organization screen shot
5. Identify the “Gaining Organization.”
a. Click “Select Organization.”
b. In the “Organization's Service/Agency” pull-down box, scroll down until “DOD Contractor Companies” is highlighted. Helpful Hint: As soon as you click on the pull-down menu, type the letter “E” key and then scroll slightly up to “DOD Contractor Companies.”
c. In the “Organization UIC/RUC/PASCODE/CAGE” box, type in the Organization code for the gaining organization. You are required to have the first three number or letters to perform an organization search, place an asterisk “*”immediately after the last number or letter of the organization code when conducting a search.
Figure 61. Gaining organization search screen
d. Click the gray “Search” button.
e. Under “Select Organization Search Results” section, you should see the Organization code for the gaining organization.

JCAVS User Guide, Version 6.0 November 2008
Section 5 – Removing Personnel from your SMO 48
Figure 62. Gaining organization search screen results
f. Click on the Organization code that is listed. (In this example the search discovered Organization code “0EK07-I.”)
Figure 63. Mass personnel screen shot showing losing and gaining organizations
g. The Organization code you selected should now be listed in the “Selected Organization” pull-down at the top of the screen.
h. Click on the gray “OK” button.
i. The Organization code you selected should now be listed in the “gaining organization” section.
6. Click on the gray “Display Eligible Personnel” button.
7. Identify those people who you want to transfer. For those who you want to transfer, click on the box in the column titled “Select.”
NOTE: Under certain circumstances, some people will NOT be eligible for the type of transaction you are attempting. If you click on the “Display Ineligible Personnel” button, it will list everyone

JCAVS User Guide, Version 6.0 November 2008
Section 5 – Removing Personnel from your SMO 49
within your PSM Net who is ineligible for the type of transaction you are attempting. It will also indicate as to the reason why they are ineligible.
Figure 64. List of person categories attached to losing organization
NOTE: More than 50 notification entries will engage the JPAS Paging Functionality. For a further explanation of paging see Related Topics: "JPAS Paging Functionality.”
8. Click on the gray “Save” button.
9. Everyone who you identified should now have a new Person Category tab for the gaining organization and the Person Category tab for the losing organization should be gone.
10. If the gaining organization has a lower FCL than the losing organization, then the Non SCI indoctrinations (accesses) for everyone identified will be automatically downgraded from the higher level to the lower level if applicable.
NOTE: DISCO will be notified of the transfer. They will notify OPM of each transfer with an “open” investigation of NLC or higher. A history of the losing organization, along with the indoctrinations each person had at the losing organization, will be maintained in JPAS.
5.5 Instructions (Separation and Transfer – Non MFO) NOTE: This transfer can only be performed if both the losing organization and the gaining organization
are outside the same Parent Organization (one can be a child and the other a parent but they can also unrelated to each other).
1. Log in as a User for the SMO you are going to transfer the personnel from.
2. Click on “Mass Personnel” (Main Menu).

JCAVS User Guide, Version 6.0 November 2008
Section 5 – Removing Personnel from your SMO 50
Figure 65. Mass personnel selection from main menu
3. Click on the “Action” pull-down menu; Choose “Multiple Facility Transfer – Non MFO.”
Figure 66. Non-MFO mass personnel transfer screen
4. Identify the “losing organization.”
a. Click “Select Organization.”
b. In the “Organization's Service/Agency” pull-down box, scroll down until “DOD Contractor Companies” is highlighted. Helpful Hint: As soon as you click on the pull-down menu, type the letter “E” key and then scroll slightly up to “DOD Contractor Companies.”
c. In the “Organization UIC/RUC/PASCODE/CAGE” box, type in the Organization code for the gaining organization. You are required to have the first three number or letters to perform an organization search, place an asterisk “*”immediately after the last number or letter of the organization code when conducting a search.

JCAVS User Guide, Version 6.0 November 2008
Section 5 – Removing Personnel from your SMO 51
Figure 67. Organization search screen
d. Click the gray “Search” button.
e. Under “Select Organization Search Results” section, you should see the Organization code for the losing organization.
Figure 68. Organization search results screen
f. Click on the Organization code that is listed. (In this example the search discovered Organization code “0EK07-I.”)
g. The Organization code you selected should now be listed in the “Selected Organization” pull-down at the top of the screen.
h. Click on the gray “OK” button.
i. The Organization code you selected should now be listed in the “losing organization” section.

JCAVS User Guide, Version 6.0 November 2008
Section 5 – Removing Personnel from your SMO 52
Figure 69. Non-MFO mass personnel transfer, losing organization screen.
5. Identify the “Gaining Organization.”
a. Click “Select Organization.”
b. In the “Organization's Service/Agency” pull-down box, scroll down until “DOD Contractor Companies” is highlighted. Helpful Hint: As soon as you click on the pull-down menu, type the letter “E” key and then scroll slightly up to “DOD Contractor Companies.”
c. In the “Organization UIC/RUC/PASCODE/CAGE” box, type in the Organization code for the gaining organization. You are required to have the first three number or letters to perform an organization search, place an asterisk “*”immediately after the last number or letter of the organization code when conducting a search.
Figure 70. Non-MFO gaining organization search
d. Click the gray “Search” button.
e. Under “Select Organization Search Results” section, you should see the Organization code for the gaining organization.

JCAVS User Guide, Version 6.0 November 2008
Section 5 – Removing Personnel from your SMO 53
Figure 71. Gaining organization search results
f. Click on the Organization code that is listed. (In this example the search discovered Organization code “0EK07-I.”)
g. The Organization code you selected should now be listed in the “Selected Organization” pull-down at the top of the screen.
Figure 72. Non-MFO mass personnel screen showing losing and gaining organizations.
h. Click on the gray “OK” button.
i. The Organization code you selected should now be listed in the “gaining organization” section.
6. Click on the gray “Display Eligible Personnel” button.
7. Identify those people who you want to transfer. For those who you want to transfer, click on the box in the column titled “Select.”
NOTE: Under certain circumstances, some people will NOT be eligible for the type of transaction you are attempting. If you click on the “Display Ineligible Personnel” button, it will list everyone within your PSM Net who is ineligible for the type of transaction you are attempting. It will also indicate as to the reason why they are ineligible.

JCAVS User Guide, Version 6.0 November 2008
Section 5 – Removing Personnel from your SMO 54
Figure 73. Person categories attached to losing organization
NOTE: More than 50 notification entries will engage the JPAS Paging Functionality. For a further explanation of paging see Related Topics: "JPAS Paging Functionality.”
8. Click on the gray “Save” button.
9. Everyone who you identified should now have a new Person Category tab for the gaining organization and the Person Category tab for the losing organization should be gone. The losing organization should click the in/out process link and out process.
10. If the gaining organization has a lower FCL than the losing organization, then the Non-SCI indoctrinations (accesses) for everyone identified will be automatically downgraded from the higher level to the lower level if applicable.
NOTE: DISCO will be notified of the transfer. They will notify OPM of each transfer with an “open” investigation of NLC or higher. A history of the losing organization, along with the indoctrinations each person had at the losing organization, will be maintained in JPAS.
5.6 Instructions (Transfer Only – Non MFO) NOTE: This transaction will “transfer” those people identified from the losing organization and will
create a new Person Category tab for them in the gaining organization. They will now have two Person Categories.
1. Log in as a User for the SMO you are going to transfer the personnel from.
2. Click on “Mass Personnel” (Main Menu).

JCAVS User Guide, Version 6.0 November 2008
Section 5 – Removing Personnel from your SMO 55
Figure 74. Mass personnel selection from main menu
3. Click on the “Action” pull-down menu; Choose “Separate and Transfer.”
4. Click on the “Separation Type” pull-down; Choose from the five available separation options. You MUST pick one of the options.
Figure 75. Transfer only – non-MFO screen
5. Identify the “losing organization.”
a. Click “Select Organization.”
b. In the “Organization's Service/Agency” pull-down box, scroll down until “DOD Contractor Companies” is highlighted. Helpful Hint: As soon as you click on the pull-down menu, type the letter “E” key and then scroll slightly up to “DOD Contractor Companies.”
c. In the “Organization UIC/RUC/PASCODE/CAGE” box, type in the Organization code for the losing organization. You are required to have the first three number or letters to perform an organization search, place an asterisk “*”immediately after the last number or letter of the organization code when conducting a search.
Choose “Transfer Only – Non MFO “

JCAVS User Guide, Version 6.0 November 2008
Section 5 – Removing Personnel from your SMO 56
Figure 76. Organization search
d. Click the gray “Search” button.
e. Under “Select Organization Search Results” section, you should see the Organization code for the losing organization.
Figure 77. Organization search results
f. Click on the Organization code that is listed. (In this example the search discovered Organization code “0EK07-I.”).
g. The Organization code you selected should now be listed in the “Selected Organization” pull-down at the top of the screen.
h. Click on the gray “OK” button.
i. The Organization code you selected should now be listed in the “losing organization” section.

JCAVS User Guide, Version 6.0 November 2008
Section 5 – Removing Personnel from your SMO 57
Figure 78. Losing organization screen shot
6. Identify the “Gaining Organization.”
a. Click “Select Organization.”
b. In the “Organization's Service/Agency” pull-down box, scroll down until “DOD Contractor Companies” is highlighted. Helpful Hint: As soon as you click on the pull-down menu, type the letter “E” key and then scroll slightly up to “DOD Contractor Companies.”
c. In the “Organization UIC/RUC/PASCODE/CAGE” box, type in the Organization code for the gaining organization. You are required to have the first three number or letters to perform an organization search, place an asterisk “*”immediately after the last number or letter of the organization code when conducting a search.
Figure 79. Gaining organization search
d. Click the gray “Search” button.
e. Under “Select Organization Search Results” section, you should see the Organization code for the gaining organization.

JCAVS User Guide, Version 6.0 November 2008
Section 5 – Removing Personnel from your SMO 58
Figure 80. Gaining organization search results
f. Click on the Organization code that is listed. (In this example the search discovered Organization code “0EK07-I.”).
g. The Organization code you selected should now be listed in the “Selected Organization” pull-down at the top of the screen.
Figure 81. Transfer only – non-MFO losing and gaining organizations
h. Click on the gray “OK” button.
i. The Organization code you selected should now be listed in the “gaining organization” section.
7. Click on the gray “Display Eligible Personnel” button.
8. Identify those people who you want to transfer. For those who you want to transfer, click on the box in the column titled “Select.”
NOTE: Under certain circumstances, some people will NOT be eligible for the type of transaction you are attempting. If you click on the “Display Ineligible Personnel” button, it will list everyone within your PSM Net who is ineligible for the type of transaction you are attempting. It will also indicate as to the reason why they are ineligible.

JCAVS User Guide, Version 6.0 November 2008
Section 5 – Removing Personnel from your SMO 59
Figure 82. Person categories attached to losing organization
NOTE: More than 50 notification entries will engage the JPAS Paging Functionality. For a further explanation of paging see Related Topics: "JPAS Paging Functionality.”
9. Click on the gray “Save” button.
10. Everyone who you identified should now have a new Person Category tab for the gaining organization and the Person Category tab for the losing organization should be gone.
11. If the gaining organization has a lower FCL than the losing organization, then the Non SCI indoctrinations (accesses) for everyone identified will be automatically downgraded from the higher level to the lower level if applicable.
NOTE: DISCO will be notified of the transfer. They will notify OPM of each transfer with an “open” investigation of NLC or higher. A history of the losing organization, along with the indoctrinations each person had at the losing organization, will be maintained in JPAS.

JCAVS User Guide, Version 6.0 November 2008
Section 6 – Visit Notification 60
Section 6 Visit Notifications Per ISL 2006-01, the requirement for a visit authorization letter for classified visits within the Department of Defense is eliminated so long as the information necessary to verify the clearance of the visitor is available in JPAS and the contractor is able to determine the visitor’s need-to-know. This does not apply to visits to or from other government agencies (Department of Energy, State Department, Department of Homeland Security, Department of Justice/FBI, etc). Contractors must still submit visit authorization letters to non-DOD agencies.
Contractors can control only their own processes for receiving incoming notifications of classified visits. Contractors will have to comply with the classified visit requirements established by other contractors and DOD activities that their employees are visiting. Employees should be informed that they may have to provide their SSNs to either the host of a classified visit or to the receptionist/security officer of another contractor or DOD activity they will be visiting as part of the necessary clearance verification process.
When companies check the JPAS Person Summary screen for incoming visitors, they should:
• Verify the visitor’s name and SSN. • Check current access level to ensure the visitor can have access to the level of classified
information to be disclosed. • Check to ensure that the JPAS record shows a current affiliation with the contractor the visitor is
representing.
As the contractor sponsoring the visit is not required to notify the site to be visited that the employee is no longer representing that contractor, a one-time check of JPAS for an on-going visit will not be sufficient. JPAS must be consulted regularly to ensure the access level and employment status of the visitor remains unchanged.
If a contractor is aware of locations that an employee frequently visits on a classified basis, and the employee is terminated, as a courtesy and in keeping with sound security practices, the contractor should notify the visited activities that the person is no longer employed or sponsored for visits.
The contractor should contact the DOD activities and other contractors prior to the scheduled arrival date of a visiting employee to determine how each organization wants to receive visitor data in order to verify the visitor’s eligibility and access level. This will help ensure that employees are not denied entry.
6.1 Determining Need-to-Know Per the NISPOM 6-102, dated 28 February 2006, responsibility for determining need-to-know in connection with a classified visit rests with the individual who will disclose classified information during the visit. Need-to-know is generally based on a contractual relationship between the contractors. In other circumstances, disclosure of the information will be based on an assessment that the receiving contractor has a bona fide need to access the information in furtherance of a GCA purpose.
6.2 Creating Outgoing Visits The “Create/Modify Visit” module allows users to add, modify, or cancel a visit for one or more individuals in JPAS. If you wish to add multiple visits for multiple persons, simply repeat the following procedures.

JCAVS User Guide, Version 6.0 November 2008
Section 6 – Visit Notification 61
NOTE: Creating/Modifying and receiving visits can be performed by Level 2, 3, 4, 5, 6, and 10 users. Levels 2 and 3 are used for SCI while Levels 4, 5, and 6 are for Non-SCI. Level 10 is used for Visit Management functions.
Instructions: 1. Log in as a User for the appropriate SMO.
2. Click on “Create/Modify Visit.”
3. Click the “Add a Visit” button.
a. Select the reason for the visit in the “Reason for Visit” drop down menu.
b. Type the POC and POC Phone number in the text boxes provided.
c. Type the visit dates or use the calendar.
Figure 83. Visit information required
4. Click the “Select SMO.”
5. Enter the SMO code of the location being visited in the “Code” field. An asterisk (*) can be used for wild card searches when using three or more characters.
6. Click the “Search” button.
Figure 84. SMO code view or search screen
7. Select the appropriate SMO Code Link.

JCAVS User Guide, Version 6.0 November 2008
Section 6 – Visit Notification 62
a. The “Visit Information” screen reappears.
b. Verify all of the information that you have entered at the top of the page.
8. Click the “Save” button.
9. After the visit is saved the “Add Visitor(s)” button is added to the page. Click the “Add Visitor(s)” button and the Person Category Search screen is displayed.
10. Type the SSN in the SSN text box and click “Search.”
11. Click the “Add” check box next to the appropriate search result.
Figure 85. Person category search
12. Click the “Add” button. The “Add” box changes to a “Reason” button, which states that “The Person is already assigned to this visit.”
13. Click the cancel button to return to the “Visit Information” screen with the Visitor List updated.
NOTE: Repeat steps 10 through 13 until all of the required visitors are added to the “Visit Information” screen.
6.3 Modifying an Existing Outgoing Visit The “Create/Modify Visit” module allows users to update an existing visit notification.
Instructions: 1. Log in as a User for the appropriate SMO.
2. Click on “Create/Modify Visit.”
3. Select the visit requiring modification from the “Visited SMO Name” column.
Figure 86. Visited SMO name screen shot
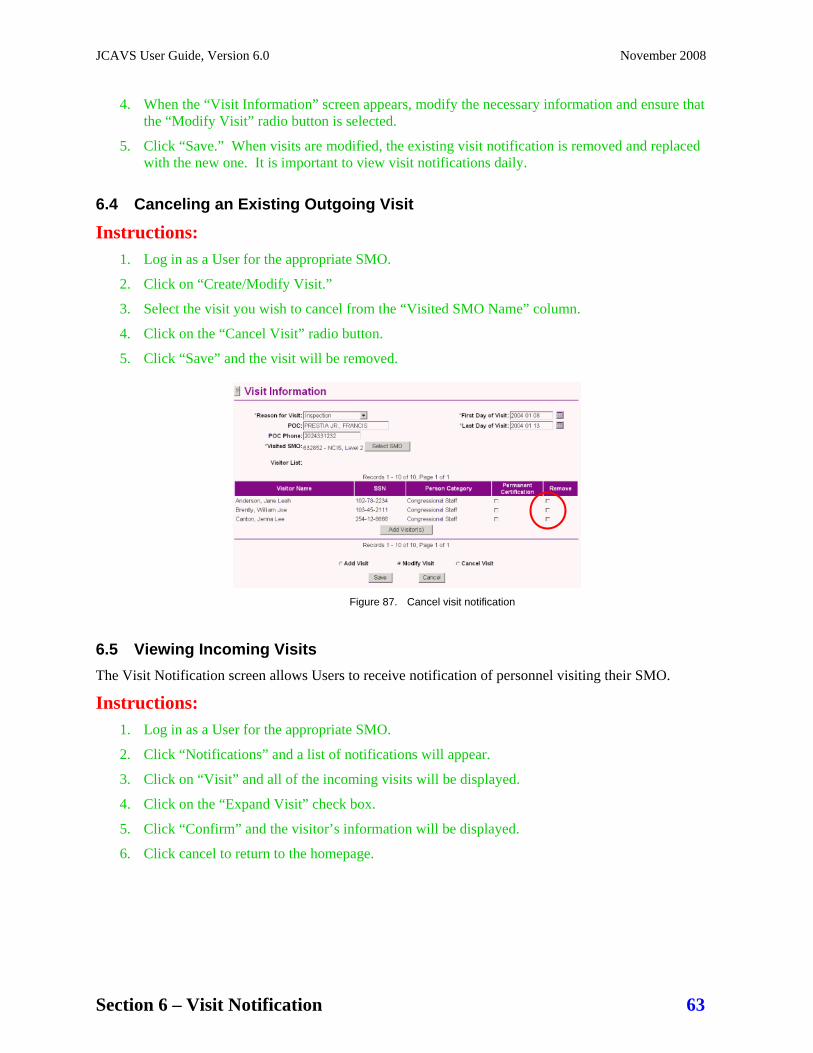
JCAVS User Guide, Version 6.0 November 2008
Section 6 – Visit Notification 63
4. When the “Visit Information” screen appears, modify the necessary information and ensure that the “Modify Visit” radio button is selected.
5. Click “Save.” When visits are modified, the existing visit notification is removed and replaced with the new one. It is important to view visit notifications daily.
6.4 Canceling an Existing Outgoing Visit
Instructions: 1. Log in as a User for the appropriate SMO.
2. Click on “Create/Modify Visit.”
3. Select the visit you wish to cancel from the “Visited SMO Name” column.
4. Click on the “Cancel Visit” radio button.
5. Click “Save” and the visit will be removed.
Figure 87. Cancel visit notification
6.5 Viewing Incoming Visits The Visit Notification screen allows Users to receive notification of personnel visiting their SMO.
Instructions: 1. Log in as a User for the appropriate SMO.
2. Click “Notifications” and a list of notifications will appear.
3. Click on “Visit” and all of the incoming visits will be displayed.
4. Click on the “Expand Visit” check box.
5. Click “Confirm” and the visitor’s information will be displayed.
6. Click cancel to return to the homepage.

JCAVS User Guide, Version 6.0 November 2008
Section 6 – Visit Notification 64
Figure 88. Visit notification screen
NOTE: Individual visits can be viewed by entering an SSN and checking the “Display abbrev. Person Summary with VISIT Information” radio button from the Select Person screen.

JCAVS User Guide, Version 6.0 November 2008
Section 7 – Investigation Requests 65
Section 7 Investigation Requests To initiate an investigation via JPAS, Users must have investigation request permissions. Account Managers grant these permissions. Users MUST have either an owning or servicing relationship before investigations can be initiated.
7.1 NISPOM Procedures for Completing the SF86 NISPOM 2-202 states that the electronic version of the SF86 shall be completed jointly by the employee and the FSO or an equivalent contractor employee who has been specifically designated by the contractor to review an employee’s SF86. Furthermore, NISPOM 2-202.a. states that:
“The FSO or designee shall inform the employee that the SF86 is subject to review and shall review the application solely to determine its adequacy and to ensure that necessary information has not been omitted. The FSO or designee shall provide the employee with written notification that review of the information is for adequacy and completeness, information will be used for no other purpose within the company, and that the information provided by the employee is protected by reference (m).” (NISPOM Reference m is the Privacy Act of 1975.)
7.2 SF86 Retention The SF86 and the signature pages will be kept by the FSO until the investigation is complete and eligibility has been granted by DISCO.
Notice to Contractors Regarding Retention of Standard Forms 86: However, because the SF-86 is reviewed as part of Special Access Program (SAP) access determinations, members of the SAP community have expressed concern about the premature destruction of the SF-86. Please note that in accordance with the February 2006 version of the NISPOM 2-202.b., contractors are authorized to retain the most current SF-86 for employees who have been nominated to perform on contracts requiring access to SAP information, for employees who have been approved for access to SAP information for as long as their access remains active, and for employees who the contractor has good reason to believe will be nominated for SAP access within one year of having completed the SF-86. SF-86 forms retained purely for potential SAP access purposes should be placed in a sealed envelope with the notation "To be opened only for a SAP access determination" and secured in a location under the control of designated security personnel. The employee should also be informed that the facility is retaining a copy of the employee’s SF-86 for purposes related to prospective SAP access.
7.3 Fingerprint Cards In accordance with ISL 2006-02, it is no longer necessary to submit Fingerprint Cards for any type of Periodic Reinvestigation unless specifically requested to do so.
The FSO may confirm OPM has received the investigation request by checking the Suitability/Security Investigations Index (SII), which will show a “received” status. The Fingerprint Cards, if required, must be received by OPM within 30 days of receipt or the investigation request (SF86) will be rejected. Confirmation may be obtained by viewing the JPAS Notification Screen, Investigation Request Status. Once DISCO submits the investigation request to OPM, the field, “Approved PSQ” will be visible. Once OPM receives the investigation request, the notification date will be reflected in the “Released PSI” field and the SII will reflect a “Received” status.

JCAVS User Guide, Version 6.0 November 2008
Section 7 – Investigation Requests 66
Annotate the e-QIP reference number in the “YOUR NO. OCA” block on the fingerprint cards. The reference number may be obtained from the bottom of the release and certification forms.
7.3.1 Where do Fingerprint Cards Go? • US Mail - E-QIP Rapid Response Team, OPM-FIPC, Post Office Box 618, Boyers, PA 16020,
or, • FedEx - E-QIP Rapid Response Team, OPM-FIPC, 1137 Branchton Rd., Boyers, PA 16020,
phone 724-794-5612.
7.4 Electronic Fingerprinting - Secure Web Fingerprint Transmission (SWFT)
SWFT is a secure web-based system that will allow cleared contractors to submit electronic fingerprints (e-fingerprints) and demographic information to DSS for applicants who require an investigation by the Office of Personnel Management (OPM) for a personnel security clearance. Cleared contractors will collect and securely transmit e-fingerprints to DSS for subsequent release to OPM based on the approval of a JPAS/e-QIP submission by the Defense Industrial Security Clearance Office (DISCO).
DSS, Lockheed Martin, Logistics Management Institute, Boeing and BAE Systems are participating in a Pilot Test for SWFT. DSS meets weekly with the industry pilot representatives to coordinate implementation and resolve issues. DSS has modified the "Agency Use" Block in JPAS to allow a notation that e-fingerprints are being submitted with scheduled implementation of the agency use block.
DSS has coordinated the electronic transmission of contractor e-fingerprints as part of the personnel security investigative process with OPM and the Defense Manpower Data Center (DMDC). DSS anticipates that the system will process machine-scanned and card-scanned fingerprint files.
While we recognize this is an important issue to all cleared industry and we appreciate everyone's enthusiasm, please DO NOT submit System Access Requests (SARs) for a SWFT account at this time. Full implementation of SWFT is planned for FY09 to include policies and procedures, based on requirements and lessons learned from the pilot test. Paper (hard copy) submission of fingerprints will still be an option for submission as part of the personnel security investigation for clearance by contractors.
Information on certified fingerprint systems may be found at http://www.fbi.gov/hq/cjisd/iafis/cert.htm . DSS does not recommend purchase of such equipment at this time. DSS will keep everyone informed by posting updated information on this website. More information will be forthcoming prior to the deployment of SWFT.
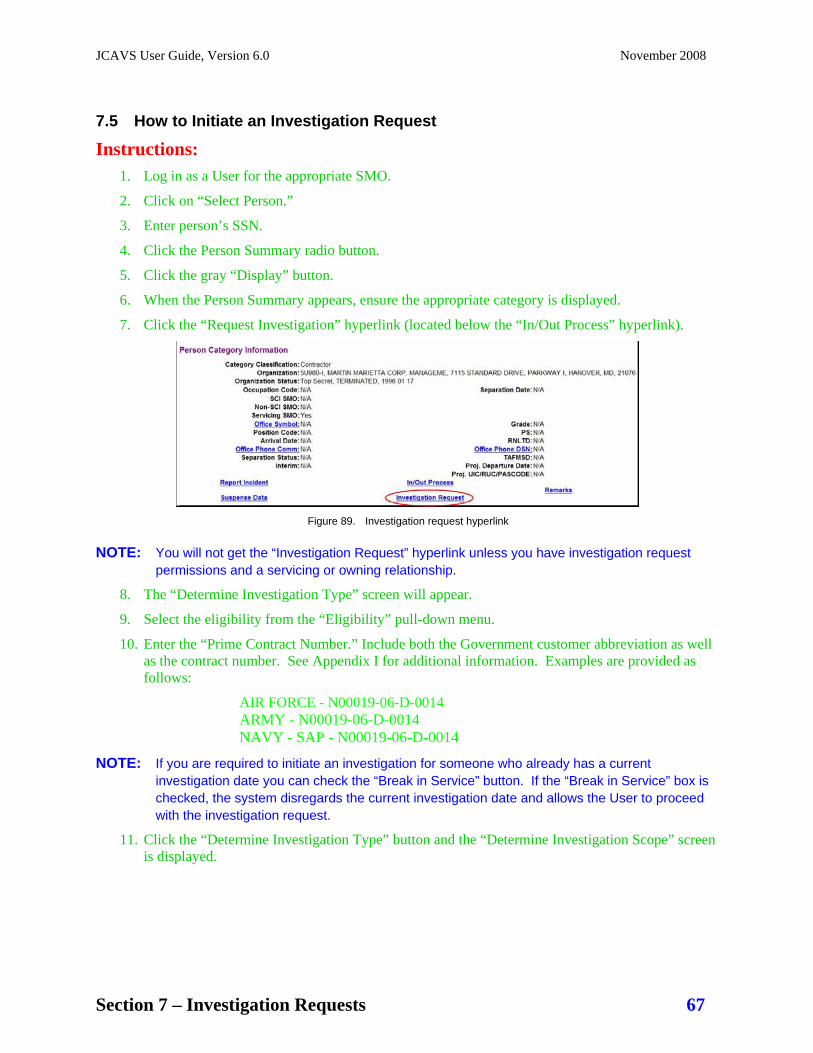
JCAVS User Guide, Version 6.0 November 2008
Section 7 – Investigation Requests 67
7.5 How to Initiate an Investigation Request
Instructions: 1. Log in as a User for the appropriate SMO.
2. Click on “Select Person.”
3. Enter person’s SSN.
4. Click the Person Summary radio button.
5. Click the gray “Display” button.
6. When the Person Summary appears, ensure the appropriate category is displayed.
7. Click the “Request Investigation” hyperlink (located below the “In/Out Process” hyperlink).
Figure 89. Investigation request hyperlink
NOTE: You will not get the “Investigation Request” hyperlink unless you have investigation request permissions and a servicing or owning relationship.
8. The “Determine Investigation Type” screen will appear.
9. Select the eligibility from the “Eligibility” pull-down menu.
10. Enter the “Prime Contract Number.” Include both the Government customer abbreviation as well as the contract number. See Appendix I for additional information. Examples are provided as follows:
AIR FORCE - N00019-06-D-0014 ARMY - N00019-06-D-0014 NAVY - SAP - N00019-06-D-0014
NOTE: If you are required to initiate an investigation for someone who already has a current investigation date you can check the “Break in Service” button. If the “Break in Service” box is checked, the system disregards the current investigation date and allows the User to proceed with the investigation request.
11. Click the “Determine Investigation Type” button and the “Determine Investigation Scope” screen is displayed.

JCAVS User Guide, Version 6.0 November 2008
Section 7 – Investigation Requests 68
Figure 90. Determine Investigation Scope
12. All of the information on this screen is pre-populated, click OK and the “Add/Modify Investigation Request” screen is displayed.
Figure 91. Add/modify investigation request
13. The “Form Type” is pre-populated.
14. The “Date of Birth” is pre-populated.
15. Enter the “Local Agency Check Date.”
16. The “Service Agency” field is pre-populated.
17. The “SOI” field is pre-populated.
18. The “OPAC-ALC” field is pre-populated.
19. The “Position Title” is pre-populated.
20. Select “Access Code” from the pull-down menu.

JCAVS User Guide, Version 6.0 November 2008
Section 7 – Investigation Requests 69
21. Leave the “Sensitivity ADP” blank.
22. Enter “346W” in the “SON” field.
23. “Extra Coverage/Advance Results.” This section is for DISCO to request additional investigation information such as Immigration and Naturalization Services (INS)/Citizenship Integration Services (CIS), etc. Industry may use this section to select “Advance NAC” if an Interim TS is required. a. To “Add” a selection:
1. Highlight and select the Extra Coverage as necessary from the drop-down menu. 2. Single-click ">>" to add selection to the “Results" box. 3. Click “Save.”
b. To “Remove” a selection: 1. Inside the “Selected Extra Coverage/Advance Results” box, highlight the coverage you
wish to remove. 2. Single-click over "<<.” 3. Click “Save.”
24. “Federal Information Processing Codes (FIPC).” Industry users can indicate that a request is for a Periodic Reinvestigation and that fingerprints are NOT required. If fingerprints are required, the User can indicate how they will be transmitted. a. To “Add” a selection:
1. Highlight and select the Extra Coverage as necessary from the drop-down menu, 2. Single-click ">>" to add selection to the “Results" box 3. Click “Save”.
b. To “Remove” a selection: 1. Inside the “Selected FIPC(s)” box, highlight the coverage you wish to remove. 2. Single-click over "<<.” 3. Click “Save.”
NOTE: Codes most probably used by Industry a. Code 7 = FP not required b. Code I = FP electronically transmitted c. Code J = FP cards mailed
NOTE: If you choose to change your FIPC option from what you initially selected, you may change the option prior to submitting the package to DISCO. For example: If you initially chose "Code J" -submit via hard copy, you can change to "Code I" - submit electronically.
25. Under the “Additional Request Information” section, in the “Requesting Official” section, enter the name, job title, telephone number and extension of the person requesting the investigation. Certain facilities may choose to enter the FSO’s information in this section as an option for all investigation requests for their facility. This is the person who will be contacted if there are questions regarding this request.

JCAVS User Guide, Version 6.0 November 2008
Section 7 – Investigation Requests 70
Figure 92. Add/modify investigation request
26. “Security Folder” and “Personnel Folder” information is pre-populated based on the employee’s organization information.
NOTE: Industry users may edit “Security Folder” and “Personnel Folder” information as needed. For example, if your personnel records are located at another location, then edit the address.
27. Click the “Initiate PSI” radio button to initiate the request immediately or the “Pending PSI” radio button if you are not ready to initiate. If you choose the “Pending PSI” option, you must initiate this request within 30 days or it will be terminated.
28. Click the gray “Save” button.
29. An “Initiated” notification will be sent to the requesting SMO; that notification will be visible in the adjudication summary on the person summary screen as well as the “Notifications” section.
Figure 93. Initiated notification

JCAVS User Guide, Version 6.0 November 2008
Section 7 – Investigation Requests 71
30. Once the investigation request has been initiated, you should provide guidance and instructions on how to access the e-QIP gateway (http://www.opm.gov/e-qip/), tell them about their golden questions and the requirement to put “unknown” when asked to list city of birth. You must also inform them of the NISPOM requirement in paragraph 2-202.a. for the security officer to review the SF86 for accuracy and completeness, and to maintain a copy until the investigation has been completed. You should also include sign-off instructions, depending upon your local procedures. Appendix I, the “e-QIP Applicant Information Sheet,” will provide instructions for properly completing the SF86.
31. After you notify the applicant, they have 30 days in which to log into e-QIP and change their “Golden Questions,” otherwise the Requesting SMO will receive a “Terminated” notification and will have to reinitiate the request.
NOTE: The three “Golden Questions” are the applicant’s passwords into the e-QIP system. These questions must be changed upon initial log in.
32. The applicant has 90 days from the initial log in to complete and certify their PSQ or the Requesting SMO will receive a “Terminated” notification. If the investigation is terminated, the Requesting SMO must “initiate” another investigation request if required.
33. Once the applicant has completed the PSQ, they will transmit to agency (Requesting SMO).
7.6 Reviewing the PSQ
Once the PSQ has been completed and transmitted to the agency, you will receive a “Ready for Review” notification.
1. Log in as a User in the appropriate SMO.
2. Select “Notifications” from the main menu.
3. Click on the “Investigation Request Status” link, which will display the “Investigation Request Status Notification” screen.
4. In the “Request Status” column, click on the “Ready for Review PSQ” link, which will display the “Add/Modify Investigation Request” screen.
5. Scroll to the bottom of the page and click “View PSQ.”
6. Review PSQ for completeness and accuracy.
NOTE: Click “Revise PSQ” if it does not meet standards. You will get a drop down menu to select the reason the PSQ is being revised. Then click “Save.” Each time you revise a PSQ a new investigation request number will be issued and new Signature Pages will be required. You will also need to inform the subject of the areas that did not meet standards and remind them that they will need to re-answer the Privacy Section questions in the SF86.
7. Review required documents in the “Investigation Request Status History” section of the “Add/Modify Investigation Request” screen. Required documents include the SF86 Certification, the Information Release, and the Medical Release form only if the subject answers “yes” to Question 21.

JCAVS User Guide, Version 6.0 November 2008
Section 7 – Investigation Requests 72
Figure 94. Add/Modify Investigation Request
7.7 E-QIP Timeline
Initiating Once an Investigation Request is initiated in JPAS, an applicant has 30 days to login to e-QIP and start their PSQ or the Investigation Request is terminated. Once an Investigation Request is initiated in JPAS, an applicant has 90 days after their initial e-QIP login date to complete their PSQ or the Investigation Request is terminated.
Reviewing and Approving Once the applicant has completed the PSQ, it must be reviewed and approved by the appropriate agency within 90 days or the Investigation Request is terminated.
Pending PSQs An Investigation Request that remains in a Pending Status and is not "Initiated" will be deleted 30 days after creation.
Stopped PSQs If an applicant has started to complete a PSQ but the Investigation Request is stopped, it must be resumed within 90 days. If the applicant has not started to complete a PSQ, but the Investigation Request is stopped, it must be resumed within 30 days.
Revised PSQs An applicant has 60 days to log into e-QIP and complete updates to their PSQ if revisions are required
7.8 Attaching Signature Pages
The User will review documents but cannot submit to DISCO until all the required Signature Pages have been received via Fax or Upload.
FAXING (866-804-0606): Anyone can fax a signature page. JPAS optically reads, using Optical Character Recognition (OCR), information on the fax to associate the fax to the correct Investigation Request and document type. The FSO or the subject can print blank signature pages from e-QIP once they have been certified. If necessary, these pages can be replaced prior to submission to DISCO. Faxed documents will be stored in the JPAS repository until the Investigation Request is approved.
UPLOADING (scanning): The User can browse and select the scanned document from a local or network drive to upload. The User identifies the type of document and the appropriate Investigation

JCAVS User Guide, Version 6.0 November 2008
Section 7 – Investigation Requests 73
Request through selection in JPAS. Documents are uploaded directly to e-QIP in real time. Each document must be scanned and uploaded individually and must be saved in *.pdf format.
NOTE: DSS performed a 60 day analysis of the JPAS Signature Page Attachment capability. The analysis has shown a 25% delay rate for faxed documents and a 0% delay rate for documents using the "Scan and Upload" method. The challenge continues to be faxed documents with markings, obscured bar code numbers, poor resolution or those which have been re-sized or faxed multiple times. These documents require manual intervention before they can be accepted into the system. DSS requests the user community's assistance in lowering and possibly eliminating the delay rate by using the "Scan and Upload" method to submit ONLY the 1) SF86 Certification 2) Authorization for Release of Information or 3) Authorization for Release of Medical Information (where applicable). All documents must bear the appropriate OPM Request ID number.
Instructions: 1. Log in as a User in the appropriate SMO.
2. Select “Notifications” from the main menu.
3. Click on the “Investigation Request Status” link, which will display the “Investigation Request Status Notification” screen.
4. In the “Request Status” column, click on the “Ready for Review PSQ” link, which will display the “Add/Modify Investigation Request” screen.
5. Click the “Documents” link at the bottom of the page.
Figure 95. Add/Modify Investigation Request
6. Upload documents on the “Investigations Request Documents,” which is now displayed.
Figure 96. Investigation Request Documents

JCAVS User Guide, Version 6.0 November 2008
Section 7 – Investigation Requests 74
7. From “Document Upload,” select “Document Type” from the drop down menu.
8. Click “Browse” and select the document that you wish to upload.
9. Click “Save.” You will now see the document with a hyperlink in the “Document History.”
10. Click cancel to go back to the “Add/Modify Investigation” screen. You will now be able to see the “Submit to DISCO” radio button.
11. A check mark indicates that a document has been received. You will NOT receive the “Submit to DISCO” button until all required documents have been received in JPAS. Once all documents have been received, the “Submit to DISCO” radio button will appear.
Figure 97. Add/Modify Investigation Request
7.9 Submitting PSQ to DISCO
Once the PSQ and all Signature Pages have been received from the subject and reviewed for completeness and accuracy, you are ready to “Submit to DISCO.”
NOTE: Be sure to print a copy of each document before you submit to DISCO. Once documents have been approved by DISCO, they are no longer available for review.
1. DISCO must now review the completed PSQ for accuracy. Once the review is complete, DISCO will either “Stop” or “Approve” the request.
a. If no discrepancies are noted, DISCO will “approve” the investigation request. The Requesting SMO will receive an “Approved” notification.
b. If discrepancies are noted, DISCO will “stop” the investigation request and the Requesting SMO will receive a “Ready-for-Review (Stopped)” notification.
2. If DISCO “stops” the investigation request, the Requesting SMO will receive a “Message from CAF” notification from DISCO advising them of the discrepancies noted during their review.

JCAVS User Guide, Version 6.0 November 2008
Section 7 – Investigation Requests 75
Figure 98. Message from CAF notification
3. For Industry, the Requesting SMO must contact the applicant to inform him/her of the discrepancy. The Requesting SMO must “initiate” a new investigation request so that the applicant can correct the discrepancies noted during the DISCO review.
4. Once all discrepancies have been corrected, the applicant should print a copy of the revised PSQ. Once the hardcopy is printed, the applicant would again “submit” the revised PSQ to the requesting agency.
5. Once DISCO has reviewed the revised copy of the PSQ, if no other discrepancies are noted, they will approve the investigation request.
7.9.1 DOD Organizations Only Processes 1. Once the Requesting SMO has received the investigation request and completed PSQ, they will
review them for accuracy and completeness.
a. If no discrepancies are noted, the Requesting SMO will “approve” the investigation request.
b. If discrepancies are noted, the Requesting SMO will “stop” the investigation request and notify the applicant of the discrepancy.
2. The Requesting SMO must “initiate” a new investigation request so that the applicant can correct the discrepancies noted during the review.
3. Once all discrepancies have been corrected, the applicant would again “release” the revised PSQ to the Requesting SMO.
4. Once the Requesting SMO has reviewed the revised copy of the PSQ per NISPOM 2-202.a. and no other discrepancies are noted, the PSQ is resubmitted to DISCO.

JCAVS User Guide, Version 6.0 November 2008
Section 7 – Investigation Requests 76
7.9.2 Industry and DOD Organizations Processes 1. Once DISCO has approved the investigation request and PSQ, they electronically transmit the
investigation request along with the PSQ to OPM.
2. After the investigation request and PSQ arrive at OPM, they are loaded into OPM investigation system “PIPS.”
3. The Requesting SMO will receive a “Released” notification which indicates that the investigation request has been terminated and the PSQ has been loaded into PIPS.
4. The next step of the process will be for OPM to open the investigation.
5. When the investigation has been scheduled it will be noted on the SII screen.
6. After the investigation has been opened it will be noted on the Person Summary Screen in the PID section.

JCAVS User Guide, Version 6.0 November 2008
Section 8 – Request to Research/Upgrade Eligibility 77
Section 8 Request to Research/Upgrade Eligibility 8.1 What is an RRU used for? The Request to Research, Upgrade Eligibility (RRU), is a direct notification to the appropriate CAF of any status changes that a user cannot make within the system. There are several reasons for why you would submit an RRU to the appropriate CAF. The following is just a sample of when you would submit an RRU.
Submit an RRU for personal information changes to update the Personnel Identification Date (PID) for subjects who have open investigations.
A person’s eligibility level does not reflect the current investigation that was conducted by Central Adjudication Facility (CAF).
For example, the Air Force has a more current investigation than what DISCO has on file.
Correcting a person’s SSN.
NOTE: Do not create a new record to correct an SSN. Submit an RRU asking DISCO to update the incorrect SSN on the existing record.
Converting a “personnel clearance” from a non-DOD agency.
NOTE: Here is an example of a conversion message: “SUBJECT’S NAME - Request conversion of DoE Q, granted on 03/17/2004, case number 0056238 to DOD Top Secret. FSO NAME and NUMBER.”
The main thing you have to remember before you attempt to send an RRU on a person is that “You must have an owning or servicing “relationship” with that person.” See How to In-Process.
8.2 How to Generate an RRU
Instructions: 1. Log in as a User of the appropriate SMO.
2. Click on “Select Person” (Main Menu).
3. Enter the person’s SSN.
4. Click on the gray “Display” button.
5. The person’s Personal Summary screen should appear with the person’s name printed at the top.
6. Make sure the category box located within the “Person Category” section is displaying the correct organization. If the correct organization is not being displayed, click on the drop down box and scroll down and highlight the correct organization.
NOTE: When the “Person Summary” screen first appears, and you see the error message: “The Person Category does not have any Owning/Servicing Relationship and no Notification based on Owning/Servicing Relationship will be sent,” then may indicate the default organization listed is not the correct organization.
7. Once the proper Person Category is listed, and the person has an appropriate relationship with the SMO, the “Request to Research/Upgrade Eligibility” hyperlink will be available.

JCAVS User Guide, Version 6.0 November 2008
Section 8 – Request to Research/Upgrade Eligibility 78
Figure 99. Request to research/upgrade eligibility link on person summary page
8. Click on the “Request to Research/Upgrade Eligibility” hyperlink.
Figure 100. Request to research/recertify/upgrade eligibility screen
9. In the “Justification” box, enter details of the request along with your telephone number.
10. Click on one of the three radio buttons that are available.
11. Click on the CAF pull-down menu and select the appropriate CAF to receive the RRU. For Industry, the CAF selection, in most cases, would be DISCO.
12. Click the gray “Save” button.
NOTE: Once you submit an RRU to the CAF, you can cancel it as long as it has not been assigned to an adjudicator.
NOTE: Continue to check “Notifications” to see the status of the RRU.

JCAVS User Guide, Version 6.0 November 2008
Section 9 – Adverse Information Reports 79
Section 9 Adverse Information/Incident Reports JPAS allows you to submit an Adverse Information Report to the appropriate CAF. You do NOT have to have a relationship with a person to submit an adverse information report on the person. However, if you do not have a relationship with a person, you will NOT receive a “notification” on that person when the adverse information is submitted or if the CAF takes action against the person’s eligibility.
NOTE: IMPORTANT -- To date, there is still a problem associated with adverse information reports that are submitted within JPAS. Unless the adverse report is submitted as “Final,” then any JPAS user can take a relationship on the record and read the adverse report. Follow the work around steps listed below:
Instructions: 1. Log in as a User.
2. Click on “Select Person” (Main Menu).
3. Enter the person’s SSN.
4. Click the “Display Person Summary” radio button (this is the default button).
5. Click the gray “Display” button.
6. The person’s Personal Summary screen should appear with the person’s name printed at the top.
7. The “Report Incident’ link is located in the Person Category section.
Figure 101. Report incident hyperlink
8. Click the “Report Incident” link.
9. “Incident Report” page returns and the appropriate information may be filled in.
10. Select “Final” for all Incident Reports.
11. Select Date of Incident.
12. Select CAF from pull down menu –DISCO.
13. Select “Incident Criteria.”
14. Provide "Unclassified Description of Incident.”
15. Enter up to 3,000 characters.

JCAVS User Guide, Version 6.0 November 2008
Section 9 – Adverse Information Reports 80
Figure 102. Incident report screen
16. For Initial Report – Start off saying: “This is an Initial Report…”
17. For Follow-Up Report – Start off saying: “This is a Follow-Up to the initial report submitted on…”
18. Print copy for your records.
19. Hit the “Save” button.
20. Once submitted you will no longer have access to this page.
21. For additional info see: www.dss.mil.
9.1 Incident Report Notifications via JPAS
The submitting office will receive notification of Incident via Incident Report Notification screen
Adjudication Summary will indicate “Pending Incident Report from DISCO”. Subject’s name and Incident Report date will appear in “RED
Subject’s name will stay red until the incident has been adjudicated After the incident report is reviewed by the adjudicator, the FSO may or may not receive a
request for the subject to submit a new SF 86 If such a request is made, the FSO should initiate the request to the employee using JPAS If the request is not received by DISCO within 30 days from the date of request, DISCO will
administratively withdraw the eligibility determination by changing the eligibility to Loss of Jurisdiction

JCAVS User Guide, Version 6.0 November 2008
Section 10 – Notifications 81
Section 10 Notifications Notification is the means in which a CAF will contact you concerning any JPAS actions. For example, if there is a change to an employee’s eligibility status or the CAF is responding back to an RRU, you will receive this via “Notifications.” You can only see notifications associated with your PSM Net.
You should check the notification menu at least once a week, but daily would be better. All notifications will remain present for 30 days or you can indicate immediate removal by checking the “Remove from Display” box and “Confirm.”
You will know you have a notification if there is a “magnifying glass” immediately to the left of the notification list.
Instructions: 1. Log in as a User for the SMO.
2. Click on “Notifications” (Main Menu).
3. The notification sub-menu will appear underneath the word “Notifications.”
4. If you have any notifications, you will see a magnifying glass immediately to the left of the menu item.
Figure 103. Notifications magnifying glass
5. If you click on the notification that has a magnifying glass, it will open a screen showing you the notification for that particular sub-menu item.
“Notifications” Menu Items
Magnifying Glass

JCAVS User Guide, Version 6.0 November 2008
Section 10 – Notifications 82
Figure 104. RRU – CAF response
6. The individual’s SSN will be hyperlinked and if you click on the SSN it will take you to that individual’s Person Summary screen.
7. If you click the gray “Cancel” button it will take you back to the Main Menu.
10.1 Notifications Link Definitions Access Suspension Notification
Report Access Suspension in the User's PSM Net. Notification is received if the CAF takes an action against a Person's Access.
Action by Svs SMO (Notification Action by Servicing Security Management Office) A notification is sent when another JCAVS User, who has a Servicing relationship with a Person
Category, takes an action on that person. The notification is sent to JCAVS User Levels 2 through 6 that have an Owning PSM Net
relationship with an affected person.
Aging Interim The six-month point is determined from the date the Non-SCI Interim is granted.
CAF Information Rqst (Central Adjudication Facility Information Request) Allows the JCAVS user to receive requests for information from the CAF including:
o Requests for Financial Statements o Mental Health Evaluations
Eligibility Change Allows JCAVS user to receive timely notifications when an Eligibility Change occurs for
someone in the JCAVS User’s PSM Net

JCAVS User Guide, Version 6.0 November 2008
Section 10 – Notifications 83
Incident Update Notifies the JCAVS User when an Incident Report is made regarding a Person's Person Category
within any PSM Net relationships
Indoc / Debrief Assist (Indoctrination / Debrief Assist) Allows JCAVS User Levels 2 and 3 to receive a notification from other JCAVS Users requesting
they indoctrinate or debrief a person SCI Access within JCAVS.
Interim SCI Status (Interim Sensitive Compartmented Information Status) The JCAVS Interim SCI Status Notification screen allows JCAVS User Levels 2 and 3 to view
pending Interim SCI requests for individuals within their PSM Net.
Investigation Request Status Allows Users to receive notifications if the status changes for an Investigation Request
Message from CAF (Message from Central Adjudication Facility) Allows JCAVS User to receive notifications sent from the CAF for individuals in their PSM Net.
Overdue Suspense Allows JCAVS User to receive timely notifications when Overdue Suspense occurs for a Person
in the User's PSM Net. The suspense are set by the User from the JCAVS Add/Modify Suspense Data screen.
Pending SPA (Pending Special Purpose Access) The JCAVS Joint Clearance and Access Verification System Pending SPA Special
Purpose Access Notification screen allows JCAVS User Level 2 to view and act upon Special Purpose Access requests submitted by JCAVS User Level 3, prior to forwarding to the appropriate CAF Central Adjudication Facility for adjudication.
Projected Losses Allows JCAVS User to receive notifications of a person's projected departure. The notification is activated once the appropriate Personnel Center sends a projected SAR or
projected RNLTD for the Person via the batch update process.
Reactivate Rqst Stat (Reactivate Request Status) Allows JCAVS and JAMS Users to receive a Notification regarding the status of their request to
have a record "Reactivated.”
RRU Response (Request to Research/Upgrade Eligibility Response) Allows the JCAVS User to receive responses from the CAF to previous requests for Research,
Recertification or Upgrade of a Person's Eligibility.
Separation with Access Allows JCAVS User Levels 2 and 3 to receive Notification for Industry Person Categories who
belong to Organizations being Terminated, Revoked, or Discontinued. The Notification is generated to the SMOs having Owning or Servicing relationships with the Separated Industry Person Categories that still have active SCI Access.
SOR (Statement of Reasons) Notifies JCAVS User Levels 2 through 6 that a SOR is being issued for an individual.
SPA Status The JCAVS Special Purpose Access Status Notification Screen allows JCAVS User Levels 2 and
3 to view results of submitted Special Purpose Access for individuals.

JCAVS User Guide, Version 6.0 November 2008
Section 10 – Notifications 84
Visit The JCAVS Visit Notification screen allows JCAVS Users to receive notification of personnel
visiting their SMO.

JCAVS User Guide, Version 6.0 November 2008
Section 11 – How to Generate a Report 85
Section 11 How to Generate a Report There are several different types of reports that can be generated from the “Report” menu within JCAVS. See Appendix L for a list of available JPAS reports. The three reports that you will most often use are:
• Periodic Reinvestigation: list of personnel within your PSM Net whose investigation is out-of-scope and requires a Periodic Reinvestigation.
• PSM Net Report: abbreviated list of all personnel in your PSM Net.
• Personnel Report: detailed list of personnel in your PSM Net, including access and eligibility information.
NOTE: It is recommended that you use Internet Explorer 6.0 when you want to generate a report. Reports can be produced, in PDF or Excel format. If you save your report as an Excel file, you will be able to sort the report on any of the available columns.
Instructions: 1. Log in as a User for the SMO.
2. Click on “Reports” (Main Menu).
3. The sub-menu items will appear underneath the word “Reports.”
Figure 105. List of reports
4. Click in the “Reports” sub-menu item the type of report you want to generate.
5. A new window will open which will allow you to customize your reports.
“Reports” Menu Items
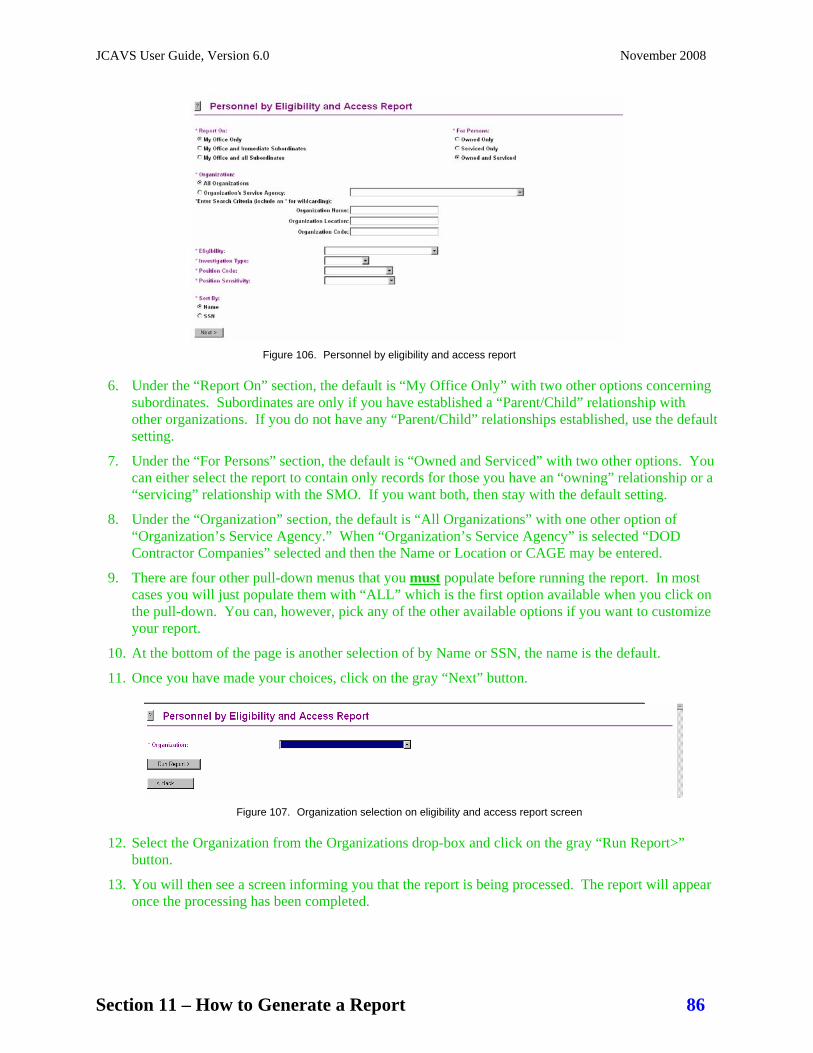
JCAVS User Guide, Version 6.0 November 2008
Section 11 – How to Generate a Report 86
Figure 106. Personnel by eligibility and access report
6. Under the “Report On” section, the default is “My Office Only” with two other options concerning subordinates. Subordinates are only if you have established a “Parent/Child” relationship with other organizations. If you do not have any “Parent/Child” relationships established, use the default setting.
7. Under the “For Persons” section, the default is “Owned and Serviced” with two other options. You can either select the report to contain only records for those you have an “owning” relationship or a “servicing” relationship with the SMO. If you want both, then stay with the default setting.
8. Under the “Organization” section, the default is “All Organizations” with one other option of “Organization’s Service Agency.” When “Organization’s Service Agency” is selected “DOD Contractor Companies” selected and then the Name or Location or CAGE may be entered.
9. There are four other pull-down menus that you must populate before running the report. In most cases you will just populate them with “ALL” which is the first option available when you click on the pull-down. You can, however, pick any of the other available options if you want to customize your report.
10. At the bottom of the page is another selection of by Name or SSN, the name is the default.
11. Once you have made your choices, click on the gray “Next” button.
Figure 107. Organization selection on eligibility and access report screen
12. Select the Organization from the Organizations drop-box and click on the gray “Run Report>” button.
13. You will then see a screen informing you that the report is being processed. The report will appear once the processing has been completed.

JCAVS User Guide, Version 6.0 November 2008
Section 11 – How to Generate a Report 87
Figure 108. Your report has been submitted for processing screen
14. While the report is processing you will also see the following screen indicating your report is running.
Figure 109. Your report is running screen
15. After the report has finished processing, you will see the final report sorted by the SSN of the personnel contained within the report.
NOTE: On the bottom left of the screen you will see two icons. The icon on the left allows you to view the report as a PDF format. The icon on the right allows you to view the report in an Excel format. See instructions below for how to get the "Save As" dialogue box when opening Excel files.
Instructions: 1. Right click on "Start" button.
2. Select "Explore."
3. Select "Tools."
4. Select "Folder Options."
5. Select "File Types."
6. Scroll all the way down and select "XLS."
7. Select "Advanced."
8. Make sure "Confirm open after download" and "Browse in same window" are checked.
9. Select "OK."
10. Select "Close."
11. Exit out of start window.
12. Go back into excel and try to open and save your Excel file.

JCAVS User Guide, Version 6.0 November 2008
Section 12 – Special Investigative Index 88
Section 12 Special Investigative Index Click on SII at the bottom of the Person Summary Screen and that will take you to the e-Clearance screen. The Special Investigative Index (SII) can be used to:
Verify that an investigation has been opened.
Verify DOE Q and L clearances for employment purposes only.
Verify AKA information.
Verify investigation summary.
JPAS Person Information Indicates Last Name, SSN, and DOB entered by the user to search for a record.
SII Person Information Indicates Last Name, SSN, and DOB returned by the SII.
SII AKA Names Indicates any AKA information returned by the SII.
SII Investigation Summary Indicates investigation information returned by SII.
SII Clearance Summary Indicates information returned by SII.
SII Messages This portion of the screen displays any messages returned by SII.
NOTE: If the OPM SII database is down, the following text will be displayed under "SII Messages:" The OPM CVS/SII System is NOT available.
Figure 110. SII snapshot

JCAVS User Guide, Version 6.0 November 2008
Section 12 – Special Investigative Index 89
Definitions of investigation terminology:
Received - The case has been received at OPM via e-QIP and is in the review process prior to being scheduled.
Scheduled - The case is open at OPM and the investigation has started.
Unacceptable- The case does not meet OPM standards and has been rejected. These must be entirely resubmitted.
CA Considered- This is used when during the course of an investigation, information is developed which requires the opening of a new lead that is beyond the normal scope of an investigation at that particular level. It is not necessarily a bad thing, just a need for more information. In some cases OPM uses this when they are waiting for information from outside agencies that has delayed the case. Unlike the CLOSED PENDING designation, these cases are still open and seem to progress reasonably well.
CP Closed Pending - The case is closed awaiting information from an outside agency that has taken too long. In some cases this may be due to an inability to perform a subject interview due to deployment of the subject to a location that is not served by OPM.

JCAVS User Guide, Version 6.0 November 2008
Section 13 – How to Submit a Test Problem Report (TPR) 90
Section 13 How to Submit a Test Problem Reports (TPRs)
The purpose of the JPAS TPR is to provide an automatic means to collect and analyze the data being submitted. TPRs can be submitted electronically via JPAS or you can download a hard copy and submit via fax. All pertinent information must be included in order to process the TPR and to provide feedback or response to the requestor.
Figure 111. JPAS TPR Example.

JCAVS User Guide, Version 6.0 November 2008
Section 13 – How to Submit a Test Problem Report (TPR) 91
• Priority 1 - Mission Critical (Show Stopper) o Adversely affects the accomplishment of an operational or mission essential capability
and no workaround solution is known. o Adversely affects technical, cost, or schedule risks to the project or to life cycle support
of the system, and no workaround solution is known.
• Priority 2 - Impacts Mission: No Workaround o Prevents the accomplishment of an operational or mission essential capability. o Jeopardizes safety, security, or other requirement designated “critical” (Show Stopper).
• Priority 3 - Impacts Mission: Workaround Available o Adversely affects the accomplishment of an operational or mission essential capability,
but a workaround solution is known. o Adversely affects technical, cost, or schedule risks to the project or to life cycle support
of the system, but a workaround solution is known.
• Priority 4 - Impacts Mission: Workaround Available o Results in user/operator inconvenience or annoyance but does not adversely affect a
required operation or mission essential capability. o Results in inconvenience or annoyance for development or support personnel but does
not prevent the accomplishment of those responsibilities.
• Priority 5 - Functionality or Modification within Current Scope; To Be Delivered in Future Release o Any TPR that describes modifications or enhancements to the system that is within the
current scope of baseline requirements. Modifications will be delivered in a future release.
• Priority 6 - Wish List Item – Functionality or Modification beyond Current Scope; To Be Considered for Development o Any TPR that requests modifications or enhancements to the system that are not deemed
to be within the current scope of requirements. Recommendation will be taken under advisement and considered for development and release at a later time.
To complete a TPR, go to the following website: https://www.dss.mil/portal/ShowBinary/BEA%20Repository/new_dss_internet//diss/jpas/tprform.html

JCAVS User Guide, Version 6.0 November 2008
Section 14 – Helpful Tips and Tricks 92
Section 14 Helpful Tips and Tricks If a person has transferred within an MFO company, the category tab will need to be changed to reflect the gaining organization; then the losing organization will have to out-process that person so that the gaining organization can in-process them.
Instructions: 1. Check the box in the “Expand” column and click confirm. This will expand the request and show
the “Document Type” and “Received Date,” if the document has already been faxed or uploaded.
Figure 112. Investigation Request Status Notification

JCAVS User Guide, Version 6.0 November 2008
Appendix A – Terms and Definitions 93
Appendix A - Terms and Definitions
• Debrief: To remove an access level, requires debrief date and reason for debrief.
• Indoctrinate: To assign an access level to a cleared employee once they have a completed investigation or interim eligibility.
• In-Process: To bring a person into your PSM Net
• Notifications: The means in which you will be notified of any JPAS action; will be indicated by a magnifying glass just to the left of the word notification.
• Organization: An organization is a unique code that has been assigned for each CAGE (Industry) and UIC (DOD) within the JPAS system. For Industry, Organizations contain the CAGE code immediately followed by a hyphenated “I.” For example, CAGE “1D020” would be established as “1D020-I.” Each person within JPAS must be assigned to an organization.
• Out-Process: To remove a person no longer associated with your PSM Net.
• Owning: When adding someone to your SMO, you must determine if you want to “own” them or just “service” them. The easiest way to determine if you should own a person is to ask the question, “Who is responsible for updating this person’s security clearance?” If you are responsible, then you should “own” this person.
• Personnel Security Management Network (PSM Net): A PSM Net is a listing of everyone within your SMO (listed by SSN) whom YOU are responsible for maintaining/updating their security clearance information.
• Reciprocity: Any previously granted PCL that is based upon a current investigation of a scope that meets or exceeds that necessary for the clearance required shall provide the basis for issuance of a new clearance without further investigation or adjudication unless significant derogatory information that was not previously adjudicated becomes known to the granting agency.
• Security Management Office (SMO): A SMO is established by an FSO and can contain one or more organizations. Each FSO must determine the number of organizations they want within their SMO. For example, if an FSO has four (4) different organizations, the FSO could either establish a separate SMO for each organization or establish one SMO for all four organizations. The SMO is responsible for “maintaining” the clearances for everyone “owned” within the SMO.
• Servicing: If you do not maintain a person’s clearance, but you want to be notified if there is a change in their eligibility, then you should set up a serving relationship with the person.

JCAVS User Guide, Version 6.0 November 2008
Appendix B – Acronyms 94
Appendix B - Acronyms AM Account Manager
CAF Central Adjudicating Facility
CAGE Commercial and Government Entity Code
CC Chain of Command
CNWDI Critical Nuclear Weapons Design Information
DCID Directorate Central Intelligence Directive
DEERS Defense Enrollment Eligibility Reporting System
DepSecDef Deputy Secretary of Defense
DISCO Defense Industrial Security Clearance Office
DOD Department of Defense
DoE Department of Energy
EPSQ Electronic Personnel Security Questionnaire
e-QIP Electronic Questionnaire for Investigation Processing
FCL Facility Clearance
FSO Facility Security Officer
ISL Industrial Security Letter
JCAVS Joint Clearance and Access Verification System
JPAS Joint Personnel Adjudication System
KMP Key Management Personnel
LOC Letter of Consent
MFO Multiple Facility Organization
MFT Multiple Facility Transfer
NAC National Agency Check
NACLAC National Agency Check with Local Area Check
NACLACC National Agency Check with Local Area Check and Credit Check
NATO North Atlantic Treaty Organization
NdA Non-disclosure Agreement (Non-SCI/DOD)
NdS Non-disclosure Statement (SCI)
NLC National Agency Check with Local Area Check and Credit Check
NRO National Reconnaissance Office

JCAVS User Guide, Version 6.0 November 2008
Appendix B – Acronyms 95
OPM Office of Personnel Management
PASCODE Personnel Accounting System Code
PCL Personnel Clearance
PCS Permanent Change of Station
PR Periodic Reinvestigation
PSM Net Personnel Security Management Network
RRU Request for Research/Recertify/Upgrade Eligibility
RUC Reporting Unit Code
SAP Special Access Program
SCI Sensitive Compartmented Information
SIGMA 16 Reserved for DoE
SII Special Investigative Inquiry
SIOP Single Integrated Operating Plan
SMO Security Management Office
SPA Special Purpose Access
SOR Statement of Reason
SSBI Single Scope Background Investigation
SSN Social Security Number
SVC Servicing
TDY Temporary Duty
TPR Test Problem Report
UIC Unit Identification Code
VAL Visit Authorization Letter

JCAVS User Guide, Version 6.0 November 2008
Appendix C – Investigation Types 96
Appendix C – Investigation Types Within JPAS you will discover several different types of investigations listed. The majority of you will normally work mainly with a Single Scope Background Investigation (SSBI) for a Top Secret clearance and a National Agency Check, Local Agency Check, Credit (NACLACC) for a Secret clearance.
The following is a list of acronyms for all the different types of investigation you’ll discover that are utilized throughout JPAS.
Code Acronym Investigation Type $ ANCI Access National Agency Check plus Written Inquires and Credit Check AN ANCI Access National Agency Check plus Written Inquires and Credit Check 27 BGI Upgrade Background Investigation (13-36 months from LBI) 29 BGI Upgrade Background Investigation (37-60 months from LBI) 37 BGI Upgrade Background Investigation (1-12 months from LBI) 4 BI Background Investigation P BIPN Background Investigation plus Current National Agency Check G BIPR Periodic Reinvestigation of Background Investigation T BIR Background Investigation Requested F BITN Background Investigation (10 year scope) I CI Character Investigation CN CNAC National Agency Check plus Credit Check CC CNCI Child Care National Agency Check plus Written Inquires and Credit Check 1 ENAC Entrance National Agency Check 8 ENAL Entrance National Agency Check plus Special Investigative Inquiry 9 IBI Interview Orientated Background Investigation K LBI Limited Background Investigation R LBIP Limited Background Investigation plus Current National Agency Check Y LBIX Limited Background Investigation - Expanded W LRC Local Records Check B LRCN Local Records Check plus Investigation Requested L MBI Minimum Background Investigation Q MBIP Minimum Background Investigation plus Current National Agency Check X MBIX Minimum Background Investigation – Expanded 2 NAC National Agency Check D NACB National Agency Check plus Written Inquires and Credit Check plus Background Investigation 3 NACI National Agency Check plus Written Inquires and Credit Check 7 NACL National Agency Check plus Special Investigative Inquiry 6 NACP National Agency Check plus 10 Years Service

JCAVS User Guide, Version 6.0 November 2008
Appendix C – Investigation Types 97
E NACS National Agency Check plus Written Inquires and Credit Check plus Single Scope Background Investigation C NACW National Agency Check plus Written Inquires and Credit Check Z NACZ National Agency Check plus Written Inquires and Credit Check plus Special Investigative Inquiry 48 NAFI Non-Appropriated Fund Suitability Determination * NLC National Agency Check, Local Agency Check & Credit XX NLC National Agency Check, Local Agency Check & Credit N NNAC National Agency Check plus Written Inquires and Credit Check plus Current National Agency Check H NPSB National Agency Check plus Partial Special Background Investigation 46 NSI NSI-NACI/Suitability Determination U OTHR Information Furnished by Sources Other than a Listed Investigation PPR Phased Periodic Reinvestigation 11 PRI Periodic Reinvestigation # PRS Periodic Reinvestigation – SECRET PR PRSC Periodic Reinvestigation – Secret/Confidential 43 RSI Reimbursable Suitability/Security Investigation 92 SAC Single Agency Check/Special Agreement Check S SBBI Special Background Investigation plus Current Background Investigation 5 SBI Special Background Investigation M SBIP Special Background Investigation/Single Scope Background Investigation plus Current National Agency Check V SBIR Single Scope Background Investigation Requested J SBPR Periodic Reinvestigation of Special Background Investigation/Single Scope Background Investigation O SII Special Investigative Inquiry 0 SSBI Single Scope Background Investigation A XNAC Expanded National Agency/Entrance National Agency Check

JCAVS User Guide, Version 6.0 November 2008
Appendix D – Termination/Transfer Flowchart 98
Appendix D – Termination/Transfer Flowchart
FSO/User receives notification
FSO/User
Is the employee
terminating?
In-Process employee in JPAS
Gaining FSO/User
Debrief employee in JPAS
FSO/User
Convert Industry Tab to new Organization
FSO/User
Separate the employee in JPAS
FSO/User
Ensure employee is properly indoctrinated
FSO/User
Out-Process the employee in JPAS
FSO/User
End
Separate employee in JPAS
Gaining FSO/User
Out-Process employee in JPAS
Gaining FSO/User
Is the employee
transferring within the SMO?
No
No
Yes
Yes
Losing FSO/User
In-Process the employee in JPAS
Gaining FSO/User
Ensure employee is properly indoctrinated
Gaining FSO/User
Willthe employee be
required to keep a clearance?
No
Yes
Out-Process employee in JPAS
Debrief employee in JPAS
Gaining FSO/User
Send Gaining FSO/User an email of MFT
Losing FSO/User
Convert Industry Tab to new Organization
Losing FSO/User

JCAVS User Guide, Version 6.0 November 2008
Appendix E –JCAVS Step Matrix 99
Appendix E – JCAVS Step Matrix

JCAVS User Guide, Version 6.0 November 2008
Appendix E –JCAVS Step Matrix 100

JCAVS User Guide, Version 6.0 November 2008
Appendix F – JCAVS Step Matrix Remarks 101
Appendix F – JCAVS Step Matrix Remarks

JCAVS User Guide, Version 6.0 November 2008
Appendix G – e-QIP Applicant Information Sheet 102
Appendix G – e-QIP Applicant Information Sheet You have been selected to utilize the new Electronic Questionnaire for Investigation Processing (e-QIP) to process your Periodic Re-investigation (PR). The e-QIP system is an electronic database that has been utilized for several years by the Office of Personnel Management (OPM) to Personnel Security Questionnaires (PSQ) for security clearances. In the past, Industry utilized a system called the Electronic Personnel Security Questionnaire (EPSQ) to process security clearances. Now Industry is also going to start using e-QIP system to process security clearances.
One of the major conveniences of the e-QIP system is that it is a web-based system, so you can access the system from anywhere you have internet access, such as your home or from the office. Since e-QIP it is a web-based system, it’s important that you have your internet browser properly configured.
Web Browser Requirements
If using Microsoft Internet Explorer (IE), you must have version 5.5 or later, with Service Pack 2. Internet Options for IE should be set as follows: • Enable JavaScript • Enable Cookies • Enable Scripting • Enable TLS 1.0 (this option is disabled by default.).
To enable TLS 1.0 in IE, on the top menu: • Select TOOLS • Select INTERNET OPTIONS • Select the tab labeled ADVANCED • Scroll down to the section labeled SECURITY • Check the box to enable TLS 1.0 • Click the OK button to save
If using AOL, open a separate window in IE (outside AOL) and set TLS 1.0 following the instructions above; or directly within AOL, go to the top menu in AOL, then: • Select SAFETY • Select SETTINGS • Select INTERNET PROPERTIES • Under RELATED SETTINGS, select INTERNET EXPLORER SETTINGS, then the ADVANCED tab • Scroll down to SECURITY • Check TLS 1.0 • Click the APPLY and OK buttons • Click SAVE in the AOL Browser Settings box
If you are using Mozilla, you must have at least version 0.9.4. Although security settings may already be defaulted to the proper values, you should verify so by following this process: • Select EDIT • Select PREFERENCES • Select PRIVACY AND SECURITY • Select SSL • Under SSL Protocol Versions, enable SSL VERSION 2, SSL VERSION 3, and TLS
Mozilla users must also verify that they are enabled to use cookies. To do so, go to your browser’s toolbar and verify in the following order: • Select EDIT

JCAVS User Guide, Version 6.0 November 2008
Appendix G – e-QIP Applicant Information Sheet 103
• Select PREFERNCES • Select PRIVACY AND SECURITY • Select COOKIES • Ensure that either ENABLE COOKIES FOR THE ORIGINATING WEBSITE ONLY or ENABLE ALL
COOKIES is checked e-QIP is also compatible with Netscape Navigator, version 6.1 or later. If you are using JAWS screen-reading software, please note that JAWS requires the use of Internet Explorer, version 5.5 or later.
Accessing e-QIP
Now that you’ve properly configured your computer, you’ll need to access the OPM e-QIP website.
1. Start your internet browser and enter the following URL website address: www.opm.gov/e-qip/
2. The e-QIP Gateway Page will appear. Scroll down and click the link labeled “e-QIP APPLICANT SITE.”
3. A “browser checker” utility will automatically run and test your computer for e-QIP compatibility. Click the “CONTINUE” button to proceed to the application. (If after doing so you receive the error message “Page Cannot Be Displayed,” please ensure that you’ve properly configured your computer and that you’ve enable TLS 1.0.)
4. A Security Alert box may appear, asking “Do you want to proceed?” If it does, click the “YES” button with the mouse, or type <CTRL Y> to continue.
5. The e-QIP Welcome Screen will appear. Enter your Social Security Number in the text entry boxes, and click the “SUBMIT” button to logon to the e-QIP applicant site.

JCAVS User Guide, Version 6.0 November 2008
Appendix G – e-QIP Applicant Information Sheet 104
6. Initially you’ll be asked to answer three default “Golden Questions.” You’ll be required to type in your last name, year you were born and city where you were born. IMPORTANT The first time you’re asked for the “City you were born,” you have to type in the word “unknown” (case sensitive). Then you may create new Golden Questions and Answers on the next screen.
7. Click the highlighted link that says: “Enter Your Data.”
8. Complete the SF-86 questions and save as instructed. Validation of your data will occur after every screen save.
9. Once you’ve completed the form, but BEFORE you certify your form, print out a copy of the PSQ.
10. Bring the printed copy of the PSQ to your Security Organization’s Facility Security Officer.
11. Once the Security Organization has reviewed the PSQ, they will contact you for additional information and/or for you to come to the Security Office to certify your PSQ electronically.
12. Once you’ve certify your PSQ, print out the release forms and certification for your signature. These signature forms will be retained by the Security Organization.
13. Print out an archival copy of your PSQ for your own records and the Security Organizations records. (If you are having difficulty opening the forms to print, right click on the link, choose SAVE AS, and then save the file on your computer. Open up the Adobe Acrobat reader program
Enter SSN
unknown

JCAVS User Guide, Version 6.0 November 2008
Appendix G – e-QIP Applicant Information Sheet 105
separately in its own window (not through Internet Explorer), and then open the file you saved in order to print it out.
14. Once you’ve printed out the Archived copy of your PSQ and the signature forms, click on the “Release Request/Transmit to Agency” link.
For additional information on using the e-QIP system and completing your PSQ, click on the “e-QIP Brochure for Applicants” located at the e-QIP Gateway.
Problem Checklist
Now that you’ve properly configured your computer, you’ll need to access the OPM e-QIP website.
1. Releases not dated, signed or legible. Modifications must be initialed by Subject.
2. DOB or POB discrepancy between FPC and SF86/SF85P.
3. Missing middle name on FPC (Must match SF86/SF85P). Indicate “NMN,” if there is no middle name. Indicate “IO” if Initial only.
4. Missing City, State and Zip. This is required for ALL residence and employment addresses.
5. The lack of SSNs and POBs for cohabitants on SSBI requests.
6. Employment and residence gaps (see instructions at www.dss.mil for specifics).
7. Lack of separation date and residence of spouse in case of separation or divorce.
8. Missing marital status of previous spouse. If unknown, indicate.
9. Missing debt clarification; indicate if still outstanding. Provide comments in remarks section if needed.
10. Subject’s certification of accuracy of EPSQ must be within 180 days.
SEE www.dss.mil FOR MORE DETAILS
Print Archival copy of PSQ
Print Signature Forms
Release PSQ to OPM

JCAVS User Guide, Version 6.0 November 2008
Appendix H – SF86 Reviewing Instructions 106
Appendix H – SF86 Reviewing Instructions Instructions on How a Facility Security Officer Should Review a Questionnaire for National
Security Positions, Standard Form 86 (SF-86), for industrial personnel
(APRIL 2008) 1. Key Points This document contains guidance for reviewing the Questionnaire for National Security Positions, SF-86, for industrial personnel. NISPOM paragraph 2-202, “Procedures for Completing the Electronic Version of the SF 86,” requires the FSO or designee to review the SF-86 to determine its adequacy and completeness before it can be sent to the Defense Industrial Security Clearance Office (DISCO.)
SF 86 submissions to the Defense Security Service (DSS) will be accomplished by using the Joint Personnel Adjudication System (JPAS). Within JPAS, there is an interface with the Electronic Questionnaire for Investigations Processing (e-QIP), which is the means to submit the clearance and investigation request to DISCO. If you do not have connectivity to e-QIP via the JPAS, or if you have questions or issues that you are unable to resolve, please contact the DoD Security Services Center at 1-888-282-7682 for assistance.
e-QIP provides edit and validation features for the SF-86 data that allows immediate correction of potential problems. The validation process discourages entry of incomplete or illogical data onto the form. FSOs should review each section of the document in its entirety, as all information presented is considered the minimum requirement for an SF-86 to be approved by DISCO.
Investigation scope for an SSBI investigation is 10 years from date of submission of the request for investigation. Investigation scope for a NACLC investigation is 7 years. Applicants must provide residence, employment and education information to meet the appropriate investigation scope.
2. Questionnaire for National Security Positions (SF 86) Criteria Section 1-6 – Your Identifying Information Name (must provide full name) Note: If a middle initial is provided, SUBJECT must state initial only (I.O.), or if no middle name is provided, SUBJECT must state No Middle Name. All items should be provided to include: Date of Birth, Place of Birth, County, Other Names Used, Height, Weight, Hair Color and Eye Color. FSOs should ensure the name provided on the SF-86 exactly matches the name in JPAS.
Section 7 – Telephone Numbers The validation process requires complete information. Ensure the three (3) digit area code is valid and seven (7) digit phone number is present.
Section 8 – Citizenship If SUBJECT is foreign born and parents are foreign born, ensure naturalization information is present.
If SUBJECT’s country of birth is one of the following: the Commonwealth of Puerto Rico, Guam, American Samoa, Northern Marianas Islands, the Virgin Islands, the Trust Territory of Baker Island, Howland Island, Jarvis Island, Midway Island, Wake Island, Johnston Island, Kingman Reef, Navassa Island, and Palmyra Atoll, naturalization information is not required.
If SUBJECT states U.S. National and is foreign born and parents are foreign born, naturalization information must be provided.

JCAVS User Guide, Version 6.0 November 2008
Appendix H – SF86 Reviewing Instructions 107
U.S. Passport If SUBJECT marked yes to U.S. passport, passport number and month/day/year issued are required.
Dual Citizenship If SUBJECT states Dual Citizenship, dual country information is required.
If SUBJECT is foreign born and shows one or both parents born in the U.S., naturalization information is not required.
Resident Aliens If SUBJECT is not a U.S. citizen, provide alien registration number, date and place of entry into the U.S.
Section 9 – Where You Have Lived
FOR NACLC Must provide residence for the last 7 years or until Subject’s 16th birthday.
For all other residence coverage requirements, follow guidelines for SSBI.
FOR SSBI Must provide residence for the last 10 years or until subject’s 18th birthday. If under 21 years of age must provide 2 years coverage or the period since subject’s 16th birthday.
Dates of coverage must be consecutive and without breaks for the entire period or an explanation must be provided.
Residence coverage must be within commuting distance of employment unless explained.
NOTE: If SUBJECT is a Consultant or employed by a commercial carrier, or the Merchant Marine, employment need not be within commuting distance.
Residence coverage must include complete addresses to include ZIP Codes.
NOTE: P.O. Box Numbers are not acceptable.
APO/FPO addresses are acceptable if within commuting distance of employment.
Section 10 – Where You Went To School
FOR SSBI/NACLC Required Data. List education for the last 10 years or list the most recent education beyond high school, no matter when education occurred. Details must include name of school, city, and state.
Section 11 – Your Employment Activities First employment listed should be information pertaining to the organization submitting the clearance request. In pre-employment situations, the employment information for that organization may be provided within Remarks. Pre-employment provided in remarks should include: Employer Name, Employer Street Address, City, State, and ZIP Code.
FOR NACLC Must provide employment for the last 7 years.
For all other employment coverage requirements, follow guidelines for SSBI.
FOR SSBI Must provide employment for the last 10 years or until subject’s 18th birthday. If under 21 years of age, must provide 2 years or the period since subject’s 16th birthday.

JCAVS User Guide, Version 6.0 November 2008
Appendix H – SF86 Reviewing Instructions 108
Make sure residence and employment are within reasonable commuting distance. (Example: Subject lists residence in California and employment in Virginia with no explanation. This will be rejected for more information unless it is explained.
Dates of coverage must be consecutive and without breaks for the entire period or an explanation must be provided.
If present employment reflects subject is at a classified job site, accept as is.
Must provide complete addresses for employment coverage to include name of employer.
APO/FPO addresses are acceptable if within commuting distance of residence.
All military duty stations must be provided.
If SUBJECT was aboard ship must provide all homeports.
Overlapping employment is acceptable if within commuting distance of each other.
If unemployed/self-employed, must provide reference to verify (can use spouse/parents as reference).
Dates of coverage must show month and year.
If SUBJECT’s job title is Field Representative, employment must still be within commuting distance of residence, or subject must provide details as to why they are not.
Federal Civil Service, provide Employer Name, Employer Street Address, City, State, and ZIP Code and dates of employment.
Section 12 – People Who Know You Well Provide information for each field.
Section 13/15 – Your Spouse Provide information for each field.
If spouse was born abroad and is now a U.S. citizen, naturalization information is required. If not a U.S. citizen but living in the U.S., alien registration number with date and place of entry into the U.S. is required. If divorced within 10 years, complete information must be provided for former spouse (s).
NOTE: Spouse Naturalization / Alien Registration information of foreign born spouses is provided in Section 14/15 Your Relatives and Associates.
Section 14/15 – Your Relatives and Associates Must provide information on relatives and associates. Information must include date, place of birth (city, state), present residence and citizenship.
SUBJECT must provide complete information on spouse-like relationship or co-habitant. This includes the social security number of all spouse-like relationships or co-habitants.
If relatives and associates were born abroad and are now United States citizens, must provide naturalization information. If not U.S. citizens but living in the U.S., must provide alien registration number with date and place of entry into the U.S.
NOTE: Immediate family members only must be listed. Immediate family member is defined as SUBJECT’s current spouse or current cohabitant, SUBJECT’s father, mother, sons, daughters, brothers, sisters.
Section 17 – Your Military History Required Data. Information must include Dates, Branch of Service.

JCAVS User Guide, Version 6.0 November 2008
Appendix H – SF86 Reviewing Instructions 109
Section 18 – Foreign Activities Required Data. When answered Yes, provide details.
Section 19 – Your Military Record Required Data. When answered Yes, provide details.
Section 19 – Your Military Record Required Data. If other than Honorable Discharge, include type of Discharge, and date of Discharge.
Section 20 – Your Selective Service Record If answered Yes/No, provide an explanation. (When SUBJECT states he is a male born after December 31, 1959 and has not registered for Selective Service, a legal exemption reason must be provided.) To verify Selective Service registration, contact the Selective Service System at 1-847-688-6888 for assistance.
Section 21 – Your Medical Record – SF 86, Question 21 – Revised to read: In the last 7 years, have you consulted with a health care professional regarding an emotional or mental health condition or were you hospitalized for such a condition?
Answer “No” if the counseling for any of the following reasons and was not court ordered:
• strictly marital, family, grief not related to violence by you; or • strictly related to adjustments from service in a military combat environment.
If you answered “Yes” indicate who conducted the treatment and/or counseling, provide the following information, dates of treatment and name/address of health care professional.
Section 22 – Your Employment Record Required Data. If answered Yes, provide date, specific reason, employer’s name, and address.
Section 25 – Your Police Record Required Data. If answered Yes, provide date, offense, action taken, law enforcement authority/court, state and ZIP Code.
Section 24 – Your Use of Illegal Drugs and Drug Activity Required Data. If answered Yes, provide dates of usage, controlled substance/prescription drug used and the number of times used.
Section 25 – Your Use of Alcohol Required Data. If answered Yes, provide dates, name and address of counselor or doctor.
Section 26 – Your Investigations Record The validation process requires Type, Date, Agency, and Clearance.
Section 27 – Your Financial Record Required Data. If answered Yes, provide Date of Action, Type of Action, Amount, Name Action Occurred Under, Court/Agency Name, and complete Street Address of Court/Agency. Information should be presented for each bankruptcy, garnishment, lien, or judgments within 7 years.
Section 28 – Your Financial Delinquencies Required Data. If answered Yes, provide Month / Year, Agency Code, and complete Street Address. Information should be presented for each delinquent debt overdue 180 days or more within 7 years or currently overdue more than 90 days.

JCAVS User Guide, Version 6.0 November 2008
Appendix H – SF86 Reviewing Instructions 110
Section 29 – Public Record Civil Court Actions Required Data. If answered Yes, provide date, nature of action, result of action, names of parties involved and court (include city and state or country if outside US).
Section 30 – Your Association Record Required Data. If answered Yes, provide Month / Year, Agency Code, and Clearance Code. 3. Continuation Space Indicate requirements concerning Special Access Programs (SAP) or Sensitive Compartmented Information (SCI) here.
Effective September 1, 2007, requests for industry SCI clearance eligibility by the Air Force CAF will be processed only if an SCI Security Management Office (SMO) is present in JPAS. Failure of the company or the AF Special Security Office (SSO) to record the relationship will result in processing for a collateral clearance eligibility decision by DISCO. This applies to investigations submitted but not yet adjudicated. At this time, there are no changes to procedures in place for SCI adjudications by other CAFs.
4. Certification That My Answers Are True Ensure the release that is submitted was generated by the e-QIP system. Failure to use the appropriate form will result in OPM being unable to match the release to the investigation request, as codes are contained on the forms to permit matching them.
Certification and Release forms may be scanned and attached in JPAS. This is the acceptable means for providing handwritten comments or markings to indicate the request is for periodic reinvestigation and no fingerprint cards are required.
If you fax Release forms, do not send a cover page or fingerprint cards. Items should be sent to 1-866-804-0686. No hand written comments or markings are acceptable.
5. Expected Attachments Fingerprint Cards for must be provided to the Office of Personnel Management within 30 days of approval by the DISCO. This is indicated by a “release PSI” status in JPAS. For further guidance on releases, certification or Fingerprint Cards, please refer to the posting.

JCAVS User Guide, Version 6.0 November 2008
Appendix I – Identifying the Government Customer 111
Appendix I – Identifying the Government Customer How to Identify the Government Customer When Requesting an Investigation for a Personnel Security Clearance (PCL) in JPAS

JCAVS User Guide, Version 6.0 November 2008
Appendix I – Identifying the Government Customer 112

JCAVS User Guide, Version 6.0 November 2008
Appendix I – Identifying the Government Customer 113

JCAVS User Guide, Version 6.0 November 2008
Appendix I – Identifying the Government Customer 114

JCAVS User Guide, Version 6.0 November 2008
Appendix J – DSS Industry Rules 115
Appendix J – DSS Industry Rules Procedures Governing Use of JPAS by Cleared Contractors
Defense Security Service April 2007
National Industrial Security Program Operating Manual (NISPOM) paragraph 2-200b states that “When the CSA [Cognizant Security Agency] has designated a database as the system of record for contractor eligibility and access, the contractor shall be responsible for annotating and maintaining the accuracy of their employees’ access records. Specific procedures will be provided by the CSA.” The Department of Defense, acting as a CSA, has designated the Joint Personnel Adjudication System (JPAS) as the DoD system of record for contractor eligibility and access.
JPAS is a U.S. Government information system that contains official government records. The information in JPAS must be protected from unauthorized disclosure and used only for authorized purposes. Contractors may only use their JPAS accounts to manage the access records of their employees and consultants, and to verify the access levels and affiliations (e.g., employee of ABC Company) of incoming visitors who require access to classified information.
The following procedures are issued under the authority provided by NISPOM paragraph 2-200b. Contractors shall follow these procedures when using JPAS and shall ensure that authorized users of JPAS have been properly informed about these procedures and any other specific policies governing access to and use of JPAS.
1. Contractors shall accurately maintain the JPAS records pertaining to their employees and consultants. Contractors must expeditiously update these records when changes occur (e.g., termination of employment).
2. Contractors are prohibited from placing false information in JPAS, and DSS will seek appropriate sanctions against contractors and contractor employees who knowingly place false information in JPAS.
3. DoD issues JPAS accounts exclusively for use by a specific contractor or corporate family of contractors. Persons given access to JPAS as account holders may only use JPAS on behalf of the cleared contractor or corporate family of contractors through which the account was issued. For example, an employee of ABC Company holding a JPAS account issued through ABC Company and who works at a government site is not authorized to use the contractor-granted account in support of the government customer. If the government customer requires the contractor employee to review or update JPAS records on behalf of the government customer, the government customer must provide the JPAS account for the contractor employee to use.
4. The JPAS account manager must be a company employee. The JPAS account manager cannot be a subcontractor or consultant.
5. Contractors may subcontract or obtain consultant support for administering security services. The using contractor will provide a JPAS account to the subcontractor or consultant under the using contractor’s Security Management Office (SMO) for the sole purpose of permitting the subcontractor or consultant to provide security services for the using company. Subcontractors or consultants providing such security services must be under the direct supervision of the using contractor’s FSO or FSO’s designee.

JCAVS User Guide, Version 6.0 November 2008
Appendix J – DSS Industry Rules 116
6. Each individual accessing JPAS must have a separate and unique account created by the individual’s JPAS account manager. The account manager must maintain a current record of every JPAS account established.
7. JPAS users may never share their user names, passwords, or other authentication information with any other individual, including anyone who is a designee or an alternate to the account holder.
8. Contractors must not allow any practices that include sharing user names, passwords, or other authentication information, and must have policies in place that guard against such practices. Contractors can establish JPAS accounts for additional users when a reasonable need exists.
9. Access to JPAS is only authorized by means of company or government-owned equipment with appropriate security controls in place. JPAS users may not access their accounts from personal or home computers.
10. Contractors are not permitted to change an existing date notation in JPAS for the Classified Information Nondisclosure Agreement (SF 312). Contractors must, however, input the date that the SF 312 was signed when JPAS does not reflect a date.
11. Contractors are authorized to verify prospective employees’ eligibility for access to classified information in JPAS prior to an offer of employment being extended. However, contractors may not use JPAS for recruiting purposes.
12. While access to JPAS is only granted to contractors who have a legitimate need for such access in support of classified work being performed for the Government, JPAS is not a classified system. DSS will not grant a facility security clearance (FCL) for the sole purpose of allowing a company or its employees to gain access to JPAS.
13. Any contractor with JPAS access that becomes aware of a violation of these procedures shall immediately report the nature of the violation, the names of the responsible parties, and a description of remedial action taken, to the servicing DSS Industrial Security Representative.
NOTE: Violations of the procedures may lead DSS to suspend or withdraw JPAS access, terminate the
JPAS account, or exclude culpable companies or persons from access to JPAS for a specified or indefinite period. DSS will also refer information concerning violations of these procedures to other federal agencies for consideration of administrative, civil or criminal sanctions when circumstances warrant.

JCAVS User Guide, Version 6.0 November 2008
Appendix K – PSM Net Validation 117
Appendix K – PSM Net Validation From the Main Menu select “PSM Net”
Will take you to JCAVS Maintain PSM Net Screen Select “Person Categories by Organization”
Click “Add” - Will take you to PSM Net Add Organization Category Hit “Select Organization” - Will take you to organization search Select DoD Contractor Companies
Enter your cage code (plus *) in last box Click “Search” – selected cage will show up Click blue link indicating cage code; company name will move to top line Click “OK” – Will take you back to “PSM Net Add Org…” Click “Search” Search result will indicate all persons associated with your cage that are not in your PSM Net
Determine if each person listed should be in your PSM Net If Yes – In-process and indoctrinate If No – In-process and out-process using the same date; then go to add/modify screen and enter
separation date and separation code. At midnight the person will drop out of your PSM Net and will no longer be associated with your Cage

JCAVS User Guide, Version 6.0 November 2008
Appendix L – Submitting Adverse Via JPAS 118
Appendix L – JPAS Reports Act PC-Access/No PSM Net
Lists organizations that have a Person Category for a subject without a PSM Net relationship owned or serviced
Inv Rqst by Duty Pos This report indicates all Investigations Request currently in your PSM Net by Duty Position.
Non-SCI Totals List of all Non-SCI Access’s, for owned and or services Person Categories in your PSM Net
or subordinate organization. Periodic Reinvest
List of Personnel within your PSM Net or subordinate organization whose investigation may be out-of-scope and may require a Periodic Reinvestigation
Personnel Detailed list of Personnel in your PSM Net and or subordinate organization, including access,
eligibility and investigation information. PSM Net Personnel
Abbreviated list of all personnel in your PSM Net or subordinate organization. SMO-No PSM Net
Retrieve information regarding SMO’s in your hierarchy that have not established a PSM Net.
SMO-No Users Retrieve information regarding SMO’s in your hierarchy that have established their SMO but
have no Personnel with an Owning or Servicing relationship in their PSM Net. SMO-PC-No Access
Retrieve information regarding SMO’s in your hierarchy that have established their PSM Net but don’t have a access indoctrinated for a Person Category.
Suspense Retrieves information regarding Suspense information the JCAVS user creates from a
subject’s Person Summery screen / Suspense Data link. Suspensions
Information regarding Suspensions for personnel in your PSM Net and or subordinate organization. • Examples:
Information regarding Eligibility Suspensions for personnel in your PSM Net and or subordinate organization.
Information Access Suspensions for personnel in your PSM Net and or subordinate organization.
JCAVS User Guide, Version 6.0 November 2008
JPAS USER GUIDE, November 2008
JPAS INDUSTRY TEAM
Quinton Wilkes – Team Lead [email protected]
Tanya Elliott
Joseph Jessop [email protected]
Toni MacDonald
Ellen Suchey [email protected]
INDUSTRIAL SECURITY FACILITIES DATABASE (ISFD)
Chad Stoker [email protected]
EDUCATION & TRAINING SUBTEAM
JPAS SUBTEAM
Toni MacDonald [email protected]
Tanya Elliott [email protected]
Joseph Jessop [email protected]
Ellen Suchey [email protected]
Rhonda Peyton [email protected]
Michelle Dockins [email protected]
Clyde Sayler
Suzie Bryant [email protected]
Michael Woolweaver
Debbie Michele [email protected]

JCAVS User Guide, Version 6.0 November 2008
JPAS USER GUIDE, November 2008
The “Joint Clearance andAccess Verification System
(JCAVS)”User’s Guide
September 2008
The “Joint Clearance andAccess Verification System
(JCAVS)”User’s Guide
September 2008
The “Joint Clearance and Access Verification System
(JCAVS)” User’s Guide
November 2008