NovaTime Supervisor Web Service Manual
56
Transcript of NovaTime Supervisor Web Service Manual

!
!
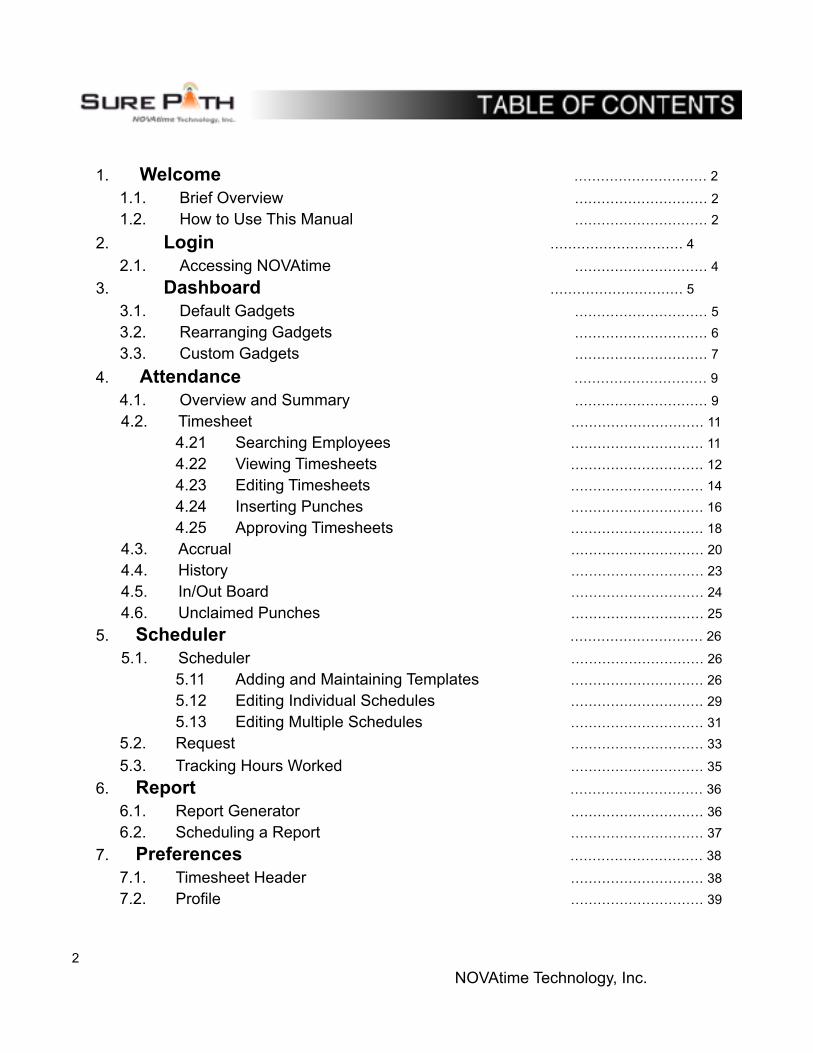
1. Welcome ………………………… 2 1.1. Brief Overview ………………………… 2 1.2. How to Use This Manual ………………………… 2
2. Login ………………………… 4 2.1. Accessing NOVAtime ………………………… 4
3. Dashboard ………………………… 5 3.1. Default Gadgets ………………………… 5 3.2. Rearranging Gadgets ………………………… 6 3.3. Custom Gadgets ………………………… 7
4. Attendance ………………………… 9 4.1. Overview and Summary ………………………… 9 4.2. Timesheet ………………………… 11
4.21 Searching Employees ………………………… 11 4.22 Viewing Timesheets ………………………… 12 4.23 Editing Timesheets ………………………… 14 4.24 Inserting Punches ………………………… 16 4.25 Approving Timesheets ………………………… 18
4.3. Accrual ………………………… 20 4.4. History ………………………… 23 4.5. In/Out Board ………………………… 24 4.6. Unclaimed Punches ………………………… 25
5. Scheduler ………………………… 26 5.1. Scheduler ………………………… 26
5.11 Adding and Maintaining Templates ………………………… 26 5.12 Editing Individual Schedules ………………………… 29 5.13 Editing Multiple Schedules ………………………… 31
5.2. Request ………………………… 33 5.3. Tracking Hours Worked ………………………… 35
6. Report ………………………… 36 6.1. Report Generator ………………………… 36 6.2. Scheduling a Report ………………………… 37
7. Preferences ………………………… 38 7.1. Timesheet Header ………………………… 38 7.2. Profile ………………………… 39
! 2NOVAtime Technology, Inc.
7.3. Preferences ………………………… 40
!
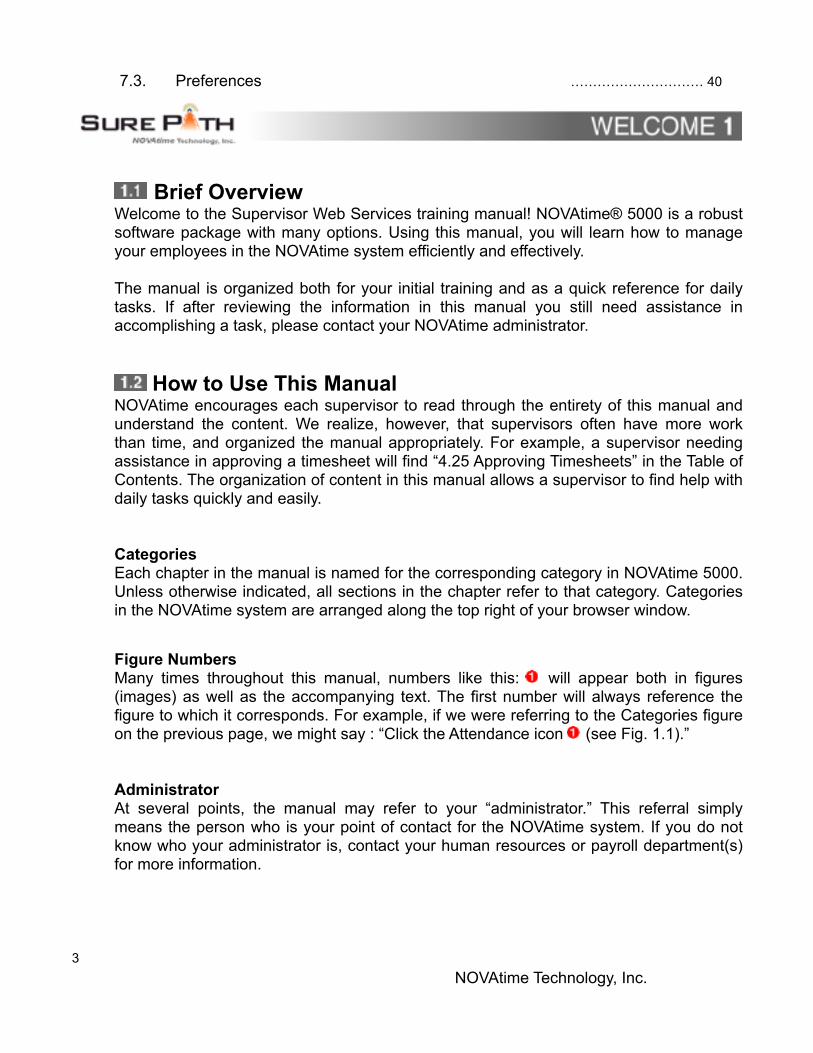
! Brief Overview Welcome to the Supervisor Web Services training manual! NOVAtime® 5000 is a robust software package with many options. Using this manual, you will learn how to manage your employees in the NOVAtime system efficiently and effectively.
The manual is organized both for your initial training and as a quick reference for daily tasks. If after reviewing the information in this manual you still need assistance in accomplishing a task, please contact your NOVAtime administrator.
! How to Use This Manual NOVAtime encourages each supervisor to read through the entirety of this manual and understand the content. We realize, however, that supervisors often have more work than time, and organized the manual appropriately. For example, a supervisor needing assistance in approving a timesheet will find “4.25 Approving Timesheets” in the Table of Contents. The organization of content in this manual allows a supervisor to find help with daily tasks quickly and easily.
Categories Each chapter in the manual is named for the corresponding category in NOVAtime 5000. Unless otherwise indicated, all sections in the chapter refer to that category. Categories in the NOVAtime system are arranged along the top right of your browser window.
Figure Numbers Many times throughout this manual, numbers like this: ! will appear both in figures (images) as well as the accompanying text. The first number will always reference the figure to which it corresponds. For example, if we were referring to the Categories figure on the previous page, we might say : “Click the Attendance icon ! (see Fig. 1.1).”
Administrator At several points, the manual may refer to your “administrator.” This referral simply means the person who is your point of contact for the NOVAtime system. If you do not know who your administrator is, contact your human resources or payroll department(s) for more information.
! 3NOVAtime Technology, Inc.

!
Copyright © 2009 NOVAtime Technology, Inc.
This documentation was first written 7/27/09 by Kevin Nielsen for and is maintained by NOVAtime Technology, Inc. All information contained within is protected under copyright law and distributed by NOVAtime Technology, Inc exclusively to its partners and customers for confidential use.
Permission to use, copy, or distribute this documentation for any purpose must be granted via expressed, written consent by NOVAtime Technology, Inc. This document may not be modified without the consent of NOVAtime Technology, Inc.
Please contact us for further information.
NOVAtime Technology, Inc. 1255 Corporate Center Drive Monterey Park, CA 91754 (323) 980-1858
! 4NOVAtime Technology, Inc.
!
Accessing NOVAtime
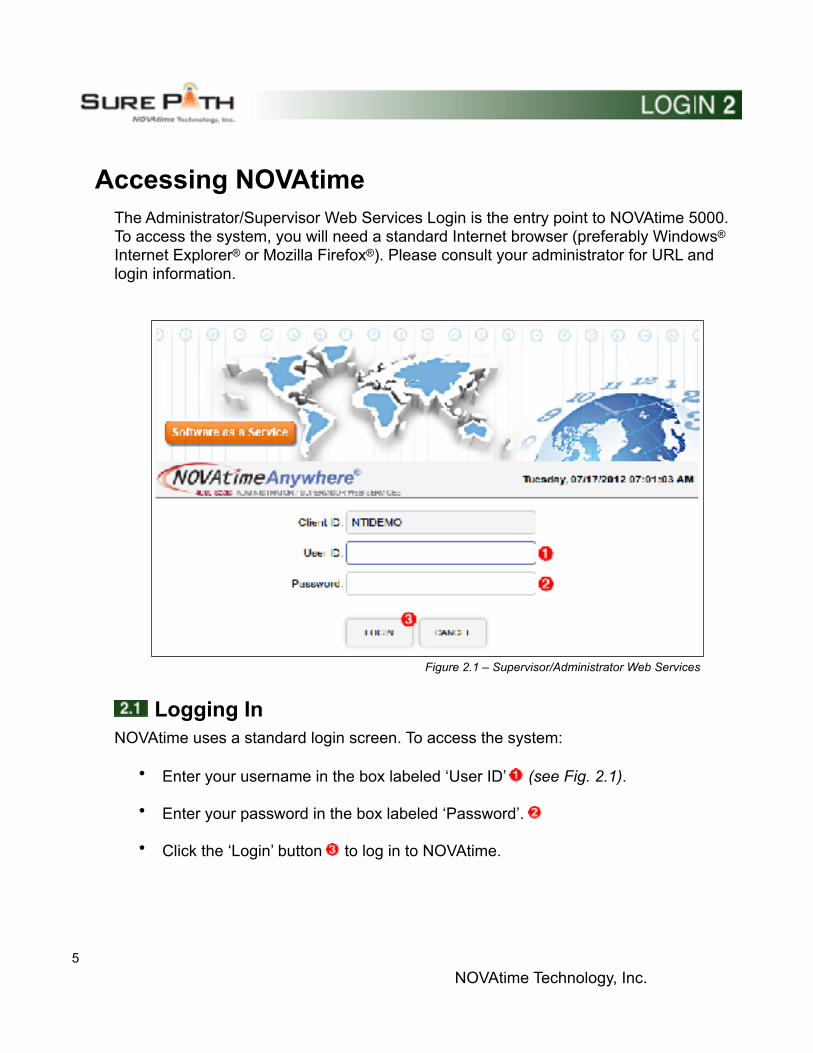
The Administrator/Supervisor Web Services Login is the entry point to NOVAtime 5000. To access the system, you will need a standard Internet browser (preferably Windows® Internet Explorer® or Mozilla Firefox®). Please consult your administrator for URL and login information.
! Figure 2.1 – Supervisor/Administrator Web Services
! Logging In NOVAtime uses a standard login screen. To access the system:
• Enter your username in the box labeled ‘User ID’ ! (see Fig. 2.1).
• Enter your password in the box labeled ‘Password’. !
• Click the ‘Login’ button ! to log in to NOVAtime.
! 5NOVAtime Technology, Inc.

Cancel the login process at any time by clicking the ‘Cancel’ button.
! 6NOVAtime Technology, Inc.
!
Dashboard
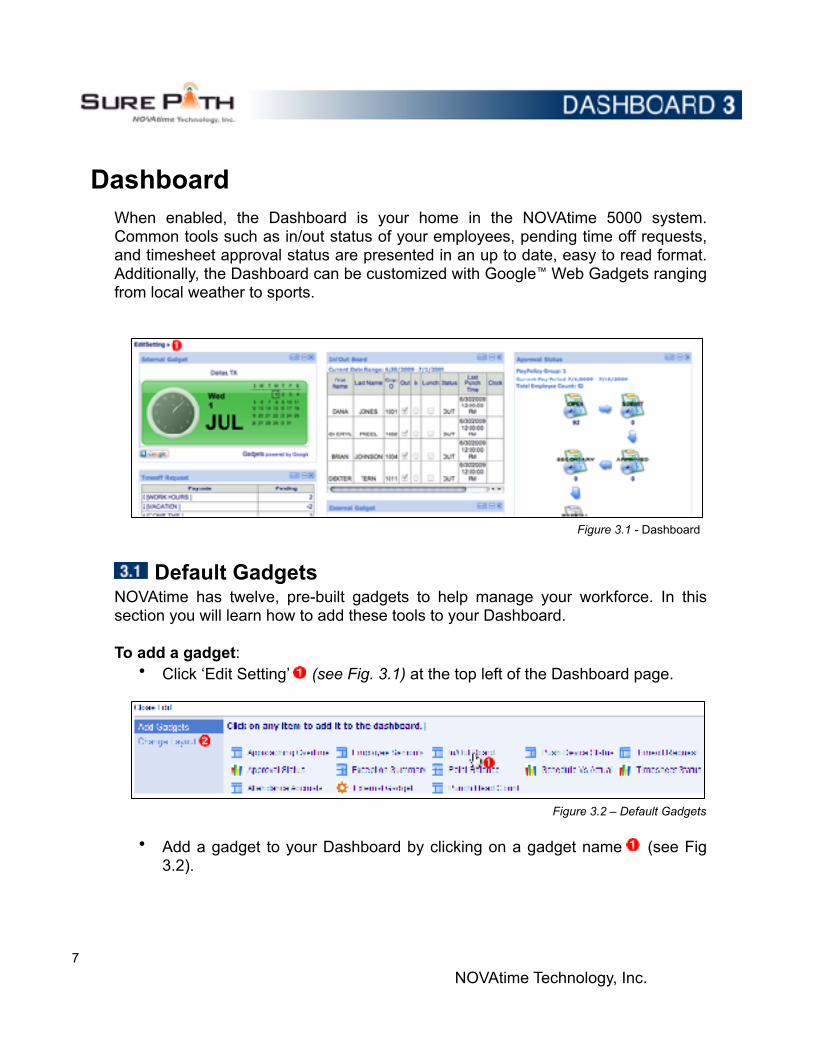
When enabled, the Dashboard is your home in the NOVAtime 5000 system. Common tools such as in/out status of your employees, pending time off requests, and timesheet approval status are presented in an up to date, easy to read format. Additionally, the Dashboard can be customized with Google™ Web Gadgets ranging from local weather to sports.
! Figure 3.1 - Dashboard
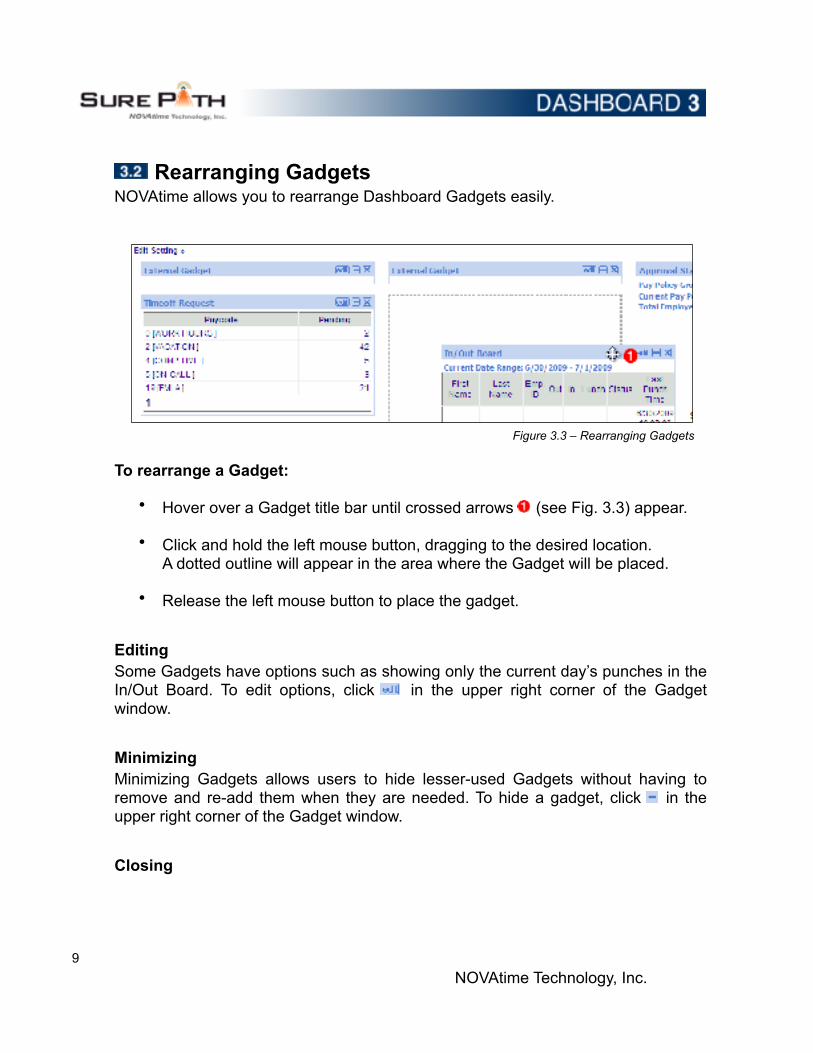
! Default Gadgets NOVAtime has twelve, pre-built gadgets to help manage your workforce. In this section you will learn how to add these tools to your Dashboard.
To add a gadget:• Click ‘Edit Setting’ ! (see Fig. 3.1) at the top left of the Dashboard page.
! Figure 3.2 – Default Gadgets
• Add a gadget to your Dashboard by clicking on a gadget name ! (see Fig 3.2).
! 7NOVAtime Technology, Inc.

• To alter the number or size of columns, click the ‘Change Layout’ tab ! and check the radio button to the left of your desired view.
! 8NOVAtime Technology, Inc.
!
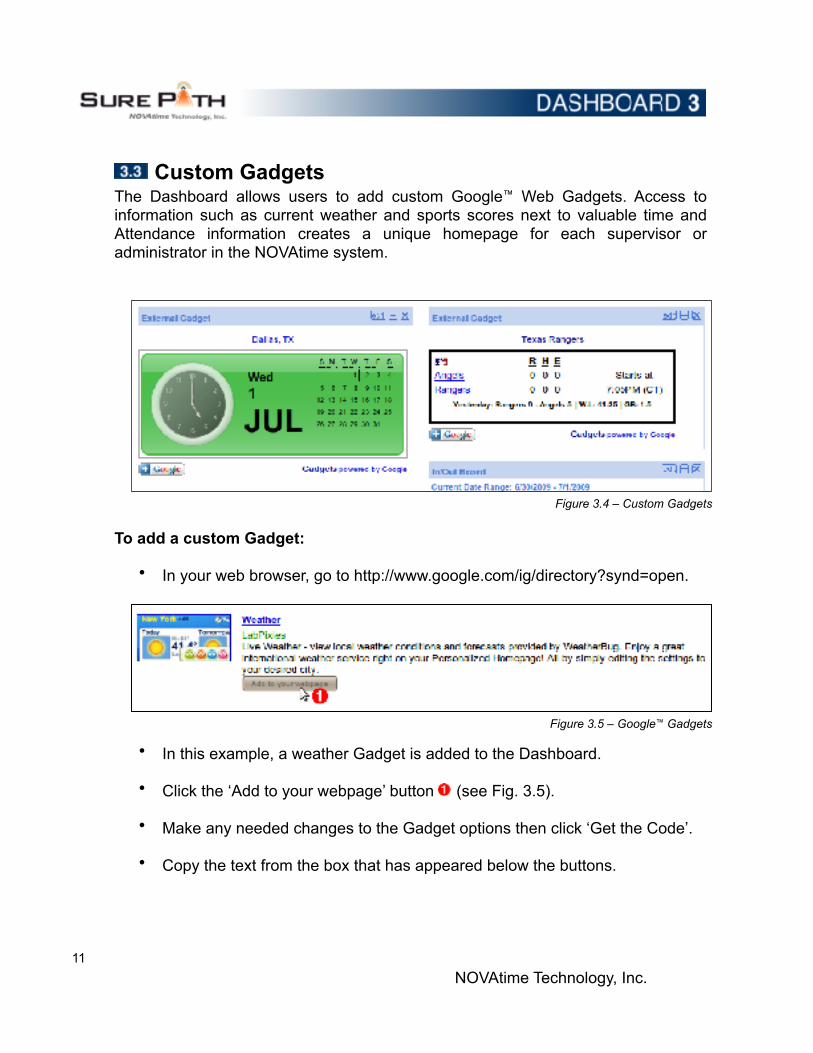
! Rearranging Gadgets NOVAtime allows you to rearrange Dashboard Gadgets easily.
! Figure 3.3 – Rearranging Gadgets
To rearrange a Gadget:
• Hover over a Gadget title bar until crossed arrows ! (see Fig. 3.3) appear.
• Click and hold the left mouse button, dragging to the desired location. A dotted outline will appear in the area where the Gadget will be placed.
• Release the left mouse button to place the gadget.
Editing Some Gadgets have options such as showing only the current day’s punches in the In/Out Board. To edit options, click ! in the upper right corner of the Gadget window.
Minimizing Minimizing Gadgets allows users to hide lesser-used Gadgets without having to remove and re-add them when they are needed. To hide a gadget, click ! in the upper right corner of the Gadget window.
Closing
! 9NOVAtime Technology, Inc.

To close an open Gadget, click ! in the upper right corner of the Gadget window. The Gadget will no longer appear when you log in to the NOVAtime system. To re-add a gadget, see section 3.1.
! 10NOVAtime Technology, Inc.
!
! Custom Gadgets The Dashboard allows users to add custom Google™ Web Gadgets. Access to information such as current weather and sports scores next to valuable time and Attendance information creates a unique homepage for each supervisor or administrator in the NOVAtime system.
! Figure 3.4 – Custom Gadgets
To add a custom Gadget:
• In your web browser, go to http://www.google.com/ig/directory?synd=open.
! Figure 3.5 – Google™ Gadgets
• In this example, a weather Gadget is added to the Dashboard.
• Click the ‘Add to your webpage’ button ! (see Fig. 3.5).
• Make any needed changes to the Gadget options then click ‘Get the Code’.
• Copy the text from the box that has appeared below the buttons.
! 11NOVAtime Technology, Inc.
• Return to the NOVAtime Dashboard.
!
• Follow the instructions for adding a Gadget from Section 3.1, selecting theGadget named “External Gadget.”
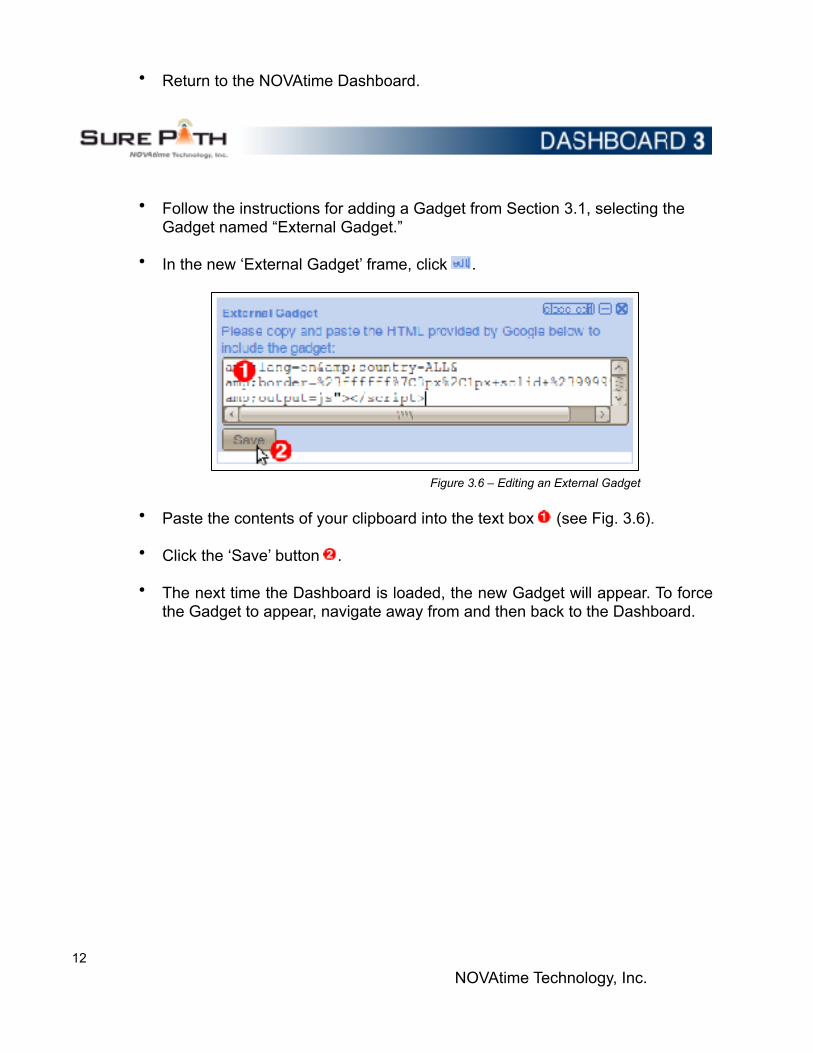
• In the new ‘External Gadget’ frame, click ! .
! Figure 3.6 – Editing an External Gadget
• Paste the contents of your clipboard into the text box ! (see Fig. 3.6).
• Click the ‘Save’ button ! .
• The next time the Dashboard is loaded, the new Gadget will appear. To force the Gadget to appear, navigate away from and then back to the Dashboard.
! 12NOVAtime Technology, Inc.
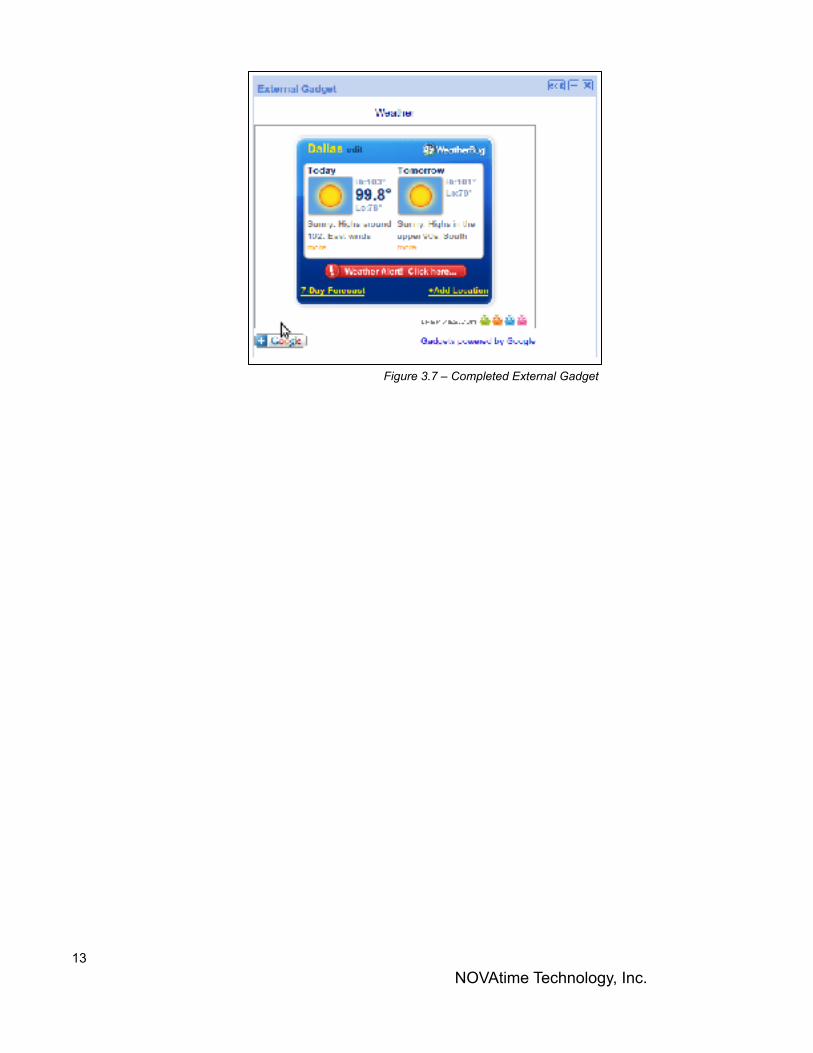
! Figure 3.7 – Completed External Gadget
! 13NOVAtime Technology, Inc.
!
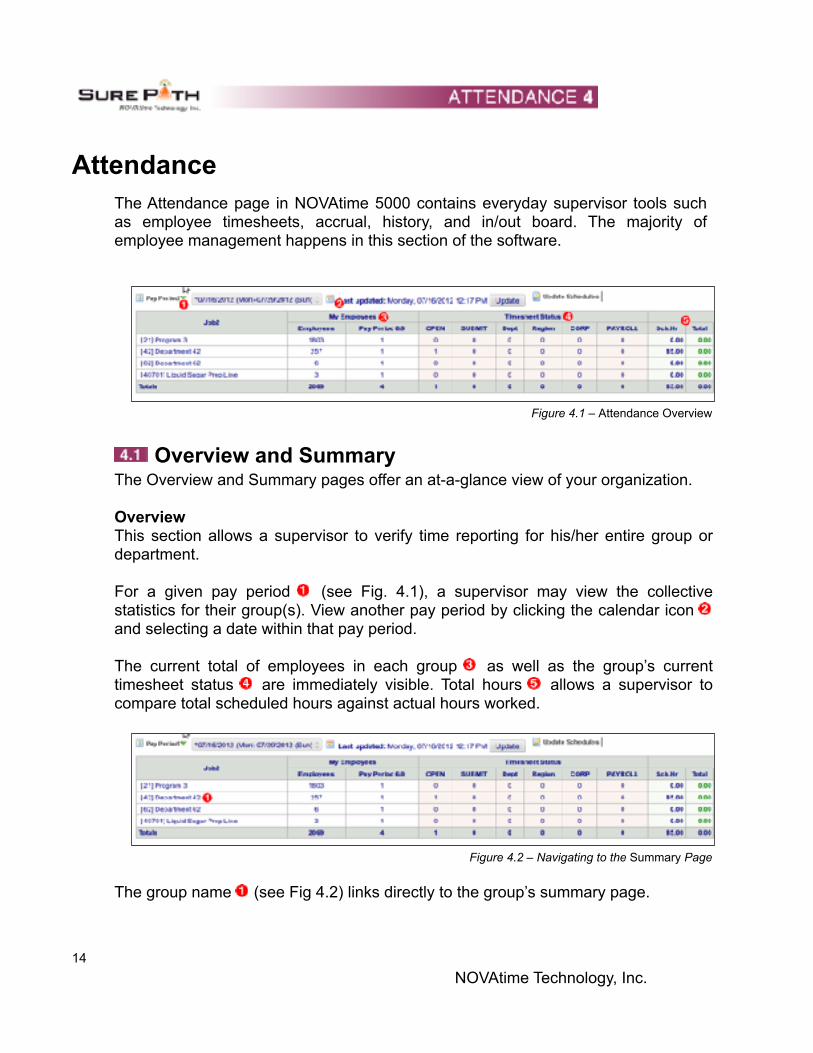
Attendance The Attendance page in NOVAtime 5000 contains everyday supervisor tools such as employee timesheets, accrual, history, and in/out board. The majority of employee management happens in this section of the software.
! Figure 4.1 – Attendance Overview
! Overview and Summary The Overview and Summary pages offer an at-a-glance view of your organization.
Overview This section allows a supervisor to verify time reporting for his/her entire group or department.
For a given pay period ! (see Fig. 4.1), a supervisor may view the collective statistics for their group(s). View another pay period by clicking the calendar icon ! and selecting a date within that pay period.
The current total of employees in each group ! as well as the group’s current timesheet status ! are immediately visible. Total hours ! allows a supervisor to compare total scheduled hours against actual hours worked.
! Figure 4.2 – Navigating to the Summary Page
The group name ! (see Fig 4.2) links directly to the group’s summary page.
! 14NOVAtime Technology, Inc.
!
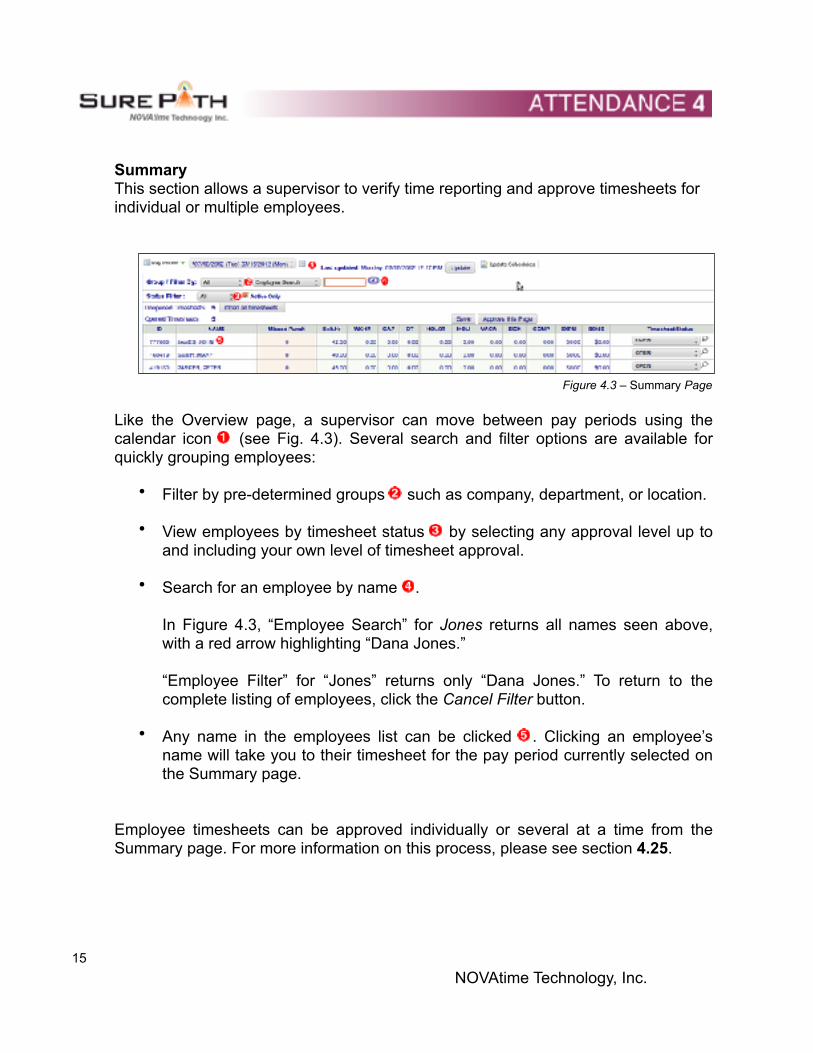
Summary This section allows a supervisor to verify time reporting and approve timesheets for individual or multiple employees.
! Figure 4.3 – Summary Page
Like the Overview page, a supervisor can move between pay periods using the calendar icon ! (see Fig. 4.3). Several search and filter options are available for quickly grouping employees:
• Filter by pre-determined groups ! such as company, department, or location.
• View employees by timesheet status ! by selecting any approval level up to and including your own level of timesheet approval.
• Search for an employee by name ! . In Figure 4.3, “Employee Search” for Jones returns all names seen above, with a red arrow highlighting “Dana Jones.” “Employee Filter” for “Jones” returns only “Dana Jones.” To return to the complete listing of employees, click the Cancel Filter button.
• Any name in the employees list can be clicked ! . Clicking an employee’s name will take you to their timesheet for the pay period currently selected on the Summary page.
Employee timesheets can be approved individually or several at a time from the Summary page. For more information on this process, please see section 4.25.
! 15NOVAtime Technology, Inc.
!
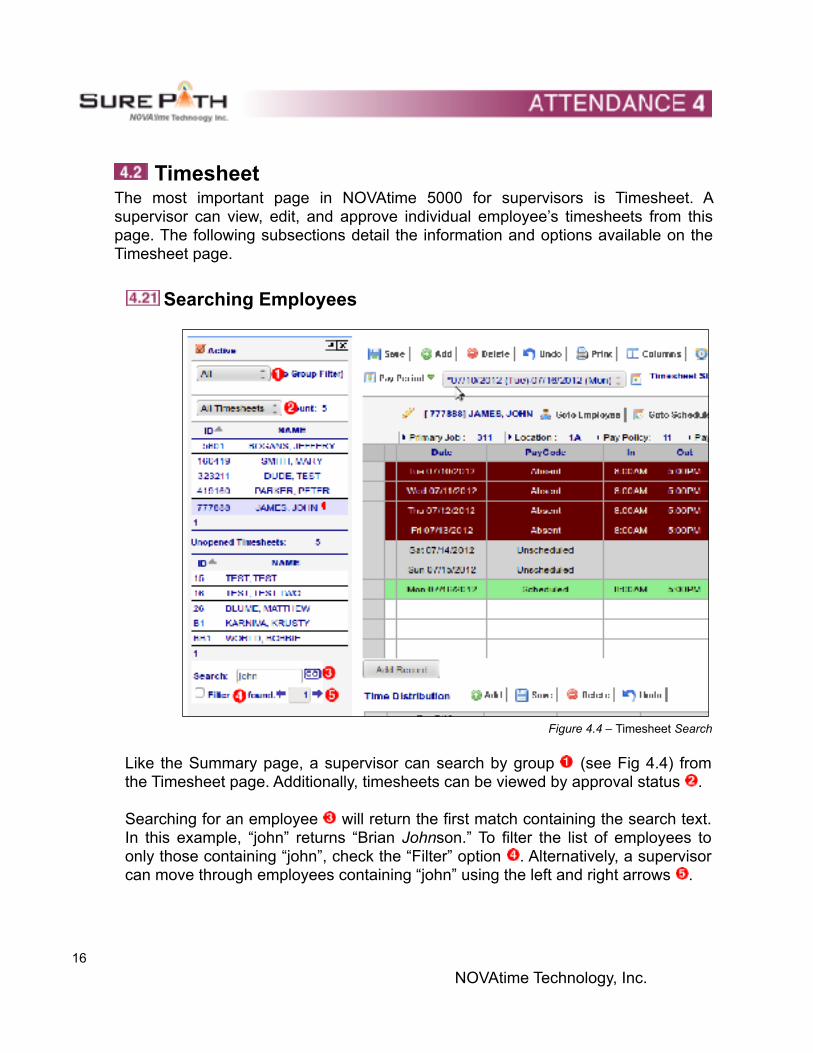
! Timesheet The most important page in NOVAtime 5000 for supervisors is Timesheet. A supervisor can view, edit, and approve individual employee’s timesheets from this page. The following subsections detail the information and options available on the Timesheet page.
! Searching Employees
! Figure 4.4 – Timesheet Search
Like the Summary page, a supervisor can search by group ! (see Fig 4.4) from the Timesheet page. Additionally, timesheets can be viewed by approval status ! .
Searching for an employee ! will return the first match containing the search text. In this example, “john” returns “Brian Johnson.” To filter the list of employees to only those containing “john”, check the “Filter” option ! . Alternatively, a supervisor can move through employees containing “john” using the left and right arrows ! .
! 16NOVAtime Technology, Inc.

Click “Goto Employee” or “Goto Schedule” to remain with that employee.
! 17NOVAtime Technology, Inc.
!
! Viewing Timesheets
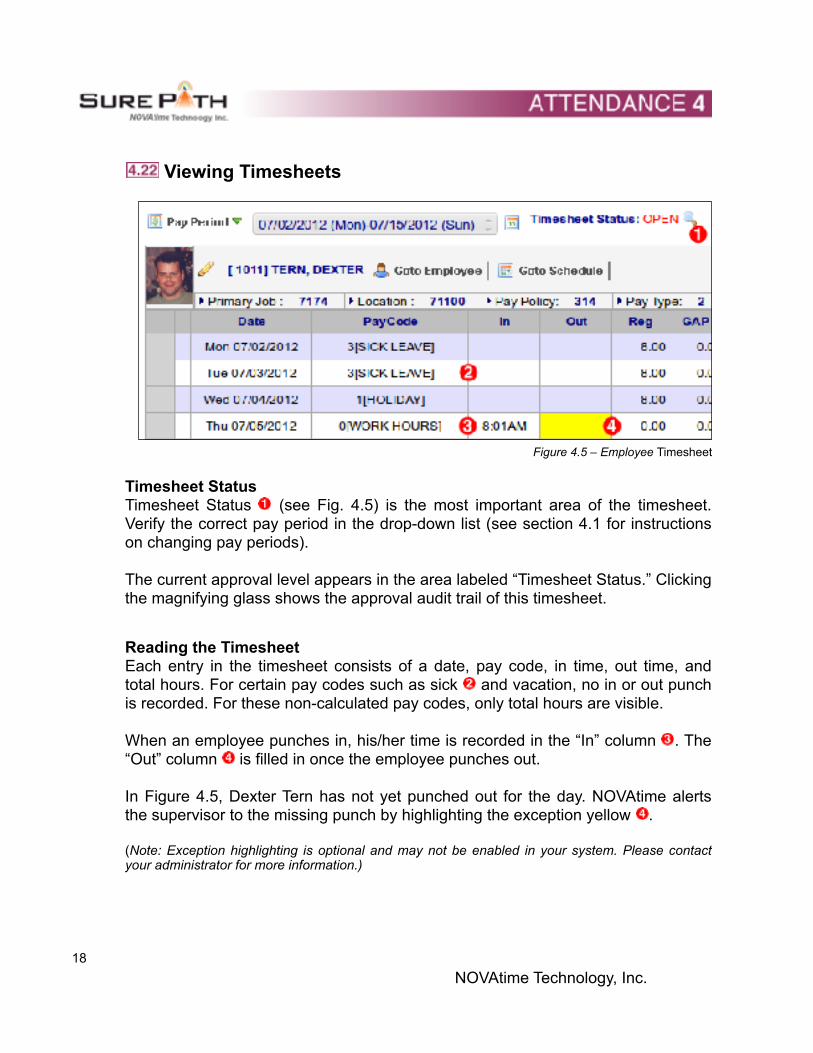
! Figure 4.5 – Employee Timesheet
Timesheet Status Timesheet Status ! (see Fig. 4.5) is the most important area of the timesheet. Verify the correct pay period in the drop-down list (see section 4.1 for instructions on changing pay periods).
The current approval level appears in the area labeled “Timesheet Status.” Clicking the magnifying glass shows the approval audit trail of this timesheet.
Reading the Timesheet Each entry in the timesheet consists of a date, pay code, in time, out time, and total hours. For certain pay codes such as sick ! and vacation, no in or out punch is recorded. For these non-calculated pay codes, only total hours are visible.
When an employee punches in, his/her time is recorded in the “In” column ! . The “Out” column ! is filled in once the employee punches out.
In Figure 4.5, Dexter Tern has not yet punched out for the day. NOVAtime alerts the supervisor to the missing punch by highlighting the exception yellow ! .
(Note: Exception highlighting is optional and may not be enabled in your system. Please contact your administrator for more information.)
! 18NOVAtime Technology, Inc.
!
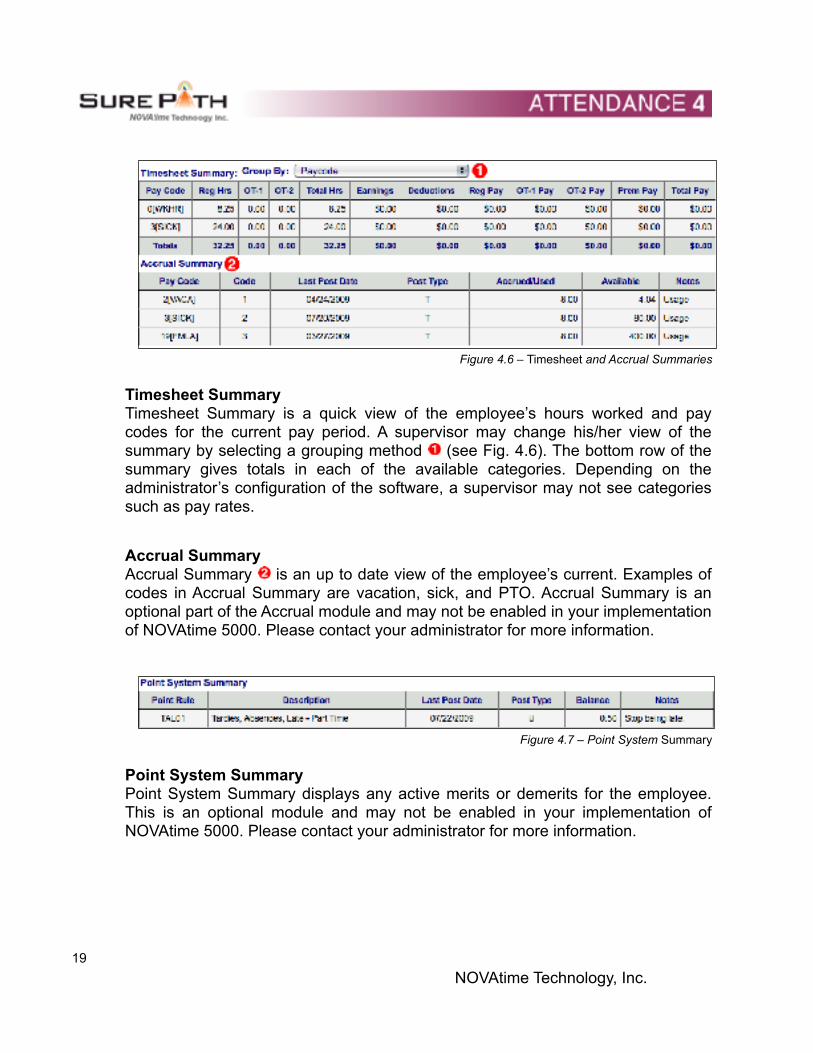
! Figure 4.6 – Timesheet and Accrual Summaries
Timesheet Summary Timesheet Summary is a quick view of the employee’s hours worked and pay codes for the current pay period. A supervisor may change his/her view of the summary by selecting a grouping method ! (see Fig. 4.6). The bottom row of the summary gives totals in each of the available categories. Depending on the administrator’s configuration of the software, a supervisor may not see categories such as pay rates.
Accrual Summary Accrual Summary ! is an up to date view of the employee’s current. Examples of codes in Accrual Summary are vacation, sick, and PTO. Accrual Summary is an optional part of the Accrual module and may not be enabled in your implementation of NOVAtime 5000. Please contact your administrator for more information.
! Figure 4.7 – Point System Summary
Point System Summary Point System Summary displays any active merits or demerits for the employee. This is an optional module and may not be enabled in your implementation of NOVAtime 5000. Please contact your administrator for more information.
! 19NOVAtime Technology, Inc.
! ! Editing Timesheets
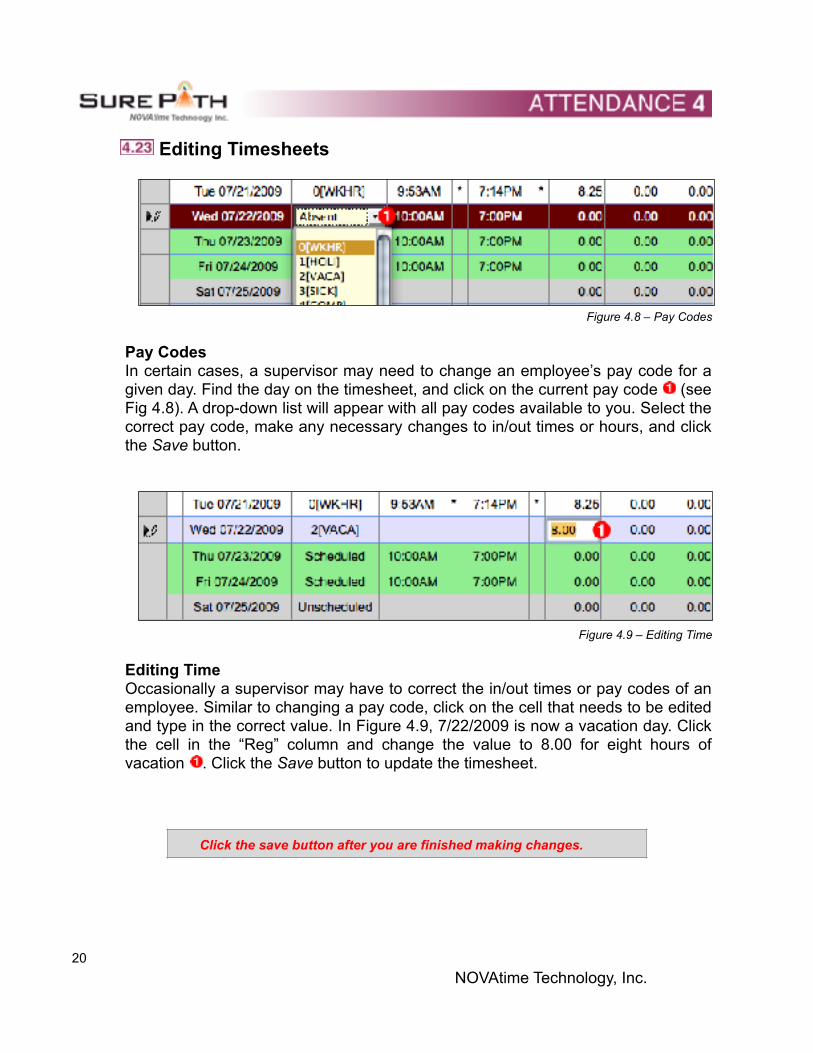
! Figure 4.8 – Pay Codes
Pay Codes In certain cases, a supervisor may need to change an employee’s pay code for a given day. Find the day on the timesheet, and click on the current pay code ! (see Fig 4.8). A drop-down list will appear with all pay codes available to you. Select the correct pay code, make any necessary changes to in/out times or hours, and click the Save button.
! Figure 4.9 – Editing Time
Editing Time Occasionally a supervisor may have to correct the in/out times or pay codes of an employee. Similar to changing a pay code, click on the cell that needs to be edited and type in the correct value. In Figure 4.9, 7/22/2009 is now a vacation day. Click the cell in the “Reg” column and change the value to 8.00 for eight hours of vacation ! . Click the Save button to update the timesheet.
Click the save button after you are finished making changes.
! 20NOVAtime Technology, Inc.
!
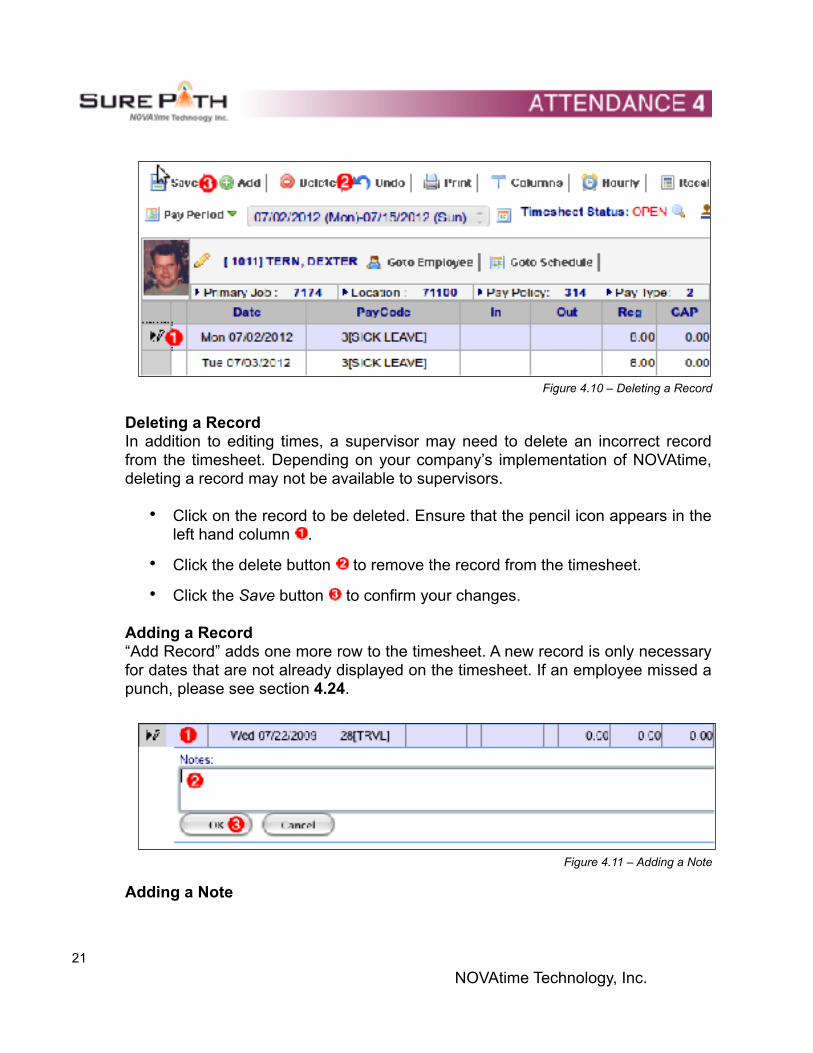
! Figure 4.10 – Deleting a Record
Deleting a Record In addition to editing times, a supervisor may need to delete an incorrect record from the timesheet. Depending on your company’s implementation of NOVAtime, deleting a record may not be available to supervisors.
• Click on the record to be deleted. Ensure that the pencil icon appears in the left hand column ! .
• Click the delete button ! to remove the record from the timesheet.
• Click the Save button ! to confirm your changes.
Adding a Record “Add Record” adds one more row to the timesheet. A new record is only necessary for dates that are not already displayed on the timesheet. If an employee missed a punch, please see section 4.24.
! Figure 4.11 – Adding a Note
Adding a Note
! 21NOVAtime Technology, Inc.

To add a note to an entry, click the notes column next to the entry ! (see Fig. 4.11), enter a note in the box provided ! , click “OK” ! , and click the Save button.
! 22NOVAtime Technology, Inc.
!
! Inserting Punches
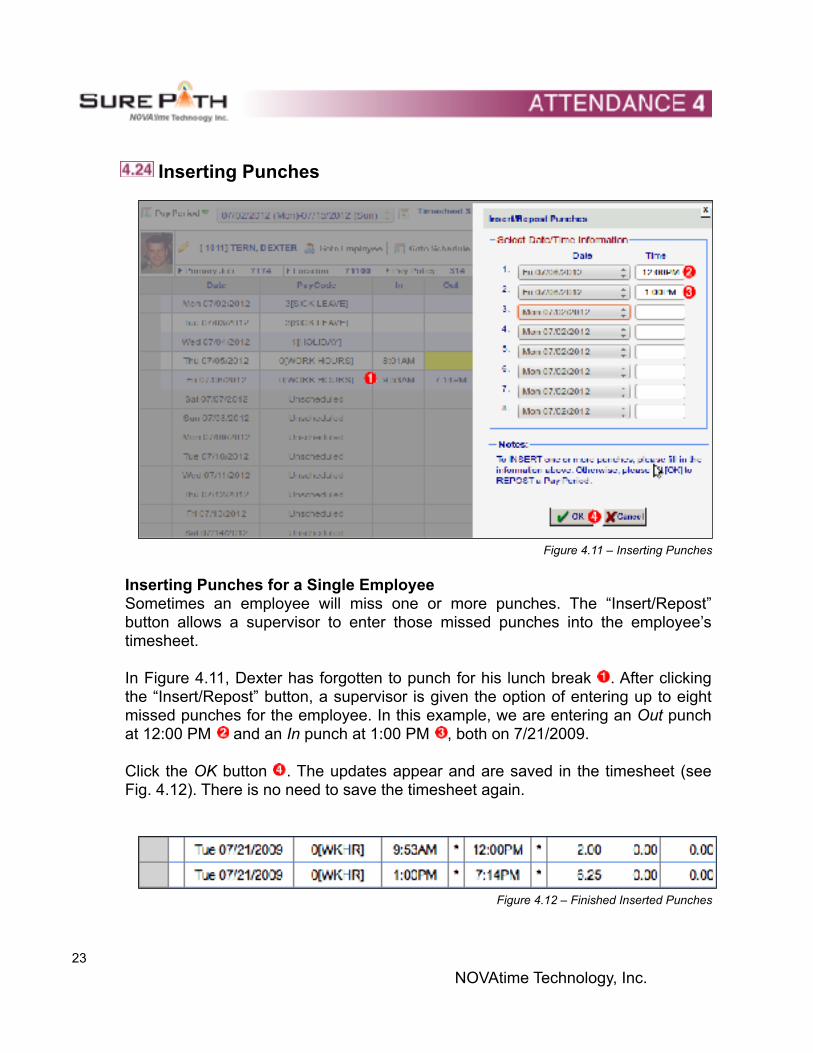
! Figure 4.11 – Inserting Punches
Inserting Punches for a Single Employee Sometimes an employee will miss one or more punches. The “Insert/Repost” button allows a supervisor to enter those missed punches into the employee’s timesheet.
In Figure 4.11, Dexter has forgotten to punch for his lunch break ! . After clicking the “Insert/Repost” button, a supervisor is given the option of entering up to eight missed punches for the employee. In this example, we are entering an Out punch at 12:00 PM ! and an In punch at 1:00 PM ! , both on 7/21/2009.
Click the OK button ! . The updates appear and are saved in the timesheet (see Fig. 4.12). There is no need to save the timesheet again.
! Figure 4.12 – Finished Inserted Punches
! 23NOVAtime Technology, Inc.
!
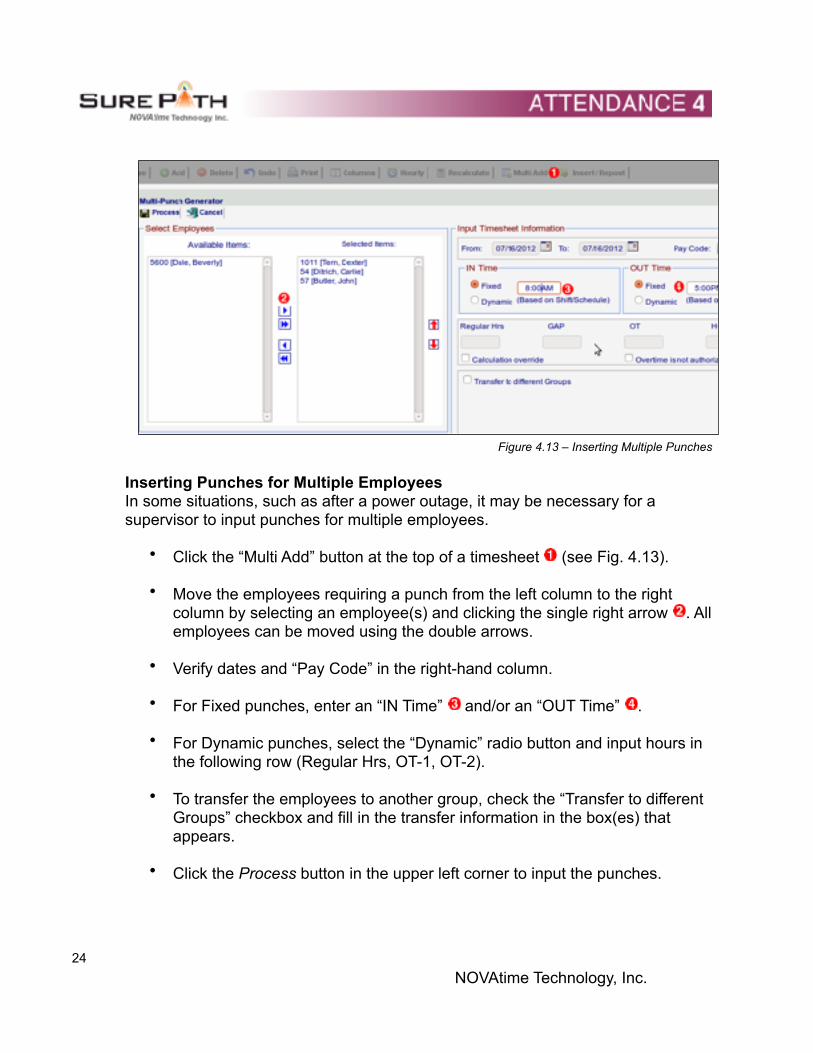
! Figure 4.13 – Inserting Multiple Punches
Inserting Punches for Multiple Employees In some situations, such as after a power outage, it may be necessary for a supervisor to input punches for multiple employees.
• Click the “Multi Add” button at the top of a timesheet ! (see Fig. 4.13).
• Move the employees requiring a punch from the left column to the right column by selecting an employee(s) and clicking the single right arrow ! . All employees can be moved using the double arrows.
• Verify dates and “Pay Code” in the right-hand column.
• For Fixed punches, enter an “IN Time” ! and/or an “OUT Time” ! .
• For Dynamic punches, select the “Dynamic” radio button and input hours in the following row (Regular Hrs, OT-1, OT-2).
• To transfer the employees to another group, check the “Transfer to different Groups” checkbox and fill in the transfer information in the box(es) that appears.
• Click the Process button in the upper left corner to input the punches.
! 24NOVAtime Technology, Inc.
!
! Approving Timesheets
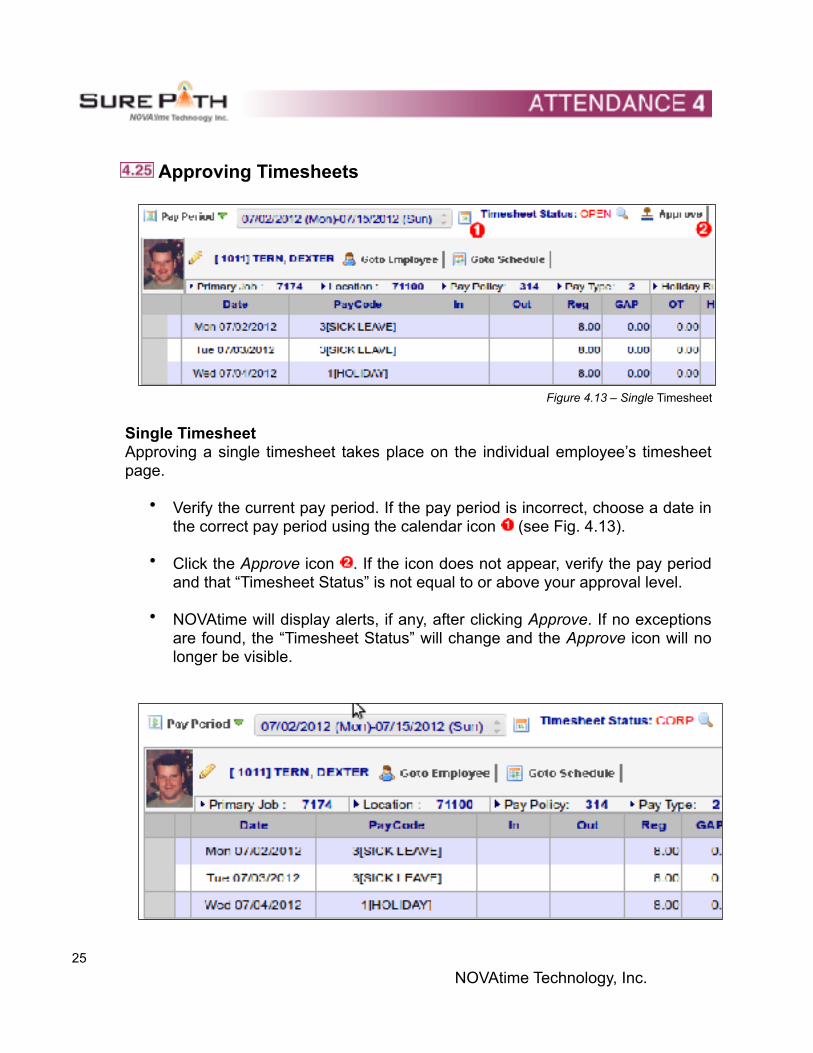
! Figure 4.13 – Single Timesheet
Single Timesheet Approving a single timesheet takes place on the individual employee’s timesheet page.
• Verify the current pay period. If the pay period is incorrect, choose a date in the correct pay period using the calendar icon ! (see Fig. 4.13).
• Click the Approve icon ! . If the icon does not appear, verify the pay period and that “Timesheet Status” is not equal to or above your approval level.
• NOVAtime will display alerts, if any, after clicking Approve. If no exceptions are found, the “Timesheet Status” will change and the Approve icon will no longer be visible.
!
! 25NOVAtime Technology, Inc.

Figure 4.14 – Approved Single Timesheet
! 26NOVAtime Technology, Inc.
!
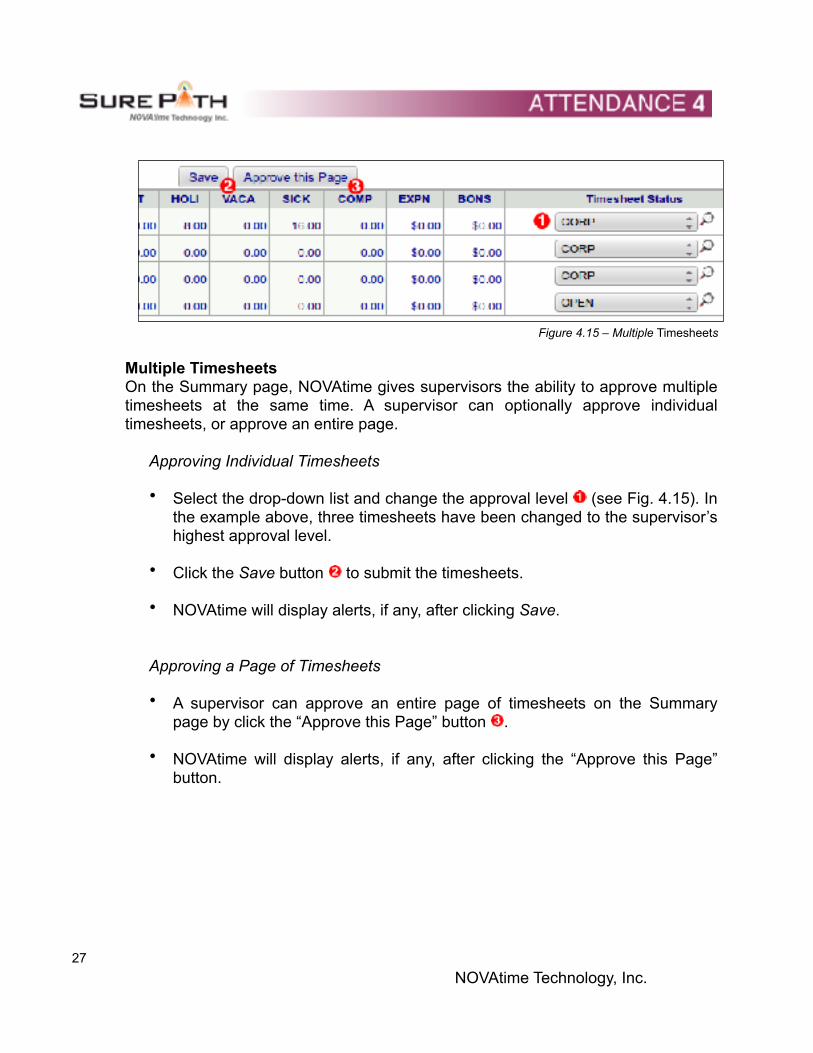
! Figure 4.15 – Multiple Timesheets
Multiple Timesheets On the Summary page, NOVAtime gives supervisors the ability to approve multiple timesheets at the same time. A supervisor can optionally approve individual timesheets, or approve an entire page.
Approving Individual Timesheets
• Select the drop-down list and change the approval level ! (see Fig. 4.15). In the example above, three timesheets have been changed to the supervisor’s highest approval level.
• Click the Save button ! to submit the timesheets.
• NOVAtime will display alerts, if any, after clicking Save.
Approving a Page of Timesheets
• A supervisor can approve an entire page of timesheets on the Summary page by click the “Approve this Page” button ! .
• NOVAtime will display alerts, if any, after clicking the “Approve this Page” button.
! 27NOVAtime Technology, Inc.
!
! Accrual The Accrual page in NOVAtime, if enabled, allows a supervisor to view and optionally modify an employee’s non-calculated pay codes, such as vacation and sick time.
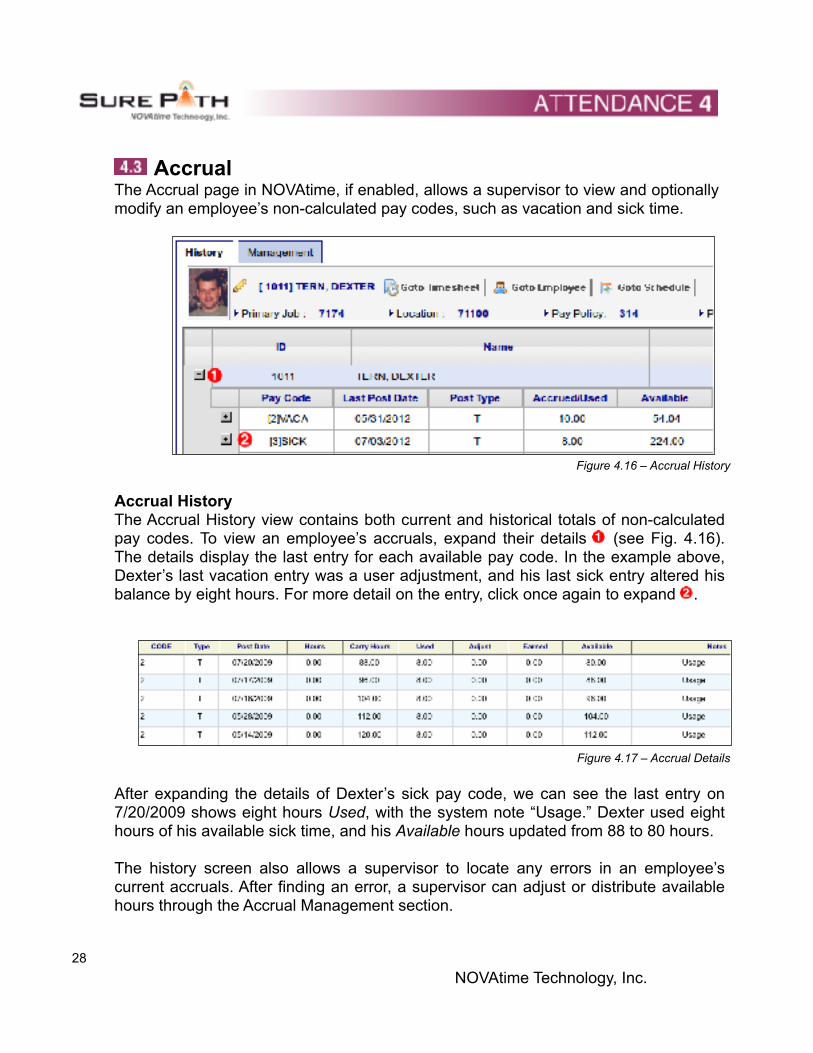
! Figure 4.16 – Accrual History
Accrual History The Accrual History view contains both current and historical totals of non-calculated pay codes. To view an employee’s accruals, expand their details ! (see Fig. 4.16). The details display the last entry for each available pay code. In the example above, Dexter’s last vacation entry was a user adjustment, and his last sick entry altered his balance by eight hours. For more detail on the entry, click once again to expand ! .
! Figure 4.17 – Accrual Details
After expanding the details of Dexter’s sick pay code, we can see the last entry on 7/20/2009 shows eight hours Used, with the system note “Usage.” Dexter used eight hours of his available sick time, and his Available hours updated from 88 to 80 hours.
The history screen also allows a supervisor to locate any errors in an employee’s current accruals. After finding an error, a supervisor can adjust or distribute available hours through the Accrual Management section.
! 28NOVAtime Technology, Inc.

For help with searching employees, please see section 4.21.
! 29NOVAtime Technology, Inc.
!
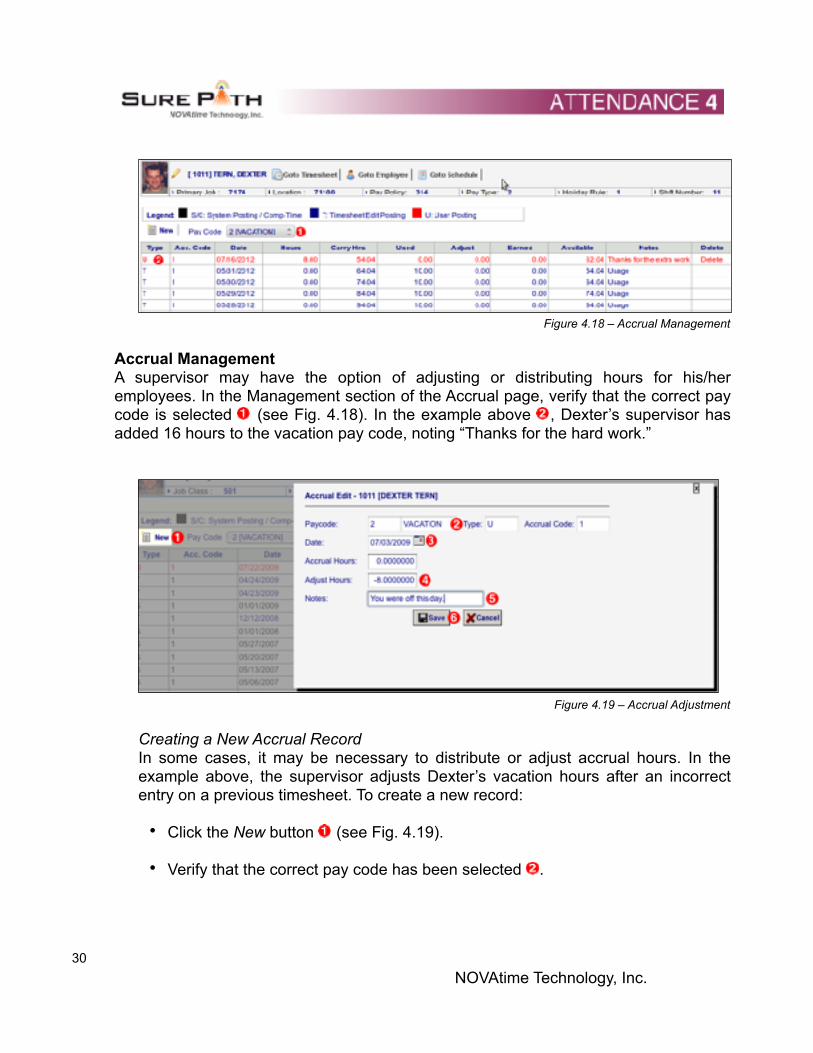
! Figure 4.18 – Accrual Management
Accrual Management A supervisor may have the option of adjusting or distributing hours for his/her employees. In the Management section of the Accrual page, verify that the correct pay code is selected ! (see Fig. 4.18). In the example above ! , Dexter’s supervisor has added 16 hours to the vacation pay code, noting “Thanks for the hard work.”
! Figure 4.19 – Accrual Adjustment
Creating a New Accrual Record In some cases, it may be necessary to distribute or adjust accrual hours. In the example above, the supervisor adjusts Dexter’s vacation hours after an incorrect entry on a previous timesheet. To create a new record:
• Click the New button ! (see Fig. 4.19).
• Verify that the correct pay code has been selected ! .
! 30NOVAtime Technology, Inc.

• The date entry defaults to today’s date. To select another date, click the calendar icon ! and choose a date.
! 31NOVAtime Technology, Inc.
!
• Enter either Accrual Hours or Adjust Hours ! . Using Adjust Hours, negative numbers remove from the existing balance while positive numbers add to the balance.
• Enter a note to explain the Accrual or Adjustment ! .
• Click the Save button to finalize your changes ! .
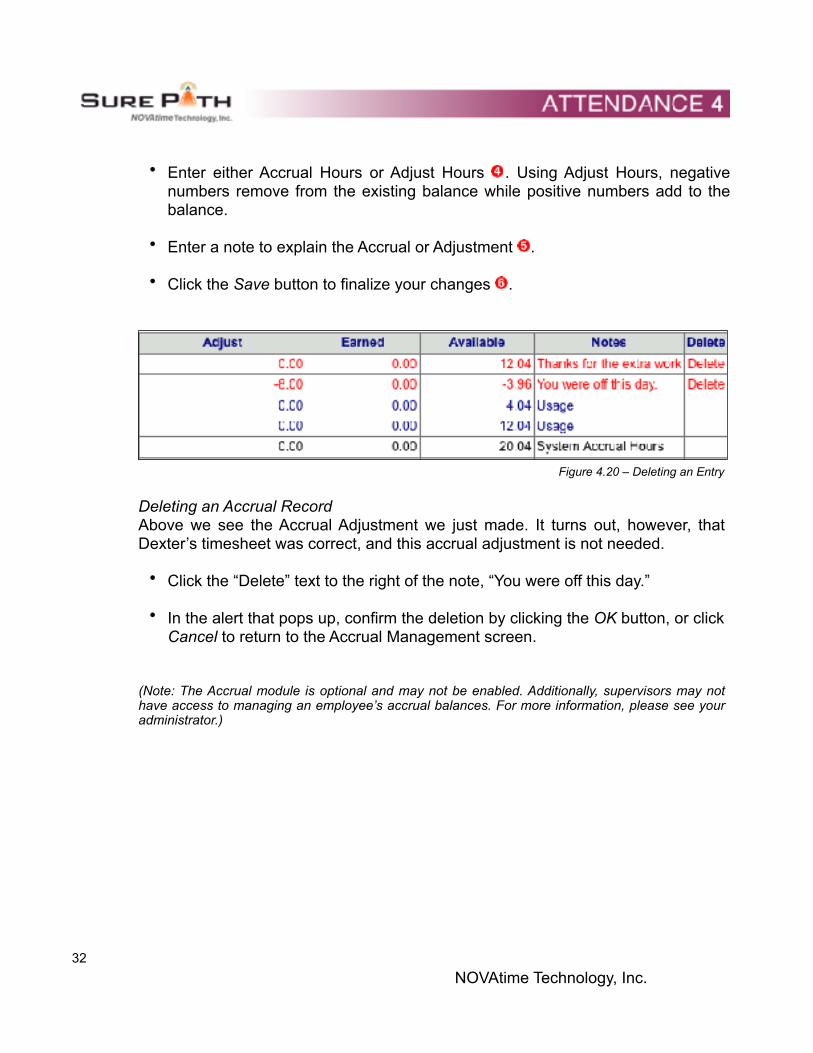
! Figure 4.20 – Deleting an Entry
Deleting an Accrual Record Above we see the Accrual Adjustment we just made. It turns out, however, that Dexter’s timesheet was correct, and this accrual adjustment is not needed.
• Click the “Delete” text to the right of the note, “You were off this day.”
• In the alert that pops up, confirm the deletion by clicking the OK button, or click Cancel to return to the Accrual Management screen.
(Note: The Accrual module is optional and may not be enabled. Additionally, supervisors may not have access to managing an employee’s accrual balances. For more information, please see your administrator.)
! 32NOVAtime Technology, Inc.
!
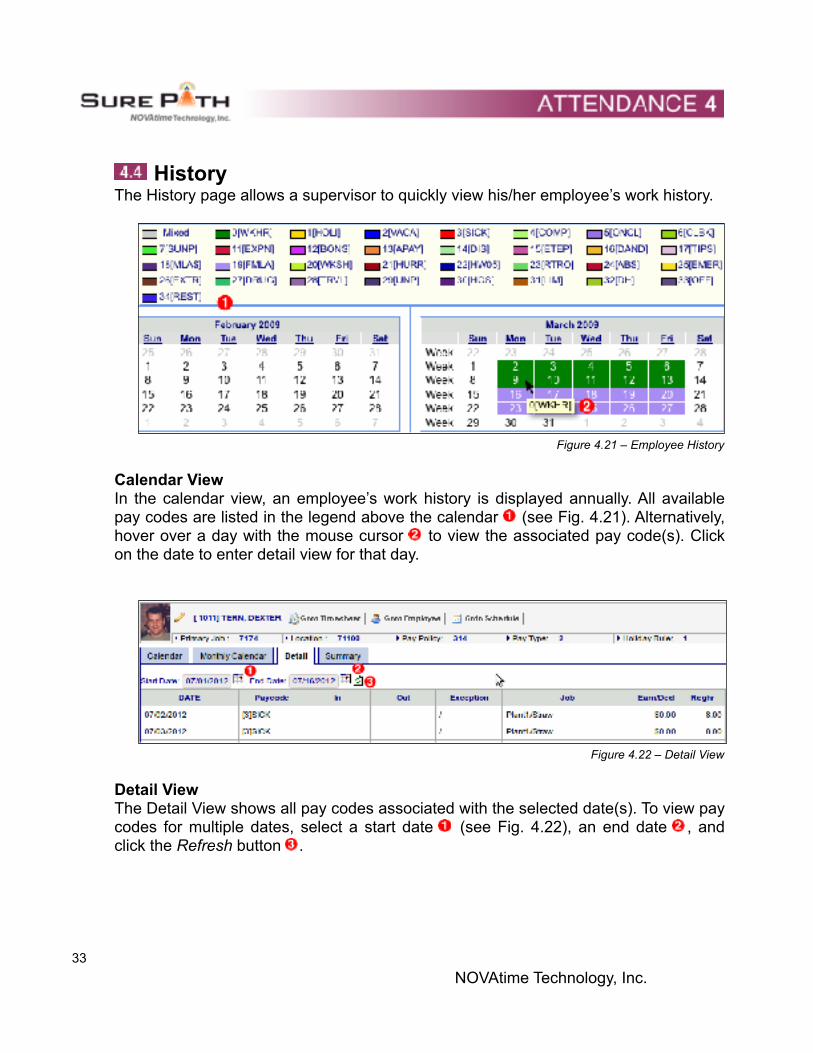
! History The History page allows a supervisor to quickly view his/her employee’s work history.
! Figure 4.21 – Employee History
Calendar View In the calendar view, an employee’s work history is displayed annually. All available pay codes are listed in the legend above the calendar ! (see Fig. 4.21). Alternatively, hover over a day with the mouse cursor ! to view the associated pay code(s). Click on the date to enter detail view for that day.
! Figure 4.22 – Detail View
Detail View The Detail View shows all pay codes associated with the selected date(s). To view pay codes for multiple dates, select a start date ! (see Fig. 4.22), an end date ! , and click the Refresh button ! .
! 33NOVAtime Technology, Inc.
!
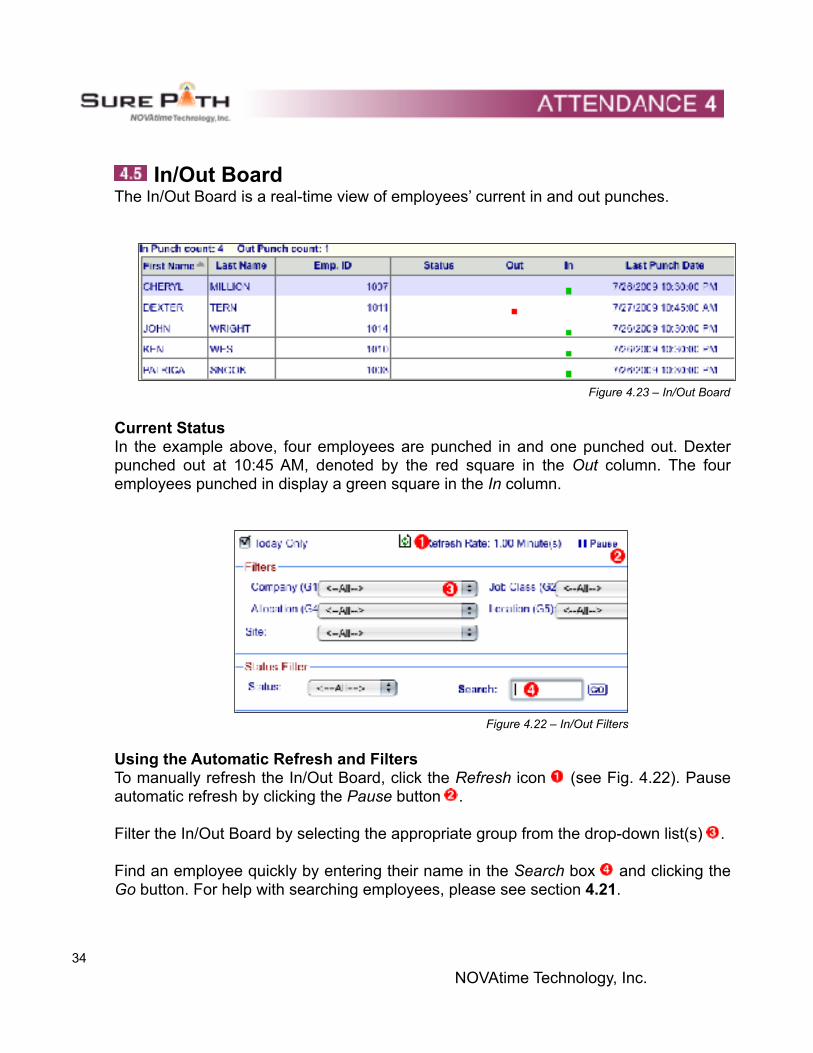
! In/Out Board The In/Out Board is a real-time view of employees’ current in and out punches.
! Figure 4.23 – In/Out Board
Current Status In the example above, four employees are punched in and one punched out. Dexter punched out at 10:45 AM, denoted by the red square in the Out column. The four employees punched in display a green square in the In column.
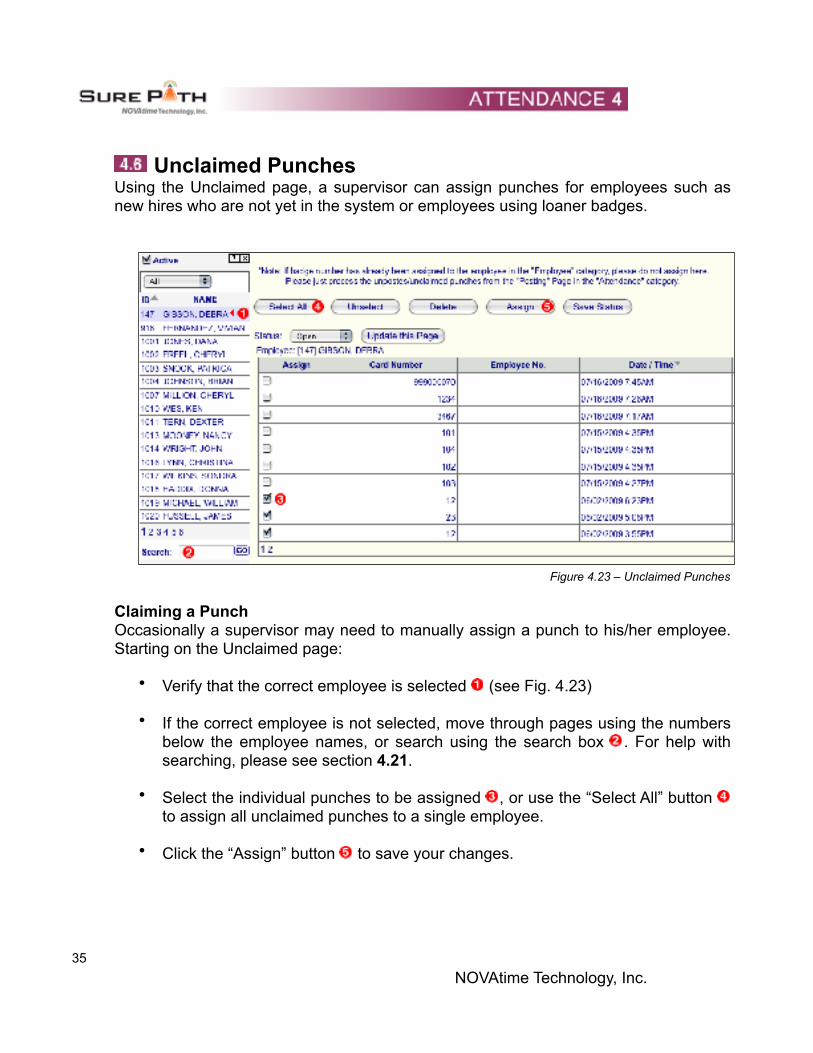
! Figure 4.22 – In/Out Filters
Using the Automatic Refresh and Filters To manually refresh the In/Out Board, click the Refresh icon ! (see Fig. 4.22). Pause automatic refresh by clicking the Pause button ! .
Filter the In/Out Board by selecting the appropriate group from the drop-down list(s) ! .
Find an employee quickly by entering their name in the Search box ! and clicking the Go button. For help with searching employees, please see section 4.21.
! 34NOVAtime Technology, Inc.
!
! Unclaimed Punches Using the Unclaimed page, a supervisor can assign punches for employees such as new hires who are not yet in the system or employees using loaner badges.
! Figure 4.23 – Unclaimed Punches
Claiming a Punch Occasionally a supervisor may need to manually assign a punch to his/her employee. Starting on the Unclaimed page:
• Verify that the correct employee is selected ! (see Fig. 4.23)
• If the correct employee is not selected, move through pages using the numbers below the employee names, or search using the search box ! . For help with searching, please see section 4.21.
• Select the individual punches to be assigned ! , or use the “Select All” button ! to assign all unclaimed punches to a single employee.
• Click the “Assign” button ! to save your changes.
! 35NOVAtime Technology, Inc.
!
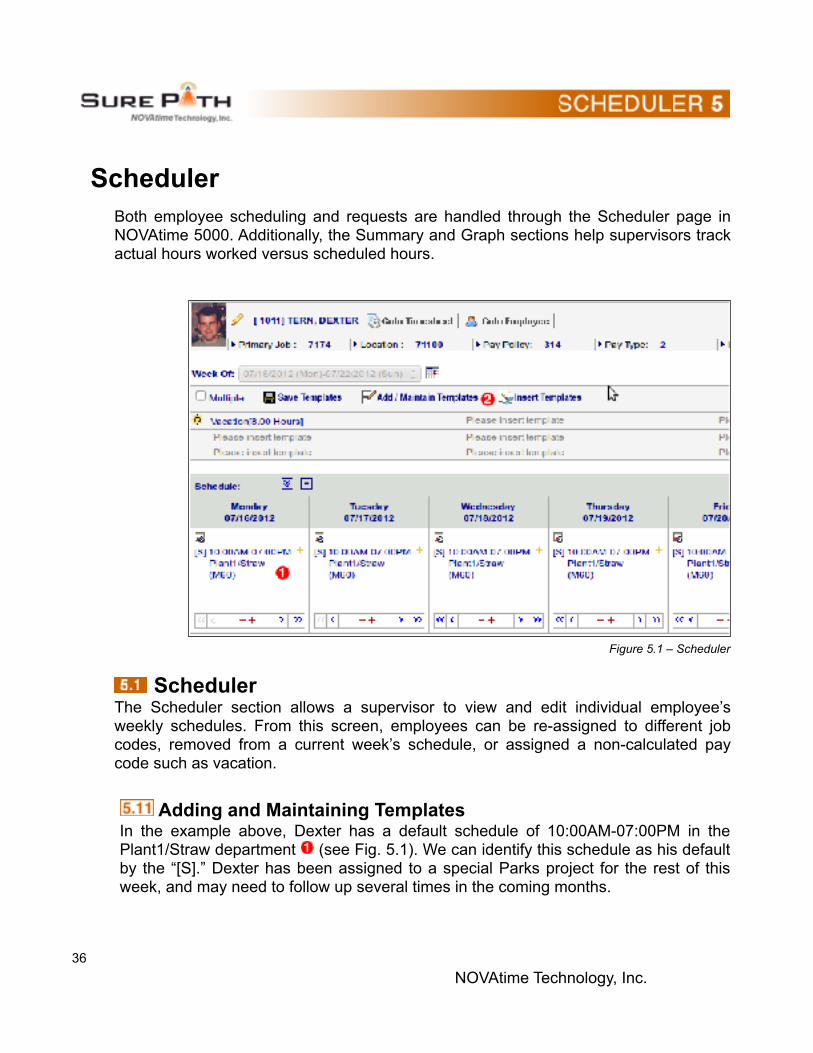
Scheduler Both employee scheduling and requests are handled through the Scheduler page in NOVAtime 5000. Additionally, the Summary and Graph sections help supervisors track actual hours worked versus scheduled hours.
! Figure 5.1 – Scheduler
! Scheduler The Scheduler section allows a supervisor to view and edit individual employee’s weekly schedules. From this screen, employees can be re-assigned to different job codes, removed from a current week’s schedule, or assigned a non-calculated pay code such as vacation.
! Adding and Maintaining Templates In the example above, Dexter has a default schedule of 10:00AM-07:00PM in the Plant1/Straw department ! (see Fig. 5.1). We can identify this schedule as his default by the “[S].” Dexter has been assigned to a special Parks project for the rest of this week, and may need to follow up several times in the coming months.
! 36NOVAtime Technology, Inc.

To make scheduling easier, a supervisor can add additional templates for future use. Click the “Add / Maintain Templates” button ! to add a new schedule template.
! 37NOVAtime Technology, Inc.
!
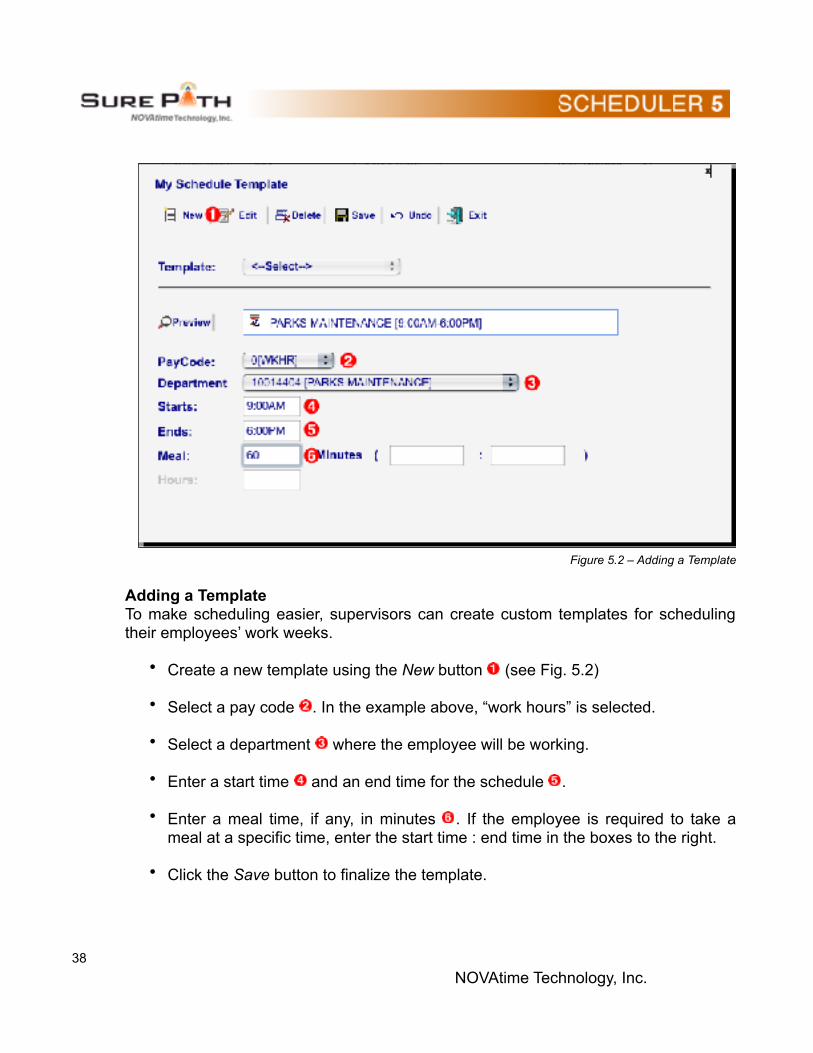
! Figure 5.2 – Adding a Template
Adding a Template To make scheduling easier, supervisors can create custom templates for scheduling their employees’ work weeks.
• Create a new template using the New button ! (see Fig. 5.2)
• Select a pay code ! . In the example above, “work hours” is selected.
• Select a department ! where the employee will be working.
• Enter a start time ! and an end time for the schedule ! .
• Enter a meal time, if any, in minutes ! . If the employee is required to take a meal at a specific time, enter the start time : end time in the boxes to the right.
• Click the Save button to finalize the template.
! 38NOVAtime Technology, Inc.

To delete a template, click the Delete button after selecting the template from the drop-down list.
! 39NOVAtime Technology, Inc.
!
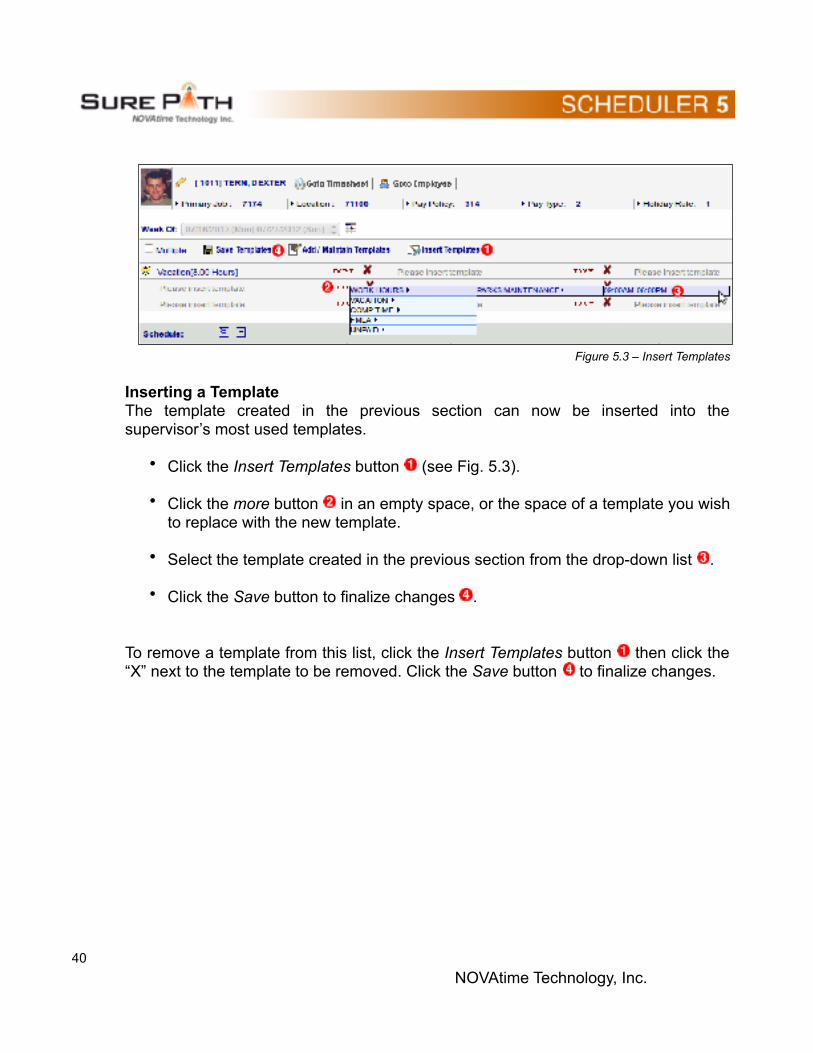
! Figure 5.3 – Insert Templates
Inserting a Template The template created in the previous section can now be inserted into the supervisor’s most used templates.
• Click the Insert Templates button ! (see Fig. 5.3).
• Click the more button ! in an empty space, or the space of a template you wish to replace with the new template.
• Select the template created in the previous section from the drop-down list ! .
• Click the Save button to finalize changes ! .
To remove a template from this list, click the Insert Templates button ! then click the “X” next to the template to be removed. Click the Save button ! to finalize changes.
! 40NOVAtime Technology, Inc.
!
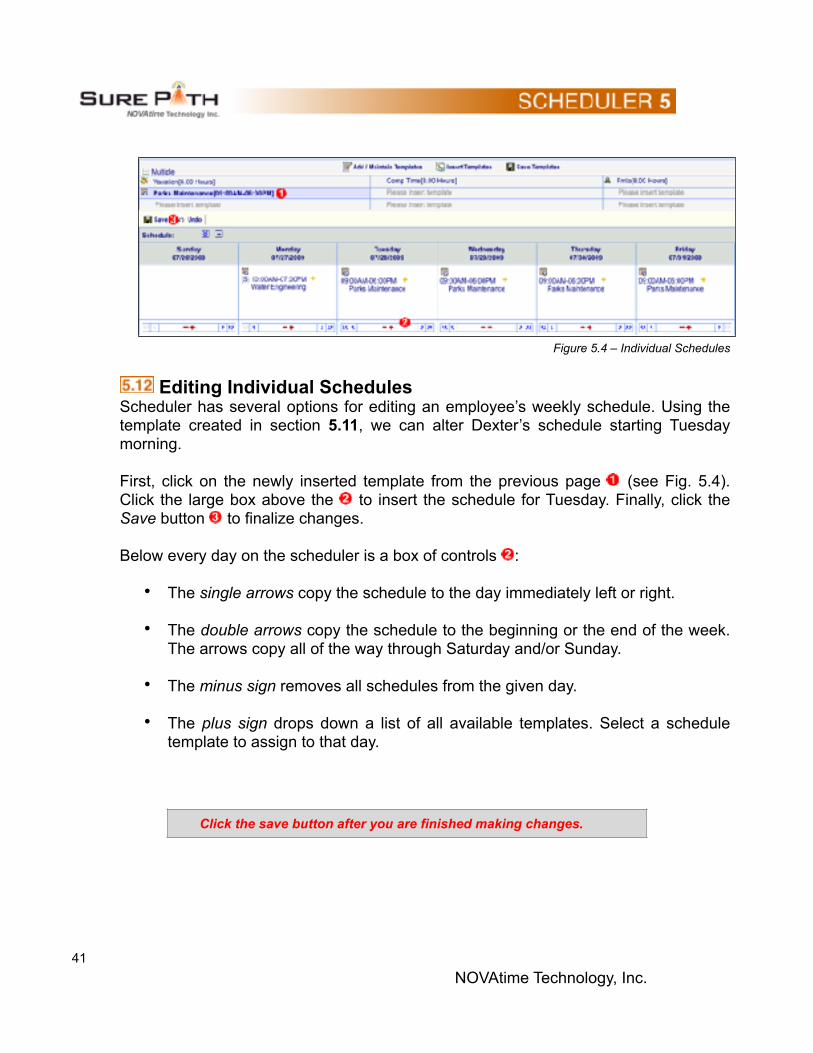
! Figure 5.4 – Individual Schedules
! Editing Individual Schedules Scheduler has several options for editing an employee’s weekly schedule. Using the template created in section 5.11, we can alter Dexter’s schedule starting Tuesday morning.
First, click on the newly inserted template from the previous page ! (see Fig. 5.4). Click the large box above the ! to insert the schedule for Tuesday. Finally, click the Save button ! to finalize changes.
Below every day on the scheduler is a box of controls ! :
• The single arrows copy the schedule to the day immediately left or right.
• The double arrows copy the schedule to the beginning or the end of the week. The arrows copy all of the way through Saturday and/or Sunday.
• The minus sign removes all schedules from the given day.
• The plus sign drops down a list of all available templates. Select a schedule template to assign to that day.
Click the save button after you are finished making changes.
! 41NOVAtime Technology, Inc.
!
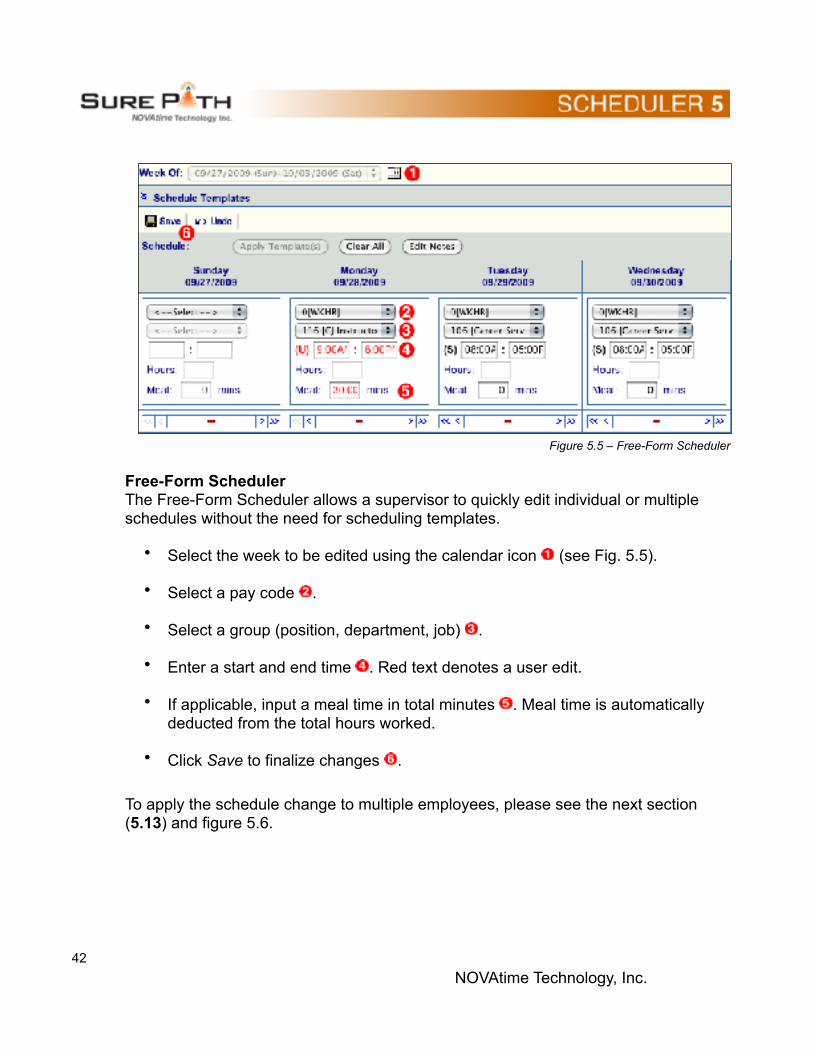
! Figure 5.5 – Free-Form Scheduler
Free-Form Scheduler The Free-Form Scheduler allows a supervisor to quickly edit individual or multiple schedules without the need for scheduling templates.
• Select the week to be edited using the calendar icon ! (see Fig. 5.5).
• Select a pay code ! .
• Select a group (position, department, job) ! .
• Enter a start and end time ! . Red text denotes a user edit.
• If applicable, input a meal time in total minutes ! . Meal time is automatically deducted from the total hours worked.
• Click Save to finalize changes ! .
To apply the schedule change to multiple employees, please see the next section (5.13) and figure 5.6.
! 42NOVAtime Technology, Inc.
!
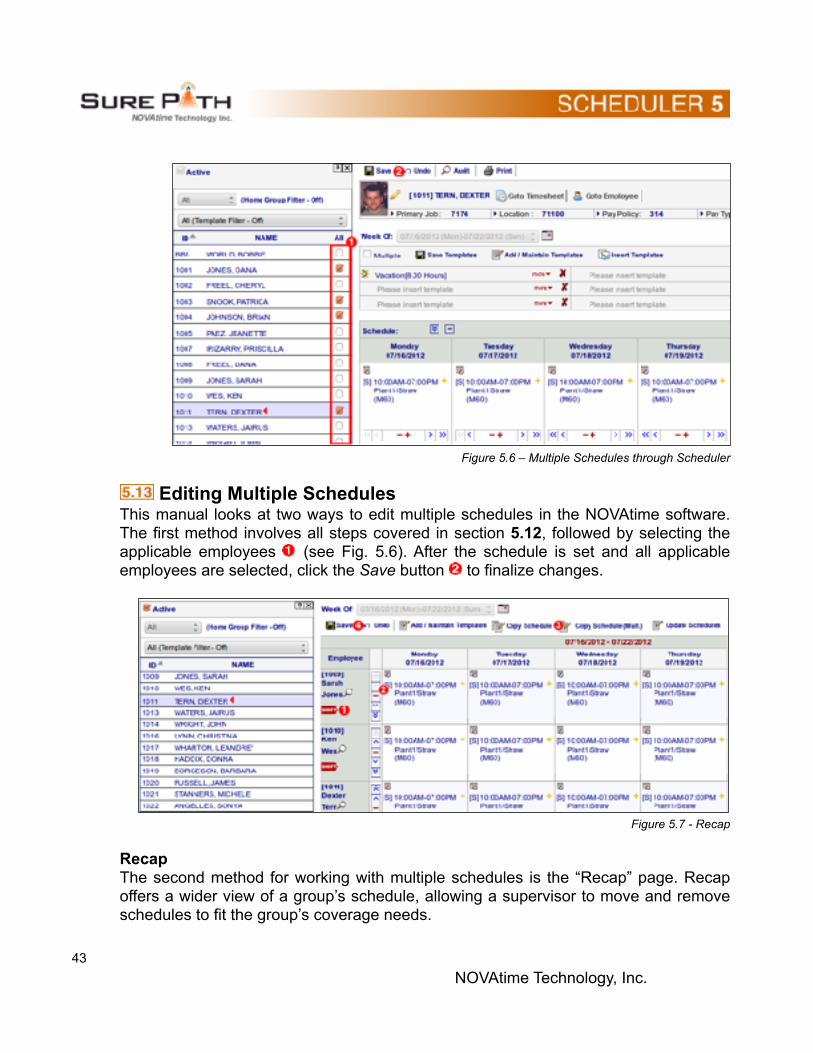
! Figure 5.6 – Multiple Schedules through Scheduler
! Editing Multiple Schedules This manual looks at two ways to edit multiple schedules in the NOVAtime software. The first method involves all steps covered in section 5.12, followed by selecting the applicable employees ! (see Fig. 5.6). After the schedule is set and all applicable employees are selected, click the Save button ! to finalize changes.
! Figure 5.7 - Recap
Recap The second method for working with multiple schedules is the “Recap” page. Recap offers a wider view of a group’s schedule, allowing a supervisor to move and remove schedules to fit the group’s coverage needs.
! 43NOVAtime Technology, Inc.

! 44NOVAtime Technology, Inc.
!
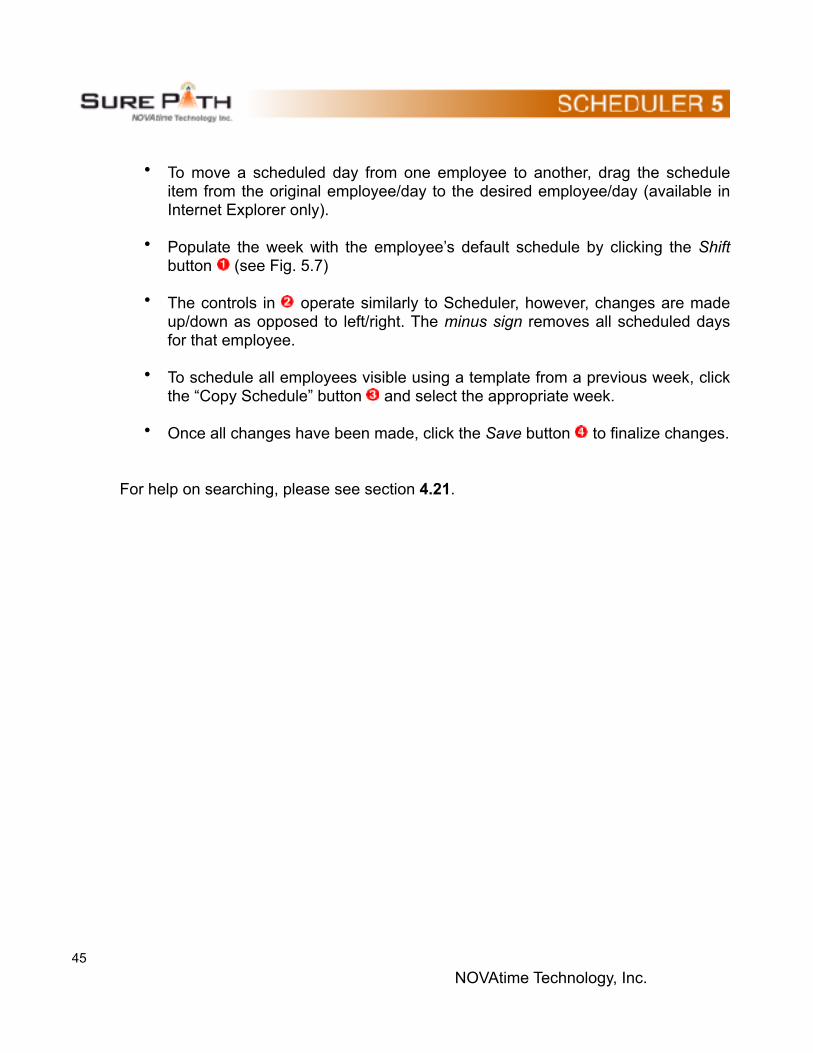
• To move a scheduled day from one employee to another, drag the schedule item from the original employee/day to the desired employee/day (available in Internet Explorer only).
• Populate the week with the employee’s default schedule by clicking the Shift button ! (see Fig. 5.7)
• The controls in ! operate similarly to Scheduler, however, changes are made up/down as opposed to left/right. The minus sign removes all scheduled days for that employee.
• To schedule all employees visible using a template from a previous week, click the “Copy Schedule” button ! and select the appropriate week.
• Once all changes have been made, click the Save button ! to finalize changes.
For help on searching, please see section 4.21.
! 45NOVAtime Technology, Inc.
!
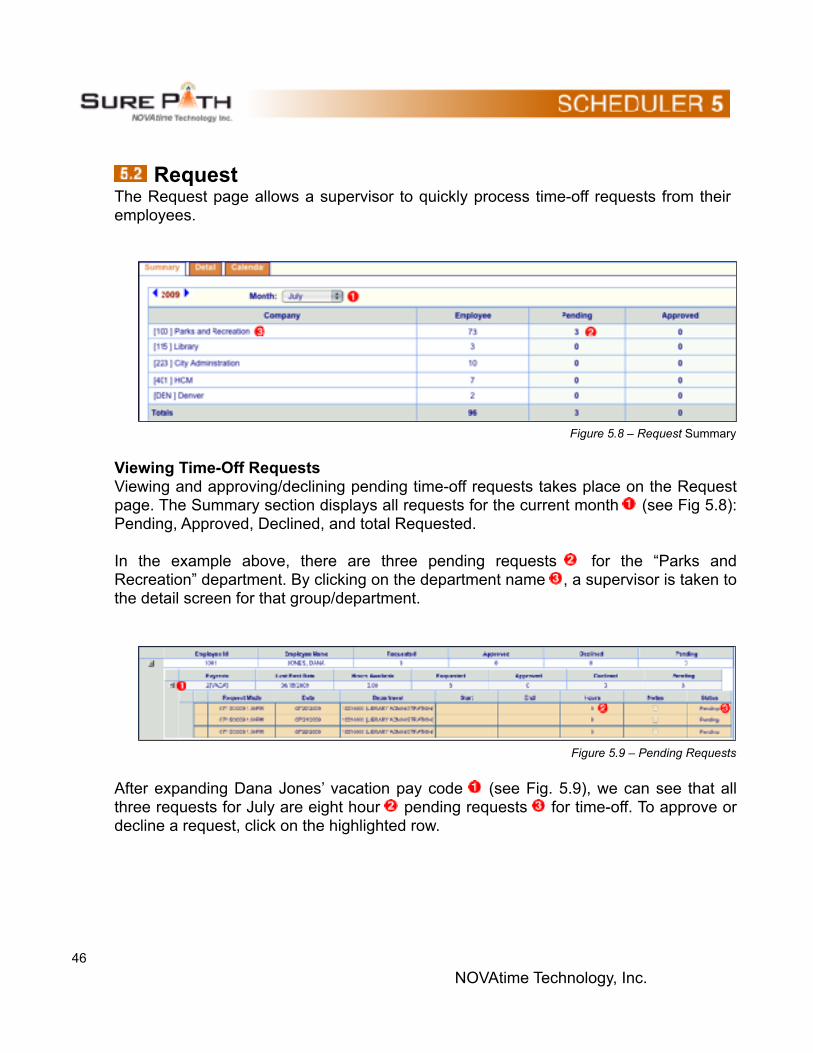
! Request The Request page allows a supervisor to quickly process time-off requests from their employees.
! Figure 5.8 – Request Summary
Viewing Time-Off Requests Viewing and approving/declining pending time-off requests takes place on the Request page. The Summary section displays all requests for the current month ! (see Fig 5.8): Pending, Approved, Declined, and total Requested.
In the example above, there are three pending requests ! for the “Parks and Recreation” department. By clicking on the department name ! , a supervisor is taken to the detail screen for that group/department.
! Figure 5.9 – Pending Requests
After expanding Dana Jones’ vacation pay code ! (see Fig. 5.9), we can see that all three requests for July are eight hour ! pending requests ! for time-off. To approve or decline a request, click on the highlighted row.
! 46NOVAtime Technology, Inc.

!
! Figure 5.10 – Approve/Decline Requests
Approving/Declining Time-Off Requests After clicking on the appropriate request (see previous page), a supervisor is presented with the detail information:
• Select “Approved” or “Declined” from the Status drop-down list ! (see Fig. 5.10).
• Review the employee comment. In the example above, the employee did not enter a comment when making the time off request.
• Make a comment ! that will be visible to the employee. It is not necessary to enter a comment.
• Click the OK button ! .
• Click the Save button on the Request page to finalize the request.
Click the save button after you are finished making changes.
! 47NOVAtime Technology, Inc.
!
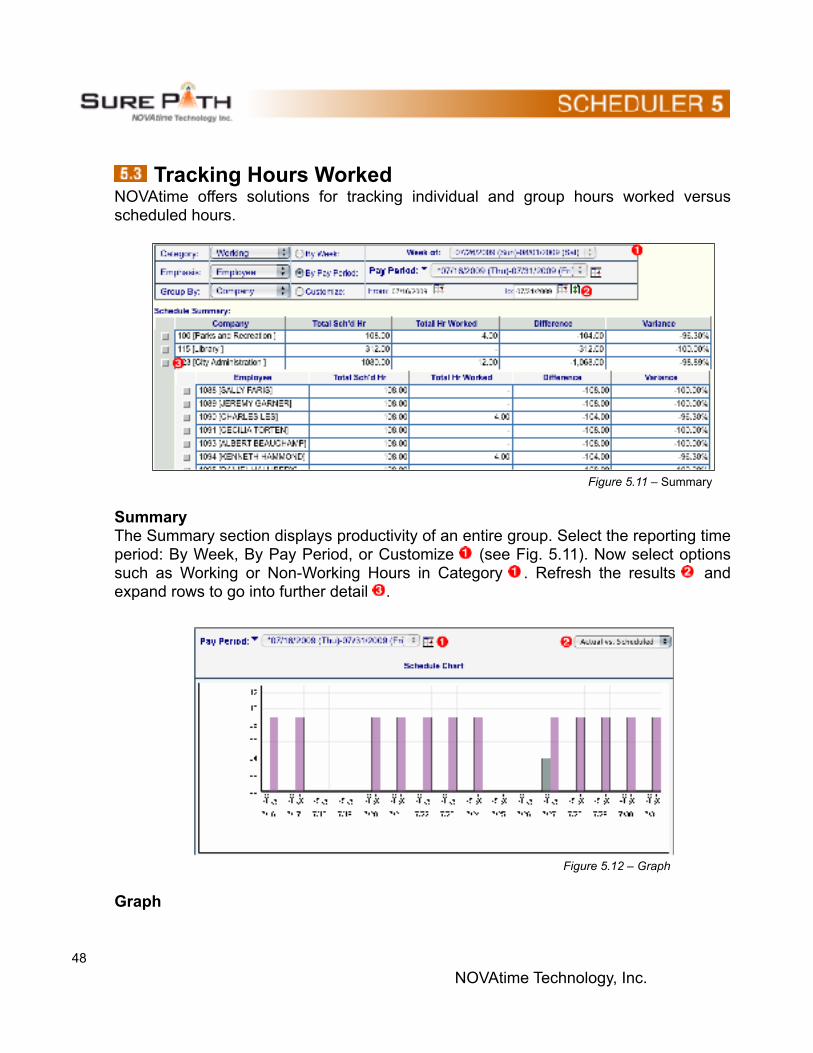
! Tracking Hours Worked NOVAtime offers solutions for tracking individual and group hours worked versus scheduled hours.
! Figure 5.11 – Summary
Summary The Summary section displays productivity of an entire group. Select the reporting time period: By Week, By Pay Period, or Customize ! (see Fig. 5.11). Now select options such as Working or Non-Working Hours in Category ! . Refresh the results ! and expand rows to go into further detail ! .
!
Figure 5.12 – Graph
Graph
! 48NOVAtime Technology, Inc.

The Graph section gives a visual representation of an employee’s hours worked. Select a Pay Period ! (see Fig. 5.12) and a reporting type ! .
! 49NOVAtime Technology, Inc.
!
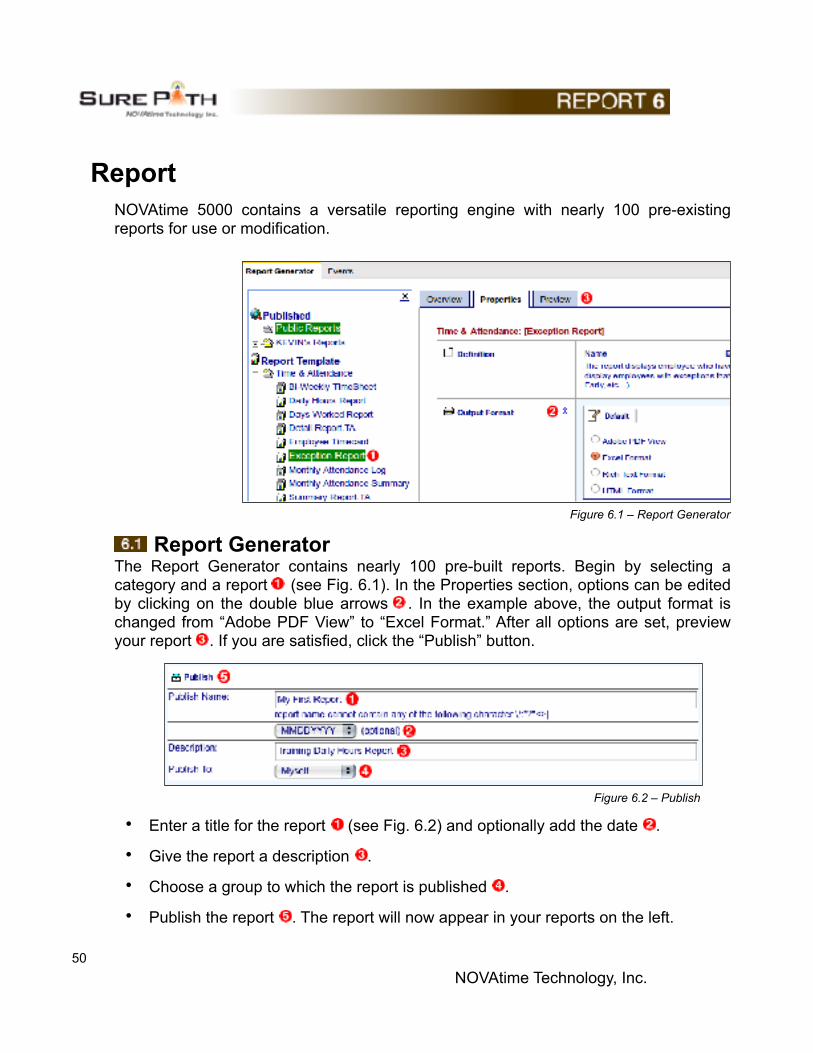
Report NOVAtime 5000 contains a versatile reporting engine with nearly 100 pre-existing reports for use or modification.
! Figure 6.1 – Report Generator
! Report Generator The Report Generator contains nearly 100 pre-built reports. Begin by selecting a category and a report ! (see Fig. 6.1). In the Properties section, options can be edited by clicking on the double blue arrows ! . In the example above, the output format is changed from “Adobe PDF View” to “Excel Format.” After all options are set, preview your report ! . If you are satisfied, click the “Publish” button.
! Figure 6.2 – Publish
• Enter a title for the report ! (see Fig. 6.2) and optionally add the date ! .
• Give the report a description ! .
• Choose a group to which the report is published ! .
• Publish the report ! . The report will now appear in your reports on the left.
! 50NOVAtime Technology, Inc.

! 51NOVAtime Technology, Inc.
!
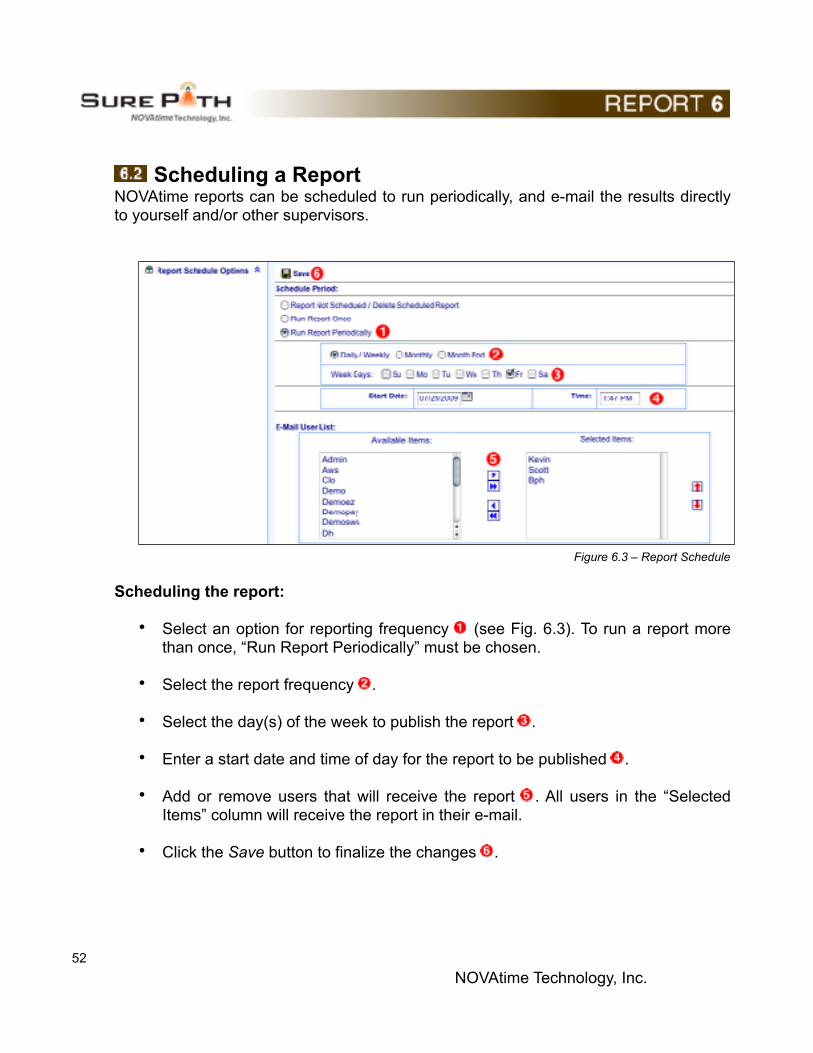
! Scheduling a Report NOVAtime reports can be scheduled to run periodically, and e-mail the results directly to yourself and/or other supervisors.
! Figure 6.3 – Report Schedule
Scheduling the report:
• Select an option for reporting frequency ! (see Fig. 6.3). To run a report more than once, “Run Report Periodically” must be chosen.
• Select the report frequency ! .
• Select the day(s) of the week to publish the report ! .
• Enter a start date and time of day for the report to be published ! .
• Add or remove users that will receive the report ! . All users in the “Selected Items” column will receive the report in their e-mail.
• Click the Save button to finalize the changes ! .
! 52NOVAtime Technology, Inc.
!
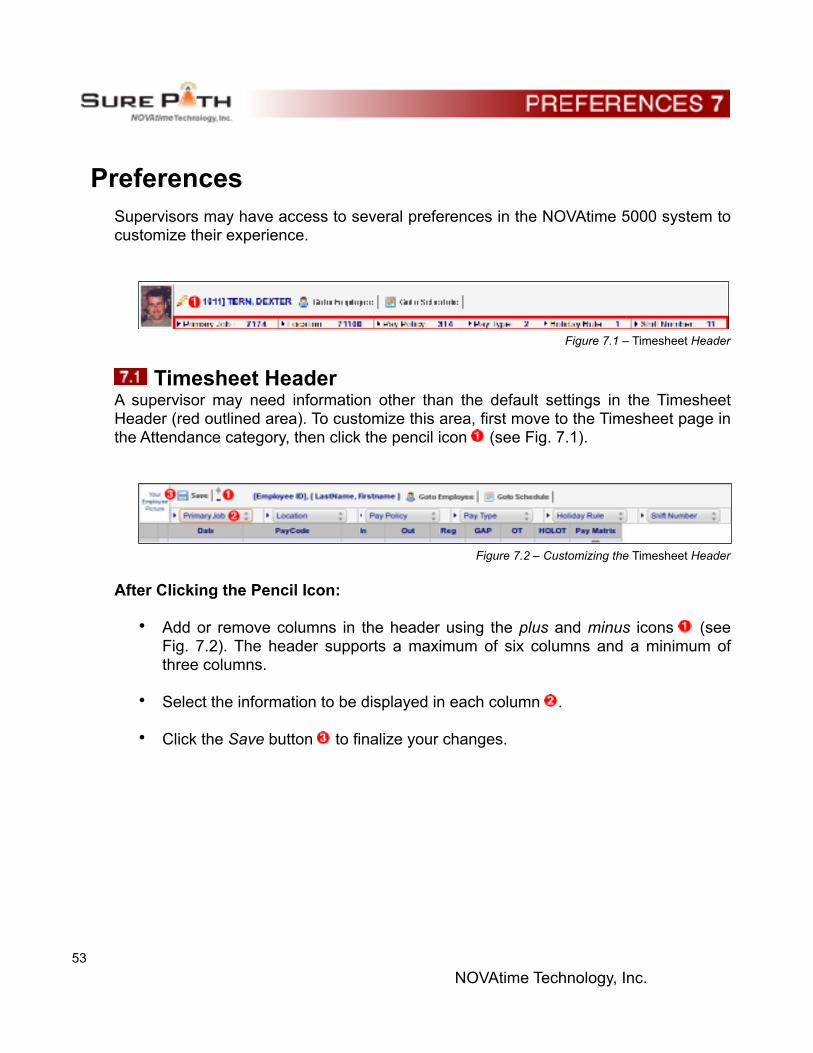
Preferences Supervisors may have access to several preferences in the NOVAtime 5000 system to customize their experience.
! Figure 7.1 – Timesheet Header
! Timesheet Header A supervisor may need information other than the default settings in the Timesheet Header (red outlined area). To customize this area, first move to the Timesheet page in the Attendance category, then click the pencil icon ! (see Fig. 7.1).
! Figure 7.2 – Customizing the Timesheet Header
After Clicking the Pencil Icon:
• Add or remove columns in the header using the plus and minus icons ! (see Fig. 7.2). The header supports a maximum of six columns and a minimum of three columns.
• Select the information to be displayed in each column ! .
• Click the Save button ! to finalize your changes.
! 53NOVAtime Technology, Inc.
!
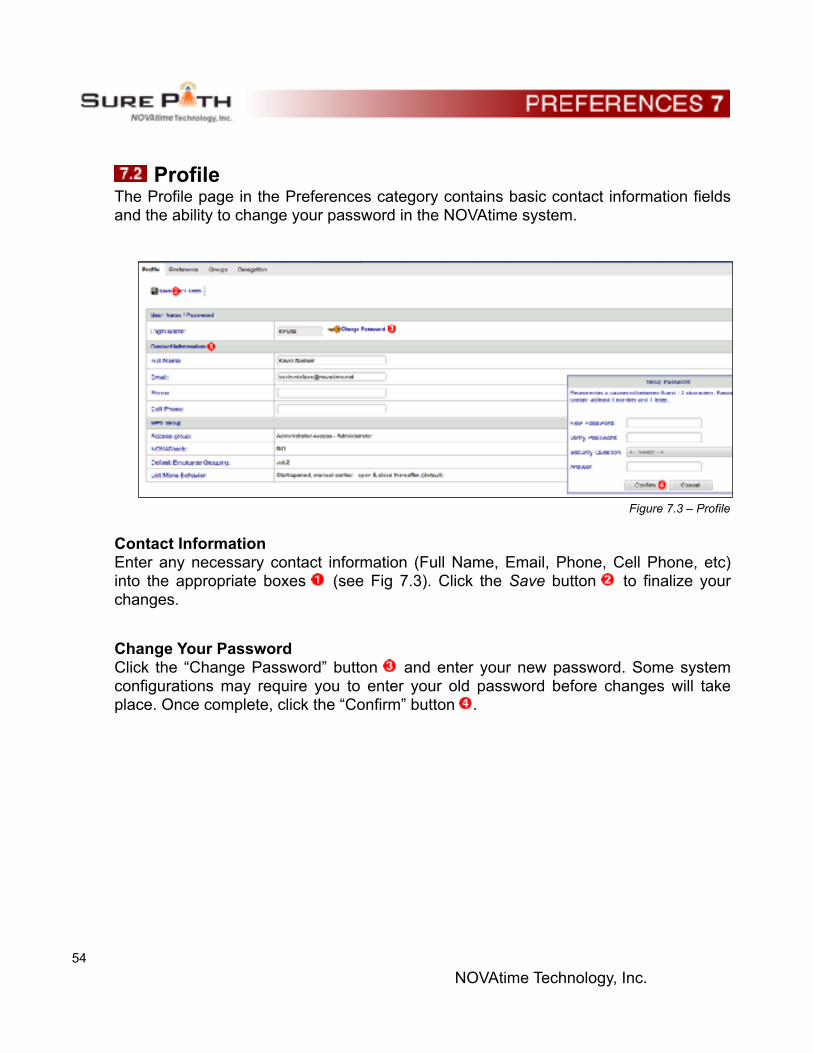
! Profile The Profile page in the Preferences category contains basic contact information fields and the ability to change your password in the NOVAtime system.
! Figure 7.3 – Profile
Contact Information Enter any necessary contact information (Full Name, Email, Phone, Cell Phone, etc) into the appropriate boxes ! (see Fig 7.3). Click the Save button ! to finalize your changes.
Change Your Password Click the “Change Password” button ! and enter your new password. Some system configurations may require you to enter your old password before changes will take place. Once complete, click the “Confirm” button ! .
! 54NOVAtime Technology, Inc.
!
! Preferences The Preferences page in the Preferences category contains several view and behavior options for NOVAtime 5000. As most options are self-explanatory, not all will be covered in this section. For additional help with options not covered, please contact your administrator. Please note that the Preferences page auto-saves after each change is made.
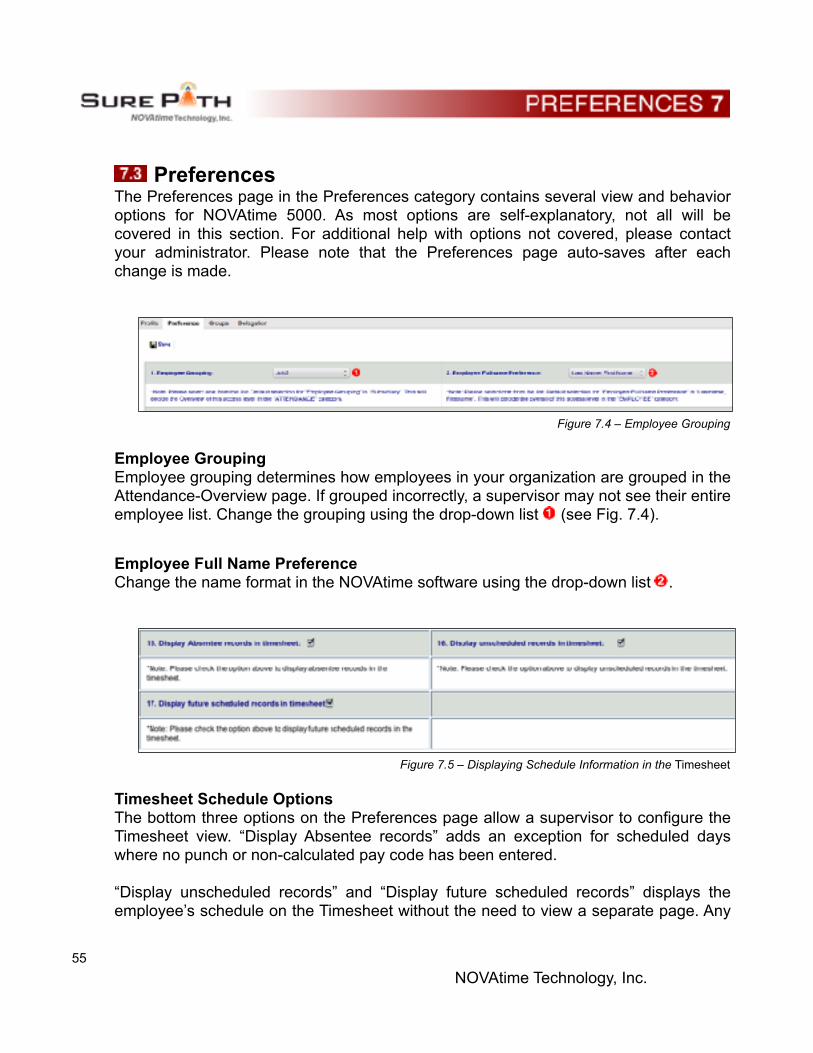
! Figure 7.4 – Employee Grouping
Employee Grouping Employee grouping determines how employees in your organization are grouped in the Attendance-Overview page. If grouped incorrectly, a supervisor may not see their entire employee list. Change the grouping using the drop-down list ! (see Fig. 7.4).
Employee Full Name Preference Change the name format in the NOVAtime software using the drop-down list ! .
! Figure 7.5 – Displaying Schedule Information in the Timesheet
Timesheet Schedule Options The bottom three options on the Preferences page allow a supervisor to configure the Timesheet view. “Display Absentee records” adds an exception for scheduled days where no punch or non-calculated pay code has been entered.
“Display unscheduled records” and “Display future scheduled records” displays the employee’s schedule on the Timesheet without the need to view a separate page. Any
! 55NOVAtime Technology, Inc.

or all of the three options may not be available in your implementation of NOVAtime. Please contact your administrator for more information.
! 56NOVAtime Technology, Inc.