Nova Bonita BPM - OW2download.forge.objectweb.org/bonita/bonita-4.1.1-BonitaQuickStart.pdf ·...
29
Nova Bonita BPM Quick Start
Transcript of Nova Bonita BPM - OW2download.forge.objectweb.org/bonita/bonita-4.1.1-BonitaQuickStart.pdf ·...
Nova Bonita BPM
Quick Start
Nova Bonita BPMQuick Start
Nova Bonita (aka Bonita v4)
Software
February 2009
Table of Contents
Chapter 1. Welcome to the Nova Bonita BPM suite ........................................................................................................ 6
Chapter 2. Setting up Nova Bonita BPM tools ................................................................................................................ 7
2.1.1 Downloading the products ......................................................................................... 7
2.1.2 Installing and launching the designer ......................................................................... 8
2.1.3 Installing and launching the console and the runtime ................................................ 8
Chapter 3. The Web Sale application .............................................................................................................................. 10
3.1 The Web Sale Process definition ........................................................................................................ 10
3.1.1 BPM project creation .................................................................................................. 10
3.1.2 Adding participants ..................................................................................................... 12
3.1.3 All about Activities ..................................................................................................... 13
3.1.4 Adding transitions ....................................................................................................... 15
3.1.5 Working with variables ............................................................................................... 16
3.1.6 Conditions in transitions ............................................................................................. 18
3.1.7 Iterations/loops/cycles ................................................................................................ 19
3.1.8 Working with connectors/hooks ................................................................................. 21
3.2 Running the Web Sale process ........................................................................................................... 23
3.2.1 Deploying the Web Sale process ................................................................................ 24
3.2.2 Creating an instance of Web Sale process .................................................................. 24
3.2.3 Interacting with the Web Sale process through the worklist ...................................... 26
3.2.4 Monitoring the Web Sale process ............................................................................... 27
3.2.5 Web forms generation and automatic types detection ................................................ 28
Nova Bonita Quick Start Guide 3
List of Figures
Creating a New BPM Project...............................................................................................................8
Login into the web 2.0 BPM console...................................................................................................9
Web 2.0 BPM environment..................................................................................................................9
WebSale process definition included in the distribution....................................................................10
Creating a New XPDL file..................................................................................................................11
BPM project structure.........................................................................................................................11
New BPM process view.....................................................................................................................12
Participants definition in the designer................................................................................................12
Activity definition dialog...................................................................................................................13
Manual activities in WebSale process................................................................................................14
Hook definition dialog........................................................................................................................14
Activities creation before arrangement..............................................................................................15
WebSale process activities and transitions.........................................................................................15
Variable definition dialog...................................................................................................................16
Designers participants view................................................................................................................17
Designers XML view (XPDL file format)..........................................................................................17
Decision variable in a condition between two activities....................................................................18
WebSale process view including conditions......................................................................................18
ExpressDelivery variable in a condition between two activities........................................................19
Adding points to transitions................................................................................................................19
Designer view using points................................................................................................................20
Changing the default activity type......................................................................................................20
Hook creation Wizard.........................................................................................................................21
Hook/Connector name dialog.............................................................................................................22
4 Nova Bonita Quick Start Guide
Developers Hook view.......................................................................................................................22
BPM management application...........................................................................................................23
Web Sale process deployment............................................................................................................24
Users worklist application..................................................................................................................24
Web forms creation in the console.....................................................................................................25
Users activity list................................................................................................................................25
Selection of values from an enumerated variable...............................................................................26
User worklist application....................................................................................................................27
Monitoring a Web Sale process instance............................................................................................27
Monitoring Web Sale process activities.............................................................................................27
Automatic types detection in web forms............................................................................................28
Date field selection in web forms.......................................................................................................28
Check semantics in web forms...........................................................................................................29
Nova Bonita Quick Start Guide 5
Chapter 1.Welcome to the Nova Bonita BPM suite
Nova Bonita comes with an open source set of tools providing an easy way to work with processes
in your organization. Build up your business processes the way Bonita team sees them:
• Create a BPM project in your Eclipse
• Start modeling a process
• Add connectors to the previous process
• Deploy your BPM project in Nova Bonita
• Interact with your BPM project through the web 2.0 based console
Nova Bonita can be used by anyone in an IT organization, no matter how big or small the
organization is.
This Quick Start Guide covers the main features of Nova Bonita, and will help you to get started
right away. To learn more about any of the features outlined here, or to get guidelines and other
useful information, please take a look to the other documents available in the Nova Bonita
distribution.
6 Nova Bonita Quick Start Guide
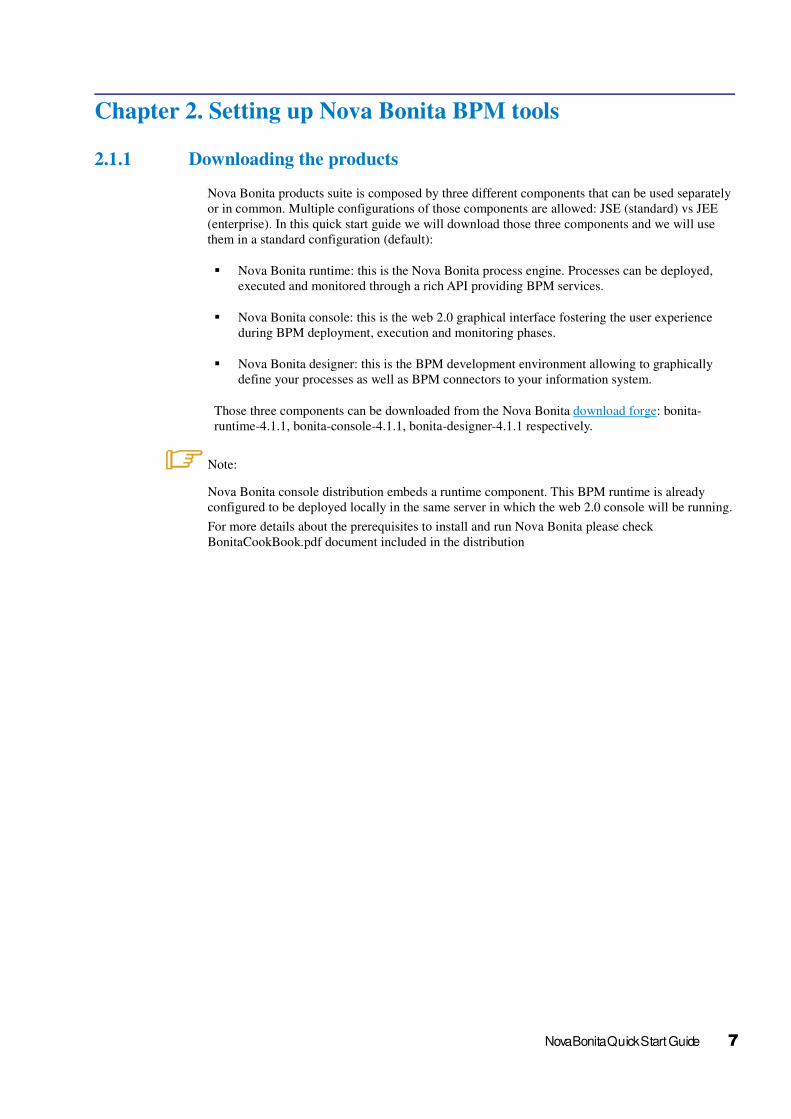
Chapter 2. Setting up Nova Bonita BPM tools
2.1.1 Downloading the products
Nova Bonita products suite is composed by three different components that can be used separately
or in common. Multiple configurations of those components are allowed: JSE (standard) vs JEE
(enterprise). In this quick start guide we will download those three components and we will use
them in a standard configuration (default):
� Nova Bonita runtime: this is the Nova Bonita process engine. Processes can be deployed,
executed and monitored through a rich API providing BPM services.
� Nova Bonita console: this is the web 2.0 graphical interface fostering the user experience
during BPM deployment, execution and monitoring phases.
� Nova Bonita designer: this is the BPM development environment allowing to graphically
define your processes as well as BPM connectors to your information system.
Those three components can be downloaded from the Nova Bonita download forge: bonita-
runtime-4.1.1, bonita-console-4.1.1, bonita-designer-4.1.1 respectively.
Note:
Nova Bonita console distribution embeds a runtime component. This BPM runtime is already
configured to be deployed locally in the same server in which the web 2.0 console will be running.
For more details about the prerequisites to install and run Nova Bonita please check
BonitaCookBook.pdf document included in the distribution
Nova Bonita Quick Start Guide 7
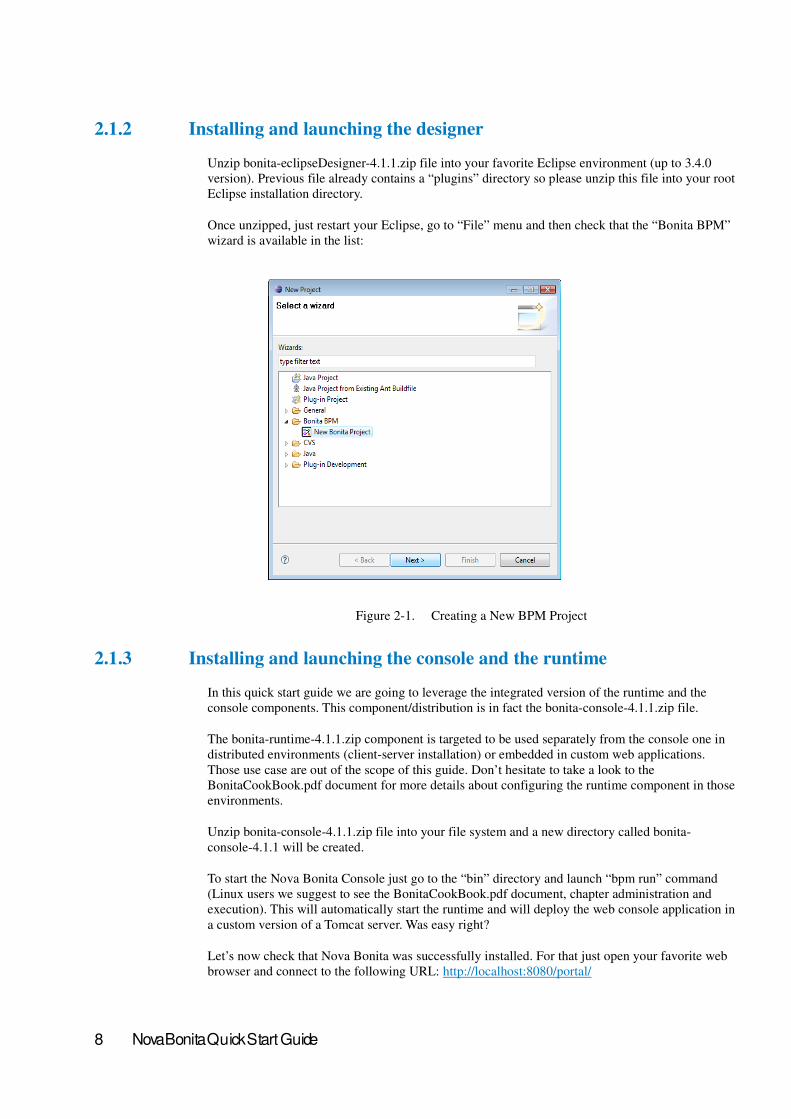
2.1.2 Installing and launching the designer
Unzip bonita-eclipseDesigner-4.1.1.zip file into your favorite Eclipse environment (up to 3.4.0
version). Previous file already contains a “plugins” directory so please unzip this file into your root
Eclipse installation directory.
Once unzipped, just restart your Eclipse, go to “File” menu and then check that the “Bonita BPM”
wizard is available in the list:
Figure 2-1. Creating a New BPM Project
2.1.3 Installing and launching the console and the runtime
In this quick start guide we are going to leverage the integrated version of the runtime and the
console components. This component/distribution is in fact the bonita-console-4.1.1.zip file.
The bonita-runtime-4.1.1.zip component is targeted to be used separately from the console one in
distributed environments (client-server installation) or embedded in custom web applications.
Those use case are out of the scope of this guide. Don’t hesitate to take a look to the
BonitaCookBook.pdf document for more details about configuring the runtime component in those
environments.
Unzip bonita-console-4.1.1.zip file into your file system and a new directory called bonita-
console-4.1.1 will be created.
To start the Nova Bonita Console just go to the “bin” directory and launch “bpm run” command
(Linux users we suggest to see the BonitaCookBook.pdf document, chapter administration and
execution). This will automatically start the runtime and will deploy the web console application in
a custom version of a Tomcat server. Was easy right?
Let’s now check that Nova Bonita was successfully installed. For that just open your favorite web
browser and connect to the following URL: http://localhost:8080/portal/
8 Nova Bonita Quick Start Guide
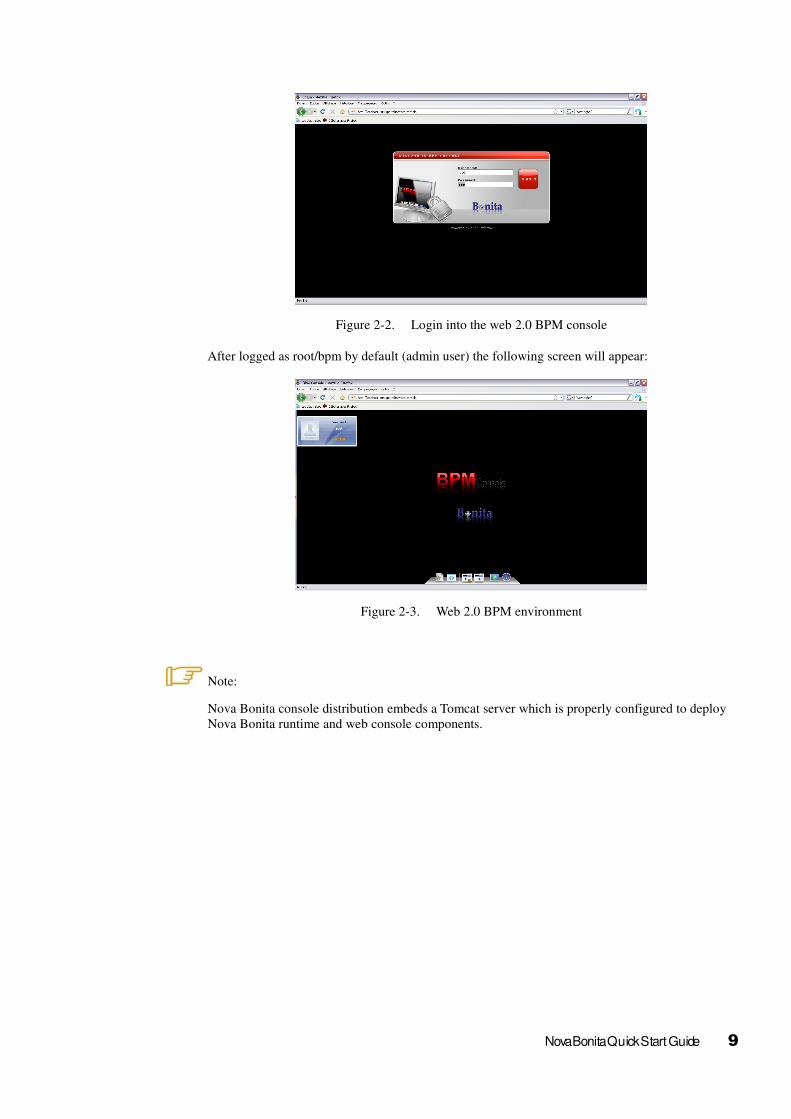
Figure 2-2. Login into the web 2.0 BPM console
After logged as root/bpm by default (admin user) the following screen will appear:
Figure 2-3. Web 2.0 BPM environment
Note:
Nova Bonita console distribution embeds a Tomcat server which is properly configured to deploy
Nova Bonita runtime and web console components.
Nova Bonita Quick Start Guide 9
Chapter 3.The Web Sale application
This is the reference example we are going to use all over this quick start guide. The idea is to
illustrate how easy is to set up a BPM based application in Nova Bonita by:
• Defining the Web Sale BPM process through the graphical designer
• Deploy it and interact with the web sale application through the web console
The Web Sale process shows a simple but common use case in which a customer and an online
shop agent/employee are involved in a purchase request.
The Web Sale application is a web application build on top of the Web Sale process which is
embedded in the Web 2.0 BPM console environment. Thus, business logic of this application is
delegated to the BPM runtime rather than coded into the application itself.
Future versions of Nova Bonita will also allow to automatically generates this web application as
an standalone web application that could be deployed out of the scope of the Web 2.0 Console.
3.1 The Web Sale process definition
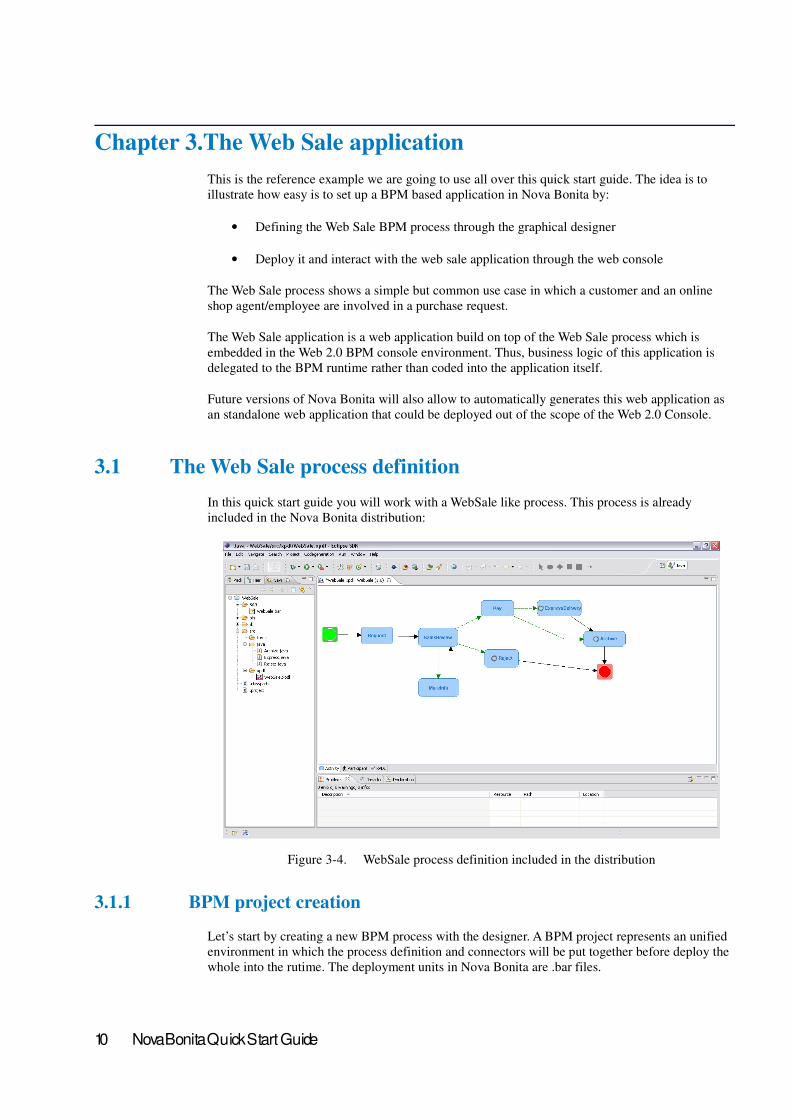
In this quick start guide you will work with a WebSale like process. This process is already
included in the Nova Bonita distribution:
Figure 3-4. WebSale process definition included in the distribution
3.1.1 BPM project creation
Let’s start by creating a new BPM process with the designer. A BPM project represents an unified
environment in which the process definition and connectors will be put together before deploy the
whole into the rutime. The deployment units in Nova Bonita are .bar files.
10 Nova Bonita Quick Start Guide

For that, just go to Eclipse File menu and select “New -> Project” feature. Then select the “New
Bonita Project” feature and specify the name of your BPM project (i.e SimpleWebSale).
Just after that, enter the name of your process (i.e SimpleWebSale) as well as a description (if
required):
Figure 3-5. Creating a New Bonita Project
Click on the “Finish” button when you are done and this wizard will automatically create a new
project in your Eclipse :
Figure 3-6. BPM project structure
Nova Bonita Quick Start Guide 11
As you can see this wizard has automatically added required libraries to compile java related BPM
entities. We will come back to this point later on.
By default, the previous operation will also creates an empty XPDL file and will open the Nova
Bonita designer:
Figure 3-7. New BPM process view
By default, a process with “start” and “end” activities is created. Time now to add activities in-
between corresponding to the WebSale business process.
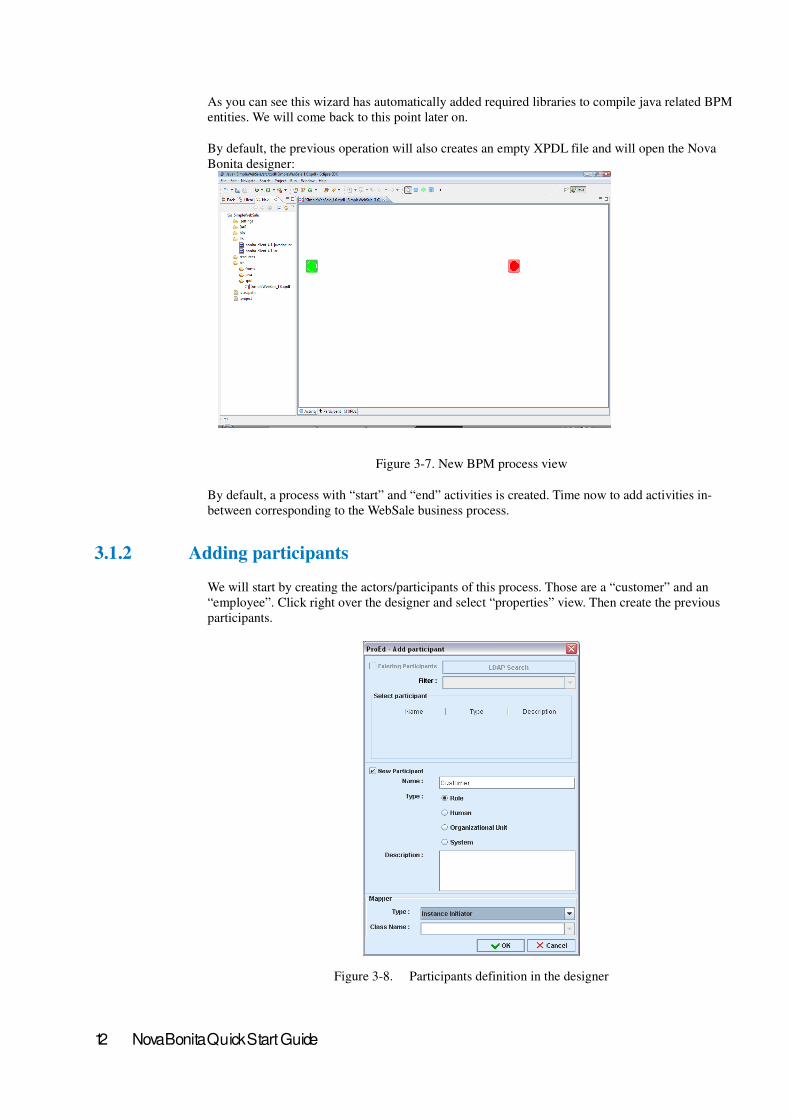
3.1.2 Adding participants
We will start by creating the actors/participants of this process. Those are a “customer” and an
“employee”. Click right over the designer and select “properties” view. Then create the previous
participants.
Figure 3-8. Participants definition in the designer
12 Nova Bonita Quick Start Guide
Both participants will be added with type “Role” (meaning potentially more than one actor could
be part of them) and using the default mapper operation: Instance Initiator.
Note:
Participants mappers are operations that resolve at runtime the users that will be assigned to a
particular role/participant definition. Commonly mappers are connectors to user repositories such
LDAP, DB, Active Directory…
In this quick start guide we are using a default mapper implementation that assigns the role to the
user that will create an instance of the BPM process. This is just for learning purposes; in a real use
case at least two different actors would be involved in the Web Sale process.
3.1.3 All about Activities
Time now to create the main activities of the WebSale BPM process. The following activities will
be created:
- “Request”, “Pay” and “MoreInfo” activities will be created as manual activities (aka user
task) and so assigned to the “customer” role previously created.
- “SalesReview” activity is also a user activity that will be assigned to the “employee” role.
- “Reject”, “ExpressDelivery” and “Archive” activities are automatic activities that will interact
with the information system (i.e sending a notification, updating a row in the database…)
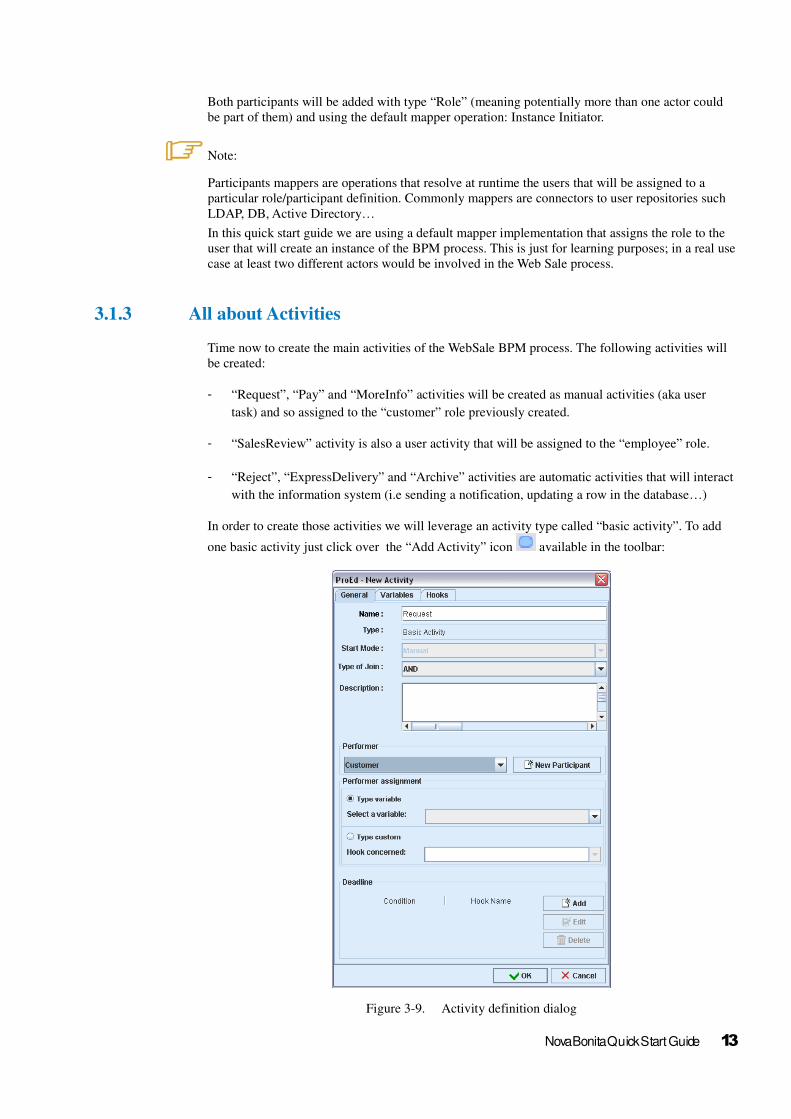
In order to create those activities we will leverage an activity type called “basic activity”. To add
one basic activity just click over the “Add Activity” icon available in the toolbar:
Figure 3-9. Activity definition dialog
Nova Bonita Quick Start Guide 13
Note:
By default a basic activity is consider to be automatic. To change it to manual just select one of the
existing participants/actors available. Those are called activity performers
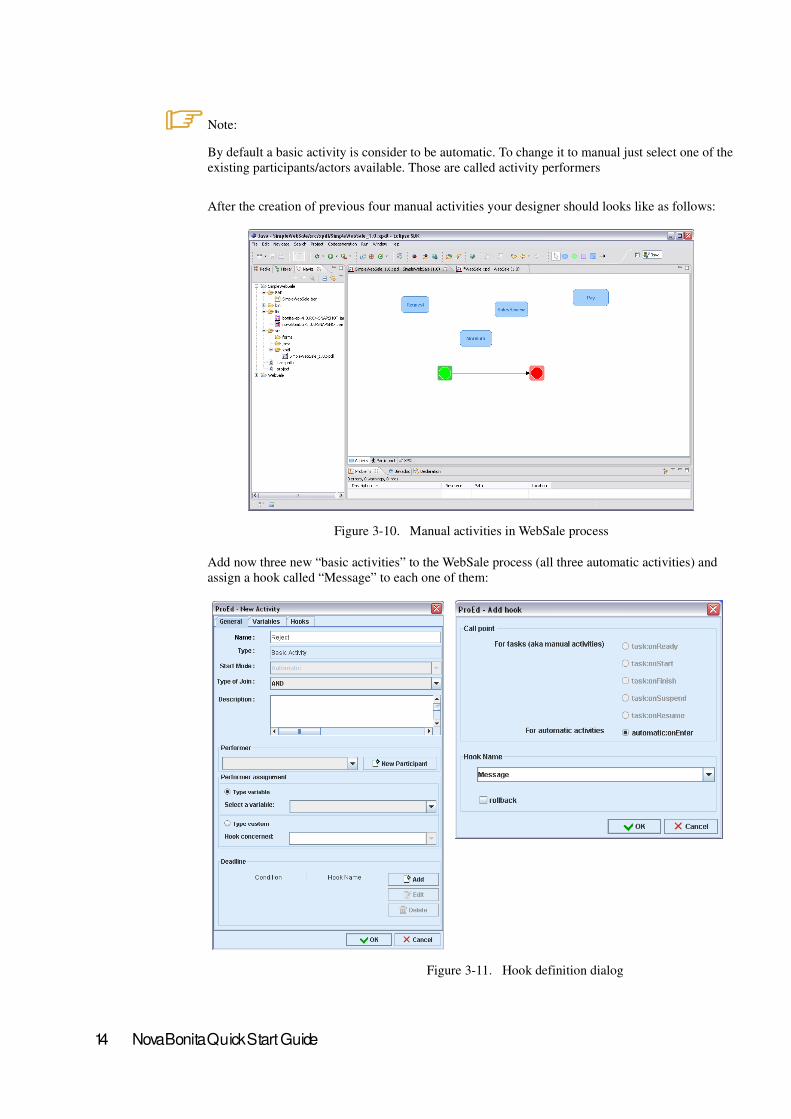
After the creation of previous four manual activities your designer should looks like as follows:
Figure 3-10. Manual activities in WebSale process
Add now three new “basic activities” to the WebSale process (all three automatic activities) and
assign a hook called “Message” to each one of them:
Figure 3-11. Hook definition dialog
14 Nova Bonita Quick Start Guide
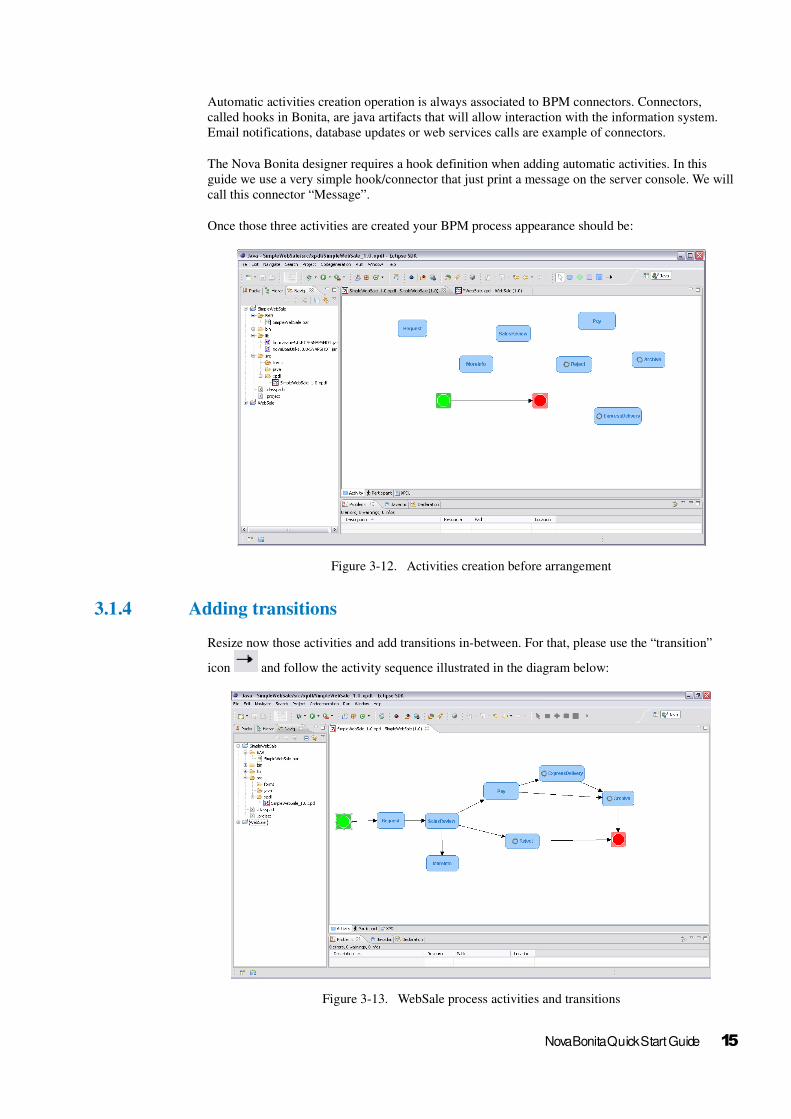
Automatic activities creation operation is always associated to BPM connectors. Connectors,
called hooks in Bonita, are java artifacts that will allow interaction with the information system.
Email notifications, database updates or web services calls are example of connectors.
The Nova Bonita designer requires a hook definition when adding automatic activities. In this
guide we use a very simple hook/connector that just print a message on the server console. We will
call this connector “Message”.
Once those three activities are created your BPM process appearance should be:
Figure 3-12. Activities creation before arrangement
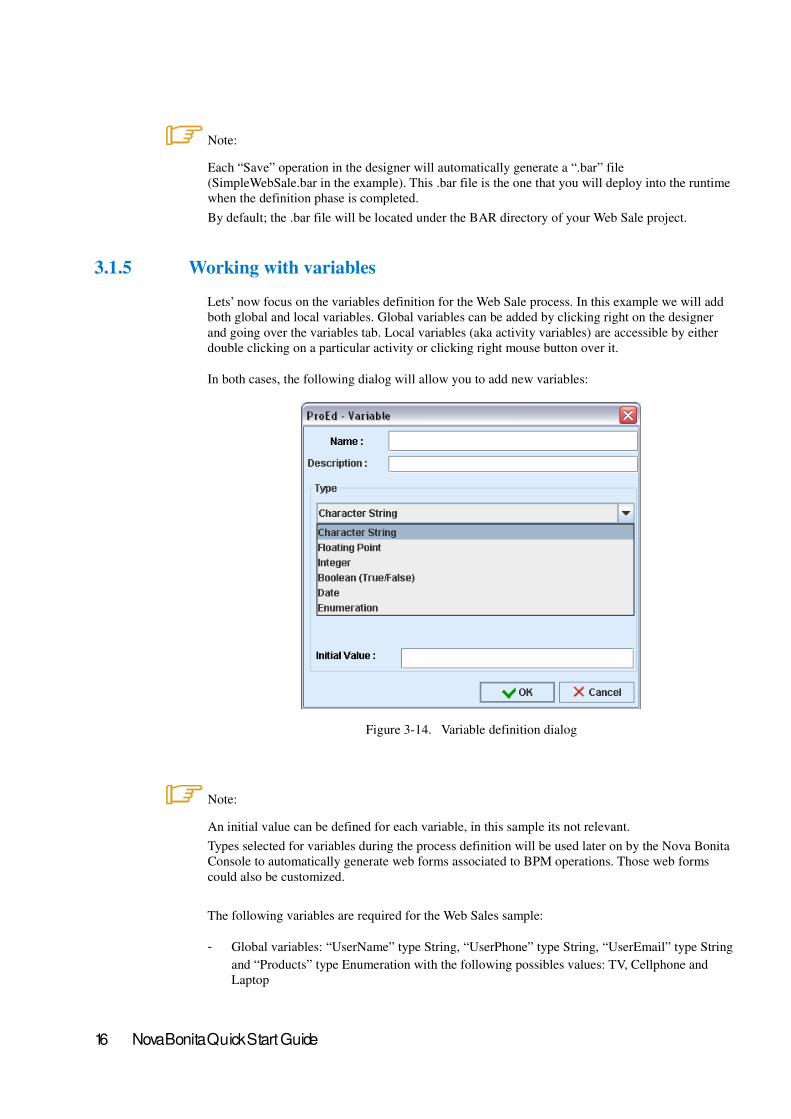
3.1.4 Adding transitions
Resize now those activities and add transitions in-between. For that, please use the “transition”
icon and follow the activity sequence illustrated in the diagram below:
Figure 3-13. WebSale process activities and transitions
Nova Bonita Quick Start Guide 15
Note:
Each “Save” operation in the designer will automatically generate a “.bar” file
(SimpleWebSale.bar in the example). This .bar file is the one that you will deploy into the runtime
when the definition phase is completed.
By default; the .bar file will be located under the BAR directory of your Web Sale project.
3.1.5 Working with variables
Lets’ now focus on the variables definition for the Web Sale process. In this example we will add
both global and local variables. Global variables can be added by clicking right on the designer
and going over the variables tab. Local variables (aka activity variables) are accessible by either
double clicking on a particular activity or clicking right mouse button over it.
In both cases, the following dialog will allow you to add new variables:
Figure 3-14. Variable definition dialog
Note:
An initial value can be defined for each variable, in this sample its not relevant.
Types selected for variables during the process definition will be used later on by the Nova Bonita
Console to automatically generate web forms associated to BPM operations. Those web forms
could also be customized.
The following variables are required for the Web Sales sample:
- Global variables: “UserName” type String, “UserPhone” type String, “UserEmail” type String
and “Products” type Enumeration with the following possibles values: TV, Cellphone and
Laptop
16 Nova Bonita Quick Start Guide
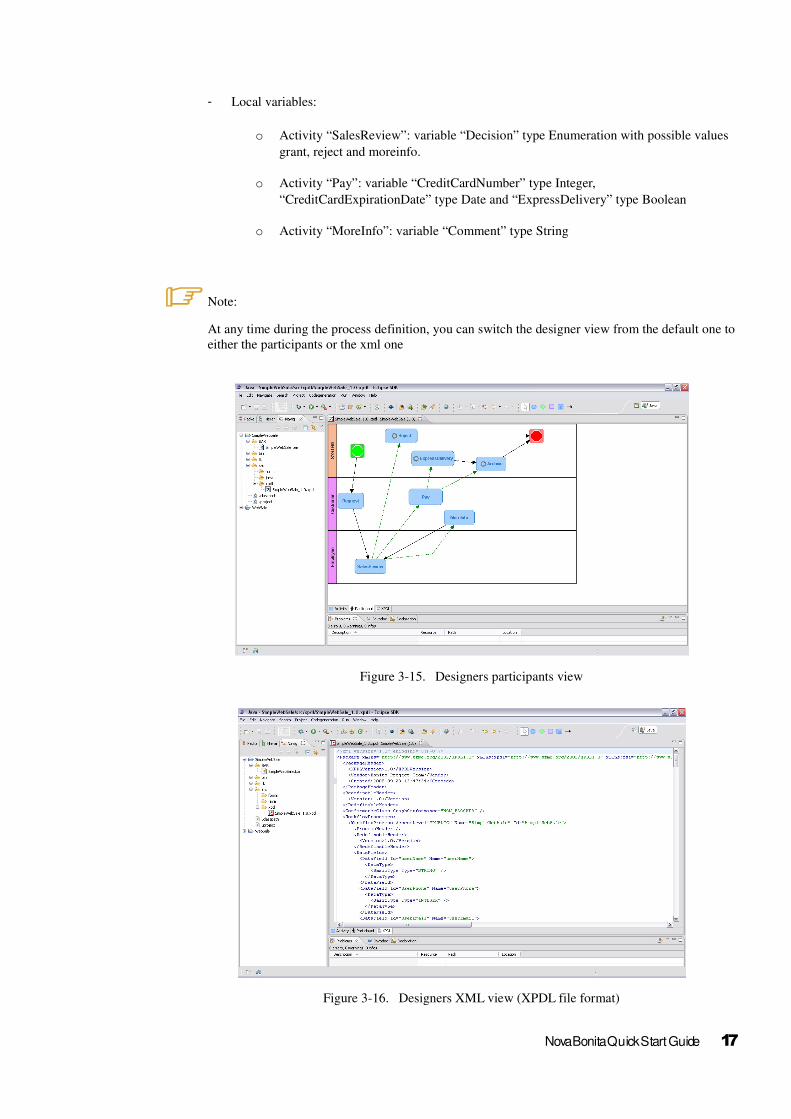
- Local variables:
o Activity “SalesReview”: variable “Decision” type Enumeration with possible values
grant, reject and moreinfo.
o Activity “Pay”: variable “CreditCardNumber” type Integer,
“CreditCardExpirationDate” type Date and “ExpressDelivery” type Boolean
o Activity “MoreInfo”: variable “Comment” type String
Note:
At any time during the process definition, you can switch the designer view from the default one to
either the participants or the xml one
Figure 3-15. Designers participants view
Figure 3-16. Designers XML view (XPDL file format)
Nova Bonita Quick Start Guide 17
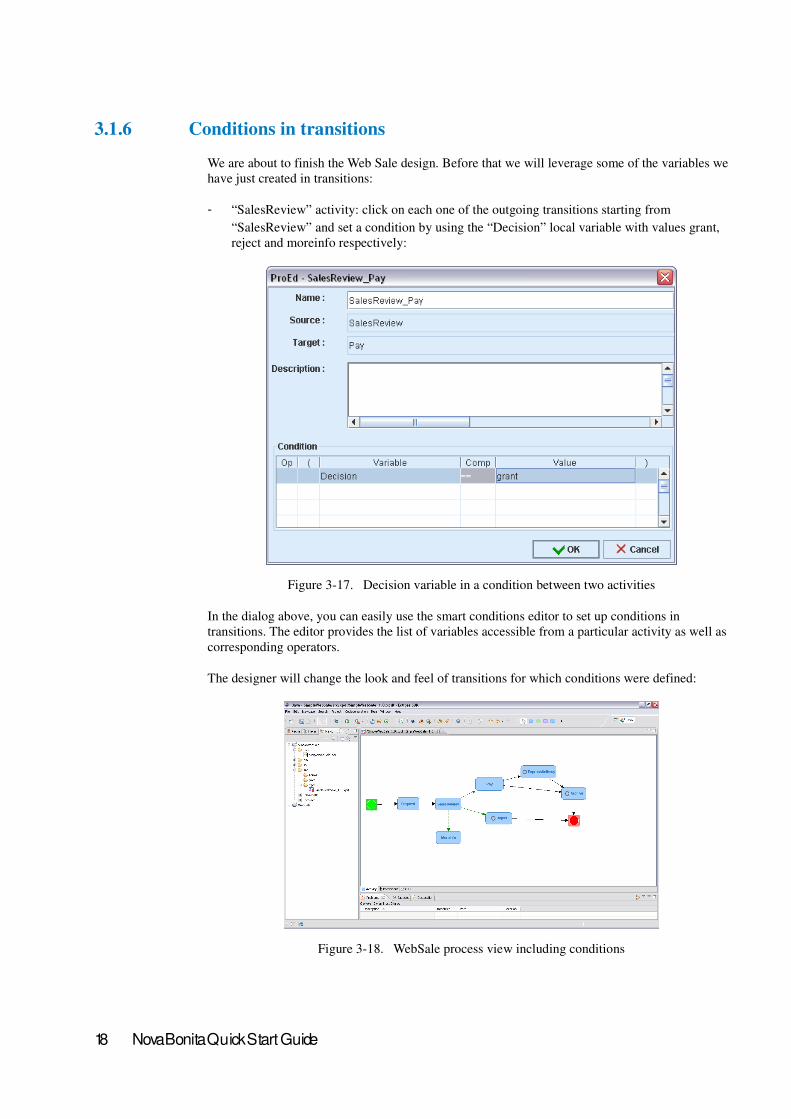
3.1.6 Conditions in transitions
We are about to finish the Web Sale design. Before that we will leverage some of the variables we
have just created in transitions:
- “SalesReview” activity: click on each one of the outgoing transitions starting from
“SalesReview” and set a condition by using the “Decision” local variable with values grant,
reject and moreinfo respectively:
Figure 3-17. Decision variable in a condition between two activities
In the dialog above, you can easily use the smart conditions editor to set up conditions in
transitions. The editor provides the list of variables accessible from a particular activity as well as
corresponding operators.
The designer will change the look and feel of transitions for which conditions were defined:
Figure 3-18. WebSale process view including conditions
18 Nova Bonita Quick Start Guide
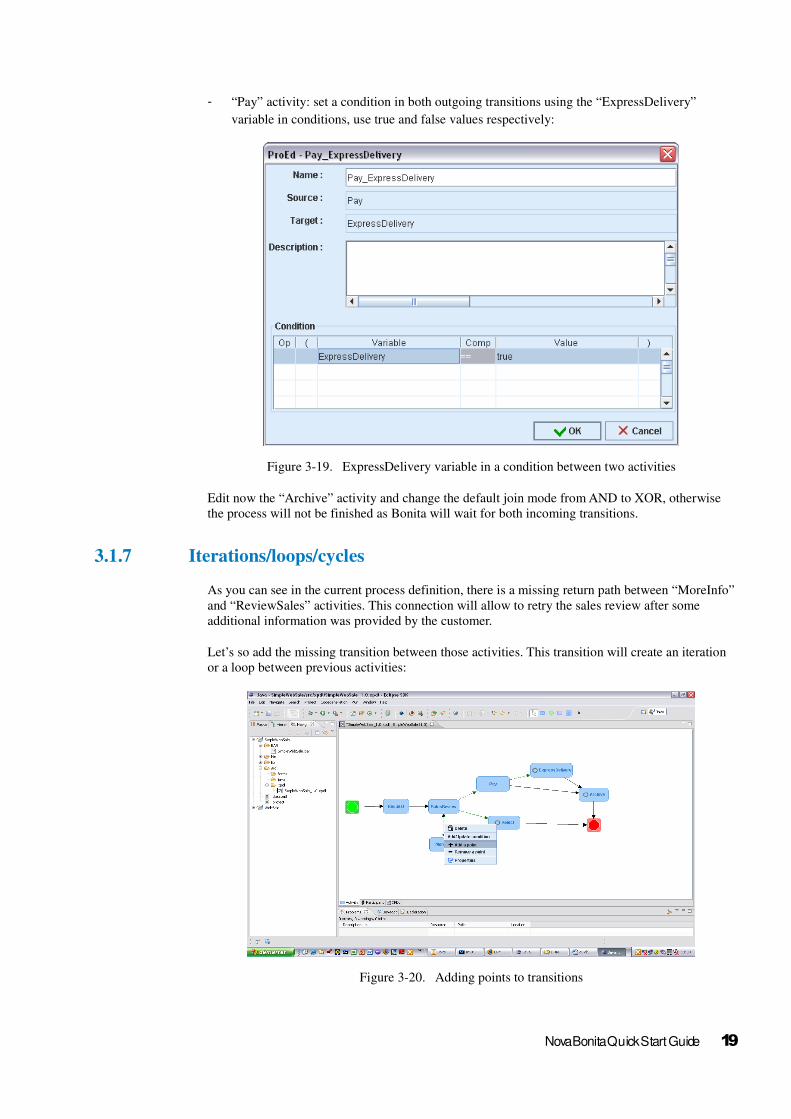
- “Pay” activity: set a condition in both outgoing transitions using the “ExpressDelivery”
variable in conditions, use true and false values respectively:
Figure 3-19. ExpressDelivery variable in a condition between two activities
Edit now the “Archive” activity and change the default join mode from AND to XOR, otherwise
the process will not be finished as Bonita will wait for both incoming transitions.
3.1.7 Iterations/loops/cycles
As you can see in the current process definition, there is a missing return path between “MoreInfo”
and “ReviewSales” activities. This connection will allow to retry the sales review after some
additional information was provided by the customer.
Let’s so add the missing transition between those activities. This transition will create an iteration
or a loop between previous activities:
Figure 3-20. Adding points to transitions
Nova Bonita Quick Start Guide 19
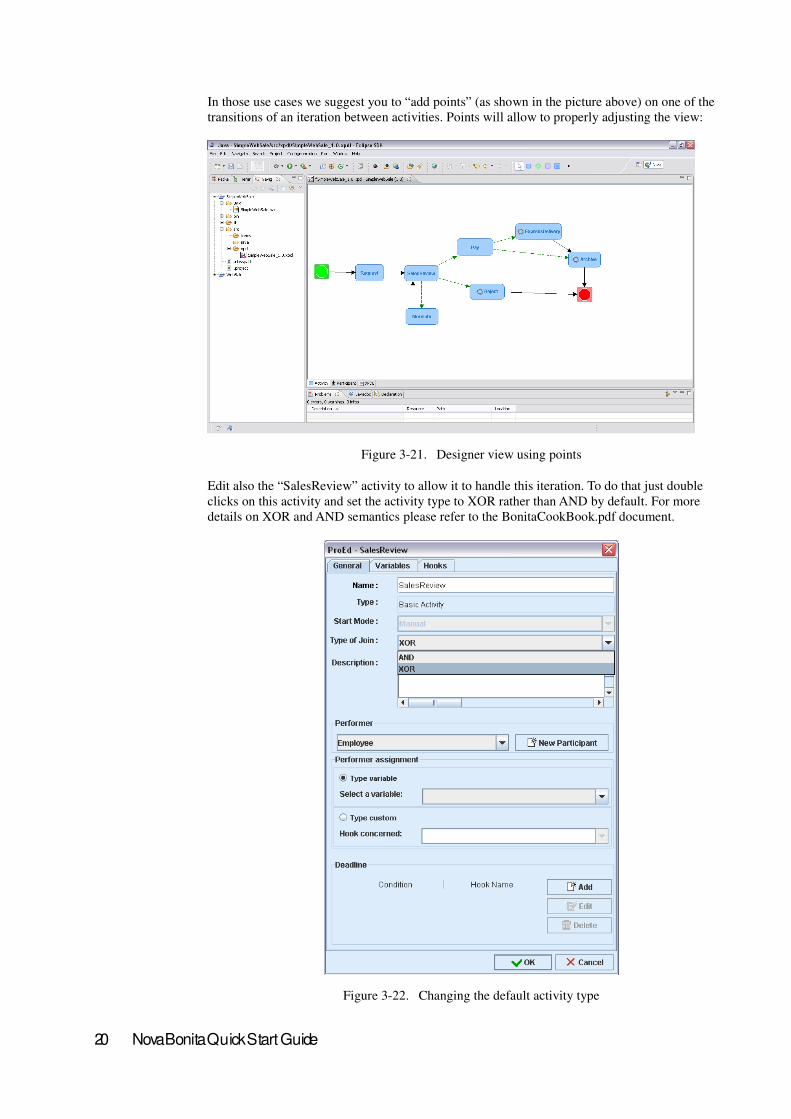
In those use cases we suggest you to “add points” (as shown in the picture above) on one of the
transitions of an iteration between activities. Points will allow to properly adjusting the view:
Figure 3-21. Designer view using points
Edit also the “SalesReview” activity to allow it to handle this iteration. To do that just double
clicks on this activity and set the activity type to XOR rather than AND by default. For more
details on XOR and AND semantics please refer to the BonitaCookBook.pdf document.
Figure 3-22. Changing the default activity type
20 Nova Bonita Quick Start Guide
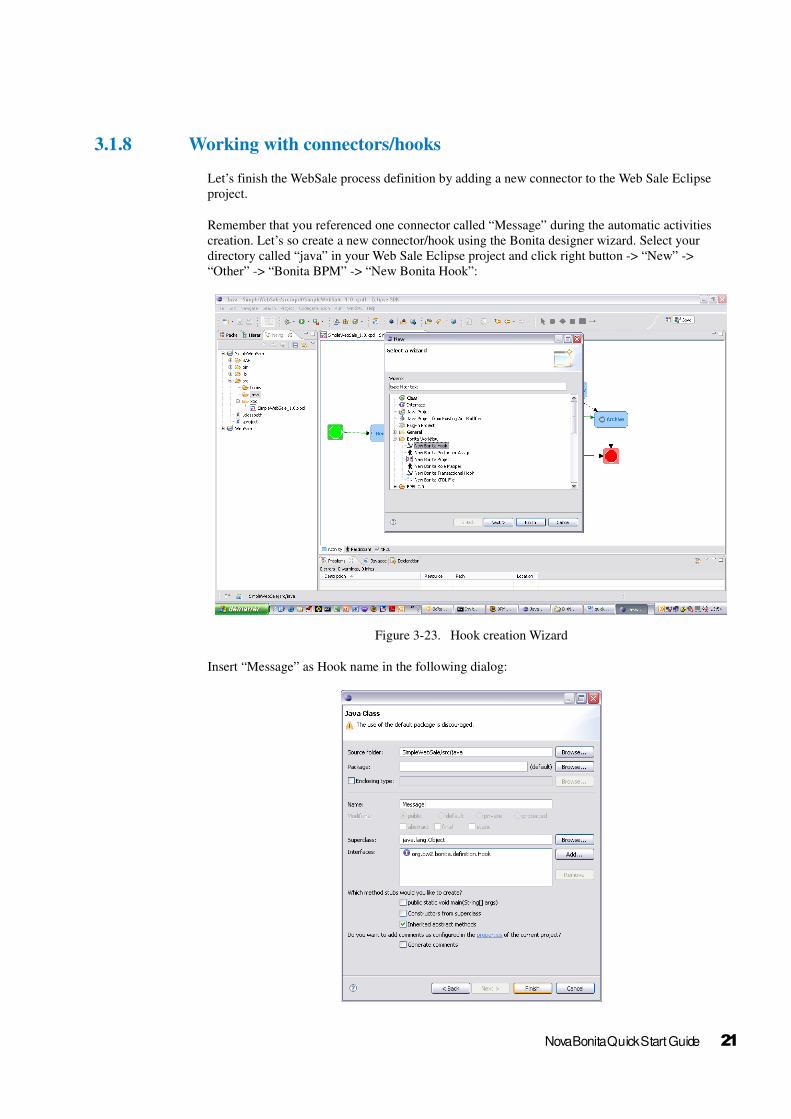
3.1.8 Working with connectors/hooks
Let’s finish the WebSale process definition by adding a new connector to the Web Sale Eclipse
project.
Remember that you referenced one connector called “Message” during the automatic activities
creation. Let’s so create a new connector/hook using the Bonita designer wizard. Select your
directory called “java” in your Web Sale Eclipse project and click right button -> “New” ->
“Other” -> “Bonita BPM” -> “New Bonita Hook”:
Figure 3-23. Hook creation Wizard
Insert “Message” as Hook name in the following dialog:
Nova Bonita Quick Start Guide 21
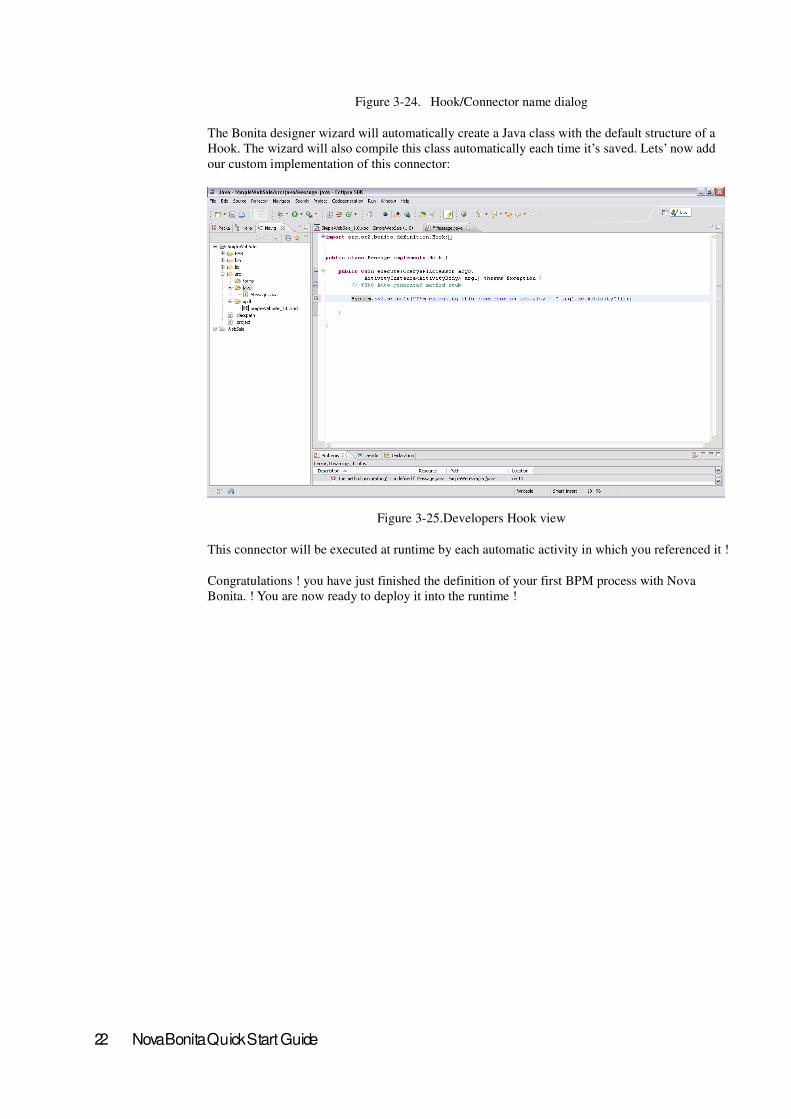
Figure 3-24. Hook/Connector name dialog
The Bonita designer wizard will automatically create a Java class with the default structure of a
Hook. The wizard will also compile this class automatically each time it’s saved. Lets’ now add
our custom implementation of this connector:
Figure 3-25.Developers Hook view
This connector will be executed at runtime by each automatic activity in which you referenced it !
Congratulations ! you have just finished the definition of your first BPM process with Nova
Bonita. ! You are now ready to deploy it into the runtime !
22 Nova Bonita Quick Start Guide
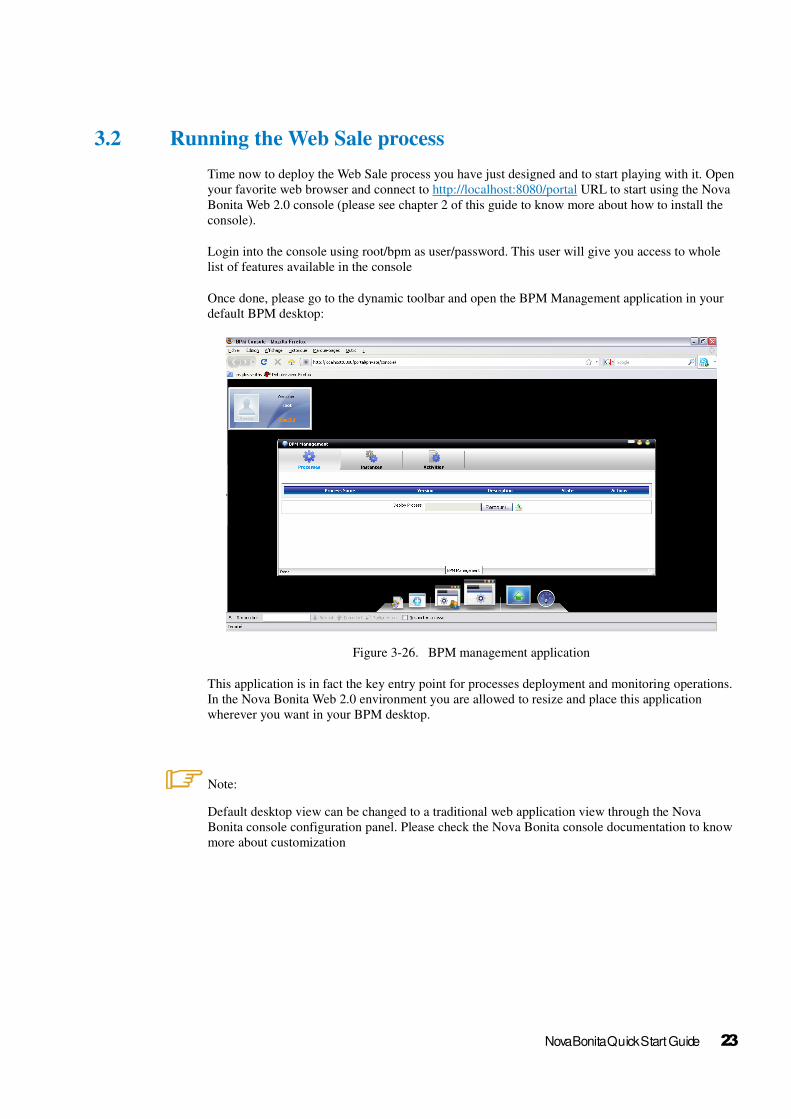
3.2 Running the Web Sale process
Time now to deploy the Web Sale process you have just designed and to start playing with it. Open
your favorite web browser and connect to http://localhost:8080/portal URL to start using the Nova
Bonita Web 2.0 console (please see chapter 2 of this guide to know more about how to install the
console).
Login into the console using root/bpm as user/password. This user will give you access to whole
list of features available in the console
Once done, please go to the dynamic toolbar and open the BPM Management application in your
default BPM desktop:
Figure 3-26. BPM management application
This application is in fact the key entry point for processes deployment and monitoring operations.
In the Nova Bonita Web 2.0 environment you are allowed to resize and place this application
wherever you want in your BPM desktop.
Note:
Default desktop view can be changed to a traditional web application view through the Nova
Bonita console configuration panel. Please check the Nova Bonita console documentation to know
more about customization
Nova Bonita Quick Start Guide 23
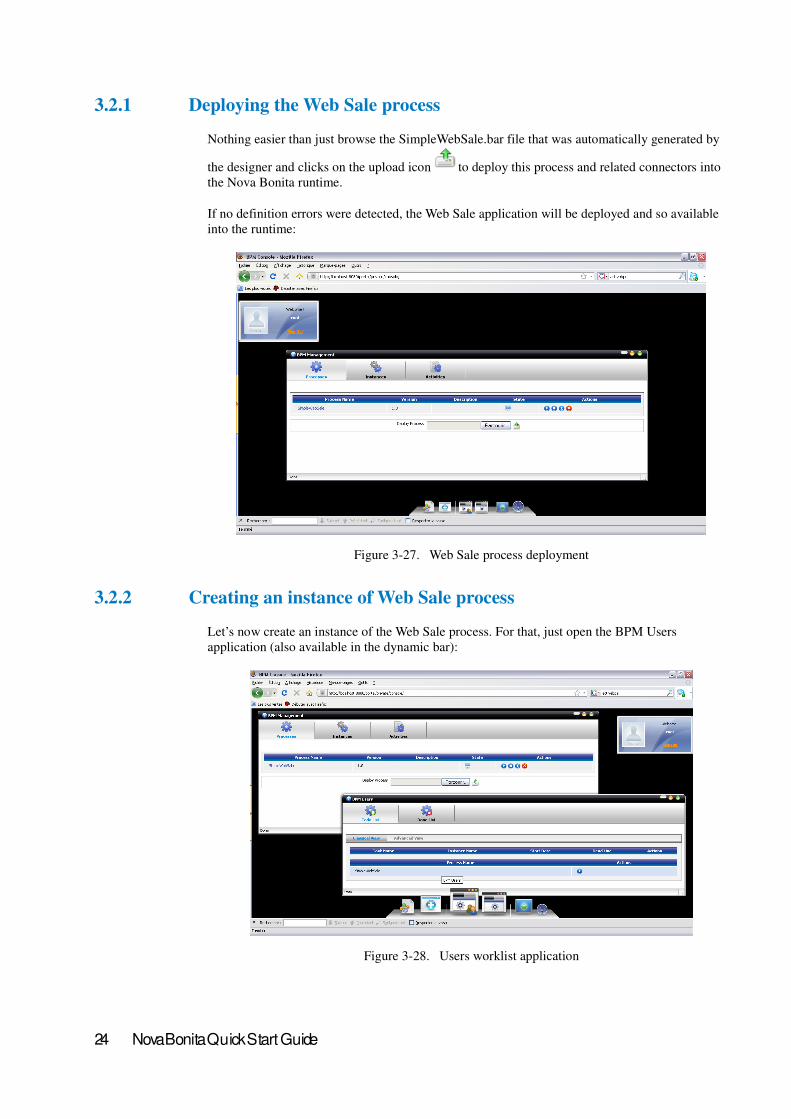
3.2.1 Deploying the Web Sale process
Nothing easier than just browse the SimpleWebSale.bar file that was automatically generated by
the designer and clicks on the upload icon to deploy this process and related connectors into
the Nova Bonita runtime.
If no definition errors were detected, the Web Sale application will be deployed and so available
into the runtime:
Figure 3-27. Web Sale process deployment
3.2.2 Creating an instance of Web Sale process
Let’s now create an instance of the Web Sale process. For that, just open the BPM Users
application (also available in the dynamic bar):
Figure 3-28. Users worklist application
24 Nova Bonita Quick Start Guide
This application allows users to create new instances of existing processes and take over activities
assigned to them. The BPM Users application is the users “worklist”. By default, any process
deployed into de runtime is available in users worklist.
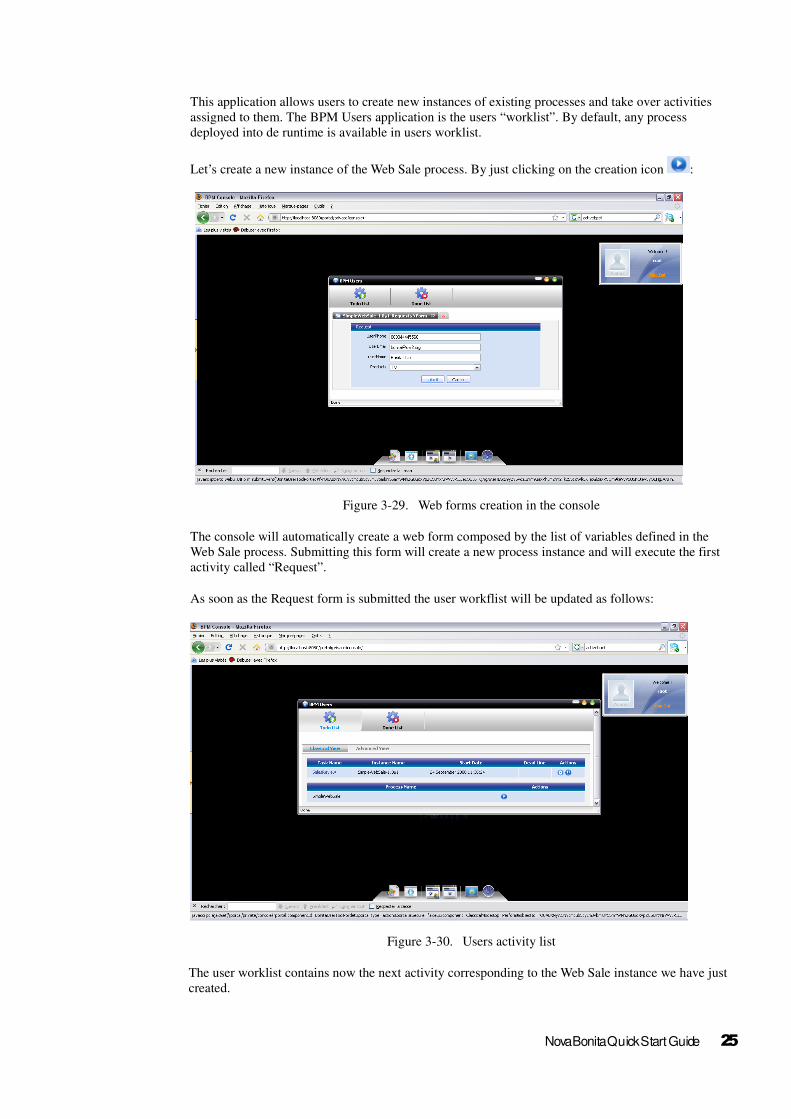
Let’s create a new instance of the Web Sale process. By just clicking on the creation icon :
Figure 3-29. Web forms creation in the console
The console will automatically create a web form composed by the list of variables defined in the
Web Sale process. Submitting this form will create a new process instance and will execute the first
activity called “Request”.
As soon as the Request form is submitted the user workflist will be updated as follows:
Figure 3-30. Users activity list
The user worklist contains now the next activity corresponding to the Web Sale instance we have just
created.
Nova Bonita Quick Start Guide 25
3.2.3 Interacting with the Web Sale process through the worklist
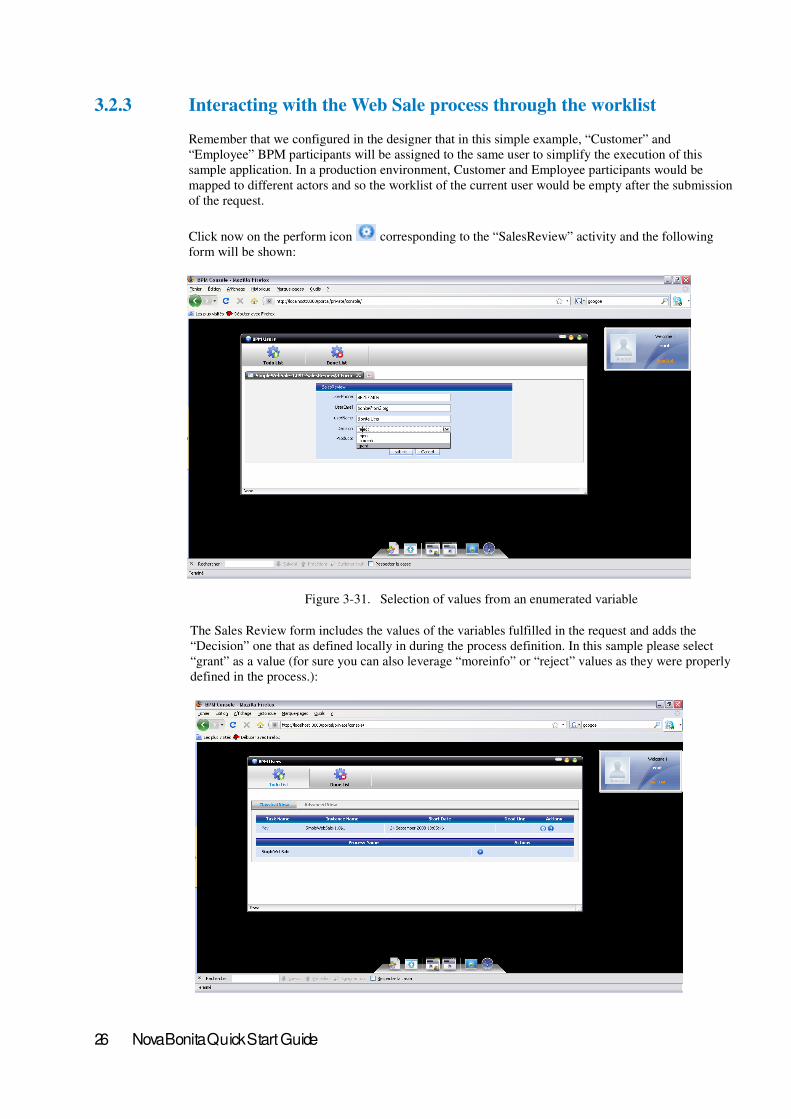
Remember that we configured in the designer that in this simple example, “Customer” and
“Employee” BPM participants will be assigned to the same user to simplify the execution of this
sample application. In a production environment, Customer and Employee participants would be
mapped to different actors and so the worklist of the current user would be empty after the submission
of the request.
Click now on the perform icon corresponding to the “SalesReview” activity and the following
form will be shown:
Figure 3-31. Selection of values from an enumerated variable
The Sales Review form includes the values of the variables fulfilled in the request and adds the
“Decision” one that as defined locally in during the process definition. In this sample please select
“grant” as a value (for sure you can also leverage “moreinfo” or “reject” values as they were properly
defined in the process.):
26 Nova Bonita Quick Start Guide
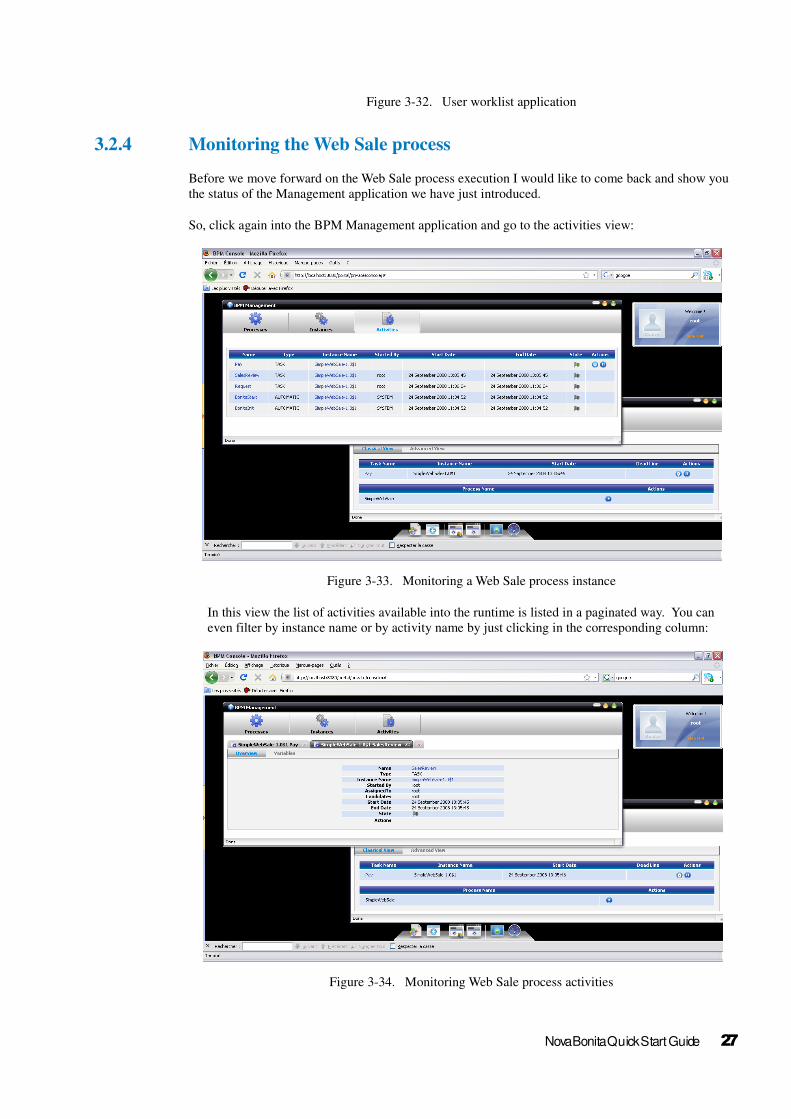
Figure 3-32. User worklist application
3.2.4 Monitoring the Web Sale process
Before we move forward on the Web Sale process execution I would like to come back and show you
the status of the Management application we have just introduced.
So, click again into the BPM Management application and go to the activities view:
Figure 3-33. Monitoring a Web Sale process instance
In this view the list of activities available into the runtime is listed in a paginated way. You can
even filter by instance name or by activity name by just clicking in the corresponding column:
Figure 3-34. Monitoring Web Sale process activities
Nova Bonita Quick Start Guide 27
In the previous example I’ve asked for more details on both “Pay” and “SalesReview” activities
3.2.5 Web forms generation and automatic types detection
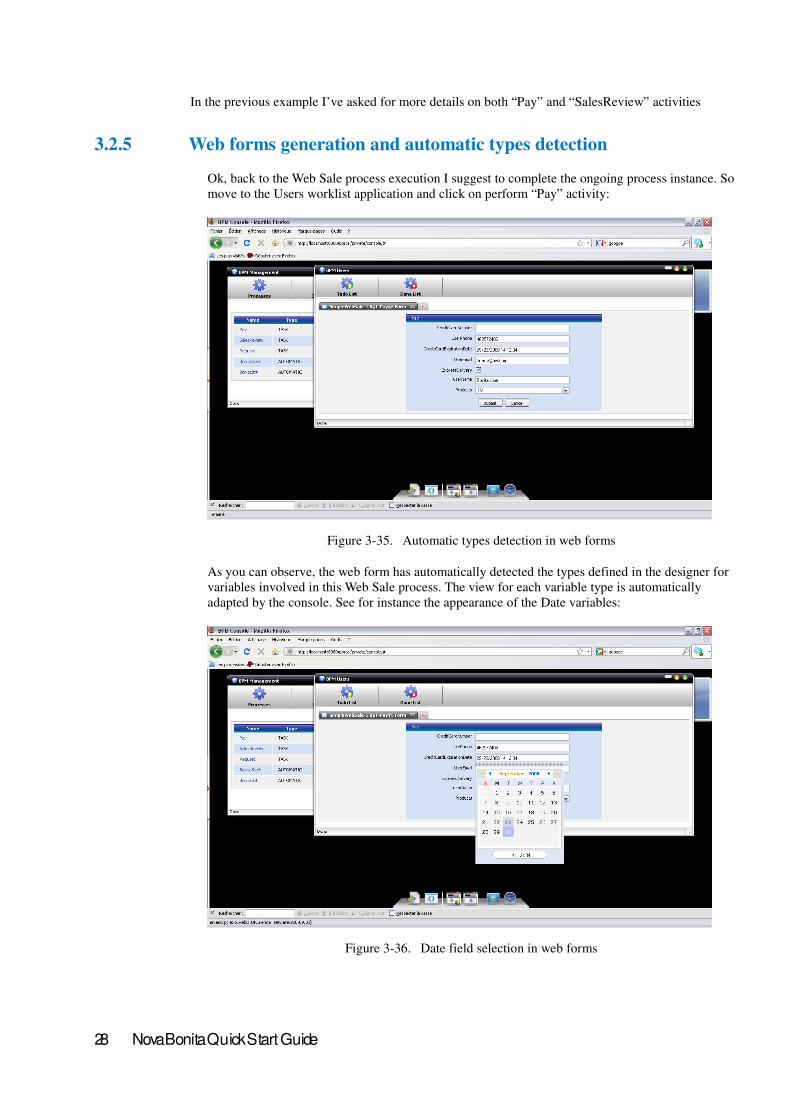
Ok, back to the Web Sale process execution I suggest to complete the ongoing process instance. So
move to the Users worklist application and click on perform “Pay” activity:
Figure 3-35. Automatic types detection in web forms
As you can observe, the web form has automatically detected the types defined in the designer for
variables involved in this Web Sale process. The view for each variable type is automatically
adapted by the console. See for instance the appearance of the Date variables:
Figure 3-36. Date field selection in web forms
28 Nova Bonita Quick Start Guide
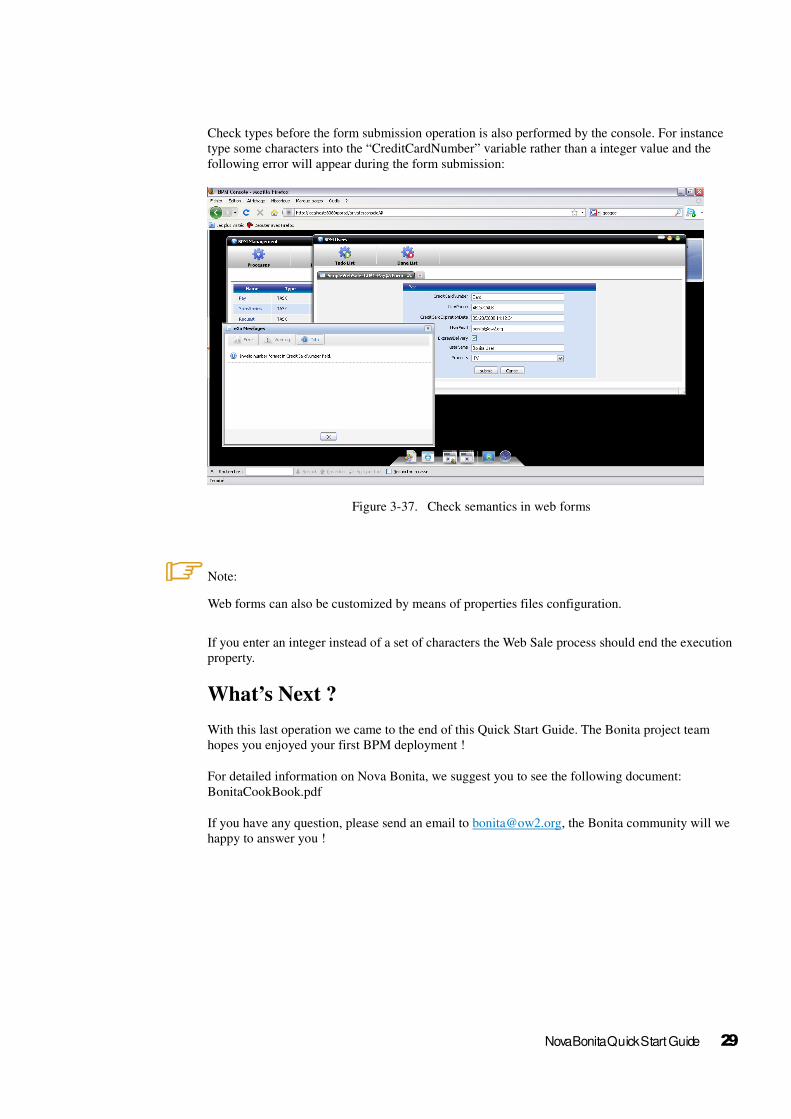
Check types before the form submission operation is also performed by the console. For instance
type some characters into the “CreditCardNumber” variable rather than a integer value and the
following error will appear during the form submission:
Figure 3-37. Check semantics in web forms
Note:
Web forms can also be customized by means of properties files configuration.
If you enter an integer instead of a set of characters the Web Sale process should end the execution
property.
What’s Next ?
With this last operation we came to the end of this Quick Start Guide. The Bonita project team
hopes you enjoyed your first BPM deployment !
For detailed information on Nova Bonita, we suggest you to see the following document:
BonitaCookBook.pdf
If you have any question, please send an email to [email protected], the Bonita community will we
happy to answer you !
Nova Bonita Quick Start Guide 29