Noughts & Crosses (Tic-Tac-Toe) - · PDF fileNoughts & Crosses (Tic-Tac-Toe) Instruction Sheet...
6
June 2009 Main items you will need: 1) The Project File (free): • Tic_Tac_Toe.mpc 2) Board with the following dimensions: ¾" thick x 9¼" wide x 30” long NOTE: Do NOT use a board that is smaller than specified above. 3) Wood glue, wood stain and/or paint and clear finish 4) Box hinge(s) and decorative clasp/latch I used a 5) A Dremel-type rotary tool to sand small details and speed up preparation for finishing. ¾"x4" piano hinge Brainerd # 1264xc and a Brainerd Box Latch #865xc which you can order online at: www.hardwareworld.com CarveWright TiPS & TRiCKS - JUNE 2009 www.carvewright.com Please visit the manufacturer’s website for more information about the CarveWright machines and see the new Pattern Depot at: For Additional Patterns you can add to your Designer software library, please visit: www.carvewright.com www.carvebuddy.com Noughts & Crosses (Tic-Tac-Toe) This month’s Tips features a fun project you can make with your CarveWright/ CompuCarve machine. The project is a simple game that everyone is familiar with. This project sort of takes it “over the top” with the felt lined, hinged case for an executive-desktop quality appearance! The game was originally known as “Noughts & Crosses” but is more widely known today as “Tic-Tac-Toe”. It will make a nice gift for children and adults alike. I can picture it as a gag gift to a retiring executive or given to one that just has too much time on his hands! I’m keeping the first one I made to add to our game collection in our Coca-Cola-themed Game Room, but I plan to make several variations of it to give away to friends and relatives. by Michael Tyler, Editor Finished Size: 3 7 /8 " x 1½"
Transcript of Noughts & Crosses (Tic-Tac-Toe) - · PDF fileNoughts & Crosses (Tic-Tac-Toe) Instruction Sheet...
June 2009
Main items you will need:1) The Project File (free): • Tic_Tac_Toe.mpc
2) Board with the following dimensions: ¾" thick x 9¼" wide x 30” long
NOTE: Do NOT use a board that issmaller than specified above.
3) Wood glue, wood stain and/or paint and clear finish
4) Box hinge(s) and decorative clasp/latchI used a
5) A Dremel-type rotary tool to sand small details and speed up preparation for finishing.
¾"x4" piano hinge Brainerd # 1264xc and a Brainerd Box Latch #865xc which youcan order online at: www.hardwareworld.com
CarveWright TiPS & TRiCKS - JUNE 2009www.carvewright.com
Please visit the manufacturer’s website
for more information about the CarveWright machines and see the new Pattern Depot at:
For Additional Patternsyou can add to your Designer software library, please visit:
www.carvewright.com
www.carvebuddy.com
Noughts & Crosses (Tic-Tac-Toe)
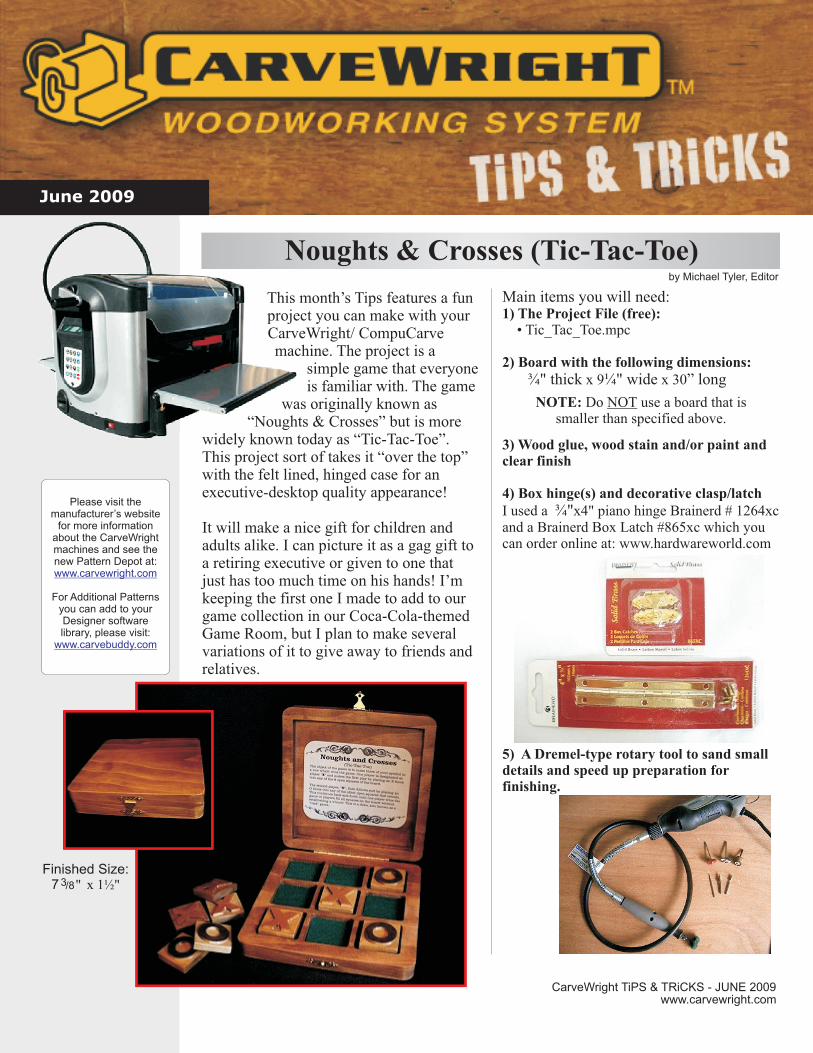
This month’s Tips features a fun project you can make with your CarveWright/ CompuCarve machine. The project is a
simple game that everyone is familiar with.
This project sort of takes it “over the top” with the felt lined, hinged case for an executive-desktop quality appearance!
The game was originally known as
“Noughts & Crosses” but is more widely known today as “Tic-Tac-Toe”.
It will make a nice gift for children and adults alike. I can picture it as a gag gift to a retiring executive or given to one that just has too much time on his hands! I’m keeping the first one I made to add to our game collection in our Coca-Cola-themed Game Room, but I plan to make several variations of it to give away to friends and relatives.
by Michael Tyler, Editor
Finished Size: 37 /8" x 1½"

Page 2
Noughts & Crosses (Tic-Tac-Toe)STEP 1Start your Designer software and open the .mpc file.(fig. 1a)
All you need to do at this point is upload the project file to your memory card. (File/Upload). When you upload, you may or may not get a pop-up window with an “Auto-Jig” warning message (fig. 1b)
If you do see the message, you may safely click on “Ignore” because the actual board will be large enough that it won’t cause any problems at all. You may also see a “Hidden Carvings” window pop-up on your screen - just click “OK”. After the project is compiled, select “Best” or “Optimal” for the File Quality setting and upload the mpc project file to your memory card. Insert the card into your machine and load a board that measures the appropriate dimension specified for the mpc (see page 1 for board dimensions).
Follow the prompts on your machine’s LCD carefully. I have outlined the steps for you in Step 2...
fig. 1b
STEP 2You will see “Project Menu” on your LCD display. Press “1” then scroll to the Tic_Tac_Toe.mpc and press the green ENTER button to select it. Then follow the additional prompts....
• Stay Under Rollers - press 1) YES
• DO NOT RESIZE or SCALE any projects! If ever prompted, always keep the original size. No scaling!
• How to Place... - press 1) Center
• Cut Board to Size? - press 2) NO
• Select Cutting Bit: 1/8" Cutting - Press ENTER. The machine will move the bit holder to the center of the machine in preparation for the bit installation.
• Load Bit:1/8" Cutting -Insert your 1/8" cutting bit, then press the green ENTER button.
• Select Carving Bit: 1/16" Carving - Press the green ENTER button. (Moves to center of machine.)
• Load Bit: 1/16" Carving - Remove the 1/8" cutting bit, and insert your 1/16" carving bit, then press the green ENTER button. After homing and finding surface, the machine will begin the carving process.
• After it is done carving, you will be prompted to load your 1/8" cutting bit. Take out the 1/16" carving bit, clean the chuck (at every bit change), insert your 1/8" cutting bit, vacuum out excess sawdust debris, then press the green ENTER button. Cutouts are always performed last, after all raster carving is done.
• The machine will now proceed to perform the cutouts as it moves around the component outlines. It leaves little tabs to hold the parts in the board. When the machine is finished, remove your board and clean your machine of excess sawdust. Your board will look like this...(fig. 2)
fig. 1a
CarveWright TiPS & TRiCKS - JUNE 2009www.carvewright.com
or3¼ hrs.BEST
6 hrs. OPTIMAL
fig. 2

Page 3
STEP 3Separate all the pieces from the board with a utility knife or hobby saw, sand off the tabs then sand all the components to remove any fuzzies and undesirable tool marks. (fig. 3a)
Use a Dremel-type tool to make the job go faster in the tight corners and crevices. I also use emory boards cut at various angles to reach into tight spots by hand.(fig. 3b, 3c)
Tape the box halves tightly together and sand the edges flush with each other. Re-tape as necessary to access all edges. (fig. 3d)
(cont.)
With the box still taped together, mark the hinge position, pre-drill holes and screw on the hinge to the box. Remove the hinge and set aside while finishing. (fig. 3e)
STEP 4 - FinishingApply stain/paint and clearcoat of your choice. I recommend applying the finish as soon as possible after prepping to seal the wood and inhibit the wood from warping. Here’s what I used on my project...
BOX:- One very light coat of thinned Bullseye Sealcoat (2 parts sealer/3 parts Denatured alcohol)- Sanded again with 400-grit wet/dry sandpaper- Cabot Stain - Pecan #8127)- Three coats Minwax water-based Satin polycrylic
X and O Blocks:- One very light coat of thinned Bullseye Sealcoat (2 parts sealer/3 parts Denatured alcohol)- Sanded again- Painted the X’s with slightly thinned Burnt Umber #20524 Apple Barrel brand acrylic paint (fig. 4a)- Painted the O’s with slightly thinned Golden Brown #20512 Apple Barrel brand acrylic paint- After the paint dried, I stained all the blocks with Minwax Stain - Puritan Pine #218)- Three coats Minwax water-based Satin polycrylic
fig. 4a
CarveWright TiPS & TRiCKS - JUNE 2009www.carvewright.com
Noughts & Crosses (Tic-Tac-Toe)
fig. 3a
fig. 3b
fig. 3c
fig. 3d
fig. 3e

Page 4
STEP 4 - Finishing (cont.)Reinstall the hinge and install your box latch after all parts are dry. (fig. 4b, 4c)
I cut felt squares from self-adhesive felt sheets (fig. 4d) (available at craft stores such as Michael’s Arts & Crafts). I removed the adhesive backing and pressed the felt squares into each of the nine block recesses. (fig. 4e)
I made an “instruction sheet” and printed it outfrom a Laser Printer (
. I glued the cut-out instructions to the lid recess using Mod-Podge brushed evenly on the back (white glue would probably work just as well). Press the sheet down and remove air bubbles by gently smoothing from the center.(fig. 4f)
When the glue was dry, I coated the instruction sheet and lid recess with 2 more light coats of MinWax water-based Polycrlic. (fig. 4g)
IN CONCLUSIONI hope you enjoyed this project! There are many ways you can customize your game box to suit any occasion. Some ideas include centerline V-carve lettering on the backside (top of box lid), tole-painting a floral design on the box, use golf leaf, rub-on stencils, rubber stamp designs, paint it a patriotic theme, give it an aged, “antique-look”. Or, you can eliminate the box lid altogether and just carve the tray and blocks - use blank magnetic business cards cut to size for the tray recesses and back of the blocks to make it a travel game - - - so many possibilities!
on ivory-colored paper I printed it with a laser printer because I wasn’t sure whether the ink would run if I used an Ink-Jet printer)
(cont.)
Michael Tyler - Editor
CarveWright TiPS & TRiCKS - JUNE 2009www.carvewright.com
Noughts & Crosses (Tic-Tac-Toe)
fig. 4b
fig. 4c
fig. 4d
fig. 4e
fig. 4f
fig. 4g

Noughts and Crosses(Tic-Tac-Toe)
The object of the game is to make three of your symbol in a row which wins the game. One player is designated as player “X” and makes the first play by placing an X block into any of the 9 open squares of the board.
The second player, “O”, then follows suit by placing an O block into any of the other open squares that remain. This continues back-and-forth until one player wins the game or players fill all squares on the board without establishing a winner. This is a draw, also known as a “Cats” game.
Print out on a Laser Printer, cut out along the lines and glue into the lid. Apply 2 light coats of clear finish to protect the
paper after the glue has dried.
Noughts & Crosses (Tic-Tac-Toe)Instruction Sheet
Page 5
RESOURCES...There are numerous resources for the CarveWright/CompuCarve owner to make their experience with these machines much more enjoyable. Please sign up on the to have the monthly newsletters automatically delivered to your email address each month. You’ll see a “Join Our Mailing List” section. Just fill in the form and you’ll be all set! Every owner should join the where fellow users share their experiences and knowledge with these machines on a daily basis. It is a FREE service that you will surely appreciate. A handy Search Feature helps you find answers to any questions you may have.
CarveWright Homepage
CarveWright User Forum
Additional Resources
The trademarks, service marks and logos (the “Trademarks”) used and displayed here are registered and unregistered Trademarks of LHR and others.
You can download the free mpc layout for the Naughts & Crosses Project from the following link:
http://www.carvebuddy.com/free_stuff_page_2.html
(you must save the Tic_Tac_Toe.zip file to your computer hard drive, then unzip it before you can open the mpc)
Page 6
Special thanks to Michael Tyler of
for providingthe content for this issue of
CarveWright TiPS and TRiCKS.
www.CarveBuddy.com
CarveWright TiPS & TRiCKS - JUNE 2009www.carvewright.com