Nokia Intellisync Wireless Email Administrator’s Guide
58
Published December 2007 Nokia Intellisync Wireless Email Administrator’s Guide Version 8.5
Transcript of Nokia Intellisync Wireless Email Administrator’s Guide
Published December 2007
Nokia Intellisync Wireless EmailAdministrator’s Guide
Version 8.5

COPYRIGHT©2007 Nokia. All rights reserved.Rights reserved under the copyright laws of the United States.
RESTRICTED RIGHTS LEGENDUse, duplication, or disclosure by the United States Government is subject to restrictions as set forth in subparagraph (c)(1)(ii) of the Rights in Technical Data and Computer Software clause at DFARS 252.227-7013.
Notwithstanding any other license agreement that may pertain to, or accompany the delivery of, this computer software, the rights of the United States Government regarding its use, reproduction, and disclosure are as set forth in the Commercial Computer Software-Restricted Rights clause at FAR 52.227-19.
IMPORTANT NOTE TO USERS This software and hardware is provided by Nokia Inc. as is and any express or implied warranties, including, but not limited to, implied warranties of merchantability and fitness for a particular purpose are disclaimed. In no event shall Nokia, or its affiliates, subsidiaries or suppliers be liable for any direct, indirect, incidental, special, exemplary, or consequential damages (including, but not limited to, procurement of substitute goods or services; loss of use, data, or profits; or business interruption) however caused and on any theory of liability, whether in contract, strict liability, or tort (including negligence or otherwise) arising in any way out of the use of this software, even if advised of the possibility of such damage.
Nokia reserves the right to make changes without further notice to any products herein.
TRADEMARKS Nokia is a registered trademark of Nokia Corporation. Synchrologic, Mobile Suite, RealSync, and Intellisync are trademarks of Nokia. Other products mentioned in this document are trademarks or registered trademarks of their respective holders.
060101
2 Nokia Intellisync Wireless Email Administrator’s Guide
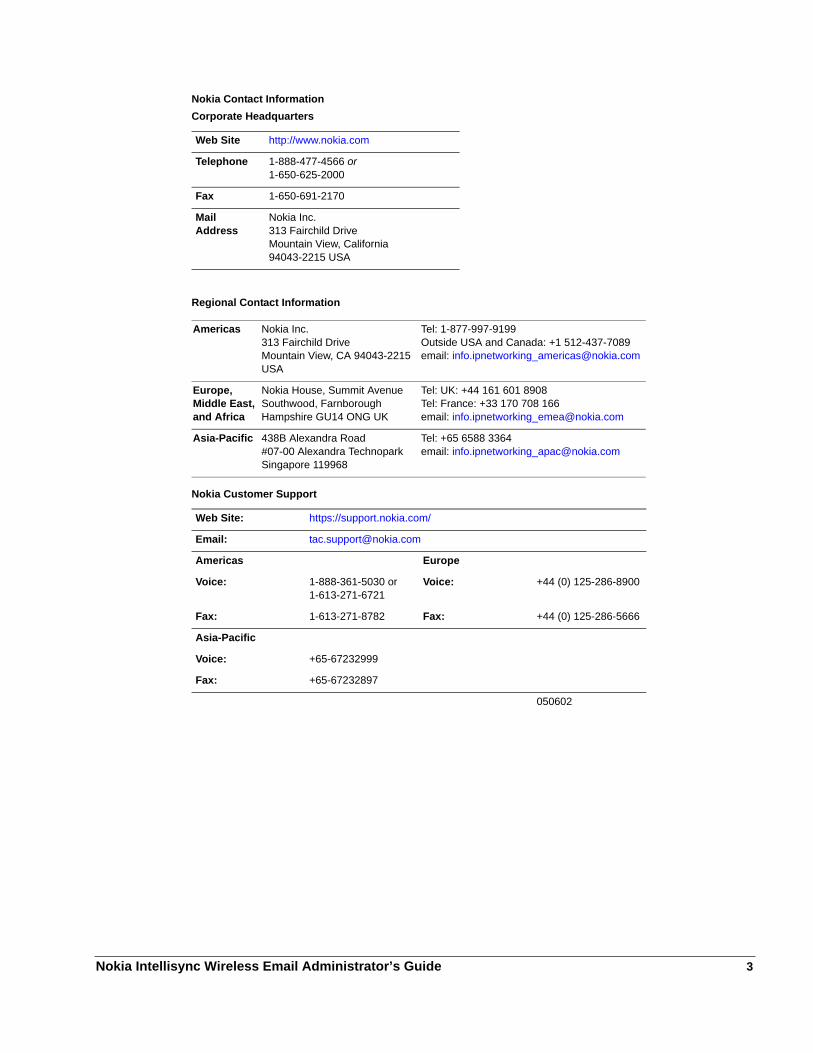
Nokia Contact InformationCorporate Headquarters
Regional Contact Information
Nokia Customer Support
Web Site http://www.nokia.com
Telephone 1-888-477-4566 or 1-650-625-2000
Fax 1-650-691-2170
Mail Address
Nokia Inc.313 Fairchild DriveMountain View, California94043-2215 USA
Americas Nokia Inc.313 Fairchild DriveMountain View, CA 94043-2215USA
Tel: 1-877-997-9199Outside USA and Canada: +1 512-437-7089email: [email protected]
Europe, Middle East, and Africa
Nokia House, Summit AvenueSouthwood, FarnboroughHampshire GU14 ONG UK
Tel: UK: +44 161 601 8908Tel: France: +33 170 708 166email: [email protected]
Asia-Pacific 438B Alexandra Road#07-00 Alexandra TechnoparkSingapore 119968
Tel: +65 6588 3364email: [email protected]
Web Site: https://support.nokia.com/
Email: [email protected]
Americas Europe
Voice: 1-888-361-5030 or 1-613-271-6721
Voice: +44 (0) 125-286-8900
Fax: 1-613-271-8782 Fax: +44 (0) 125-286-5666
Asia-Pacific
Voice: +65-67232999
Fax: +65-67232897
050602
Nokia Intellisync Wireless Email Administrator’s Guide 3

4 Nokia Intellisync Wireless Email Administrator’s Guide

Contents
About this Guide . . . . . . . . . . . . . . . . . . . . . . . . . . . . . . . . . . . . . . . . . . . . . . . . . . . 9In This Guide . . . . . . . . . . . . . . . . . . . . . . . . . . . . . . . . . . . . . . . . . . . . . . . . . . . . . . . 9Conventions This Guide Uses . . . . . . . . . . . . . . . . . . . . . . . . . . . . . . . . . . . . . . . . . 10
Notices . . . . . . . . . . . . . . . . . . . . . . . . . . . . . . . . . . . . . . . . . . . . . . . . . . . . . . . . . 10Command-Line Conventions. . . . . . . . . . . . . . . . . . . . . . . . . . . . . . . . . . . . . . . . . 10Text Conventions . . . . . . . . . . . . . . . . . . . . . . . . . . . . . . . . . . . . . . . . . . . . . . . . . 11
Related Documentation . . . . . . . . . . . . . . . . . . . . . . . . . . . . . . . . . . . . . . . . . . . . . . 12Accessing Server Documentation . . . . . . . . . . . . . . . . . . . . . . . . . . . . . . . . . . . . . 12Assessing Server Online Help. . . . . . . . . . . . . . . . . . . . . . . . . . . . . . . . . . . . . . . . 13Accessing Client Documentation. . . . . . . . . . . . . . . . . . . . . . . . . . . . . . . . . . . . . . 13
Client Installation and Setup Guides . . . . . . . . . . . . . . . . . . . . . . . . . . . . . . . . . 13Client Online Help . . . . . . . . . . . . . . . . . . . . . . . . . . . . . . . . . . . . . . . . . . . . . . . 14
1 Nokia Intellisync Mobile Suite . . . . . . . . . . . . . . . . . . . . . . . . . . . . . . . . . . . . . . . 15Overview . . . . . . . . . . . . . . . . . . . . . . . . . . . . . . . . . . . . . . . . . . . . . . . . . . . . . . . . . 15Nokia Intellisync Mobile Suite Products . . . . . . . . . . . . . . . . . . . . . . . . . . . . . . . . . . 16
WebAdmin Console. . . . . . . . . . . . . . . . . . . . . . . . . . . . . . . . . . . . . . . . . . . . . . . . 16Wireless Email. . . . . . . . . . . . . . . . . . . . . . . . . . . . . . . . . . . . . . . . . . . . . . . . . . . . 17Application Sync . . . . . . . . . . . . . . . . . . . . . . . . . . . . . . . . . . . . . . . . . . . . . . . . . . 17File Sync . . . . . . . . . . . . . . . . . . . . . . . . . . . . . . . . . . . . . . . . . . . . . . . . . . . . . . . . 18Device Management . . . . . . . . . . . . . . . . . . . . . . . . . . . . . . . . . . . . . . . . . . . . . . . 18Nokia Intellisync Mobile Suite Client . . . . . . . . . . . . . . . . . . . . . . . . . . . . . . . . . . . 19Nokia Intellisync Mobile Gateway . . . . . . . . . . . . . . . . . . . . . . . . . . . . . . . . . . . . . 19Server Database . . . . . . . . . . . . . . . . . . . . . . . . . . . . . . . . . . . . . . . . . . . . . . . . . . 19
2 Using WebAdmin Console . . . . . . . . . . . . . . . . . . . . . . . . . . . . . . . . . . . . . . . . . . 21Overview . . . . . . . . . . . . . . . . . . . . . . . . . . . . . . . . . . . . . . . . . . . . . . . . . . . . . . . . . 21Getting Started . . . . . . . . . . . . . . . . . . . . . . . . . . . . . . . . . . . . . . . . . . . . . . . . . . . . . 21Operating Conventions. . . . . . . . . . . . . . . . . . . . . . . . . . . . . . . . . . . . . . . . . . . . . . . 22
3 Managing System Settings . . . . . . . . . . . . . . . . . . . . . . . . . . . . . . . . . . . . . . . . . . 23Overview . . . . . . . . . . . . . . . . . . . . . . . . . . . . . . . . . . . . . . . . . . . . . . . . . . . . . . . . . 23General Settings. . . . . . . . . . . . . . . . . . . . . . . . . . . . . . . . . . . . . . . . . . . . . . . . . . . . 23Server Names Settings . . . . . . . . . . . . . . . . . . . . . . . . . . . . . . . . . . . . . . . . . . . . . . 24Server Key Settings . . . . . . . . . . . . . . . . . . . . . . . . . . . . . . . . . . . . . . . . . . . . . . . . . 24Authentication Settings. . . . . . . . . . . . . . . . . . . . . . . . . . . . . . . . . . . . . . . . . . . . . . . 24
Nokia Intellisync Wireless Email Administrator’s Guide 5
Authentication Sources . . . . . . . . . . . . . . . . . . . . . . . . . . . . . . . . . . . . . . . . . . . . 25Directory Settings . . . . . . . . . . . . . . . . . . . . . . . . . . . . . . . . . . . . . . . . . . . . . . . . . . 25Secure Gateway Settings . . . . . . . . . . . . . . . . . . . . . . . . . . . . . . . . . . . . . . . . . . . . 25License Settings . . . . . . . . . . . . . . . . . . . . . . . . . . . . . . . . . . . . . . . . . . . . . . . . . . . 25
4 Managing Users . . . . . . . . . . . . . . . . . . . . . . . . . . . . . . . . . . . . . . . . . . . . . . . . . . . 27Overview . . . . . . . . . . . . . . . . . . . . . . . . . . . . . . . . . . . . . . . . . . . . . . . . . . . . . . . . . 27Adding New Users . . . . . . . . . . . . . . . . . . . . . . . . . . . . . . . . . . . . . . . . . . . . . . . . . 27
Adding Users Manually . . . . . . . . . . . . . . . . . . . . . . . . . . . . . . . . . . . . . . . . . . . . 28Importing Users From a Text File. . . . . . . . . . . . . . . . . . . . . . . . . . . . . . . . . . . . . 28
Using Tokens with Text Files . . . . . . . . . . . . . . . . . . . . . . . . . . . . . . . . . . . . . . 28Time Zone Reference List . . . . . . . . . . . . . . . . . . . . . . . . . . . . . . . . . . . . . . . . . 30Adding Users Through Auto-discovery . . . . . . . . . . . . . . . . . . . . . . . . . . . . . . . 33
Sending an Install SMS Message . . . . . . . . . . . . . . . . . . . . . . . . . . . . . . . . . . . . 33Deleting Users . . . . . . . . . . . . . . . . . . . . . . . . . . . . . . . . . . . . . . . . . . . . . . . . . . . 33Exporting User Information . . . . . . . . . . . . . . . . . . . . . . . . . . . . . . . . . . . . . . . . . 33Printing User Information . . . . . . . . . . . . . . . . . . . . . . . . . . . . . . . . . . . . . . . . . . . 33Modifying a User’s Account . . . . . . . . . . . . . . . . . . . . . . . . . . . . . . . . . . . . . . . . . 33Viewing a User’s Synchronization Activity . . . . . . . . . . . . . . . . . . . . . . . . . . . . . . 33Assigning Users to Groups . . . . . . . . . . . . . . . . . . . . . . . . . . . . . . . . . . . . . . . . . 34
5 Managing Devices . . . . . . . . . . . . . . . . . . . . . . . . . . . . . . . . . . . . . . . . . . . . . . . . . 35Overview . . . . . . . . . . . . . . . . . . . . . . . . . . . . . . . . . . . . . . . . . . . . . . . . . . . . . . . . . 35Deleting Devices . . . . . . . . . . . . . . . . . . . . . . . . . . . . . . . . . . . . . . . . . . . . . . . . . . . 35Exporting Device Information . . . . . . . . . . . . . . . . . . . . . . . . . . . . . . . . . . . . . . . . . 35Printing Device Information . . . . . . . . . . . . . . . . . . . . . . . . . . . . . . . . . . . . . . . . . . . 36Viewing and Modifying Device Information . . . . . . . . . . . . . . . . . . . . . . . . . . . . . . . 36Viewing and Managing Push Log Information. . . . . . . . . . . . . . . . . . . . . . . . . . . . . 36
Exporting Push Log Information. . . . . . . . . . . . . . . . . . . . . . . . . . . . . . . . . . . . . . 36Printing Push Log Information . . . . . . . . . . . . . . . . . . . . . . . . . . . . . . . . . . . . . . . 36
Viewing and Modifying Theft/Loss Protection Information . . . . . . . . . . . . . . . . . . . 36
6 Managing Groups . . . . . . . . . . . . . . . . . . . . . . . . . . . . . . . . . . . . . . . . . . . . . . . . . . 37Overview . . . . . . . . . . . . . . . . . . . . . . . . . . . . . . . . . . . . . . . . . . . . . . . . . . . . . . . . . 37Adding New Groups . . . . . . . . . . . . . . . . . . . . . . . . . . . . . . . . . . . . . . . . . . . . . . . . 37Viewing and Modifying a Group’s Hierarchy . . . . . . . . . . . . . . . . . . . . . . . . . . . . . . 38Deleting Groups . . . . . . . . . . . . . . . . . . . . . . . . . . . . . . . . . . . . . . . . . . . . . . . . . . . 38Exporting Group Information . . . . . . . . . . . . . . . . . . . . . . . . . . . . . . . . . . . . . . . . . . 38Printing Group Information . . . . . . . . . . . . . . . . . . . . . . . . . . . . . . . . . . . . . . . . . . . 38Viewing and Modifying a Group’s Information. . . . . . . . . . . . . . . . . . . . . . . . . . . . . 38Managing Parent Groups . . . . . . . . . . . . . . . . . . . . . . . . . . . . . . . . . . . . . . . . . . . . 38Managing Child Groups . . . . . . . . . . . . . . . . . . . . . . . . . . . . . . . . . . . . . . . . . . . . . 38Assigning Users to Groups . . . . . . . . . . . . . . . . . . . . . . . . . . . . . . . . . . . . . . . . . . . 39
6 Nokia Intellisync Wireless Email Administrator’s Guide

7 Managing User Settings . . . . . . . . . . . . . . . . . . . . . . . . . . . . . . . . . . . . . . . . . . . . 41Overview . . . . . . . . . . . . . . . . . . . . . . . . . . . . . . . . . . . . . . . . . . . . . . . . . . . . . . . . . 41General User Settings . . . . . . . . . . . . . . . . . . . . . . . . . . . . . . . . . . . . . . . . . . . . . . . 42
Client Install/Deployment User Settings . . . . . . . . . . . . . . . . . . . . . . . . . . . . . . . . 42Generating a Standalone Install Package . . . . . . . . . . . . . . . . . . . . . . . . . . . . . 42
Push/Interval Sync User Settings . . . . . . . . . . . . . . . . . . . . . . . . . . . . . . . . . . . . . 42Security/Encryption User Settings. . . . . . . . . . . . . . . . . . . . . . . . . . . . . . . . . . . . . 42
Configuring User Credentials Settings . . . . . . . . . . . . . . . . . . . . . . . . . . . . . . . . 43Configuring Power-on Password Settings . . . . . . . . . . . . . . . . . . . . . . . . . . . . . 43Generating Random Password Settings . . . . . . . . . . . . . . . . . . . . . . . . . . . . . . 43
Web/WAP Security User Settings . . . . . . . . . . . . . . . . . . . . . . . . . . . . . . . . . . . . . 43Wireless Email Settings . . . . . . . . . . . . . . . . . . . . . . . . . . . . . . . . . . . . . . . . . . . . . . 44
Wireless Email User Settings . . . . . . . . . . . . . . . . . . . . . . . . . . . . . . . . . . . . . . . . 44Configuring Wireless Email Performance Settings. . . . . . . . . . . . . . . . . . . . . . . 44Configuring Wireless Email Size Limits Settings . . . . . . . . . . . . . . . . . . . . . . . . 44
Novell GroupWise Wireless Email Settings. . . . . . . . . . . . . . . . . . . . . . . . . . . . . . 45Configuring GroupWise Access Settings . . . . . . . . . . . . . . . . . . . . . . . . . . . . . . 45Configuring GroupWise User Settings . . . . . . . . . . . . . . . . . . . . . . . . . . . . . . . . 45
Push Wireless Email Settings . . . . . . . . . . . . . . . . . . . . . . . . . . . . . . . . . . . . . . . . 45Alerts Wireless Email Settings . . . . . . . . . . . . . . . . . . . . . . . . . . . . . . . . . . . . . . . 45Filter Wireless Email Settings . . . . . . . . . . . . . . . . . . . . . . . . . . . . . . . . . . . . . . . . 45
Configuring Calendar Filter Settings . . . . . . . . . . . . . . . . . . . . . . . . . . . . . . . . . 46Configuring Contacts Filter Settings. . . . . . . . . . . . . . . . . . . . . . . . . . . . . . . . . . 46Configuring Tasks Filter Settings . . . . . . . . . . . . . . . . . . . . . . . . . . . . . . . . . . . . 46Configuring Email Filter Settings . . . . . . . . . . . . . . . . . . . . . . . . . . . . . . . . . . . . 46Configuring Memos Filter Settings . . . . . . . . . . . . . . . . . . . . . . . . . . . . . . . . . . . 46
Inbox and Outbox Wireless Email Settings . . . . . . . . . . . . . . . . . . . . . . . . . . . . . . 46Sent Items Wireless Email Settings . . . . . . . . . . . . . . . . . . . . . . . . . . . . . . . . . . . 46Drafts Wireless Email Settings . . . . . . . . . . . . . . . . . . . . . . . . . . . . . . . . . . . . . . . 47PIM Wireless Email Settings . . . . . . . . . . . . . . . . . . . . . . . . . . . . . . . . . . . . . . . . . 47
8 Management Settings . . . . . . . . . . . . . . . . . . . . . . . . . . . . . . . . . . . . . . . . . . . . . . 49Overview . . . . . . . . . . . . . . . . . . . . . . . . . . . . . . . . . . . . . . . . . . . . . . . . . . . . . . . . . 49Servers . . . . . . . . . . . . . . . . . . . . . . . . . . . . . . . . . . . . . . . . . . . . . . . . . . . . . . . . . . . 49
Deleting Servers . . . . . . . . . . . . . . . . . . . . . . . . . . . . . . . . . . . . . . . . . . . . . . . . . . 49Exporting Server Information. . . . . . . . . . . . . . . . . . . . . . . . . . . . . . . . . . . . . . . . . 50Printing Server Information . . . . . . . . . . . . . . . . . . . . . . . . . . . . . . . . . . . . . . . . . . 50View Specific Server Information . . . . . . . . . . . . . . . . . . . . . . . . . . . . . . . . . . . . . 50Activate or Deactivate a Server. . . . . . . . . . . . . . . . . . . . . . . . . . . . . . . . . . . . . . . 50
Administrators . . . . . . . . . . . . . . . . . . . . . . . . . . . . . . . . . . . . . . . . . . . . . . . . . . . . . 50Adding Administrators . . . . . . . . . . . . . . . . . . . . . . . . . . . . . . . . . . . . . . . . . . . . . . 50Deleting Administrators . . . . . . . . . . . . . . . . . . . . . . . . . . . . . . . . . . . . . . . . . . . . . 50Exporting Administrators’ Information . . . . . . . . . . . . . . . . . . . . . . . . . . . . . . . . . . 51
Nokia Intellisync Wireless Email Administrator’s Guide 7
Printing Administrators’ Information . . . . . . . . . . . . . . . . . . . . . . . . . . . . . . . . . . . 51View and Modifying an Administrator’s Information . . . . . . . . . . . . . . . . . . . . . . . 51Activate or Deactivate an Administrator . . . . . . . . . . . . . . . . . . . . . . . . . . . . . . . . 51
9 Managing Reports . . . . . . . . . . . . . . . . . . . . . . . . . . . . . . . . . . . . . . . . . . . . . . . . . 53Overview . . . . . . . . . . . . . . . . . . . . . . . . . . . . . . . . . . . . . . . . . . . . . . . . . . . . . . . . . 53Device Reports . . . . . . . . . . . . . . . . . . . . . . . . . . . . . . . . . . . . . . . . . . . . . . . . . . . . 53
Device Last Connection Report . . . . . . . . . . . . . . . . . . . . . . . . . . . . . . . . . . . . . . 53Performance Reports . . . . . . . . . . . . . . . . . . . . . . . . . . . . . . . . . . . . . . . . . . . . . . . 53
System Sync Times Report . . . . . . . . . . . . . . . . . . . . . . . . . . . . . . . . . . . . . . . . . 54Sync Per Hour Report . . . . . . . . . . . . . . . . . . . . . . . . . . . . . . . . . . . . . . . . . . . . . 54
License Report . . . . . . . . . . . . . . . . . . . . . . . . . . . . . . . . . . . . . . . . . . . . . . . . . . . . 54Select License to access the License Report.. . . . . . . . . . . . . . . . . . . . . . . . . . 54
10 Managing Logs . . . . . . . . . . . . . . . . . . . . . . . . . . . . . . . . . . . . . . . . . . . . . . . . . . . . 55Overview . . . . . . . . . . . . . . . . . . . . . . . . . . . . . . . . . . . . . . . . . . . . . . . . . . . . . . . . . 55Audit Trail Log . . . . . . . . . . . . . . . . . . . . . . . . . . . . . . . . . . . . . . . . . . . . . . . . . . . . . 55User Activity Log . . . . . . . . . . . . . . . . . . . . . . . . . . . . . . . . . . . . . . . . . . . . . . . . . . . 55Server Activity Log . . . . . . . . . . . . . . . . . . . . . . . . . . . . . . . . . . . . . . . . . . . . . . . . . 56
8 Nokia Intellisync Wireless Email Administrator’s Guide

About this Guide
In This GuideThis guide is organized into the following chapters.
Chapter 1, “Nokia Intellisync Mobile Suite” introduces you to Nokia Intellisync Mobile Suite and provides information for using the application effectively.Chapter 2, “Using WebAdmin Console.” provides an overview and instructions for maintaining data on the server using WebAdmin Console.Chapter 3, “Managing System Settings” provides information on managing server-related settings.Chapter 4, “Managing Users” provides information on managing user accounts.Chapter 5, “Managing Devices” provides information on managing devices.Chapter 6, “Managing Groups” provides information on managing groups of users.Chapter 7, “Managing User Settings” provides information on managing general and email settings for users.Chapter 8, “Management Settings” provides information on managing servers and administrators.Chapter 9, “Managing Reports” provides information on running reports.Chapter 10, “Managing Logs” provides information on user and server activity logs.
Additional information provided in this section is as follows:Conventions This Guide UsesRelated DocumentationRelated Documentation
Nokia Intellisync Wireless Email Administrator’s Guide 9
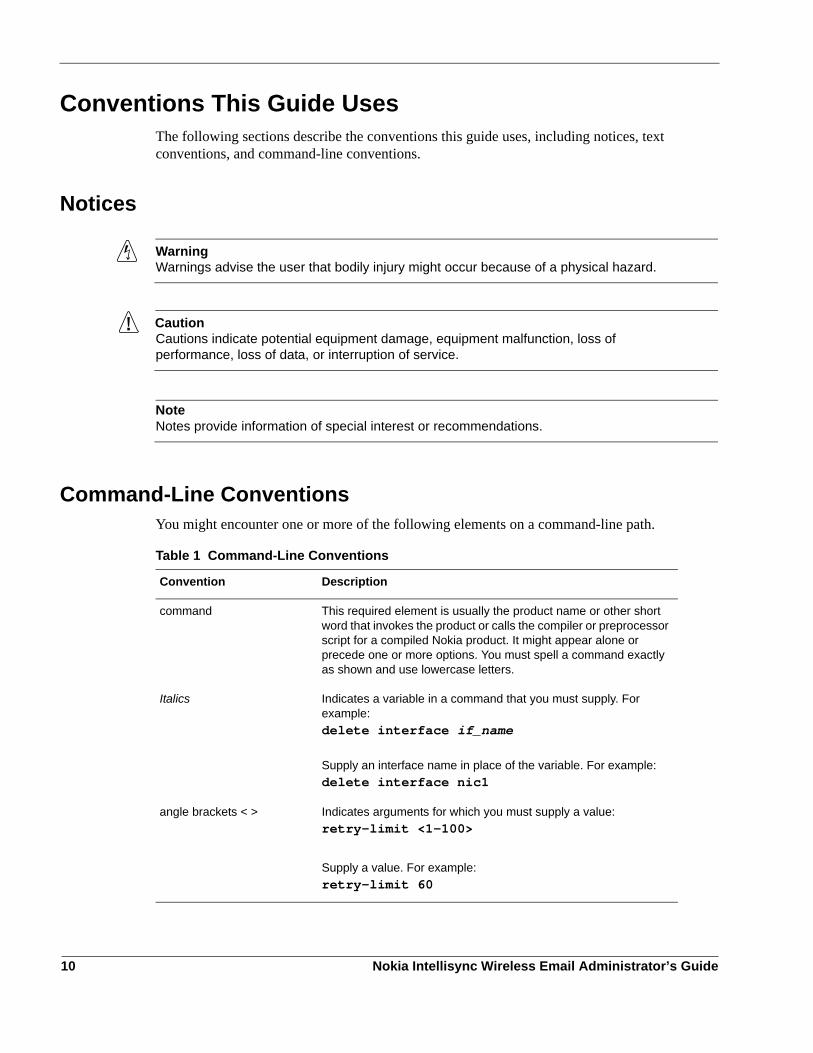
Conventions This Guide UsesThe following sections describe the conventions this guide uses, including notices, text conventions, and command-line conventions.
Notices
WarningWarnings advise the user that bodily injury might occur because of a physical hazard.
CautionCautions indicate potential equipment damage, equipment malfunction, loss of performance, loss of data, or interruption of service.
NoteNotes provide information of special interest or recommendations.
Command-Line ConventionsYou might encounter one or more of the following elements on a command-line path.
Table 1 Command-Line Conventions
Convention Description
command This required element is usually the product name or other short word that invokes the product or calls the compiler or preprocessor script for a compiled Nokia product. It might appear alone or precede one or more options. You must spell a command exactly as shown and use lowercase letters.
Italics Indicates a variable in a command that you must supply. For example:delete interface if_name
Supply an interface name in place of the variable. For example:delete interface nic1
angle brackets < > Indicates arguments for which you must supply a value:retry-limit <1–100>
Supply a value. For example:retry-limit 60
10 Nokia Intellisync Wireless Email Administrator’s Guide

Conventions This Guide Uses
Text ConventionsTable 2 describes the text conventions in this guide.
Square brackets [ ] Indicates optional arguments.delete [slot slot_num]
For example:delete slot 3
Vertical bars, also called a pipe (|)
Separates alternative, mutually exclusive elements. framing <sonet | sdh>
To complete the command, supply the value. For example:framing sonetorframing sdh
-flag A flag is usually an abbreviation for a function, menu, or option name, or for a compiler or preprocessor argument. You must enter a flag exactly as shown, including the preceding hyphen.
.ext A filename extension, such as .ext, might follow a variable that represents a filename. Type this extension exactly as shown, immediately after the name of the file. The extension might be optional in certain products.
( . , ; + * - / ) Punctuation and mathematical notations are literal symbols that you must enter exactly as shown.
' ' Single quotation marks are literal symbols that you must enter as shown.
Table 1 Command-Line Conventions (continued)
Convention Description
Table 2 Text Conventions
Convention Description
monospace font Indicates command syntax, or represents computer or screen output, for example:Log error 12453
Key names Keys that you press simultaneously are linked by a plus sign (+):Press Ctrl + Alt + Del.
Menu commands Menu commands are separated by a greater than sign (>):Choose File > Open.
Nokia Intellisync Wireless Email Administrator’s Guide 11

Related DocumentationNokia offers a common framework for the Intellisync Mobile Suite products. For this reason, there are electronic manuals and online help systems that cover the entire suite, plus additional resources for specific products.For instructions to access documentation, see the following topics:
“Accessing Server Documentation”“Accessing Client Documentation”
Accessing Server DocumentationThe following server guides are available for Nokia Intellisync Mobile Suite. These documents are available on the Nokia Support Site (http://support.nokia.com) in Adobe Portable Document Format (PDF) or through your system administrator.
Nokia Intellisync Wireless Email Linux Installation Guide (LinuxWEInstallGdeEN.pdf) Includes the installation requirements and other information you need to install Nokia Intellisync Wireless Email software for servers and clients.
Nokia Intellisync Mobile Suite Release Notes (ReleaseNotesEN.pdf) Includes important information you should know before you install and use Nokia Intellisync Mobile Suite. This document includes important late-breaking information that may not be included in other documentation. This document applies to the entire suite and is shared with other Nokia Intellisync Mobile Suite products.
Nokia Intellisync Wireless Email Administrator’s Guide (WirelessEmailAdminGuideEN.pdf) Covers system administrative functions for managing the Wireless Email server and client operation.
The words enter and type Enter indicates you type something and then press the Return or Enter key.Do not press the Return or Enter key when an instruction says type.
Italics • Emphasizes a point or denotes new terms at the place where they are defined in the text.
• Indicates an external book title reference.• Indicates a variable in a command:delete interface if_name
Table 2 Text Conventions (continued)
Convention Description
12 Nokia Intellisync Wireless Email Administrator’s Guide

Related Documentation
Nokia Intellisync Secure Gateway Administrator’s Guide (SecureGatewayGdeEN.pdf) Written as a companion book to the Nokia Intellisync Wireless Email Administrator’s Guide. Covers administrative functions for managing the Secure Gateway.
Assessing Server Online HelpThe following online help systems are embedded in the server applications.
Nokia Intellisync Mobile Suite WebAdmin Console Help Includes information for managing the Intellisync Mobile Suite server using a Web browser.
Accessing Client DocumentationThe following electronic client documents are available on the Nokia Support Site (http://support.nokia.com) in Adobe Portable Document Format (PDF) or through your system administrator.
Client Installation and Setup GuidesEach guide includes information for installing software on devices using a specific platform, configuring synchronization settings, and synchronizing for the first time.
NoteThe client guides are not installed as part of the client installation. You decide whether to provide this documentation to your users.
Table 3 Client Guides
Name File Name
Intellisync Mobile Suite Client Guide–Palm OS Platform PalmUsersGuideEN.pdf
Intellisync Mobile Suite Client Guide–Pocket PC Platform PPCUsersGuideEN.pdf
Intellisync Mobile Suite Client Guide–Smartphone Platform SmartphoneUsersGuideEN.pdf
Intellisync Mobile Suite Client Guide–S60 3rd Edition Platform Symbian60_UsersGuideEN.pdf
Intellisync Mobile Suite Client Guide–S80 Platform Symbian80_UsersGuideEN.pdf
Intellisync Mobile Suite Client Guide–UIQ Platform SymbianUIQ_UsersGuideEN.pdf
Intellisync Mobile Suite Client Guide–UIQ 3rd Edition Platform SymbianUIQ3_UsersGuideEN.pdf
Intellisync Mobile Suite Client Guide–J2ME Platform J2ME_UsersGuideEN.pdf
Nokia Intellisync Wireless Email Administrator’s Guide 13
Client Online HelpThe following online help systems are embedded in the Wireless Email client application.
Nokia Intellisync PC Client (SynchroClientEN.chm) Includes information about using the Nokia Intellisync Mobile Suite client on a PC.
Intellisync Mobile Suite Web PIM Help Includes information about using the Nokia Intellisync Mobile Suite client using a Web browser.
14 Nokia Intellisync Wireless Email Administrator’s Guide

1 Nokia Intellisync Mobile Suite
OverviewNokia Intellisync Mobile Suite consists of both server and client components that facilitate interaction with the server. The server is the data synchronization host to which mobile devices connect. The Web-based administrative console on the server, known as WebAdmin Console, controls functions such as user authentication, user settings, communication, logging, and reporting, among others.Nokia Intellisync Mobile Suite is a collection of products designed to help you support your mobile workforce. This collection of products handles distribution, collection, and synchronization of your e-business data, documents, and applications. At any given time, your mobile employees have access to the same data and corporate applications as your LAN-connected employees.
Figure 1 Nokia Intellisync Mobile Suite Includes Software for Server and Clients
PDA
Laptop
Server
Mobile devices
WebAdmin Console and other important components run on the server.
Nokia Intellisync Mobile Suite
Nokia Intellisync Wireless Email Administrator’s Guide 15

1 Nokia Intellisync Mobile Suite
Nokia Intellisync Mobile Suite ProductsThe Nokia Intellisync Mobile Suite infrastructure contains the basic elements in your mobile solution. In addition to this framework, four separate products are available for you to purchase to support your mobile workforce. Nokia offers the following products as part of Nokia Intellisync Mobile Suite.
Wireless EmailApplication Sync File SyncDevice Management
These products snap into the Nokia Intellisync Mobile Suite framework. You can use the products together or separately.
Figure 2 Nokia Intellisync Mobile Suite with Products Installed
WebAdmin ConsoleWebAdmin Console is installed as part of the server installation and serves as the single application for managing many administrative tasks.
Managing user and system settingsManaging users, groups, and devicesRunning reports and viewing logsManaging servers and administratorsCollect and manage asset and inventory information
For information on using WebAdmin Console, see Chapter 2, “Using WebAdmin Console.”
Nokia Intellisync Mobile Suite
Nokia Intellisync Mobile Gateway
WebAdmin Console
Wireless Email
Application Sync
Device Management
File Sync
16 Nokia Intellisync Wireless Email Administrator’s Guide

Nokia Intellisync Mobile Suite Products
Wireless EmailWireless Email offers centralized email and personal information manager (PIM) synchronization for your users. Wireless Email allows users to synchronize email, contacts, memos, calendar, and to-do items among all their mobile devices, eliminating duplicate data entry. This same data is accessible from any Internet-ready mobile phone and Web browser on any computer connected to the Internet. For supported devices, you can set up the Push feature so users receive new email as it comes in, without any intervention from you.
Figure 3 Universal Synchronization Using Wireless Email.
Application SyncApplication Sync synchronizes and distributes relational data among client computers that are intermittently connected to a server. Application Sync supports data synchronization for multiple combinations of databases.Application Sync software is integrated with your company’s applications, enabling synchronization without changes to your application. Application Sync captures changes from every client user, stores the changes and forwards them to the users you specify in your data sharing rules. Because Application Sync sends only the changed data to specific users, you can reduce communication costs and security risks.
Nokia Intellisync Wireless Email
Laptop/Office PCHome PC
Mobile Phone
Wireless Device
Pager
Wireless Device
Nokia Intellisync Wireless Email Administrator’s Guide 17

1 Nokia Intellisync Mobile Suite
File SyncUsing File Sync, you can send files or content to mobile users and also collect files or content from users.File Sync is based on a publish-and-subscribe model. You can make files available to your users by creating packages called publications. These publications can remove directories, execute programs or scripts, copy files, delete files, move files, or rename files. You can also control who receives specific files by subscribing users to the files. File Sync can deliver documents of any file type, including Microsoft Word documents, Excel spreadsheets, and HTML pages. You can create and associate publications with specific users, thereby creating a subscription. As part of the publication package, you can assign actions or create instruction scripts to run functions such as editing registry entries or launching programs. After you associate a user with a publication, the user automatically receives updates to any file in that publication.
Device ManagementDevice Management allows the system administrator to collect and manage asset and inventory information for mobile devices, along with several other administrative functions in WebAdmin Console.
Manage theft/loss protection settingsAccess a user’s device remotelyRestrict the use of certain device hardware elementsBackup files from the users’ device to the server
You can schedule the collection of this asset information, as well as choose specific assets to include in those collections. Device Management also delivers software packages and updates to your client computers using the Publications feature. Using WebAdmin Console, you can set up publications for software installation and maintenance. These publications can accomplish a variety of tasks.
Remove directoriesExecute programs or scriptsCopy, delete, move, or rename filesReturn client system informationAdd or delete registry keys
You can require the client computer to receive these publications or send the publications upon request.
18 Nokia Intellisync Wireless Email Administrator’s Guide
Nokia Intellisync Mobile Suite Products
Nokia Intellisync Mobile Suite ClientThe Nokia Intellisync Mobile Suite client application provides users with easy access to information available through your server. The client application runs on client computers and mobile devices. This is the only application an end user needs to stay connected while away from the office. The client has an easy-to-use user interface and serves as the user’s launch pad for delivery of all mobile information. After a synchronization session, the user sees a summary of the new information. The user can also view summary information from previous sessions.Different versions of the Nokia Intellisync Mobile Suite client software are available for the following platforms.
J2ME PhonePalmPC Desktop or LaptopSymbian S60 2nd EditionSymbian S60 3rd EditionSymbian S80Symbian UIQ 2nd EditionSymbian UIQ 3rd EditionWindows Mobile Pocket PC and Windows CEWindows Mobile Smartphone
Nokia Intellisync Mobile GatewayThe Nokia Intellisync Mobile Gateway handles communication, connection, security and encryption, and user authentication. The Mobile Gateway is the connection between the server and the outside world. Mobile Gateway is installed as part of the server installation. The client software contains the components required to connect to the server through the Mobile Gateway.
Server DatabaseNokia Intellisync Mobile Suite requires a database to store your users, groups, logs, and other important data. Nokia Intellisync Mobile Suite works with the database to store and retrieve information as needed.The server installation program includes and establishes a database for a production environment. For a complete list of Linux installation requirements, see the Nokia Intellisync Wireless Email Linux Installation Guide. These documents are available on the Nokia Support Site at (http://support.nokia.com) in Adobe Portable Document Format (PDF).
Nokia Intellisync Wireless Email Administrator’s Guide 19

1 Nokia Intellisync Mobile Suite
20 Nokia Intellisync Wireless Email Administrator’s Guide
2 Using WebAdmin Console
OverviewWebAdmin Console is a Web-based application for managing administrative tasks on the server. WebAdmin Console installs automatically during the server installation, which makes it available for you to use immediately. Using WebAdmin Console, you can manage any of the following administrative functions.
Manage user and system settingsManage users, groups, and devicesManage servers and administratorsRunning reports and viewing logs
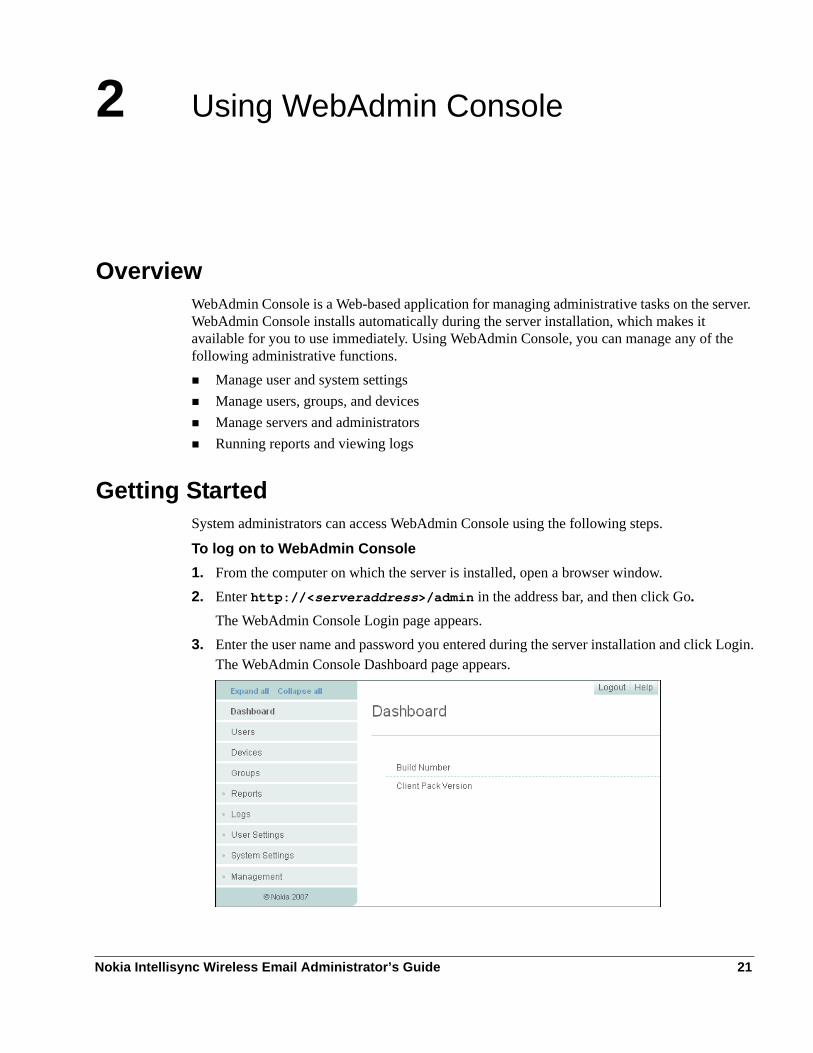
Getting StartedSystem administrators can access WebAdmin Console using the following steps.
To log on to WebAdmin Console1. From the computer on which the server is installed, open a browser window.2. Enter http://<serveraddress>/admin in the address bar, and then click Go.
The WebAdmin Console Login page appears.3. Enter the user name and password you entered during the server installation and click Login.
The WebAdmin Console Dashboard page appears.
Nokia Intellisync Wireless Email Administrator’s Guide 21

2 Using WebAdmin Console
Operating ConventionsWebAdmin Console provides a navigation frame on the left for access to various administrative options, or nodes. To view specific information, select the appropriate node from the navigation frame. For comprehensive instructions on using a specific node, click Help.Your license key determines which features are available in WebAdmin Console.
22 Nokia Intellisync Wireless Email Administrator’s Guide

3 Managing System Settings
OverviewThe System Settings node in WebAdmin Console provides easy access to manage server-related settings. From WebAdmin Console, select System Settings to access the following options.
General SettingsServer NamesServer KeyAuthenticationDirectoriesSecure GatewaysLicense
NoteWebAdmin Console provides comprehensive online help to assist you as you work with administrative tasks. In most cases, the online help provides more information and instructions than found in this guide. To access online help, click Help on any page in WebAdmin Console.
General SettingsFrom General Settings you can manage the following information.
Proxy server SMTP server for alerts and push Web site security settingsNightly maintenance schedulesClient language settings
To manage General Settings, select System Settings > General. To edit settings, click Edit.
Nokia Intellisync Wireless Email Administrator’s Guide 23

3 Managing System Settings
Server Names SettingsFrom Server Names Settings you can verify your external server names and confirm your external IP address/DNS names are correct. You can manage the following server information.
Web site server nameSync server nameNetwork push server and port Internal server name
To manage Server Names Settings, select System Settings > Server Names. To edit settings, click Edit.
Server Key SettingsFrom Server Key Settings you can enable a Server Key Exchange, a security feature that exchanges a unique key between the server and the client. You can manage the following server key information.
Server key exchange Server key length settingsDefault key settingsIssue a new key
To manage Server Key Settings, select System Settings > Server Names. To edit settings, click Edit. To issue a new key, click Issue New Key.
Authentication Settings Before a user can access your corporate computer system, the user’s identification must pass an authentication process. From Authentication Settings you can manage the following information.
Default password for Intellisync authenticationUser and device discovery settingsUser lockout settings
To manage Authentication Settings, select System Settings > Authentication. To edit settings, click Edit.
24 Nokia Intellisync Wireless Email Administrator’s Guide
Directory Settings
Authentication SourcesFrom Authentication Sources you can configure the GroupWise source that is used to authenticate users. To manage Authentication Sources, select System Settings > Authentication > Sources.
Directory SettingsFrom Directories Settings you can specify where you want to store Nokia Intellisync Mobile Suite data. You can manage the following directory information.
Multiple or single location for data storageRoot locationMobile Gateway message store locationWireless Email data locationClient deployment packages locationContent area location
To manage Directory Settings, select System Settings > Directory. To edit settings, click Edit.
Secure Gateway SettingsFrom Secure Gateways Settings you can view, add, delete, export, or print Secure Gateway information. To manage Secure Gateway Settings, select System Settings > Secure Gateways, and then click the appropriate option.
License SettingsYour license is based on the products and number of licenses you purchase. Evaluation licenses expire; however, production licenses do not expire. To upgrade your license or increase the number of licensed users, contact your sales representative. To view your license information, select System Settings > License. To add a new license key number, click Edit.
Nokia Intellisync Wireless Email Administrator’s Guide 25

3 Managing System Settings
26 Nokia Intellisync Wireless Email Administrator’s Guide

4 Managing Users
OverviewAll Nokia Intellisync Mobile Suite products share a common database of users and groups. Each person who sends and receives information must have a unique user name, which is used to validate the user during a synchronization session and determine which information the user can access.From WebAdmin Console, select Users to complete the following tasks.
Add new usersSend an SMS message to a user’s device to download and install softwareDelete usersExport user informationPrint user informationModify a user’s accountView a user’s synchronization activityAssign users to groups
NoteWebAdmin Console provides comprehensive online help to assist you as you work with administrative tasks. In most cases, the online help provides more information and instructions than found in this guide. To access online help, click Help on any page in WebAdmin Console.
Adding New UsersYou can add new users using one of the following options.
Manually add a userImport users from a text fileAuto-discovery
Nokia Intellisync Wireless Email Administrator’s Guide 27
4 Managing Users
Adding Users Manually You can manually add users if you are not using the auto-discovery method. For more information on auto-discovery, see “Adding Users Through Auto-discovery” on page 33. To manually add a small number of new users, select Users, and then click New.
Importing Users From a Text FileTo import users from a text file, complete the following steps.
To import users from a text file1. Prepare a text file containing user information. The text file should have one user ID per
line. To add additional user information, see “Using Tokens with Text Files” on page 28.2. Select Users.
The Users page appears.3. Click Import.
The Import Users from File page appears.
4. In the File Name field, type the text file name or click Browse, select the text file, and then click Open.
5. Click Import from File.
Using Tokens with Text FilesIf you want to import additional user information, you can use tokens separated by tabs to include various properties for each user. The following tokens are available to use in your text file.
$password=<followed by the password for this user>$description=<followed by some descriptive text about this user>$firstname=<followed by the user’s first name>$lastname=<followed by the user’s last name>$addtogroup=<followed by the group name to which the user should be a member>$active=<followed by 0 or 1, where 0 indicates inactive and 1 indicates active>$alertdevice=<followed by phone, pager, or email address>$alertphonenumber=<followed by the phone number of the alert device>$alertemailaddr=<followed by the email address to receive alerts>$alertcarrier=<followed by Verizon, Sprint, AT&T Wireless, Alltel, T-Mobile, or Cingular>$emailAddress=<followed by the user’s email address>$language=<followed by two-character country code. Valid entries are EN (English), FR (French), ES (Spanish), DE (German), JA (Japanese)>$timezone=<followed by timezone specification>
28 Nokia Intellisync Wireless Email Administrator’s Guide

Adding New Users
$authtype=<followed by -1 for NT; 0 for IMS authentication>$sync=<followed by 1. This triggers a synchronization session after configuration>$serverdevice=<one of “Domino,” “GroupWise,” “IMAP,” “XML,<ID>” where <ID> is the XML translator identifier such as “100,” or “GT,<ID>” where <ID> is the Generic Translator identifier number> If $serverdevice is specified, then any parameters following $serverdevice will be passed to the server connection until the end of line or you specify another $serverdevice.If $serverdevice = Domino:$dominousername=<followed by the Domino user name. The domino user name may be canonical or abbreviated. This parameter is required for courier access; otherwise, it is not used.>$dominoidfile=<followed by the path to the user’s ID file. This parameter is required for upload ID file access; otherwise, it is not used.>$dominopassword=<followed by the password for the user’s ID file. This parameter is required for upload ID file access; otherwise, it is not used.>If $serverdevice = Exchange: $exchangeserver=<followed by the exchange server>$exchangemailbox=<followed by the exchange mailbox, which can be specified using “firstname lastname” or the alias (the text before the @ in the primary email address)>You have to use courier access to configure Exchange.If $serverdevice= GroupWise:$GWServer=<followed by the GroupWise server>$GWPort=<followed by the GroupWise port number>$GWUuid=<followed by the GroupWise unique user ID>$GWDisplayName=<followed by the GroupWise user full name>$GWUser=<followed by the GroupWise user name>$GWPassword=<followed by the GroupWise user password. This parameter is not required for trusted application access.>If $serverdevice = IMAP:$IMAPServer=<followed by the IMAP server name>$IMAPUser=<followed by the IMAP user ID>$IMAPPassword=<followed by the IMAP user password>$IMAPInboxFolderName=<followed by the IMAP Inbox folder name on the server>$IMAPDraftsFolderName=<followed by the IMAP Drafts folder name on the server>$IMAPSentItemsFolderName=<followed by the IMAP Sent Items folder name on the server>
Nokia Intellisync Wireless Email Administrator’s Guide 29

4 Managing Users
If $serverdevice = XML,<ID>:$XMLUser=<followed by the XML user ID>$XMLPassword=<followed by the XML user password>$XMLCompany=<followed by the company name on the server>
NoteTo ensure a successful import, review the tokens for accuracy and separate each with a tab.
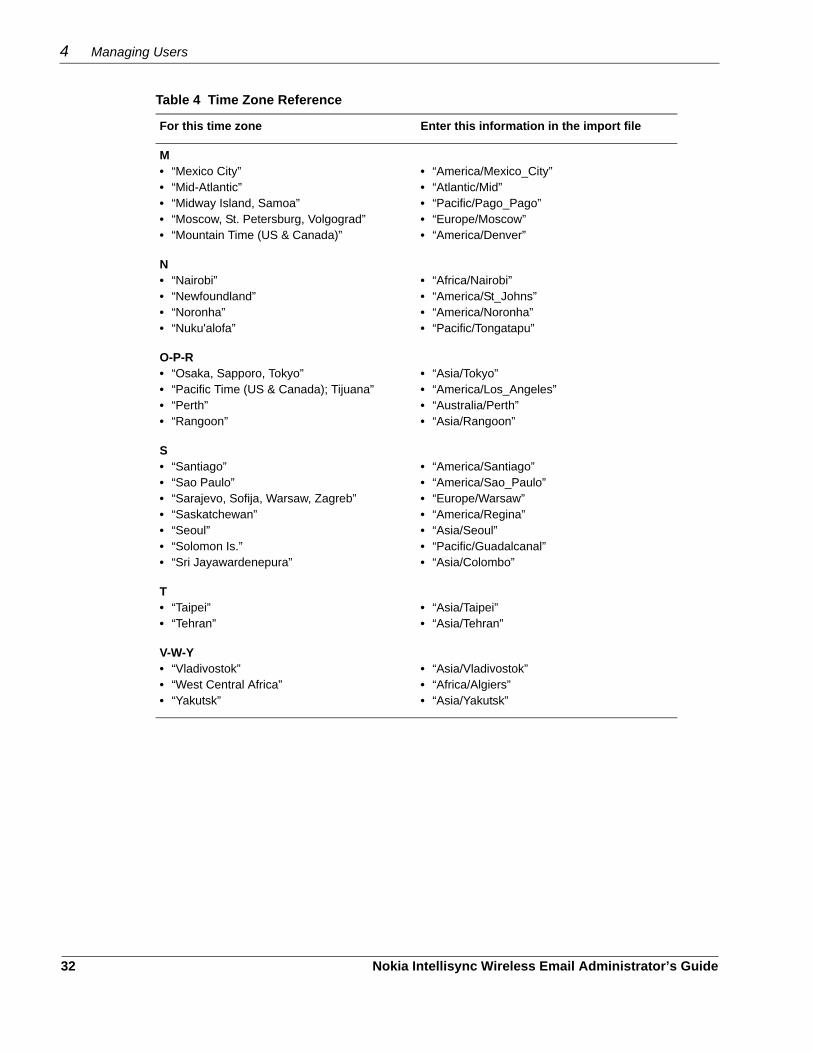
Time Zone Reference ListUse the following table to reference the correct time zones when using the $timezone token.Table 4 Time Zone Reference
For this time zone Enter this information in the import file
A • “Abu Dhabi, Muscat”• “Adelaide”• “Alaska”• “Almaty, Novosibirsk”• “Amsterdam, Berlin, Rome, Vienna”• “Arizona”• “Astana, Dhaka”• “Athens, Istanbul, Minsk”• “Atlantic Time (Canada)”• “Auckland, Wellington”• “Azores”
• “Asia/Muscat”• “Australia/Adelaide”• “America/Anchorage”• “Asia/Novosibirsk”• “Europe/Berlin”• “America/Phoenix”• “Asia/Dacca”• “Europe/Athens”• “America/Halifax”• “Pacific/Auckland”• “Atlantic/Azores”
B• “Baghdad”• “Baku, Tbilisi, Yerevan”• “Bangkok, Hanoi, Jakarta”• “Beijing, Chongqing, Hong Kong, Urumqi”• “Belgrade, Bratislava, Budapest, Prague”• “Bogota, Lima, Quito”• “Brasilia”• “Brisbane”• “Brussels, Copenhagen, Madrid, Paris”• “Bucharest”• “Buenos Aires, Georgetown”
• “Asia/Baghdad”• “Asia/Yerevan”• “Asia/Bangkok”• “Asia/Hong_Kong”• “Europe/Prague”• “America/Bogota”• “America/Sao_Paulo”• “Australia/Brisbane”• “Europe/Paris”• “Europe/Bucharest”• “America/Buenos_Aires”
30 Nokia Intellisync Wireless Email Administrator’s Guide

Adding New Users
C• “Cairo”• “Calcutta, Chennai, Mumbai, New Dehli”• “Canberra, Melbourne, Sydney”• “Cape Verde Is.”• “Caracas, La Paz”• “Casablanca, Monrovia”• “Central America”• “Central Time (US & Canada)”• “Chihuahua, La Paz, Mazatlan”
• “Africa/Cairo”• “Asia/Calcutta”• “Australia/Sydney”• “Atlantic/Cape_Verde”• “America/Caracas”• “Africa/Casablanca”• “America/El_Salvador”• “America/Chicago”• “America/Mazatlan”
D• “Darwin”• “Dublin, Edinburgh, Lisbon, London”
• “Australia/Darwin”• “Europe/London”
E-F• “Eastern Time (US & Canada)”• “Ekaterinburg”• “Fiji, Marshall Is.”
• “America/New_York”• “Asia/Ekaterinburg”• “Pacific/Fiji”
G• “Greenland”• “Guam, Port Moresby”
• “America/Godthab”• “Pacific/Guam”
H• “Harare, Pretoria”• “Hawaii”• “Helsinki, Tallinn”• “Hobart”
• “Africa/Harare”• “Pacific/Honolulu”• “Europe/Helsinki”• “Australia/Hobart”
I-J• “Indiana (East)”• “International Date Line West”• “Irkutsk, Ulaan Bataar”• “Islamabad, Karachi, Tashkent”• “Jerusalem”
• “America/Indianapolis”• “Pacific/DateLineWest”• “Asia/Irkutsk”• “Asia/Karachi”• “Asia/Jerusalem”
K• “Kabul”• “Kathmandu”• “Krasnoyarsk”• “Kuala Lumpur, Singapore”• “Kuwait, Riyadh”
• “Asia/Kabul”• “Asia/Katmandu”• “Asia/Krasnoyarsk”• “Asia/Singapore”• “Asia/Kuwait”
Table 4 Time Zone Reference
For this time zone Enter this information in the import file
Nokia Intellisync Wireless Email Administrator’s Guide 31
4 Managing Users
M• “Mexico City”• “Mid-Atlantic”• “Midway Island, Samoa”• “Moscow, St. Petersburg, Volgograd”• “Mountain Time (US & Canada)”
• “America/Mexico_City”• “Atlantic/Mid”• “Pacific/Pago_Pago”• “Europe/Moscow”• “America/Denver”
N• “Nairobi”• “Newfoundland”• “Noronha”• “Nuku'alofa”
• “Africa/Nairobi”• “America/St_Johns”• “America/Noronha”• “Pacific/Tongatapu”
O-P-R• “Osaka, Sapporo, Tokyo”• “Pacific Time (US & Canada); Tijuana”• “Perth”• “Rangoon”
• “Asia/Tokyo”• “America/Los_Angeles”• “Australia/Perth”• “Asia/Rangoon”
S• “Santiago”• “Sao Paulo”• “Sarajevo, Sofija, Warsaw, Zagreb”• “Saskatchewan”• “Seoul”• “Solomon Is.”• “Sri Jayawardenepura”
• “America/Santiago”• “America/Sao_Paulo”• “Europe/Warsaw”• “America/Regina”• “Asia/Seoul”• “Pacific/Guadalcanal”• “Asia/Colombo”
T• “Taipei”• “Tehran”
• “Asia/Taipei”• “Asia/Tehran”
V-W-Y• “Vladivostok”• “West Central Africa”• “Yakutsk”
• “Asia/Vladivostok”• “Africa/Algiers”• “Asia/Yakutsk”
Table 4 Time Zone Reference
For this time zone Enter this information in the import file
32 Nokia Intellisync Wireless Email Administrator’s Guide

Adding New Users
Adding Users Through Auto-discoveryBy default the server automatically adds a new user when the user logs into the Web site or synchronizes for the first time. To add users through auto-discovery, you must first create an authentication source. By default, the server authenticates a user based on how the user enters the system. For example, if you import a user from a GroupWise source, then the server uses GroupWise authentication by default.
Figure 4 Overview of User Auto-discovery Process
Sending an Install SMS MessageYou can send an SMS message that contains a hyperlink that the user taps to download and install software. To send an SMS message, select Users, select a user from the User Name list, and then click Send Install SMS.
Deleting Users When you delete a user, the account is removed across all licensed Nokia Intellisync Mobile Suite products. To delete a user, select Users, check the check box next to a user's name or check multiple users, and then click Delete.
Exporting User Information To export users' information to a Microsoft Excel file, select Users, and then click Export.
Printing User Information To print a list of users’ information, select Users, and then click Print.
Modifying a User’s Account To modify a user’s account, select Users, click a user's name from the list, and then click Edit.
Viewing a User’s Synchronization Activity To view a user’s synchronization activity, select Users, click a user's name, and then click the User Activity link.
A user logs in to the Nokia Intellisync Web site using existing network user name and password.
Nokia Intellisync Mobile Suite recognizes the user, creates an account, locates the user’s mailbox, and initiates a synchronization session.
Nokia Intellisync Wireless Email Administrator’s Guide 33

4 Managing Users
Assigning Users to Groups All new users are automatically assigned to the New Users and All Users groups. To add or modify a user’s assigned groups, select Users, click a user's name, and then click the Assigned Groups link.
34 Nokia Intellisync Wireless Email Administrator’s Guide
5 Managing Devices
OverviewThe Devices node provides easy access to manage device information. Devices are associated with users, which you can then assign to groups. From the Device node, you can access status information such as the last connection and last network push date and time, and general device information. From WebAdmin Console, select Devices to complete the following tasks.
Delete a deviceExport device informationPrint device informationView and modify a device’s informationView and manage push log informationView and modify theft/loss protection information
NoteWebAdmin Console provides comprehensive online help to assist you as you work with administrative tasks. In most cases, the online help provides more information and instructions than found in this guide. To access online help, click Help on any page in WebAdmin Console.
Deleting DevicesWhen you delete a device, the individual user associated with that device remains active. To delete a device, select Devices, check the check box next to a user name associated with the device you want to delete, or check multiple users, and then click Delete.
Exporting Device InformationTo export device information to a Microsoft Excel file, select Devices, and then click Export.
Nokia Intellisync Wireless Email Administrator’s Guide 35

5 Managing Devices
Printing Device InformationTo print device information, select Devices, and then click Print.
Viewing and Modifying Device InformationTo view device information for a specific user, select Devices, and then click a Device Name from the list. To modify device information, click Edit. To view user information, click the link in the Used By field.
Viewing and Managing Push Log InformationTo view push log information, click Devices, click a Device Name from the list, and then click the Push Log link.
Exporting Push Log InformationTo export push log information to a Microsoft Excel file, click Export from the Push Log screen.
Printing Push Log InformationTo print push log information, click Print from the Push Log screen.
Viewing and Modifying Theft/Loss Protection InformationTo view theft/loss protection information, click Devices, click a Device Name from the list, and then click the Theft/Loss link. To modify Theft/Loss information, click Edit. To view user information, click the link in the Used By field.
36 Nokia Intellisync Wireless Email Administrator’s Guide
6 Managing Groups
OverviewAll Nokia Intellisync Mobile Suite products share a common database of users and groups. You can create groups and then assign users to the groups. You can also import groups from a defined GroupWise source. From WebAdmin Console, select Groups to complete the following tasks.
Add new groupsView and modify a group’s hierarchyDelete groupsExport group informationPrint group informationView and modify a group’s informationManage parent groupsManage child groupsAssign users to groupsView and modify a user’s account
NoteWebAdmin Console provides comprehensive online help to assist you as you work with administrative tasks. In most cases, the online help provides more information and instructions than found in this guide. To access online help, click Help on any page in WebAdmin Console.
Adding New GroupsA group is a collection of users sharing a common characteristic such as device type, locale, or function. Each group is identified by a unique name, and you can assign zero or more users to a group. To manually add a new group, select Groups, and then click New.
Nokia Intellisync Wireless Email Administrator’s Guide 37
6 Managing Groups
Viewing and Modifying a Group’s HierarchyTo view or modify a group’s hierarchy or access specific group information, select Groups, and then click Show Tree.
Deleting GroupsWhen you delete a group, the individual members of the group remain active in the system. To delete a group, select Groups, check the check box next to a group name or check multiple groups, and then click Delete.
NoteYou cannot delete the New Users group or the All Users group.
Exporting Group InformationTo export group information to a Microsoft Excel file, select Groups, and then click Export.
Printing Group InformationTo print group information, select Groups, and then click Print.
Viewing and Modifying a Group’s InformationTo view a group’s information, select Groups, click a group name from the list. To modify group information, click Edit.
Managing Parent GroupsA group containing one or more subgroups, also known as child groups, is considered the parent group. A group can have 0 or 1 parent groups and multiple child groups.To assign or unassign parent groups, select Groups, click a group name from the list, and then click the Parent Groups link.
Managing Child GroupsTo assign or unassign child groups, select Groups, click a group name from the list, and then click the Child Groups link.
38 Nokia Intellisync Wireless Email Administrator’s Guide

Assigning Users to Groups
Assigning Users to GroupsAll new users are automatically assigned to the New Users group and All Users group. To assign or unassign a group’s users, select Groups, click a group name from the list, and then click the Assigned Users link.
Nokia Intellisync Wireless Email Administrator’s Guide 39

6 Managing Groups
40 Nokia Intellisync Wireless Email Administrator’s Guide
7 Managing User Settings
OverviewThe User Settings node in WebAdmin Console helps you manage groups of users with similar characteristics, such as levels of expertise, communication methods, and frequently used applications. User Settings allows you to ensure that users’ devices have the correct settings. As the administrator, you can determine the type and number of user settings you need to effectively service your mobile community.Your license determines which User Settings options are available. From WebAdmin Console, select User Settings to complete the following tasks.
View or modify general user settingsView or modify users settings for email Assign settings to appropriate groups or usersDelete user settings
Several user settings are configured for you in advance, and some of these default settings may be sufficient for your operation. However, if you want to create new user settings, use the default settings as a starting point. You do not have to change user settings for users to connect and synchronize with the server; the default user settings automatically apply to each user and group. Consider evaluating how your system operates using the default settings before making changes.
NoteWebAdmin Console provides comprehensive online help to assist you as you work with administrative tasks. In most cases, the online help provides more information and instructions than found in this guide. To access online help, click Help on any page in WebAdmin Console.
Nokia Intellisync Wireless Email Administrator’s Guide 41

7 Managing User Settings
General User SettingsFrom General Users Settings you can manage the following settings.
Client install and deployment Push and interval synchronizationSecurity and encryptionWeb/WAP security
Client Install/Deployment User SettingsClient Install/Deployment User Settings allow you to create a set of Nokia Intellisync Mobile Suite applications for various installation and deployment profiles. The applications you specify become part of every device installation for users assigned to a particular setting. Select User Settings > General > Client Install/Deployment. To create a new setting, click Create New Setting. To edit a setting, click Edit. If more than one setting appears, click a setting name, and then click Edit.
Generating a Standalone Install PackageTo allow users to install the client software without using the Nokia Intellisync Mobile Suite Web site, you can generate a standalone install package that includes the specified device, feature, proxy, server name, and server key information. To generate a standalone install package, select User Settings > General > Client Install/Deployment, and then click Edit. If more than one setting appears, click a setting name, and then click Edit.
Push/Interval Sync User SettingsFrom Push/Interval Sync User Settings you can create and edit push settings (both network push and SMS push) and interval synchronization settings. Push allows users to receive email messages on the device soon after the email arrives on the server. Interval Sync allows you to synchronize data automatically at intervals you define.To view, create, or modify settings for push or interval synchronization, select User Settings > General > Push/Interval Sync, and then select a device. To edit a setting, click Edit. If more than one setting appears, click a setting name, and then click Edit.
Security/Encryption User SettingsFrom Security/Encryption User Settings you can define the encryption method you want to use to access the server, synchronize data, and store client authentication credentials. The encryption methods have varying levels of security; therefore, you can select the method best suited for a particular user or group. The key exchange is Diffie-Hellman.
42 Nokia Intellisync Wireless Email Administrator’s Guide

General User Settings
To view, create, or modify encryption settings, select User Settings > General > Security/Encryption, and then select a device. To edit settings, click Edit. If more than one setting appears, click a setting name, and then click Edit.
Configuring User Credentials SettingsThe Nokia Intellisync Mobile Suite client does not store users’ passwords on the device. However, you can have the authentication credentials cached on the device. These authentication credentials, which are different from the user’s password, are created when the user connects and enters a password.To view, create, or modify user credentials, select User Settings > General > Security/Encryption, and then click a device. If more than one setting appears, click a setting name. To edit settings, click Edit
Configuring Power-on Password SettingsTo view, create, or modify power-on password settings, select User Settings > General > Security/Encryption, select a device, and then click the Power-on Password tab. If more than one setting appears, click a setting name, and then click the Power-on Password tab. To edit settings, click Edit.
NoteUser-generated passwords do not expire. The password remains valid until a user changes the password or contacts the administrator to receive a new, randomly generated password.
Generating Random Password SettingsYou can create a random safe password for users who forget their password. Select User Settings > General > Security/Encryption. Select a device, and then click the Power-on Password tab, and then click Edit. If more than one setting appears, click a setting name, click the Power-on Password tab, and then click Edit.
Web/WAP Security User SettingsUsers’ passwords are not stored on the device for Web access. However, you can use Web/WAP Security settings to store credentials. These credentials are created when the user connects and enters a password. To view, create, or modify Web/WAP Security settings, select User Settings > General > Web/WAP Security. If more than one setting appears, click a setting name. To edit settings, click Edit
Nokia Intellisync Wireless Email Administrator’s Guide 43
7 Managing User Settings
Wireless Email SettingsFrom Wireless Email Settings you can manage the following settings.
Wireless Email UserNovell GroupWisePushAlertsFilterInbox and OutboxSent ItemsDraftsPIM
Wireless Email User SettingsFrom Wireless Email User settings you can set user options and permissions for email. Wireless Email User Settings are separated into three tabbed pages.
SettingPerformanceSize Limits
To view, create, or modify Wireless Email User Settings, select User Settings > Wireless Email, and then click Wireless Email User. If more than one setting appears, click a setting name. To edit settings, click Edit.
Configuring Wireless Email Performance SettingsYou can define how long items should remain in a user’s Inbox, Sent Items, and Calendar folders. In addition, you can control whether users can override these settings. To view, create, or modify Wireless Email User Performance settings, select User Settings > Wireless Email > Wireless Email User, and then click the Performance tab. If more than one setting appears, click a setting name, and then click the Performance tab. To edit settings, click Edit
NoteStoring less data makes device synchronization and Internet browsing faster.
Configuring Wireless Email Size Limits SettingsYou can control what happens when a user’s data exceeds the server storage limits. To view, create, or modify Wireless Email User Size Limits settings, select User Settings > Wireless Email > Wireless Email User, and then click the Size Limits tab. If more than one setting appears, click a setting name, and then click the Size Limits tab. To edit settings, click Edit.
44 Nokia Intellisync Wireless Email Administrator’s Guide
Wireless Email Settings
Novell GroupWise Wireless Email SettingsFrom Novell GroupWise user settings you can set values for the server, access methods, user options, and system address book synchronization sessions. Novell GroupWise settings are separated into two tabbed pages.
Novell GroupWise Access SettingsNovell GroupWise User Settings
Configuring GroupWise Access SettingsTo view, create, or modify Novell GroupWise Wireless Email server and access settings, select User Settings > Wireless Email, and then click Novell GroupWise to access the Novell GroupWise Access tab. If more than one setting appears, click a setting name, and then click the GroupWise Access tab. To edit settings, click Edit.
Configuring GroupWise User SettingsTo view, create, or modify Novell GroupWise Wireless Email user settings, select User Settings > Wireless Email, click Novell GroupWise, and then click the Novell GroupWise User Settings tab. If more than one setting appears, click a setting name, and then click the Novell GroupWise User Settings. To edit settings, click Edit.
Push Wireless Email SettingsPush is a feature that allows users to receive email messages and PIM data updates on their device soon after the email arrives or the PIM data is updated on the server. From Push settings you can view, create, or modify push settings. Select User Settings > Wireless Email, and then click Push. If more than one setting appears, click a setting name. To edit settings, click Edit.
Alerts Wireless Email SettingsAn Alert notifies the device when new email arrives in the user’s Inbox or when a calendar event is modified. From the Alerts setting you can view, create, or modify alerts settings. Select User Settings > Wireless Email, and then click Alerts. If more than one setting appears, click a setting name. To edit settings, click Edit.
Filter Wireless Email SettingsFrom Filter settings you can create filters to restrict calendar, contacts, tasks, email, and memo entries from synchronizing with the server and devices. For each filter you can select one or more fields to filter, create conditions and rules. Select User Settings > Wireless Email, and then click Filters. If more than one setting appears, click a setting name.
Nokia Intellisync Wireless Email Administrator’s Guide 45
7 Managing User Settings
Configuring Calendar Filter SettingsTo view, create, or modify Calendar Filter settings, select User Settings > Wireless Email, and then click Filter. To add conditions and rules, click New. If more than one setting appears, click a setting name.
Configuring Contacts Filter SettingsTo view, create, or modify Contacts Filter settings, select User Settings > Wireless Email, click Filter, and then click the Contacts tab. To add conditions and rules, click New. If more than one setting appears, click a setting name.
Configuring Tasks Filter SettingsTo view, create, or modify Tasks Filter settings, select User Settings > Wireless Email, click Filter, and then click the Tasks tab. To add conditions and rules, click New. If more than one setting appears, click a setting name.
Configuring Email Filter SettingsTo view, create, or modify Email Filter settings, select User Settings > Wireless Email, click Filter, and then click the Email tab. To add conditions and rules, click New. If more than one setting appears, click a setting name.
Configuring Memos Filter SettingsTo view, create, or modify Memos Filter settings, select User Settings > Wireless Email, click Filter, and then click the Memos tab. To add conditions and rules, click New. If more than one setting appears, click a setting name.
Inbox and Outbox Wireless Email SettingsFrom Inbox and Outbox settings you can set combinations of values for message truncation, attachment limitations, old email deletion, and preview. To view, create, or modify Inbox and Outbox settings, select User Settings > Wireless Email > Inbox & Outbox, and then select a device. If more than one setting appears, click a setting name. To edit settings, click Edit.
Sent Items Wireless Email SettingsFrom Sent Items settings you can set up truncation, attachment options, and old email deletion. To view, create, or modify Sent Items, select User Settings > Wireless Email > Sent Items, and then select a device. If more than one setting appears, click a setting name. To edit settings, click Edit.
46 Nokia Intellisync Wireless Email Administrator’s Guide
Wireless Email Settings
Drafts Wireless Email SettingsFrom Drafts settings you set up truncation and attachment options. To view, create, or modify Drafts settings, select User Settings > Wireless Email > Drafts, and then select a device. If more than one setting appears, click a setting name. To edit settings, click Edit.
PIM Wireless Email SettingsFrom PIM settings you can manage Calendar, Contacts, Tasks, Notes, and Personalized Information settings. To view, create, or modify PIM settings, select User Settings > Wireless Email > PIM, and then select a device. If more than one setting appears, click a setting name. To edit settings, click Edit.
Nokia Intellisync Wireless Email Administrator’s Guide 47

7 Managing User Settings
48 Nokia Intellisync Wireless Email Administrator’s Guide

8 Management Settings
OverviewThe Management node in WebAdmin Console helps you manage server information and administrators accounts.From WebAdmin console, select Management to access the following options.
ServersAdministrators
NoteWebAdmin Console provides comprehensive online help to assist you as you work with administrative tasks. In most cases, the online help provides more information and instructions than found in this guide. To access online help, click Help on any page in WebAdmin Console.
Servers From the Servers option you can complete the following tasks.
Delete a serverExport server informationPrint server informationView specific server informationActivate or deactivate a server
Deleting Servers To delete servers, select Management > Servers, check the check box next to a server’s name or check multiple servers, and then click Delete.
Nokia Intellisync Wireless Email Administrator’s Guide 49

8 Management Settings
Exporting Server Information To export server information to a Microsoft Excel file, select Management > Servers, and then click Export.
Printing Server Information To print a list of servers and the associated configuration information, select Management > Servers, and then click Print.
View Specific Server Information To view configuration information for a specific server, select Management > Servers, click a server name from the list, and then click Edit.
Activate or Deactivate a Server To activate or deactivate a server, select Management > Servers, click a server name from the list, and then click Edit.
AdministratorsFrom the Administrators option you can complete the following tasks.
Add a new administratorDelete an administratorExport administrators’ informationPrint administrators’ informationView and modify an administrator’s informationActivate or deactivate an administrator
Adding Administrators To add a new administrator, select Management > Administrators, and then click New.
Deleting Administrators To delete an administrator, select Management > Administrators, check the check box next to an administrator’s name or check multiple administrators, and then click Delete.
50 Nokia Intellisync Wireless Email Administrator’s Guide

Administrators
Exporting Administrators’ Information To export administrators’ information to a Microsoft Excel file, select Management > Administrators, and then click Export.
Printing Administrators’ Information To print a list of administrators, select Management > Administrators, and then click Print.
View and Modifying an Administrator’s Information To view an administrator’s information, select Management > Administrators, and then click an administrator’s name from the list. To modify an administrator’s information, click Edit.
Activate or Deactivate an AdministratorTo activate or deactivate an administrator, select Management > Servers > Administrators, click an administrator’s name from the list, and then click Edit.
Nokia Intellisync Wireless Email Administrator’s Guide 51

8 Management Settings
52 Nokia Intellisync Wireless Email Administrator’s Guide

9 Managing Reports
OverviewThe Reports node in WebAdmin provides easy access to reports. You can use reports to review information about your system.Expand the Reports node to access the following options.
DevicesPerformanceLicense
NoteWebAdmin Console provides comprehensive online help to assist you as you work with administrative tasks. In most cases, the online help provides more information and instructions than found in this guide. To access online help, click Help on any page in WebAdmin Console.
Device ReportsSelect Devices to access the Device Last Connect Report.
Device Last Connection ReportThe Device Last Connection report provides a list of the latest connection dates and times for devices. Select the appropriate input data, and then click Refresh to generate an on-screen report. To export the report, click Export. To print the report, click Print.
Performance ReportsSelect Performance to access the following reports.
Nokia Intellisync Wireless Email Administrator’s Guide 53

9 Managing Reports
System Sync Times ReportThe System Sync Times report provides a list of average, maximum, and longest synchronization times, the number of synchronizations for the selected dates, and the users with the longest times. Select the appropriate input data, and then click Refresh to generate an on-screen report. To export the report, click Export. To print the report, click Print.
Sync Per Hour ReportThe Sync Per Hour report provides an hourly synchronization graphical report. Select the appropriate input data, and then click Refresh to generate an on-screen report. To export the report, click Export. To print the report, click Print.
License Report
Select License to access the License Report.
The License report provides a list of the number of licenses you purchased for each product and the number of licenses in use. To export the report, click Export. To print the report, click Print.
54 Nokia Intellisync Wireless Email Administrator’s Guide

10 Managing Logs
OverviewThe Logs node in WebAdmin Console provides easy access to logs for viewing historical information about your system. Select Logs to access the following activity logs.
Audit TrailUser ActivityServer Activity
NoteWebAdmin Console provides comprehensive online help to assist you as you work with administrative tasks. In most cases, the online help provides more information and instructions than found in this guide. To access online help, click Help on any page in WebAdmin Console.
Audit Trail LogThe Audit Trail log provides a list of WebAdmin Console changes. Select the appropriate input data, and then click Refresh to generate an on-screen report. To export the report, click Export. To print the report, click Print.
User Activity LogThe User Activity log provides a list of users’ synchronization activities. Select the appropriate input data, and then click Refresh to generate an on-screen report. To export the report, click Export. To print the report, click Print.
Nokia Intellisync Wireless Email Administrator’s Guide 55
10 Managing Logs
Server Activity LogThe Server Activity log provides a list of server events. Select the appropriate input data, and then click Refresh to generate an on-screen report. To export the report, click Export. To print the report, click Print.
56 Nokia Intellisync Wireless Email Administrator’s Guide
Index
Aadministrators
activate or deactivate an administrator 51adding 50deleting 50exporting to Microsoft Excel 51
All Users group 38authentication
authentication process 24
Ddeleting
users 33Devices node
delete a device 35export to Microsoft Excel 35modify device information 36overview 35print device information 36set up theft/loss protection 36view push log information 36
documentationconventions 10files you can customize for users 13structure 9
GGroups node
assign users to a group 39delete a group 38managing child groups 38managing parent groups 38modify a group’s hierarchy 38overview 37
Hhelp
accessing 23, 27, 35, 37, 41, 49, 53, 55list of available help
systems 23, 27, 35, 37, 41, 49, 53, 55
Llicenses
evaluation licenses 25Logs node
Audit Trail log 55overview 55Server Activity log 56User Activity log 55
MManagement control
Reports control 54Management node
activate or deactivate a server 50activate or deactivate an administrator 51add a new administrator 50delete a server 49export administrator information to Microsoft
Excel 51export server information to Microsoft Excel 50overview 49print a list of servers 50
NNew Users group 38Nokia Intellisync Application Sync
overview 17Nokia Intellisync Device Management
overview 18Nokia Intellisync File Sync
overview 18Nokia Intellisync Mobile Gateway
overview 19Nokia Intellisync Mobile Suite
overview 15products available 16
Oonline help
accessing 23, 27, 35, 37, 41, 49, 53, 55
Rremoving
users 33Reports node
Device Last Connection report 53License report 54overview 53
Nokia Intellisync Wireless Email Administrator’s Guide 57

Sync Per Hour report 54System Sync Times report 54
Ssecurity
authentication process 24Security/Encryption
password management 43System Settings
authentication settings 24
Ttokens
for importing users from text file 28
UUser Settings node
generate a random password 43manage power-on password settings 43Novell GroupWise settings 45overview 41push and interval synchronization 42security and encryption 42Web/WAP security 43Wireless Email settings 44
usersadd new users 27add users manually 28deleting 33overview 27
WWebAdmin Console
log on 21operating conventions 22overview 21
58 Nokia Intellisync Wireless Email Administrator’s Guide