NO MORE APPLES FOR TEACHER!
32
A Magazine for Raspberry Pi Users ISSUE 01 MAY 2012 ISSUE 01 MAY 2012 Raspberry Pi is a trademark of The Raspberry Pi Foundation. Front Cover and Feedback Images were created using http://photoFunia.com A Magazine for Raspberry Pi Users NO MORE APPLES FOR TEACHER! NO MORE APPLES FOR TEACHER! http://www.themagpi.com x RacyPy x Debian x Scratch x Python x RacyPy x Debian x Scratch x Python Introducing... The Raspberry Pi Introducing... The Raspberry Pi A new breed of computer A new breed of computer QR Code:
Transcript of NO MORE APPLES FOR TEACHER!

A Magazine for Raspberry Pi Users
ISSUE 01 MAY 2012ISSUE 01 MAY 2012
Raspberry Pi is a trademark of The Raspberry Pi Foundation.Front Cover and Feedback Images were created using http://photoFunia.com
A Magazine for Raspberry Pi Users
NO MOREAPPLESFORTEACHER!
NO MOREAPPLESFORTEACHER!
http://www.themagpi.com
RacyPy
Debian
Scratch
Python
RacyPy
Debian
Scratch
Python
Introducing...TheRaspberry Pi
Introducing...TheRaspberry PiA new breed ofcomputerA new breed ofcomputer
QR Code:

Over the coming issues, The MagPi will
explore the exciting things that can be
done with this very special computer.
We will introduce you to the various
Raspberry Pi operating systems, how to
program in a range of languages, and
start your own interesting projects. We
aim to help experts and beginners get the
most out of the Raspberry Pi hardware
and more importantly help build a fun
and friendly community for everyone to
get involved with.
2

If you like your apples to be whiteand shiny, your apricots madefrom silicon, and you'd rather talkto your blackberries, then youmay be in for a treat...
The Raspberry Pi computer is the size of acredit card, completely silent and costs under£30. The operating system runs from an SDflash card, allowing its personality to instantlybe switched by swapping cards. Its potentialuses are staggering, and as yet, not fullyexplored, but it has already been tested as amultimedia player with streaming capabilities,a games machine, an internet browser and ahardware development board. It is intendedto be used as an educational device forpeople of all ages and skill levels.
Article by Jaseman & Meltwater
ContentsDebian VirtualBox
Programming
The Scratch Patch
The Python Pit
Feedback
Web Links & Credits
Lucky Element 14 Road Test Prize Winner 'GizmoB73' unboxed this late'R&D' prototype.
Fresh fruitFresh fruit
P.16
P.18
P.20
P.23
P.30
P.32
Interest in the Raspberry Pi is alreadyincredible, and demand has far exceededexpectations. IT professionals, electronicsexperts and newcomers are all eager to gettheir hands on the small device whicheverybody agrees 'is going to be huge'.
P.04
P.05
P.06
P.09
P.10
P.12
Affordable Computing
The Fall Of Programming
The Pioneers
Hardware Development
Skutter
RacyPy LiveCD & Virtual Machine3

The MagPi Issue 01 MAY 2012
The Dawn OfAffordableComputing
The ZX81 and Spectrum by Sinclair
Research, were among the first
affordable home computers available
during the early 1980's.
Although these 8-bit computers were
crude by today's standards, they gave
ordinary people the opportunity to
write computer programs and games.
The BBC Acorn computer was
backed by the British Government
for use in education and subsidies
were granted to schools. These
computers were a little too expensive
for most families to have at home.
The 'Electron' was Acorn's attempt at
addressing the price issue. They sold
a number of units, however despite
being more powerful on the hardware
side, the range of game titles was
significantly smaller than rivals
Sinclair and Commodore.
4

The Fall OfProgramming
Home computer users were becoming less
interested in writing their own programs.
Slick-looking, professionally made games that
were coming out of software publishing
companies were compelling.
Zealand Story'.
The trend of moving away from programming
followed within the education sector. Early
software packages like Wordstar, and Lotus 123
were difficult to use before the days of the
graphical interface, but typing skills, word
processing, spreadsheet and database training
continued to be the focus. Programming was seen
as a very specialist and niche area of study.
Ocean Software for
example, boasted
an impressive
library of hit game
titles such as
'Daley Thompson's
Decathlon', 'Chase
HQ' and 'New
5

6
The Pioneers
The story of how the Raspberry Pi computer came to be.
Cambridge University attendees have played a major role in the development of computersin Britain. The story of how these individuals have branched out into various organisationssuch as ARM Holdings plc, Acorn, Sinclair Research, Element 14, Broadcom and theRaspberry Pi Foundation is a complicated one.
Cambridge and beyond
To understand the links between all of thesecompanies and organisations is extremely difficult,due to many mergers, acquisitions,dismemberments, shareholdings, employmentmovements and so forth, and many a journalist hasbeen beaten trying to unravel exactly who did what,and who now owns it.
What we do know is that the Raspberry Pi projectbegan in 2006. There was a common desire amongcertain individuals to recapture a sense of thepioneering spirit of computing that came during the1980's, when affordable personal computers becameavailable to the average hobbyist or buddingcomputer enthusiast. There was a growing concernabout the diminishing interest in computer scienceand an opinion that the ICT curriculum had becometoo focused upon word processing, spreadsheetsand databases. Early microcontroller-based circuit board
The Raspberry Pi Foundation Trustees
Initially the plan was to build a simplemicrocontroller-based computer that booted straightinto a Python interpreter prompt (The Pi in theRaspberry Pi name was a reference to the Pythonprogramming language).
This cheap device was intended to be used topromote and invigorate the next generation ofprogrammers, and developers.

7The MagPi Issue 01 MAY 2012
Due to the cost of producing a working system withnetworking capabilities, device drivers, etc. built intothe interpreter, it was decided that it would be easierto use an already freely available operating system(Linux). Using Linux would also allow flexibility in thechoice of programming languages and other softwarethat could be used.
The option of using a 'System on a Chip' (SoC)became preferable to a microcontroller computer.Broadcom had developed a range of ARMprocessors for use in smart phones.
Broadcom employee Eben Upton, and otherluminaries such as David Braben (Famed writer ofthe BBC Micro games 'Elite' and 'Frontier'), JackLang, Pete Lomas, Professor Alan Mycroft and DrRobert Mullins set up a charity called 'The RaspberryPi Foundation'. The idea they had in mind was todesign a SoC board populated with a BroadcomARM11 processor chip, which could be produced andsold at a very inviting price, to a potential newgeneration of computer science engineers.
USB stick sized early version of the Raspberry Pi
It was decided that a credit-card sized board wouldbe sufficient, and The Raspberry Pi Foundation setabout designing the board layout and working withthe Linux community to develop and refine a numberof Linux operating system distributions that wouldwork well with the 700MHz ARM1176JZF-Sprocessor. The initial design had an SD card readerfitted to the underside of the printed circuit board(PCB), however the first prototype card readersprotruded slightly outside of the credit card shape.
The first prototype boards were the size of a USBmemory stick, with 1 USB port at one end and aHDMI video output at the other end. These boardsused microSD memory cards to store the Linuxoperating system. The boards were too small toaccommodate a network port, GPIO header,composite video and analogue audio outputs, whichwould mean that they were unsuitable as hardwaredevelopment boards.
(continued over page...)

Raspberry Pi Beta board
8
Co-founder Eben Upton displays one of the first Alpha boards
Article by Jaseman
unit (GPU). Notably the beta boards were fitted withmicro-usb power connectors. This meant that itwould be possible to use commonly found phonechargers to power the boards.
In January, The Raspberry Pi Foundation auctionedsome of their prototype Raspberry Pi boards on Ebayand announced that the first 10,000 Raspberry Picomputers were being manufactured in China. Theywould be sold through industial componentssuppliers 'RS Components International' and'Premier Farnell' with additional design engineercommunity support provided through 'Element 14'.
After a few setbacks, the first Raspberry Pi boardswere available for pre-order. The official launch wasat 6am on the 29th of February 2012.
In August 2011, fifty alpha boards were produced.The SD card reader had been repositioned to beflush with the edge of the card.
By December 2011, beta boards of the Raspberry Piwere able to demonstrate Full HD 1080p videoplayback and a ported version of the Quake 3 game,using the onboard Videocore IV graphics processing

9
Hardware Development and RoboticsGert van Loo has developed a General
Purpose Input/Output (GPIO) expansion
board for the Raspberry Pi. The board
is able to control flashing light-emitting
diodes (LEDs), and connect to servo
motors, sensors and other electronic
components.
Over the following months, we will be
following these and other home-grown
projects.
Enthusiast 'Bodge N Hackitt' is planning to
connect a robotic arm to the USB port and
GPIO header of a Raspberry Pi. The first
part of his series of articles can be found
on pages 10-11.
Gertboard & Motor
OWI USB Robotic Arm Kit

In these articles I will be describing someexperiments into controlling real worldapplications using various aspects of theRaspberry Pi computer.
I was inspired to start this project when amember of the Raspberry Pi forum broughtto my attention a low cost robotic arm kitthat could be controlled via a computer'sUSB port. The arm reminded me ofsomething called a “skutter” from one ofmy favourite TV shows, Red Dwarf (Picturedright) that was on when I was still growingup. I thought that, as the Raspberry Pi is sosmall, has such low power requirementsand is still so useful as a computer that Icould easily combine the robot arm with akind of motorized base and have the wholething run from batteries and powered by aRaspberry Pi which would act as theSkutter's 'brain'
It seemed to me that this would make a funkind of project which could even have someserious applications. Imagine if you couldmake an intelligent robot that was able torun about on its wheels and manipulatethings in the real world with its robotic arm.Yes, it could be fun just in its own sense butalso it could be of tremendous use forpeople with disabilities. It might even oneday be useful as a kind of fix-it bot thatcould access small spaces where peoplewould find it difficult or dangerous to getto.
In order to accomplish this, the Raspberry Pihas two interfaces which will allow usaccess to control stuff. The first of these is akind of standard interface which almost allmodern computers have built in. It's called
SKUTTERBy Bodge N Hackitt
a “USB” or Universal Serial Bus. I will explainhow some elements of USB work in thenext article but it is worth noting here thatthis little port that we take for granted isextremely complicated. Fortunately thereare some things which will make our workwith this easier.
The second of these interfaces on theRaspberry Pi is called the GPIO which standsfor General Purpose Input (and) Output.This part of the Raspberry Pi promises toallow the user to easily control all mannerof devices but at the time of writing thisarticle the Raspberry Pi is not available.
This means that the first of theseexperiments will be carried out using a“virtual” Raspberry Pi running on a PC (Thisis not strictly true, a proper virtual RasPi
10

To make this simple robotic arm into amore useful device we will need to do some'hacking' and make some modifications.
As this project progresses we will coversome ways of adding simple “feedback” toour robotic arm so that it will know whereeach arm part is in the space around it (itsenvironment).
We will also investigate some moreadvanced methods of giving our robot akind of sense of sight by using “sonar” andwe will consider some further possibleapplications of machine vision usingcameras.
When the actual Raspberry Pi computerbecomes available we will be able to startto put things together properly and beginto construct our motorized base.
In the next article I will cover methods ofcontrolling the robotic arm via the USB bywriting instructions in the Pythonprogramming language. Looking forward toseeing some of you again then.
Bodge N Hackitt.
would involve programming a simulation ofthe ARM processor, its memory, storageand all its other associated parts. My“virtual” Raspberry Pi is actually just aminimal installation of Debian-Linux (theoperating system) that's running on aprogram called Oracle Virtual Box. Luckilythis set up does give me access to the USBport and this should work exactly the samein this virtual implementation as it would onthe real thing. (Sadly, at the moment wecan't try things that would use the GPIO asthere is currently no straightforward way ofmaking a virtual Raspberry Pi with a virtualGPIO header).
The robotic arm kit called the “OWI Edge” iscurrently available from Maplin electronicsand it uses a simple USB interface to controlit.
This kit is sold with a CD ROM with softwarethat will allow you to control it from aWindows PC. The software allows you toremote control the robot arm or to make asequence of instructions that controls it bysetting the time and direction that eachjoint should move. The design of this robotand software is very limited. The softwareonly allows for the most basic ofprogramming and movement and the armitself has no feedback. This means that, as itis we have no way of knowing what the armis doing other than by looking at itourselves.
A truly useful robot needs to know itselfwhere it is in space. In theory we should beable to say to it “Get the object over“there” and the robot will know I am “here”and I need to be “there”. To get to “there” Imust move by “this” much and in “that”direction.
11

A Tasty Bit Of RacyPyA Tasty Bit Of RacyPyA Tasty Bit Of RacyPyA Tasty Bit Of RacyPy
What is RacyPy?
RacyPy, is a pre-packaged cd image which when "booted" (run from power up) will load a graphical desktop similar to a MS Windows or Apple Mac computer.
The RacyPy image is setup as a “Live CD” which means it loads directly to memory and nothing is installed.
RacyPy comes with a range of software ready to run, such as:
AbiWord — word processing
Gnumeric — spreadsheets
SeaMonkey — web-browsing
mtPaint — graphic editing
Geany/Vim — programming editors
MPlayer/Ogle/Pmusic — video/DVD/music playback
Python 2.7.2 and 3.1.4 — program-ming
Plus many other useful utilities. If you de-cide to use RacyPy more than once you can also setup a USB Memory Device to store your user data on, this will also allow you to install any additional programs which will be loaded every time you reload it.
Why not have a play with RacyPy and jump into the world of Linux and pro-
gramming? RacyPy which uses Puppy, a lightweight Linux distribution,
which can be used to try out Linux on any PC without even installing it.
This is packaged with a range of tools ready to go, so you are ready to try
the tutorials later in this magazine.
Get Ready!
First, obtain the iso image file:
Racy-5PyTeampython.iso (384Mb)
http://goo.gl/UykP4
Depending on the method, you’ll need:
If you intend on keeping your settings (which can then be loaded each time), then it is recommended you have a USB flash memory stick of at least 1Gb or more.
Live CD Blank CDR & CD/DVD Writer*
Virtual Machine
940Mb hard-drive space This includes: ~300Mb for the Virtual Machine software when installed 384Mb for the iso file 256Mb for temporary RAM space (only needed when running)
Universal USB Installer
http://www.pendrivelinux.com
If you don't have a CD/DVD drive on your system it is also possible to boot and run Linux from a USB memory device (1Gb or more). Follow the guide from http://goo.gl/S4VTI but instead of "Lucid Puppy" select "Racy Puppy". Then press "browse" to Racy-5PyTeampython.iso you downloaded above. If you don't see it, try ensure you have named it with “racy-5” at the start of the filename.
The MagPi Issue 01 May 2012 12
Thanks to TeamPython and antiloquax for permission to use RacyPy!

Virtual Machine
To run RacyPy we recommend using VMPlayer, which can be obtained from http://www.vmware.com or directly from http://goo.gl/8oKED.
1.Once you have installed VMPlayer, open the program and select "Create a New Virtual Machine.
2.Select "I will install the operating system later".
3.Select "Other" and "Other" for the Guest Operating System. We do not need any specific features, so generic options should be fine.
LiveCD Boot
The simplest way to use this image is to "burn" the "image" to a CD. You can use your own software or you can use a free program called ImgBurn, which will ensure the CD is written correctly to al-low it to boot.
Once you have a CD, you need to en-sure your system will "boot" from it (use the CD to start up instead of your nor-mal operating system). If your comput-er doesn't do this automatically, often there is a particular key you can press (F2, F8 etc) to select booting from an optical device. Each computer is slight-ly different so pay particular attention to any messages which flash up when you first switch on your computer.
ImgBurn — http://www.imgburn.com
Once you have in-stalled the software, you can “right click” on the iso file and
select “Burn using ImgBurn”. Alterna-tively, run the program and select, “Write Image File To Disc” and select the iso file (File ->Browse for a source file…).
Insert your blank CDR into your CD writer drive and start the write process, by pressing the write button
A really useful way to try out Linux is to use a virtual machine (VM). A VM is simply a simulated computer which runs on top of whatever operating system you are using.
This means you can run this virtual comput-er in a window alongside your other win-dows, and everything to do with it is con-tained within a few files separate to your normal operating system. When you are done, you can simply remove them!
Got a taste for more?
You can install and try out Debian (the official raspberry pi distribution), later on in this issue.
continued over the page...
13
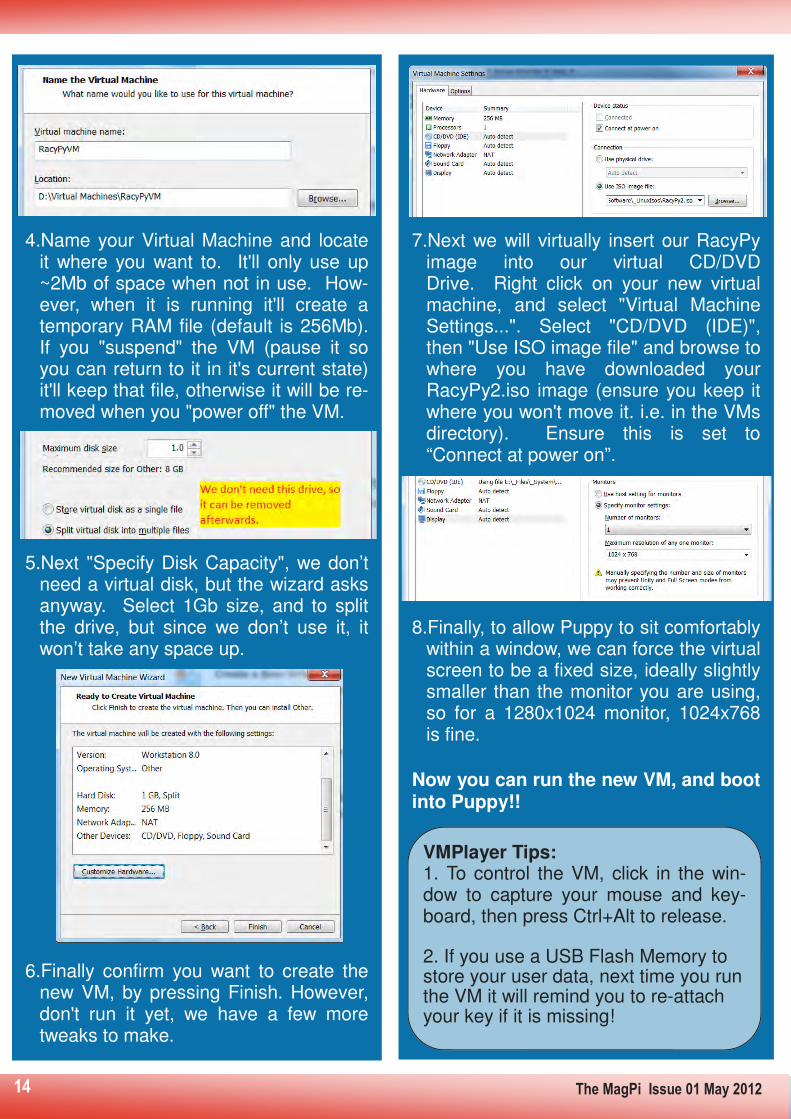
4.Name your Virtual Machine and locate it where you want to. It'll only use up ~2Mb of space when not in use. How-ever, when it is running it'll create a temporary RAM file (default is 256Mb). If you "suspend" the VM (pause it so you can return to it in it's current state) it'll keep that file, otherwise it will be re-moved when you "power off" the VM.
5.Next "Specify Disk Capacity", we don’t need a virtual disk, but the wizard asks anyway. Select 1Gb size, and to split the drive, but since we don’t use it, it won’t take any space up.
6.Finally confirm you want to create the new VM, by pressing Finish. However, don't run it yet, we have a few more tweaks to make.
7.Next we will virtually insert our RacyPy image into our virtual CD/DVD Drive. Right click on your new virtual machine, and select "Virtual Machine Settings...". Select "CD/DVD (IDE)", then "Use ISO image file" and browse to where you have downloaded your RacyPy2.iso image (ensure you keep it where you won't move it. i.e. in the VMs directory). Ensure this is set to “Connect at power on”.
8.Finally, to allow Puppy to sit comfortably within a window, we can force the virtual screen to be a fixed size, ideally slightly smaller than the monitor you are using, so for a 1280x1024 monitor, 1024x768 is fine.
Now you can run the new VM, and boot into Puppy!!
VMPlayer Tips: 1. To control the VM, click in the win-dow to capture your mouse and key-board, then press Ctrl+Alt to release. 2. If you use a USB Flash Memory to store your user data, next time you run the VM it will remind you to re-attach your key if it is missing!
The MagPi Issue 01 May 2012 14

Optional "Pets"
Since this is based on Puppy Linux, there are many packages which are extra easy to install called "pet" files. The files contain everything to install and setup the program.
Installing Pets Either download the "pet" file directly within RacyPy or put the file on your USB memory device. Click on the file and confirm you want to install. The package manager will tell you when it is installed and where in the menu to find it (i.e. Scratch will be put under "Utilities"). For exampl Scratch, as used in this mag:
Scratch.pet — http://goo.gl/YQKNw (33Mb)
More information on using RacyPy and also tips and
guides on getting started programming with
Python and Scratch visit:
http://raspberrypy.tumblr.com
Article by meltwater
First Boot
When you boot for the first time, you will be able to configure your setup. Puppy al-lows you to store all your user data con-veniently on a USB memory device so it is available next time you boot (regardless of which machine you are using).
To Keep Your Data After booting and configuring your setup,
1. Select "Shutdown" and "Power-off com-puter" from the bottom "Menu" button.
2. You will be prompted by the "First shut-down: save session" window. As rec-ommended, choose to "SAVE TO FILE".
3. We will select the defaults (carefully read the info there for other options).
4. After the 2fs file is written it may prompt "copy .sfs from CD", this is optional (it will use 379Mb extra on the USB memory device).
5. The next time you boot with the USB memory device attached, it will load up your settings and programs from your last session.***
First shutdown: Default Action
ask fido Select "administrator"
get ready Plug the USB memory device in*
choose filesystem Select "ext2"
save-file name Leave blank
encryption Select NORMAL
size save-file Select 512Mb**
sanity check Should match below!
NOTES:
*If using a VM, you may need to click on the device icon at the bottom of the win-dow (next to VMWare logo). If successful you will see the following icon appear on the desktop.
**The remaining space can then be accessed and used by both Linux and Windows.
***On the 1st boot after this, you may be asked about adding "BootManager:SFS files", press ok for now, we will cover this another time.
15

16 The MagPi Issue 01 MAY 2012
A step-by-step guide to creating a virtualmachine of the 'Debian Linux' operatingsystem to run on your Windows PC.
1. Start Oracle VM VirtualBox
Creating the Virtual Machine
5. Memory: 256 MB
2. Click 'New'
3. Click 'Next' to start the 'New Virtual Machine Wizard'
4. Name: Debian O.S.: Linux Version: Debian
6. Untick Start-up Disk.
7. Click 'Continue' at the warning
8. Click 'Create'
http://goo.gl/cOLBPhttp://goo.gl/xPXvs
http://goo.gl/gLmjf
Download the Debian LiveCD ISOfile:For Intel Processors (770 MB):For AMD Processors (770 MB):
Use 'Windows Hosts' Version (92 MB):
An 'Operating System' (OS) is a set ofinstructions that help a computer tounderstand how to control the connectedhardware devices.
The 'Boot Sequence' is a list of events thatbegins when you power up your computer.
A state of readiness is usually indicated whenall the screen activity has stopped and you areconfronted with a logon prompt or graphicaluser interface (GUI). In this example the GUIis called 'LXDE' - Lightweight X11 DesktopEnvironment.
Whilst waiting for yourRaspberry Pi, why not trythe Linux Debian OS?
Then download and install OracleVM VirtualBox:

17
10. Under IDE Controller, click on the CD icon (Empty)
11. Tick Live CD/DVD and click the CD icon next to'CD/DVD Drive:' (Under Attributes)
9. In the right hand column of the VirtualBox Manager,click on the word 'Storage'
12. Click 'Choose a Virtual CD/DVD disk file...'
13. Browse for the downloaded Debian .iso file and click'Open'
14. Click OK to leave the Settings screen.
15. Click 'Start' to boot the virtual machine
Continued over page...
16. Press ENTER to choose 'Live' option
Wait a moment while Debian boots into the LXDEgraphical interface. More to follow in issue 2.
Article by Jaseman

>Programming
18
Computer programming or 'coding' is
a method of getting a computer to
perform tasks, such as displaying and
processing information, creating
games and applications or controlling
devices, motors or robots.
The computer can interpret our commands
through programming languages, which help
to make the processes of instructing the
computer easier.
When we 'run' a computer program, the
computer starts to carry out our instructions
step by step and reacts to 'events'. We can
tell the program how it should deal with certain
events. For example, your program might be
instructed to sense events such as a certain
fgsdjhjkfkfghjk
The MagPi Issue 01 MAY 2012
Article by Jaseman
key being pressed on the keyboard, a click of
the mouse on a button, and how it should
react to these events.
The MagPi will show you how to get started
writing your own programs and games, and
providing examples and tutorials.
'The Scratch Patch' and 'The Python Pit' are
the first programming sections of the
magazine (See pages 20 onwards). We will
be adding to this as things progress.

'Python is a remarkably powerful dynamicprogramming language that is used in a widevariety of application domains.'
'Pygame is a set of Python modules designedfor writing games. Pygame adds functionalityon top of the excellent SDL library. This allowsyou to create fully featured games andmultimedia programs in the python language.'
'Scratch is a programming language thatmakes it easy to create your own interactivestories, animations, games, music, and art'
'A geometry package providing for bothgraphical and algebraic input..'
'JavaScript is a prototype-based scriptinglanguage that is dynamic, weakly typed andhas first-class functions. It is a multi-paradigmlanguage, supporting object-oriented,imperative, and functional programmingstyles.'
<HTML>'HyperText Markup Language is the mainmarkup language for web pages.'
19
'KidsRuby makes it fun and easy to learn howto program.'
There are many other programminglanguages available to try. We will tryto introduce some of them. Feel freeto submit your own programmingarticles.

20
Here at The MagPi, we highly recommend you to try out 'Scratch' - An easy to use programminglanguage for beginners. If you don't already have Scratch, you can download it from thefollowing website:
http://info.scratch.mit.edu/Scratch_1.4_Download
Once you have it installed and running, the best way to get started is to click on the Helppull-down and take a look at the Help Page and Help Screens. Most of the information you willneed is already there. Spend some time familiarizing yourself with the scratch interface - It isvery intuitive. Then try our Dizzy Cat / Crazy Drum tutorial on the following pages.

21
DIZZY CAT / CRAZY DRUMSHere is a rather silly little scratch program for you to try:
1. Open Scratch
2. Click on the Scratch Cat Sprite 1
3. Click on Control and drag the 'when flagclicked' block to the Scripts area.
4. Drag the 'forever' block to the scripts area sothat it locks in place under the 'when flag clicked'block.
5. Click on 'Motion' and drag the 'turn 15 degrees'block into the middle of the 'forever' block.
6. Click the green flag to start running the script,and see Scratch Cat spinning.
7. Click on Looks and drag the 'change size by10' block under the 'turn 15 degrees' block (Alsoinside the 'forever' block. Watch how the catgrows.
8. Change the '15' in 'turn 15 degrees' to '-5' andchange the '10' in change size by 10' to '-1'. Seehow the cat starts spinning in the other directionand slowly starts to shrink.
9. Make the cat grow again by changing the valueof 'change size by' to '1'.
continued over page...

22
10. Click on Sound and drag the 'play drum 48 for0.2 beats' into the 'forever' block. Then changethe value of play drum from 48 to 35.
11. Keep adding more and more drums andchange the number of each one so that thenumbers go from 35 all the way up to 81. Listento the different sounds each drum makes. As thescripts area fills up, you will have to use thescroll bar to the right to scroll up and down.
12. Drag the 'change tempo by 20' block into the'forever' block. Wait and listen as the drums getfaster and faster. When you can't take itanymore, change the value of 'change tempo by'to -20. After a little while, the drum tempo willslow down again - Phew!
13. Press the red spot which is next to the greenflag to stop the terrible noise!
Poor cat!
By Jaseman

23
T E S T E D !
Here at the Python Pit, you will find Python andPygame programs to type in. Each month we willbring you examples that will help to demonstratesome of the commands and programming methodsto get you started writing your own code.
All of the programs are tested before the magazinegoes live, and will have a stamp underneathshowing which operating system and languageversions were used for the testing.
PYTHON VERSION: 2.6.6 / 2.7.2 / 3.2.2PYGAME VERSION: N/AO.S.: Debian / RacyPy / Win7
# PUTTING TEXT ONTO THE SCREEN
# By Jaseman - 23rd April 2012
print ("*** Welcome to The Python Pit! ***")
print () # A line space
print ("Brought to you by The MagPi")
NOTE: The examples in this issue are written for Python 3. They will work on older versions by makinga change to all the print commands: Change print ("TEXT") to print "TEXT" - remove the ( ) brackets.
T E S T E D !PYTHON VERSION: 2.6.6 / 2.7.2 / 3.2.2PYGAME VERSION: N/AO.S.: Debian / RacyPy / Win7
# ARITHMETIC
# By Jaseman - 23rd April 2012
print ("Two plus two equals ",2+2); print ()
print ("Eight minus three equals ",8-3); print ()
print ("Four times two equals ",4*2); print ()
print ("Ten divided by two equals ",10/2); print()
Notice how we can put two print commandsonto the same line using a ; semi-colon. Thesecond print command gives us a line spacebetween each equation. You will also noticethat the answer for the division sum includesa decimal place...
The # hash symbol means 'comment'Python will ignore anything that is writtenafter the hash - it is a way to add your ownheadings, notes or reminders to theprogram.
(continued over page...)

T E S T E D !
24
In this example we use the 'INT( )' function to remove the decimal places in the answer. The number isrounded to the nearest whole number. INT is short for Integer - Another word for whole number.
T E S T E D !PYTHON VERSION: 2.6.6 / 2.7.2 / 3.2.2PYGAME VERSION: N/AO.S.: Debian / RacyPy / Win7
Some Python commands only accept wholenumbers (For example when referring tocolor values). Use 'INT( )' if you need toensure that your result has no decimalplaces.
PYTHON VERSION: 2.6.6 / 2.7.2 / 3.2.2PYGAME VERSION: N/AO.S.: Debian / RacyPy / Win7
# SPARE ME THE DETAILS
# By Jaseman - 24th April 2012
print ("Seven divided by three is",7/3); print ()
print ("Seven divided by three is roughly",int(7/3)); print()
print ("Five divided by two is",5/2); print ()
print ("Five divided by two is roughly",int(5/2)); print()
Using variables, we can get our program to remember numbers and words that it can use later on. Youmay remember doing this sort of thing in school.
# ALGEBRA
# By Jaseman - 24th April 2012
a = 3
b = 7
c = 4
print ("A is equal to",a); print ()
print ("B is equal to",b); print()
print ("C is equal to",c); print ()
print ("A plus B equals",a+b); print()
print ("A plus B plus C equals",a+b+c); print()
print ("A plus B minus C equals",a+b-c); print()

25
As well as numbers, variables can be words. We call these 'strings' because they are a string ofalphanumeric characters strung (or grouped) together.
T E S T E D !
# STRINGS OF WORDS
# By Jaseman - 24th April 2012
a = "If you"
b = "notice"
c = "this"
d = "you will"
e = "is not worth"
f = "noticing!"
print (a,b,c,b,d,b,c,b,e,f); print ()
In Python there are many ways of counting. In this example we use a 'FOR LOOP'. The number (n)starts at zero and increases to 10. Note: We have to add a +1 onto the end otherwise the loop will stopat number 9. Try changing the number 10 in the program and run it again to see the results.
T E S T E D !
# COUNTING WITH FOR LOOPS
# By Jaseman - 24th April 2012
for n in range(0,10+1):
print (n)
It is possible to count in steps too. Try changing the for command as follows:for n in range(0,100+1,5):
This counts up to a hundred in increments of five. We can even do it in reverse:for n in range(100,0-1,-5):
PYTHON VERSION: 2.6.6 / 2.7.2 / 3.2.2PYGAME VERSION: N/AO.S.: Debian / RacyPy / Win7
PYTHON VERSION: 2.6.6 / 2.7.2 / 3.2.2PYGAME VERSION: N/AO.S.: Debian / RacyPy / Win7
(continued over page...)
See how the print command is indented. Theindentation is important as this shows Pythonthat the print command is part of the FORLOOP. Always indent the text as shown inthese listings.

T E S T E D !
26
The WHILE LOOP continues until a certain criteria is met. In this program the number (n) starts off aszero. It keeps increasing by 1 for as long as the number is less than or equal to the value of ten ( <= 10).
There are some situations where WHILELOOPS are more suitable than FOR LOOPS -Usually in less predictable circumstances.
PYTHON VERSION: 2.6.6 / 2.7.2 / 3.2.2PYGAME VERSION: N/AO.S.: Debian / RacyPy / Win7
# COUNTING WITH WHILE LOOPS
# By Jaseman - 24th April 2012
n=0
while n <= 10:
print (n)
n += 1
To achieve the incremental steps in the counting, change the n += 1 to a higher number. Counting inreverse could be done like this:n=10while n >= 0:
print (n)n -= 1
T E S T E D !We have to import the 'random' library tohelp Python to generate random numbers.The program makes use of a FOR LOOP sothat the print command repeats six times.
PYTHON VERSION: 2.6.6 / 2.7.2 / 3.2.2PYGAME VERSION: N/AO.S.: Debian / RacyPy / Win7
# LOTTERY NUMBERS
# By Jaseman - 24th April 2012
import random
for n in range(1,6+1): # We want six random numbers
print (random.randint(1,100)) # Picks a number between 1 and 100
If you want more random numbers - change the 6 to a higher number.
You could also change the range in the 'random.randint( , )' if you don'twant it between 1 - 100

27
This time, the WHILE LOOP keeps generating random numbers until it finds a number '13'. Theoperator '!=" means 'not equal to', in other words keep looping while it's any number but thirteen.
T E S T E D !PYTHON VERSION: 2.6.6 / 2.7.2 / 3.2.2PYGAME VERSION: N/AO.S.: Debian / RacyPy / Win7
# BINGO!
# By Jaseman - 24th April 2012
import random
n = 0
while n != 13: # Keep looping till you get thirteen
n = random.randint(1,100)
print (n)
Earlier we saw how words can be stored as string variables. This program creates something called a'STRING ARRAY', which is a list of separate words stored in variables. Each word is allocated anumber starting from zero, so the word 'I' is mytext[0], 'Love' is mytext[1], 'My' is mytext[2] and so on.
T E S T E D !
# STRING ARRAYS
# By Jaseman - 24th April 2012
mytext = ["I", "Love", "My","Raspberry","Pi"]
for n in range(0,5):
print (mytext[n])
print()
PYTHON VERSION: 2.6.6 / 2.7.2 / 3.2.2PYGAME VERSION: N/AO.S.: Debian / RacyPy / Win7
(continued over page...)

28
This game will take a bit more typing, but it is a good example of what the Pygame library can do. Don'tworry if you do not understand all of the commands. We will be covering these in more detail in thenext issue. Note: You will need a mouse connected to your computer to control the bat.
# BAT AND BALL
# By antiloquax - 28th April 2012
import pygamefrom pygame.locals import *pygame.init()
# set the width and height of the screensize = [400, 400]screen = pygame.display.set_mode(size)
# give the window a titlepygame.display.set_caption("Bat and Ball")
# This makes the normal mouse pointer invisible in graphics windowpygame.mouse.set_visible(0)
# create surfaces for the bat and ballbat_surf = pygame.Surface((64,12))bat_surf.fill((0,255,0))batrect = bat_surf.get_rect()ball_surf = pygame.Surface((30,30))ballrect = ball_surf.get_rect()
ball = pygame.draw.circle(ball_surf, (0,0,255),[15, 15], 15)
# set speed of ballspeed = [3, 3]
# puts the bat center of screen, near the bottombatrect.center = ((size[0]/2), (size[1] - 50))
# make a text objectfont = pygame.font.Font(None, 36)text = font.render("Game Over", True, (255,0,0))textRect = text.get_rect()textRect.centerx = (size[0]/2)textRect.centery = (size[1]/2)
# loop until the user clicks the close buttondone=0
# create a timer to control how often the screen updatesclock = pygame.time.Clock()
# main game loopwhile done == 0:
screen.fill((0,0,0))
# event handling for event in pygame.event.get(): # if we click something ... if event.type == pygame.QUIT: # if we click close ... done=1 # this will cause the loop to finish.

29
T E S T E D !PYTHON VERSION: 3.2.2PYGAME VERSION: Pygame 1.9.2a0O.S.: Win7
# moves bat in accordance with the mouse position position = pygame.mouse.get_pos() batrect.centerx = position[0]
# move the ball ballrect.left += speed[0] ballrect.top += speed[1]
# collision detection if ballrect.colliderect(batrect): speed[1] = -speed[1]
# check if the ball is going off screen if ballrect.left < 0 or ballrect.right > size[0]: speed[0] = -speed[0] if ballrect.top < 0: speed[1] = -speed[1]
# print "Game Over" if the ball leaves screen if ballrect.top > size[1]: screen.blit(text, textRect) pygame.display.flip() pygame.time.wait(2000) # 2000 milliseconds pause ballrect.top=0; ballrect.left=(size[0]/2) # reset the ball position
screen.blit(ball_surf, ballrect) screen.blit(bat_surf, batrect)
# set the loop to 60 cycles per second clock.tick(60)
# update the display pygame.display.flip()
Make sure to observe UPPER and lower case text, for example:.font.Font.Surface.Clock
Try altering the '# set speed of ball' section:
EG: speed = [5,5]
You can also alter the width and height of the screen.
Let us know how you get on with these programs. We will bring you some more Python and Pygameexamples in Issue 2.

30
Feedback'Magazine has to bedone.'
SN
'I would love to see amagazine, but I'd also liketo see it be a communityled effort that is free fordownload.'
Abishur'
'The magazine is lookinggreat. There is certainlya need for this sort of'step by step' guide.Keep up the good work!'
Montala
'Hi Guys… I'm education
coordinator for the
Foundation and (at the
moment) the onlyemployee. The MagPi isa great idea!.'
Myra
'Exciting! We're veryhappy to see you guysdoing this, and we'relooking forward to seeingwhat you come up with.
Thanks for letting meknow about it.'
Liz
'Group effort PDF mag,but it would be nice tosee one of those monthly
online flash page turnmagazines with pictures nstuff.'
monkeyra
'A mag would be great.Especially if there was
plenty of programming
tutorials/simple apps.'
fastkat

Raspberry Pi is a trademark of the Raspberry Pi foundation. The MagPi magazine is collaboratively produced by anindependent group of Raspberry Pi owners, and is not affiliated in any way with the Raspberry Pi Foundation. TheMagpi does not accept ownership or responsibility for the content or opinions expressed in any of the articlesincluded in this issue. All articles are checked and tested before the release deadline is met but some faults mayremain. The reader is responsible for all consequences, both to software and hardware, following the implementationof any of the advice or code printed. The MagPi does not claim to own any copyright licenses and all content of thearticles are submitted with the responsibility lying with that of the article writer.

Other Resources and Weblinks
http://elinux.org/R-Pi_HubWiki hub for the Raspberry Pi computer.
http://www.raspberrypi.orgOfficial home of the Raspberry Pi Foundation.
http://www.youtube.com/RaspberryPiTutorialsVideo tutorials and python / pygame programming examples by Liam Fraser.
http://www.python.orgOfficial site for the Python programming language.
http://www.debian.orgHomepage for the Linux Debian Operating System.
Team:
http://www.themagpi.comOfficial website of The MagPi magazine.
Ash StoneChief Editor / Administrator / Website / Header
Jason 'Jaseman' DaviesPage Designs / Writer
MeltwaterWriter / Editor / Photographer
Bodge N HackittWriter
GizmoB73, Darren Grant, Mike Clements, Russell
Davis, Rudi Kuin, Deep Thought, Liz Upton & Myra
Raspberry Pi is a trademark of The Raspberry Pi Foundation,
http://www.raspberrypi.org/forum/educational-applications/jasemans-python-lessonsPython / Pygame tutorials by Jaseman.
Chris 'tzj' StaggPhotographer / Graphics
The MagPi Issue 01 MAY 2012
Tandy havegenerously providedThe MagPi with aDomain name.
A great big 'THANKYOU' from The MagPiTeam.
Look out for someinteresting news aboutTandy in next month'sissue.
Additional help and support:
tzj
antiloquaxPython Tutor