Nextiva Review Operator Guide - JS Security Concepts review... · Verint Video Intelligence...
171
Nextiva Review Operator Guide Software Release 6.0 April 2009
Transcript of Nextiva Review Operator Guide - JS Security Concepts review... · Verint Video Intelligence...
Nextiva Review OperatorGuide
Software Release 6.0
April 2009
© 2009 Verint Systems Inc. All Rights Reserved Worldwide.
Confidential and Proprietary Information of Verint Systems Inc.
All materials (regardless of form and including, without limitation, software applications, documenta-tion, and any other information relating to Verint Systems, its products or services) are the exclusiveproperty of Verint Systems Inc. Only expressly authorized individuals under obligations of confidenti-ality are permitted to review materials in this document. By reviewing these materials, you agree tonot disclose these materials to any third party unless expressly authorized by Verint Systems, and toprotect the materials as confidential and trade secret information. Any unauthorized review, retrans-mission, dissemination or other use of these materials is strictly prohibited. If you are not authorizedto review these materials, please return these materials (and any copies) from where they were ob-tained. All materials found herein are provided “AS IS” and without warranty of any kind.
The Verint Systems Inc. products are protected by one or more of the following U.S., European orInternational Patents: USPN 5,659,768; USPN 5,689,442; USPN 5,790,798; USPN 6,278,978; USPN6,370,574; USPN 6,404,857; USPN 6,510,220; USPN 6,724,887; USPN 6,751,297; USPN6,757,361; USPN 6,782,093; USPN 6,839,667; USPN 6,952,732; USPN 6,959,078; USPN6,959,405; USPN 7,047,296; USPN 7,149,788; USPN 7,155,399; USPN 7,203,285; USPN7,216,162; USPN 7,219,138; USPN 7,254,546; USPN 7,281,173; USPN 7,284,049; USPN7,325,190; USPN 7,466,816; USPN 7,478,051; USPN RE40,634; and other provisional rights fromone or more of the following Published US Patent Applications: US 11/394,408; US 11/771,499; US11/396,514; US 11/772,440; US 11/565,943; US 11/565,946; US 11/565,948; US 11/540,739; US11/540,086; US 11/541,313; US 11/541,252; US 11/540,282; US 11/529,947; US 11/540,785; US11/540,736; US 11/540,904; US 11/540,353; US 11/608,340; US 11/608,350; US 11/608,358; US11/567,808; US 11/692,983; US 11/693,933; US 11/693,923; US 11/693,828; US 11/567,852; US11/608,440; US 12/015,621; US 11/540,322; US 11/924,201; US 11/616,490; US 11/621,134; US11/752,458; US 11/712,933; US 11/824,980; US 11/729,185; US 11/804,748; US 11/831,260; US11/395,992; US 11/359,319; US 11/359,195; US 11/359,357; US 10/832,509; US 11/742,733; US11/831,257; US 11/831,250; US 11/691,530; US 11/479,267; US 11/529,942; US 11/768,349; US11/540,281; US 10/633,357; US 11/693,899; US 11/479,056; US 11/529,132; US 11/540,320; US11/037,604; US 11/529,842; US 11/540,171; US 11/478,714; US 11/529,946; US 11/868,656; US11/776,659; US 11/090,638; US 11/410,004; US 10/771,315; US 10/771,409; US 11/540,900; US11/528,267; US 12/118,781; and other U.S. and International Patents and Patents Pending.
VERINT, the VERINT logo, ACTIONABLE INTELLIGENCE, POWERING ACTIONABLE INTELLI-GENCE, WITNESS ACTIONABLE SOLUTIONS, STAR-GATE, RELIANT, VANTAGE, X-TRACT,NEXTIVA, ULTRA, AUDIOLOG, WITNESS, the WITNESS logo, IMPACT 360, the IMPACT 360 logo,IMPROVE EVERYTHING, EQUALITY, CONTACTSTORE, and CLICK2STAFF are trademarks orregistered trademarks of Verint Systems Inc. or its subsidiaries. Other trademarks mentioned are theproperty of their respective owners.
Contents
Verint Video Intelligence Solutions i
Chapter 1 • Preface ............................................................................................. vAudience ......................................................................................................... vHow to Use this Guide ....................................................................................... vRelated Documentation ..................................................................................... vHow to Contact Us ............................................................................................vi
Chapter 2 • Getting Started ................................................................................. 1System Requirements ....................................................................................... 1Disabling Screen Savers .................................................................................... 2Launching Review and Logging In ....................................................................... 2Using the Review Interface ................................................................................ 5
Using the Application Toolbar........................................................................ 6Using Windows Keyboard Shortcuts ............................................................... 6Using the Navigation Pane............................................................................ 8Using the Live and Recorded Tabs ................................................................. 9Organizing the Workspace ...........................................................................10Connecting to Multiple Sites.........................................................................14Establishing a Remote Connection ................................................................16Opening External Media Files .......................................................................17Getting Help ..............................................................................................18
Setting Preferences..........................................................................................19Setting Alarm Preferences ...........................................................................19Setting Application Preferences ....................................................................22Setting Display Preferences .........................................................................23Setting Video Quality Preferences .................................................................24
Chapter 3 • Live and Recorded Video................................................................. 27Viewing Live Video ...........................................................................................27
Performing a Quick Query on Live Video ........................................................32Recording Live Video ..................................................................................33Zooming In On Video..................................................................................33Using Tear Off Video...................................................................................34
Using Pan/Tilt/Zoom Camera Controls ................................................................34Displaying the PTZ Toolbar ..........................................................................34Using PTZ Lock ..........................................................................................36Using the Heads Up Display .........................................................................39Adjusting the Iris and Focus ........................................................................39Using the PTZ Menu....................................................................................40Using Presets.............................................................................................40Using Patterns ...........................................................................................43
Viewing Recorded Video....................................................................................46Using Camera Maps .........................................................................................49Using Linked Maps ...........................................................................................50Synchronizing Videos .......................................................................................51Using Bookmarks.............................................................................................51
Adding a Bookmark ....................................................................................51Viewing a Bookmark ...................................................................................52
Contents
Verint Video Intelligence Solutionsii
Deleting a Bookmark ..................................................................................53Searching for a Bookmark ...........................................................................54
Scheduling Video Queries..................................................................................56Viewing Camera Tours......................................................................................59Exporting Video ...............................................................................................60
Exporting Live Video ...................................................................................61Exporting Recorded Video............................................................................62Viewing Exported Video...............................................................................64Authenticating Exported Video .....................................................................65
Chapter 4 • Alarm Video .................................................................................... 67Using Review in Alarm Mode .............................................................................68Searching for Alarms........................................................................................69Viewing Alarm Video ........................................................................................72Acknowledge an Alarm .....................................................................................75Creating an Alarm Investigation.........................................................................76
Chapter 5 • Video Activity ................................................................................. 77Using the Activity Scan.....................................................................................77Detecting Activity ............................................................................................79
Chapter 6 • Image Toolkit ................................................................................. 85Opening the Image Toolkit ................................................................................85Using the Image Toolkit Menu and Toolbar ..........................................................86
File Menu ..................................................................................................87Edit Menu..................................................................................................87Image Menu ..............................................................................................88Colors Menu ..............................................................................................88Tools Menu................................................................................................89Help Menu.................................................................................................89
Using the File Menu Options ..............................................................................89Saving an Image........................................................................................89Printing an Image ......................................................................................90Exiting the Image Toolkit ............................................................................90
Using the Edit Menu Options..............................................................................90Redoing Changes .......................................................................................90Undoing Changes .......................................................................................90
Using the Image Menu Options ..........................................................................91Reloading an Image....................................................................................91Detecting Edges in an Image .......................................................................91Sharpening an Image .................................................................................92Cropping an Image.....................................................................................93Zooming an Image .....................................................................................93Resizing an Image......................................................................................93
Using the Colors Menu Options ..........................................................................94Changing the Brightness of an Image............................................................95Changing the Contrast of an Image ..............................................................95Changing an Image to Gray Scale.................................................................95Equalizing the Contrast of an Image .............................................................96Reducing Colors in an Image .......................................................................96
Using the Tools Menu Options............................................................................97Annotating an Image ..................................................................................97
Nextiva Review Operator Guide
Verint Video Intelligence Solutions iii
Adding the Date and Time ...........................................................................98Keeping the Aspect Ratio of an Image...........................................................99
Chapter 7 • Investigation Management ........................................................... 101Using the Investigation Binder.........................................................................102
Opening the Investigation Binder Window....................................................103Resizing/Hiding the Search Pane ................................................................104Searching for an Investigation ...................................................................104Viewing Investigation Attachments .............................................................106
Creating a New Investigation...........................................................................109Adding Attachments to an Investigation............................................................111
Attaching a Video .....................................................................................111Attaching an Alarm...................................................................................112Attaching a File ........................................................................................113Attaching an Image ..................................................................................114
Editing an Investigation ..................................................................................115Viewing the Revision History......................................................................116Revising Investigation Details ....................................................................116Removing an Attachment ..........................................................................117Removing an Investigation from the Binder .................................................118
Exporting an Investigation ..............................................................................118Viewing an Exported Investigation ...................................................................120
Chapter 8 • PTZ Keyboards.............................................................................. 123Operating the American Dynamics AD2078 and AD2088 .....................................124Operating the Bosch LTC 5136.........................................................................130Operating the Honeywell KEGS-5300................................................................132
Selecting Monitors and Cameras.................................................................132Creating and Starting Presets ....................................................................132Calling and Stopping a Salvo......................................................................133Recording a Pattern ..................................................................................134Using Playback Video ................................................................................134Using the Keyboard Commands..................................................................135
Operating the Honeywell RD-530 .....................................................................140Creating and Starting Presets ....................................................................140Calling and Stopping a Salvo......................................................................141Recording a Pattern ..................................................................................141Using Playback Video ................................................................................142Using the Keyboard Commands..................................................................143
Operating the Pelco KBD300A..........................................................................146Selecting Monitors and Cameras.................................................................146Creating and Starting Presets ....................................................................147Calling and Stopping a Salvo......................................................................147Recording a Pattern ..................................................................................147Using Playback Video ................................................................................147Using the Keyboard Commands..................................................................148
Operating the Pelco 9760................................................................................150Logging In...............................................................................................151Logging Off .............................................................................................151Using the Keyboard Commands..................................................................152
Index ...................................................................................................157

Verint Video Intelligence Solutionsiv
Verint Video Intelligence Solutions v
PrefaceThe Nextiva® Review Operator Guide is designed to help video operators learn and understand how to view live, recorded, and alarm video, as well as use the various features to store and enhance that video.
AudienceThis guide has been prepared for the following audience:
Users who view live, recorded, and alarm video
System administrators
This guide assumes that you are familiar with:
General use of computers
Microsoft Windows® operating systems
How to Use this GuideThis guide contains all the information needed to use the Nextiva Review application. Access to certain features depends on how the application is deployed, and how the system administrator sets the user permissions in Nextiva Control Center. Review will display only what is available to the user according to their access permissions. This guide assumes the system is set up to enable all the features available in Nextiva Review. Contact your system administrator for more information about your user access permissions.
Related DocumentationIn addition to this guide, the following documentation is also available:
Nextiva Administrator Guide
Nextiva Installation Guide
Nextiva System Planning Guide
Nextiva IntelliView Deployment and Maintenance Guide
Nextiva Third-Party PTZ Camera and Keyboard Integration Guide
Preface
Verint Video Intelligence Solutionsvi
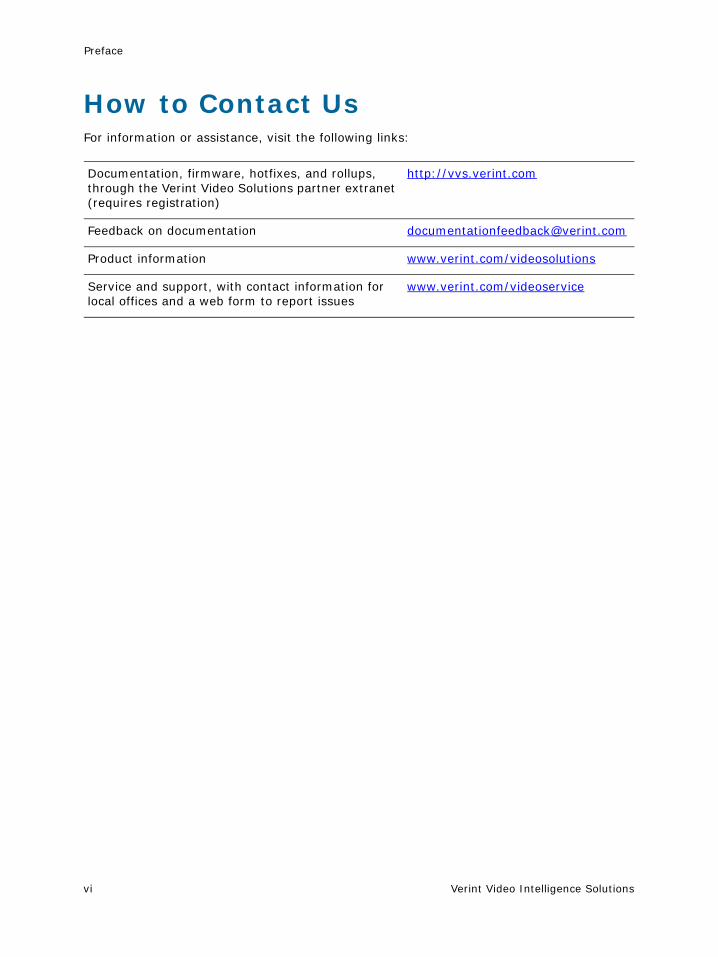
How to Contact UsFor information or assistance, visit the following links:
Documentation, firmware, hotfixes, and rollups, through the Verint Video Solutions partner extranet (requires registration)
http://vvs.verint.com
Feedback on documentation [email protected]
Product information www.verint.com/videosolutions
Service and support, with contact information for local offices and a web form to report issues
www.verint.com/videoservice
Verint Video Intelligence Solutions 1
Chapter
Getting StartedNextiva Review is an application that is used to view, record, and replay surveillance video. Live video is available for viewing from cameras connected to local or remote sites. Real-time activity can also be recorded on demand.
Operators can use Review to retrieve and display recorded video from a recorder or storage device, including video recorded during an alarm event.
Nextiva Review contains several features for reviewing surveillance video, including:
Camera maps, which are interactive visual representations of facility layouts and camera locations.
Export functions, for transferring video to a local or network drive, or burning it to a writable compact disc (CD).
An investigation management system, used by authorized personnel to gather case-related data from recorded video.
The Image Toolkit, used to enhance individual still frames of video.
The application window provides a user-friendly layout, and is divided into various sections that make it easy to customize views.
Along with System Requirements, this chapter contains the following procedures:
Disabling Screen Savers
Launching Review and Logging In
Using the Review Interface
Setting Preferences
System RequirementsThe instructions presented in this guide assume that your Nextiva system is properly set up, including the required hardware and edge devices. For more information on system specifications, see the Nextiva System Planning Guide.
1: Getting Started
Verint Video Intelligence Solutions2
Disabling Screen SaversScreen savers can adversely affect the display of video through Nextiva applications. Verint recommends disabling screen savers on all workstations running Review.
To disable the Windows screen saver:
1. Open Windows Control Panel, then double-click Display. The Display Properties window opens.
2. Select the Screen Saver tab, then select None from the Screen saver drop-down list.
3. Click Apply, then click OK to close the Display Properties window.
Launching Review and Logging InNextiva Review is launched using one of the following methods:
The Nextiva Review desktop icon, if the application is installed locally on the workstation.
A Web browser, with the Review URL provided by the system administrator. This method is used to log in to Review from a different workstation.
A user name and password, provided by the system administrator, are required to open the application. This user name and password might be the same as your Windows login, unless access control is authenticated by the Nextiva system.
To launch Review and log in for the first time:
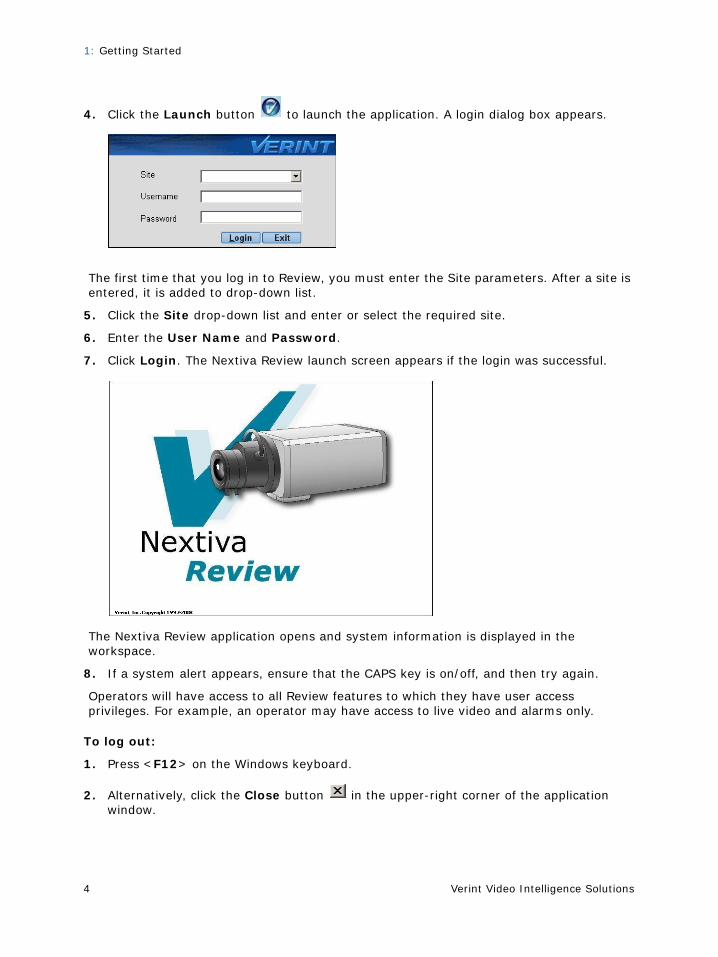
1. Double-click the Nextiva Review desktop icon .
A login dialog box appears.
2. If Nextiva Review is installed on the workstation, proceed to step 5.
Nextiva Review Operator Guide
Verint Video Intelligence Solutions 3
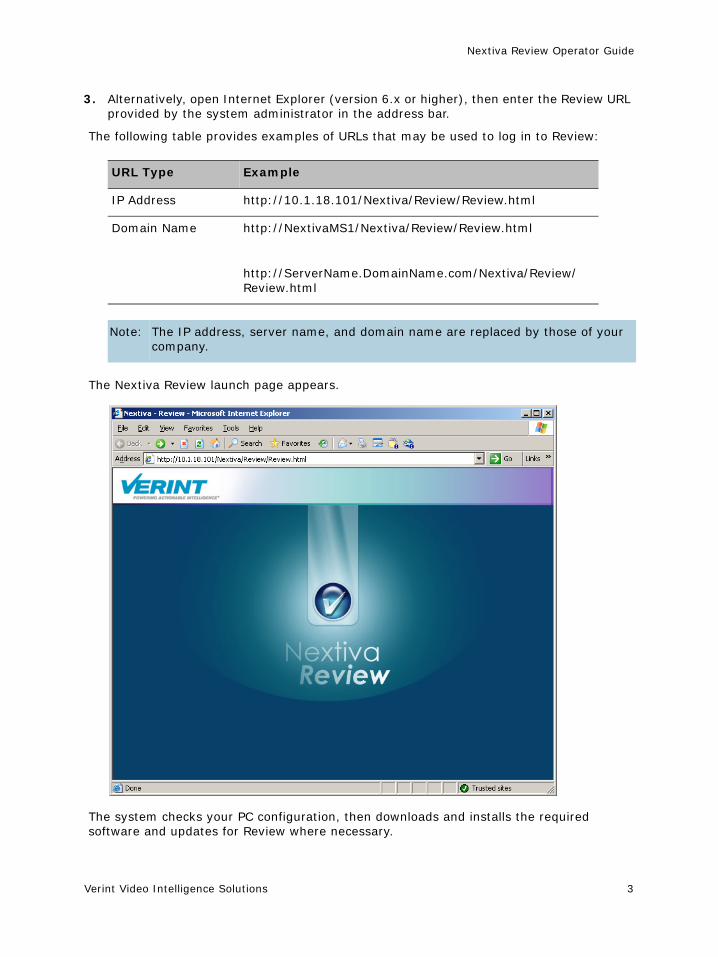
3. Alternatively, open Internet Explorer (version 6.x or higher), then enter the Review URL provided by the system administrator in the address bar.
The following table provides examples of URLs that may be used to log in to Review:
The Nextiva Review launch page appears.
The system checks your PC configuration, then downloads and installs the required software and updates for Review where necessary.
URL Type Example
IP Address http://10.1.18.101/Nextiva/Review/Review.html
Domain Name http://NextivaMS1/Nextiva/Review/Review.html
http://ServerName.DomainName.com/Nextiva/Review/Review.html
Note: The IP address, server name, and domain name are replaced by those of your company.
1: Getting Started
Verint Video Intelligence Solutions4
4. Click the Launch button to launch the application. A login dialog box appears.
The first time that you log in to Review, you must enter the Site parameters. After a site is entered, it is added to drop-down list.
5. Click the Site drop-down list and enter or select the required site.
6. Enter the User Name and Password.
7. Click Login. The Nextiva Review launch screen appears if the login was successful.
The Nextiva Review application opens and system information is displayed in the workspace.
8. If a system alert appears, ensure that the CAPS key is on/off, and then try again.
Operators will have access to all Review features to which they have user access privileges. For example, an operator may have access to live video and alarms only.
To log out:
1. Press <F12> on the Windows keyboard.
2. Alternatively, click the Close button in the upper-right corner of the application window.
Nextiva Review Operator Guide
Verint Video Intelligence Solutions 5
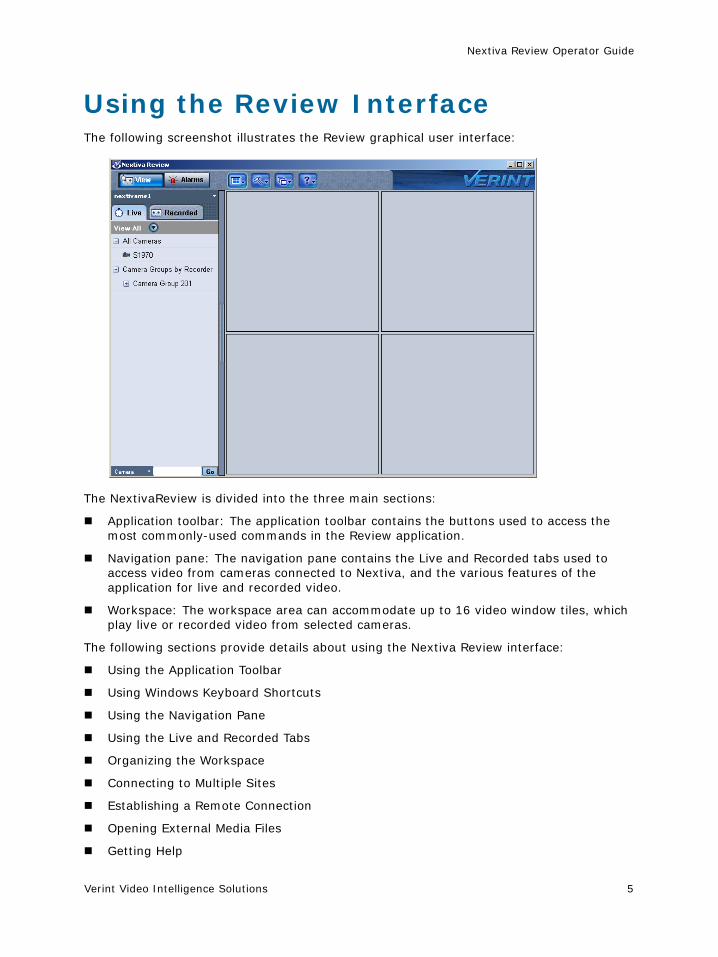
Using the Review InterfaceThe following screenshot illustrates the Review graphical user interface:
The NextivaReview is divided into the three main sections:
Application toolbar: The application toolbar contains the buttons used to access the most commonly-used commands in the Review application.
Navigation pane: The navigation pane contains the Live and Recorded tabs used to access video from cameras connected to Nextiva, and the various features of the application for live and recorded video.
Workspace: The workspace area can accommodate up to 16 video window tiles, which play live or recorded video from selected cameras.
The following sections provide details about using the Nextiva Review interface:
Using the Application Toolbar
Using Windows Keyboard Shortcuts
Using the Navigation Pane
Using the Live and Recorded Tabs
Organizing the Workspace
Connecting to Multiple Sites
Establishing a Remote Connection
Opening External Media Files
Getting Help
1: Getting Started
Verint Video Intelligence Solutions6
Using the Application ToolbarThe following buttons are located in the application toolbar, at the top of the Review window:
Using Windows Keyboard ShortcutsThe following table lists the Windows keyboard shortcuts available in Review.
Tool Button Description
View Used to view live and recorded video, bookmarks, scheduled restores, camera tours, maps, and search features.
Alarms Used to access alarm video, and alarm event details.
Layout Options Used to define the layout of the application window.
Tools and Configuration
Used to manage investigations, open media files, and define preferences.
Workspaces Used to save, select, and delete workspaces.
Nextiva Review Help Used to access the application help, and the About window.
Shortcut Button Description
F1 Access the online help
F4 Toggle video toolbar
F11/Ctrl + F Review interface full screen mode
Ctrl + M Toggle camera list
F12 Close Review
Ctrl + B Add a Video Bookmark
Ctrl + E Video Export

Nextiva Review Operator Guide
Verint Video Intelligence Solutions 7
Ctrl + I Launch the Image Toolkit
Ctrl + T Tools Menu
Ctrl + L Switch to live video
Ctrl + O Tear Off (video)
Alt + Enter Maximize video window tile
Esc Return video tile to normal
Ctrl + P /
Play/Pause
Ctrl + Q Quick Query
Right Arrow Fast forward in Playback mode (not in Frame by Frame mode)
Left Arrow Rewind in Playback mode (not in Frame by Frame mode)
Right Arrow or mouse wheel rotated upwards
Step forward in Playback mode (Frame by Frame)
Left Arrow or mouse wheel rotated downwards
Step backward in Playback mode (Frame by Frame)
Note: Consult your system administrator to change the mapping for any of the Windows keyboard shortcuts. Your system administrator will tell you which shortcuts can be remapped.
Shortcut Button Description

1: Getting Started
Verint Video Intelligence Solutions8
Using the Navigation PaneThe following screenshot illustrates the Review navigation pane:
The navigation pane is divided into the following parts:
Site: Indicates the current site, and can be used to connect to a remote site
View: Shows or hides the components in the Live and Recorded tabs, as required
Live and Recorded tabs: Contains the camera tree, which lists all cameras connected to Nextiva for viewing live video, or retrieving recorded video
Search: Searches for items in the navigation pane
Resizing/Hiding the Navigation PaneUse the mouse resize the viewing area of the navigation pane.
To resize the navigation pane:
1. Position the mouse cursor between the navigation pane and the workspace.
2. Press and hold the left mouse button when the cursor changes to .
3. Drag the mouse right or left to resize the pane horizontally.
The workspace area can also be expanded by hiding the navigation pane.
Nextiva Review Operator Guide
Verint Video Intelligence Solutions 9
To show/hide the navigation pane:
1. Click the Layout Options button on the application toolbar, then select Toggle Camera List.
The navigation pane is removed from the interface.
2. Repeat the selected action to restore the navigation pane.
Using the Live and Recorded TabsThe Live and Recorded tabs are used to access the majority of the Review functions. Each tab lists all the cameras connected to the site that the operator has permission to view. Cameras are also arranged in groups by recorder.
The Live tab displays the live video feeds.The Live tab is also used to access camera tours and maps of camera locations.
The cameras listed in the Recorded tab display recorded video, based on query parameters set by the operator, when a camera is selected. The Recorded tab is also used to access scheduled restores, maps, and bookmarks.
Click the plus sign next to the All Cameras group name to expand the camera tree. Cameras that are currently open in the workspace are highlighted in the camera tree.
Each camera has an icon next to it, indicating the type of camera that it is:
Fixed camera,
Fixed camera with audio,
Pan/tilt/zoom camera,
Pan/tilt/zoom camera with audio.
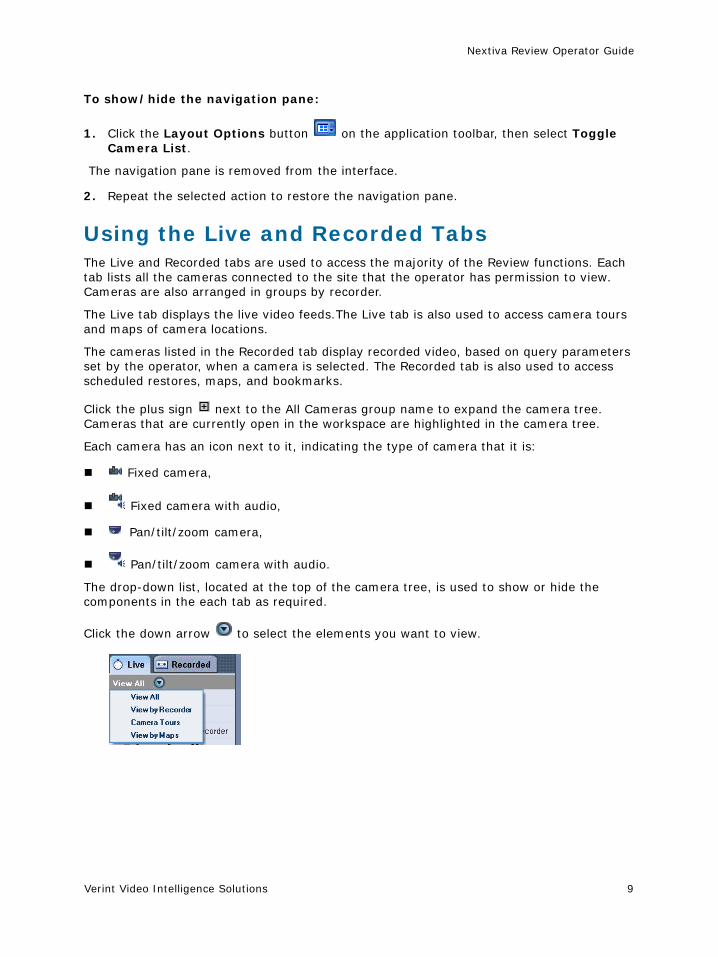
The drop-down list, located at the top of the camera tree, is used to show or hide the components in the each tab as required.
Click the down arrow to select the elements you want to view.
1: Getting Started
Verint Video Intelligence Solutions10
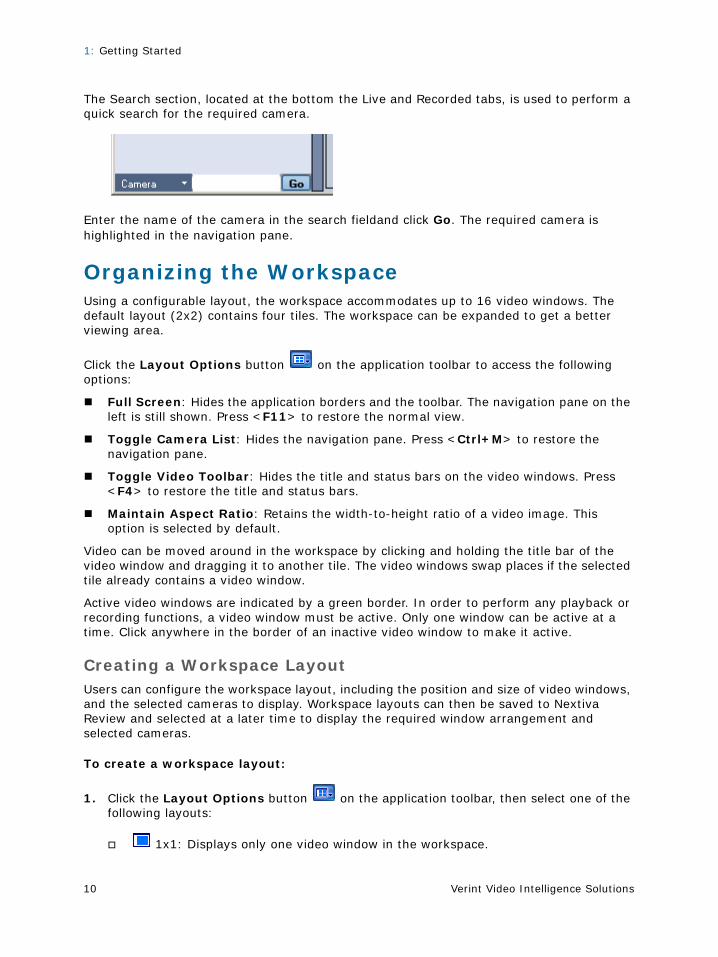
The Search section, located at the bottom the Live and Recorded tabs, is used to perform a quick search for the required camera.
Enter the name of the camera in the search fieldand click Go. The required camera is highlighted in the navigation pane.
Organizing the WorkspaceUsing a configurable layout, the workspace accommodates up to 16 video windows. The default layout (2x2) contains four tiles. The workspace can be expanded to get a better viewing area.
Click the Layout Options button on the application toolbar to access the following options:
Full Screen: Hides the application borders and the toolbar. The navigation pane on the left is still shown. Press <F11> to restore the normal view.
Toggle Camera List: Hides the navigation pane. Press <Ctrl+M> to restore the navigation pane.
Toggle Video Toolbar: Hides the title and status bars on the video windows. Press <F4> to restore the title and status bars.
Maintain Aspect Ratio: Retains the width-to-height ratio of a video image. This option is selected by default.
Video can be moved around in the workspace by clicking and holding the title bar of the video window and dragging it to another tile. The video windows swap places if the selected tile already contains a video window.
Active video windows are indicated by a green border. In order to perform any playback or recording functions, a video window must be active. Only one window can be active at a time. Click anywhere in the border of an inactive video window to make it active.
Creating a Workspace LayoutUsers can configure the workspace layout, including the position and size of video windows, and the selected cameras to display. Workspace layouts can then be saved to Nextiva Review and selected at a later time to display the required window arrangement and selected cameras.
To create a workspace layout:
1. Click the Layout Options button on the application toolbar, then select one of the following layouts:
1x1: Displays only one video window in the workspace.
Nextiva Review Operator Guide
Verint Video Intelligence Solutions 11
2x2: Displays four cameras in the workspace.
3x3: Divides the workspace into nine equally sized tiles.
4x4L: Divides the workspace into 16 equally sized tiles.
1x5: Divides the workspace into six tiles: one main tile, with five smaller tiles below and to the right of it.
2. Select the required camera from the navigation pane and drag it into the desired tile in the workspace.
3. Click the Workspaces button on the application toolbar.
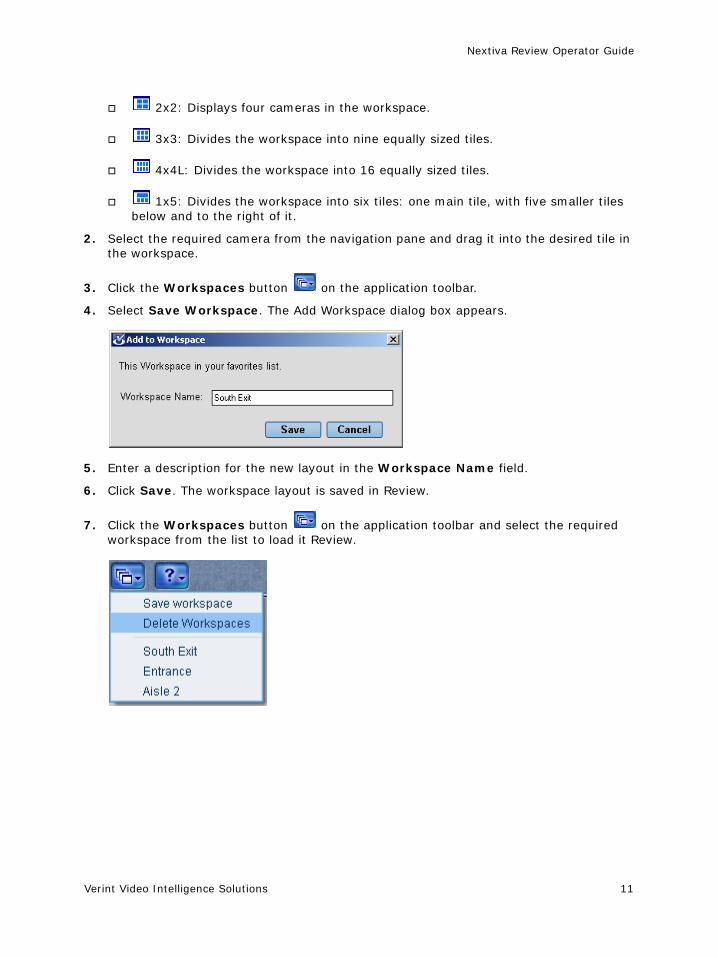
4. Select Save Workspace. The Add Workspace dialog box appears.
5. Enter a description for the new layout in the Workspace Name field.
6. Click Save. The workspace layout is saved in Review.
7. Click the Workspaces button on the application toolbar and select the required workspace from the list to load it Review.
1: Getting Started
Verint Video Intelligence Solutions12
Managing a WorkspaceYou can organize all saved layouts so that they appear in order when listed under the Workspaces button. You can also delete a workspace layout that is no longer used.
To manage the workspace:
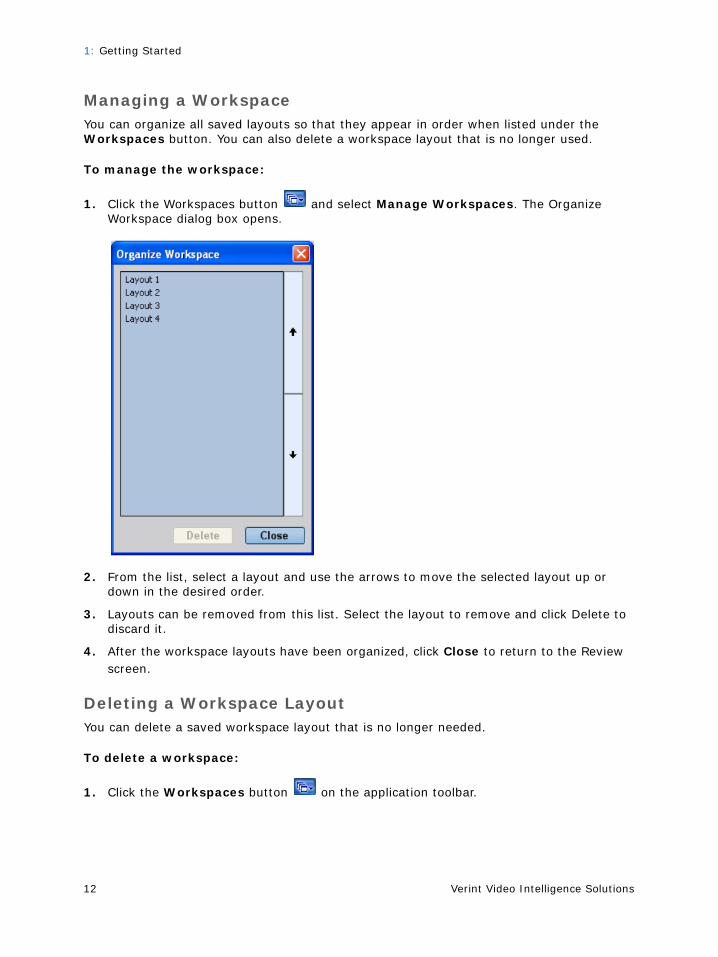
1. Click the Workspaces button and select Manage Workspaces. The Organize Workspace dialog box opens.
2. From the list, select a layout and use the arrows to move the selected layout up or down in the desired order.
3. Layouts can be removed from this list. Select the layout to remove and click Delete to discard it.
4. After the workspace layouts have been organized, click Close to return to the Review screen.
Deleting a Workspace LayoutYou can delete a saved workspace layout that is no longer needed.
To delete a workspace:
1. Click the Workspaces button on the application toolbar.
Nextiva Review Operator Guide
Verint Video Intelligence Solutions 13
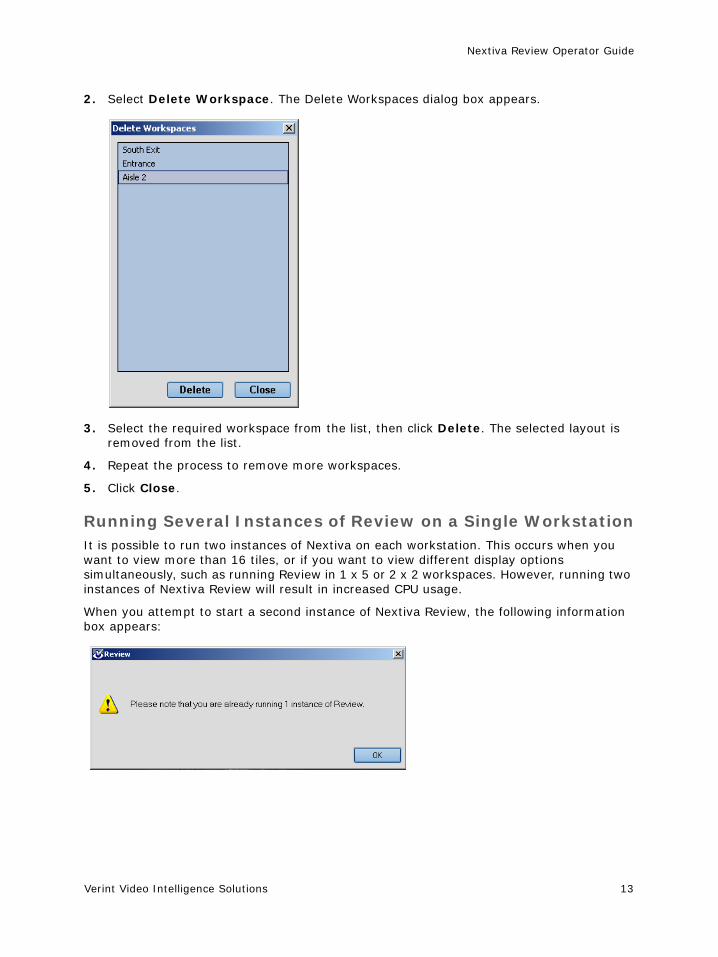
2. Select Delete Workspace. The Delete Workspaces dialog box appears.
3. Select the required workspace from the list, then click Delete. The selected layout is removed from the list.
4. Repeat the process to remove more workspaces.
5. Click Close.
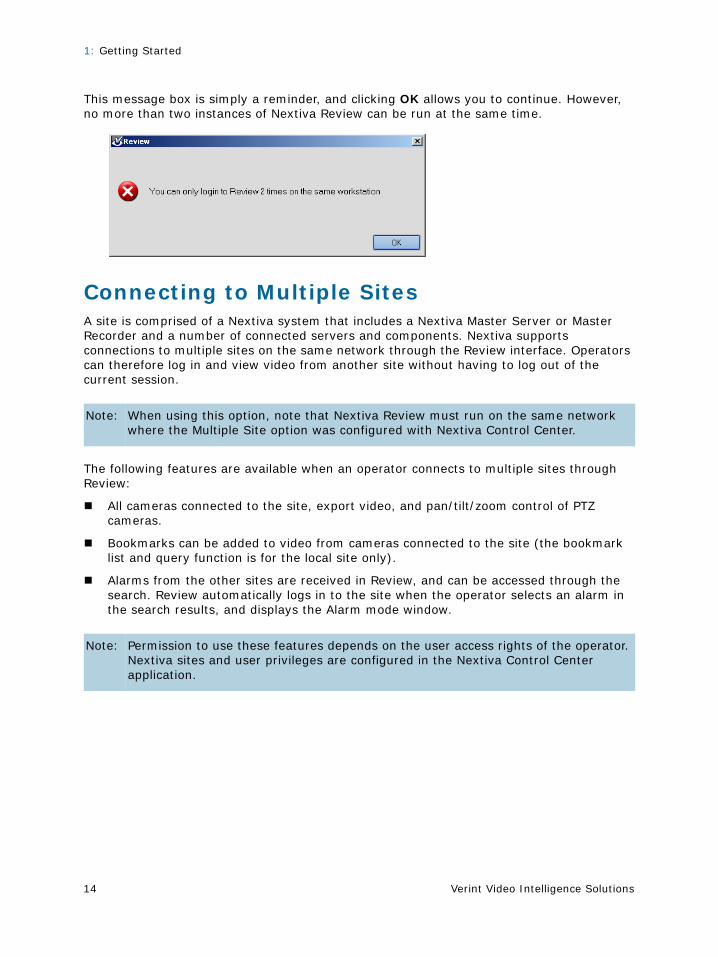
Running Several Instances of Review on a Single WorkstationIt is possible to run two instances of Nextiva on each workstation. This occurs when you want to view more than 16 tiles, or if you want to view different display options simultaneously, such as running Review in 1 x 5 or 2 x 2 workspaces. However, running two instances of Nextiva Review will result in increased CPU usage.
When you attempt to start a second instance of Nextiva Review, the following information box appears:
1: Getting Started
Verint Video Intelligence Solutions14
This message box is simply a reminder, and clicking OK allows you to continue. However, no more than two instances of Nextiva Review can be run at the same time.
Connecting to Multiple SitesA site is comprised of a Nextiva system that includes a Nextiva Master Server or Master Recorder and a number of connected servers and components. Nextiva supports connections to multiple sites on the same network through the Review interface. Operators can therefore log in and view video from another site without having to log out of the current session.
The following features are available when an operator connects to multiple sites through Review:
All cameras connected to the site, export video, and pan/tilt/zoom control of PTZ cameras.
Bookmarks can be added to video from cameras connected to the site (the bookmark list and query function is for the local site only).
Alarms from the other sites are received in Review, and can be accessed through the search. Review automatically logs in to the site when the operator selects an alarm in the search results, and displays the Alarm mode window.
Note: When using this option, note that Nextiva Review must run on the same network where the Multiple Site option was configured with Nextiva Control Center.
Note: Permission to use these features depends on the user access rights of the operator. Nextiva sites and user privileges are configured in the Nextiva Control Center application.
Nextiva Review Operator Guide
Verint Video Intelligence Solutions 15
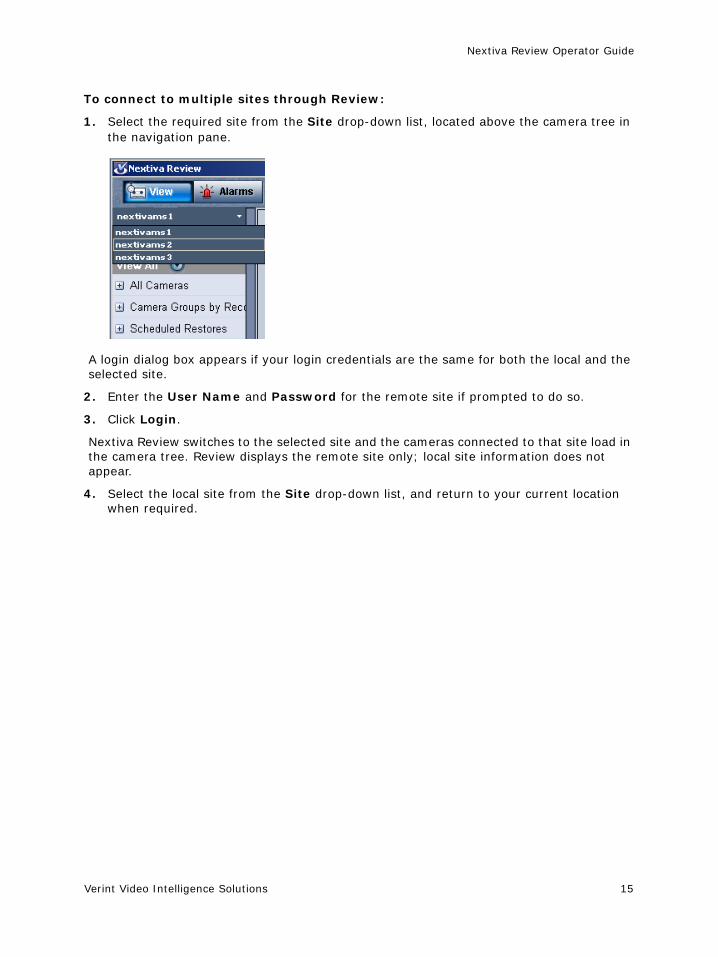
To connect to multiple sites through Review:
1. Select the required site from the Site drop-down list, located above the camera tree in the navigation pane.
A login dialog box appears if your login credentials are the same for both the local and the selected site.
2. Enter the User Name and Password for the remote site if prompted to do so.
3. Click Login.
Nextiva Review switches to the selected site and the cameras connected to that site load in the camera tree. Review displays the remote site only; local site information does not appear.
4. Select the local site from the Site drop-down list, and return to your current location when required.
1: Getting Started
Verint Video Intelligence Solutions16
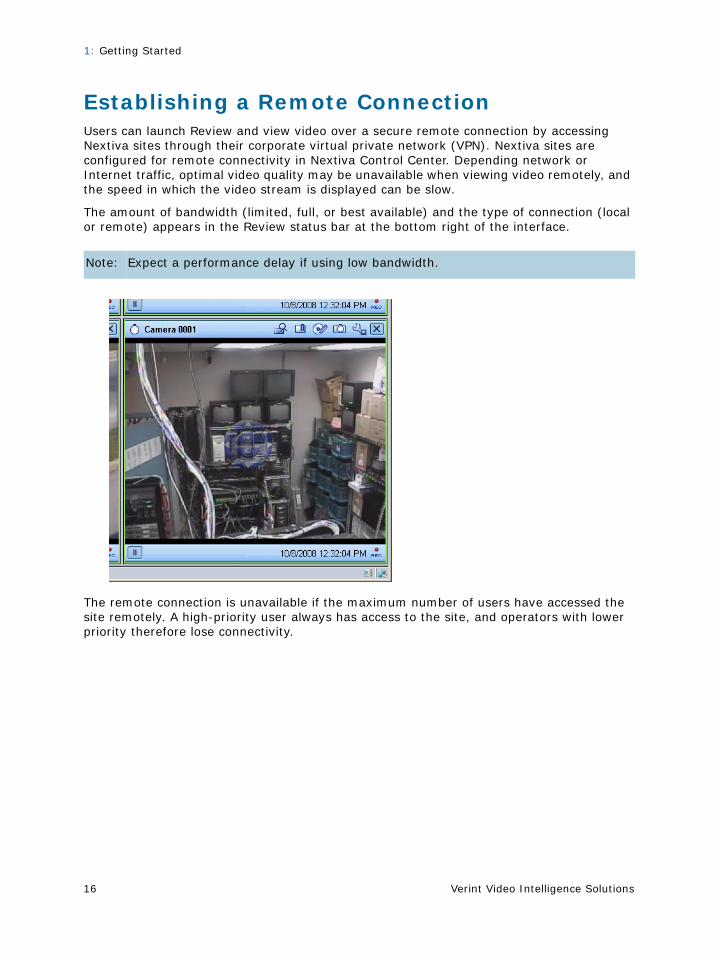
Establishing a Remote ConnectionUsers can launch Review and view video over a secure remote connection by accessing Nextiva sites through their corporate virtual private network (VPN). Nextiva sites are configured for remote connectivity in Nextiva Control Center. Depending network or Internet traffic, optimal video quality may be unavailable when viewing video remotely, and the speed in which the video stream is displayed can be slow.
The amount of bandwidth (limited, full, or best available) and the type of connection (local or remote) appears in the Review status bar at the bottom right of the interface.
The remote connection is unavailable if the maximum number of users have accessed the site remotely. A high-priority user always has access to the site, and operators with lower priority therefore lose connectivity.
Note: Expect a performance delay if using low bandwidth.
Nextiva Review Operator Guide
Verint Video Intelligence Solutions 17
Opening External Media FilesThe following external media can be opened in Nextiva Review:
Video files exported from Review in Audio Video Interleave (*.avi) format, with audio support
Image files in bitmap, JPEG, or TIF formats
To open a media file in Review:
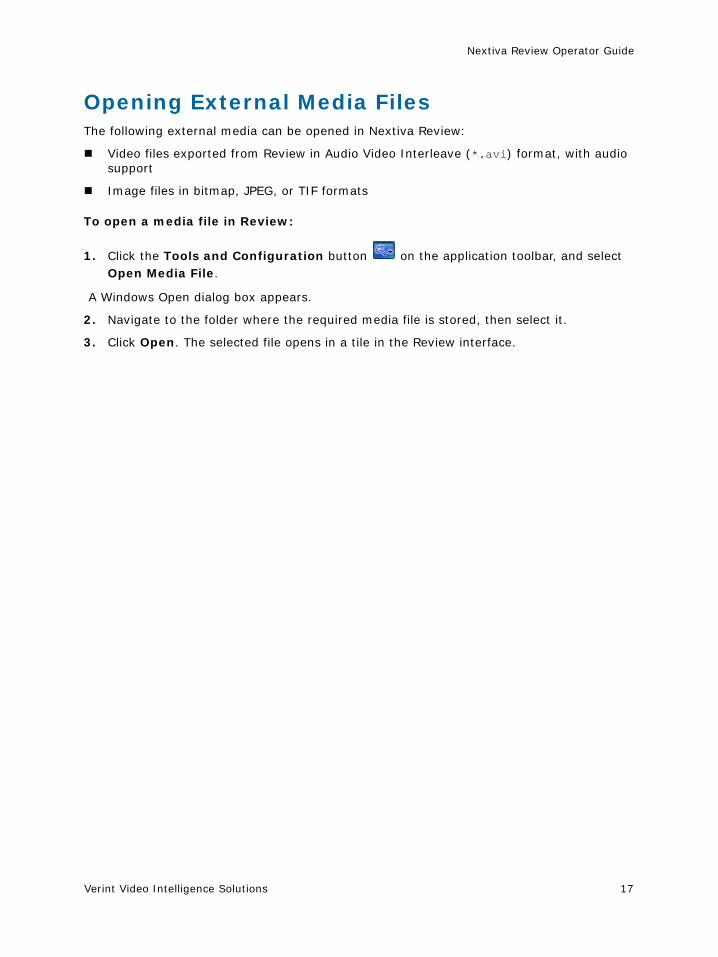
1. Click the Tools and Configuration button on the application toolbar, and select Open Media File.
A Windows Open dialog box appears.
2. Navigate to the folder where the required media file is stored, then select it.
3. Click Open. The selected file opens in a tile in the Review interface.
1: Getting Started
Verint Video Intelligence Solutions18
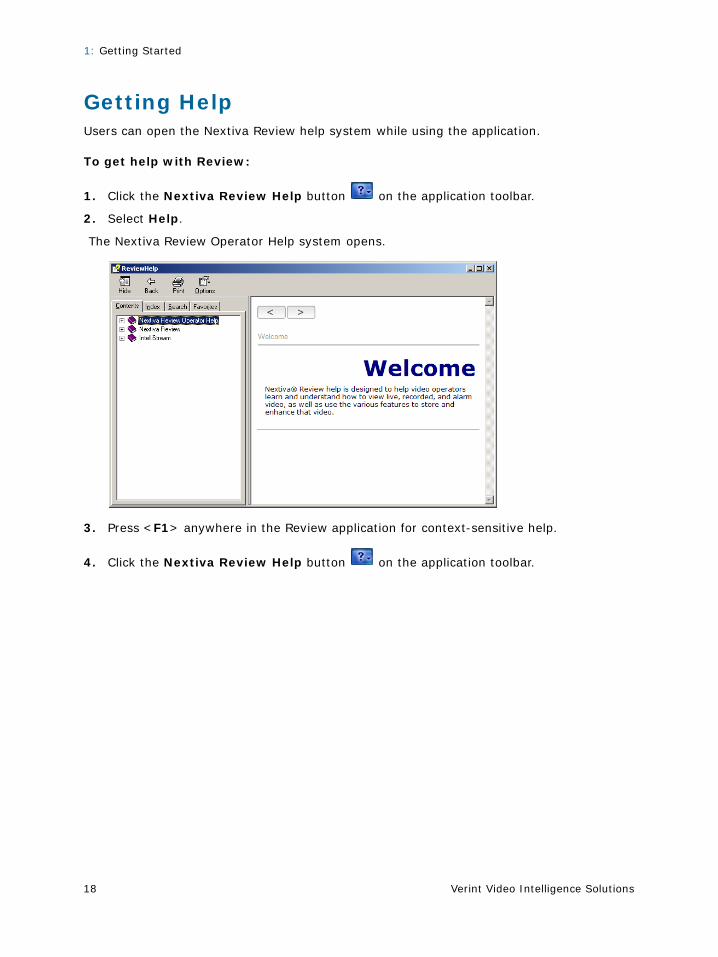
Getting HelpUsers can open the Nextiva Review help system while using the application.
To get help with Review:
1. Click the Nextiva Review Help button on the application toolbar.
2. Select Help.
The Nextiva Review Operator Help system opens.
3. Press <F1> anywhere in the Review application for context-sensitive help.
4. Click the Nextiva Review Help button on the application toolbar.
Nextiva Review Operator Guide
Verint Video Intelligence Solutions 19
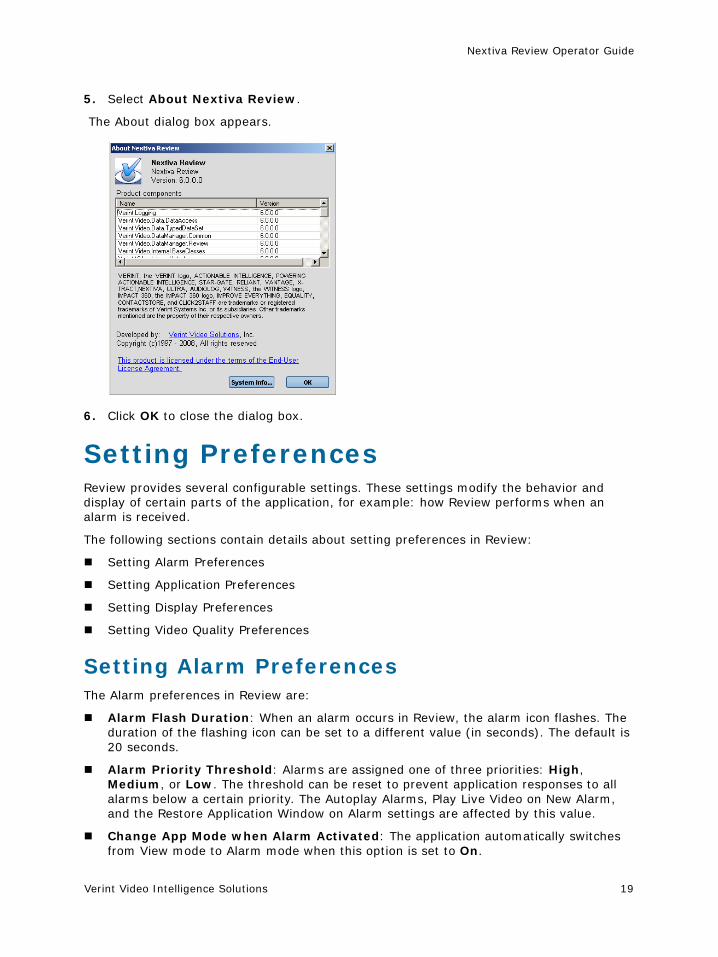
5. Select About Nextiva Review.
The About dialog box appears.
6. Click OK to close the dialog box.
Setting PreferencesReview provides several configurable settings. These settings modify the behavior and display of certain parts of the application, for example: how Review performs when an alarm is received.
The following sections contain details about setting preferences in Review:
Setting Alarm Preferences
Setting Application Preferences
Setting Display Preferences
Setting Video Quality Preferences
Setting Alarm PreferencesThe Alarm preferences in Review are:
Alarm Flash Duration: When an alarm occurs in Review, the alarm icon flashes. The duration of the flashing icon can be set to a different value (in seconds). The default is 20 seconds.
Alarm Priority Threshold: Alarms are assigned one of three priorities: High, Medium, or Low. The threshold can be reset to prevent application responses to all alarms below a certain priority. The Autoplay Alarms, Play Live Video on New Alarm, and the Restore Application Window on Alarm settings are affected by this value.
Change App Mode when Alarm Activated: The application automatically switches from View mode to Alarm mode when this option is set to On.
1: Getting Started
Verint Video Intelligence Solutions20
Number of Alarms to Retrieve: The number of alarms retrieved in search results can be limited to an amount set by the user, between 50 and 500. The default is 100 alarms. The number entered applies to all search forms that retrieve alarms in Review.
Play Live Video on New Alarm: Review automatically displays live video from a camera associated with the alarm event when this option is set to On. This applies only to alarms where the priority is equal to, or above, the Alarm Priority Threshold.
Restore Application Window on Alarm: When this options is set to On, the application window automatically resizes to its previous dimensions and becomes the active window when a new alarm event occurs. This setting is particularly useful when you plan to work with the Review window minimized.
Taskbar Notification: A message pops up from the Windows taskbar when this option is set to On, alerting the operator that an alarm occurred.
To set alarm preferences:
1. Click the Tools and Configuration button on the application toolbar
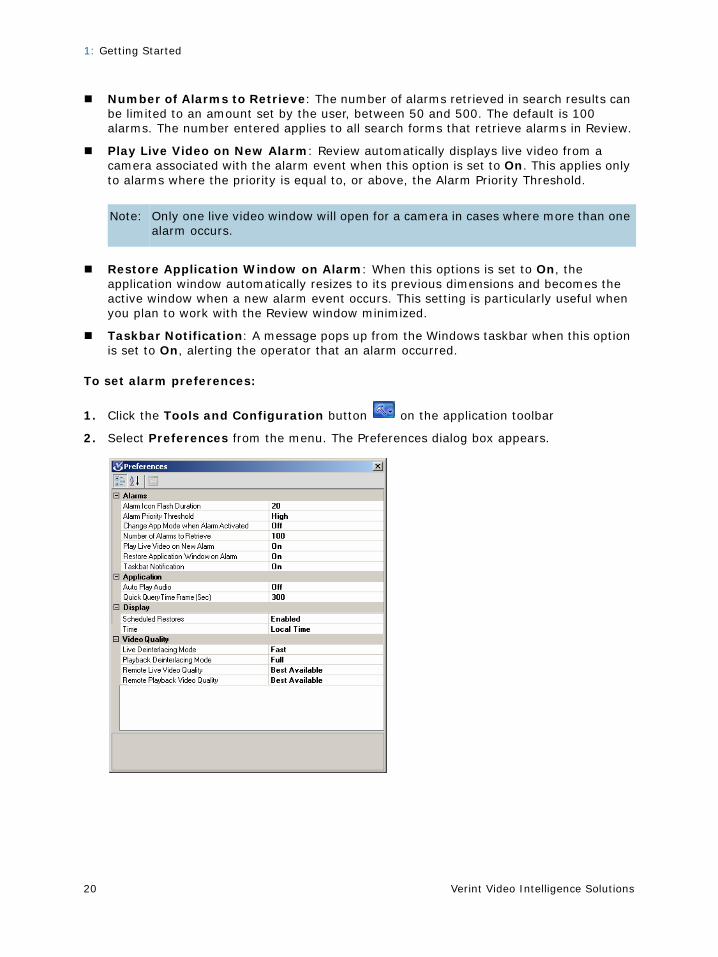
2. Select Preferences from the menu. The Preferences dialog box appears.
Note: Only one live video window will open for a camera in cases where more than one alarm occurs.
Nextiva Review Operator Guide
Verint Video Intelligence Solutions 21
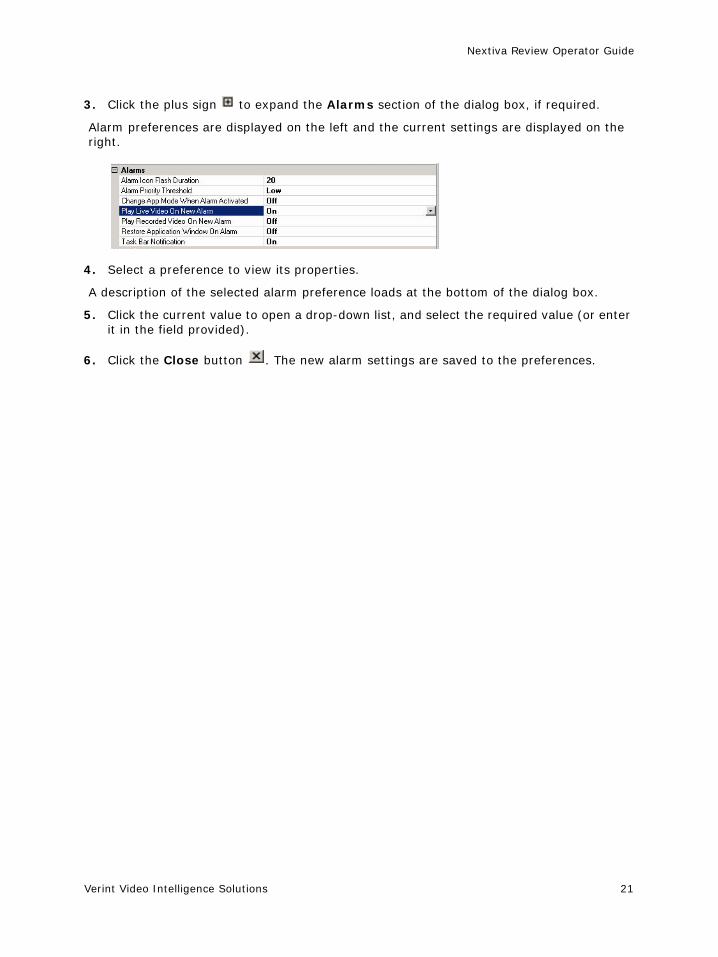
3. Click the plus sign to expand the Alarms section of the dialog box, if required.
Alarm preferences are displayed on the left and the current settings are displayed on the right.
4. Select a preference to view its properties.
A description of the selected alarm preference loads at the bottom of the dialog box.
5. Click the current value to open a drop-down list, and select the required value (or enter it in the field provided).
6. Click the Close button . The new alarm settings are saved to the preferences.
1: Getting Started
Verint Video Intelligence Solutions22
Setting Application PreferencesThe Application preferences in Review are as follows:
Auto Play Audio—Audio plays automatically when this option is set to On.
Quick Query Time Frame (Sec)—Defines the playback time for an instant replay when the user performs a quick query on live video. The time frame can be between 30 and 600 seconds. The default is 300 seconds.
To set application preferences:
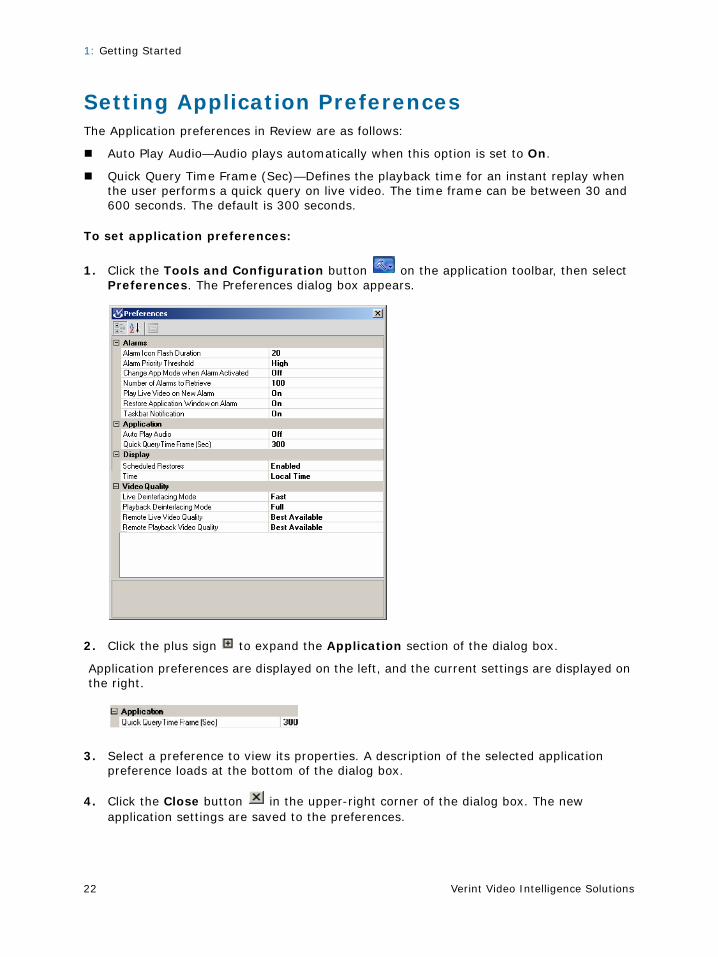
1. Click the Tools and Configuration button on the application toolbar, then select Preferences. The Preferences dialog box appears.
2. Click the plus sign to expand the Application section of the dialog box.
Application preferences are displayed on the left, and the current settings are displayed on the right.
3. Select a preference to view its properties. A description of the selected application preference loads at the bottom of the dialog box.
4. Click the Close button in the upper-right corner of the dialog box. The new application settings are saved to the preferences.
Nextiva Review Operator Guide
Verint Video Intelligence Solutions 23
Setting Display PreferencesThe Display preferences in Review are as follows:
Scheduled Restores—Users can set up recorded video queries and schedule them to take place at a different time. The Schedule button is available in the Video Query dialog box when this option is set to Enabled.
Time—The application time can be set to display the 24-hour time format (for example, 17:23:42), or according to the time settings that are configured on the local computer.
To set display preferences:
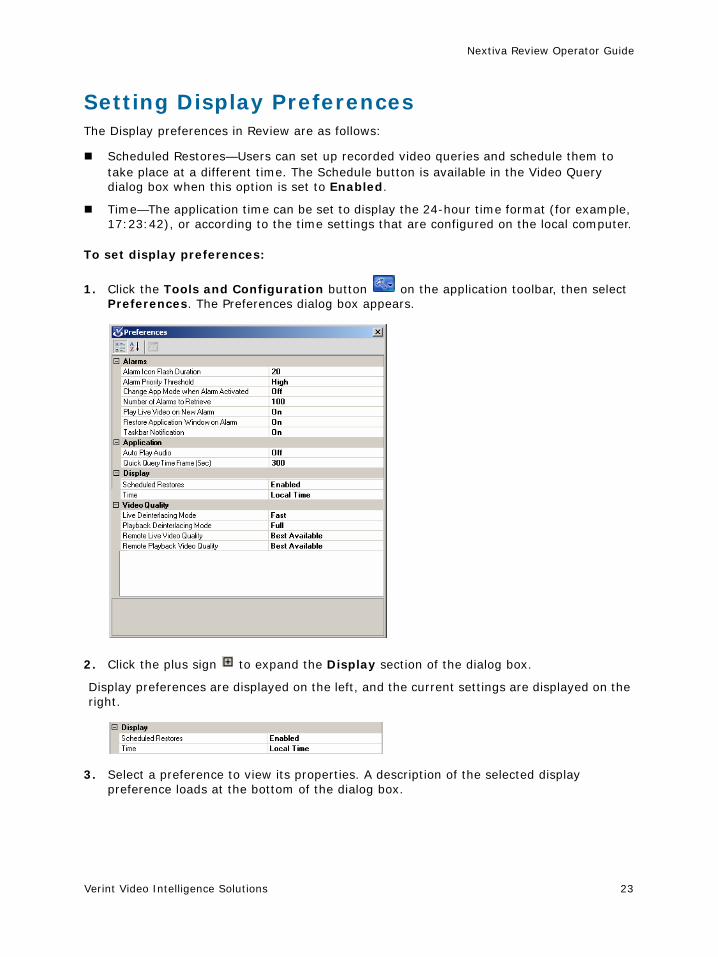
1. Click the Tools and Configuration button on the application toolbar, then select Preferences. The Preferences dialog box appears.
2. Click the plus sign to expand the Display section of the dialog box.
Display preferences are displayed on the left, and the current settings are displayed on the right.
3. Select a preference to view its properties. A description of the selected display preference loads at the bottom of the dialog box.
1: Getting Started
Verint Video Intelligence Solutions24
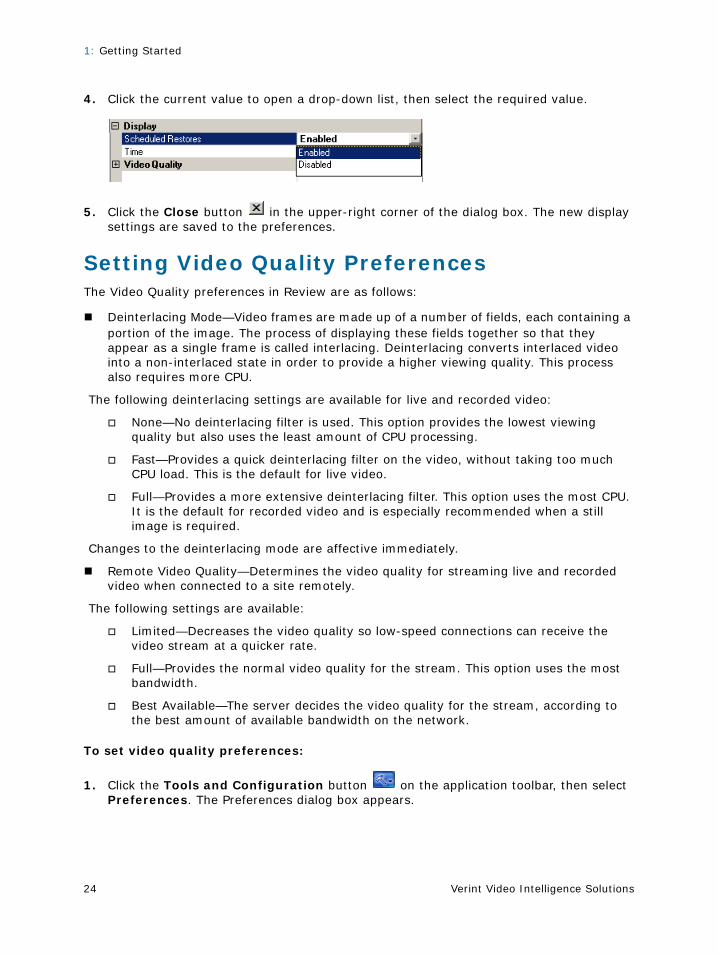
4. Click the current value to open a drop-down list, then select the required value.
5. Click the Close button in the upper-right corner of the dialog box. The new display settings are saved to the preferences.
Setting Video Quality PreferencesThe Video Quality preferences in Review are as follows:
Deinterlacing Mode—Video frames are made up of a number of fields, each containing a portion of the image. The process of displaying these fields together so that they appear as a single frame is called interlacing. Deinterlacing converts interlaced video into a non-interlaced state in order to provide a higher viewing quality. This process also requires more CPU.
The following deinterlacing settings are available for live and recorded video:
None—No deinterlacing filter is used. This option provides the lowest viewing quality but also uses the least amount of CPU processing.
Fast—Provides a quick deinterlacing filter on the video, without taking too much CPU load. This is the default for live video.
Full—Provides a more extensive deinterlacing filter. This option uses the most CPU. It is the default for recorded video and is especially recommended when a still image is required.
Changes to the deinterlacing mode are affective immediately.
Remote Video Quality—Determines the video quality for streaming live and recorded video when connected to a site remotely.
The following settings are available:
Limited—Decreases the video quality so low-speed connections can receive the video stream at a quicker rate.
Full—Provides the normal video quality for the stream. This option uses the most bandwidth.
Best Available—The server decides the video quality for the stream, according to the best amount of available bandwidth on the network.
To set video quality preferences:
1. Click the Tools and Configuration button on the application toolbar, then select Preferences. The Preferences dialog box appears.
Nextiva Review Operator Guide
Verint Video Intelligence Solutions 25
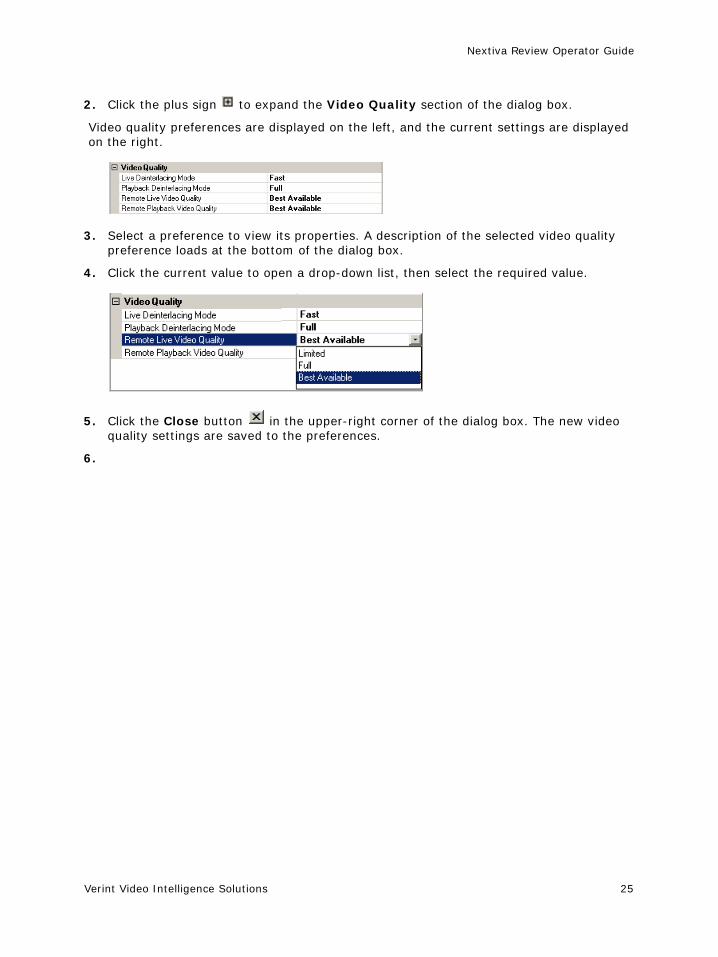
2. Click the plus sign to expand the Video Quality section of the dialog box.
Video quality preferences are displayed on the left, and the current settings are displayed on the right.
3. Select a preference to view its properties. A description of the selected video quality preference loads at the bottom of the dialog box.
4. Click the current value to open a drop-down list, then select the required value.
5. Click the Close button in the upper-right corner of the dialog box. The new video quality settings are saved to the preferences.
6.

1: Getting Started
Verint Video Intelligence Solutions26

Verint Video Intelligence Solutions27
Chapter
Live and Recorded VideoNextiva Review is used to view live video or retrieve recorded video, which is displayed in a video window when a camera is selected from the camera tree.
The application also provides several video features, such as pan/tilt/zoom (PTZ) functionality, video bookmarks, camera tours, scheduled queries, and video export.
This chapter contains the following procedures for live and recorded video:
Viewing Live Video
Using Pan/Tilt/Zoom Camera Controls
Viewing Recorded Video
Using Camera Maps
Synchronizing Videos
Using Bookmarks
Scheduling Video Queries
Viewing Camera Toursy
Exporting Video
Viewing Live VideoNextiva Review is used to monitor real-time video images from surveillance cameras. Live video is displayed in the video window, which opens in the workspace after the required camera is selected from the Live tab.
To view live video:
1. Click the View button on the application toolbar.
2. Select the Live tab from the navigation pane.
3. Double-click the required camera from the camera tree, or drag it into a tile on the workspace. A video window opens in the tile and begins playing live video images from the selected camera.
2: Live and Recorded Video
Verint Video Intelligence Solutions28
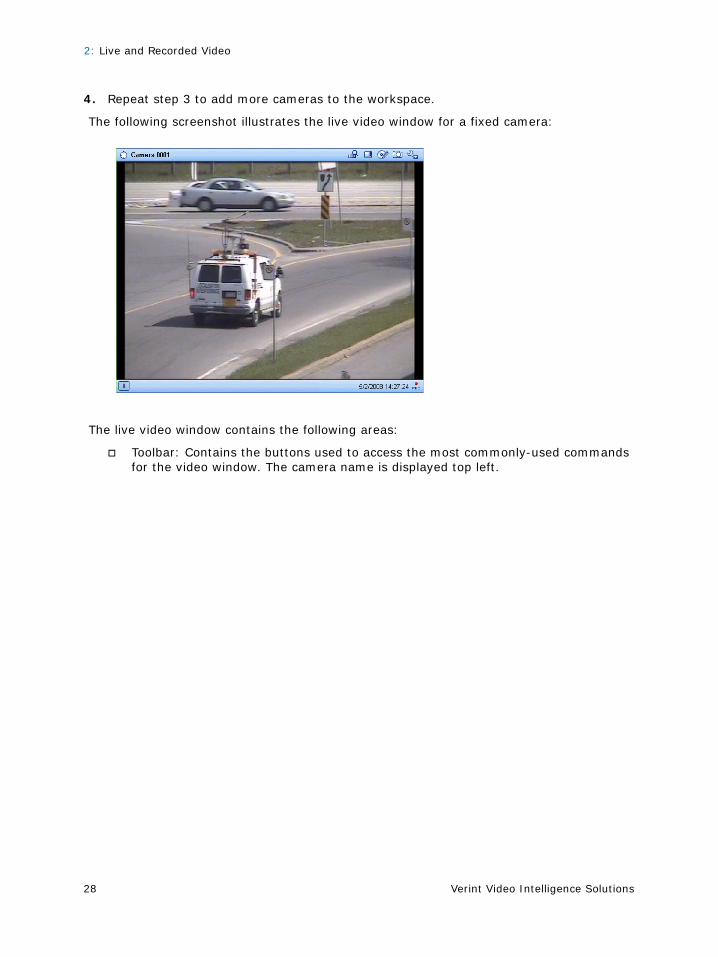
4. Repeat step 3 to add more cameras to the workspace.
The following screenshot illustrates the live video window for a fixed camera:
The live video window contains the following areas:
Toolbar: Contains the buttons used to access the most commonly-used commands for the video window. The camera name is displayed top left.
Nextiva Review Operator Guide
Verint Video Intelligence Solutions 29
Live video: Displays the live video feed.
Bottom bar: Displays the current date and time, and indicates when the live video is recording.
The toolbar, located at the top of the video window, contains the following functions:
An active video window is surrounded by a green border. A video window must be active to perform any video function in that window.
5. Click anywhere in an inactive window to activate it.
6. Double-click the video window toolbar, or press <Alt + Enter>, to maximize the video window for a better view of the video images. The video window is enlarged to fill the workspace area, covering the other open video windows.
Function Button Description
Quick Query Displays an instant replay of a live video feed.
Bookmark Creates and saves a bookmark, then opens the Bookmark dialog box.
Export Opens the Export Media dialog box.
Image Toolkit Launches the Image Toolkit.
Tools Menu Expands a menu with the following tools for live and recorded video:
Quick Query
Play Live
Set Frame Advance
Loop video
Start Recording
Stop Recording
Get Bookmarks
Tear Off
Authenticate Video
Note: Tools for recorded/exported video are unavailable for selection while in live video mode.
Show PTZ Toolbar Toggles the PTZ toolbar. Available when the video window displays video from a pan/tilt/zoom camera.
2: Live and Recorded Video
Verint Video Intelligence Solutions30
7. Press <Esc> or <Alt + Enter> again to exit the full screen. The video window returns to the normal view, and the other video windows are available in the workspace.
Note: The maximized screen is automatically exited if the user connects to a different Nextiva site in Review.

Nextiva Review Operator Guide
Verint Video Intelligence Solutions 31
8. Click the Layout Options button on the application toolbar, then select Toggle Video Toolbar. The toolbar and bottom bar are removed from all video windows open in the workspace.
Vertical red and blue bars appear in the video window if the live video feed is lost. Video loss happens when the camera is disconnected from the encoder.
The live video feed is restored within one second after reconnection to the encoder.
The video image is black, and an icon in the upper-right corner of the video window indicates when the encoder where the camera is attached becomes disconnected from the system.

2: Live and Recorded Video
Verint Video Intelligence Solutions32
The live video feed is restored within one second after the encoder is reconnected to the system.
The video image is black, and an icon in the upper-right corner of the video window indicates when the system is unable to get the live video feed from the recorder (for example, if the recorder is offline).
Performing a Quick Query on Live VideoThe Quick Query is used to view an instant replay of a live video feed.
To run a quick query:
1. Select the required video window in the workspace.
Nextiva Review Operator Guide
Verint Video Intelligence Solutions 33
2. Click the Quick Query button on the video window toolbar.
The video window begins to play the previous minutes of recorded video from the selected camera.
3. Click the Tools Menu button on the video window toolbar.
4. Select Play Live when the query time has ended. The video window returns to playing the live video feed.
Recording Live VideoThe system administrator uses Nextiva Control Center to configure the way in which live video is recorded by the system. Video can be set to record continuously, or to only begin recording when important events occur at the site. Operators can record live video on demand when required, if the camera is set to record only event video.
To record live video on demand:
1. Click the Tools Menu button on the video window toolbar, then select Start Recording.
The REC light in the bottom-right corner of the video window turns red , and the system begins to record the live video feed.
2. Click the Tools Menu button, then select Stop Recording to end the recording.
Zooming In On VideoThe Zoom function is used to enlarge the scale of a video display, allowing operators to see a closer view of a video image.
This procedure applies to video from a fixed camera, or video from a PTZ camera with the Heads Up Display currently disabled.
To zoom in on video:
1. Select the required video window in the workspace.
2. Place the mouse cursor in the area to zoom, then click and hold the left mouse button.
3. Drag the mouse across the image to create a rectangle around the area of interest.
4. Release the mouse button. A zoomed view of the selected area appears in the video window.
Note: The instant replay can be anywhere between five and ten minutes, depending on the application preferences set in Review. Refer to the “Setting Application Preferences” section on page 22 for details about setting the time frame for video playback.
2: Live and Recorded Video
Verint Video Intelligence Solutions34
5. Repeat the process on the zoomed view and zoom in further.
6. Right-click anywhere in the video window and return to the original view.
Using Tear Off VideoTear Off Video detaches video windows from the Review workspace. Upon being detached, a video window can be placed in other areas of the Windows desktop, moved to a second monitor (if connected to the workstation), or minimized to the Windows taskbar.
To tear off video:
1. Select the required video window in the workspace.
2. Click the Tools Menu button on the video window toolbar, then select Tear Off.
The video window becomes detached from the Review window. Associated audio (if available) continues to play, even when a different video in the main application window is selected.
3. Using the mouse, click and drag the tear off video window to a new location on the desktop, or minimize it to the taskbar.
4. Click the Close button to close the tear off video window (it does not return to the Review workspace).
Using Pan/Tilt/Zoom Camera ControlsPan/tilt/zoom (PTZ) cameras are controlled in Nextiva Review using the Heads Up Display (HUD) and the PTZ toolbar. PTZ control is available in the video window when a PTZ camera is selected from the Live tab.
The sections that follow contain instructions for using PTZ camera controls in Review:
Displaying the PTZ Toolbar
Using PTZ Lock
Using the Heads Up Display
Adjusting the Iris and Focus
Using the PTZ Menu
Using Presets
Using Patterns
Displaying the PTZ ToolbarThe PTZ toolbar contains the buttons used to control a PTZ camera in the workspace.
Nextiva Review Operator Guide
Verint Video Intelligence Solutions 35
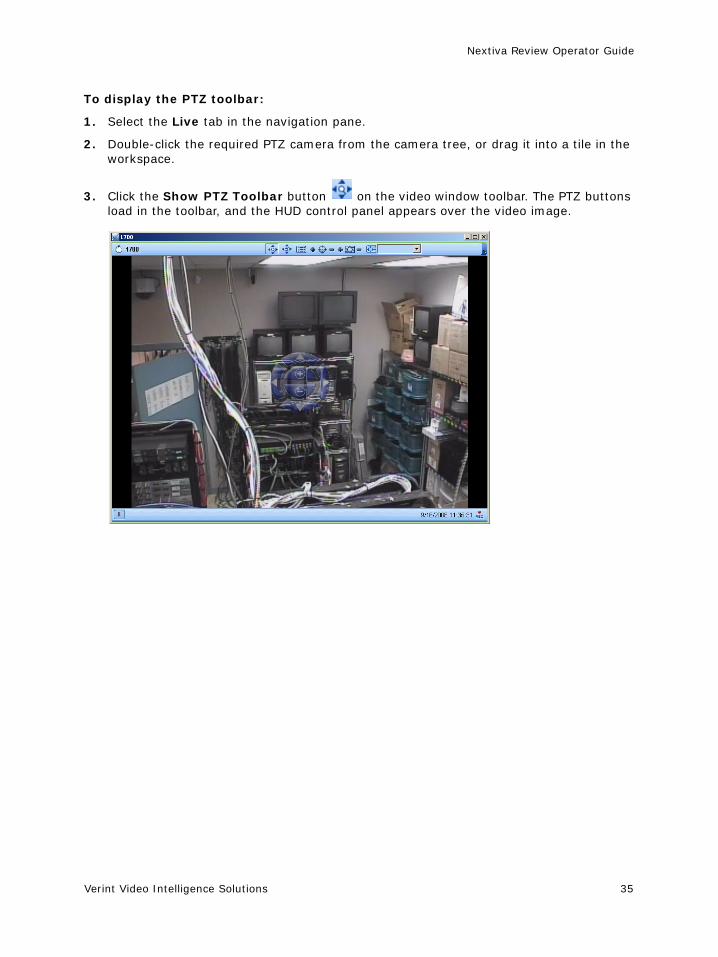
To display the PTZ toolbar:
1. Select the Live tab in the navigation pane.
2. Double-click the required PTZ camera from the camera tree, or drag it into a tile in the workspace.
3. Click the Show PTZ Toolbar button on the video window toolbar. The PTZ buttons load in the toolbar, and the HUD control panel appears over the video image.
2: Live and Recorded Video
Verint Video Intelligence Solutions36
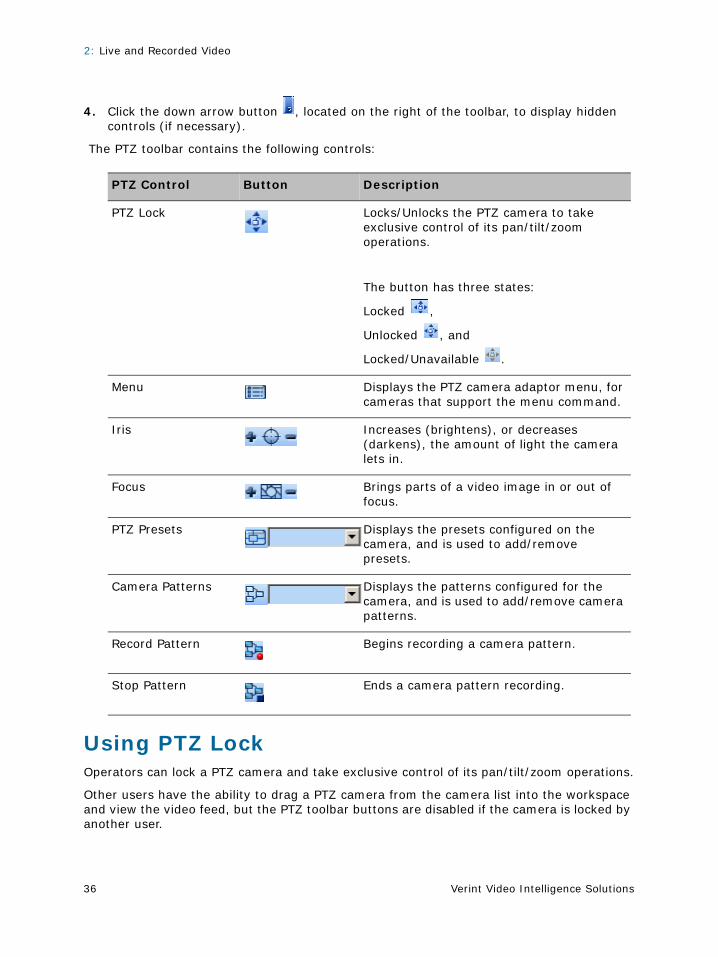
4. Click the down arrow button , located on the right of the toolbar, to display hidden controls (if necessary).
The PTZ toolbar contains the following controls:
Using PTZ LockOperators can lock a PTZ camera and take exclusive control of its pan/tilt/zoom operations.
Other users have the ability to drag a PTZ camera from the camera list into the workspace and view the video feed, but the PTZ toolbar buttons are disabled if the camera is locked by another user.
PTZ Control Button Description
PTZ Lock Locks/Unlocks the PTZ camera to take exclusive control of its pan/tilt/zoom operations.
The button has three states:
Locked ,
Unlocked , and
Locked/Unavailable .
Menu Displays the PTZ camera adaptor menu, for cameras that support the menu command.
Iris Increases (brightens), or decreases (darkens), the amount of light the camera lets in.
Focus Brings parts of a video image in or out of focus.
PTZ Presets Displays the presets configured on the camera, and is used to add/remove presets.
Camera Patterns Displays the patterns configured for the camera, and is used to add/remove camera patterns.
Record Pattern Begins recording a camera pattern.
Stop Pattern Ends a camera pattern recording.
Nextiva Review Operator Guide
Verint Video Intelligence Solutions 37
Review users (and keyboards connected to Nextiva) are given PTZ control and lock privileges for PTZ cameras. These settings are defined in Nextiva Control Center by the system administrator.
Users with high-priority permissions always have access to PTZ controls and can unlock cameras currently locked by other users without those permissions.
Patterns and presets do not execute for a locked PTZ camera when selected by a camera tour.
A locked PTZ camera is automatically released when the video window is removed from the workspace or when the Review application is closed.
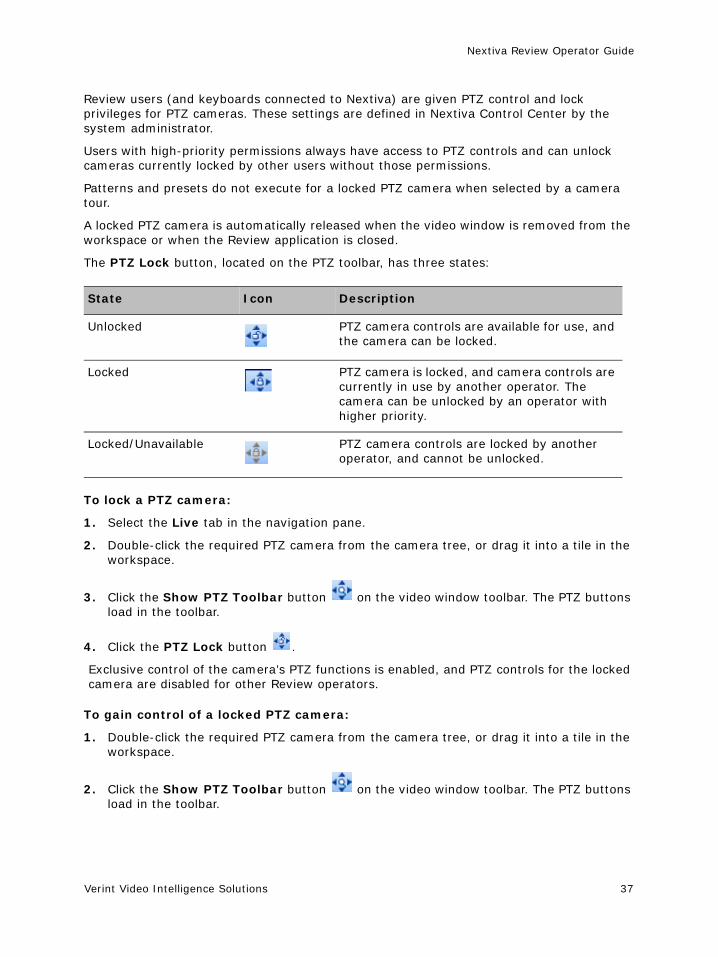
The PTZ Lock button, located on the PTZ toolbar, has three states:
To lock a PTZ camera:
1. Select the Live tab in the navigation pane.
2. Double-click the required PTZ camera from the camera tree, or drag it into a tile in the workspace.
3. Click the Show PTZ Toolbar button on the video window toolbar. The PTZ buttons load in the toolbar.
4. Click the PTZ Lock button .
Exclusive control of the camera’s PTZ functions is enabled, and PTZ controls for the locked camera are disabled for other Review operators.
To gain control of a locked PTZ camera:
1. Double-click the required PTZ camera from the camera tree, or drag it into a tile in the workspace.
2. Click the Show PTZ Toolbar button on the video window toolbar. The PTZ buttons load in the toolbar.
State Icon Description
Unlocked PTZ camera controls are available for use, and the camera can be locked.
Locked PTZ camera is locked, and camera controls are currently in use by another operator. The camera can be unlocked by an operator with higher priority.
Locked/Unavailable PTZ camera controls are locked by another operator, and cannot be unlocked.
2: Live and Recorded Video
Verint Video Intelligence Solutions38
3. Click the PTZ Lock button .
This button is enabled for operators who have precedence. Otherwise, the button is unavailable (grayed-out).
The locked camera is released and ready to re-lock.
4. Click the PTZ Lock button again.
Exclusive control of the camera’s PTZ functions is enabled, and PTZ controls for the locked camera are disabled for other Review operators.
The following occurs to the other user who had previously locked the PTZ controls:
An overlay is displayed in the video window for three seconds. The overlay message indicates that the pan/tilt/zoom controls are now unavailable.
The PTZ toolbar automatically returns to the normal video window toolbar, and the Show PTZ Toolbar button is disabled.
Nextiva Review Operator Guide
Verint Video Intelligence Solutions 39
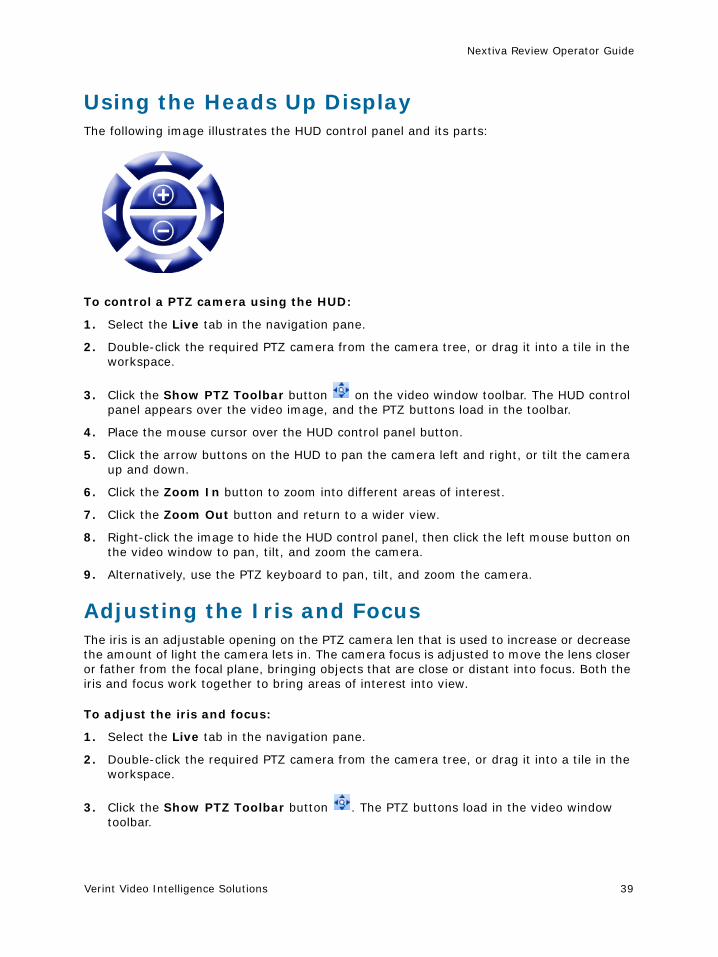
Using the Heads Up DisplayThe following image illustrates the HUD control panel and its parts:
To control a PTZ camera using the HUD:
1. Select the Live tab in the navigation pane.
2. Double-click the required PTZ camera from the camera tree, or drag it into a tile in the workspace.
3. Click the Show PTZ Toolbar button on the video window toolbar. The HUD control panel appears over the video image, and the PTZ buttons load in the toolbar.
4. Place the mouse cursor over the HUD control panel button.
5. Click the arrow buttons on the HUD to pan the camera left and right, or tilt the camera up and down.
6. Click the Zoom In button to zoom into different areas of interest.
7. Click the Zoom Out button and return to a wider view.
8. Right-click the image to hide the HUD control panel, then click the left mouse button on the video window to pan, tilt, and zoom the camera.
9. Alternatively, use the PTZ keyboard to pan, tilt, and zoom the camera.
Adjusting the Iris and FocusThe iris is an adjustable opening on the PTZ camera len that is used to increase or decrease the amount of light the camera lets in. The camera focus is adjusted to move the lens closer or father from the focal plane, bringing objects that are close or distant into focus. Both the iris and focus work together to bring areas of interest into view.
To adjust the iris and focus:
1. Select the Live tab in the navigation pane.
2. Double-click the required PTZ camera from the camera tree, or drag it into a tile in the workspace.
3. Click the Show PTZ Toolbar button . The PTZ buttons load in the video window toolbar.
2: Live and Recorded Video
Verint Video Intelligence Solutions40
4. Click the Iris Open and Iris Close buttons, and adjust the iris so the area of interest is correctly exposed.
5. Click the Focus Near and Focus Far buttons, and adjust the focus so the area of interest is in clear view.
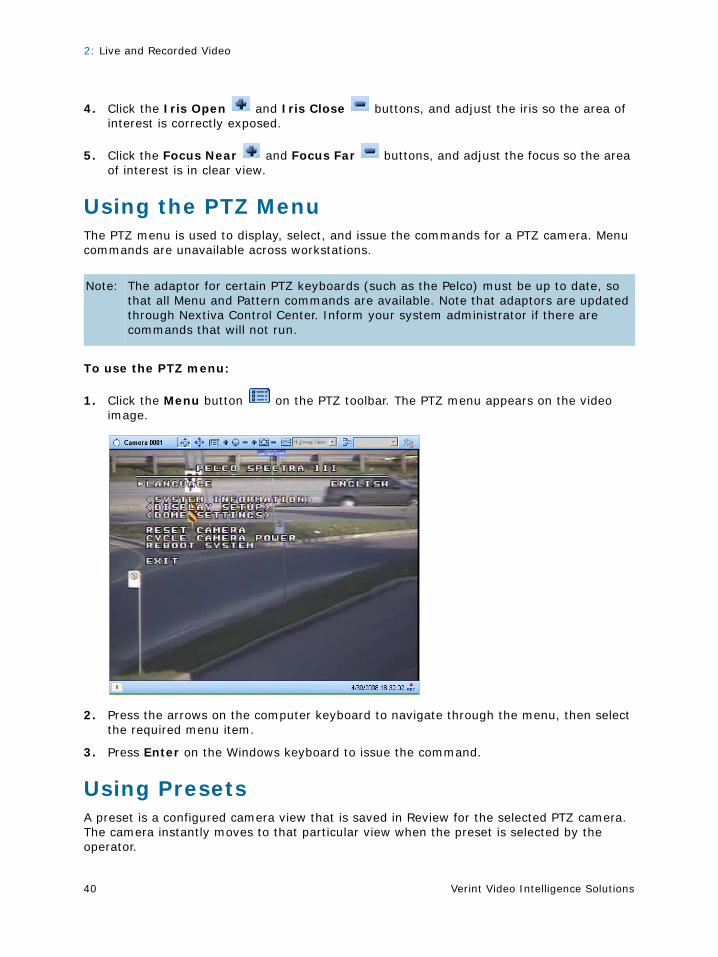
Using the PTZ MenuThe PTZ menu is used to display, select, and issue the commands for a PTZ camera. Menu commands are unavailable across workstations.
To use the PTZ menu:
1. Click the Menu button on the PTZ toolbar. The PTZ menu appears on the video image.
2. Press the arrows on the computer keyboard to navigate through the menu, then select the required menu item.
3. Press Enter on the Windows keyboard to issue the command.
Using PresetsA preset is a configured camera view that is saved in Review for the selected PTZ camera. The camera instantly moves to that particular view when the preset is selected by the operator.
Note: The adaptor for certain PTZ keyboards (such as the Pelco) must be up to date, so that all Menu and Pattern commands are available. Note that adaptors are updated through Nextiva Control Center. Inform your system administrator if there are commands that will not run.
Nextiva Review Operator Guide
Verint Video Intelligence Solutions 41
The sections that follow contain procedures for using camera presets in Nextiva Review:
Adding a Preset
Selecting a Preset
Deleting a Preset
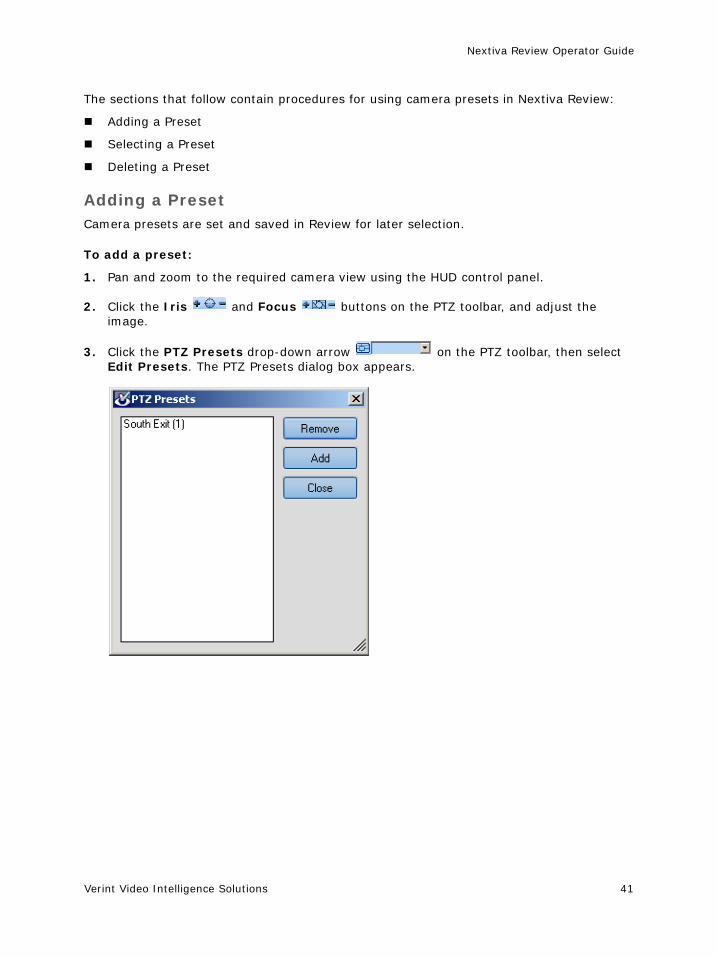
Adding a PresetCamera presets are set and saved in Review for later selection.
To add a preset:
1. Pan and zoom to the required camera view using the HUD control panel.
2. Click the Iris and Focus buttons on the PTZ toolbar, and adjust the image.
3. Click the PTZ Presets drop-down arrow on the PTZ toolbar, then select Edit Presets. The PTZ Presets dialog box appears.
2: Live and Recorded Video
Verint Video Intelligence Solutions42
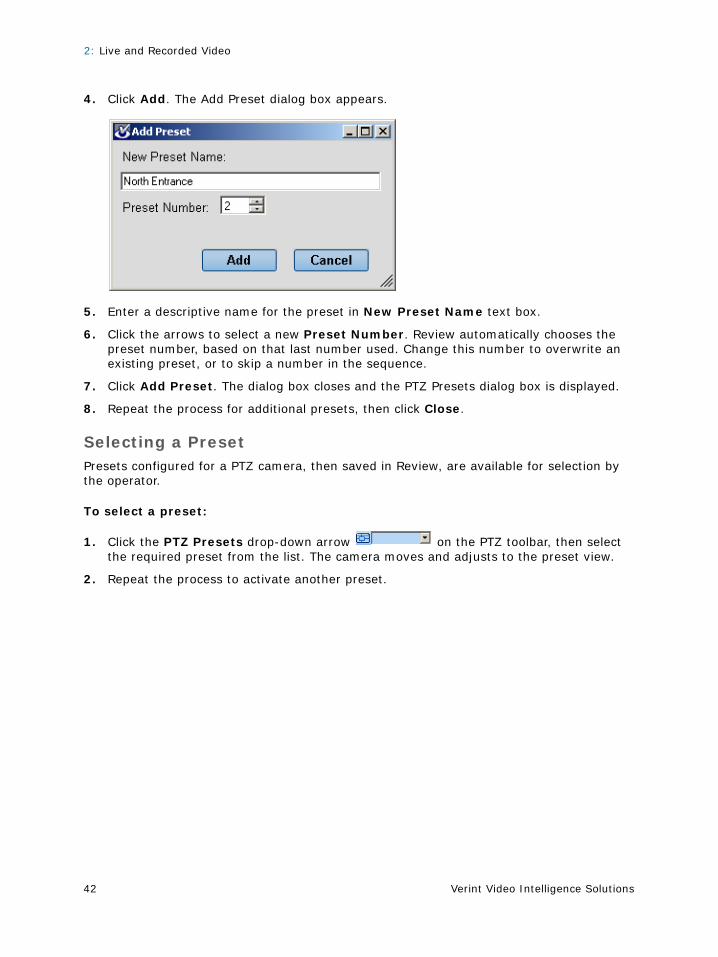
4. Click Add. The Add Preset dialog box appears.
5. Enter a descriptive name for the preset in New Preset Name text box.
6. Click the arrows to select a new Preset Number. Review automatically chooses the preset number, based on that last number used. Change this number to overwrite an existing preset, or to skip a number in the sequence.
7. Click Add Preset. The dialog box closes and the PTZ Presets dialog box is displayed.
8. Repeat the process for additional presets, then click Close.
Selecting a PresetPresets configured for a PTZ camera, then saved in Review, are available for selection by the operator.
To select a preset:
1. Click the PTZ Presets drop-down arrow on the PTZ toolbar, then select the required preset from the list. The camera moves and adjusts to the preset view.
2. Repeat the process to activate another preset.

Nextiva Review Operator Guide
Verint Video Intelligence Solutions 43
Deleting a PresetPresets assigned to a PTZ camera can be removed from the system. Once removed, the preset is unavailable for selection for that camera.
To delete a preset:
1. Click the PTZ Presets drop-down menu on the PTZ toolbar, then select Edit Presets. The PTZ Presets dialog box appears.
2. Select the required preset for deletion, then click Remove. The preset is deleted from the list.
3. Click Close, then return to Review.
Using PatternsA camera pattern is a sequence of camera movements configured for the selected PTZ camera.
The sections that follow contain procedures for using camera patterns in Review:
Adding a Camera Pattern
Running a Camera Pattern
Deleting a Camera Pattern
2: Live and Recorded Video
Verint Video Intelligence Solutions44
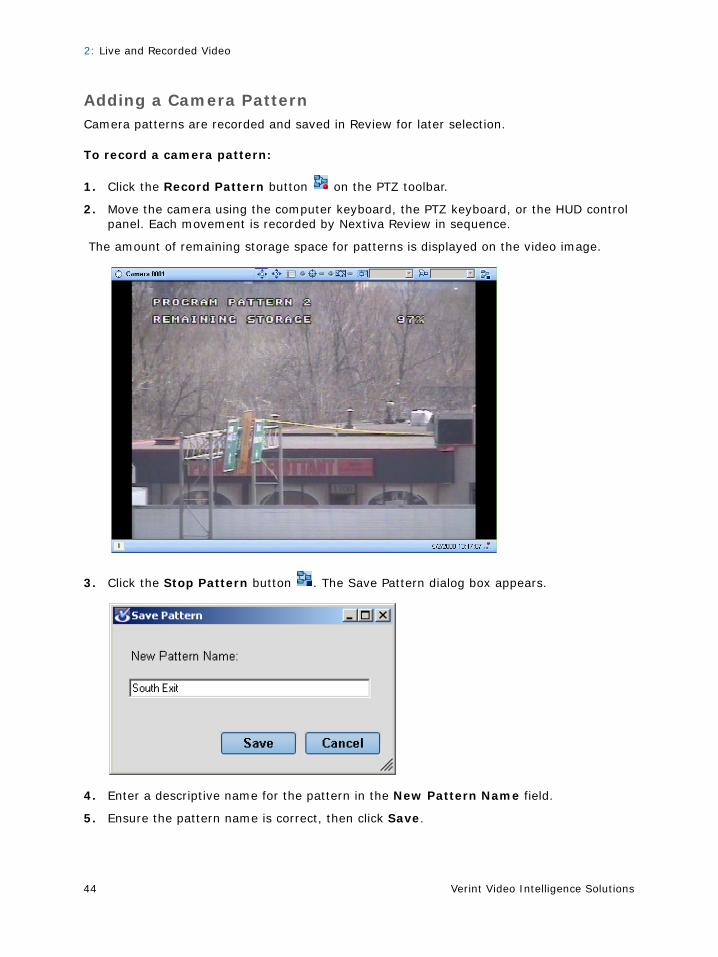
Adding a Camera PatternCamera patterns are recorded and saved in Review for later selection.
To record a camera pattern:
1. Click the Record Pattern button on the PTZ toolbar.
2. Move the camera using the computer keyboard, the PTZ keyboard, or the HUD control panel. Each movement is recorded by Nextiva Review in sequence.
The amount of remaining storage space for patterns is displayed on the video image.
3. Click the Stop Pattern button . The Save Pattern dialog box appears.
4. Enter a descriptive name for the pattern in the New Pattern Name field.
5. Ensure the pattern name is correct, then click Save.
Nextiva Review Operator Guide
Verint Video Intelligence Solutions 45
Running a Camera PatternPatterns that are recorded for a PTZ camera and then saved in Review can be selected by the operator.
To run a camera pattern:
1. Click the PTZ Patterns drop-down menu on the PTZ toolbar, then select the required pattern from the list. The camera moves, in sequence, according to the selected pattern.
2. Repeat the process to activate another pattern.
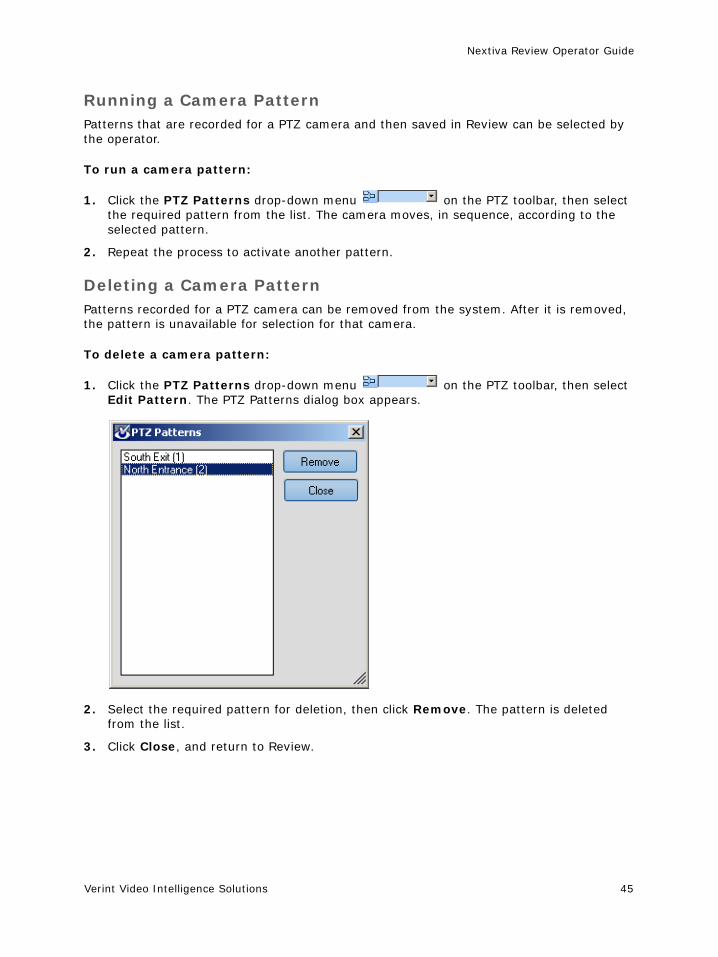
Deleting a Camera PatternPatterns recorded for a PTZ camera can be removed from the system. After it is removed, the pattern is unavailable for selection for that camera.
To delete a camera pattern:
1. Click the PTZ Patterns drop-down menu on the PTZ toolbar, then select Edit Pattern. The PTZ Patterns dialog box appears.
2. Select the required pattern for deletion, then click Remove. The pattern is deleted from the list.
3. Click Close, and return to Review.
2: Live and Recorded Video
Verint Video Intelligence Solutions46
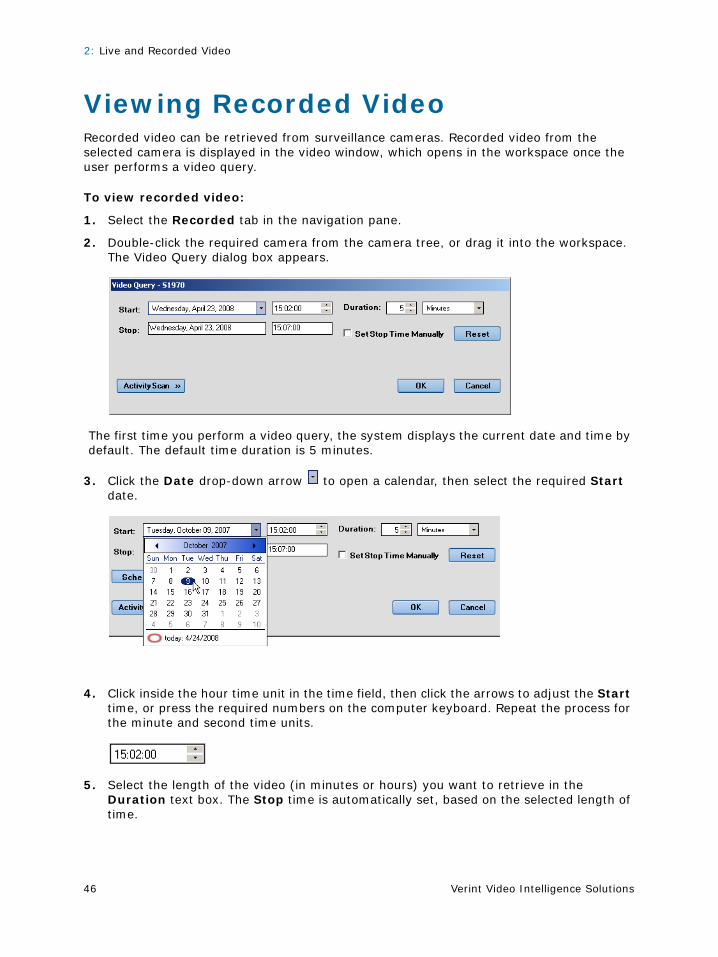
Viewing Recorded VideoRecorded video can be retrieved from surveillance cameras. Recorded video from the selected camera is displayed in the video window, which opens in the workspace once the user performs a video query.
To view recorded video:
1. Select the Recorded tab in the navigation pane.
2. Double-click the required camera from the camera tree, or drag it into the workspace. The Video Query dialog box appears.
The first time you perform a video query, the system displays the current date and time by default. The default time duration is 5 minutes.
3. Click the Date drop-down arrow to open a calendar, then select the required Start date.
4. Click inside the hour time unit in the time field, then click the arrows to adjust the Start time, or press the required numbers on the computer keyboard. Repeat the process for the minute and second time units.
5. Select the length of the video (in minutes or hours) you want to retrieve in the Duration text box. The Stop time is automatically set, based on the selected length of time.
Nextiva Review Operator Guide
Verint Video Intelligence Solutions 47
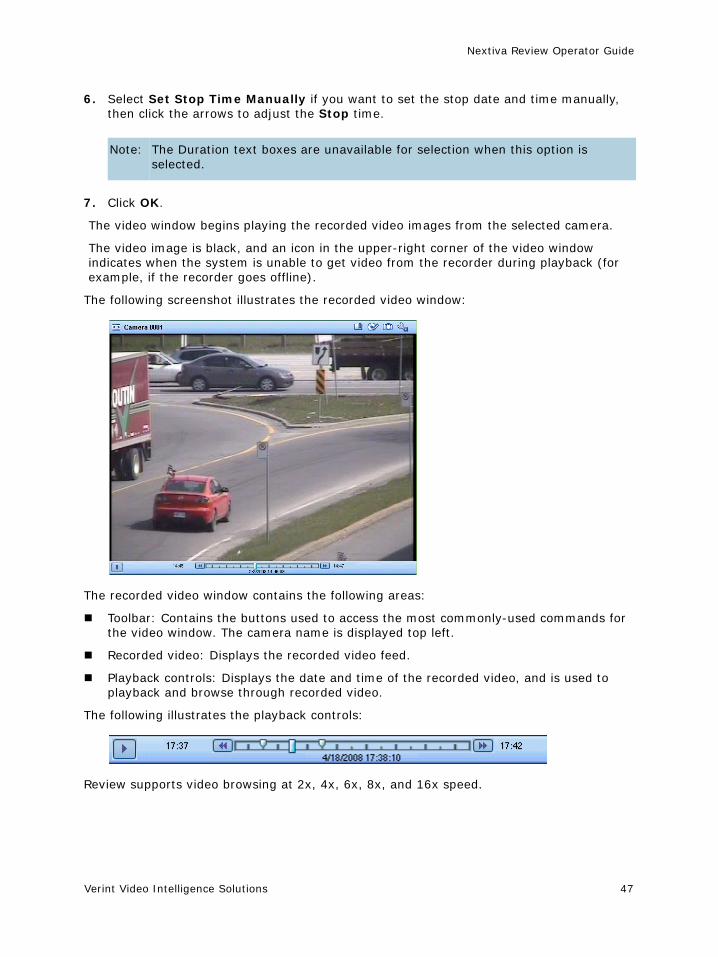
6. Select Set Stop Time Manually if you want to set the stop date and time manually, then click the arrows to adjust the Stop time.
7. Click OK.
The video window begins playing the recorded video images from the selected camera.
The video image is black, and an icon in the upper-right corner of the video window indicates when the system is unable to get video from the recorder during playback (for example, if the recorder goes offline).
The following screenshot illustrates the recorded video window:
The recorded video window contains the following areas:
Toolbar: Contains the buttons used to access the most commonly-used commands for the video window. The camera name is displayed top left.
Recorded video: Displays the recorded video feed.
Playback controls: Displays the date and time of the recorded video, and is used to playback and browse through recorded video.
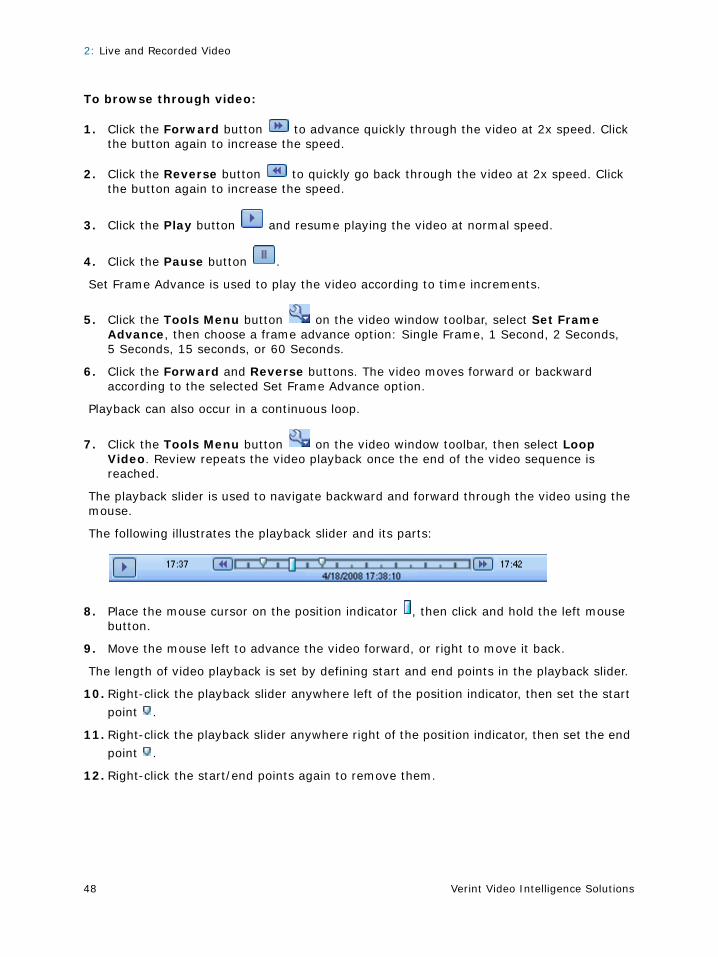
The following illustrates the playback controls:
Review supports video browsing at 2x, 4x, 6x, 8x, and 16x speed.
Note: The Duration text boxes are unavailable for selection when this option is selected.
2: Live and Recorded Video
Verint Video Intelligence Solutions48
To browse through video:
1. Click the Forward button to advance quickly through the video at 2x speed. Click the button again to increase the speed.
2. Click the Reverse button to quickly go back through the video at 2x speed. Click the button again to increase the speed.
3. Click the Play button and resume playing the video at normal speed.
4. Click the Pause button .
Set Frame Advance is used to play the video according to time increments.
5. Click the Tools Menu button on the video window toolbar, select Set Frame Advance, then choose a frame advance option: Single Frame, 1 Second, 2 Seconds, 5 Seconds, 15 seconds, or 60 Seconds.
6. Click the Forward and Reverse buttons. The video moves forward or backward according to the selected Set Frame Advance option.
Playback can also occur in a continuous loop.
7. Click the Tools Menu button on the video window toolbar, then select Loop Video. Review repeats the video playback once the end of the video sequence is reached.
The playback slider is used to navigate backward and forward through the video using the mouse.
The following illustrates the playback slider and its parts:
8. Place the mouse cursor on the position indicator , then click and hold the left mouse button.
9. Move the mouse left to advance the video forward, or right to move it back.
The length of video playback is set by defining start and end points in the playback slider.
10. Right-click the playback slider anywhere left of the position indicator, then set the start
point .
11. Right-click the playback slider anywhere right of the position indicator, then set the end
point .
12. Right-click the start/end points again to remove them.
Nextiva Review Operator Guide
Verint Video Intelligence Solutions 49
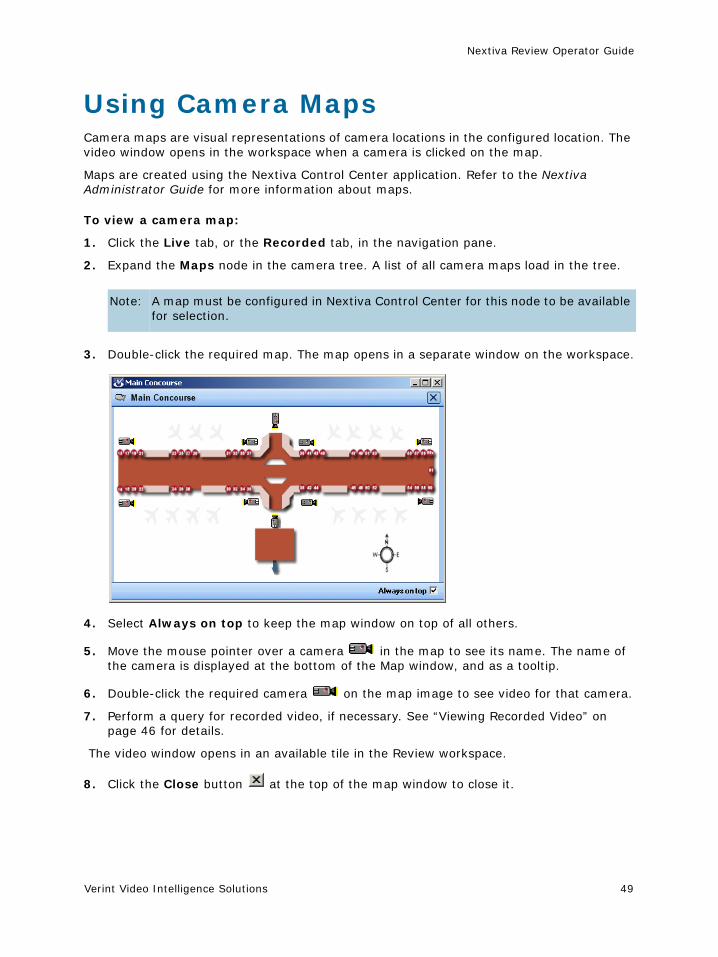
Using Camera MapsCamera maps are visual representations of camera locations in the configured location. The video window opens in the workspace when a camera is clicked on the map.
Maps are created using the Nextiva Control Center application. Refer to the Nextiva Administrator Guide for more information about maps.
To view a camera map:
1. Click the Live tab, or the Recorded tab, in the navigation pane.
2. Expand the Maps node in the camera tree. A list of all camera maps load in the tree.
3. Double-click the required map. The map opens in a separate window on the workspace.
4. Select Always on top to keep the map window on top of all others.
5. Move the mouse pointer over a camera in the map to see its name. The name of the camera is displayed at the bottom of the Map window, and as a tooltip.
6. Double-click the required camera on the map image to see video for that camera.
7. Perform a query for recorded video, if necessary. See “Viewing Recorded Video” on page 46 for details.
The video window opens in an available tile in the Review workspace.
8. Click the Close button at the top of the map window to close it.
Note: A map must be configured in Nextiva Control Center for this node to be available for selection.
2: Live and Recorded Video
Verint Video Intelligence Solutions50
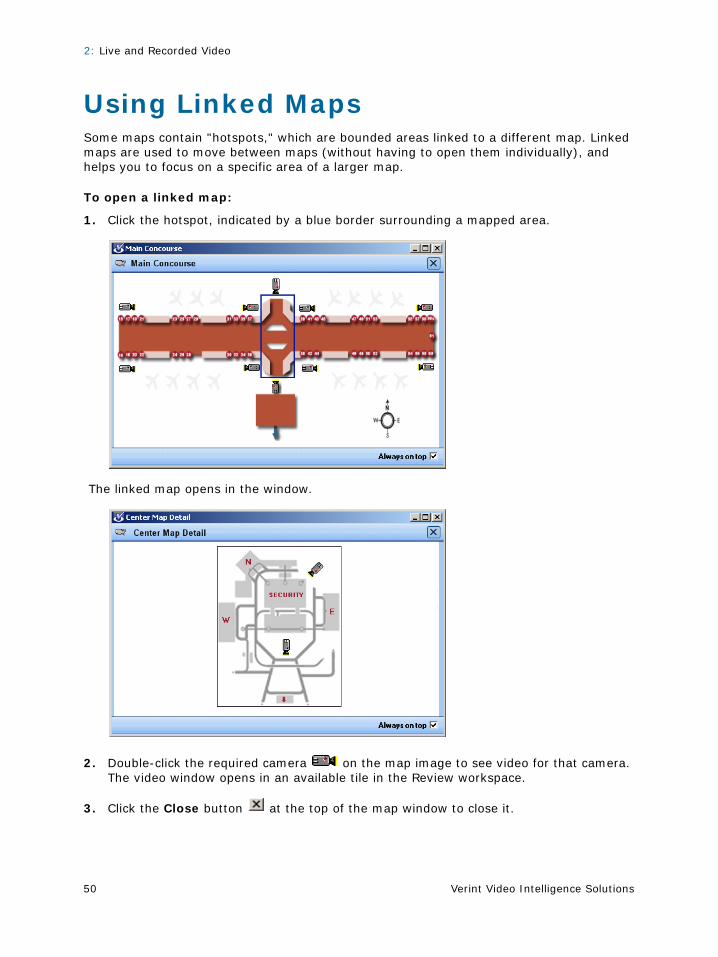
Using Linked MapsSome maps contain "hotspots," which are bounded areas linked to a different map. Linked maps are used to move between maps (without having to open them individually), and helps you to focus on a specific area of a larger map.
To open a linked map:
1. Click the hotspot, indicated by a blue border surrounding a mapped area.
The linked map opens in the window.
2. Double-click the required camera on the map image to see video for that camera. The video window opens in an available tile in the Review workspace.
3. Click the Close button at the top of the map window to close it.
Nextiva Review Operator Guide
Verint Video Intelligence Solutions 51
Synchronizing VideosThe Synchronize Video function is used to play recorded video from two or more cameras in unison.
To synchronize video:
1. Click the Recorded tab in the navigation pane, then drag the required camera into the workspace. The Query Video dialog box appears.
2. Select the required date and time duration, and click OK. The video window opens in the workspace.
3. Repeat the process to open recorded video from more cameras.
4. Select the required video window in the workspace. This is the main video to which all other videos synchronize.
5. Select the Synch with [camera name] check box in each video window you wish to synchronize.
Each playback function performed on the selected video affects all videos synchronized to it. For example, pause the video in the selected window, and video is paused in all other synchronized windows.
6. Clear the Synch with [camera name] check box in a video window, to end the process.
Using BookmarksA bookmark is a two-minute video clip: one minute before the selected frame, and one minute after. Users can immediately go to that frame when necessary.
The sections that follow contain details about bookmarks:
Adding a Bookmark
Viewing a Bookmark
Deleting a Bookmark
Searching for a Bookmark
Adding a BookmarkOperators can bookmark and save the location of an important frame in live or recorded video.
Note: The retention time for bookmarks is defined in Nextiva Control Center. Refer to the Nextiva Administrator Guide for details.

2: Live and Recorded Video
Verint Video Intelligence Solutions52
To bookmark a frame of video:
1. Click the Bookmark button at the top of the video window. The bookmark is saved immediately, and the Add Bookmark dialog box appears.
2. Enter a descriptive name in the Title text box. The title can have up-to 50 text characters.
3. Enter the required information about this bookmark in the Annotation text box. For example, explain why the bookmark was created, and include any important information associated with the video.
4. Click Finish. The bookmark is added to the Bookmarks list in the Recorded tab.
Viewing a BookmarkOperators can jump to an important frame of recorded video that has been bookmarked.
To view video from a bookmark:
1. Select the Recorded tab in the navigation pane.
Note: The Bookmark tree only displays bookmarks from the previous seven (7) days. To find bookmarks older than seven days, refer to Searching for a Bookmark.
Nextiva Review Operator Guide
Verint Video Intelligence Solutions 53
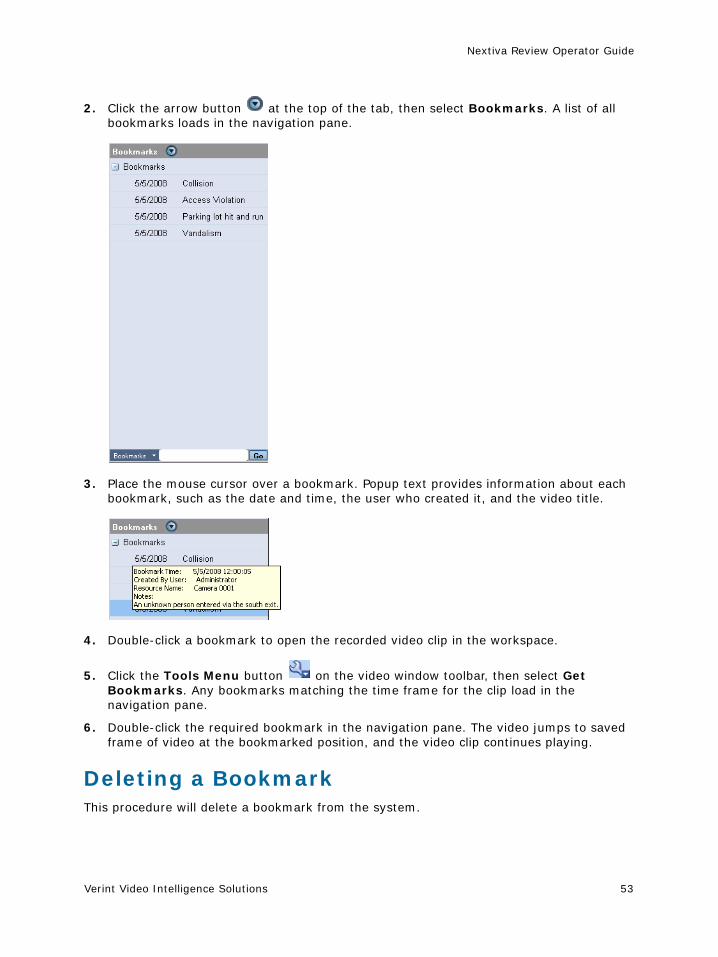
2. Click the arrow button at the top of the tab, then select Bookmarks. A list of all bookmarks loads in the navigation pane.
3. Place the mouse cursor over a bookmark. Popup text provides information about each bookmark, such as the date and time, the user who created it, and the video title.
4. Double-click a bookmark to open the recorded video clip in the workspace.
5. Click the Tools Menu button on the video window toolbar, then select Get Bookmarks. Any bookmarks matching the time frame for the clip load in the navigation pane.
6. Double-click the required bookmark in the navigation pane. The video jumps to saved frame of video at the bookmarked position, and the video clip continues playing.
Deleting a BookmarkThis procedure will delete a bookmark from the system.
2: Live and Recorded Video
Verint Video Intelligence Solutions54
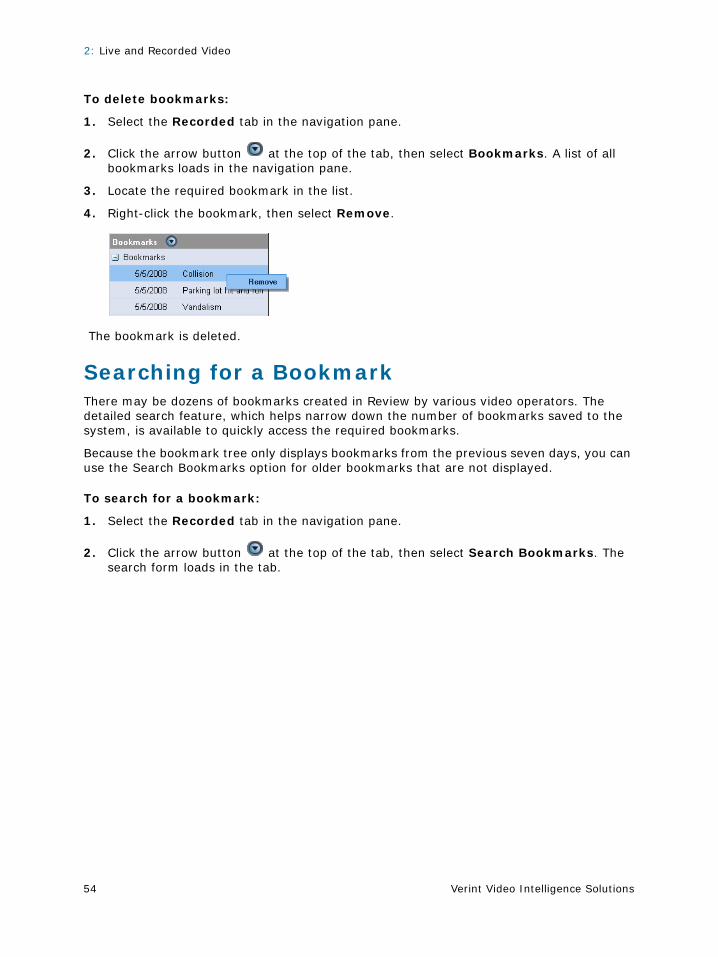
To delete bookmarks:
1. Select the Recorded tab in the navigation pane.
2. Click the arrow button at the top of the tab, then select Bookmarks. A list of all bookmarks loads in the navigation pane.
3. Locate the required bookmark in the list.
4. Right-click the bookmark, then select Remove.
The bookmark is deleted.
Searching for a BookmarkThere may be dozens of bookmarks created in Review by various video operators. The detailed search feature, which helps narrow down the number of bookmarks saved to the system, is available to quickly access the required bookmarks.
Because the bookmark tree only displays bookmarks from the previous seven days, you can use the Search Bookmarks option for older bookmarks that are not displayed.
To search for a bookmark:
1. Select the Recorded tab in the navigation pane.
2. Click the arrow button at the top of the tab, then select Search Bookmarks. The search form loads in the tab.
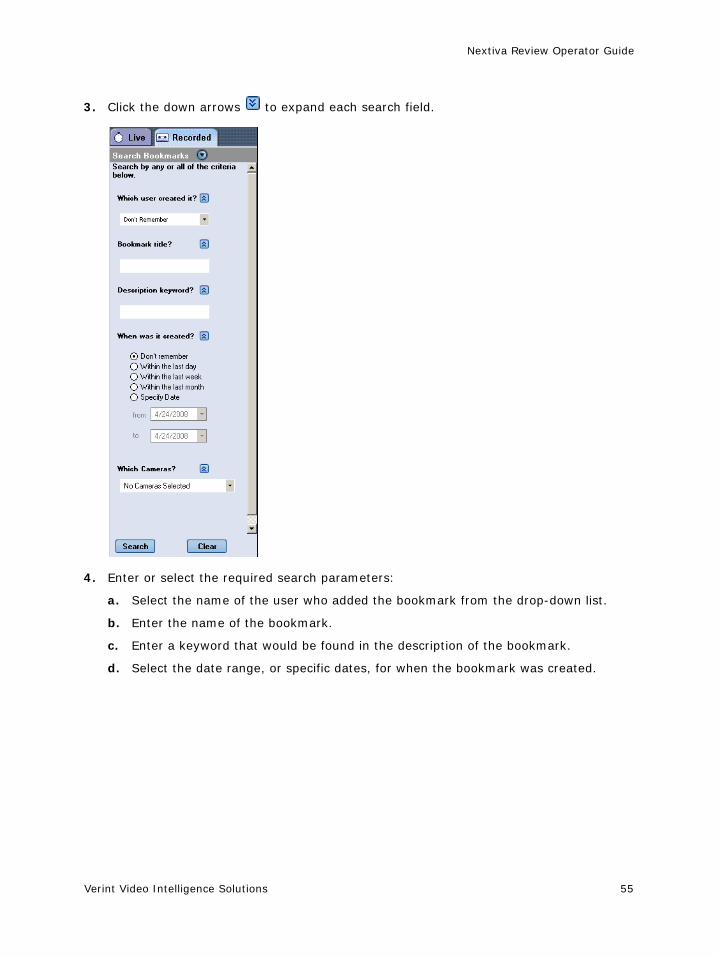
Nextiva Review Operator Guide
Verint Video Intelligence Solutions 55
3. Click the down arrows to expand each search field.
4. Enter or select the required search parameters:
a. Select the name of the user who added the bookmark from the drop-down list.
b. Enter the name of the bookmark.
c. Enter a keyword that would be found in the description of the bookmark.
d. Select the date range, or specific dates, for when the bookmark was created.
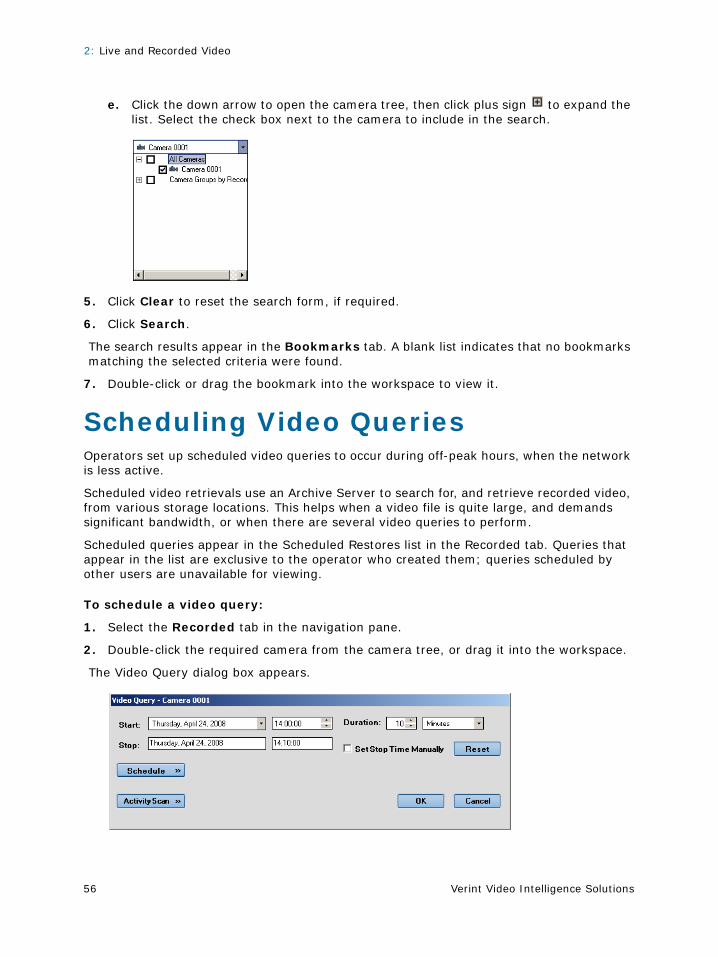
2: Live and Recorded Video
Verint Video Intelligence Solutions56
e. Click the down arrow to open the camera tree, then click plus sign to expand the list. Select the check box next to the camera to include in the search.
5. Click Clear to reset the search form, if required.
6. Click Search.
The search results appear in the Bookmarks tab. A blank list indicates that no bookmarks matching the selected criteria were found.
7. Double-click or drag the bookmark into the workspace to view it.
Scheduling Video QueriesOperators set up scheduled video queries to occur during off-peak hours, when the network is less active.
Scheduled video retrievals use an Archive Server to search for, and retrieve recorded video, from various storage locations. This helps when a video file is quite large, and demands significant bandwidth, or when there are several video queries to perform.
Scheduled queries appear in the Scheduled Restores list in the Recorded tab. Queries that appear in the list are exclusive to the operator who created them; queries scheduled by other users are unavailable for viewing.
To schedule a video query:
1. Select the Recorded tab in the navigation pane.
2. Double-click the required camera from the camera tree, or drag it into the workspace.
The Video Query dialog box appears.
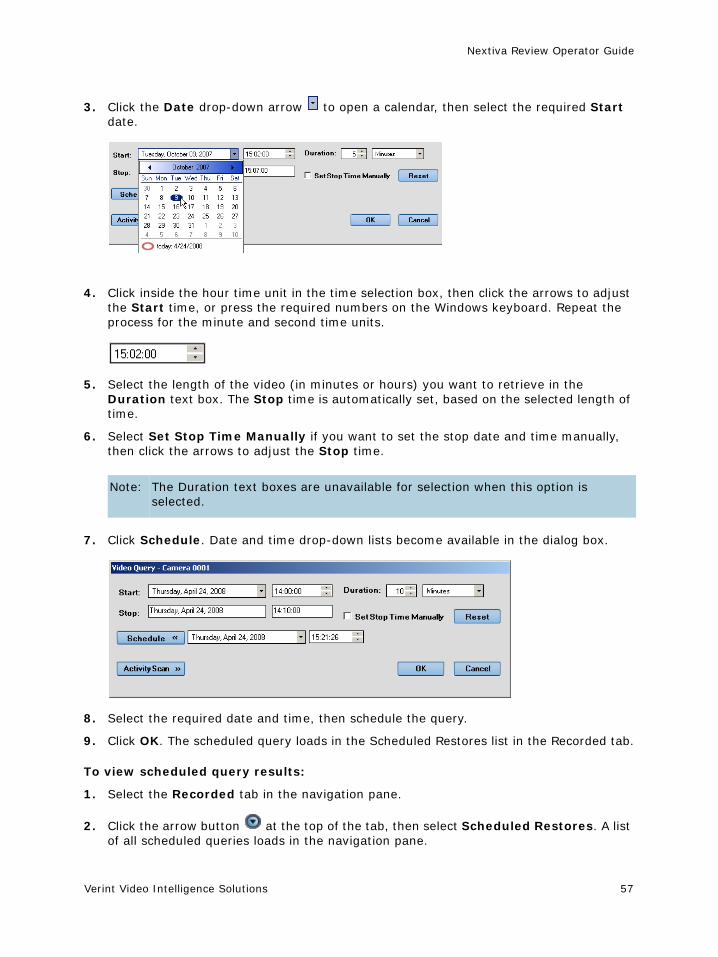
Nextiva Review Operator Guide
Verint Video Intelligence Solutions 57
3. Click the Date drop-down arrow to open a calendar, then select the required Start date.
4. Click inside the hour time unit in the time selection box, then click the arrows to adjust the Start time, or press the required numbers on the Windows keyboard. Repeat the process for the minute and second time units.
5. Select the length of the video (in minutes or hours) you want to retrieve in the Duration text box. The Stop time is automatically set, based on the selected length of time.
6. Select Set Stop Time Manually if you want to set the stop date and time manually, then click the arrows to adjust the Stop time.
7. Click Schedule. Date and time drop-down lists become available in the dialog box.
8. Select the required date and time, then schedule the query.
9. Click OK. The scheduled query loads in the Scheduled Restores list in the Recorded tab.
To view scheduled query results:
1. Select the Recorded tab in the navigation pane.
2. Click the arrow button at the top of the tab, then select Scheduled Restores. A list of all scheduled queries loads in the navigation pane.
Note: The Duration text boxes are unavailable for selection when this option is selected.
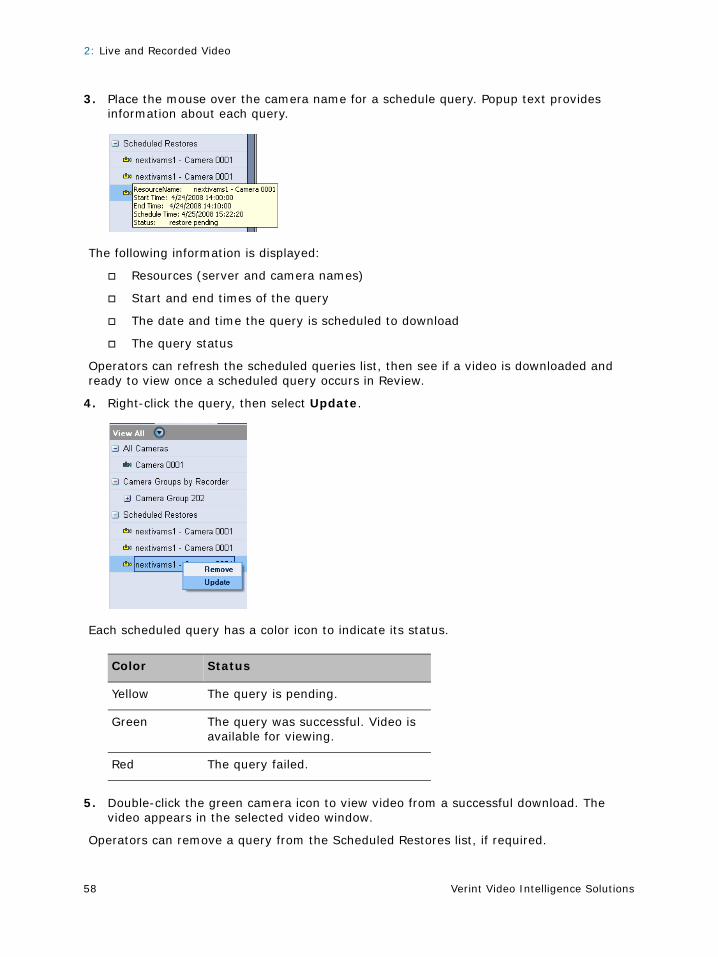
2: Live and Recorded Video
Verint Video Intelligence Solutions58
3. Place the mouse over the camera name for a schedule query. Popup text provides information about each query.
The following information is displayed:
Resources (server and camera names)
Start and end times of the query
The date and time the query is scheduled to download
The query status
Operators can refresh the scheduled queries list, then see if a video is downloaded and ready to view once a scheduled query occurs in Review.
4. Right-click the query, then select Update.
Each scheduled query has a color icon to indicate its status.
5. Double-click the green camera icon to view video from a successful download. The video appears in the selected video window.
Operators can remove a query from the Scheduled Restores list, if required.
Color Status
Yellow The query is pending.
Green The query was successful. Video is available for viewing.
Red The query failed.
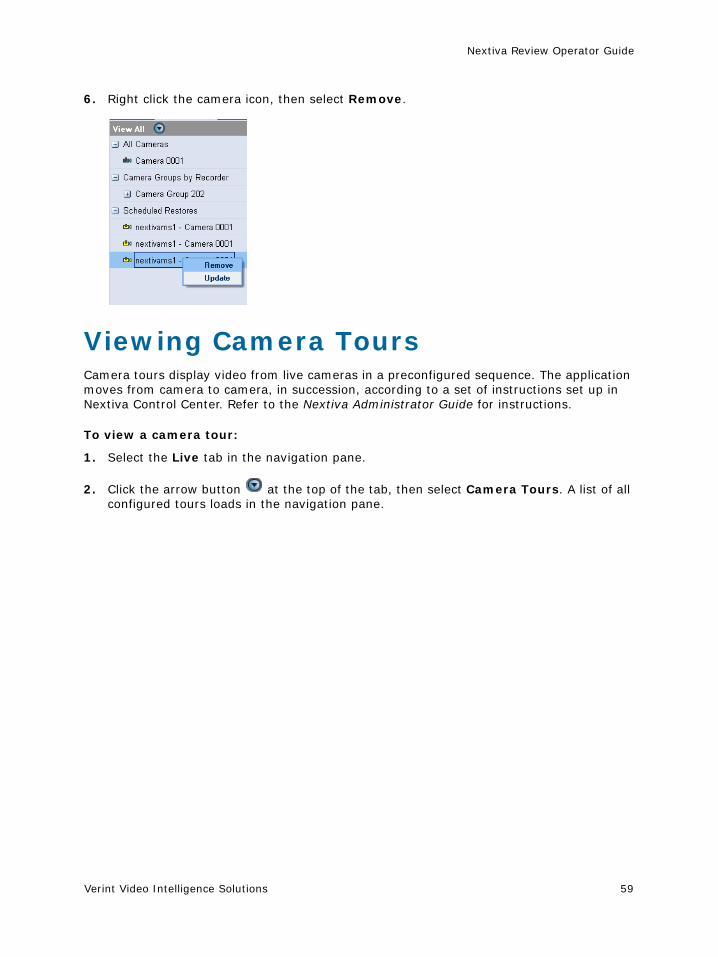
Nextiva Review Operator Guide
Verint Video Intelligence Solutions 59
6. Right click the camera icon, then select Remove.
Viewing Camera ToursCamera tours display video from live cameras in a preconfigured sequence. The application moves from camera to camera, in succession, according to a set of instructions set up in Nextiva Control Center. Refer to the Nextiva Administrator Guide for instructions.
To view a camera tour:
1. Select the Live tab in the navigation pane.
2. Click the arrow button at the top of the tab, then select Camera Tours. A list of all configured tours loads in the navigation pane.
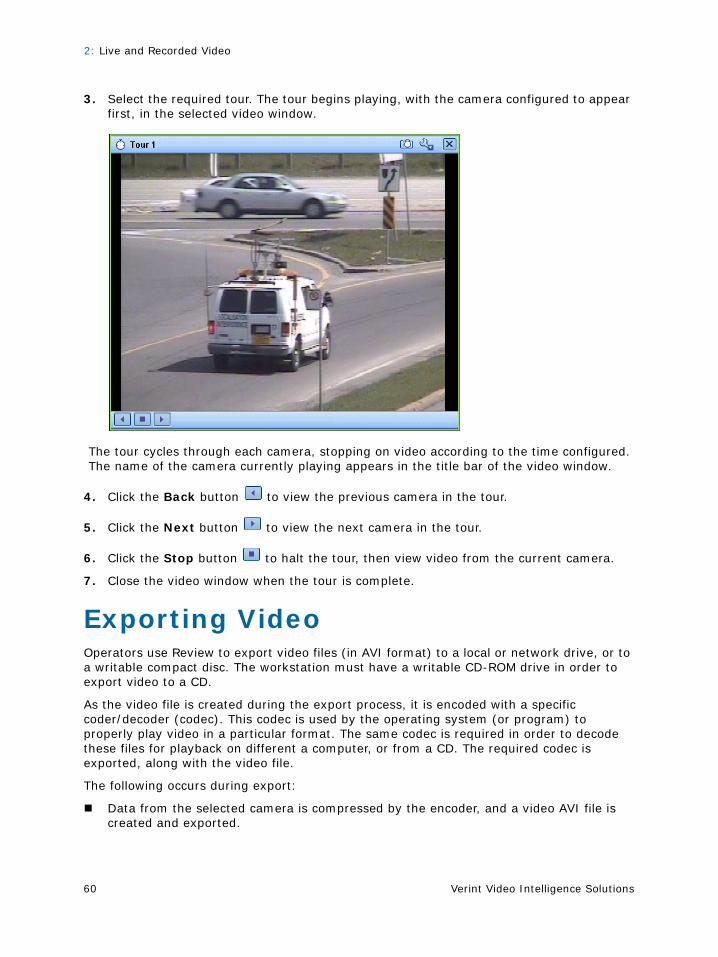
2: Live and Recorded Video
Verint Video Intelligence Solutions60
3. Select the required tour. The tour begins playing, with the camera configured to appear first, in the selected video window.
The tour cycles through each camera, stopping on video according to the time configured. The name of the camera currently playing appears in the title bar of the video window.
4. Click the Back button to view the previous camera in the tour.
5. Click the Next button to view the next camera in the tour.
6. Click the Stop button to halt the tour, then view video from the current camera.
7. Close the video window when the tour is complete.
Exporting VideoOperators use Review to export video files (in AVI format) to a local or network drive, or to a writable compact disc. The workstation must have a writable CD-ROM drive in order to export video to a CD.
As the video file is created during the export process, it is encoded with a specific coder/decoder (codec). This codec is used by the operating system (or program) to properly play video in a particular format. The same codec is required in order to decode these files for playback on different a computer, or from a CD. The required codec is exported, along with the video file.
The following occurs during export:
Data from the selected camera is compressed by the encoder, and a video AVI file is created and exported.
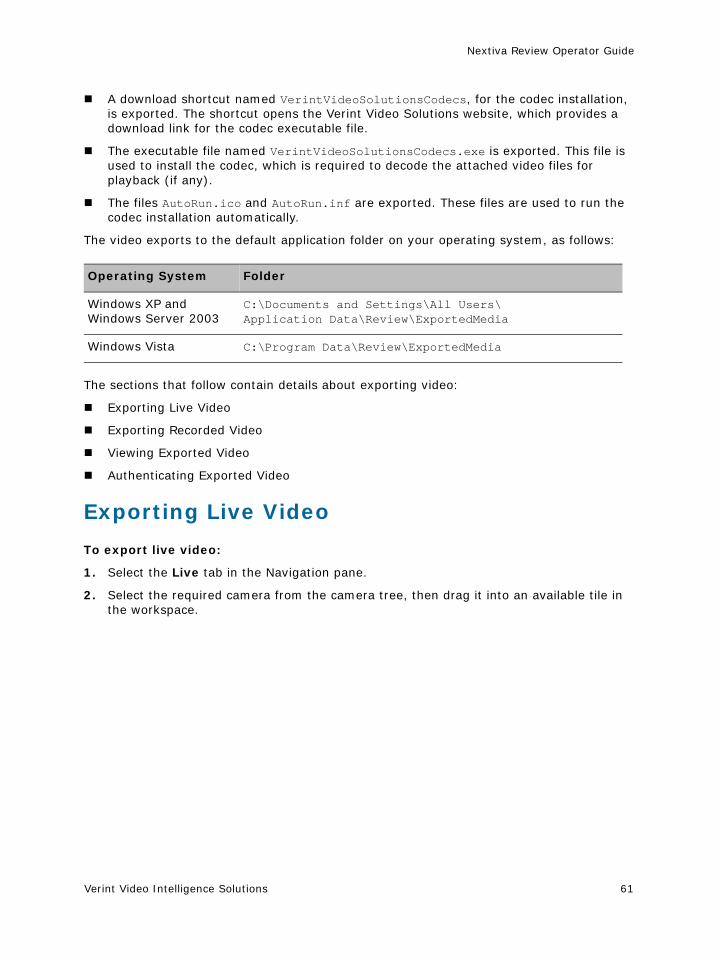
Nextiva Review Operator Guide
Verint Video Intelligence Solutions 61
A download shortcut named VerintVideoSolutionsCodecs, for the codec installation, is exported. The shortcut opens the Verint Video Solutions website, which provides a download link for the codec executable file.
The executable file named VerintVideoSolutionsCodecs.exe is exported. This file is used to install the codec, which is required to decode the attached video files for playback (if any).
The files AutoRun.ico and AutoRun.inf are exported. These files are used to run the codec installation automatically.
The video exports to the default application folder on your operating system, as follows:
The sections that follow contain details about exporting video:
Exporting Live Video
Exporting Recorded Video
Viewing Exported Video
Authenticating Exported Video
Exporting Live Video
To export live video:
1. Select the Live tab in the Navigation pane.
2. Select the required camera from the camera tree, then drag it into an available tile in the workspace.
Operating System Folder
Windows XP and Windows Server 2003
C:\Documents and Settings\All Users\Application Data\Review\ExportedMedia
Windows Vista C:\Program Data\Review\ExportedMedia
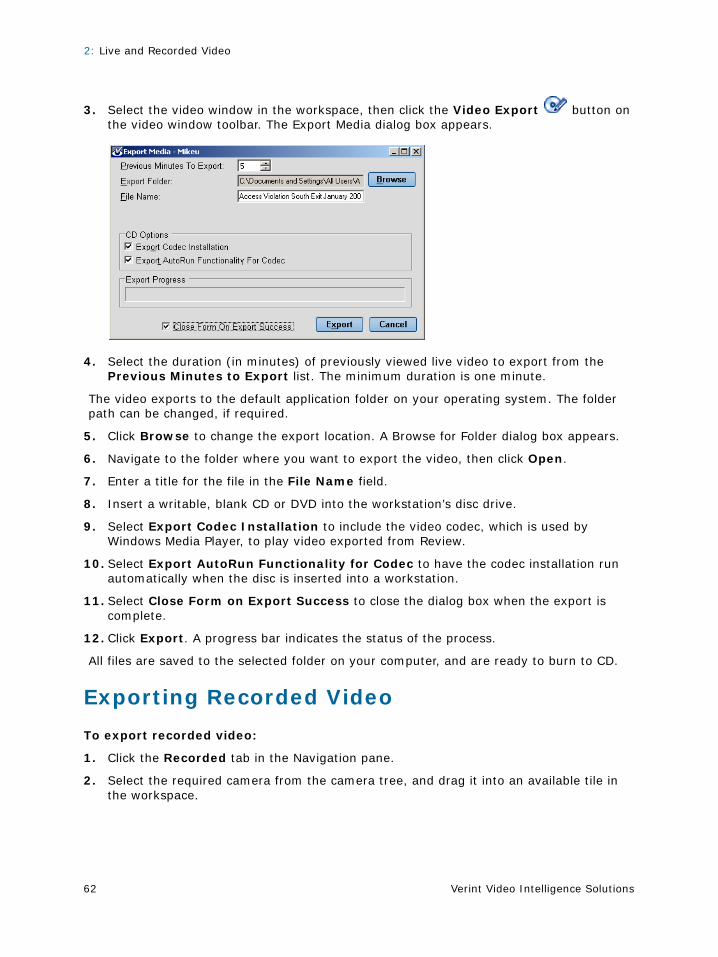
2: Live and Recorded Video
Verint Video Intelligence Solutions62
3. Select the video window in the workspace, then click the Video Export button on the video window toolbar. The Export Media dialog box appears.
4. Select the duration (in minutes) of previously viewed live video to export from the Previous Minutes to Export list. The minimum duration is one minute.
The video exports to the default application folder on your operating system. The folder path can be changed, if required.
5. Click Browse to change the export location. A Browse for Folder dialog box appears.
6. Navigate to the folder where you want to export the video, then click Open.
7. Enter a title for the file in the File Name field.
8. Insert a writable, blank CD or DVD into the workstation’s disc drive.
9. Select Export Codec Installation to include the video codec, which is used by Windows Media Player, to play video exported from Review.
10. Select Export AutoRun Functionality for Codec to have the codec installation run automatically when the disc is inserted into a workstation.
11. Select Close Form on Export Success to close the dialog box when the export is complete.
12. Click Export. A progress bar indicates the status of the process.
All files are saved to the selected folder on your computer, and are ready to burn to CD.
Exporting Recorded Video
To export recorded video:
1. Click the Recorded tab in the Navigation pane.
2. Select the required camera from the camera tree, and drag it into an available tile in the workspace.
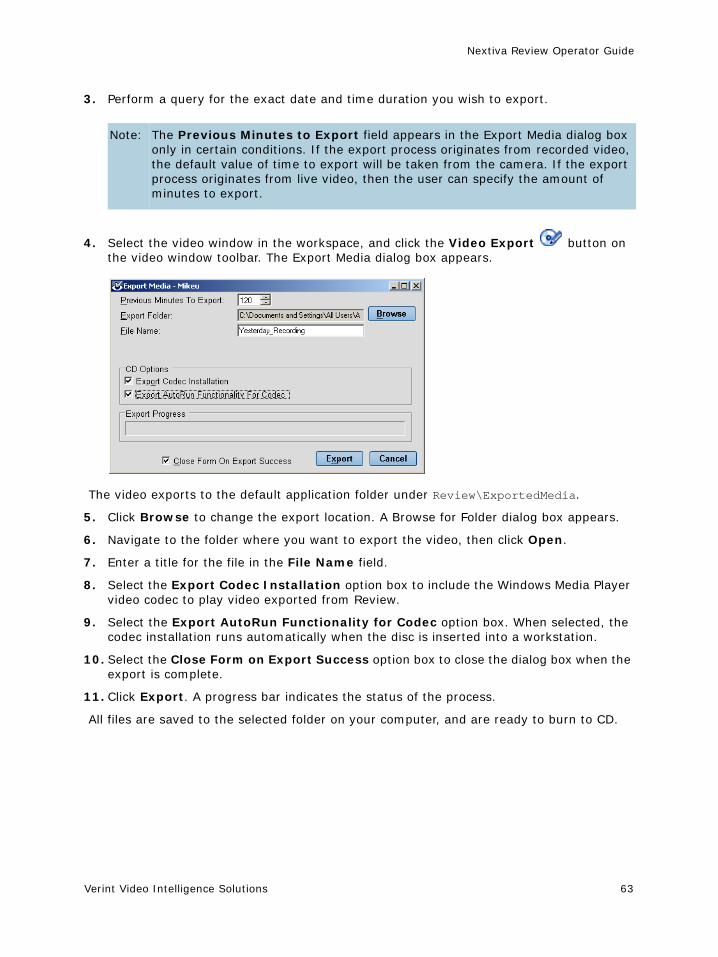
Nextiva Review Operator Guide
Verint Video Intelligence Solutions 63
3. Perform a query for the exact date and time duration you wish to export.
4. Select the video window in the workspace, and click the Video Export button on the video window toolbar. The Export Media dialog box appears.
The video exports to the default application folder under Review\ExportedMedia.
5. Click Browse to change the export location. A Browse for Folder dialog box appears.
6. Navigate to the folder where you want to export the video, then click Open.
7. Enter a title for the file in the File Name field.
8. Select the Export Codec Installation option box to include the Windows Media Player video codec to play video exported from Review.
9. Select the Export AutoRun Functionality for Codec option box. When selected, the codec installation runs automatically when the disc is inserted into a workstation.
10. Select the Close Form on Export Success option box to close the dialog box when the export is complete.
11. Click Export. A progress bar indicates the status of the process.
All files are saved to the selected folder on your computer, and are ready to burn to CD.
Note: The Previous Minutes to Export field appears in the Export Media dialog box only in certain conditions. If the export process originates from recorded video, the default value of time to export will be taken from the camera. If the export process originates from live video, then the user can specify the amount of minutes to export.
2: Live and Recorded Video
Verint Video Intelligence Solutions64
Viewing Exported VideoExported video files can be viewed in Nextiva Review or on another computer using Windows Media Player 11.
To play exported video from a local or network folder:
1. Open Windows Explorer, and navigate to the folder where the video files are stored.
2. Double-click VerintVideoSolutionsCodecs.exe, and install the video codec (if required).
3. Click the Tools and Configuration button on the application toolbar, and select Open Media File.
A Windows Open dialog box appears.
4. Navigate to the folder where the required AVI file is stored, and select it.
5. Click Open.
The selected file opens in a tile in the Review interface.
6. Alternatively, select the required video AVI file and drag it into the Review workspace. The video opens in a video window.
7. Alternatively, right-click the video file and select Play.
The video opens in Windows Media Player and begins playing.
To play exported video from a CD:
1. Insert the CD into the CD-ROM drive.
2. Open Windows Explorer, then navigate to the CD-ROM drive.
3. Double-click VerintVideoSolutionsCodecs.exe, or use the download link, and install the video codec (if required).
4. Select the required video file from the CD, and drag it into the Review workspace.
The video opens in a video window.
5. Alternatively, right-click the video file and select Play. The video opens in Windows Media Player and begins playing.
Note: If Autorun was enabled in the Export Media dialog box, the codec installation begins automatically.
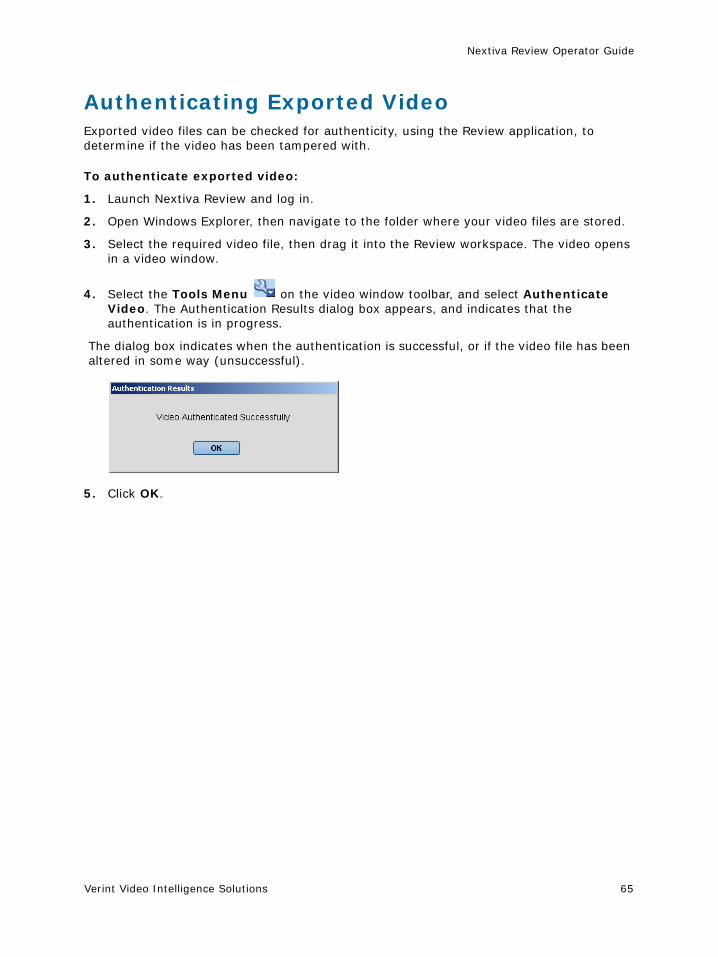
Nextiva Review Operator Guide
Verint Video Intelligence Solutions 65
Authenticating Exported VideoExported video files can be checked for authenticity, using the Review application, to determine if the video has been tampered with.
To authenticate exported video:
1. Launch Nextiva Review and log in.
2. Open Windows Explorer, then navigate to the folder where your video files are stored.
3. Select the required video file, then drag it into the Review workspace. The video opens in a video window.
4. Select the Tools Menu on the video window toolbar, and select Authenticate Video. The Authentication Results dialog box appears, and indicates that the authentication is in progress.
The dialog box indicates when the authentication is successful, or if the video file has been altered in some way (unsuccessful).
5. Click OK.

2: Live and Recorded Video
Verint Video Intelligence Solutions66
Verint Video Intelligence Solutions 67
Chapter
Alarm VideoVideo alarms are sent from Nextiva Control Center to Review, and alert the operator when a possible security violation occurs at the site that requires immediate attention. Incoming alarms can have one of three priorities: high, medium, or low.
Details about the alarm are available for viewing when an alarm is selected. This includes the time and place where the alarm occurred, and the associated system messages (when available).
Operators click a button to acknowledge when an alarm is received. This adds their user name to the alarm video, and other users can see who retrieved the alarm.
This chapter contains the following procedures for alarm video:
Using Review in Alarm Mode
Searching for Alarms
Viewing Alarm Video
Acknowledge an Alarm
Creating an Alarm Investigation
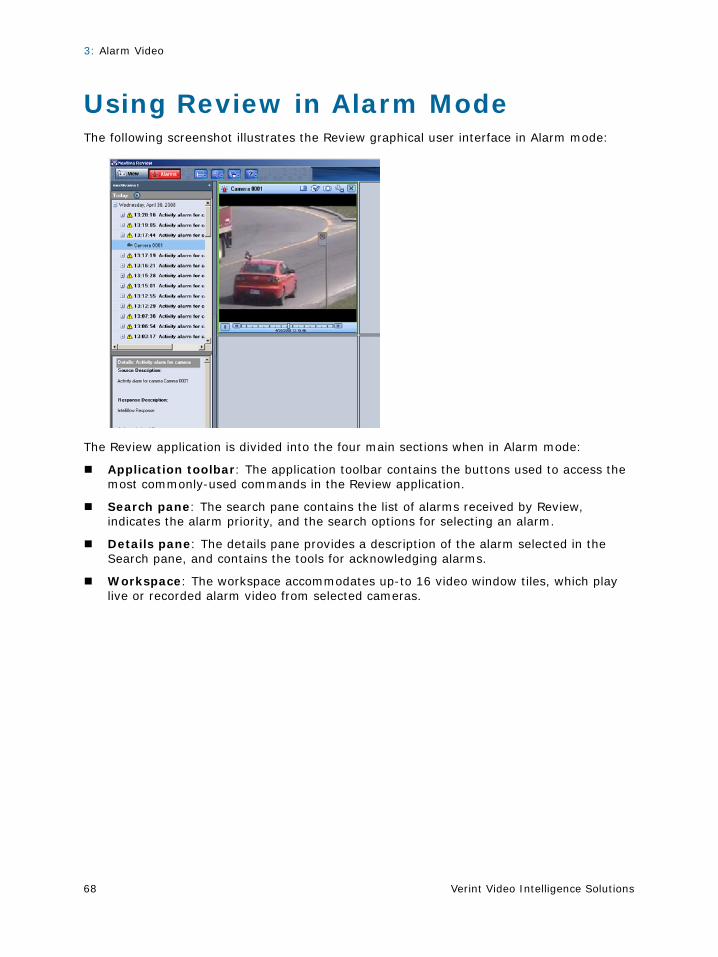
3: Alarm Video
Verint Video Intelligence Solutions68
Using Review in Alarm ModeThe following screenshot illustrates the Review graphical user interface in Alarm mode:
The Review application is divided into the four main sections when in Alarm mode:
Application toolbar: The application toolbar contains the buttons used to access the most commonly-used commands in the Review application.
Search pane: The search pane contains the list of alarms received by Review, indicates the alarm priority, and the search options for selecting an alarm.
Details pane: The details pane provides a description of the alarm selected in the Search pane, and contains the tools for acknowledging alarms.
Workspace: The workspace accommodates up-to 16 video window tiles, which play live or recorded alarm video from selected cameras.

Nextiva Review Operator Guide
Verint Video Intelligence Solutions 69
Review responds to alarms in the following ways, depending on the alarm preferences defined in the system:
The application is restored as the top window, if Review is minimized to the Windows taskbar.
The application returns to the normal view if a video window tile is maximized in the workspace, and Review automatically switches from View mode to Alarm mode.
The Alarms button on the application toolbar begins to flash red, alerting the operator that an alarm event has occurred.
An alarm notification popup appears from the Windows taskbar.
A video window opens in the Review workspace automatically, if there is an available video window tile, and displays video when an alarm event occurs.
The alarm icon , located at the top of the video window, indicates that the video is associated with an alarm.
Review automatically displays live video from a camera associated with the alarm event.
Operators can also select alarm video for viewing in the workspace.
Searching for AlarmsThe Search pane, located on the left of the interface, provides search options. Use these functions to narrow down the number of alarms listed in the pane, or to search for an alarm by priority, date, camera, and description.
To search for alarms:
1. Click the arrow button at the top of the Search pane, then select one of the following options:
Today—Lists all alarms received on the current day.
All Alarms—Lists all received alarms.
Search—Loads the search form for a manual search.
2. Select or clear Unacknowledged Only. The Search pane lists active alarms exclusively when this option is selected.
Note: Refer to the “Setting Alarm Preferences” section on page 19 for more information about how incoming alarms are displayed in Review.
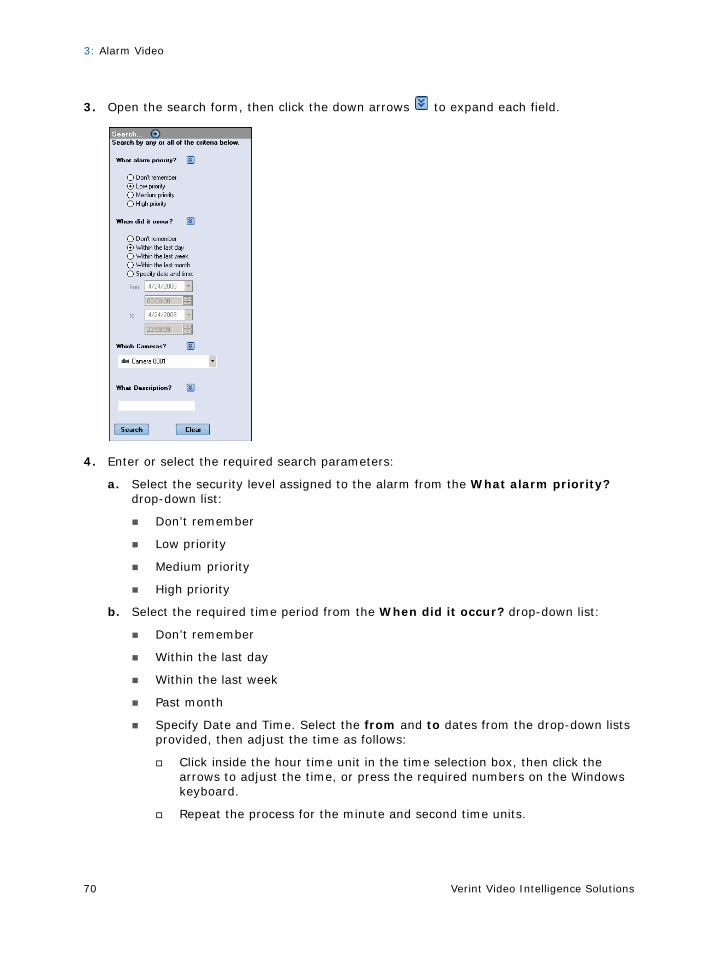
3: Alarm Video
Verint Video Intelligence Solutions70
3. Open the search form, then click the down arrows to expand each field.
4. Enter or select the required search parameters:
a. Select the security level assigned to the alarm from the What alarm priority? drop-down list:
Don’t remember
Low priority
Medium priority
High priority
b. Select the required time period from the When did it occur? drop-down list:
Don’t remember
Within the last day
Within the last week
Past month
Specify Date and Time. Select the from and to dates from the drop-down lists provided, then adjust the time as follows:
Click inside the hour time unit in the time selection box, then click the arrows to adjust the time, or press the required numbers on the Windows keyboard.
Repeat the process for the minute and second time units.
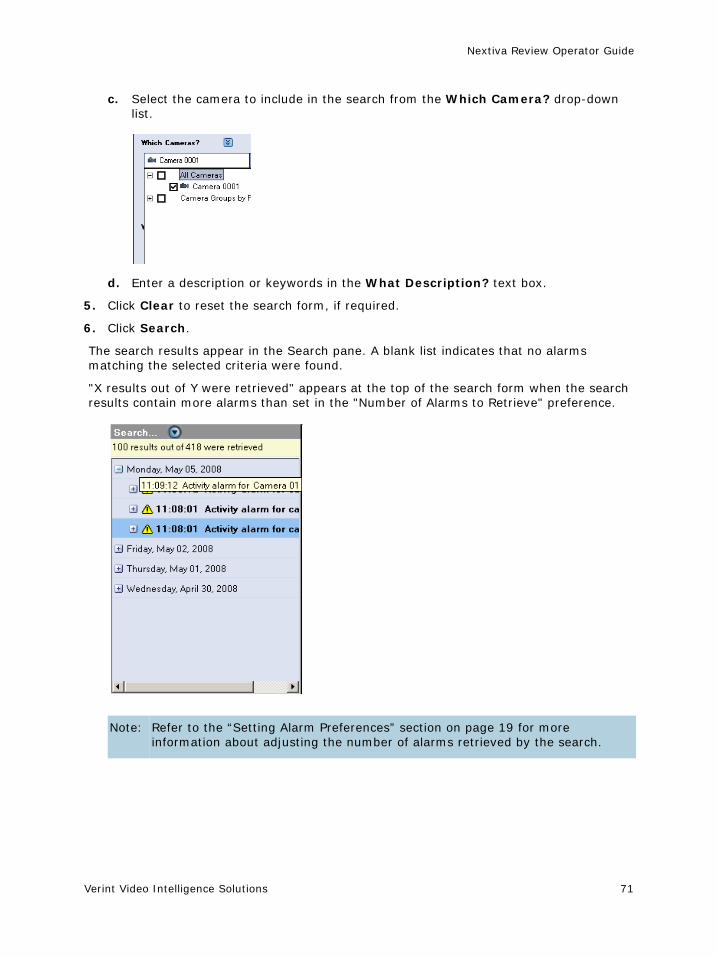
Nextiva Review Operator Guide
Verint Video Intelligence Solutions 71
c. Select the camera to include in the search from the Which Camera? drop-down list.
d. Enter a description or keywords in the What Description? text box.
5. Click Clear to reset the search form, if required.
6. Click Search.
The search results appear in the Search pane. A blank list indicates that no alarms matching the selected criteria were found.
"X results out of Y were retrieved" appears at the top of the search form when the search results contain more alarms than set in the "Number of Alarms to Retrieve" preference.
Note: Refer to the “Setting Alarm Preferences” section on page 19 for more information about adjusting the number of alarms retrieved by the search.
3: Alarm Video
Verint Video Intelligence Solutions72
The results also reflect the number of alarms retrieved at the time the user performs the query. Users must perform another search in order to update the results after new alarms arrive. The results information is cleared when the user switches between View and Alarm mode.
7. Double-click or drag the alarm into the workspace to view it.
Alarms from all Nextiva servers that you can connect to through Review are also listed in the search results.
Viewing Alarm VideoAn event that has triggered an alarm sends an alert message to Review. The retention time (defined in Nextiva Control Center), and the size of the recorder, affects how long these alarms are available for viewing. The system begins to groom (delete) older video once the storage disks have reached maximum capacity. Alarms that have recorded video associated with them are retained by the recorder for longer periods.
To view alarm video:
1. Click the Alarms button on the application toolbar. The Review interface switches to Alarm mode.
2. Use the search functions to narrow down the number of alarms listed in the Search pane.
The following icons indicate the priority level for incoming alarms:
High-priority
Medium-priority
Only text is displayed for low-priority alarms.
3. Place the mouse cursor over an alarm title. Popup text provides information about each alarm, such as the date and time, the camera, and the alarm title.
Nextiva Review Operator Guide
Verint Video Intelligence Solutions 73
4. Select an alarm from the list to view its details.
The following details are displayed:
Source Description—Describes where the alarm came from, such as the camera name.
Response Description—Provides the name of the alarm response.
Acknowledged By—Indicates the user who viewed and acknowledged the alarm.
Alarm Notes—Provides notes about the alarm entered by other users (if any).
Alarms with associated video have a plus sign next to them.
5. Click to open the alarm, then view the camera that triggered the alarm.
6. Double-click the alarm, or drag it into the workspace.
A video window opens, then recorded video from the alarm begins playing. Video advances at normal speed, by default.
3: Alarm Video
Verint Video Intelligence Solutions74
7. Double-click the video window toolbar, or press <Alt + Enter> to maximize the video window for a better view of the alarm video images. The video window is enlarged to fill the workspace area.
New alarm video windows open in the workspace, behind the maximized video window, if new alarms arrive while in the maximized view.
8. Press <Esc> or <Alt + Enter> again to exit the full screen. The video window returns to the normal view, and the new alarm video windows are available for viewing in the workspace.
To browse through alarm video:
1. Click the Forward button to advance quickly through the video at 2x speed. Click the button again to increase the speed.
2. Click the Reverse button to quickly go back through the video at 2x speed. Click the button again to increase the speed.
3. Click the Play button and resume playing the video at normal speed.
4. Click the Pause button .
Set Frame Advance is used to play the video according to time increments.
5. Click the Tools Menu button on the video window toolbar, select Set Frame Advance, then choose a frame advance option: Single Frame, 1 Second, 2 Seconds, 5 Seconds, 15 seconds, or 60 Seconds.
6. Click the Forward and Reverse buttons. The video moves forward or backward according to the selected Set Frame Advance option.
Playback can also occur in a continuous loop.
7. Click the Tools Menu button on the video window toolbar, then select Loop Video. Review repeats the video playback once the end of the video sequence is reached.
The playback slider is used to navigate backward and forward through the video using the mouse.
The following illustrates the playback slider and its parts:
8. Place the mouse cursor on the position indicator , then click and hold the left mouse button.
9. Move the mouse left to advance the video forward, or right to move it back.
The length of video playback is set by defining start and end points in the playback slider.
Nextiva Review Operator Guide
Verint Video Intelligence Solutions 75
10. Right-click the playback slider anywhere left of the position indicator, then set the start
point .
11. Right-click the playback slider anywhere right of the position indicator, then set the end
point .
12. Right-click the start/end points again to remove them.
Acknowledge an AlarmOperators acknowledge an alarm to indicate when alarm details and video have been viewed, and the incident has been taken care of. Alarms that are currently active are displayed in bold in the Search pane.
To acknowledge an alarm:
1. Click the Alarms button on the application toolbar. Review changes to Alarm mode.
2. Click the arrow button at the top of the Search pane, then select Unacknowledged Only.
3. Place the mouse cursor over an alarm title. Popup text provides information about each alarm, such as the date and time, the camera, and the alarm title.
4. Select an alarm from the list to view its details.
5. Double-click the alarm, or drag it into the workspace. A video window opens, and begins playing the video images from the alarm.
6. Browse through the video, then enter any information about the alarm in the Alarm Notes text box, located in the Details pane (if required).
7. Click the Acknowledge button. This marks the alarm and associated video as viewed, then adds the operator name and alarm notes.
8. Right-click the alarm, and select Unacknowledge Alarm. The alarm status is set back to active, and the operator name and notes are removed from the alarm.
3: Alarm Video
Verint Video Intelligence Solutions76
Creating an Alarm InvestigationAlarm video that contains important information can be added to an investigation report, then saved in the system using the Review investigations management feature.
To create an alarm investigation:
1. Click the Investigation button located at the bottom of the Details pane.
2. Follow the instructions in the “Investigation Management” section on page 101.
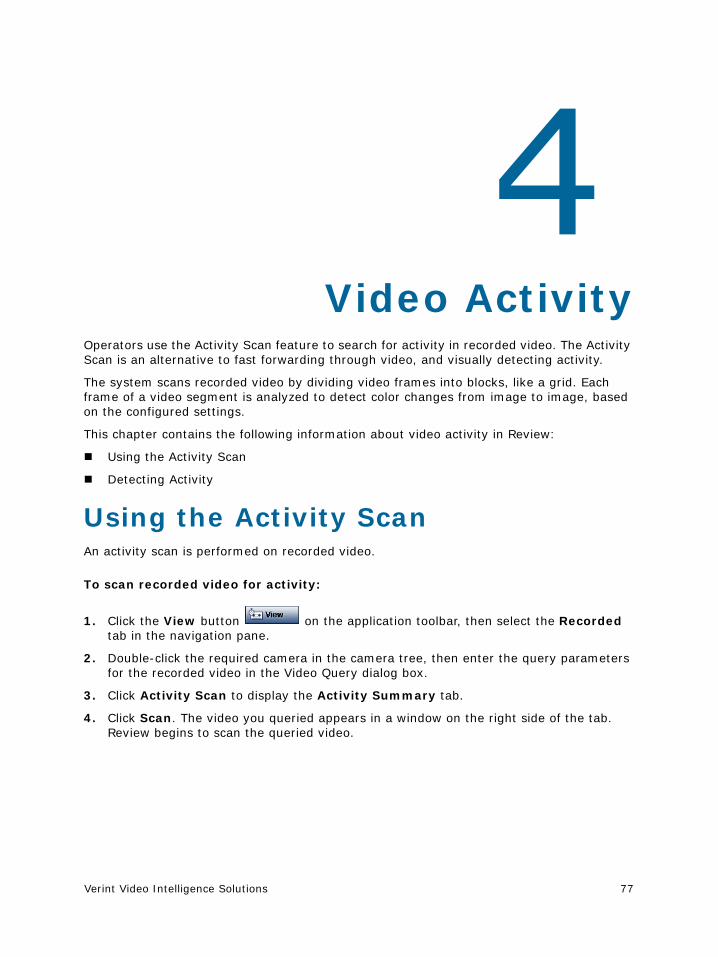
Verint Video Intelligence Solutions 77
Chapter
Video ActivityOperators use the Activity Scan feature to search for activity in recorded video. The Activity Scan is an alternative to fast forwarding through video, and visually detecting activity.
The system scans recorded video by dividing video frames into blocks, like a grid. Each frame of a video segment is analyzed to detect color changes from image to image, based on the configured settings.
This chapter contains the following information about video activity in Review:
Using the Activity Scan
Detecting Activity
Using the Activity ScanAn activity scan is performed on recorded video.
To scan recorded video for activity:
1. Click the View button on the application toolbar, then select the Recorded tab in the navigation pane.
2. Double-click the required camera in the camera tree, then enter the query parameters for the recorded video in the Video Query dialog box.
3. Click Activity Scan to display the Activity Summary tab.
4. Click Scan. The video you queried appears in a window on the right side of the tab. Review begins to scan the queried video.
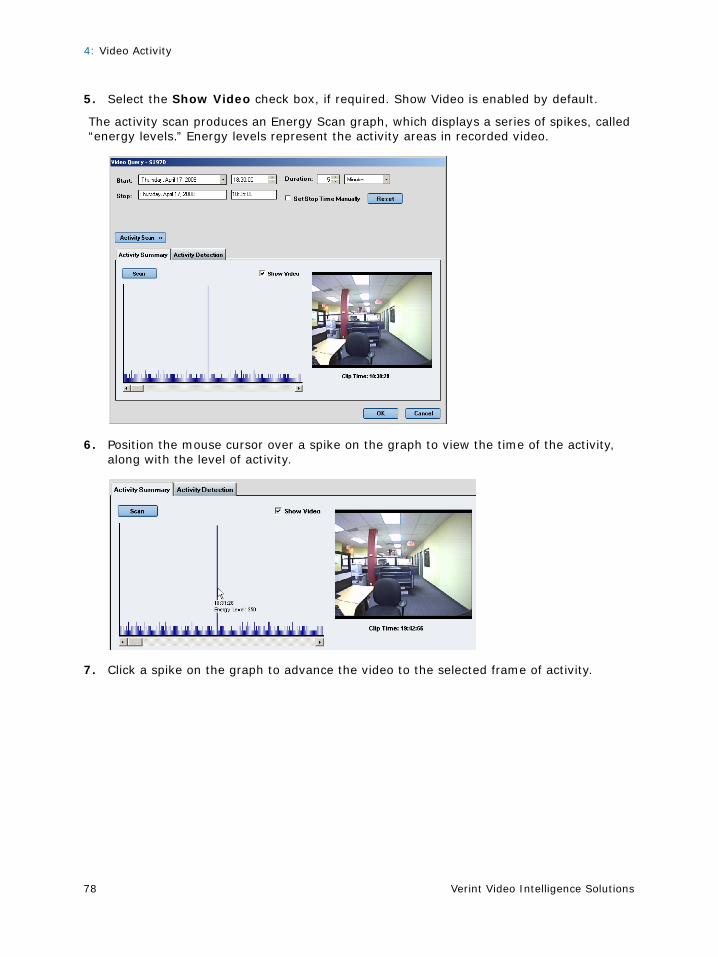
4: Video Activity
Verint Video Intelligence Solutions78
5. Select the Show Video check box, if required. Show Video is enabled by default.
The activity scan produces an Energy Scan graph, which displays a series of spikes, called “energy levels.” Energy levels represent the activity areas in recorded video.
6. Position the mouse cursor over a spike on the graph to view the time of the activity, along with the level of activity.
7. Click a spike on the graph to advance the video to the selected frame of activity.

Nextiva Review Operator Guide
Verint Video Intelligence Solutions 79
8. Click OK to display the recorded video in the workspace when the scan is complete.
The Video Query dialog box closes, and the Energy Scan window opens in the workspace.
The video and Energy Scan below illustrates the lights going out in an office:
9. Click a spike on the graph in the Energy Scan window. The video advances to the selected frame of activity.
Detecting ActivityActivity Scan analyzes the entire field of view recorded by the selected camera, by default. Operators use the Activity Detection tools to define the areas of video in a camera’s field of view to include in the activity scan.
To draw detection areas for the scan:
1. Click the View button on the application toolbar, then select the Recorded tab in the navigation pane.
2. Double-click the required camera in the camera tree, then enter the query parameters for the recorded video in the Video Query dialog box.
3. Click Activity Scan. The Activity Summary tab loads in the dialog box.
4. Click Scan. The video you queried appears in a window on the right side of the tab, and the Energy Scan graph is created.
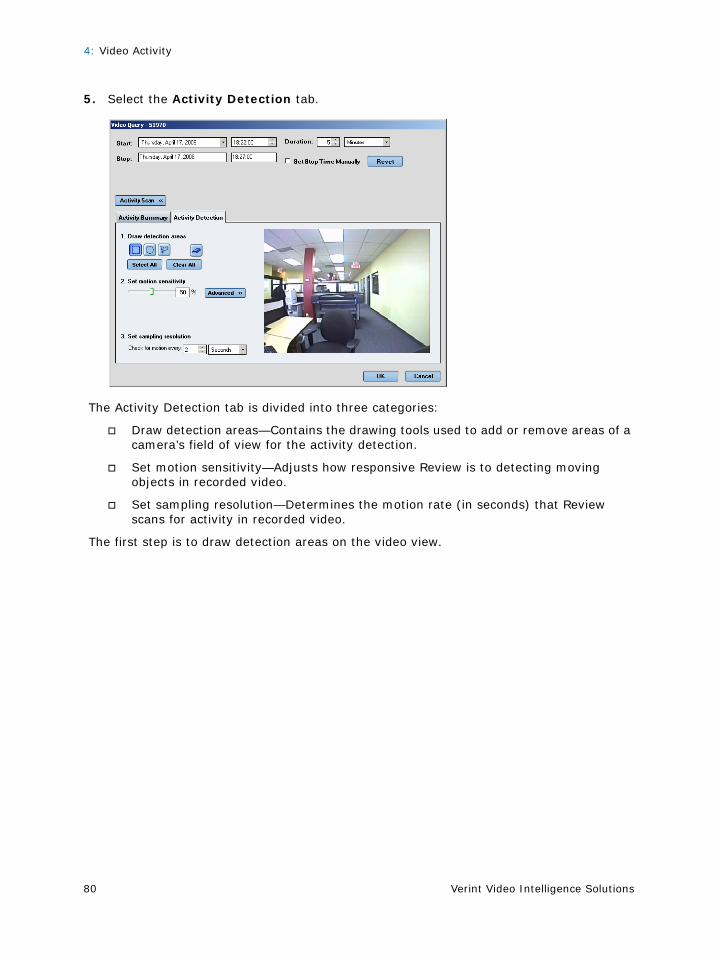
4: Video Activity
Verint Video Intelligence Solutions80
5. Select the Activity Detection tab.
The Activity Detection tab is divided into three categories:
Draw detection areas—Contains the drawing tools used to add or remove areas of a camera’s field of view for the activity detection.
Set motion sensitivity—Adjusts how responsive Review is to detecting moving objects in recorded video.
Set sampling resolution—Determines the motion rate (in seconds) that Review scans for activity in recorded video.
The first step is to draw detection areas on the video view.
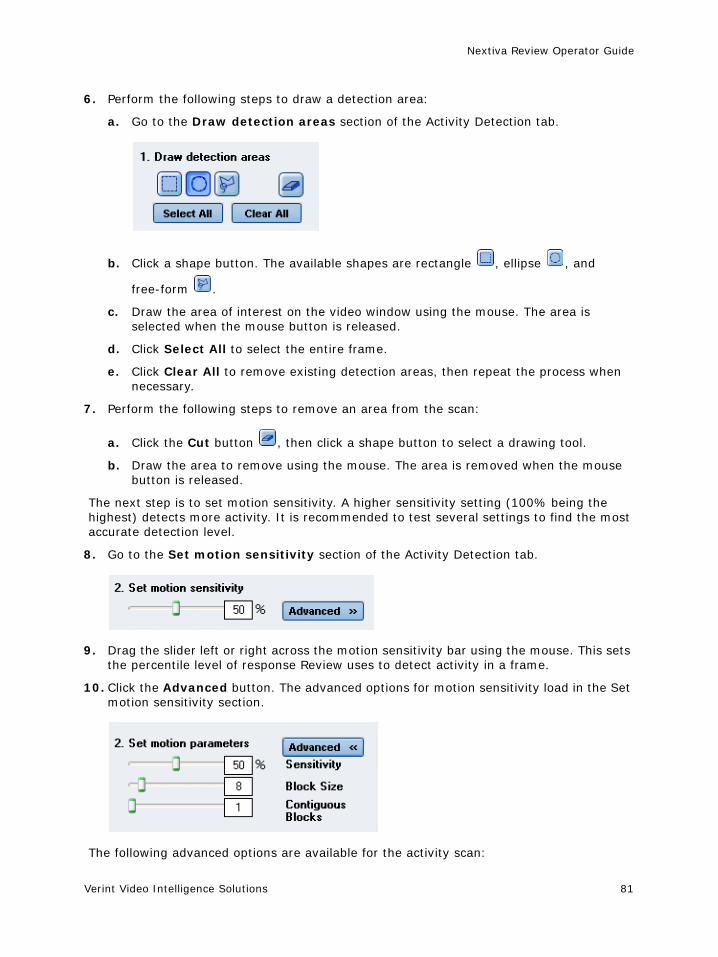
Nextiva Review Operator Guide
Verint Video Intelligence Solutions 81
6. Perform the following steps to draw a detection area:
a. Go to the Draw detection areas section of the Activity Detection tab.
b. Click a shape button. The available shapes are rectangle , ellipse , and
free-form .
c. Draw the area of interest on the video window using the mouse. The area is selected when the mouse button is released.
d. Click Select All to select the entire frame.
e. Click Clear All to remove existing detection areas, then repeat the process when necessary.
7. Perform the following steps to remove an area from the scan:
a. Click the Cut button , then click a shape button to select a drawing tool.
b. Draw the area to remove using the mouse. The area is removed when the mouse button is released.
The next step is to set motion sensitivity. A higher sensitivity setting (100% being the highest) detects more activity. It is recommended to test several settings to find the most accurate detection level.
8. Go to the Set motion sensitivity section of the Activity Detection tab.
9. Drag the slider left or right across the motion sensitivity bar using the mouse. This sets the percentile level of response Review uses to detect activity in a frame.
10. Click the Advanced button. The advanced options for motion sensitivity load in the Set motion sensitivity section.
The following advanced options are available for the activity scan:
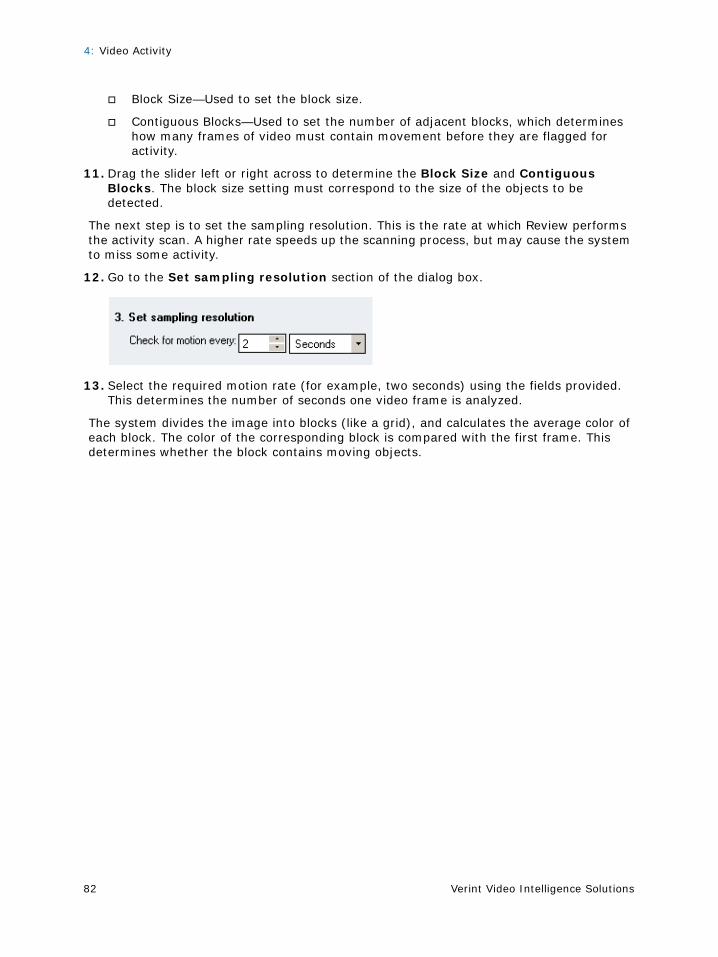
4: Video Activity
Verint Video Intelligence Solutions82
Block Size—Used to set the block size.
Contiguous Blocks—Used to set the number of adjacent blocks, which determines how many frames of video must contain movement before they are flagged for activity.
11. Drag the slider left or right across to determine the Block Size and Contiguous Blocks. The block size setting must correspond to the size of the objects to be detected.
The next step is to set the sampling resolution. This is the rate at which Review performs the activity scan. A higher rate speeds up the scanning process, but may cause the system to miss some activity.
12. Go to the Set sampling resolution section of the dialog box.
13. Select the required motion rate (for example, two seconds) using the fields provided. This determines the number of seconds one video frame is analyzed.
The system divides the image into blocks (like a grid), and calculates the average color of each block. The color of the corresponding block is compared with the first frame. This determines whether the block contains moving objects.
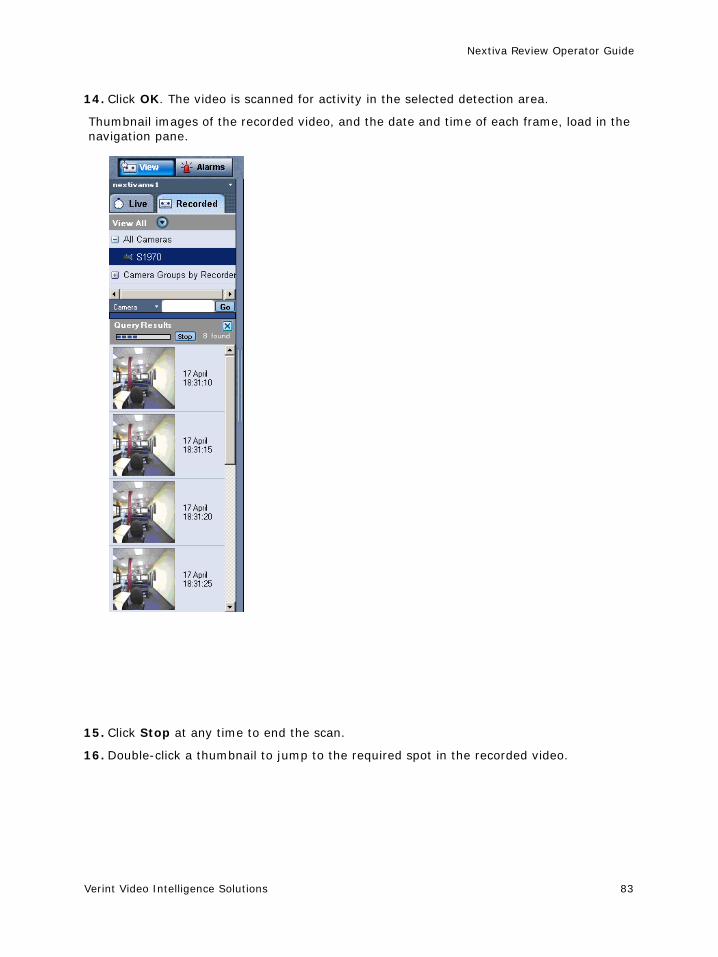
Nextiva Review Operator Guide
Verint Video Intelligence Solutions 83
14. Click OK. The video is scanned for activity in the selected detection area.
Thumbnail images of the recorded video, and the date and time of each frame, load in the navigation pane.
15. Click Stop at any time to end the scan.
16. Double-click a thumbnail to jump to the required spot in the recorded video.

Verint Video Intelligence Solutions84
Verint Video Intelligence Solutions 85
Chapter
Image ToolkitNextiva Review includes the Image Toolkit, which is used to enhance still frames of video. Using the Image Toolkit, you can:
Detect edges of objects in images captured under poor lighting conditions
Zoom-in on an area or object of interest in the video image
Adjust the contrast and brightness of a video image
Crop and resize the video image
Add text and date and time overlays
Save images in JPEG or Bitmap format
Print images to a local or network printer
This chapter contains the following procedures for using the Image Toolkit:
Opening the Image Toolkit
Using the Image Toolkit Menu and Toolbar
Using the File Menu Options
Using the Edit Menu Options
Using the Image Menu Options
Using the Colors Menu Options
Using the Tools Menu Options
Opening the Image ToolkitThe Image Toolkit is launched from Review, and captures the current frame of live or recorded video.
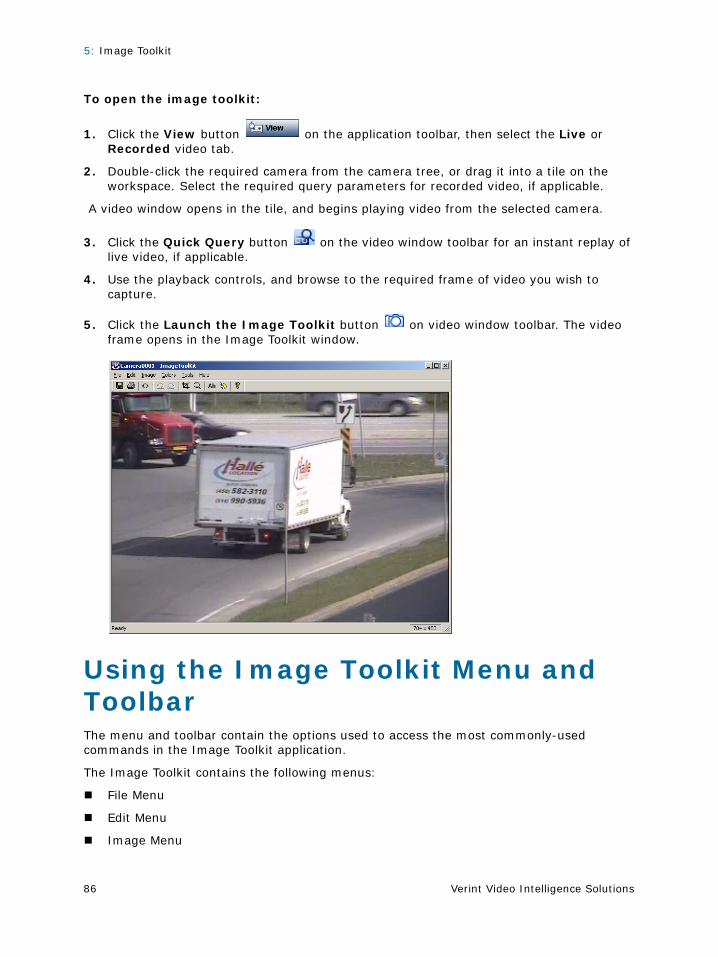
5: Image Toolkit
Verint Video Intelligence Solutions86
To open the image toolkit:
1. Click the View button on the application toolbar, then select the Live or Recorded video tab.
2. Double-click the required camera from the camera tree, or drag it into a tile on the workspace. Select the required query parameters for recorded video, if applicable.
A video window opens in the tile, and begins playing video from the selected camera.
3. Click the Quick Query button on the video window toolbar for an instant replay of live video, if applicable.
4. Use the playback controls, and browse to the required frame of video you wish to capture.
5. Click the Launch the Image Toolkit button on video window toolbar. The video frame opens in the Image Toolkit window.
Using the Image Toolkit Menu and ToolbarThe menu and toolbar contain the options used to access the most commonly-used commands in the Image Toolkit application.
The Image Toolkit contains the following menus:
File Menu
Edit Menu
Image Menu

Nextiva Review Operator Guide
Verint Video Intelligence Solutions 87
Colors Menu
Tools Menu
Help Menu
The sections that follow describe the menu options, corresponding toolbar buttons, and Windows keyboard shortcuts for the various tools.
File MenuThe File menu is used to save and print images, and to exit the Image Toolkit. The File menu contains the following commands:
Edit MenuThe Edit menu is used to undo or redo changes made to images. The Edit menu contains the following commands.
Menu Option Toolbar Button
Keyboard Shortcut
Description
Save <Ctrl+S> Saves the image.
Print <Ctrl+P> Prints the image.
Print Setup Defines the print setup.
Exit Exits the Image Toolkit.
Menu Option Toolbar Button
Keyboard Shortcut
Description
Redo <Ctrl+Y> Repeat the last change made to the image.
Undo <Ctrl+Z> Reverse the last change made to the image.
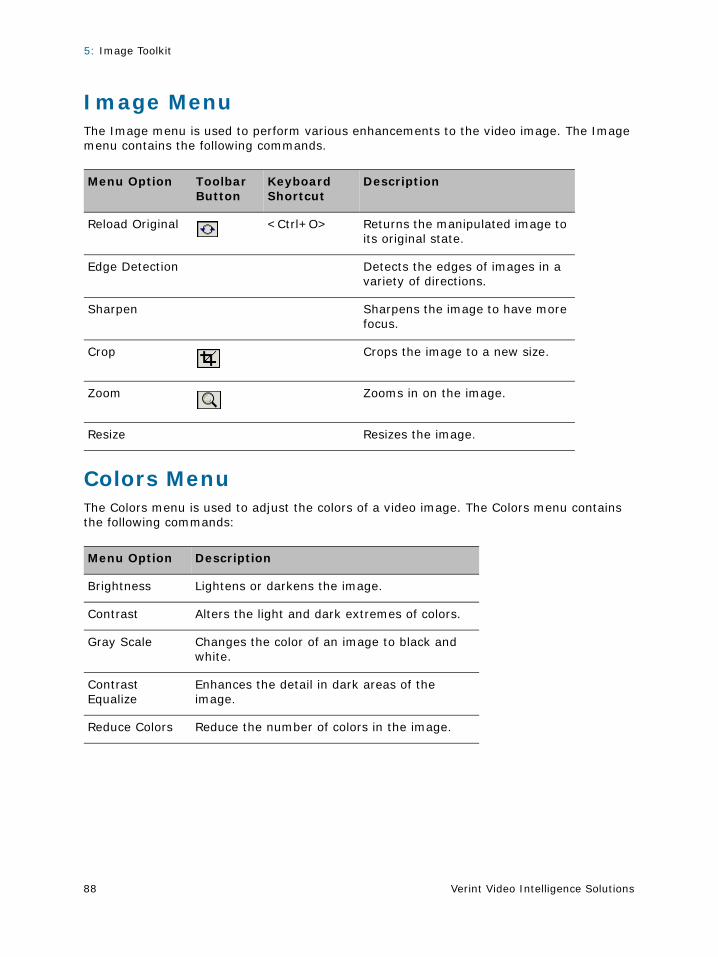
5: Image Toolkit
Verint Video Intelligence Solutions88
Image MenuThe Image menu is used to perform various enhancements to the video image. The Image menu contains the following commands.
Colors MenuThe Colors menu is used to adjust the colors of a video image. The Colors menu contains the following commands:
Menu Option Toolbar Button
Keyboard Shortcut
Description
Reload Original <Ctrl+O> Returns the manipulated image to its original state.
Edge Detection Detects the edges of images in a variety of directions.
Sharpen Sharpens the image to have more focus.
Crop Crops the image to a new size.
Zoom Zooms in on the image.
Resize Resizes the image.
Menu Option Description
Brightness Lightens or darkens the image.
Contrast Alters the light and dark extremes of colors.
Gray Scale Changes the color of an image to black and white.
Contrast Equalize
Enhances the detail in dark areas of the image.
Reduce Colors Reduce the number of colors in the image.
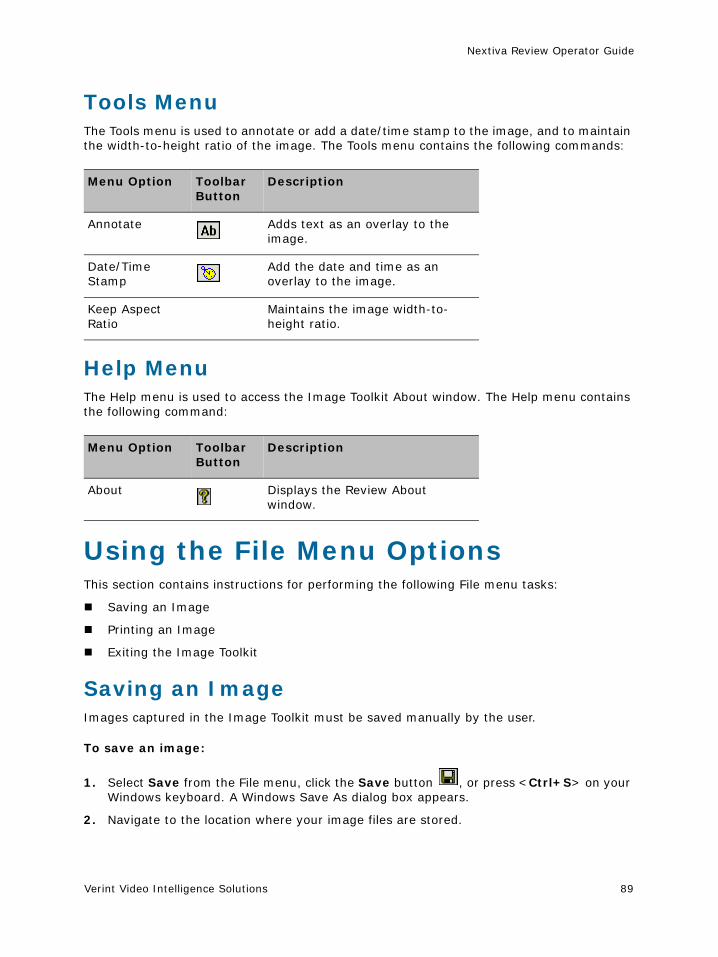
Nextiva Review Operator Guide
Verint Video Intelligence Solutions 89
Tools MenuThe Tools menu is used to annotate or add a date/time stamp to the image, and to maintain the width-to-height ratio of the image. The Tools menu contains the following commands:
Help MenuThe Help menu is used to access the Image Toolkit About window. The Help menu contains the following command:
Using the File Menu OptionsThis section contains instructions for performing the following File menu tasks:
Saving an Image
Printing an Image
Exiting the Image Toolkit
Saving an ImageImages captured in the Image Toolkit must be saved manually by the user.
To save an image:
1. Select Save from the File menu, click the Save button , or press <Ctrl+S> on your Windows keyboard. A Windows Save As dialog box appears.
2. Navigate to the location where your image files are stored.
Menu Option Toolbar Button
Description
Annotate Adds text as an overlay to the image.
Date/Time Stamp
Add the date and time as an overlay to the image.
Keep Aspect Ratio
Maintains the image width-to-height ratio.
Menu Option Toolbar Button
Description
About Displays the Review About window.
5: Image Toolkit
Verint Video Intelligence Solutions90
3. Enter the name for the image in the File name text box. Do not use any special characters.
4. Select the required format from the Save as type drop-down list: Windows bitmap or JPEG.
5. Click Save. The image is saved.
Printing an ImageYou can print an image captured using the Image Toolkit.
To print an image:
1. Select Print from the File menu, click the Print button or press <Ctrl+P> on your Windows keyboard. A standard Windows Print dialog box appears.
2. Select the appropriate printer.
3. Click OK. The image is printed.
Exiting the Image ToolkitExit the Image Toolkit by selecting Exit from the File menu, or by clicking the Exit button
located at the top right corner of the Image Toolkit window.
Using the Edit Menu OptionsThis section contains instructions for performing the following Edit menu tasks:
Redoing Changes
Undoing Changes
Redoing ChangesRepeat the last change made to an image.
To redo a change made to an image:
1. Select Redo from the Edit menu, or click the Redo button . The last change you made to the image is repeated.
2. Save the image as described in “Saving an Image” on page 89.
Undoing ChangesThe last change made to an image is reversed each time an Undo is performed.
Nextiva Review Operator Guide
Verint Video Intelligence Solutions 91
To undo changes made to an image:
1. Select Undo from the Edit menu, or click the Undo button . The last change made to the image is revered.
2. Repeat the process for each change you want to reverse. The Undo button is unavailable once all changes are reversed.
3. Save the image as described in “Saving an Image” on page 89.
Using the Image Menu OptionsThis section contains instructions for performing the following Image menu tasks:
Reloading an Image
Detecting Edges in an Image
Sharpening an Image
Cropping an Image
Zooming an Image
Resizing an Image
Reloading an ImageThe Reload option is used to return the image to its original state. This is handy if you have made several changes to an image, and want to reverse all of them.
To reload an image:
1. Select Reload Original from the Image menu.
2. Alternatively, click the Reload Original button or press <Ctrl+O> on your Windows keyboard. The image is returned to its original state.
Detecting Edges in an ImageThe Edge Detection feature darkens the image, and highlights the edges of objects. This feature provides several different methods to detect edges in a variety of directions.

5: Image Toolkit
Verint Video Intelligence Solutions92
To detect edges in an image:
1. Select Edge Detection from the Image menu. The Edge Detection dialog box appears.
The recommended Detection Method is Gradient.
2. Select Gradient, then select the required direction.
3. Select the Preview check box to view the changes immediately. This check box is selected by default.
4. Click OK to apply the changes. The dialog box closes and returns to the Image Toolkit window.
Sharpening an ImageThe Sharpen feature is used to make the edges of images more defined, with improved focus.
To sharpen an image:
1. Select Sharpen from the Image menu. The Sharpen dialog box appears.
2. Move the slider to the left to make the image smoother.
3. Move the slider to the right to sharpen the image.
4. Select the Preview check box to view the changes immediately. This check box is selected by default.
5. Click OK to apply the changes. The dialog box closes and returns to the Image Toolkit window.
Note: The Image Toolkit provides several detection methods. The effectiveness of each method depends on many variables. It is suggested that you test each algorithm, then select the one that best meets your needs.
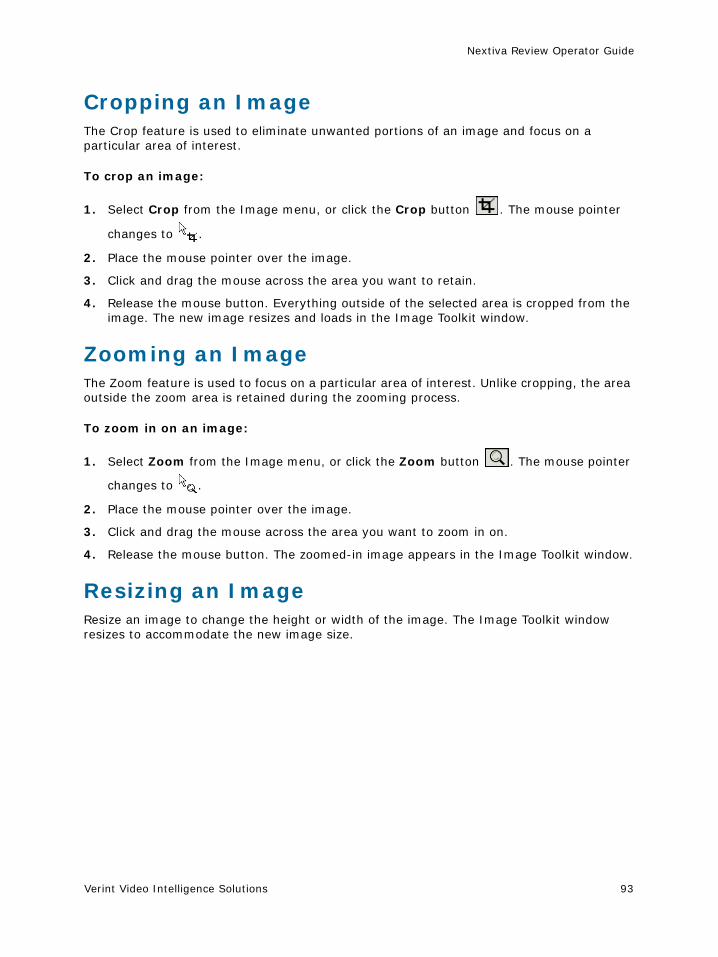
Nextiva Review Operator Guide
Verint Video Intelligence Solutions 93
Cropping an ImageThe Crop feature is used to eliminate unwanted portions of an image and focus on a particular area of interest.
To crop an image:
1. Select Crop from the Image menu, or click the Crop button . The mouse pointer
changes to .
2. Place the mouse pointer over the image.
3. Click and drag the mouse across the area you want to retain.
4. Release the mouse button. Everything outside of the selected area is cropped from the image. The new image resizes and loads in the Image Toolkit window.
Zooming an ImageThe Zoom feature is used to focus on a particular area of interest. Unlike cropping, the area outside the zoom area is retained during the zooming process.
To zoom in on an image:
1. Select Zoom from the Image menu, or click the Zoom button . The mouse pointer
changes to .
2. Place the mouse pointer over the image.
3. Click and drag the mouse across the area you want to zoom in on.
4. Release the mouse button. The zoomed-in image appears in the Image Toolkit window.
Resizing an ImageResize an image to change the height or width of the image. The Image Toolkit window resizes to accommodate the new image size.

5: Image Toolkit
Verint Video Intelligence Solutions94
To resize an image:
1. Select Resize from the Image menu. The Resize Image dialog box appears.
2. Select one of the following methods to resize the image:
Pixel Size—Resizes the image in pixel dimensions. Enter the required values in the Width and Height text boxes.
Percentage of Original—Resizes the image by a percentage. Enter the required values in the Width and Height text boxes.
Actual/Print Size—Resizes the image by inches. Enter the required values in the Width and Height text boxes.
3. Select Normal from the Resize Method drop-down list for no interpolation, or select Resample for bilinear interpolation.
4. Select the Maintain Aspect Ratio check box if you want to retain the image’s width-to-height ratio when resizing. This check box is selected by default. The system automatically adjusts the width/height when this option is selected.
5. Click OK to apply the changes. The dialog box closes and returns to the Image Toolkit window.
Using the Colors Menu OptionsThis section contains instructions for performing the following Colors menu tasks:
Changing the Brightness of an Image
Changing the Contrast of an Image
Changing an Image to Gray Scale
Equalizing the Contrast of an Image
Reducing Colors in an Image
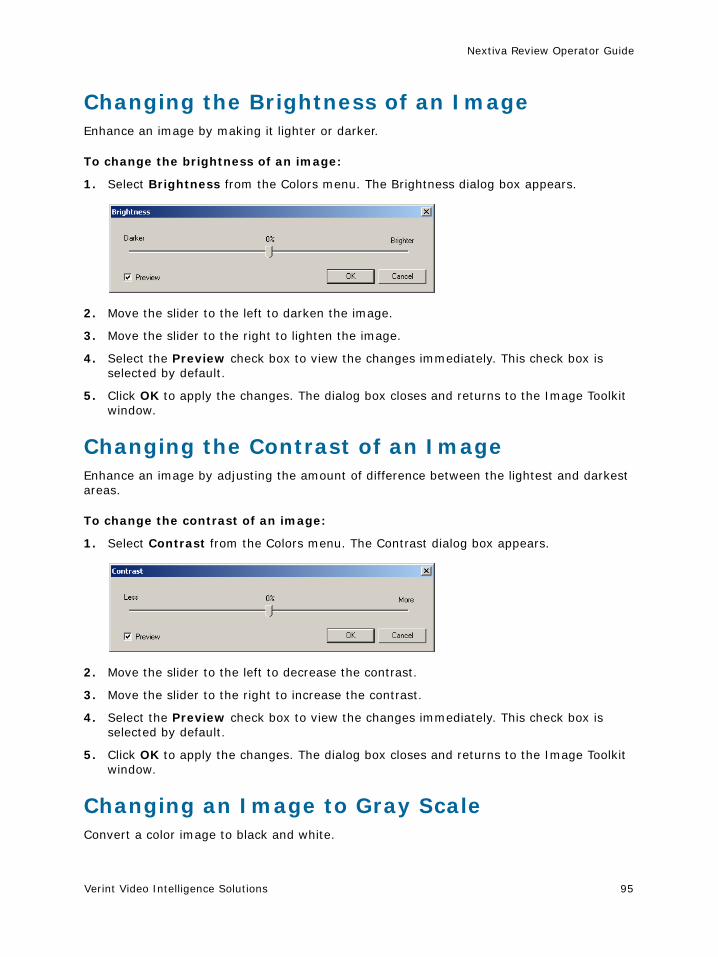
Nextiva Review Operator Guide
Verint Video Intelligence Solutions 95
Changing the Brightness of an ImageEnhance an image by making it lighter or darker.
To change the brightness of an image:
1. Select Brightness from the Colors menu. The Brightness dialog box appears.
2. Move the slider to the left to darken the image.
3. Move the slider to the right to lighten the image.
4. Select the Preview check box to view the changes immediately. This check box is selected by default.
5. Click OK to apply the changes. The dialog box closes and returns to the Image Toolkit window.
Changing the Contrast of an ImageEnhance an image by adjusting the amount of difference between the lightest and darkest areas.
To change the contrast of an image:
1. Select Contrast from the Colors menu. The Contrast dialog box appears.
2. Move the slider to the left to decrease the contrast.
3. Move the slider to the right to increase the contrast.
4. Select the Preview check box to view the changes immediately. This check box is selected by default.
5. Click OK to apply the changes. The dialog box closes and returns to the Image Toolkit window.
Changing an Image to Gray ScaleConvert a color image to black and white.
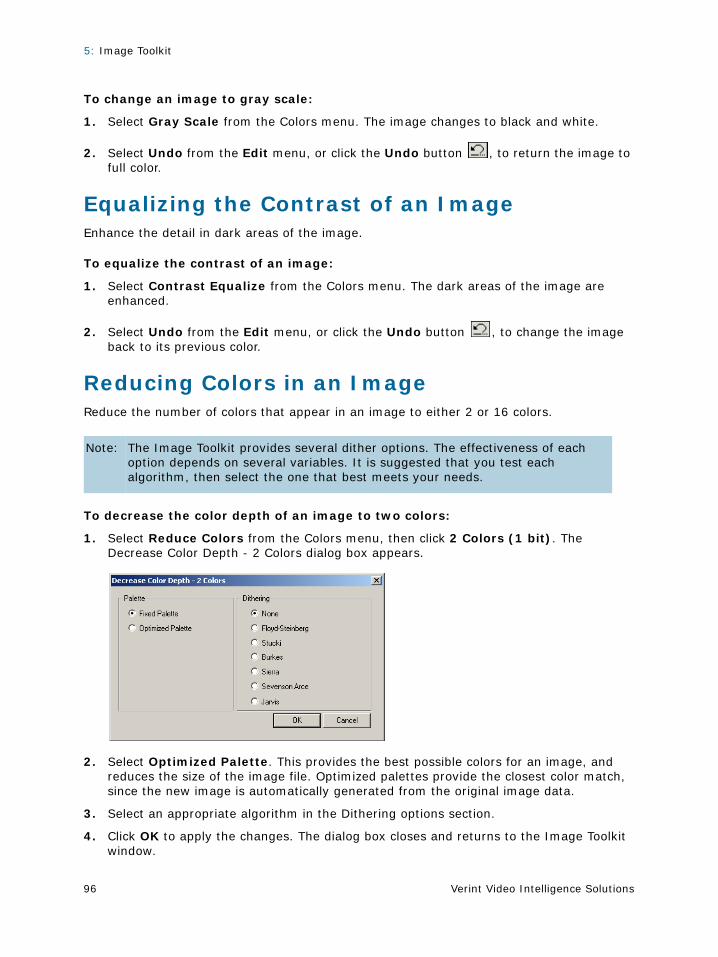
5: Image Toolkit
Verint Video Intelligence Solutions96
To change an image to gray scale:
1. Select Gray Scale from the Colors menu. The image changes to black and white.
2. Select Undo from the Edit menu, or click the Undo button , to return the image to full color.
Equalizing the Contrast of an ImageEnhance the detail in dark areas of the image.
To equalize the contrast of an image:
1. Select Contrast Equalize from the Colors menu. The dark areas of the image are enhanced.
2. Select Undo from the Edit menu, or click the Undo button , to change the image back to its previous color.
Reducing Colors in an ImageReduce the number of colors that appear in an image to either 2 or 16 colors.
To decrease the color depth of an image to two colors:
1. Select Reduce Colors from the Colors menu, then click 2 Colors (1 bit). The Decrease Color Depth - 2 Colors dialog box appears.
2. Select Optimized Palette. This provides the best possible colors for an image, and reduces the size of the image file. Optimized palettes provide the closest color match, since the new image is automatically generated from the original image data.
3. Select an appropriate algorithm in the Dithering options section.
4. Click OK to apply the changes. The dialog box closes and returns to the Image Toolkit window.
Note: The Image Toolkit provides several dither options. The effectiveness of each option depends on several variables. It is suggested that you test each algorithm, then select the one that best meets your needs.
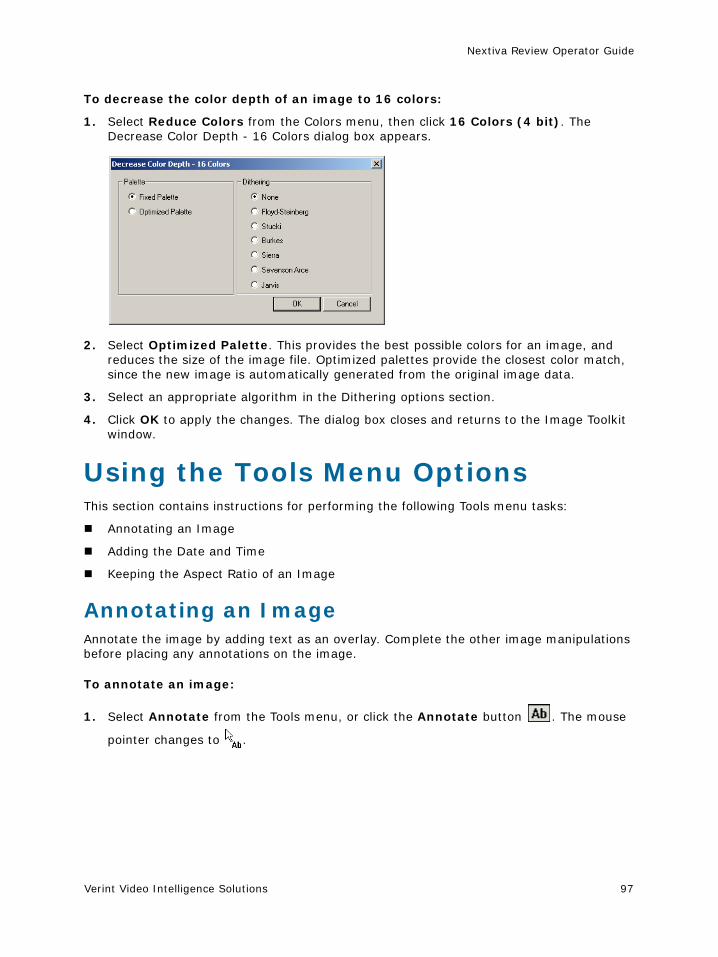
Nextiva Review Operator Guide
Verint Video Intelligence Solutions 97
To decrease the color depth of an image to 16 colors:
1. Select Reduce Colors from the Colors menu, then click 16 Colors (4 bit). The Decrease Color Depth - 16 Colors dialog box appears.
2. Select Optimized Palette. This provides the best possible colors for an image, and reduces the size of the image file. Optimized palettes provide the closest color match, since the new image is automatically generated from the original image data.
3. Select an appropriate algorithm in the Dithering options section.
4. Click OK to apply the changes. The dialog box closes and returns to the Image Toolkit window.
Using the Tools Menu OptionsThis section contains instructions for performing the following Tools menu tasks:
Annotating an Image
Adding the Date and Time
Keeping the Aspect Ratio of an Image
Annotating an ImageAnnotate the image by adding text as an overlay. Complete the other image manipulations before placing any annotations on the image.
To annotate an image:
1. Select Annotate from the Tools menu, or click the Annotate button . The mouse
pointer changes to .
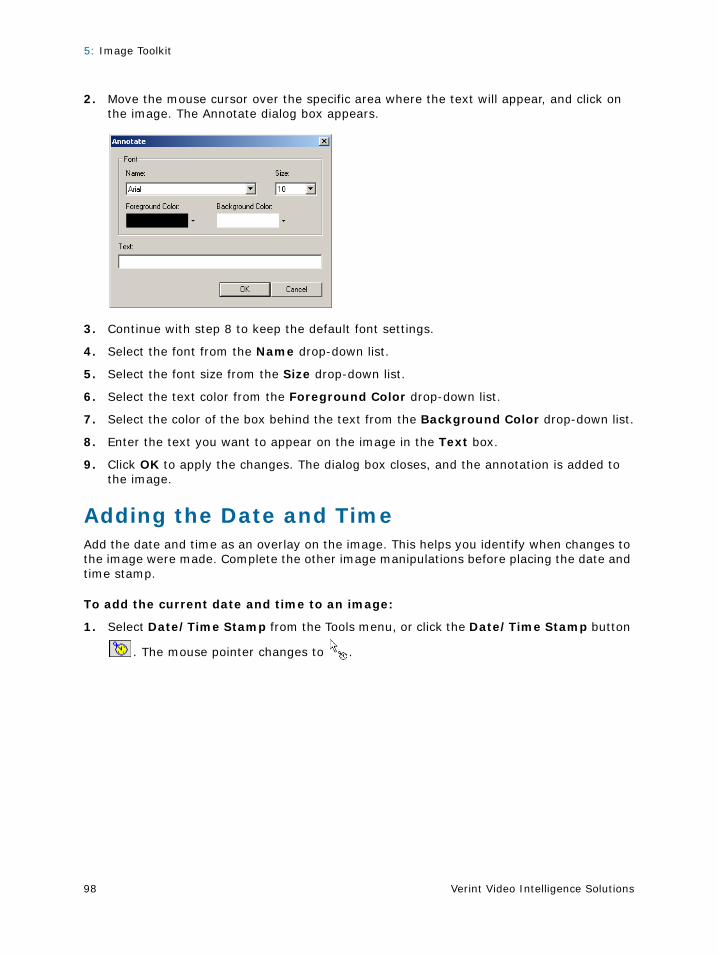
5: Image Toolkit
Verint Video Intelligence Solutions98
2. Move the mouse cursor over the specific area where the text will appear, and click on the image. The Annotate dialog box appears.
3. Continue with step 8 to keep the default font settings.
4. Select the font from the Name drop-down list.
5. Select the font size from the Size drop-down list.
6. Select the text color from the Foreground Color drop-down list.
7. Select the color of the box behind the text from the Background Color drop-down list.
8. Enter the text you want to appear on the image in the Text box.
9. Click OK to apply the changes. The dialog box closes, and the annotation is added to the image.
Adding the Date and TimeAdd the date and time as an overlay on the image. This helps you identify when changes to the image were made. Complete the other image manipulations before placing the date and time stamp.
To add the current date and time to an image:
1. Select Date/Time Stamp from the Tools menu, or click the Date/Time Stamp button
. The mouse pointer changes to .
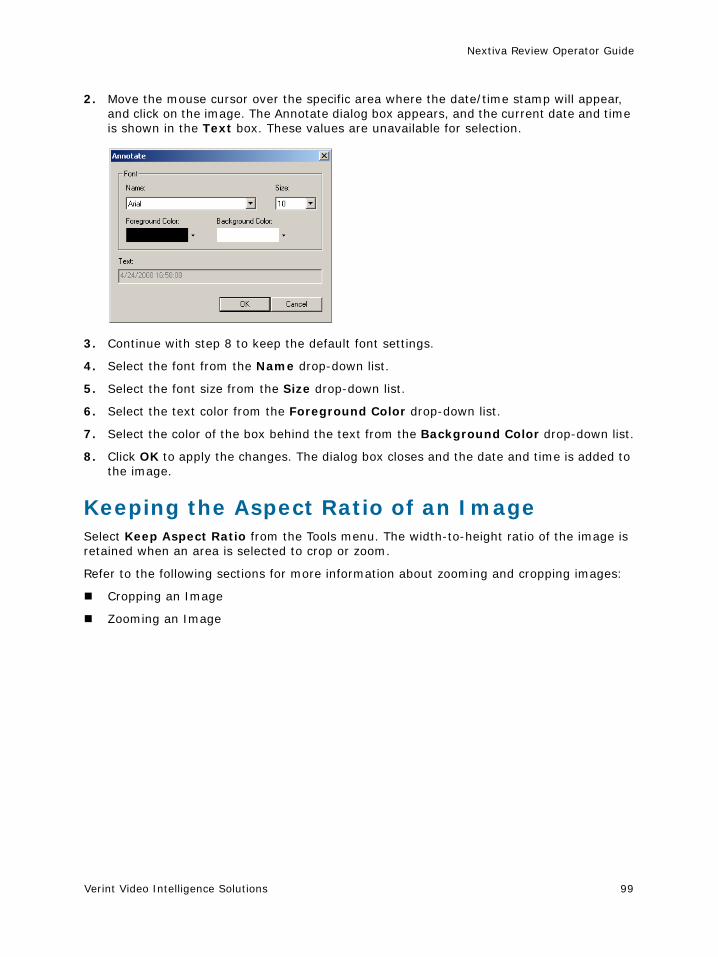
Nextiva Review Operator Guide
Verint Video Intelligence Solutions 99
2. Move the mouse cursor over the specific area where the date/time stamp will appear, and click on the image. The Annotate dialog box appears, and the current date and time is shown in the Text box. These values are unavailable for selection.
3. Continue with step 8 to keep the default font settings.
4. Select the font from the Name drop-down list.
5. Select the font size from the Size drop-down list.
6. Select the text color from the Foreground Color drop-down list.
7. Select the color of the box behind the text from the Background Color drop-down list.
8. Click OK to apply the changes. The dialog box closes and the date and time is added to the image.
Keeping the Aspect Ratio of an ImageSelect Keep Aspect Ratio from the Tools menu. The width-to-height ratio of the image is retained when an area is selected to crop or zoom.
Refer to the following sections for more information about zooming and cropping images:
Cropping an Image
Zooming an Image

5: Image Toolkit
Verint Video Intelligence Solutions100

Verint Video Intelligence Solutions 101
Chapter
InvestigationManagement
Investigators gather important information relating to recorded video and add details to an Investigation Binder to manage their reports. The Investigation Binder can include the following attachments: videos, alarms, document files, and still images.
Investigators also have the option to include explanatory notes describing the contents of the binder, and other users can add information as the investigation evolves. Investigations can be exported, permanently saved, and accessed on other workstations.
This chapter contains the following procedures for managing investigations:
Using the Investigation Binder
Creating a New Investigation
Editing an Investigation
Exporting an Investigation
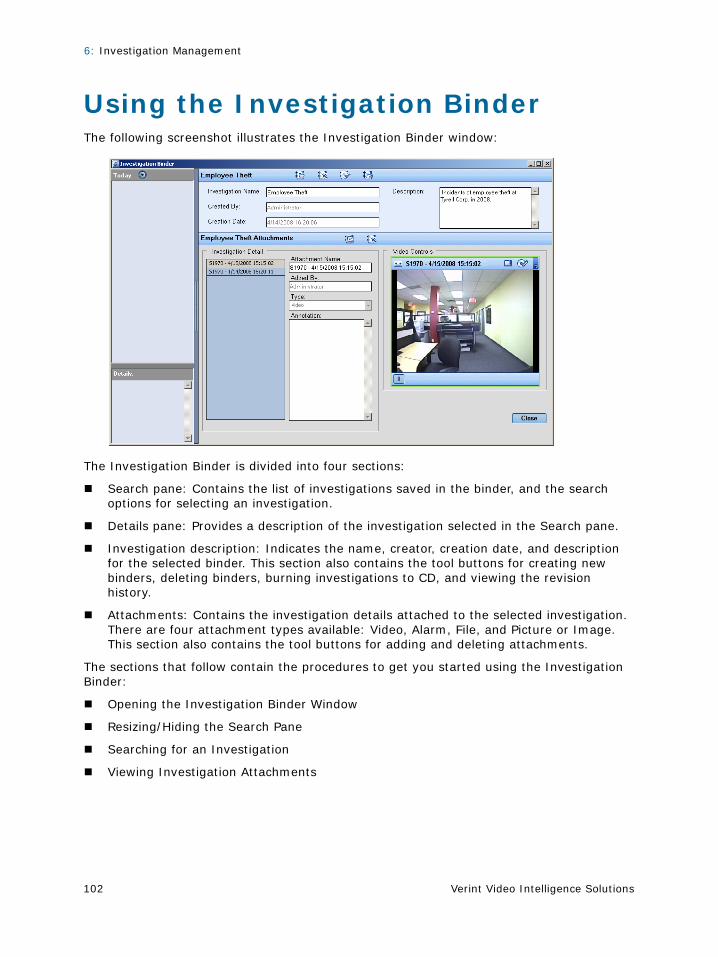
6: Investigation Management
Verint Video Intelligence Solutions102
Using the Investigation BinderThe following screenshot illustrates the Investigation Binder window:
The Investigation Binder is divided into four sections:
Search pane: Contains the list of investigations saved in the binder, and the search options for selecting an investigation.
Details pane: Provides a description of the investigation selected in the Search pane.
Investigation description: Indicates the name, creator, creation date, and description for the selected binder. This section also contains the tool buttons for creating new binders, deleting binders, burning investigations to CD, and viewing the revision history.
Attachments: Contains the investigation details attached to the selected investigation. There are four attachment types available: Video, Alarm, File, and Picture or Image. This section also contains the tool buttons for adding and deleting attachments.
The sections that follow contain the procedures to get you started using the Investigation Binder:
Opening the Investigation Binder Window
Resizing/Hiding the Search Pane
Searching for an Investigation
Viewing Investigation Attachments
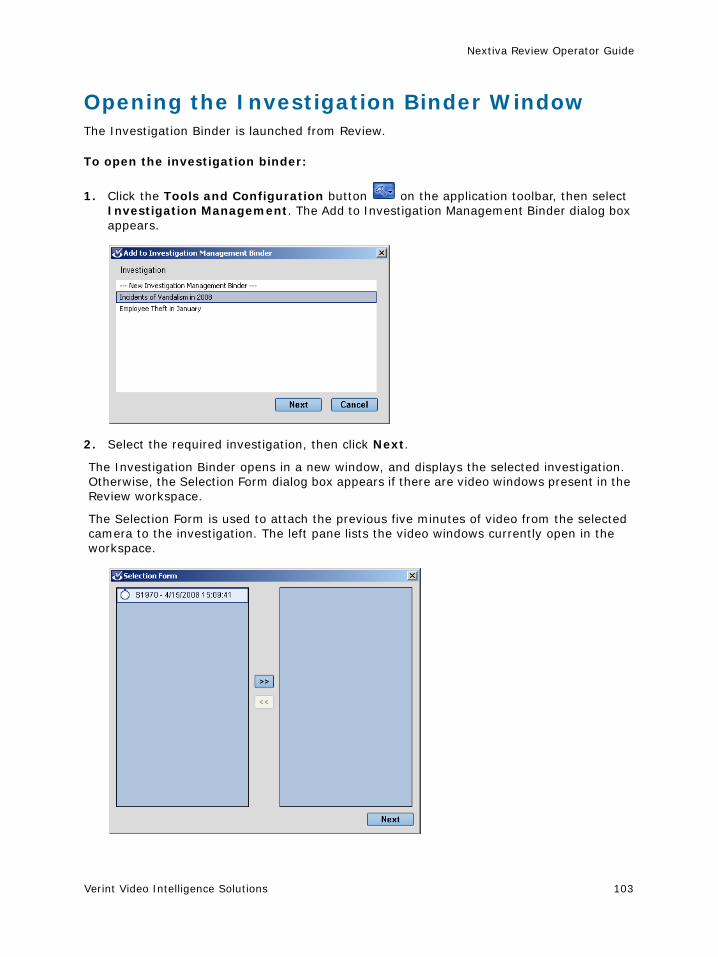
Nextiva Review Operator Guide
Verint Video Intelligence Solutions 103
Opening the Investigation Binder WindowThe Investigation Binder is launched from Review.
To open the investigation binder:
1. Click the Tools and Configuration button on the application toolbar, then select Investigation Management. The Add to Investigation Management Binder dialog box appears.
2. Select the required investigation, then click Next.
The Investigation Binder opens in a new window, and displays the selected investigation. Otherwise, the Selection Form dialog box appears if there are video windows present in the Review workspace.
The Selection Form is used to attach the previous five minutes of video from the selected camera to the investigation. The left pane lists the video windows currently open in the workspace.
6: Investigation Management
Verint Video Intelligence Solutions104
3. Select the required camera from the left pane, then click the Insert button to load it in the right pane.
4. Click Next. The Investigation Binder opens in a new window, and displays the selected investigation.
Resizing/Hiding the Search PaneUsers can expand the viewing area of the Search pane by resizing it with the mouse.
To resize the navigation pane:
1. Position the mouse cursor between the Search pane and the Investigation area.
2. Press and hold the left mouse button, then drag the mouse right or left to horizontally resize the pane.
The investigation area can also be expanded by hiding the Search pane.
To show/hide the Search pane:
1. Click the vertical lines between the Search pane and the investigation.
The Search pane is removed from the interface.
2. Repeat the selected action to restore the Search pane.
Searching for an InvestigationThe Search pane, located on the left of the Investigation Binder window, provides search and sorting options. Use these options to narrow down the number of investigations listed in the pane, or to search for an investigation.
To search for an investigation:
1. Click the arrow button at the top of the Search pane, and select one of the following options:
Today—Lists all investigations created the current day.
Last 7 days—Lists all investigations created in the last seven days, including the current day.
Last 14 days—Lists all investigations created in the last 14 days, including the current day.
All Investigations—Lists all investigations created.
Search—Loads the search form for a manual search.
Investigations that meet the select criterion are displayed in the Search pane.

Nextiva Review Operator Guide
Verint Video Intelligence Solutions 105
2. Open the search form, and click the down arrows to expand each field.
3. Enter or select the required search parameters:
a. Select the required user name from the Who created it? drop-down list:
Don’t remember
Administrator
User 1
User 2
b. Enter the investigation name in the Title text box.
c. Enter a description or keywords in the Keywords text box.
d. Select the required time period from the Creation Date drop-down list:
Don’t remember
Within the last day
Within the last week
6: Investigation Management
Verint Video Intelligence Solutions106
Past month
Specify Date. Select the from and to dates from the drop-down lists provided.
4. Click Clear to reset the search form, if required.
5. Click Search.
The search results appear in the Search pane. A blank list indicates that no binders matching the selected criteria were found.
6. Select an investigation in the search results to view its description.
7. Double-click the required investigation to open it in the binder.
Viewing Investigation AttachmentsInvestigators attach recorded video, alarm video, external files, and images to their investigations. These details are available for viewing in the Attachments section of the Investigation Binder window.
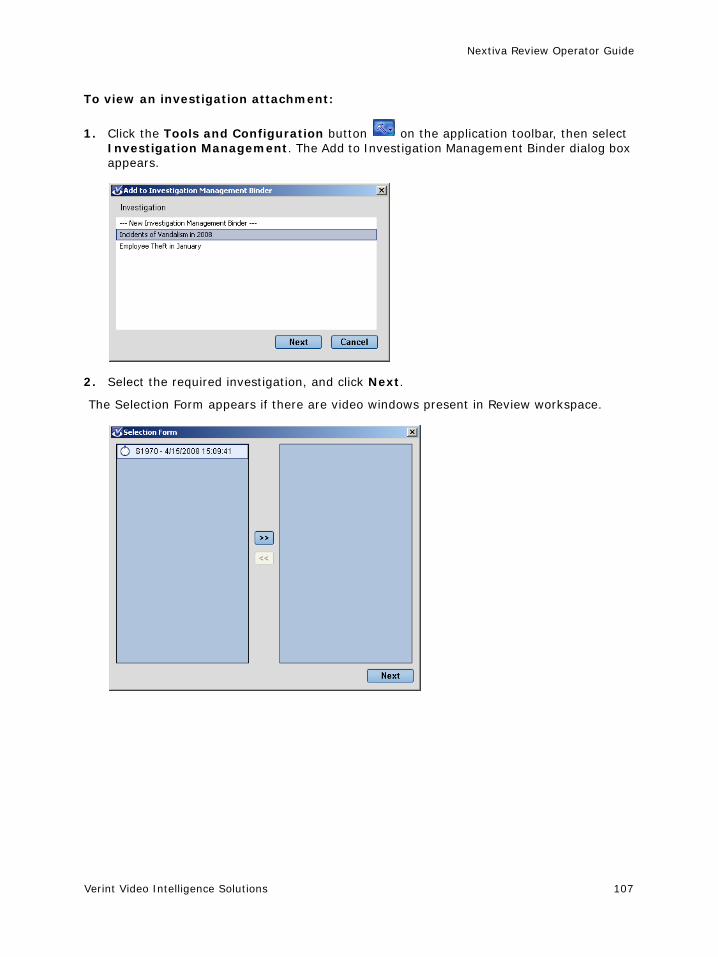
Nextiva Review Operator Guide
Verint Video Intelligence Solutions 107
To view an investigation attachment:
1. Click the Tools and Configuration button on the application toolbar, then select Investigation Management. The Add to Investigation Management Binder dialog box appears.
2. Select the required investigation, and click Next.
The Selection Form appears if there are video windows present in Review workspace.
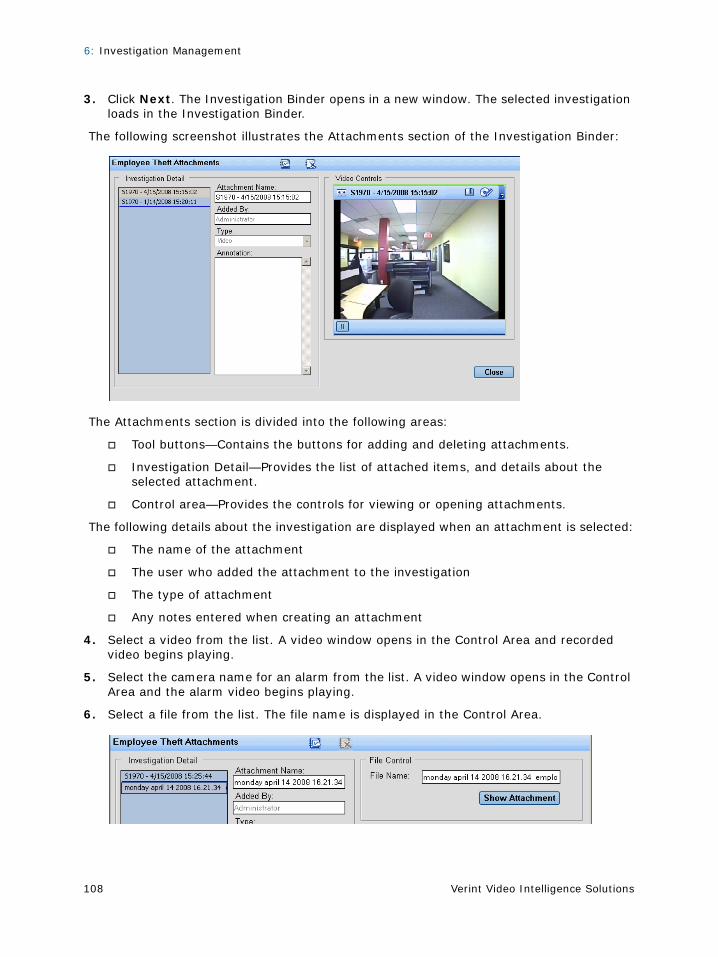
6: Investigation Management
Verint Video Intelligence Solutions108
3. Click Next. The Investigation Binder opens in a new window. The selected investigation loads in the Investigation Binder.
The following screenshot illustrates the Attachments section of the Investigation Binder:
The Attachments section is divided into the following areas:
Tool buttons—Contains the buttons for adding and deleting attachments.
Investigation Detail—Provides the list of attached items, and details about the selected attachment.
Control area—Provides the controls for viewing or opening attachments.
The following details about the investigation are displayed when an attachment is selected:
The name of the attachment
The user who added the attachment to the investigation
The type of attachment
Any notes entered when creating an attachment
4. Select a video from the list. A video window opens in the Control Area and recorded video begins playing.
5. Select the camera name for an alarm from the list. A video window opens in the Control Area and the alarm video begins playing.
6. Select a file from the list. The file name is displayed in the Control Area.
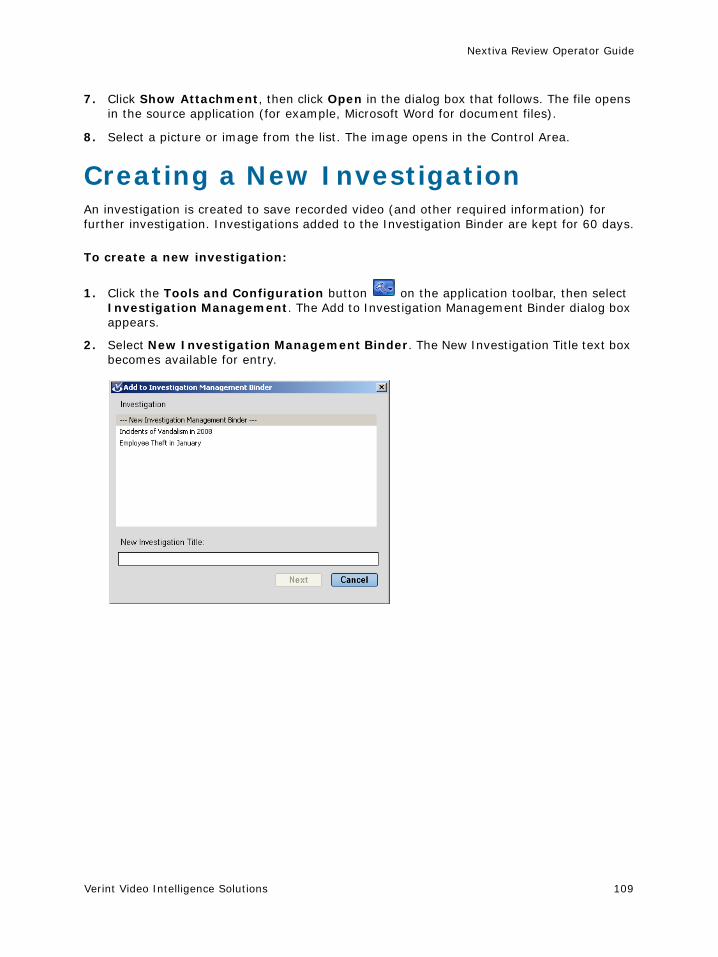
Nextiva Review Operator Guide
Verint Video Intelligence Solutions 109
7. Click Show Attachment, then click Open in the dialog box that follows. The file opens in the source application (for example, Microsoft Word for document files).
8. Select a picture or image from the list. The image opens in the Control Area.
Creating a New InvestigationAn investigation is created to save recorded video (and other required information) for further investigation. Investigations added to the Investigation Binder are kept for 60 days.
To create a new investigation:
1. Click the Tools and Configuration button on the application toolbar, then select Investigation Management. The Add to Investigation Management Binder dialog box appears.
2. Select New Investigation Management Binder. The New Investigation Title text box becomes available for entry.

6: Investigation Management
Verint Video Intelligence Solutions110
3. Enter a New Investigation Title, then click Next.
The Investigation Binder opens in a new window and displays the new investigation. Otherwise, the Selection Form dialog box opens if there are video windows present in the Review workspace.
The Selection Form is used to attach the previous five minutes of video from the selected camera to the investigation. The left pane lists the video windows currently open in the workspace.
4. Select a camera from the left pane, then click the Insert button to load it in the right pane.
5. Click Next. The Investigation Binder opens in a new window.
6. Add a description for the investigation in the Description text box.
7. Follow the instructions in the “Adding Attachments to an Investigation” section on page 111, and attach items to the investigation as required.
There are four attachment types available: Video, Alarm, File, and Picture or Image. Items are listed in the Investigation Detail section of the Attachments area.
8. Click Close to save the investigation. The Add Comment dialog box appears.
9. Enter a Comment about the investigation in the field provided.
10. Select Read Only to set the investigation to read-only.
Only the user who created the investigation, and users with administrative privileges, can edit the investigation.
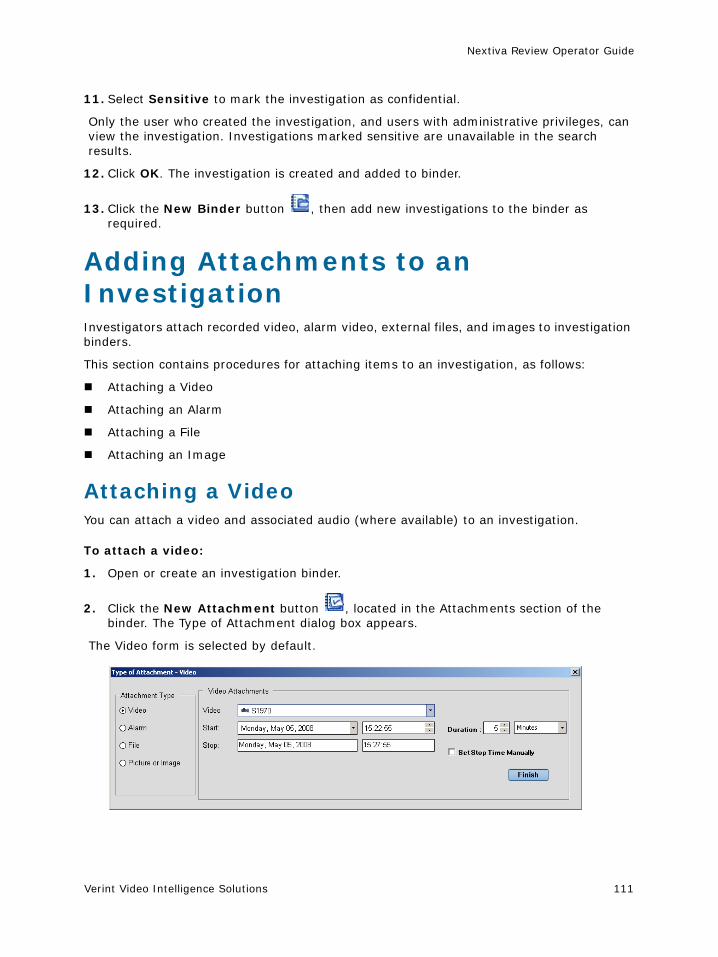
Nextiva Review Operator Guide
Verint Video Intelligence Solutions 111
11. Select Sensitive to mark the investigation as confidential.
Only the user who created the investigation, and users with administrative privileges, can view the investigation. Investigations marked sensitive are unavailable in the search results.
12. Click OK. The investigation is created and added to binder.
13. Click the New Binder button , then add new investigations to the binder as required.
Adding Attachments to an InvestigationInvestigators attach recorded video, alarm video, external files, and images to investigation binders.
This section contains procedures for attaching items to an investigation, as follows:
Attaching a Video
Attaching an Alarm
Attaching a File
Attaching an Image
Attaching a VideoYou can attach a video and associated audio (where available) to an investigation.
To attach a video:
1. Open or create an investigation binder.
2. Click the New Attachment button , located in the Attachments section of the binder. The Type of Attachment dialog box appears.
The Video form is selected by default.

6: Investigation Management
Verint Video Intelligence Solutions112
3. Select the Video drop-down to show the camera tree. The tree includes a list of all cameras, and camera groups by recorder.
4. Clicking the plus sign to expand the camera tree, then select the check box next to the required camera.
5. Select the date, time, and duration (in minutes or hours). Alternatively, select Set Stop Time Manually, then select the required Stop date and time.
6. Click Finish. The video is attached to the investigation.
Attaching an AlarmYou can attach alarm video to an investigation.
To attach alarm video:
1. Open or create an investigation binder.
2. Click the New Attachment button , located in the Attachments section of the binder. The Type of Attachment dialog box appears.
3. Select the Alarm radio button on the left. The Alarm form loads in the dialog box.
4. Select the date, time, and duration (in minutes or hours). Alternatively, select Set Stop Time Manually, then select the required Stop date and time.
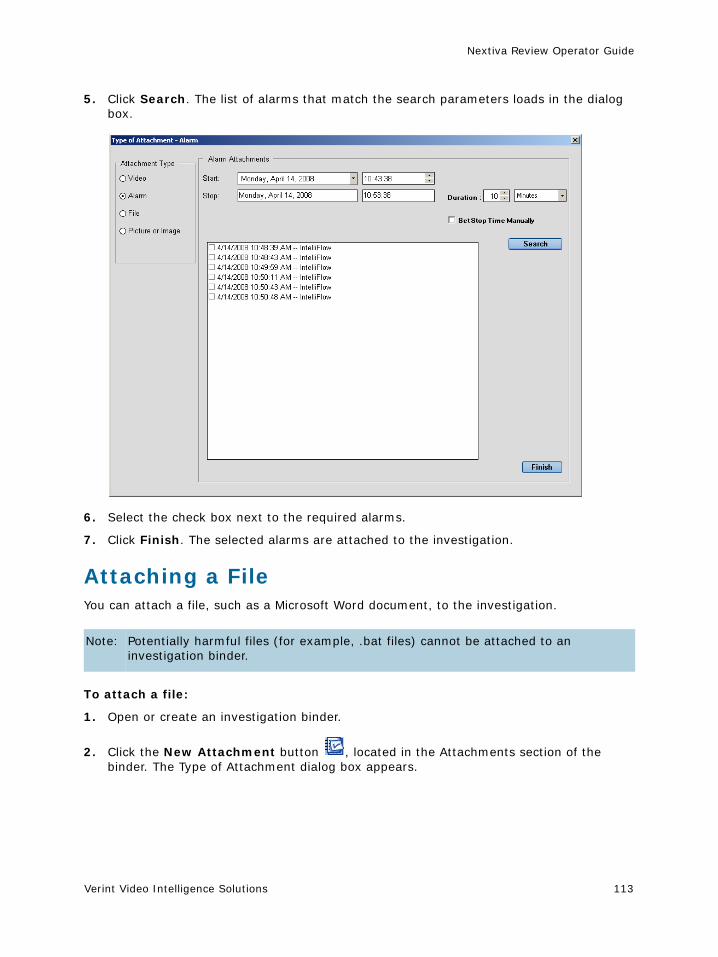
Nextiva Review Operator Guide
Verint Video Intelligence Solutions 113
5. Click Search. The list of alarms that match the search parameters loads in the dialog box.
6. Select the check box next to the required alarms.
7. Click Finish. The selected alarms are attached to the investigation.
Attaching a FileYou can attach a file, such as a Microsoft Word document, to the investigation.
To attach a file:
1. Open or create an investigation binder.
2. Click the New Attachment button , located in the Attachments section of the binder. The Type of Attachment dialog box appears.
Note: Potentially harmful files (for example, .bat files) cannot be attached to an investigation binder.
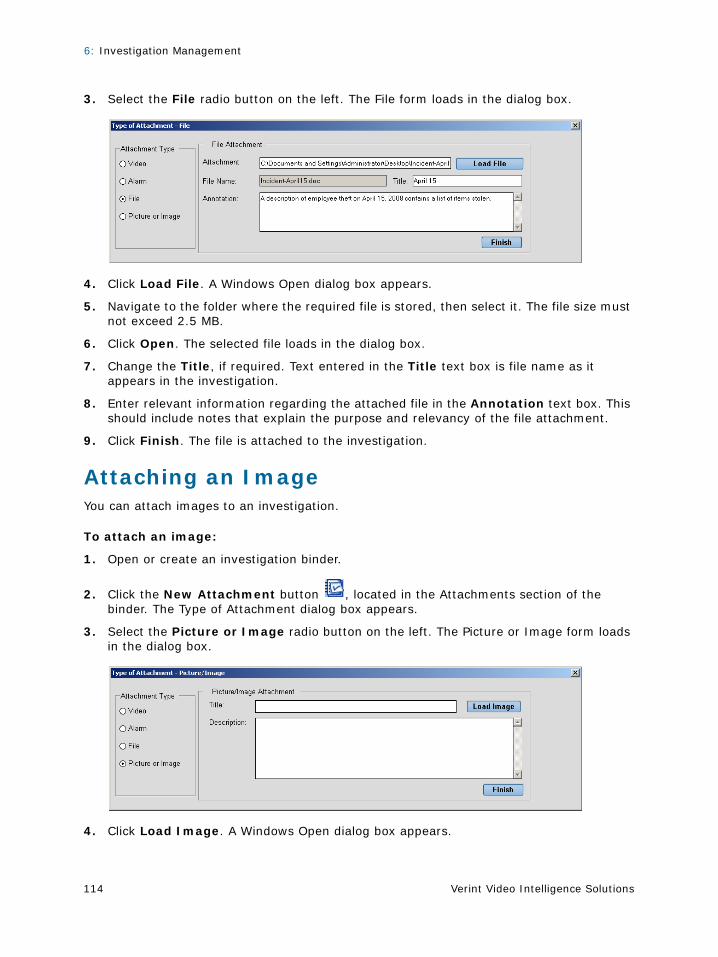
6: Investigation Management
Verint Video Intelligence Solutions114
3. Select the File radio button on the left. The File form loads in the dialog box.
4. Click Load File. A Windows Open dialog box appears.
5. Navigate to the folder where the required file is stored, then select it. The file size must not exceed 2.5 MB.
6. Click Open. The selected file loads in the dialog box.
7. Change the Title, if required. Text entered in the Title text box is file name as it appears in the investigation.
8. Enter relevant information regarding the attached file in the Annotation text box. This should include notes that explain the purpose and relevancy of the file attachment.
9. Click Finish. The file is attached to the investigation.
Attaching an ImageYou can attach images to an investigation.
To attach an image:
1. Open or create an investigation binder.
2. Click the New Attachment button , located in the Attachments section of the binder. The Type of Attachment dialog box appears.
3. Select the Picture or Image radio button on the left. The Picture or Image form loads in the dialog box.
4. Click Load Image. A Windows Open dialog box appears.
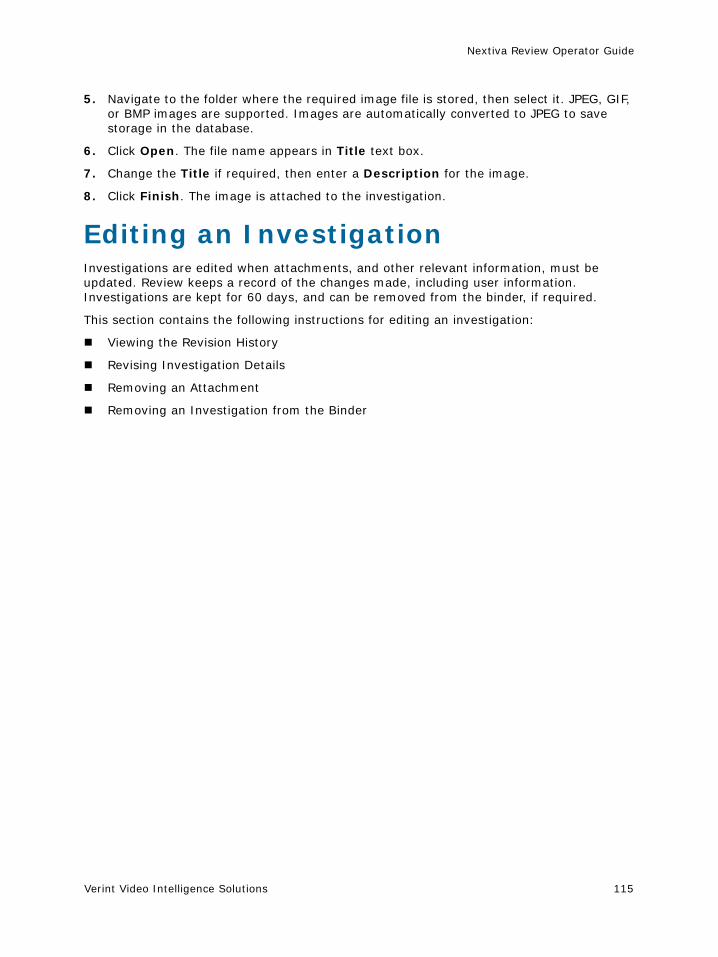
Nextiva Review Operator Guide
Verint Video Intelligence Solutions 115
5. Navigate to the folder where the required image file is stored, then select it. JPEG, GIF, or BMP images are supported. Images are automatically converted to JPEG to save storage in the database.
6. Click Open. The file name appears in Title text box.
7. Change the Title if required, then enter a Description for the image.
8. Click Finish. The image is attached to the investigation.
Editing an InvestigationInvestigations are edited when attachments, and other relevant information, must be updated. Review keeps a record of the changes made, including user information. Investigations are kept for 60 days, and can be removed from the binder, if required.
This section contains the following instructions for editing an investigation:
Viewing the Revision History
Revising Investigation Details
Removing an Attachment
Removing an Investigation from the Binder
6: Investigation Management
Verint Video Intelligence Solutions116
Viewing the Revision HistoryThe Revision History contains a list of users who have revised the investigation, including the date of the revisions and user comments.
To view the revision history:
1. Click the Revision/History button , located above the Investigation Description section of the binder. The Revision History dialog box appears.
The revision history lists the date of the each revision, the user who revised the investigation, and comments entered by the user (if any).
2. Click Close, then return to the Investigation Binder.
Revising Investigation DetailsInvestigators continue to update their investigations as cases evolve. The investigation name, description, attachments, and annotations can be revised when new information and events occur at the site.
To update investigation details:
1. Click the Tools and Configuration button on the application toolbar, then select Investigation Management. The Add to Investigation Management Binder dialog box appears.
2. Select the required investigation binder, then click Next.
The Investigation Binder opens in a new window and displays the investigation. Otherwise, the Selection Form dialog box appears if there are video windows present in the Review workspace.
3. Click Next.
4. Edit the investigation and add attachments as required.
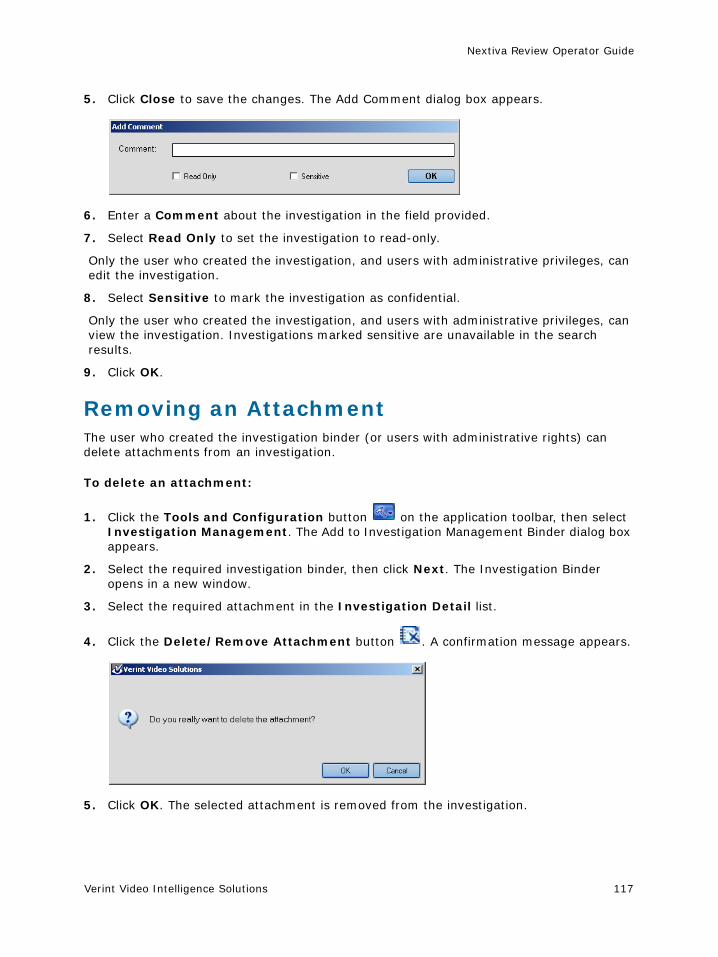
Nextiva Review Operator Guide
Verint Video Intelligence Solutions 117
5. Click Close to save the changes. The Add Comment dialog box appears.
6. Enter a Comment about the investigation in the field provided.
7. Select Read Only to set the investigation to read-only.
Only the user who created the investigation, and users with administrative privileges, can edit the investigation.
8. Select Sensitive to mark the investigation as confidential.
Only the user who created the investigation, and users with administrative privileges, can view the investigation. Investigations marked sensitive are unavailable in the search results.
9. Click OK.
Removing an AttachmentThe user who created the investigation binder (or users with administrative rights) can delete attachments from an investigation.
To delete an attachment:
1. Click the Tools and Configuration button on the application toolbar, then select Investigation Management. The Add to Investigation Management Binder dialog box appears.
2. Select the required investigation binder, then click Next. The Investigation Binder opens in a new window.
3. Select the required attachment in the Investigation Detail list.
4. Click the Delete/Remove Attachment button . A confirmation message appears.
5. Click OK. The selected attachment is removed from the investigation.
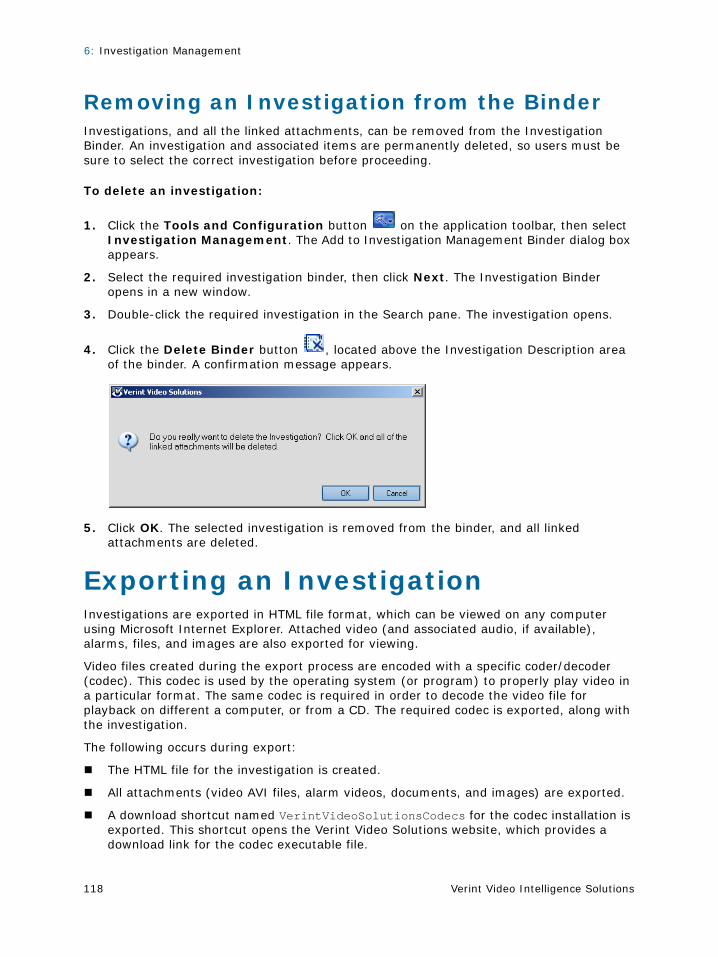
6: Investigation Management
Verint Video Intelligence Solutions118
Removing an Investigation from the BinderInvestigations, and all the linked attachments, can be removed from the Investigation Binder. An investigation and associated items are permanently deleted, so users must be sure to select the correct investigation before proceeding.
To delete an investigation:
1. Click the Tools and Configuration button on the application toolbar, then select Investigation Management. The Add to Investigation Management Binder dialog box appears.
2. Select the required investigation binder, then click Next. The Investigation Binder opens in a new window.
3. Double-click the required investigation in the Search pane. The investigation opens.
4. Click the Delete Binder button , located above the Investigation Description area of the binder. A confirmation message appears.
5. Click OK. The selected investigation is removed from the binder, and all linked attachments are deleted.
Exporting an InvestigationInvestigations are exported in HTML file format, which can be viewed on any computer using Microsoft Internet Explorer. Attached video (and associated audio, if available), alarms, files, and images are also exported for viewing.
Video files created during the export process are encoded with a specific coder/decoder (codec). This codec is used by the operating system (or program) to properly play video in a particular format. The same codec is required in order to decode the video file for playback on different a computer, or from a CD. The required codec is exported, along with the investigation.
The following occurs during export:
The HTML file for the investigation is created.
All attachments (video AVI files, alarm videos, documents, and images) are exported.
A download shortcut named VerintVideoSolutionsCodecs for the codec installation is exported. This shortcut opens the Verint Video Solutions website, which provides a download link for the codec executable file.
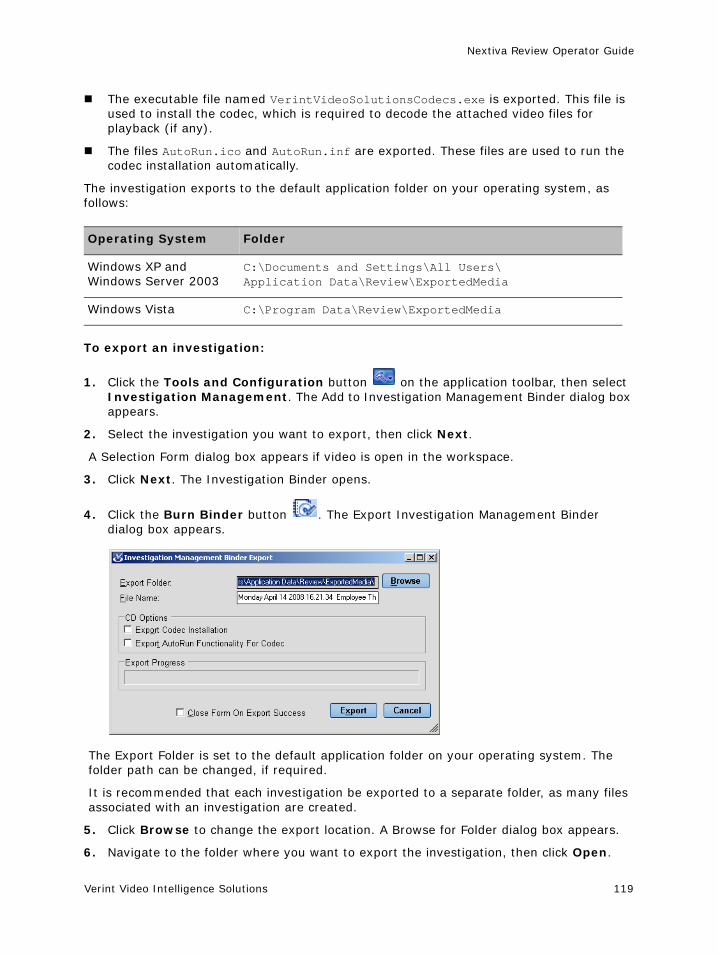
Nextiva Review Operator Guide
Verint Video Intelligence Solutions 119
The executable file named VerintVideoSolutionsCodecs.exe is exported. This file is used to install the codec, which is required to decode the attached video files for playback (if any).
The files AutoRun.ico and AutoRun.inf are exported. These files are used to run the codec installation automatically.
The investigation exports to the default application folder on your operating system, as follows:
To export an investigation:
1. Click the Tools and Configuration button on the application toolbar, then select Investigation Management. The Add to Investigation Management Binder dialog box appears.
2. Select the investigation you want to export, then click Next.
A Selection Form dialog box appears if video is open in the workspace.
3. Click Next. The Investigation Binder opens.
4. Click the Burn Binder button . The Export Investigation Management Binder dialog box appears.
The Export Folder is set to the default application folder on your operating system. The folder path can be changed, if required.
It is recommended that each investigation be exported to a separate folder, as many files associated with an investigation are created.
5. Click Browse to change the export location. A Browse for Folder dialog box appears.
6. Navigate to the folder where you want to export the investigation, then click Open.
Operating System Folder
Windows XP and Windows Server 2003
C:\Documents and Settings\All Users\Application Data\Review\ExportedMedia
Windows Vista C:\Program Data\Review\ExportedMedia
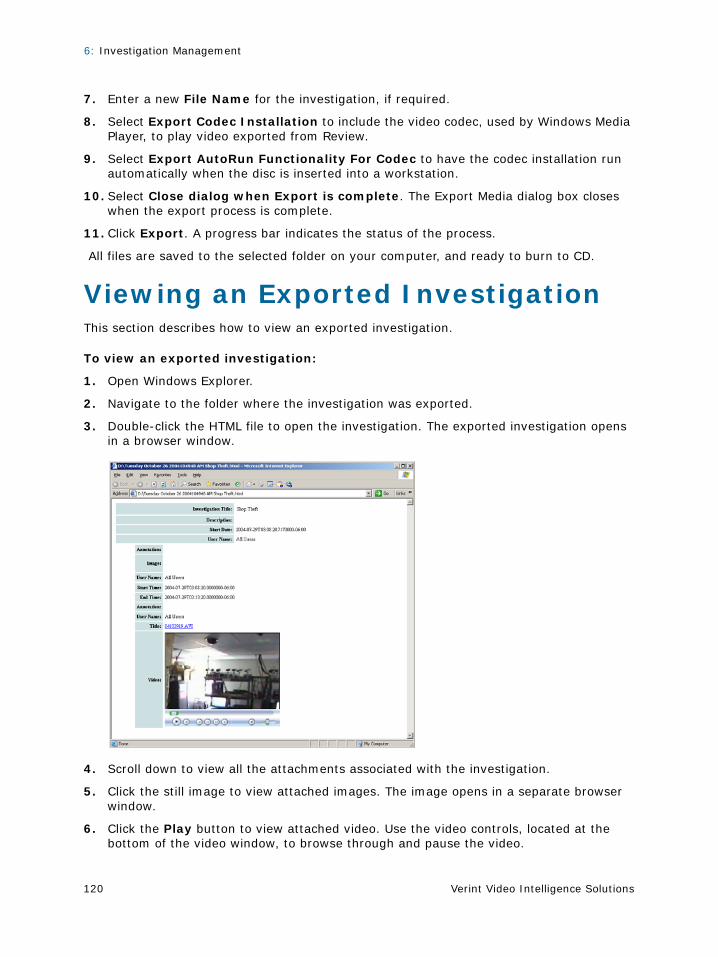
6: Investigation Management
Verint Video Intelligence Solutions120
7. Enter a new File Name for the investigation, if required.
8. Select Export Codec Installation to include the video codec, used by Windows Media Player, to play video exported from Review.
9. Select Export AutoRun Functionality For Codec to have the codec installation run automatically when the disc is inserted into a workstation.
10. Select Close dialog when Export is complete. The Export Media dialog box closes when the export process is complete.
11. Click Export. A progress bar indicates the status of the process.
All files are saved to the selected folder on your computer, and ready to burn to CD.
Viewing an Exported InvestigationThis section describes how to view an exported investigation.
To view an exported investigation:
1. Open Windows Explorer.
2. Navigate to the folder where the investigation was exported.
3. Double-click the HTML file to open the investigation. The exported investigation opens in a browser window.
4. Scroll down to view all the attachments associated with the investigation.
5. Click the still image to view attached images. The image opens in a separate browser window.
6. Click the Play button to view attached video. Use the video controls, located at the bottom of the video window, to browse through and pause the video.
Nextiva Review Operator Guide
Verint Video Intelligence Solutions 121
7. Double-click the required file to open it in the source application (for example, Microsoft Word for document files).

6: Investigation Management
Verint Video Intelligence Solutions122
Verint Video Intelligence Solutions 123
Chapter
PTZ KeyboardsOperators use pan/tilt/zoom (PTZ) keyboards to control PTZ cameras. PTZ camera controls include panning, tilting, and zooming the cameras; calling camera patterns and presets; starting camera tours, and acknowledging alarms. Various functions are performed by pressing certain key sequences on the PTZ keyboard and using the keyboard joystick. Commands processed by the keyboard are dependant upon the keyboard model.
The following table listed the PTZ keyboards supported by Nextiva:
This chapter contains the following procedures for using keyboards with Nextiva Review:
Operating the American Dynamics AD2078 and AD2088
Operating the Bosch LTC 5136
Operating the Honeywell KEGS-5300
Operating the Honeywell RD-530
Operating the Pelco KBD300A
Operating the Pelco 9760
Manufacturer Model
American Dynamics AD2078
AD2088
Bosch LTC-5136
Honeywell KEGS-5300
RD-530
Pelco KBD300A
9760 KBD

7: PTZ Keyboards
Verint Video Intelligence Solutions124
Operating the American Dynamics AD2078 and AD2088The American Dynamics AD2088 keyboard is displayed in the following figure:
The following table lists the American Dynamics AD2078 and AD2088 commands supported by Nextiva:
Command AD2078 AD2088
SWITCHING
Select Monitor 1. Turn the key switch to OFF.
2. Press the MONITOR key.
3. Enter the Monitor ID.
1. Enter the Monitor ID.
2. Press the MON key.
Select Camera 1. Turn the key switch to OFF.
2. Press the CAMERA key.
3. Enter the Camera ID Number.
1. Enter the Camera ID Number.
2. Press the CAM key.
Start Camera Tour 1. Turn the key switch to OFF.
2. Enter the Monitor ID.
3. Press the MONITOR key.
4. Enter the Tour ID.
5. Press the RUN key.
1. Enter the Monitor ID.
2. Press the MON key.
3. Enter the Tour Number.
4. Press the RUN key.
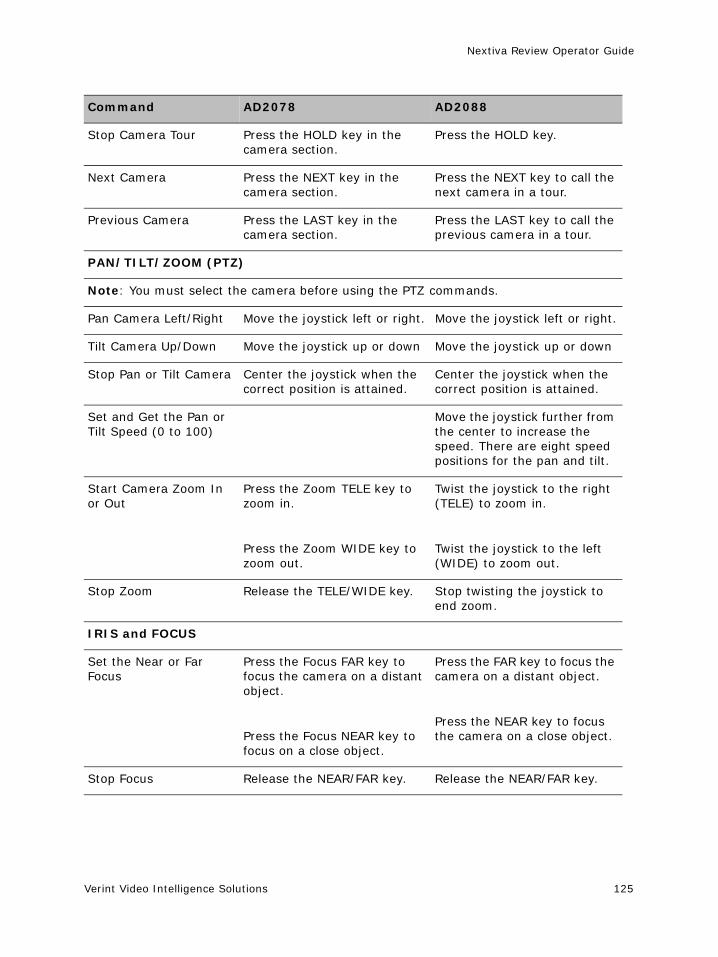
Nextiva Review Operator Guide
Verint Video Intelligence Solutions 125
Stop Camera Tour Press the HOLD key in the camera section.
Press the HOLD key.
Next Camera Press the NEXT key in the camera section.
Press the NEXT key to call the next camera in a tour.
Previous Camera Press the LAST key in the camera section.
Press the LAST key to call the previous camera in a tour.
PAN/TILT/ZOOM (PTZ)
Note: You must select the camera before using the PTZ commands.
Pan Camera Left/Right Move the joystick left or right. Move the joystick left or right.
Tilt Camera Up/Down Move the joystick up or down Move the joystick up or down
Stop Pan or Tilt Camera Center the joystick when the correct position is attained.
Center the joystick when the correct position is attained.
Set and Get the Pan or Tilt Speed (0 to 100)
Move the joystick further from the center to increase the speed. There are eight speed positions for the pan and tilt.
Start Camera Zoom In or Out
Press the Zoom TELE key to zoom in.
Press the Zoom WIDE key to zoom out.
Twist the joystick to the right (TELE) to zoom in.
Twist the joystick to the left (WIDE) to zoom out.
Stop Zoom Release the TELE/WIDE key. Stop twisting the joystick to end zoom.
IRIS and FOCUS
Set the Near or Far Focus
Press the Focus FAR key to focus the camera on a distant object.
Press the Focus NEAR key to focus on a close object.
Press the FAR key to focus the camera on a distant object.
Press the NEAR key to focus the camera on a close object.
Stop Focus Release the NEAR/FAR key. Release the NEAR/FAR key.
Command AD2078 AD2088
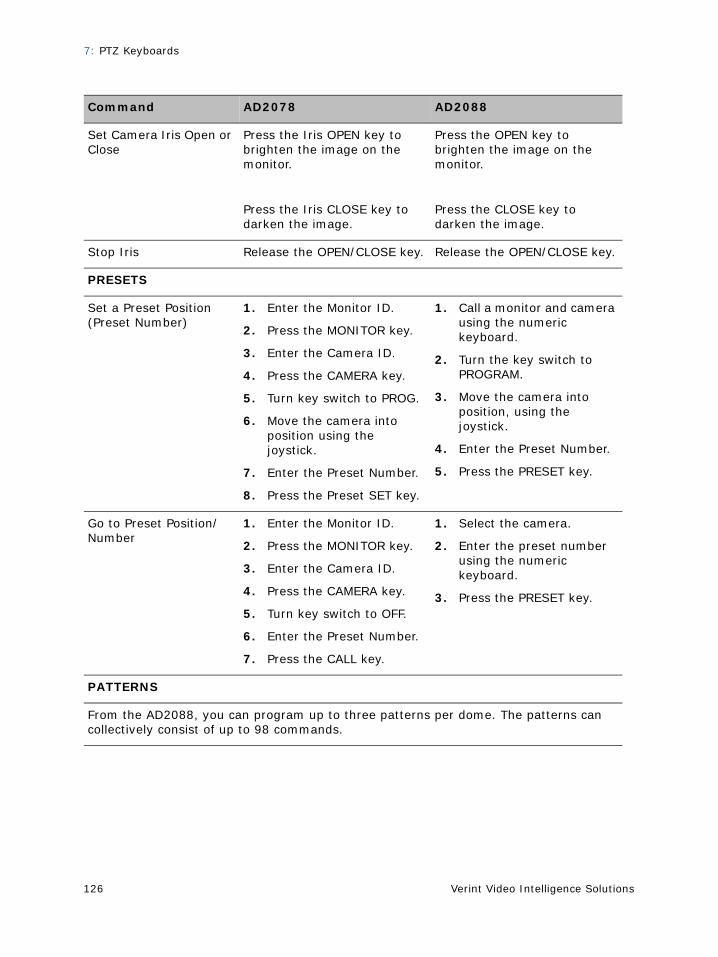
7: PTZ Keyboards
Verint Video Intelligence Solutions126
Set Camera Iris Open or Close
Press the Iris OPEN key to brighten the image on the monitor.
Press the Iris CLOSE key to darken the image.
Press the OPEN key to brighten the image on the monitor.
Press the CLOSE key to darken the image.
Stop Iris Release the OPEN/CLOSE key. Release the OPEN/CLOSE key.
PRESETS
Set a Preset Position (Preset Number)
1. Enter the Monitor ID.
2. Press the MONITOR key.
3. Enter the Camera ID.
4. Press the CAMERA key.
5. Turn key switch to PROG.
6. Move the camera into position using the joystick.
7. Enter the Preset Number.
8. Press the Preset SET key.
1. Call a monitor and camera using the numeric keyboard.
2. Turn the key switch to PROGRAM.
3. Move the camera into position, using the joystick.
4. Enter the Preset Number.
5. Press the PRESET key.
Go to Preset Position/Number
1. Enter the Monitor ID.
2. Press the MONITOR key.
3. Enter the Camera ID.
4. Press the CAMERA key.
5. Turn key switch to OFF.
6. Enter the Preset Number.
7. Press the CALL key.
1. Select the camera.
2. Enter the preset number using the numeric keyboard.
3. Press the PRESET key.
PATTERNS
From the AD2088, you can program up to three patterns per dome. The patterns can collectively consist of up to 98 commands.
Command AD2078 AD2088
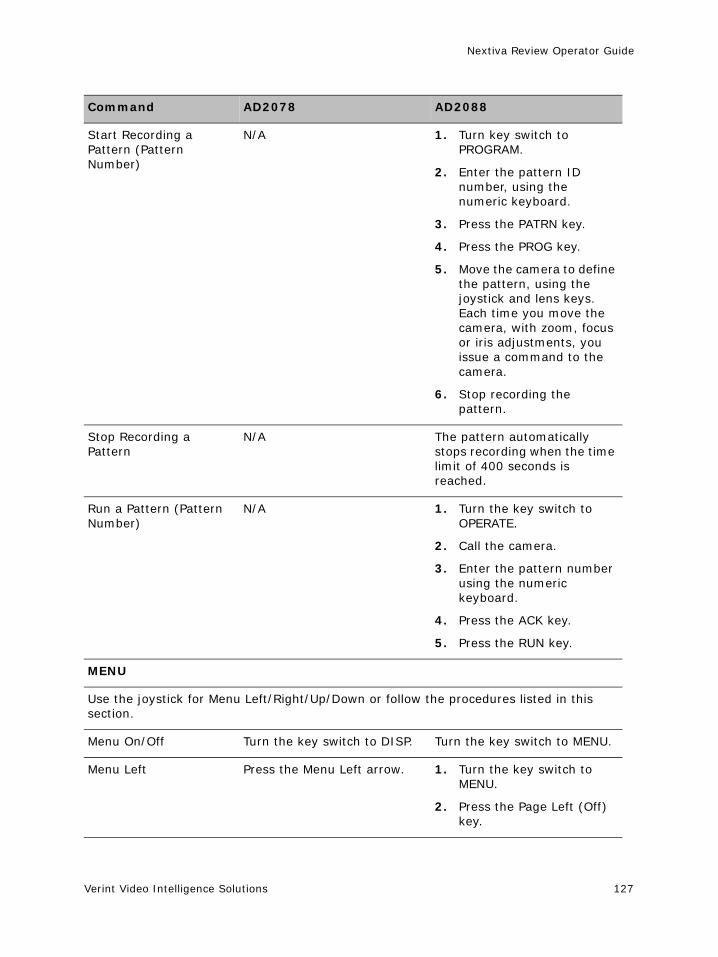
Nextiva Review Operator Guide
Verint Video Intelligence Solutions 127
Start Recording a Pattern (Pattern Number)
N/A 1. Turn key switch to PROGRAM.
2. Enter the pattern ID number, using the numeric keyboard.
3. Press the PATRN key.
4. Press the PROG key.
5. Move the camera to define the pattern, using the joystick and lens keys. Each time you move the camera, with zoom, focus or iris adjustments, you issue a command to the camera.
6. Stop recording the pattern.
Stop Recording a Pattern
N/A The pattern automatically stops recording when the time limit of 400 seconds is reached.
Run a Pattern (Pattern Number)
N/A 1. Turn the key switch to OPERATE.
2. Call the camera.
3. Enter the pattern number using the numeric keyboard.
4. Press the ACK key.
5. Press the RUN key.
MENU
Use the joystick for Menu Left/Right/Up/Down or follow the procedures listed in this section.
Menu On/Off Turn the key switch to DISP. Turn the key switch to MENU.
Menu Left Press the Menu Left arrow. 1. Turn the key switch to MENU.
2. Press the Page Left (Off) key.
Command AD2078 AD2088
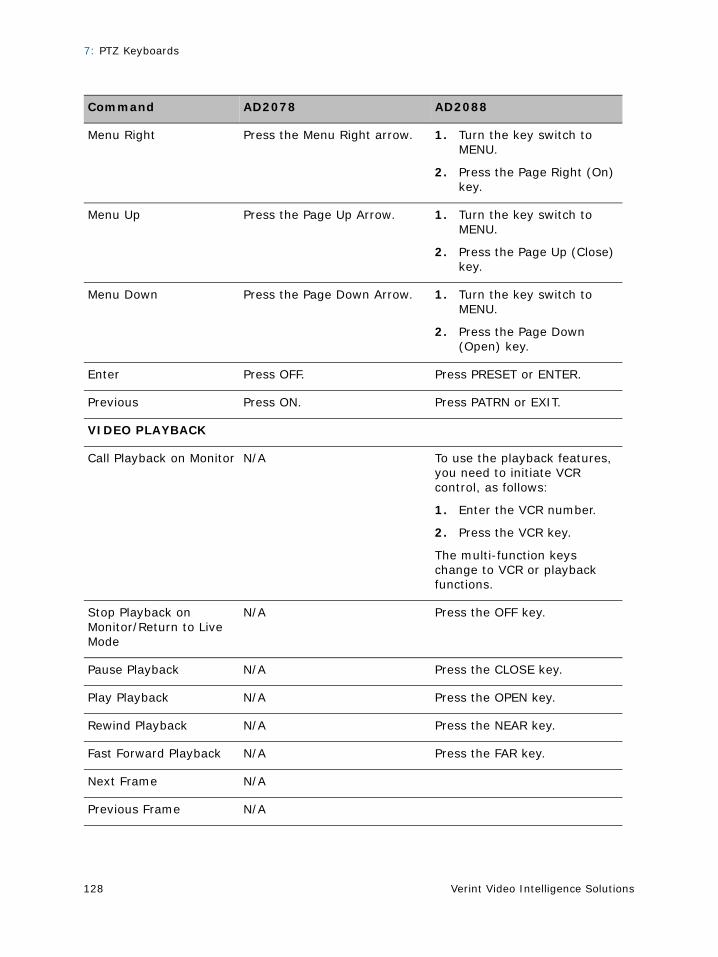
7: PTZ Keyboards
Verint Video Intelligence Solutions128
Menu Right Press the Menu Right arrow. 1. Turn the key switch to MENU.
2. Press the Page Right (On) key.
Menu Up Press the Page Up Arrow. 1. Turn the key switch to MENU.
2. Press the Page Up (Close) key.
Menu Down Press the Page Down Arrow. 1. Turn the key switch to MENU.
2. Press the Page Down (Open) key.
Enter Press OFF. Press PRESET or ENTER.
Previous Press ON. Press PATRN or EXIT.
VIDEO PLAYBACK
Call Playback on Monitor N/A To use the playback features, you need to initiate VCR control, as follows:
1. Enter the VCR number.
2. Press the VCR key.
The multi-function keys change to VCR or playback functions.
Stop Playback on Monitor/Return to Live Mode
N/A Press the OFF key.
Pause Playback N/A Press the CLOSE key.
Play Playback N/A Press the OPEN key.
Rewind Playback N/A Press the NEAR key.
Fast Forward Playback N/A Press the FAR key.
Next Frame N/A
Previous Frame N/A
Command AD2078 AD2088
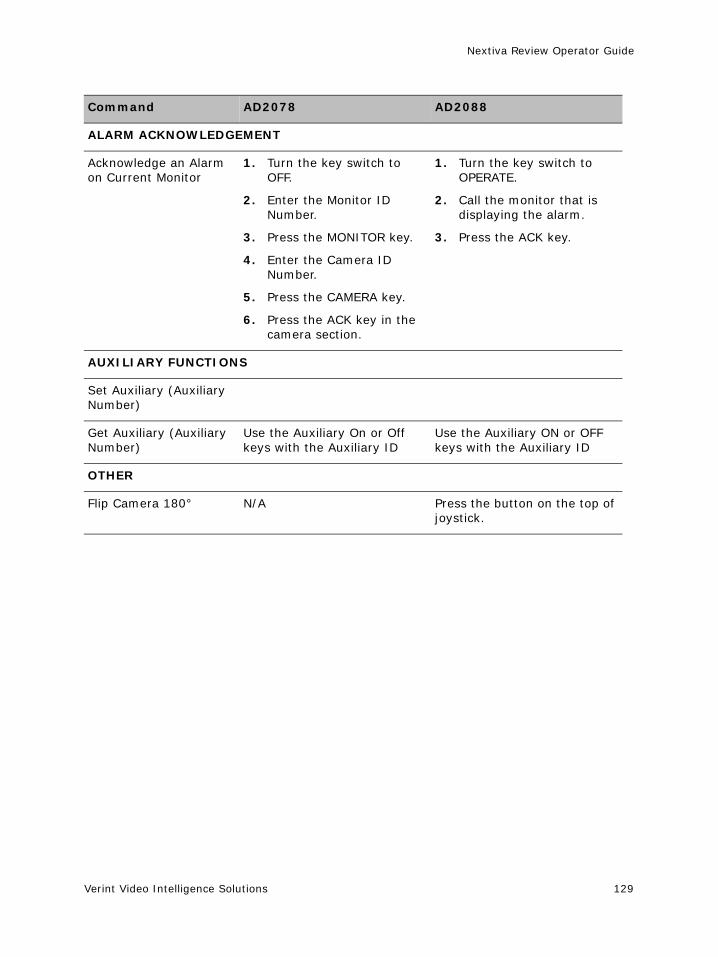
Nextiva Review Operator Guide
Verint Video Intelligence Solutions 129
ALARM ACKNOWLEDGEMENT
Acknowledge an Alarm on Current Monitor
1. Turn the key switch to OFF.
2. Enter the Monitor ID Number.
3. Press the MONITOR key.
4. Enter the Camera ID Number.
5. Press the CAMERA key.
6. Press the ACK key in the camera section.
1. Turn the key switch to OPERATE.
2. Call the monitor that is displaying the alarm.
3. Press the ACK key.
AUXILIARY FUNCTIONS
Set Auxiliary (Auxiliary Number)
Get Auxiliary (Auxiliary Number)
Use the Auxiliary On or Off keys with the Auxiliary ID
Use the Auxiliary ON or OFF keys with the Auxiliary ID
OTHER
Flip Camera 180° N/A Press the button on the top of joystick.
Command AD2078 AD2088
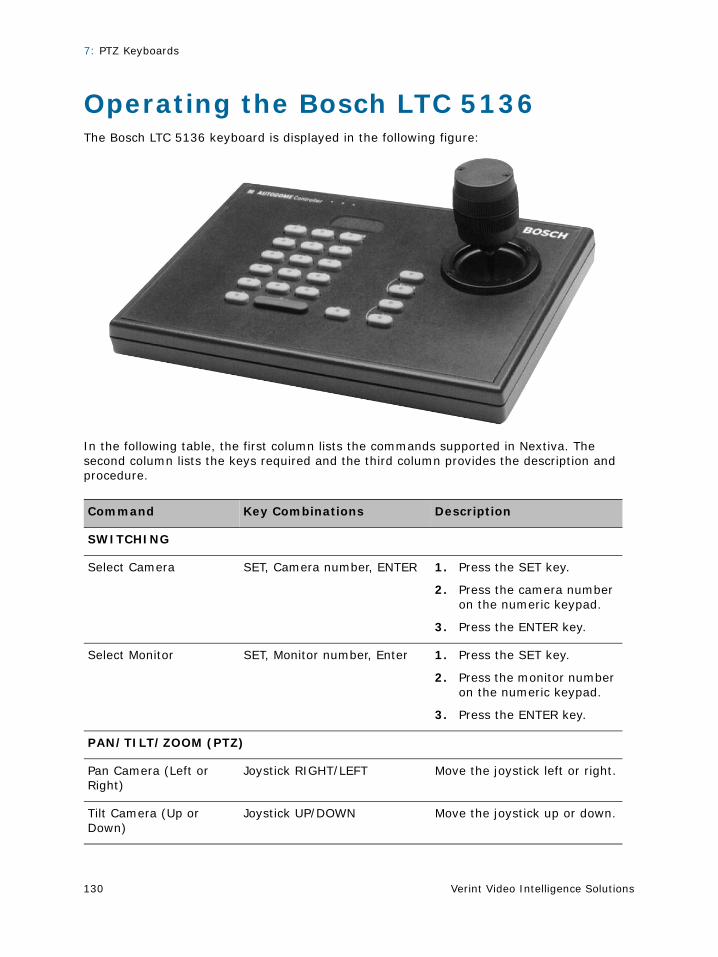
7: PTZ Keyboards
Verint Video Intelligence Solutions130
Operating the Bosch LTC 5136The Bosch LTC 5136 keyboard is displayed in the following figure:
In the following table, the first column lists the commands supported in Nextiva. The second column lists the keys required and the third column provides the description and procedure.
Command Key Combinations Description
SWITCHING
Select Camera SET, Camera number, ENTER 1. Press the SET key.
2. Press the camera number on the numeric keypad.
3. Press the ENTER key.
Select Monitor SET, Monitor number, Enter 1. Press the SET key.
2. Press the monitor number on the numeric keypad.
3. Press the ENTER key.
PAN/TILT/ZOOM (PTZ)
Pan Camera (Left or Right)
Joystick RIGHT/LEFT Move the joystick left or right.
Tilt Camera (Up or Down)
Joystick UP/DOWN Move the joystick up or down.
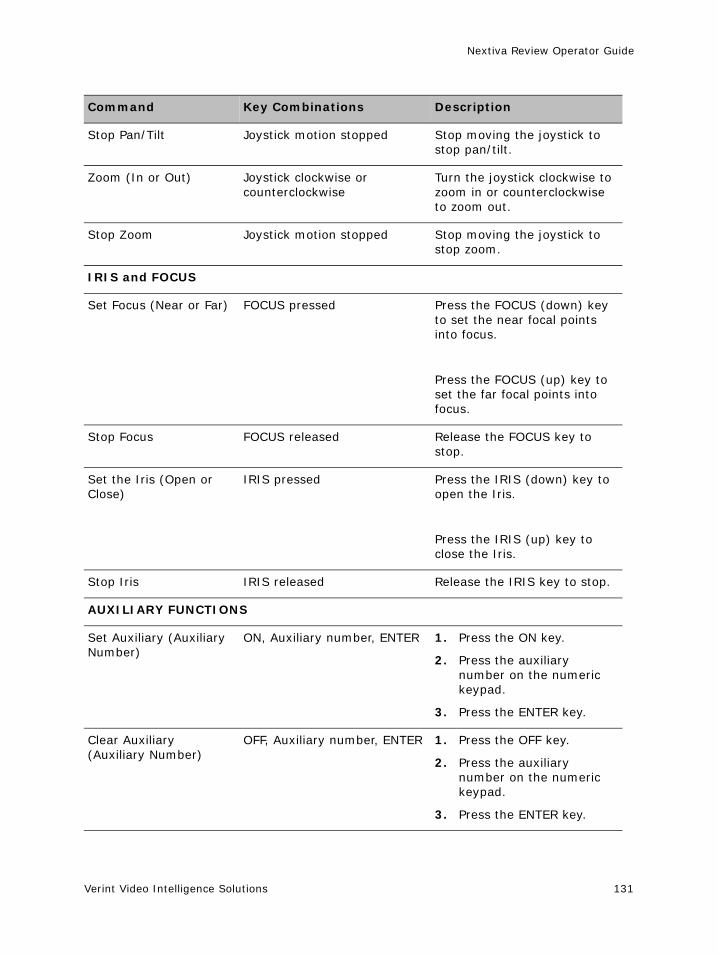
Nextiva Review Operator Guide
Verint Video Intelligence Solutions 131
Stop Pan/Tilt Joystick motion stopped Stop moving the joystick to stop pan/tilt.
Zoom (In or Out) Joystick clockwise or counterclockwise
Turn the joystick clockwise to zoom in or counterclockwise to zoom out.
Stop Zoom Joystick motion stopped Stop moving the joystick to stop zoom.
IRIS and FOCUS
Set Focus (Near or Far) FOCUS pressed Press the FOCUS (down) key to set the near focal points into focus.
Press the FOCUS (up) key to set the far focal points into focus.
Stop Focus FOCUS released Release the FOCUS key to stop.
Set the Iris (Open or Close)
IRIS pressed Press the IRIS (down) key to open the Iris.
Press the IRIS (up) key to close the Iris.
Stop Iris IRIS released Release the IRIS key to stop.
AUXILIARY FUNCTIONS
Set Auxiliary (Auxiliary Number)
ON, Auxiliary number, ENTER 1. Press the ON key.
2. Press the auxiliary number on the numeric keypad.
3. Press the ENTER key.
Clear Auxiliary (Auxiliary Number)
OFF, Auxiliary number, ENTER 1. Press the OFF key.
2. Press the auxiliary number on the numeric keypad.
3. Press the ENTER key.
Command Key Combinations Description
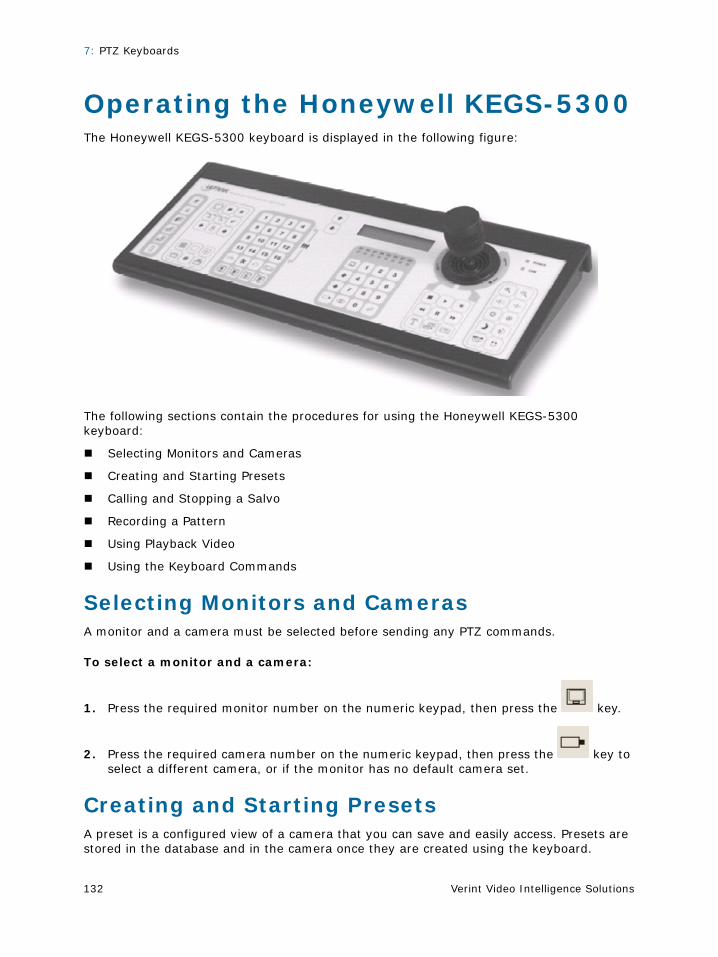
7: PTZ Keyboards
Verint Video Intelligence Solutions132
Operating the Honeywell KEGS-5300The Honeywell KEGS-5300 keyboard is displayed in the following figure:
The following sections contain the procedures for using the Honeywell KEGS-5300 keyboard:
Selecting Monitors and Cameras
Creating and Starting Presets
Calling and Stopping a Salvo
Recording a Pattern
Using Playback Video
Using the Keyboard Commands
Selecting Monitors and CamerasA monitor and a camera must be selected before sending any PTZ commands.
To select a monitor and a camera:
1. Press the required monitor number on the numeric keypad, then press the key.
2. Press the required camera number on the numeric keypad, then press the key to select a different camera, or if the monitor has no default camera set.
Creating and Starting PresetsA preset is a configured view of a camera that you can save and easily access. Presets are stored in the database and in the camera once they are created using the keyboard.
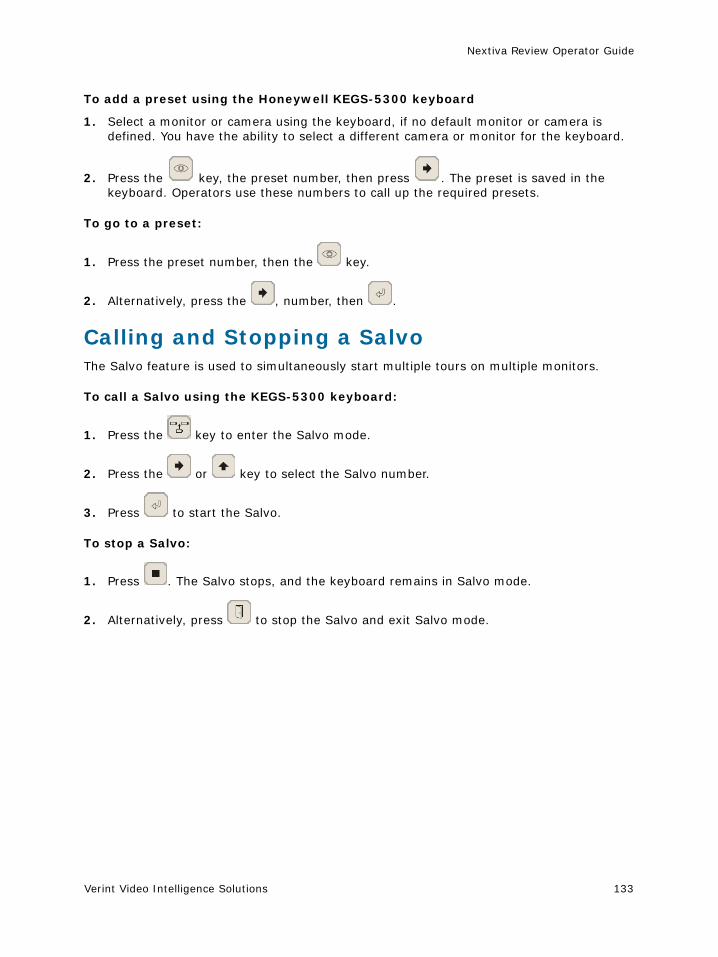
Nextiva Review Operator Guide
Verint Video Intelligence Solutions 133
To add a preset using the Honeywell KEGS-5300 keyboard
1. Select a monitor or camera using the keyboard, if no default monitor or camera is defined. You have the ability to select a different camera or monitor for the keyboard.
2. Press the key, the preset number, then press . The preset is saved in the keyboard. Operators use these numbers to call up the required presets.
To go to a preset:
1. Press the preset number, then the key.
2. Alternatively, press the , number, then .
Calling and Stopping a SalvoThe Salvo feature is used to simultaneously start multiple tours on multiple monitors.
To call a Salvo using the KEGS-5300 keyboard:
1. Press the key to enter the Salvo mode.
2. Press the or key to select the Salvo number.
3. Press to start the Salvo.
To stop a Salvo:
1. Press . The Salvo stops, and the keyboard remains in Salvo mode.
2. Alternatively, press to stop the Salvo and exit Salvo mode.
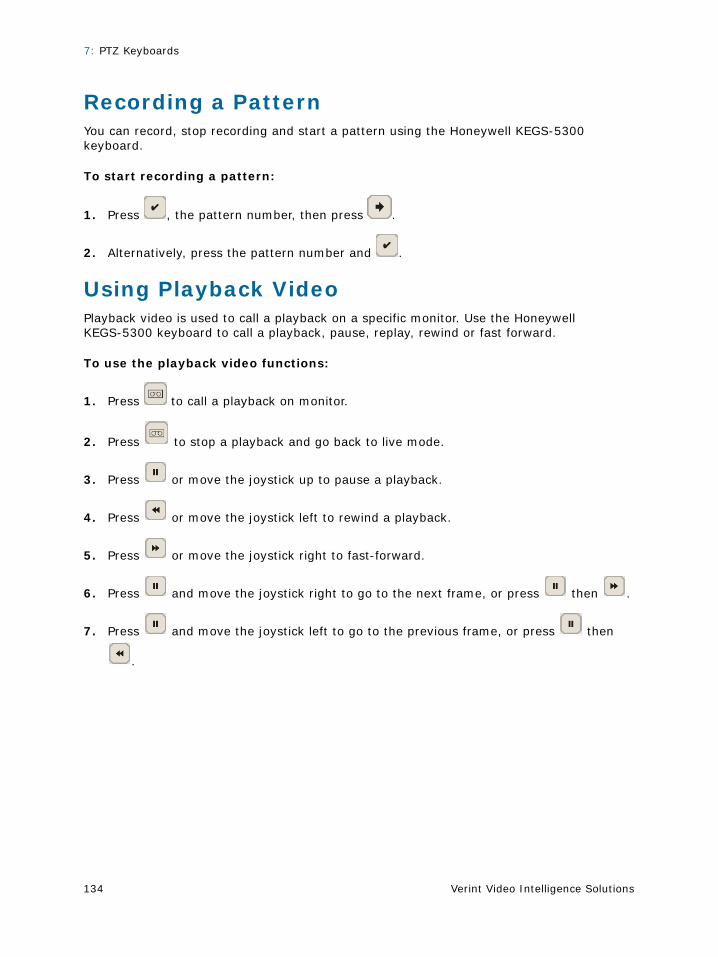
7: PTZ Keyboards
Verint Video Intelligence Solutions134
Recording a PatternYou can record, stop recording and start a pattern using the Honeywell KEGS-5300 keyboard.
To start recording a pattern:
1. Press , the pattern number, then press .
2. Alternatively, press the pattern number and .
Using Playback VideoPlayback video is used to call a playback on a specific monitor. Use the Honeywell KEGS-5300 keyboard to call a playback, pause, replay, rewind or fast forward.
To use the playback video functions:
1. Press to call a playback on monitor.
2. Press to stop a playback and go back to live mode.
3. Press or move the joystick up to pause a playback.
4. Press or move the joystick left to rewind a playback.
5. Press or move the joystick right to fast-forward.
6. Press and move the joystick right to go to the next frame, or press then .
7. Press and move the joystick left to go to the previous frame, or press then
.
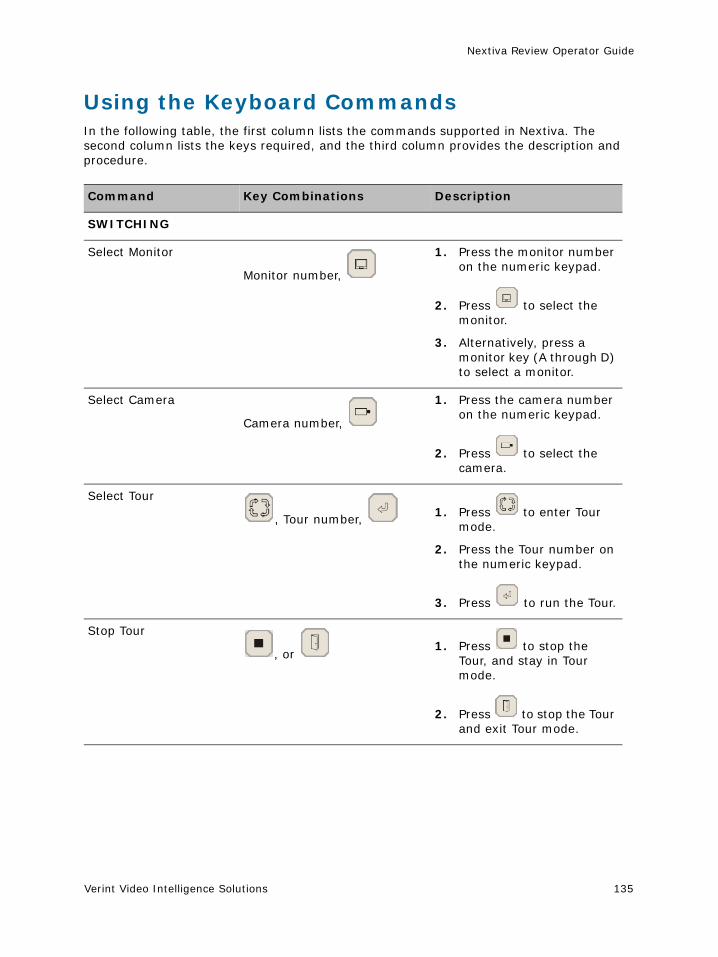
Nextiva Review Operator Guide
Verint Video Intelligence Solutions 135
Using the Keyboard CommandsIn the following table, the first column lists the commands supported in Nextiva. The second column lists the keys required, and the third column provides the description and procedure.
Command Key Combinations Description
SWITCHING
Select Monitor
Monitor number,
1. Press the monitor number on the numeric keypad.
2. Press to select the monitor.
3. Alternatively, press a monitor key (A through D) to select a monitor.
Select Camera
Camera number,
1. Press the camera number on the numeric keypad.
2. Press to select the camera.
Select Tour
, Tour number, 1. Press to enter Tour mode.
2. Press the Tour number on the numeric keypad.
3. Press to run the Tour.
Stop Tour
, or 1. Press to stop the
Tour, and stay in Tour mode.
2. Press to stop the Tour and exit Tour mode.
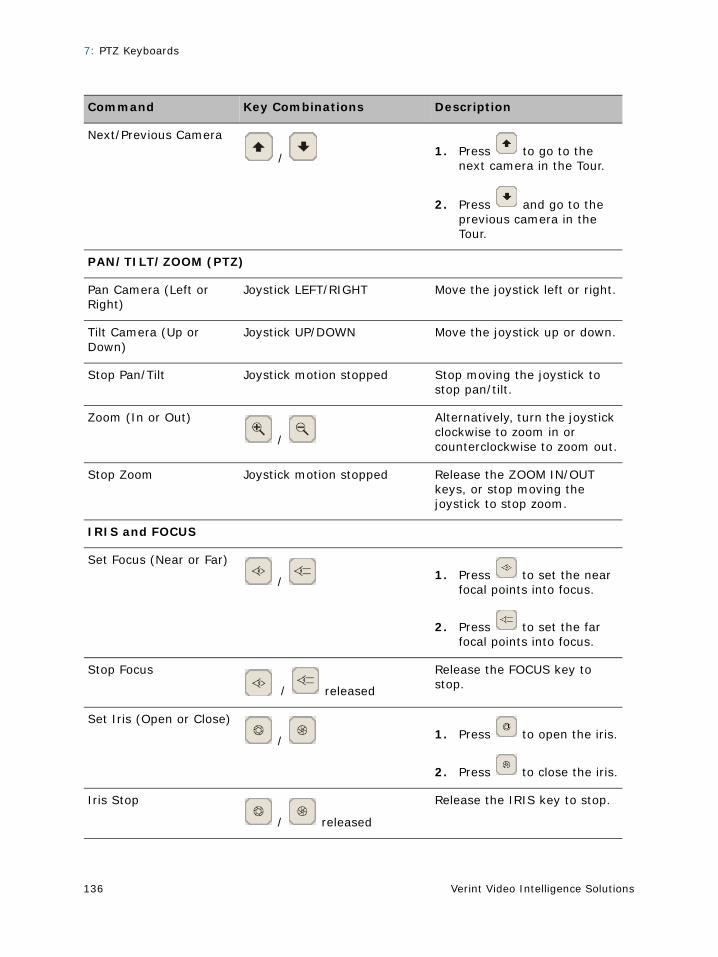
7: PTZ Keyboards
Verint Video Intelligence Solutions136
Next/Previous Camera
/ 1. Press to go to the next camera in the Tour.
2. Press and go to the previous camera in the Tour.
PAN/TILT/ZOOM (PTZ)
Pan Camera (Left or Right)
Joystick LEFT/RIGHT Move the joystick left or right.
Tilt Camera (Up or Down)
Joystick UP/DOWN Move the joystick up or down.
Stop Pan/Tilt Joystick motion stopped Stop moving the joystick to stop pan/tilt.
Zoom (In or Out)
/
Alternatively, turn the joystick clockwise to zoom in or counterclockwise to zoom out.
Stop Zoom Joystick motion stopped Release the ZOOM IN/OUT keys, or stop moving the joystick to stop zoom.
IRIS and FOCUS
Set Focus (Near or Far)
/ 1. Press to set the near focal points into focus.
2. Press to set the far focal points into focus.
Stop Focus
/ released
Release the FOCUS key to stop.
Set Iris (Open or Close)
/ 1. Press to open the iris.
2. Press to close the iris.
Iris Stop
/ released
Release the IRIS key to stop.
Command Key Combinations Description
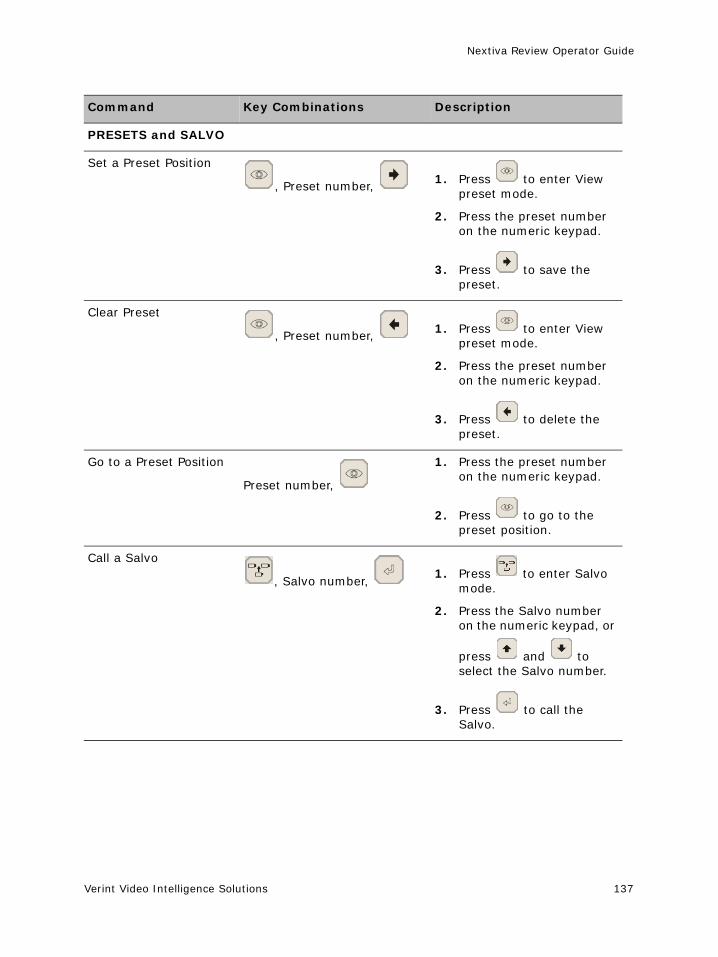
Nextiva Review Operator Guide
Verint Video Intelligence Solutions 137
PRESETS and SALVO
Set a Preset Position
, Preset number, 1. Press to enter View preset mode.
2. Press the preset number on the numeric keypad.
3. Press to save the preset.
Clear Preset
, Preset number, 1. Press to enter View preset mode.
2. Press the preset number on the numeric keypad.
3. Press to delete the preset.
Go to a Preset Position
Preset number,
1. Press the preset number on the numeric keypad.
2. Press to go to the preset position.
Call a Salvo
, Salvo number, 1. Press to enter Salvo
mode.
2. Press the Salvo number on the numeric keypad, or
press and to select the Salvo number.
3. Press to call the Salvo.
Command Key Combinations Description
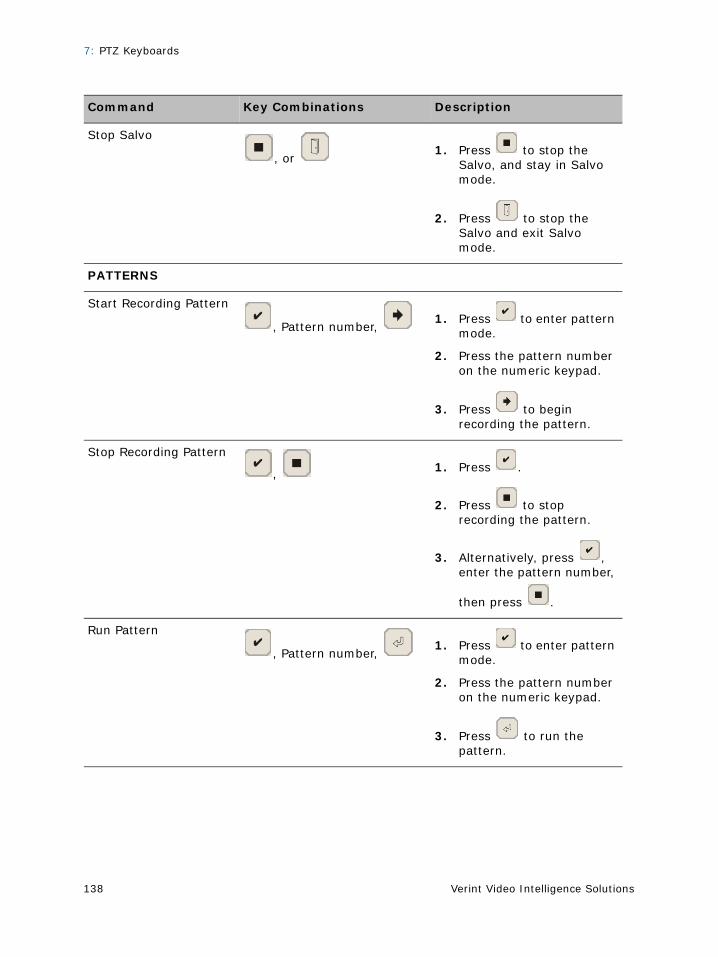
7: PTZ Keyboards
Verint Video Intelligence Solutions138
Stop Salvo
, or 1. Press to stop the
Salvo, and stay in Salvo mode.
2. Press to stop the Salvo and exit Salvo mode.
PATTERNS
Start Recording Pattern
, Pattern number, 1. Press to enter pattern
mode.
2. Press the pattern number on the numeric keypad.
3. Press to begin recording the pattern.
Stop Recording Pattern
, 1. Press .
2. Press to stop recording the pattern.
3. Alternatively, press , enter the pattern number,
then press .
Run Pattern
, Pattern number, 1. Press to enter pattern
mode.
2. Press the pattern number on the numeric keypad.
3. Press to run the pattern.
Command Key Combinations Description
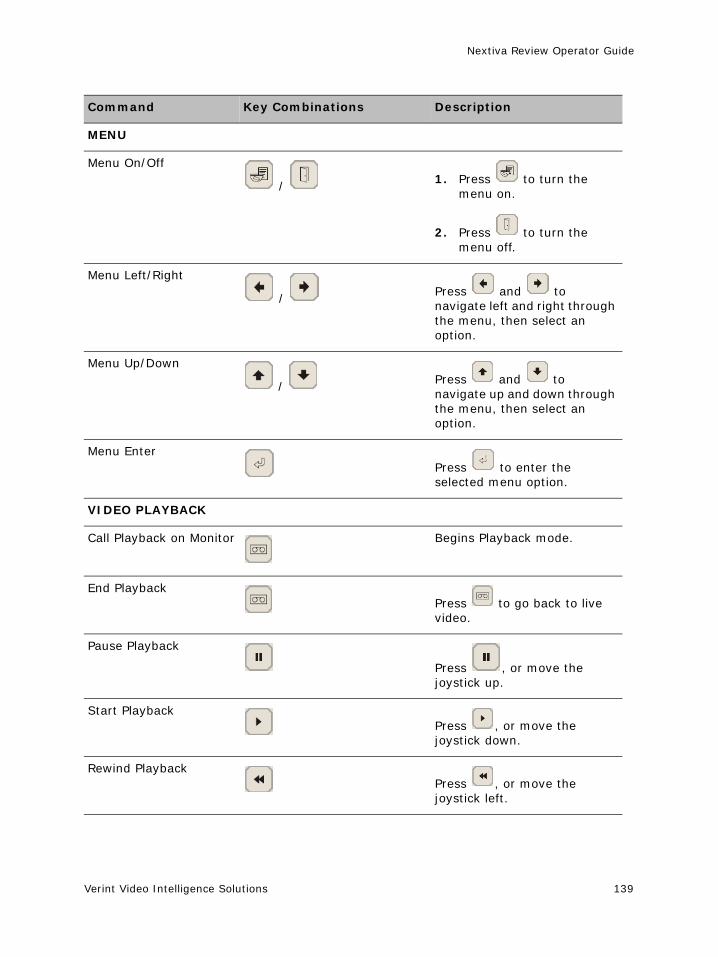
Nextiva Review Operator Guide
Verint Video Intelligence Solutions 139
MENU
Menu On/Off
/ 1. Press to turn the menu on.
2. Press to turn the menu off.
Menu Left/Right
/ Press and to navigate left and right through the menu, then select an option.
Menu Up/Down
/ Press and to navigate up and down through the menu, then select an option.
Menu EnterPress to enter the selected menu option.
VIDEO PLAYBACK
Call Playback on Monitor Begins Playback mode.
End PlaybackPress to go back to live video.
Pause Playback
Press , or move the joystick up.
Start PlaybackPress , or move the joystick down.
Rewind PlaybackPress , or move the joystick left.
Command Key Combinations Description
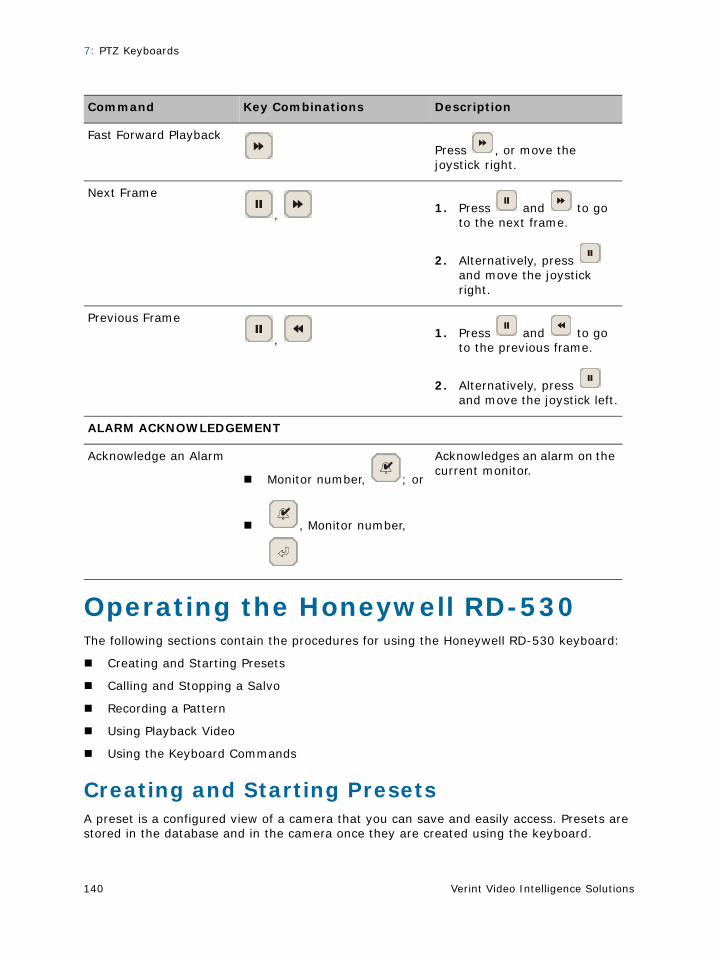
7: PTZ Keyboards
Verint Video Intelligence Solutions140
Operating the Honeywell RD-530The following sections contain the procedures for using the Honeywell RD-530 keyboard:
Creating and Starting Presets
Calling and Stopping a Salvo
Recording a Pattern
Using Playback Video
Using the Keyboard Commands
Creating and Starting PresetsA preset is a configured view of a camera that you can save and easily access. Presets are stored in the database and in the camera once they are created using the keyboard.
Fast Forward PlaybackPress , or move the joystick right.
Next Frame
, 1. Press and to go to the next frame.
2. Alternatively, press and move the joystick right.
Previous Frame
, 1. Press and to go to the previous frame.
2. Alternatively, press and move the joystick left.
ALARM ACKNOWLEDGEMENT
Acknowledge an Alarm
Monitor number, ; or
, Monitor number,
Acknowledges an alarm on the current monitor.
Command Key Combinations Description
Nextiva Review Operator Guide
Verint Video Intelligence Solutions 141
To add a preset using the Honeywell RD-530 keyboard:
1. Select a monitor or camera using the keyboard, if no default monitor or camera is defined. You have the ability to select a different camera or monitor for the keyboard.
2. Press a number on the numeric keypad, then press and hold the SET key for two seconds. The preset is saved in the keyboard. Operators use these numbers to call up the required presets.
To go to a preset:
1. Press the preset number on the numeric keypad, then press the VIEW key. The camera moves to the stated position.
2. Alternatively, press the VIEW key, the preset number, then ENT.
Calling and Stopping a SalvoThe Salvo feature is used to simultaneously start multiple tours on multiple monitors.
To call a Salvo using the Honeywell RD-530 keyboard:
1. Press the INS key to start Salvo mode.
2. Press the UP and DOWN arrows to select the required Salvo number.
3. Press ENT to start the Salvo.
4. Alternatively, press INS Salvo number, ENT Salvo number, then the press the NEXT key.
To stop a Salvo:
1. Press the HALT key. This stops a specific Salvo, and the keyboard remains in Salvo mode.
2. Press the ALT key to exit Salvo mode.
Recording a PatternYou can record, stop recording and start a pattern using the Honeywell RD-530 keyboard.
To start recording a pattern:
1. Press the SET key.
2. Press the pattern number on the numeric keypad.
3. Press the RIGHT arrow key.
To stop recording the pattern:
1. Press the SET key, then press the HALT key.
2. Alternatively, press SET, press the pattern number on the numeric keypad, then press HALT.
7: PTZ Keyboards
Verint Video Intelligence Solutions142
Using Playback VideoPlayback video is used to call a playback on a specific monitor. Use the Honeywell RD-530 keyboard to call a playback, pause, replay, rewind or fast forward.
To use the playback video functions:
1. Press VCR to call a playback on monitor.
2. Press LIVE to stop a playback (back to live mode).
3. Press PAUSE or move the joystick up to pause a playback.
4. Press REW or move the joystick left to rewind a playback.
5. Press FWD or move the joystick right to fast-forward.
6. Press PAUSE and move the joystick right to go to the next frame, or press PAUSE then FWD.
7. Press PAUSE and move the joystick left to go to the previous frame, or press PAUSE then REW.
Nextiva Review Operator Guide
Verint Video Intelligence Solutions 143
Using the Keyboard CommandsIn the following table, the first column lists the commands supported in Nextiva. The second column lists the keys required, and the third column provides the description and procedure.
Items in CAPS indicate a key on the Honeywell RD-530 keyboard. The number is either an IntelliStream ID or an auxiliary input number.
Command Key Combinations Description
SWITCHING
Select Monitor Monitor number, MON; or
MON number, ENT
1. Press the monitor number on the numeric keypad.
2. Press the MON key.
Select Camera Camera number, CAM; or
Camera number, ENT
1. Press the camera number on the numeric keypad.
2. Press the CAM key.
Select Tour SCAN, Tour number, ENT; or
SEQ, Tour number, ENT
Alternatively, you can:
1. Press SCAN or SEQ to enter Tour mode.
2. Press UP / DOWN to select the tour number.
3. Press ENT to start the tour.
Stop Tour HALT to stop the tour and stay in Tour mode; or
ALT to exit Tour mode
Next/Previous Camera UP/DOWN arrows Use sequence keys.
PAN/TILT/ZOOM (PTZ)
Pan/Tilt/Zoom Joystick 1. Move the joystick clockwise to zoom in.
2. Move the joystick counterclockwise to zoom out.
Zoom In/Out Zoom IN/OUT keys 1. Press the IN key to zoom in.
2. Press the OUT key to zoom out.
7: PTZ Keyboards
Verint Video Intelligence Solutions144
IRIS and FOCUS
Iris and Focus NEAR/FAR keys The NEAR and FAR keys are used to set, start, and stop the iris and focus on cameras.
Release the OPEN/CLOSE keys to stop the iris.
Stop Focus NEAR/FAR keys released
Set the Iris on the camera
OPEN/CLOSE keys
Stop Iris OPEN/CLOSE keys released
PRESETS and SALVO
Set a Preset Position VIEW, Preset number, RIGHT arrow
Press VIEW, preset number to create and start a preset.
Clear preset n VIEW, Preset number, LEFT arrow
Go to a Preset Position Preset number, VIEW; or
VIEW, Preset number, ENT
Call a Salvo INS, Salvo number, ENT Alternatively, you can:
1. Press INS to start Salvo mode.
2. Press the UP and DOWN arrows to select a Salvo number.
3. Press ENT to start the Salvo.
Stop a Salvo HALT to stop the Salvo
ALT to exit Salvo mode
Press HALT to stop but stay in Salvo mode.
PATTERNS
Start Recording Pattern SET, Pattern number, RIGHT arrow
Press SET, Pattern number, and HALT to stop recording.
Stop Recording Pattern n
SET, HALT
Run Pattern n SET, Pattern number, RIGHT arrow
Clear Pattern n SET, Pattern number, LEFT arrow
Command Key Combinations Description
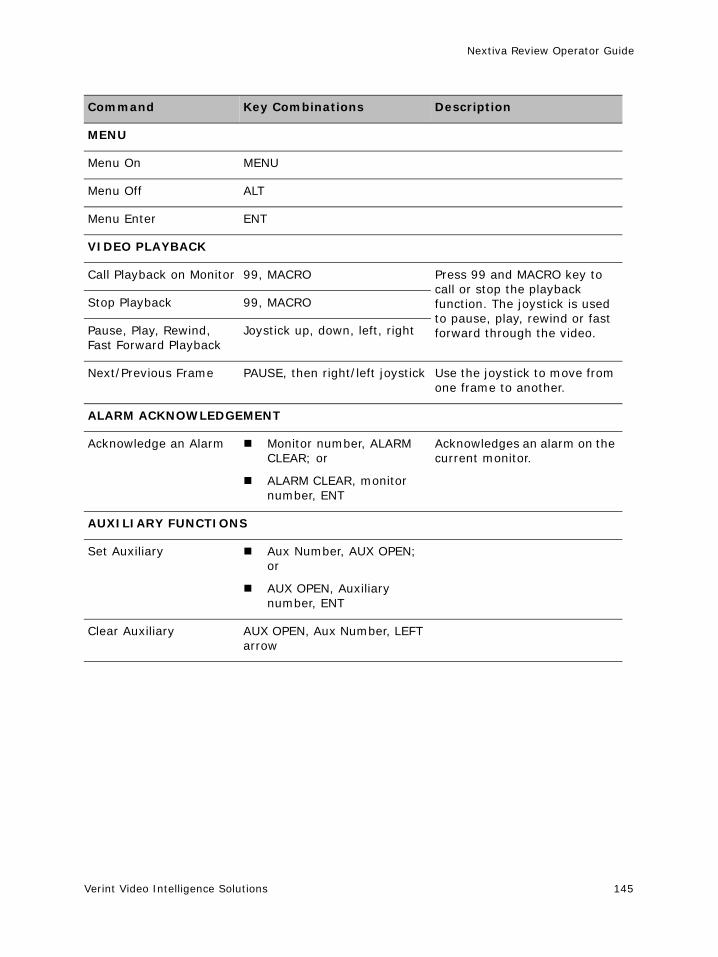
Nextiva Review Operator Guide
Verint Video Intelligence Solutions 145
MENU
Menu On MENU
Menu Off ALT
Menu Enter ENT
VIDEO PLAYBACK
Call Playback on Monitor 99, MACRO Press 99 and MACRO key to call or stop the playback function. The joystick is used to pause, play, rewind or fast forward through the video.
Stop Playback 99, MACRO
Pause, Play, Rewind, Fast Forward Playback
Joystick up, down, left, right
Next/Previous Frame PAUSE, then right/left joystick Use the joystick to move from one frame to another.
ALARM ACKNOWLEDGEMENT
Acknowledge an Alarm Monitor number, ALARM CLEAR; or
ALARM CLEAR, monitor number, ENT
Acknowledges an alarm on the current monitor.
AUXILIARY FUNCTIONS
Set Auxiliary Aux Number, AUX OPEN; or
AUX OPEN, Auxiliary number, ENT
Clear Auxiliary AUX OPEN, Aux Number, LEFT arrow
Command Key Combinations Description
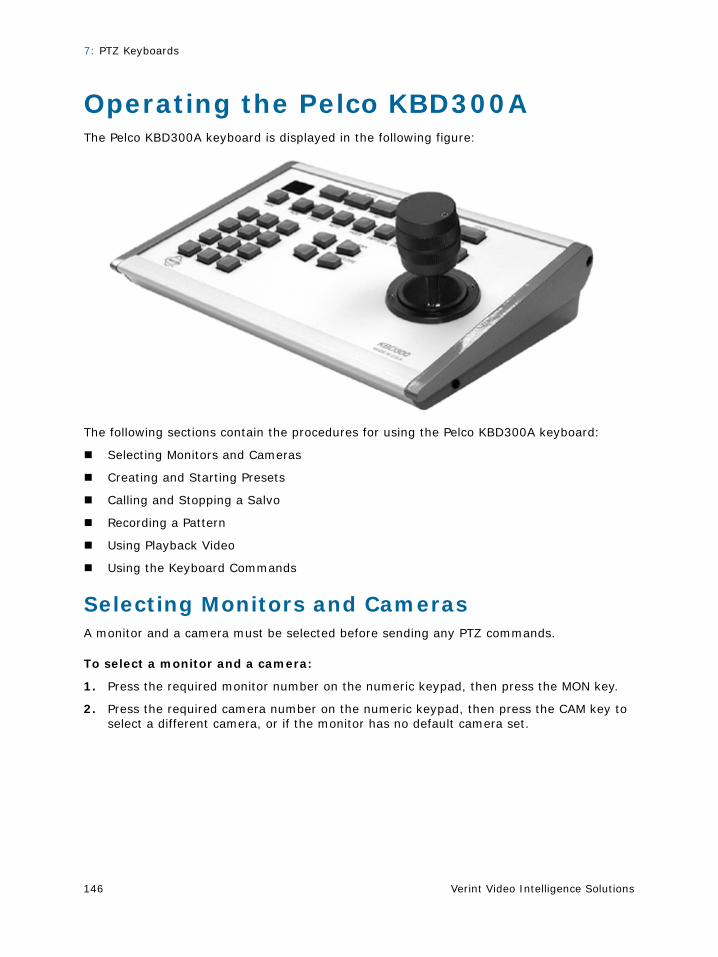
7: PTZ Keyboards
Verint Video Intelligence Solutions146
Operating the Pelco KBD300AThe Pelco KBD300A keyboard is displayed in the following figure:
The following sections contain the procedures for using the Pelco KBD300A keyboard:
Selecting Monitors and Cameras
Creating and Starting Presets
Calling and Stopping a Salvo
Recording a Pattern
Using Playback Video
Using the Keyboard Commands
Selecting Monitors and CamerasA monitor and a camera must be selected before sending any PTZ commands.
To select a monitor and a camera:
1. Press the required monitor number on the numeric keypad, then press the MON key.
2. Press the required camera number on the numeric keypad, then press the CAM key to select a different camera, or if the monitor has no default camera set.
Nextiva Review Operator Guide
Verint Video Intelligence Solutions 147
Creating and Starting PresetsA preset is a configured view of a camera that you can save and easily access. Presets are stored in the database and in the camera once they are created using the keyboard.
To add a preset using a Pelco ASCII keyboard:
1. Press a number on the numeric keypad.
2. Press and hold the PRESET key for two seconds. The preset is saved in the keyboard. Operators use these numbers to call up the required presets.
To go to a preset:
1. Press the preset number on the numeric keypad.
2. Press the PRESET key. The camera moves to the stated position.
Calling and Stopping a SalvoThe Salvo feature is used to simultaneously start multiple tours on multiple monitors.
To call/stop a Salvo using a Pelco ASCII keyboard:
1. Press a number on the numeric keypad, then press the NEXT key.
2. Press the MON key, the Salvo number, then the MON key again to stop a Salvo.
Recording a PatternUse the Pelco ASCII keyboard to record, stop recording, and start a pattern.
To record and run a pattern:
1. Press a pattern number.
2. Press and hold the PATTERN key for two seconds.
3. Press the ACK key to stop recording.
4. Press the pattern number, then press the PATTERN key for two seconds.
Using Playback VideoPlayback video is used to call a playback on a specific monitor. Use the Pelco ASCII keyboard to call a playback, pause, replay, rewind or fast forward.
To use the playback video functions:
1. Press 99, then press the MACRO key to call a playback.
2. Press 99, then press the MACRO key again to return to live video.
3. Move the joystick to pause, play, rewind, and fast forward through the video.
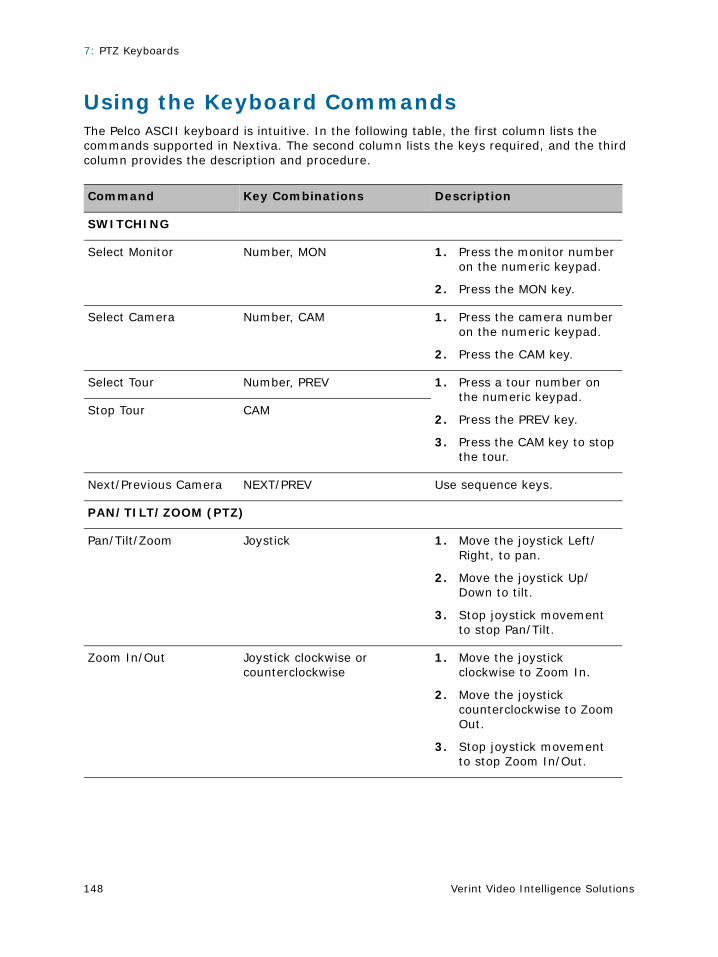
7: PTZ Keyboards
Verint Video Intelligence Solutions148
Using the Keyboard CommandsThe Pelco ASCII keyboard is intuitive. In the following table, the first column lists the commands supported in Nextiva. The second column lists the keys required, and the third column provides the description and procedure.
Command Key Combinations Description
SWITCHING
Select Monitor Number, MON 1. Press the monitor number on the numeric keypad.
2. Press the MON key.
Select Camera Number, CAM 1. Press the camera number on the numeric keypad.
2. Press the CAM key.
Select Tour Number, PREV 1. Press a tour number on the numeric keypad.
2. Press the PREV key.
3. Press the CAM key to stop the tour.
Stop Tour CAM
Next/Previous Camera NEXT/PREV Use sequence keys.
PAN/TILT/ZOOM (PTZ)
Pan/Tilt/Zoom Joystick 1. Move the joystick Left/Right, to pan.
2. Move the joystick Up/Down to tilt.
3. Stop joystick movement to stop Pan/Tilt.
Zoom In/Out Joystick clockwise or counterclockwise
1. Move the joystick clockwise to Zoom In.
2. Move the joystick counterclockwise to Zoom Out.
3. Stop joystick movement to stop Zoom In/Out.
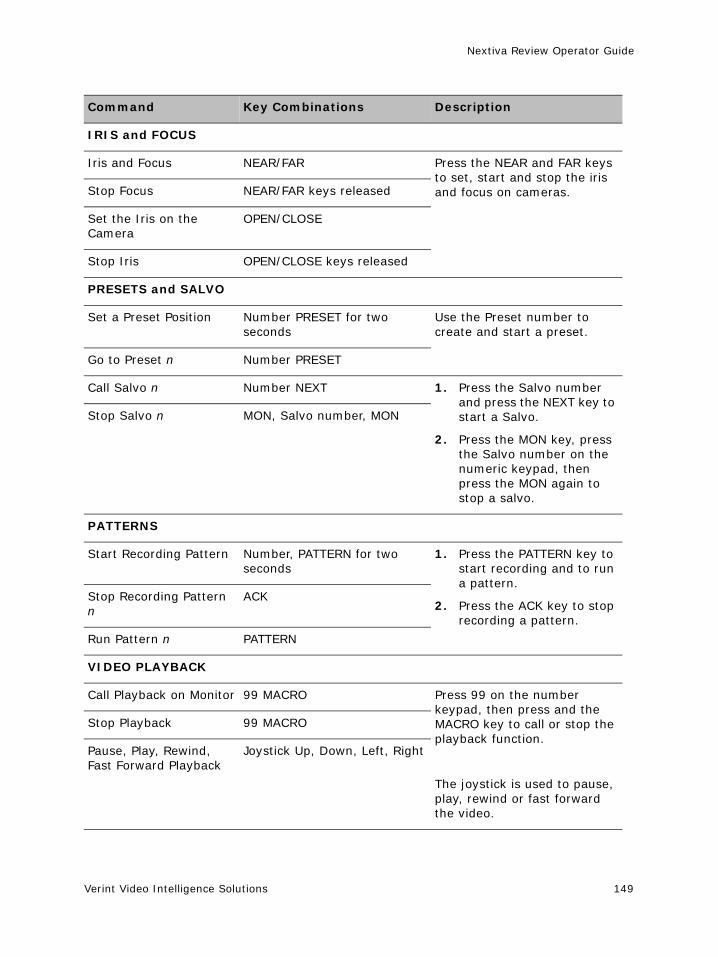
Nextiva Review Operator Guide
Verint Video Intelligence Solutions 149
IRIS and FOCUS
Iris and Focus NEAR/FAR Press the NEAR and FAR keys to set, start and stop the iris and focus on cameras.Stop Focus NEAR/FAR keys released
Set the Iris on the Camera
OPEN/CLOSE
Stop Iris OPEN/CLOSE keys released
PRESETS and SALVO
Set a Preset Position Number PRESET for two seconds
Use the Preset number to create and start a preset.
Go to Preset n Number PRESET
Call Salvo n Number NEXT 1. Press the Salvo number and press the NEXT key to start a Salvo.
2. Press the MON key, press the Salvo number on the numeric keypad, then press the MON again to stop a salvo.
Stop Salvo n MON, Salvo number, MON
PATTERNS
Start Recording Pattern Number, PATTERN for two seconds
1. Press the PATTERN key to start recording and to run a pattern.
2. Press the ACK key to stop recording a pattern.
Stop Recording Pattern n
ACK
Run Pattern n PATTERN
VIDEO PLAYBACK
Call Playback on Monitor 99 MACRO Press 99 on the number keypad, then press and the MACRO key to call or stop the playback function.
The joystick is used to pause, play, rewind or fast forward the video.
Stop Playback 99 MACRO
Pause, Play, Rewind, Fast Forward Playback
Joystick Up, Down, Left, Right
Command Key Combinations Description
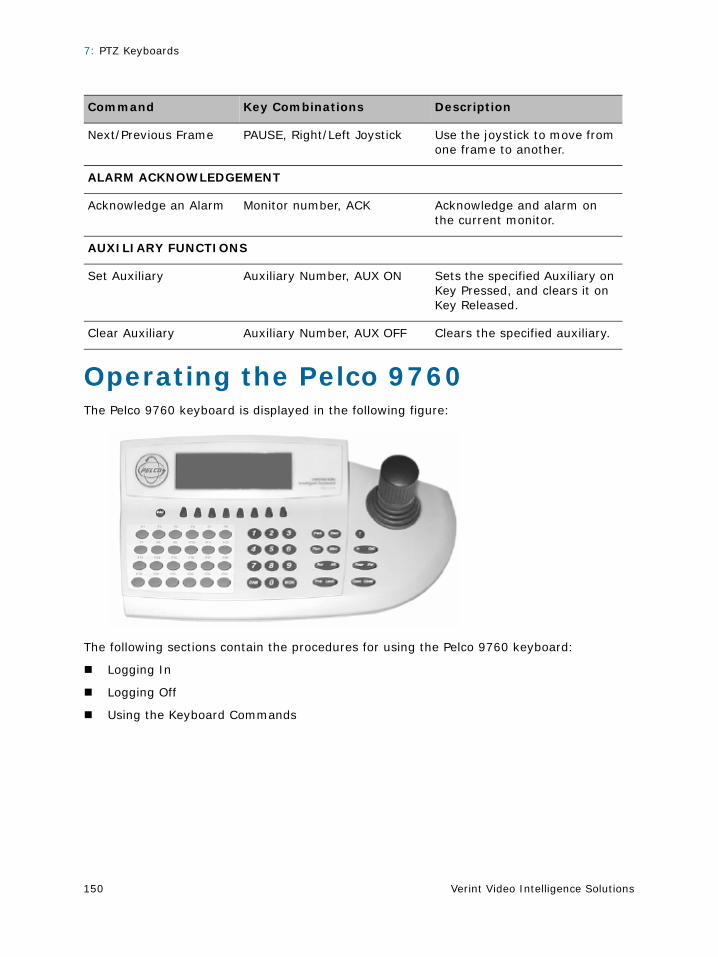
7: PTZ Keyboards
Verint Video Intelligence Solutions150
Operating the Pelco 9760The Pelco 9760 keyboard is displayed in the following figure:
The following sections contain the procedures for using the Pelco 9760 keyboard:
Logging In
Logging Off
Using the Keyboard Commands
Next/Previous Frame PAUSE, Right/Left Joystick Use the joystick to move from one frame to another.
ALARM ACKNOWLEDGEMENT
Acknowledge an Alarm Monitor number, ACK Acknowledge and alarm on the current monitor.
AUXILIARY FUNCTIONS
Set Auxiliary Auxiliary Number, AUX ON Sets the specified Auxiliary on Key Pressed, and clears it on Key Released.
Clear Auxiliary Auxiliary Number, AUX OFF Clears the specified auxiliary.
Command Key Combinations Description
Nextiva Review Operator Guide
Verint Video Intelligence Solutions 151
Logging InSwitch to Operation Mode before logging in, if you are currently in Setup Mode. This enables the keyboard commands. The keyboard must be in Operation Mode in order to log in.
To activate Operation Mode:
1. Select in Setup Mode.
2. Set DIP Switch 2 OFF.
3. Select . The Log In Display appears on the LCD display.
Refer to the CM9760-KBD/CM9760-KBR Series Installation/Operation Manual for more information.
To log in to the keyboard:
1. Enter your four-digit PIN. appears on the LCD display, with four asterisks (****) to indicate the PIN.
2. Ensure that the following message appears on the LCD display: Enter MON Num for Keyboard 1. This indicates that the login was successful.
Logging OffThere are two ways to log off. You can either log off Operation Mode or select Monitor 0 from the Main Menu.
To log off Operation Mode:
1. Press .
2. Select . The following confirmation message appears: Are you sure you want to log off?
3. Select .
Note: You can enter any four-digit number for the PIN.
7: PTZ Keyboards
Verint Video Intelligence Solutions152
Using the Keyboard CommandsIn the following table, the first column lists the commands supported in Nextiva. The second column lists the keys required, and the third column provides the description and procedure.
Further details are provided in the CM9760-KBD/CM9760-KBR Series Installation/Operation Manual.
Command Key Combinations Description
SWITCHING
Select Monitor
Monitor Number,
Enter the monitor number. The number appears next to
the monitor icon . Then,
press .
Select Camera
Camera Number,
Press the camera number. The number appears next to the
camera icon . Then, press
.
Scrolling
and
Use the scroll keys to scroll up and down through the list of monitors or cameras.
Return to Main Menu
or
Press the ESC key, or select the Operation Mode key to return to the main menu.
PAN/TILT/ZOOM (PTZ)
When a PTZ camera is selected, PTZ appears on the top-right corner of the LCD display.
Pan and Tilt Joystick RIGHT/LEFT
Joystick UP/DOWN
Move the joystick to the left or right to pan, or up and down to tilt. Stop joystick motion to stop panning or tilting.
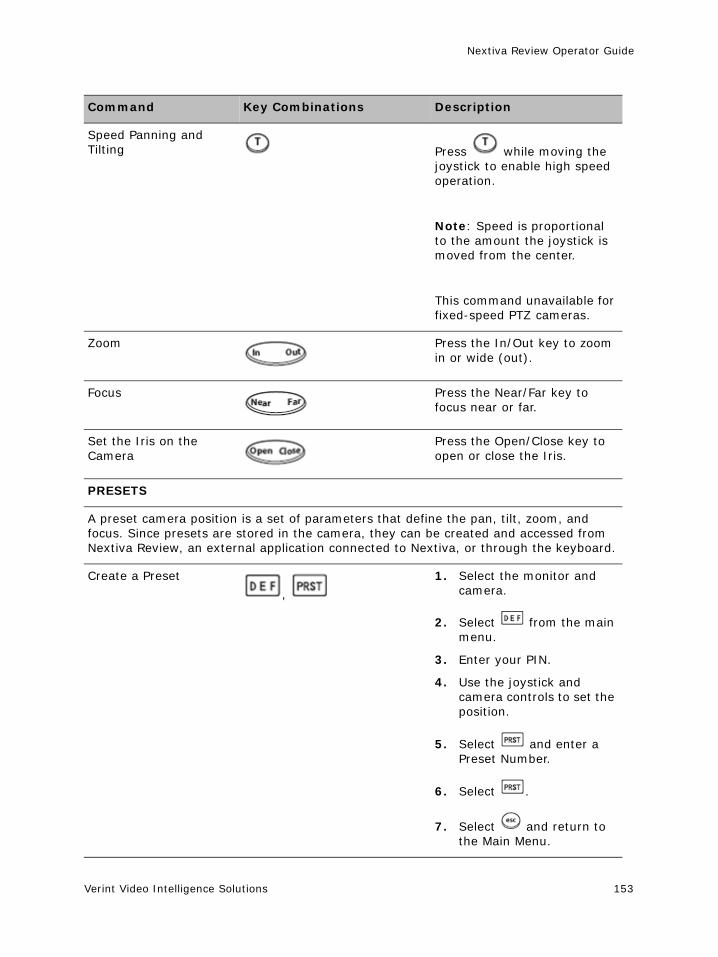
Nextiva Review Operator Guide
Verint Video Intelligence Solutions 153
Speed Panning and Tilting Press while moving the
joystick to enable high speed operation.
Note: Speed is proportional to the amount the joystick is moved from the center.
This command unavailable for fixed-speed PTZ cameras.
Zoom Press the In/Out key to zoom in or wide (out).
Focus Press the Near/Far key to focus near or far.
Set the Iris on the Camera
Press the Open/Close key to open or close the Iris.
PRESETS
A preset camera position is a set of parameters that define the pan, tilt, zoom, and focus. Since presets are stored in the camera, they can be created and accessed from Nextiva Review, an external application connected to Nextiva, or through the keyboard.
Create a Preset
,
1. Select the monitor and camera.
2. Select from the main menu.
3. Enter your PIN.
4. Use the joystick and camera controls to set the position.
5. Select and enter a Preset Number.
6. Select .
7. Select and return to the Main Menu.
Command Key Combinations Description
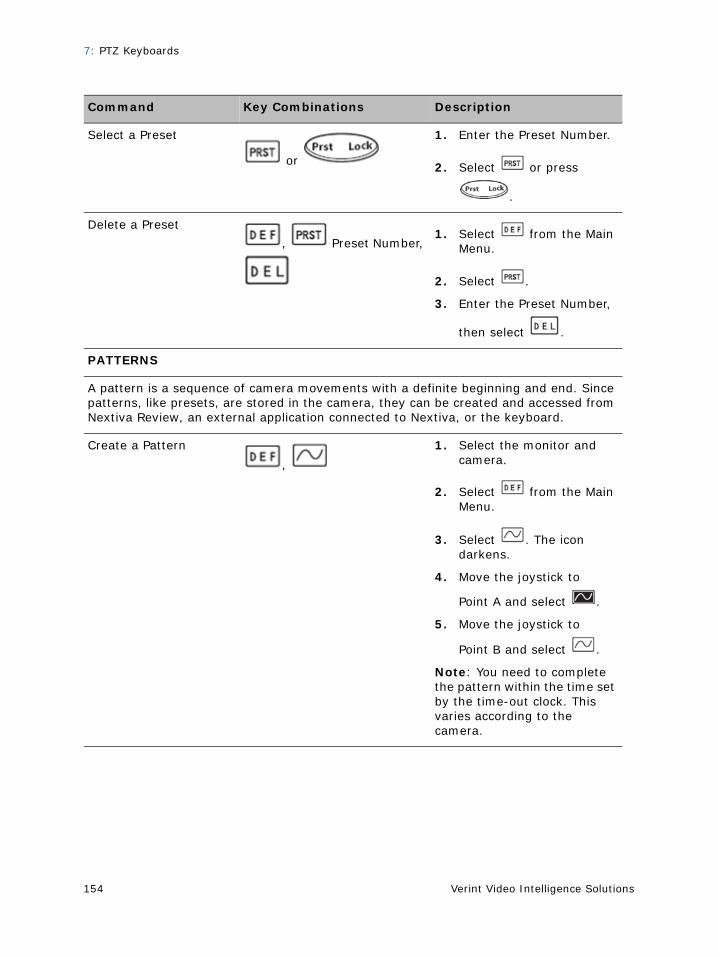
7: PTZ Keyboards
Verint Video Intelligence Solutions154
Select a Preset
or
1. Enter the Preset Number.
2. Select or press
.
Delete a Preset
, Preset Number, 1. Select from the Main
Menu.
2. Select .
3. Enter the Preset Number,
then select .
PATTERNS
A pattern is a sequence of camera movements with a definite beginning and end. Since patterns, like presets, are stored in the camera, they can be created and accessed from Nextiva Review, an external application connected to Nextiva, or the keyboard.
Create a Pattern
,
1. Select the monitor and camera.
2. Select from the Main Menu.
3. Select . The icon darkens.
4. Move the joystick to
Point A and select .
5. Move the joystick to
Point B and select .
Note: You need to complete the pattern within the time set by the time-out clock. This varies according to the camera.
Command Key Combinations Description
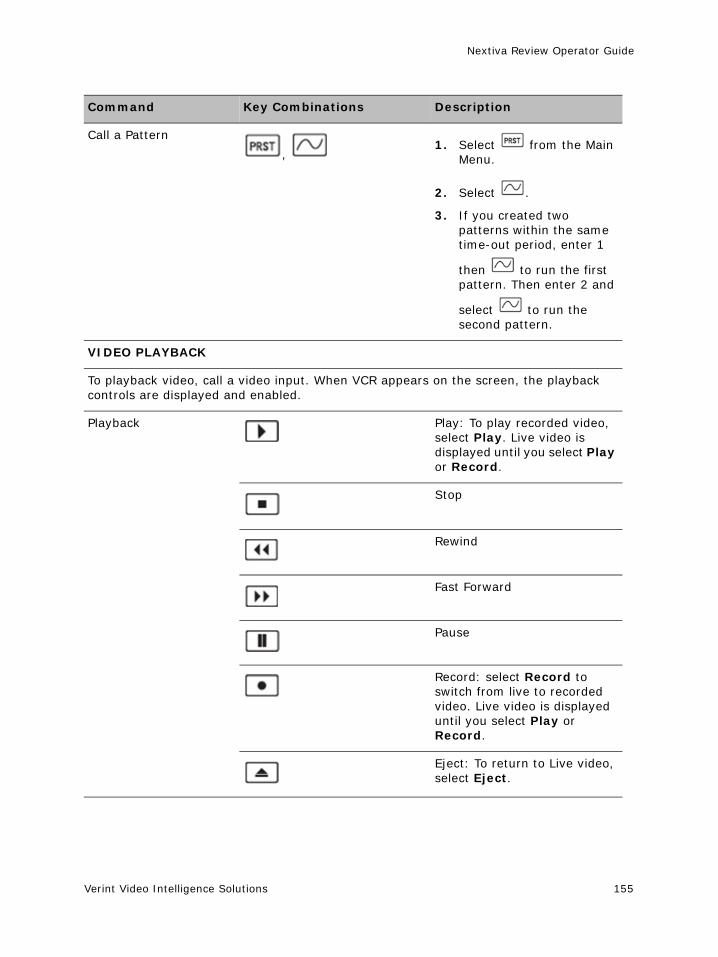
Nextiva Review Operator Guide
Verint Video Intelligence Solutions 155
Call a Pattern
, 1. Select from the Main
Menu.
2. Select .
3. If you created two patterns within the same time-out period, enter 1
then to run the first pattern. Then enter 2 and
select to run the second pattern.
VIDEO PLAYBACK
To playback video, call a video input. When VCR appears on the screen, the playback controls are displayed and enabled.
Playback Play: To play recorded video, select Play. Live video is displayed until you select Play or Record.
Stop
Rewind
Fast Forward
Pause
Record: select Record to switch from live to recorded video. Live video is displayed until you select Play or Record.
Eject: To return to Live video, select Eject.
Command Key Combinations Description
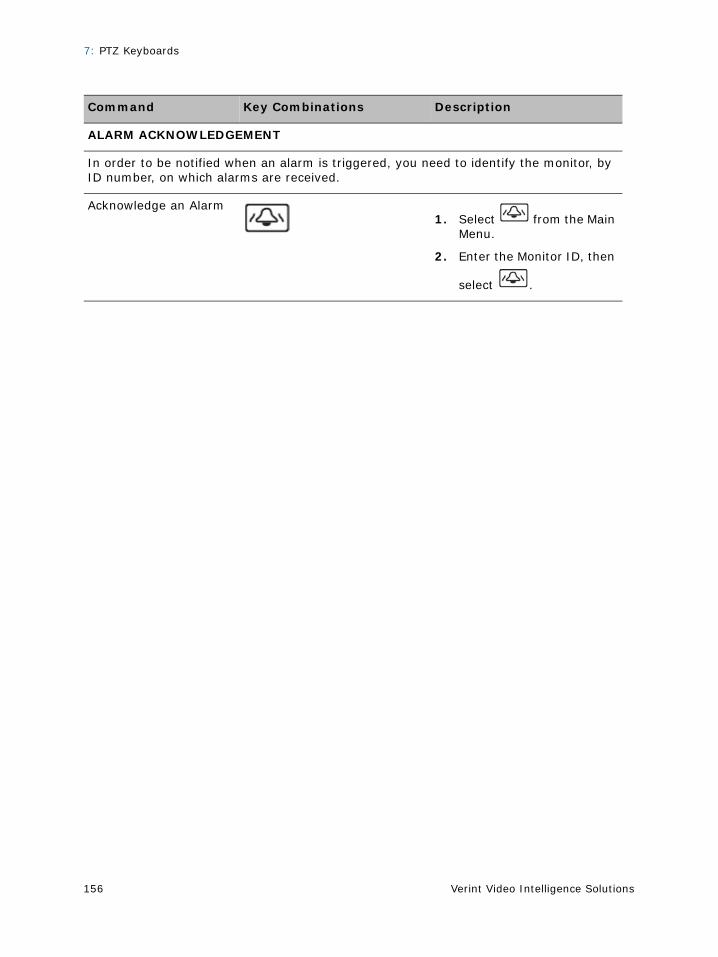
7: PTZ Keyboards
Verint Video Intelligence Solutions156
ALARM ACKNOWLEDGEMENT
In order to be notified when an alarm is triggered, you need to identify the monitor, by ID number, on which alarms are received.
Acknowledge an Alarm1. Select from the Main
Menu.
2. Enter the Monitor ID, then
select .
Command Key Combinations Description
Nextiva Review Operator Guide
Verint Video Intelligence Solutions 157
IndexAactivity detection 79activity scan 77alarm
acknowledge 75investigation 76preference 19search 69video 72
Alarm mode 68American Dynamics keyboard 124–129application toolbar 6authenticate video 65authentication 2
Bbookmark
adding 52deleting 54searching 54viewing 52
Bosch LTC 5136 keyboard 130–131
Ccamera list 9camera pattern
adding 44deleting 45running 45
camera presetadding 41deleting 43selecting 42
camera tour 59codec (coder/decoder) 60
Ddeinterlacing 24delete
camera pattern 45investigation 118
display preference 23
Eexported video
authenticate 65codec installation 64view 64
external file, opening 17
Ffocus, adjusting 39
Ggrayscale 95
Hhelp system 18Honeywell
KEGS-5300 keyboard 132–140RD-530 keyboard 140–145
IImage Toolkit
annotate 97brightness 95color, reducing 96Colors menu 88contrast, changing 95contrast, equalizing 96crop 93date stamp 98edge detection 91Edit menu 87exit 90File menu 87grayscale 95Help menu 89Image menu 88keep aspect ratio 99opening 85print image 90redo change 90reload image 91resize 93save image 89sharpen 92time stamp 98Tools menu 89undo change 90zoom 93
Nextiva Review Operator Guide
Verint Video Intelligence Solutions 158
investigationadding attachments 111–115creating 109deleting 118editing 115–118exporting 118revision history 116viewing 120
iris, adjusting 39
Kkeyboard shortcut 6
Llinked map 50Live tab 9live video
record 33tear off 34zoom 33
loop video 74
MManaging a Workspace 12map
linked 50viewing 49
multiple sites, connecting 14
Nnavigation pane 8
Ppan camera 34pan/tilt/zoom (PTZ) 34Pelco
9760 keyboard 150–156KBD300A keyboard 146–150
preferencealarm 19application 22display 23setting 19video quality 24
PTZ (pan/tilt/zoom) 34PTZ keyboard
American Dynamics 124Bosch LTC 5136 130Honeywell 132, 140Pelco 146, 150using 123–156
PTZ lock, using 36PTZ Menu, using 40
Qquery, scheduling 56quick query, running 32
RRecorded tab 9recorded video
query schedule 56synchronize 51tear off 34zoom 33
related documentation vreload image 91remote connection 16Review
application preferences 19–25interface 5logging in 2logging out 4
revision history, viewing 116
Sscreen saver, disabling 2search
alarm 69bookmark 54investigation 104
shortcut, keyboard 6still image
annotate 97brighten 95color, reduce 96contrast 95, 96crop 93date stamp 98edge detection 91grayscale 95keep aspect ratio 99resize 93sharpen 92time stamp 98
synchronize video 51system requirements 1
Ttear off video 34tilt camera 34tour 59
Uuser access permission v, 4
Nextiva Review Operator Guide
Verint Video Intelligence Solutions 159
VVerint web site vivideo
activity 77–83alarm 72export 60live 27recorded 46tear off 34zoom 33
video lost 31video quality 24View mode 5VPN (Virtual Private Network) 16
Wweb site, Verint viWindows shortcut 6workspace
add 10delete 12manage 12managing 12using 10–13
workstationmultiple monitors 13
Zzoom
camera 34still image 93video image 33

Nextiva Review Operator Guide
Verint Video Intelligence Solutions 160
Nextiva Review Operator Guide
Verint Video Intelligence Solutions 161

AMERICAS EMEA [email protected] [email protected] [email protected]
www.verint.com/videosolutions www.verint.com/videosolutions www.verint.com/videosolutions