NEWSLETTER OF THE AUSTIN SCALE MODLERS … · kit features a beautiful painting of a JG54 ......
19
Zvezda's 1/48 Messerschmitt Bf-109F-4 by Floyd S. Werner, Jr. IPMS #26266 T he arrival of the Zvezda Bf-109F-4 has been highly anticipated by this modeler. Having built the Bf-109F-2, I was excited about the possibilities. Packaged in an extremely sturdy cardboard locking lid box the kit features a beautiful painting of a JG54 aircraft in combat. This is just an exciting beginning to the model. Inside the cardboard box, you are treated to three large light grey sprues, two smaller light grey ones, and a sprue of clear parts. There are over 200 parts and they are beautifully rendered, although my lower wings were slightly warped. This would be no big deal as the upper wings would take care of the warp. The detail is gorgeous and perfectly rendered with no flash anywhere. You get parts for the F-4 and F-4/Trop. A relatively complete engine is included and you’ll have to use most of it regardless if you have the engine cowlings open or not. The instructions are broken down into 26 steps. Because of all the options the instructions are ‘crowded’. This just means you need to study them before you begin. The other thing you will need to decide is what configuration you want to do beforehand. You get the option of engine cowling opened or closed. There are three different canopy configurations. Wheels up or down? There are four armament options. You get MG-151/20 underwing cannons, a drop tank, ETC rack and bombs for SC50 and SC 250s. (continued on page four) 2011 IPMS/USA Website of the Year 2009 IPMS/USA Newsletter of the Year 2010 IPMS/USA Webmaster of the Year 2011 / 2009 IPMS/USA Region 6/ Webmaster of the Year 2010 / 2006 IPMS/USA Region 6/ Chapter of the Year In this issue: A Mess 1 Of Messerchmitt Message From 3 The Prez Fiddly Bits 3 Web At Night: Rewind 6 Concept Notes: 7 A Review Micro Plane: 8 A Review The Effects Of 9 Gamma Rays In Memoriam: 10 Russell Mapes Simplicity Itself 11 Help A Brother Out 12 Old Rumors/ 13 New Kits 2G Vol 21 No.9 40th Anniversary(1973-2013) September 2013 SPRUE SPRUE EXAMINER EXAMINER NEWSLETTER OF THE AUSTIN SCALE MODLERS SOCIETY [All photos by Floyd S. Werner, Jr.]
Transcript of NEWSLETTER OF THE AUSTIN SCALE MODLERS … · kit features a beautiful painting of a JG54 ......

Zvezda's 1/48 Messerschmitt
Bf-109F-4
by Floyd S. Werner, Jr. IPMS #26266
T he arrival of the Zvezda Bf-109F-4 has been highly anticipated by this modeler. Having built the Bf-109F-2, I was excited about the possibilities. Packaged in an extremely sturdy cardboard locking lid box the kit features a beautiful painting of a JG54 aircraft in combat. This is just an exciting beginning to the model. Inside the cardboard box, you are treated to three large light grey sprues, two smaller light
grey ones, and a sprue of clear parts. There are over 200 parts and they are beautifully rendered, although my lower wings were slightly warped. This would be no big deal as the upper wings would take care of the
warp. The detail is gorgeous and perfectly rendered
with no flash anywhere. You get parts for the
F-4 and F-4/Trop. A relatively complete engine is included and you’ll have to use most of it regardless if you have the engine cowlings open or
not. The instructions are broken down into 26 steps. Because of all the options the instructions are ‘crowded’. This just means you need to study them before you begin. The other thing you will need to decide is what configuration you want to do beforehand. You get the option of engine cowling opened or closed. There are three different canopy configurations. Wheels up or down? There are four armament options. You get MG-151/20 underwing cannons, a drop tank, ETC rack and bombs for SC50 and SC 250s.
(continued on page four)
2011 IPMS/USA Website of
the Year
2009 IPMS/USA Newsletter
of the Year
2010 IPMS/USA Webmaster
of the Year
2011 / 2009 IPMS/USA Region 6/ Webmaster of the
Year
2010 / 2006 IPMS/USA Region 6/ Chapter of the
Year
In this issue:
A Mess 1
Of Messerchmitt
Message From 3
The Prez
Fiddly Bits 3
Web At Night: Rewind 6
Concept Notes: 7
A Review
Micro Plane: 8
A Review
The Effects Of 9
Gamma Rays
In Memoriam: 10
Russell Mapes
Simplicity Itself 11
Help A Brother Out 12
Old Rumors/ 13
New Kits 2G
Vol 21 No.9 40th Anniversary(1973-2013) September 2013
SPRUESPRUE
EXAMINER EXAMINER
NEWSLETTER OF THE AUSTIN SCALE MODLERS SOCIETY
[All photos by Floyd S. Werner, Jr.]

Our Sponsors: Austin Armor
Builders Society
www.austinarmorbuilders.com
South Texas Auto Modeler
www.hillcountryhobby.com
www.kingshobbyshop.com
iwata-media.com
centexmodelers.com
ASMS is on
www @
austinsms.org
Phil Brandt
(in memorium) Eric Choy
Jeff Forster
Russ Holm
Jack Johnston
Mike Kizin
Mike Poole
Aaron Smischney
ASMS Officers & Chairpersons
Mike Poole, President 512. 494. 5879, [email protected]
Ron McCracken, Vice-President 512. 748. 3455, [email protected]
Jeff Forster, Treasurer 512. 331.1644, [email protected]
Bobbie Wilson, Secretary 512. 291. 2116, [email protected]
Ben Morton, Newsletter Editor 512. 878. 1869, [email protected]
Eric Choy, Show Coordinator 512. 249. 9184, [email protected]
Mike ‘Hollywood’ Gilsbach, Webmaster 512. 258. 2952, [email protected]
Milton Bell, IPMS/USA Coordinator 512. 454. 2395, [email protected] Tim Robb, Membership Coordinator 512.392.0611, [email protected]
IPMS Wounded Warriors Chapter Several IPMS members have since 2009 been managing the Warrior Family Support Center in San Antonio, Texas. The center is
located at Brooke Army Medical Center (BAMC), Ft. Sam Houston, Texas. Troops are sent to BAMC for treatment and rehabilitation, some staying for up to 12 months. BAMC and the Center for the Intrepid are known as being among the elite medical facilities in the world for treatment
and injuries received in combat zone. Through the generosity of hundreds of IPMS members, IPMS chapters, and modelers the Warriors stationed at BAMC have received models, tools, books, movies
and other hobby related items through the IPMS Wounded Warriors Chapter. Donations can be sent to IPMS Wounded Warriors Chapter contact person, Dick
Montgomery, ([email protected]).
Vol 21 No. 9
Model Shows
AMPS Centex, Georgetown Community Center, Georgetown, Texas 9.21.13 austinarmorbuilders.com Sproo Doo, Central Arkansas Modelers, Benton, Arkansas 9.21.13
casmodels.org AutumnCon 2013, Clarion Inn, Covington, Lousiana 9.28.13
northshoremodelers.com Region 6 Regional Convention, Norris Conference Center, Austin, Texas 10. 5.13
austinsms.org
Local Club Meetings Hill Country Outlaws Model Railroading Club, King’s Hobby, Austin, Texas 9.28.13 Austin Armor Builders Society, Old Quarry Branch APL, Austin, Texas 10.2.13
www.austinarmorbuilders.com Austin Model Cars, King’s Hobby Shop, Austin, Texas 10.3.13 CenTex Modelers, Trinity Lutheran Church, Copperas Cove, Texas 9.19.13
www.centexmodelers.com ASMS Build Day, King’s Hobby Shop, Austin, Texas 9.21.13
Other Events Fall Fly-In, Pioneer Flight Museum, Kingsbury, Texas 11.9.13
http://pioneerflightmuseum.org
Upcoming EventsUpcoming EventsUpcoming EventsUpcoming Events
Austin Scale Modelers Society (ASMS) is a chartered chapter of International Plastic Modeler’s Society (IPMS/USA). ASMS meets on the third Thursday of each month. Annual dues for full membership are $20 (individual) or $25 (family). The views expressed in this newsletter are those of the author (s). It is intended for educational purposes only. ASMS does not endorse the contents of any article.
Page 2

Vol 21 No. 9
Fiddly Bits Frank Seibert
Page 3 Vol 21 No. 9
I nitial reports are in and it would appear that Modeling-in-Action Day at King’s Hobby was enough of a success to con-tinue. There were about a dozen or so folks in attendance. The morning session seems to have been dominated by some cars guys and the odd on-looker. The afternoon brought forth some club stalwarts with Ron , Randy, Milton and Mike K. hanging out. The next monthly modeling day will be Saturday, September 21 beginning at 10AM. Come one, come all!
There is some consideration being given to renaming the event ‘Build and Bull’. Some ASMS club members journeyed to Loveland, Colorado for the IPMS/USA National Convention. In attendance were Ben Morton, Bruce Burden, Tim Robb and for a brief moment, Bob Bethea. I think we may have been mis-
pronouncing his last name. Turns out the correct pronunciation is: “ Bee The A”. Who knew? Lots of terrific models on display and a not too shabby vendor area. Squadron Publications, Eduard, CMK, Rare Plane
Detective and Zoukei-Mura showed up in force. There was vast smattering of other venders there to assist with the burden of your cash money weighing you down. Although, I still don’t know what that Revell guy was up to. (?) Congratulations
to Tim for his second place finish with his La-7 featured in an earlier issue (May 2013) of this newsletter. The Region 6 Regional Model Contest will soon be upon us (Saturday, October 5). With apologies to the writers of Battle: Los Angeles, “All hands on deck, Staff Sergeant!”. If you have not already done so, please find some time to volunteer at the contest. Folks are needed for registration, make-n-take, door prize table, and judging. Staff is also needed for lots of other sundry jobs. There is even a need for someone to set out the trophies. An opportunity to show off your merchandising
skills. Please note the sign-up sheet at our forthcoming club meeting. It’s gonna be crazy fun!
Frank
Message from the Prez… Mike Poole
I t’s getting down to the wire for The Region Six Regional Model Convention on Saturday, October 5th and the last of the preparations are being completed. Eric tells me that the vendor tables are selling out fast so if you were planning to re-
serve some, don’t delay. I received a nice tip by a member who emailed that IPMS/USA and Revell have a special Make-N-Take kit purchase pro-gram. Thanks to that, we now have 50 new Snap-Tite kits for our show. If someone is interested in helping with Make-N-Take we still have two openings. There are also openings left in show registration, general admission, and the door prize
table. I’ve also been busy posting promotional threads on the car sites I frequent and have been getting favorable responses and inquiries. I encourage everyone to take a moment to post a thread or announcement in your frequented websites with a
link back to our show page. Everything we can do to get the word out will help show turnout. I’ll make this one short this month. Remember this is a quarterly contest month. The theme this time is anything chosen
from Phil Brandt’s collection. Build one for Bondo and bring it to the meeting!
Mike

Page 4 Vol 21 No. 9
There are plenty of parts that will not be used, a bonus for those of us who model multiple versions of the 109. This whole kit screams value, except for the decals. The decals are not as crisp as I would like. It appears that they have some ‘bleed’ of color.
There are markings for one aircraft from JG54 during two seasons. One of them is quite unique looking with winter painted on one side and camouflage on the other. If I were going to do this aircraft I’d have to do some more research to make sure it is accurate but it is really neat
looking. To me the decals are not a big deal as there are plenty of aftermarket decals out there. Of course I could not leave well
enough alone and had to add some aftermarket stuff. I chose to use the Eduard Zoom kit for the Bf-109F-2, as it is essentially the same details. I also added some stuff from the Vector Bf-109F-2 update set. This corrects some things in the kit. Namely a better center section of canopy, the underside of the ailerons and the elliptical openings on the spinner. Vector also sells a new flap set which I had to incorporate. Eagle Cal decals were sourced for the markings that I wanted to do. I built the F-2 version with the cowlings opened so I wanted to see how this kit fit with the cowling closed. So with that I had my configuration.
Unlike most builds this one begins with the engine assembly. The fit of the engine was superb and perfect. Get use to those terms as that will be a common theme.
As I was building the engine up I was thinking maybe an open cowling wouldn’t be too bad. Once assembled the engine fits perfectly to the firewall. Everything has positive locking points. However without the engine bearers the assembly is fragile so use caution when handling it. The cockpit was next up. This is one of the most complete cockpits in this scale I’ve ever seen. The detail has to be seen
to be believed. I loved it. I did elect to add some Eduard to it just for spice. I used the pre-painted instrument panel which I always love. I used some Krystal Kleer for the dials. The only thing really lacking in the cockpit is the seatbelts. If you add the pilot figure, which is very good, then even that is taken care of. I used the Eduard seatbelts, which had to be modified slightly for the kit. Tamiya Dark Grey was used for RLM66 throughout the cockpit. A wash of Payne’s Grey artist oils followed by a dry brush of RLM 02 and silver brought out the detail. Zvezda would have you build the tail section separate and add it to the fuselage after completion. I elected to build the right side tail with the right side fuselage section. This allowed me to properly position the tail. Then it was a matter of flat sanding the fuselage and joining them when the time came. The fit of the fuselage and all the stuff that goes into it was...wait for it...perfect. The lower wings, as mentioned earlier, were slightly warped in the box. However, once the wing is built up as it is designed the warp disappears. The fit of the wings was again perfect. One thing that I didn’t like was the inboard flaps had mold release marks. These would have been easily filled but since I was going to use the Vector flaps this proved a non-issue for me.
You can add the flight control surfaces at this time as they are all provided separately. My aircraft had the later style wing tip lights as on the Gustav so I deviated from kit instructions. My subject aircraft had no belly tank or
gondolas so it was easy to build up the bottom. Those items

Vol 21 No. 9 Page 5
are provided along with two style bomb racks. Offering up the wings to the fuselage again proved to be a non-issue and the fit was, dare I say it? Perfect.
The engine cowling area is the next thing to build up. Here is where I expected issues if there were going to be any, but as you can guess the fit was perfect. Now I’m not saying I didn’t have the whole nose taped up so that nothing could move but it the fit was perfect and looks great. There was no need for any sanding. I was impressed. With that it was time to paint up the model. I wiped the model with Polly Scale Plastic-Prep. I masked off the canopy with Tamiya tape and then sprayed that area with RLM66. The whole model was then primed in Alclad Grey Primer and micro filler. Surprisingly to me there was no need to repair anything. I was ecstatic. Some Tamiya Dark Grey was pre-shaded along panel lines and in areas to break up the monotonous look of certain panels.
I started painting by spraying Tamiya Flat Yellow on the appropriate places with an airbrush. Left to dry overnight, it was then taped up and the bottom was sprayed a custom mixed Tamiya RLM 78. This was followed up by a custom mixed Tamiya RLM 79. Now came the fun part. I used Gunze RLM 75 to spray the areas that needed it. The key was to get a relatively sharp edge on the fuselage and a softer edge on the wings. I used some masking tape held off the surface for the fuselage and
free handed the wings. I was pretty happy with the results. Then it was time to add the Gunze RLM 70, Black Green. Some touch up was required. A coat of Alclad Gloss was added in preparation for the decals. I did not like the kit decals and didn’t even try them. I had already decided to use some Eagle Cal decals. These were added with no issues whatsoever. I made a very minor mistake that I dare you to find. Nothing dramatic, it just annoyed me that I messed it up. A coat of Alclad Flat was sprayed and with that the weathering could begin. I started weathering by doing a burnt umber artist oils wash into the panel lines and I dot filtered it on certain areas to break up the colors. This was followed up with some oil paints being dotted on the surface. I used buff, titanium white, and some burnt umber in the high traffic areas.
These were all then mixed in with a turpenoid damp brush. Once happy with the results I used a sponge with silver paint for the worn areas of the paint. Some MiG Pigments were used to dirty up the exhausts and the wing root area. Tamiya Soot weathering powder was added to the wing root and exhaust areas. With that I was pretty much done. Masks were removed, wheels added, and canopy with antenna put in place. The model was done. It was one of the most enjoyable models I’ve ever built. Fit was perfect throughout. How does this compare to a Hasegawa kit? Leaps and bounds superior. This is the finest Bf-109F-4 in any scale in my opinion. I can safely say that this model builds up perfectly with the engine cowling opened or closed. The aftermarket items fit perfectly. The Vector parts are a really nice addition. The Eduard Zoom set adds the things that you need for this kit. The Eagle Cals were gorgeous. All of them are highly recommended. Vector even has a G-2 conversion set for those so inclined.

Page 6 Vol 21 No. 9
This really is a superior kit. It is on lines with Tamiya and Eduard. Despite the large parts count and multiple options, I can say that you will enjoy this build and the results. I enjoyed it as a model and as a 109.
I’ll be building more of these in the future. I may even sell my Hasegawa F models to buy more. That is how much I
enjoyed this kit for ease of building and accuracy. Highly recommended. Thanks to Dragon/USA and IPMS/ USA for the review copy.
Floyd
Web At Night : Rewind compiled by Jean-Michel D’Aubigne
F irst , there is a small correction to be made from last month’s Sprue Examiner. In Aaron Smischney’s column concerning Tamiya’s new Gama Goat, an additional ‘m’ was
added to gama . Merde! To help clear up any remaining confusion there is a video or fifteen showing the Gama Goat in action. You may be inter-ested to note that the Gama Goat got it’s name by combining the name of the inventor of the powered articulating joint, Robert Gamount with the vehicles abilities off-road. Hence
the goat part. www.youtube.com/watch?v=_DWaWH7;Cfg
The 2013 IPMS/USA Thin Air Nationals are over and done with. Now, it is on to ‘The Thick Air Nationals’ in Virginia next year. The website for IPMS/USA 2014 Convention is up and running. You may also avail yourself of lots of pho-tos that have been posted of the entries from the 2013 con-
vention. Both are available via the IPMS/USA website: www.ipmsusa.com
The following website has little to do with modeling but it struck me as definitive proof that ‘Bigfoot’ is alive and well and residing on Mars, not in some misérable swamp in Lou-isiana. Besides, everyone should have known that women are
from Venus... www.space.com/4876-female-figure-mars-rock.html
Jean-Michel
Monthly Program Schedule
by Ron McCracken, Vice President
Month Presenter/Subject
September Quarterly Contest/ Bondo Special
October TBA November TBA December Quarterly Contest/ White Elephant
If you are interested in making a presentation at our club meetings contact Ron McCracken at:
Quarterly Contest
Schedule
O ur club’s quarterly contest are held on the last month of each calen-
dar quarter. Here are the dates and themes for 2013.
Date Theme
September19 Bondo Special (A kit received from the estate of Phil “Bondo” Brandt.)
December19 White Elephant

Vol 21 No. 9 Page 7 Vol 21 No. 9
%orth American P-51D/Concept %ote
SWS %o. IV
by David Goudie IPMS # 6340
Z oukei-Mura is a relatively new manufacturer of model aircraft kits and linked accessories. The company has named the first kits in 1/32 scale their "Super Wing Series". Re-leases seem to be about one a year up to this point and the kits are highly accurate and detailed to the “nth” degree. Kit releases to this point include (in order):
• J7W1 SHINDEN
• Focke-Wulf Ta152H-1
• A-1H SKYRAIDER U.S.NAVY
• P-51D Mustang
• Sd.Kfz.2 Kettenkrad
Perusing the Zuokei-Mura website: http://www.zoukeimura.co.jp/en/index.html will also reveal a full line of kit upgrades to further enhance and detail each model. As a matter of fact, this company has accomplished a
lot more in its short exis-tence than many older and more ex-perienced manufactur-ers. Included in the company’s full line of accessories for their kit releases is “The Concept Note” issued as a series numbered SWS-I thru SWS-IV. The
numbers coincide with the kit numbering and are in order of release. This review covers Concept Note SWS-IV for the SWS-IV P-51D Mustang. Concept Note SWS III for the A-1H Doug-las Skyraider was previously reviewed by Rick Bellanger, IPMS# 35220 http://web.ipmsusa3.org/content/1h-skyraider-concept-notes-sws-no-iii . With minor differences, each in the series is the same and worth the price. I purchased this book from the Zuokei-Mura
booth at the IPMS/USA National Convention. Like the kits, these books are a modeler’s dream. With de-tailed information on how the kits are researched and devel-oped, along with detailed descriptions of the kit assembly and detailing. The descriptions are written by modelers and are good references with step-by-step construction guides. Several model builds are included, including an interesting one where foil is used to get the natural metal finish. IPMS/USA’s own Dave Morrissette is author of one of the articles and covers “Betty Lee III”. Included also are several P-51D “in actions”, and inter-esting information of design features of the machine with descrip tions of the why’s and how's. In real-ity, almost any-thing a modeler needs to research and build one of these kits. Those interested in engi-neering or techni-cal aspects will also find good stuff. A super detailer can build one of these models and be satis-fied or purchase as many upgrades as he wishes to further detail the model. At the end of the reviewed publication you will find four pages of detailed cut-away blue line drawings in 1/48th scale. The last page of this contains a general specification chart along with drawings of the three canopy types used, i.e. Dal-las, Inglewood (early) and Inglewood (late). The coups-de-gras is administered with the inclusion of a fold-out poster printed on heavy matte paper. Shown are a large sampling of well and not-so-well known aircraft with information on the aircraft unit and pilot. Example: “P-51D-25NA , Sr. no.44-73108, “Red Dog XII” of the 344th FS, 4th FG, Flown by Maj. Louis H. Norley Jr.” Nineteen other air-craft are included, including “Cripes A’ Mighty” and “Old Crow”. The Zoukei-Mura people had a full crew at their large vendor booth which included the owner of Zoukei-Mura,

Page 8 Vol 21 No. 9
Hideyaki Shigeta, and his two sons. They were delightful people and were happy to autograph any purchases and also insisted on taking a photo of each person who made a pur-
chase. I am happy to recommend this “Concept Notes” and the rest of this series even if you don’t have the kits from this com-pany. Any other manufacturer’s kit for the subject aircraft would be well served for a builder with these references on
his bench.
As a side note, I will add that Hideyaki-san was announcing to people surrounding his booth that we should expect new models which would surprise and please everyone. I remain
tuned in, having all four of the current releases in my stash.
David
Micro Ace's F-105D Thunderchief
by Cesar Herdez
I stumbled upon this kit whilst doing internet research on a hobby retailer in Japan. The manufacturer was unknown to me at the time but I've come to find out that Micro Aces is an
adjunct of Arii Models. The Micro Ace series of small scale aircraft models(1/144th) encompasses a range of subjects. From a few WWII Japa-nese aircraft to more modern subjects including the F-4 Phantom/F-15 Eagle. This particular release is the F-105D
Thunderchief, Vietnam. The kit or rather kits, as there are three models per box, is pretty basic. Something not unexpected in this scale. Panel
line engraving appears to be just about right with nice detail on all parts. There are no wing stores save for the under wing
fuel tanks. There is however a centerline fuel tank included
which is a nice addition. Micro Ace sells supplemental kits of
under wing stores, as is rather common in this scale. The kit has no cockpit detail. Just cement the fuselage halves together , paint the cockpit area gray, slap on the can-opy and your done. Easy! I would note that the canopy frame engraving is nice. In this scale, some
manufacturers just give you a clear blob and call it a canopy. I'll probably carve out this area and add a seat from another kit. Along with some sidewalls made from plastic card stock and some bits from the spares box you don't need to add that
much to achieve an acceptable rendition of a cockpit. That’s one of the beauties of modeling in this scale. You need not worry about someone ‘knocking’ your work be-cause there are only three bolts on the forward landing gear strut instead of the actual four bolts common to a certain
type. As mention, there are three complete kits in the box. Each kit consists of 27 parts including a clear canopy. The parts bor-der on being a bit ‘thick’ and out of scale particularly the landing gear doors. But some judicious sanding on the gear
doors will solve most of those problems. There is a more than adequate decal sheet included. It would have been totally cool if they had included the shark mouth markings often common to some F-105's during the Vietnam period but you do have some stencil/warning data as well as the usual markings for three separate aircraft. I suspect that you can acquire additional markings from a separate decal
sheet. The Micro Ace series isn’t quite up to the standard that Sweet, Eduard ,or Dragon generally hold but in this scale they are nice kits never the less. At a reasonable cost for
three models kits( about$12.00) you can do an entire wing. The box top artwork on the Micro Ace series was done by
Satoshi Watanabe. A Japanese artist of some repute.
Cesar

Vol 21 No. 9 Page 9
U.S. Army Attack Aircraft /A-33 Gamma
by Ron McCracken
N ext in the series on U.S. Army Air Force attack aircraft is the Douglas A-33, which is one of several little-known attack aircraft conscripted in small numbers by the U.S. Army Air Forces at the beginning of WW II, when aircraft of all varieties were in short supply and anything flyable was taken into inventory and pressed into use. The story of the A-33 begins in 1935 with Northrop's development of the A-17, a single-engine, two-place monoplane attack bomber. It was to be the last single engine attack bomber developed specifically to an Air Corps requirement, and Northrop was successful in selling a number of them to the Air Corps, in both fixed-gear and
retractable-gear versions. However, by 1939 the single engine attack plane was out of favor with the Air Corps, and no further development of the Northrop A-17 was undertaken for Air Corps use. But the Douglas Aircraft Company became interested in the A-17
design for potential update and sales in the export market.
Douglas obtained a license for the design and updated the basic aircraft primarily by installing the more powerful Wright GR-1820-G205A engine. This version was given the Douglas designation of DB-8A. Sales were made to the Netherlands and Norway in Europe, and several South American countries. 36 DB-8A-5N (N for Norway) aircraft were ordered by Norway early in 1940. In addition to the four wing-mounted .30 caliber machine guns of the A-17, they were equipped to carry one .50 caliber machine gun in each of two underwing pods just outboard of the main landing gear, and
had two flexible .30 caliber machine guns in the rear cockpit. They also had an odd semi-retractable bomb-aiming position under the aft fuselage. The series of photographs, found in "Flight" Magazine's online archives, shows the compartment in its extended position.
Although the Dutch DB-8A order saw combat, Norway was occupied by German forces before their order could be delivered, so the 36 DB-8A-5s were turned over to the Norwegian government-in-exile which was operating a flight training facility known as "Little Norway" at Island Airport in Ontario, Canada. Eventually the flight training of Norwegian pilots was transferred to RAF and RCAF schools, and the Model 8A-5s
were declared surplus to Norwegian requirements. Consequently, 18 Model 8A-5s were taken over by the USAAF on December 9, 1941 under the designation of A-
33-DE and assigned the serials 42-13584/13601. Although they received an Attack designation, they were operated as trainers at stateside airfields and in consequence, received the 1941 standard finish for Air Corps all-metal advanced trainers -- bare metal. Also, as a general rule, all armament was removed. Fortunately, due to the European and South American use of this aircraft, a limited-run injection-moulded kit is available in 1/72nd scale, although not under the A-33 designation. MPM released a kit which is currently available under the
"DB-8 Bombers over South America" label. Other than appropriate national markings, everything you need comes in the box. There's not much good news for the 1/48th scale fan, there not being even an A-17 kit available in this scale as a starting point. The MPM kit is quite versatile, having alternate parts for both fixed and retractable landing gear and three different engine/cowling options. The only troublesome assembly tasks were filling in a few gaps around the wheel well bulges
Northrop A-17
Page 10 Vol 21 No. 9
and a bit of trim-and-fit effort at the trailing edge of the wing-to-fuselage joint. Otherwise, the kit goes together well. You might want to add some locator pins for the horizontal stabilizers, but that is not absolutely necessary. The wing center section carries through under the fuselage, so no spe-cial preparation is required to attach the wings. To obtain an A-33, use the assembly instruction options la-beled "CAM A,B,C", with two exceptions. In step 6, the airscoop atop the cowling is labeled as a "CAM D,E" option. Go ahead and attach the airscoop. Second, you can omit the four .30 caliber machine gun barrels on the wing leading edge. I've never seen a photo of an A-33 where they were installed. (one less fragile part to break off!) The odd clear part that goes under the aft fuselage is in-tended to represent the retractable bomb-aimer's position, in the retracted configuration. I'd suggest cutting away the portion of the wing cen-ter section part that un-derlies this, to help with the illusion of an opening into the fuselage. Also, the instructions are a bit vague as to the attachment of the main landing gear struts. These do NOT attach perpen-
dicular to the wing, they angle rearward and inward. On the front page of the instructions is a good side-view drawing that shows the fore-and-aft alignment of the gear strut. For the side-to-side angle, attach the strut angled in-ward so the attachment pin for the wheel ends up horizontal. (the configuration is very like the Douglas SBD "Dauntless" main gear). Some detail enhancements add authenticity. The DB-8A had four small oval viewing ports on each side of the fuselage under the rear cockpit. The kit has oval panel lines scribed in the appropriate location. You might want to drill these out
and add clear "windows". Or, just paint 'em gloss black. Also (and this seems to be a common shortcoming of these limited run kits) there are no clear leading edge landing light covers. The location, again, is demarked by panel lines, but you'll have to cut out the openings and add your own clear parts. Fortunately, they are small enough to be carved from a bit of clear sprue.
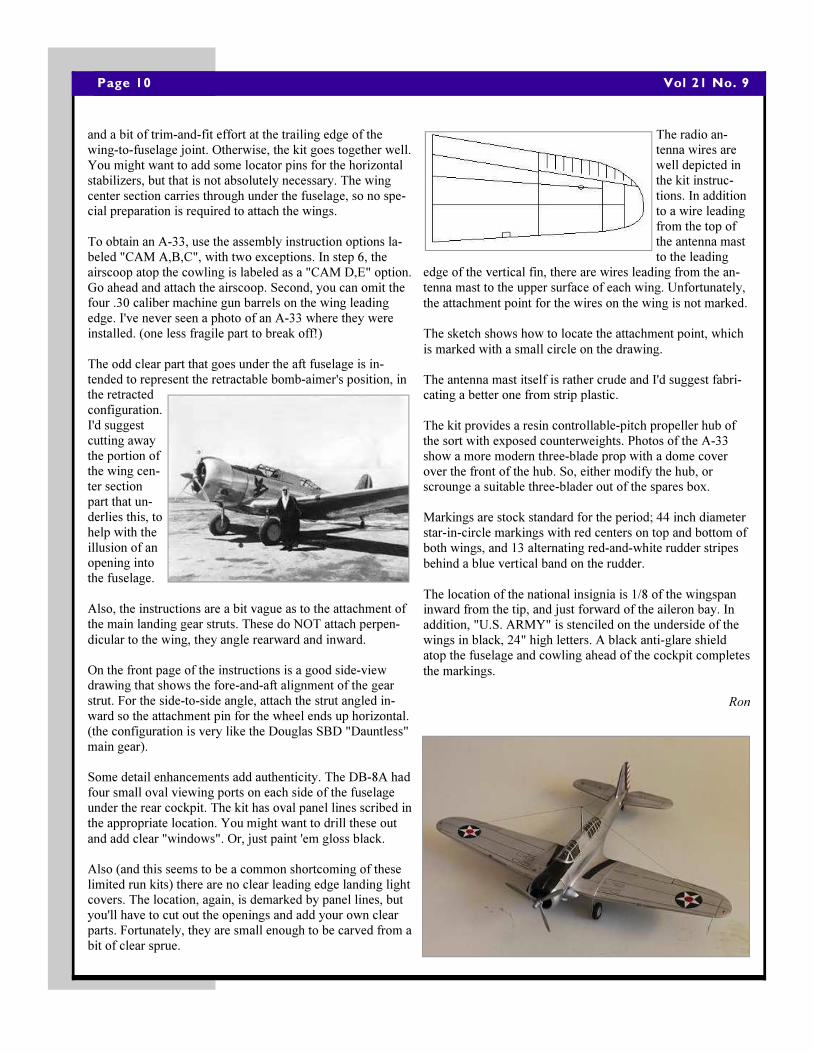
The radio an-tenna wires are well depicted in the kit instruc-tions. In addition to a wire leading from the top of the antenna mast to the leading
edge of the vertical fin, there are wires leading from the an-tenna mast to the upper surface of each wing. Unfortunately,
the attachment point for the wires on the wing is not marked. The sketch shows how to locate the attachment point, which
is marked with a small circle on the drawing. The antenna mast itself is rather crude and I'd suggest fabri-cating a better one from strip plastic. The kit provides a resin controllable-pitch propeller hub of the sort with exposed counterweights. Photos of the A-33 show a more modern three-blade prop with a dome cover over the front of the hub. So, either modify the hub, or scrounge a suitable three-blader out of the spares box. Markings are stock standard for the period; 44 inch diameter star-in-circle markings with red centers on top and bottom of both wings, and 13 alternating red-and-white rudder stripes
behind a blue vertical band on the rudder. The location of the national insignia is 1/8 of the wingspan inward from the tip, and just forward of the aileron bay. In addition, "U.S. ARMY" is stenciled on the underside of the wings in black, 24" high letters. A black anti-glare shield atop the fuselage and cowling ahead of the cockpit completes
the markings.
Ron

Vol 21 No. 9 Page 11
Simplicity Itself
(or how to easily find that part that just fell on
the floor.)
by Ben Morton
O n more than one occasion , whilst working on a model, I have dropped a part that lands either on the work surface and bounces onto the floor or falls there directly
from my nimble fingers. Very rarely, this errant part will fall onto the work surface, is joyfully recovered and I go happily about concluding
with the current model building step that I am on. More often than not though, it goes shooting off in some hyperbolic arch never to be seen again. Even after repeated diligent searches. Sometimes on hands and knees with a
flashlight and a goodly supply of masking tape. It seemed to me that there might be a simple, unambiguous method that one could employ to find that errant part with little muss or fuss. I believe I may have discovered that
method. With the aid of my son, who is currently on a 12 year plan to acquire his Bachelors’ Degree in Math from the University of Texas/Austin, I have come up with a simple, easy equation that eliminates most if not all probabilities and minimizes those variables that can affect the trajectory of the part in question and allow the user to immediately locate said part and continue on with a fun, rewarding
model building experience. After careful and deliberate consultation with the afore-mentioned perpetual math student, I would like to submit the following simple, easy equation that will assist you in locating the errant part and prevent it from remaining right
where it fell for perpetuity. By providing the exact X,Y,Z axis all you’ll need to do is
lean over and pick it up the part. It should be noted that this simple, easy equation takes into account the various factors that affect the trajectory of the part and that careful measurements of each factor will need
to be taken before hand. The more accurate these measurements, the greater the degree of confidence you can have in the end result. This simple, easy equation accounts for not only the effect of gravity but also corrects for humidity, barometric pressure, wind direction, wind velocity, air temperature and air
density.
Support Your Local
Hobby Shop
King’s Hobby Shop www.kingshobbyshop.com
Hill Country Hobby www.hillcountryhobby.com
HobbyTown www.hobbytown.com
Russell Mapes
1958 -2013
R ussell Mapes, a former member of ASMS and a good friend died August 23rd in the early evening. He died in an automo-bile accident on High-
way 71. Follow the link for a report on the accident. http://www.statesman.com/news/news/traffic/officials-identify-man-killed-in-fatal-western-
tra/nZcGy/ Russell was an active member of ASMS for many years and remained an avid modeler. He worked as a carpenter and worked with me to build the room I’m sitting in as I
write this now. He and I published one of the first newsletters for the club and he was elected to several club posts. He moved from the Austin area some years ago but soon returned and
continued to work in the area. Milton Bell

Page 12 Vol 21 No. 9
All of which can effect the final resting place of the part. To a lesser degree this simple, easy equation also takes into ac-count the effects of solar winds as well as correcting for the
Coriolis Effect.
Just a few of you may be wondering...What is the Coriolis Effect? This phenomenon is the effect that the earth’s rota-tion has on an object. More often than not, this phenomenon
is associated with the launch of a rocket into space. It can best be described thus: If one is standing on the sur-face on the earth and throws an object into space (assuming of course that the object has sufficient velocity) that object appears to arc off in the direction of the earth‘s rotation. In reality, the object is headed away from the earth in a straight
line. Simply plug in the variables( humidity, wind speed/direction, air temperature, etc), do the math and voila! It might be worth noting that the answer may be in metric. You’ll need another equation to correct for that and calculate the meas-
urement you derive into feet and inches. I think that you’ll agree that this simple, easy to use equation will soon put and end to those endless hours of grubbing
around on the floor searching for that missing part.. You’re welcome!
Ben
�ow is the time for all good
members to come to the aid of their
model club.
T he date for the Region Six Regional Model
contest is approaching and your assistance is
needed to help make the show a success. What,
you may ask, is involved with helping? Well, I’ll
tell you.
Mostly it amounts to
being an august member
of the show’s staff.
Manning the registra-
tion table, judging, set-
up/take-down, etc. ...
niggling little chores
that have to be done to
help things move along
in an orderly, efficient
manner.
It also helps to mitigate the need for our show
coordinator, Eric Choy, to start pulling out his
hair. (Of which there isn't all that much.) So, help
a brother out and your club by volunteering to
work the show.
For those of us who don’t normally ‘work a show’
as a matter of course, now would be a excellent
time to forgo that prohibition and volunteer.
Sign-up sheets with the appropriate duties and
times will be available at our next club meeting.
Even with volunteering at the show, there will
still be plenty of time for you to peruse the mod-
els, spend some money with the vendors and com-
miserate with other modelers.

Vol 21 No. 9 Page 13
Miscellaneous
F or all you WWI enthusiasts, Taurus Models
[ taurusmodels.pl ] has a couple of items to peak your interest. Both in 1/32nd scale, they are showing a resin spark plug set for Type IV British rotary engines. Now that might seem to be superfluous without a British rotary engine to put them on but Taurus has solved that problem for you with their Gnome Monosoupape 9 type B-2 rotary engine. This kit is 91 resin bits with some wire for ...well,
wiring. AFV Club has been diversifying their product line of late and to continue that effort they have some scale (1/35) camo netting. In desert tan, jungle green and snow gray you can now toss out your bags of tea and that bolt of cheese
cloth. Those of you that have the AMT 1/48th scale kit of the Tigercat still in your stash, Wolfpack Design has a wing-fold set to help you out. It looks to be fairly extensive and is the game in town if you want folded wings. For those of you yearning to fold some wings but have no kit, the AMT kit
was re-issued by Italeri some few years ago. For the airliner crowd, there are some after-market decals available from Lima 2ovember Decals. [Indecals.com] This is Norwegian company that specializes in Norwegian airliner decals. Mostly SAS and Norway Air decals that are printed by that group in Italy, Cartograf. They also have a few vacuform/resin kits, notable a Waco YKS-7. One interesting decal sheet has some tail flash for an
airliner that features Sonja Henie. While we’re on the decal thingy, Print Scale
[printscale.org] has some high-quality decals to assist you with your ordnance marking chores. This Romanian company has a decal sheet of US WWII/Korean War bomb and rocket markings. They also are showing a decal sheet
that would go nicely with Eduard’s 1/144th scale JU-52.
Golzar
Aircraft
S o, it's already September... The Nationals are over; the kids are back in school, and everywhere except Texas the air is turning towards fall. You know what that means? It's
high time to get our Christmas lists going! And, speaking of the Nationals, I hope that everyone that went had a great time, and for those that didn't (which include me) I hope to see you in Hampton, Virginia, next
year for the 50th anniversary of IPMS/USA. Alright, on to the models… If you haven't seen the new Tamiya Corsair yet, then get out from under that rock and get over to King's Hobby. It's an engineering marvel. It gets my vote for kit of the decade. Be sure to pick one up and build it. I know some of you won't have room for it. So, just have fun building it and give it to the neighbor kid.
He'll like it too. Due to be hitting the shelves soon is a brand new 1/32nd scale Me 109G-6 from Revell of
Germany. The latest '109 super-kit is a study in simplicity and detail. RoG designed this thing without taking a page from Hasegawa's notes and produced a kit with a low number of parts and a
ton of details. It's a striking model and it does have some interesting engineering breakdown of the parts. And, the kicker is the price point is set at $30.00! Yep, less that the current price of many 1/72nd scales kits. Holy Moly... how can you not
get a couple of these beauties? Ah, yes who can forget Meng Models, one of the new hotshot kids on the block? Well, they've just announced a new large scale kit that took many by surprise. A new 1/32nd scale Me 163B will be coming forth from the Meng production lines by the end of the year. Yep, a new
replacement for the aging Hasegawa effort, which actually
Old Rumors/New Kits 2G
Aaron Smischney, Jeff Forster, Golzar Shahrzăd, Mike Poole,
Randy Bumgardner, Rick Herrington

Page 14 Vol 21 No. 9
does build up into a respectable model of the diminutive
rocket fighter. Also in the pipeline from Meng is a new tool follow up to their previous release, a 1/48th scale Me 410A-1.
I'm not sure of the time line, although it shouldn't be too long as I'm sure they can reuse a sprue or two from their
previous Me 410B-2 release. So, it you've been to Hyperscale recently, you will have undoubtedly noticed the Eduard ad with the pink bikini-clad blonde lying atop the MiG-21. Yes, that is an aircraft
in the ad; I had to verify it several times. Anyway, that's Eduard's latest offering in their very nice MiG-21 lineup – not the girl, the airplane. It's a brand new 1/48th scale MiG-21PFM, the Tarantula Fighter. I'm not sure where the “Tarantula Fighter” stuff came from but if it's as good as its predecessors, then it will be one to get for the Cold War
Modelers. The other new kid on the block that has come on like gangbusters, Kitty Hawk, has some nice surprises up their collective sleeves. First up is their 1/48th scale JAS-39A/C Gripen which hit the store shelves last month, like King's...,
and is a very nice kit of this under-represented aircraft. Second is the 1/48th scale MiG-25 Foxbat. This kit will be a biggie with lots of ordnance to pack onto it. I'm expecting
it to hit the shelves sometime around Christmas... Ah, just in time for Good Ole St. Nick to drop it under my tree.
Meng also announced a couple of surprising new kits, but no release dates, as
of yet. The first certainly floored me, as I thought the Revell-Monogram kit was still pretty good with a bit of work. They are releasing a new tool 1/48th scale
McDonnell-Douglas F-101A Voodoo. Woo-hoo! Yes, I know it's not the F-101C, or the RF-101, but it's a start to a great line of kits. The CAD renderings look very nice, and, given Kitty Hawk's good track record, it will be
kit worthy of the stash – if not the actual workbench. The biggest surprise was what Meng announced just recently: a 1/32nd scale North American AT-6G. Yep, a brand new Texan – not only a new Texan, but a new
1/32nd scale Texan. Now, this is the 'G' version with provisions for the wing guns and rockets and all of that. However, I'm suspecting that it can be easily backdated to USAAF/USN trainer configuration. No word on release date, so plan on
sometime in 2014.
Randy
Shipping �ews
H ere’s the stuff. The long awaited Trumpeter British cruiser HMS Belfast will be in your favorite hobby shop (King’s) next week.
The USS San Diego LPD-22 Amphibious Transport Dock is coming your way soon . This kit is from Bronco and both items are in 1/350th scale.

Page 15 Vol 21 No. 9
Aoshima is showing a couple 1/700th scale IJN Heavy cruis-ers, the Maya (1944) and the Takao.
For something a bit more modern , Hasagawa has the JMSDF Kirishima, a modern Japanese guided missile cruiser. From HobbyBoss is the Soviet aircraft carrier Baku. Both kits are in 1/700th scale. Revell is rounding out the offerings this month with a 1/72nd scale Type IXC U-Boat.
Nothing has been announced in 1/200th scale ships, thank goodness.
Rick
Automotive
A uto detail modelers rejoice! The Big ‘T’ is back and better than ever, baby. After a dearth of automotive kits for
some time, Tamiya has re-cently an-nounced a major new tooling
project. The Fer-
rari “LaFerrari” will be available in 1/24th scale as a highly detailed (full engine, full suspension, and opening every-thing) kit this fall. Recently leaked CAD drawings indicate it will have a similar level of detail to their popular Enzo and
FXX kits.
The best news is it appears to be reasonably priced in the $40 range so far thanks to the weak Japanese Yen. I already have mine on pre-order. Maybe while we wait we can learn to
accept that dorky model name: Ferrari “TheFerrari” ???
I said Tamiya was back and here’s even more! A new
Harley Davidson Fat Bay in Giant Scale (1/6th) will hit the
market just in time for Santa’s Midnight Ride.
As all big
scale bike
aficionados
(both of you)
will recall,
this isn’t the
first Fat Boy
from Tamiya
in this scale.
They once
offered a 1/6
version back in the 1990’s that quickly disappeared from
store shelves amid swirling rumors the folks in Milwaukie
were sore about something. Apparently they’ve kissed and
made up and a new updated version will soon be on offer.
Hold onto your wallet though. This baby will retail north of
$170.
Long-time readers of this column know I was almost cata-tonic a few months ago when it was announced that not one, but TWO McLaren F1 supercars would be tooled for injec-
tion molding this year. Since then the Fujimi version of this amazing vehicle has been released to much disappointment and dejection. We knew there would be no engine or suspension but the car’s
tooling has a myriad of flaws as well.
So now all eyes are on the other guys – Aoshima.

Vol 21 No. 9 Page 16
The photo is a pre-tooling mock-up printed on a 3D printer to test for accuracy and part fit. The detail is outstanding, the research is spot-on, and the best part is that they actually take time to listen to their customers on Facebook and other so-
cial media sites. The first version release will be the Le Mans GT Long Tail early next year. Sorry, no pricing information is available yet
but I’d guess low $60s. That’s it for me. Build something!
Mike
Armor
G reetings armor fans and hello armor curious! Let’s do this on a timeline...first up , WWI.
Meng’s new FT-17 is hitting the channels and everyone who has written about it has nothing but positive things to say. Full interior and multiple gun options! Plus, if you choose not to mount the Hotchkiss machine guns, there is a tripod included so you can set it up in a gun compartment. How’s
that for cool?
Ok, how about early WWII? Bronco has released more infor-mation on a weird but cool war Panzer I, Ausf F. As you can see, its “the best from our heart”. Full interior, modelkasten style tracks with separate pins (love ‘em or hate’em. I like
them personally).
Here is an official shot from Bronco of a built-up model
showing the interior and wheel and track detail. Very cool!
HobbyBoss has a kit for this tank that is also well done and
in shops now. It has no interior but is a much simpler build
and cheaper. Gotta love competion and
choice!
The HobbyBoss kit for those that want a ‘curbside’ kit or the
Bronco that needs nothing else to make a complete and full kit( well, maybe an en-gine?). On the Russian front, HobbyBoss is coming out with a Soviet T-37. This little tank was previously only available as a pretty dodgy kit. It’s nice to see it coming out
in 21st century style.
Let’s go forward a few decades...If you’re a modern Russian armor fan, Trumpeter is going to make you very
happy.
First up, they have announced an all new T-80B. Very cool! I have built (and spent a lot of time fixing) the Dragon/
Shanghai kit of this beast.
By shanghai, I think that they mean it steals you away to spend years in indentured servitude...but, I digress.) Also announced is their first T-72! Trumpeter T-72B 1990. This is actually very closely related to their new T-90 tank but that’s
Ok.
Knowing Trumpeter they will be burying us under all the variants soon enough. Look at what they’ve done with their
T-62 and T-64 series.

Page 17 Vol 21 No. 9
Some people may complain about a few inaccuracies here
and there but, I for one, am not complaining.
I have never understood some people. Would you rather go back to the Skiff and those old clunky Dragon kits? Spend-ing hours reshaping turrets, replacing all the road wheels and melding poorly cast resin hulls not to mention those bare
bones plastic tubs/hulls?
I’m glad I have that old T-80 under my belt to remind me how difficult it can be. I am looking forward to a resin free build! Anyway, I rambling and ranting and this is not the editorial section. It’s a superb time to be a modeler no matter what subject you
like to build. So don’t be shy, build it!
Cheers, ‘til next time!
Aaron
Miscellaneous P.S.
I came across this next item after I’d already ‘pasted-up’ the newsletter and got lazy, so I placed it here. From Pegasus
Models comes something to please the sci-fi modeler as well as the armor folk. In 1/32nd scale, The Hunter /Killer tank from the movie Termi-nator 2:Judgment Day. The kit measures in at about 8”X 12” inches and has an MSRP of
$75.
Golzar
2013 Region 6 Regional Model Convention
Show Roster Openings
T his is the current listings of staff openings for the Region 6 Regional Convention that our club is hosting
Saturday, October 5. If you have already signed up to do something, thanks! If not, please take a moment, peruse the list and make a se-lection. A complete listing will be available at our Sep-
tember 19th club meeting. There is an overabundance of members signing up for pre-show/trophy set-up duties. If you can see your way clear to utilizing your talents in another or additional area
it will be greatly appreciated. Show Registration: This is kinda cool as all the models
come to you. From 10:30A to 12:30P - two openings General Admission: From 1:00P to 3:00P - one opening From 3:00P to 4:00P - one opening Door Prize Table: From 1:00P to 3:00P - two openings Show Judging: Come one, come all! You can’t have too
many judges. Make-%-Take: Introduce budding young modelers to the hobby. Maybe even get your hands ‘dirty’ on a snap-tite
kit. Those kits have come along way. From 10:00A to 12:00P - one opening From 12:00P to 2:00P - one opening Most of these staffing duties aren’t all that strenuous and most are in the afternoon. Which just might be the perfect time for you to sit back and relax (seating is provided) and
check out your newly acquired treasures.

In the latest issue of…
IPMS/USA Journal July-August Volume 25, �umber 04
Join IPMS/USA!
IPMS/USA is an organization dedicated to the fun of Scale Modeling. Started by Jim Sage of Dallas, Texas in 1964,
there are now IPMS branches all over the world.
As part of your IPMS/USA membership, you will receive The IPMS Journal six times a year. In it you will find stories of interest on subjects such as aircraft, armor,
automotive, ships, and figures. You will also find listings of IPMS contests and swap meets, hints and tips, and reviews. Membership also qualifies you to participate in IPMS/USA sanctioned Regional Contests, as well as our world-famous
National Convention, held each summer.
As a member, you'll also be able to access our online Member's Forum where a wide variety of society and modeling topics are discussed. In addition, many hobby shops around the county offer discounts to IPMS/USA
members. To join IPMS/USA, simply use the form below or
go to www.ipmsusa.org and click Join IPMS/USA!
For any questions or problems regarding your membership application or renewal, please contact the IPMS/USA Officer
Manager, Ms. M.J. Kinney [email protected].
Vol 21 No. 9 Page 18
• The Evolution of IPMS/USA Publications - The 50-year journey from the IPMS magazine to the Journal, by Ralph R. Forehand
• Building a Better Bogue - Improving the Flight Deck and Camouflaging Sky Wave’s 1:700 Escort Carrier, by Bert McDowell
• Wow! I Can See Again! - How lenses and lights can change your modeling experience, by H. Davis Gandees
• To Boldly Go… A Three-Year Mission to Complete a Detailed 1:1400 AMT Enterprise D, by Bart Cusamano
• Bitchin’ Camaros - Putting A Great Finish on the Next-Generation Chevy from Revell’s New kit, by Wolfgang Meindl
• From Cover Art to Starship - Building ASNS Discovery from the Antares Trilogy from scratch, by Dan Thompson

Next Meeting:
September 19, 2013 at
Austin Old Quarry Library (7051 Village Center Drive)
7PM to 8:45PM
Program: Quarterly Contest
Theme: ‘Bondo’ Special
Austin Scale Modelers Society
c/o 1228 W. San Antonio Street San Marcos, Texas 78666
www.austinsms.org
IPMS/USA Region 6 2013 Convention
Saturday,
October 5, 2013
Norris Convention
Center
Austin, Texas
Show theme: ‘From Russia With Love’ Any Russian or Soviet subject is eligible
to enter for the theme award.
Show theme is being sponsored by:
For more information visit: austinsms.org