NEWBURY AMATEUR ASTRONOMICAL SOCIETYnewburyastro.org.uk/assets/beginners/whatsup/Decemb… · ·...
9
1 NEWBURY ASTRONOMICAL SOCIETY BEGINNERS MAGAZINE - DECEMBER 2011 THE CONSTELLATION OF CASSIOPEIA Cassiopeia is one of the most recognisable constellations and is directly overhead at this time. The stars that form the distinctive ‘W’ shape are bright and make the pattern stand out very well even though the constellation is located in the Milky Way. If binoculars are used to sweep through Cassiopeia what looks like clouds of stars can be seen. These are the stars in the arms of our galaxy ‘The Milky Way’. Cassiopeia is circumpolar this means it is always visible in a clear night sky because it does not set below the horizon. It is also useful for finding the North star (or Pole Star) Polaris in the constellation of Ursa Minor. Cassiopeia is located almost directly opposite Polaris from Ursa Major (The Great Bear or Plough). By using the central ‘Ʌ’ of the ‘W’ as a pointer the direction passes through the Pole Star and on to Ursa Major. If the Pole Star cannot be found on the way to Ursa Major then the two pointer stars of the saucepan shape of Ursa Major can be used to find it. As Cassiopeia is directly overhead at this time of the year it can be used to find Ursa Major that is hovering over the northern horizon for most of the winter. There are two Messier Open Clusters in Cassiopeia, M52 and M103. M52 M103 Both of these open clusters are within the reach of binoculars and will appear as small fuzzy spots. A telescope will resolve the M52 cluster enabling most of its 150 individual stars to be made out. The stars are very young and may even be younger that those in the Pleiades in Taurus. M103 was a late addition to Charles Messier’s catalogue and wasn’t even discovered by Messier. The cluster is slightly smaller and fainter than M52 but is still easy to find using binoculars. There are a couple of small satellite galaxies of M31 in Cassiopeia but these will need a medium sized telescope to find. GEMINID METEOR SHOWER THIS MONTH In the middle of this month, around 6 th to 19 th December, there will be a meteor shower known as the Geminid shower. The best time to watch for the meteors will be in the evening of 13 th and the morning of 14 th December when the shower should be at its peak. However some should be visible all night. Unfortunately the Moon will be a waning gibbous crescent just 20° south of the radiant in Cancer. The type of meteor that occurs in showers usually originates from a comet and is much more common than the ‘Fireballs’ that originate from asteroids. The Geminid shower is thought to originate from an asteroid known as 3200. This means the meteoroids (the particles moving through space) are probably made of rock or metal so they often survive quite a long time when they enter Earth’s atmosphere. The Geminid meteors also enter the atmosphere comparatively slowly at about 35 km/second compared with other showers that enter at over 75 km/second. As a result of this slower entry and a more robust make up the Geminid meteors tend to appear slower and their trails across the sky last longer. Because the constellation of Gemini is above the horizon from early evening, the meteors can be seen for most of the night and in almost any part of the sky. By midnight the constellation will be almost due south and high in the sky. See the chart below. Weather permitting, the Geminid shower could be promising this year and should be worth waiting up for if the sky is going to be clear, even with the Moon. If you are intending to have a look remember to wrap up warm before you go out because you will soon feel very cold and that will spoil your enjoyment of the shower. Make yourself comfortable in a garden chair and spend at least half an hour looking. There might be up to 100 per hour if we are lucky. NEWBURY ASTRONOMICAL SOCIETY MEETING 6 th January Members night - Talks by our members Website: www.newburyas.org.uk THE NEXT NEWBURY BEGINNERS MEETING 21 st December DAWN on Vesta Website: www.naasbeginners.co.uk
-
Upload
phungkhanh -
Category
Documents
-
view
217 -
download
1
Transcript of NEWBURY AMATEUR ASTRONOMICAL SOCIETYnewburyastro.org.uk/assets/beginners/whatsup/Decemb… · ·...

1
NEWBURY ASTRONOMICAL SOCIETY
BEGINNERS MAGAZINE - DECEMBER 2011
THE CONSTELLATION OF CASSIOPEIA
Cassiopeia is one of the most recognisable constellations and is
directly overhead at this time. The stars that form the
distinctive ‘W’ shape are bright and make the pattern stand out
very well even though the constellation is located in the Milky
Way. If binoculars are used to sweep through Cassiopeia what
looks like clouds of stars can be seen. These are the stars in the
arms of our galaxy ‘The Milky Way’.
Cassiopeia is circumpolar this means it is always visible in a
clear night sky because it does not set below the horizon. It is
also useful for finding the North star (or Pole Star) Polaris in
the constellation of Ursa Minor. Cassiopeia is located almost
directly opposite Polaris from Ursa Major (The Great Bear or
Plough). By using the central ‘Ʌ’ of the ‘W’ as a pointer the
direction passes through the Pole Star and on to Ursa Major. If
the Pole Star cannot be found on the way to Ursa Major then
the two pointer stars of the saucepan shape of Ursa Major can
be used to find it. As Cassiopeia is directly overhead at this
time of the year it can be used to find Ursa Major that is
hovering over the northern horizon for most of the winter.
There are two Messier Open Clusters in Cassiopeia, M52 and
M103.
M52 M103
Both of these open clusters are within the reach of binoculars
and will appear as small fuzzy spots. A telescope will resolve
the M52 cluster enabling most of its 150 individual stars to be
made out. The stars are very young and may even be younger
that those in the Pleiades in Taurus. M103 was a late addition
to Charles Messier’s catalogue and wasn’t even discovered by
Messier. The cluster is slightly smaller and fainter than M52
but is still easy to find using binoculars. There are a couple of
small satellite galaxies of M31 in Cassiopeia but these will need
a medium sized telescope to find.
GEMINID METEOR SHOWER THIS MONTH
In the middle of this month, around 6th to 19
th December, there will
be a meteor shower known as the Geminid shower. The best time to
watch for the meteors will be in the evening of 13th and the morning
of 14th December when the shower should be at its peak. However
some should be visible all night. Unfortunately the Moon will be a
waning gibbous crescent just 20° south of the radiant in Cancer.
The type of meteor that occurs in showers usually originates from a
comet and is much more common than the ‘Fireballs’ that originate
from asteroids. The Geminid shower is thought to originate from an
asteroid known as 3200. This means the meteoroids (the particles
moving through space) are probably made of rock or metal so they
often survive quite a long time when they enter Earth’s atmosphere.
The Geminid meteors also enter the atmosphere comparatively
slowly at about 35 km/second compared with other showers that
enter at over 75 km/second. As a result of this slower entry and a
more robust make up the Geminid meteors tend to appear slower and
their trails across the sky last longer.
Because the constellation of Gemini is above the horizon from early
evening, the meteors can be seen for most of the night and in almost
any part of the sky. By midnight the constellation will be almost due
south and high in the sky. See the chart below.
Weather permitting, the Geminid shower could be promising this
year and should be worth waiting up for if the sky is going to be
clear, even with the Moon. If you are intending to have a look
remember to wrap up warm before you go out because you will soon
feel very cold and that will spoil your enjoyment of the shower.
Make yourself comfortable in a garden chair and spend at least half
an hour looking. There might be up to 100 per hour if we are lucky.
NEWBURY ASTRONOMICAL SOCIETY MEETING
6th January Members night - Talks by our members
Website: www.newburyas.org.uk
THE NEXT NEWBURY BEGINNERS MEETING
21st December DAWN on Vesta
Website: www.naasbeginners.co.uk

2
DAWN ON VESTA Nasa’s DAWN space probe arrived at its destination, the
asteroid Vesta, in July this year. The craft used a new ‘High
Tech’ engine to propel it on its rather roundabout journey to
Vesta. The probe was launched on a Delta II rocket in
September 2007. After leaving the launch vehicle, Dawn used
its revolutionary Ion Thruster Engine to accelerate it to an
encounter with Mars.
The route Dawn took to Vesta
Dawn used a gravitational ‘slingshot’ maneuver to gain speed
from Mars. The probe then journeyed further out into the
Asteroid Belt to rendezvous with Vesta in July this year. After
spending just over a year studying Vesta it will depart on a
further 17 month journey to arrive at Ceres in February 2015.
Vesta and Ceres with our Moon for comparison
During its nearly decade-long mission the Dawn mission will
study the asteroid Vesta and then move on to the dwarf planet
Ceres. These celestial bodies are believed to have accreted
early in the history of the solar system. The mission will
characterise the early solar system and the processes that
dominated its formation.
Ceres and Vesta were chosen as two contrasting proto-planets,
the first one apparently "wet" (that is icy) and the other "dry"
(or rocky). Both bodies are thought to have had further growth,
through accretion, terminated by the formation of Jupiter. They
provide a bridge in our understanding between the formation of
rocky planets and the icy bodies of our solar system and under
what conditions a rocky planet can hold water.
Ceres and Vesta are the two most massive residents of the asteroid
belt. Vesta is a rocky body, while Ceres is believed to contain large
quantities of water ice. The profound differences in geology
between these two protoplanets that formed and evolved so close to
each other form a bridge from the rocky bodies of the inner solar
system to the icy bodies, all of which lay beyond in the outer solar
system. At present most of what we now know about Vesta and
Ceres comes from ground-based and Earth-orbiting telescopes like
NASA's Hubble Space Telescope. The telescopes pick up sunlight
reflected from the surface in the ultraviolet, visible and near-infrared
and by emitted radiation in the far-infrared and microwave regions.
Now we are beginning to receive close up images of Vesta returned
from DAWN as it orbits the asteroid.
Vesta imaged as DAWN entered orbit on 17
th July 2011
DAWN with remain in orbit around Vesta for a year studying many
aspects of the asteroid with a host of onboard instruments.
A view of the south polar region of Vesta from DAWN
After a year studying Vesta, DAWN will depart for its second
destination the dwarf planet Ceres. When it arrives at Ceres in July
2015 observations will provide unprecedented data to help scientists
understand the earliest chapter of our solar system. Ceres is a dwarf
planet whose mass comprises about one-third of the total mass of
the bodies in the asteroid belt. Spectral characteristics suggest it
may be a frozen water-rich body unlike Vesta which is rocky with a
possible metallic core.

3
ASSEMBLING A TELESCOPE FOR THE FIRST TIME
The diagram above shows a typical telescope assembly with the main parts identified.
First a safety notice. If assembly is to be conducted outside in
daylight then the Dust Cap [A] must be fitted to avoid sunlight
entering the tube and causing damage to the components or
injury to the person who is assembling the telescope.
In this article the guidance is of a general nature as each
telescope has differences in design depending on the supplier
and the components used. Illustrations are from the assembly
of a Skywatcher 120mm f1000 refractor fitted to an EQ5
Equatorial Mounting and Field Tripod.
On receiving the new telescope open the package and check
that all sub-assemblies and components are present according
to the list in the instructions. Read the instructions as these
may be good and enable the telescope to be assembled without
any problems. The guidance in this magazine should be used
as additional help or if problems are encountered.
When using these instructions first identify the equivalent sub-
assemblies and components supplied with those shown in the
diagram above, they may not be identical but should look
similar. When this has been done assembly can begin.
First assembly can be done indoors or outdoors but if it is to be
done outside in daylight take special note of the safety notice
at the beginning of this article.
First set up the tripod stand [comprising a & b] (from the
diagram above). For the first assembly it is not necessary to
accurately ‘level’ or ‘align’ the stand. It does however help to
start with the stand roughly level and oriented in a north – south
alignment. (Figures 1 & 2 show an alterative design.)
Figure 1 A typical Field Tripod’ with a Leg Spreader
Position the Leg Spreader on the lower Hand Nut with the
strengthening webs at the bottom and the leg notches located on
the legs. Tighten the Hand Nut until the legs are rigid.

4
Do not over tighten the Hand-Nut or it may damage the Leg
Spreader.
Figure 2 View of the underneath of the Leg Spreader
Using a compass to identify north, rotate the tripod so that the
marked north position is pointing approximately north.
Figure 3 Using a compass to align the stand to north
It will be necessary to align and level the stand more accurately
for first observing session. We will be covering this aspect in the
January magazine.
On the tripod mounting head shown in Figure 3 there is a fine
alignment peg at the north position. This is used to carry out fine
alignment on north for observing. During first assembly if a
notch is present make sure the two adjusters on the equatorial
mounting base are unscrewed so they do not interfere with fitting.
Figure 4 The Equatorial Mounting fitted to the Tripod Head
The Equatorial Mounting Securing Hand Grip can be seen above
the Leg Spreader in Figure 2. If the Equatorial Mounting is a
heavy model an extra pair of hands may be required for this
operation. Lift the Equatorial Mounting and position it on to the
Tripod Mounting Head. Ensure the fine adjusting screws do not
‘hang up’ on the ‘North’ location peg (if present). Raise the
Equatorial Mounting Securing Hand Grip and rotate it until the
thread engages into the thread in the Equatorial Mounting base.
Tighten the Equatorial Mounting Securing Hand Grip to secure the
Equatorial Mounting. (Securing arrangements may vary.)
Figure 5 RA Lock Knob [8] similar to Dec Lock Knob [9]
Before proceeding with the next operation tighten the RA Lock
Knob [8] and the Dec Lock Knob [9] to prevent inadvertent
rotation. If not already fitted (as shown in Figure 4) fit the
Counterweight Rod [4].
Figure 6 Counter Balance Weight and Rod
Remove the Counterweight safety screw from the end of the
Counterweight Rod. Slide the Counterweight on to the
Counterweight Rod and secure using the Counterweight Thumb
Screw [6]. Re-fit the Counterweight safety screw to the
Counterweight Rod. The Tripod and Equatorial Mounting are now
ready to receive the Telescope Optical Tube Assembly.
If the type of tripod shown in the opening diagram is supplied then
it should be assembled as follows: Open the Tripod Legs [a] while
raising the hinged Spreader Arms. When the Spreader Arms are
fully extended position the Accessory Tray [b] on top of the
Spreader Arms. Align the holes in the Accessory Tray with the
holes on the Spreader Arms and fit the securing screws. Pull the
legs out to fully tension the legs and produce a rigid assembly that
is ready to fit the Equatorial Mounting.

5
FITTING THE OPTICAL TUBE ASSEMBLY TO THE MOUNT
Most telescopes use a system of Tube Mounting Rings [12],
Mounting Plate [11] and a ‘Dove Tail’ location to fix the
Optical Tube Assembly (telescope) to the mounting.
Figure 7 The Optical Tube Assembly
Figure 8 The Tube Mounting Rings and Mounting Plate
Figure 9 The ‘Dovetail Locator’ on the Mounting
Before starting to assemble the components to fit the Optical
Tube Assembly to the Mounting, the mounting must be
positioned in the orientation in which it will be used. This does
depend largely on the design of the mounting. We must ensure
the Drive Control Knobs do not interfere with the movement of
the telescope and they are easily accessible when using the
telescope. Most observing will be done with the telescope
pointing towards the south with a view sweeping from east to
west. So it helps to set up as we expect to observe.
The Tripod should have been set up roughly in a north – south
alignment as shown in Figures 1 and 3. Release the Dec Lock
Knob [9] see Fig 5 rotate the Dec until the Dove Tail is sitting
horizontally and re-lock the Dec Lock Knob. See Figure 9.
Before assembling the Tube Mounting Rings to the Mounting
Plate fit the Mounting Plate into the ‘Dove Tail’ on the
Equatorial Mounting. It will usually only fit one way and often
has a location screw set at an angle to ensure it is fitted the right
way up and in the correct position. With the Mounting Plate
fitted into the ‘Dove Tail’, position the Tube Mounting Rings
where they will be secured to the Mounting Plate. Position the
Tube Mounting Rings so that when the hinged top section is
opened it opens downward and the clamp screws are on the top.
Take a note of the orientation of the Tube Mounting Rings.
Figure 10 Tube Mounting Rings and Mounting Plate Assembly
Remove and secure the Tube Mounting Rings to the Mounting
Plate in the positions established above. Securing is usually done
with two bolts or screws. See Figure 8. Fit the Tube Mounting
Assembly into the ‘Dove Tail’ and clamp it in position using the
Clamp Screw and the Location Screw. See Figure 10.
The next operation may require an extra pair of hands. Undo the
Tube Mounting Ring Clamps and swing them clear. Swing the
hinged top of the rings into the ‘open’ position. The Optical
Tube Assembly [D] is usually supplied pre-assembled except for
fitting the Finder [F]. Lift the Optical Tube Assembly and
carefully position it into the open Tube Mounting Rings with the
Telescope pointing to the south. While holding the Optical Tube
Assembly in the lower half of the Tube Mounting Rings raise the
top sections and lightly clamp around the tube. See Figure 11
Figure 11 The Optical Tube clamped in the Mounting Rings
6
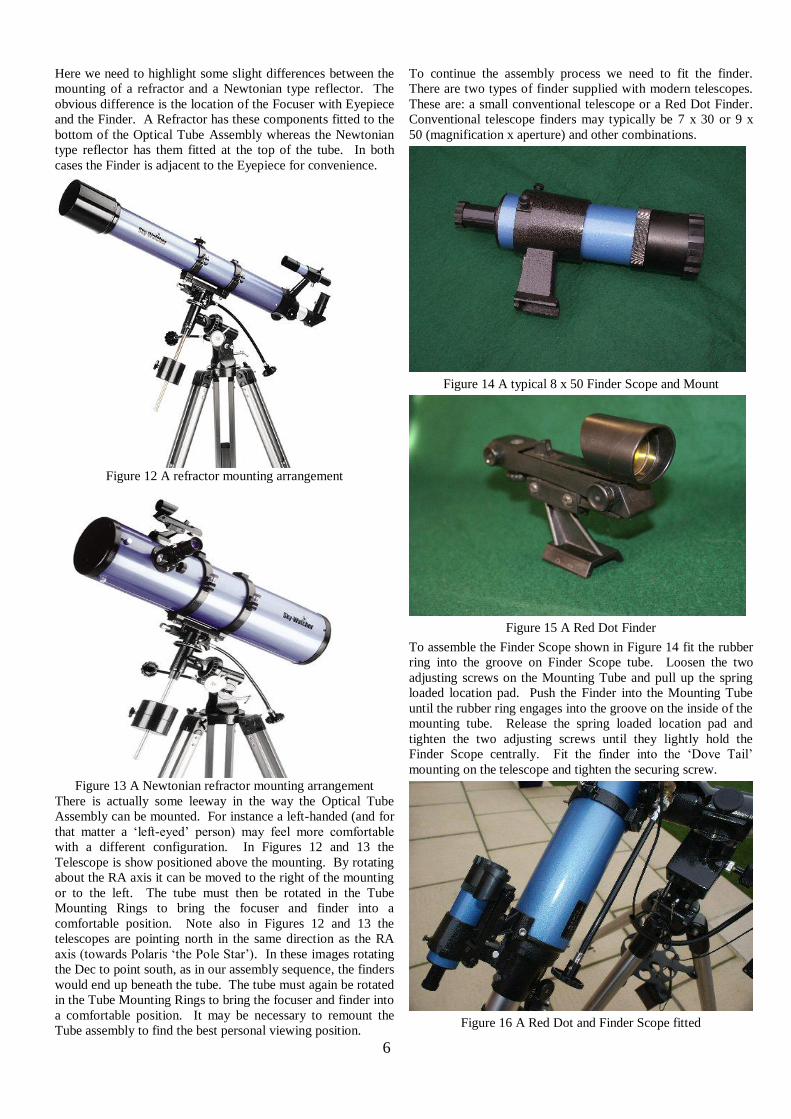
Here we need to highlight some slight differences between the
mounting of a refractor and a Newtonian type reflector. The
obvious difference is the location of the Focuser with Eyepiece
and the Finder. A Refractor has these components fitted to the
bottom of the Optical Tube Assembly whereas the Newtonian
type reflector has them fitted at the top of the tube. In both
cases the Finder is adjacent to the Eyepiece for convenience.
Figure 12 A refractor mounting arrangement
Figure 13 A Newtonian refractor mounting arrangement
There is actually some leeway in the way the Optical Tube
Assembly can be mounted. For instance a left-handed (and for
that matter a ‘left-eyed’ person) may feel more comfortable
with a different configuration. In Figures 12 and 13 the
Telescope is show positioned above the mounting. By rotating
about the RA axis it can be moved to the right of the mounting
or to the left. The tube must then be rotated in the Tube
Mounting Rings to bring the focuser and finder into a
comfortable position. Note also in Figures 12 and 13 the
telescopes are pointing north in the same direction as the RA
axis (towards Polaris ‘the Pole Star’). In these images rotating
the Dec to point south, as in our assembly sequence, the finders
would end up beneath the tube. The tube must again be rotated
in the Tube Mounting Rings to bring the focuser and finder into
a comfortable position. It may be necessary to remount the
Tube assembly to find the best personal viewing position.
To continue the assembly process we need to fit the finder.
There are two types of finder supplied with modern telescopes.
These are: a small conventional telescope or a Red Dot Finder.
Conventional telescope finders may typically be 7 x 30 or 9 x
50 (magnification x aperture) and other combinations.
Figure 14 A typical 8 x 50 Finder Scope and Mount
Figure 15 A Red Dot Finder
To assemble the Finder Scope shown in Figure 14 fit the rubber
ring into the groove on Finder Scope tube. Loosen the two
adjusting screws on the Mounting Tube and pull up the spring
loaded location pad. Push the Finder into the Mounting Tube
until the rubber ring engages into the groove on the inside of the
mounting tube. Release the spring loaded location pad and
tighten the two adjusting screws until they lightly hold the
Finder Scope centrally. Fit the finder into the ‘Dove Tail’
mounting on the telescope and tighten the securing screw.
Figure 16 A Red Dot and Finder Scope fitted
7
BALANCING THE TELECOPE
The main assembly sequence is now complete and the new
telescope is almost ready to use. However before use we need to
make a few adjustments to balance the telescope.
Figure 17 The completed telescope assembly
First we can balance the Optical Tube Assembly. To make sure
the balance is correct we need to fit an Eyepiece into the Focuser
Assembly. Loosen the small thumb screw on the side of the
focuser tube. If fitted remove the dust cap from the focuser and
fit the Eyepiece. Tighten the thumb screw to secure the Eyepiece.
Make sure the telescope is not pointing towards the Sun and
remove the Dust Cover from the end of the Tube.
Support the tube and release the Dec Lock. Carefully let the tube
swing up or down a little to indicate which end is heaviest.
Slacken off the Tube Mounting Ring Clamp Screws. While
rotating the tube back and forth slightly slide the tube through the
Tube Mounting Rings towards the lighter end. Let the tube swing
up and down again to check the balance. Repeat the process until
the tube does not swing up or down. Re-tighten the Tube
Mounting Ring Clamp Screws and the Dec Lock.
Figure 18 The RA axis on the Mounting
To balance the RA axis support the tube assembly (make sure the
Dec is locked) and the Counter Weight Rod is horizontal as
shown in Figure 18. Support the Optical Tube Assembly to
prevent inadvertent rotation. Release the RA lock and allow the
Tube and Counter Weight Assembly to rotate slightly. If the
Optical Tube Assembly moves down move it back to horizontal
and engage the RA Lock. Loosen the Counter Weight Clamp
Screw and slide the Counter Weight further along the Rod.
Repeat until rotating assembly is balanced.
FITTING ANY EXTRA COMPONENTS
The telescope is now ready for use and we will be looking at the
final adjustments that need to be made next month. In January we
will be looking at setting the telescope up for observing.
Some telescopes can have additional upgrade equipment supplied
when purchased at additional cost. Alternatively upgrades can be
bought separately or at a later stage. Here are a few words about
those extra components that are most often supplied with the
telescope package.
One very useful extra is an electric drive on the RA axis. This
allows the telescope to track an object as it appears to move across
the sky due the rotation of Earth on its axis.
Figure 19 A RA and Dec Drive System
There are many ways that the drive system is fitted depending on
the design of the mounting. Some have a small motor that replaces
the RA Control Knob [7]. Some mountings have a special motor
bay designed into the Equatorial Mounting. The telescope
assembled in this article does have a special bay for the RA Motor.
It also has a drive on the Dec axis but this is a relative luxury
compared to the RA Drive. The Drives with the Control Box and
Battery Pack shown in Figure 19 were supplied with the telescope.
Figure 20 The telescope with RA and Dec Drives fitted
In Figure 20 the Control Box and Battery Pack are shown between
the legs of the Tripod. The RA Dive Motor is housed in the square
black compartment with the cable connected. See Figure 18 for a
closer view of the RA Motor Bay. The Dec Motor is fitted on the
top of the Mounting close to the Dove Tail location. It can be seen
closer in Figure 9 and 18. The motors can be disengaged using the
silver knurled knob on the RA and Dec Hand Control Knobs.
8
THE SOLAR SYSTEM THIS MONTH
MERCURY rises at 07:30 on 1st December, 06:10 on 15
th and
06:14 on 30th it will be low in the south east just before sunrise.
Mercury will be difficult to see and will need a clear view to the
eastern horizon.
VVEENNUUSS rises over the eastern horizon at about 10:09 on 1st
December, 10:13 on 15th and 10:09 on 30
th and will be observable
low in the south west after sunset this month. It will be difficult to
see and will need a clear view to the south western horizon.
MARS rises at 23:06 on 1st December, 22:48 on 15
th and 22:26 on
30th
but is still only 7½ arc-seconds in diameter and therefore still
quite small even in a larger telescope. It is observable after
midnight in the constellation of Leo.
JUPITER rises at 14:04 on 1st December, 13:23 on 15
th and 12:43
on 30th. It will be well high the east at sunset and will be
observable for the rest of the night in the constellation of Aries.
See the table in the next column that lists of interesting events to
watch out for on Jupiter this month.
SATURN rises at 03:23 on 1st December, 02:48 on 15
th and 02:43
on 30th so it will be observable to the early riser in the east close to
the bright star Spica in the constellation of Virgo.
URANUS rises at 12:27 and will be observable until about
midnight this month when it sets in the west. It passed through
opposition in September and is now getting past its best. A
telescope will show Uranus looking like a rather fuzzy blue tinted
star in the constellation of Pisces.
NEPTUNE rises at 11:30 and is an evening object setting in the
west at 21:26 this month. It looks rather like Uranus in a telescope
but smaller and fainter. It is located in the constellation of
Aquarius.
THE MOON The Moon has been creeping along the southern horizon during the
autumn but is now starting to move higher and into clearer air.
The best time to observe the Moon is during periods from ‘New
Moon’ through to just after ‘First Quarter’ (half Moon) [up until
about 5th December] and from just before ‘Last Quarter’ [about
16th
December] to the end of the phase. A filter will lessen the
glare and improve the contrast and will allow the Moon to be
observed right through full Moon. However with the Sun shining
almost directly down on the Moon surface shadows will be short
and it will be more difficult to see surface features in fine detail.
The Phases of the Moon this month
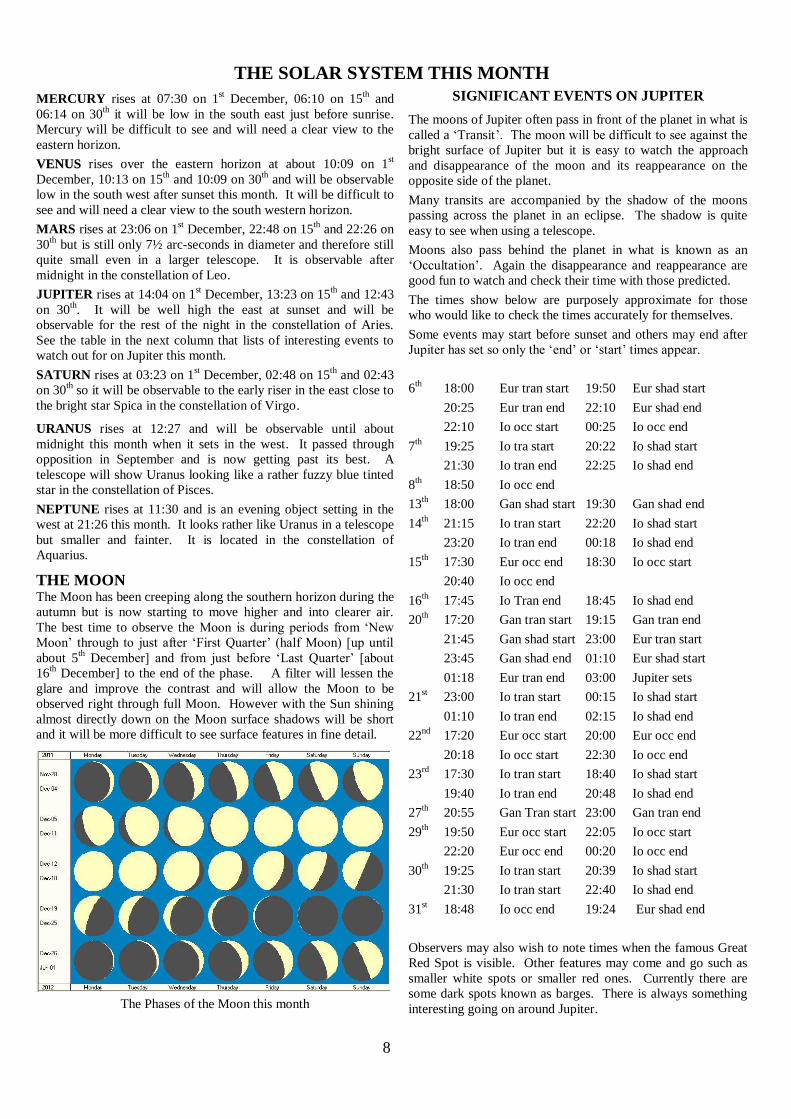
SIGNIFICANT EVENTS ON JUPITER
The moons of Jupiter often pass in front of the planet in what is
called a ‘Transit’. The moon will be difficult to see against the
bright surface of Jupiter but it is easy to watch the approach
and disappearance of the moon and its reappearance on the
opposite side of the planet.
Many transits are accompanied by the shadow of the moons
passing across the planet in an eclipse. The shadow is quite
easy to see when using a telescope.
Moons also pass behind the planet in what is known as an
‘Occultation’. Again the disappearance and reappearance are
good fun to watch and check their time with those predicted.
The times show below are purposely approximate for those
who would like to check the times accurately for themselves.
Some events may start before sunset and others may end after
Jupiter has set so only the ‘end’ or ‘start’ times appear.
6th 18:00 Eur tran start 19:50 Eur shad start
20:25 Eur tran end 22:10 Eur shad end
22:10 Io occ start 00:25 Io occ end
7th 19:25 Io tra start 20:22 Io shad start
21:30 Io tran end 22:25 Io shad end
8th 18:50 Io occ end
13th 18:00 Gan shad start 19:30 Gan shad end
14th 21:15 Io tran start 22:20 Io shad start
23:20 Io tran end 00:18 Io shad end
15th 17:30 Eur occ end 18:30 Io occ start
20:40 Io occ end
16th 17:45 Io Tran end 18:45 Io shad end
20th 17:20 Gan tran start 19:15 Gan tran end
21:45 Gan shad start 23:00 Eur tran start
23:45 Gan shad end 01:10 Eur shad start
01:18 Eur tran end 03:00 Jupiter sets
21st 23:00 Io tran start 00:15 Io shad start
01:10 Io tran end 02:15 Io shad end
22nd
17:20 Eur occ start 20:00 Eur occ end
20:18 Io occ start 22:30 Io occ end
23rd
17:30 Io tran start 18:40 Io shad start
19:40 Io tran end 20:48 Io shad end
27th 20:55 Gan Tran start 23:00 Gan tran end
29th 19:50 Eur occ start 22:05 Io occ start
22:20 Eur occ end 00:20 Io occ end
30th 19:25 Io tran start 20:39 Io shad start
21:30 Io tran start 22:40 Io shad end
31st 18:48 Io occ end 19:24 Eur shad end
Observers may also wish to note times when the famous Great
Red Spot is visible. Other features may come and go such as
smaller white spots or smaller red ones. Currently there are
some dark spots known as barges. There is always something
interesting going on around Jupiter.

9
THE SKY THIS MONTH
The chart above shows the night sky as it appears on 15th December at 9 o’clock in the evening Greenwich Mean Time (GMT). As
the Earth orbits the Sun and we look out into space each night the stars will appear to have moved across the sky by a small amount.
Every month Earth moves one twelfth of its circuit around the Sun, this amounts to 30 degrees each month. There are about 30 days
in each month so each night the stars appear to move about 1 degree. The sky will therefore appear the same as shown on the chart
above at 10 o’clock GMT at the beginning of the month and at 8 o’clock GMT at the end of the month. The stars also appear to move
15º (360º divided by 24) each hour from east to west, due to the Earth rotating once every 24 hours,
The centre of the chart will be the position in the sky directly overhead, called the Zenith. First we need to find some familiar objects
so we can get our bearings. The Pole Star Polaris can be easily found by first finding the familiar shape of the Great Bear ‘Ursa
Major’ that is also sometimes called the Plough or even the Big Dipper by the Americans. Ursa Major is visible throughout the year
from Britain and is always quite easy to find. This month it is close to the northern horizon. Look for the distinctive saucepan shape,
four stars forming the bowl and three stars forming the handle. Follow an imaginary line, up from the two stars in the bowl furthest
from the handle. These will point the way to Polaris which will be to the north of overhead at about 50º above the northern horizon.
Polaris is the only moderately bright star in a fairly empty patch of sky. When you have found Polaris turn completely around and
you will be facing south. To use this chart, position yourself looking south and hold the chart above your eyes.
Planets in the morning sky are: Saturn Mars and Mercury Planets in the night sky are: Jupiter, Uranus and Neptune.
The planets not best positioned this month are: Venus (visible soon after sunset in south west).