NEW Recovery Zone - cdn.ymaws.com
15
NEW.RECOVERYZONE.COM - 2021 Website Handbook NEW Recovery Zone HANDBOOK
Transcript of NEW Recovery Zone - cdn.ymaws.com

NEW.RECOVERYZONE.COM - 2021
Website Handbook
NEW
Recovery
Zone
HA
ND
BO
OK

2
IITAP LLC New.Recoveryzone.com

3
Contents Welcome to the New Recovery Zone website ..................................................................................................................... 3
Basic Introduction .................................................................................................................................................................. 4
Homepage Tour ................................................................................................................................................................. 4
Website URL ................................................................................................................................................................... 4
Therapist Login Web Page ............................................................................................................................................. 5
Therapist Home .................................................................................................................................................................. 6
Sorting information ....................................................................................................................................................... 6
Canceling a Survey ......................................................................................................................................................... 6
Setup Client ID and Assessment.................................................................................................................................... 7
Client Login ......................................................................................................................................................................... 7
Taking the Assessment .................................................................................................................................................. 8
Client Login Script .......................................................................................................................................................... 8
View Reports .......................................................................................................................................................................... 9
Re-Running Calculations ...................................................................................................................................................... 10
Therapist Must Download Reports..... ................................................................................................................................. 11
Simple Survey Storage .......................................................................................................................................................... 11
Email Survey to Client ........................................................................................................................................................... 13
Welcome to the New Recovery Zone website IITAP has rebuilt the Recovery Zone (RZ) website. Starting in 2017 the need to provide a more robust system that would allow the flexibility to grow as well as expand the variety valuable assessment tools was initiated. As we work through this transition, we appreciate the time and patience our community has given us with constructive feedback and hours of testing. We will continue to improve and adjust the system to make it the useful tool we envisioned in its infancy. With any infant there are growing pains and so it is with new applications. We rejoice at the momentous steps of advancement and continue to refine and smooth the rough edges. As the new Recovery Zone begins to take on a life of its own, we will be here to shape and enhance it through the years ahead.

4
Basic Introduction
Homepage Tour
Let us look at the homepage and notice what each of the elements do. Everything that you or your client needs to begin will be found here.
Website URL Currently if you type in recoveryzone.com into your address bar you will be directed back to new.recoveryzone.com. We want to direct our therapist to use the new site for assigning all new assessments.
5
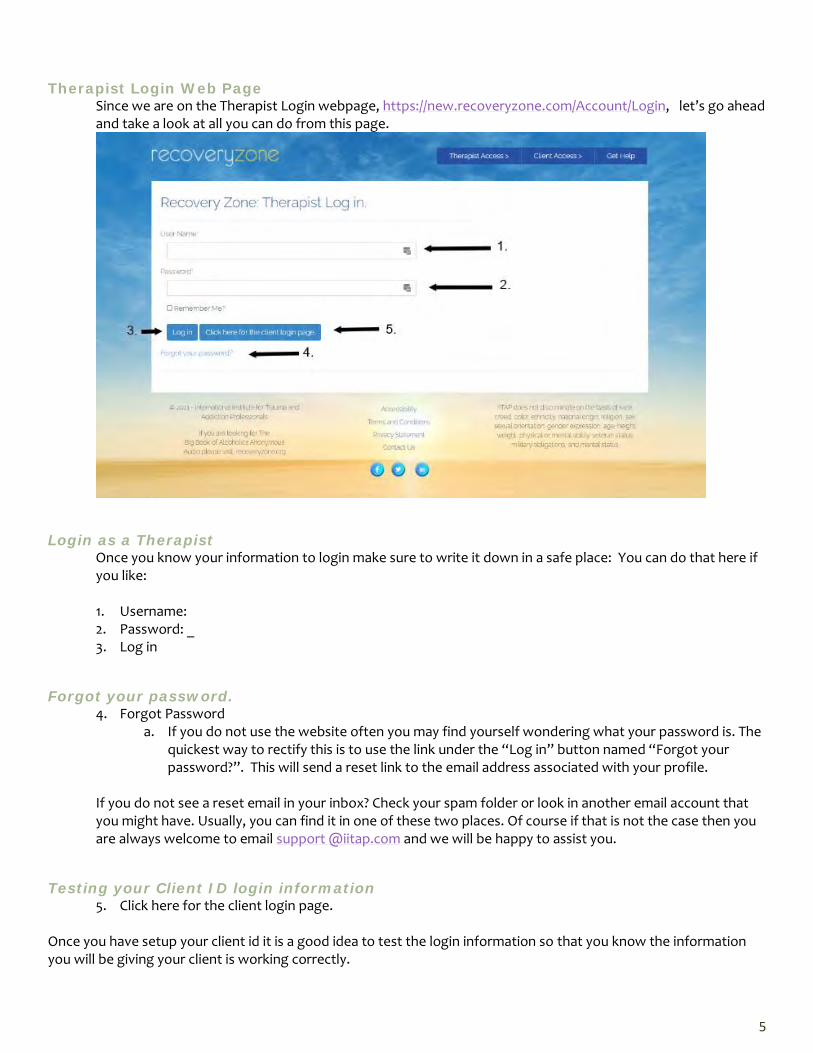
Therapist Login Web Page Since we are on the Therapist Login webpage, https://new.recoveryzone.com/Account/Login, let’s go ahead and take a look at all you can do from this page.
Login as a Therapist Once you know your information to login make sure to write it down in a safe place: You can do that here if you like: 1. Username: 2. Password: _ 3. Log in
Forgot your password. 4. Forgot Password
a. If you do not use the website often you may find yourself wondering what your password is. The quickest way to rectify this is to use the link under the “Log in” button named “Forgot your password?”. This will send a reset link to the email address associated with your profile.
If you do not see a reset email in your inbox? Check your spam folder or look in another email account that you might have. Usually, you can find it in one of these two places. Of course if that is not the case then you are always welcome to email support @iitap.com and we will be happy to assist you.
Testing your Client ID login information 5. Click here for the client login page.
Once you have setup your client id it is a good idea to test the login information so that you know the information you will be giving your client is working correctly.

6
Therapist Home This is your therapist dashboard. Most of what you will be doing on this website will happen here. There is a lot going on when you have your first glance but follow my instructions and the steps will become second nature to you in no time.
Many of the features are self-explanatory but there are some nuances that I need to point out.
Sorting information
Notice the table column headings. Some of them have a funnel icon, , next to some of the headings. This funnel means that you can filter and sort information. If you click on the funnel you will have a dropdown menu that allows you to sort information based on the heading of that column. This will come in very handy when your client reports become numerous.
Canceling a Survey Notice in the last column of the above image you will see the “Cancel Survey” button. It is the only one in this list of surveys. You can determine the reason by looking under the column called “Survey Status”. For this survey, the client is still in the demographic section of the assessment. The system will allow you to cancel a survey as long as you haven’t started it or you haven’t gone past the demographic section. If you decide to cancel, the tokens will go back into your account to reuse.

7
Setup Client ID and Assessment 1. Click on button “Create a New Client Login”. 2. Create an ID. This can be anything you want but you can only use it once. (Do not use spaces in your ID) 3. Now click on “Add Client Login and Assign Surveys”
Now it is time to choose which assessment that you want to assign to this client identifier. Put a check in the correct boxes.
Once you have your assessment(s) chosen and the boxes checked then click “Save”. If you need to purchase tokens, then you can do that by clicking the “Purchase More Tokens” button. Fill out your credit card information and insert the quantity of tokens you want to purchase. Now purchase your tokens. Now go back and assign the surveys to the Client ID if you have not done so before.
Client Login
This page is located at https://new.recoveryzone.com/Client/Login

8
Once you have given your client their login information also explain that there will be less room for error if they will type just the first name of the Therapist/Practice and then allow the dropdown to populate a list. This way they can choose the exact formatting of their name. It must be exactly formatted as it is in the database or the system will throw an error. Next have them cut and paste the Assigned (Client) ID into the text box and click “Log in”.
Taking the Assessment Once the client has logged in, they can begin their assessment(s). All questions are required and designated by the red * next to each question. The client can stop and save their work and log out if they need to take a break. When they log back in the system will start them from where they left off. At any time, you the therapist, can look at your assessments from your home web page, https://new.recoveryzone.com/Therapist, and see where you client is in their assessment.
Client Login Script Here is some script that you can give your clients. All you need to do is update it with your information. ________________________________________________________________________________________ Dear ____________ To begin your assessment please go to: https://new.recoveryzone.com Click on: Client Access Therapist/Practice Choose: Therapist Name Here (This has to be exactly like it is typed here. It is easiest to just type the first name and then choose the correct Therapist/Practice from the list) Assigned Identifier: _________ (Depending on patient) Click Login At any time, you may save and logout if you would like to take a break. When you are ready to start again re-login and the system will go to the last page you left off. Once you have completed your assessment you can log out and close the browser window. Your therapist will then be able to review your report. Good luck, __________________________________________________________________________________________________

9
View Reports When you are ready to view your clients report you will want to be at your Therapist Home web page, https://new.recoveryzone.com/Therapist.
There are several views of your reports that you can download. 1. View Report: This is a shorten version of the report. Only elevated items are reported on the front
pages. All other items can be access by clicking on a link in each section named: “see all client results”. By clicking on this link you can see the results of every item asked in that section.
2. Extended Report: This is the long version of the assessment. The report displays the same as the first view however, at the end of the report all the client results will be reported. This creates a longer version.
3. Client Report: This is only a partial report that you can give your client. This report also includes
homework questions that you can provide your client for further exploration. The SDI 4.0 and SDI-NM 4.0 are the only assessments that have a client report ..
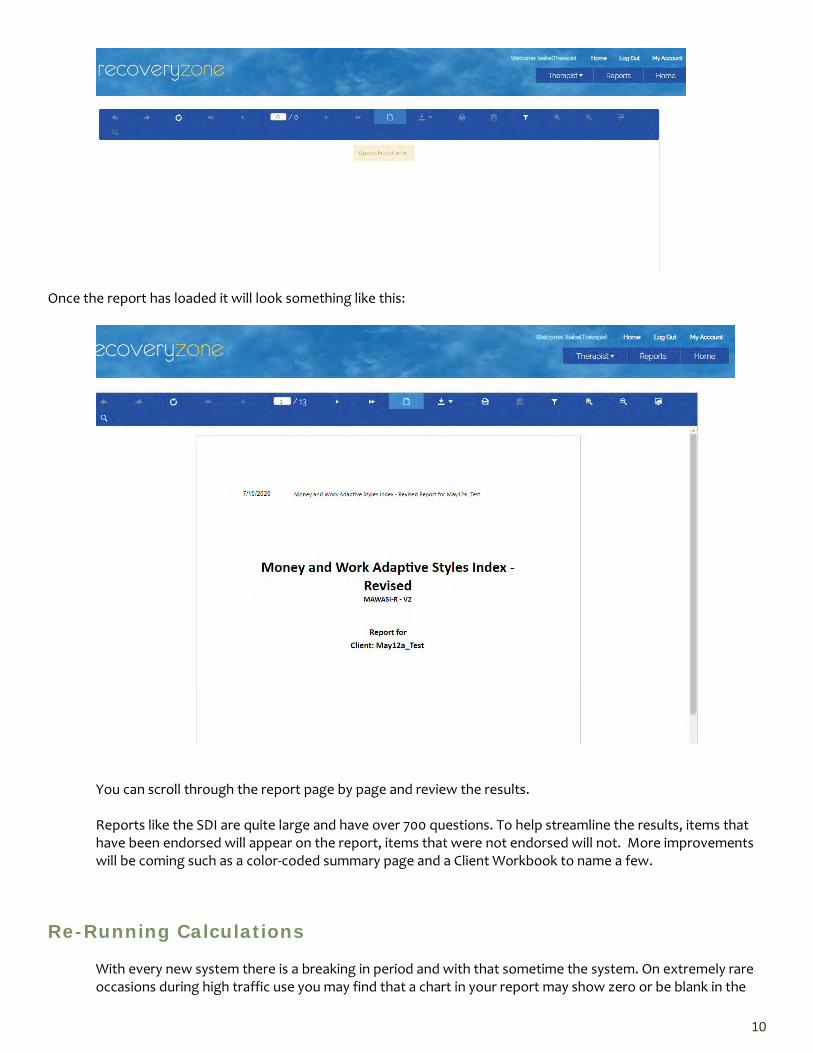
The first time you compile a report you will see the “Running Report Calculations” web page.
This means that the system is compiling the results and creating a report for you. As it works through this process a new web page will appear that shows the beginning of a report. Depending on how big the report, such as the SDI 4.0, it can take up to 60 seconds to appear. This is an act of patience but there is a lot of work going on behind the scenes. The wait will be worth it.
10
Once the report has loaded it will look something like this:
You can scroll through the report page by page and review the results. Reports like the SDI are quite large and have over 700 questions. To help streamline the results, items that have been endorsed will appear on the report, items that were not endorsed will not. More improvements will be coming such as a color-coded summary page and a Client Workbook to name a few.
Re-Running Calculations With every new system there is a breaking in period and with that sometime the system. On extremely rare occasions during high traffic use you may find that a chart in your report may show zero or be blank in the

11
charts. This does not mean that you data was lost it just mean you may need to rerun the calculation processor again. It this happens a window will popup guiding you on how to rerun those calculations.
Therapist Must Download Reports
Assessments will only be stored on the Recovery Zone servers for 6 months. Periodically, server optimization will purge all assessments that are six months or older. IMPORTANT: Once your client has completed their assessment it is important that you download the Extended Report to your storage device, so you do not lose your information. If you are unfamiliar with how to download and store assessments, I will show you an example of how to do this by creating a folder on your desktop and storing them there.
Simple Survey Storage The method I am going to show you is by no means the only way, but it is easy and if you are not comfortable with technology then this might be the right option. It is your choice. Let’s begin. 1. How to create a folder on your computers desktop.
a. Right click on your mouse on the computer desktop. A menu will appear. Go to: New > Folder and click.

12
b. Name the new folder “ Client Surveys”.
2. Now login to your Recovery Zone Account and Click on one of your survey buttons called View Report. (Note: Take note of the Client ID. You will need that when you name your file.)
3. Once your report has loaded then click on the “Download” icon and choose “Acrobat PDF file”. Wait for a moment for the Save As screen to pop up.
4. Once your Save As screen pops up click on “Desktop” > “Client Surveys”> and open the folder we create previously. In the “File Name” field make sure you add the Client ID to the file name so that you know whose report this is. Lastly click “Save”. Great Job.

13
5. Remember to download your surveys as soon as they are completed to avoid losing them after 6
months.
Email Survey to Client
Sometimes you may want to email a survey to a client. It is amazingly simple. I will use the example from above where our client surveys are stored in a folder named “Client Surveys” on the computers desktop. Let us begin.
1. I am going to use Google in this example but you can use whatever email program you have. It will be similar. First open your email program and compose a new message.
2. Next, navigate to the folder on your desktop called “Client Surveys” and open it up.
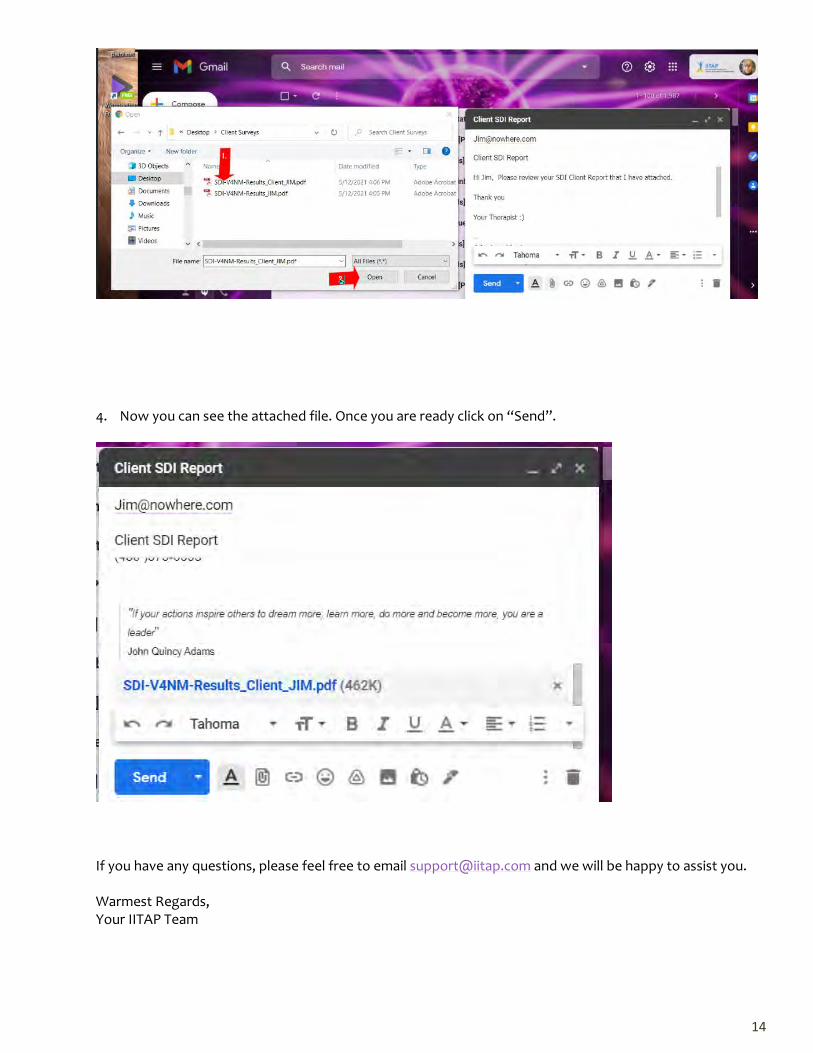
3. Now you should see all the client surveys you have saved in this folder. Click on the one you want to
attach and then click on “Open”. This will attach the file.
14
4. Now you can see the attached file. Once you are ready click on “Send”.
If you have any questions, please feel free to email [email protected] and we will be happy to assist you. Warmest Regards, Your IITAP Team