New & Improved View Preferences - ZSKVersion 1.3 New Features New & Improved View Preferences On the...
17
Copyright 2007 Midwest Distributors Version 1.3 New Features New & Improved View Preferences On the General Tab in the View Preferences, the layout has been updated and easier to read. Instead of open- ing the View Preferences every time you want to turn a toolbar on or off, you can do it without even opening the Preferences Dialog Box. When you are in the IDS program, just right click on any area immediately sur- rounding the design work area and the list of toolbars will appear with a checkmark. To turn a toolbar off, just left click next to the toolbar name and deselect it. To turn a toolbar on, just make sure that toolbar has a checkmark next to it with a left click. Also in the View Preferences, you can now choose to have the Edit Dialog box appear when inserting an image - this is the dialog box that allows you to open a graphics program to edit your image. The Hoop/Original Point layout has been improved for ease of use to pull and choose your hoop from the manu- facturer and to save your own hoops! Use the scroll bar in the custom hoop for circle or rectangular corner settings. New Hoops and Hoop Sizes have been included in the improved View Preference Settings. Find your hoop by manufacturer and style type. You can also add and save your own hoop sizes within the Hoop/Original Point Tab (ie: for after market hoops). Just select the plus button below the hoop types to add your own hoop size within the specific manufacturer selected – or create your own set of hoops all together! Edit and Delete hoops within the hoop preferences to customize your hoop settings. Save your designs to start and stop in the Design Cen- ter or Bottom Center. If you choose to save the Bottom Center, you can also change the offset to better line up your design.
Transcript of New & Improved View Preferences - ZSKVersion 1.3 New Features New & Improved View Preferences On the...

�Copyright 2007 Midwest Distributors
Version 1.3New Features
New & Improved View Preferences
On the General Tab in the View Preferences, the layout has been updated and easier to read. Instead of open-ing the View Preferences every time you want to turn a toolbar on or off, you can do it without even opening the Preferences Dialog Box. When you are in the IDS program, just right click on any area immediately sur-rounding the design work area and the list of toolbars will appear with a checkmark. To turn a toolbar off, just left click next to the toolbar name and deselect it. To turn a toolbar on, just make sure that toolbar has a checkmark next to it with a left click. Also in the View Preferences, you can now choose to have the Edit Dialog box appear when inserting an image - this is the dialog box that allows you to open a graphics program to edit your image.
The Hoop/Original Point layout has been improved for ease of use to pull and choose your hoop from the manu-facturer and to save your own hoops! Use the scroll bar in the custom hoop for circle or rectangular corner settings.
New Hoops and Hoop Sizes have been included in the improved View Preference Settings. Find your hoop by manufacturer and style type. You can also add and save your own hoop sizes within the Hoop/Original Point Tab (ie: for after market hoops). Just select the plus button below the hoop types to add your own hoop size within the specific manufacturer selected – or create your own set of hoops all together! Edit and Delete hoops within the hoop preferences to customize your hoop settings.
Save your designs to start and stop in the Design Cen-ter or Bottom Center. If you choose to save the Bottom Center, you can also change the offset to better line up your design.
2Copyright 2007 Midwest Distributors
Version 1.3New Features
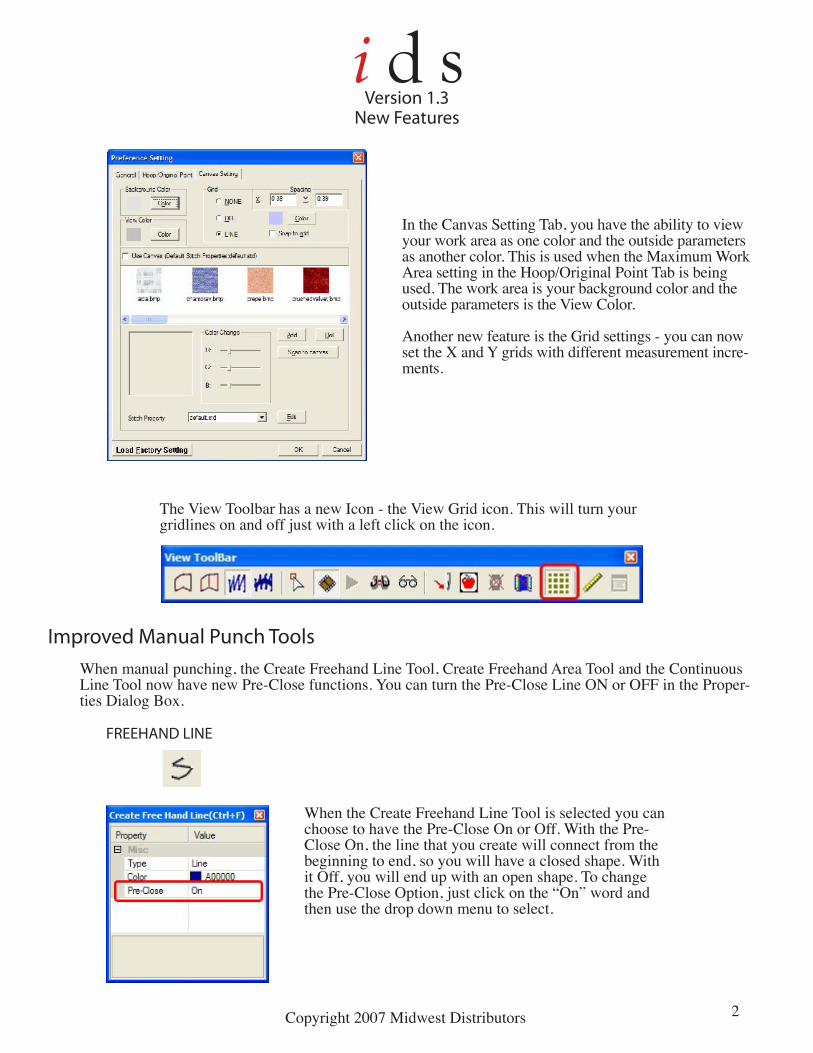
In the Canvas Setting Tab, you have the ability to view your work area as one color and the outside parameters as another color. This is used when the Maximum Work Area setting in the Hoop/Original Point Tab is being used. The work area is your background color and the outside parameters is the View Color.
Another new feature is the Grid settings - you can now set the X and Y grids with different measurement incre-ments.
Improved Manual Punch ToolsWhen manual punching, the Create Freehand Line Tool, Create Freehand Area Tool and the Continuous Line Tool now have new Pre-Close functions. You can turn the Pre-Close Line ON or OFF in the Proper-ties Dialog Box.
When the Create Freehand Line Tool is selected you can choose to have the Pre-Close On or Off. With the Pre-Close On, the line that you create will connect from the beginning to end, so you will have a closed shape. With it Off, you will end up with an open shape. To change the Pre-Close Option, just click on the “On” word and then use the drop down menu to select.
FREEHAND LINE
The View Toolbar has a new Icon - the View Grid icon. This will turn your gridlines on and off just with a left click on the icon.

�Copyright 2007 Midwest Distributors
Version 1.3New Features
When the Create Freehand Area Tool is selected you can choose to have the Pre-Close function On or Off. With the Pre-Close On, the area that you create will connect from the beginning to end - showing the last connecting line on screen. This gives you a preview of what the area will look like prior to the end input. When it is Off, the shape will still close and make a connecting area, but it will not show on screen. To change the Pre-Close Op-tion, just click on the “On” word and then use the drop down menu to select.
FREEHAND AREA
When the Continuous Line Tool is selected you can choose to digitize an area or a line! To change between area and line, just change the Property Type to Area or Line by left clicking on the Line Value.
You can also have the Pre-Close function On or Off. With the Pre-Close On, the area or line that you create will connect from the beginning to end - showing the last connecting line on screen. This gives you a preview of what the area/line will look like prior to the end input. When it is Off, the shape will still close and make a con-necting area, but it will not show on screen. To change the Pre-Close Option, just click on the “On” word and then use the drop down menu to select.
CONTINUOUS LINE/AREA
�Copyright 2007 Midwest Distributors
Version 1.3New Features
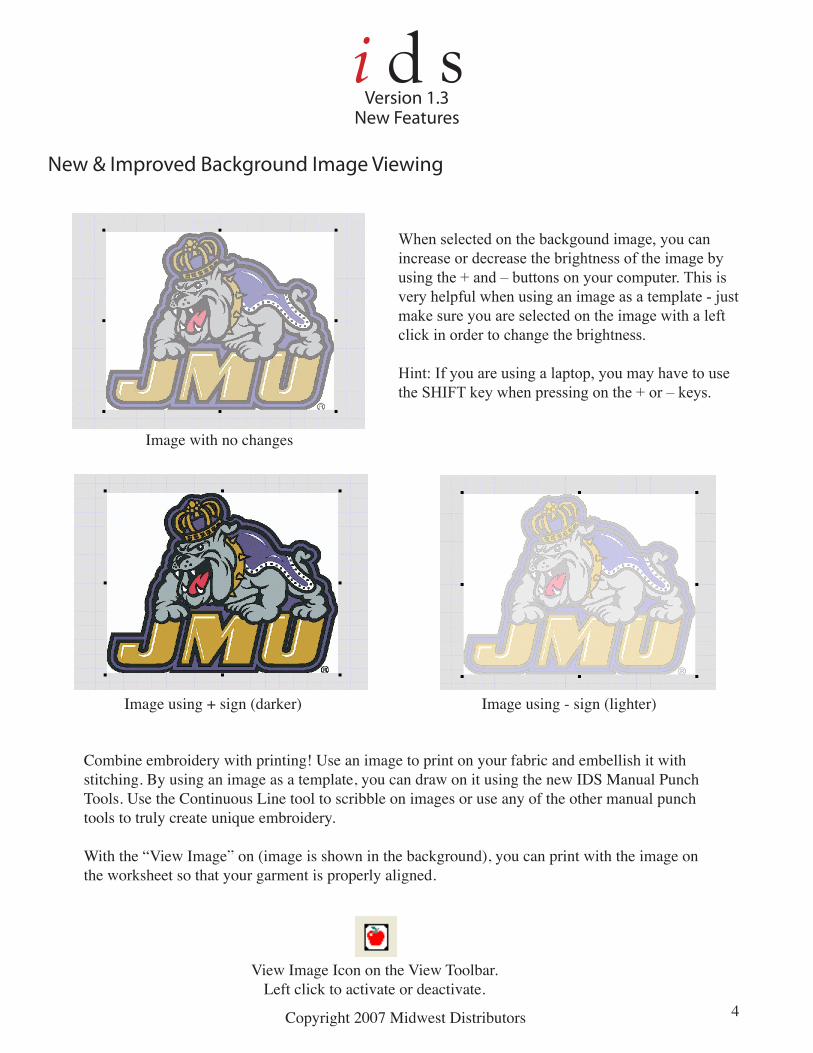
New & Improved Background Image Viewing
When selected on the backgound image, you can increase or decrease the brightness of the image by using the + and – buttons on your computer. This is very helpful when using an image as a template - just make sure you are selected on the image with a left click in order to change the brightness.
Hint: If you are using a laptop, you may have to use the SHIFT key when pressing on the + or – keys.
Image with no changes
Image using + sign (darker) Image using - sign (lighter)
Combine embroidery with printing! Use an image to print on your fabric and embellish it with stitching. By using an image as a template, you can draw on it using the new IDS Manual Punch Tools. Use the Continuous Line tool to scribble on images or use any of the other manual punch tools to truly create unique embroidery.
With the “View Image” on (image is shown in the background), you can print with the image on the worksheet so that your garment is properly aligned.
View Image Icon on the View Toolbar.Left click to activate or deactivate.
�Copyright 2007 Midwest Distributors
Version 1.3New Features
New & Improved Onscreen Design Properties
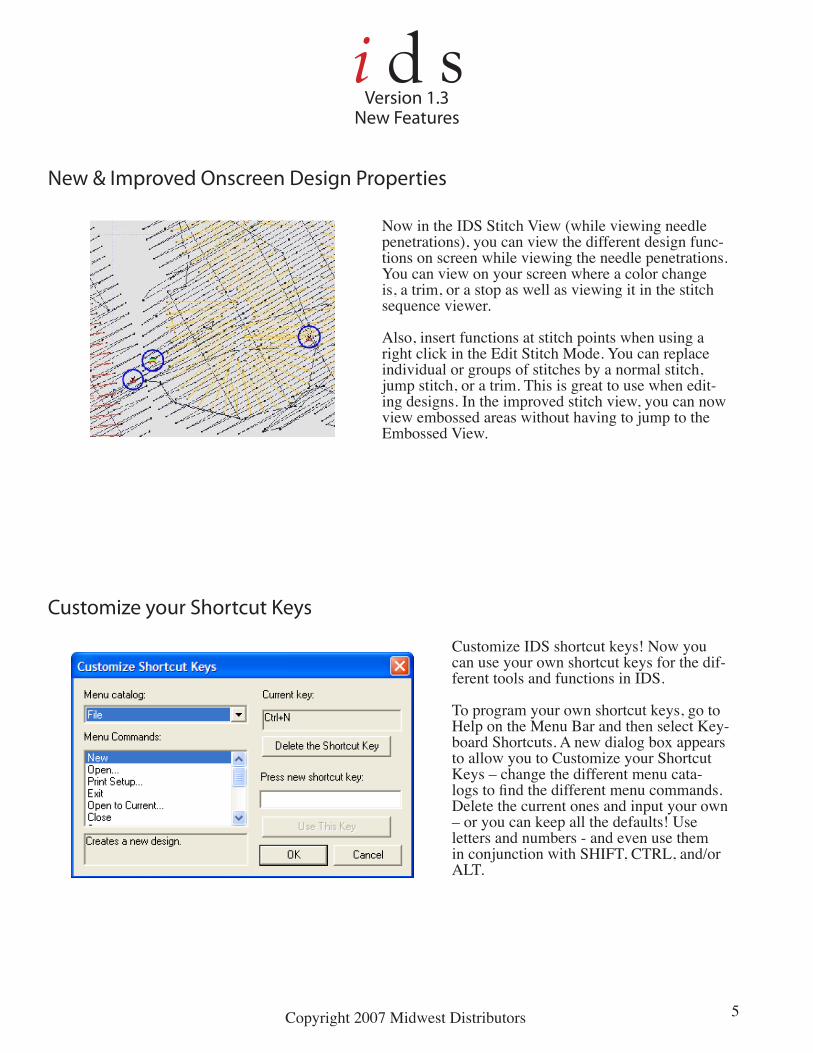
Now in the IDS Stitch View (while viewing needle penetrations), you can view the different design func-tions on screen while viewing the needle penetrations. You can view on your screen where a color change is, a trim, or a stop as well as viewing it in the stitch sequence viewer.
Also, insert functions at stitch points when using a right click in the Edit Stitch Mode. You can replace individual or groups of stitches by a normal stitch, jump stitch, or a trim. This is great to use when edit-ing designs. In the improved stitch view, you can now view embossed areas without having to jump to the Embossed View.
Customize your Shortcut Keys
Customize IDS shortcut keys! Now you can use your own shortcut keys for the dif-ferent tools and functions in IDS.
To program your own shortcut keys, go to Help on the Menu Bar and then select Key-board Shortcuts. A new dialog box appears to allow you to Customize your Shortcut Keys – change the different menu cata-logs to find the different menu commands. Delete the current ones and input your own – or you can keep all the defaults! Use letters and numbers - and even use them in conjunction with SHIFT, CTRL, and/or ALT.

�Copyright 2007 Midwest Distributors
Version 1.3New Features
E-Mail Pictures of your Design as a JPG
Email designs quickly and easily by saving an IDS design as a JPG!
Use the SAVE AS function and Save the em-broidery pattern as displayed on your design screen as a picture file so you can share it with all your friends. Just use the “Save As” option from the File menu and choose the jpg file type from the drop down menu. Save the design on a hard drive on your computer. Once the file is saved as a jpg, it’s now easy to email the file to anyone on your email list.
New Pre-Digitized Fonts and Small Letter Stitch Settings
When inserting text, you can now use pre-digitized fonts. There are 2� pre-digitized fonts included in the IDS software.
To choose a pre-digitized font, use the drop down arrow in the Font List and choose a font that has the @ symbol preceeding the font name (ie: @Avant Garde). You will know that it is a pre-dig-itized font because the preview letter box will have an outline of the letters rather than filled in color letters.
* Some TTF have the @ symbol preceed-ing the font name, but they also have the TT symbol as well.

7Copyright 2007 Midwest Distributors
Version 1.3New Features
You also have the option to use Small Letter-ing Stitch Properties on a letter design. Just place a checkmark next to Small Lettering Stitch (with a left click) and the appropriate stitch settings will load as soon as the stiches are Generated. This will help stitch those small letters better than with the default set-tings. Use a pre-digitized font with the small lettering stitch and see a world of difference!
Use a Vertical Layout with your letters just by left clicking in the box next to “Vertical Layout.” The letters you type in will appear stacked in the design rather than next to each other.
New Insert Stitch Functions
When inserting stitch by stitch manually, you now have the ability to choose different functions. The new functions are Normal Stitch, Jump Stitch, Trim, and Sequins. A Normal Stitch lays down a stitch penetration point for every Left Click. A Jump Stitch is for an extended length of thread in between stitches. A Trim will insert a trim when you Left Click and a Sequins will insert a sequins on a Left Click.
To insert a stitch manually, Left Click on the Insert Stitch icon The default is Normal Stitch. To choose a different function, Right Click on the design work area and then Left Click on the function you would like to use.
Note: When inserting a Sequin Stitch, the Sequin locking style is selected on the Sequin Tool-bar.
�Copyright 2007 Midwest Distributors
Version 1.3New Features
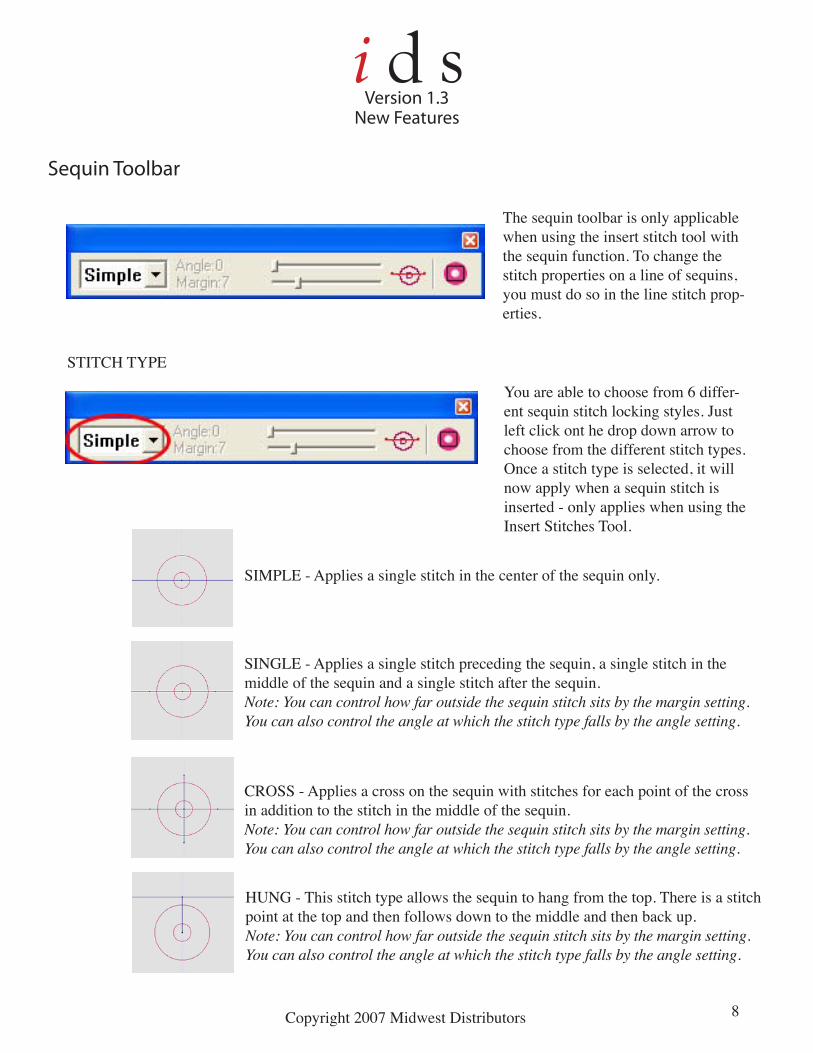
Sequin Toolbar
The sequin toolbar is only applicable when using the insert stitch tool with the sequin function. To change the stitch properties on a line of sequins, you must do so in the line stitch prop-erties.
STITCH TYPE
You are able to choose from � differ-ent sequin stitch locking styles. Just left click ont he drop down arrow to choose from the different stitch types. Once a stitch type is selected, it will now apply when a sequin stitch is inserted - only applies when using the Insert Stitches Tool.
SIMPLE - Applies a single stitch in the center of the sequin only.
SINGLE - Applies a single stitch preceding the sequin, a single stitch in the middle of the sequin and a single stitch after the sequin.Note: You can control how far outside the sequin stitch sits by the margin setting. You can also control the angle at which the stitch type falls by the angle setting.
CROSS - Applies a cross on the sequin with stitches for each point of the cross in addition to the stitch in the middle of the sequin.Note: You can control how far outside the sequin stitch sits by the margin setting. You can also control the angle at which the stitch type falls by the angle setting.
HUNG - This stitch type allows the sequin to hang from the top. There is a stitch point at the top and then follows down to the middle and then back up.Note: You can control how far outside the sequin stitch sits by the margin setting. You can also control the angle at which the stitch type falls by the angle setting.
�Copyright 2007 Midwest Distributors
Version 1.3New Features
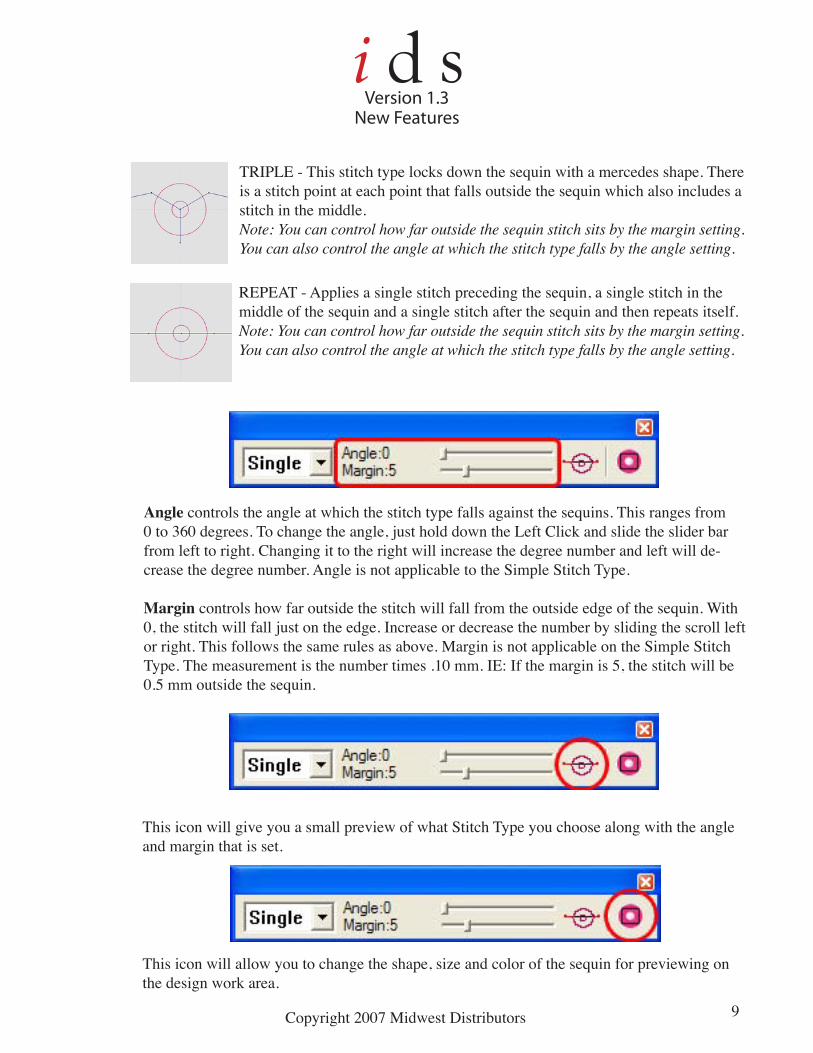
TRIPLE - This stitch type locks down the sequin with a mercedes shape. There is a stitch point at each point that falls outside the sequin which also includes a stitch in the middle.Note: You can control how far outside the sequin stitch sits by the margin setting. You can also control the angle at which the stitch type falls by the angle setting.
REPEAT - Applies a single stitch preceding the sequin, a single stitch in the middle of the sequin and a single stitch after the sequin and then repeats itself.Note: You can control how far outside the sequin stitch sits by the margin setting. You can also control the angle at which the stitch type falls by the angle setting.
Angle controls the angle at which the stitch type falls against the sequins. This ranges from 0 to ��0 degrees. To change the angle, just hold down the Left Click and slide the slider bar from left to right. Changing it to the right will increase the degree number and left will de-crease the degree number. Angle is not applicable to the Simple Stitch Type.
Margin controls how far outside the stitch will fall from the outside edge of the sequin. With 0, the stitch will fall just on the edge. Increase or decrease the number by sliding the scroll left or right. This follows the same rules as above. Margin is not applicable on the Simple Stitch Type. The measurement is the number times .�0 mm. IE: If the margin is �, the stitch will be 0.� mm outside the sequin.
This icon will give you a small preview of what Stitch Type you choose along with the angle and margin that is set.
This icon will allow you to change the shape, size and color of the sequin for previewing on the design work area.
�0Copyright 2007 Midwest Distributors
Version 1.3New Features
Sequins on a Line
With IDS Version �.�, you can now input the Sequins Stitch Type to any Line property that is created in the software. The element must be a Line and not an Area - you can not yet apply Sequins to an Area.
Input Sequins on a Line:
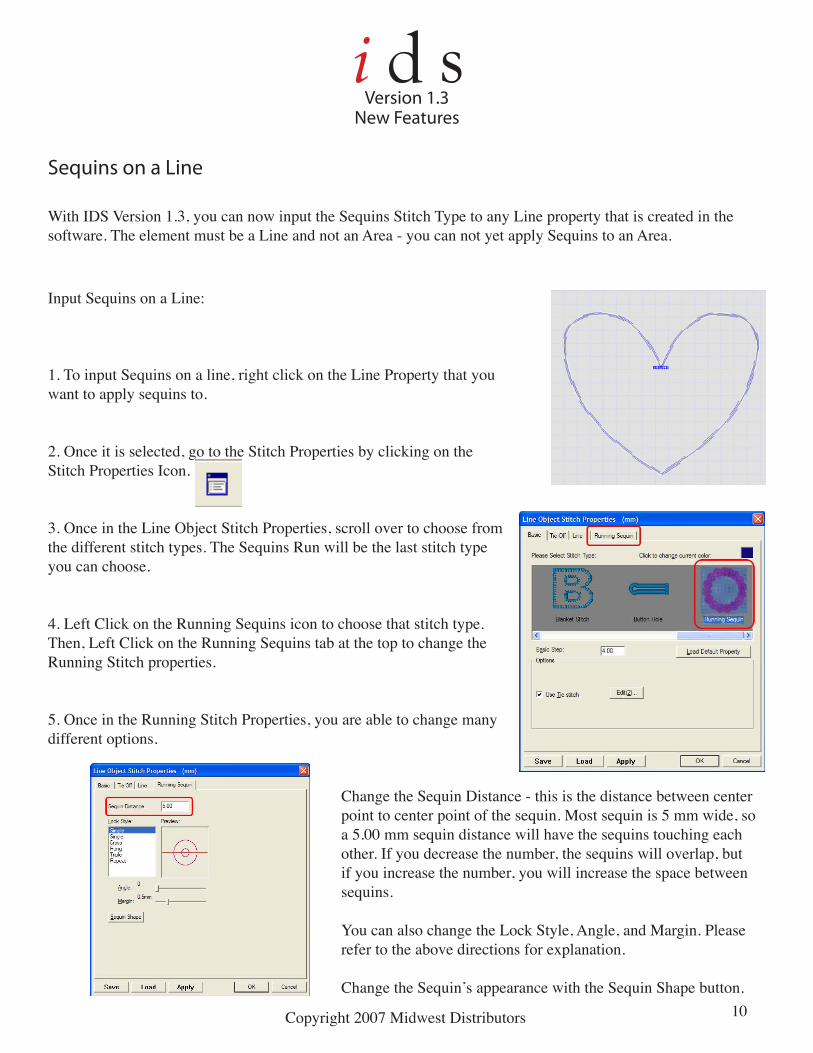
�. To input Sequins on a line, right click on the Line Property that you want to apply sequins to.
2. Once it is selected, go to the Stitch Properties by clicking on the Stitch Properties Icon.
�. Once in the Line Object Stitch Properties, scroll over to choose from the different stitch types. The Sequins Run will be the last stitch type you can choose.
�. Left Click on the Running Sequins icon to choose that stitch type. Then, Left Click on the Running Sequins tab at the top to change the Running Stitch properties.
�. Once in the Running Stitch Properties, you are able to change many different options.
Change the Sequin Distance - this is the distance between center point to center point of the sequin. Most sequin is � mm wide, so a �.00 mm sequin distance will have the sequins touching each other. If you decrease the number, the sequins will overlap, but if you increase the number, you will increase the space between sequins.
You can also change the Lock Style, Angle, and Margin. Please refer to the above directions for explanation.
Change the Sequin’s appearance with the Sequin Shape button.

��Copyright 2007 Midwest Distributors
Version 1.3New Features
�. Once you have changed the settings, left click OK and now the Line you selected will have the sequins stitch type applied.
7. Export to DST format using the Export II function. This Ex-port II function is for sequins. If you use the Export I fucntion, then the sequins will not work.
New Export/Import II Functions
There is a new Import and Export Function in IDS Version �.� - it is Import II and Export II. These functions are primarily for DST stitch files. The Import and Export II functions have been enhanced for DST stitch files.
�. To Export to a DST using the Export II function, Left Click on the Drop Down Arrow next to the Export Icon on the Standard Toolbar. Scroll down and Left Click to select Export II.
2. The Save As Dialog Box will appear after you choose Export II. Choose the appropriate drive and file folder that you would like to save the design to. Remember that this will save the design as a DST, not an IDS file.
3. Type in a file name in the File Name Box and then Left Click on the Save Button. This will now save your design as a DST in the desired directory.
�. To Import a DST using the Import I function,
Left Click on the Drop Down Arrow next to the Import Icon on the Standard Toolbar. Scroll down and Left Click to select Import II.
2. The Open Dialog Box will appear after you choose Import II. Choose the appropriate drive and file folder that you would like to open the design from. Remember that this will open the design as a DST, not an IDS file.
�2Copyright 2007 Midwest Distributors
Version 1.3New Features
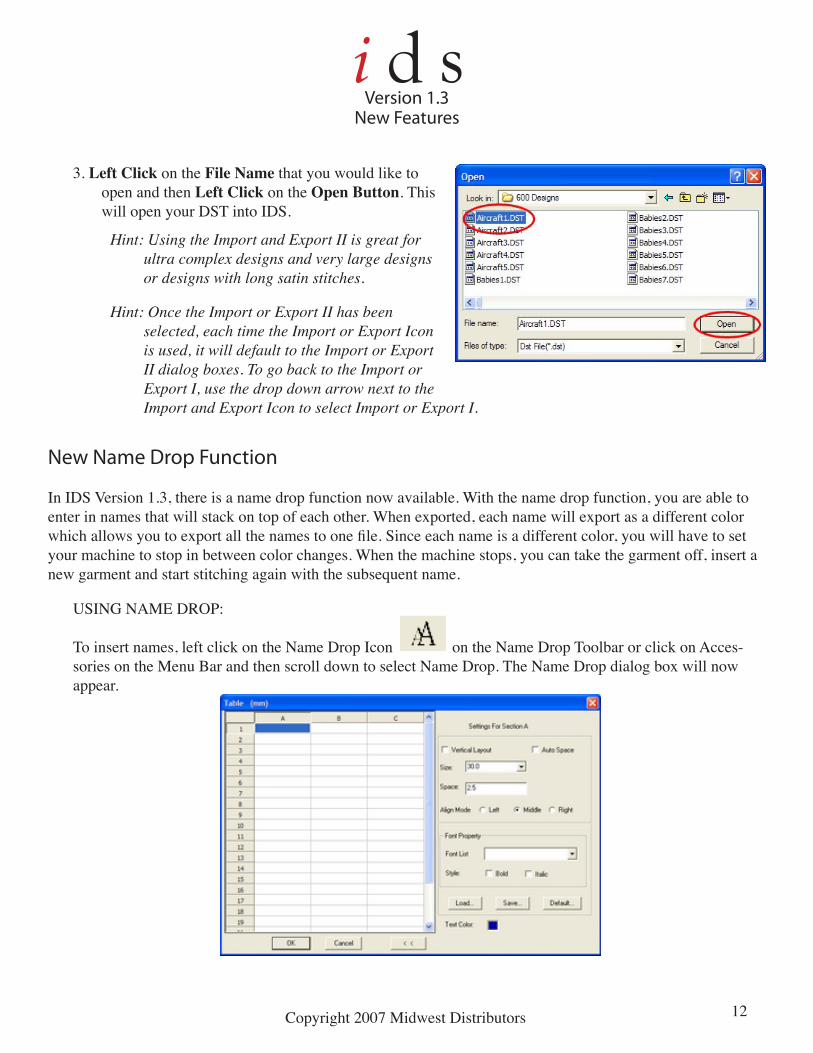
�. Left Click on the File Name that you would like to open and then Left Click on the Open Button. This will open your DST into IDS.
Hint: Using the Import and Export II is great for ultra complex designs and very large designs or designs with long satin stitches.
Hint: Once the Import or Export II has been selected, each time the Import or Export Icon is used, it will default to the Import or Export II dialog boxes. To go back to the Import or Export I, use the drop down arrow next to the Import and Export Icon to select Import or Export I.
New Name Drop Function
In IDS Version �.�, there is a name drop function now available. With the name drop function, you are able to enter in names that will stack on top of each other. When exported, each name will export as a different color which allows you to export all the names to one file. Since each name is a different color, you will have to set your machine to stop in between color changes. When the machine stops, you can take the garment off, insert a new garment and start stitching again with the subsequent name.
USING NAME DROP:
To insert names, left click on the Name Drop Icon on the Name Drop Toolbar or click on Acces-sories on the Menu Bar and then scroll down to select Name Drop. The Name Drop dialog box will now appear.
��Copyright 2007 Midwest Distributors
Version 1.3New Features
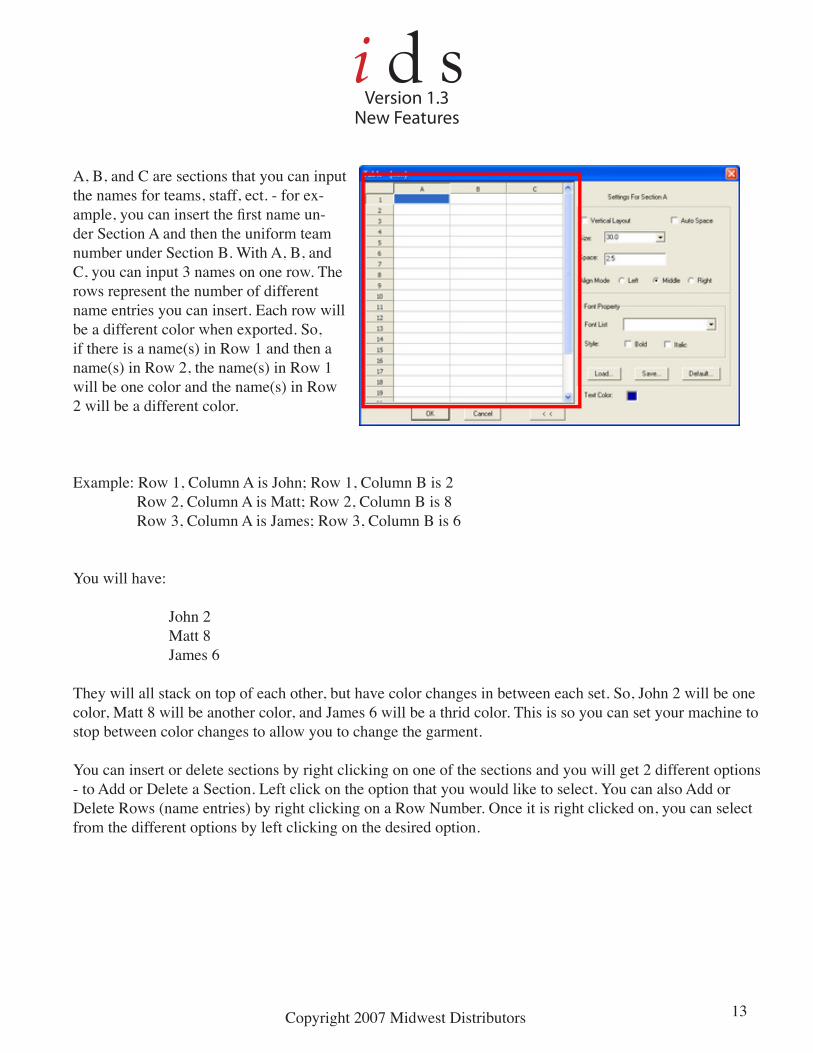
A, B, and C are sections that you can input the names for teams, staff, ect. - for ex-ample, you can insert the first name un-der Section A and then the uniform team number under Section B. With A, B, and C, you can input � names on one row. The rows represent the number of different name entries you can insert. Each row will be a different color when exported. So, if there is a name(s) in Row � and then a name(s) in Row 2, the name(s) in Row � will be one color and the name(s) in Row 2 will be a different color.
Example: Row �, Column A is John; Row �, Column B is 2 Row 2, Column A is Matt; Row 2, Column B is � Row �, Column A is James; Row �, Column B is �
You will have:
John 2 Matt � James �
They will all stack on top of each other, but have color changes in between each set. So, John 2 will be one color, Matt � will be another color, and James � will be a thrid color. This is so you can set your machine to stop between color changes to allow you to change the garment.
You can insert or delete sections by right clicking on one of the sections and you will get 2 different options - to Add or Delete a Section. Left click on the option that you would like to select. You can also Add or Delete Rows (name entries) by right clicking on a Row Number. Once it is right clicked on, you can select from the different options by left clicking on the desired option.
��Copyright 2007 Midwest Distributors
Version 1.3New Features
SETTINGS FOR THE DIFFERENT SECTIONS
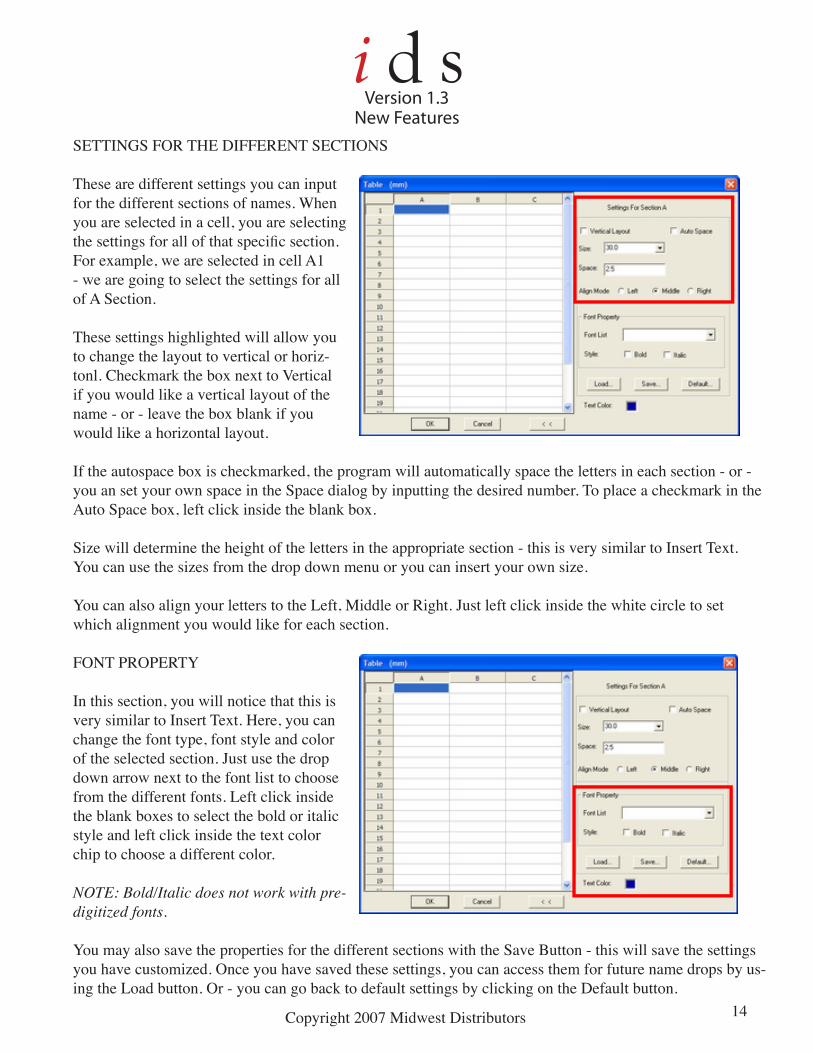
These are different settings you can input for the different sections of names. When you are selected in a cell, you are selecting the settings for all of that specific section. For example, we are selected in cell A� - we are going to select the settings for all of A Section.
These settings highlighted will allow you to change the layout to vertical or horiz-tonl. Checkmark the box next to Vertical if you would like a vertical layout of the name - or - leave the box blank if you would like a horizontal layout.
If the autospace box is checkmarked, the program will automatically space the letters in each section - or - you an set your own space in the Space dialog by inputting the desired number. To place a checkmark in the Auto Space box, left click inside the blank box.
Size will determine the height of the letters in the appropriate section - this is very similar to Insert Text. You can use the sizes from the drop down menu or you can insert your own size.
You can also align your letters to the Left, Middle or Right. Just left click inside the white circle to set which alignment you would like for each section.
FONT PROPERTY
In this section, you will notice that this is very similar to Insert Text. Here, you can change the font type, font style and color of the selected section. Just use the drop down arrow next to the font list to choose from the different fonts. Left click inside the blank boxes to select the bold or italic style and left click inside the text color chip to choose a different color.
NOTE: Bold/Italic does not work with pre-digitized fonts.
You may also save the properties for the different sections with the Save Button - this will save the settings you have customized. Once you have saved these settings, you can access them for future name drops by us-ing the Load button. Or - you can go back to default settings by clicking on the Default button.
��Copyright 2007 Midwest Distributors
Version 1.3New Features
EXAMPLE:
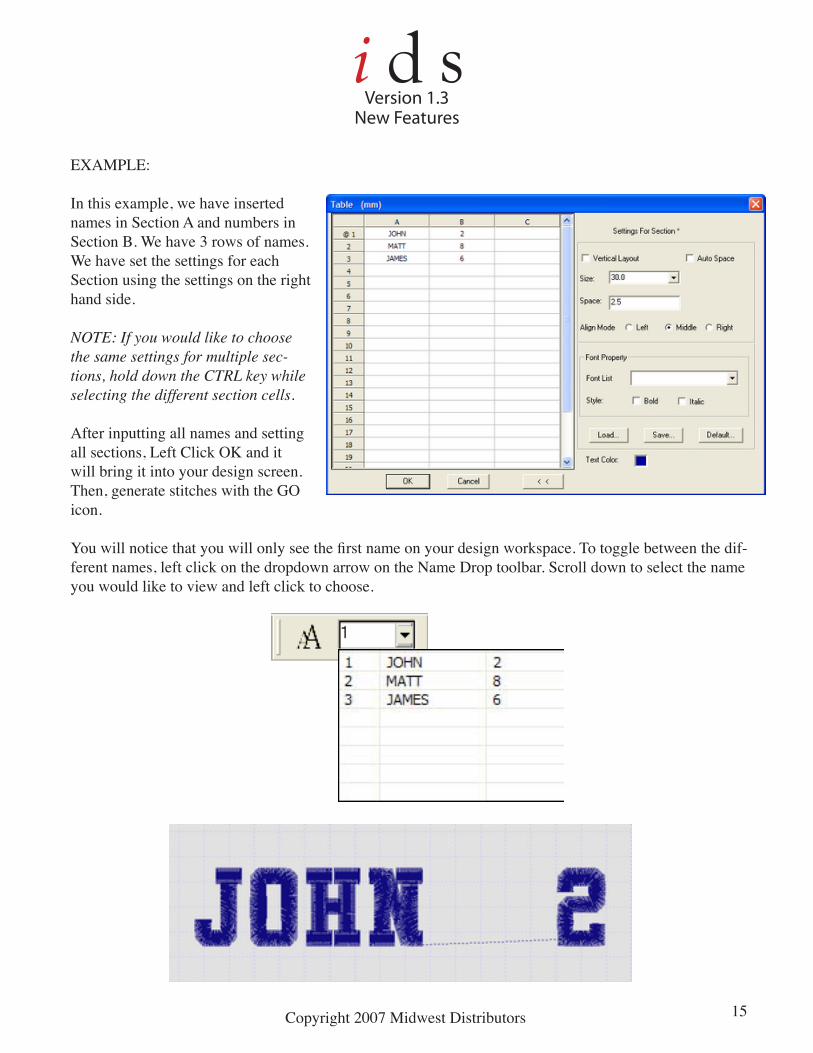
In this example, we have inserted names in Section A and numbers in Section B. We have � rows of names. We have set the settings for each Section using the settings on the right hand side.
NOTE: If you would like to choose the same settings for multiple sec-tions, hold down the CTRL key while selecting the different section cells.
After inputting all names and setting all sections, Left Click OK and it will bring it into your design screen. Then, generate stitches with the GO icon.
You will notice that you will only see the first name on your design workspace. To toggle between the dif-ferent names, left click on the dropdown arrow on the Name Drop toolbar. Scroll down to select the name you would like to view and left click to choose.
��Copyright 2007 Midwest Distributors
Version 1.3New Features
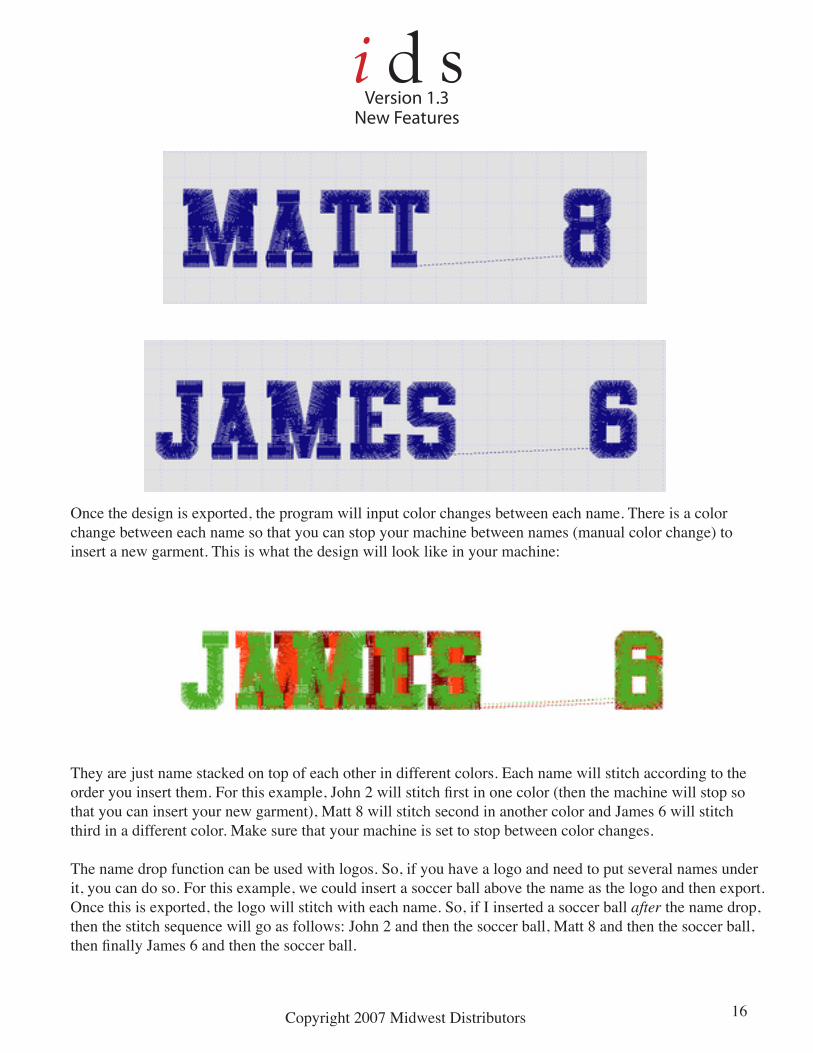
Once the design is exported, the program will input color changes between each name. There is a color change between each name so that you can stop your machine between names (manual color change) to insert a new garment. This is what the design will look like in your machine:
They are just name stacked on top of each other in different colors. Each name will stitch according to the order you insert them. For this example, John 2 will stitch first in one color (then the machine will stop so that you can insert your new garment), Matt � will stitch second in another color and James � will stitch third in a different color. Make sure that your machine is set to stop between color changes.
The name drop function can be used with logos. So, if you have a logo and need to put several names under it, you can do so. For this example, we could insert a soccer ball above the name as the logo and then export. Once this is exported, the logo will stitch with each name. So, if I inserted a soccer ball after the name drop, then the stitch sequence will go as follows: John 2 and then the soccer ball, Matt � and then the soccer ball, then finally James 6 and then the soccer ball.
�7Copyright 2007 Midwest Distributors
Version 1.3New Features
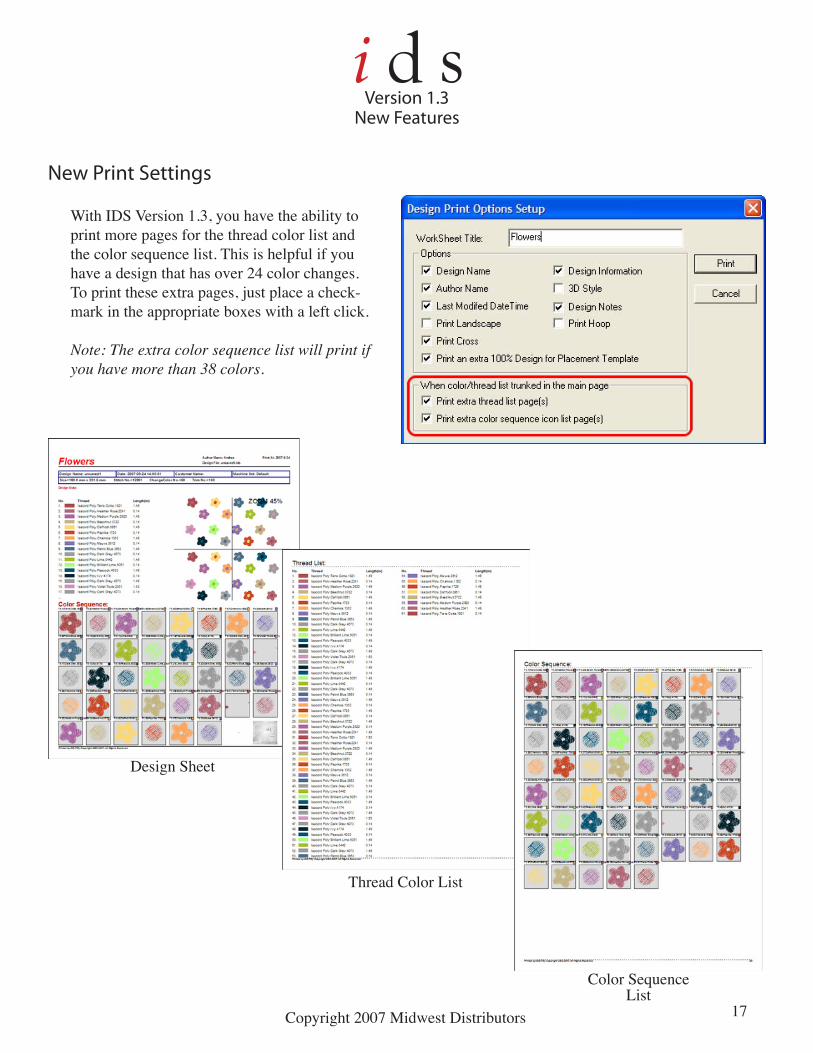
New Print Settings
With IDS Version �.�, you have the ability to print more pages for the thread color list and the color sequence list. This is helpful if you have a design that has over 2� color changes. To print these extra pages, just place a check-mark in the appropriate boxes with a left click.
Note: The extra color sequence list will print if you have more than 38 colors.
Design Sheet
Thread Color List
Color SequenceList