New Features of Cinema 4D 11 In Depth · 3 Animation Layers Animation layers serve multiple...
16
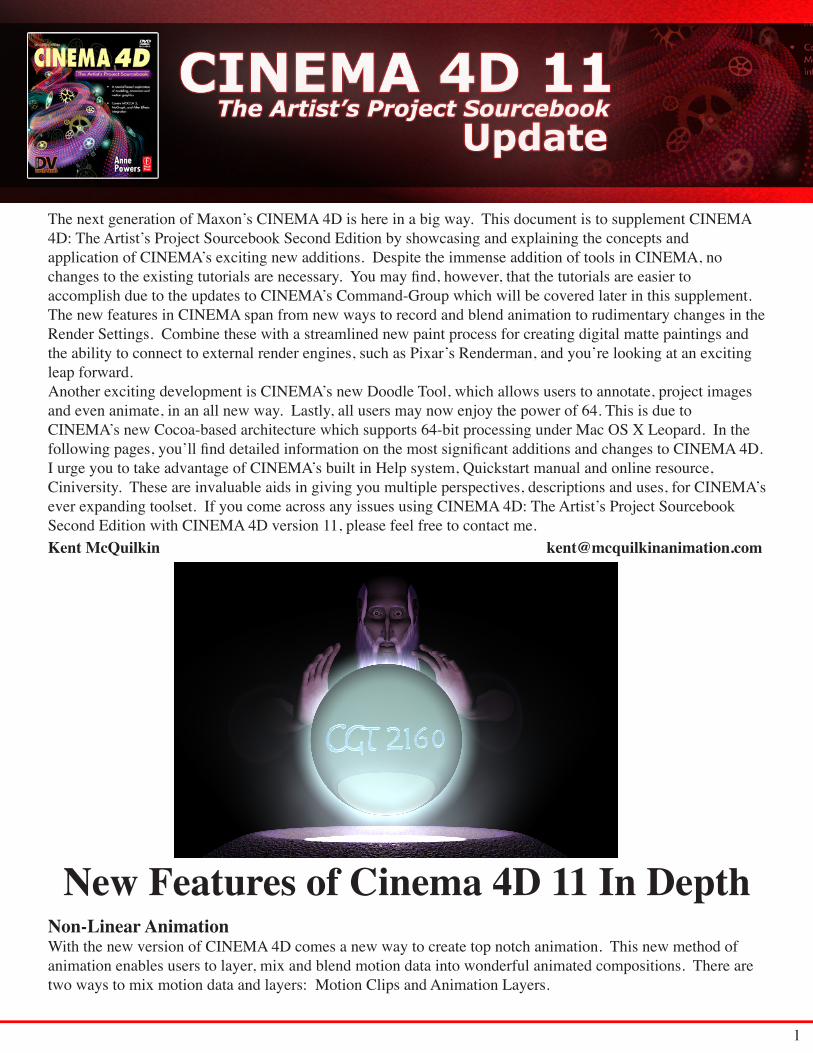
1 The next generation of Maxon’s CINEMA 4D is here in a big way. This document is to supplement CINEMA 4D: The Artist’s Project Sourcebook Second Edition by showcasing and explaining the concepts and application of CINEMA’s exciting new additions. Despite the immense addition of tools in CINEMA, no changes to the existing tutorials are necessary. You may find, however, that the tutorials are easier to accomplish due to the updates to CINEMA’s Command-Group which will be covered later in this supplement. The new features in CINEMA span from new ways to record and blend animation to rudimentary changes in the Render Settings. Combine these with a streamlined new paint process for creating digital matte paintings and the ability to connect to external render engines, such as Pixar’s Renderman, and you’re looking at an exciting leap forward. Another exciting development is CINEMA’s new Doodle Tool, which allows users to annotate, project images and even animate, in an all new way. Lastly, all users may now enjoy the power of 64. This is due to CINEMA’s new Cocoa-based architecture which supports 64-bit processing under Mac OS X Leopard. In the following pages, you’ll find detailed information on the most significant additions and changes to CINEMA 4D. I urge you to take advantage of CINEMA’s built in Help system, Quickstart manual and online resource, Ciniversity. These are invaluable aids in giving you multiple perspectives, descriptions and uses, for CINEMA’s ever expanding toolset. If you come across any issues using CINEMA 4D: The Artist’s Project Sourcebook Second Edition with CINEMA 4D version 11, please feel free to contact me. Kent McQuilkin [email protected] Non-Linear Animation With the new version of CINEMA 4D comes a new way to create top notch animation. This new method of animation enables users to layer, mix and blend motion data into wonderful animated compositions. There are two ways to mix motion data and layers: Motion Clips and Animation Layers. New Features of Cinema 4D 11 In Depth
Transcript of New Features of Cinema 4D 11 In Depth · 3 Animation Layers Animation layers serve multiple...
1
The next generation of Maxon’s CINEMA 4D is here in a big way. This document is to supplement CINEMA 4D: The Artist’s Project Sourcebook Second Edition by showcasing and explaining the concepts and application of CINEMA’s exciting new additions. Despite the immense addition of tools in CINEMA, no changes to the existing tutorials are necessary. You may find, however, that the tutorials are easier to accomplish due to the updates to CINEMA’s Command-Group which will be covered later in this supplement. The new features in CINEMA span from new ways to record and blend animation to rudimentary changes in the Render Settings. Combine these with a streamlined new paint process for creating digital matte paintings and the ability to connect to external render engines, such as Pixar’s Renderman, and you’re looking at an exciting leap forward. Another exciting development is CINEMA’s new Doodle Tool, which allows users to annotate, project images and even animate, in an all new way. Lastly, all users may now enjoy the power of 64. This is due to CINEMA’s new Cocoa-based architecture which supports 64-bit processing under Mac OS X Leopard. In the following pages, you’ll find detailed information on the most significant additions and changes to CINEMA 4D. I urge you to take advantage of CINEMA’s built in Help system, Quickstart manual and online resource, Ciniversity. These are invaluable aids in giving you multiple perspectives, descriptions and uses, for CINEMA’s ever expanding toolset. If you come across any issues using CINEMA 4D: The Artist’s Project Sourcebook Second Edition with CINEMA 4D version 11, please feel free to contact me.Kent McQuilkin [email protected]
Non-Linear AnimationWith the new version of CINEMA 4D comes a new way to create top notch animation. This new method of animation enables users to layer, mix and blend motion data into wonderful animated compositions. There are two ways to mix motion data and layers: Motion Clips and Animation Layers.
New Features of Cinema 4D 11 In Depth

2 3
Motion ClipsMotion Clips allow you to take motion capture data or traditional keyframed animation and create a motion clip that can be reused, looped and even blended with other motion clips to create transitional animation compositions. This is an incredible method to take an advanced animation and make it as simple as drag and drop. Think about having a character rigged to stand, run and walk. You will have many controllers that require keyframes set for this animation to work. This can get very complex and occasionally, the traditional way of looping these animations by setting the After setting under Tracks to Repeat can give you some unexpected trouble. Likewise, you have to go to each controller (ie. left hand, right hand, left foot, right foot, etc.) and set these tracks to repeat. With Motion Clips, this is gone. Now you can group all of your controllers and select the parent and simply select Add Motion Clip in the Animation Menu. (Figure 1) In the Add Motion Clips menu, you will now have options as to what values you want included in this Motion Tag and which Child objects you wish to include. (Figure 2) A Motions System Tag now appears to the right of the object. To see the motions system timeline and view a graphical representation of the Motion Clip, click on the Motion Tag and in the Attribute Manager, select Open in TL. (Figure 3) Clicking on the Motion Clip in the Timeline will open a host of options in the Attribute Manager. This includes how many times you want the clip to loop and blending options. (Figure 1)
(Figure 2)
(Figure 3)

3
Animation LayersAnimation layers serve multiple purposes in CINEMA 4D. As with all layering systems, animation layers give us the ability to create, organize, blend, control and simplify complex works. The power and possibilities of Animation Layers will become evident even from this simplistic example. (Figure 4)
Animation Layers ProjectAdd a sphere, set its’ segments to 72, press the C key to make the sphere editable. Go to the Right view (F3), and select the Object Axis Tool and pull the green Y handle down to where the blue Z Axis is aligned with the bottom of the sphere. In the time slider, change the last frame value from 90 to 70. Switch back to the Model Tool.With the sphere selected, scroll to the Animation Menu and select Add Animation Layer from the pull down menu. (See Figure 4) Notice a new tag is created to the right of your sphere and a Motion System tab shows up in the attribute manager. In the attribute manager, click the rename button and change layer 0 to Y Movement.Make sure you are at frame 0 and click the coordinates tab in the attribute manager. Click the record button to set keyframes for all of the sphere’s parameters. Scroll to frame 30 in the time slider and set the value of P.Y to 800. Press record once again to record new keyframes. Now scroll to frame 70. Click on the Motion System Tab and choose Set to Zero. New keyframes have now been added at frame 70 that match the initial state at 0. This is a handy shortcut to allow easy looping of sequences. Zoom out a bit and play the animation.Return to frame 0 and click Add in the Motion System tab within the attribute manager. Click the Renamebutton and name the new layer Squash. In the coordinates tab, change the S.X value to 1.5, the S.Y. value to .5 and the S.Z. value to 1.5.. Press the record keyframe button. Scroll to frame 5, change the S.X and S.Z values to 0.75 and the S.Y. value to 1.5 and press record. Move to frame 30 and change the S.X and S.Z values to 1.1 and the S.Y to 0.9. Click the record button to set these keyframes.
4 5
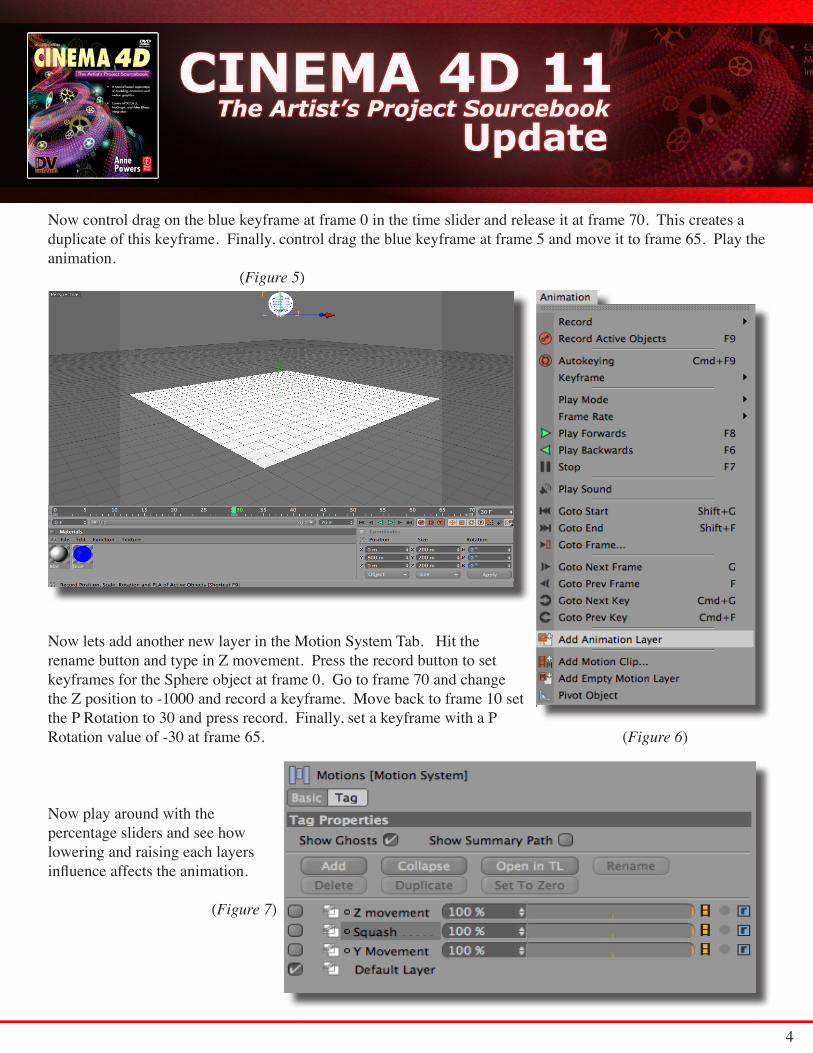
Now control drag on the blue keyframe at frame 0 in the time slider and release it at frame 70. This creates a duplicate of this keyframe. Finally, control drag the blue keyframe at frame 5 and move it to frame 65. Play the animation. (Figure 5)
Now lets add another new layer in the Motion System Tab. Hit therename button and type in Z movement. Press the record button to set keyframes for the Sphere object at frame 0. Go to frame 70 and change the Z position to -1000 and record a keyframe. Move back to frame 10 set the P Rotation to 30 and press record. Finally, set a keyframe with a P Rotation value of -30 at frame 65. (Figure 6)
Now play around with the percentage sliders and see how lowering and raising each layers influence affects the animation. (Figure 7)

5
Lastly, add a floor object. Create a new material for the floor, raise the brightness value to 100%. Create a new omni light and change its Y value to 3500. Under shadow, change it to soft.
(Figure 8)

6 7
The Doodle ToolCINEMA 4D’s Doodle Tool is much more than just a way to scribble away time. This new addition allows artists to mark up work, set key (doodle) frames, create watermarks and project bitmaps. As you will see, the Doodle Tool can also be rendered. Below you can see how annotations can be rendered and shared amongartists working to get shots completed. (Figures 9 & 10)
(Figure 9)
(Figure 10)

7
Follow along with this quick look at the Doodle Tool to see how to setup doodle frames and ensure that they render with your final output.
The Doodle Tool ProjectStart a new document. In the Time slider, change the end frame to 24. At frame 0, go to the Tool Menu, scroll down to Doodle and choose add doodle frame. (Figure 11) Now choose doodle paint from the Tool Menu>Doodle>Doodle Paint. Adjust the RGB sliders to pick the color you would like and draw the bottom half of a circle at the very top of your editor window. Use the Y axis to center the shape horizontally. (Figure 12) Move to frame 2 in the time slider and draw a proportionate full circle slightly lower than the first. Repeat this for frames 4,6,8, and 10. If you are particular as to the exact placement of your circles, copy the previous keyframe, draw your shape. and use the doodle erase tool to remove the old circle. At frame 12, draw a squashed circle below the previous at frame 10. Now control drag a copy of the blue keyframe at frame 10 and release it at frame 14. Then copy 8 to 16, 6 to 18, 4 to 20, 2 to 22 and 0 to 24. Now click and hold on the render settings and ensure that render doodle is checked under options. Click and hold on the render to picture button and select make preview. Set the frame rate to film standard 24 fps. Viola, you’ve animated with the doodle tool. Keep in mind, CINEMA tags work with the doodle object as well. Character Poses, Pre-Viz and annotation are all great uses of the Doodle Tool.
(Figure 11)
(Figure 12)

8 9
Using bitmaps with the doodle tool is similar to configuring a background image in a view window but with a couple of major differences. First, the doodle projects the image as if it were on your windshield. As you rotate and move the camera, the doodle image adjusts to remain centered exactly where you placed it. Secondly, doodle frames can be animated and are easily rendered to final output.
Let’s see how this works. Start a new document, navigate to the Tools menu and select add doodle frame from the doodle menu. Now click on the doodle object in the object manager and select the options tab. Before you load a bitmap, think of the angle of your camera. You want to match it as close as possible before adding the image. Likewise, know the size of the image and match up the Size X and Size Y parameters accordingly. Now you’re ready to load a bitmap and that’s it.(Figure 13) Notice in perspective view, when you rotate, zoom or move your camera, the doodle moves with it.
(Figure 13)
There are many of uses for loading bitmaps into the Doodle Tool, we’ll look at one having to do with prepping for Projectionman next.

9
ProjectionManProjectionman is an awesome and exciting new edition to CINEMA 4D. It’s been utilized in many Hollywood blockbusters and now is at your fingertips. ProjectionMan allows CINEMA users to project images onto simple geometric shapes to provide the illusion of photorealistic 3d space. Creating great digital matte paintings has long been possible with CINEMA but now the process has been streamlined and allows users to do in seconds what may have taken hours in the past.
Believe it or not, a great way to get started with ProjectionMan is to breakout the Doodle Tool. By following the steps mentioned for creating a Doodle Frame with a bitmap, you can get started in adding, shaping and positioning your geometry. Make sure you resize the X and Y values to match the image you wish to project. Doodle objects are limited to a max size of 1024 x 1024 but that should be adequate to get you close enough to begin matching shapes.
Choose Load Bitmap and locate your image. Now is the time to line up the view and begin adding the simple objects to match the terrain of your projection image. In order to see your scene, the doodle image needs to be somewhat transparent. To accomplish this, right click or Cmd click on your doodle object in the object manager and choose a Display Tag from the CINEMA Tags menu. Lower the visibility to an acceptable level. Now you are ready to add your shapes to match the projection contour.(Figure 14)
(Figure 14)

10 11
Once you have the basic layout, go to the Window Menu and select ProjectionMan.(Figure 15) In the new Projectionman manager, shift select your objects and right click or Cmd click and choose New Projectionman Camera.(Figure 16) You may not want the default alpha. If this is the case, choose disable for that channel. By default, the image you choose will be added to the luminance channel.(Figure 17) This allows your scene to light itself and alleviates the risk of shadows ruining your illusion. You can add channels by clicking on their corresponding x’s in the ProjectionMan Manager or, as with all materials, in the Material Manager. Should you choose to map your images in the color channel, you can use CINEMA lights to light the scene. Alpha channels and PSD Layers can be used to isolate portions of your texture to affect designated geometry only.
Once your geometry is lined up and the texture is mapped correctly, it is time to add another camera for animation. Add a new camera and name it something like Animated Cam. In the editor window, go to Cameras>Scene Cameras>Animated Cam. Now you are looking through your new animated camera and can set keyframes for the movement you want. The enhanced cooperation with Photoshop greatly improves the ability to add and adjust layers for camera mapping. As stated above, when using layered PSD images for a more complex projection, ProjectionMan allows you to choose the layers you want to map on each object.
(Figure 15)
(Figure 16)

11
(Figure 17)
(Figure 18)
(Figure 19)

12 13
BodyPaint R4Exciting new updates have arrived for Bodypaint starting with a Photoshop-like interface and better Photoshop integration. When opening up Bodypaint, the first thing you may notice is the vertical listing of its most popular tools on the left. Another nice update is the addition of the toolbar at the bottom of the layers tab. Changes in Bodypaint’s toolset continue with the addition of three new tools. The Blur, Sharpen and Colorize Tools all enhance users abilities to create fantastics textures. The Colorize Tool, for example, allows the recoloring of an existing texture using a selected replacement color.
Brushes within Bodypaint have themselves been revamped for better control and usability. For starters, brushes are now tool specific. You can toggle between tools and their brush values will be retained. Brushes also benefit from the increase in Photoshop integration by allowing your favorite brushes to be added directly to Bodypaint. To do so, simply open Photoshop and open the brushes panel. Click on the menu drop down to the right of the panel and choose Save Brushes.(Figure 20) Choose your destination and open CINEMA 4D 11. Once in Bodypaint, go to the brushes Tab and select File>Load brushes. (Figure 21)
The remaining updates combine to improve the overall workflow and effectiveness of BodyPaint. The inclusion of Edge mode and tools such as Path, Loop and Ring selection in the UV edit mode toolbar, means no more trips to the Command Manager to create seams and selections to help unwrap your UVs. Lastly, improved sensitivity and options for tablet use give artists greater control to craft their masterpieces without leaving Bodypaint.
(Figure 20) (Figure 21)
(Figure 22)

13
RenderingThe biggest and best change in CINEMA 4D’s Rendering is the overhaul that has taken place within the rendering engine itself. You can expect faster render speeds and better results, particularly in the use of Global Illumination. With the new updates to CINEMA, all users, regardless of platform, can enjoy 64 bit rendering on the most challenging of calculations, including the Hair module. When you open the render settings for the first time, the changes to layout are starkly apparent. The settings have been completely reorganized to group related settings to aid in the workflow of getting your scenes rendered the way you want them. For example, under the Save option, you’ll find Full Render, Software and Hardware Preview Renders and the new CineMan Render option. CineMan is a new feature that allows CINEMA users to communicate with external render engines. Most impressively, CineMan allows you to interact with Pixar’s RenderMan. As stated above, Global Illumination (GI) has seen a rework and will help users get more realistic renderings. Global Illumination simulates a real world look by reflecting light off of the objects in your scene. By default, any scenes created in older versions of CINEMA using Global Illumination will be updated on import. If you would like CINEMA 4D 11 to retain the older GI version, you must uncheck the Global Illumination conversion on import option in the render portion of the preferences menu. Global Illumination is found in the effects pull down.
Lastly, render settings can be configured and saved as custom presets that can be loaded at any time. To do so, with your settings changes made, click on the Render Settings tab at the bottom left of the Render Setting menu and choose Save Preset. To load a preset, simply click on the same Render Settings tab and choose Load Preset. This is a great time saver and ensures that your renders are consistent and as you want them every time.
(Figure 23)
14 15
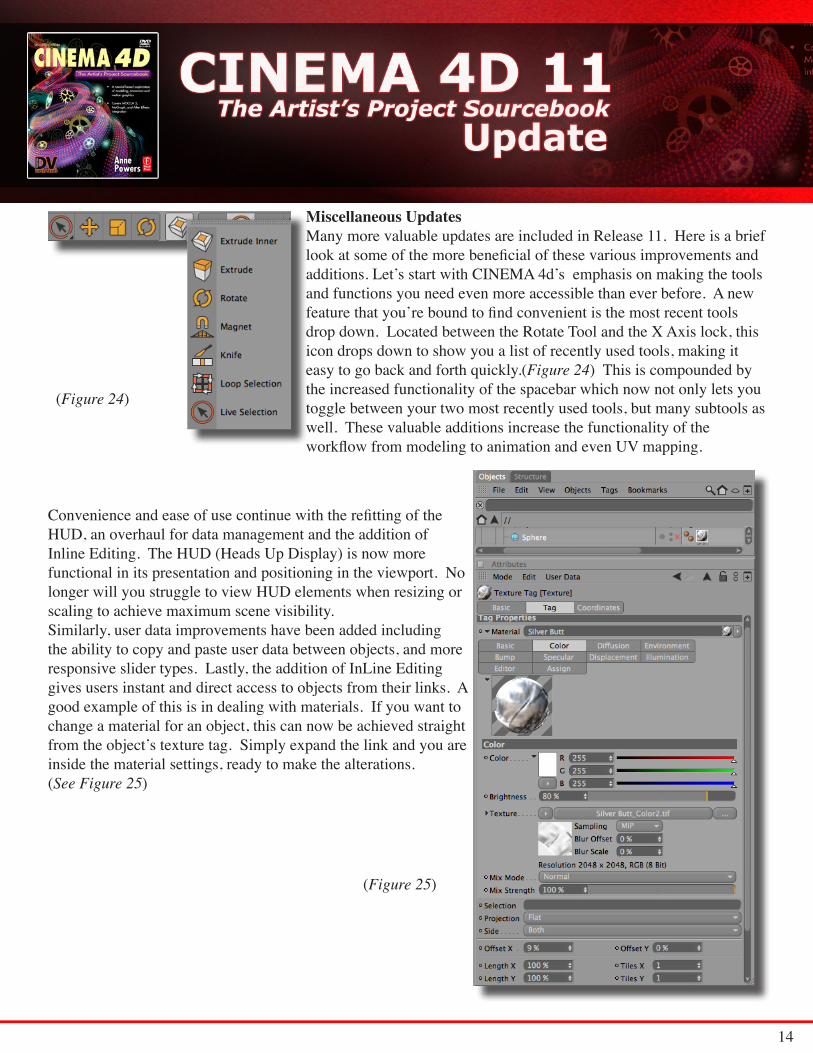
Miscellaneous UpdatesMany more valuable updates are included in Release 11. Here is a brief look at some of the more beneficial of these various improvements and additions. Let’s start with CINEMA 4d’s emphasis on making the tools and functions you need even more accessible than ever before. A new feature that you’re bound to find convenient is the most recent tools drop down. Located between the Rotate Tool and the X Axis lock, this icon drops down to show you a list of recently used tools, making it easy to go back and forth quickly.(Figure 24) This is compounded by the increased functionality of the spacebar which now not only lets you toggle between your two most recently used tools, but many subtools as well. These valuable additions increase the functionality of the workflow from modeling to animation and even UV mapping.
Convenience and ease of use continue with the refitting of the HUD, an overhaul for data management and the addition of Inline Editing. The HUD (Heads Up Display) is now more functional in its presentation and positioning in the viewport. No longer will you struggle to view HUD elements when resizing or scaling to achieve maximum scene visibility. Similarly, user data improvements have been added including the ability to copy and paste user data between objects, and more responsive slider types. Lastly, the addition of InLine Editing gives users instant and direct access to objects from their links. A good example of this is in dealing with materials. If you want to change a material for an object, this can now be achieved straight from the object’s texture tag. Simply expand the link and you are inside the material settings, ready to make the alterations. (See Figure 25)
(Figure 24)
(Figure 25)

15
With materials in mind, now is a good time to mention the enhancement of controls in both the transparency and reflections channels. The new features listed aid tremendously in the pursuit of realistic imagery. In the transparency channel you’ll find new options such as: Total Internal Reflection, Exit Reflections, and Absorption variables. Additionally, Dispersion has been replaced with Blurriness and includes more controls to fine tune the effect. The reflection channel has seen one new addition which, ironically, is the Additive option. With this option enabled, the reflection channel builds upon the color channel rather than replacing it. (See Figure 27)
The last update of this supplement is a great enhancement for the animation portion of CINEMA. As a convert from traditional animation, the addition of Ghosting in CINEMA 4D 11 is dear to my heart. Ghosting, or Onion skinning, as it is also known, is the visible inclusion of frames before, after, or both, to a current frame of animation. Think about flipping through a stack of hand drawn pages to add keys or inbetweens to an animation. The ghost frames let you see where the animated subject has been and where it is going. This gives users a great tool to fine tune their poses and results in better animation. Ghosting is achieved by enabling the Ghosting option within the Display Tag, which should be placed on the geometry of the related object (this could be a HyperNurbs parent). Ghosting Color, frequency of steps, and duration of animation, can all be adjusted from within the Ghost settings. Once you have the parameters set, simply select the Calculate Cache button and you are in business. (Figures 28 & 29)
(Figure 26)
(Figure 28) (Figure 29)
(Figure 27)

16
Again, these are just some of the many updates included in release 11. Please take advantage of the built in Help system provided, as well as Maxon’s online resource, Ciniversity, to find in depth looks at the various improvements of this new release.Hopefully, Release 11 will inspire you as much as it has empowered you to create your best work and top flight animation. Enjoy!!!
AcknowledgementsIn conclusion, I would like to thank everyone who has assisted me in the completion of this supplement. Most importantly, I would like to thank my family, especially my wife Sally, and my children, Max, Emma and Samuel, for their sacrifice in giving me the time to explore and document this work. I would also like to thank Michael Hewes, Darrin Frankovitz and all the fine people at Maxon for their knowledge and support. Lastly, I would like to thank Paul Temme and Focal Press and especially, Artist’s Project Sourcebook Author, Anne Powers for providing CINEMA 4D users with such a great book to learn and teach this magnificent software.