New features 3.1 - Home | Dental Wings · Useful tip: In your anatomy editor, you can activate or...
7
New features 3.1.0 Version 1.0 March 23 st , 2012 Summary This document explains how to use the new features introduced in the release version 3.1.0 of Dental Wings Open Software (DWOS). 1. Advanced pontic 2. Anatomical telescopic coping 3. Merz anatomy library 4. Add/remove material within a predefined range 5. Multiple edition of dental bands 1. Advanced pontic The “Advanced pontic” is a new prosthesis type that you can select when creating an order. Its particularity is that, unlike regular pontics, you can draw a margin on the gingiva. See how the gingival area of this pontic perfectly adapts to the clinical context. Here is how to use it: 1. Select the “Advanced pontic” when you define the bridge's elements while creating the order. * Tip: If you do not see Advanced pontic in your menu, click the applications icon in the top icon menu bar (it looks like a gear). Select « Material Management ». Chose the material you selected in your order from the left pane and click the « Elements available » tab from the right pane. Click in the box next to « advanced pontic » to put a check in it. It should now appear in your « Prosthesis type » menu in the order receiving application. Dental Wings Inc. New features 3.1.0 STS75-0010 1/7 Figure 2: Prosthesis type menu with new Advanced pontic Figure 1: gingival area of an advanced pontic within a bridge
Transcript of New features 3.1 - Home | Dental Wings · Useful tip: In your anatomy editor, you can activate or...
New features 3.1.0
Version 1.0
March 23st, 2012
Summary
This document explains how to use the new features introduced in the release version 3.1.0 of Dental Wings Open Software (DWOS).
1. Advanced pontic
2. Anatomical telescopic coping
3. Merz anatomy library
4. Add/remove material within a predefined range
5. Multiple edition of dental bands
1. Advanced pontic
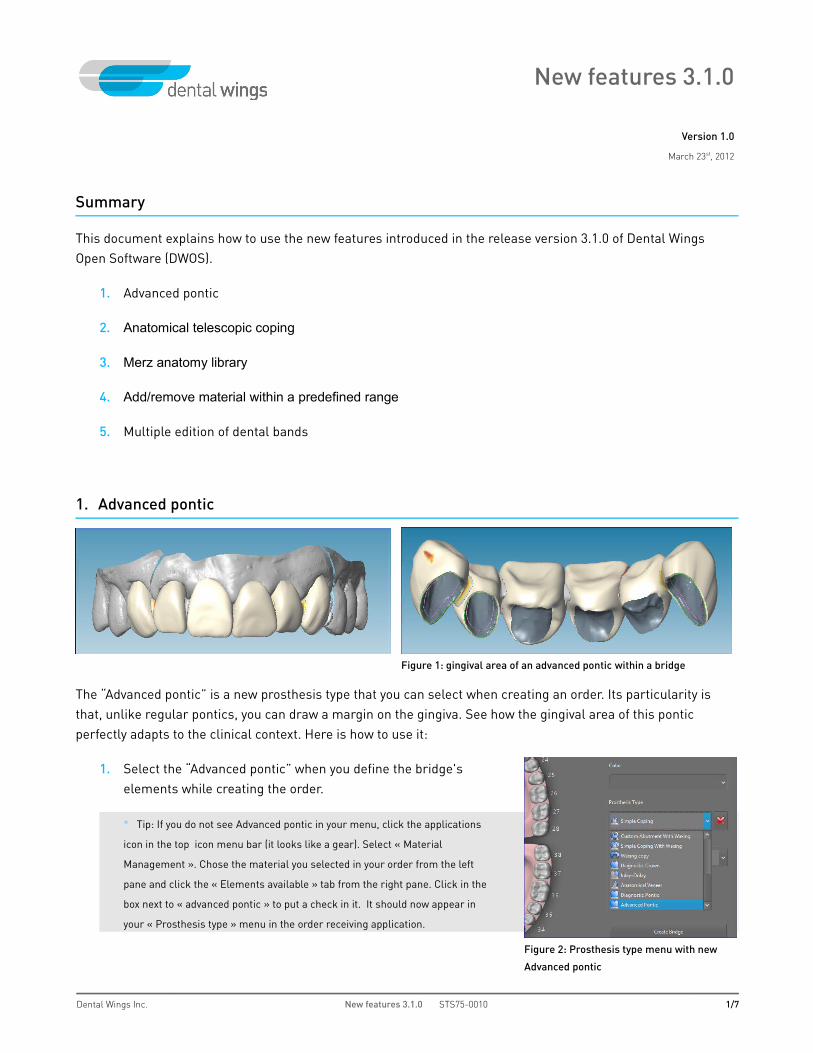
The “Advanced pontic” is a new prosthesis type that you can select when creating an order. Its particularity is that, unlike regular pontics, you can draw a margin on the gingiva. See how the gingival area of this pontic perfectly adapts to the clinical context. Here is how to use it:
1. Select the “Advanced pontic” when you define the bridge's elements while creating the order.
* Tip: If you do not see Advanced pontic in your menu, click the applications
icon in the top icon menu bar (it looks like a gear). Select « Material
Management ». Chose the material you selected in your order from the left
pane and click the « Elements available » tab from the right pane. Click in the
box next to « advanced pontic » to put a check in it. It should now appear in
your « Prosthesis type » menu in the order receiving application.
Dental Wings Inc. New features 3.1.0 STS75-0010 1/7
Figure 2: Prosthesis type menu with new
Advanced pontic
Figure 1: gingival area of an advanced pontic within a bridge

During the scan process, the pontic area will be managed more or less as a die * because you will have to request a scan of the gingival area, in the same manner you would request a precise scan of a stump.
2. After precise scan of the arch and before scanning dies on multi-die plate, right-click on an advanced pontic and select “scan preparation on model”. You can select “Extract scan from arch scan” since precise re-scan is not necessary. Define the target area for the pontic using the orange dots and click OK.
*Notice in figure3, how # 11 is identified as “stump 11” and not as a pontic.
3. When proceeding with “edit margin on next available preparation” you will be ask to draw a margin for your diagnostic pontics. Click on the “Switch design view” button and start drawing by clicking on the gingiva to place points.
4. Once you're in the Crown & bridge CAD module, you can rework on you margin by right-clicking on the diagnostic pontic and selecting “edit margin line”.
Dental Wings Inc. New features 3.1.0 STS75-0010 2/7
Figure 3: Locate gingiva to draw
margin
Figure 4: "Extract scan from arch scan"
check box
Figure 5: "Switch design
view" button
Figure 6: Draw margin on the gingiva
Figure 7: contextual menu in
CADFigure 8: Select "Edit margin" Figure 9: Move dots to edit margin

2. Anatomical telescopic coping
It is now possible to design a telescopic coping that follows anatomy's outline
1. Start by selecting a telescopic coping while defining the prosthesis type in “order creation”.
2. Once you open a Crown & bridge CAD session, right-click on your coping and select “Recompute”.
3. Select the “telescopic Crown params” tab.
4. Activate “Project on anatomy” check box.
5. Adjust other parameters to your liking.
6. The coping has adopted the anatomy contours.
Dental Wings Inc. New features 3.1.0 STS75-0010 3/7
Figure 10: Telescopic coping in order creation Figure 11: "Recompute” in CAD
Figure 12: "Project on anatomy" check box
Figure 13: Telescopic copings before "Project on
anatomy"Figure 14: Telescopic copings after "Project on anatomy"

3- Merz anatomy kit
Dental Wings has concluded an agreement with Merz Dental so that you can benefit from the full integration of their state-of-the-art anatomy kits. You will surely appreciate the easy access to these highly morphological and detailed structures, pre-installed with the 3.1.0 upgrade. Here are 2 simple ways to chose between usual default Dental Wings anatomy kits, or Merz's kits : Artegral BM, Artegral IM, DeltaForm®Posterior, Polystar®Selection.
1. Choosing your anatomy kit upfront, in order creation.
2. Changing your reference kit during a CAD session by using the “Re-adapt anatomy” function.
• Right-click on a prosthesis and select <“Anatomy“ (or “Overlay” in some cases) <“Re-Adapt Anatomy”.
• Click in the field next to “Anatomy Kit”.
• Chose an anatomy kit.
Dental Wings Inc. New features 3.1.0 STS75-0010 4/7
Figure 15: Merz's anatomy kits: Artegral BM, Artegral IM, DeltaForm® Posterior, Polystar® Selection
Figure 16: Choosing anatomy kit in order
creation
Figure 17: "Re-adapt anatomy" in CAD Figure 18: Chosing anatomy kitFigure 19: Changing anatomy kit

Useful tip:
In your anatomy editor, you can activate or deactivate an option that enables scaling the anatomies, or not, when computing prostheses.
1. Click on the “Application” icon from the top menu bar
2. Select “Anatomy”
3. Right-click on a kit.
4. Look at the last item of the menu:
• If the the “Auto Scale” is activated, it means that the CAD Engine has the ability to scale the chosen anatomy to make it fit in the allowed space of the present case. Click to deactivate.
• If the “Auto Scale” is deactivated, it means that the CAD Engine cannot scale the chosen anatomy to fit the case. It will be placed as it is, without any modification. Of course, you are always able to edit it yourself in CAD module with the “Transform” function.
Try both to find witch one better suits your working method.
Dental Wings Inc. New features 3.1.0 STS75-0010 5/7
Figure 20: "Auto scale" activated
Figure 21: Auto-scale
deactivated
Figure 19: Accessing
anatomy library

4- Add/remove material within a predefined range
This is a new check box added in the “waxing tool” parameter window. When it is activated, it prevents from adding more material than the value that you enter, or inversely, removing more material than specified. To use this new feature:
1. Right-click on a prosthesis and select < “Anatomy” (or “Overlay” in some cases) < Add/Remove material.
2. In the “Waxing tool” parameter window, look for “Min/Max Range”
3. Put a check in the “Range check” box.
4. Enter your preferred values
Observe the following example:
In figure 24, the maximum height of material that can be added is set to 1 millimeter.In figure 25, the maximum height of material that can be removed is set to 0.5 millimeter.
Attention!
Do not confuse with the “Amplitude” value, which corresponds to the amount of material added or removed each time the tool (delimited by
the purple circle) skims the surface.
Dental Wings Inc. New features 3.1.0 STS75-0010 6/7
Figure 22: Add/remove material or
"waxing tool"
Figure 23: Range check activated
Figure 24: Adding material up to 1mm Figure 25: Removing no more than 0.5mm of material
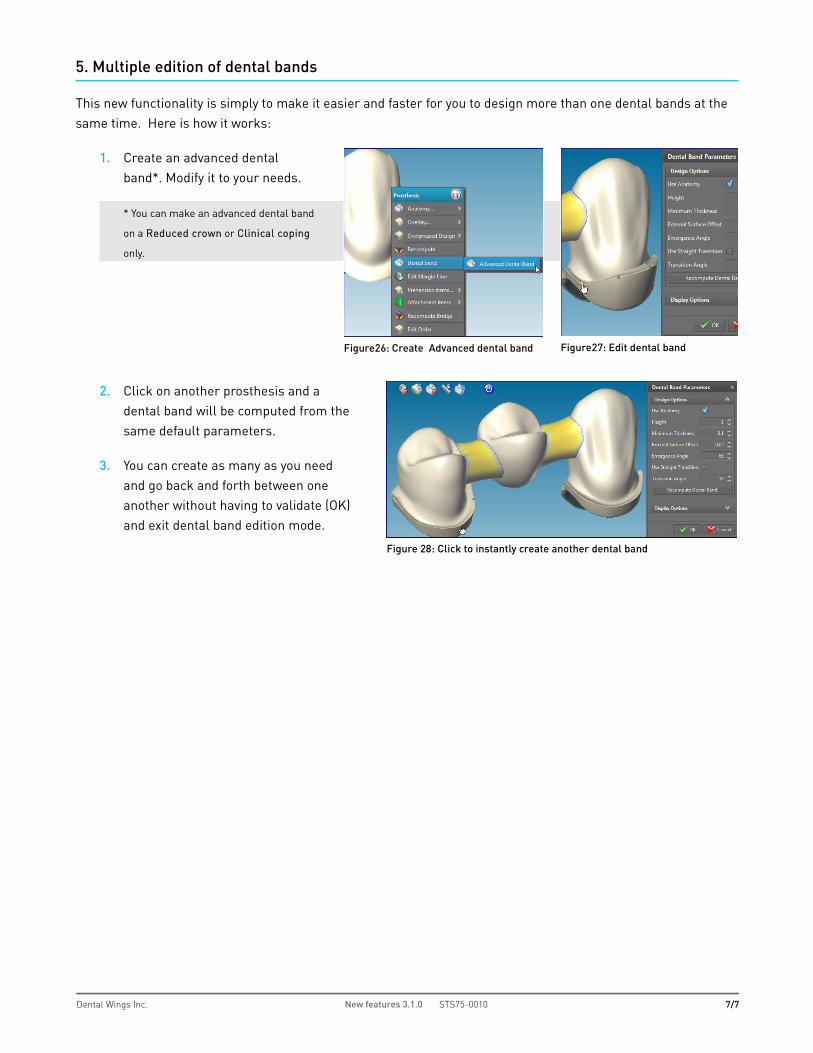
5. Multiple edition of dental bands
This new functionality is simply to make it easier and faster for you to design more than one dental bands at the same time. Here is how it works:
1. Create an advanced dental band*. Modify it to your needs.
* You can make an advanced dental band
on a Reduced crown or Clinical coping
only.
2. Click on another prosthesis and a dental band will be computed from the same default parameters.
3. You can create as many as you need and go back and forth between one another without having to validate (OK) and exit dental band edition mode.
Dental Wings Inc. New features 3.1.0 STS75-0010 7/7
Figure26: Create Advanced dental band Figure27: Edit dental band
Figure 28: Click to instantly create another dental band