Network Testing Tools Ettore Tamiro GARR - Network Operation Center PAP Workshop July 15, 2009.
44
Network Testing Tools Ettore Tamiro GARR - Network Operation Center PAP Workshop July 15, 2009
-
Upload
andra-stevenson -
Category
Documents
-
view
218 -
download
3
Transcript of Network Testing Tools Ettore Tamiro GARR - Network Operation Center PAP Workshop July 15, 2009.

Network Testing Tools
Ettore Tamiro
GARR - Network Operation Center
PAP Workshop
July 15, 2009

2
Installing a perfSONAR Network Performance Node
This tutorial is based on a previous work by
Rich CarlsonFor the
NWS WorkshopJan 12-14, 2009

3
Introduction
First question:
Why do we need network testing tools?

4
Introduction
• Healthy networks are the basis for a good user experience
• Network issues that may be not perceptible using certain applications, can be very annoying for other specific services or can even be the source of severe problems
• This is more true for networks intended to offer multimedia services

5
Introduction
Second question:
What do we are searching for?

6
Introduction
• Congested links• Queuing problems• Packet Delay Variations (Jitter)• Packet Loss• …

7
Introduction
Third question:
What all of these problems have in common?

8
Introduction
At least one thing:
They are hard to investigate!
And even worst: they are harder to discover
in a multi-domain environment

9
Introduction
Fourth question:
Are we all alone or out there we can find
something to help us in our quest?

10
Introduction
Internet2 has built a live Linux distro
With a built-in set of network testing tools
11
Introduction
• Most of the Internet2 network performance tools are client/server based• Client software runs on the users
Laptop/Desktop computer• Software is automatically downloaded when a test is
requested• Server software runs on a dedicated server
which is physically attached to the network on the same LAN as the production server• Software is pre-installed and must be customized
before using

12
Initial Suite of Tools
• NDT – a client/server program to find host configuration and network infrastructure faults
• NPAD – a client/server program to verify host configuration and local infrastructure will work with remote sites
• BWCTL – a client/server program to continuously monitor the network infrastructure
• OWAMP – a client/server program to continuously monitor the end-to-end delay

13
perfSONAR
• A framework for building large scale, multi-domain network measurement and monitoring infrastructures• Reference implementations of tools that
use this framework have been developed by Internet2 engineers to demonstrate the value of this approach
14
perfSONAR perfNode
• A pre-built ISO image that can be booted to quickly bring up a measurement server• Initial boot requires configuration and
customization steps (this presentation)• Subsequent boots bring the system back to
this known state
• Most of the data in this slide deck comes from the on-line quick-start guide by Jason Zurawski http://code.google.com/p/perfsonar-ps/wiki/NPToolkitQuickStart

15
Step 1 – Obtain the ISO image
• Download the latest ISO image from http://www.perfsonar.net/download/bundles/pS-NPToolkit/current.iso
• OR, ask Internet2 staff to send you a CD-ROM disk
• Burn the downloaded ISO image onto a CD-ROM disk • Be sure and burn this as an ISO image and
not as a data disk, see the instructions for your burner software.

16
Step 2 – Prepare the Hardware
• Find a computer you can dedicate as a server• 1.8 GHz Intel/AMD processor• 512 MB RAM• 80 GB Hard disk (Disk needs to be formatted)• 100 Mbps Ethernet interface• CD read-only disk drive
• Note: a low-cost rack-mount server is available from KOI computers http://www.koicomputers.com/ for approximately $600, contact Internet2 staff for details

17
Step 3 (a) – Initial Boot – BIOS setup
Once you have obtained a setup cd-rom, be sure that your server is configured to boot first from removable media.
This is done by manipulating the boot device priority in the BIOS settings
Be aware that dealing with the BIOS is a risky task, so If you feel unsure, ask for help
18
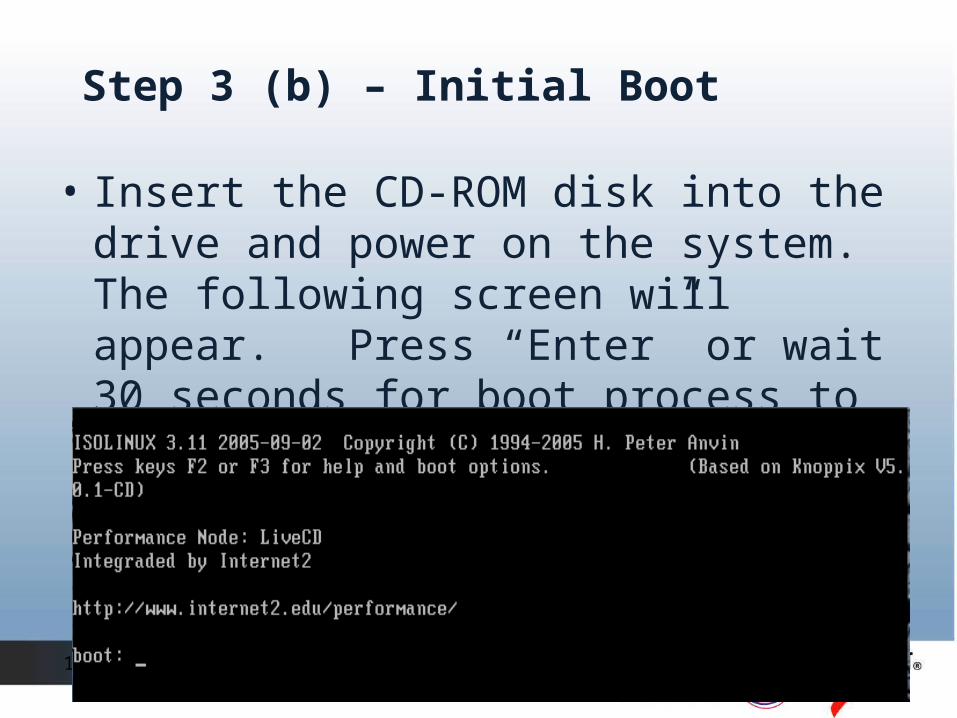
Step 3 (b) – Initial Boot
• Insert the CD-ROM disk into the drive and power on the system. The following screen will appear. Press “Enter” or wait 30 seconds for boot process to begin

19
Step 4 – Begin Configuration
• After a short time, the following screen will appear. All items in RED need to be configured.

20
Step 5 (a) – Begin Configuration
BE CAREFULL AT THIS STEP!
perfSONAR perfNode uses a mass storage unit to hold both collected data
And configuration settings.
You will be prompted to specify this unit and a wrong selection could
Make you loose all of the data stored on your computer HD!
You have been provided with a 2GB usb disk that will be used as installation
Unit. If unsure on which unit to select during the setup process, don’t esitate to
ASK!

21
Step 5 (b) – Select a Drive
• Enter ‘1’ to configure the Drive information
• In this case only 1 drive is available, select the drive listed on your server• Note: the drive will be reformatted if
necessary

22
Step 6 – Configure Site Settings
• Select ‘2’ to enter the Site Settings option• Enter admin’s name/email, org name and physical
location, and the link speed, use “PAPW” as the communities of interest

23
Step 7 – Enter passwords
• Enter ‘3’ to set the system passwords, you will not be able to use the system if you don’t set these passwords

24
Step 8 – Configure specific services
• Enter ‘4’ to enable/disable specific services• Enable NDT, NPAD, BWCTL, OWAMP and Web Service• Enable SSH only if you want to remotely login to this server• Disable PingER, SNMP, and perfSONAR-BUOY services

25
Step 9 – Manage Users
• Skip this item, unless you specifically need to add a new user, you can skip this item!

26
Step 10 – Configure BWCTL
• Enter ‘6’ and press ‘Enter’ when prompted. Simply take the default settings

27
Step 11 – Configure NTP
• You are in a closed LAN so enter ‘7’, then simply enter ‘0’ to exit this page. For a production system you can obtain better servers from your campus IT staff

28
Step 12 – Configure OWAMP
• Enter ‘8’ and then press ‘Enter’ when prompted to take the default values

29
Step 13 – Configure Static IP address• In most cases your campus will automatically
assign an IP address to the server during the boot process but
• For this tutorial provide the IP address and NETMASK that you have received from the PAPW staff

30
Step 14 – Enter timezone info
• An optional step to set the timezone for your physical location.

31
Step 15 – Modify advertised interface
• Skip this item. In most cases your server will have only 1 network interface so you can skip this task.

32
Configuration Complete
• Once you have configured all these items, Press ‘0’, the system may reboot, or it may just continue on and complete the boot process.
• When the boot process is complete you will receive a login prompt.• The login id is “knoppix” (no quotes)• The password is what you assigned

33
User Login Complete

34
Verify IP address
• Enter the command ‘ifconfig’ to verify IP address is configured and operational

35
Start KDE desktop environment
• Enter the command ‘startx’

36
Java support• In the “real world” you don’t need Java to run
on your server because it is required only by the client hosts (the one with the browser)
• But, given that you have only one PC for this tutorial, you need to run a server and a client on the same machine
• GARR has made available a web server in this LAN with everything needed for a “painless” Java setup (http://192.168.118.1)
• Once Java will be installed you can test your server or those of your collegues

37
Verify Operation
• Bring up a web browser and enter https://{ip-address} where {ip-address} is the address assigned to this server in the w.x.y.z format
• If your IT department has assigned a DNS name to this address you can use that name instead.

38
Main Server Web page

39
Finding other Server
• The “Global Set Of Services” link gets you to a new page that lists your peer servers.
• All remote servers should be listed, servers run by peer PAPW sites will appear under the “PAPW” heading

40

41
Server Status
• Your server is now ready to support testing
• You can point clients to it so verify your site is operating properly
• You can point clients to the remote site to verify that the WAN path is capable of carrying your traffic

42
Running NDT test
• Press “Start” Button

43
Running NPAD test
• Test to Local server and enter required speed and RTT to remote location then press “start”

44
Conclusion
• Server should be permanently installed at your home institution ‘on’ your local network
• Once the ISO image is booted, the tools will register with a global lookup service so others can find them
• These tools will make it easier to find and fix network performance problems