Network Settings Startup Guide -...
44
Network Settings Startup Guide MIMAKI ENGINEERING CO., LTD. URL: http://eng.mimaki.co.jp/ Version 1.0 D202526-10
Transcript of Network Settings Startup Guide -...

Network SettingsStartup Guide
MIMAKI ENGINEERING CO., LTD.URL: http://eng.mimaki.co.jp/
Version 1.0 D202526-10

Notice
2
Notice• It is strictly prohibited to write or copy a part or whole of this document without our approval.• The contents of this document may be subject to change without notice.• Due to improvement or change of this software, the description of this document could be partially different
in specification, for which your understanding is requested.• It is strictly prohibited to copy this software to other disk (excluding the case for making backup) or to load
on the memory for the purpose other than executing it.• The customer is responsible for the communication fee for Internet communication such as e-mail notifica-
tion.• The notification by the event mail function may not be delivered due to Internet environment, failure of the
device/ the power supply, etc. Mimaki has absolutely no responsibility for any damages or loss resulting from non-delivery or delays.
Microsoft, Windows, Windows 2000, Windows XP, Windows Vista, Windows Vista or Windows 8 are trade-marks of Microsoft Corporation and other countries.All brand names and product names are trademarks or registered trademarks of their respective companies.
About this manual
3
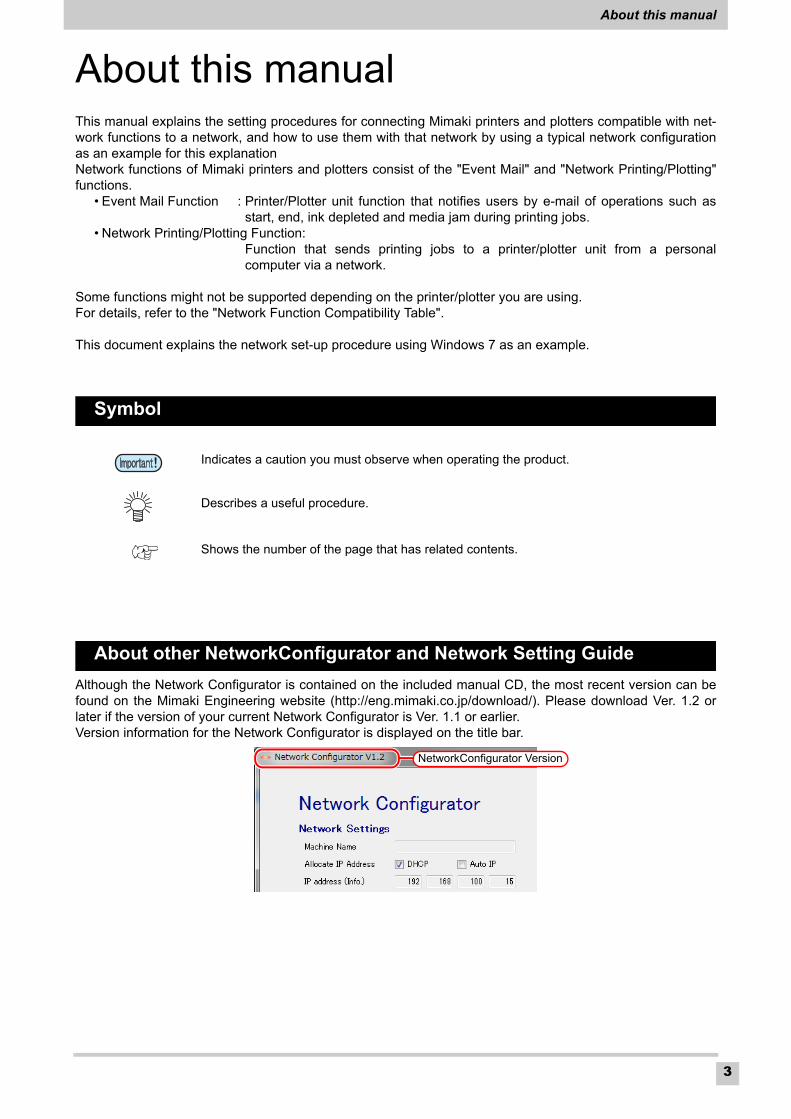
About this manualThis manual explains the setting procedures for connecting Mimaki printers and plotters compatible with net-work functions to a network, and how to use them with that network by using a typical network configuration as an example for this explanationNetwork functions of Mimaki printers and plotters consist of the "Event Mail" and "Network Printing/Plotting" functions.
• Event Mail Function : Printer/Plotter unit function that notifies users by e-mail of operations such as start, end, ink depleted and media jam during printing jobs.
• Network Printing/Plotting Function: Function that sends printing jobs to a printer/plotter unit from a personal computer via a network.
Some functions might not be supported depending on the printer/plotter you are using.For details, refer to the "Network Function Compatibility Table".
This document explains the network set-up procedure using Windows 7 as an example.
Symbol
About other NetworkConfigurator and Network Setting Guide
Although the Network Configurator is contained on the included manual CD, the most recent version can be found on the Mimaki Engineering website (http://eng.mimaki.co.jp/download/). Please download Ver. 1.2 or later if the version of your current Network Configurator is Ver. 1.1 or earlier.Version information for the Network Configurator is displayed on the title bar.
Indicates a caution you must observe when operating the product.
Describes a useful procedure.
Shows the number of the page that has related contents.
NetworkConfigurator Version

Table Contents
4
Table Contents
Notice ..................................................................................................... 2
About this manual ................................................................................. 3
Symbol ....................................................................................................................3About other NetworkConfigurator and Network Setting Guide ...............................3
Using the Event Mail Function ............................................................. 5
Step1: Connect the Printer/Plotter and Personal Computer with the LAN ..............8Step2: Check the Printer/Plotter Network Settings .................................................9Step3: Check the Network Settings of the Printer/Plotter and Personal Computer ....10Step4: Install the Network Configurator ................................................................11Step5: Specify Event Mail Items ...........................................................................15
Using the Network Printing/Plotting Function (With Automatic IP Address Allocation) ............................................................................ 19
Step1: Connect the Printer/Plotter and Personal Computer with the LAN ............21Step2: Check the Printer/Plotter Network Settings ...............................................22Step3: Check the Network Settings of the Printer/Plotter and Personal Computer ....23
Using the Network Printing/Plotting Function (With a Static IP Address) . 24
Step1: Connect the Printer/Plotter and Personal Computer with the LAN ............26Step2: Specify the Static IP address in the Printer/Plotter ....................................27Step3: Specify the static IP address in the personal computer .............................28Step4: Check the Network Settings of the Printer/Plotter and Personal Computer ....28
Using the Network Printing/Plotting Function (If the Printer/Plotter and Personal Computer are Directly Connected by using a LAN Cable) ............................................................................. 29
Step1: Connect the Printer/Plotter and Personal Computer by Using a LAN Cable ...31Step2: Check the Printer/Plotter Network Settings ...............................................32Step3: Check the Network Settings of the Printer/Plotter and Personal Computer ....33
Appendix 1. Switching the IP Address Acquisition Settings of a Personal Computer to Automatic ........................................................................................ 34
Appendix 2. Switching the IP Address Acquisition Settings of a Personal Computer to Static IP Address ............................................................................ 38

Using the Event Mail Function
5
Using the Event Mail FunctionModel case
The network environment used as an example for explanation satisfies the following four conditions.(1) The printer/plotter and personal computer are connected to a LAN that can automatically obtain an
IP address.(2) The LAN described in (1) can be connected to the Internet.*1
(3) The terminal receiving mail can be connected to the Internet.*1
(4) You have your own mail account (Gmail cannot be used).*1*2*3
*1. Although the above model case shows an example with an Internet-connected environment, an Internet-connected en-vironment is not required if you have a mail server within your LAN and mail can be received from that LAN.
*2. A mail service (such as Gmail) that requires SSL communication with the source address cannot be used.
*3. Specify settings so that event mail is not judged to be spam mail by the spam mail filter. It is sufficient to specify settings so that mail from the sending address is allowed to pass through the filter. If you are not sure how to specify the actual settings, please inquire with the corresponding mobile phone company or administrator (provider) of the receiving mail server.
• Although this does not apply to this case, the event mail function can also be used with static IP address allocation.
• If a printer or plotter is compatible with both "Event Mail" and "Network Printing/Plotting" functions, "Network Printing/Plotting" can be used by implementing the "Event Mail" settings. It is not necessary to separately specify the "Network Printing/Plotting" settings.
Mail-receiving Terminal
Destination Mail Address [email protected]
: LANInter net
Printer / Plotter
Network HUB
Router
Model case
Inter net
Personal Computer
NetworkConfigurator

Using the Event Mail Function
6
Items you must provide
□Internet-connected envi-ronment
Contracted with Internet carrier or provider
□ Sending mail account*1
*1. A mail service (such as Gmail) that requires SSL communication with the source address cannot be used.
□Receiving mail
account*2
*2. Specify settings so that event mail is not judged to be spam mail by the spam mail filter. It is sufficient to specify set-tings so that mail from the sending address is allowed to pass through the filter. If you are not sure how to specify the actual settings, please inquire with the corresponding mobile phone company or administrator (provider) of the re-ceiving mail server.
□ Router
□ Network HUB Required amount of units
□ LAN cable Required amount of cables
□ Personal computerWindows XP SP3, Windows Vista SP2, Windows 7 SP1, Windows 8, with each one being 32/64-bit compatibleNET Framework 3.5 must be installed
□ Printer/PlotterMimaki product that is compatible with the network function (Refer to the "Network Function Compatibility Table" for compatible models.)
□ NetworkConfigurator Network settings application provided by Mimaki
Using the Event Mail Function
7
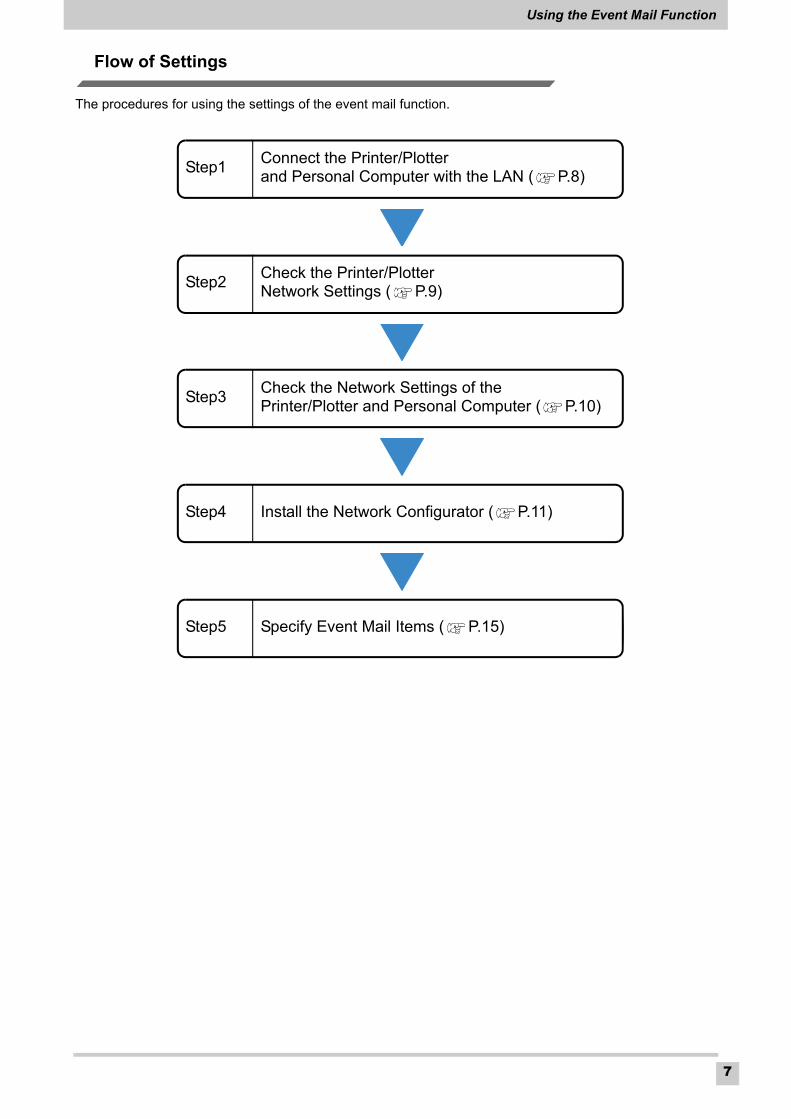
Flow of Settings
The procedures for using the settings of the event mail function.
Step1Connect the Printer/Plotter and Personal Computer with the LAN ( P.8)
Step2Check the Printer/Plotter Network Settings ( P.9)
Step3Check the Network Settings of the Printer/Plotter and Personal Computer ( P.10)
Step4 Install the Network Configurator ( P.11)
Step5 Specify Event Mail Items ( P.15)

Using the Event Mail Function
8
Step1: Connect the Printer/Plotter and Personal Computer with the LAN
Perform the following procedures with the printer/plotter and personal computer.
1 Connect the printer/plotter and personal computer to the network.
Printer / Plotter
Turn off the printer/plotter power, and connect the printer/plotter to the net-work hub by using a LAN cable.Refer to the "Names of Parts and Functions" section of the printer/plotter operation manual if the LAN connector location of the printer/plotter is unclear.
Personal computer
Turn off the personal computer power, and connect the personal computer to network hub by using a LAN cable.Refer to the personal computer operation manual if the LAN connector loca-tion of your personal computer is unclear.

Using the Event Mail Function
9
Step2: Check the Printer/Plotter Network Settings
1 Turn on the printer/plotter power.
2 From the printer/plotter operation panel, specify [ON] for DHCP (automatic IP address acquisition).
• Default setting is "ON".
3 Referring to the "Set the network" section of the printer/plotter operation manual, check the IP address allocated to the printer/plotter.
4 After checking, return to the <LOCAL> screen.
• Operation differs depending on the model. For details, refer to the "Set the network" section of the printer/plotter operation manual.
• If the IP address is "169.254.*.*", either the LAN cable connection is faulty or the environment is such that an IP address cannot be automatically obtained. In such cases, consult the network administrator or installation personnel.
C h e c k I P A d d r e s s
1 9 2 . 1 6 8 . 1 0 0 . 1 0 1
Using the Event Mail Function
10
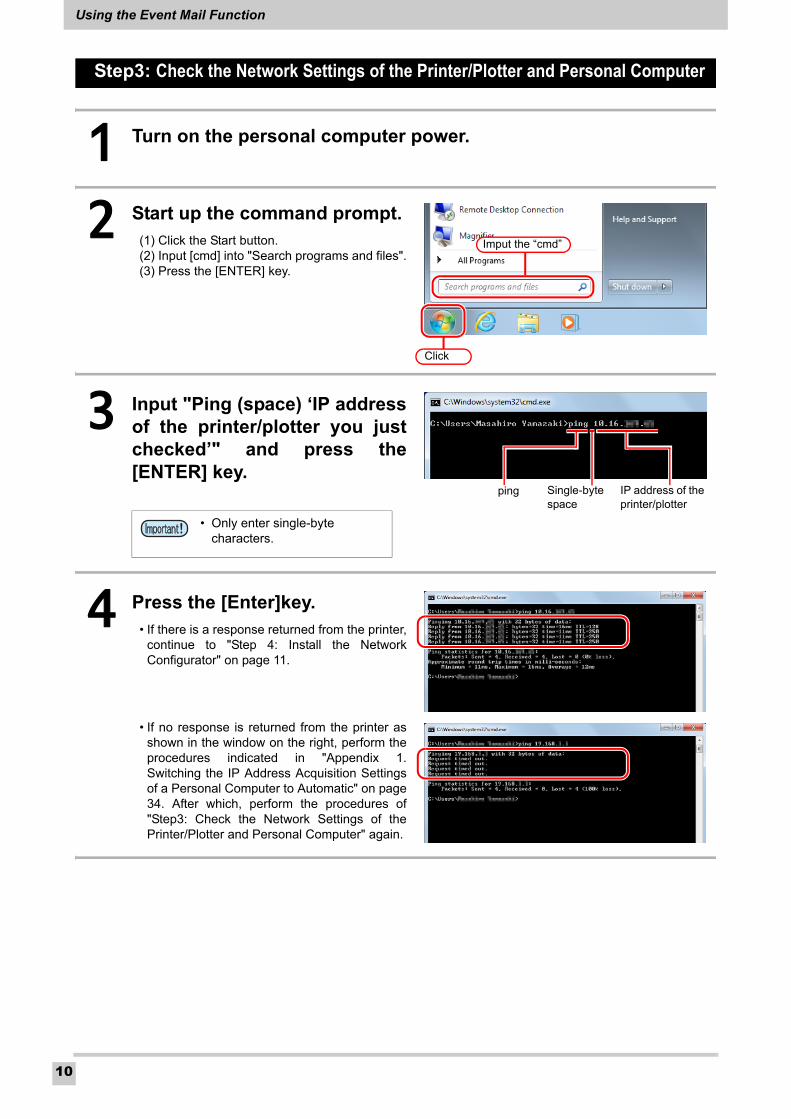
Step3: Check the Network Settings of the Printer/Plotter and Personal Computer
1 Turn on the personal computer power.
2 Start up the command prompt.(1) Click the Start button.(2) Input [cmd] into "Search programs and files".(3) Press the [ENTER] key.
3 Input "Ping (space) ‘IP address of the printer/plotter you just checked’" and press the [ENTER] key.
4 Press the [Enter]key.• If there is a response returned from the printer,
continue to "Step 4: Install the Network Configurator" on page 11.
• If no response is returned from the printer as shown in the window on the right, perform the procedures indicated in "Appendix 1. Switching the IP Address Acquisition Settings of a Personal Computer to Automatic" on page 34. After which, perform the procedures of "Step3: Check the Network Settings of the Printer/Plotter and Personal Computer" again.
• Only enter single-byte characters.
Imput the “cmd”
Click
ping Single-byte space
IP address of the printer/plotter

Using the Event Mail Function
11
Install the Network Configurator
Step4: Install the Network Configurator
Although the Network Configurator is contained on the included manual CD, the most recent version can be found on the Mimaki Engineering website (http://eng.mimaki.co.jp/download/). Please download Ver. 1.2 or later if the version of your current Network Configurator is Ver. 1.1 or earlier. (Refer to Page 13 "Install from the Mimaki Website")
Install from CD-ROM
1 Insert the "Operation Manual" CD-ROM that comes with the printer/plotter into the CD-ROM drive.
2 Click "Network Configurator" after the launcher starts up.
• The screen is for CG-SRIII.
• If the launcher does not start up, open the CD- ROM drive in Explorer and double-click on "Menu.exe".
3 After the folder containing the "Network Configurator" opens, copy the "Network Configurator" to your desktop.
Click
Double click
Copy

Using the Event Mail Function
12
4 Click to close the launcher.
Click
Close

Using the Event Mail Function
13
Install from the Mimaki Website
The actual download procedures might be different from the download procedures explained in the documen-tation.Follow the actual download procedures.
1 Download the Network Configurator
(1) Access the Mimaki Engineering website (http://eng.mimaki.co.jp/download/), and select "Driver/Utility" from "Download file selection".
(2) Select the "model" and "series" being used from the "Product type".
(3) Under "OS type", select the OS of the personal computer to which the Network Configurator will be installed, and click [Search].
(4) Click on "Network Configurator v *.*" in the search results.
(5) Click [Download] on the detailed search results window.
2 Click .
3 Click when the security warning window is displayed.
Click
Click
Run
Click
Run

Using the Event Mail Function
14
4 Click .
5 Select "Desktop" as the location to save the file and click .
6 Click .
7 "NetworkConfigurator.exe" is extracted to your desktop.
• The release notes and manual are also extracted.
Click
Browse
Click
SelectOK
Click
OK

Using the Event Mail Function
15
Step5: Specify Event Mail Items
1 Double-click the icon on your desktop.
2 The printer/plotter information is displayed in the Machine List. Select the name of the printer/ plotter and click .
3 Check [IP address (Info.)] on the displayed Network Configurator settings window.
• Check that the displayed [IP address (Info.)] is the same as the printer/plotter IP address that was checked in procedure 3 of "Step2: Check the Printer/Plotter Network Settings" on page 9.
• It is not necessary to change the "Network Set-tings".
• If the printer/plotter information is not displayed in the Machine List, it is possible that the printer/plotter and personal computer have not been properly connected to the network. Refer to "’Not Found’ is displayed in the list box and you cannot get the printer list, or Communication cannot be established with the machine of the address input as the Direct Address" troubleshooting procedure under "Set the Network", and perform the corresponding recovery procedures.
Click
Select
Select
Check

Using the Event Mail Function
16
4 Specify "Mail Server Settings"
• Enter values for (1) to (7) that are appropriate for the environment you are using. If you do not know a set value, refer to the mailer set values in Outlook 2010 or similar program.
• (A) [Send to Address]: Enter the mail address of the event mail destination.• (B) [Mail Title]: Enter the mail title. This will be displayed as the title of received mail.
• (6)Authentic Method Do not select "OFF". Specify "ON" for "APOP". Use with the following combinations.
(1)(2)(3)(4)
(5)
(6)
(7)
(A)(B)
(1)
(2)
(4)(5)
(6)
(3)
(7)
• The values shown in these windows are input examples. Specify settings by replacing with the set values of the mailer you are using.
Example: Outlook 2010 Settings Window
Outlook 2007 Settings Network Configurator Settings
“My outgoing server (SMTP) requires authenti-cation”: ON
Select "SMTP Auth."
“My outgoing server (SMTP) requires authenti-cation”: OFF
Select “POP Before SMTP”

Using the Event Mail Function
17
5 Check "Event Mail Function" to enable the event mail function.
6 Use the "Event Mail Settings" to select the event(s) for which mail is sent.
• The details of each item differ for each model. Refer to the printer/plotter operation manual.
• Items that are not selected are grayed-out.
7 Click when settings are completed.
8 Click in order to check that mail is sent to the destination address specified in procedure 4.
• A few minutes might be required for the mail to arrive depending on various conditions. This does not indicate a fault.
• If the test mail is not received, send a test mail according to the "Send a test e-mail" in the printer/plotter operation manual. If an error code is displayed in the LCD of the printer/plotter, refer to the list of error codes of "Send a test e-mail" in the printer/plotter operation manual and perform the corresponding recovery procedures.
• If no error code is displayed, refer to "E-mail can't be sent.(After the test mail is sent, an error code isn't displayed.)" on page 7 of the Network Setting Guide.
Check
Click
Commit
Click
Test Mail Transmit

Using the Event Mail Function
18
9 Click .
10 Click .
Click
Exit
Click
Exit

Using the Network Printing/Plotting Function (With Automatic IP Address Allocation)
19
Using the Network Printing/Plotting Function (With Automatic IP Address Allocation)
Model case
The network environment used as an example for explanation satisfies the following condition.(1) The printer/plotter and personal computer are connected to a LAN that can automatically obtain an
IP address.
Items you must provide
• An Internet connection is not necessary.• It is assumed that the network to which the printer/plotter and personal computer are connected has
DHCP service enabled.
□ Router A personal computer or server that can allocate an IP address can also be used.
□ Network HUB Required amount of units
□ LAN cable Required amount of cables
□ Personal computerWindows XP SP3, Windows Vista SP2, Windows 7 SP1, Windows 8, with each one being 32/64-bit compatible
□ Printer/PlotterMimaki product that is compatible with the network function (Refer to the "Network Function Compatibility Table" for compatible models.)
Internet
: LAN: Internet
Printer / Plotter
Network HUB
Router
Model case
Personal computer

Using the Network Printing/Plotting Function (With Automatic IP Address Allocation)
20
Flow of Settings
Perform the following procedures to specify the settings required in order to use the network printing/plotting function.
Step1Connect the Printer/Plotter and Personal Computer with the LAN ( P.21)
Step2Check the Printer/Plotter Network Settings ( P.22)
Step3Check the Network Settings of the Printer/Plotter and Personal Computer ( P.23)

Using the Network Printing/Plotting Function (With Automatic IP Address Allocation)
21
Step1: Connect the Printer/Plotter and Personal Computer with the LAN
Perform the following procedures with the printer/plotter and personal computer.
1 Connect the printer/plotter and personal computer to the network.
Printer / Plotter
Turn off the printer/plotter power, and connect the printer/plotter to the net-work hub by using a LAN cable.Refer to the "Names of Parts and Functions" section of the printer/plotter operation manual if the LAN connector location of the printer/plotter is unclear.
Personal computer
Turn off the personal computer power, and connect the personal computer to network hub by using a LAN cable.Refer to the personal computer operation manual if the LAN connector loca-tion of your personal computer is unclear.

Using the Network Printing/Plotting Function (With Automatic IP Address Allocation)
22
Step2: Check the Printer/Plotter Network Settings
1 Turn on the printer/plotter power.
2 From the printer/plotter operation panel, specify [ON] for DHCP (automatic IP address acquisition).
• Default setting is "ON".
3 Referring to the "Set the network" section of the printer/ plotter operation manual, check the IP address allocated to the printer/plotter.
4 After checking, return to the <LOCAL> screen.
• Operation differs depending on the model. For details, refer to the "Set the network" section of the printer/plotter operation manual.
• If the IP address is "169.254.*.*", either the LAN cable connection is faulty or the environment is such that an IP address cannot be automatically obtained. In such cases, consult the network administrator or installation personnel.
C h e c k I P A d d r e s s
1 0 . 1 6 . ∗ ∗ ∗ . ∗ ∗ ∗

Using the Network Printing/Plotting Function (With Automatic IP Address Allocation)
23
Step3: Check the Network Settings of the Printer/Plotter and Personal Computer
1 Turn on the personal computer power.
2 Start up the command prompt.(1) Click the Start button.(2) Input [cmd] into "Search programs and files".(3) Press the [ENTER] key.
3 Input "Ping (space) ‘IP address of the printer/plotter you just checked’" and press the [ENTER] key.
4 Press the [Enter]key.• Procedures are completed when a response is
returned from the printer.
• If no response is returned from the printer as shown in the window on the right, perform the procedures indicated in "Appendix 1. Switching the IP Address Acquisition Settings of a Personal Computer to Automatic" on page 34. After which, perform the procedures of "Step3: Check the Network Settings of the Printer/Plotter and Personal Computer" again.
• Only enter single-byte characters.
Imput the “cmd”
Click
ping IP address of the printer/plotter
ping Single-byte space
IP address of the printer/plotter

Using the Network Printing/Plotting Function (With a Static IP Address)
24
Using the Network Printing/Plotting Function (With a Static IP Address)
Model case
The network environment used as an example for explanation satisfies the following condition.(1) Connect the printer/plotter and personal computer to a LAN using a static IP address.
Items you must provide
• The IP address shown above is an assumed IP address for the purposes of explanation. When specifying the actual settings, specify an IP address and subnet mask that match your environment.
□ Network HUB Required amount of units
□ LAN cable Required amount of cables
□ Personal computerWindows XP SP3, Windows Vista SP2, Windows 7 SP1, Windows 8, with each one being 32/64-bit compatible
□ Printer/PlotterMimaki product that is compatible with the network function (Refer to the "Network Function Compatibility Table" for compatible models.)
: LAN
Printer / PlotterIP Address: 192.168.100.10
Network HUB
Model case
Personal ComputerIP Address: 192.168.100.20
Subnet mask: 255.255.255.0
Using the Network Printing/Plotting Function (With a Static IP Address)
25
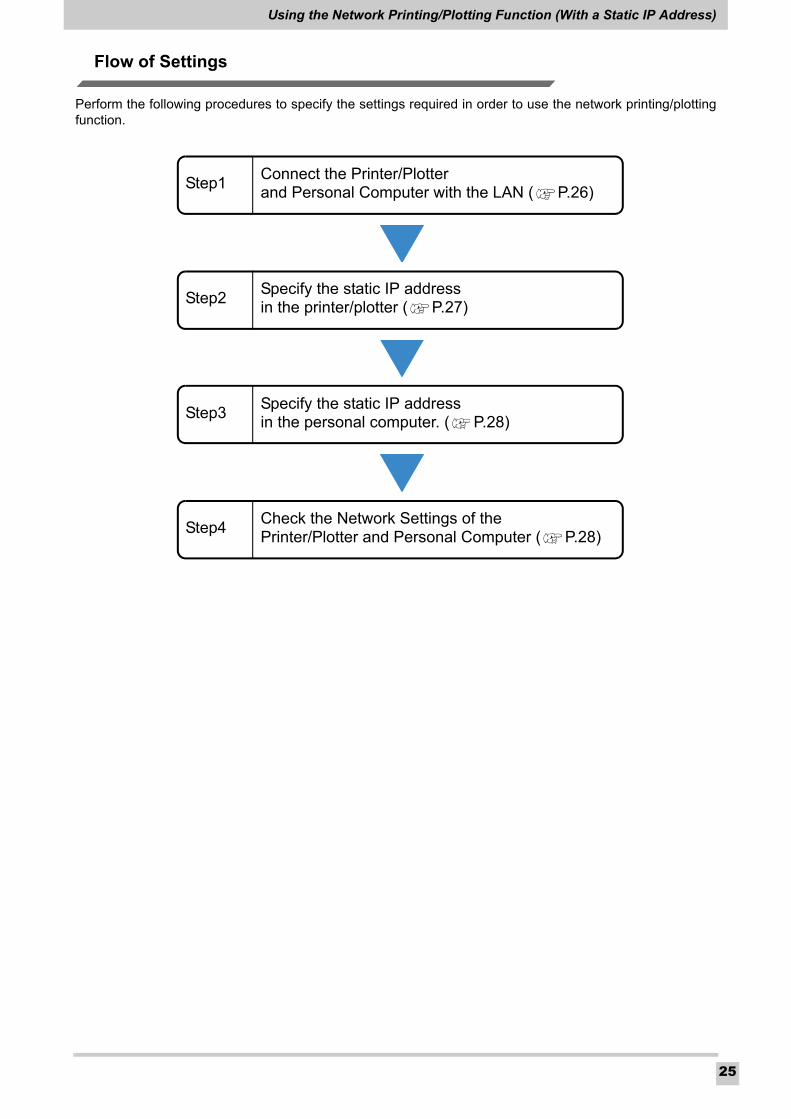
Flow of Settings
Perform the following procedures to specify the settings required in order to use the network printing/plotting function.
Step1Connect the Printer/Plotter and Personal Computer with the LAN ( P.26)
Step2Specify the static IP address in the printer/plotter ( P.27)
Step3Specify the static IP address in the personal computer. ( P.28)
Step4Check the Network Settings of the Printer/Plotter and Personal Computer ( P.28)

Using the Network Printing/Plotting Function (With a Static IP Address)
26
Step1: Connect the Printer/Plotter and Personal Computer with the LAN
Perform the following procedures with the printer/plotter and personal computer.
1 Connect the printer/plotter and personal computer to the network.
Printer / Plotter
Turn off the printer/plotter power, and connect the printer/plotter to the net-work hub by using a LAN cable.Refer to the "Names of Parts and Functions" section of the printer/plotter operation manual if the LAN connector location of the printer/plotter is unclear.
Personal computer
Turn off the personal computer power, and connect the personal computer to network hub by using a LAN cable.Refer to the personal computer operation manual if the LAN connector loca-tion of your personal computer is unclear.

Using the Network Printing/Plotting Function (With a Static IP Address)
27
Step2: Specify the Static IP address in the Printer/Plotter
1 Turn on the printer/plotter power.
2 From the printer/plotter operation panel, specify [OFF] for DHCP (automatic IP address acquisition) and enter the following values. IP Address: 192.168.100.10 Subnet mask: 24
3 After checking, return to the <LOCAL> screen.
• Enter the following values for the printer/plotter subnet mask.
• Operation differs depending on the model. For details, refer to the "Set the network" section of the printer/plotter operation manual.
Printer/Plotter Subnet Mask Values
Subnet maskPrinter/Plotter
Subnet Mask ValuesSubnet mask
8 255. 0. 0. 0 20 255. 255. 240. 0
9 255. 128. 0. 0 21 255. 255. 248. 0
10 255. 192. 0. 0 22 255. 255. 252. 0
11 255. 224. 0. 0 23 255. 255. 254. 0
12 255. 240. 0. 0 24 255. 255. 255. 0
13 255. 248. 0. 0 25 255. 255. 255. 128
14 255. 252. 0. 0 26 255. 255. 255. 192
15 255. 254. 0. 0 27 255. 255. 255. 224
16 255. 255. 0. 0 28 255. 255. 255. 240
17 255. 255. 128. 0 29 255. 255. 255. 248
18 255. 255. 192. 0 30 255. 255. 255. 252
19 255. 255. 224. 0

Using the Network Printing/Plotting Function (With a Static IP Address)
28
Step3: Specify the static IP address in the personal computer
For setting procedures refer to "Appendix 2. Switching the IP Address Acquisition Settings of a Personal Com-puter to Static IP Address" on page 38.
Step4: Check the Network Settings of the Printer/Plotter and Personal Computer
1 Turn on the personal computer power.
2 Start up the command prompt.(1) Click the Start button.(2) Input [cmd] into "Search programs and files".(3) Press the [ENTER] key.
3 Input "Ping (space) ‘192.168.100.10’" and press the [ENTER] key.
4 Press the [Enter]key.• Procedures are completed when a response is
returned from the printer.
• If no response is returned from the printer as shown in the window on the right, return to Page 26 "Step1: Connect the Printer/Plotter and Personal Computer with the LAN" on page 26 and specify the settings again.
• Only enter single-byte characters.
Imput the “cmd”
Click
ping Single-byte space
IP address of the printer/plotter

Using the Network Printing/Plotting Function (If the Printer/Plotter and Personal Computer are Directly Connected by using a LAN Cable)
29
Using the Network Printing/Plotting Function (If the Printer/Plotter and Personal Computer are Directly Connected by using a LAN Cable)
Model case
The network environment used as an example for explanation satisfies the following condition.(1) Network in which the printer/plotter and personal computer are connected one-to-one.
Items you must provide
□ LAN cable Required amount of cables
□ Personal computerWindows XP SP3, Windows Vista SP2, Windows 7 SP1, Windows 8, with each one being 32/64-bit compatible
□ Printer/PlotterMimaki product that is compatible with the network function (Refer to the "Network Function Compatibility Table" for compatible models.)
: LAN
Printer / Plotter
Model case
Personal Computer

Using the Network Printing/Plotting Function (If the Printer/Plotter and Personal Computer are Directly Connected by using a LAN Cable)
30
Flow of Settings
Perform the following procedures to specify the settings required in order to use the network printing/plotting function.
Step1Connect the Printer/Plotter and Personal Computer by Using a LAN Cable ( P.31)
Step2Check the Printer/Plotter Network Settings ( P.32)
Step3Check the Network Settings of the Printer/Plotter and Personal Computer ( P.33)

Using the Network Printing/Plotting Function (If the Printer/Plotter and Personal Computer are Directly Connected by using a LAN Cable)
31
Step1: Connect the Printer/Plotter and Personal Computer by Using a LAN Cable
Perform the following procedures with the printer/plotter and personal computer.
1 Directly connect the printer/plotter and personal computer using a LAN cable.
• Turn off the printer/plotter power, and connect the printer/plotter and personal computer by using a LAN cable.
• Refer to the "Names of Parts and Functions" section of the printer/plotter operation manual if the LAN connector location of the printer/plotter is unclear.
• Refer to the personal computer operation manual if the LAN connector location of your personal computer is unclear.

Using the Network Printing/Plotting Function (If the Printer/Plotter and Personal Computer are Directly Connected by using a LAN Cable)
32
Step2: Check the Printer/Plotter Network Settings
1 Turn on the printer/plotter power.
2 From the printer/plotter operation panel, specify [ON] for Auto IP (IP address self-allocation).
3 After checking, return to the <LOCAL> screen.
4 Turn the power OFF.
5 Turn on the printer/plotter power.
6 Referring to the "Set the network" section of the printer/plotter operation manual, check the IP address allocated to the printer/ plotter.
7 After checking, return to the <LOCAL> screen.
• Operation differs depending on the model. For details, refer to the "Set the network" section of the printer/plotter operation manual.
• Check that the IP address is "169.254.*.*". If it is not this address, it is possible that there is a settings error or connection fault. Check the settings and connection.
C h e c k I P A d d r e s s
1 6 9 . 2 5 4 . 4 9 . 8

Using the Network Printing/Plotting Function (If the Printer/Plotter and Personal Computer are Directly Connected by using a LAN Cable)
33
Step3: Check the Network Settings of the Printer/Plotter and Personal Computer
1 Turn on the personal computer power.
2 Start up the command prompt.(1) Click the Start button.(2) Input [cmd] into "Search programs and files".(3) Press the [ENTER] key.
3 Input "Ping (space) ‘IP address of the printer/plotter you just checked’" and press the [ENTER] key.
4 Press the [Enter]key.• Procedures are completed when a response is
returned from the printer.
• If no response is returned from the printer as shown in the window on the right, perform the procedures indicated in "Appendix 1. Switching the IP Address Acquisition Settings of a Personal Computer to Automatic" on page 34. After which, perform the procedures of "Step3: Check the Network Settings of the Printer/Plotter and Personal Computer" again.
• Only enter single-byte characters.
Imput the “cmd”
Click
ping Single-byte space
IP address of the printer/plotter

Appendix 1. Switching the IP Address Acquisition Settings of a Personal Computer to Automatic
34
Appendix 1. Switching the IP Address Acquisition Settings of a Personal Computer to Automatic
1 From the control panel, select "Network and Internet".
2 From the Network and Sharing Center, select "View network status and tasks".
3 Select the LAN connection method.
• This case shows an example of a connection using a wired LAN.
• Click the “Kocal Area Connection”
• Select the connection corresponding to the network environment you are using.
Select
Select
Click

Appendix 1. Switching the IP Address Acquisition Settings of a Personal Computer to Automatic
35
4 Click .
5 Select [Internet Protocol Version 4 (TCP/IPv4)] and click
.
Click
Properties
Click
Select
Properties

Appendix 1. Switching the IP Address Acquisition Settings of a Personal Computer to Automatic
36
6 Select [Obtain an IP address automatically] and click
.
7 Click .
Select
Click
OK
Click
Close

Appendix 1. Switching the IP Address Acquisition Settings of a Personal Computer to Automatic
37
8 Click .
9 Click to close the window.
Click
Close
Click
X

Appendix 2. Switching the IP Address Acquisition Settings of a Personal Computer to Static IP Address
38
Appendix 2. Switching the IP Address Acquisition Settings of a Personal Computer to Static IP AddressCheck the following items if specifying a static IP address for the personal computer IP address.Inquire with the LAN administrator if you have any doubts or concerns.
• Personal computer IP address• Subnet mask(•Default gateway address (Required if communicating beyond the router))(•DNS server address (Required if communicating via the Internet or other methods besides the LAN.))
Below is an explanation of an example using the following set values.
1 From the control panel, select "Network and Internet".
2 From the Network and Sharing Center, select "View network status and tasks".
Personal Computer IP Address
192.168.100.20
Subnet mask 255.255.255.0 (24 using CIDR notation)
Default gateway Not specified
DNS server Not specified
Select
Select

Appendix 2. Switching the IP Address Acquisition Settings of a Personal Computer to Static IP Address
39
3 Select the LAN connection method.
• This case shows an example of a connection using a wired LAN.
• Click the “Kocal Area Connection”
4 Click .
5 Select [Internet Protocol Version 4 (TCP/IPv4)] and click
.
• Select the connection corresponding to the network environment you are using.
Click
Click
Properties
Click
Select
Properties

Appendix 2. Switching the IP Address Acquisition Settings of a Personal Computer to Static IP Address
40
6 Select [Use the following address], enter the values in the [IP address] and [Subnet mask], and click .
• Enter the following values. • IP Address: 192.168.100.20• Subnet mask: 255.255.255.0
7 Click .
Select
Click
Enter
Required if communicating via other methods besides the LAN.
Click
Close

Appendix 2. Switching the IP Address Acquisition Settings of a Personal Computer to Static IP Address
41
8 Click .
9 Click to close the window.
Click
Close
Click
X

Memo


D202526-10-31052013Printed in Japan
© 2013 MIMAKI ENGINEERING CO., LTD. All rights reserved.
IT
SW: 1.2


![User's Guide · in the [Startup Settings]. Normally, choose [Display Startup Dialog Box]. 7 Starting P-touch Editor Introduction Creating Labels Appendix Layout window ... Database](https://static.fdocuments.net/doc/165x107/5e72f1adf7ca7c6bad614564/users-guide-in-the-startup-settings-normally-choose-display-startup-dialog.jpg)