Network Security Solutions - Allied Telesis · Network Security Solutions Implementing Network...
34
Network Security Solutions Implementing Network Access Control (NAC) Allied Telesis www.alliedtelesis.com Page 1 Tested Solution: Protecting your network with Symantec Network Access Control (NAC) and Allied Telesis Switches Today’s networks increasingly require protection against attacks that originate from within the network. All too often these LAN-based attacks are released accidentally onto a network when a naive or careless user connects a device infected with malicious software into the LAN. To effectively defend against these internal threats, network administrators need secure LAN switches to inhibit network attacks, and to control network access using Health and Security policies. These policies can ensure that only legitimate users access the network and that the connecting devices conform to strict security requirements. The intelligent way to manage Health and Security policies is to set the network to manage itself using a Network Access Control (NAC) solution. NAC is a way of automating policy management on a network, allowing a network administrator to efficiently control network access and manage network security. When a network is secured with a NAC solution, devices must successfully authenticate and conform to the network’s security policy before they are allowed normal network access. If a device fails authentication or does not meet the requirements of the security policy, the network can reject access, or grant only limited access until the device has taken remedial action. There are a number of NAC solutions available in the marketplace. This tested solution focuses on how to secure your network using the NAC solution offered by Symantec. For further information about NAC technology, and the NAC features available on Allied Telesis switches, see “Allied Telesis provides advanced edge security for enterprise networks” available from http://www.alliedtelesis.com/resources/literature/literature.aspx?id=5 Access Requestor Protection Enforcement Point Policy Decision Point Policy and RADIUS Server x900 Switch Diagram 1: Network Access Control
Transcript of Network Security Solutions - Allied Telesis · Network Security Solutions Implementing Network...

Network Security SolutionsImplementing Network Access Control (NAC)
Allied Telesis www.alliedtelesis.comPage 1
Tested Solution: Protecting your network with Symantec Network Access Control (NAC) and Allied Telesis Switches
Today’s networks increasingly require protection against attacks that originate from within the network. All too often these LAN-based attacks are released accidentally onto a network when a naive or careless user connects a device infected with malicious software into the LAN. To effectively defend against these internal threats, network administrators need secure LAN switches to inhibit network attacks, and to control network access using Health and Security policies. These policies can ensure that only legitimate users access the network and that the connecting devices conform to strict security requirements.
The intelligent way to manage Health and Security policies is to set the network to manage itself using a Network Access Control (NAC) solution. NAC is a way of automating policy management on a network, allowing a network administrator to efficiently control network access and manage network security. When a network is secured with a NAC solution, devices must successfully authenticate and conform to the network’s security policy before they are allowed normal network access. If a device fails authentication or does not meet the requirements of the security policy, the network can reject access, or grant only limited access until the device has taken remedial action.
There are a number of NAC solutions available in the marketplace. This tested solution focuses on how to secure your network using the NAC solution offered by Symantec.
For further information about NAC technology, and the NAC features available on Allied Telesis switches, see
“Allied Telesis provides advanced edge security for enterprise networks”
available from http://www.alliedtelesis.com/resources/literature/literature.aspx?id=5
Access Requestor
Protection EnforcementPoint
Policy Decision Point
Policy andRADIUSServer
x900 Switch
Diagram 1: Network Access Control

Allied Telesis www.alliedtelesis.comPage 2
NETWORK SECURITY SOLUTIONS | Implementing Network Access Control (NAC)
This tested solution uses Allied Telesis switches in the following ways:
An x900 Series switch and an AT-8600 Series switch are configured as Network Policy Enforcement Points at the edge of the network. ■
An x900 switch is configured as both the RADIUS and DHCP server for the network. ■
An x900 switch is configured as the Layer 3 switch at the heart of the network. It is configured with the Access Control Lists that determine ■
network access for authorized client PCs.
The Products section at end of this document lists the Allied Telesis products that support NAC solutions.
The Symantec SolutionThe NAC solution offered by Symantec allows network administrators to automate policies to protect their network, such as ensuring that legitimate users have client PCs with the:
most recent security patches installed ■
latest anti-malware scanners installed and updated ■
host-based firewall enabled ■
This document explains how to configure a simple network protected by Symantec NAC. The connecting devices in the example network are PCs using 802.1X authentication. VLAN identifiers are used to separate the PCs based on whether they conform to the network Health policies.
Symantec NAC requires Microsoft Windows server and client software. For a detailed list of compatible versions, visit Symantec online at http://www.symantec.com/business/network-access-control
The following Symantec components are necessary in this solution:
Symantec Endpoint Protection Manager
This application runs on a Microsoft Windows server. It provides the interface used to configure the security policy for the network, and distributes the policy to the other devices in the NAC system. Within the application, you can:
configure a comprehensive set of information about the setup and security status of client devices ■
display logs from the other devices in the system ■
display charts and statistics relating to the security scans of client devices ■
Symantec LAN Enforcer
This component is available as either a dedicated 19” rack-mountable hardware device or a set of software that runs under Linux. In essence, the LAN Enforcer is a RADIUS proxy that forwards authentication requests to a RADIUS server, and then alters the replies in order to implement the NAC policy.
Symantec NAC Client SoftwareThe Symantec NAC Client software on each client PC communicates with the Endpoint Protection Manager to determine whether the PC meets the current requirements of the network. If a client PC fails this check, the NAC Client software can take remedial action.

Allied Telesis www.alliedtelesis.comPage 3
NETWORK SECURITY SOLUTIONS | Implementing Network Access Control (NAC)
Building the Network
This tested solution uses the example network in Daigram 2.
In this example network, the client PCs are connected to edge switches acting as Policy Enforcement Points (PEP). Clients that authenticate successfully are assigned into either VLAN 10 (for policy compliant PCs) or VLAN 11 (for policy noncompliant PCs). Network access for noncompliant PCs is limited using Access Control Lists (ACLs) on the Layer 3 switch at the centre of the network. The VLAN assignment is controlled by the LAN Enforcer, which tells the edge switches which VLAN to assign each client to. The following figure shows how network access is decided.
Client PCs
Layer 3 switch
Endpoint Protection Manager192.168.100.2
LAN Enforcer192.168.100.1
RADIUS &DHCP server192.168.100.3
x900-12XT/S
x900-12XT/S
Policy Enforcment Point
AT-8624T/2M
Policy DecisionPoint
x900-24XT
Tagged in VLAN 10 or VLAN 11
VLAN1 192.168.100.11
VLAN1 192.168.100.254
VLAN1 192.168.100.10
Diagram 2: example network
Normal networkaccess granted
(VLAN 10)
Client requests network access
Is a valid User ID
provided?
Doesdevice adhere
to policy?
Network access denied
(port closed)
Access only to network servers for
remediation(VLAN 11)
No
No
Yes
Yes

Allied Telesis www.alliedtelesis.comPage 4
NETWORK SECURITY SOLUTIONS | Implementing Network Access Control (NAC)
When a PC first connects to the network, the connected edge switch sends an authentication request. The PC responds with the username and password of the user. The switch forwards this to the LAN Enforcer (configured as the RADIUS server on the edge switch). The LAN Enforcer checks with the RADIUS server that the username and password are correct.
If this check fails, the LAN Enforcer sets the network access for the PC as per the policy–in this example, the port is closed to the PC (an alternative could be to direct the user to a guest VLAN which has restricted access).
If the PC passes this check, then it is allowed network access based on its identity and its conformance to the health and security policy (called the “Host Integrity Policy” by Symantec). The Symantec client software on the PC checks this conformance with the Endpoint Protection Manager. If the PC does not comply with the health and security policy, it is placed in the noncompliant VLAN, which in this example is set to allow only limited network access. Giving the PC access to the network servers allows the Symantec Client software to download software updates to remedy the compliance issue.
Once a PC passes the health and security checks the LAN Enforcer assigns the PC to the compliant VLAN, giving it user-appropriate network access–in this example, full network access.
Steps to build the Network
To build this network, follow the configuration sections of this document summarized here:
Configure the Layer 3 Switch ■ on page 5 • Configure this switch with the two VLANs used for client PCs. • Set the ports attached to the edge switches as tagged for VLAN 10 and 11. • Create ACLs to limit access to the network for noncompliant PCs.
Install the Symantec LAN Enforcer ■ on page 6 • Enter the basic configuration details (advanced configuration is via the Endpoint Protection Manager). • Connect the LAN Enforcer to the Layer 3 Switch. • Add the connection details and password for the Endpoint Protection Manager.
Install the Symantec Endpoint Protection Manager ■ on page 7 • Connect the server to the Layer 3 switch. • Install the Symantec software. • Check that it can communicate with the LAN Enforcer.
Configure the RADIUS and DHCP server ■ on page 12 • Obtain a certificate for the switch using its local Certificate Authority. • Enable the RADIUS server and enter the user details. • Create the DHCP pools for compliant and noncompliant PCs. • Enable the DHCP server.
Configure the Symantec Endpoint Protection Manager ■ on page 13 • Define the LAN Enforcer’s interactions with the edge switches. • Add the details of the RADIUS server for the LAN Enforcer. • Create the Host Integrity Policy – this defines the system configuration required on a client PC. • Define how the Endpoint Protection Manager interacts with client PCs. • Create an installation package to download onto client PCs.
Configure the edge switches ■ on page 24 • Set the LAN Enforcer as the RADIUS server and set it as the authenticator for 802.1X requests. • Create the compliant and noncompliant VLANs. • Set the ports attached to client PCs as 802.1X authenticating ports. • Set the port connected to the Layer 3 switch as non-authenticated and with VLAN tagging for VLANs 10 and 11.
Install and configure the client PCs ■ on page 25 • Enable 802.1X authentication on the PCs. • Connect the PCs to the edge switches. • From the Endpoint Protection Manager, find each PC on the network and install the Symantec Client software on them. • Check the client status to confirm the installation is successful.

Allied Telesis www.alliedtelesis.comPage 5
NETWORK SECURITY SOLUTIONS | Implementing Network Access Control (NAC)
Configure the Layer 3 Switch
This example configuration script is for a switch running the AlliedWare PlusTM Operating System. You can configure switches that run the AlliedWareTM Operating System in a similar manner.
vlan database vlan 10 name compliant vlan 11 name noncompliant vlan 10-11 state enable
access-list 3001 permit ip 192.168.110.0/24 any
access-list 3002 permit ip 192.168.111.0/24 192.168.100.1/32access-list 3003 permit ip 192.168.111.0/24 192.168.100.2/32access-list 3004 permit ip 192.168.111.0/24 192.168.100.3/32
access-list 3005 permit udp any range 67 68 any range 67 68
access-list 3006 deny ip any any
interface port1.0.10-1.0.24 switchport switchport mode trunk switchport trunk allowed vlan add 10-11 ip access-group 3001 ip access-group 3002 ip access-group 3003 ip access-group 3004 ip access-group 3005 ip access-group 3006
interface vlan1 ip address 192.168.100.254/24
interface vlan10 ip address 192.168.110.254/24 ip dhcp-relay server-address 192.168.100.3
interface vlan11 ip address 192.168.111.254/24 ip dhcp-relay server-address 192.168.100.3
Creates and enables the VLANs for compliant and noncompliant client devices
Creates the ACLs that will restrict network access to the client PCs. Compliant PCs (with an IP address in the 192.168.110.0 subnet) are allowed normal access to the network.
Configures the ports to which the edge switches attach. These ports are tagged in VLANs 10 and 11, to accept traffic in both the compliant and noncompliant VLANs.
The ACLs are applied to these ports, to control client traffic as described above.
Attaches a management IP address to the server VLAN (VLAN1).
IP addresses are assigned to the client VLANs, so that this switch can Layer 3 switch traffic to and from those VLANs.
DHCP relay is configured, to direct client DHCP requests to the DHCP server at 192.168.100.3.
Noncompliant PCs (with an IP address in the 192.168.111.0 subnet) are allowed access ONLY to the servers.
Sets the switch to drop all traffic that does not match the other ACLs.
Allows all DHCP traffic.

Allied Telesis www.alliedtelesis.comPage 6
NETWORK SECURITY SOLUTIONS | Implementing Network Access Control (NAC)
Install the Symantec LAN Enforcer In this section we will:
enter the basic configuration details for the LAN Enforcer ■
connect the LAN Enforcer to the Layer 3 Switch ■
add the connection details for the Endpoint Protection Manager ■
Basic ConfigurationInstall the LAN Enforcer appliance, or the software-only version, using the installation guides provided by Symantec. Log into the LAN Enforcer using the default username root and password Symantec. The first time that you log in, the LAN Enforcer prompts you for some basic configuration information. You will need to specify::
The type of Symantec Enforcer appliance this is – enter L to specify that it is a LAN Enforcer.1.
The 2. host name of the LAN Enforcer – you can either enter a new hostname or leave this as the default name “Enforcer”.
A new 3. root password for logging into the LAN Enforcer. Remote access is not enabled until you change the password. The new password must contain one lowercase letter, one uppercase letter, one digit, and one symbol (for example: @11ielD~r0x).
A new 4. admin password. The admin account is a lower-privilege user than the root.
The time zone to apply time zone rules.5.
The date and time.6.
The Network Interface Card (NIC) settings. In this example network, the command is:7.
configure interface set eth0 ip 192.168.100.1 subnet mask 255.255.255.0 gateway ip 192.168.10.254
You can now press any key to display a configuration summary. Press Q to complete the configuration.
Connect the LAN Enforcer to the Layer 3 switchConnect the Ethernet port of the LAN Enforcer to one of the VLAN1 ports of the Layer 3 switch, and then check that the connection is working by pinging the switch. You should see successful ping responses:
Add the connection details for the Endpoint Protection ManagerThe LAN Enforcer does not operate in any meaningful way until it has received policy information and other instructions from the Endpoint Protection Manager. So, an important step is to configure the LAN Enforcer with information on how to communicate with the Endpoint Protection Manager. To do this:
Type 1. configure to enter Configuration mode.
Enter the command 2. spm ip 192.168.100.2 group symantecpolicys http 80 key 12Enforcer34
The group Symantecpolicys parameter creates a new group in the Endpoint Protection Manager under which you will find the LAN Enforcer.
The key parameter sets a password shared by the LAN Enforcer and the Endpoint Protection Manager. When you configure the Endpoint Protection Manager later you will need to set the same password, in this example 12Enforcer34.
Once you have entered the command, the LAN Enforcer will then start trying to connect to the Endpoint Protection Manager. Of course, the connection will not succeed until you have installed the Endpoint Protection Manager, but the LAN Enforcer will keep retrying the connection until it finally succeeds.
This ends the configuration tasks you need to perform using the LAN Enforcer’s command line interface. You will enter the rest of the LAN Enforcer’s configuration using the Management Console of the Endpoint Protection Manager.
Enforcer# Enforcer# ping 192.168.100.254 PING 192.168.100.254 (192.168.100.254) 56(84) bytes of data. 64 bytes from 192.168.100.254: icmp_seq=0 ttl=64 time=4.32 ms 64 bytes from 192.168.100.254: icmp_seq=1 ttl=64 time=14.0 ms 64 bytes from 192.168.100.254: icmp_seq=2 ttl=64 time=3.28 ms 64 bytes from 192.168.100.254: icmp_seq=3 ttl=64 time=15.0 ms
--- 192.168.100.254 ping statistics --- 4 packets transmitted, 4 received, 0% packet loss, time 63ms rtt min/avg/max/mdev = 3.282/9.172/15.074/5.395 ms, piper 2 ipg/ewma 21.173/6.479 ms Enforcer# _

Allied Telesis www.alliedtelesis.comPage 7
NETWORK SECURITY SOLUTIONS | Implementing Network Access Control (NAC)
Install the Symantec Endpoint Protection ManagerIn this section we will:
install the software ■
check communication with the LAN Enforcer ■
Install the softwareThe Symantec Endpoint Protection Manager software requires a server running a compatible operating system. See Symantec online for an up to date list at http://www.symantec.com/business/network-access-control
Before you can install the Symantec software, you will need to:
check that the Microsoft Web Server (IIS) is installed on the PC ■
connect the PC to the Layer 3 switch, so that the software has IP connectivity to the LAN Enforcer. The Symantec Endpoint Protection ■
Manager software does not control the IP address on the PC’s NIC, so you will need to configure the NIC using the configuration interface provided by the Windows Control Panel.
When you are ready, run the setup program to install the software. The setup program will ask you standard install questions (for example, which directory to install the software into). Once the software is installed, the setup program automatically runs a Configuration Wizard. Some of the configuration windows have important options that you will need to know how to configure:
The first window of the Configuration Wizard asks you to choose between Simple and Advanced configuration. Even though the Advanced 1. option is described as being for servers that will manage more than 100 clients, choose this option anyway, as it is the only option that will enable you to specify a password for communication with the LAN Enforcer.

Allied Telesis www.alliedtelesis.comPage 8
NETWORK SECURITY SOLUTIONS | Implementing Network Access Control (NAC)
2. The next significant window is the one which asks you whether or not you are installing your first site. In this window, ensure that you choose the default option (Install my first site):
3. In the window that requests a server name and TCP ports, enter a suitable name, and leave the port numbers at the defaults.

Allied Telesis www.alliedtelesis.comPage 9
NETWORK SECURITY SOLUTIONS | Implementing Network Access Control (NAC)
4. In the Create encryption password window, you must enter the same password that you entered into the LAN Enforcer as the key parameter in the command used to configure the connection to the Endpoint Protection Manager:spm ip 192.168.100.2 group symantecpolicys http 80 key 12Enforcer34It is important that this is exactly the same, otherwise the LAN Enforcer and the Endpoint Protection Manager will not be able to communicate with one another.
5. In the window that creates the system administrator account, you do not need to enter an email address if you don’t want to.

Allied Telesis www.alliedtelesis.comPage 10
NETWORK SECURITY SOLUTIONS | Implementing Network Access Control (NAC)
6. In the final window of the configuration wizard, choose not to run the Migration and Deployment Wizard.
Check communication with the LAN Enforcer
At this point, the installation of the Symantec Endpoint Protection Manager is complete. Right now, it is worth checking that the Endpoint Protection Manager is successfully communicating with the LAN Enforcer.
1. Log in to the Endpoint Protection Manager (the login screen is automatically presented to you after you have completed the Configuration Wizard).
2. From the menu of icons down the Left-hand side of the screen, choose Admin.
3. From the menu near the bottom left of the screen, choose Servers.
4. The View Servers pane will show a tree that displays the servers that the Symantec Endpoint Protection Manager is aware of. Check in this tree for an Enforcer group whose name is the same as the value you entered for the group parameter on the LAN Enforcer in the command:spm ip 192.168.100.2 group symantecpolicys http 80 key 12Enforcer34 Check that within that Enforcer Group there is an Enforcer server.

Allied Telesis www.alliedtelesis.comPage 11
NETWORK SECURITY SOLUTIONS | Implementing Network Access Control (NAC)
Similarly, the LAN Enforcer should report that it is in contact with the Endpoint Protection Manager. Entering the command show status on the LAN Enforcer command line should provide an an output similar to the following (in particular, there should be a YES beside Policy Manager Connected) :
It is vital that the LAN Enforcer and the Endpoint Protection Manager establish successful communication with each other. If the Endpoint Protection Manager and the LAN Enforcer are not reporting that they are in contact with each other then:
Check that they have IP connectivity to each other, by testing that each one can ping the other. ■
Re-enter the ■ spm ip 192.168.100.2 group symantecpolicys http 80 key 12Enforcer34 command, paying special attention to the IP address, TCP port number, and key string.
Shut down the Symantec Endpoint Protection Manager and start it up again. ■
If they still cannot communicate, then you may need to re-install the Endpoint Protection Manager.
Enforcer#: show status# Enforcer Status: ONLINE Policy Manager Connected: YES Policy Manager: 192.168.100.2 HTTP 80 Packets Received: 0 Packets Transmitted: 0 Packet Receive Failed: 0 Packet Transfer Failed: 0 Enforcer Health: EXCELLENT Enforcer Uptime: 0 days 01:10:55

Allied Telesis www.alliedtelesis.comPage 12
NETWORK SECURITY SOLUTIONS | Implementing Network Access Control (NAC)
Configure the RADIUS and DHCP serverIn this tested solution, the RADIUS and DHCP server is an x900 switch using the local RADIUS and DHCP server features available with the AlliedWare PlusTM Operating System.
The RADIUS server must be configured to accept requests from the LAN Enforcer, as the LAN Enforcer’s proxy function will cause it to appear to the RADIUS server as a NAS.
crypto pki trustpoint local
crypto pki enroll local
radius-server local server enable
nas 192.168.100.1 key 12Radius34
user joebloggs password ********* user acitizen password ********* user alansmithee password *********
interface vlan1 ip address 192.168.100.3/24
ip dhcp pool NAC-compliantnetwork 192.168.110.0 255.255.255.0range 192.168.110.1 192.168.110.200dns-server 192.168.100.1default-router 192.168.110.254lease 1 1 1subnet-mask 255.255.255.0
ip dhcp pool NAC-noncompliantnetwork 192.168.111.0 255.255.255.0range 192.168.111.1 192.168.111.200dns-server 192.168.100.1default-router 192.168.111.254lease 1 1 1subnet-mask 255.255.255.0
service dhcp-server
Sets the local Certificate Authority (CA) to be the source of certificates for RADIUS.
Enables the local RADIUS server.
Configures the server to accept requests from the LAN Enforcer. The parameter key 12Radius34 sets the “Shared Secret” between this server and the LAN Enforcer.
Adds users to the RADIUS server’s user database.
Enables the DHCP server on the switch.
Obtains a certificate from the local CA.
Attaches a management IP address to the switch.
Creates the DHCP pool for client PCs that the Endpoint Protection Manager deems compliant. These PCs are allocated an IP address in the range 192.168.110.1 – 192.168.110.200..
Creates the DHCP pool for client PCs that the Endpoint Protection Manager deems compliant. These PCs are allocated an IP address in the range 192.168.110.1 – 192.168.110.200..
Allied Telesis www.alliedtelesis.comPage 13
NETWORK SECURITY SOLUTIONS | Implementing Network Access Control (NAC)
Configure the Symantec Endpoint Protection ManagerThe Symantec Endpoint Protection Manager is highly configurable, and has numerous options to control all manner of aspects of the Network Access Control system. In this tested solution we configure a subset of the Endpoint Protection Manager functionality to create a small working system.
We will configure the:
Switch Policy options ■ This defines the LAN Enforcer’s interactions with the edge switches.
RADIUS server options ■ This adds the details of the RADIUS server to the LAN Enforcer.
Host Integrity Policy requirements ■ This defines the system configuration required on a client PC.
Client settings ■
This defines how the Endpoint Protection Manager interacts with client PCs.
Install Package ■ This creates an installation package to download onto client PCs.
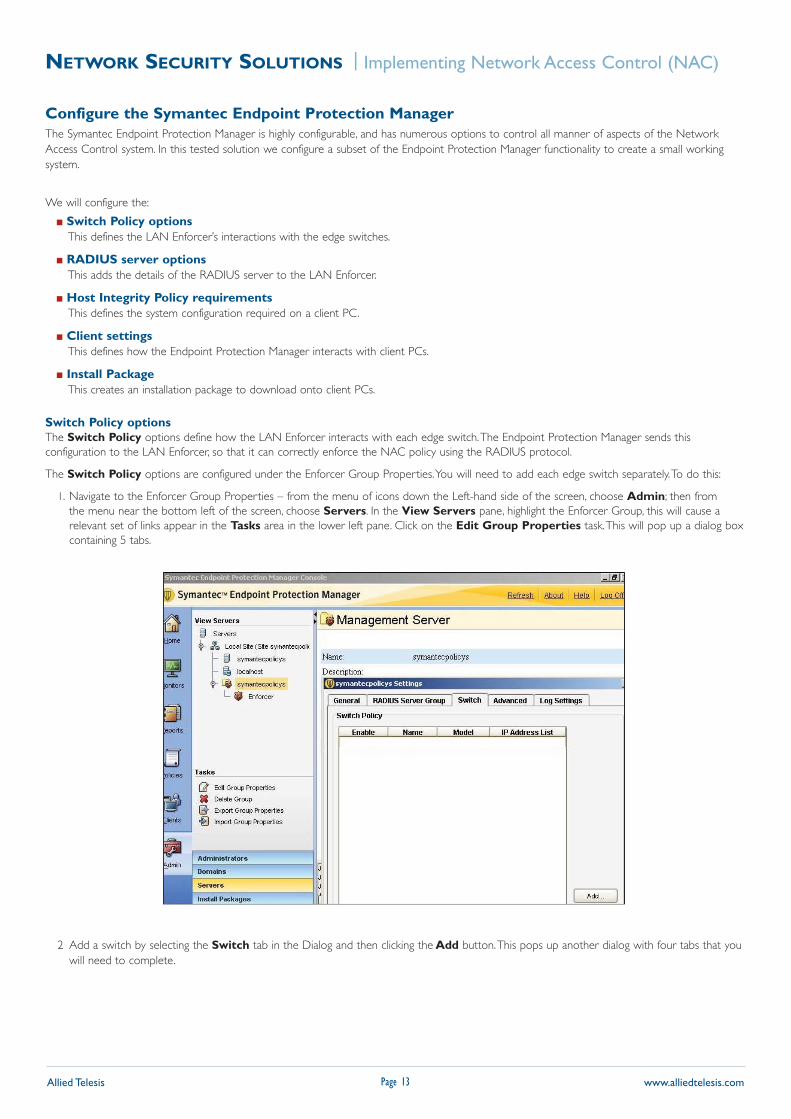
Switch Policy optionsThe Switch Policy options define how the LAN Enforcer interacts with each edge switch. The Endpoint Protection Manager sends this configuration to the LAN Enforcer, so that it can correctly enforce the NAC policy using the RADIUS protocol.
The Switch Policy options are configured under the Enforcer Group Properties. You will need to add each edge switch separately. To do this:
Navigate to the Enforcer Group Properties – from the menu of icons down the Left-hand side of the screen, choose 1. Admin; then from the menu near the bottom left of the screen, choose Servers. In the View Servers pane, highlight the Enforcer Group, this will cause a relevant set of links appear in the Tasks area in the lower left pane. Click on the Edit Group Properties task. This will pop up a dialog box containing 5 tabs.
2 Add a switch by selecting the Switch tab in the Dialog and then clicking the Add button. This pops up another dialog with four tabs that you will need to complete.

Allied Telesis www.alliedtelesis.comPage 14
NETWORK SECURITY SOLUTIONS | Implementing Network Access Control (NAC)
3. In the Basic Information tab, enter the shared secret that you want between the edge switch and the LAN Enforcer – you must enter this password on the edge switch later, as the key value in the command radius-server host 192.168.100.1 key 12PEPSecret34.
In the Switch Model field, it is important that you set this to Allied Telesis, or if your software version does not have that option, one of Foundry, HP, or Nortel. This sets the LAN Enforcer to send the dynamic VLAN information in RADIUS Accept messages in a format that the Allied Telesis switches can recognise.
4. In the Switch Address tab, set the IP address of the switch. The Name you configure in this tab is not significant.

Allied Telesis www.alliedtelesis.comPage 15
NETWORK SECURITY SOLUTIONS | Implementing Network Access Control (NAC)
5. In the VLAN tab, configure the VLANs that will be dynamically allocated to the compliant and noncompliant client PCs. The names given to the VLANs are not significant.
6. In the Action tab you enter the information that is key to the operation of the NAC solution. It is in this tab that you specify the way in which the system chooses which VLAN to allocate to client PCs, based on the results of the authentication and the Host Integrity Policy check.
In this example, if the authentication succeeds and the Policy Check passes, the client PC is put in the compliant VLAN. If the authentication succeeds and the Policy Check fails, the client PC is put in the noncompliant VLAN. If the authentication fails, the client PC is blocked.
7. Click OK when you have finished configuring the Switch Policy options. The Endpoint Protection Manager automatically sends this configuration to the LAN Enforcer. For this tested solution, repeat these steps to add the second edge switch before continuing on.

Allied Telesis www.alliedtelesis.comPage 16
NETWORK SECURITY SOLUTIONS | Implementing Network Access Control (NAC)
RADIUS server options
To add the RADIUS server to the policy configuration, select the RADIUS Server Group tab of the Group Settings dialog. You need to create a RADIUS Server Group and add the server to that group. Ensure that the shared secret is exactly the same text as you entered using the key parameter in the command nas 192.168.100.1 key 12Radius34 when you configure the RADIUS server.
This completes the properties that you need to configure for the LAN Enforcer. The Endpoint Protection Manager automatically sends this configuration to the LAN Enforcer.

Allied Telesis www.alliedtelesis.comPage 17
NETWORK SECURITY SOLUTIONS | Implementing Network Access Control (NAC)
Host Integrity Policy requirements
The next step is to set up the policy that defines what “Host Integrity” means for the client PCs in this network. There are a great variety of options you can configure for the Host Integrity policy, and what you configure will depend on your network.
To configure a policy that is applied to all client PCs on the network:
1. Navigate to the Host Integrity Policy configuration – choose the Policies icon at the left of the screen; highlight Host Integrity in the View Policies pane, and choose Add a Host Integrity Policy from the task list beneath the policy list.
2. This opens the Host Integrity Policy window. Check that Enable this policy is ticked. Under Groups Using This Policy, check that the Global group is selected.

Allied Telesis www.alliedtelesis.comPage 18
NETWORK SECURITY SOLUTIONS | Implementing Network Access Control (NAC)
3. Click on the Requirements option on the left hand menu to add a requirement that client PCs must satisfy before they can pass the Host Integrity check.
For any given requirement, you can choose from a number of different Vendors and specify how remediation should be performed on a client that fails this requirement.

Allied Telesis www.alliedtelesis.comPage 19
NETWORK SECURITY SOLUTIONS | Implementing Network Access Control (NAC)
4. Add all specific requirements you want for the policy, such as requirements for an Antivirus scanner, Firewall, Service Pack, or other option. Then exit the policy by clicking OK at the bottom of the screen.
When you exit the policy, you may get the following warning:
Select Yes, then choose Global in the next dialog.

Allied Telesis www.alliedtelesis.comPage 20
NETWORK SECURITY SOLUTIONS | Implementing Network Access Control (NAC)
Client settings
The Client settings allow you to customise how the Endpoint Protection Manager interacts with client PCs.
1. Navigate to the Client settings – in the left-hand menu, choose the Clients icon; in the View Clients pane, highlight Global. This presents a 4-tab dialog in the right-hand pane. Choose the Policies tab.
2. Under Location-independent Policies and Settings, choose General Settings.

Allied Telesis www.alliedtelesis.comPage 21
NETWORK SECURITY SOLUTIONS | Implementing Network Access Control (NAC)
3. This pops up the General Settings dialog. The Restart Options governs what will happen on occasions when the Endpoint Protection Manager has to restart client PCs. We recommend you choose the Prompt the user to restart the computer option, as a forced restart is very disconcerting for users.

Allied Telesis www.alliedtelesis.comPage 22
NETWORK SECURITY SOLUTIONS | Implementing Network Access Control (NAC)
4. Then, choose the Security Settings tab in the dialog. In this dialog we recommend selecting the Allow user to select the authentication protocol option under Use the client as an 802.1x supplicant. This lets you use the inbuilt 802.1X feature on the client PCs, which is significantly more configurable and controllable than the same feature in the Symantec NAC client software. If you leave this set to Use Symantec Transparent Mode then the clients use the Symantec NAC Client software.
If you want to prevent end users from accessing the NAC client on their PCs, then select one or more of the options in the Client Password Protection groupbox.
5. Click OK in this dialog to finish configuring your client policy.

Allied Telesis www.alliedtelesis.comPage 23
NETWORK SECURITY SOLUTIONS | Implementing Network Access Control (NAC)
Install Package
You are now ready to create a Client Install Package.
1. Choose the Install Packages tab on the main window.
2. Next choose Add Client Install Package from the Tasks menu. This will pop up the Add Client Install Package dialog.
You do not need to define a schedule for installations at this stage. Simply click OK in this dialog to create an install package that you will download later on to the client PCs.
This completes the configuration tasks on the Endpoint Protection Manager for now. Next we will configure the devices at the edge of the network.

Allied Telesis www.alliedtelesis.comPage 24
NETWORK SECURITY SOLUTIONS | Implementing Network Access Control (NAC)
Configure the Edge SwitchesThis tested solution uses two Allied Telesis edge switches as Policy Enforcement Points. Once you have configured them, attach them to the Layer 3 switch. The following configuration script is for the x900 Series switch running the AlliedWare PlusTM Operating System.
The AT-8600 Series switch runs the AlliedWareTM Operating System. The configuration of this edge switch is:
radius-server host 192.168.100.1 key 12PEPSecret34
aaa authentication dot1x default group radius
vlan database vlan 10 name compliant vlan 11 name noncompliant vlan 10-11 state enable
interface port1.0.1-1.0.23 switchport switchport mode access dot1x port-control auto dot1x control-direction in auth dynamic-vlan-creation
interface port1.0.24 switchport switchport mode trunk switchport trunk allowed vlan add 10-11
interface vlan1 ip address 192.168.100.10/24
Attaches a management IP address to VLAN1.
Sends authentication requests to the LAN Enforcer at 192.168.100.1. The key 12PEPSecret34 parameter sets the “Shared Secret” between the LAN Enforcer and this switch.
Sets the switch to use the configured RADIUS servers for 802.1X authentication requests.
Creates the compliant and noncompliant VLANs. There are no statically allocated ports on these VLANs. Instead the switch dynamically allocates the ports using the 802.1X VLAN assignment process.
Sets the ports attached to client PCs (ports 1 to 23) as authenticating ports.
802.1X is enabled on these ports and configured to accept dynamic VLAN assignment.
Sets the port attached to the Layer 3 switch as non-authenticating, and sets the connection to send VLAN-tagged Ethernet frames for VLANs 10 and 11. The native (untagged) VLAN remains VLAN1.
add radius server=192.168.100.1 secret=12PEPSecret34 port=1812
create vlan=compliant vid=10create vlan=noncompliant vid=11
add vlan=10 port=24 frame=taggedadd vlan=11 port=24 frame=tagged
enable ipadd ip int=vlan1 ip=192.168.100.11 mask=255.255.255.0
enable portauth=8021xenable portauth=8021x port=1-23 type=authenticator
Sends authentication requests to the LAN Enforcer at 192.168.100.1. The secret=12PEPSecret34 parameter sets the “Shared Secret” between the LAN Enforcer and this switch.
Creates the compliant and noncompliant VLANs. There are no statically allocated ports on these VLANs. Instead the switch dynamically allocates the ports using the 802.1X VLAN assignment process.
Sets the port attached to the Layer 3 switch as non-authenticating, and sets the connection to send VLAN-tagged Ethernet frames for VLANs 10 and 11. The native (untagged) VLAN remains VLAN1.
Attaches a management IP address to VLAN1.
Sets the ports attached to client PCs (ports 1 to 23) as authenticating ports.
802.1X is enabled on these ports and configured to accept dynamic VLAN assignment.
Allied Telesis www.alliedtelesis.comPage 25
NETWORK SECURITY SOLUTIONS | Implementing Network Access Control (NAC)
Install and Configure the Client PCsThe NAC infrastructure is now all in place, so the client PCs can be attached. In this section we will:
Enable 802.1X authentication on the client PCs ■
Connect the PCs to the network and authenticate ■
Use the Endpoint Protection Manager to find the PCs on the network ■
Install the Symantec Client software on the PCs ■
Check the client status to confirm the installation is successful ■
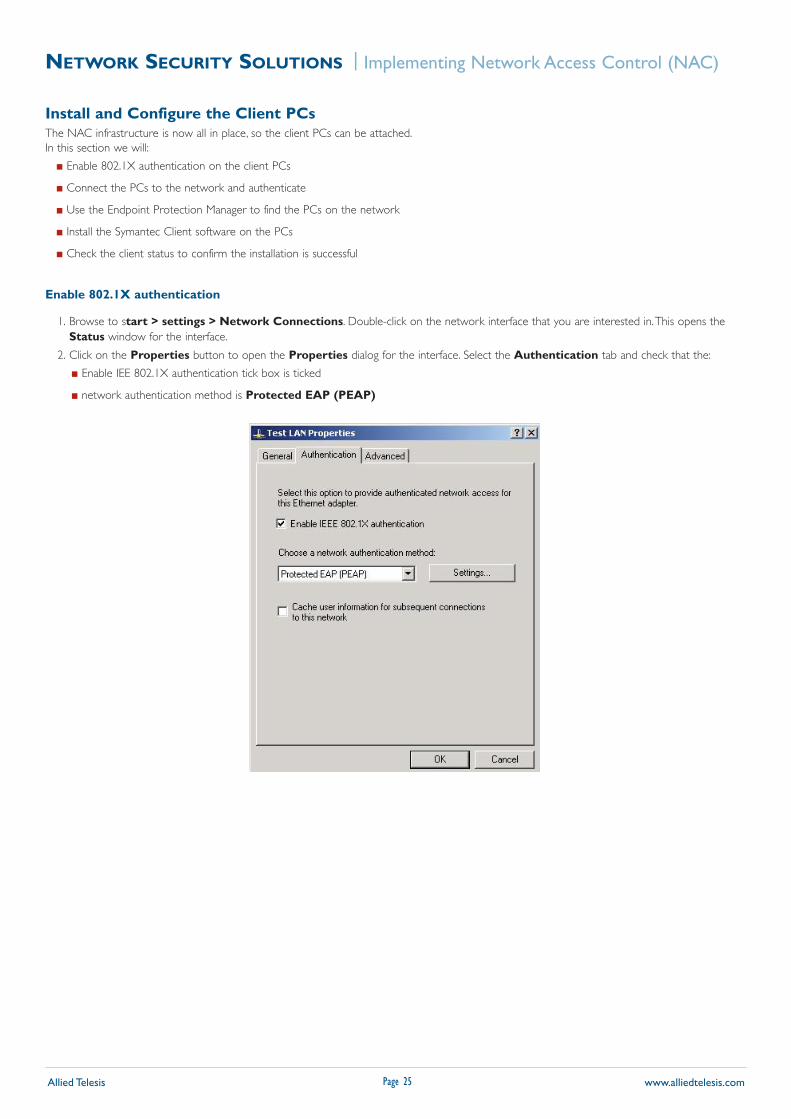
Enable 802.1X authentication
1. Browse to start > settings > Network Connections. Double-click on the network interface that you are interested in. This opens the Status window for the interface.
2. Click on the Properties button to open the Properties dialog for the interface. Select the Authentication tab and check that the:
Enable IEE 802.1X authentication tick box is ticked ■
network authentication method is ■ Protected EAP (PEAP)

Allied Telesis www.alliedtelesis.comPage 26
NETWORK SECURITY SOLUTIONS | Implementing Network Access Control (NAC)
3. Click on the Settings button in this dialog to open the PEAP properties dialog. To keep things simple, you can set the PC so that it doesn’t require the PC to validate the server’s certificate (uncheck the box circled in red below). On the bottom half of the dialog, check that the Select Authentication Method field is set to Secured password (EAP-MSCHAP v2).
4. Click the Configure button in this dialog to open the EAP MSCHAP v2 Properties dialog. Un-tick the checkbox in this dialog. This means that the PC’s user will always be prompted for their username and password when the network interface needs to be authenticated.
5. Click OK on all the open dialogs. The interface is now set up.

Allied Telesis www.alliedtelesis.comPage 27
NETWORK SECURITY SOLUTIONS | Implementing Network Access Control (NAC)
Connect the PCs to the network and authenticateWhen you connect the PCs, a balloon appears prompting you for a username and password:
Click on the balloon. In the dialog that appears, enter the 802.1X username and password for that PC. You will need to have already configured this username and password on the RADIUS server.
The 802.1X authentication should succeed, but the Host Integrity check will fail, as the PC is not yet running the Symantec NAC client. So, the LAN Enforcer will allocate the client to VLAN11. The PC obtains an IP address in the 192.168.111.0/24 subnet, and is only able to access the NAC servers.
At this point, we need to return to the Endpoint Protection Manager to finish the job.
Use the Endpoint Protection Manager to find the PCs on the network
1. In the menu at the left of the screen, choose the Clients icon. Then from the Tasks menu, choose Find Unmanaged Computers.

Allied Telesis www.alliedtelesis.comPage 28
NETWORK SECURITY SOLUTIONS | Implementing Network Access Control (NAC)
2. In the Find Unmanaged Computers dialog, specify the:
IP address range you wish to search ■
username and password that is used to log in to the PC ■
the Workgroup or domain that the PC belongs to ■
3. Click the Search Now button, and the Endpoint Protection Manager will begin searching the specified IP address range. When it has found the PC, it will appear in the Unmanaged Computers list in the middle of the window.

Allied Telesis www.alliedtelesis.comPage 29
NETWORK SECURITY SOLUTIONS | Implementing Network Access Control (NAC)
4. Select the PC from the list. Then use the Change.. button, at the bottom of the dialog, to select the group that you wish to install the client into. Click the Start Installation button to download onto the client the Install Package that you created earlier.
This will automatically install the Symantec NAC Client software onto the PC. After a minute or two, a message will pop up on the client PC
to inform the user that the NAC Client is being configured:
5. When the installation is complete, exit the Find Unmanaged Computers dialog on the Endpoint Protection Manager.
6. Navigate to the client within the Endpoint Protection Manager – choose the appropriate client group in the View Clients pane, and select the Clients tab in the right-hand pane. The PC now appears in the clients list.

Allied Telesis www.alliedtelesis.comPage 30
NETWORK SECURITY SOLUTIONS | Implementing Network Access Control (NAC)
7. Right-click on the client, and from the resulting pop-up menu, choose Run Command on Client then Restart Computers.
This will cause a Restart Notification to pop up on the client PC
If all is well, when the PC restarts it will pass its Host Integrity check, be allocated into VLAN10, and have full access to the network.

Allied Telesis www.alliedtelesis.comPage 31
NETWORK SECURITY SOLUTIONS | Implementing Network Access Control (NAC)
Check the client statusOn the client, there is an icon in the System Tray that indicates the status of the client connection:
The plain key icon appears when the Host Integrity is OK, but the computer is not currently in contact with the Symantec Endpoint Protection Manager.
The key with green dot icon appears when the Host Integrity is OK, and the computer is currently in contact with the Symantec Endpoint Protection Manager.
The key with red dot icon appears when the Host Integrity check has failed.
When Host Integrity checks fail, the PC user is informed of the reason:
The NAC client will display logs that record events related to Host Integrity checking, and related to interactions with the Symantec Endpoint Protection Manager.

Allied Telesis www.alliedtelesis.comPage 32
NETWORK SECURITY SOLUTIONS | Implementing Network Access Control (NAC)

Allied Telesis www.alliedtelesis.comPage 33
NETWORK SECURITY SOLUTIONS | Implementing Network Access Control (NAC)
ProductsThe following Allied Telesis Layer 3 switches support the configurations detailed in this solution:
SwitchBlade® x908
Advanced Layer 3 Modular Switch
8 x 60Gbps Expansion Bays ■
x900-12X and 24X Series
Advanced Gigabit Layer 3+ Expandable Switches
x900-24XT
2 x 60Gbps Expansion Bays ■
24 x 10/100/1000BASE-T (RJ-45) copper ports ■
x900-24XT-N
NEBS Compliant
2 x 60Gbps Expansion Bays ■
24 x 10/100/1000BASE-T (RJ-45) copper ports ■
x900-24XS
2 x 60Gbps Expansion Bays ■
24 x 100/1000BASE-X SFP ports ■
x900-12XT/S
1 x 60Gbps Expansion Bay ■
12 x combo ports (10/100/1000BASE-T copper or SFP) ■
AT8600 series
Layer 3 Fast Ethernet Switches
AT-8624T/2M
24 x 10/100BASE-T ports ■
2 x Uplink Module Bays ■
AT-8648T/2SP
48 x 10/100BASE-T ports ■
2 x SFP ports in combo with 2 x 10/100/1000T uplink ports (RJ- ■
45)
AT-8624POE
24 x 10/100BASE-T ports with PoE ■
2 x Uplink Module Bays ■
About Allied Telesis Inc.
Allied Telesis is a world class leader in delivering IP/Ethernet network solutions to the global market place. We create innovative, standards-based IP networks that seamlessly connect you with voice, video and data services.
Enterprise customers can build complete end-to-end networking solutions through a single vendor, with core to edge technologies ranging from powerful 10 Gigabit Layer 3 switches right through to media converters.
Allied Telesis also offer a wide range of access, aggregation and backbone solutions for Service Providers. Our products range from industry leading media gateways which allow voice, video and data services to be delivered to the home and business, right through to high-end chassis-based platforms providing significant network infrastructure.
Allied Telesis' flexible service and support programs are tailored to meet a wide range of needs, and are designed to protect your Allied Telesis investment well into the future.
Visit us online at www.alliedtelesis.com
AdAdvavancnceded L Layayerer 3 3 M Mododulularar S Swiwitctchh
SwitchBlade x908
x900 Family
AT-8600 Series

USA Headquarters | 19800 North Creek Parkway | Suite 100 | Bothell | WA 98011 | USA | T: +1 800 424 4284 | F: +1 425 481 3895European Headquarters | Via Motta 24 | 6830 Chiasso | Switzerland | T: +41 91 69769.00 | F: +41 91 69769.11Asia-Pacific Headquarters | 11 Tai Seng Link | Singapore | 534182 | T: +65 6383 3832 | F: +65 6383 3830
www.alliedtelesis.com© 2008 Allied Telesis Inc. All rights reserved. Information in this document is subject to change without notice. All company names, logos, and product designs that are trademarks or registered trademarks are the property of their respective owners. C618-31010-00 RevA