NetApp ONTAP Integration with OpenStack - … NetApp ONTAP Integration with OpenStack ... This lab...
108
NetApp ONTAP Integration with OpenStack November 2016 | SL10272 Version 1.2.2
-
Upload
truongliem -
Category
Documents
-
view
272 -
download
2
Transcript of NetApp ONTAP Integration with OpenStack - … NetApp ONTAP Integration with OpenStack ... This lab...

NetApp ONTAP Integration withOpenStack
November 2016 | SL10272 Version 1.2.2
2 NetApp ONTAP Integration with OpenStack © 2016 NetApp, Inc. All rights reserved. NetApp Proprietary
TABLE OF CONTENTS
1 Introduction...................................................................................................................................... 3
2 Lab Environment............................................................................................................................. 4
3 Lab Activities................................................................................................................................... 7
3.1 Clustered ONTAP Configuration and Review......................................................................... 7
3.2 RedHat Host Hypervisor Login.............................................................................................. 12
3.3 Review Manila, the Shared File Service Configuration........................................................14
3.4 Create NFS shares with Manila, the OpenStack Shared File Service.................................18
3.5 Manage NFS Shares Lifecycle with Manila...........................................................................23
3.6 Demonstrate Manila Share Replication.................................................................................34
3.7 Demonstrate the use of Manila with Share Servers (multi-SVM mode)............................. 38
3.8 Manage NFS Shares with Manila UI for Horizon.................................................................. 53
3.9 Extend and Shrink a Manila Share........................................................................................ 60
3.10 Review the Cinder Services Configuration using clustered Data ONTAP........................62
3.11 Review NetApp Cinder Driver Configuration......................................................................64
3.12 Review of Storage Service Catalog configuration............................................................. 69
3.13 Create Cinder Volumes using Storage Service Catalog.................................................... 72
3.14 Validate Cinder Volume Creation with NFS Protocol......................................................... 89
3.15 Validate Cinder Volume Creation with iSCSI Protocol.......................................................91
3.16 Demonstrate the use of Swift using the OpenStack Dashboard (Horizon)...................... 95
4 Lab Limitations............................................................................................................................ 105
5 References....................................................................................................................................106
6 Version History............................................................................................................................ 107
3 NetApp ONTAP Integration with OpenStack © 2016 NetApp, Inc. All rights reserved. NetApp Proprietary
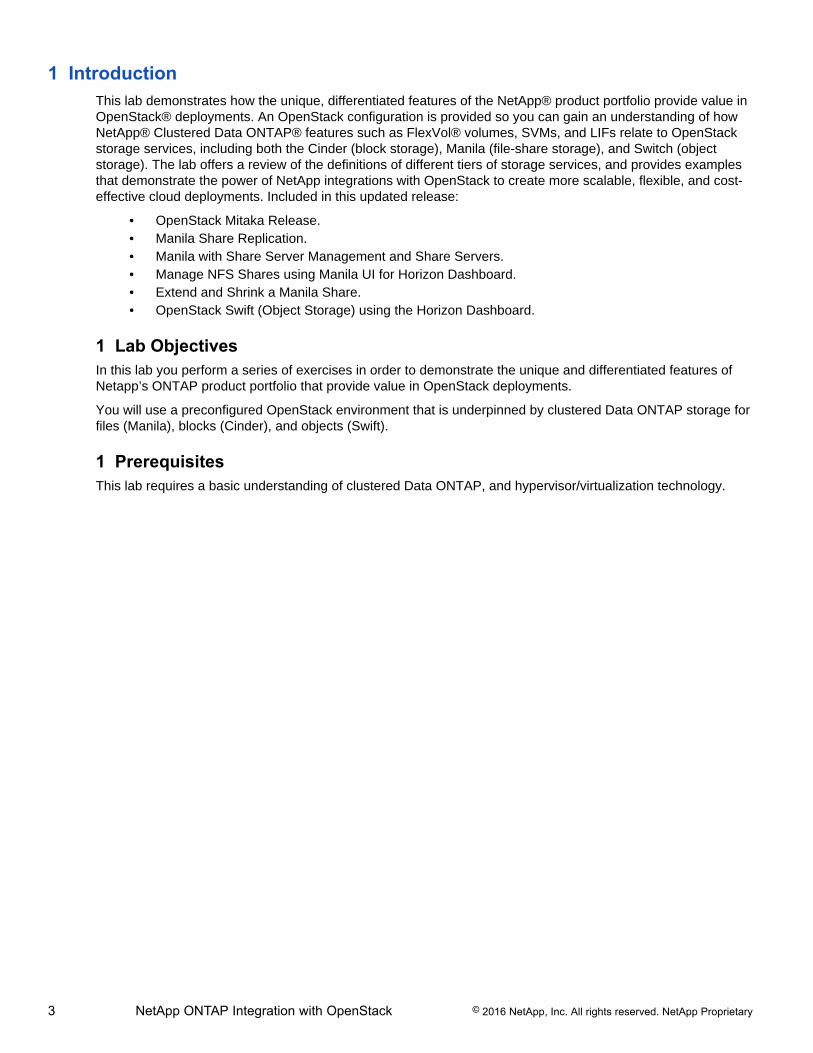
1 IntroductionThis lab demonstrates how the unique, differentiated features of the NetApp® product portfolio provide value inOpenStack® deployments. An OpenStack configuration is provided so you can gain an understanding of howNetApp® Clustered Data ONTAP® features such as FlexVol® volumes, SVMs, and LIFs relate to OpenStackstorage services, including both the Cinder (block storage), Manila (file-share storage), and Switch (objectstorage). The lab offers a review of the definitions of different tiers of storage services, and provides examplesthat demonstrate the power of NetApp integrations with OpenStack to create more scalable, flexible, and cost-effective cloud deployments. Included in this updated release:
• OpenStack Mitaka Release.• Manila Share Replication.• Manila with Share Server Management and Share Servers.• Manage NFS Shares using Manila UI for Horizon Dashboard.• Extend and Shrink a Manila Share.• OpenStack Swift (Object Storage) using the Horizon Dashboard.
1 Lab ObjectivesIn this lab you perform a series of exercises in order to demonstrate the unique and differentiated features ofNetapp’s ONTAP product portfolio that provide value in OpenStack deployments.
You will use a preconfigured OpenStack environment that is underpinned by clustered Data ONTAP storage forfiles (Manila), blocks (Cinder), and objects (Swift).
1 PrerequisitesThis lab requires a basic understanding of clustered Data ONTAP, and hypervisor/virtualization technology.

4 NetApp ONTAP Integration with OpenStack © 2016 NetApp, Inc. All rights reserved. NetApp Proprietary
2 Lab EnvironmentThe products used in this lab include the following:
• Clustered Data ONTAP• OnCommand System Manager• NetApp drivers for Openstack (Kilo release) for:
• Block-storage (Cinder)• File-share storage (Manila)• Object-storage (Swift)
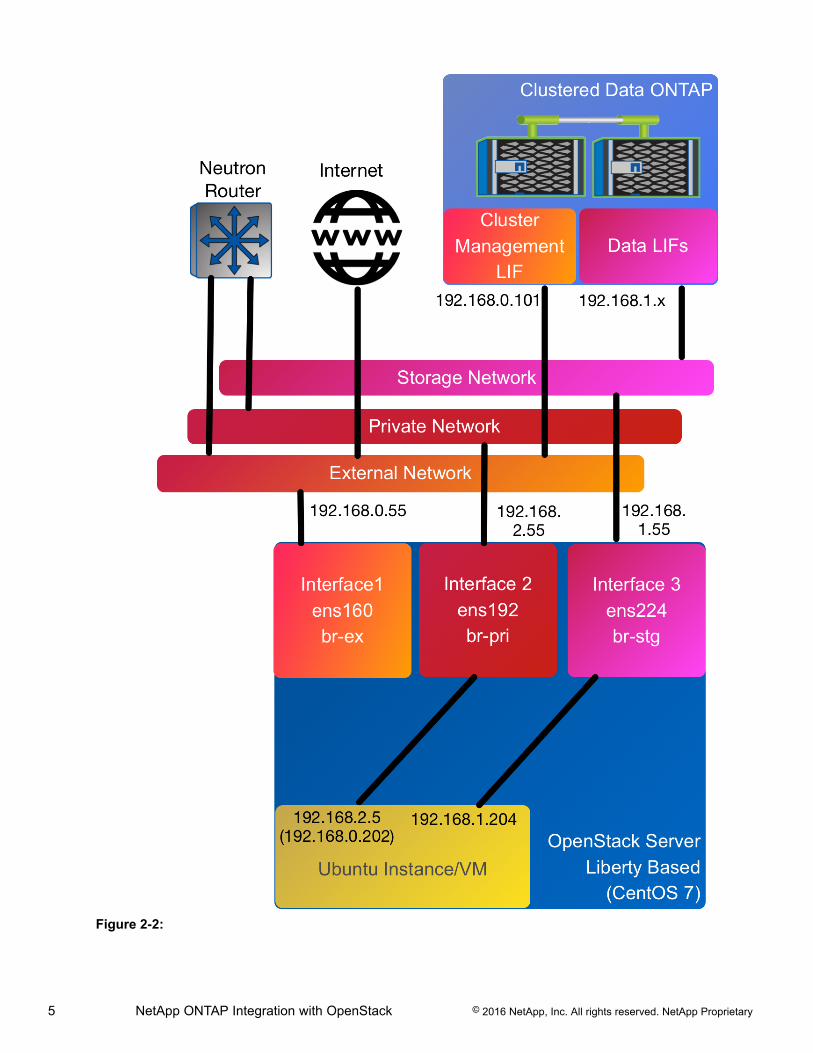
This lab is configured with an OpenStack Server and a Clustered Data ONTAP simulator. The OpenStack Serverhas three network interfaces:
• External Interface: for communication to/from the Internet. The external network is 192.168.0.0/24.• Private Interface: for communication between OpenStack instances. The private network is
192.168.1.0/24.• Storage Interface: for communication to/from the Clustered Data ONTAP Data LIFS. The storage
network is 192.168.2.0/24.
Figure 2-1:
A router has been pre-configured so that the Ubuntu Instance/VM can communicate with the Internet. The UbuntuInstance/VM has two network interfaces – a private interface, and a storage interface. Using OpenStack, afloating-ip address has been configured so that you can login to the instance/VM. You will always login to the VMusing its 192.168.0.0/24 floating IP address on the external network.
5 NetApp ONTAP Integration with OpenStack © 2016 NetApp, Inc. All rights reserved. NetApp Proprietary
Figure 2-2:
6 NetApp ONTAP Integration with OpenStack © 2016 NetApp, Inc. All rights reserved. NetApp Proprietary
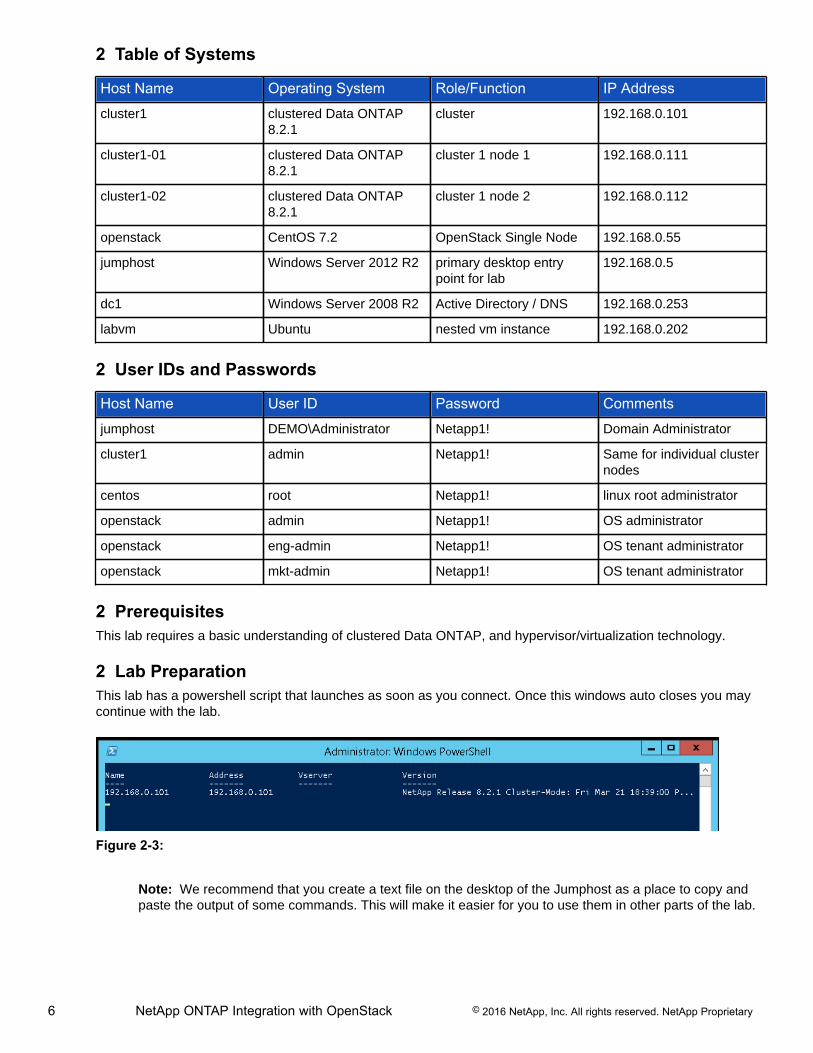
2 Table of Systems
Host Name Operating System Role/Function IP Address
cluster1 clustered Data ONTAP8.2.1
cluster 192.168.0.101
cluster1-01 clustered Data ONTAP8.2.1
cluster 1 node 1 192.168.0.111
cluster1-02 clustered Data ONTAP8.2.1
cluster 1 node 2 192.168.0.112
openstack CentOS 7.2 OpenStack Single Node 192.168.0.55
jumphost Windows Server 2012 R2 primary desktop entrypoint for lab
192.168.0.5
dc1 Windows Server 2008 R2 Active Directory / DNS 192.168.0.253
labvm Ubuntu nested vm instance 192.168.0.202
2 User IDs and Passwords
Host Name User ID Password Comments
jumphost DEMO\Administrator Netapp1! Domain Administrator
cluster1 admin Netapp1! Same for individual clusternodes
centos root Netapp1! linux root administrator
openstack admin Netapp1! OS administrator
openstack eng-admin Netapp1! OS tenant administrator
openstack mkt-admin Netapp1! OS tenant administrator
2 PrerequisitesThis lab requires a basic understanding of clustered Data ONTAP, and hypervisor/virtualization technology.
2 Lab PreparationThis lab has a powershell script that launches as soon as you connect. Once this windows auto closes you maycontinue with the lab.
Figure 2-3:
Note: We recommend that you create a text file on the desktop of the Jumphost as a place to copy andpaste the output of some commands. This will make it easier for you to use them in other parts of the lab.
7 NetApp ONTAP Integration with OpenStack © 2016 NetApp, Inc. All rights reserved. NetApp Proprietary
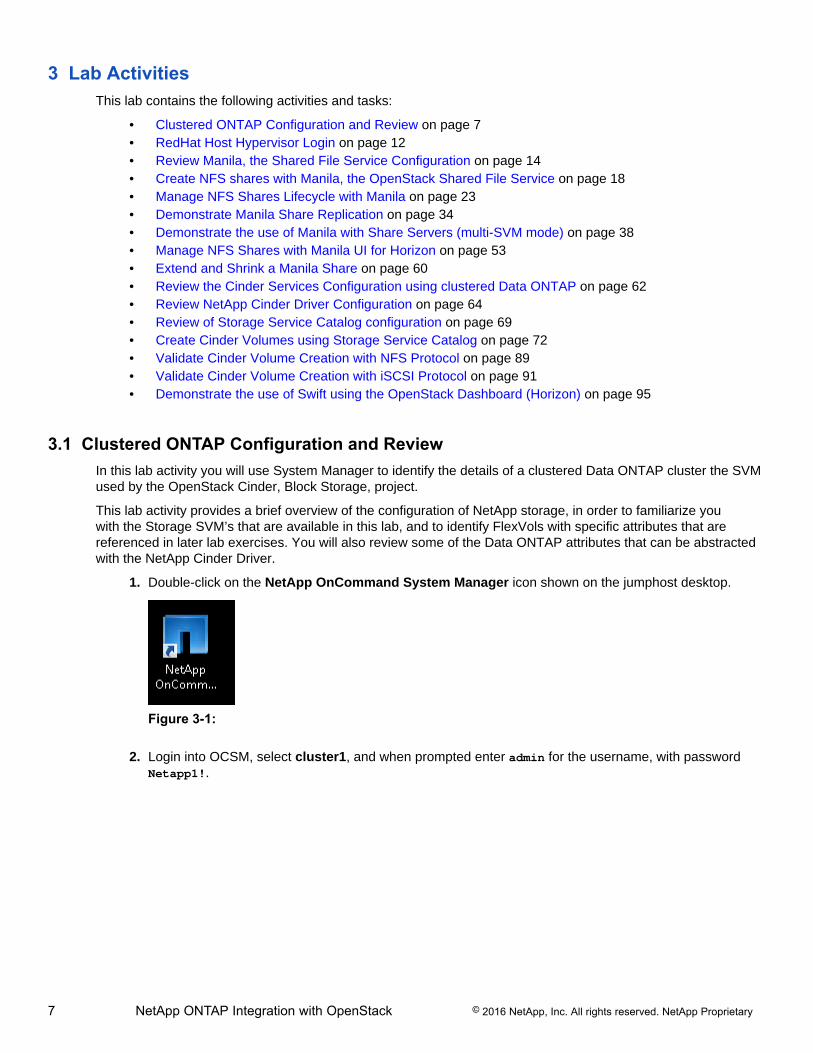
3 Lab ActivitiesThis lab contains the following activities and tasks:
• Clustered ONTAP Configuration and Review on page 7• RedHat Host Hypervisor Login on page 12• Review Manila, the Shared File Service Configuration on page 14• Create NFS shares with Manila, the OpenStack Shared File Service on page 18• Manage NFS Shares Lifecycle with Manila on page 23• Demonstrate Manila Share Replication on page 34• Demonstrate the use of Manila with Share Servers (multi-SVM mode) on page 38• Manage NFS Shares with Manila UI for Horizon on page 53• Extend and Shrink a Manila Share on page 60• Review the Cinder Services Configuration using clustered Data ONTAP on page 62• Review NetApp Cinder Driver Configuration on page 64• Review of Storage Service Catalog configuration on page 69• Create Cinder Volumes using Storage Service Catalog on page 72• Validate Cinder Volume Creation with NFS Protocol on page 89• Validate Cinder Volume Creation with iSCSI Protocol on page 91• Demonstrate the use of Swift using the OpenStack Dashboard (Horizon) on page 95
3.1 Clustered ONTAP Configuration and ReviewIn this lab activity you will use System Manager to identify the details of a clustered Data ONTAP cluster the SVMused by the OpenStack Cinder, Block Storage, project.
This lab activity provides a brief overview of the configuration of NetApp storage, in order to familiarize youwith the Storage SVM’s that are available in this lab, and to identify FlexVols with specific attributes that arereferenced in later lab exercises. You will also review some of the Data ONTAP attributes that can be abstractedwith the NetApp Cinder Driver.
1. Double-click on the NetApp OnCommand System Manager icon shown on the jumphost desktop.
Figure 3-1:
2. Login into OCSM, select cluster1, and when prompted enter admin for the username, with passwordNetapp1!.
8 NetApp ONTAP Integration with OpenStack © 2016 NetApp, Inc. All rights reserved. NetApp Proprietary
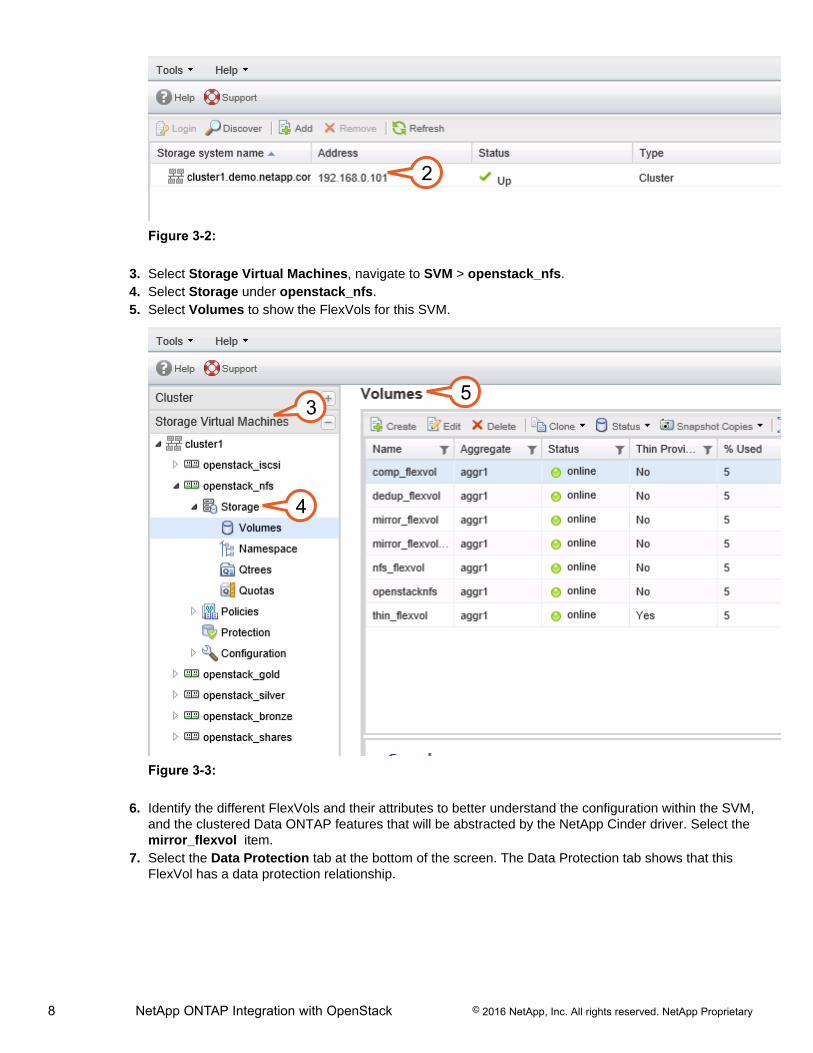
2
Figure 3-2:
3. Select Storage Virtual Machines, navigate to SVM > openstack_nfs.4. Select Storage under openstack_nfs.5. Select Volumes to show the FlexVols for this SVM.
3
4
5
Figure 3-3:
6. Identify the different FlexVols and their attributes to better understand the configuration within the SVM,and the clustered Data ONTAP features that will be abstracted by the NetApp Cinder driver. Select themirror_flexvol item.
7. Select the Data Protection tab at the bottom of the screen. The Data Protection tab shows that thisFlexVol has a data protection relationship.
9 NetApp ONTAP Integration with OpenStack © 2016 NetApp, Inc. All rights reserved. NetApp Proprietary
6
7
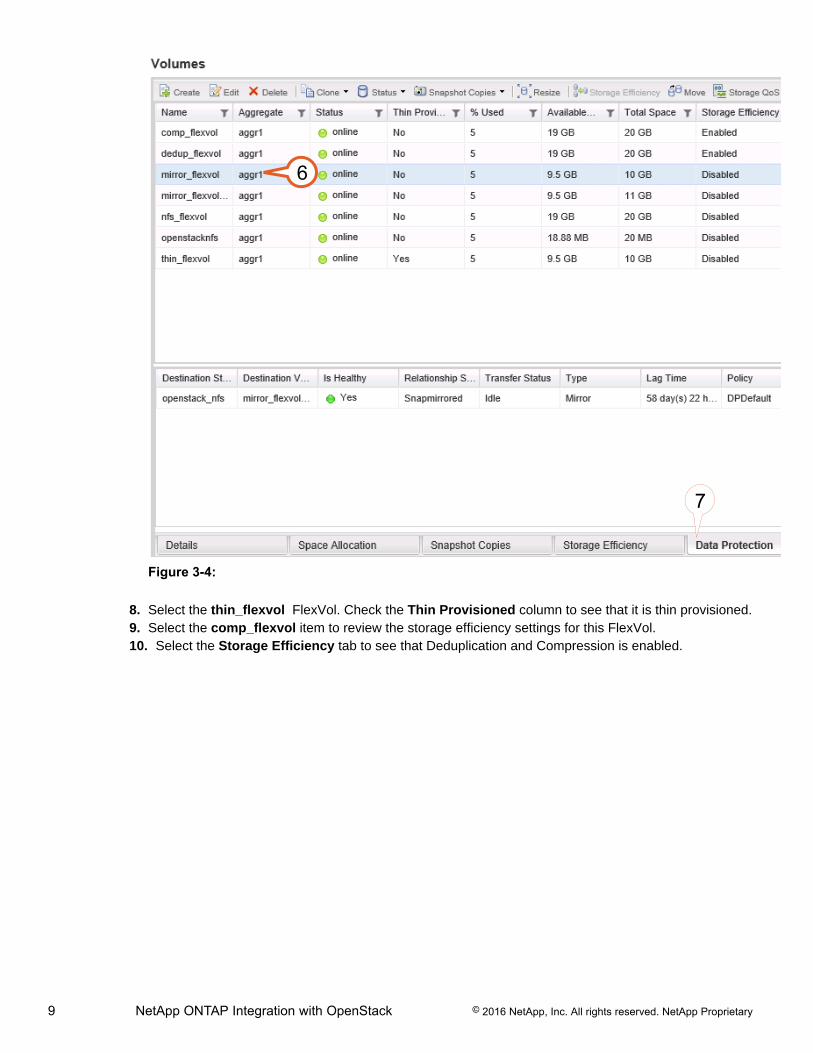
Figure 3-4:
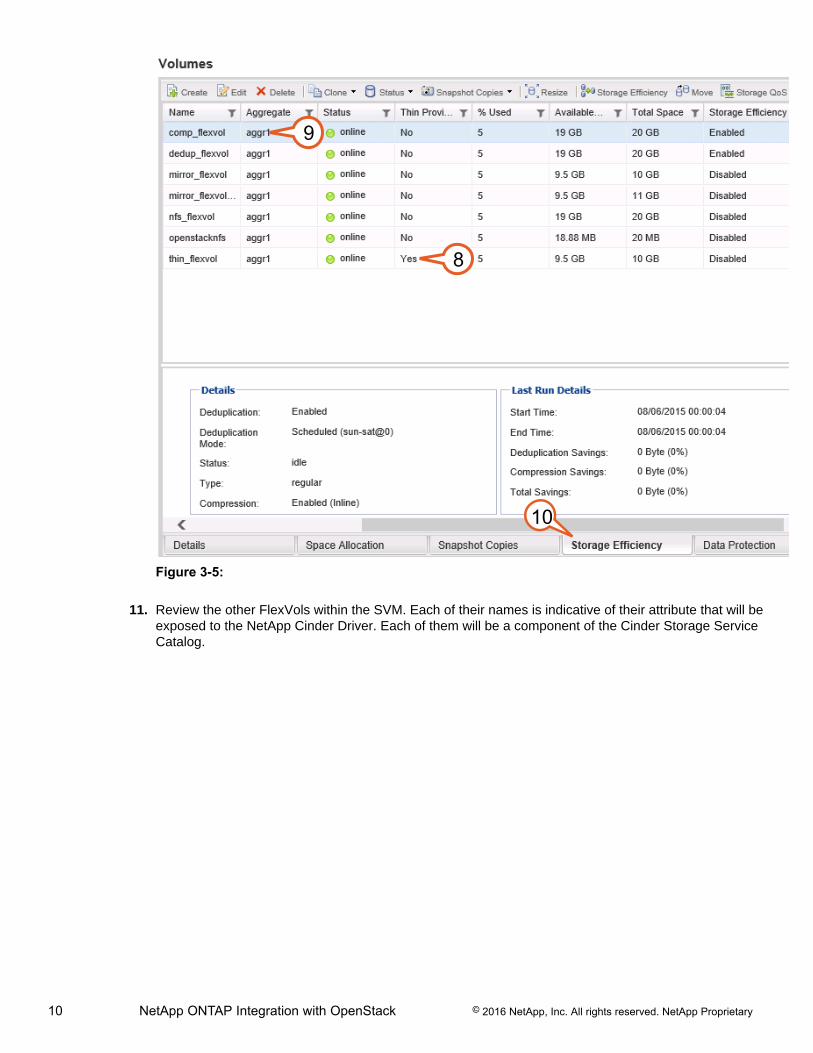
8. Select the thin_flexvol FlexVol. Check the Thin Provisioned column to see that it is thin provisioned.9. Select the comp_flexvol item to review the storage efficiency settings for this FlexVol.10. Select the Storage Efficiency tab to see that Deduplication and Compression is enabled.
10 NetApp ONTAP Integration with OpenStack © 2016 NetApp, Inc. All rights reserved. NetApp Proprietary
8
9
10
Figure 3-5:
11. Review the other FlexVols within the SVM. Each of their names is indicative of their attribute that will beexposed to the NetApp Cinder Driver. Each of them will be a component of the Cinder Storage ServiceCatalog.

11 NetApp ONTAP Integration with OpenStack © 2016 NetApp, Inc. All rights reserved. NetApp Proprietary
11
Figure 3-6:
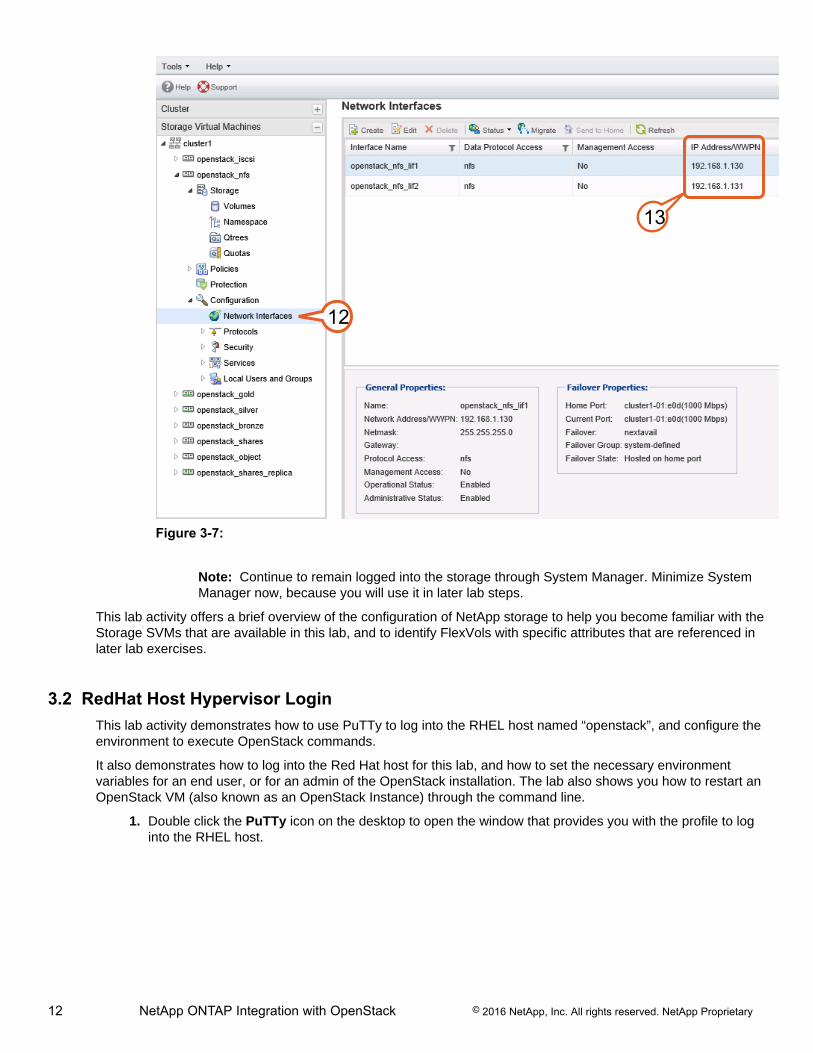
12. Identify the clustered Data ONTAP Network Interfaces used by the openstack_nfs SVM. Navigate toopenstack_nfs SVM > Configuration > Network Interfaces.
13. Identify the Interface Name and IP Address of each LIF. The IP address will be used as reference inlater steps.
12 NetApp ONTAP Integration with OpenStack © 2016 NetApp, Inc. All rights reserved. NetApp Proprietary
12
13
Figure 3-7:
Note: Continue to remain logged into the storage through System Manager. Minimize SystemManager now, because you will use it in later lab steps.
This lab activity offers a brief overview of the configuration of NetApp storage to help you become familiar with theStorage SVMs that are available in this lab, and to identify FlexVols with specific attributes that are referenced inlater lab exercises.
3.2 RedHat Host Hypervisor LoginThis lab activity demonstrates how to use PuTTy to log into the RHEL host named “openstack”, and configure theenvironment to execute OpenStack commands.
It also demonstrates how to log into the Red Hat host for this lab, and how to set the necessary environmentvariables for an end user, or for an admin of the OpenStack installation. The lab also shows you how to restart anOpenStack VM (also known as an OpenStack Instance) through the command line.
1. Double click the PuTTy icon on the desktop to open the window that provides you with the profile to loginto the RHEL host.
13 NetApp ONTAP Integration with OpenStack © 2016 NetApp, Inc. All rights reserved. NetApp Proprietary
Figure 3-8:
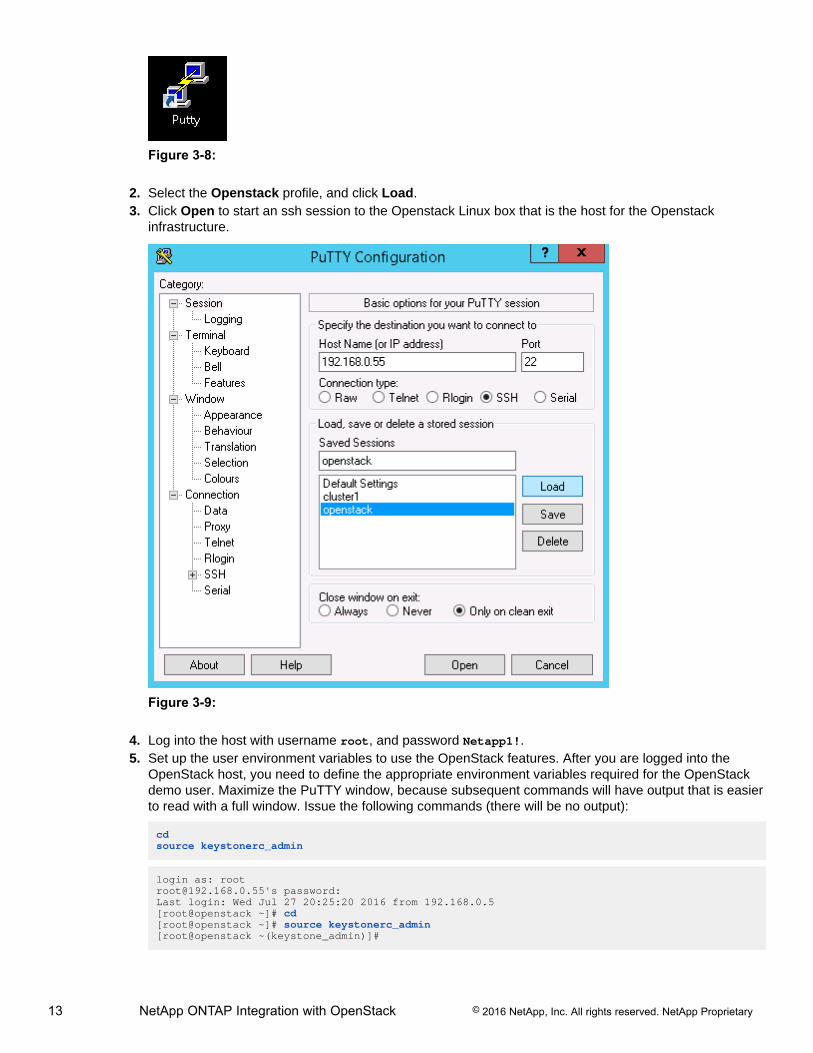
2. Select the Openstack profile, and click Load.3. Click Open to start an ssh session to the Openstack Linux box that is the host for the Openstack
infrastructure.
Figure 3-9:
4. Log into the host with username root, and password Netapp1!.5. Set up the user environment variables to use the OpenStack features. After you are logged into the
OpenStack host, you need to define the appropriate environment variables required for the OpenStackdemo user. Maximize the PuTTY window, because subsequent commands will have output that is easierto read with a full window. Issue the following commands (there will be no output):
cdsource keystonerc_admin
login as: [email protected]'s password:Last login: Wed Jul 27 20:25:20 2016 from 192.168.0.5[root@openstack ~]# cd[root@openstack ~]# source keystonerc_admin[root@openstack ~(keystone_admin)]#
14 NetApp ONTAP Integration with OpenStack © 2016 NetApp, Inc. All rights reserved. NetApp Proprietary
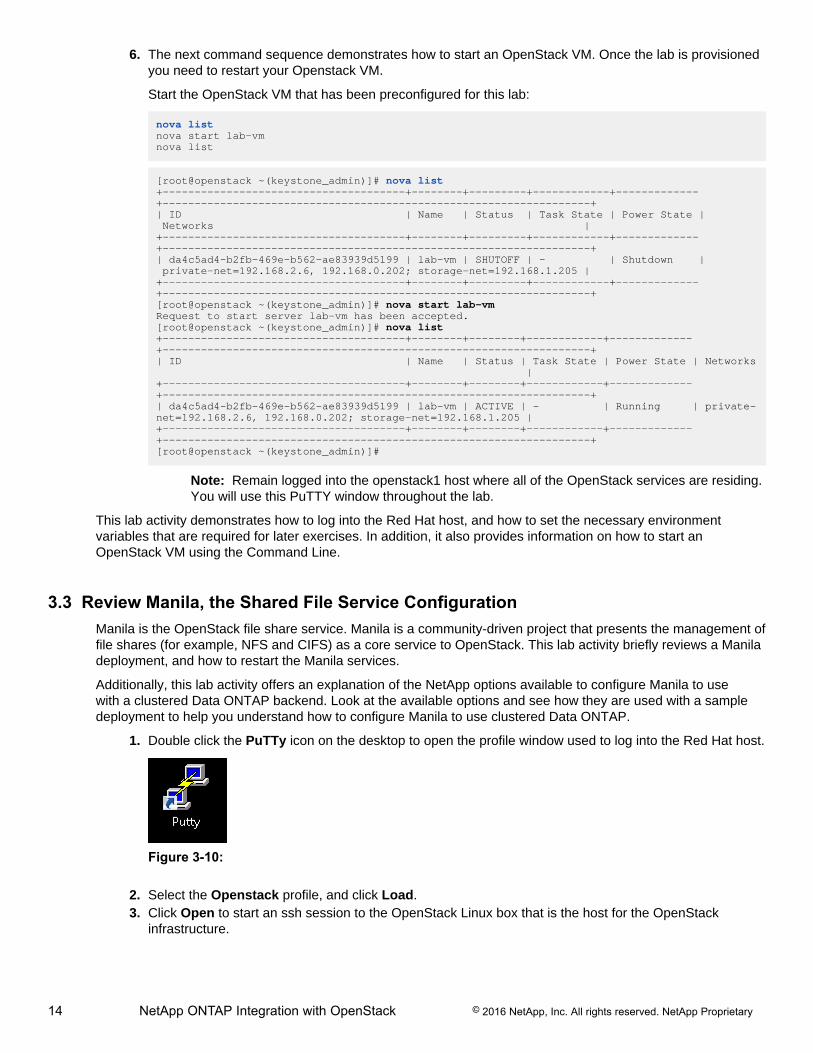
6. The next command sequence demonstrates how to start an OpenStack VM. Once the lab is provisionedyou need to restart your Openstack VM.
Start the OpenStack VM that has been preconfigured for this lab:
nova listnova start lab-vmnova list
[root@openstack ~(keystone_admin)]# nova list+--------------------------------------+--------+---------+------------+-------------+-------------------------------------------------------------------+| ID | Name | Status | Task State | Power State | Networks |+--------------------------------------+--------+---------+------------+-------------+-------------------------------------------------------------------+| da4c5ad4-b2fb-469e-b562-ae83939d5199 | lab-vm | SHUTOFF | - | Shutdown | private-net=192.168.2.6, 192.168.0.202; storage-net=192.168.1.205 |+--------------------------------------+--------+---------+------------+-------------+-------------------------------------------------------------------+[root@openstack ~(keystone_admin)]# nova start lab-vmRequest to start server lab-vm has been accepted.[root@openstack ~(keystone_admin)]# nova list+--------------------------------------+--------+--------+------------+-------------+-------------------------------------------------------------------+| ID | Name | Status | Task State | Power State | Networks |+--------------------------------------+--------+--------+------------+-------------+-------------------------------------------------------------------+| da4c5ad4-b2fb-469e-b562-ae83939d5199 | lab-vm | ACTIVE | - | Running | private-net=192.168.2.6, 192.168.0.202; storage-net=192.168.1.205 |+--------------------------------------+--------+--------+------------+-------------+-------------------------------------------------------------------+[root@openstack ~(keystone_admin)]#
Note: Remain logged into the openstack1 host where all of the OpenStack services are residing.You will use this PuTTY window throughout the lab.
This lab activity demonstrates how to log into the Red Hat host, and how to set the necessary environmentvariables that are required for later exercises. In addition, it also provides information on how to start anOpenStack VM using the Command Line.
3.3 Review Manila, the Shared File Service ConfigurationManila is the OpenStack file share service. Manila is a community-driven project that presents the management offile shares (for example, NFS and CIFS) as a core service to OpenStack. This lab activity briefly reviews a Maniladeployment, and how to restart the Manila services.
Additionally, this lab activity offers an explanation of the NetApp options available to configure Manila to usewith a clustered Data ONTAP backend. Look at the available options and see how they are used with a sampledeployment to help you understand how to configure Manila to use clustered Data ONTAP.
1. Double click the PuTTy icon on the desktop to open the profile window used to log into the Red Hat host.
Figure 3-10:
2. Select the Openstack profile, and click Load.3. Click Open to start an ssh session to the OpenStack Linux box that is the host for the OpenStack
infrastructure.

15 NetApp ONTAP Integration with OpenStack © 2016 NetApp, Inc. All rights reserved. NetApp Proprietary
Figure 3-11:
4. Log into the host with username root, and password Netapp1!.5. Setup the user environment variables to use the OpenStack features. After you are logged into the
OpenStack host, define the appropriate environment variables required for the OpenStack admin user toreview the Manila services. Issue the following commands on the Linux host:
cdsource keystonerc_admin
login as: [email protected]'s password:Last login: Wed Jul 27 20:25:20 2016 from 192.168.0.5[root@openstack ~]# cd[root@openstack ~]# source keystonerc_admin[root@openstack ~(keystone_admin)]#
6. Once you provision the lab you need to restart the Manila services to ensure that they are up, available,and enabled. Issue the following commands as root to start the Manila Services:
systemctl restart openstack-manila-sharesystemctl restart openstack-manila-scheduler
[root@openstack ~(keystone_admin)]# systemctl restart openstack-manila-share[root@openstack ~(keystone_admin)]# systemctl restart openstack-manila-scheduler
16 NetApp ONTAP Integration with OpenStack © 2016 NetApp, Inc. All rights reserved. NetApp Proprietary
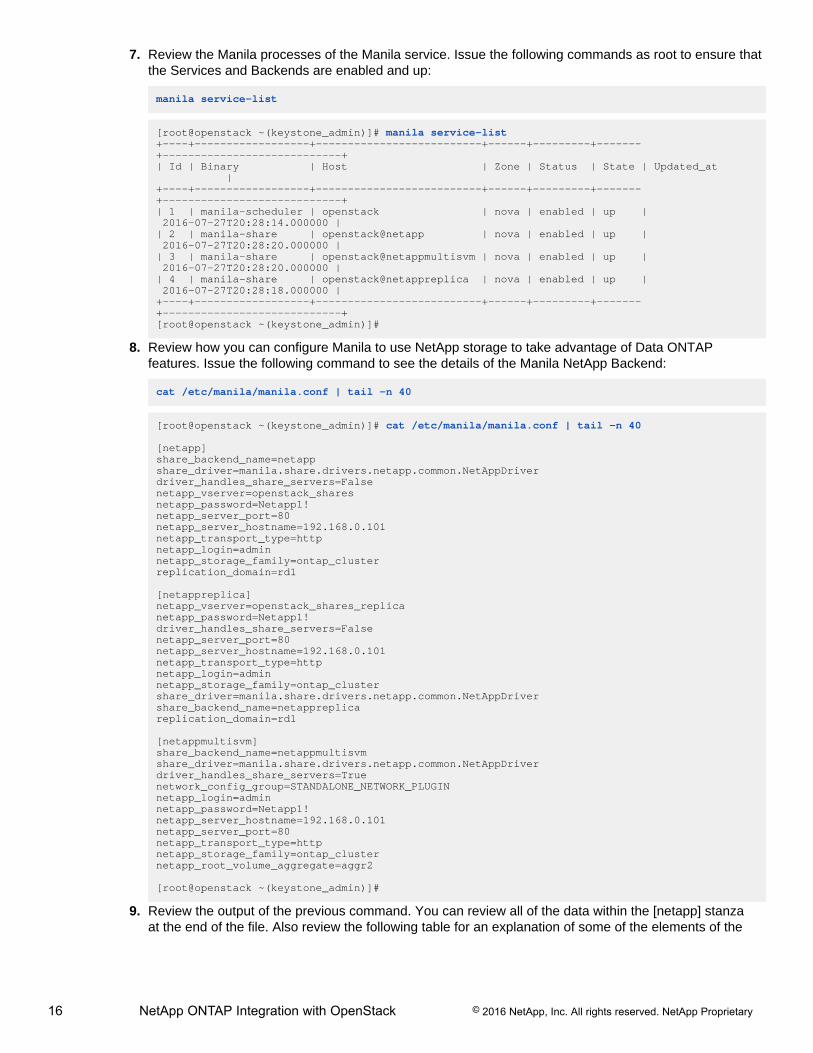
7. Review the Manila processes of the Manila service. Issue the following commands as root to ensure thatthe Services and Backends are enabled and up:
manila service-list
[root@openstack ~(keystone_admin)]# manila service-list+----+------------------+--------------------------+------+---------+-------+----------------------------+| Id | Binary | Host | Zone | Status | State | Updated_at |+----+------------------+--------------------------+------+---------+-------+----------------------------+| 1 | manila-scheduler | openstack | nova | enabled | up | 2016-07-27T20:28:14.000000 || 2 | manila-share | openstack@netapp | nova | enabled | up | 2016-07-27T20:28:20.000000 || 3 | manila-share | openstack@netappmultisvm | nova | enabled | up | 2016-07-27T20:28:20.000000 || 4 | manila-share | openstack@netappreplica | nova | enabled | up | 2016-07-27T20:28:18.000000 |+----+------------------+--------------------------+------+---------+-------+----------------------------+[root@openstack ~(keystone_admin)]#
8. Review how you can configure Manila to use NetApp storage to take advantage of Data ONTAPfeatures. Issue the following command to see the details of the Manila NetApp Backend:
cat /etc/manila/manila.conf | tail -n 40
[root@openstack ~(keystone_admin)]# cat /etc/manila/manila.conf | tail -n 40
[netapp]share_backend_name=netappshare_driver=manila.share.drivers.netapp.common.NetAppDriverdriver_handles_share_servers=Falsenetapp_vserver=openstack_sharesnetapp_password=Netapp1!netapp_server_port=80netapp_server_hostname=192.168.0.101netapp_transport_type=httpnetapp_login=adminnetapp_storage_family=ontap_clusterreplication_domain=rd1
[netappreplica]netapp_vserver=openstack_shares_replicanetapp_password=Netapp1!driver_handles_share_servers=Falsenetapp_server_port=80netapp_server_hostname=192.168.0.101netapp_transport_type=httpnetapp_login=adminnetapp_storage_family=ontap_clustershare_driver=manila.share.drivers.netapp.common.NetAppDrivershare_backend_name=netappreplicareplication_domain=rd1
[netappmultisvm]share_backend_name=netappmultisvmshare_driver=manila.share.drivers.netapp.common.NetAppDriverdriver_handles_share_servers=Truenetwork_config_group=STANDALONE_NETWORK_PLUGINnetapp_login=adminnetapp_password=Netapp1!netapp_server_hostname=192.168.0.101netapp_server_port=80netapp_transport_type=httpnetapp_storage_family=ontap_clusternetapp_root_volume_aggregate=aggr2
[root@openstack ~(keystone_admin)]#
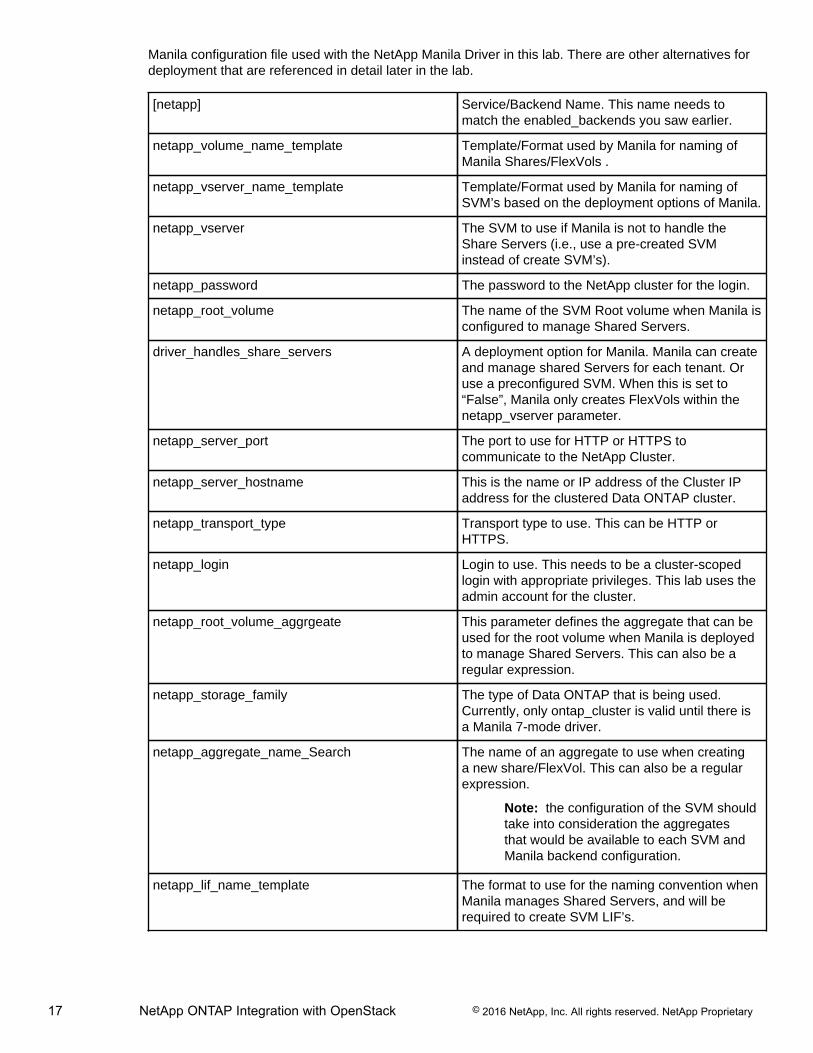
9. Review the output of the previous command. You can review all of the data within the [netapp] stanzaat the end of the file. Also review the following table for an explanation of some of the elements of the
17 NetApp ONTAP Integration with OpenStack © 2016 NetApp, Inc. All rights reserved. NetApp Proprietary
Manila configuration file used with the NetApp Manila Driver in this lab. There are other alternatives fordeployment that are referenced in detail later in the lab.
[netapp] Service/Backend Name. This name needs tomatch the enabled_backends you saw earlier.
netapp_volume_name_template Template/Format used by Manila for naming ofManila Shares/FlexVols .
netapp_vserver_name_template Template/Format used by Manila for naming ofSVM’s based on the deployment options of Manila.
netapp_vserver The SVM to use if Manila is not to handle theShare Servers (i.e., use a pre-created SVMinstead of create SVM’s).
netapp_password The password to the NetApp cluster for the login.
netapp_root_volume The name of the SVM Root volume when Manila isconfigured to manage Shared Servers.
driver_handles_share_servers A deployment option for Manila. Manila can createand manage shared Servers for each tenant. Oruse a preconfigured SVM. When this is set to“False”, Manila only creates FlexVols within thenetapp_vserver parameter.
netapp_server_port The port to use for HTTP or HTTPS tocommunicate to the NetApp Cluster.
netapp_server_hostname This is the name or IP address of the Cluster IPaddress for the clustered Data ONTAP cluster.
netapp_transport_type Transport type to use. This can be HTTP orHTTPS.
netapp_login Login to use. This needs to be a cluster-scopedlogin with appropriate privileges. This lab uses theadmin account for the cluster.
netapp_root_volume_aggrgeate This parameter defines the aggregate that can beused for the root volume when Manila is deployedto manage Shared Servers. This can also be aregular expression.
netapp_storage_family The type of Data ONTAP that is being used.Currently, only ontap_cluster is valid until there isa Manila 7-mode driver.
netapp_aggregate_name_Search The name of an aggregate to use when creatinga new share/FlexVol. This can also be a regularexpression.
Note: the configuration of the SVM shouldtake into consideration the aggregatesthat would be available to each SVM andManila backend configuration.
netapp_lif_name_template The format to use for the naming convention whenManila manages Shared Servers, and will berequired to create SVM LIF’s.
18 NetApp ONTAP Integration with OpenStack © 2016 NetApp, Inc. All rights reserved. NetApp Proprietary
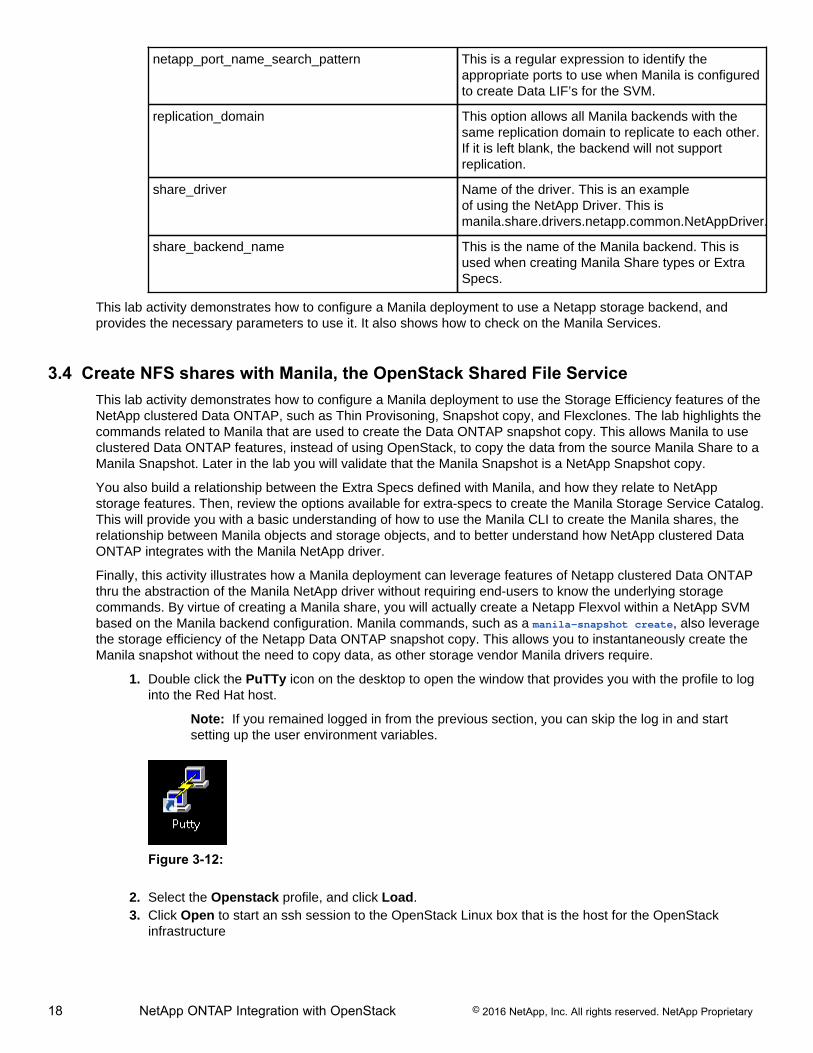
netapp_port_name_search_pattern This is a regular expression to identify theappropriate ports to use when Manila is configuredto create Data LIF’s for the SVM.
replication_domain This option allows all Manila backends with thesame replication domain to replicate to each other.If it is left blank, the backend will not supportreplication.
share_driver Name of the driver. This is an exampleof using the NetApp Driver. This ismanila.share.drivers.netapp.common.NetAppDriver.
share_backend_name This is the name of the Manila backend. This isused when creating Manila Share types or ExtraSpecs.
This lab activity demonstrates how to configure a Manila deployment to use a Netapp storage backend, andprovides the necessary parameters to use it. It also shows how to check on the Manila Services.
3.4 Create NFS shares with Manila, the OpenStack Shared File ServiceThis lab activity demonstrates how to configure a Manila deployment to use the Storage Efficiency features of theNetApp clustered Data ONTAP, such as Thin Provisoning, Snapshot copy, and Flexclones. The lab highlights thecommands related to Manila that are used to create the Data ONTAP snapshot copy. This allows Manila to useclustered Data ONTAP features, instead of using OpenStack, to copy the data from the source Manila Share to aManila Snapshot. Later in the lab you will validate that the Manila Snapshot is a NetApp Snapshot copy.
You also build a relationship between the Extra Specs defined with Manila, and how they relate to NetAppstorage features. Then, review the options available for extra-specs to create the Manila Storage Service Catalog.This will provide you with a basic understanding of how to use the Manila CLI to create the Manila shares, therelationship between Manila objects and storage objects, and to better understand how NetApp clustered DataONTAP integrates with the Manila NetApp driver.
Finally, this activity illustrates how a Manila deployment can leverage features of Netapp clustered Data ONTAPthru the abstraction of the Manila NetApp driver without requiring end-users to know the underlying storagecommands. By virtue of creating a Manila share, you will actually create a Netapp Flexvol within a NetApp SVMbased on the Manila backend configuration. Manila commands, such as a manila-snapshot create, also leveragethe storage efficiency of the Netapp Data ONTAP snapshot copy. This allows you to instantaneously create theManila snapshot without the need to copy data, as other storage vendor Manila drivers require.
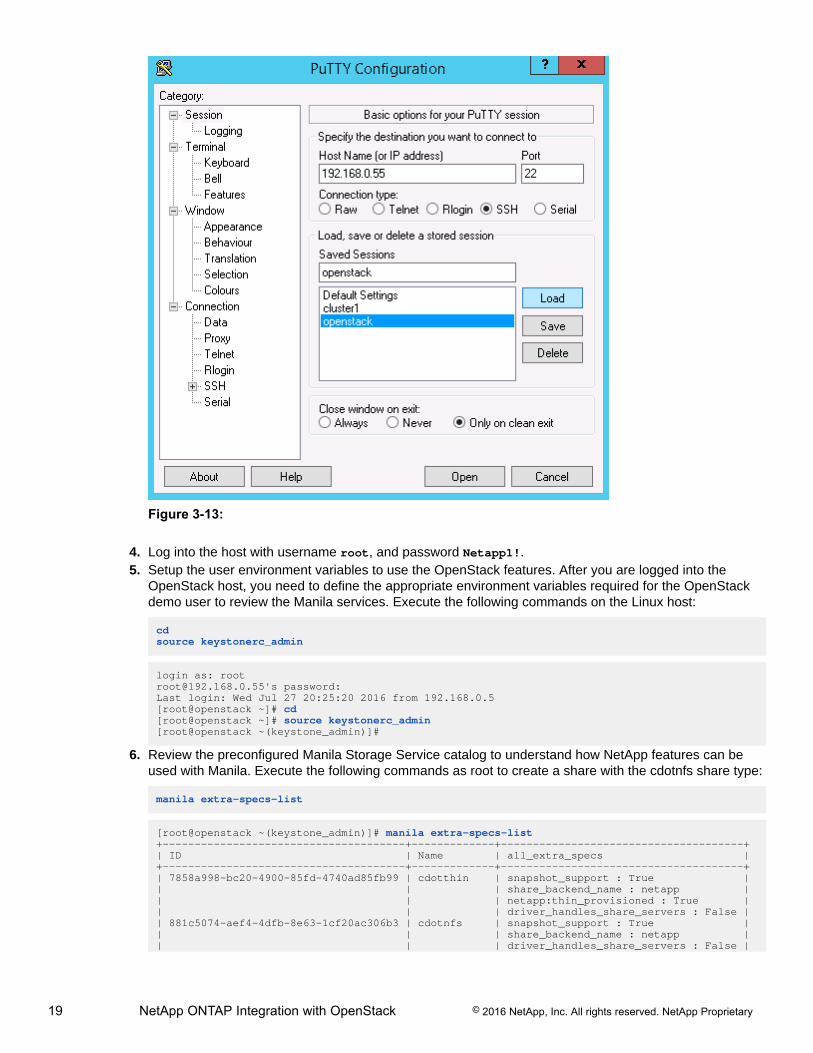
1. Double click the PuTTy icon on the desktop to open the window that provides you with the profile to loginto the Red Hat host.
Note: If you remained logged in from the previous section, you can skip the log in and startsetting up the user environment variables.
Figure 3-12:
2. Select the Openstack profile, and click Load.3. Click Open to start an ssh session to the OpenStack Linux box that is the host for the OpenStack
infrastructure
19 NetApp ONTAP Integration with OpenStack © 2016 NetApp, Inc. All rights reserved. NetApp Proprietary
Figure 3-13:
4. Log into the host with username root, and password Netapp1!.5. Setup the user environment variables to use the OpenStack features. After you are logged into the
OpenStack host, you need to define the appropriate environment variables required for the OpenStackdemo user to review the Manila services. Execute the following commands on the Linux host:
cdsource keystonerc_admin
login as: [email protected]'s password:Last login: Wed Jul 27 20:25:20 2016 from 192.168.0.5[root@openstack ~]# cd[root@openstack ~]# source keystonerc_admin[root@openstack ~(keystone_admin)]#
6. Review the preconfigured Manila Storage Service catalog to understand how NetApp features can beused with Manila. Execute the following commands as root to create a share with the cdotnfs share type:
manila extra-specs-list
[root@openstack ~(keystone_admin)]# manila extra-specs-list+--------------------------------------+-------------+--------------------------------------+| ID | Name | all_extra_specs |+--------------------------------------+-------------+--------------------------------------+| 7858a998-bc20-4900-85fd-4740ad85fb99 | cdotthin | snapshot_support : True || | | share_backend_name : netapp || | | netapp:thin_provisioned : True || | | driver_handles_share_servers : False || 881c5074-aef4-4dfb-8e63-1cf20ac306b3 | cdotnfs | snapshot_support : True || | | share_backend_name : netapp || | | driver_handles_share_servers : False |
20 NetApp ONTAP Integration with OpenStack © 2016 NetApp, Inc. All rights reserved. NetApp Proprietary
| 98f3c1aa-4cd0-4185-98b7-5fb4e93a9959 | multisvm | snapshot_support : True || | | share_backend_name : netappmultisvm || | | driver_handles_share_servers : True || f62aef87-642f-451c-93f4-29a0736d10cb | replication | replication_type : dr || | | snapshot_support : True || | | driver_handles_share_servers : False |+--------------------------------------+-------------+--------------------------------------+[root@openstack ~(keystone_admin)]#
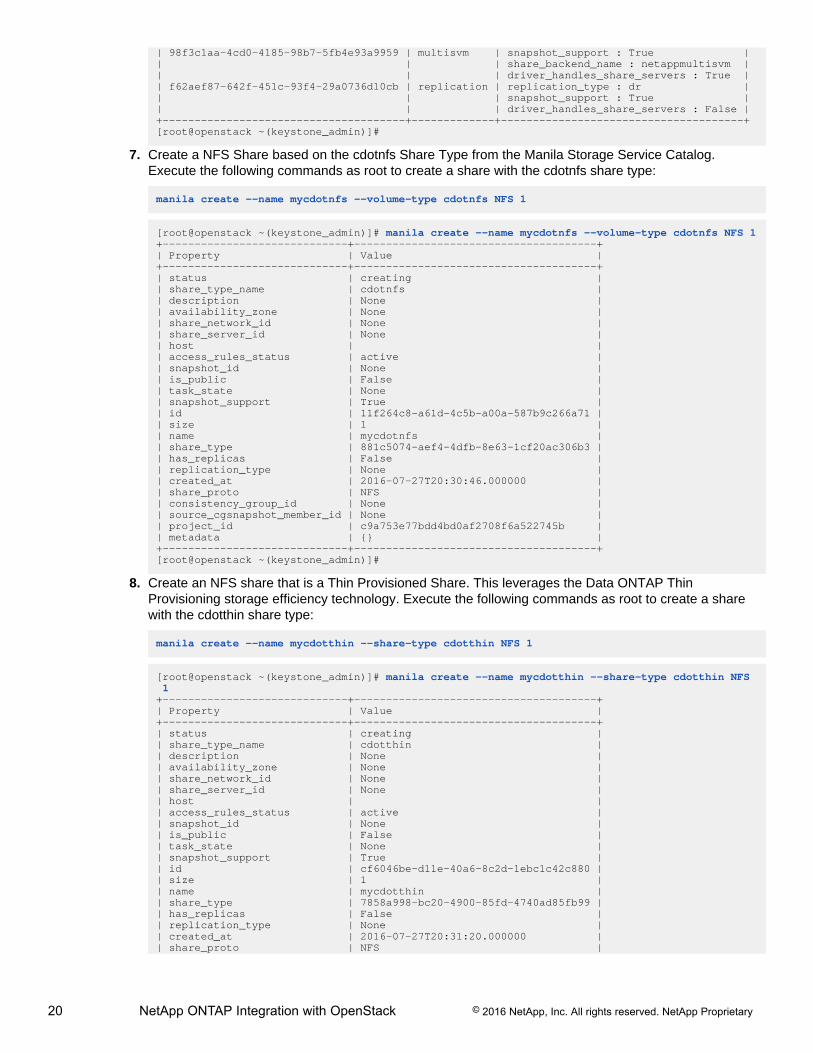
7. Create a NFS Share based on the cdotnfs Share Type from the Manila Storage Service Catalog.Execute the following commands as root to create a share with the cdotnfs share type:
manila create --name mycdotnfs --volume-type cdotnfs NFS 1
[root@openstack ~(keystone_admin)]# manila create --name mycdotnfs --volume-type cdotnfs NFS 1+-----------------------------+--------------------------------------+| Property | Value |+-----------------------------+--------------------------------------+| status | creating || share_type_name | cdotnfs || description | None || availability_zone | None || share_network_id | None || share_server_id | None || host | || access_rules_status | active || snapshot_id | None || is_public | False || task_state | None || snapshot_support | True || id | 11f264c8-a61d-4c5b-a00a-587b9c266a71 || size | 1 || name | mycdotnfs || share_type | 881c5074-aef4-4dfb-8e63-1cf20ac306b3 || has_replicas | False || replication_type | None || created_at | 2016-07-27T20:30:46.000000 || share_proto | NFS || consistency_group_id | None || source_cgsnapshot_member_id | None || project_id | c9a753e77bdd4bd0af2708f6a522745b || metadata | {} |+-----------------------------+--------------------------------------+[root@openstack ~(keystone_admin)]#
8. Create an NFS share that is a Thin Provisioned Share. This leverages the Data ONTAP ThinProvisioning storage efficiency technology. Execute the following commands as root to create a sharewith the cdotthin share type:
manila create --name mycdotthin --share-type cdotthin NFS 1
[root@openstack ~(keystone_admin)]# manila create --name mycdotthin --share-type cdotthin NFS 1+-----------------------------+--------------------------------------+| Property | Value |+-----------------------------+--------------------------------------+| status | creating || share_type_name | cdotthin || description | None || availability_zone | None || share_network_id | None || share_server_id | None || host | || access_rules_status | active || snapshot_id | None || is_public | False || task_state | None || snapshot_support | True || id | cf6046be-d11e-40a6-8c2d-1ebc1c42c880 || size | 1 || name | mycdotthin || share_type | 7858a998-bc20-4900-85fd-4740ad85fb99 || has_replicas | False || replication_type | None || created_at | 2016-07-27T20:31:20.000000 || share_proto | NFS |
21 NetApp ONTAP Integration with OpenStack © 2016 NetApp, Inc. All rights reserved. NetApp Proprietary
| consistency_group_id | None || source_cgsnapshot_member_id | None || project_id | c9a753e77bdd4bd0af2708f6a522745b || metadata | {} |+-----------------------------+--------------------------------------+[root@openstack ~(keystone_admin)]#
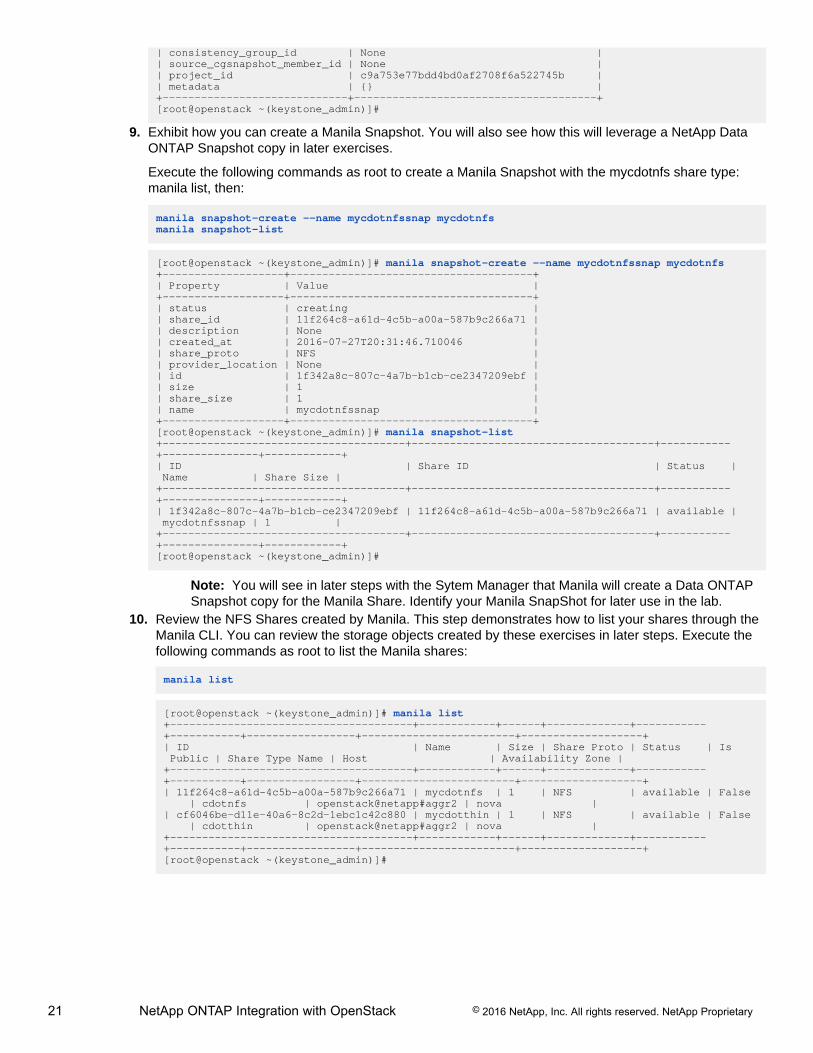
9. Exhibit how you can create a Manila Snapshot. You will also see how this will leverage a NetApp DataONTAP Snapshot copy in later exercises.
Execute the following commands as root to create a Manila Snapshot with the mycdotnfs share type:manila list, then:
manila snapshot-create --name mycdotnfssnap mycdotnfs manila snapshot-list
[root@openstack ~(keystone_admin)]# manila snapshot-create --name mycdotnfssnap mycdotnfs+-------------------+--------------------------------------+| Property | Value |+-------------------+--------------------------------------+| status | creating || share_id | 11f264c8-a61d-4c5b-a00a-587b9c266a71 || description | None || created_at | 2016-07-27T20:31:46.710046 || share_proto | NFS || provider_location | None || id | 1f342a8c-807c-4a7b-b1cb-ce2347209ebf || size | 1 || share_size | 1 || name | mycdotnfssnap |+-------------------+--------------------------------------+[root@openstack ~(keystone_admin)]# manila snapshot-list+--------------------------------------+--------------------------------------+-----------+---------------+------------+| ID | Share ID | Status | Name | Share Size |+--------------------------------------+--------------------------------------+-----------+---------------+------------+| 1f342a8c-807c-4a7b-b1cb-ce2347209ebf | 11f264c8-a61d-4c5b-a00a-587b9c266a71 | available | mycdotnfssnap | 1 |+--------------------------------------+--------------------------------------+-----------+---------------+------------+[root@openstack ~(keystone_admin)]#
Note: You will see in later steps with the Sytem Manager that Manila will create a Data ONTAPSnapshot copy for the Manila Share. Identify your Manila SnapShot for later use in the lab.
10. Review the NFS Shares created by Manila. This step demonstrates how to list your shares through theManila CLI. You can review the storage objects created by these exercises in later steps. Execute thefollowing commands as root to list the Manila shares:
manila list
[root@openstack ~(keystone_admin)]# manila list+--------------------------------------+------------+------+-------------+-----------+-----------+-----------------+------------------------+-------------------+| ID | Name | Size | Share Proto | Status | Is Public | Share Type Name | Host | Availability Zone |+--------------------------------------+------------+------+-------------+-----------+-----------+-----------------+------------------------+-------------------+| 11f264c8-a61d-4c5b-a00a-587b9c266a71 | mycdotnfs | 1 | NFS | available | False | cdotnfs | openstack@netapp#aggr2 | nova || cf6046be-d11e-40a6-8c2d-1ebc1c42c880 | mycdotthin | 1 | NFS | available | False | cdotthin | openstack@netapp#aggr2 | nova |+--------------------------------------+------------+------+-------------+-----------+-----------+-----------------+------------------------+-------------------+[root@openstack ~(keystone_admin)]#
22 NetApp ONTAP Integration with OpenStack © 2016 NetApp, Inc. All rights reserved. NetApp Proprietary
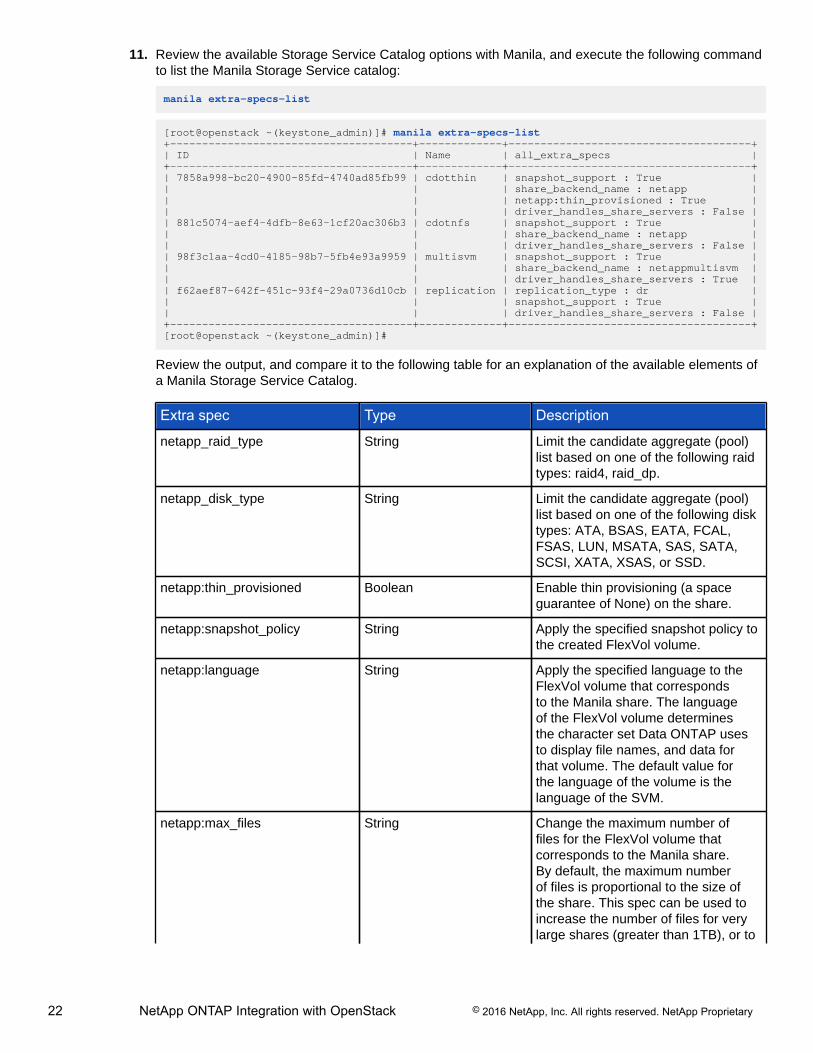
11. Review the available Storage Service Catalog options with Manila, and execute the following commandto list the Manila Storage Service catalog:
manila extra-specs-list
[root@openstack ~(keystone_admin)]# manila extra-specs-list+--------------------------------------+-------------+--------------------------------------+| ID | Name | all_extra_specs |+--------------------------------------+-------------+--------------------------------------+| 7858a998-bc20-4900-85fd-4740ad85fb99 | cdotthin | snapshot_support : True || | | share_backend_name : netapp || | | netapp:thin_provisioned : True || | | driver_handles_share_servers : False || 881c5074-aef4-4dfb-8e63-1cf20ac306b3 | cdotnfs | snapshot_support : True || | | share_backend_name : netapp || | | driver_handles_share_servers : False || 98f3c1aa-4cd0-4185-98b7-5fb4e93a9959 | multisvm | snapshot_support : True || | | share_backend_name : netappmultisvm || | | driver_handles_share_servers : True || f62aef87-642f-451c-93f4-29a0736d10cb | replication | replication_type : dr || | | snapshot_support : True || | | driver_handles_share_servers : False |+--------------------------------------+-------------+--------------------------------------+[root@openstack ~(keystone_admin)]#
Review the output, and compare it to the following table for an explanation of the available elements ofa Manila Storage Service Catalog.
Extra spec Type Description
netapp_raid_type String Limit the candidate aggregate (pool)list based on one of the following raidtypes: raid4, raid_dp.
netapp_disk_type String Limit the candidate aggregate (pool)list based on one of the following disktypes: ATA, BSAS, EATA, FCAL,FSAS, LUN, MSATA, SAS, SATA,SCSI, XATA, XSAS, or SSD.
netapp:thin_provisioned Boolean Enable thin provisioning (a spaceguarantee of None) on the share.
netapp:snapshot_policy String Apply the specified snapshot policy tothe created FlexVol volume.
netapp:language String Apply the specified language to theFlexVol volume that correspondsto the Manila share. The languageof the FlexVol volume determinesthe character set Data ONTAP usesto display file names, and data forthat volume. The default value forthe language of the volume is thelanguage of the SVM.
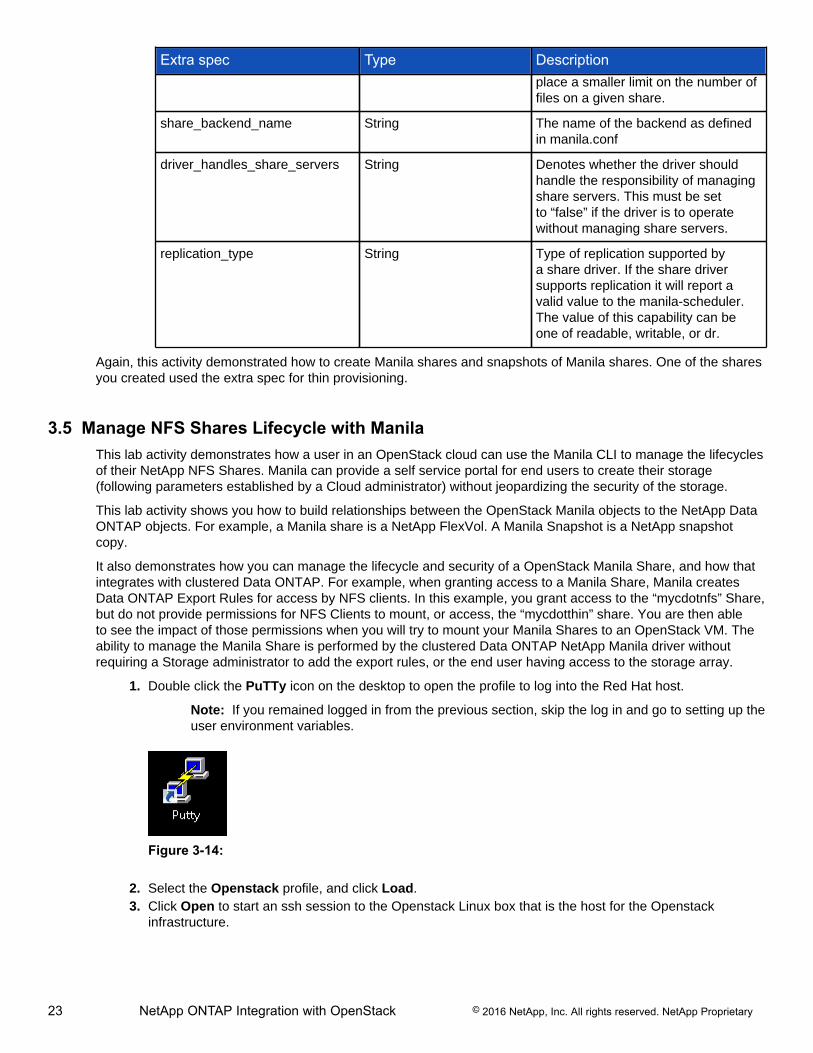
netapp:max_files String Change the maximum number offiles for the FlexVol volume thatcorresponds to the Manila share.By default, the maximum numberof files is proportional to the size ofthe share. This spec can be used toincrease the number of files for verylarge shares (greater than 1TB), or to
23 NetApp ONTAP Integration with OpenStack © 2016 NetApp, Inc. All rights reserved. NetApp Proprietary
Extra spec Type Descriptionplace a smaller limit on the number offiles on a given share.
share_backend_name String The name of the backend as definedin manila.conf
driver_handles_share_servers String Denotes whether the driver shouldhandle the responsibility of managingshare servers. This must be setto “false” if the driver is to operatewithout managing share servers.
replication_type String Type of replication supported bya share driver. If the share driversupports replication it will report avalid value to the manila-scheduler.The value of this capability can beone of readable, writable, or dr.
Again, this activity demonstrated how to create Manila shares and snapshots of Manila shares. One of the sharesyou created used the extra spec for thin provisioning.
3.5 Manage NFS Shares Lifecycle with ManilaThis lab activity demonstrates how a user in an OpenStack cloud can use the Manila CLI to manage the lifecyclesof their NetApp NFS Shares. Manila can provide a self service portal for end users to create their storage(following parameters established by a Cloud administrator) without jeopardizing the security of the storage.
This lab activity shows you how to build relationships between the OpenStack Manila objects to the NetApp DataONTAP objects. For example, a Manila share is a NetApp FlexVol. A Manila Snapshot is a NetApp snapshotcopy.
It also demonstrates how you can manage the lifecycle and security of a OpenStack Manila Share, and how thatintegrates with clustered Data ONTAP. For example, when granting access to a Manila Share, Manila createsData ONTAP Export Rules for access by NFS clients. In this example, you grant access to the “mycdotnfs” Share,but do not provide permissions for NFS Clients to mount, or access, the “mycdotthin” share. You are then ableto see the impact of those permissions when you will try to mount your Manila Shares to an OpenStack VM. Theability to manage the Manila Share is performed by the clustered Data ONTAP NetApp Manila driver withoutrequiring a Storage administrator to add the export rules, or the end user having access to the storage array.
1. Double click the PuTTy icon on the desktop to open the profile to log into the Red Hat host.
Note: If you remained logged in from the previous section, skip the log in and go to setting up theuser environment variables.
Figure 3-14:
2. Select the Openstack profile, and click Load.3. Click Open to start an ssh session to the Openstack Linux box that is the host for the Openstack
infrastructure.
24 NetApp ONTAP Integration with OpenStack © 2016 NetApp, Inc. All rights reserved. NetApp Proprietary
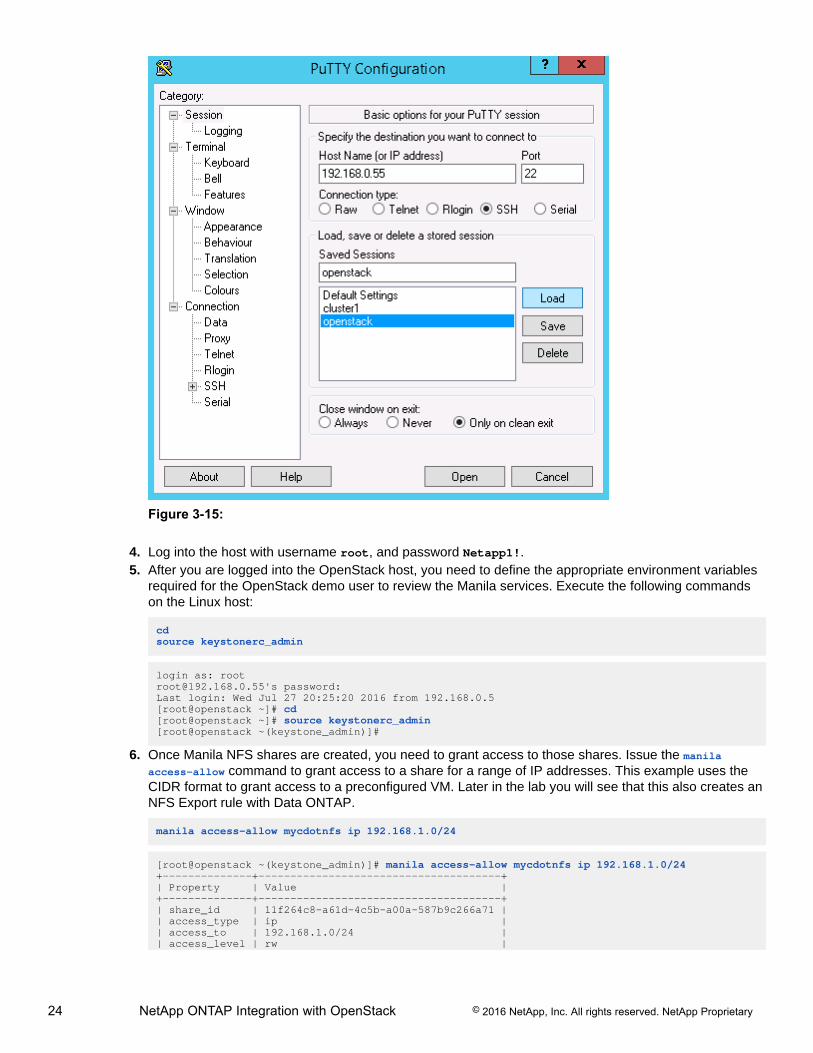
Figure 3-15:
4. Log into the host with username root, and password Netapp1!.5. After you are logged into the OpenStack host, you need to define the appropriate environment variables
required for the OpenStack demo user to review the Manila services. Execute the following commandson the Linux host:
cdsource keystonerc_admin
login as: [email protected]'s password:Last login: Wed Jul 27 20:25:20 2016 from 192.168.0.5[root@openstack ~]# cd[root@openstack ~]# source keystonerc_admin[root@openstack ~(keystone_admin)]#
6. Once Manila NFS shares are created, you need to grant access to those shares. Issue the manilaaccess-allow command to grant access to a share for a range of IP addresses. This example uses theCIDR format to grant access to a preconfigured VM. Later in the lab you will see that this also creates anNFS Export rule with Data ONTAP.
manila access-allow mycdotnfs ip 192.168.1.0/24
[root@openstack ~(keystone_admin)]# manila access-allow mycdotnfs ip 192.168.1.0/24+--------------+--------------------------------------+| Property | Value |+--------------+--------------------------------------+| share_id | 11f264c8-a61d-4c5b-a00a-587b9c266a71 || access_type | ip || access_to | 192.168.1.0/24 || access_level | rw |
25 NetApp ONTAP Integration with OpenStack © 2016 NetApp, Inc. All rights reserved. NetApp Proprietary
| state | new || id | 62a66721-d230-41f8-9f78-24f4585c3cd2 |+--------------+--------------------------------------+[root@openstack ~(keystone_admin)]#
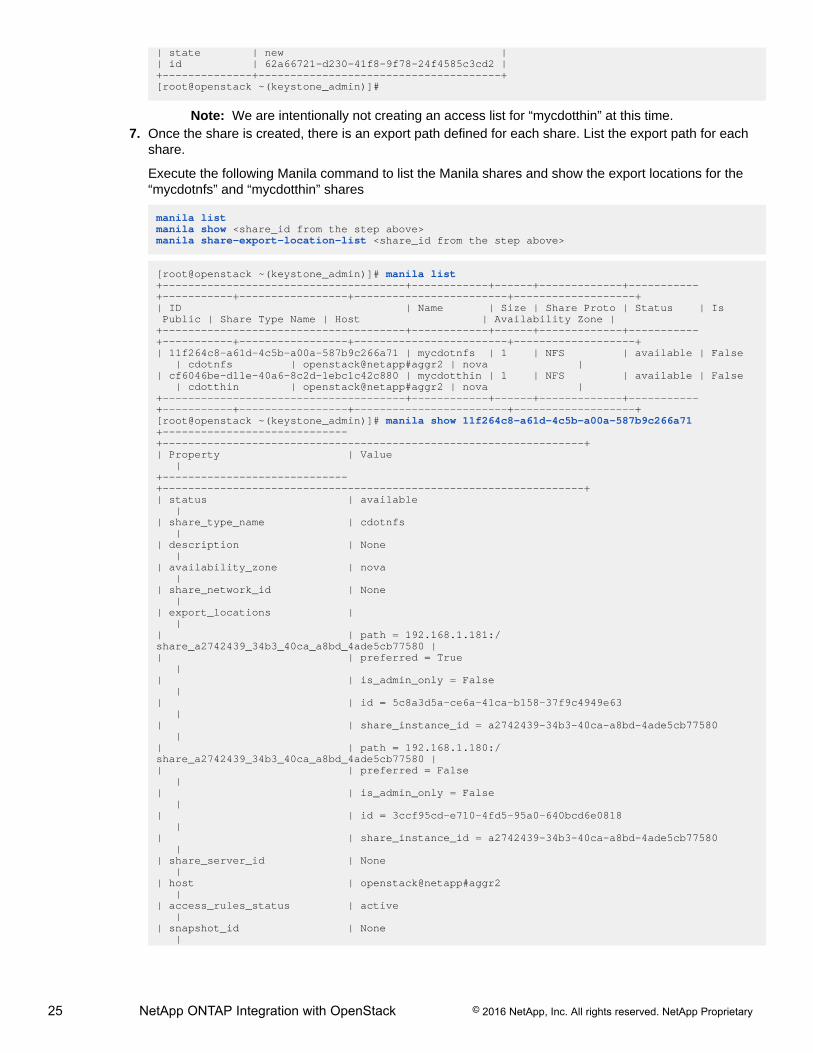
Note: We are intentionally not creating an access list for “mycdotthin” at this time.7. Once the share is created, there is an export path defined for each share. List the export path for each
share.
Execute the following Manila command to list the Manila shares and show the export locations for the“mycdotnfs” and “mycdotthin” shares
manila listmanila show <share_id from the step above>manila share-export-location-list <share_id from the step above>
[root@openstack ~(keystone_admin)]# manila list+--------------------------------------+------------+------+-------------+-----------+-----------+-----------------+------------------------+-------------------+| ID | Name | Size | Share Proto | Status | Is Public | Share Type Name | Host | Availability Zone |+--------------------------------------+------------+------+-------------+-----------+-----------+-----------------+------------------------+-------------------+| 11f264c8-a61d-4c5b-a00a-587b9c266a71 | mycdotnfs | 1 | NFS | available | False | cdotnfs | openstack@netapp#aggr2 | nova || cf6046be-d11e-40a6-8c2d-1ebc1c42c880 | mycdotthin | 1 | NFS | available | False | cdotthin | openstack@netapp#aggr2 | nova |+--------------------------------------+------------+------+-------------+-----------+-----------+-----------------+------------------------+-------------------+[root@openstack ~(keystone_admin)]# manila show 11f264c8-a61d-4c5b-a00a-587b9c266a71+-----------------------------+------------------------------------------------------------------+| Property | Value |+-----------------------------+------------------------------------------------------------------+| status | available || share_type_name | cdotnfs || description | None || availability_zone | nova || share_network_id | None || export_locations | || | path = 192.168.1.181:/share_a2742439_34b3_40ca_a8bd_4ade5cb77580 || | preferred = True || | is_admin_only = False || | id = 5c8a3d5a-ce6a-41ca-b158-37f9c4949e63 || | share_instance_id = a2742439-34b3-40ca-a8bd-4ade5cb77580 || | path = 192.168.1.180:/share_a2742439_34b3_40ca_a8bd_4ade5cb77580 || | preferred = False || | is_admin_only = False || | id = 3ccf95cd-e710-4fd5-95a0-640bcd6e0818 || | share_instance_id = a2742439-34b3-40ca-a8bd-4ade5cb77580 || share_server_id | None || host | openstack@netapp#aggr2 || access_rules_status | active || snapshot_id | None |
26 NetApp ONTAP Integration with OpenStack © 2016 NetApp, Inc. All rights reserved. NetApp Proprietary
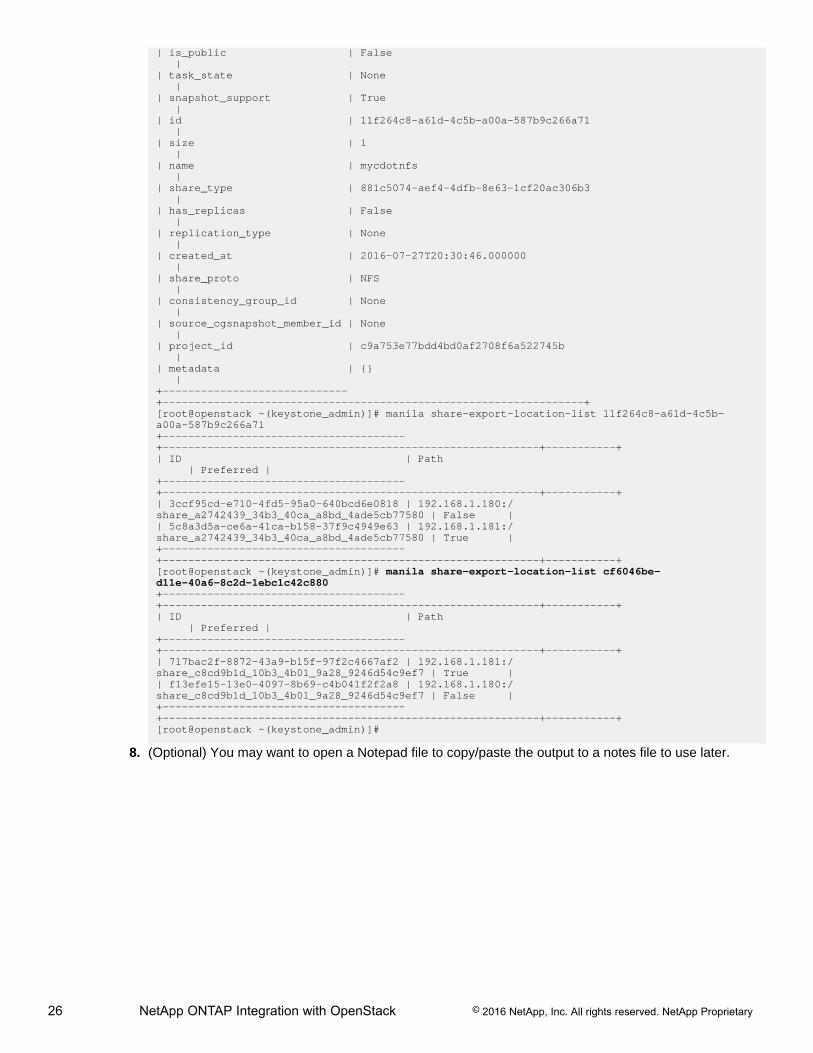
| is_public | False || task_state | None || snapshot_support | True || id | 11f264c8-a61d-4c5b-a00a-587b9c266a71 || size | 1 || name | mycdotnfs || share_type | 881c5074-aef4-4dfb-8e63-1cf20ac306b3 || has_replicas | False || replication_type | None || created_at | 2016-07-27T20:30:46.000000 || share_proto | NFS || consistency_group_id | None || source_cgsnapshot_member_id | None || project_id | c9a753e77bdd4bd0af2708f6a522745b || metadata | {} |+-----------------------------+------------------------------------------------------------------+[root@openstack ~(keystone_admin)]# manila share-export-location-list 11f264c8-a61d-4c5b-a00a-587b9c266a71+--------------------------------------+-----------------------------------------------------------+-----------+| ID | Path | Preferred |+--------------------------------------+-----------------------------------------------------------+-----------+| 3ccf95cd-e710-4fd5-95a0-640bcd6e0818 | 192.168.1.180:/share_a2742439_34b3_40ca_a8bd_4ade5cb77580 | False || 5c8a3d5a-ce6a-41ca-b158-37f9c4949e63 | 192.168.1.181:/share_a2742439_34b3_40ca_a8bd_4ade5cb77580 | True |+--------------------------------------+-----------------------------------------------------------+-----------+[root@openstack ~(keystone_admin)]# manila share-export-location-list cf6046be-d11e-40a6-8c2d-1ebc1c42c880+--------------------------------------+-----------------------------------------------------------+-----------+| ID | Path | Preferred |+--------------------------------------+-----------------------------------------------------------+-----------+| 717bac2f-8872-43a9-b15f-97f2c4667af2 | 192.168.1.181:/share_c8cd9b1d_10b3_4b01_9a28_9246d54c9ef7 | True || f13efe15-13e0-4097-8b69-c4b041f2f2a8 | 192.168.1.180:/share_c8cd9b1d_10b3_4b01_9a28_9246d54c9ef7 | False |+--------------------------------------+-----------------------------------------------------------+-----------+[root@openstack ~(keystone_admin)]#
8. (Optional) You may want to open a Notepad file to copy/paste the output to a notes file to use later.
27 NetApp ONTAP Integration with OpenStack © 2016 NetApp, Inc. All rights reserved. NetApp Proprietary
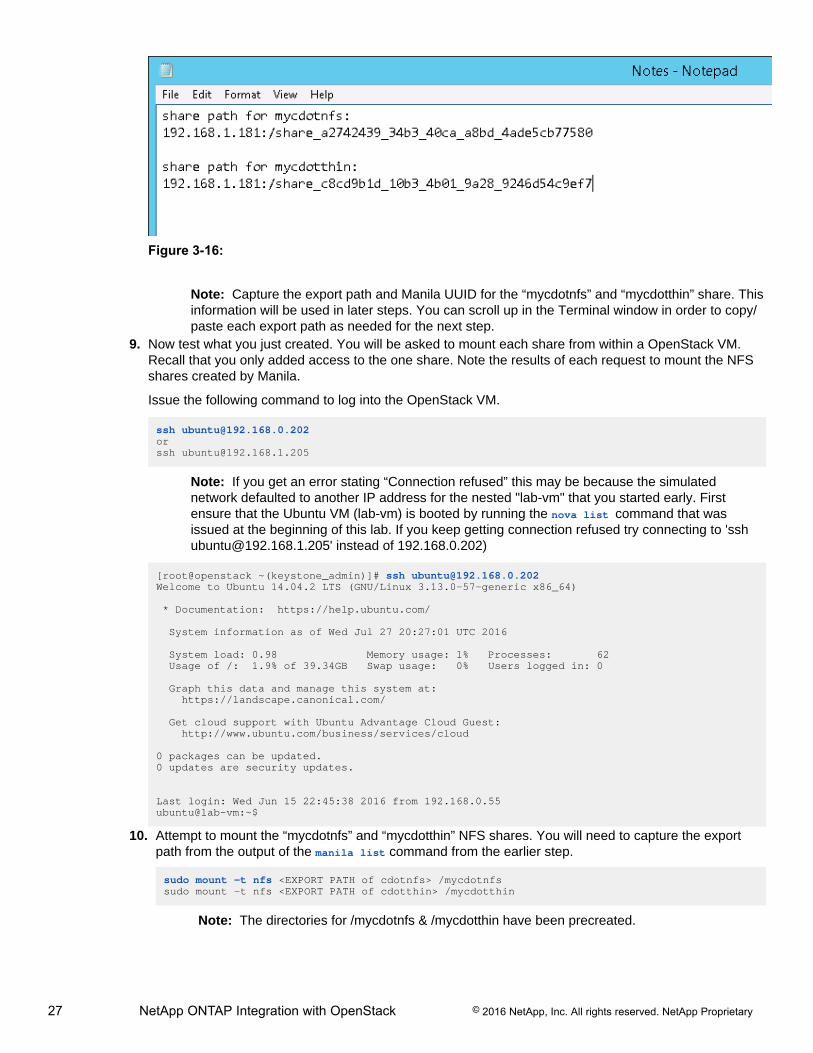
Figure 3-16:
Note: Capture the export path and Manila UUID for the “mycdotnfs” and “mycdotthin” share. Thisinformation will be used in later steps. You can scroll up in the Terminal window in order to copy/paste each export path as needed for the next step.
9. Now test what you just created. You will be asked to mount each share from within a OpenStack VM.Recall that you only added access to the one share. Note the results of each request to mount the NFSshares created by Manila.
Issue the following command to log into the OpenStack VM.
ssh [email protected] [email protected]
Note: If you get an error stating “Connection refused” this may be because the simulatednetwork defaulted to another IP address for the nested "lab-vm" that you started early. Firstensure that the Ubuntu VM (lab-vm) is booted by running the nova list command that wasissued at the beginning of this lab. If you keep getting connection refused try connecting to '[email protected]' instead of 192.168.0.202)
[root@openstack ~(keystone_admin)]# ssh [email protected] to Ubuntu 14.04.2 LTS (GNU/Linux 3.13.0-57-generic x86_64)
* Documentation: https://help.ubuntu.com/
System information as of Wed Jul 27 20:27:01 UTC 2016
System load: 0.98 Memory usage: 1% Processes: 62 Usage of /: 1.9% of 39.34GB Swap usage: 0% Users logged in: 0
Graph this data and manage this system at: https://landscape.canonical.com/
Get cloud support with Ubuntu Advantage Cloud Guest: http://www.ubuntu.com/business/services/cloud
0 packages can be updated.0 updates are security updates.
Last login: Wed Jun 15 22:45:38 2016 from 192.168.0.55ubuntu@lab-vm:~$
10. Attempt to mount the “mycdotnfs” and “mycdotthin” NFS shares. You will need to capture the exportpath from the output of the manila list command from the earlier step.
sudo mount -t nfs <EXPORT PATH of cdotnfs> /mycdotnfssudo mount -t nfs <EXPORT PATH of cdotthin> /mycdotthin
Note: The directories for /mycdotnfs & /mycdotthin have been precreated.
28 NetApp ONTAP Integration with OpenStack © 2016 NetApp, Inc. All rights reserved. NetApp Proprietary
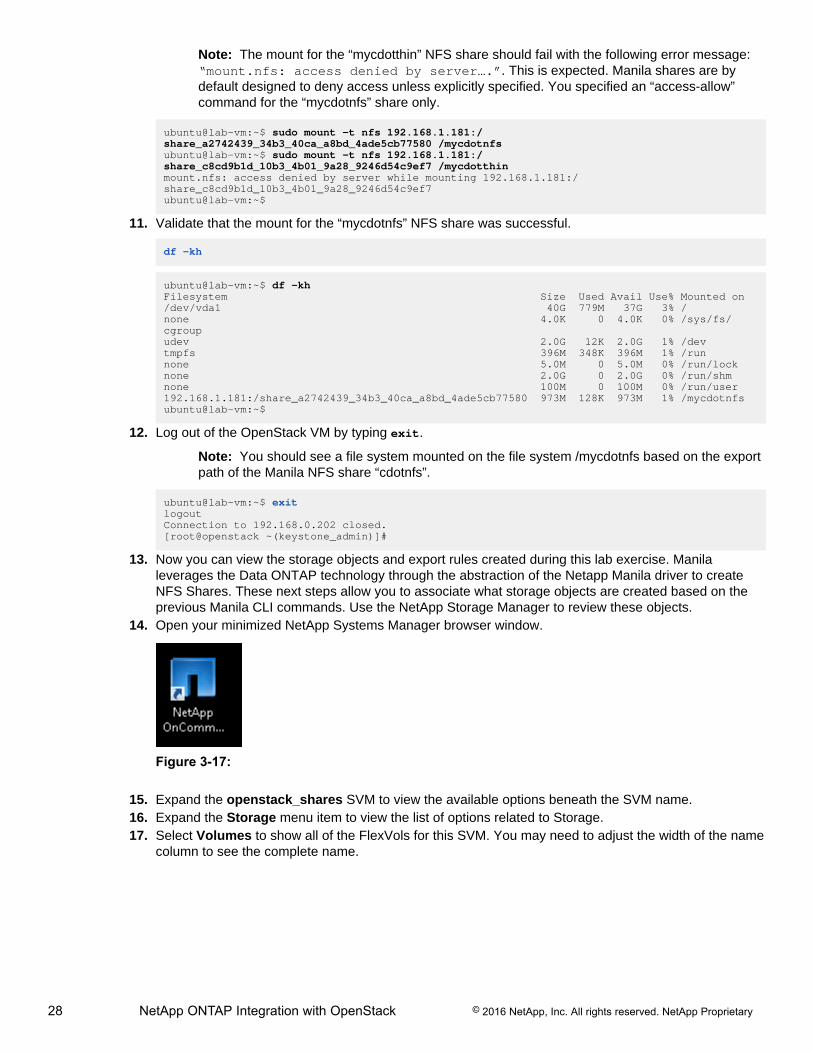
Note: The mount for the “mycdotthin” NFS share should fail with the following error message:“mount.nfs: access denied by server….”. This is expected. Manila shares are bydefault designed to deny access unless explicitly specified. You specified an “access-allow”command for the “mycdotnfs” share only.
ubuntu@lab-vm:~$ sudo mount -t nfs 192.168.1.181:/share_a2742439_34b3_40ca_a8bd_4ade5cb77580 /mycdotnfsubuntu@lab-vm:~$ sudo mount -t nfs 192.168.1.181:/share_c8cd9b1d_10b3_4b01_9a28_9246d54c9ef7 /mycdotthinmount.nfs: access denied by server while mounting 192.168.1.181:/share_c8cd9b1d_10b3_4b01_9a28_9246d54c9ef7ubuntu@lab-vm:~$
11. Validate that the mount for the “mycdotnfs” NFS share was successful.
df -kh
ubuntu@lab-vm:~$ df -khFilesystem Size Used Avail Use% Mounted on/dev/vda1 40G 779M 37G 3% /none 4.0K 0 4.0K 0% /sys/fs/cgroupudev 2.0G 12K 2.0G 1% /devtmpfs 396M 348K 396M 1% /runnone 5.0M 0 5.0M 0% /run/locknone 2.0G 0 2.0G 0% /run/shmnone 100M 0 100M 0% /run/user192.168.1.181:/share_a2742439_34b3_40ca_a8bd_4ade5cb77580 973M 128K 973M 1% /mycdotnfsubuntu@lab-vm:~$
12. Log out of the OpenStack VM by typing exit.
Note: You should see a file system mounted on the file system /mycdotnfs based on the exportpath of the Manila NFS share “cdotnfs”.
ubuntu@lab-vm:~$ exitlogoutConnection to 192.168.0.202 closed.[root@openstack ~(keystone_admin)]#
13. Now you can view the storage objects and export rules created during this lab exercise. Manilaleverages the Data ONTAP technology through the abstraction of the Netapp Manila driver to createNFS Shares. These next steps allow you to associate what storage objects are created based on theprevious Manila CLI commands. Use the NetApp Storage Manager to review these objects.
14. Open your minimized NetApp Systems Manager browser window.
Figure 3-17:
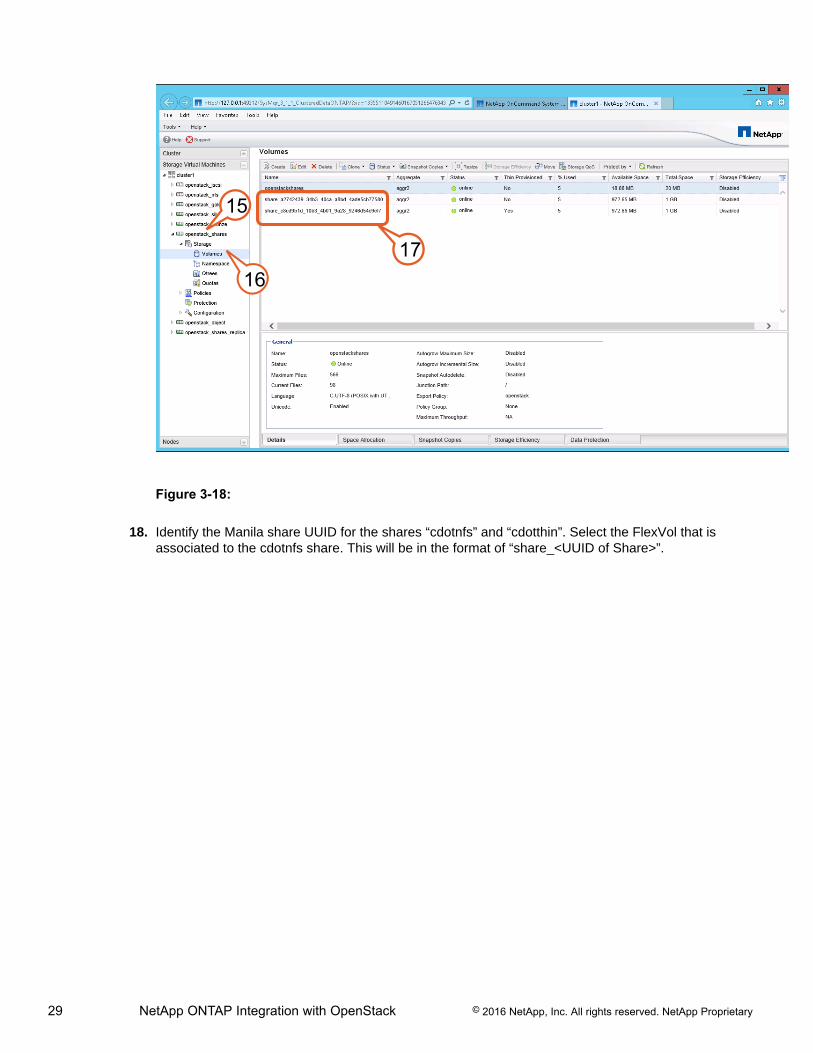
15. Expand the openstack_shares SVM to view the available options beneath the SVM name.16. Expand the Storage menu item to view the list of options related to Storage.17. Select Volumes to show all of the FlexVols for this SVM. You may need to adjust the width of the name
column to see the complete name.
29 NetApp ONTAP Integration with OpenStack © 2016 NetApp, Inc. All rights reserved. NetApp Proprietary
15
1617
Figure 3-18:
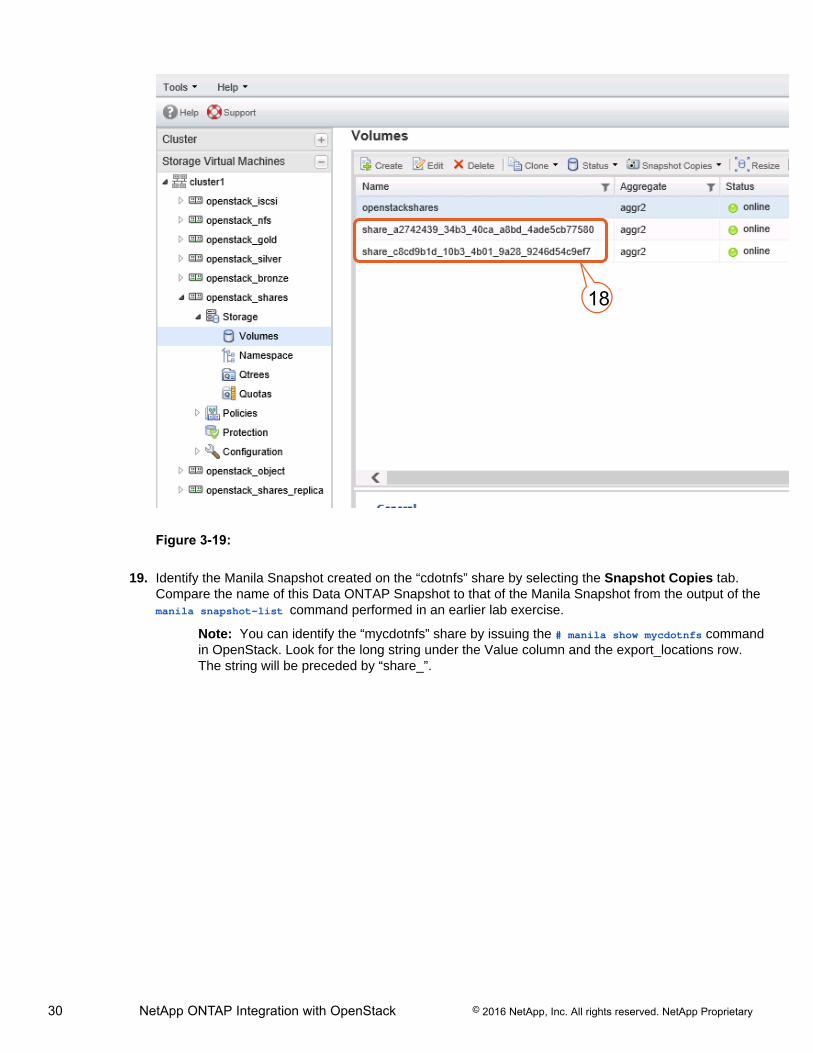
18. Identify the Manila share UUID for the shares “cdotnfs” and “cdotthin”. Select the FlexVol that isassociated to the cdotnfs share. This will be in the format of “share_<UUID of Share>”.
30 NetApp ONTAP Integration with OpenStack © 2016 NetApp, Inc. All rights reserved. NetApp Proprietary
18
Figure 3-19:
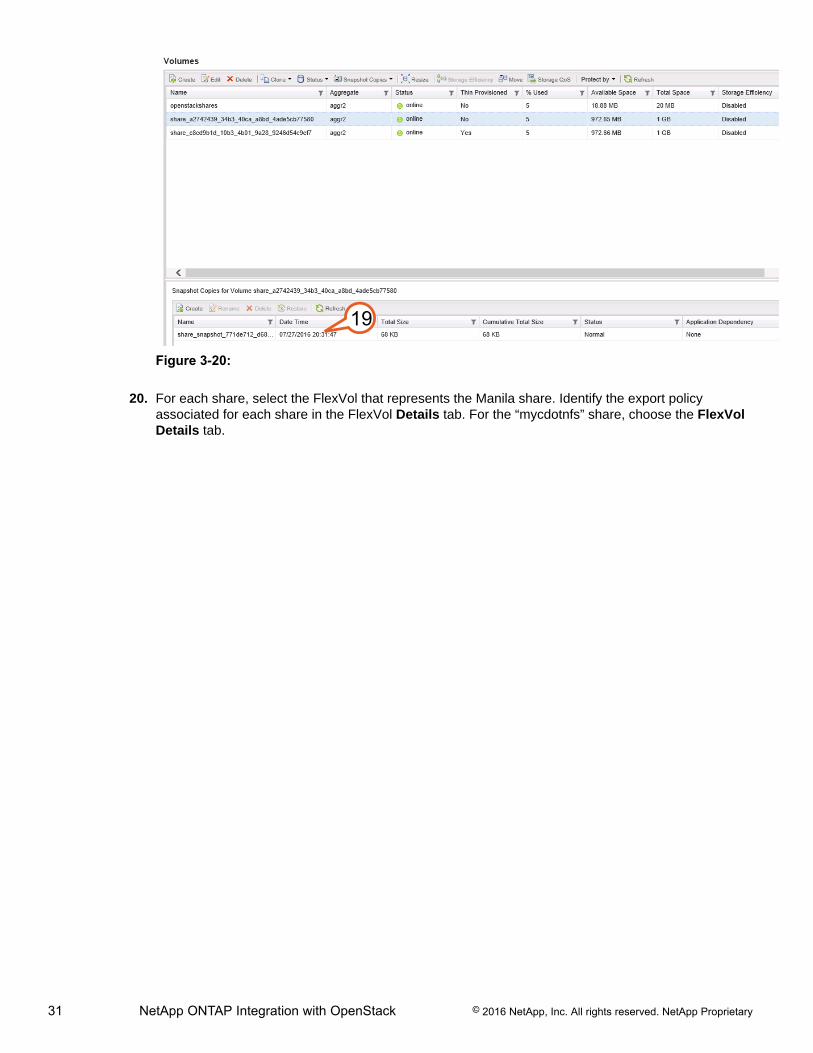
19. Identify the Manila Snapshot created on the “cdotnfs” share by selecting the Snapshot Copies tab.Compare the name of this Data ONTAP Snapshot to that of the Manila Snapshot from the output of themanila snapshot-list command performed in an earlier lab exercise.
Note: You can identify the “mycdotnfs” share by issuing the # manila show mycdotnfs commandin OpenStack. Look for the long string under the Value column and the export_locations row.The string will be preceded by “share_”.
31 NetApp ONTAP Integration with OpenStack © 2016 NetApp, Inc. All rights reserved. NetApp Proprietary
19
Figure 3-20:
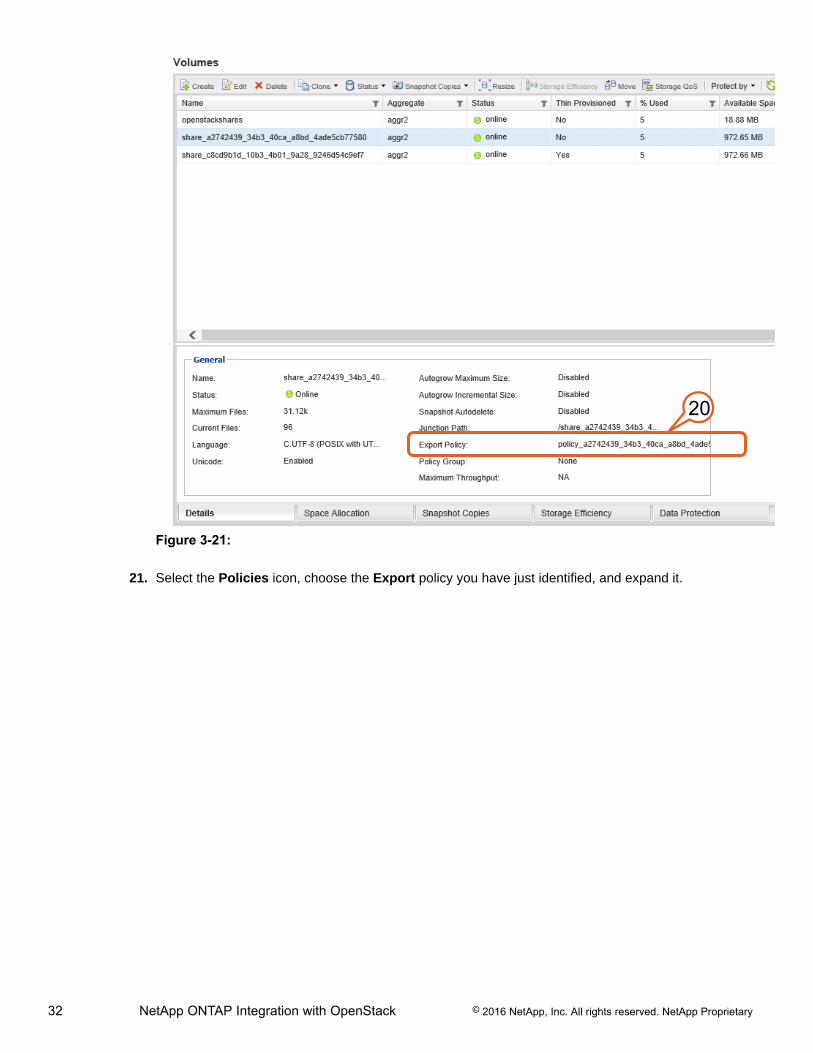
20. For each share, select the FlexVol that represents the Manila share. Identify the export policyassociated for each share in the FlexVol Details tab. For the “mycdotnfs” share, choose the FlexVolDetails tab.
32 NetApp ONTAP Integration with OpenStack © 2016 NetApp, Inc. All rights reserved. NetApp Proprietary
20
Figure 3-21:
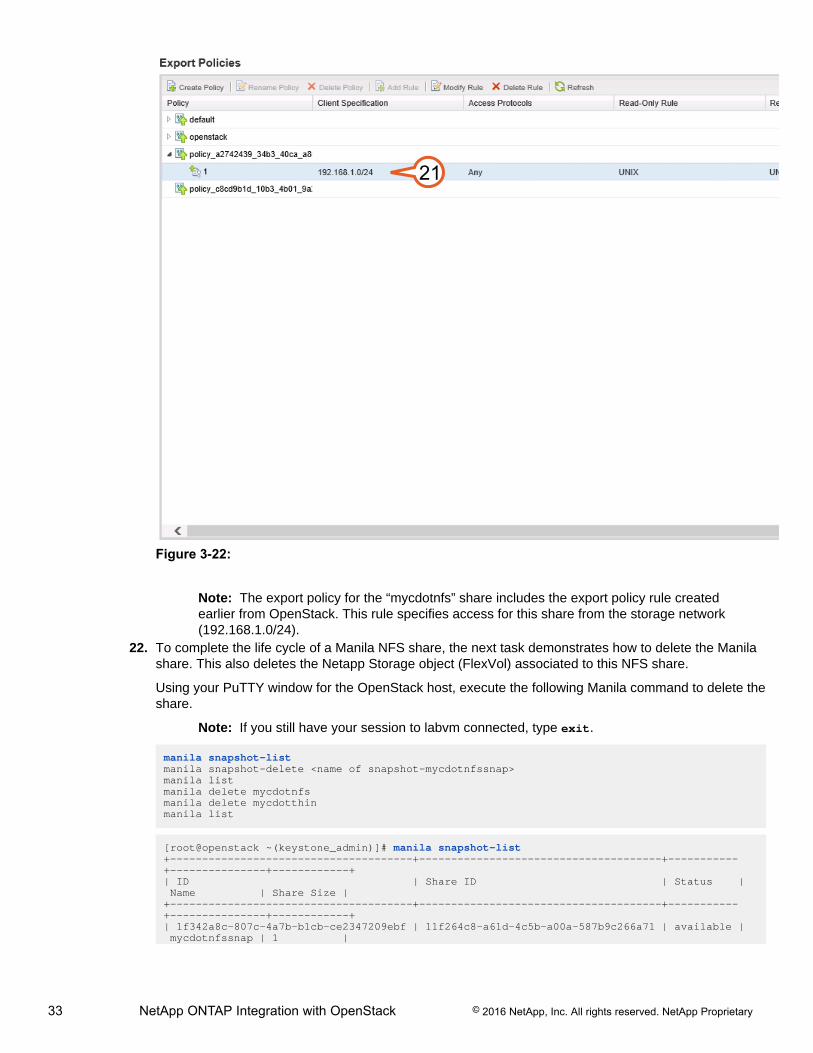
21. Select the Policies icon, choose the Export policy you have just identified, and expand it.
33 NetApp ONTAP Integration with OpenStack © 2016 NetApp, Inc. All rights reserved. NetApp Proprietary
21
Figure 3-22:
Note: The export policy for the “mycdotnfs” share includes the export policy rule createdearlier from OpenStack. This rule specifies access for this share from the storage network(192.168.1.0/24).
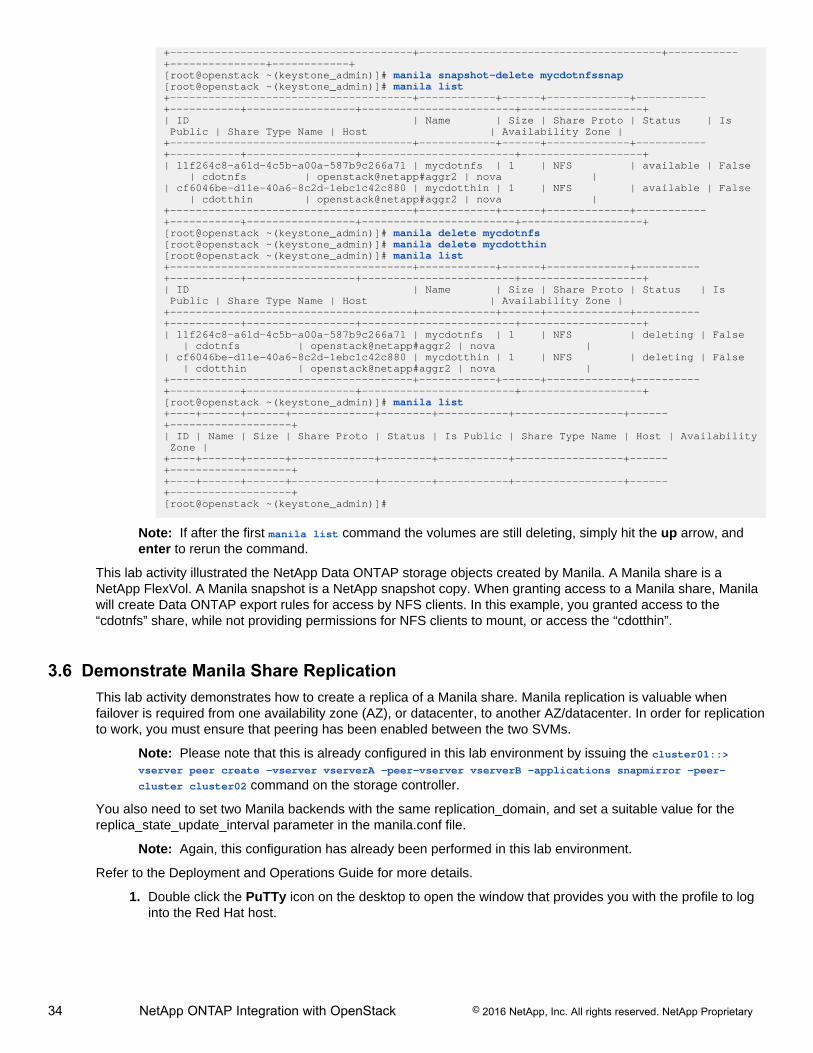
22. To complete the life cycle of a Manila NFS share, the next task demonstrates how to delete the Manilashare. This also deletes the Netapp Storage object (FlexVol) associated to this NFS share.
Using your PuTTY window for the OpenStack host, execute the following Manila command to delete theshare.
Note: If you still have your session to labvm connected, type exit.
manila snapshot-listmanila snapshot-delete <name of snapshot-mycdotnfssnap>manila listmanila delete mycdotnfsmanila delete mycdotthinmanila list
[root@openstack ~(keystone_admin)]# manila snapshot-list+--------------------------------------+--------------------------------------+-----------+---------------+------------+| ID | Share ID | Status | Name | Share Size |+--------------------------------------+--------------------------------------+-----------+---------------+------------+| 1f342a8c-807c-4a7b-b1cb-ce2347209ebf | 11f264c8-a61d-4c5b-a00a-587b9c266a71 | available | mycdotnfssnap | 1 |
34 NetApp ONTAP Integration with OpenStack © 2016 NetApp, Inc. All rights reserved. NetApp Proprietary
+--------------------------------------+--------------------------------------+-----------+---------------+------------+[root@openstack ~(keystone_admin)]# manila snapshot-delete mycdotnfssnap[root@openstack ~(keystone_admin)]# manila list+--------------------------------------+------------+------+-------------+-----------+-----------+-----------------+------------------------+-------------------+| ID | Name | Size | Share Proto | Status | Is Public | Share Type Name | Host | Availability Zone |+--------------------------------------+------------+------+-------------+-----------+-----------+-----------------+------------------------+-------------------+| 11f264c8-a61d-4c5b-a00a-587b9c266a71 | mycdotnfs | 1 | NFS | available | False | cdotnfs | openstack@netapp#aggr2 | nova || cf6046be-d11e-40a6-8c2d-1ebc1c42c880 | mycdotthin | 1 | NFS | available | False | cdotthin | openstack@netapp#aggr2 | nova |+--------------------------------------+------------+------+-------------+-----------+-----------+-----------------+------------------------+-------------------+[root@openstack ~(keystone_admin)]# manila delete mycdotnfs[root@openstack ~(keystone_admin)]# manila delete mycdotthin[root@openstack ~(keystone_admin)]# manila list+--------------------------------------+------------+------+-------------+----------+-----------+-----------------+------------------------+-------------------+| ID | Name | Size | Share Proto | Status | Is Public | Share Type Name | Host | Availability Zone |+--------------------------------------+------------+------+-------------+----------+-----------+-----------------+------------------------+-------------------+| 11f264c8-a61d-4c5b-a00a-587b9c266a71 | mycdotnfs | 1 | NFS | deleting | False | cdotnfs | openstack@netapp#aggr2 | nova || cf6046be-d11e-40a6-8c2d-1ebc1c42c880 | mycdotthin | 1 | NFS | deleting | False | cdotthin | openstack@netapp#aggr2 | nova |+--------------------------------------+------------+------+-------------+----------+-----------+-----------------+------------------------+-------------------+[root@openstack ~(keystone_admin)]# manila list+----+------+------+-------------+--------+-----------+-----------------+------+-------------------+| ID | Name | Size | Share Proto | Status | Is Public | Share Type Name | Host | Availability Zone |+----+------+------+-------------+--------+-----------+-----------------+------+-------------------++----+------+------+-------------+--------+-----------+-----------------+------+-------------------+[root@openstack ~(keystone_admin)]#
Note: If after the first manila list command the volumes are still deleting, simply hit the up arrow, andenter to rerun the command.
This lab activity illustrated the NetApp Data ONTAP storage objects created by Manila. A Manila share is aNetApp FlexVol. A Manila snapshot is a NetApp snapshot copy. When granting access to a Manila share, Manilawill create Data ONTAP export rules for access by NFS clients. In this example, you granted access to the“cdotnfs” share, while not providing permissions for NFS clients to mount, or access the “cdotthin”.
3.6 Demonstrate Manila Share ReplicationThis lab activity demonstrates how to create a replica of a Manila share. Manila replication is valuable whenfailover is required from one availability zone (AZ), or datacenter, to another AZ/datacenter. In order for replicationto work, you must ensure that peering has been enabled between the two SVMs.
Note: Please note that this is already configured in this lab environment by issuing the cluster01::>vserver peer create -vserver vserverA -peer-vserver vserverB -applications snapmirror -peer-
cluster cluster02 command on the storage controller.
You also need to set two Manila backends with the same replication_domain, and set a suitable value for thereplica_state_update_interval parameter in the manila.conf file.
Note: Again, this configuration has already been performed in this lab environment.
Refer to the Deployment and Operations Guide for more details.
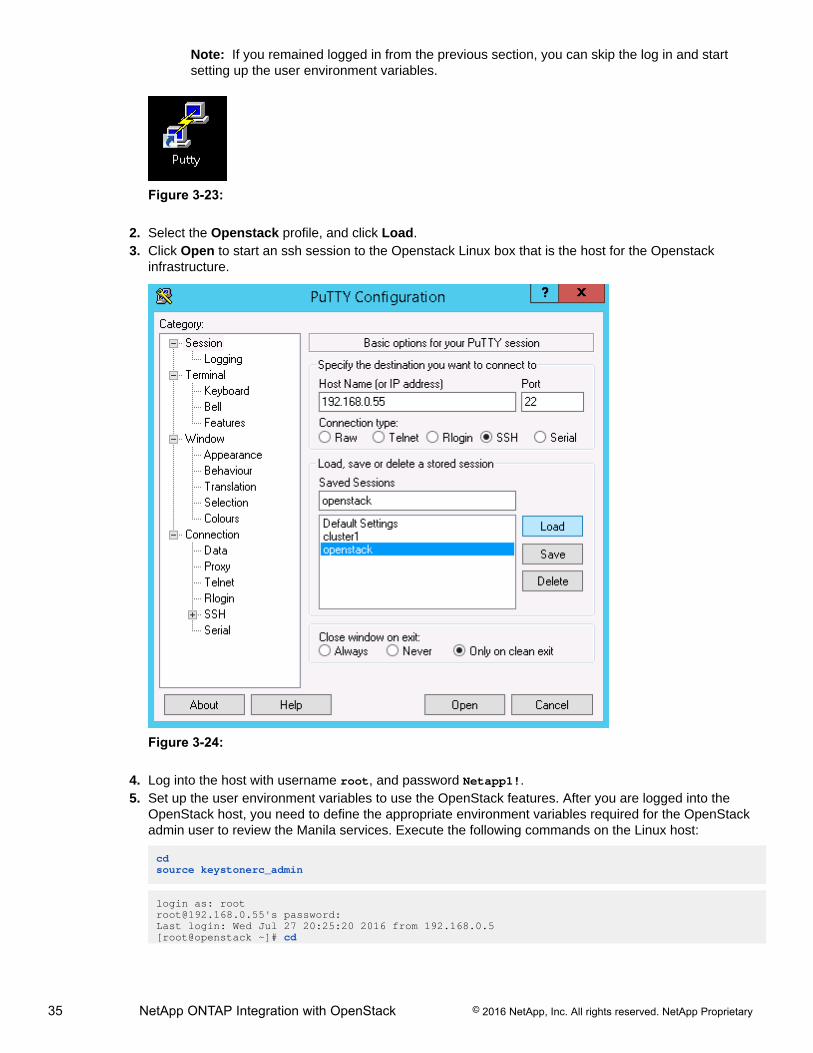
1. Double click the PuTTy icon on the desktop to open the window that provides you with the profile to loginto the Red Hat host.
35 NetApp ONTAP Integration with OpenStack © 2016 NetApp, Inc. All rights reserved. NetApp Proprietary
Note: If you remained logged in from the previous section, you can skip the log in and startsetting up the user environment variables.
Figure 3-23:
2. Select the Openstack profile, and click Load.3. Click Open to start an ssh session to the Openstack Linux box that is the host for the Openstack
infrastructure.
Figure 3-24:
4. Log into the host with username root, and password Netapp1!.5. Set up the user environment variables to use the OpenStack features. After you are logged into the
OpenStack host, you need to define the appropriate environment variables required for the OpenStackadmin user to review the Manila services. Execute the following commands on the Linux host:
cdsource keystonerc_admin
login as: [email protected]'s password:Last login: Wed Jul 27 20:25:20 2016 from 192.168.0.5[root@openstack ~]# cd
36 NetApp ONTAP Integration with OpenStack © 2016 NetApp, Inc. All rights reserved. NetApp Proprietary
[root@openstack ~]# source keystonerc_admin[root@openstack ~(keystone_admin)]#
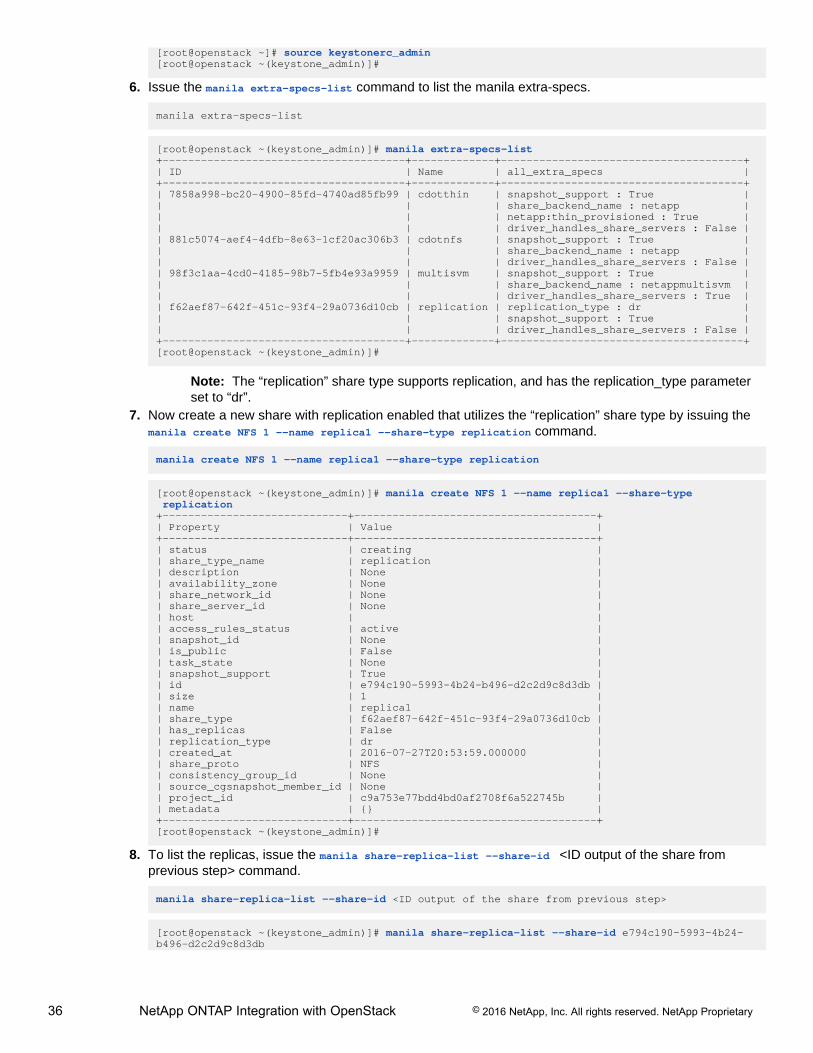
6. Issue the manila extra-specs-list command to list the manila extra-specs.
manila extra-specs-list
[root@openstack ~(keystone_admin)]# manila extra-specs-list+--------------------------------------+-------------+--------------------------------------+| ID | Name | all_extra_specs |+--------------------------------------+-------------+--------------------------------------+| 7858a998-bc20-4900-85fd-4740ad85fb99 | cdotthin | snapshot_support : True || | | share_backend_name : netapp || | | netapp:thin_provisioned : True || | | driver_handles_share_servers : False || 881c5074-aef4-4dfb-8e63-1cf20ac306b3 | cdotnfs | snapshot_support : True || | | share_backend_name : netapp || | | driver_handles_share_servers : False || 98f3c1aa-4cd0-4185-98b7-5fb4e93a9959 | multisvm | snapshot_support : True || | | share_backend_name : netappmultisvm || | | driver_handles_share_servers : True || f62aef87-642f-451c-93f4-29a0736d10cb | replication | replication_type : dr || | | snapshot_support : True || | | driver_handles_share_servers : False |+--------------------------------------+-------------+--------------------------------------+[root@openstack ~(keystone_admin)]#
Note: The “replication” share type supports replication, and has the replication_type parameterset to “dr”.
7. Now create a new share with replication enabled that utilizes the “replication” share type by issuing themanila create NFS 1 --name replica1 --share-type replication command.
manila create NFS 1 --name replica1 --share-type replication
[root@openstack ~(keystone_admin)]# manila create NFS 1 --name replica1 --share-type replication+-----------------------------+--------------------------------------+| Property | Value |+-----------------------------+--------------------------------------+| status | creating || share_type_name | replication || description | None || availability_zone | None || share_network_id | None || share_server_id | None || host | || access_rules_status | active || snapshot_id | None || is_public | False || task_state | None || snapshot_support | True || id | e794c190-5993-4b24-b496-d2c2d9c8d3db || size | 1 || name | replica1 || share_type | f62aef87-642f-451c-93f4-29a0736d10cb || has_replicas | False || replication_type | dr || created_at | 2016-07-27T20:53:59.000000 || share_proto | NFS || consistency_group_id | None || source_cgsnapshot_member_id | None || project_id | c9a753e77bdd4bd0af2708f6a522745b || metadata | {} |+-----------------------------+--------------------------------------+[root@openstack ~(keystone_admin)]#
8. To list the replicas, issue the manila share-replica-list --share-id <ID output of the share fromprevious step> command.
manila share-replica-list --share-id <ID output of the share from previous step>
[root@openstack ~(keystone_admin)]# manila share-replica-list --share-id e794c190-5993-4b24-b496-d2c2d9c8d3db
37 NetApp ONTAP Integration with OpenStack © 2016 NetApp, Inc. All rights reserved. NetApp Proprietary
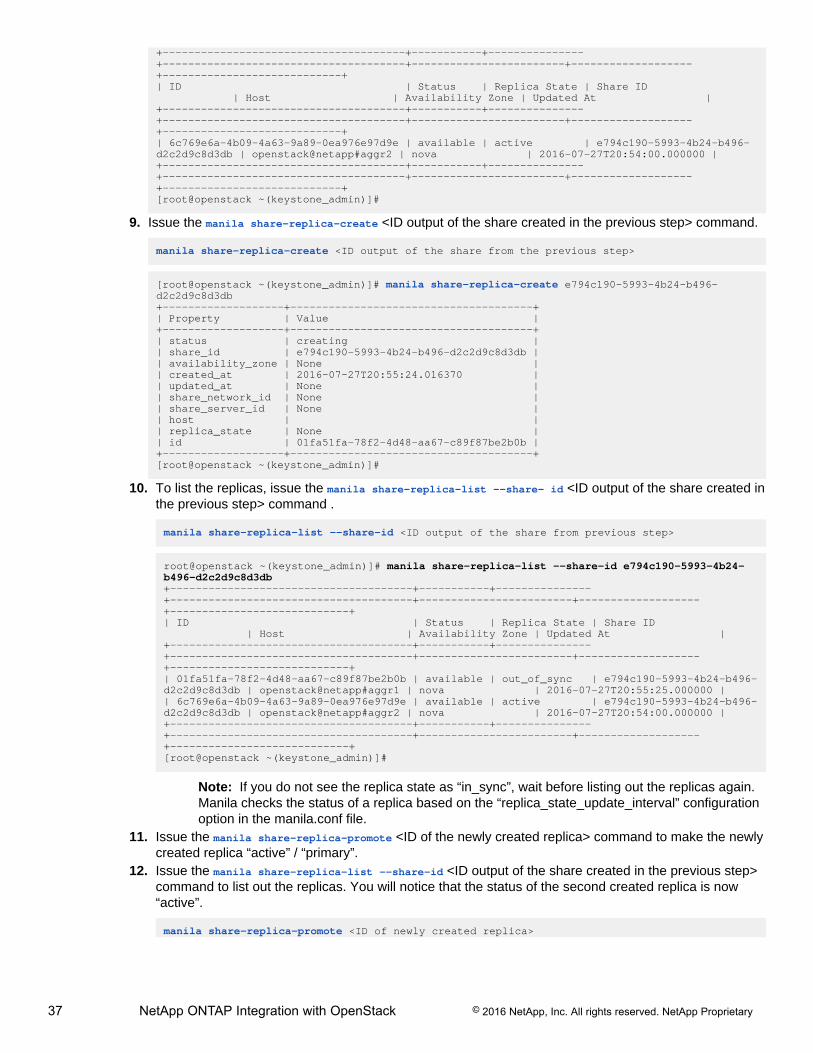
+--------------------------------------+-----------+---------------+--------------------------------------+------------------------+-------------------+----------------------------+| ID | Status | Replica State | Share ID | Host | Availability Zone | Updated At |+--------------------------------------+-----------+---------------+--------------------------------------+------------------------+-------------------+----------------------------+| 6c769e6a-4b09-4a63-9a89-0ea976e97d9e | available | active | e794c190-5993-4b24-b496-d2c2d9c8d3db | openstack@netapp#aggr2 | nova | 2016-07-27T20:54:00.000000 |+--------------------------------------+-----------+---------------+--------------------------------------+------------------------+-------------------+----------------------------+[root@openstack ~(keystone_admin)]#
9. Issue the manila share-replica-create <ID output of the share created in the previous step> command.
manila share-replica-create <ID output of the share from the previous step>
[root@openstack ~(keystone_admin)]# manila share-replica-create e794c190-5993-4b24-b496-d2c2d9c8d3db+-------------------+--------------------------------------+| Property | Value |+-------------------+--------------------------------------+| status | creating || share_id | e794c190-5993-4b24-b496-d2c2d9c8d3db || availability_zone | None || created_at | 2016-07-27T20:55:24.016370 || updated_at | None || share_network_id | None || share_server_id | None || host | || replica_state | None || id | 01fa51fa-78f2-4d48-aa67-c89f87be2b0b |+-------------------+--------------------------------------+[root@openstack ~(keystone_admin)]#
10. To list the replicas, issue the manila share-replica-list --share- id <ID output of the share created inthe previous step> command .
manila share-replica-list --share-id <ID output of the share from previous step>
root@openstack ~(keystone_admin)]# manila share-replica-list --share-id e794c190-5993-4b24-b496-d2c2d9c8d3db+--------------------------------------+-----------+---------------+--------------------------------------+------------------------+-------------------+----------------------------+| ID | Status | Replica State | Share ID | Host | Availability Zone | Updated At |+--------------------------------------+-----------+---------------+--------------------------------------+------------------------+-------------------+----------------------------+| 01fa51fa-78f2-4d48-aa67-c89f87be2b0b | available | out_of_sync | e794c190-5993-4b24-b496-d2c2d9c8d3db | openstack@netapp#aggr1 | nova | 2016-07-27T20:55:25.000000 || 6c769e6a-4b09-4a63-9a89-0ea976e97d9e | available | active | e794c190-5993-4b24-b496-d2c2d9c8d3db | openstack@netapp#aggr2 | nova | 2016-07-27T20:54:00.000000 |+--------------------------------------+-----------+---------------+--------------------------------------+------------------------+-------------------+----------------------------+[root@openstack ~(keystone_admin)]#
Note: If you do not see the replica state as “in_sync”, wait before listing out the replicas again.Manila checks the status of a replica based on the “replica_state_update_interval” configurationoption in the manila.conf file.
11. Issue the manila share-replica-promote <ID of the newly created replica> command to make the newlycreated replica “active” / “primary”.
12. Issue the manila share-replica-list --share-id <ID output of the share created in the previous step>command to list out the replicas. You will notice that the status of the second created replica is now“active”.
manila share-replica-promote <ID of newly created replica>
38 NetApp ONTAP Integration with OpenStack © 2016 NetApp, Inc. All rights reserved. NetApp Proprietary
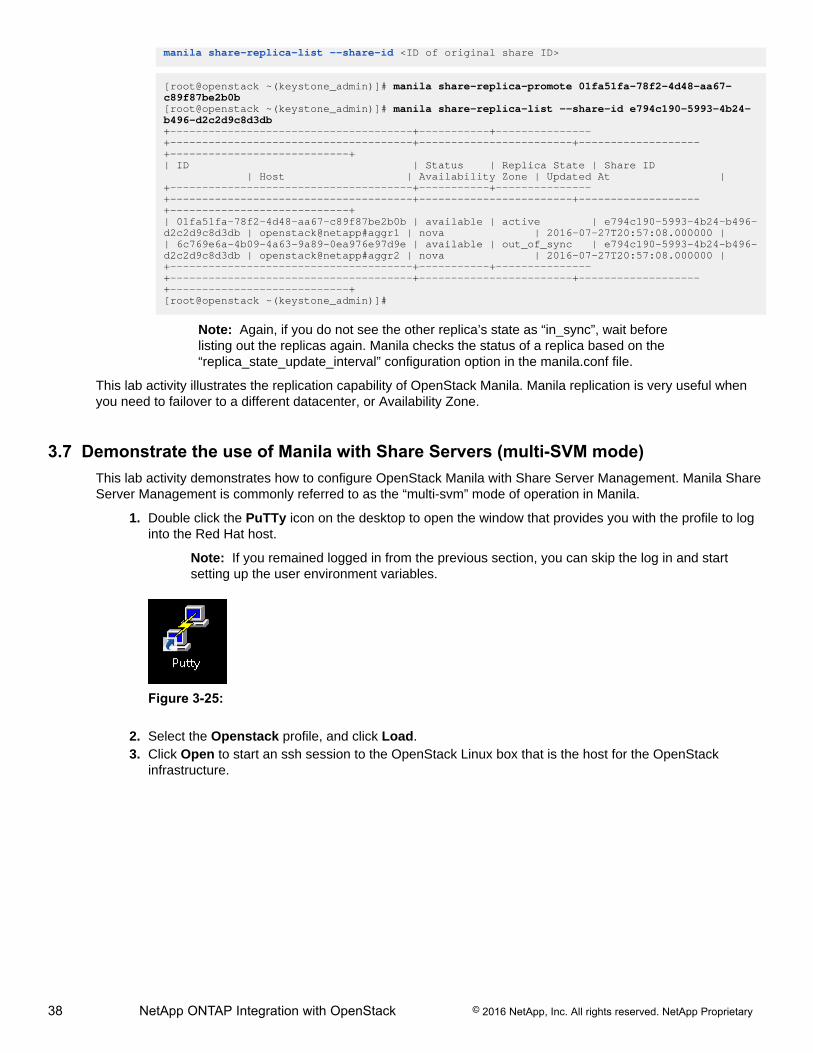
manila share-replica-list --share-id <ID of original share ID>
[root@openstack ~(keystone_admin)]# manila share-replica-promote 01fa51fa-78f2-4d48-aa67-c89f87be2b0b[root@openstack ~(keystone_admin)]# manila share-replica-list --share-id e794c190-5993-4b24-b496-d2c2d9c8d3db+--------------------------------------+-----------+---------------+--------------------------------------+------------------------+-------------------+----------------------------+| ID | Status | Replica State | Share ID | Host | Availability Zone | Updated At |+--------------------------------------+-----------+---------------+--------------------------------------+------------------------+-------------------+----------------------------+| 01fa51fa-78f2-4d48-aa67-c89f87be2b0b | available | active | e794c190-5993-4b24-b496-d2c2d9c8d3db | openstack@netapp#aggr1 | nova | 2016-07-27T20:57:08.000000 || 6c769e6a-4b09-4a63-9a89-0ea976e97d9e | available | out_of_sync | e794c190-5993-4b24-b496-d2c2d9c8d3db | openstack@netapp#aggr2 | nova | 2016-07-27T20:57:08.000000 |+--------------------------------------+-----------+---------------+--------------------------------------+------------------------+-------------------+----------------------------+[root@openstack ~(keystone_admin)]#
Note: Again, if you do not see the other replica’s state as “in_sync”, wait beforelisting out the replicas again. Manila checks the status of a replica based on the“replica_state_update_interval” configuration option in the manila.conf file.
This lab activity illustrates the replication capability of OpenStack Manila. Manila replication is very useful whenyou need to failover to a different datacenter, or Availability Zone.
3.7 Demonstrate the use of Manila with Share Servers (multi-SVM mode)This lab activity demonstrates how to configure OpenStack Manila with Share Server Management. Manila ShareServer Management is commonly referred to as the “multi-svm” mode of operation in Manila.
1. Double click the PuTTy icon on the desktop to open the window that provides you with the profile to loginto the Red Hat host.
Note: If you remained logged in from the previous section, you can skip the log in and startsetting up the user environment variables.
Figure 3-25:
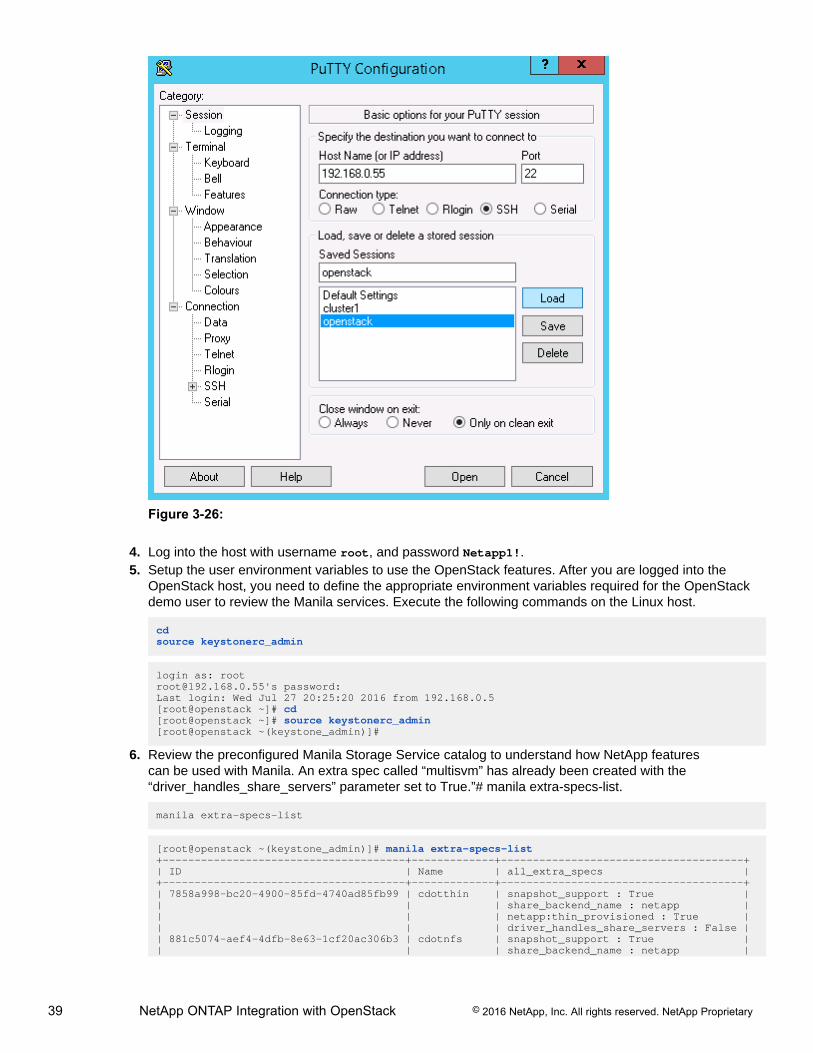
2. Select the Openstack profile, and click Load.3. Click Open to start an ssh session to the OpenStack Linux box that is the host for the OpenStack
infrastructure.
39 NetApp ONTAP Integration with OpenStack © 2016 NetApp, Inc. All rights reserved. NetApp Proprietary
Figure 3-26:
4. Log into the host with username root, and password Netapp1!.5. Setup the user environment variables to use the OpenStack features. After you are logged into the
OpenStack host, you need to define the appropriate environment variables required for the OpenStackdemo user to review the Manila services. Execute the following commands on the Linux host.
cdsource keystonerc_admin
login as: [email protected]'s password:Last login: Wed Jul 27 20:25:20 2016 from 192.168.0.5[root@openstack ~]# cd[root@openstack ~]# source keystonerc_admin[root@openstack ~(keystone_admin)]#
6. Review the preconfigured Manila Storage Service catalog to understand how NetApp featurescan be used with Manila. An extra spec called “multisvm” has already been created with the“driver_handles_share_servers” parameter set to True.”# manila extra-specs-list.
manila extra-specs-list
[root@openstack ~(keystone_admin)]# manila extra-specs-list+--------------------------------------+-------------+--------------------------------------+| ID | Name | all_extra_specs |+--------------------------------------+-------------+--------------------------------------+| 7858a998-bc20-4900-85fd-4740ad85fb99 | cdotthin | snapshot_support : True || | | share_backend_name : netapp || | | netapp:thin_provisioned : True || | | driver_handles_share_servers : False || 881c5074-aef4-4dfb-8e63-1cf20ac306b3 | cdotnfs | snapshot_support : True || | | share_backend_name : netapp |
40 NetApp ONTAP Integration with OpenStack © 2016 NetApp, Inc. All rights reserved. NetApp Proprietary
| | | driver_handles_share_servers : False || 98f3c1aa-4cd0-4185-98b7-5fb4e93a9959 | multisvm | snapshot_support : True || | | share_backend_name : netappmultisvm || | | driver_handles_share_servers : True || f62aef87-642f-451c-93f4-29a0736d10cb | replication | replication_type : dr || | | snapshot_support : True || | | driver_handles_share_servers : False |+--------------------------------------+-------------+--------------------------------------+[root@openstack ~(keystone_admin)]#
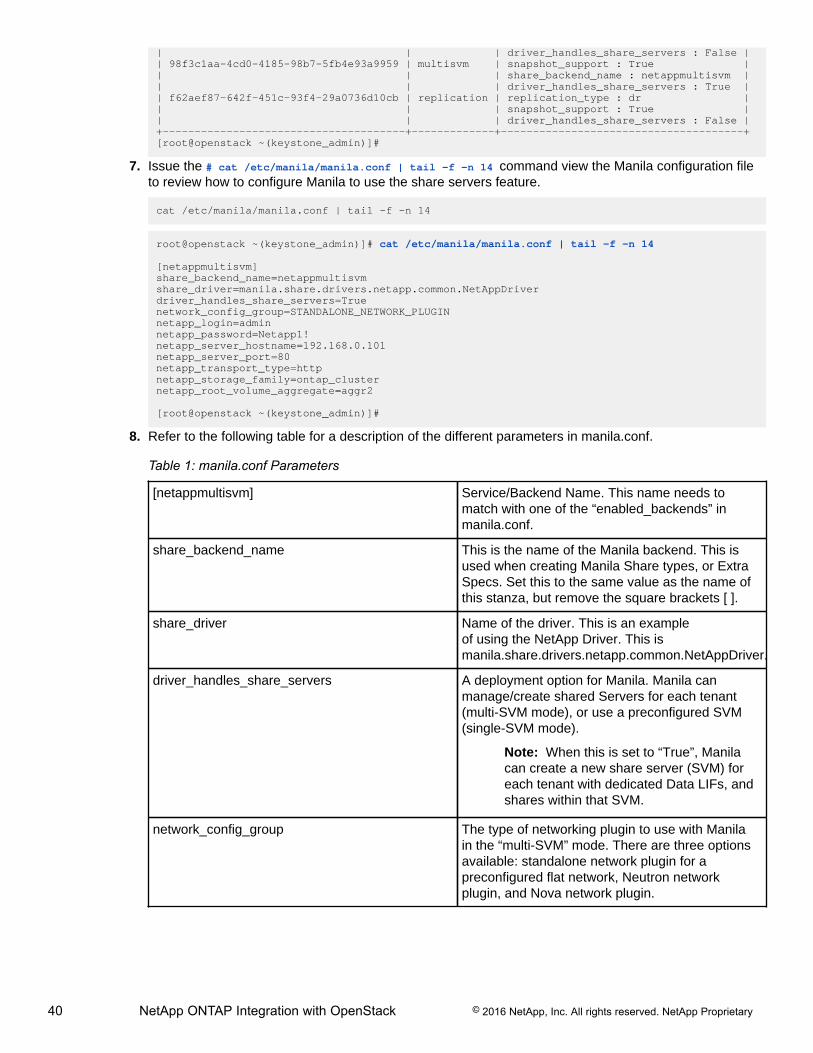
7. Issue the # cat /etc/manila/manila.conf | tail –f –n 14 command view the Manila configuration fileto review how to configure Manila to use the share servers feature.
cat /etc/manila/manila.conf | tail -f -n 14
root@openstack ~(keystone_admin)]# cat /etc/manila/manila.conf | tail -f -n 14
[netappmultisvm]share_backend_name=netappmultisvmshare_driver=manila.share.drivers.netapp.common.NetAppDriverdriver_handles_share_servers=Truenetwork_config_group=STANDALONE_NETWORK_PLUGINnetapp_login=adminnetapp_password=Netapp1!netapp_server_hostname=192.168.0.101netapp_server_port=80netapp_transport_type=httpnetapp_storage_family=ontap_clusternetapp_root_volume_aggregate=aggr2
[root@openstack ~(keystone_admin)]#
8. Refer to the following table for a description of the different parameters in manila.conf.
Table 1: manila.conf Parameters
[netappmultisvm] Service/Backend Name. This name needs tomatch with one of the “enabled_backends” inmanila.conf.
share_backend_name This is the name of the Manila backend. This isused when creating Manila Share types, or ExtraSpecs. Set this to the same value as the name ofthis stanza, but remove the square brackets [ ].
share_driver Name of the driver. This is an exampleof using the NetApp Driver. This ismanila.share.drivers.netapp.common.NetAppDriver.
driver_handles_share_servers A deployment option for Manila. Manila canmanage/create shared Servers for each tenant(multi-SVM mode), or use a preconfigured SVM(single-SVM mode).
Note: When this is set to “True”, Manilacan create a new share server (SVM) foreach tenant with dedicated Data LIFs, andshares within that SVM.
network_config_group The type of networking plugin to use with Manilain the “multi-SVM” mode. There are three optionsavailable: standalone network plugin for apreconfigured flat network, Neutron networkplugin, and Nova network plugin.

41 NetApp ONTAP Integration with OpenStack © 2016 NetApp, Inc. All rights reserved. NetApp Proprietary
netapp_login Login to use. This needs to be a cluster-scopedlogin with appropriate privileges. This lab uses theadmin account for the cluster.
netapp_password The password to the NetApp cluster for the login.
netapp_server_hostname This is the name, or IP address, of the Cluster IPaddress for the clustered Data ONTAP cluster.
netapp_server_port The port to use for HTTP, or HTTPS, tocommunicate to the NetApp Cluster.
netapp_transport_type Transport type to use. This can be HTTP orHTTPS.
netapp_storage_family The type of Data ONTAP that is being used.Please set this to ontap_cluster.
netapp_root_volume_aggrgeate This parameter defines the aggregate that can beused for the root volume when Manila is deployedto manage Shared Servers. This can also be aregular expression
9. In order to enable this Manila backend, an “enabled_backends” parameter has been set. Issue the# cat /etc/manila/manila.conf | grep ^enabled_share_backends command to view it’s value inmanila.conf.
cat /etc/manila/manila.conf | grep ^enabled_share_backends
[root@openstack ~(keystone_admin)]# cat /etc/manila/manila.conf | grep ^enabled_share_backendsenabled_share_backends=netapp,netappreplica,netappmultisvm[root@openstack ~(keystone_admin)]#
10. Manila can operate with three networking options: standalone pre-configured networks, Neutronnetworks, and Nova networks. In order to use standalone networking, additional parameters must beset in manila.conf. In order to view the configuration, issue the # cat /etc/manila/manila.conf | tail–f –n 46 | head –n 6 command.
cat /etc/manila/manila.conf | tail -f -n 46 | head -n 6
[root@openstack ~(keystone_admin)]# cat /etc/manila/manila.conf | tail -f -n 46 | head -n 6[STANDALONE_NETWORK_PLUGIN]network_api_class=manila.network.standalone_network_plugin.StandaloneNetworkPluginstandalone_network_plugin_gateway=192.168.1.1standalone_network_plugin_mask=255.255.255.0standalone_network_plugin_allowed_ip_ranges=192.168.1.211-192.168.1.220standalone_network_plugin_ip_version=4[root@openstack ~(keystone_admin)]#
Review the following table for configuration details.
Table 2: StandAlone Network Plugin Parameters Definitions
[STANDALONE_NETWORK_PLUGIN] This value must match the name of the“network_config_group” in the service/backendstanza.
standalone_network_plugin_gateway The gateway for the pre-existing network.
standalone_network_plugin_mask The subnet mask for the pre-existing network.
standalone_network_plugin_allowed_ip_ranges The IP ranges to use for Manila share servers.These should be chosen without any IP addressconflicts.
42 NetApp ONTAP Integration with OpenStack © 2016 NetApp, Inc. All rights reserved. NetApp Proprietary
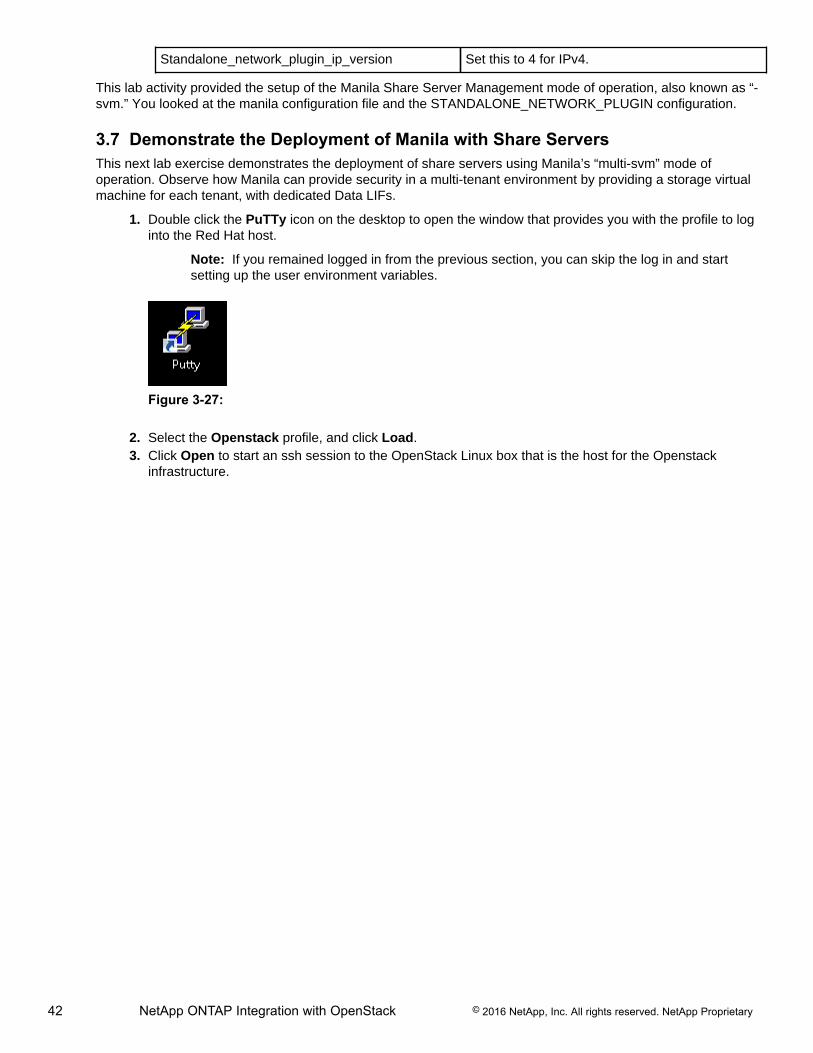
Standalone_network_plugin_ip_version Set this to 4 for IPv4.
This lab activity provided the setup of the Manila Share Server Management mode of operation, also known as “-svm.” You looked at the manila configuration file and the STANDALONE_NETWORK_PLUGIN configuration.
3.7 Demonstrate the Deployment of Manila with Share ServersThis next lab exercise demonstrates the deployment of share servers using Manila’s “multi-svm” mode ofoperation. Observe how Manila can provide security in a multi-tenant environment by providing a storage virtualmachine for each tenant, with dedicated Data LIFs.
1. Double click the PuTTy icon on the desktop to open the window that provides you with the profile to loginto the Red Hat host.
Note: If you remained logged in from the previous section, you can skip the log in and startsetting up the user environment variables.
Figure 3-27:
2. Select the Openstack profile, and click Load.3. Click Open to start an ssh session to the OpenStack Linux box that is the host for the Openstack
infrastructure.
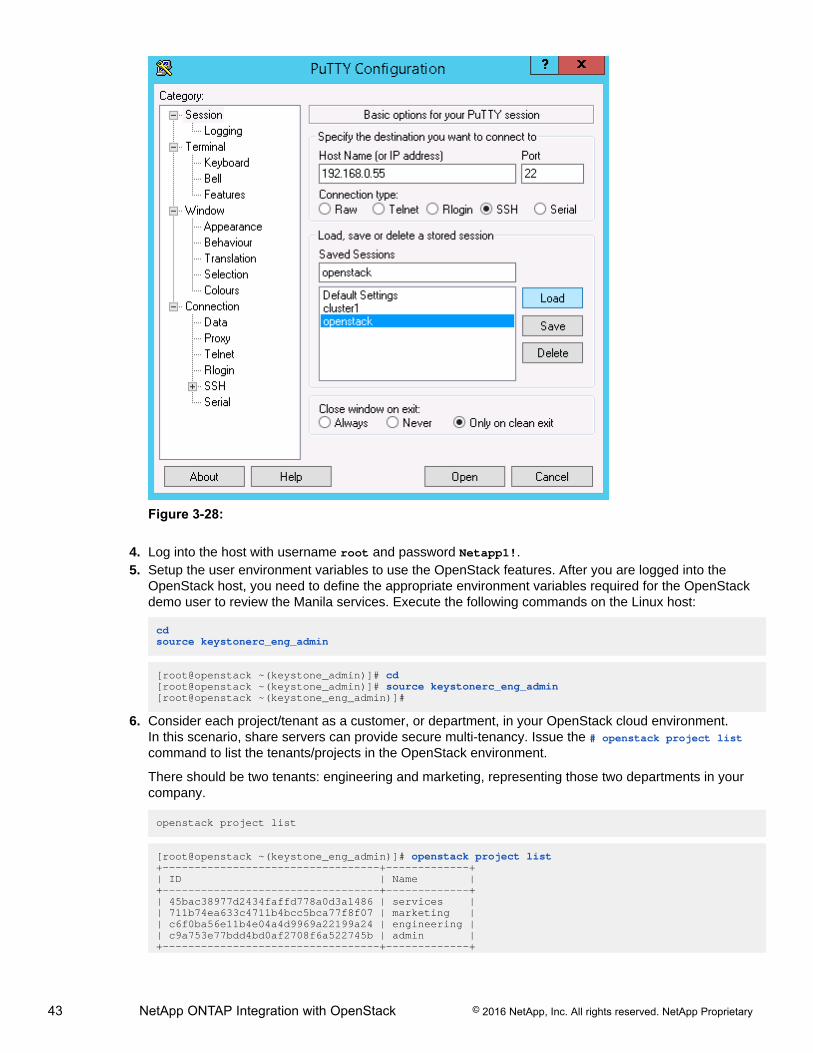
43 NetApp ONTAP Integration with OpenStack © 2016 NetApp, Inc. All rights reserved. NetApp Proprietary
Figure 3-28:
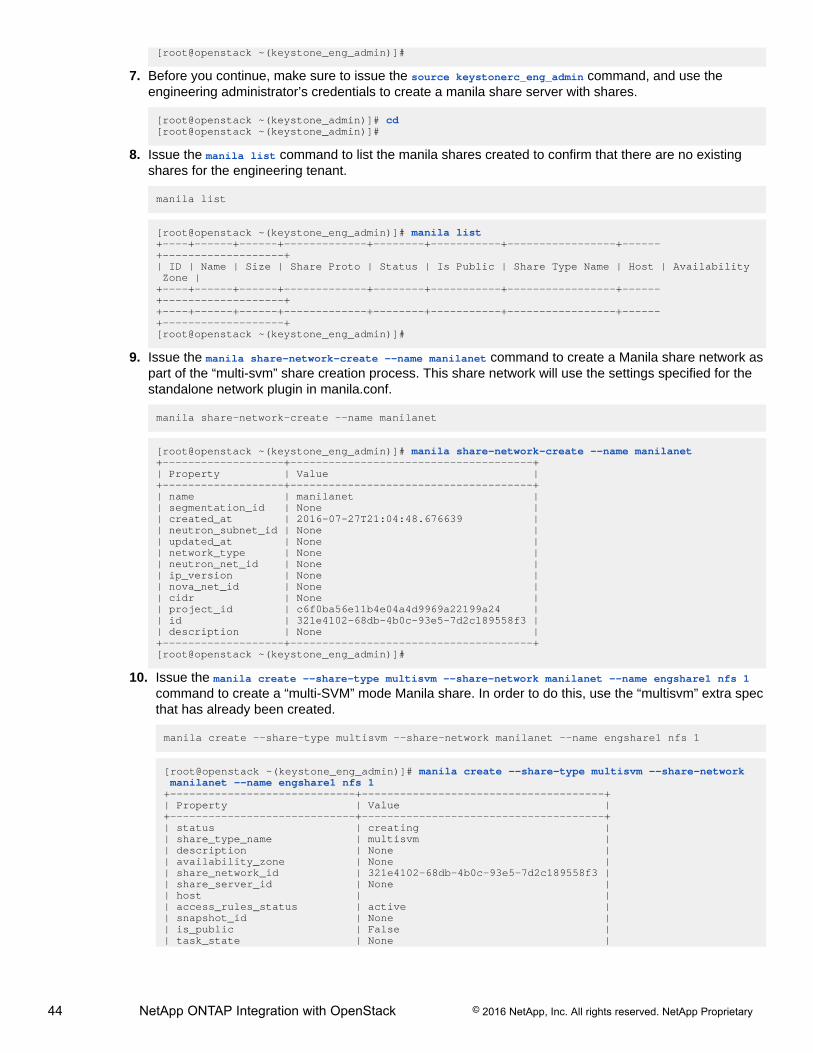
4. Log into the host with username root and password Netapp1!.5. Setup the user environment variables to use the OpenStack features. After you are logged into the
OpenStack host, you need to define the appropriate environment variables required for the OpenStackdemo user to review the Manila services. Execute the following commands on the Linux host:
cdsource keystonerc_eng_admin
[root@openstack ~(keystone_admin)]# cd[root@openstack ~(keystone_admin)]# source keystonerc_eng_admin[root@openstack ~(keystone_eng_admin)]#
6. Consider each project/tenant as a customer, or department, in your OpenStack cloud environment.In this scenario, share servers can provide secure multi-tenancy. Issue the # openstack project listcommand to list the tenants/projects in the OpenStack environment.
There should be two tenants: engineering and marketing, representing those two departments in yourcompany.
openstack project list
[root@openstack ~(keystone_eng_admin)]# openstack project list+----------------------------------+-------------+| ID | Name |+----------------------------------+-------------+| 45bac38977d2434faffd778a0d3a1486 | services || 711b74ea633c4711b4bcc5bca77f8f07 | marketing || c6f0ba56e11b4e04a4d9969a22199a24 | engineering || c9a753e77bdd4bd0af2708f6a522745b | admin |+----------------------------------+-------------+
44 NetApp ONTAP Integration with OpenStack © 2016 NetApp, Inc. All rights reserved. NetApp Proprietary
[root@openstack ~(keystone_eng_admin)]#
7. Before you continue, make sure to issue the source keystonerc_eng_admin command, and use theengineering administrator’s credentials to create a manila share server with shares.
[root@openstack ~(keystone_admin)]# cd[root@openstack ~(keystone_admin)]#
8. Issue the manila list command to list the manila shares created to confirm that there are no existingshares for the engineering tenant.
manila list
[root@openstack ~(keystone_eng_admin)]# manila list+----+------+------+-------------+--------+-----------+-----------------+------+-------------------+| ID | Name | Size | Share Proto | Status | Is Public | Share Type Name | Host | Availability Zone |+----+------+------+-------------+--------+-----------+-----------------+------+-------------------++----+------+------+-------------+--------+-----------+-----------------+------+-------------------+[root@openstack ~(keystone_eng_admin)]#
9. Issue the manila share-network-create --name manilanet command to create a Manila share network aspart of the “multi-svm” share creation process. This share network will use the settings specified for thestandalone network plugin in manila.conf.
manila share-network-create --name manilanet
[root@openstack ~(keystone_eng_admin)]# manila share-network-create --name manilanet+-------------------+--------------------------------------+| Property | Value |+-------------------+--------------------------------------+| name | manilanet || segmentation_id | None || created_at | 2016-07-27T21:04:48.676639 || neutron_subnet_id | None || updated_at | None || network_type | None || neutron_net_id | None || ip_version | None || nova_net_id | None || cidr | None || project_id | c6f0ba56e11b4e04a4d9969a22199a24 || id | 321e4102-68db-4b0c-93e5-7d2c189558f3 || description | None |+-------------------+--------------------------------------+[root@openstack ~(keystone_eng_admin)]#
10. Issue the manila create --share-type multisvm --share-network manilanet --name engshare1 nfs 1command to create a “multi-SVM” mode Manila share. In order to do this, use the “multisvm” extra specthat has already been created.
manila create --share-type multisvm --share-network manilanet --name engshare1 nfs 1
[root@openstack ~(keystone_eng_admin)]# manila create --share-type multisvm --share-network manilanet --name engshare1 nfs 1+-----------------------------+--------------------------------------+| Property | Value |+-----------------------------+--------------------------------------+| status | creating || share_type_name | multisvm || description | None || availability_zone | None || share_network_id | 321e4102-68db-4b0c-93e5-7d2c189558f3 || share_server_id | None || host | || access_rules_status | active || snapshot_id | None || is_public | False || task_state | None |
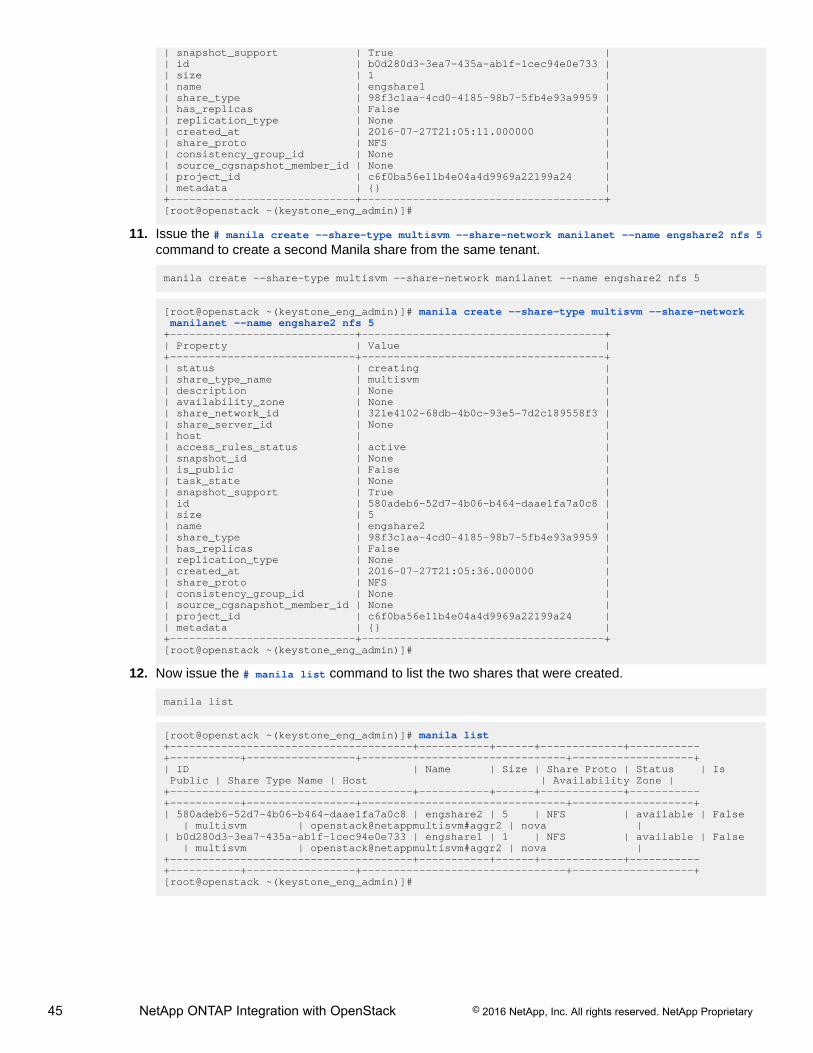
45 NetApp ONTAP Integration with OpenStack © 2016 NetApp, Inc. All rights reserved. NetApp Proprietary
| snapshot_support | True || id | b0d280d3-3ea7-435a-ab1f-1cec94e0e733 || size | 1 || name | engshare1 || share_type | 98f3c1aa-4cd0-4185-98b7-5fb4e93a9959 || has_replicas | False || replication_type | None || created_at | 2016-07-27T21:05:11.000000 || share_proto | NFS || consistency_group_id | None || source_cgsnapshot_member_id | None || project_id | c6f0ba56e11b4e04a4d9969a22199a24 || metadata | {} |+-----------------------------+--------------------------------------+[root@openstack ~(keystone_eng_admin)]#
11. Issue the # manila create --share-type multisvm --share-network manilanet --name engshare2 nfs 5command to create a second Manila share from the same tenant.
manila create --share-type multisvm --share-network manilanet --name engshare2 nfs 5
[root@openstack ~(keystone_eng_admin)]# manila create --share-type multisvm --share-network manilanet --name engshare2 nfs 5+-----------------------------+--------------------------------------+| Property | Value |+-----------------------------+--------------------------------------+| status | creating || share_type_name | multisvm || description | None || availability_zone | None || share_network_id | 321e4102-68db-4b0c-93e5-7d2c189558f3 || share_server_id | None || host | || access_rules_status | active || snapshot_id | None || is_public | False || task_state | None || snapshot_support | True || id | 580adeb6-52d7-4b06-b464-daae1fa7a0c8 || size | 5 || name | engshare2 || share_type | 98f3c1aa-4cd0-4185-98b7-5fb4e93a9959 || has_replicas | False || replication_type | None || created_at | 2016-07-27T21:05:36.000000 || share_proto | NFS || consistency_group_id | None || source_cgsnapshot_member_id | None || project_id | c6f0ba56e11b4e04a4d9969a22199a24 || metadata | {} |+-----------------------------+--------------------------------------+[root@openstack ~(keystone_eng_admin)]#
12. Now issue the # manila list command to list the two shares that were created.
manila list
[root@openstack ~(keystone_eng_admin)]# manila list+--------------------------------------+-----------+------+-------------+-----------+-----------+-----------------+--------------------------------+-------------------+| ID | Name | Size | Share Proto | Status | Is Public | Share Type Name | Host | Availability Zone |+--------------------------------------+-----------+------+-------------+-----------+-----------+-----------------+--------------------------------+-------------------+| 580adeb6-52d7-4b06-b464-daae1fa7a0c8 | engshare2 | 5 | NFS | available | False | multisvm | openstack@netappmultisvm#aggr2 | nova || b0d280d3-3ea7-435a-ab1f-1cec94e0e733 | engshare1 | 1 | NFS | available | False | multisvm | openstack@netappmultisvm#aggr2 | nova |+--------------------------------------+-----------+------+-------------+-----------+-----------+-----------------+--------------------------------+-------------------+[root@openstack ~(keystone_eng_admin)]#
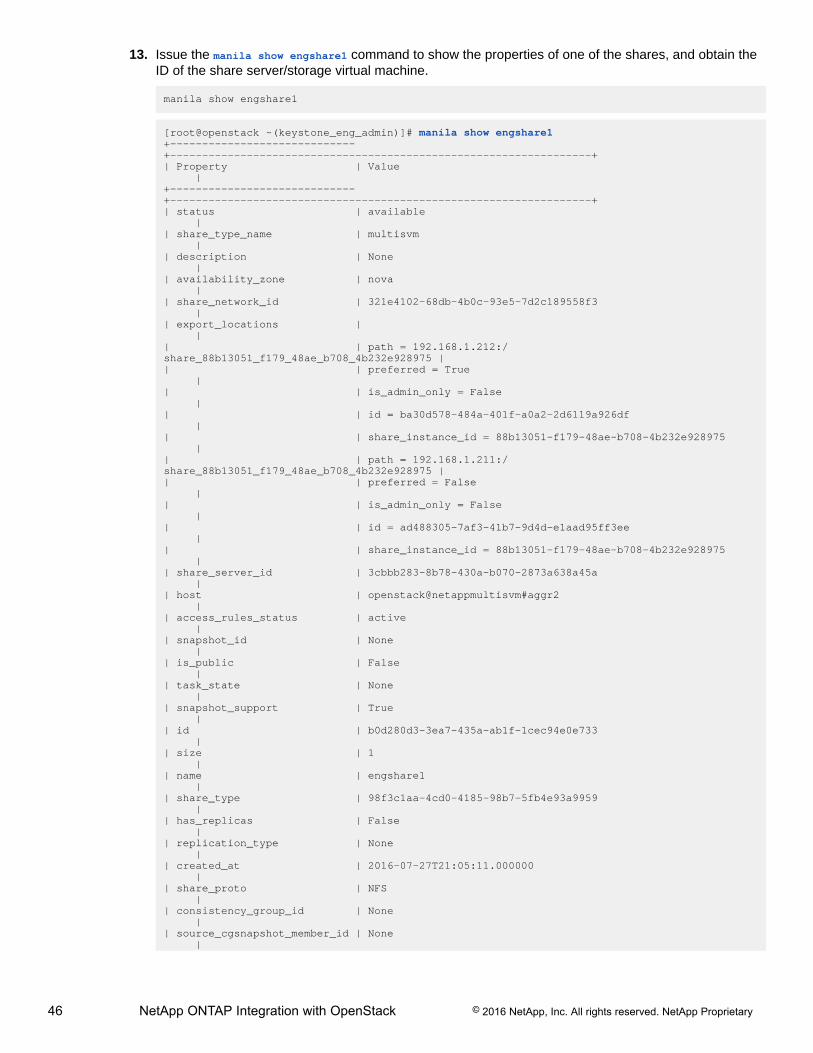
46 NetApp ONTAP Integration with OpenStack © 2016 NetApp, Inc. All rights reserved. NetApp Proprietary
13. Issue the manila show engshare1 command to show the properties of one of the shares, and obtain theID of the share server/storage virtual machine.
manila show engshare1
[root@openstack ~(keystone_eng_admin)]# manila show engshare1+-----------------------------+------------------------------------------------------------------+| Property | Value |+-----------------------------+------------------------------------------------------------------+| status | available || share_type_name | multisvm || description | None || availability_zone | nova || share_network_id | 321e4102-68db-4b0c-93e5-7d2c189558f3 || export_locations | || | path = 192.168.1.212:/share_88b13051_f179_48ae_b708_4b232e928975 || | preferred = True || | is_admin_only = False || | id = ba30d578-484a-401f-a0a2-2d6119a926df || | share_instance_id = 88b13051-f179-48ae-b708-4b232e928975 || | path = 192.168.1.211:/share_88b13051_f179_48ae_b708_4b232e928975 || | preferred = False || | is_admin_only = False || | id = ad488305-7af3-41b7-9d4d-e1aad95ff3ee || | share_instance_id = 88b13051-f179-48ae-b708-4b232e928975 || share_server_id | 3cbbb283-8b78-430a-b070-2873a638a45a || host | openstack@netappmultisvm#aggr2 || access_rules_status | active || snapshot_id | None || is_public | False || task_state | None || snapshot_support | True || id | b0d280d3-3ea7-435a-ab1f-1cec94e0e733 || size | 1 || name | engshare1 || share_type | 98f3c1aa-4cd0-4185-98b7-5fb4e93a9959 || has_replicas | False || replication_type | None || created_at | 2016-07-27T21:05:11.000000 || share_proto | NFS || consistency_group_id | None || source_cgsnapshot_member_id | None |
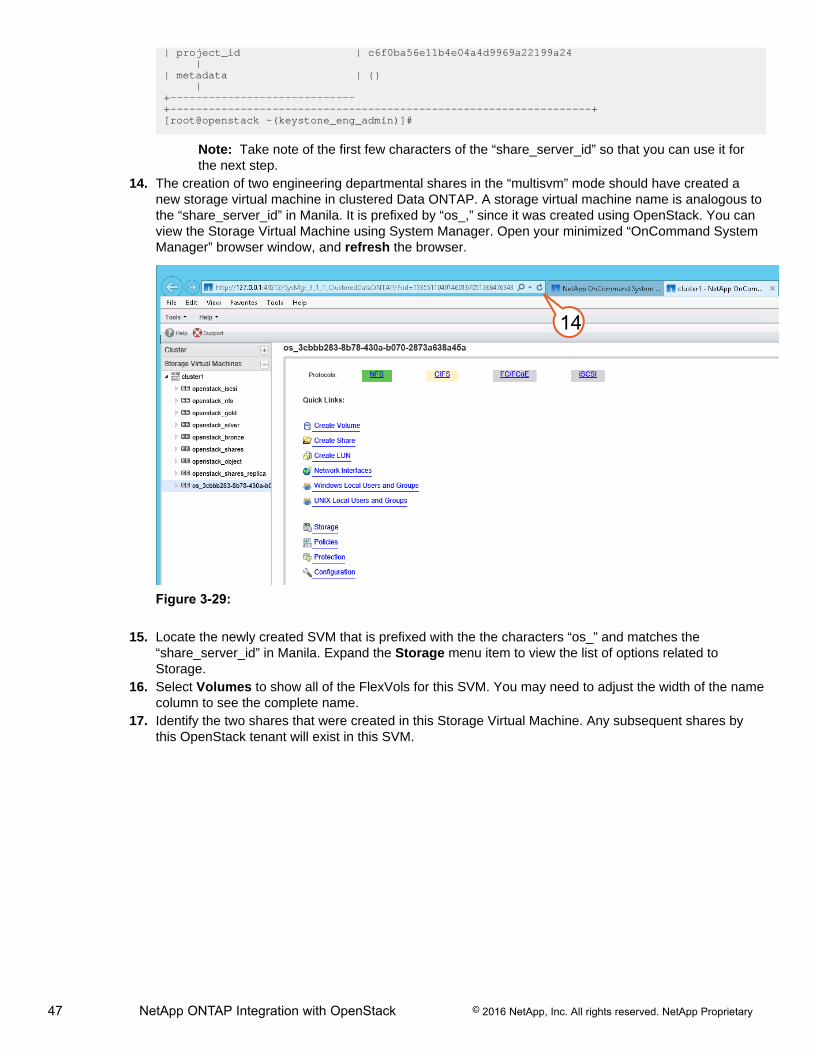
47 NetApp ONTAP Integration with OpenStack © 2016 NetApp, Inc. All rights reserved. NetApp Proprietary
| project_id | c6f0ba56e11b4e04a4d9969a22199a24 || metadata | {} |+-----------------------------+------------------------------------------------------------------+[root@openstack ~(keystone_eng_admin)]#
Note: Take note of the first few characters of the “share_server_id” so that you can use it forthe next step.
14. The creation of two engineering departmental shares in the “multisvm” mode should have created anew storage virtual machine in clustered Data ONTAP. A storage virtual machine name is analogous tothe “share_server_id” in Manila. It is prefixed by “os_,” since it was created using OpenStack. You canview the Storage Virtual Machine using System Manager. Open your minimized “OnCommand SystemManager” browser window, and refresh the browser.
14
Figure 3-29:
15. Locate the newly created SVM that is prefixed with the the characters “os_” and matches the“share_server_id” in Manila. Expand the Storage menu item to view the list of options related toStorage.
16. Select Volumes to show all of the FlexVols for this SVM. You may need to adjust the width of the namecolumn to see the complete name.
17. Identify the two shares that were created in this Storage Virtual Machine. Any subsequent shares bythis OpenStack tenant will exist in this SVM.
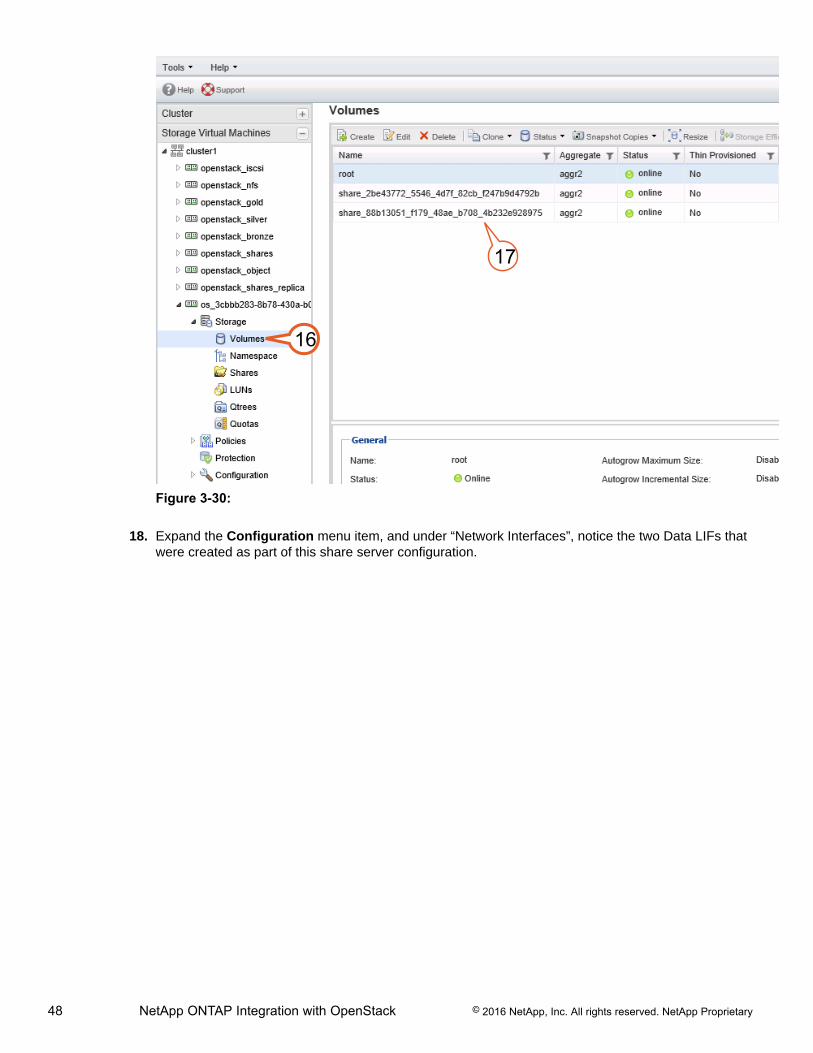
48 NetApp ONTAP Integration with OpenStack © 2016 NetApp, Inc. All rights reserved. NetApp Proprietary
16
17
Figure 3-30:
18. Expand the Configuration menu item, and under “Network Interfaces”, notice the two Data LIFs thatwere created as part of this share server configuration.
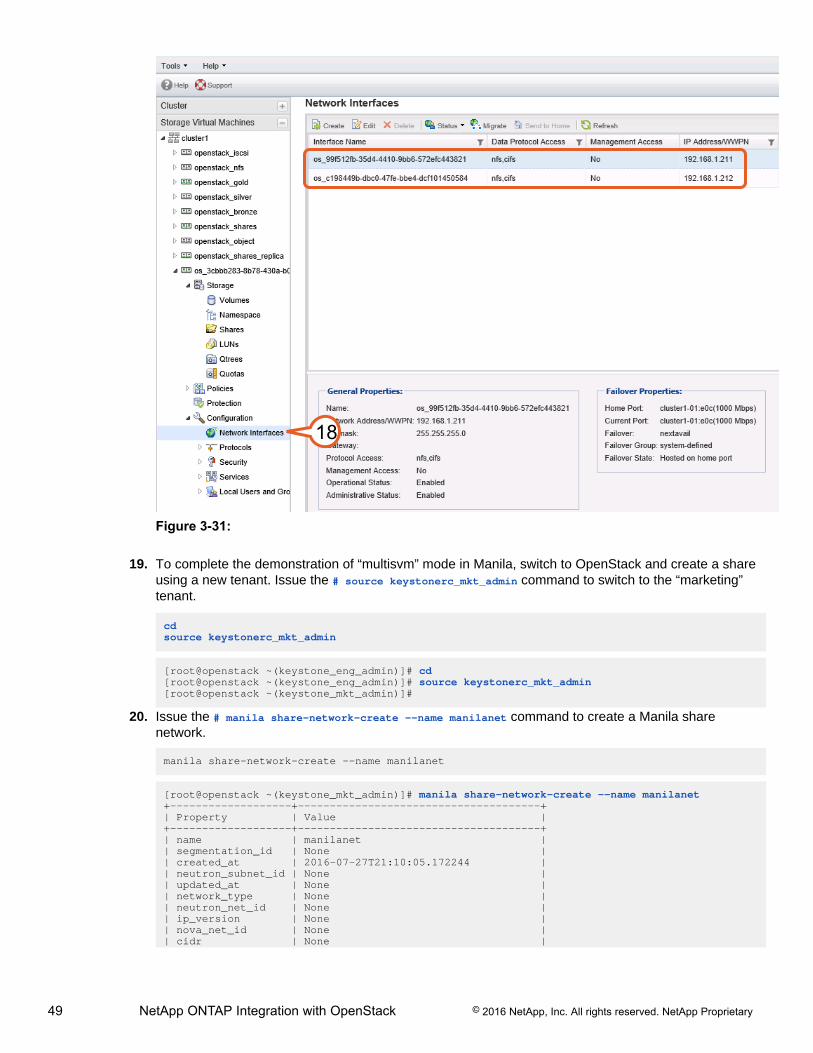
49 NetApp ONTAP Integration with OpenStack © 2016 NetApp, Inc. All rights reserved. NetApp Proprietary
18
Figure 3-31:
19. To complete the demonstration of “multisvm” mode in Manila, switch to OpenStack and create a shareusing a new tenant. Issue the # source keystonerc_mkt_admin command to switch to the “marketing”tenant.
cdsource keystonerc_mkt_admin
[root@openstack ~(keystone_eng_admin)]# cd[root@openstack ~(keystone_eng_admin)]# source keystonerc_mkt_admin[root@openstack ~(keystone_mkt_admin)]#
20. Issue the # manila share-network-create --name manilanet command to create a Manila sharenetwork.
manila share-network-create --name manilanet
[root@openstack ~(keystone_mkt_admin)]# manila share-network-create --name manilanet+-------------------+--------------------------------------+| Property | Value |+-------------------+--------------------------------------+| name | manilanet || segmentation_id | None || created_at | 2016-07-27T21:10:05.172244 || neutron_subnet_id | None || updated_at | None || network_type | None || neutron_net_id | None || ip_version | None || nova_net_id | None || cidr | None |
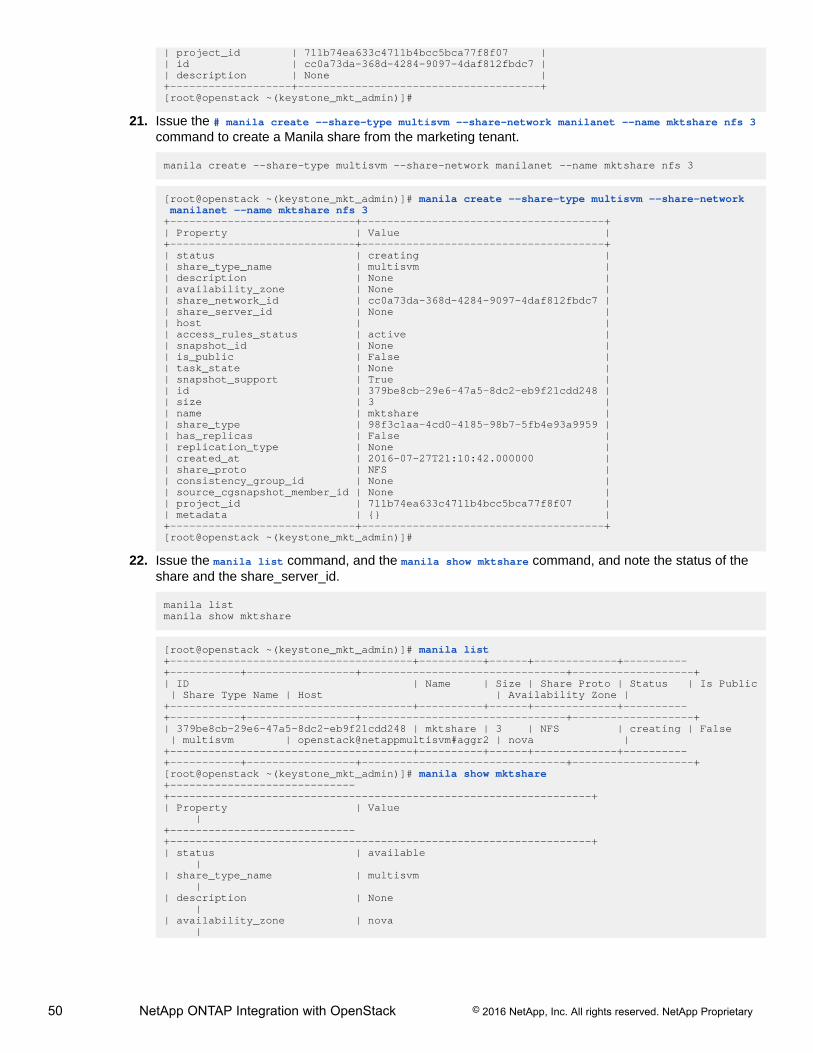
50 NetApp ONTAP Integration with OpenStack © 2016 NetApp, Inc. All rights reserved. NetApp Proprietary
| project_id | 711b74ea633c4711b4bcc5bca77f8f07 || id | cc0a73da-368d-4284-9097-4daf812fbdc7 || description | None |+-------------------+--------------------------------------+[root@openstack ~(keystone_mkt_admin)]#
21. Issue the # manila create --share-type multisvm --share-network manilanet --name mktshare nfs 3command to create a Manila share from the marketing tenant.
manila create --share-type multisvm --share-network manilanet --name mktshare nfs 3
[root@openstack ~(keystone_mkt_admin)]# manila create --share-type multisvm --share-network manilanet --name mktshare nfs 3+-----------------------------+--------------------------------------+| Property | Value |+-----------------------------+--------------------------------------+| status | creating || share_type_name | multisvm || description | None || availability_zone | None || share_network_id | cc0a73da-368d-4284-9097-4daf812fbdc7 || share_server_id | None || host | || access_rules_status | active || snapshot_id | None || is_public | False || task_state | None || snapshot_support | True || id | 379be8cb-29e6-47a5-8dc2-eb9f21cdd248 || size | 3 || name | mktshare || share_type | 98f3c1aa-4cd0-4185-98b7-5fb4e93a9959 || has_replicas | False || replication_type | None || created_at | 2016-07-27T21:10:42.000000 || share_proto | NFS || consistency_group_id | None || source_cgsnapshot_member_id | None || project_id | 711b74ea633c4711b4bcc5bca77f8f07 || metadata | {} |+-----------------------------+--------------------------------------+[root@openstack ~(keystone_mkt_admin)]#
22. Issue the manila list command, and the manila show mktshare command, and note the status of theshare and the share_server_id.
manila listmanila show mktshare
[root@openstack ~(keystone_mkt_admin)]# manila list+--------------------------------------+----------+------+-------------+----------+-----------+-----------------+--------------------------------+-------------------+| ID | Name | Size | Share Proto | Status | Is Public | Share Type Name | Host | Availability Zone |+--------------------------------------+----------+------+-------------+----------+-----------+-----------------+--------------------------------+-------------------+| 379be8cb-29e6-47a5-8dc2-eb9f21cdd248 | mktshare | 3 | NFS | creating | False | multisvm | openstack@netappmultisvm#aggr2 | nova |+--------------------------------------+----------+------+-------------+----------+-----------+-----------------+--------------------------------+-------------------+[root@openstack ~(keystone_mkt_admin)]# manila show mktshare+-----------------------------+------------------------------------------------------------------+| Property | Value |+-----------------------------+------------------------------------------------------------------+| status | available || share_type_name | multisvm || description | None || availability_zone | nova |
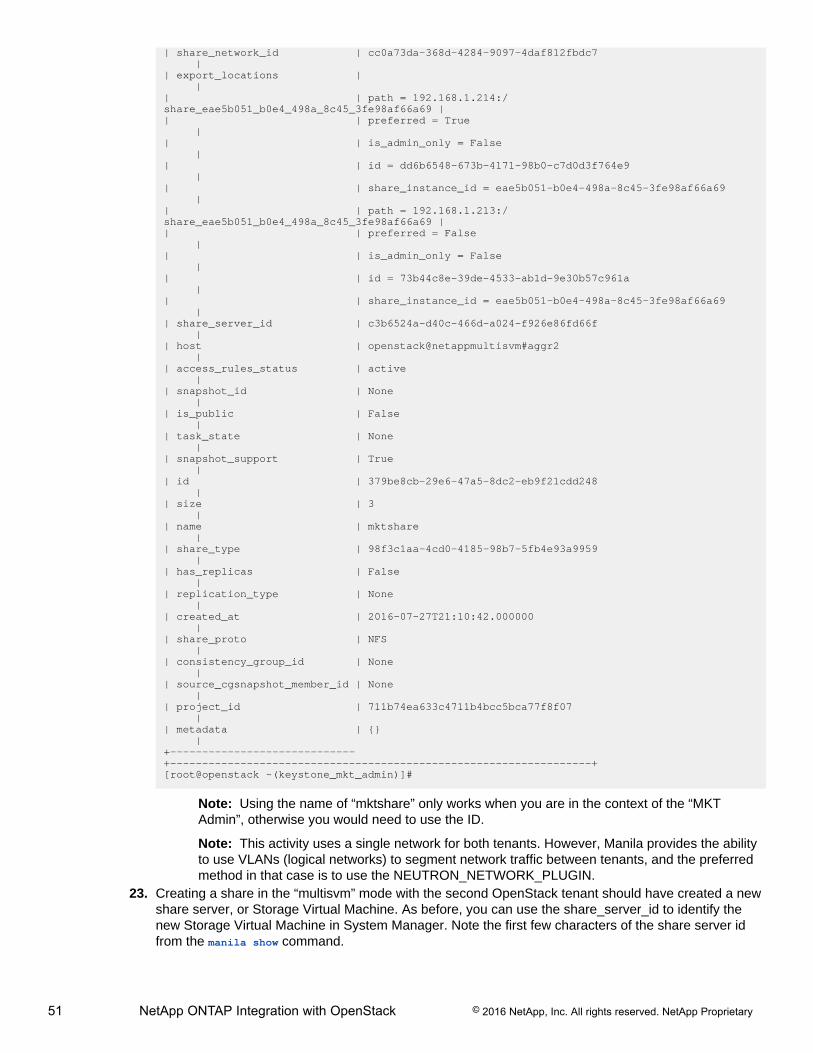
51 NetApp ONTAP Integration with OpenStack © 2016 NetApp, Inc. All rights reserved. NetApp Proprietary
| share_network_id | cc0a73da-368d-4284-9097-4daf812fbdc7 || export_locations | || | path = 192.168.1.214:/share_eae5b051_b0e4_498a_8c45_3fe98af66a69 || | preferred = True || | is_admin_only = False || | id = dd6b6548-673b-4171-98b0-c7d0d3f764e9 || | share_instance_id = eae5b051-b0e4-498a-8c45-3fe98af66a69 || | path = 192.168.1.213:/share_eae5b051_b0e4_498a_8c45_3fe98af66a69 || | preferred = False || | is_admin_only = False || | id = 73b44c8e-39de-4533-ab1d-9e30b57c961a || | share_instance_id = eae5b051-b0e4-498a-8c45-3fe98af66a69 || share_server_id | c3b6524a-d40c-466d-a024-f926e86fd66f || host | openstack@netappmultisvm#aggr2 || access_rules_status | active || snapshot_id | None || is_public | False || task_state | None || snapshot_support | True || id | 379be8cb-29e6-47a5-8dc2-eb9f21cdd248 || size | 3 || name | mktshare || share_type | 98f3c1aa-4cd0-4185-98b7-5fb4e93a9959 || has_replicas | False || replication_type | None || created_at | 2016-07-27T21:10:42.000000 || share_proto | NFS || consistency_group_id | None || source_cgsnapshot_member_id | None || project_id | 711b74ea633c4711b4bcc5bca77f8f07 || metadata | {} |+-----------------------------+------------------------------------------------------------------+[root@openstack ~(keystone_mkt_admin)]#
Note: Using the name of “mktshare” only works when you are in the context of the “MKTAdmin”, otherwise you would need to use the ID.
Note: This activity uses a single network for both tenants. However, Manila provides the abilityto use VLANs (logical networks) to segment network traffic between tenants, and the preferredmethod in that case is to use the NEUTRON_NETWORK_PLUGIN.
23. Creating a share in the “multisvm” mode with the second OpenStack tenant should have created a newshare server, or Storage Virtual Machine. As before, you can use the share_server_id to identify thenew Storage Virtual Machine in System Manager. Note the first few characters of the share server idfrom the manila show command.

52 NetApp ONTAP Integration with OpenStack © 2016 NetApp, Inc. All rights reserved. NetApp Proprietary
24. Open your minimized “NetApp Systems Manager” browser window. In order to view the new StorageVirtual Machine, you may need to refresh your browser window so that the new SVM menu item isreflected.
2
Figure 3-32:
25. Locate the newly created SVM that is prefixed with the the characters “os_” and matches theshare_server_id in Manila.
26. Expand the Storage menu item to view the list of options related to Storage.27. Select Volumes to show all of the FlexVols for this SVM. You may need to adjust the width of the name
column to see the complete name.28. Identify the single share that was created in this Storage Virtual Machine. Any subsequent shares for
the “marketing” tenant will exist in this SVM.
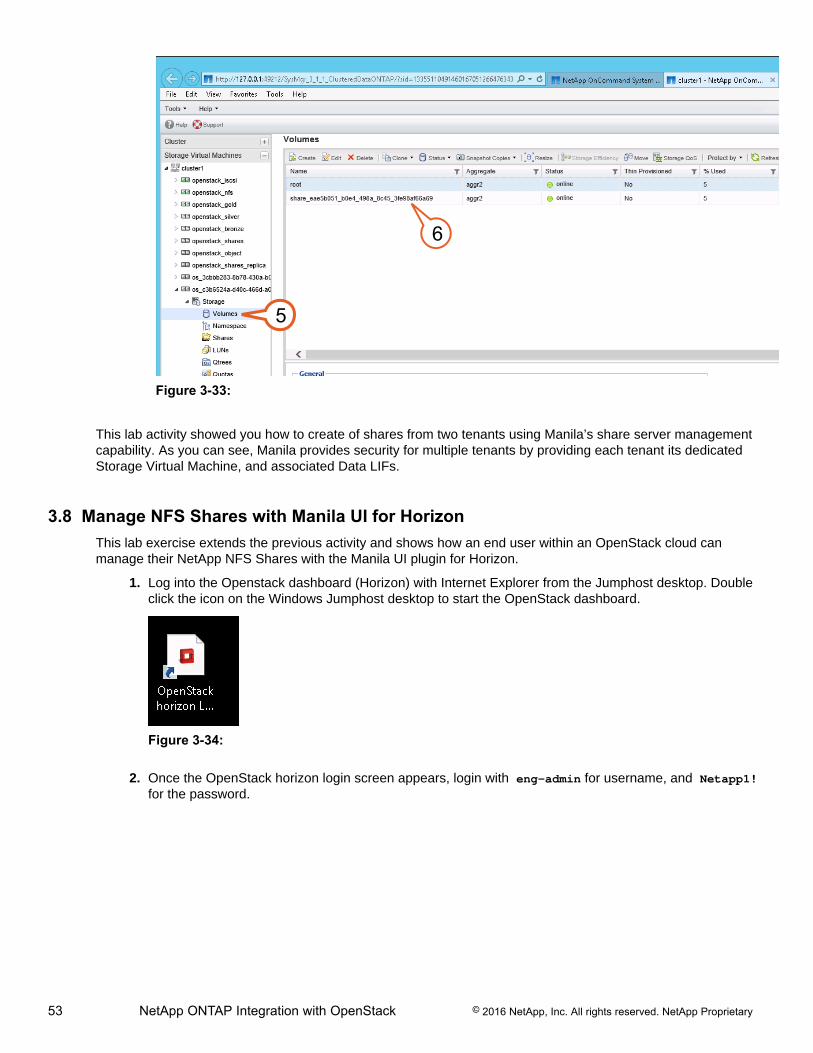
53 NetApp ONTAP Integration with OpenStack © 2016 NetApp, Inc. All rights reserved. NetApp Proprietary
5
6
Figure 3-33:
This lab activity showed you how to create of shares from two tenants using Manila’s share server managementcapability. As you can see, Manila provides security for multiple tenants by providing each tenant its dedicatedStorage Virtual Machine, and associated Data LIFs.
3.8 Manage NFS Shares with Manila UI for HorizonThis lab exercise extends the previous activity and shows how an end user within an OpenStack cloud canmanage their NetApp NFS Shares with the Manila UI plugin for Horizon.
1. Log into the Openstack dashboard (Horizon) with Internet Explorer from the Jumphost desktop. Doubleclick the icon on the Windows Jumphost desktop to start the OpenStack dashboard.
Figure 3-34:
2. Once the OpenStack horizon login screen appears, login with eng-admin for username, and Netapp1!for the password.
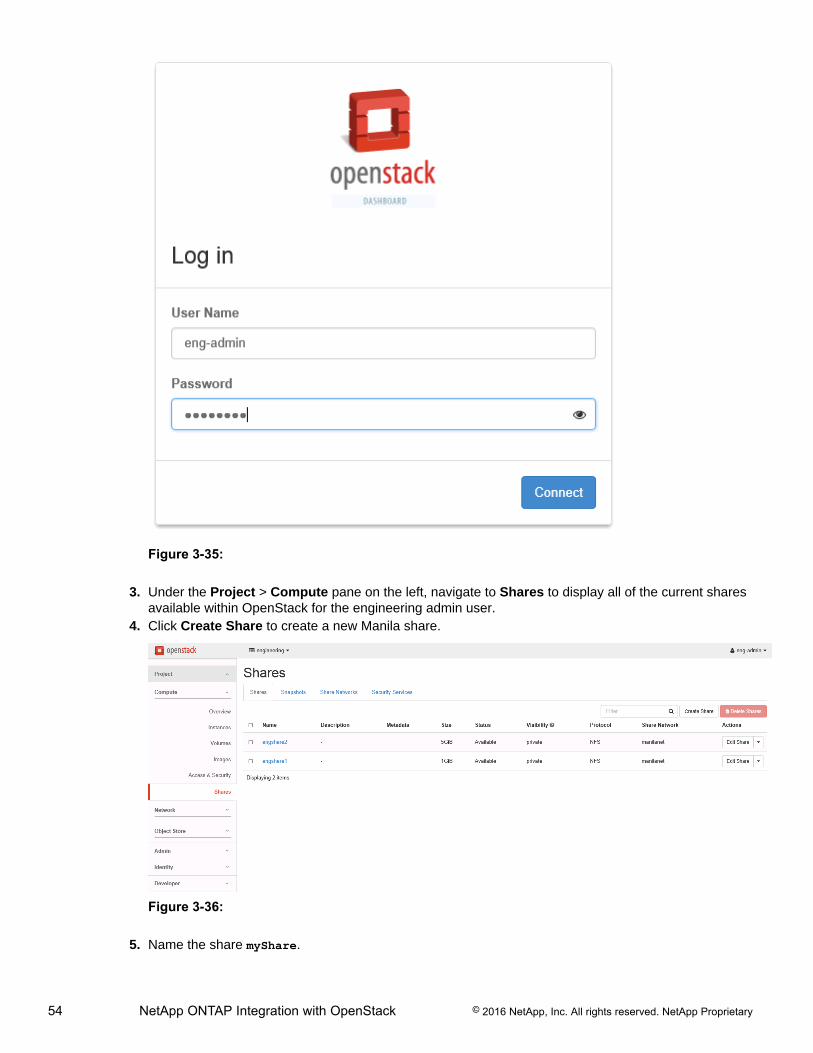
54 NetApp ONTAP Integration with OpenStack © 2016 NetApp, Inc. All rights reserved. NetApp Proprietary
Figure 3-35:
3. Under the Project > Compute pane on the left, navigate to Shares to display all of the current sharesavailable within OpenStack for the engineering admin user.
4. Click Create Share to create a new Manila share.
Figure 3-36:
5. Name the share myShare.
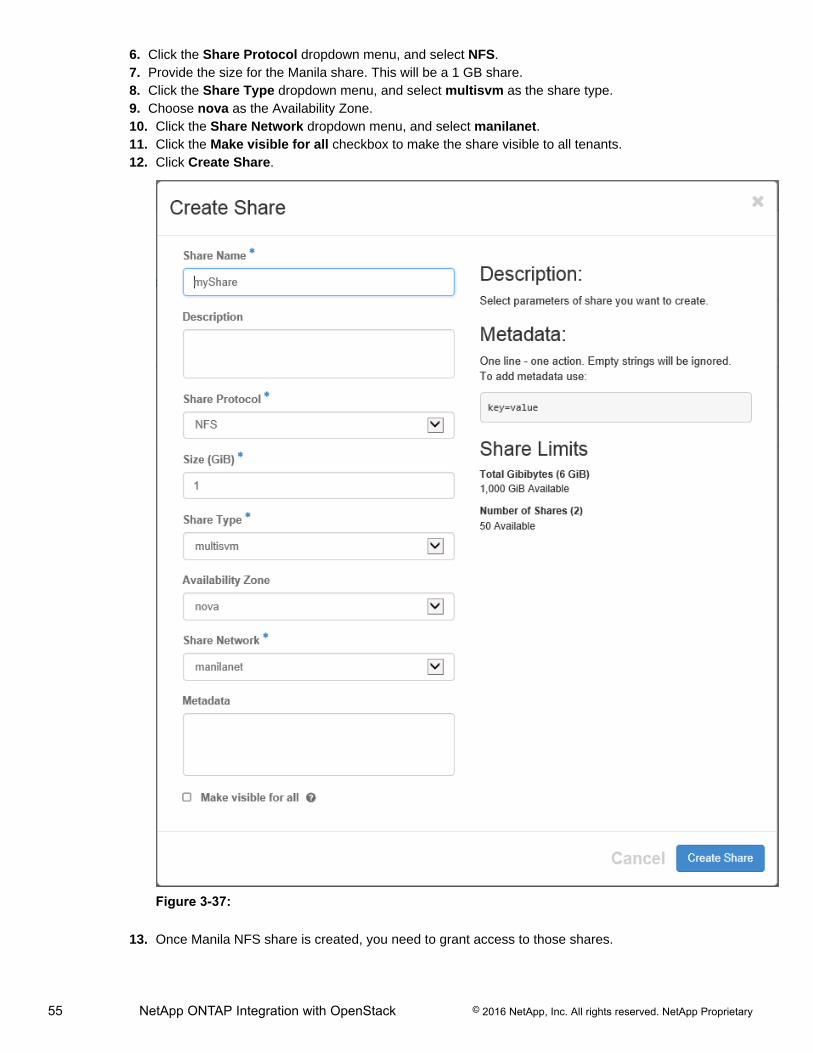
55 NetApp ONTAP Integration with OpenStack © 2016 NetApp, Inc. All rights reserved. NetApp Proprietary
6. Click the Share Protocol dropdown menu, and select NFS.7. Provide the size for the Manila share. This will be a 1 GB share.8. Click the Share Type dropdown menu, and select multisvm as the share type.9. Choose nova as the Availability Zone.10. Click the Share Network dropdown menu, and select manilanet.11. Click the Make visible for all checkbox to make the share visible to all tenants.12. Click Create Share.
Figure 3-37:
13. Once Manila NFS share is created, you need to grant access to those shares.
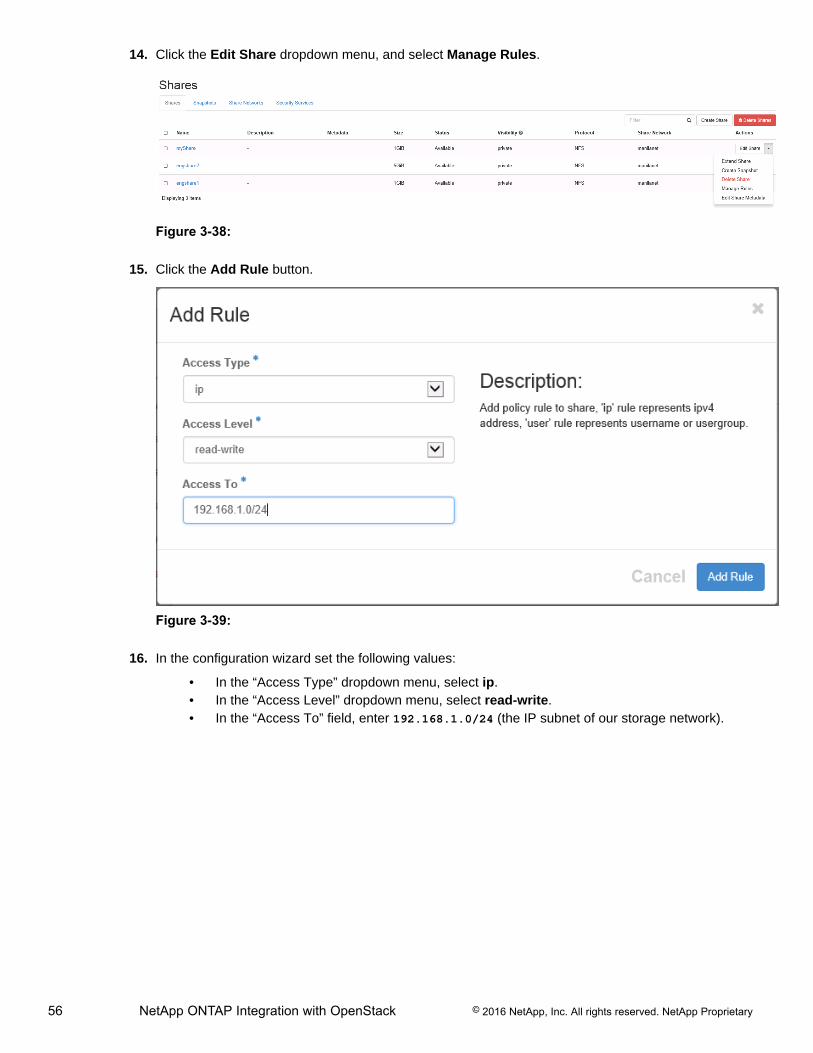
56 NetApp ONTAP Integration with OpenStack © 2016 NetApp, Inc. All rights reserved. NetApp Proprietary
14. Click the Edit Share dropdown menu, and select Manage Rules.
Figure 3-38:
15. Click the Add Rule button.
Figure 3-39:
16. In the configuration wizard set the following values:
• In the “Access Type” dropdown menu, select ip.• In the “Access Level” dropdown menu, select read-write.• In the “Access To” field, enter 192.168.1.0/24 (the IP subnet of our storage network).

57 NetApp ONTAP Integration with OpenStack © 2016 NetApp, Inc. All rights reserved. NetApp Proprietary
Figure 3-40:
17. The completed share is displayed. Click on Shares to return to Share list.
Figure 3-41:
18. Once the share is created, there is an export path defined for each share. Copy the export path for theshare you just created by going to its details page.
19. Click on myShare in the “Shares” tab. This will bring up the details page.
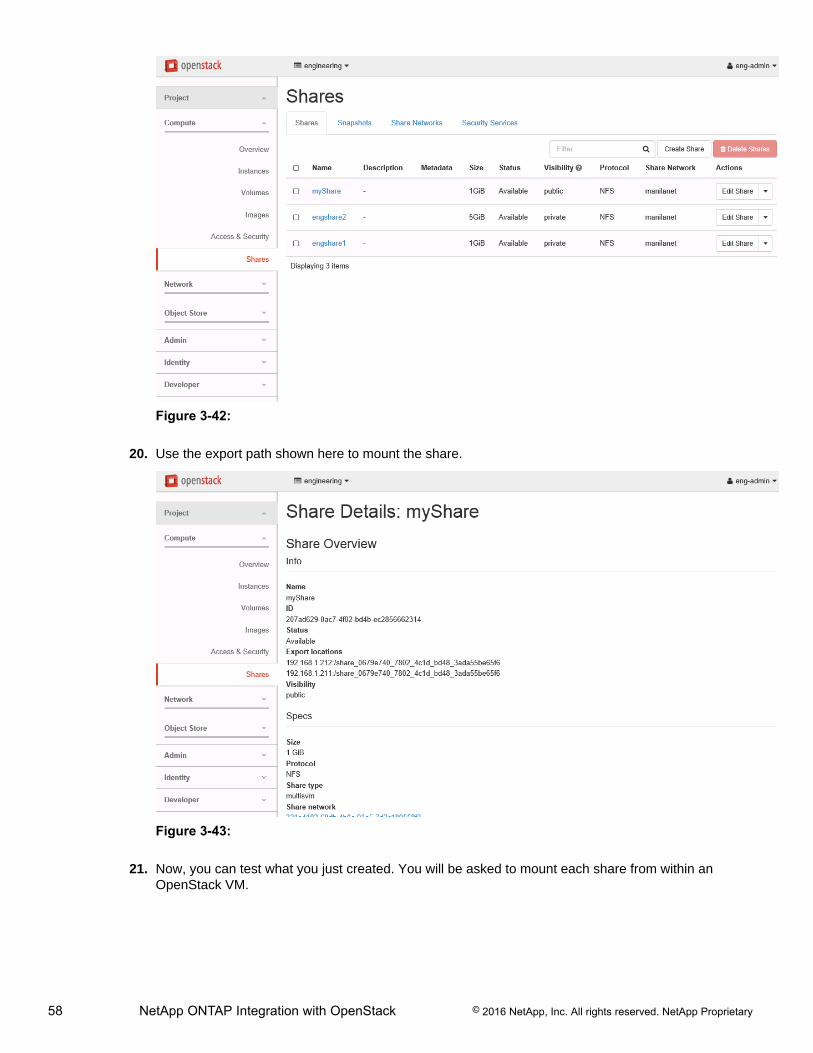
58 NetApp ONTAP Integration with OpenStack © 2016 NetApp, Inc. All rights reserved. NetApp Proprietary
Figure 3-42:
20. Use the export path shown here to mount the share.
Figure 3-43:
21. Now, you can test what you just created. You will be asked to mount each share from within anOpenStack VM.
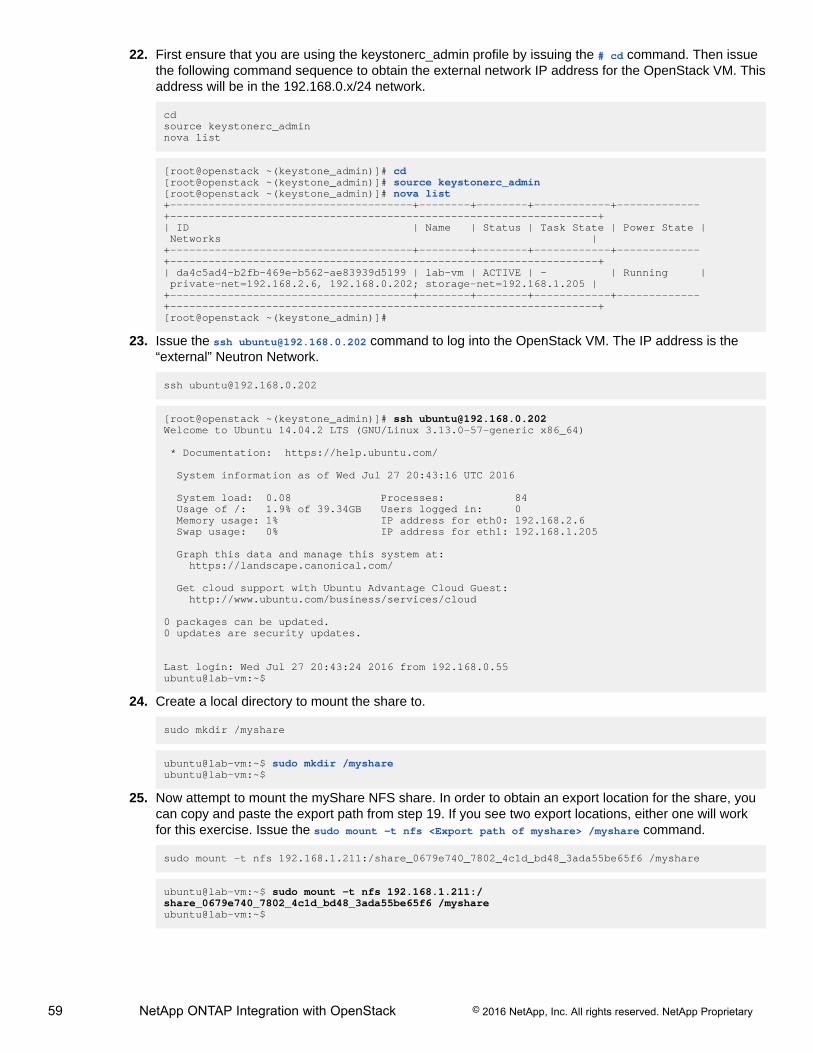
59 NetApp ONTAP Integration with OpenStack © 2016 NetApp, Inc. All rights reserved. NetApp Proprietary
22. First ensure that you are using the keystonerc_admin profile by issuing the # cd command. Then issuethe following command sequence to obtain the external network IP address for the OpenStack VM. Thisaddress will be in the 192.168.0.x/24 network.
cdsource keystonerc_adminnova list
[root@openstack ~(keystone_admin)]# cd[root@openstack ~(keystone_admin)]# source keystonerc_admin[root@openstack ~(keystone_admin)]# nova list+--------------------------------------+--------+--------+------------+-------------+-------------------------------------------------------------------+| ID | Name | Status | Task State | Power State | Networks |+--------------------------------------+--------+--------+------------+-------------+-------------------------------------------------------------------+| da4c5ad4-b2fb-469e-b562-ae83939d5199 | lab-vm | ACTIVE | - | Running | private-net=192.168.2.6, 192.168.0.202; storage-net=192.168.1.205 |+--------------------------------------+--------+--------+------------+-------------+-------------------------------------------------------------------+[root@openstack ~(keystone_admin)]#
23. Issue the ssh [email protected] command to log into the OpenStack VM. The IP address is the“external” Neutron Network.
[root@openstack ~(keystone_admin)]# ssh [email protected] to Ubuntu 14.04.2 LTS (GNU/Linux 3.13.0-57-generic x86_64)
* Documentation: https://help.ubuntu.com/
System information as of Wed Jul 27 20:43:16 UTC 2016
System load: 0.08 Processes: 84 Usage of /: 1.9% of 39.34GB Users logged in: 0 Memory usage: 1% IP address for eth0: 192.168.2.6 Swap usage: 0% IP address for eth1: 192.168.1.205
Graph this data and manage this system at: https://landscape.canonical.com/
Get cloud support with Ubuntu Advantage Cloud Guest: http://www.ubuntu.com/business/services/cloud
0 packages can be updated.0 updates are security updates.
Last login: Wed Jul 27 20:43:24 2016 from 192.168.0.55ubuntu@lab-vm:~$
24. Create a local directory to mount the share to.
sudo mkdir /myshare
ubuntu@lab-vm:~$ sudo mkdir /myshareubuntu@lab-vm:~$
25. Now attempt to mount the myShare NFS share. In order to obtain an export location for the share, youcan copy and paste the export path from step 19. If you see two export locations, either one will workfor this exercise. Issue the sudo mount –t nfs <Export path of myshare> /myshare command.
sudo mount -t nfs 192.168.1.211:/share_0679e740_7802_4c1d_bd48_3ada55be65f6 /myshare
ubuntu@lab-vm:~$ sudo mount -t nfs 192.168.1.211:/share_0679e740_7802_4c1d_bd48_3ada55be65f6 /myshareubuntu@lab-vm:~$

60 NetApp ONTAP Integration with OpenStack © 2016 NetApp, Inc. All rights reserved. NetApp Proprietary
26. Issue the df –h command to validate that the mount for the myManilaShare NFS Share was successful.
df -h
ubuntu@lab-vm:~$ df -hFilesystem Size Used Avail Use% Mounted on/dev/vda1 40G 779M 37G 3% /none 4.0K 0 4.0K 0% /sys/fs/cgroupudev 2.0G 12K 2.0G 1% /devtmpfs 396M 348K 396M 1% /runnone 5.0M 0 5.0M 0% /run/locknone 2.0G 0 2.0G 0% /run/shmnone 100M 0 100M 0% /run/user192.168.1.211:/share_0679e740_7802_4c1d_bd48_3ada55be65f6 973M 128K 973M 1% /myshareubuntu@lab-vm:~$
27. Issue the exit command to log out of the OpenStack VM.
exit
ubuntu@lab-vm:~$ exitlogoutConnection to 192.168.0.202 closed.[root@openstack ~(keystone_admin)]#
Note: You should see a file system mounted on the file system “/myManilaShare” based on the exportpath of the Manila NFS share myShare.
This lab activity illustrates how to use the Manila UI plugin for Horizon to manage the shares through a GUI, inaddition to using the CLI.
3.9 Extend and Shrink a Manila ShareThis lab exercise shows how an end user within an OpenStack cloud can extend or shrink an existing Manilashare through the CLI.
1. Double click the PuTTy icon on the desktop to open the profile to log into the Red Hat host.
Note: If you remained logged in from the previous section, skip the log in and go to setting up theuser environment variables.
Figure 3-44:
2. Select the Openstack profile, and click Load.3. Click Open to start an ssh session to the Openstack Linux box that is the host for the Openstack
infrastructure.
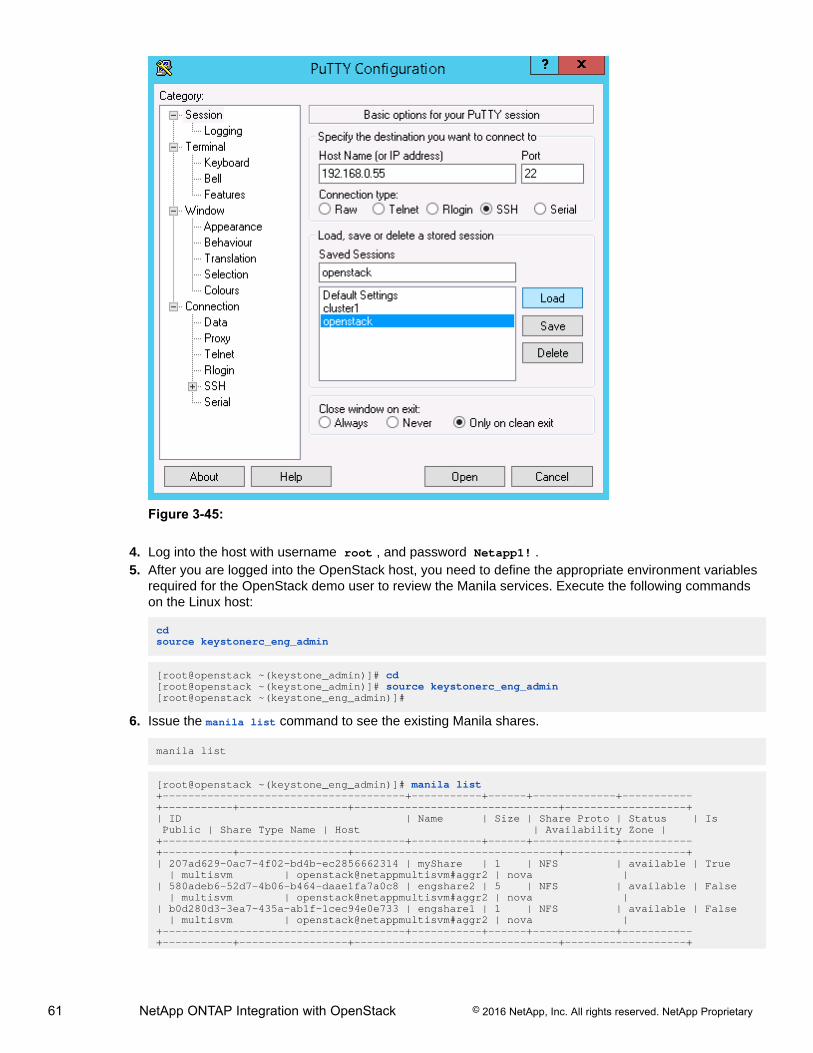
61 NetApp ONTAP Integration with OpenStack © 2016 NetApp, Inc. All rights reserved. NetApp Proprietary
Figure 3-45:
4. Log into the host with username root , and password Netapp1! .5. After you are logged into the OpenStack host, you need to define the appropriate environment variables
required for the OpenStack demo user to review the Manila services. Execute the following commandson the Linux host:
cdsource keystonerc_eng_admin
[root@openstack ~(keystone_admin)]# cd[root@openstack ~(keystone_admin)]# source keystonerc_eng_admin[root@openstack ~(keystone_eng_admin)]#
6. Issue the manila list command to see the existing Manila shares.
manila list
[root@openstack ~(keystone_eng_admin)]# manila list+--------------------------------------+-----------+------+-------------+-----------+-----------+-----------------+--------------------------------+-------------------+| ID | Name | Size | Share Proto | Status | Is Public | Share Type Name | Host | Availability Zone |+--------------------------------------+-----------+------+-------------+-----------+-----------+-----------------+--------------------------------+-------------------+| 207ad629-0ac7-4f02-bd4b-ec2856662314 | myShare | 1 | NFS | available | True | multisvm | openstack@netappmultisvm#aggr2 | nova || 580adeb6-52d7-4b06-b464-daae1fa7a0c8 | engshare2 | 5 | NFS | available | False | multisvm | openstack@netappmultisvm#aggr2 | nova || b0d280d3-3ea7-435a-ab1f-1cec94e0e733 | engshare1 | 1 | NFS | available | False | multisvm | openstack@netappmultisvm#aggr2 | nova |+--------------------------------------+-----------+------+-------------+-----------+-----------+-----------------+--------------------------------+-------------------+
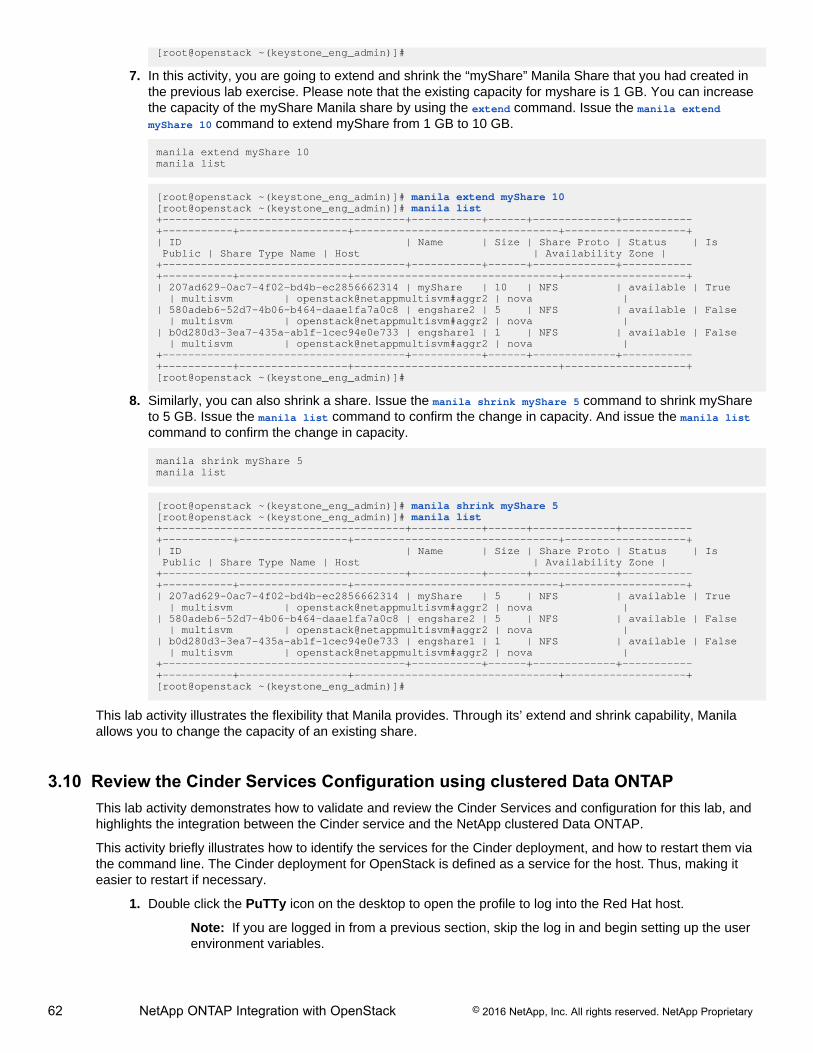
62 NetApp ONTAP Integration with OpenStack © 2016 NetApp, Inc. All rights reserved. NetApp Proprietary
[root@openstack ~(keystone_eng_admin)]#
7. In this activity, you are going to extend and shrink the “myShare” Manila Share that you had created inthe previous lab exercise. Please note that the existing capacity for myshare is 1 GB. You can increasethe capacity of the myShare Manila share by using the extend command. Issue the manila extendmyShare 10 command to extend myShare from 1 GB to 10 GB.
manila extend myShare 10manila list
[root@openstack ~(keystone_eng_admin)]# manila extend myShare 10[root@openstack ~(keystone_eng_admin)]# manila list+--------------------------------------+-----------+------+-------------+-----------+-----------+-----------------+--------------------------------+-------------------+| ID | Name | Size | Share Proto | Status | Is Public | Share Type Name | Host | Availability Zone |+--------------------------------------+-----------+------+-------------+-----------+-----------+-----------------+--------------------------------+-------------------+| 207ad629-0ac7-4f02-bd4b-ec2856662314 | myShare | 10 | NFS | available | True | multisvm | openstack@netappmultisvm#aggr2 | nova || 580adeb6-52d7-4b06-b464-daae1fa7a0c8 | engshare2 | 5 | NFS | available | False | multisvm | openstack@netappmultisvm#aggr2 | nova || b0d280d3-3ea7-435a-ab1f-1cec94e0e733 | engshare1 | 1 | NFS | available | False | multisvm | openstack@netappmultisvm#aggr2 | nova |+--------------------------------------+-----------+------+-------------+-----------+-----------+-----------------+--------------------------------+-------------------+[root@openstack ~(keystone_eng_admin)]#
8. Similarly, you can also shrink a share. Issue the manila shrink myShare 5 command to shrink myShareto 5 GB. Issue the manila list command to confirm the change in capacity. And issue the manila listcommand to confirm the change in capacity.
manila shrink myShare 5manila list
[root@openstack ~(keystone_eng_admin)]# manila shrink myShare 5[root@openstack ~(keystone_eng_admin)]# manila list+--------------------------------------+-----------+------+-------------+-----------+-----------+-----------------+--------------------------------+-------------------+| ID | Name | Size | Share Proto | Status | Is Public | Share Type Name | Host | Availability Zone |+--------------------------------------+-----------+------+-------------+-----------+-----------+-----------------+--------------------------------+-------------------+| 207ad629-0ac7-4f02-bd4b-ec2856662314 | myShare | 5 | NFS | available | True | multisvm | openstack@netappmultisvm#aggr2 | nova || 580adeb6-52d7-4b06-b464-daae1fa7a0c8 | engshare2 | 5 | NFS | available | False | multisvm | openstack@netappmultisvm#aggr2 | nova || b0d280d3-3ea7-435a-ab1f-1cec94e0e733 | engshare1 | 1 | NFS | available | False | multisvm | openstack@netappmultisvm#aggr2 | nova |+--------------------------------------+-----------+------+-------------+-----------+-----------+-----------------+--------------------------------+-------------------+[root@openstack ~(keystone_eng_admin)]#
This lab activity illustrates the flexibility that Manila provides. Through its’ extend and shrink capability, Manilaallows you to change the capacity of an existing share.
3.10 Review the Cinder Services Configuration using clustered Data ONTAPThis lab activity demonstrates how to validate and review the Cinder Services and configuration for this lab, andhighlights the integration between the Cinder service and the NetApp clustered Data ONTAP.
This activity briefly illustrates how to identify the services for the Cinder deployment, and how to restart them viathe command line. The Cinder deployment for OpenStack is defined as a service for the host. Thus, making iteasier to restart if necessary.
1. Double click the PuTTy icon on the desktop to open the profile to log into the Red Hat host.
Note: If you are logged in from a previous section, skip the log in and begin setting up the userenvironment variables.
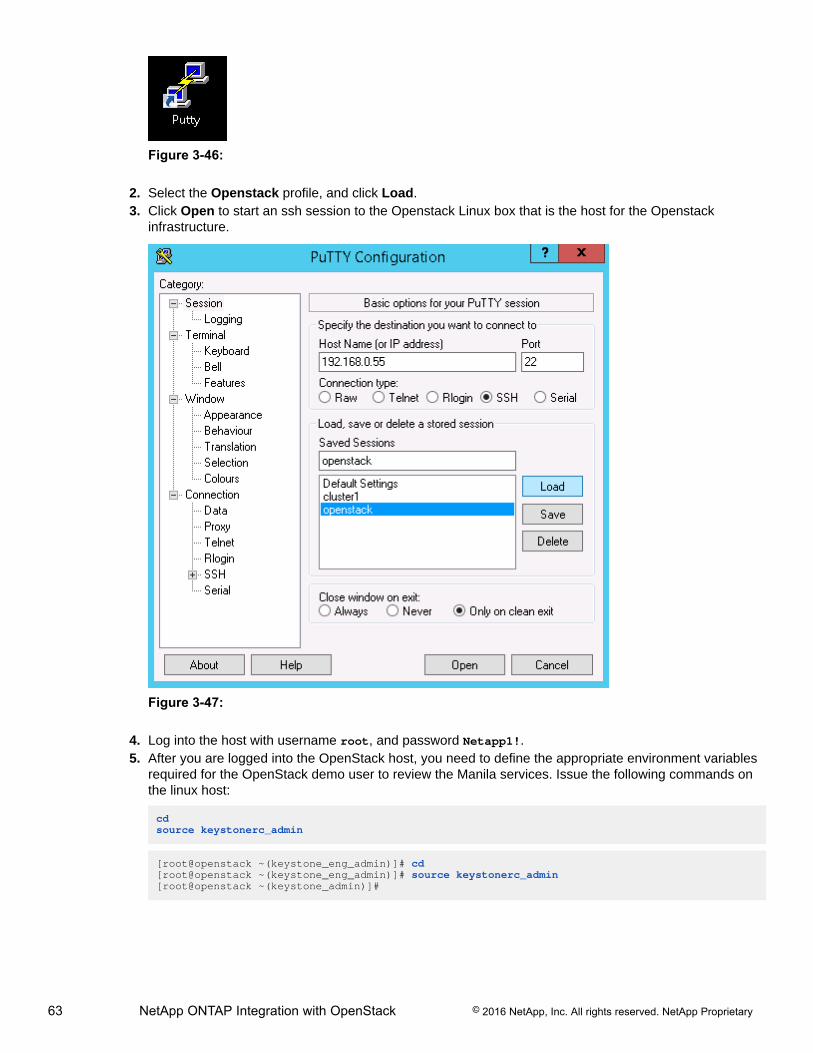
63 NetApp ONTAP Integration with OpenStack © 2016 NetApp, Inc. All rights reserved. NetApp Proprietary
Figure 3-46:
2. Select the Openstack profile, and click Load.3. Click Open to start an ssh session to the Openstack Linux box that is the host for the Openstack
infrastructure.
Figure 3-47:
4. Log into the host with username root, and password Netapp1!.5. After you are logged into the OpenStack host, you need to define the appropriate environment variables
required for the OpenStack demo user to review the Manila services. Issue the following commands onthe linux host:
cdsource keystonerc_admin
[root@openstack ~(keystone_eng_admin)]# cd[root@openstack ~(keystone_eng_admin)]# source keystonerc_admin[root@openstack ~(keystone_admin)]#
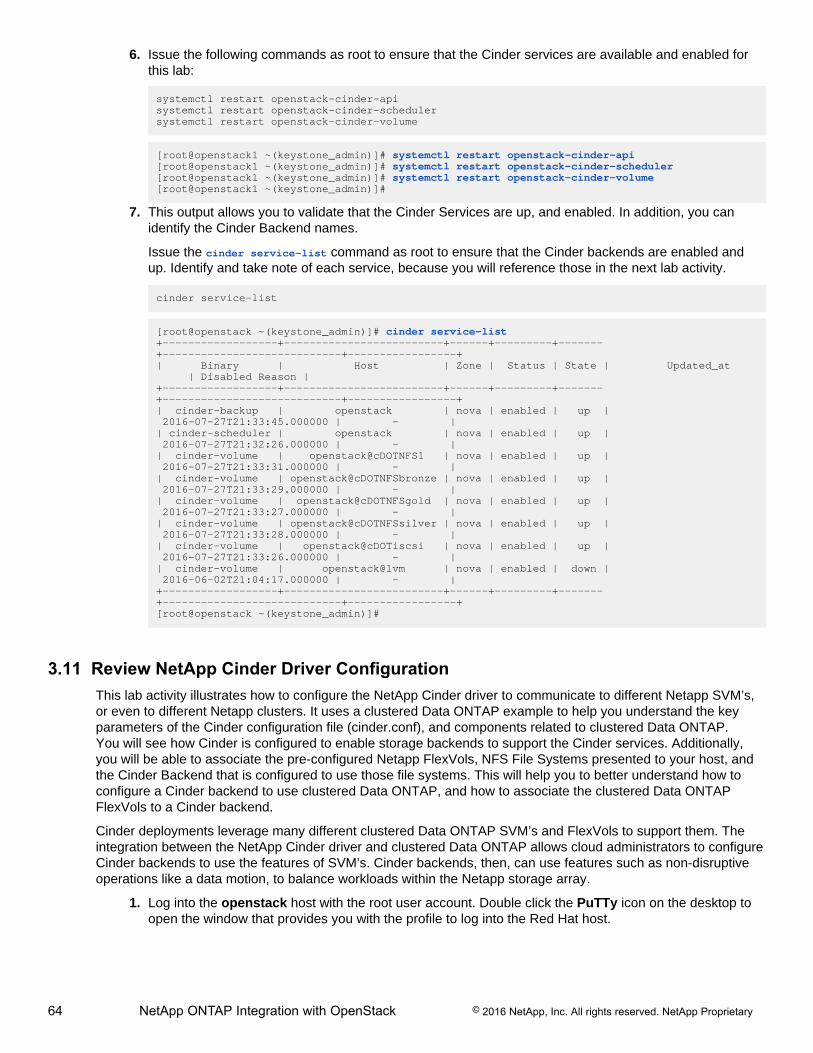
64 NetApp ONTAP Integration with OpenStack © 2016 NetApp, Inc. All rights reserved. NetApp Proprietary
6. Issue the following commands as root to ensure that the Cinder services are available and enabled forthis lab:
systemctl restart openstack-cinder-apisystemctl restart openstack-cinder-schedulersystemctl restart openstack-cinder-volume
[root@openstack1 ~(keystone_admin)]# systemctl restart openstack-cinder-api[root@openstack1 ~(keystone_admin)]# systemctl restart openstack-cinder-scheduler[root@openstack1 ~(keystone_admin)]# systemctl restart openstack-cinder-volume[root@openstack1 ~(keystone_admin)]#
7. This output allows you to validate that the Cinder Services are up, and enabled. In addition, you canidentify the Cinder Backend names.
Issue the cinder service-list command as root to ensure that the Cinder backends are enabled andup. Identify and take note of each service, because you will reference those in the next lab activity.
cinder service-list
[root@openstack ~(keystone_admin)]# cinder service-list+------------------+-------------------------+------+---------+-------+----------------------------+-----------------+| Binary | Host | Zone | Status | State | Updated_at | Disabled Reason |+------------------+-------------------------+------+---------+-------+----------------------------+-----------------+| cinder-backup | openstack | nova | enabled | up | 2016-07-27T21:33:45.000000 | - || cinder-scheduler | openstack | nova | enabled | up | 2016-07-27T21:32:26.000000 | - || cinder-volume | openstack@cDOTNFS1 | nova | enabled | up | 2016-07-27T21:33:31.000000 | - || cinder-volume | openstack@cDOTNFSbronze | nova | enabled | up | 2016-07-27T21:33:29.000000 | - || cinder-volume | openstack@cDOTNFSgold | nova | enabled | up | 2016-07-27T21:33:27.000000 | - || cinder-volume | openstack@cDOTNFSsilver | nova | enabled | up | 2016-07-27T21:33:28.000000 | - || cinder-volume | openstack@cDOTiscsi | nova | enabled | up | 2016-07-27T21:33:26.000000 | - || cinder-volume | openstack@lvm | nova | enabled | down | 2016-06-02T21:04:17.000000 | - |+------------------+-------------------------+------+---------+-------+----------------------------+-----------------+[root@openstack ~(keystone_admin)]#
3.11 Review NetApp Cinder Driver ConfigurationThis lab activity illustrates how to configure the NetApp Cinder driver to communicate to different Netapp SVM’s,or even to different Netapp clusters. It uses a clustered Data ONTAP example to help you understand the keyparameters of the Cinder configuration file (cinder.conf), and components related to clustered Data ONTAP.You will see how Cinder is configured to enable storage backends to support the Cinder services. Additionally,you will be able to associate the pre-configured Netapp FlexVols, NFS File Systems presented to your host, andthe Cinder Backend that is configured to use those file systems. This will help you to better understand how toconfigure a Cinder backend to use clustered Data ONTAP, and how to associate the clustered Data ONTAPFlexVols to a Cinder backend.
Cinder deployments leverage many different clustered Data ONTAP SVM’s and FlexVols to support them. Theintegration between the NetApp Cinder driver and clustered Data ONTAP allows cloud administrators to configureCinder backends to use the features of SVM’s. Cinder backends, then, can use features such as non-disruptiveoperations like a data motion, to balance workloads within the Netapp storage array.
1. Log into the openstack host with the root user account. Double click the PuTTy icon on the desktop toopen the window that provides you with the profile to log into the Red Hat host.
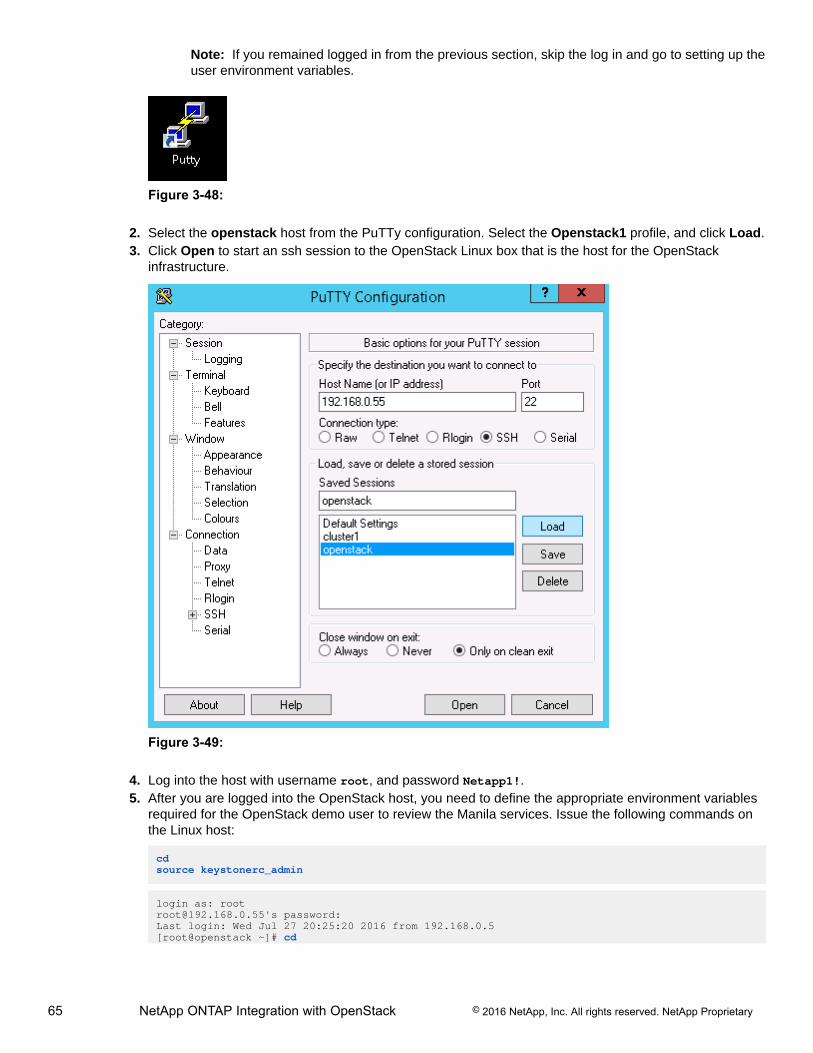
65 NetApp ONTAP Integration with OpenStack © 2016 NetApp, Inc. All rights reserved. NetApp Proprietary
Note: If you remained logged in from the previous section, skip the log in and go to setting up theuser environment variables.
Figure 3-48:
2. Select the openstack host from the PuTTy configuration. Select the Openstack1 profile, and click Load.3. Click Open to start an ssh session to the OpenStack Linux box that is the host for the OpenStack
infrastructure.
Figure 3-49:
4. Log into the host with username root, and password Netapp1!.5. After you are logged into the OpenStack host, you need to define the appropriate environment variables
required for the OpenStack demo user to review the Manila services. Issue the following commands onthe Linux host:
cdsource keystonerc_admin
login as: [email protected]'s password:Last login: Wed Jul 27 20:25:20 2016 from 192.168.0.5[root@openstack ~]# cd

66 NetApp ONTAP Integration with OpenStack © 2016 NetApp, Inc. All rights reserved. NetApp Proprietary
[root@openstack ~]# source keystonerc_admin[root@openstack ~(keystone_admin)]#
6. Review the cinder.conf file to see how Cinder services get enabled.
Issue the following command to review the contents of the cnder.conf file for enabled backends:
cat /etc/cinder/cinder.conf | grep ^enabled_backends
[root@openstack ~(keystone_admin)]# cat /etc/cinder/cinder.conf | grep ^enabled_backendsenabled_backends=cDOTNFS1,cDOTNFSgold,cDOTNFSsilver,cDOTNFSbronze,cDOTiscsi[root@openstack ~(keystone_admin)]#
7. Review the NetApp storage elements used to configure the Cinder backend named “cDOTNFS1”.
Issue the following command to list the contents of the cDOTNFS backend configuration:
cat /etc/cinder/cinder.conf | tail -65 | head -15
[root@openstack ~(keystone_admin)]# cat /etc/cinder/cinder.conf | tail -65 | head -15
[cDOTNFS1]volume_driver=cinder.volume.drivers.netapp.common.NetAppDrivernetapp_login=adminnetapp_password=Netapp1!volume_backend_name=cDOTNFS1netapp_server_hostname='192.168.0.101'netapp_server_port=80netapp_transport_type=httpnetapp_vserver=openstack_nfsnetapp_storage_protocol=nfsnetapp_storage_family=ontap_clusternfs_shares_config=/etc/cinder/nfs.conf
[root@openstack ~(keystone_admin)]#
8. Identify the value for the netapp_vserver. This will be used by System Manager in later steps.9. Refer to the following table for the parameters displayed in the cinder.conf file.
[cDOTNFS1] Service/Backend Name. This name needs tomatch the enabled_backends you saw earlier.
volume_driver Name of the driver. This is an exampleof using the NetApp Driver. This iscinder.volume.drivers.netapp.common.NetAppDriver
netapp_login Login to use. This needs to be a cluster-scopedlogin with appropriate privileges. This lab uses theadmin account for the cluster.
netapp_password The password to the NetApp cluster for the login.
volume_backend_name The name to reference the backend for additionalcommands. Typically, this name should match thename of the Service/Backend. Or, for the definitionof a backend when using extra-specs(seen later)
netapp_server_hostname The name or IP address of the NetApp Clusterwhere the SVM resides for this Service/Backend.
netapp_server_port The port to use for HTTP or HTTPS tocommunicate to the NetApp Cluster.
netapp_transport_type Transport type to use. This can be HTTP orHTTPS.
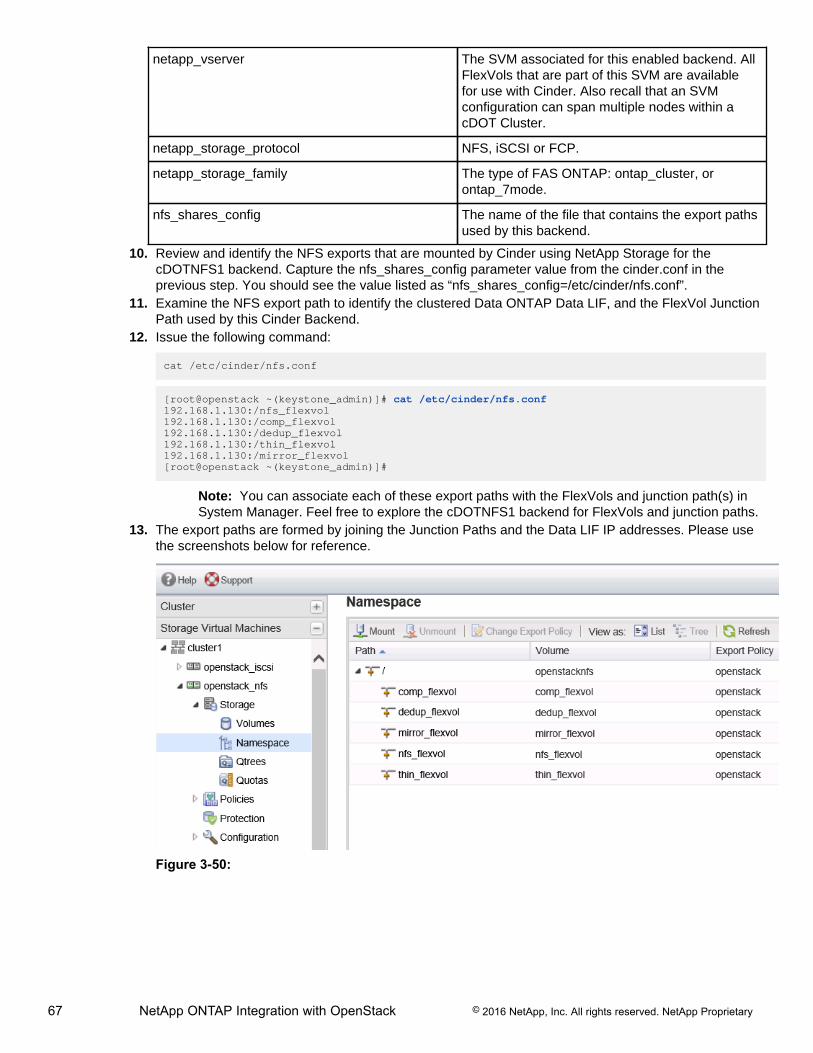
67 NetApp ONTAP Integration with OpenStack © 2016 NetApp, Inc. All rights reserved. NetApp Proprietary
netapp_vserver The SVM associated for this enabled backend. AllFlexVols that are part of this SVM are availablefor use with Cinder. Also recall that an SVMconfiguration can span multiple nodes within acDOT Cluster.
netapp_storage_protocol NFS, iSCSI or FCP.
netapp_storage_family The type of FAS ONTAP: ontap_cluster, orontap_7mode.
nfs_shares_config The name of the file that contains the export pathsused by this backend.
10. Review and identify the NFS exports that are mounted by Cinder using NetApp Storage for thecDOTNFS1 backend. Capture the nfs_shares_config parameter value from the cinder.conf in theprevious step. You should see the value listed as “nfs_shares_config=/etc/cinder/nfs.conf”.
11. Examine the NFS export path to identify the clustered Data ONTAP Data LIF, and the FlexVol JunctionPath used by this Cinder Backend.
12. Issue the following command:
cat /etc/cinder/nfs.conf
[root@openstack ~(keystone_admin)]# cat /etc/cinder/nfs.conf192.168.1.130:/nfs_flexvol192.168.1.130:/comp_flexvol192.168.1.130:/dedup_flexvol192.168.1.130:/thin_flexvol192.168.1.130:/mirror_flexvol[root@openstack ~(keystone_admin)]#
Note: You can associate each of these export paths with the FlexVols and junction path(s) inSystem Manager. Feel free to explore the cDOTNFS1 backend for FlexVols and junction paths.
13. The export paths are formed by joining the Junction Paths and the Data LIF IP addresses. Please usethe screenshots below for reference.
Figure 3-50:
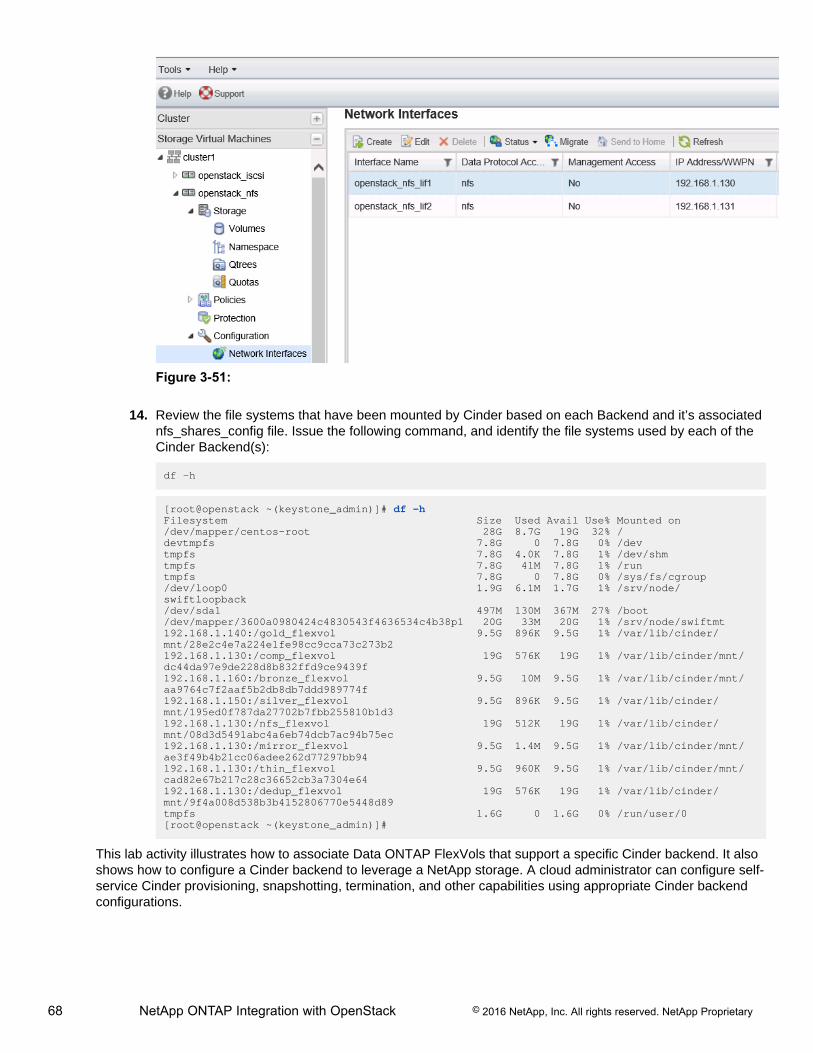
68 NetApp ONTAP Integration with OpenStack © 2016 NetApp, Inc. All rights reserved. NetApp Proprietary
Figure 3-51:
14. Review the file systems that have been mounted by Cinder based on each Backend and it’s associatednfs_shares_config file. Issue the following command, and identify the file systems used by each of theCinder Backend(s):
df -h
[root@openstack ~(keystone_admin)]# df -hFilesystem Size Used Avail Use% Mounted on/dev/mapper/centos-root 28G 8.7G 19G 32% /devtmpfs 7.8G 0 7.8G 0% /devtmpfs 7.8G 4.0K 7.8G 1% /dev/shmtmpfs 7.8G 41M 7.8G 1% /runtmpfs 7.8G 0 7.8G 0% /sys/fs/cgroup/dev/loop0 1.9G 6.1M 1.7G 1% /srv/node/swiftloopback/dev/sda1 497M 130M 367M 27% /boot/dev/mapper/3600a0980424c4830543f4636534c4b38p1 20G 33M 20G 1% /srv/node/swiftmt192.168.1.140:/gold_flexvol 9.5G 896K 9.5G 1% /var/lib/cinder/mnt/28e2c4e7a224e1fe98cc9cca73c273b2192.168.1.130:/comp_flexvol 19G 576K 19G 1% /var/lib/cinder/mnt/dc44da97e9de228d8b832ffd9ce9439f192.168.1.160:/bronze_flexvol 9.5G 10M 9.5G 1% /var/lib/cinder/mnt/aa9764c7f2aaf5b2db8db7ddd989774f192.168.1.150:/silver_flexvol 9.5G 896K 9.5G 1% /var/lib/cinder/mnt/195ed0f787da27702b7fbb255810b1d3192.168.1.130:/nfs_flexvol 19G 512K 19G 1% /var/lib/cinder/mnt/08d3d5491abc4a6eb74dcb7ac94b75ec192.168.1.130:/mirror_flexvol 9.5G 1.4M 9.5G 1% /var/lib/cinder/mnt/ae3f49b4b21cc06adee262d77297bb94192.168.1.130:/thin_flexvol 9.5G 960K 9.5G 1% /var/lib/cinder/mnt/cad82e67b217c28c36652cb3a7304e64192.168.1.130:/dedup_flexvol 19G 576K 19G 1% /var/lib/cinder/mnt/9f4a008d538b3b4152806770e5448d89tmpfs 1.6G 0 1.6G 0% /run/user/0[root@openstack ~(keystone_admin)]#
This lab activity illustrates how to associate Data ONTAP FlexVols that support a specific Cinder backend. It alsoshows how to configure a Cinder backend to leverage a NetApp storage. A cloud administrator can configure self-service Cinder provisioning, snapshotting, termination, and other capabilities using appropriate Cinder backendconfigurations.
69 NetApp ONTAP Integration with OpenStack © 2016 NetApp, Inc. All rights reserved. NetApp Proprietary
3.12 Review of Storage Service Catalog configurationThis lab activity shows how to leverage features of Data OTAP with a Storage Service Catalog with the CinderStorage Service Catalog. It illustrates how to leverage features of Data OTAP thru an abstraction of the NetAppCinder driver to allow a Cloud administrator to configure a Storage Service Catalog.
Take a moment to look at the pre-configured Storage Service Catalog (extra-specs), and review the detailsof each based on the description provided in the table shown below. Cloud and Storage administrators cancollaborate to build an enterprise ready Storage Service Catalog for Cloud users that leverages Data ONTAPfeatures without requiring an advanced understanding of storage to enable those features. The next lab activitywill show you how to use some of those features.
1. Double click the PuTTy icon on the desktop to open the profile to log into the Red Hat host.
Note: If you remained logged in from the previous section, skip the log in and begin setting upthe user environment variables.
Figure 3-52:
2. Select the Openstack profile, and click Load.3. Click Open to start an ssh session to the host for the Openstack infrastructure.
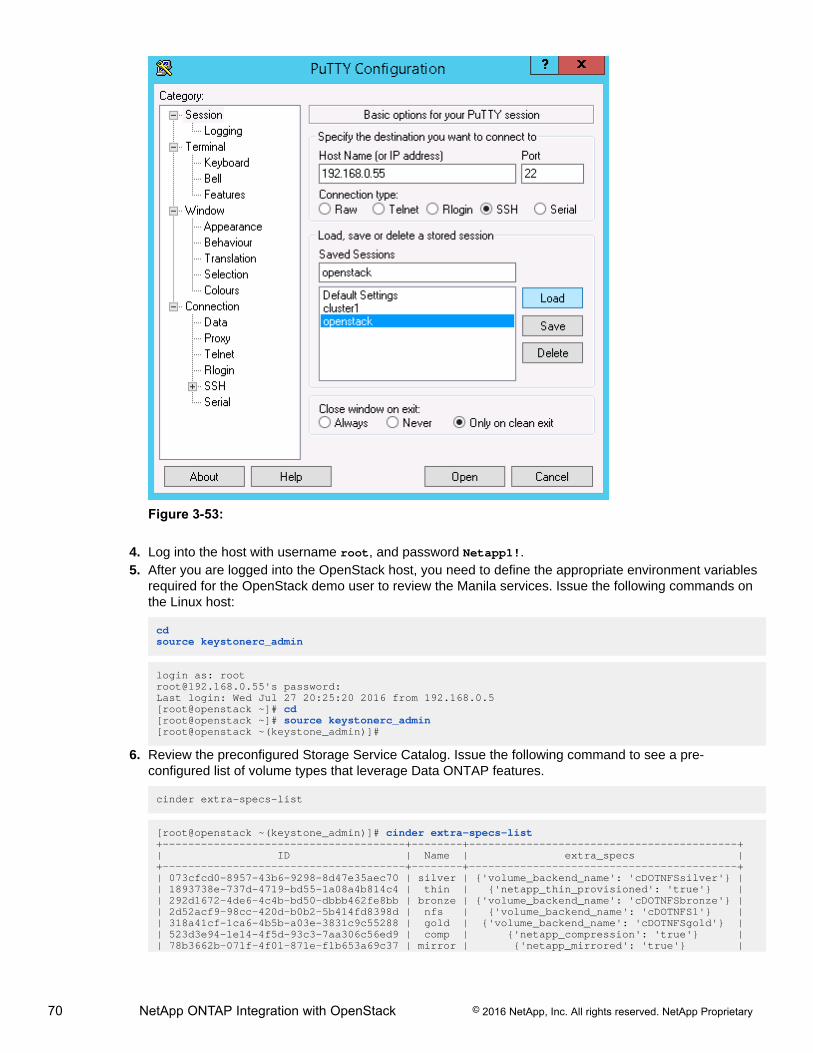
70 NetApp ONTAP Integration with OpenStack © 2016 NetApp, Inc. All rights reserved. NetApp Proprietary
Figure 3-53:
4. Log into the host with username root, and password Netapp1!.5. After you are logged into the OpenStack host, you need to define the appropriate environment variables
required for the OpenStack demo user to review the Manila services. Issue the following commands onthe Linux host:
cdsource keystonerc_admin
login as: [email protected]'s password:Last login: Wed Jul 27 20:25:20 2016 from 192.168.0.5[root@openstack ~]# cd[root@openstack ~]# source keystonerc_admin[root@openstack ~(keystone_admin)]#
6. Review the preconfigured Storage Service Catalog. Issue the following command to see a pre-configured list of volume types that leverage Data ONTAP features.
cinder extra-specs-list
[root@openstack ~(keystone_admin)]# cinder extra-specs-list+--------------------------------------+--------+------------------------------------------+| ID | Name | extra_specs |+--------------------------------------+--------+------------------------------------------+| 073cfcd0-8957-43b6-9298-8d47e35aec70 | silver | {'volume_backend_name': 'cDOTNFSsilver'} || 1893738e-737d-4719-bd55-1a08a4b814c4 | thin | {'netapp_thin_provisioned': 'true'} || 292d1672-4de6-4c4b-bd50-dbbb462fe8bb | bronze | {'volume_backend_name': 'cDOTNFSbronze'} || 2d52acf9-98cc-420d-b0b2-5b414fd8398d | nfs | {'volume_backend_name': 'cDOTNFS1'} || 318a41cf-1ca6-4b5b-a03e-3831c9c55288 | gold | {'volume_backend_name': 'cDOTNFSgold'} || 523d3e94-1e14-4f5d-93c3-7aa306c56ed9 | comp | {'netapp_compression': 'true'} || 78b3662b-071f-4f01-871e-f1b653a69c37 | mirror | {'netapp_mirrored': 'true'} |
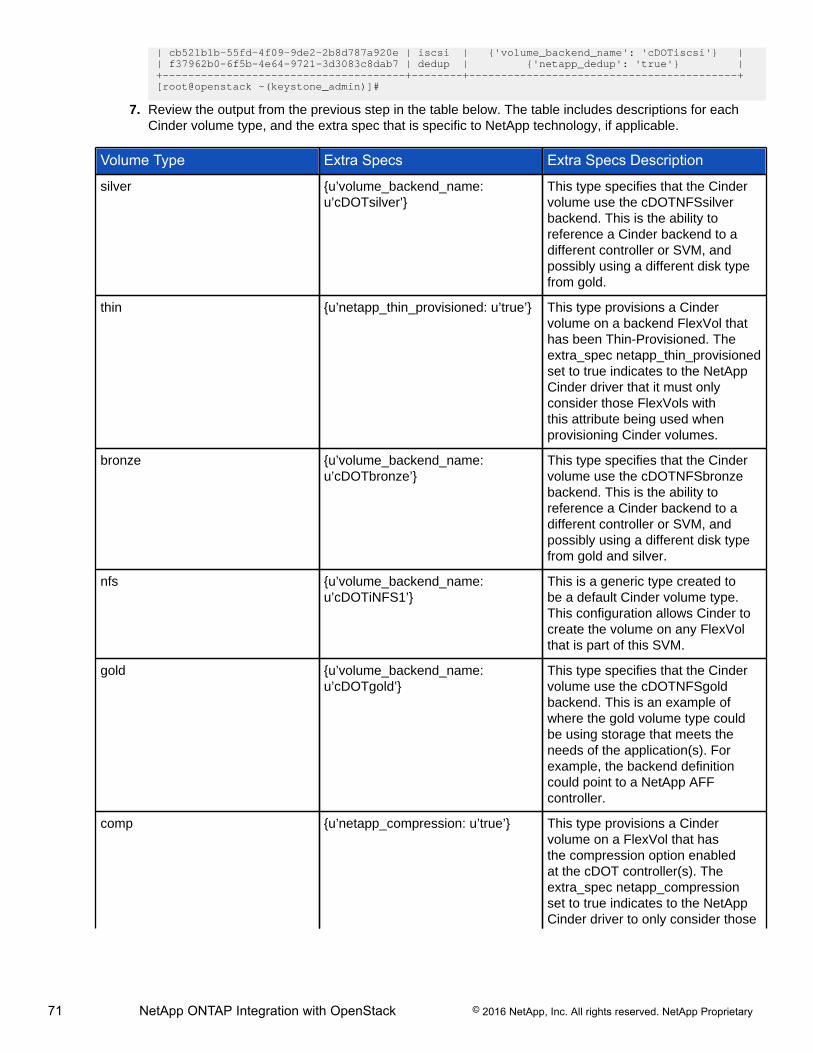
71 NetApp ONTAP Integration with OpenStack © 2016 NetApp, Inc. All rights reserved. NetApp Proprietary
| cb521b1b-55fd-4f09-9de2-2b8d787a920e | iscsi | {'volume_backend_name': 'cDOTiscsi'} || f37962b0-6f5b-4e64-9721-3d3083c8dab7 | dedup | {'netapp_dedup': 'true'} |+--------------------------------------+--------+------------------------------------------+[root@openstack ~(keystone_admin)]#
7. Review the output from the previous step in the table below. The table includes descriptions for eachCinder volume type, and the extra spec that is specific to NetApp technology, if applicable.
Volume Type Extra Specs Extra Specs Description
silver {u’volume_backend_name:u’cDOTsilver’}
This type specifies that the Cindervolume use the cDOTNFSsilverbackend. This is the ability toreference a Cinder backend to adifferent controller or SVM, andpossibly using a different disk typefrom gold.
thin {u’netapp_thin_provisioned: u’true’} This type provisions a Cindervolume on a backend FlexVol thathas been Thin-Provisioned. Theextra_spec netapp_thin_provisionedset to true indicates to the NetAppCinder driver that it must onlyconsider those FlexVols withthis attribute being used whenprovisioning Cinder volumes.
bronze {u’volume_backend_name:u’cDOTbronze’}
This type specifies that the Cindervolume use the cDOTNFSbronzebackend. This is the ability toreference a Cinder backend to adifferent controller or SVM, andpossibly using a different disk typefrom gold and silver.
nfs {u’volume_backend_name:u’cDOTiNFS1’}
This is a generic type created tobe a default Cinder volume type.This configuration allows Cinder tocreate the volume on any FlexVolthat is part of this SVM.
gold {u’volume_backend_name:u’cDOTgold’}
This type specifies that the Cindervolume use the cDOTNFSgoldbackend. This is an example ofwhere the gold volume type couldbe using storage that meets theneeds of the application(s). Forexample, the backend definitioncould point to a NetApp AFFcontroller.
comp {u’netapp_compression: u’true’} This type provisions a Cindervolume on a FlexVol that hasthe compression option enabledat the cDOT controller(s). Theextra_spec netapp_compressionset to true indicates to the NetAppCinder driver to only consider those
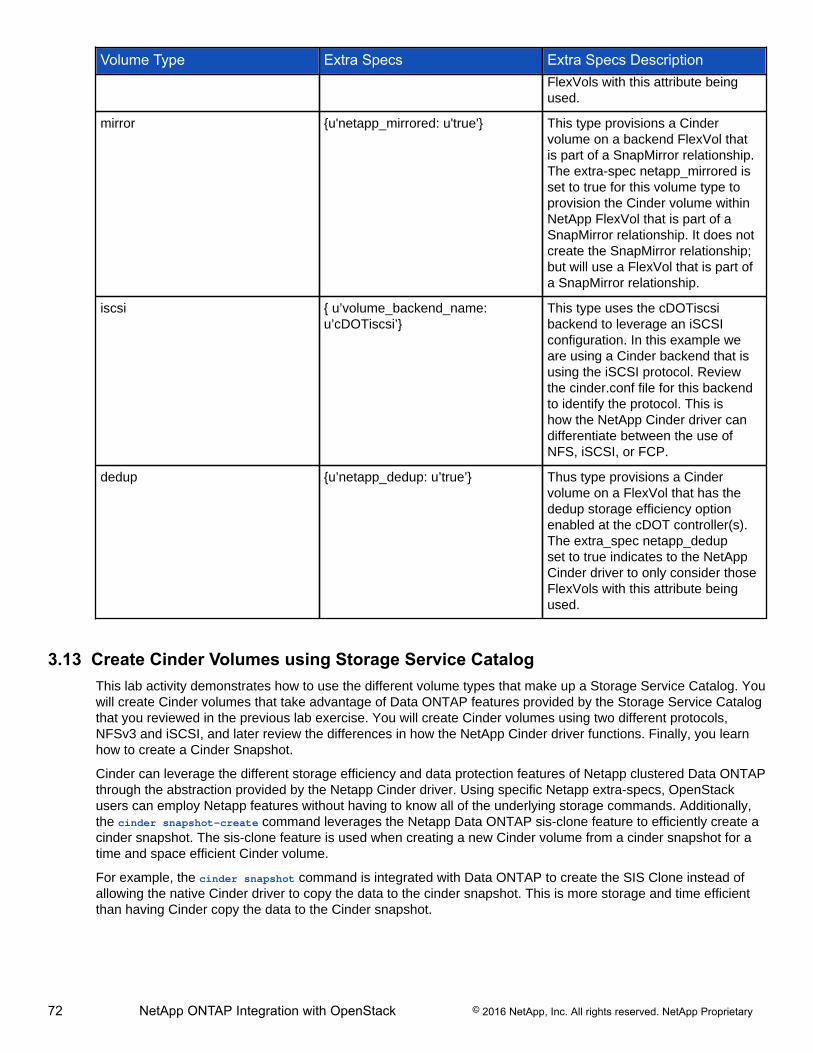
72 NetApp ONTAP Integration with OpenStack © 2016 NetApp, Inc. All rights reserved. NetApp Proprietary
Volume Type Extra Specs Extra Specs DescriptionFlexVols with this attribute beingused.
mirror {u'netapp_mirrored: u'true'} This type provisions a Cindervolume on a backend FlexVol thatis part of a SnapMirror relationship.The extra-spec netapp_mirrored isset to true for this volume type toprovision the Cinder volume withinNetApp FlexVol that is part of aSnapMirror relationship. It does notcreate the SnapMirror relationship;but will use a FlexVol that is part ofa SnapMirror relationship.
iscsi { u’volume_backend_name:u’cDOTiscsi’}
This type uses the cDOTiscsibackend to leverage an iSCSIconfiguration. In this example weare using a Cinder backend that isusing the iSCSI protocol. Reviewthe cinder.conf file for this backendto identify the protocol. This ishow the NetApp Cinder driver candifferentiate between the use ofNFS, iSCSI, or FCP.
dedup {u’netapp_dedup: u’true’} Thus type provisions a Cindervolume on a FlexVol that has thededup storage efficiency optionenabled at the cDOT controller(s).The extra_spec netapp_dedupset to true indicates to the NetAppCinder driver to only consider thoseFlexVols with this attribute beingused.
3.13 Create Cinder Volumes using Storage Service CatalogThis lab activity demonstrates how to use the different volume types that make up a Storage Service Catalog. Youwill create Cinder volumes that take advantage of Data ONTAP features provided by the Storage Service Catalogthat you reviewed in the previous lab exercise. You will create Cinder volumes using two different protocols,NFSv3 and iSCSI, and later review the differences in how the NetApp Cinder driver functions. Finally, you learnhow to create a Cinder Snapshot.
Cinder can leverage the different storage efficiency and data protection features of Netapp clustered Data ONTAPthrough the abstraction provided by the Netapp Cinder driver. Using specific Netapp extra-specs, OpenStackusers can employ Netapp features without having to know all of the underlying storage commands. Additionally,the cinder snapshot-create command leverages the Netapp Data ONTAP sis-clone feature to efficiently create acinder snapshot. The sis-clone feature is used when creating a new Cinder volume from a cinder snapshot for atime and space efficient Cinder volume.
For example, the cinder snapshot command is integrated with Data ONTAP to create the SIS Clone instead ofallowing the native Cinder driver to copy the data to the cinder snapshot. This is more storage and time efficientthan having Cinder copy the data to the Cinder snapshot.
73 NetApp ONTAP Integration with OpenStack © 2016 NetApp, Inc. All rights reserved. NetApp Proprietary
1. Log into the OpenStack dashboard (Horizon) with Internet Explorer from the Jumphost desktop. Doubleclick the icon on the Windows Jumphost desktop to start the OpenStack dashboard.
Figure 3-54:
2. Log into the OpenStack environment using the provided credentials. Once the OpenStack horizon loginscreen appears, use the following credentials: User Name admin, and Password Netapp1!
Figure 3-55:
3. Under the “Project, Compute” pane on the left, choose the Volumes tab to display all of the currentvolumes available within OpenStack for the Admin user. Click Volumes.
4. Click the + Create Volume button to create a new Cinder volume.
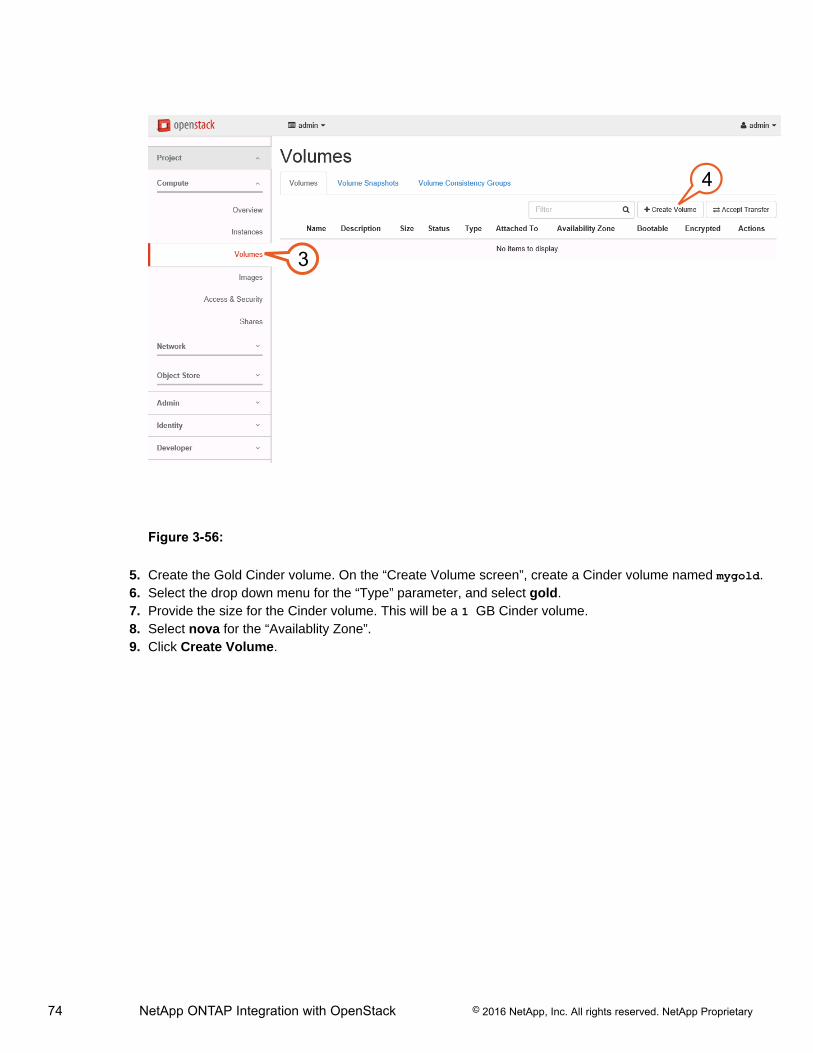
74 NetApp ONTAP Integration with OpenStack © 2016 NetApp, Inc. All rights reserved. NetApp Proprietary
3
4
Figure 3-56:
5. Create the Gold Cinder volume. On the “Create Volume screen”, create a Cinder volume named mygold.6. Select the drop down menu for the “Type” parameter, and select gold.7. Provide the size for the Cinder volume. This will be a 1 GB Cinder volume.8. Select nova for the “Availablity Zone”.9. Click Create Volume.
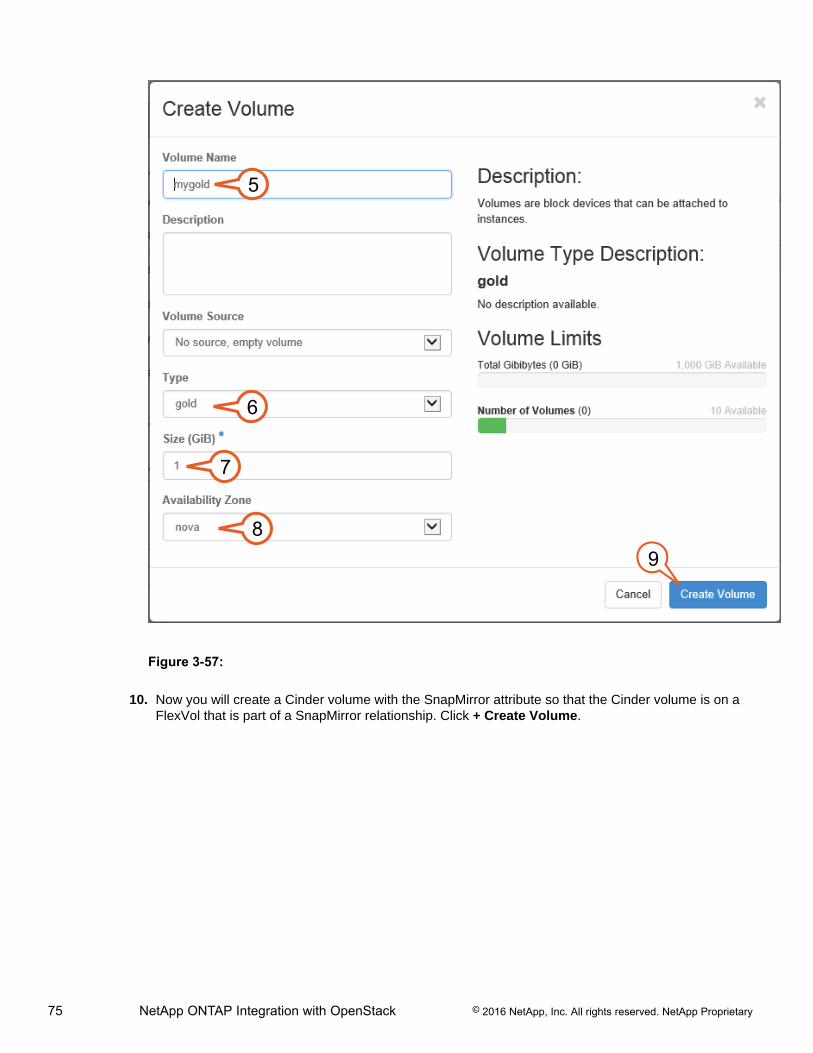
75 NetApp ONTAP Integration with OpenStack © 2016 NetApp, Inc. All rights reserved. NetApp Proprietary
5
6
7
98
Figure 3-57:
10. Now you will create a Cinder volume with the SnapMirror attribute so that the Cinder volume is on aFlexVol that is part of a SnapMirror relationship. Click + Create Volume.
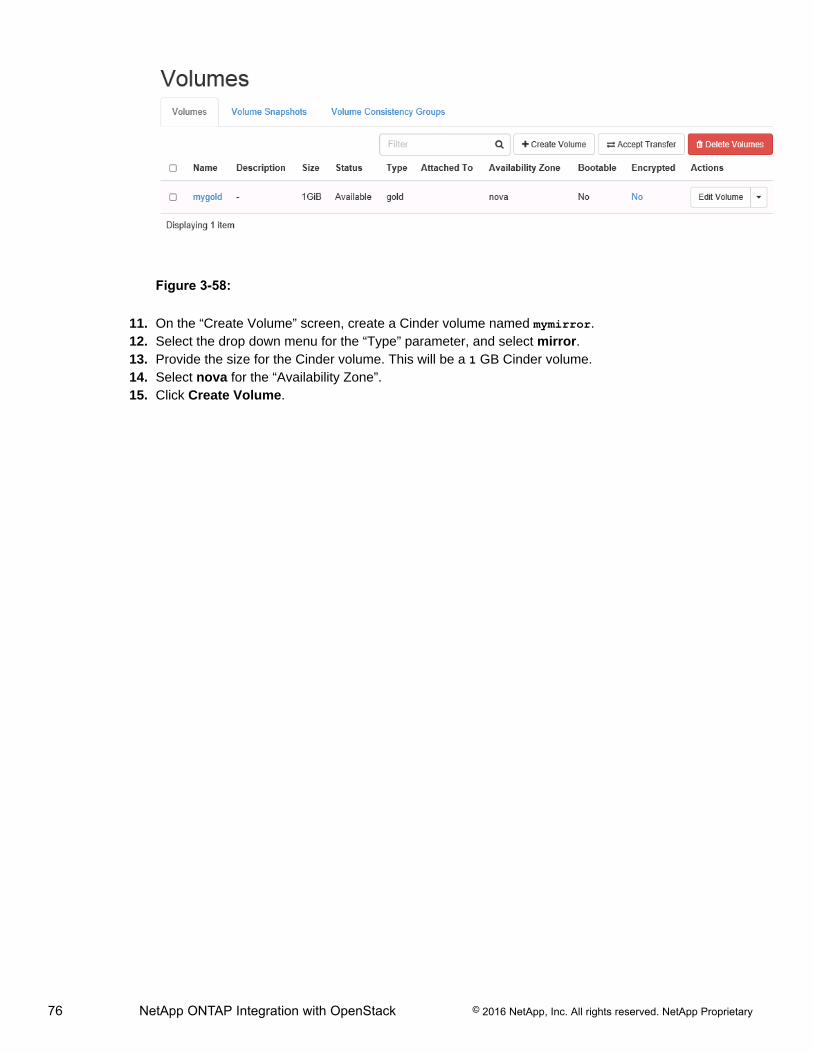
76 NetApp ONTAP Integration with OpenStack © 2016 NetApp, Inc. All rights reserved. NetApp Proprietary
Figure 3-58:
11. On the “Create Volume” screen, create a Cinder volume named mymirror.12. Select the drop down menu for the “Type” parameter, and select mirror.13. Provide the size for the Cinder volume. This will be a 1 GB Cinder volume.14. Select nova for the “Availability Zone”.15. Click Create Volume.
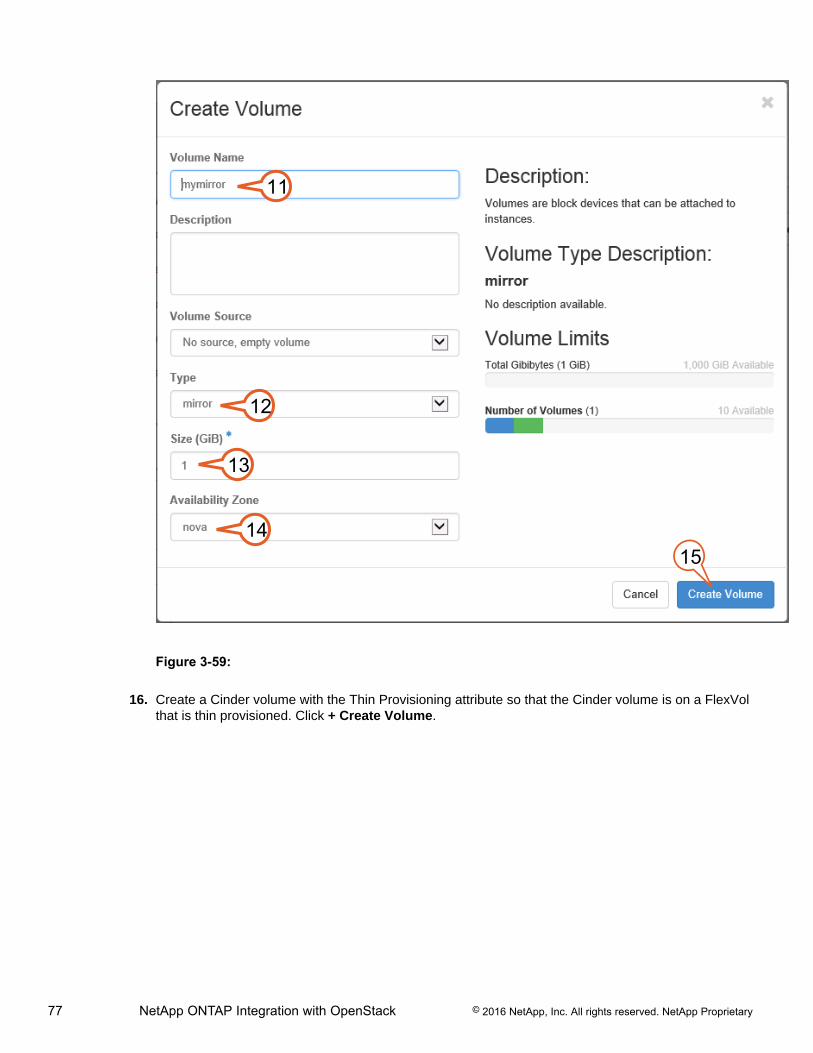
77 NetApp ONTAP Integration with OpenStack © 2016 NetApp, Inc. All rights reserved. NetApp Proprietary
11
12
13
1514
Figure 3-59:
16. Create a Cinder volume with the Thin Provisioning attribute so that the Cinder volume is on a FlexVolthat is thin provisioned. Click + Create Volume.
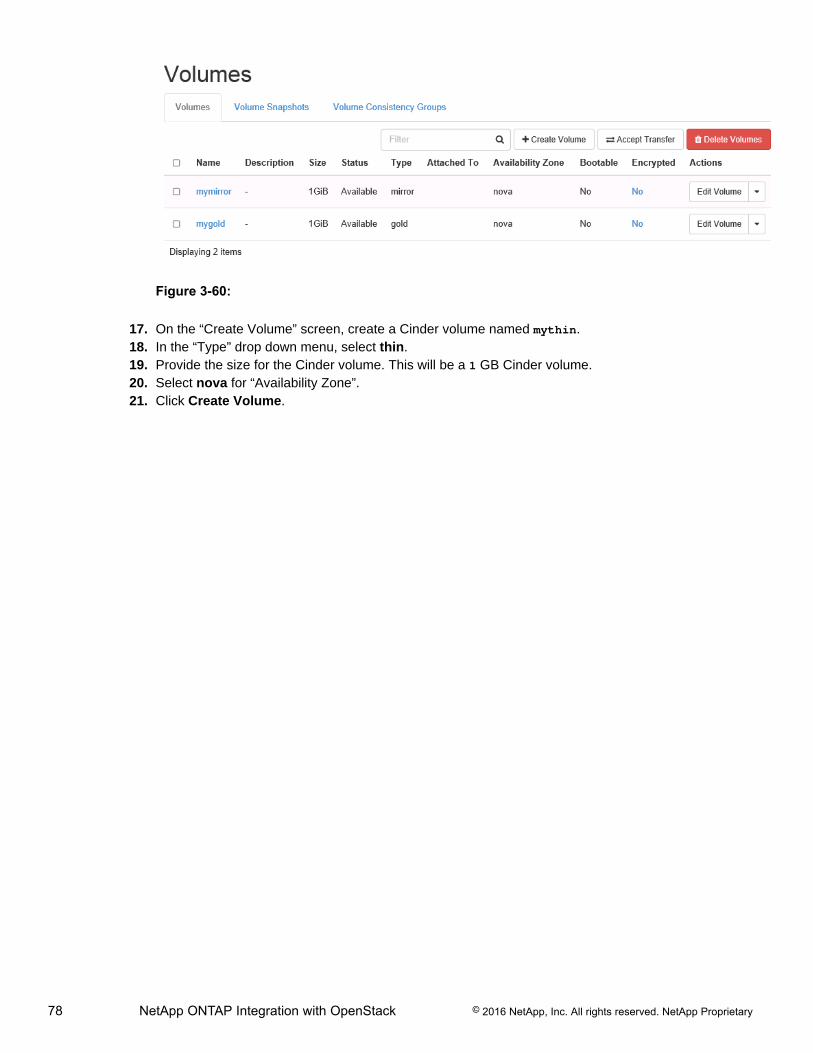
78 NetApp ONTAP Integration with OpenStack © 2016 NetApp, Inc. All rights reserved. NetApp Proprietary
Figure 3-60:
17. On the “Create Volume” screen, create a Cinder volume named mythin.18. In the “Type” drop down menu, select thin.19. Provide the size for the Cinder volume. This will be a 1 GB Cinder volume.20. Select nova for “Availability Zone”.21. Click Create Volume.
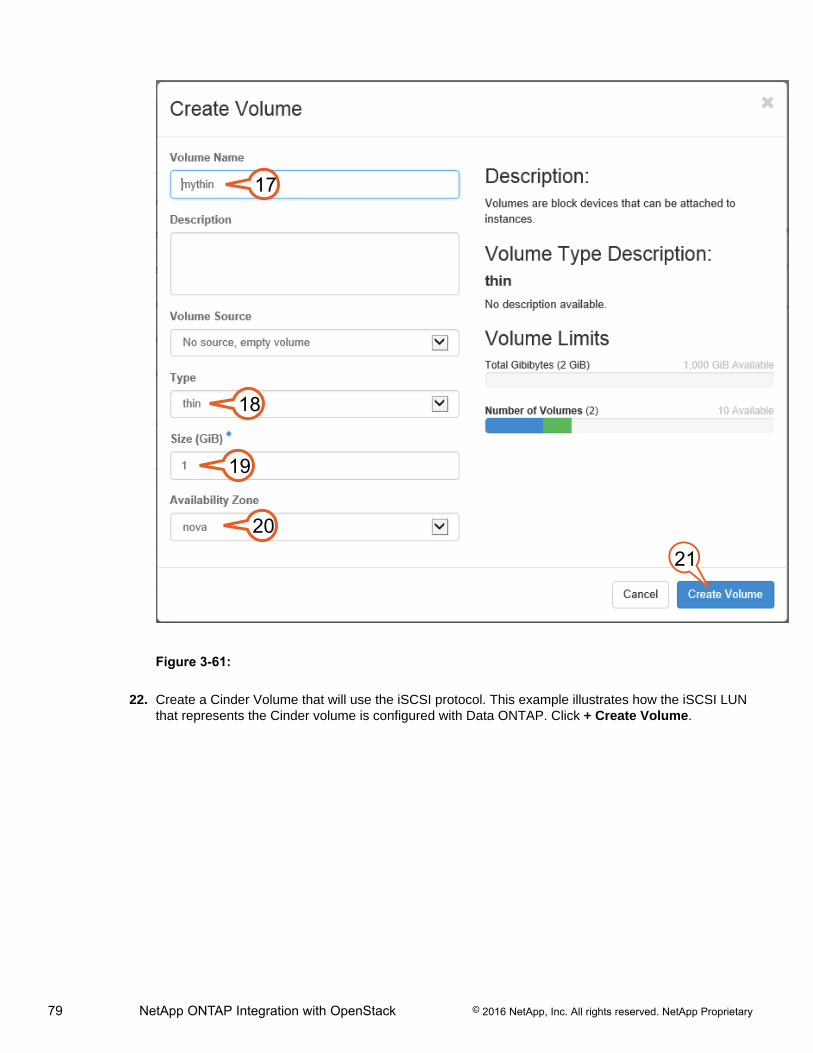
79 NetApp ONTAP Integration with OpenStack © 2016 NetApp, Inc. All rights reserved. NetApp Proprietary
17
18
19
2120
Figure 3-61:
22. Create a Cinder Volume that will use the iSCSI protocol. This example illustrates how the iSCSI LUNthat represents the Cinder volume is configured with Data ONTAP. Click + Create Volume.
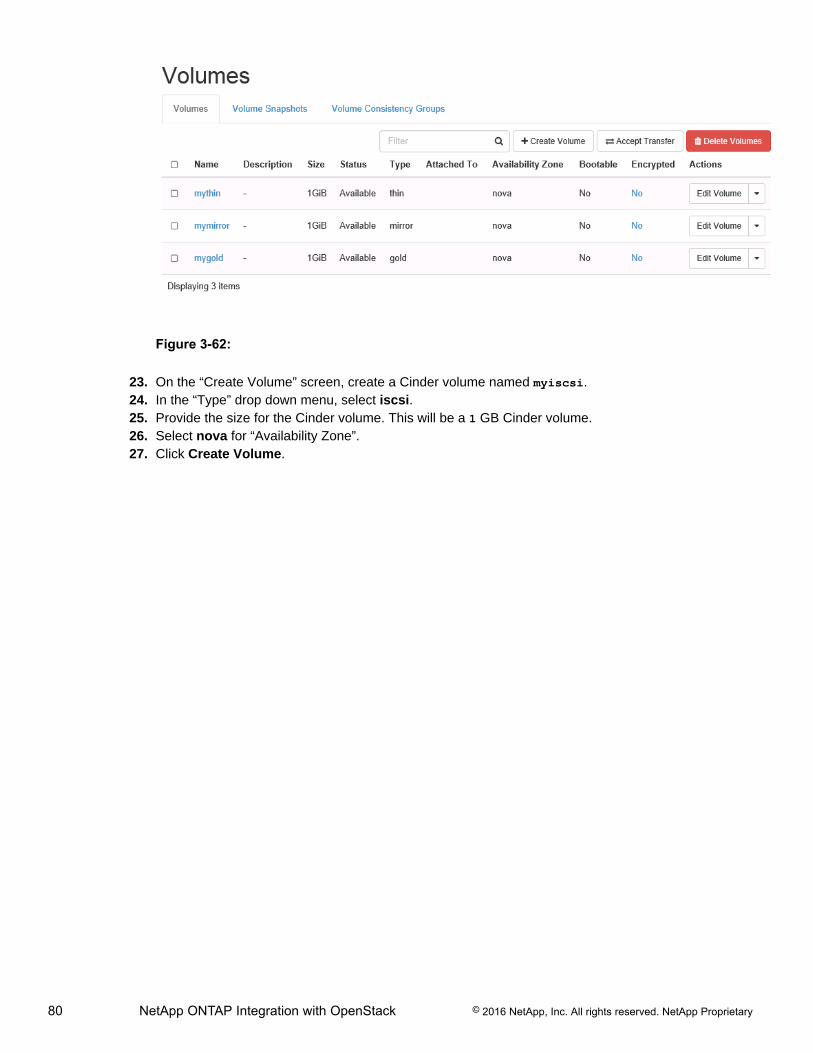
80 NetApp ONTAP Integration with OpenStack © 2016 NetApp, Inc. All rights reserved. NetApp Proprietary
Figure 3-62:
23. On the “Create Volume” screen, create a Cinder volume named myiscsi.24. In the “Type” drop down menu, select iscsi.25. Provide the size for the Cinder volume. This will be a 1 GB Cinder volume.26. Select nova for “Availability Zone”.27. Click Create Volume.
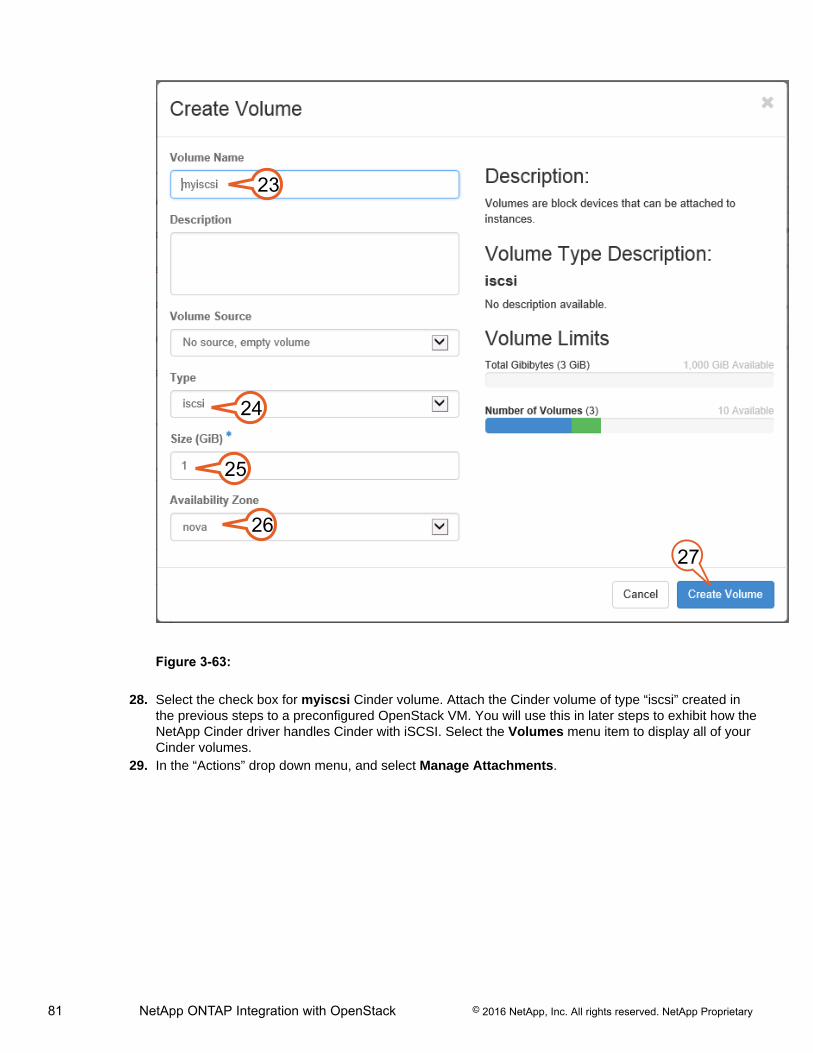
81 NetApp ONTAP Integration with OpenStack © 2016 NetApp, Inc. All rights reserved. NetApp Proprietary
23
24
25
2726
Figure 3-63:
28. Select the check box for myiscsi Cinder volume. Attach the Cinder volume of type “iscsi” created inthe previous steps to a preconfigured OpenStack VM. You will use this in later steps to exhibit how theNetApp Cinder driver handles Cinder with iSCSI. Select the Volumes menu item to display all of yourCinder volumes.
29. In the “Actions” drop down menu, and select Manage Attachments.
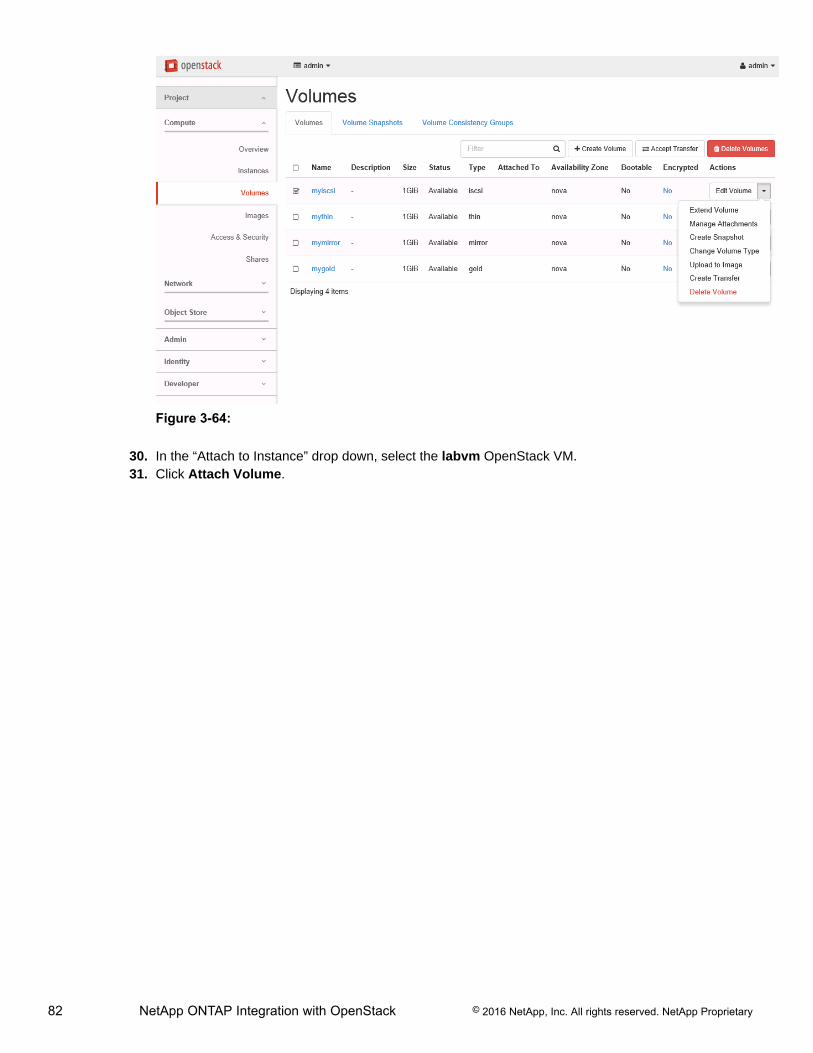
82 NetApp ONTAP Integration with OpenStack © 2016 NetApp, Inc. All rights reserved. NetApp Proprietary
Figure 3-64:
30. In the “Attach to Instance” drop down, select the labvm OpenStack VM.31. Click Attach Volume.
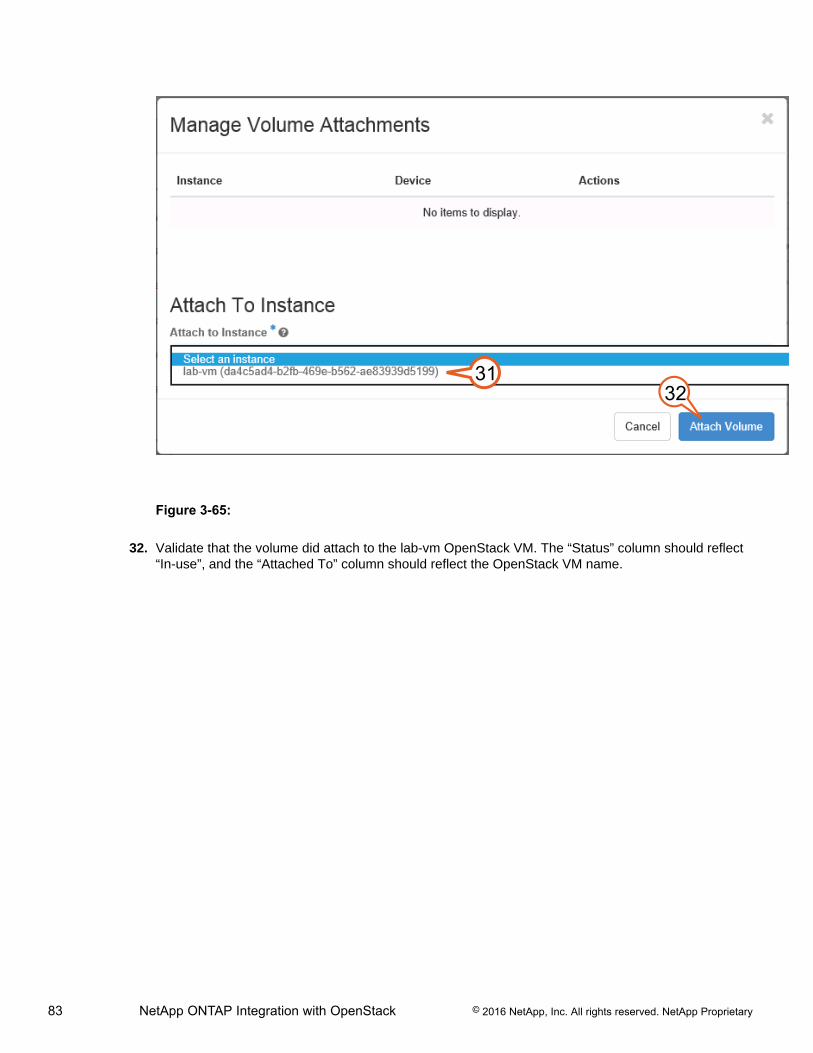
83 NetApp ONTAP Integration with OpenStack © 2016 NetApp, Inc. All rights reserved. NetApp Proprietary
3132
Figure 3-65:
32. Validate that the volume did attach to the lab-vm OpenStack VM. The “Status” column should reflect“In-use”, and the “Attached To” column should reflect the OpenStack VM name.
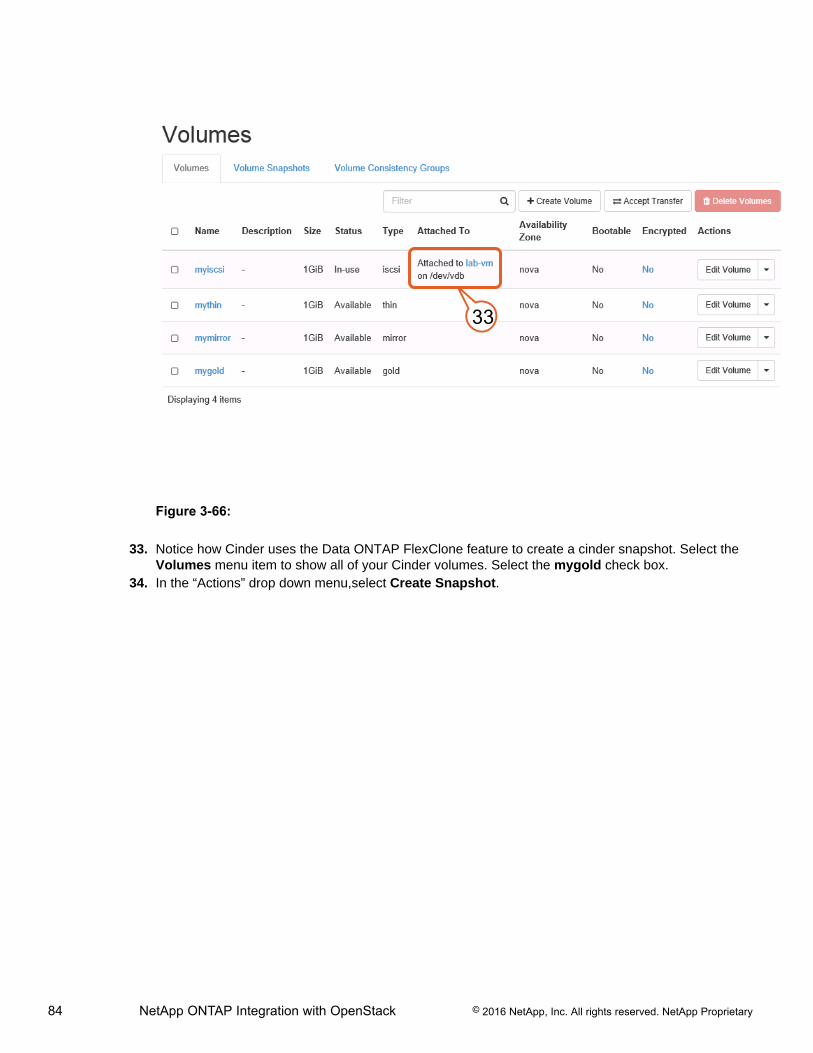
84 NetApp ONTAP Integration with OpenStack © 2016 NetApp, Inc. All rights reserved. NetApp Proprietary
33
Figure 3-66:
33. Notice how Cinder uses the Data ONTAP FlexClone feature to create a cinder snapshot. Select theVolumes menu item to show all of your Cinder volumes. Select the mygold check box.
34. In the “Actions” drop down menu,select Create Snapshot.
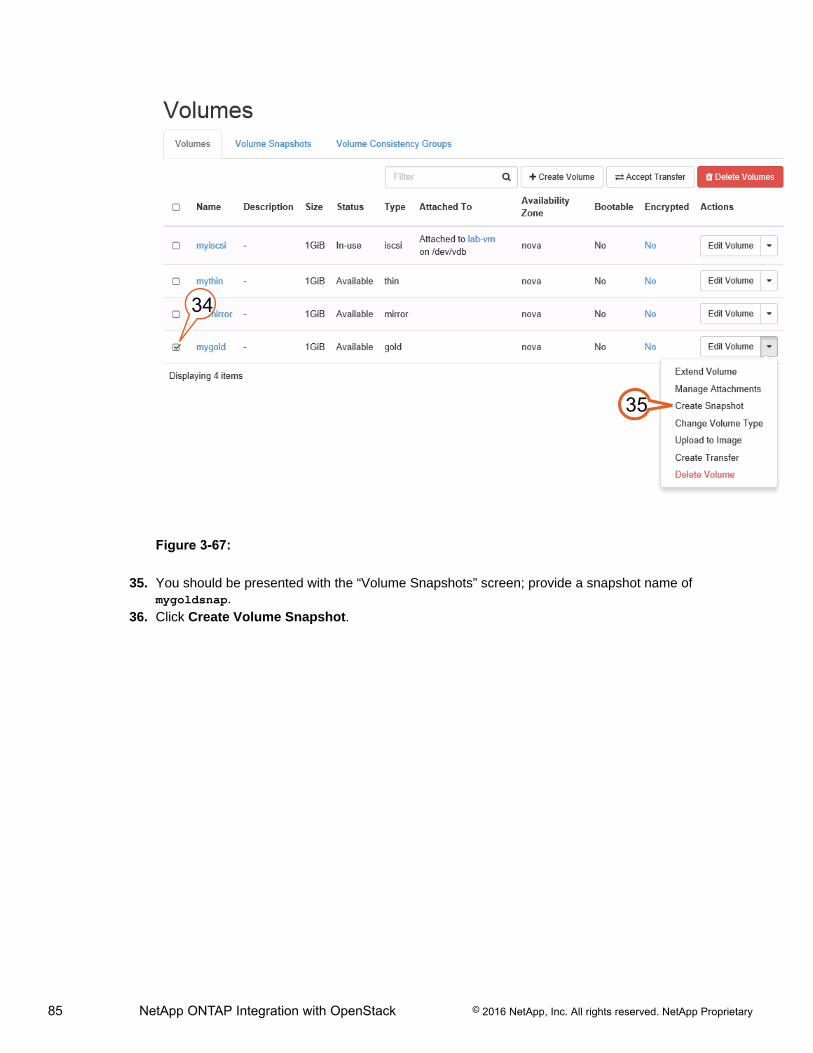
85 NetApp ONTAP Integration with OpenStack © 2016 NetApp, Inc. All rights reserved. NetApp Proprietary
34
35
Figure 3-67:
35. You should be presented with the “Volume Snapshots” screen; provide a snapshot name ofmygoldsnap.
36. Click Create Volume Snapshot.

86 NetApp ONTAP Integration with OpenStack © 2016 NetApp, Inc. All rights reserved. NetApp Proprietary
36
37
Figure 3-68:
37. Click +Create Volume to create a Cinder volume from Snapshot. Provide a new name for the Cindervolume. You will see in the screen that your Snapshot is listed as the source. Click +Create Volume.
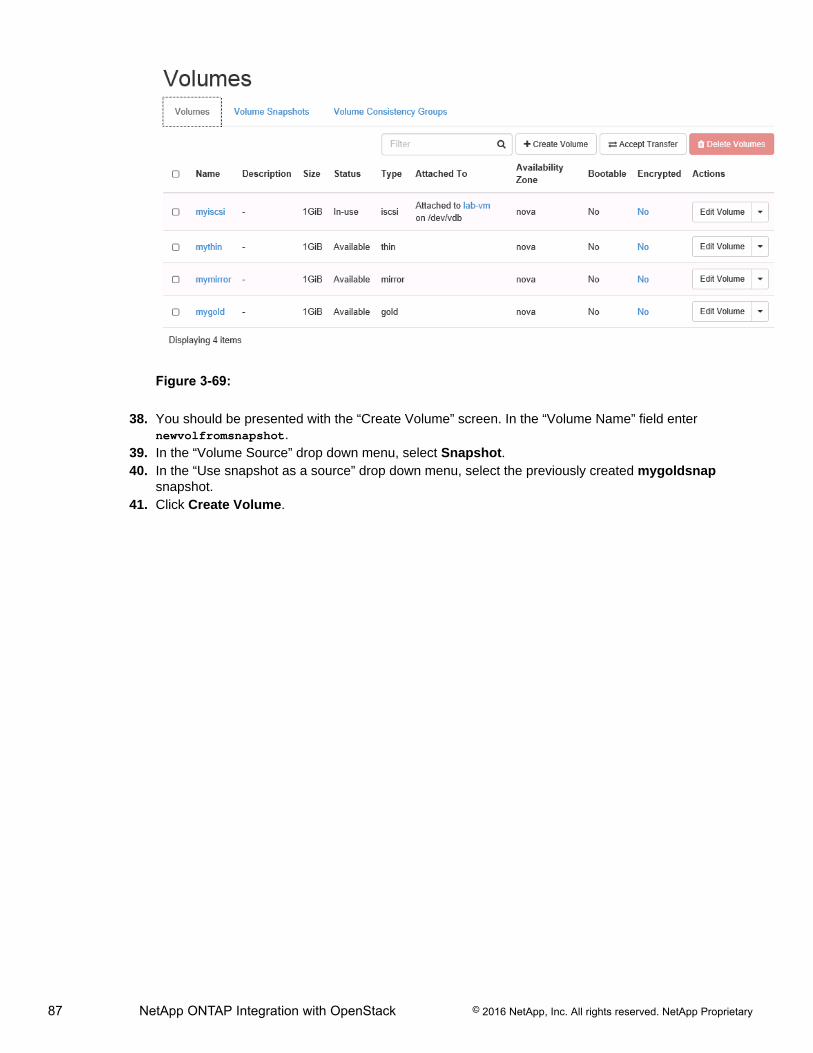
87 NetApp ONTAP Integration with OpenStack © 2016 NetApp, Inc. All rights reserved. NetApp Proprietary
Figure 3-69:
38. You should be presented with the “Create Volume” screen. In the “Volume Name” field enternewvolfromsnapshot.
39. In the “Volume Source” drop down menu, select Snapshot.40. In the “Use snapshot as a source” drop down menu, select the previously created mygoldsnap
snapshot.41. Click Create Volume.
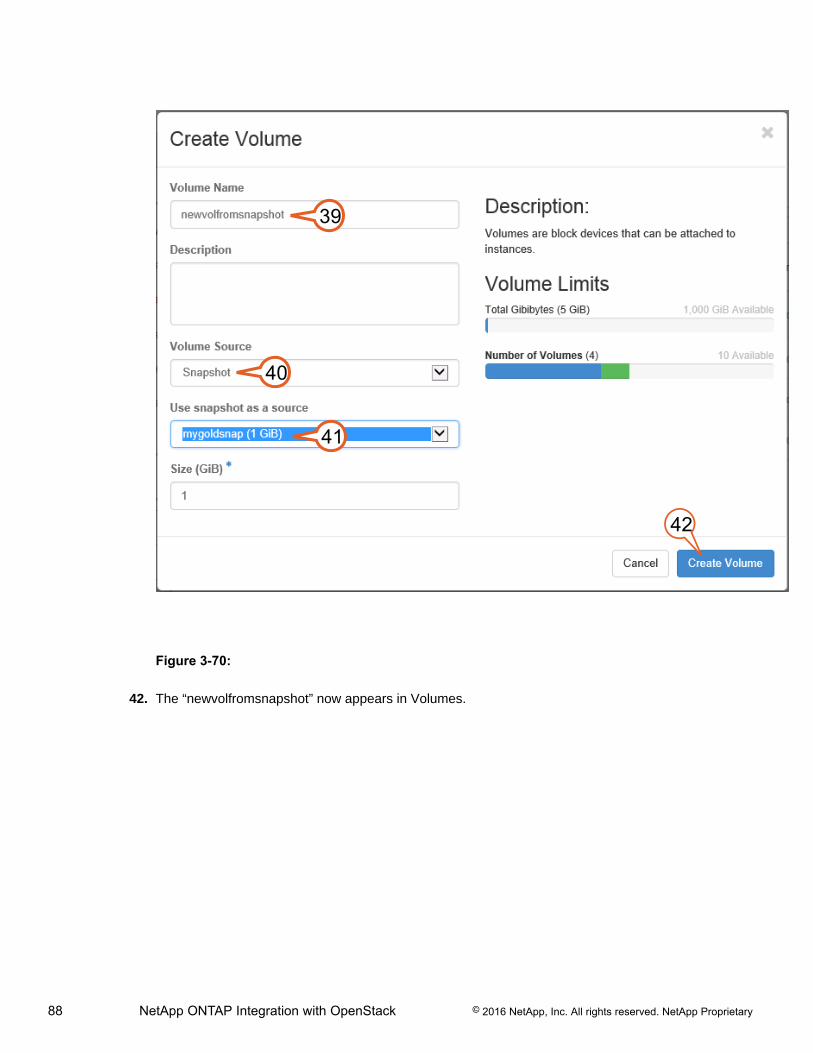
88 NetApp ONTAP Integration with OpenStack © 2016 NetApp, Inc. All rights reserved. NetApp Proprietary
39
40
41
42
Figure 3-70:
42. The “newvolfromsnapshot” now appears in Volumes.
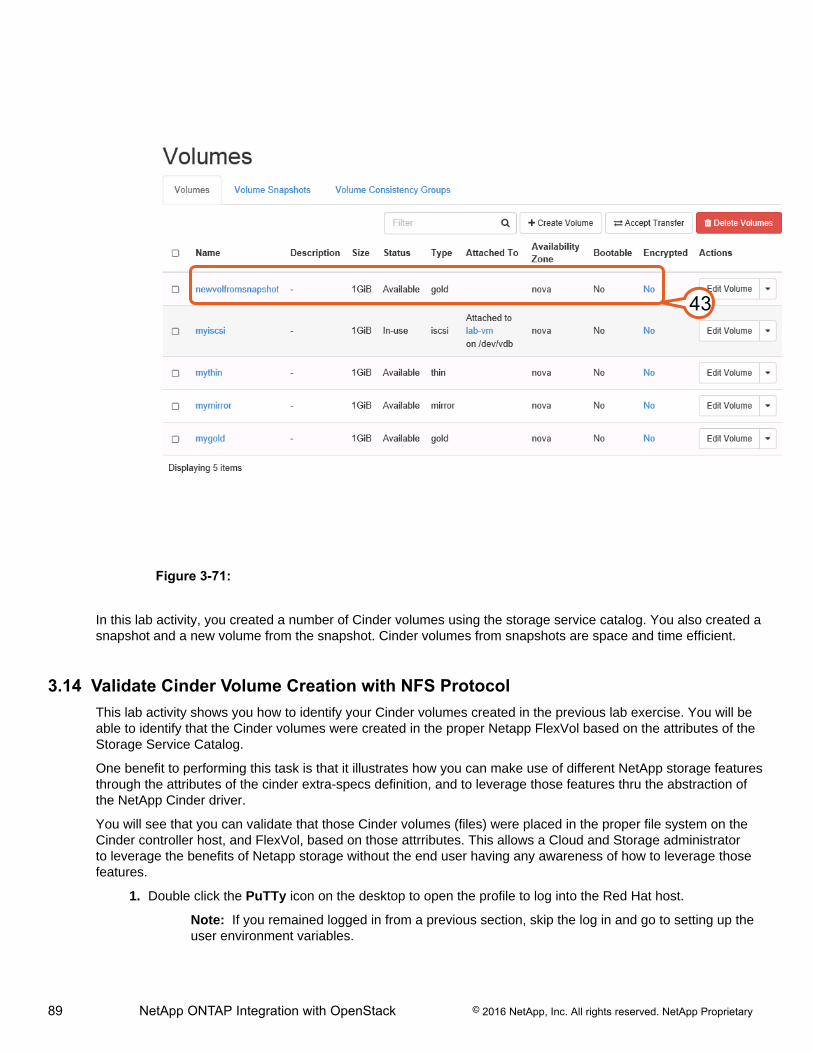
89 NetApp ONTAP Integration with OpenStack © 2016 NetApp, Inc. All rights reserved. NetApp Proprietary
43
Figure 3-71:
In this lab activity, you created a number of Cinder volumes using the storage service catalog. You also created asnapshot and a new volume from the snapshot. Cinder volumes from snapshots are space and time efficient.
3.14 Validate Cinder Volume Creation with NFS ProtocolThis lab activity shows you how to identify your Cinder volumes created in the previous lab exercise. You will beable to identify that the Cinder volumes were created in the proper Netapp FlexVol based on the attributes of theStorage Service Catalog.
One benefit to performing this task is that it illustrates how you can make use of different NetApp storage featuresthrough the attributes of the cinder extra-specs definition, and to leverage those features thru the abstraction ofthe NetApp Cinder driver.
You will see that you can validate that those Cinder volumes (files) were placed in the proper file system on theCinder controller host, and FlexVol, based on those attrributes. This allows a Cloud and Storage administratorto leverage the benefits of Netapp storage without the end user having any awareness of how to leverage thosefeatures.
1. Double click the PuTTy icon on the desktop to open the profile to log into the Red Hat host.
Note: If you remained logged in from a previous section, skip the log in and go to setting up theuser environment variables.
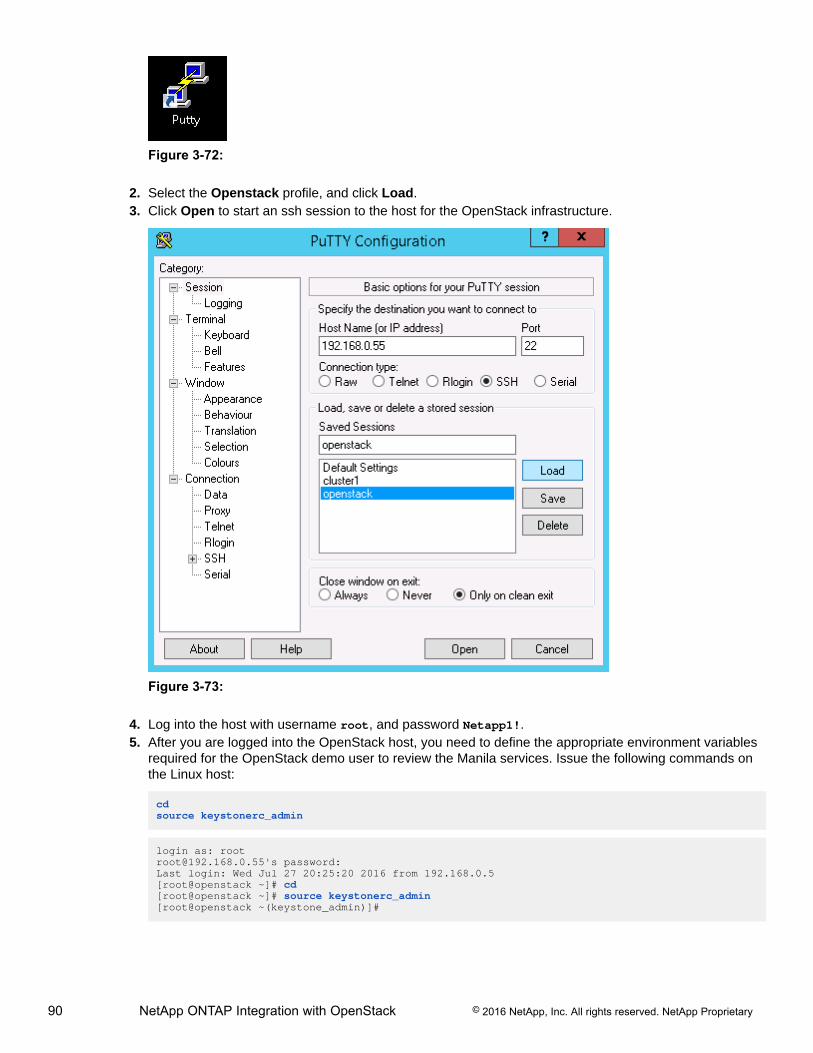
90 NetApp ONTAP Integration with OpenStack © 2016 NetApp, Inc. All rights reserved. NetApp Proprietary
Figure 3-72:
2. Select the Openstack profile, and click Load.3. Click Open to start an ssh session to the host for the OpenStack infrastructure.
Figure 3-73:
4. Log into the host with username root, and password Netapp1!.5. After you are logged into the OpenStack host, you need to define the appropriate environment variables
required for the OpenStack demo user to review the Manila services. Issue the following commands onthe Linux host:
cdsource keystonerc_admin
login as: [email protected]'s password:Last login: Wed Jul 27 20:25:20 2016 from 192.168.0.5[root@openstack ~]# cd[root@openstack ~]# source keystonerc_admin[root@openstack ~(keystone_admin)]#
91 NetApp ONTAP Integration with OpenStack © 2016 NetApp, Inc. All rights reserved. NetApp Proprietary
6. To list the Cinder volumes created through the Openstack Horizon GUI, issue the following command:
cinder list
[root@openstack ~(keystone_admin)]# cinder list+--------------------------------------+-----------+--------------------+------+-------------+----------+--------------------------------------+| ID | Status | Name | Size | Volume Type | Bootable | Attached to |+--------------------------------------+-----------+--------------------+------+-------------+----------+--------------------------------------+| 0d5122c2-4506-4702-b105-bdc154d32dc5 | available | mythin | 1 | thin | false | || 526ac8f8-86b0-4dfb-a698-5561fe0f2956 | in-use | myiscsi | 1 | iscsi | false | da4c5ad4-b2fb-469e-b562-ae83939d5199 || 7f78ee32-25cc-4c71-bc8e-7fa5d23c83f3 | available | mygold | 1 | gold | false | || 90502173-27cf-4516-81f8-3cda1228c49b | available | mymirror | 1 | mirror | false | || d7bff82d-5a78-4a7d-9e3e-e633ab03ea6b | available | newvolfromsnapshot | 1 | gold | false | |+--------------------------------------+-----------+--------------------+------+-------------+----------+--------------------------------------+[root@openstack ~(keystone_admin)]#
7. Identify the file system for each of the Cinder volumes previously created, and confirm that the Cindervolume (which is a file) was created in the correct file system. Each file system is defined to supportspecific Cinder volume types. This illustrates how you can use the Storage Service Catalog to definewhich file system is used by each specific volume type. For example, the “mygold” Cinder volume willplace a file in the NFS file system represented by the openstack_gold SVM, and FlexVol.
ls /var/lib/cinder/mnt/*/*<The ID from the Cinder list command>*df -kh | grep <File system UUID from output of the ls command above>
[root@openstack ~(keystone_admin)]# ls /var/lib/cinder/mnt/*/*7f78ee32-25cc-4c71-bc8e-7fa5d23c83f3*/var/lib/cinder/mnt/28e2c4e7a224e1fe98cc9cca73c273b2/volume-7f78ee32-25cc-4c71-bc8e-7fa5d23c83f3[root@openstack ~(keystone_admin)]# df -kh | grep /var/lib/cinder/mnt/28e2c4e7a224e1fe98cc9cca73c273b2192.168.1.140:/gold_flexvol 9.5G 896K 9.5G 1% /var/lib/cinder/mnt/28e2c4e7a224e1fe98cc9cca73c273b2[root@openstack ~(keystone_admin)]#
3.15 Validate Cinder Volume Creation with iSCSI ProtocolThis lab activity illustrates how the NetApp Cinder driver uses Data ONTAP to manage LUNS using the iSCSIprotocol with a Data ONTAP FlexVol supporting the Cinder backend. Managing the iSCSI Luns is performedthrough the Netapp Cinder driver. This allows OpenStack to provide a self service portal to create the Cindervolumes, and manage the iSCSI LUNS without any interaction or requests to a storage administrator.
The NetApp Cinder driver easily manages iSCSI LUNS, and makes them available to users with OpenStackVMs in a self service process. The driver manages the lifecycle of the LUN, and offers the ability of create DataONTAP igroups, mapping the LUN to the appropriate igroup, and deleting the LUN once the Cinder volume isdeleted.
1. Log back into System Manager. Double-click on the NetApp On Command System Manager iconshown on the Jumphost desktop.
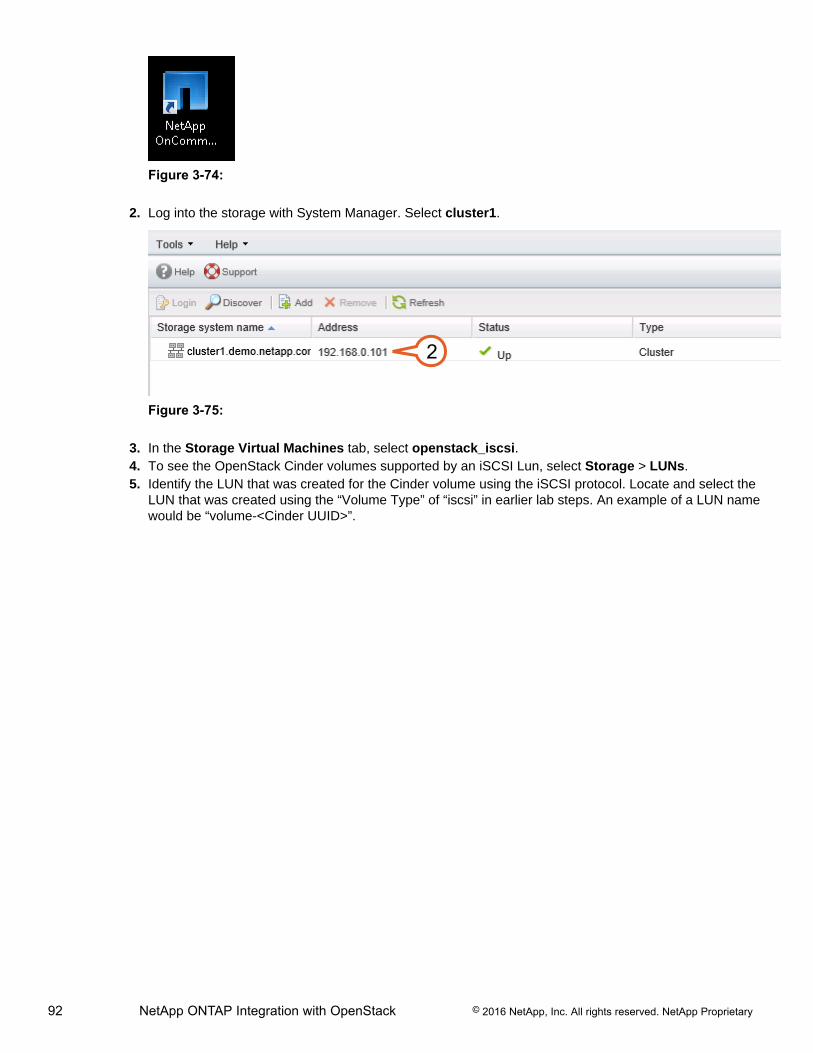
92 NetApp ONTAP Integration with OpenStack © 2016 NetApp, Inc. All rights reserved. NetApp Proprietary
Figure 3-74:
2. Log into the storage with System Manager. Select cluster1.
2
Figure 3-75:
3. In the Storage Virtual Machines tab, select openstack_iscsi.4. To see the OpenStack Cinder volumes supported by an iSCSI Lun, select Storage > LUNs.5. Identify the LUN that was created for the Cinder volume using the iSCSI protocol. Locate and select the
LUN that was created using the “Volume Type” of “iscsi” in earlier lab steps. An example of a LUN namewould be “volume-<Cinder UUID>”.
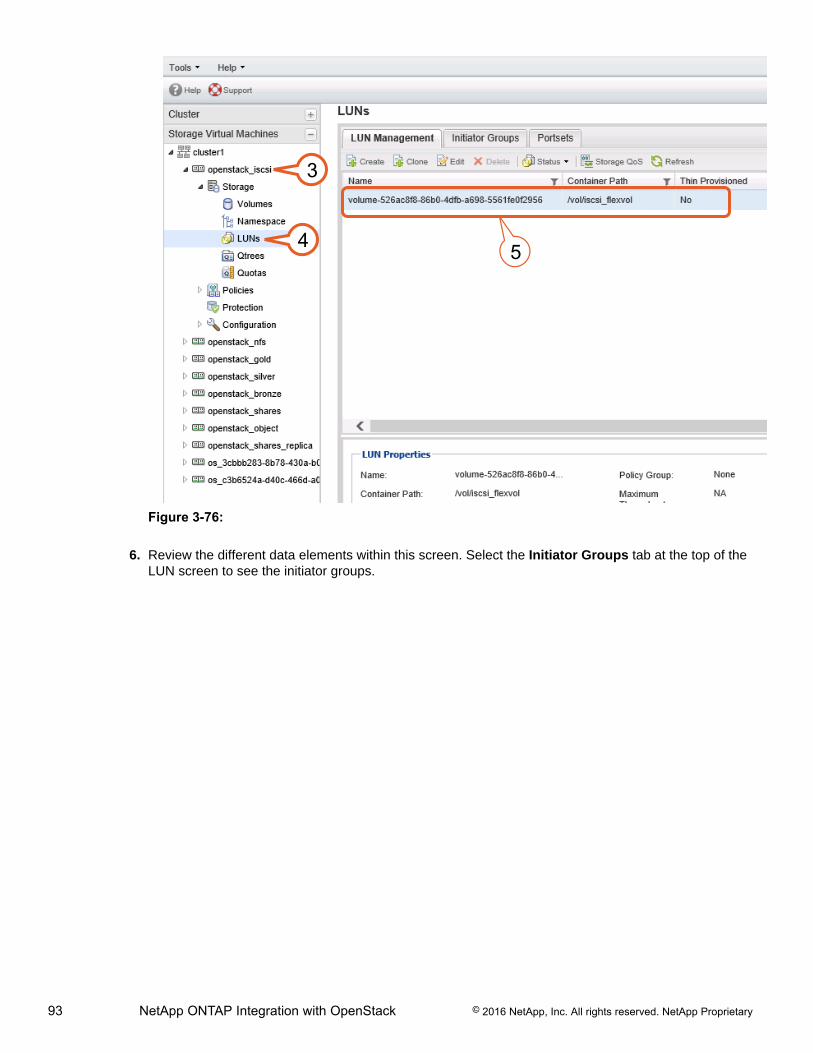
93 NetApp ONTAP Integration with OpenStack © 2016 NetApp, Inc. All rights reserved. NetApp Proprietary
3
4 5
Figure 3-76:
6. Review the different data elements within this screen. Select the Initiator Groups tab at the top of theLUN screen to see the initiator groups.
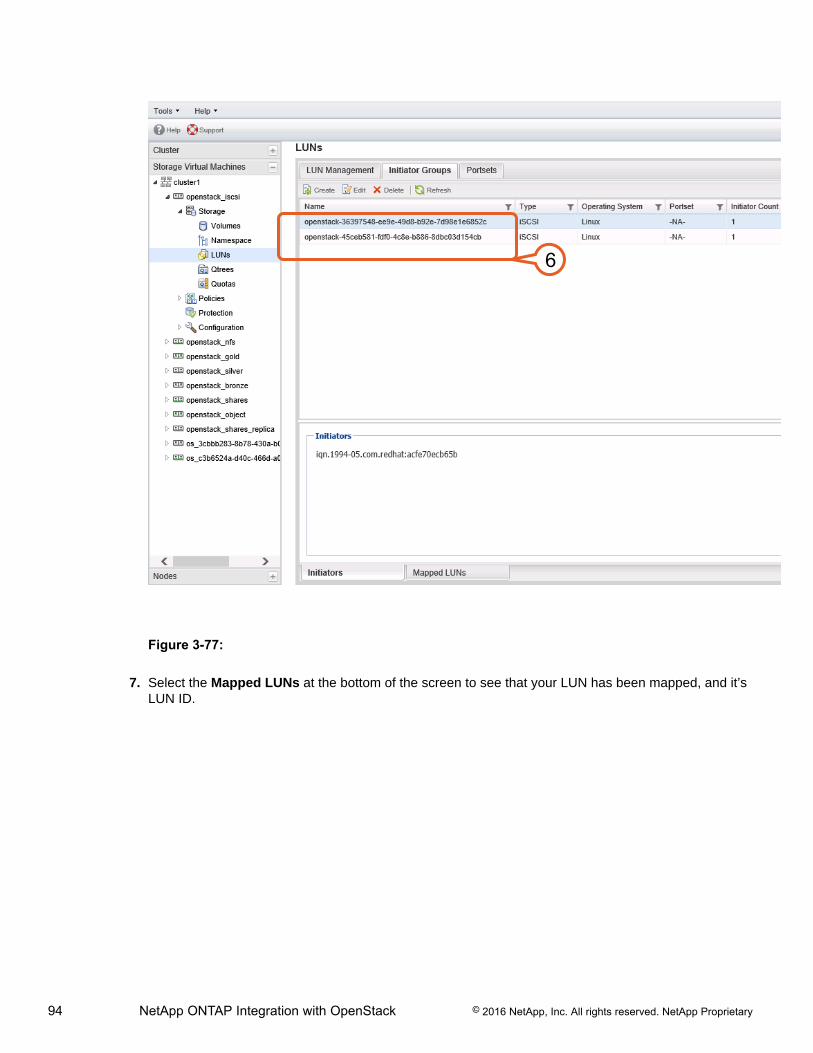
94 NetApp ONTAP Integration with OpenStack © 2016 NetApp, Inc. All rights reserved. NetApp Proprietary
6
Figure 3-77:
7. Select the Mapped LUNs at the bottom of the screen to see that your LUN has been mapped, and it’sLUN ID.
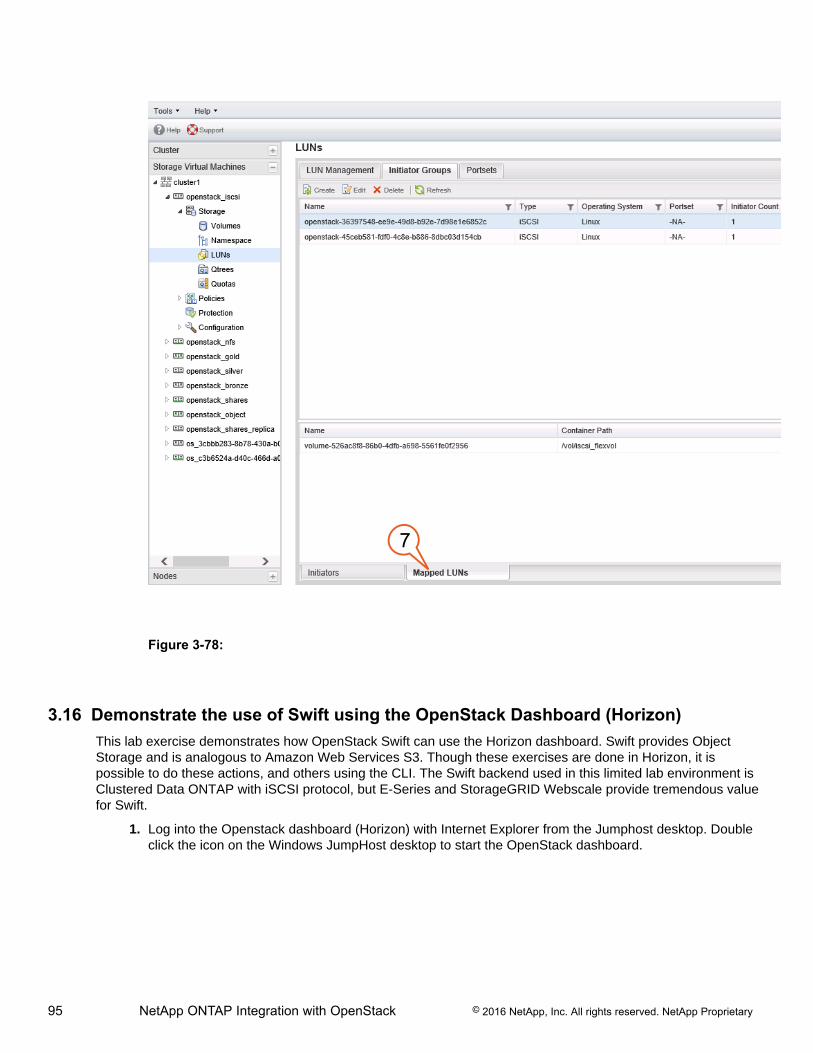
95 NetApp ONTAP Integration with OpenStack © 2016 NetApp, Inc. All rights reserved. NetApp Proprietary
7
Figure 3-78:
3.16 Demonstrate the use of Swift using the OpenStack Dashboard (Horizon)This lab exercise demonstrates how OpenStack Swift can use the Horizon dashboard. Swift provides ObjectStorage and is analogous to Amazon Web Services S3. Though these exercises are done in Horizon, it ispossible to do these actions, and others using the CLI. The Swift backend used in this limited lab environment isClustered Data ONTAP with iSCSI protocol, but E-Series and StorageGRID Webscale provide tremendous valuefor Swift.
1. Log into the Openstack dashboard (Horizon) with Internet Explorer from the Jumphost desktop. Doubleclick the icon on the Windows JumpHost desktop to start the OpenStack dashboard.
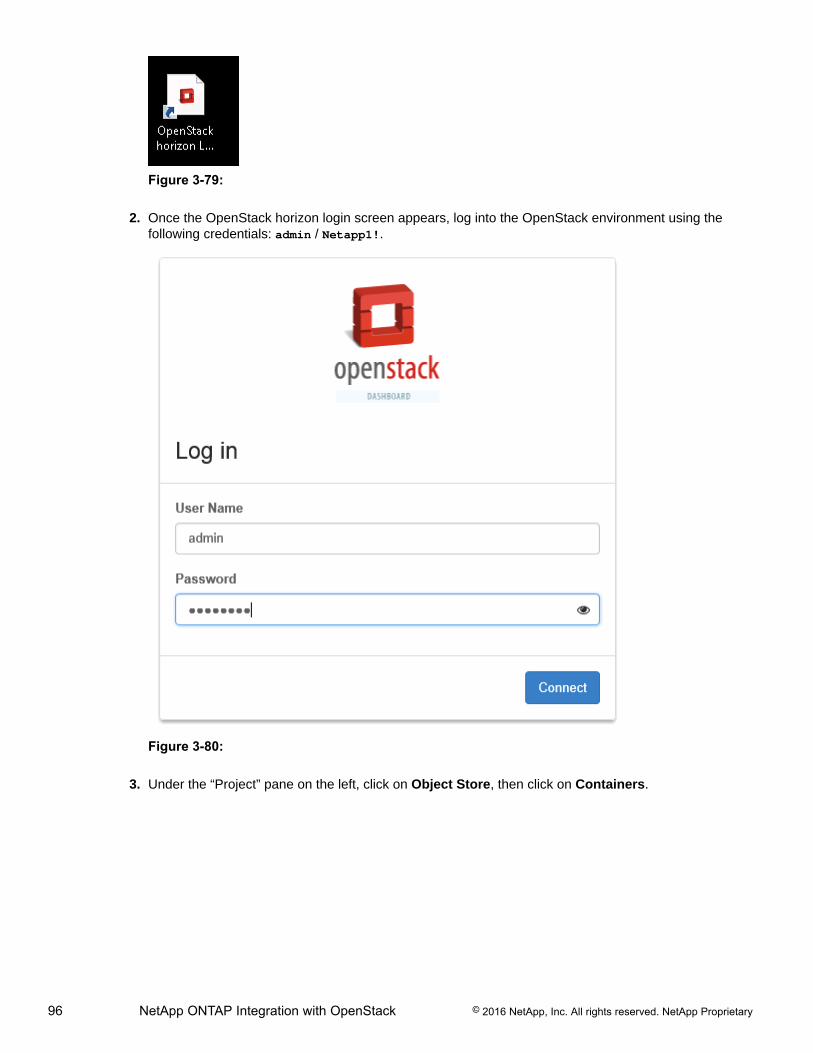
96 NetApp ONTAP Integration with OpenStack © 2016 NetApp, Inc. All rights reserved. NetApp Proprietary
Figure 3-79:
2. Once the OpenStack horizon login screen appears, log into the OpenStack environment using thefollowing credentials: admin / Netapp1!.
Figure 3-80:
3. Under the “Project” pane on the left, click on Object Store, then click on Containers.
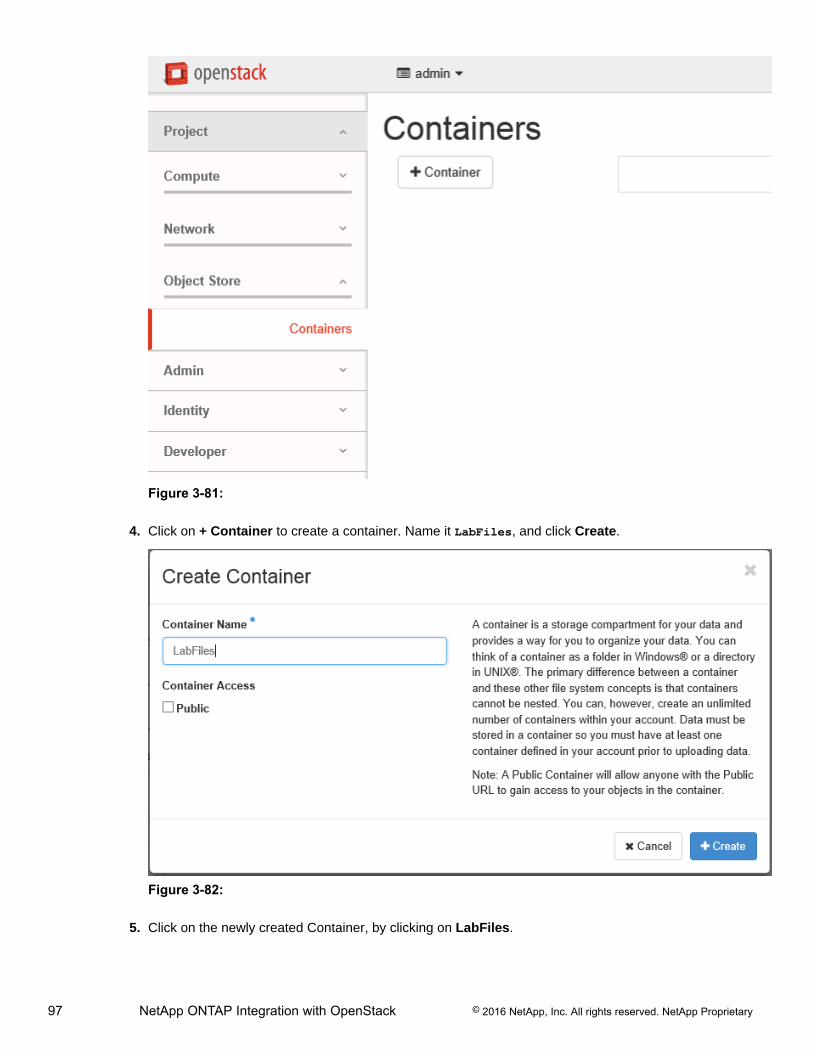
97 NetApp ONTAP Integration with OpenStack © 2016 NetApp, Inc. All rights reserved. NetApp Proprietary
Figure 3-81:
4. Click on + Container to create a container. Name it LabFiles, and click Create.
Figure 3-82:
5. Click on the newly created Container, by clicking on LabFiles.
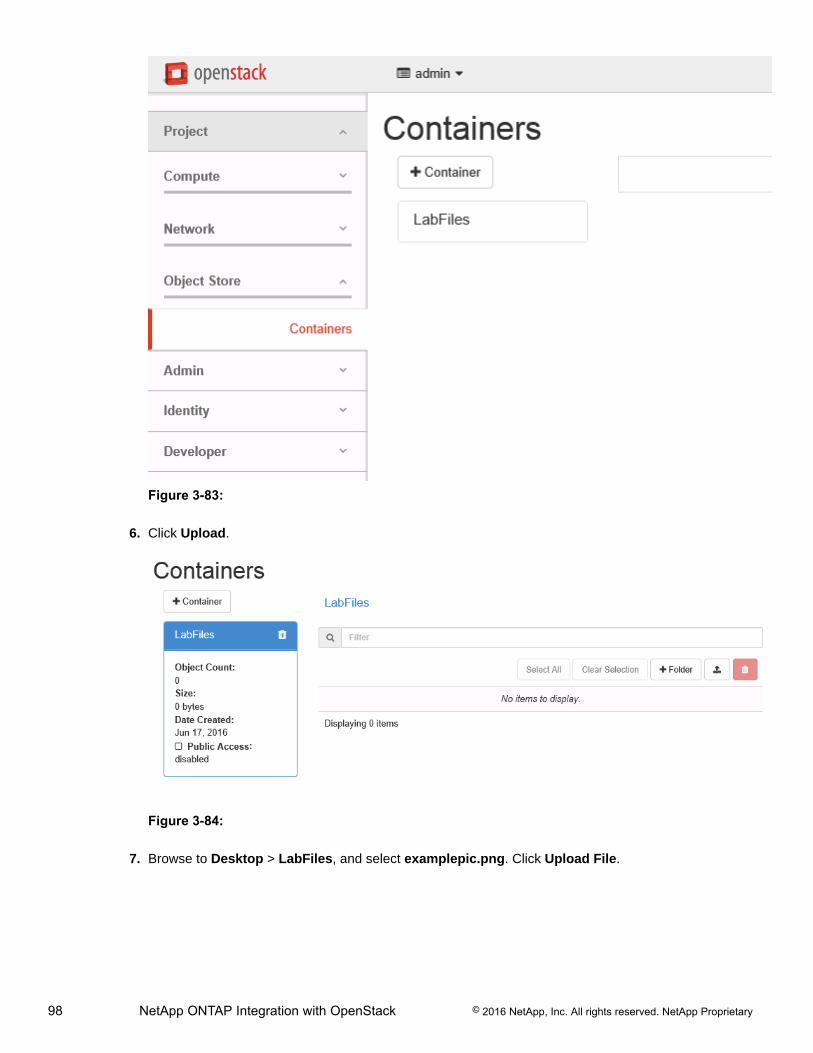
98 NetApp ONTAP Integration with OpenStack © 2016 NetApp, Inc. All rights reserved. NetApp Proprietary
Figure 3-83:
6. Click Upload.
Figure 3-84:
7. Browse to Desktop > LabFiles, and select examplepic.png. Click Upload File.
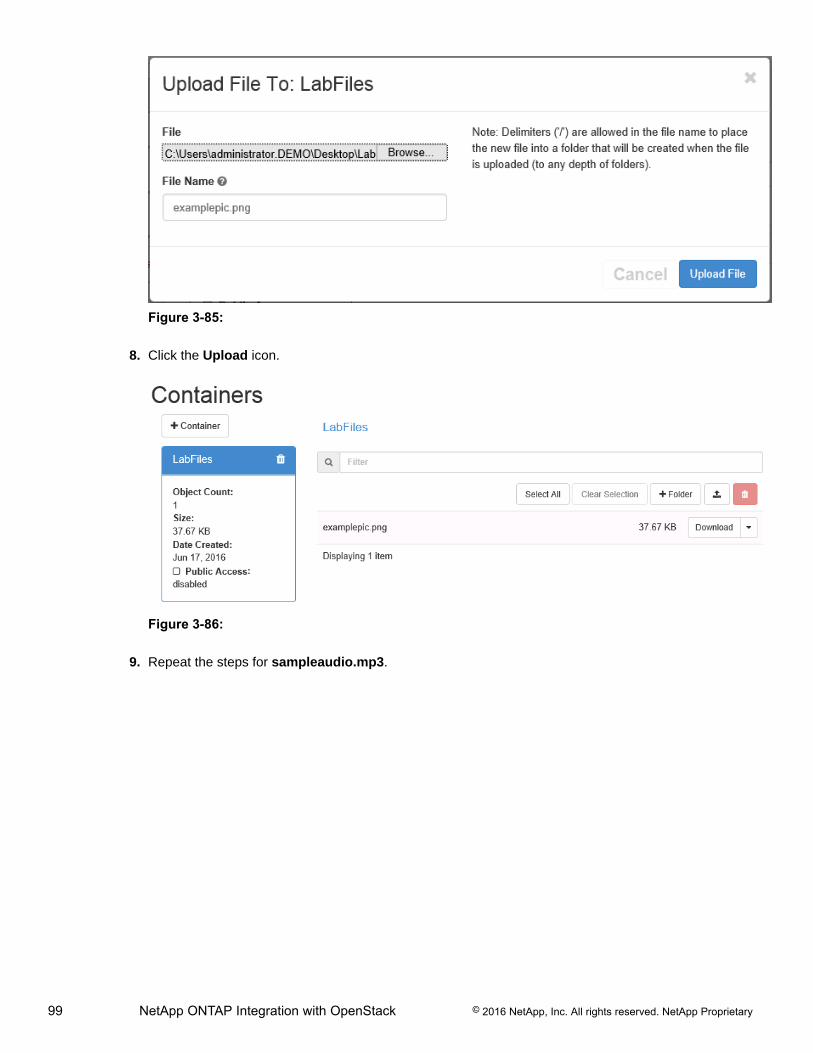
99 NetApp ONTAP Integration with OpenStack © 2016 NetApp, Inc. All rights reserved. NetApp Proprietary
Figure 3-85:
8. Click the Upload icon.
Figure 3-86:
9. Repeat the steps for sampleaudio.mp3.
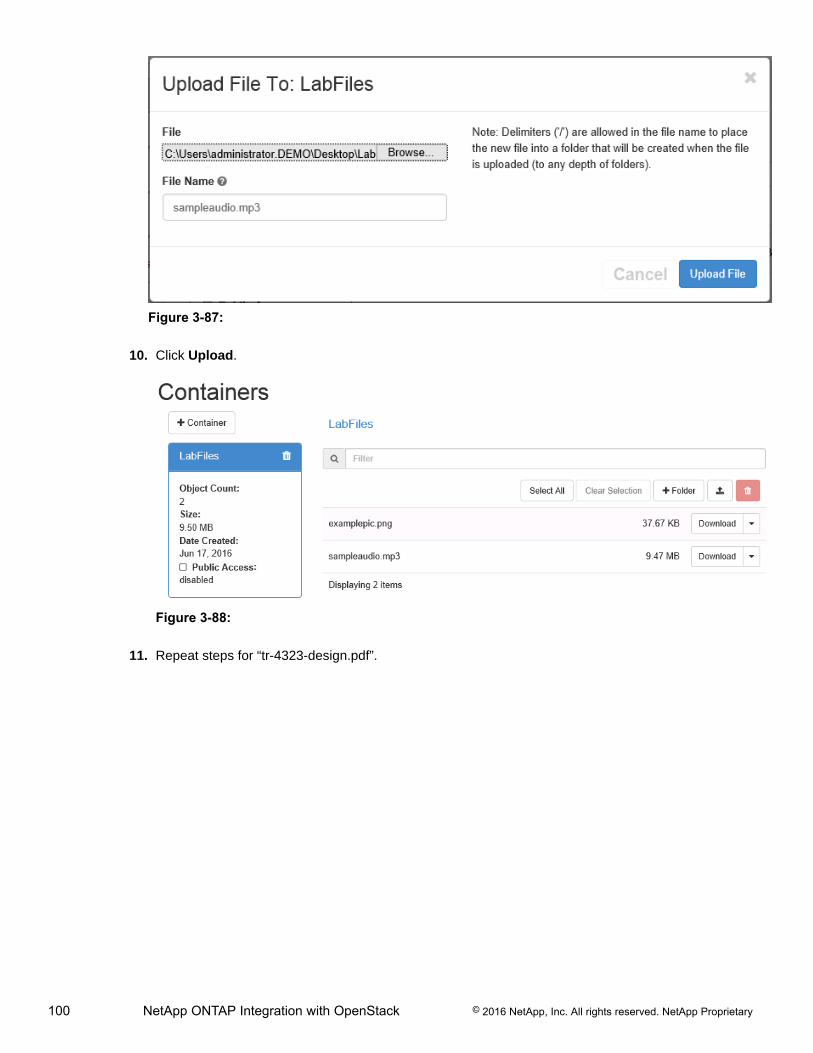
100 NetApp ONTAP Integration with OpenStack © 2016 NetApp, Inc. All rights reserved. NetApp Proprietary
Figure 3-87:
10. Click Upload.
Figure 3-88:
11. Repeat steps for “tr-4323-design.pdf”.
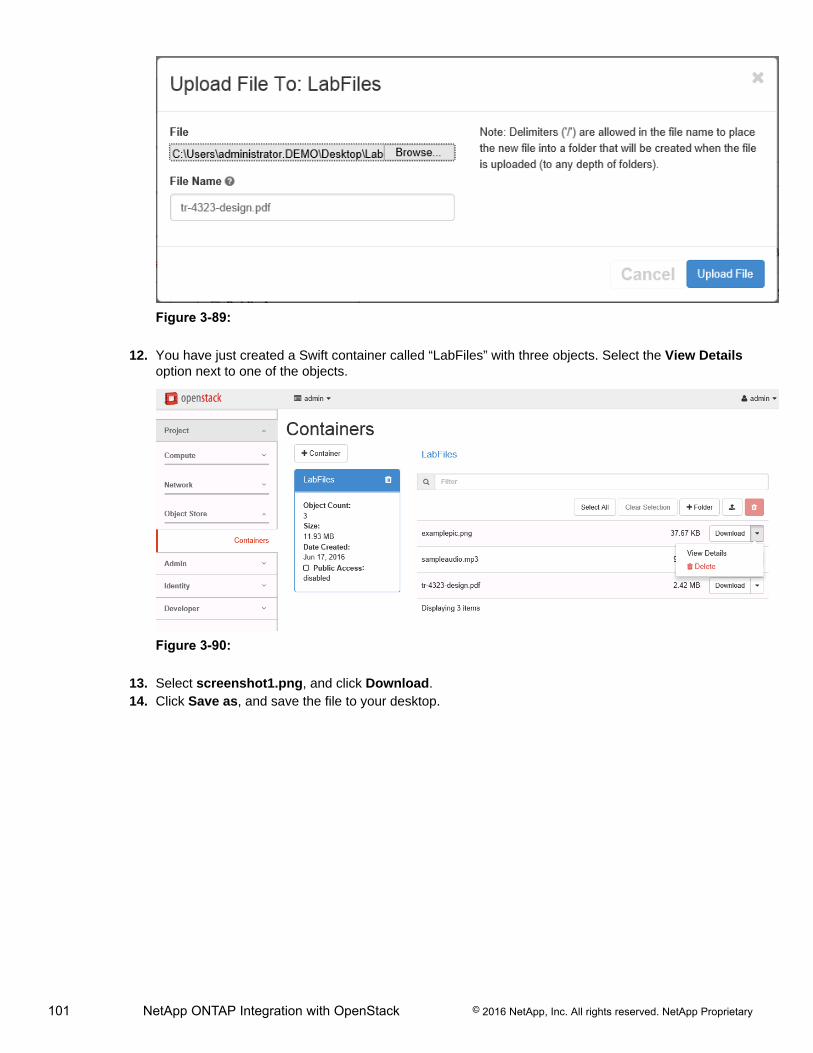
101 NetApp ONTAP Integration with OpenStack © 2016 NetApp, Inc. All rights reserved. NetApp Proprietary
Figure 3-89:
12. You have just created a Swift container called “LabFiles” with three objects. Select the View Detailsoption next to one of the objects.
Figure 3-90:
13. Select screenshot1.png, and click Download.14. Click Save as, and save the file to your desktop.
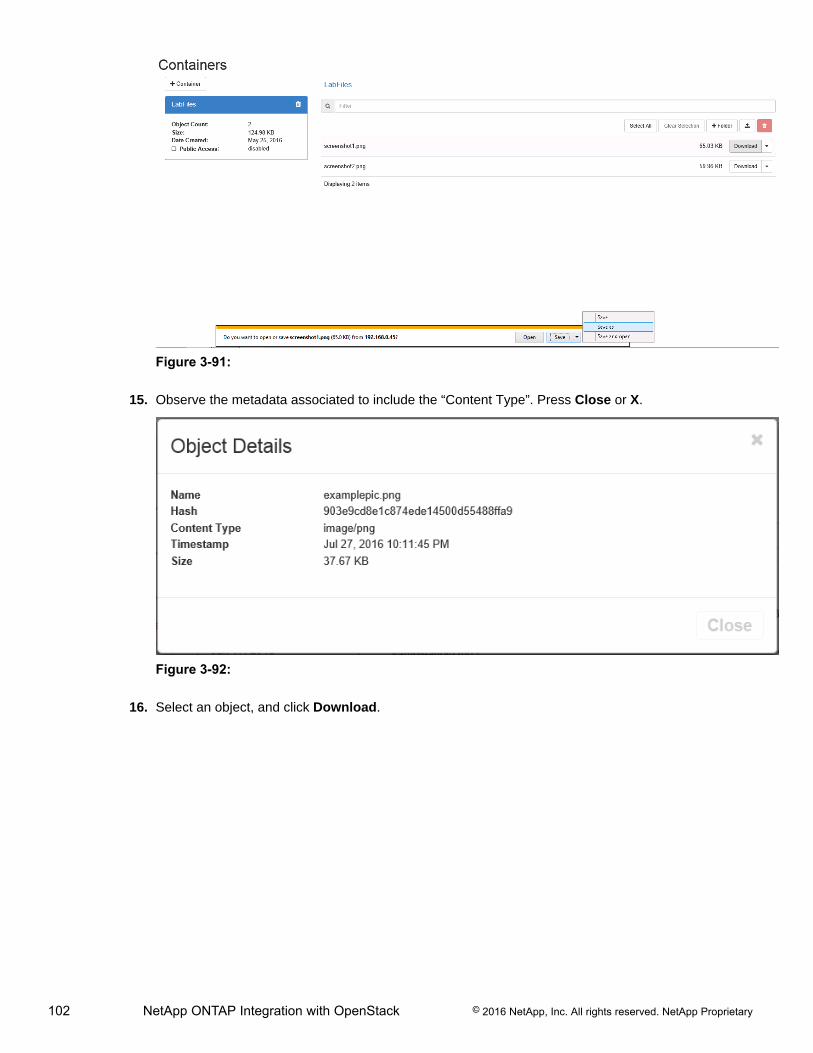
102 NetApp ONTAP Integration with OpenStack © 2016 NetApp, Inc. All rights reserved. NetApp Proprietary
Figure 3-91:
15. Observe the metadata associated to include the “Content Type”. Press Close or X.
Figure 3-92:
16. Select an object, and click Download.

103 NetApp ONTAP Integration with OpenStack © 2016 NetApp, Inc. All rights reserved. NetApp Proprietary
Figure 3-93:
17. Click Save as.
Figure 3-94:
18. Switch to your desktop, and open the downloaded file by double-clicking on it. You should see theobject you just downloaded from Swift. In this case the object was an image, but you can use Swift forother files as well.
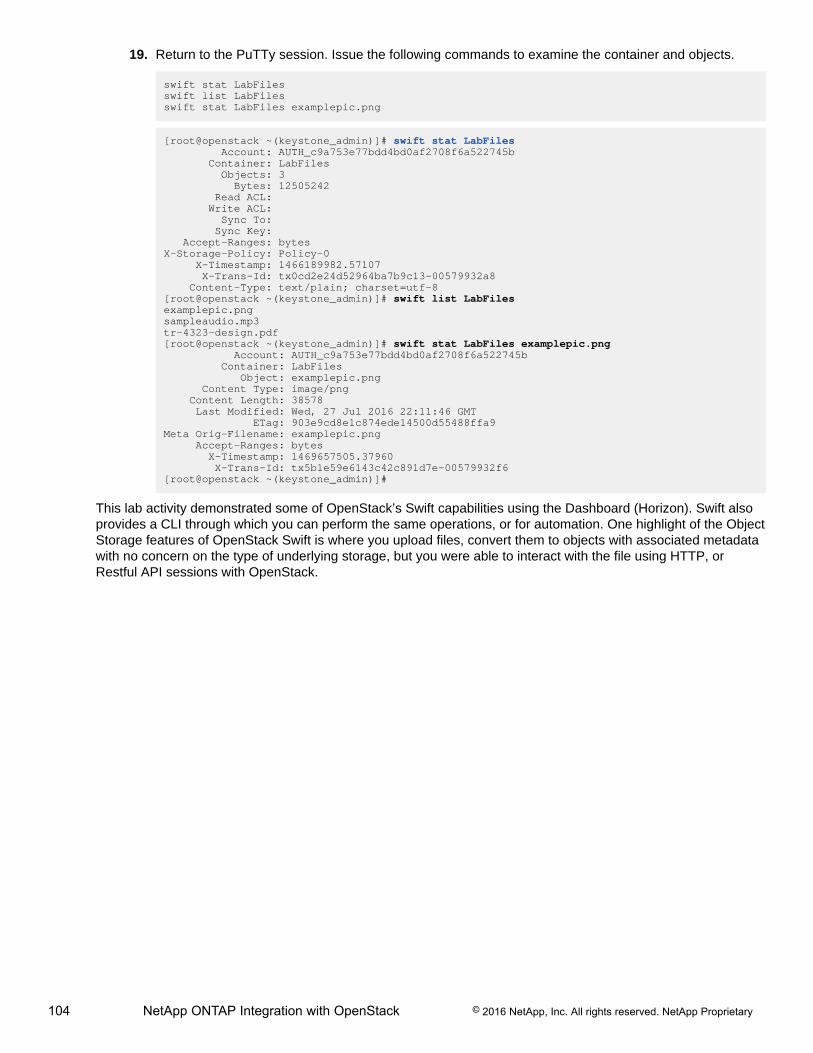
104 NetApp ONTAP Integration with OpenStack © 2016 NetApp, Inc. All rights reserved. NetApp Proprietary
19. Return to the PuTTy session. Issue the following commands to examine the container and objects.
swift stat LabFilesswift list LabFilesswift stat LabFiles examplepic.png
[root@openstack ~(keystone_admin)]# swift stat LabFiles Account: AUTH_c9a753e77bdd4bd0af2708f6a522745b Container: LabFiles Objects: 3 Bytes: 12505242 Read ACL: Write ACL: Sync To: Sync Key: Accept-Ranges: bytesX-Storage-Policy: Policy-0 X-Timestamp: 1466189982.57107 X-Trans-Id: tx0cd2e24d52964ba7b9c13-00579932a8 Content-Type: text/plain; charset=utf-8[root@openstack ~(keystone_admin)]# swift list LabFilesexamplepic.pngsampleaudio.mp3tr-4323-design.pdf[root@openstack ~(keystone_admin)]# swift stat LabFiles examplepic.png Account: AUTH_c9a753e77bdd4bd0af2708f6a522745b Container: LabFiles Object: examplepic.png Content Type: image/png Content Length: 38578 Last Modified: Wed, 27 Jul 2016 22:11:46 GMT ETag: 903e9cd8e1c874ede14500d55488ffa9Meta Orig-Filename: examplepic.png Accept-Ranges: bytes X-Timestamp: 1469657505.37960 X-Trans-Id: tx5b1e59e6143c42c891d7e-00579932f6[root@openstack ~(keystone_admin)]#
This lab activity demonstrated some of OpenStack’s Swift capabilities using the Dashboard (Horizon). Swift alsoprovides a CLI through which you can perform the same operations, or for automation. One highlight of the ObjectStorage features of OpenStack Swift is where you upload files, convert them to objects with associated metadatawith no concern on the type of underlying storage, but you were able to interact with the file using HTTP, orRestful API sessions with OpenStack.
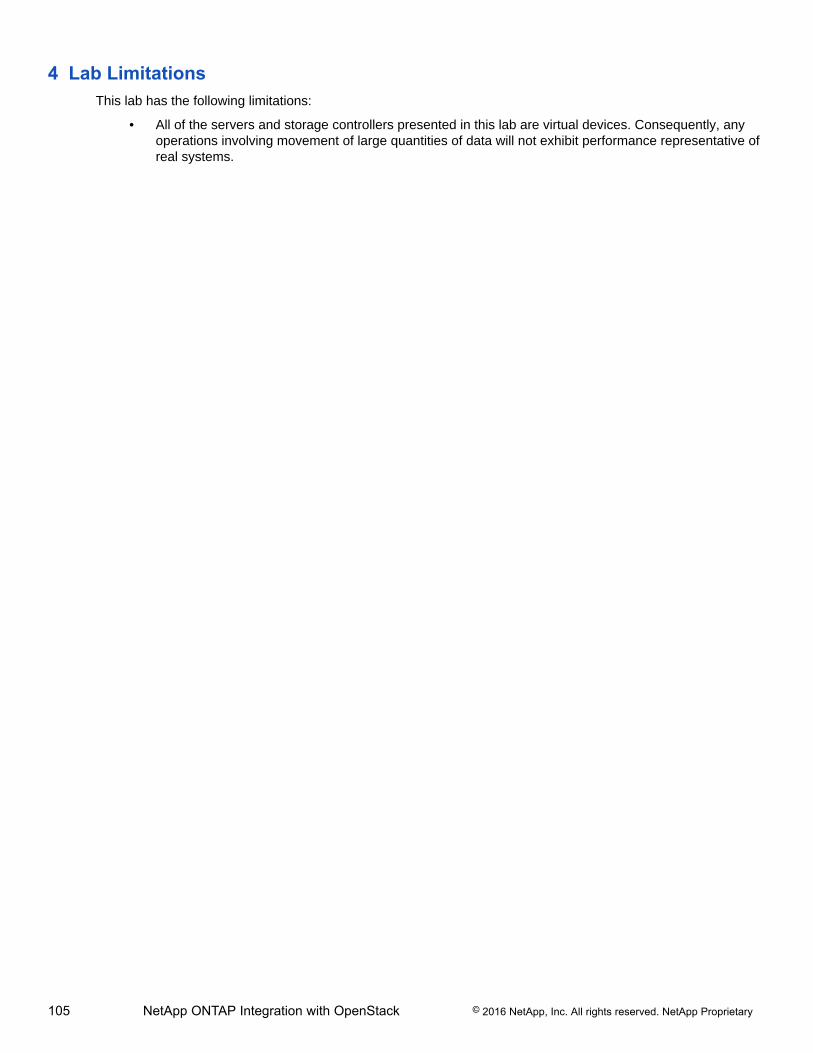
105 NetApp ONTAP Integration with OpenStack © 2016 NetApp, Inc. All rights reserved. NetApp Proprietary
4 Lab LimitationsThis lab has the following limitations:
• All of the servers and storage controllers presented in this lab are virtual devices. Consequently, anyoperations involving movement of large quantities of data will not exhibit performance representative ofreal systems.
106 NetApp ONTAP Integration with OpenStack © 2016 NetApp, Inc. All rights reserved. NetApp Proprietary
5 ReferencesThe following references were used to create this lab guide.
• OpenStack@NetApp http://netapp.github.io• NetApp Deployment and Operations Guide for FAS vs. E-Series http://netapp.github.io/openstack-
deploy-ops-guide/liberty/content/section_cinder-deployment-choices.html#d6e1024• NetApp SolidFire Resources for OpenStack: http://www.solidfire.com/solutions/cloud-orchestration/
openstack
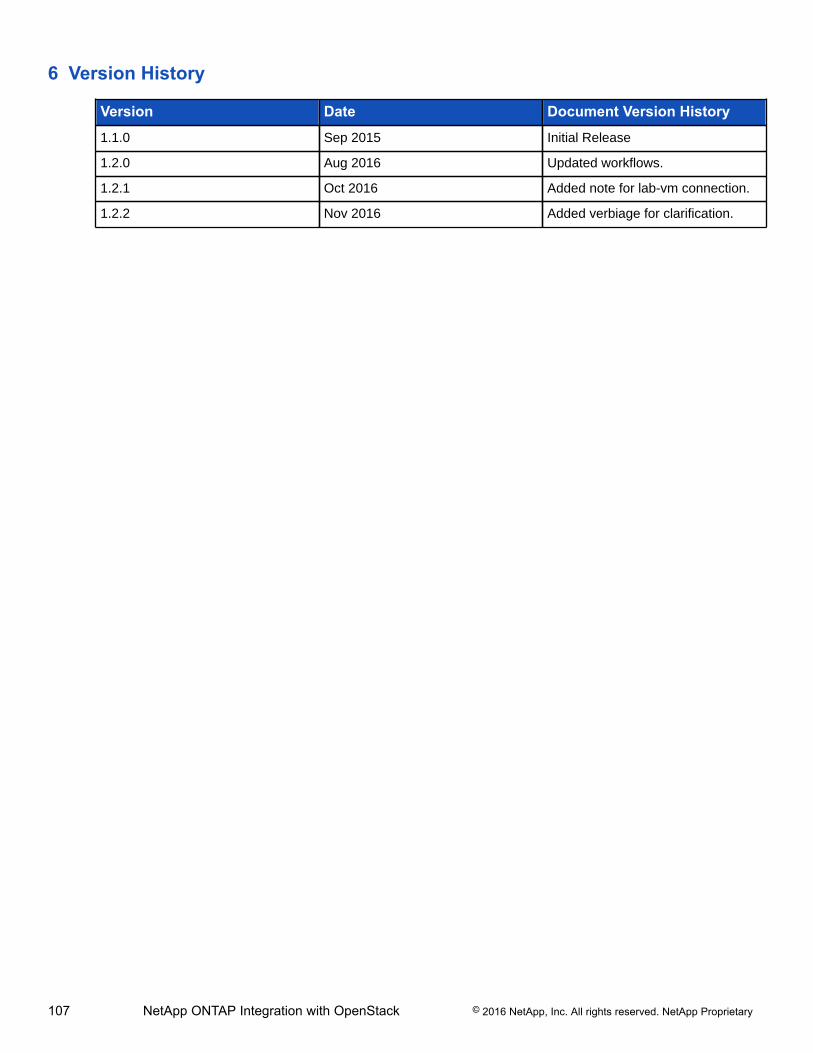
107 NetApp ONTAP Integration with OpenStack © 2016 NetApp, Inc. All rights reserved. NetApp Proprietary
6 Version History
Version Date Document Version History
1.1.0 Sep 2015 Initial Release
1.2.0 Aug 2016 Updated workflows.
1.2.1 Oct 2016 Added note for lab-vm connection.
1.2.2 Nov 2016 Added verbiage for clarification.
Refer to the Interoperability Matrix Tool (IMT) on the NetApp Support site to validate that the exactproduct and feature versions described in this document are supported for your specific environment.The NetApp IMT defines product components and versions that can be used to construct configurationsthat are supported by NetApp. Specific results depend on each customer's installation in accordancewith published specifications.
NetApp provides no representations or warranties regarding the accuracy, reliability, or serviceability of anyinformation or recommendations provided in this publication, or with respect to any results that may be obtainedby the use of the information or observance of any recommendations provided herein. The information in thisdocument is distributed AS IS, and the use of this information or the implementation of any recommendations ortechniques herein is a customer’s responsibility and depends on the customer’s ability to evaluate and integratethem into the customer’s operational environment. This document and the information contained herein may beused solely in connection with the NetApp products discussed in this document.
Go further, faster®
© 2016 NetApp, Inc. All rights reserved. No portions of this presentation may be reproduced without prior writtenconsent of NetApp, Inc. Specifications are subject to change without notice. NetApp and the NetApp logo areregistered trademarks of NetApp, Inc. in the United States and/or other countries. All other brands or products aretrademarks or registered trademarks of their respective holders and should be treated as such.