Nesting Tool For CorelDRAW Standard Edition Tool/Nesting Tool For CorelDRAW...Table of Contents...
26
Nesting Tool For CorelDRAW Standard Edition Copyright 2011-2050 Leonard CNC Software
Transcript of Nesting Tool For CorelDRAW Standard Edition Tool/Nesting Tool For CorelDRAW...Table of Contents...

Nesting Tool For
CorelDRAW Standard Edition
Copyright 2011-2050 Leonard CNC Software

Table of Contents
Introduction.............................................................................................................................. 2
Installation ............................................................................................................................... 3 Overview .................................................................................................................................. 6 Quick Start ............................................................................................................................... 8
Preparing Your Artwork ............................................................................................................. 18
Examples.................................................................................................................................. 21 Licensing .................................................................................................................................. 23 Reference ................................................................................................................................. 24
Support .................................................................................................................................... 25 Bug Fixes and Enhancements..................................................................................................... 26

Nesting Tool For CorelDRAW Standard Edition http://www.LeonardCNCSoftware.com The Nesting Tool Standard Edition performs automatic layouts of a number of closed shapes onto a sheet. The sheet can be an arbitrary shape, it does not have to be square or rectangular. The sheet CANNOT have internal defects (holes). It must be solid within its boundaries. The shapes themselves must be combined if they contain any internal cutouts which are called islands. This will allow the shape to be nested as a single unit using the outline as the shape to be nested. The shapes and the sheet / stock piece to nest on must both be completely inside the CorelDRAW page boundaries. Here is one of the examples that is provided. It is NewJob01.cdr. All .cdr files are provided in CorelDRAW X3 format so they can be used with X3, X4, X5 and X6.

Nesting Tool For CorelDRAW Standard Edition Installation of the Nesting Tool Standard Edition is very simple. To use the installer program you must rename it. It will originally have a file extension of .ex1. This must be renamed to .exe so you can double click on it to run it. NestingToolStd-Setup.ex1 will be renamed to NestingToolStd-Setup.exe. When you run NestingToolStd-Setup.exe you will see the welcome screen, then a license text screen. After you agree to the license you will see:
This screen shows all the supported CorelDRAW versions that were found on the computer being installed. If you want all the versions checked then just press the 'Install' button and the installation will proceed.

If you only want some of the CorelDRAW versions to have the product installed then uncheck the ones that you don't want. If you can't unzip the distribution file(s) then you can download WinZIP from Corel: http://www.winzip.com/ There is a free WinZIP alternative from: http://www.jzip.com/ Disk Drive Used If your computer does NOT have a C: drive then just install as usual. Substitute the drive letter you installed on for the C: in the examples in this document. For example, a system that only has an I: main disk drive will usually have CorelDRAW X3 installed here: I:\Program Files\Corel\CorelDRAW Graphics Suite 13 Windows Vista Windows Vista is only supported for CorelDRAW X3 and X4, since Corel only supports X3 and X4. If you encounter difficulties installing on Vista, please try disabling the UAC temporarily and reinstalling.

Windows 7 Windows 7 is only officially supported for CorelDRAW X4, X5 and X6, since Corel only supports X4, X5 and X6. However, X3 with SP2 seems to work well. SP1 for X3 would not install on Windows 7 for me so it may not be a viable choice. Our software does work though. Please disable the UAC temporarily before installing. Windows 8 Windows 8 is only officially supported for CorelDRAW X6 since Corel only supports X6. Please disable the UAC temporarily before installing. Customizing the Toolbar that Holds the Button If you want to change the toolbar that the Nesting Tool Standard Edition button appears on just edit the NestingToolStd.ini file using NOTEPAD.EXE. Change the ToolBarName=Standard to whatever toolbar you would like to use. For example, if you have created a toolbar just to hold all the buttons from macros and other CorelDRAW addins you have acquired then use that name. The toolbar name MUST be EXACTLY the same as you see in the CorelDRAW customization screen. You can find the NestingToolStd.ini file at C:\LeonardCncSoftware\Nesting Tool Standard Edition Please only use NOTEPAD (from the windows accessories menu) to do any editing. Other editors like Microsoft Word will make the file unusable as a Nesting Tool Standard Edition configuration file.

Nesting Tool For CorelDRAW Standard Edition The Nesting Tool Standard Edition performs automatic layouts of a number of closed shapes onto a sheet. The sheet can be an arbitrary shape, it does not have to be square or rectangular. The sheet CANNOT have internal defects (holes). It must be solid within its boundaries. All artwork must be in INCHES, MM or CM units. The shapes themselves must be combined if they contain any internal cutouts which are called islands. This will allow the shape to be nested as a single unit using the outline as the shape to be nested. The shapes and the sheet / stock piece to nest on must both be completely inside the CorelDRAW page boundaries. All shapes must be converted to curves. Here is one of the examples that is provided. It is NewJob01.cdr. All .cdr files are provided in CorelDRAW X3 format so they can be used with X3, X4, X5 and X6.
QuickNest auto setup A drawing can be quickly nested by meeting the following conditions: The drawing contains all the elements needed on a single layer. It must be in INCHES, MM or CM units 1. The layer that all the shapes are on MUST be named "Layer 1" 2. No extra layers have been added for SHAPES, STOCK or NEST purposes. 3. The largest shape on "Layer 1" is the stock piece working area to nest onto See the Quick Start section for complete details on using QuickNest

Nesting Tool For CorelDRAW Standard Edition To get started, just push the toolbar button that was installed for your version of CorelDRAW. This will display the main menu screen for the Nesting Tool. Note that if you do not have the drawing that you want to nest open then you must close the Nesting Tool main menu screen to open that drawing. Creating a New Job Automatically The example we will use here is the NewJob01.cdr file. This is a simple drawing that makes it easy to explain the beginning steps for a nesting job file. This drawing contains all the elements needed on a single layer. The layers for the sheet / stock to nest onto and the layer for the nest itself will be added automatically if all conditions are met: 1. The layer that all the shapes are on MUST be named "Layer 1" 2. No extra layers have been added for SHAPES, STOCK or NEST purposes. 3. The largest shape on "Layer 1" is the stock piece working area to nest onto

Here is what the layer structure looks like at this point:
Open the nesting menu
Press the 'Setup Job' button. The Job Setup Screen is displayed. Since there is only one user layer named "Layer 1" the job will be created automatically using the default parameters. Note the default Kerf Width, Safety and Rotate Step values. You will probably want to change these. The default quantity of 1 will allow an initial layout. This is useful for approximating how much material is needed for one of each shape.
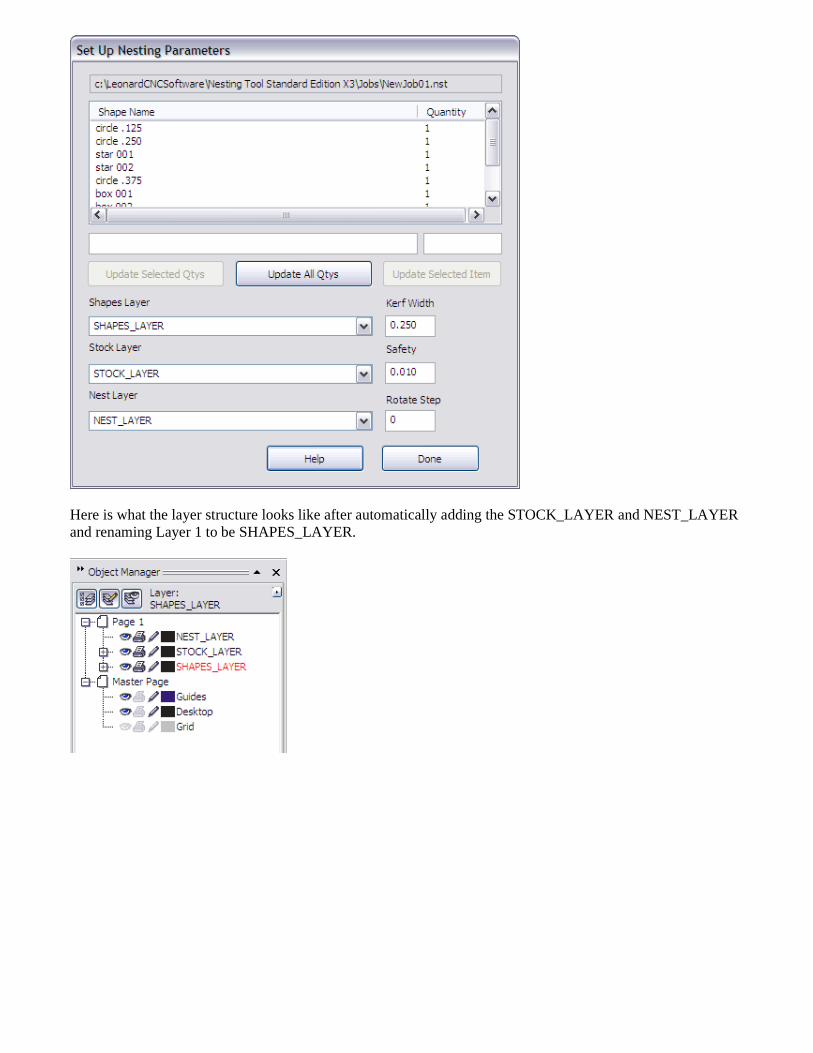
Here is what the layer structure looks like after automatically adding the STOCK_LAYER and NEST_LAYER and renaming Layer 1 to be SHAPES_LAYER.

Now define the nesting Quantity needed of each shape. The Nesting Tool will attempt to satisfy the quantity needed. You can also change the Kerf Width, Safety and Rotation Step values for this job.
After all this is completed press the 'Done' button to return to the main menu. Then Press the 'Do Nesting' button to make the nested shapes.

Here is the completed nest onto the stock piece.
To see if the nesting quantities were satisfied press the 'Report' button to look at the nesting report.

Here is what the report for this nest looks like
Editing an Existing Job The example we will use here is the Abalam01.cdr file. This is two different fingerboard inlay sets that will be nested on a sheet of Abalam, a VERY expensive laminated shell product. Note that this a custom setup so the PART_LAYER is a non-standard name. We also have two layers for the stock piece, one for the actual area to be nested and one to represent the sheet that is used on the Laser / CNC system with margins. There are also two different sizes of inlay dots used to finish filling the sheet.

Open the Nesting Tool main menu:
Press the 'Setup Job' button: Notice that when you select a row the corresponding shape on the PART_LAYER becomes selected. That is how you know which shape you are working with. After selecting the row / shape you want to edit change the Quantity and / or Shape Name then press the Update button to make the changes permanent. You can also edit the shape name to make future edits easier.

Here is what the nest looks like for this drawing and job:
You can also marquee select a set of shape in CorelDRAW then press the 'Setup Job' button. This will allow the quantity to be set equal for all of those shapes. This is good for things like the fingerboard inlays that must be made in sets.

Here is the fingerboard inlay set with the snowflake shapes selected in CorelDRAW:

Now, when you press the 'Setup Job' button the nesting setup screen will show all of those shapes selected. You can then just enter the quantity you want and press the 'Update Selected Quantities' button.
Note: You MUST use 'setup job' every time you nest

Nesting Tool For CorelDRAW Standard Edition All artwork must be in INCHES, MM or CM units.
Nesting Text Break text apart if you don't want to nest certain letters as compound shapes. Nesting lower case "j" and lower case "i" as two shapes each will give better material utilization. Grouped Shapes Grouped shapes are combined and treated as compound shapes. Compound Shapes Compound shapes are shapes that contain more than one independent outline. Compound shapes must be aligned along the X or Y axis. This gives the smallest possible bounding box which is what we use to nest these shapes with multiple outlines. An example of a compound shape is a lower case "j" or a lower case "i". Both of these have a dot on top. Nesting Sheets Must Be Solid A sheet or stock piece cannot have any defects or holes in it. Here is a sheet of Abalam that has already had some diamonds cut out of it. It cannot be used for nesting since the software is not aware of the holes in the sheet.

Simple Shapes A simple shape is just a closed outline. An example of this is a circle, oval, rectangle or square

Complex Shapes with Islands A shape with islands is a closed outline that has other closed outlines completely inside of it. This upper case A or upper case D as an example. Shapes with islands must be converted to curves and combined. This is done automatically for lettering. Here are some examples of complex shapes with islands.
Each shape must have at least quantity 1 to nest. If a shape is set to quantity 0 then it will not be part of the nest.

Nesting Tool For CorelDRAW Standard Edition There are several example drawings that are installed with the Nesting Tool. They can all be found in the folder: C:\LeonardCncSoftware\Nesting Tool Standard Edition\Drawings
The drawings are: NewJob01.cdr
This drawing does NOT come with a job file. It is set up to demonstrate the Quick Nest option. See the Quick Start section for details of using Quick Nest. This is a VERY easy and fast way to set up a new nesting job which can then be optimized iteratively.

Abalam01.cdr
This has a job file that specifies other parameters. It can all be found in the folder: C:\LeonardCncSoftware\Nesting Tool Standard Edition\Jobs The job file is Abalam01.nst. This has all the parameters to produce the nest shown in the Quick Start section.

Nesting Tool For CorelDRAW Standard Edition Licensing the Nesting Tool Standard Edition after the end of the evaluation period (or before!) is easy. Press the 'License' button on the main screen and you will see the license screen. The Computer ID is at the top. This string of characters uniquely identifies the computer you want to license for the Nesting Tool. Press the 'Save' button and a file 'NestingToolStdID.uid' will be created in the folder "C:\LeonardCNCSoftware\Nesting Tool Standard Edition". Just email this file to us at '[email protected]' and then pay us with PayPal or use the payment buttons on the website.. We will return another file to you which is 'NestingToolStd.lic'. Copy this file to the folder "C:\LeonardCNCSoftware\Nesting Tool Standard Edition" and your Nesting Tool is licensed for unlimited nests! NOTE: The 64 bit ID and license files will be named 'NestingToolStd64ID.uid', 'NestingToolStd64ID.don', 'NestingToolStd64.lic' and 'NestingToolStd64.don'. If you have purchased the dongle option then the ID file will be 'NestingToolStdID.don' and the license file will be 'NestingToolStd.don'. You MUST copy the 'NestingToolStd.don' to the folder "C:\LeonardCNCSoftware\Nesting Tool Standard Edition" on every computer that you want to run the Nesting Tool Standard Edition on. The dongle MUST be plugged in at all times you wish to use or license the software. If the license key in the NestingToolStd.lic file does not match the computer ID of the current computer the text 'Invalid License - Please contact us" will display in the License Status box. If all is well you will see this screen with the text 'Fully Licensed - Thank You Again' in the License Status box.
NOTE: Cut-and-paste of computer IDs and License keys is no longer supported. Screencaps have never been supported. You MUST use the instructions here to get a license key.

Nesting Tool For CorelDRAW Standard Edition The drawing has to be saved and must have separate layers for the SHAPES, STOCK and NEST You MUST use 'setup job' every time you nest shapes with islands must be converted to curves and combined compound shapes should be aligned to either the X or Y axis. at least quantity one of each shape must be nested or the shape will not be part of the nest.

Nesting Tool For CorelDRAW Standard Edition Support is available through email and at our CNC software forum http://www.leonardcncsoftware.com/phpBB3/ Contact us on the web at http://www.leonardcncsoftware.com Portions of the Nesting Tool Standard Edition are copyright Building Block Software - http://BuildingBlock.com - This is a world class computational geometry library that we are also using in our full CAD / CAM program DragonCNC. This library enables us to write solutions beyond what the CorelDRAW Object Model can do in VBA or VSTA. Please inquire as to any custom programming for CorelDRAW that you may need. Portions of the Nesting Tool Standard Edition are copyright Optimal Programs - http://www.optimalprograms.com Custom nesting programs require a separate license from Optimal Programs. This must be purchased in advance. Reseller arrangements are available. Please inquire.

Nesting Tool For CorelDRAW Standard Edition The Nesting Tool release 1.0 does not have any bug fixes or enhancements yet. The Nesting Tool release 1.1 was changed to use different methods to specify shapes to nest and had many bugs fixed. The Nesting Tool release 1.2 changes and fixes: It has a new licensing system and installer that bundles all the files needed for all supported versions of CorelDRAW into a single installer. The new licensing system requires the use of ID and License files. Cut-and-paste is no longer supported. This version allows multiple users with different user accounts on the same computer. Fixed a bug in the licensing system that prevented using maximum length computer names. A dongle option to allow use on multiple computers (one at a time) is available for an extra charge Added support for Home and Student X6 installations Added support for Technical Suite X6 installations


![CorelDRAW Graphics Suite 2019 - product.corel.comproduct.corel.com/.../CorelDRAW/...Guide/CorelDRAW-Graphics-Suite-2019.pdf · 快速入门指南 [ 1 ] CorelDRAW Graphics Suite 2019](https://static.fdocuments.net/doc/165x107/5e153e0205d6154bf55c2b87/coreldraw-graphics-suite-2019-eeoe-1-coreldraw-graphics-suite.jpg)


![CorelDRAW Graphics Suite 2019 - product.corel.comproduct.corel.com/.../CorelDRAW/...Guide/CorelDRAW-Graphics-Suite-2019.pdf · Schnellstarthandbuch [ 1 ] CorelDRAW Graphics Suite](https://static.fdocuments.net/doc/165x107/5e0e571ce184e06f630a9a34/coreldraw-graphics-suite-2019-schnellstarthandbuch-1-coreldraw-graphics-suite.jpg)