
NEOD Acuity “Near Visual Acuity Solution for iPad mini with … · 2016-02-23 · Symbols Used...
39
NEOD Acuity “Near Visual Acuity Solution for iPad mini with Retina display” USER GUIDE Version 1.2 By William H.A. Beaudot, PhD Copyright © 2014-2016 NEOD Inc, All Rights Reserved. Contact Information: NEOD Inc. 24 Malborough Road Markham, ON L6B 0E9, CANADA Phone: +1 416-454-3433 Email: [email protected] Web: http://www.neodinc.com NEOD Acuity User Guide (version 1.2 – Feb 19, 2016)
Transcript of NEOD Acuity “Near Visual Acuity Solution for iPad mini with … · 2016-02-23 · Symbols Used...

NEOD Acuity“Near Visual Acuity Solution
for iPad mini with Retina display” USER GUIDE Version 1.2
By William H.A. Beaudot, PhD
Copyright © 2014-2016 NEOD Inc, All Rights Reserved.
! Contact Information: ! NEOD Inc.! ! ! ! ! ! 24 Malborough Road! ! ! ! ! ! Markham, ON L6B 0E9, CANADA! ! ! ! ! ! Phone: ! +1 416-454-3433! ! ! ! ! ! Email:! [email protected]! ! ! ! ! ! Web:!! http://www.neodinc.com
NEOD Acuity User Guide (version 1.2 – Feb 19, 2016)

DISCLAIMER.The "NEOD Acuity" software is provided by NEOD Inc on an "AS IS" basis. NEOD INC MAKES NO WARRANTIES, EXPRESS OR IMPLIED, INCLUDING WITHOUT LIMITATION THE IMPLIED WARRANTIES OF NON-INFRINGEMENT, MERCHANTABILITY AND FITNESS FOR A PARTICULAR PURPOSE, REGARDING THE "NEOD ACUITY" SOFTWARE OR ITS USE AND OPERATION ALONE OR IN COMBINATION WITH OTHER PRODUCTS. IN NO EVENT SHALL NEOD INC BE L IABLE FOR ANY SPECIAL, D IRECT, INDIRECT, INCIDENTAL OR CONSEQUENTIAL DAMAGES ( INCLUDING, BUT NOT LIMITED TO, PROCUREMENT OF SUBSTITUTE GOODS OR SERVICES; LOSS OF USE, DATA, OR PROFITS; OR BUSINESS INTERRUPTION) ARISING IN ANY WAY OUT OF THE USE, REPRODUCTION, MODIFICATION AND/OR DISTRIBUTION OF THE "NEOD ACUITY" SOFTWARE, HOWEVER CAUSED AND WHETHER UNDER THEORY OF CONTRACT, TORT (INCLUDING NEGLIGENCE), STRICT LIABILITY OR OTHERWISE, EVEN IF NEOD INC HAS BEEN ADVISED OF THE POSSIBILITY OF SUCH DAMAGE.
COPYRIGHT.This manual is copyrighted with all rights reserved. Under the copyright laws, this manual may not be copied, reproduced or translated into another language, stored in a retrieval system, or transmitted, in any form, or by any means, mechanical, electronic, photocopying, recording, or otherwise, in whole or in part, without the prior written permission of NEOD INC.
CORRECTIONS.No patent liability is assumed regarding the use of the information contained herein. Moreover, because NEOD INC is constantly striving to improve its high-quality products, the information contained in this manual is subject to change without notice. Every precaution has been taken in the preparation of this manual. Nevertheless, NEOD INC assumes no responsibility for errors or omissions. Neither is any liability assumed for damages resulting from the use of the information contained in this publication. To report any problem with this documentation or the softwares, send an e-mail to: [email protected].
INTERPRETATION OF RESULTS.This user guide does not provide guidance on the interpretation of near visual acuity measurements. The experimenter must ensure to have received appropriate training in such interpretation. For this reason NEOD INC cannot be held responsible for misdiagnosis of results.
NEOD Acuity User Guide (version 1.2 – Feb 19, 2016)! 2
Apple, iPad, iPhone, iPod touch, iTunes, and the names of Apple products referenced herein are trademarks of Apple Inc., registered in the U.S. and other countries. App Store is a service mark of Apple Inc. All other brand and product names are trademarks of their respective holders. Any omission of such trademarks from any product is regretted and is not intended as an infringement on such trademarks.

Symbols UsedThis manual uses the following symbols to indicate special information:
Symbol! ! Description
❖ Indicates tips that help you better use this app.
➡ Indicates important information pertaining to visual acuity.
TerminologyThis user guide uses the terms Experimenter or User to refer to the person operating the iPad® device, and Patient or Subject to refer to the person undergoing the test.
RequirementsThis mobile App is available exclusively for iPad™ devices from Apple running iOS 8 and iOS 9. Compatibility for older versions of iOS is not supported.
NEOD Acuity User Guide (version 1.2 – Nov 19, 2016)! 3

Table Of ContentsOverview! 6
NEOD Acuity ! 8
Getting Started! 8
Configuring the Acuity Testing! 10
• Acuity Units! 11
• Viewing Distance! 13
• Measurement Protocol! 13
• Luminance Level! 15
• Contrast Level! 15
Available Optotypes! 15
• Landolt 'C'! 16
• Tumbling 'E'! 16
• Sloan optotypes! 16
• HOTV optotypes! 16
• Kid optotypes! 17
• Numbers optotypes! 17
• Optotype settings! 17
Measuring Visual Acuity! 18
• Chart Panel! 18
• Procedures! 19
• Scoring Methods! 21
Reading Charts! 22
Refractive Targets! 23
NEOD Acuity User Guide (version 1.2 – Feb 19, 2016)! 4

Creating Configurations! 24
Managing the Subjects! 26
• Patients List! 26
• Personal Information! 26
• Eye Prescription! 27
• Acuity History! 28
• Session Information! 29
Exporting & Importing Acuity Data! 30
Using NEOD Phoropter Mount! 33
Frequently Asked Questions (F.A.Q.)! 35
Configuring your iPad mini! 36
Power Adapter vs Battery! 36
Settings! 36
Lightning Conditions & Brightness! 37
Landscape vs Portrait Mode! 37
Adequacy of the iPad mini for Visual Acuity Testing! 38
iPad mini Display Specifications! 38
Specifications for visual acuity testing! 39
Pros & Cons! 39
NEOD Acuity User Guide (version 1.2 – Nov 19, 2016)! 5

OverviewVisual acuity is the most important test used to evaluate eyesight. It measures the eye's ability to resolve details at near and far distance. It usually involves reading letters or looking at symbols of different sizes (optotypes) on a wall chart, similar to the famous Snellen chart found in most physician offices and developed by Dutch ophthalmologist Herman Snellen in 1862.
NEOD Acuity for iPad mini with Retina display is NEOD’s mobile solution for vision care specialists: it brings computerized versions of the "gold standard" acuity testing on this popular mobile platform in the clinical environment and it provides fast, efficient and reliable assessment of NEAR visual acuity for literate and illiterate people as well as preschool children. Moreover, NEOD Acuity promotes the use of the logMAR chart design recommended by the National Eye Institute (NEI) and the International Council of Ophthalmology (ICO) to address design flaws in the Snellen chart. Ideally NEOD Acuity should be used with our patented NEOD Phoropter Mount for iPad mini which can be ordered online on our website (http://www.neodinc.com).
NEOD Acuity for iPad mini has many features that are required in a clinical environment:
• Interactive LogMAR charts in landscape and portrait modes• Near visual acuity measurement using standard optotypes• Refractive targets• Randomized design to prevent subjects to memorize the test• Keep track of visual acuity history, subject/patient information and prescription• Exporting of acuity data through email in HTML format• Database backup and import with overwrite, append and merge capabilities• Units conversion tool• Information about common eye conditions you can share with your patient/subject• PDF documentation available online
Many options are also available to customize acuity testing:
• Simple or ETDRS acuity scoring• Charts composed either of single letter, single line or multiple lines• Standard optotypes (Landolt C, Tumbling E, Sloan, HOTV, Kid, Numbers)• Standard acuity units (foot, meter, decimal, VAR, logMAR, cpd, M-system)• Custom reading test• Black letter on white background or reverse• Confusion bars• 4 or 8 orientations for Landolt C optotype• Distance units and near viewing distance up to 1.5 meters (5 feet)• Custom luminance and contrast levels
NEOD Acuity User Guide (version 1.2 – Nov 19, 2016)! 6

Our patented NEOD Mount for iPad mini features:
• Easy gliding and fastening along any test distance on the phoropter rod• Functional for both left or right sided exam room configuration• Dual slot for iPad mini with Retina display and Near Card interface• Dual sided opening for patient testing and educational demonstration while
mounted• Calibration markings on mount window for selected target distance while using
iPad mini or Near Card• Finger cut out for easily removing iPad mini from slot
The NEOD Acuity app is available exclusively on Apple App Store:
http://appstore.com/neodacuity
The NEOD Mount for iPad mini can be ordered online on our website:
http://www.neodinc.com
❖ Our NEOD Acuity app and NEOD Mount are products that need to be purchased separately. While they can be used independently, they have been specifically designed to work together.
NEOD Acuity User Guide (version 1.2 – Nov 19, 2016)! 7

NEOD Acuity
The most reliable acuity tests used today follow the logMAR design recommended by the National Eye Institute (NEI) and the International Council of Ophthalmology (ICO) to address design flaws in the 150 year-old Snellen chart: the charts provided by NEOD Acuity follow this logMAR design by implementing a geometric progression of letter sizes and proportional spacing between letters, with standard optotypes specifically designed to appear equally recognizable and appropriate for testing literate and illiterate people as well as
preschool children.
Moreover, to measure visual acuity in a precise and efficient way NEOD Acuity provides unique interactive logMAR charts that are randomly generated to prevent the subjects to memorize the test. The NEOD Acuity app runs exclusively on the iPad mini with Retina display to take advantage of its larger display with sufficient resolution and implements many features required for both research and clinical studies.
Getting Started
To start using NEOD Acuity, tap its icon to launch it:
At first launch, the documentation window will be shown. Simply tap the button in the top-right corner to switch to the main panel. The main panel shows subject specific information in the top half and optotype specific buttons in the bottom half. The subjects list is shown on the left side in landscape mode only. To get access to it in portrait mode tap the "Patients" button in the top toolbar to present the subject list in a popover window. To return to the documentation window, tap the button in the top-right corner.
NEOD Acuity User Guide (version 1.2 – Nov 19, 2016)! 8

The bottom toolbar provides access to additional functions:
to manage your own custom testing configurations,
to customize the settings of the acuity testing (acuity units, optotype appearance, chart type, acuity scoring, termination criterion and distance units, etc),
to convert between various acuity units,
to export the acuity data through e-mail in HTML format or as a database backup file.
NEOD Acuity User Guide (version 1.2 – Nov 19, 2016)! 9

Configuring the Acuity Testing
To configure the test settings, tap the icon in the bottom toolbar. This opens a popover window with customizable settings:
• The acuity units (Foot, Meter, Decimal, VAR, LogMAR, CPD, M-system). Note that the standard acuity is indicated in the selected unit (e.g. 20/20 in foot units),
• The viewing distance and its unit (metric or imperial),
• The luminance expressed in cd/m2 and the contrast relative to the background expressed as a Weber fraction,
• The type of refraction target to be displayed and the type of anaglyph glasses,
• The chart type: multiple lines, single horizontal or vertical line, or single letter,
• The starting acuity at the top line or bottom line and the number of lines (0 if automatic selection),
• The acuity scoring method (simple or ETDRS). Note that changing the method selection resets by default some other settings (For example selecting the ETDRS method resets the chart type to 'Multiple Lines' and the termination criterion to 3 incorrect letters),
NEOD Acuity User Guide (version 1.2 – Nov 19, 2016)! 10

• The termination criterion for the selected method (1 letter, 3 letters or an entire line incorrect for the ETDRS method for example),
• The optotype appearance: black letters on white background or white letters on black background, the number of orientations (only applies to Landolt C and Tumbling E optotypes), the presence and type of confusion bars (none, bars or frame type),
The large green button allows the creation of a new configuration based on the current selected settings. Multiple configurations can be created to enhance your practice and best match your patients’ needs.
Acuity Units
NEOD Acuity can measure and report visual acuity in various standard units, either as Snellen fractions in foot, meter or decimal units, as logarithmic scales in logMAR or VAR units, or as resolution in cycle per degree (CPD):
• Foot units are used in the US: visual acuity is expressed as Snellen fractions in foot relative to 20/20, the standard definition of "normal" visual acuity, that is the ability to resolve a spatial pattern separated by a visual angle of one minute of arc. If you have a visual acuity of 20/x, then if you stood 20 feet away from an object and the "normal" person stood x feet away, you would both see the same thing. If x is more than 20 feet, you have worse eyesight than normal, and if it is less than 20 feet, you have better than "normal" vision.
• Meter units are used in UK: visual acuity is expressed relative to 6/6 (meters), roughly equivalent to 20/20 (feet).
• Decimal units are used in France: acuity is defined as the reciprocal value of the size of the gap (measured in arc minutes) of the smallest Landolt C that can be reliably identified. A value of 1.0 is equivalent to 20/20. Values lower than 1.0 mean worst acuity, and values higher than 1.0 mean better acuity than "normal".
• VAR (Visual Acuity Rating) units provide a more intuitive scoring: the VAR scale is similar to the logMAR scale, but represented as a percentage. A value of 100 is equivalent to 20/20. Values lower than 100 mean worst acuity, and values higher than 100 mean better acuity than "normal".
• LogMAR units are used in clinical research where acuity is expressed as the logarithm of the minimum angle of resolution. LogMAR scale converts the
NEOD Acuity User Guide (version 1.2 – Nov 19, 2016)! 11

geometric sequence of a traditional chart to a linear scale. It measures visual acuity loss: positive values indicate vision loss, while negative values denote normal or better visual acuity. A value of 0.0 is equivalent to 20/20. Though this scale is rarely used clinically, it is more frequently used in statistical calculations because it provides a more scientific equivalent for the traditional clinical statement of "lines lost" or "lines gained", which is valid only when all steps between lines are equal, which is not usually the case.
• CPD (Cycle Per Degree) units express visual acuity in term of angular resolution. A value of 30 cpd corresponds to a resolution of 2 arc minutes per line pair (i.e. a 1 arc minute gap in an optotype) and is equivalent to 20/20. Values lower than 30 cpd mean worst acuity, and values higher than 30 cpd mean better acuity than "normal". The upper limit is directly related to the resolving power of the cone photoreceptors in the retina center (fovea) and by the imperfect optics of the eye: for a human eye with excellent acuity, the maximum theoretical resolution is 50 CPD (equivalent to 20/12).
• M-unit system (introduced by Louise Sloan) is generally used to measure near visual acuity and with low-vision patients, where 1 M-unit subtends 5 minutes of arc at 1 meter; it follows that a letter of n M-units will subtend 5 minutes of arc at n meters. M-units are commonly used on metric letter charts and in reading cards.
➡ As emphasized above it is important to note that despite being referred as the normal or standard visual acuity, 20/20 and its equivalents in other units do not indicate a perfect vision but should be thought of as the lower limit of the normal visual acuity, the maximum acuity of a healthy human eye being approximately 20/16 to 20/12.
The selected acuity unit in the settings is used by default in all acuity tests. Note that a tool is available in the bottom bar to easily convert between the different visual acuity units (see button) as illustrated below:
NEOD Acuity User Guide (version 1.2 – Nov 19, 2016)! 12
Viewing Distance
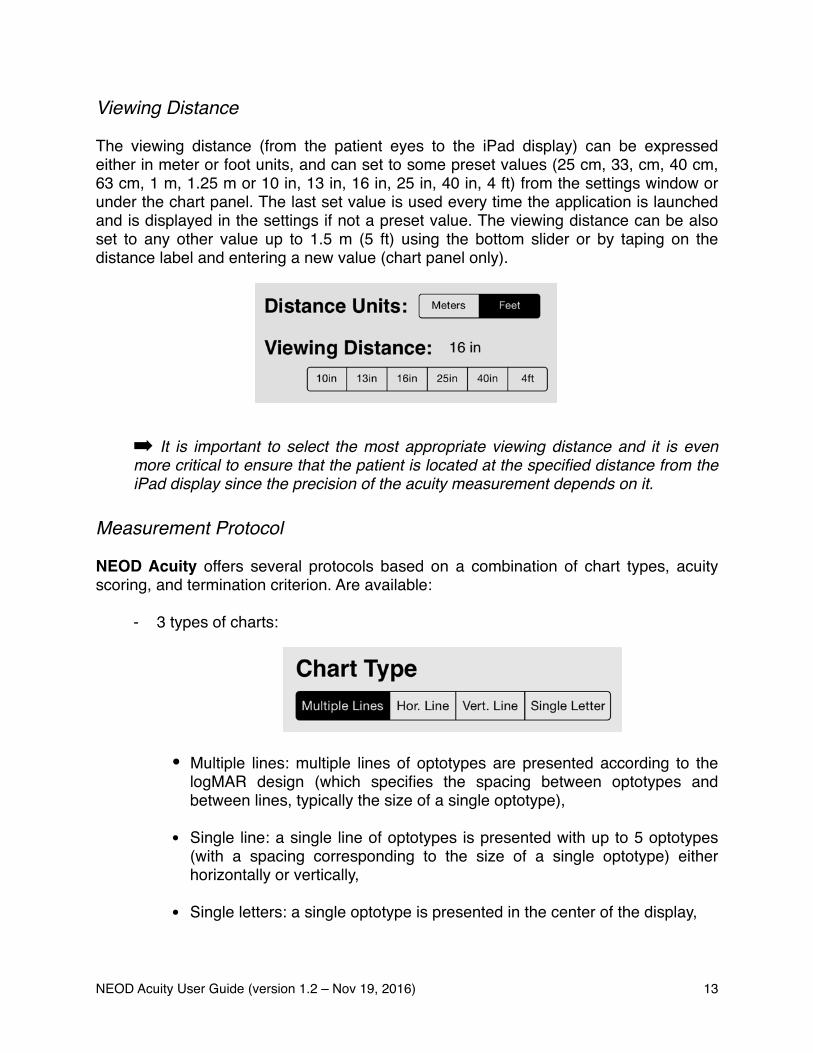
The viewing distance (from the patient eyes to the iPad display) can be expressed either in meter or foot units, and can set to some preset values (25 cm, 33, cm, 40 cm, 63 cm, 1 m, 1.25 m or 10 in, 13 in, 16 in, 25 in, 40 in, 4 ft) from the settings window or under the chart panel. The last set value is used every time the application is launched and is displayed in the settings if not a preset value. The viewing distance can be also set to any other value up to 1.5 m (5 ft) using the bottom slider or by taping on the distance label and entering a new value (chart panel only).
➡ It is important to select the most appropriate viewing distance and it is even more critical to ensure that the patient is located at the specified distance from the iPad display since the precision of the acuity measurement depends on it.
Measurement Protocol
NEOD Acuity offers several protocols based on a combination of chart types, acuity scoring, and termination criterion. Are available:
- 3 types of charts:
• Multiple lines: multiple lines of optotypes are presented according to the logMAR design (which specifies the spacing between optotypes and between lines, typically the size of a single optotype),
• Single line: a single line of optotypes is presented with up to 5 optotypes (with a spacing corresponding to the size of a single optotype) either horizontally or vertically,
• Single letters: a single optotype is presented in the center of the display,
NEOD Acuity User Guide (version 1.2 – Nov 19, 2016)! 13

- 2 acuity scoring methods:
• Simple: the easy and fast way to measure visual acuity though less precise,
• ETDRS: the standard way to measure visual acuity in clinical environment,
- 3 termination criteria based on incorrectness:
• 1 letter: the test stops after 1 incorrect letter,
• 3 letters: the test stops after 3 incorrect letters on the same line (this is the default termination criterion for the ETDRS scoring),
• 1 line: the test stops after a whole incorrect line.
❖ The protocol defined in the settings is only followed when running a session through the remote mode. The protocol is otherwise considered as ‘manual’ as the progress across the chart is under the control of the experimenter through the touch screen interactions and the measurement determined by the line taped by the experimenter which should correspond to the smallest line the patient can fully read.
- For multiple lines chart type, the starting visual acuity can be specified either for the top line or bottom line of the chart as well as the number of lines by pressing the +/– stepper buttons (0 line meaning automatically selected):
NEOD Acuity User Guide (version 1.2 – Nov 19, 2016)! 14

Luminance Level
The luminance of the bright portion of the charts can be specified in cd/m2 and should always be set to an appropriate level: the International Council of Ophthalmology and
the American National Standards Institute for ETDRS recommend a minimum luminance of 85 cd/m2. Note that it is also important to make sure that the "Auto-Brightness" option is turned off in the "Brightness & Wallpaper" section of the “Settings” app (see the Configuration and Adequacy sections).
❖ Note that the specified luminance is only an approximation based on the light emitted by an iPad without a screen protector. Slight variations are normal between different iPads of the same model. Since different iPad models may have different display technologies, the app uses your iPad model to determine the maximum luminance available.
Contrast Level
The contrast of the optotypes relative to the background luminance can be expressed as a Weber fraction between 0.5 and 100%. Like luminance, contrast is known to significantly affect visual acuity in an age-dependent manner (explaining for example why the need of older people for increased lighting during indoor tasks and night driving).
Available Optotypes
NEOD Acuity provides the most standard optotypes to test visual acuity in literate and illiterate people as well as preschool children, including the Landolt C and Tumbling E symbols considered as the reference optotypes by the International Council of Ophthalmology in its Visual Acuity Measurement Standard. The standard optotypes have been specifically designed to appear equally recognizable contrarily to those used in the Snellen chart. The available optotypes are represented as large icons in the
NEOD Acuity User Guide (version 1.2 – Nov 19, 2016)! 15
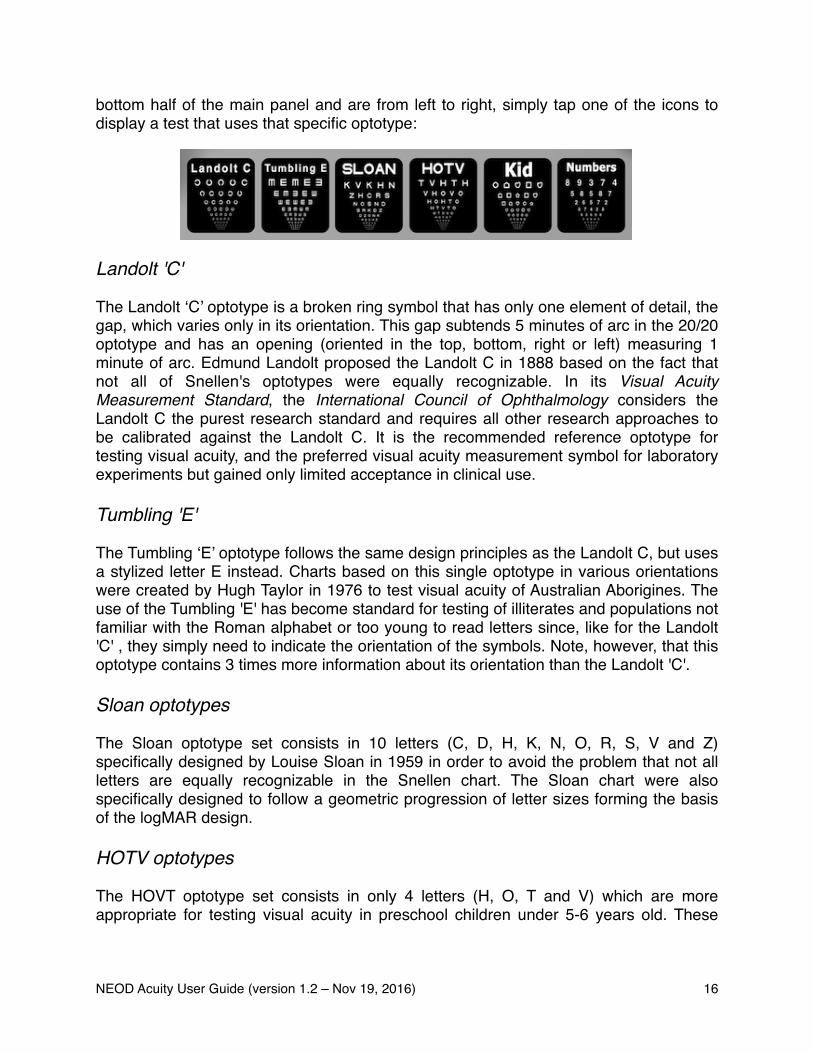
bottom half of the main panel and are from left to right, simply tap one of the icons to display a test that uses that specific optotype:
Landolt 'C'
The Landolt ‘C’ optotype is a broken ring symbol that has only one element of detail, the gap, which varies only in its orientation. This gap subtends 5 minutes of arc in the 20/20 optotype and has an opening (oriented in the top, bottom, right or left) measuring 1 minute of arc. Edmund Landolt proposed the Landolt C in 1888 based on the fact that not all of Snellen's optotypes were equally recognizable. In its Visual Acuity Measurement Standard, the International Council of Ophthalmology considers the Landolt C the purest research standard and requires all other research approaches to be calibrated against the Landolt C. It is the recommended reference optotype for testing visual acuity, and the preferred visual acuity measurement symbol for laboratory experiments but gained only limited acceptance in clinical use.
Tumbling 'E'
The Tumbling ‘E’ optotype follows the same design principles as the Landolt C, but uses a stylized letter E instead. Charts based on this single optotype in various orientations were created by Hugh Taylor in 1976 to test visual acuity of Australian Aborigines. The use of the Tumbling 'E' has become standard for testing of illiterates and populations not familiar with the Roman alphabet or too young to read letters since, like for the Landolt 'C' , they simply need to indicate the orientation of the symbols. Note, however, that this optotype contains 3 times more information about its orientation than the Landolt 'C'.
Sloan optotypes
The Sloan optotype set consists in 10 letters (C, D, H, K, N, O, R, S, V and Z) specifically designed by Louise Sloan in 1959 in order to avoid the problem that not all letters are equally recognizable in the Snellen chart. The Sloan chart were also specifically designed to follow a geometric progression of letter sizes forming the basis of the logMAR design.
HOTV optotypes
The HOVT optotype set consists in only 4 letters (H, O, T and V) which are more appropriate for testing visual acuity in preschool children under 5-6 years old. These
NEOD Acuity User Guide (version 1.2 – Nov 19, 2016)! 16

optotypes are also assumed to be equally recognizable and maximally distinguishable. A child should be first taught the four symbols and then tested against the HOTV chart.
Kid optotypes
The Kid optotype set consists in outlines of 6 figures easily recognized by children (apple, house, circle, square, heart and star). It is adapted from the LEA™ Symbol and Patti Pics™ charts used to measure visual acuity in preschool children too young to perform the HOTV test. The “Kid” chart follows the same logMAR design as the other charts.
Numbers optotypes
The Number optotype set consists in 8 digits (2, 3, 4, 5, 6, 7, 8, 9) found in the "Feinbloom Number Chart" designed by Dr. William Feinbloom in 1935 to test people with low vision. The “Numbers” chart follows the same logMAR design as the other charts.
➡ It is important to select the most appropriate optotype set based on the patient abilities. The Landolt 'C' and Tumbling 'E' optotypes only require the patients to indicate their orientations while all other optotypes need to be identified.
Optotype settings
The optotypes presentation can be customized in the settings section:
• Appearance: the optotypes can be displayed either as black letters on white background or white letters on black background. If there is no counter-indication, acuity testing should be performed preferentially with black letters on white background,
NEOD Acuity User Guide (version 1.2 – Nov 19, 2016)! 17

• Orientations: Landolt C and Tumbling E optotypes have always their orientation randomized among 4 (C & E) or 8 directions (C only). The use of 8 orientations for the Landolt C can improve the reliability of the acuity measurement,
• Confusion Bars: the optotypes can be surrounded to investigate the crowding effect (interaction between target in its surround) which is particularly important in Amblyopia. The surround can be either bars or a frame, and applies on the single letter, whole line or entire chart depending on the chart type, with a spacing corresponding to half the size of a single optotype.
❖ Tap the icon corresponding to the desired optotypes to switch to the chart panel and start the testing!
Measuring Visual Acuity
Chart Panel
After starting the acuity test, you are presented with the chart panel that displays optotypes to be discriminated by the patients, similar to the one shown below. The top or bottom line are displayed at the starting acuity size specified in the settings.
Several controls are available on the chart panel:
! The label above the chart to generate a whole new chart each time one taps it.
NEOD Acuity User Guide (version 1.2 – Nov 19, 2016)! 18

Stop the session and return to the previous panel (no data is saved),
Hide the controls on the iPad display,
Generate a new chart with optotype size decreased or increased by 0.1 log unit.Use the slider between these two buttons to set the size of the top line to any valid value (displayed in red above the chart).
Lock and unlock the chart generation: once locked the same chart (i.e. composed of the same sequence of optotypes) is presented each a test is run.
The acuity bar on the left side indicates the acuity value for each line of a multiple line chart. This bar is updated each time the chart is changed.This bar can be shown or hidden by taping on it.
Set the viewing distance to one of the preset distances. Use the slider on its right to set the viewing distance to any value up to 1.5
meters (5 ft). Tap the “Viewing Distance” label to enter a specific value. The chart is then automatically scaled to maintain the acuity level.
The split horizontal line on the left and right sides of a multiple lines chart points to the current line the patient is asked to read. When interacting directly with the touch screen, the experimenter can drag up or down this line. On its release the test is stopped and the experimenter is asked whether to save the acuity score associated with this line.
❖ Make sure to properly configure your iPad before running a session in terms of power, settings, brightness, and orientation (see the chapter Configuring your iPad).
Procedures
The general procedures for assessing visual acuity follow these basic steps (though methods may vary from practice to practice):
1. Position the patient at the appropriate distance,
NEOD Acuity User Guide (version 1.2 – Nov 19, 2016)! 19

2. Cover the eye not being evaluated (starting with the worst of the two eyes if known),
3. Ask the patient to read the optotypes from left to right starting with the top line,
4. Decrease the size of the optotype until the patient is unable to read or misses some of the characters on any one line,
5. Note the last line successfully read and record the incorrect result,
6. Repeat the above procedure for the fellow eye, then for both eyes together with and without corrective lenses.
The computerized solution provided by NEOD Acuity for the iPad mini relies on the experimenter interacting directly with the iPad through touch screen interactions. Follow these steps to run a test:
1. Configure your test in the settings section (units, optotype appearance, protocol),
2. Create or select the patient and customize the session (tested eye, correction, notes) in the "Current Session" section of the subject panel,
3. Tap one of the optotype icons to switch to the chart panel,
4. Set precisely the viewing distance using the bottom slider or using one of the preset values,
5. Adjust the vertical slider on the right to select a range of letter sizes that can be easily seen by the patient (for a multiple lines chart, this would be a range for which the subject can easily identify all letters in the first line but fails for the last one). This step can be skipped by starting with the default initial acuity level (20/200),
6. Ask the patient to read the optotypes from left to right starting with the top line,
7. If the subject can correctly identify all letters on that line, then ask the subject to read the next smaller line, and so on until the subject fails at least once. If the last line is reached without error, then press the '–' button to generate a new chart with smaller letters and repeat this step until the subject fails at least once. If the subject fails on the first line, press the '+' button to generate a new chart with larger letters and repeat this step.
NEOD Acuity User Guide (version 1.2 – Nov 19, 2016)! 20

8. Once an error occurs, tap and release the smallest line the patient can partially read (the acuity estimate displayed above the chart only indicates the score associated with this line when entirely read) and indicate the number of incorrect letters on the selected line to save a more accurate estimate of the corresponding acuity score,
9. Abort a test at any time by taping the button in the top left corner of the chart panel.
❖ If the patient shows some difficulty to locate the line to read, then the experimenter can activate a line indicator by touching on the side of the line as show below:
Maintain and drag the touch up or down to shift the indication bar, and release the touch outside the chart area to hide the line indicator without displaying the scoring message.
❖ Tap the button in the top-right corner to minimize the visibility of the different control elements or to turn on the acuity scale on the left side of the chart.
❖ Tap the button in the bottom-right corner to lock the chart to its current content and prevent it to be randomized at each run.
Scoring Methods
The procedure for measuring visual acuity consist in presenting optotypes of decreasing size until the subject is unable to discriminate between them. The scoring method is determined by the termination criterion, and the same scoring method can be applied irrespective of the chart type (multiple lines, single line and single letter).
The simple method provides an easy and fast way to measure visual acuity though less precise: the acuity score is the acuity level of the smallest line that can be read without any error. The advantages of this method are its simplicity and speed. However it has the main disadvantage to be prone to inaccuracy if the patient’s responses are unreliable due to other factors than their limited acuity (for example due to communication errors or limited recognition and interpretation skills), and can lead to erroneously low estimates of visual acuity. Note that since the computerized acuity test has the ability to randomly generate a new chart, retesting the same line with different optotypes could be a more efficient way to ensure that the subject error does not result
NEOD Acuity User Guide (version 1.2 – Nov 19, 2016)! 21

from a false alarm: thus the reliability of the simple scoring method can be easily improved by retesting the erroneous line with a new set of optotypes (tap the label above the chart to generate a new random one) before deciding to terminate the test.
The ETDRS scoring method (developed in the context of "Early Treatment for Diabetic Retinopathy Study") provides a simple solution to this problem, and is the standard way to measure visual acuity in clinical environment: the termination criterion is based on several incorrect responses on the same line (typically 3 incorrect letters) rather than a single one to ensure that the subject has indeed reached their acuity limit. Moreover, the ETDRS method takes the contribution of each failed letter into account when calculating the acuity scoring (in a logMAR design with 5 letters per line and with a difference of 0.1 logMAR units between successive lines, each letter contributes for 0.1/5 = 0.02 logMAR units).
As noted in the procedure section above, it is always possible to indicate the exact number of incorrect letters to obtain a more accurate estimate of the acuity score.
Reading Charts
Taping this chart icon will display the list of available reading charts. Taping the title of one of them (red frame below) will present a continuous text reading testing. A reading chart named "History of Acuity" is available as default, but additional reading charts can be added by taping the '+' button, and their content customized by taping the button (green frame below):
The appearance can be customized by adding a format prefix between { } to the text to specify the maximum number of letters per line, the maximum numbers of words per line and the number of lines per acuity level: for example the default prefix {30:7:4} would indicate to present a continuous text composed of 4 lines per acuity level with no more than 30 letters or 7 words per line. If the specified text contains paragraphs separated by a linefeed (or carriage return), then the presentation order of the paragraphs is randomly generated (except if the chart is locked as indicated by the locked button in the bottom right corner of the chart). When scoring the test, it is possible to indicate the number of missed words on the selected text to improve the precision of the acuity measurement.
NEOD Acuity User Guide (version 1.2 – Nov 19, 2016)! 22

Refractive Targets
Taping this icon will display a refractive target. Several non-adjustable refractive targets best viewed from a viewing distance of 40 cm (16 in) are available by default (swipe to the left or to the right in the Targets section to access the different targets) in addition of a reading chart that displays several paragraphs of text:
• 20/30 Horizontal and Vertical Sloan lines,
• von Graefe Phoria Test: used to subjectively measure both the magnitude and direction of an ocular deviation,
• Cross Cylinder Targets: used to determine near add for patients with presbyopia,
• Astigmatism Chart & Fan: people with astigmatism will see some of the lines more clearer than others,
• Duochrome Test: used during a monocular refraction to determine the best vision sphere. An eye that is in a myopic state will tend to see the target on the red filter more clearly while an eye in a hyperopic state will tend to see the target on the green filter more clearly,
• Paragraphs: several text paragraphs at different sizes expressed in points (8 pts to 18 pts).
Note that the above targets are only available when 'Defaults' is the selected option in the Settings section :
Other options allow to display a specific size-adjustable refraction target to match the viewing distance to the subject:
• von Graefe Target used to subjectively measure both the magnitude and direction of an ocular deviation (with adjustable letter acuity),
• Cross-Cylinder Grid used to determine near add for patients with presbyopia (adjustable, 1 deg size by default),
• Mallett Fixation Disparity Target used to assess the horizontal and vertical fixation disparity using anaglyph glasses (~1 deg target diameter, 30 arcmin separation between Nonius strips),
NEOD Acuity User Guide (version 1.2 – Nov 19, 2016)! 23

• Worth 4 Dots Test used to assess binocular suppression (adjustable, 1 deg dot diameter by default).
To view the Mallett Fixation Disparity Target and Worth 4 Dots Test, you would need to use standard anaglyph glasses, typically of red/green, red-cyan or green-magenta types. Simply tap the left and right lenses to adjust the color to match those of your particular glasses:
Creating Configurations
When running multiple charts with the same patient or different charts for different patients, specifying manually each chart settings can become cumbersome and prone to errors. To simplify this process, configurations can be created in advance using the button entitled "Creating New Configuration" in the Settings section :
Taping this button create a new configuration, based on the current settings, which can be named and associated with one of the available acuity tests.
NEOD Acuity User Guide (version 1.2 – Nov 19, 2016)! 24

The created configurations can be managed by taping the button in the bottom toolbar. Taping one of the configuration will run the associated test whose settings can be inspected by taping the button:
NEOD Acuity User Guide (version 1.2 – Nov 19, 2016)! 25

Managing the Subjects
The top part of the main panel is updated with the currently selected patient or group specific information, whose name is always indicated in the title of the top toolbar.The patient or group information includes:
• Some personal information (gender, age, eye condition, e-mail and phone number),
• The eye prescription (for glasses and/or contact lenses),
• The history of acuity measurements,
• The settings for the current session (tested eye, correction, notes).
Patients List
The patients list is available in the left section in portrait mode, and is available through a popover window in landscape mode by taping the "Patients" button in the top toolbar. New subjects can be added by taping the '+' button in the Patients section and entering their name. Tap the 'Edit' button to remove, rename, or reorder a patient. Then tap the "Done" button to validate these changes. Note that the list is displayed in alphabetical order by default and a search field is also included. If you are not interested to keep a list of patients, you may simply add a group name instead.
Personal Information
NEOD Acuity User Guide (version 1.2 – Nov 19, 2016)! 26

The personal information consists of:
• The patient gender,
• The patient age,
• The patient eye condition (several common conditions are available),
• The patient email and phone number.
All this information is mandatory. The personal information is locked by default. To unlock them, tap the locker icon.
Eye Prescription
If known, the eye prescription can be entered for either glasses or contact lenses. For eyeglass prescription, both distance and near vision prescriptions can be provided. The prescription format includes all standard parameters found in the prescription provided by an eyewear prescriber, such as an optometrist or ophthalmologist.
The prescription information can be entered either using the numerical keyboard by taping individually each data field or using a picker panel by taping the small “RIGHT EYE”/”LEFT EYE” buttons.
NEOD Acuity User Guide (version 1.2 – Nov 19, 2016)! 27

For an eyeglass prescription:
For a contact lens prescription:
Acuity History
Each new acuity measurement is added to the acuity history. The history can be expanded or collapsed by taping the ‘+’ or ‘–’ sign in the table header.
Tap any entry in this table to inspect the detail of the measurement. Tap the “Delete” button in the session details to delete this entry.
NEOD Acuity User Guide (version 1.2 – Nov 19, 2016)! 28

Session Information
Information for the current session consists of:
• The tested eye(s),
• Whether the eye(s) is corrected,
• Any other information that would be useful to note.
This information is recorded along with the acuity score measured for the current session so it is important to make sure it is correctly specified before running a session. This information can be retrieved through inspection of the measurement details in the acuity history.
NEOD Acuity User Guide (version 1.2 – Nov 19, 2016)! 29

Exporting & Importing Acuity Data
The acuity history can be exported through email either as an HTML table or a database backup file:
When exporting as an HTML table, the acuity history can be emailed either for the currently selected patient or for all patients:
The selected acuity data is then presented and sent as an HTML table where each session is represented as a row where each column indicated a parameter value as shown below:
NEOD Acuity User Guide (version 1.2 – Nov 19, 2016)! 30
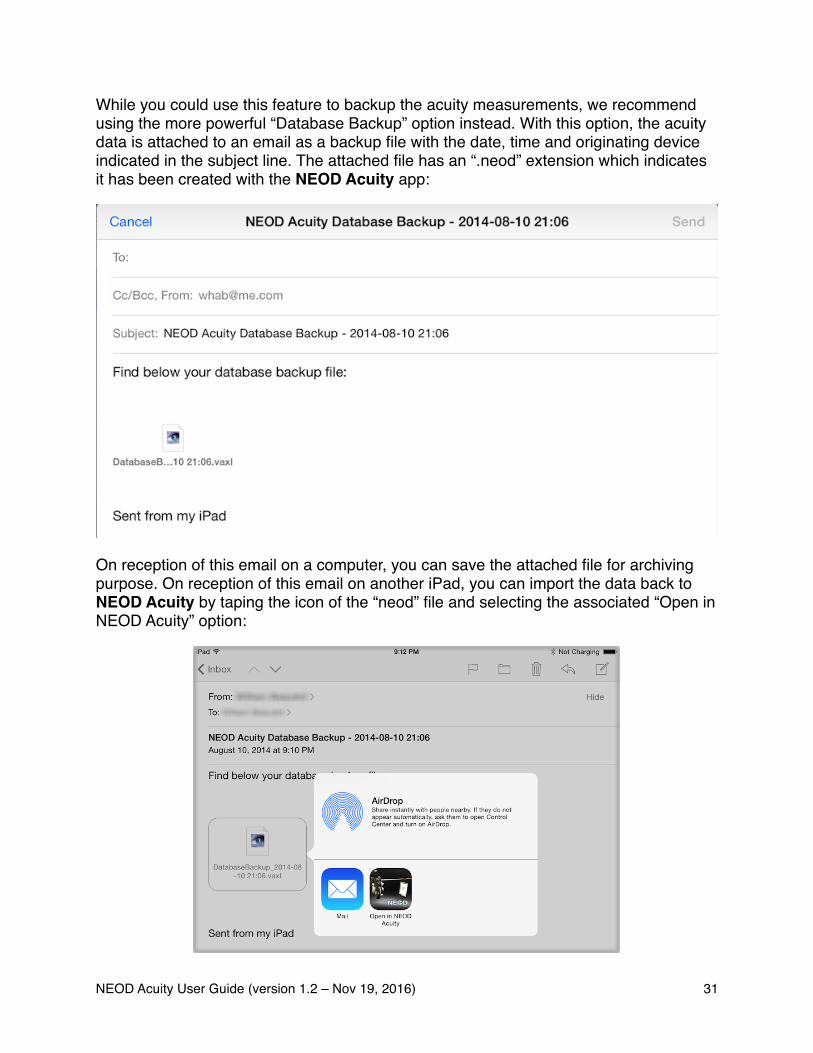
While you could use this feature to backup the acuity measurements, we recommend using the more powerful “Database Backup” option instead. With this option, the acuity data is attached to an email as a backup file with the date, time and originating device indicated in the subject line. The attached file has an “.neod” extension which indicates it has been created with the NEOD Acuity app:
On reception of this email on a computer, you can save the attached file for archiving purpose. On reception of this email on another iPad, you can import the data back to NEOD Acuity by taping the icon of the “neod” file and selecting the associated “Open in NEOD Acuity” option:
NEOD Acuity User Guide (version 1.2 – Nov 19, 2016)! 31

When opening an “neod” file, the NEOD Acuity app will launch and ask what to do with the data contained in the imported file. The available options are:
- “Overwrite” to replace the current data with the imported one (beware that the pre-vious data will be lost so be careful!),
- “Append” to add the imported data to the current one (beware that patients with the same name may then appear in the patients list and may require that you manually “clean” this list),
- 32“Merge” to complete the current data with the imported one: patients with same name, gender and age (year and month) are merged so missing data like condition and contact information will be filled in and the respective acuity history be ap-pended to the previous one if differing in the assessment date and time.
NEOD Acuity User Guide (version 1.2 – Nov 19, 2016)! 32

Using NEOD Phoropter Mount
Ideally the NEOD Acuity App should be used with our patented NEOD Phoropter Mount designed specifically for the iPad mini. The NEOD Mount features:
• Easy gliding and fastening along any test distance on the phoropter rod
• Functional for both left or right sided exam room configuration
• Dual slot for iPad mini with Retina display and Near Card interface
• Dual sided opening for patient testing and educational demonstration while mounted
NEOD Acuity User Guide (version 1.2 – Nov 19, 2016)! 33

• Calibration markings on mount window for selected target distance while using iPad mini or Near Card
• Finger cut out for easily removing iPad mini from slot
The NEOD Mount for iPad mini can be ordered online on our website:http://www.neodinc.com
When the practitioner is setting the desired test distance they must align the inside marking (closest to the patient) on the NEOD phoropter mount window to the desired test distance on the rod if using the iPad mini or if using a near card must align the central marking on the mount window with the desired test distance on the rod. The reason for this is that the plain of the LED aligns with the inside marking on the mount window and the plain of the near card aligns with the central marking on the mount window. Once desired test distance is obtained the practitioner can fasten the mount.
NEOD Acuity User Guide (version 1.2 – Nov 19, 2016)! 34

Frequently Asked Questions (F.A.Q.)
Q: Has this Visual Acuity solution been validated by independent vision care professionals?R: Several research laboratories around the world are currently evaluating similar solutions compared to other chart-based or computer-based solutions. Find below references to some of these works that have used the iPad “Visual Acuity XL” app from Kybervision. Note that NEOD Acuity relies on the very same technology as “Visual Acuity XL” (also developed by Dr. William H.A. Beaudot, co-founder of NEOD Inc). We will add more when made publicly available:
Jacobs Robert, Black Joanna, Tran An, Chen Lu, Geraint Phillips, Thompson Ben (University of Auckland) “An iPad for an eye test?” 89th Annual Meeting of the American Academy of Optometry, Boston, October 2011.
JM Black, RJ Jacobs, G Phillips, L Chen, E Tan, A Tran, B Thompson (2013) “An assessment of the iPad as a testing platform for distance visual acuity in adults”, BMJ Open [Link]
Conor P. Malone, Colm McCourt, Nawal T. Al Daqqaq, Conor Murphy (Royal Victoria Eye and Ear Hospital, Dublin, Ireland) “Evaluation of Tablet Computers in the Assessment of Visual Acuity: Can iPads™ Replace the Snellen Chart?” ARVO 2014 Annual Meeting Abstracts, Orlando, May 2014.
NEOD Acuity User Guide (version 1.2 – Feb 19, 2016)! 35

Configuring your iPad mini
The iPad mini needs to be properly configured before running any visual acuity test. Here are a few important recommendations to follow before carrying out a test to ensure a smooth process:
Power Adapter vs Battery
If the iPad mini is not plugged to an electrical outlet or a computer system while running the acuity testing, make sure that its battery is fully charged beforehand (the battery level is indicated in the top right hand corner). While the iPad mini can typically provide up to 10 hours of battery life, the use of the Bluetooth/WiFi connection and high brightness can significantly reduce that time. Keep handy the USB cable for charging through an electrical outlet or a computer system or an iPad 10W USB Power Adapter that lets you charge your iPad directly through an electrical outlet. A 6-foot-long power cord can be also useful to charge it from an even greater distance if necessary.
Settings
It is important to make sure that there is no system setting on your iPad device that may interfere with the testing process. We recommend that you open the "Settings" app and check the following properties:
• in the "Display & Brightness" section:
- "Auto-Brightness" set to OFF- Brightness level set to an appropriate level (see below)
• in the "Notifications" section:
- all "Notifications" set to OFF
• in the "Network" section:
- “WiFi” set to OFF- "Bluetooth" set to OFF- "Cellular Data" set to OFF- or simply “Airplane Mode” set to ON
• in the "General" section:
- "Auto-Lock" set to NEVER
NEOD Acuity User Guide (version 1.2 – Feb 19, 2016)! 36

Lightning Conditions & Brightness
Visual acuity testing should be conducted under standardized lighting conditions. The test light level recommended by the National Academy of Sciences and by the American National Standards Institute for ETDRS is a minimum luminance of 85 cd/m2. This level corresponds to about 25% of the maximum brightness level provided by a typical iPad display (measured maximum brightness is about 375 to 450 cd/m2). This testing brightness can be specified either:
• by moving the slider in the "Display & Brightness" section of the "Settings" app to about 3 cm from the left extremity should provide about 85 cd/m2. If unsure about the correct brightness, simply max out the iPad brightness to ensure optimal viewing conditions.
• or using the Luminance option available from the settings section : it can be indicated independently of the system brightness (see above) and directly in term of cd/m2.
The iPad should be also placed at a well illuminated location that does not bring any reflection in the iPad screen (because of the very glossy nature of the iPad screen, it is recommended to install an antiglare screen protector if reflections occur in the experimental environment). Keep handy some cleaning cloth for the iPad display as it can get easily covered with finger prints and smudges.
Landscape vs Portrait Mode
The iPad mini can be either used in Landscape or Portrait mode: the portrait mode allows the presentation of more acuity lines on the same display while the landscape mode allows the presentation of more optotypes per line for larger optotype size (up to 5). The Portrait mode is always used with the NEOD phoropter mount.
NEOD Acuity User Guide (version 1.2 – Nov 19, 2016)! 37

Adequacy of the iPad mini for Visual Acuity Testing
iPad mini Display Specifications
• Technology:! ! ! LED-backlit IPS LCD• Aspect ratio:!! ! 4:3• Glossy screen
iPad mini (released in 2012):
• Resolution:! ! ! 1024 x 768• Diagonal:! ! ! 7.9" (20 cm)• Pixel density:!! ! 163 ppi (6.4 ppm)• Min Luminance:! ! ~ 0.5 cd/m2
• Max luminance:! ! ~ 400 cd/m2
• Max contrast ratio:!! ~ 800:1• Adequacy:! ! poor
iPad mini 2/3 with Retina display:
• Resolution:! ! ! 2048 x 1536• Diagonal:! ! ! 7.9" (20 cm)• Pixel density:!! ! 326 ppi (12.8 ppm)• Min Luminance:! ! ~ 0.5 cd/m2
• Max luminance:! ! ~ 400 cd/m2
• Max contrast ratio:!! ~ 800:1• Adequacy:! ! good
iPad mini 4 with Retina display (released in 2015):
• Resolution:! ! ! 2048 x 1536• Diagonal:! ! ! 7.9" (20 cm)• Pixel density:!! ! 326 ppi (12.8 ppm)• Min Luminance:! ! ~ 0.5 cd/m2
• Max luminance:! ! ~ 450 cd/m2
• Max contrast ratio:!! ~ 900:1• Adequacy:! ! very good (low reflection)
NEOD Acuity User Guide (version 1.2 – Feb 19, 2016)! 38

Specifications for visual acuity testing
• Recommended minimum luminance: 85 cd/m2
(see the Luminance and Configuring your devices sections)
• The table below provides some comparison between the different iPad devices:
DevicesComparison
iPad mini iPad mini withRetina display
Minimum distancefor 20/20
22” / 55 cm 11" / 27 cm
Minimum distancefor 20/10 (60 cpd)
43” / 110 cm 22" / 55 cm
Best acuityat reading distance(14-16” / 36-41 cm)
20/30 to 20/26 20/15 to 20/13
Best acuityat 39” / 1m
20/11 20/5
Pros & Cons
The screen of the iPad mini with Retina display is a very high quality LCD display, with a high brightness and a high contrast ratio, particularly well suited for visual acuity testing. Pixel density (326 ppi) is adequate for measuring near visual acuity (20/10 measurable at a distance of 55 cm or 22").
A potential problem is the screen glossiness: glossy screens are more susceptible to glare, reflecting light from windows and light bulbs (some scientific publications have quantified that problem, see the references provided in the FAQ section). Moreover they tend to show fingerprints and smudges more readily, especially when they are off. On the contrary matte screens tend to handle glare better, due to a polarized coating over the glass that diffuses ambient light. A side effect of the matte finish is a slight blurring, reduced contrast and a narrower viewing angle.
NEOD Acuity User Guide (version 1.2 – Nov 19, 2016)! 39


![Aleksandr Nevsky - Un Héroe del Pueblo (NeoD+Sword) [12º Aniversario CRG].cbr](https://static.fdocuments.net/doc/165x107/55cf8cd85503462b13901e4f/aleksandr-nevsky-un-heroe-del-pueblo-neodsword-12o-aniversario-crgcbr.jpg)