CSR cn a t e cn can e Re a€¦ · CSR cn a t e cn can e Re a . cn cn cn cn cn cn cn crq cn cn cn
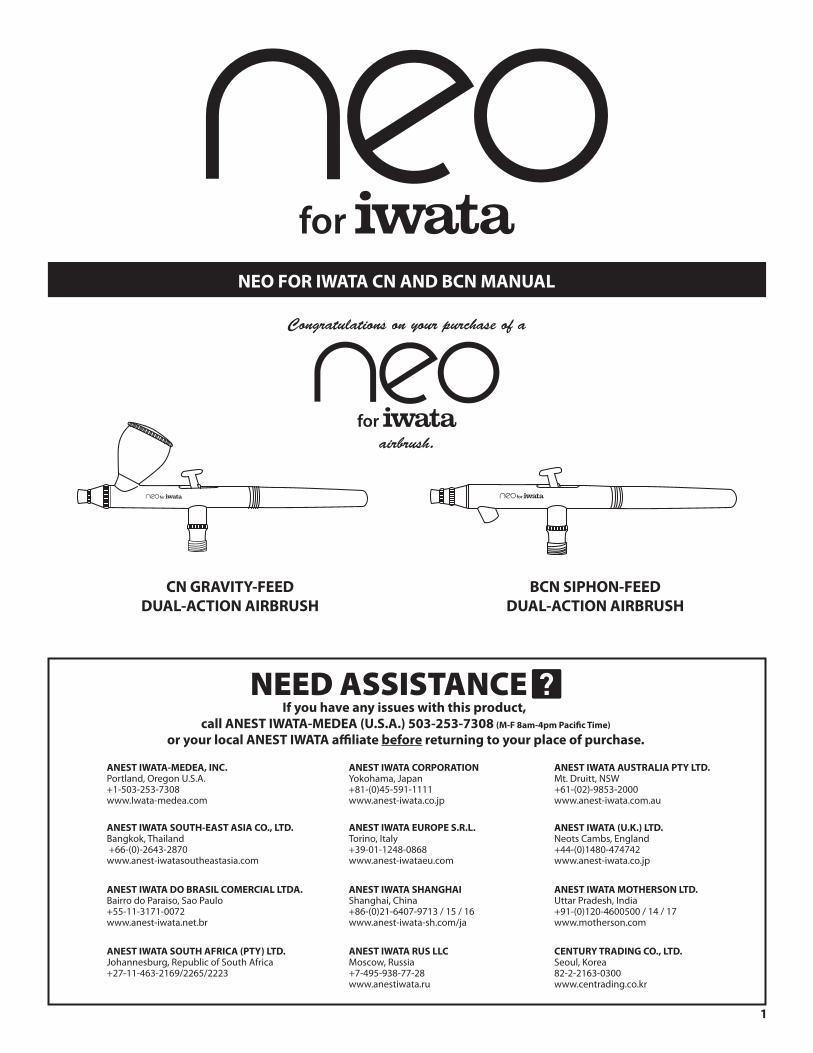
NEO SERIES MANUAL
Congratulations on your purchase of a
NEO SERIES MANUALairbrush.
CN GRAVITY-FEEDDUAL-ACTION AIRBRUSH
BCN SIPHON-FEEDDUAL-ACTION AIRBRUSH
NEO FOR IWATA CN AND BCN MANUAL
CN GRAVITY-FEEDDUAL-ACTION AIRBRUSH
BCN SIPHON-FEEDDUAL-ACTION AIRBRUSH
1
ANEST IWATA-MEDEA, INC.Portland, Oregon U.S.A.+1-503-253-7308www.Iwata-medea.com
ANEST IWATA AUSTRALIA PTY LTD.Mt. Druitt, NSW+61-(02)-9853-2000www.anest-iwata.com.au
ANEST IWATA EUROPE S.R.L.Torino, Italy+39-01-1248-0868www.anest-iwataeu.com
ANEST IWATA SOUTH-EAST ASIA CO., LTD.Bangkok, Thailand +66-(0)-2643-2870www.anest-iwatasoutheastasia.com
ANEST IWATA SHANGHAIShanghai, China+86-(0)21-6407-9713 / 15 / 16www.anest-iwata-sh.com/ja
ANEST IWATA RUS LLCMoscow, Russia+7-495-938-77-28www.anestiwata.ru
ANEST IWATA CORPORATIONYokohama, Japan+81-(0)45-591-1111www.anest-iwata.co.jp
ANEST IWATA (U.K.) LTD.Neots Cambs, England+44-(0)1480-474742www.anest-iwata.co.jp
ANEST IWATA MOTHERSON LTD.Uttar Pradesh, India+91-(0)120-4600500 / 14 / 17www.motherson.com
ANEST IWATA SOUTH AFRICA (PTY) LTD.Johannesburg, Republic of South Africa+27-11-463-2169/2265/2223
ANEST IWATA DO BRASIL COMERCIAL LTDA.Bairro do Paraiso, Sao Paulo+55-11-3171-0072www.anest-iwata.net.br
CENTURY TRADING CO., LTD.Seoul, Korea82-2-2163-0300 www.centrading.co.kr
If you have any issues with this product, call ANEST IWATA-MEDEA (U.S.A.) 503-253-7308 (M-F 8am-4pm Paci�c Time)
or your local ANEST IWATA a�liate before returning to your place of purchase.
NEED ASSISTANCE
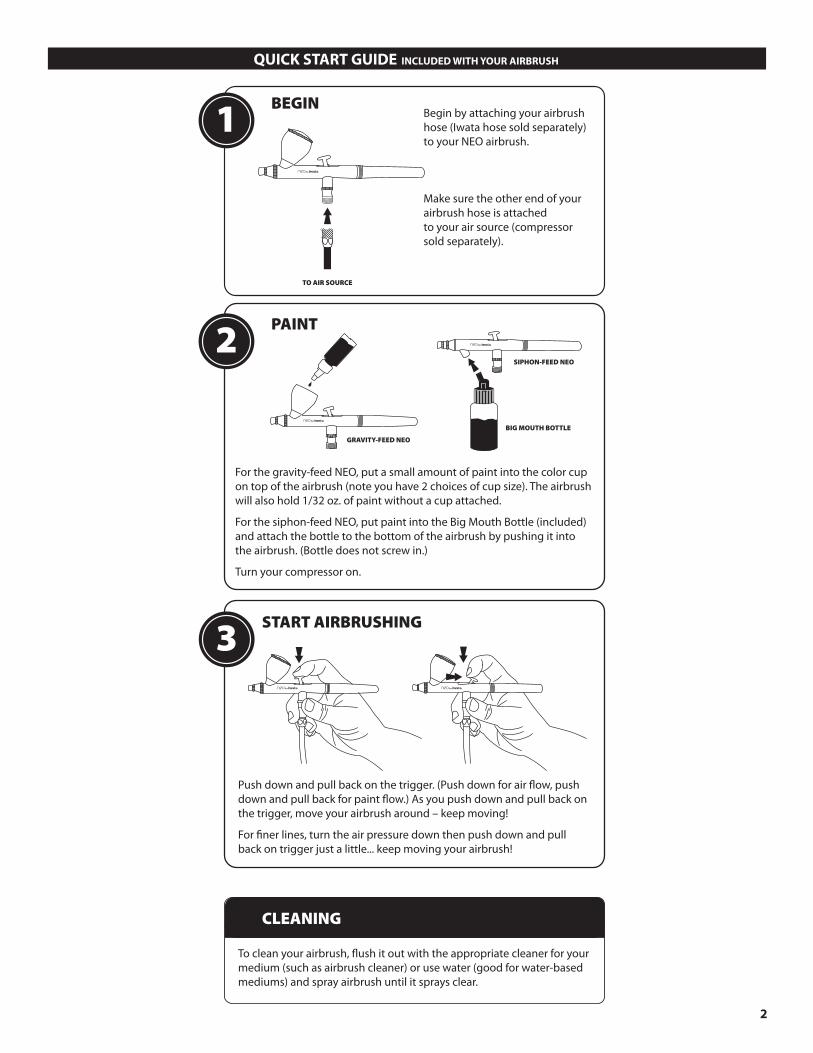
Push down and pull back on the trigger. (Push down for air �ow, push down and pull back for paint �ow.) As you push down and pull back on the trigger, move your airbrush around – keep moving!
For �ner lines, turn the air pressure down then push down and pull back on trigger just a little... keep moving your airbrush!
To clean your airbrush, �ush it out with the appropriate cleaner for your medium (such as airbrush cleaner) or use water (good for water-based mediums) and spray airbrush until it sprays clear.
ANEST IWATA-MEDEA, Inc.1336 N. Mason St. Portland, OR 97217503-253-7308 | www.iwata-medea.com
Begin by attaching your airbrush hose (Iwata hose sold separately) to your NEO airbrush.
Make sure the other end of your airbrush hose is attached to your air source (compressor sold separately).
For the gravity-feed NEO, put a small amount of paint into the color cup on top of the airbrush (note you have 2 choices of cup size). The airbrush will also hold 1/32 oz. of paint without a cup attached.
For the siphon-feed NEO, put paint into the Big Mouth Bottle (included) and attach the bottle to the bottom of the airbrush by pushing it into the airbrush. (Bottle does not screw in.)
Turn your compressor on.
For further in-depth tips and info, please go to
www.iwata-neo.com
BEGIN
CLEANING
1
PAINT2
START AIRBRUSHING3
TO AIR SOURCE
GRAVITY-FEED NEO
SIPHON-FEED NEO
BIG MOUTH BOTTLE
For further in-depth tips and info, please go towww.iwata-neo.com
Quick Start Guide
QUICK START GUIDE INCLUDED WITH YOUR AIRBRUSH
2
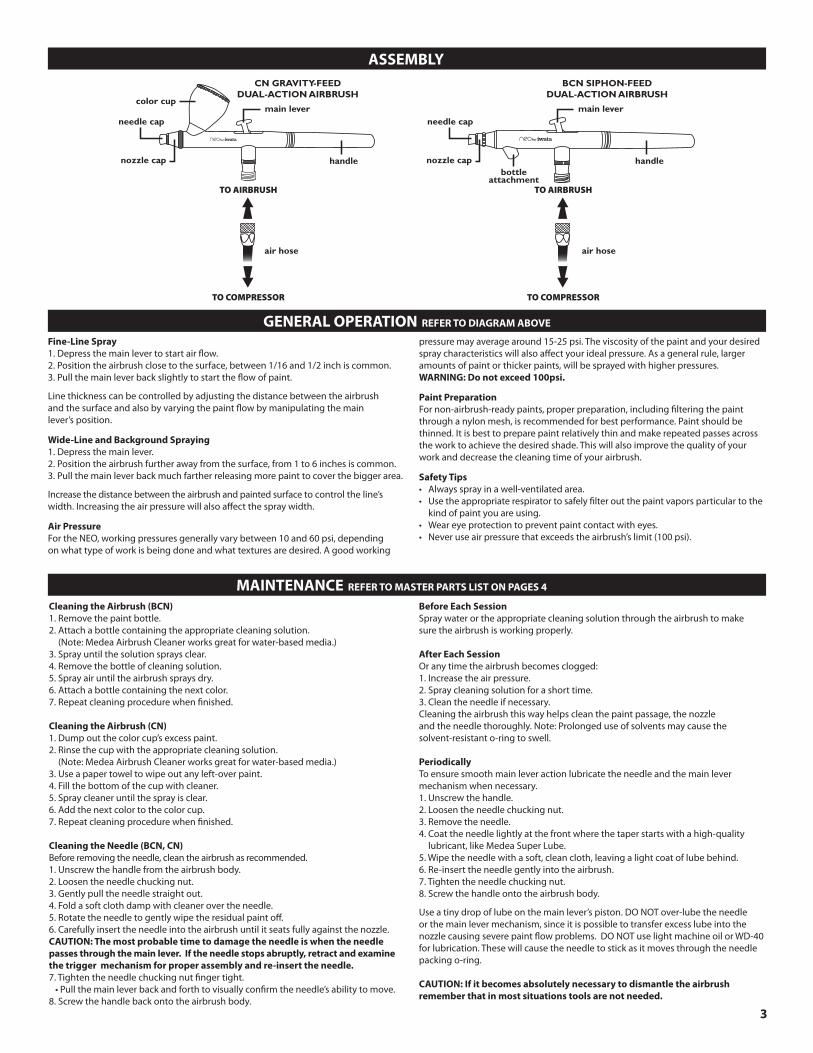
ASSEMBLY
TO COMPRESSOR
TO AIRBRUSH
TO COMPRESSOR
TO AIRBRUSH
CN GRAVITY-FEEDDUAL-ACTION AIRBRUSH
BCN SIPHON-FEEDDUAL-ACTION AIRBRUSH
Needle chucking guideneedle
main levercolor cup
needle cap
nozzle capbottle
attachment
handle
main leverneedle cap
nozzle cap handle
air hoseair hose
Fine-Line Spray 1. Depress the main lever to start air flow.2. Position the airbrush close to the surface, between 1/16 and 1/2 inch is common. 3. Pull the main lever back slightly to start the flow of paint.
Line thickness can be controlled by adjusting the distance between the airbrush and the surface and also by varying the paint flow by manipulating the main lever’s position.
Wide-Line and Background Spraying 1. Depress the main lever.2. Position the airbrush further away from the surface, from 1 to 6 inches is common.3. Pull the main lever back much farther releasing more paint to cover the bigger area.
Increase the distance between the airbrush and painted surface to control the line’s width. Increasing the air pressure will also affect the spray width.
Air PressureFor the NEO, working pressures generally vary between 10 and 60 psi, depending on what type of work is being done and what textures are desired. A good working
pressure may average around 15-25 psi. The viscosity of the paint and your desired spray characteristics will also affect your ideal pressure. As a general rule, larger amounts of paint or thicker paints, will be sprayed with higher pressures. WARNING: Do not exceed 100psi.
Paint PreparationFor non-airbrush-ready paints, proper preparation, including filtering the paint through a nylon mesh, is recommended for best performance. Paint should be thinned. It is best to prepare paint relatively thin and make repeated passes across the work to achieve the desired shade. This will also improve the quality of your work and decrease the cleaning time of your airbrush.
Safety Tips• Alwayssprayinawell-ventilatedarea.• Usetheappropriaterespiratortosafelyfilteroutthepaintvaporsparticulartothe
kind of paint you are using.• Weareyeprotectiontopreventpaintcontactwitheyes.• Neveruseairpressurethatexceedstheairbrush’slimit(100psi).
GENERAL OPERATION REFER TO DIAGRAM ABOVE
Cleaning the Airbrush (BCN) 1. Remove the paint bottle.2. Attach a bottle containing the appropriate cleaning solution. (Note:MedeaAirbrushCleanerworksgreatforwater-basedmedia.)
3. Spray until the solution sprays clear.4. Remove the bottle of cleaning solution.5. Spray air until the airbrush sprays dry.6. Attach a bottle containing the next color.7. Repeat cleaning procedure when finished.
Cleaning the Airbrush (CN)1. Dump out the color cup’s excess paint.2. Rinse the cup with the appropriate cleaning solution. (Note:MedeaAirbrushCleanerworksgreatforwater-basedmedia.)
3.Useapapertoweltowipeoutanyleft-overpaint.4. Fill the bottom of the cup with cleaner.5. Spray cleaner until the spray is clear.6. Add the next color to the color cup.7. Repeat cleaning procedure when finished.
Cleaning the Needle (BCN, CN)Before removing the needle, clean the airbrush as recommended.1.Unscrewthehandlefromtheairbrushbody.2. Loosen the needle chucking nut.3. Gently pull the needle straight out.4. Fold a soft cloth damp with cleaner over the needle.5. Rotate the needle to gently wipe the residual paint off.6.Carefullyinserttheneedleintotheairbrushuntilitseatsfullyagainstthenozzle.CAUTION: The most probable time to damage the needle is when the needle passes through the main lever. If the needle stops abruptly, retract and examine the trigger mechanism for proper assembly and re-insert the needle.7. Tighten the needle chucking nut finger tight.•Pullthemainleverbackandforthtovisuallyconfirmtheneedle’sabilitytomove.8. Screw the handle back onto the airbrush body.
Before Each Session Spray water or the appropriate cleaning solution through the airbrush to make sure the airbrush is working properly.
After Each SessionOranytimetheairbrushbecomesclogged:1. Increase the air pressure.2. Spray cleaning solution for a short time.3.Cleantheneedleifnecessary.Cleaningtheairbrushthiswayhelpscleanthepaintpassage,thenozzle andtheneedlethoroughly.Note:Prolongeduseofsolventsmaycausethe solvent-resistant o-ring to swell.
PeriodicallyTo ensure smooth main lever action lubricate the needle and the main lever mechanism when necessary.1.Unscrewthehandle.2. Loosen the needle chucking nut.3. Remove the needle.4.Coattheneedlelightlyatthefrontwherethetaperstartswithahigh-quality lubricant,likeMedeaSuperLube.
5.Wipetheneedlewithasoft,cleancloth,leavingalightcoatoflubebehind.6. Re-insert the needle gently into the airbrush.7. Tighten the needle chucking nut.8. Screw the handle onto the airbrush body.
Useatinydropoflubeonthemainlever’spiston.DONOTover-lubetheneedleor the main lever mechanism, since it is possible to transfer excess lube into the nozzlecausingseverepaintflowproblems.DONOTuselightmachineoilorWD-40for lubrication. These will cause the needle to stick as it moves through the needle packing o-ring.
CAUTION: If it becomes absolutely necessary to dismantle the airbrush remember that in most situations tools are not needed.
MAINTENANCE REFER TO MASTER PARTS LIST ON PAGES 4
3
4
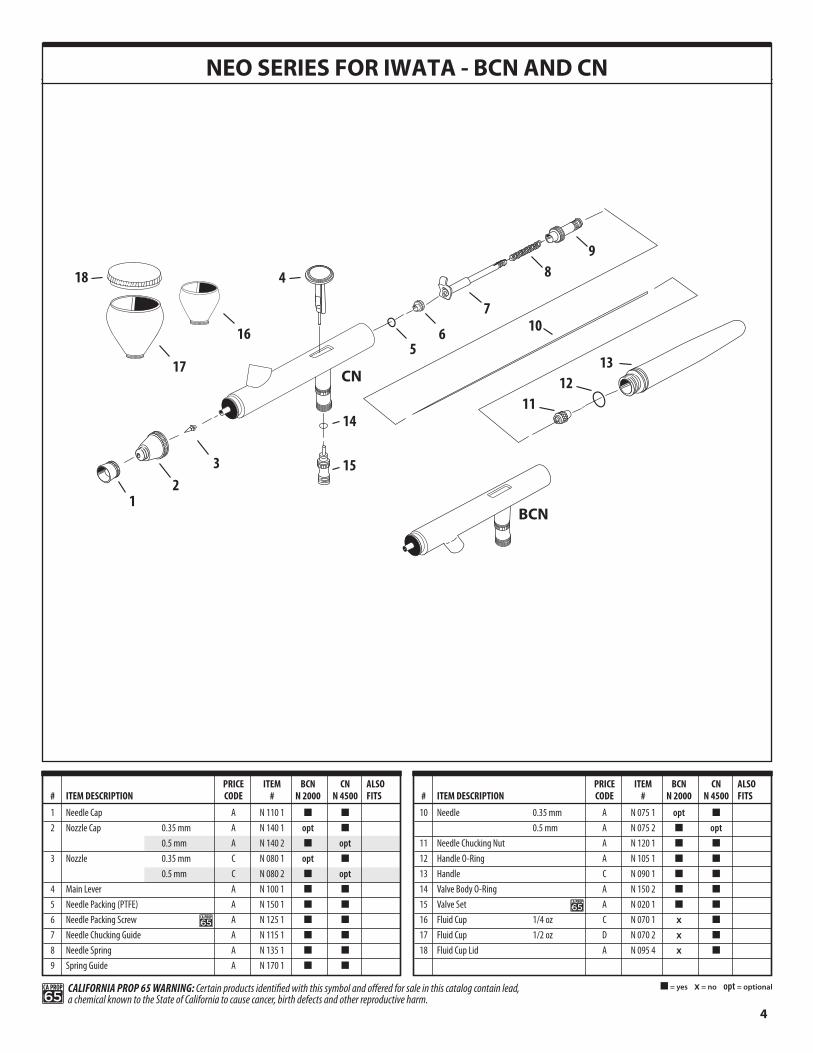
NEO SERIES FOR IWATA - BCN AND CN
PRICE ITEM BCN CN ALSO # ITEM DESCRIPTION CODE # N 2000 N 4500 FITS
10 Needle 0.35 mm A N 075 1 opt n
0.5 mm A N 075 2 n opt 11 Needle Chucking Nut A N 120 1 n n 12 Handle O-Ring A N 105 1 n n
13 Handle C N 090 1 n n
14 Valve Body O-Ring A N 150 2 n n
15 Valve Set A N 020 1 n n
16 Fluid Cup 1/4 oz C N 070 1 x n
17 Fluid Cup 1/2 oz D N 070 2 x n
18 Fluid Cup Lid A N 095 4 x n
BCN
13
2
14
15
418
6
7
89
105
17
16
11
CN 12
PRICE ITEM BCN CN ALSO # ITEM DESCRIPTION CODE # N 2000 N 4500 FITS
1 Needle Cap A N 110 1 n n
2 Nozzle Cap 0.35 mm A N 140 1 opt n
0.5 mm A N 140 2 n opt 3 Nozzle 0.35 mm C N 080 1 opt n
0.5 mm C N 080 2 n opt 4 Main Lever A N 100 1 n n
5 Needle Packing (PTFE) A N 150 1 n n
6 Needle Packing Screw A N 125 1 n n
7 Needle Chucking Guide A N 115 1 n n
8 Needle Spring A N 135 1 n n
9 Spring Guide A N 170 1 n n
CALIFORNIA PROP 65 WARNING: Certain products identified with this symbol and offered for sale in this catalog contain lead, a chemical known to the State of California to cause cancer, birth defects and other reproductive harm.
CA PROP
65n = yes x = no opt = optional
CA PROP
65
CA PROP
65
Nozzle Intime,thenozzlemaywearorbedamagedandmayneedtobereplaced.1.Unscrewthehandle.2. Loosen the needle chucking nut.3. Gently pull the needle part way back. It doesn’t need to be fully pulled out.4.Unscrewtheneedlecapandthenozzlecap.5.Unscrewthenozzlecounter-clockwisewiththeprovidedwrench.6.Screwthenewnozzleintotheairbrushbodywithyourfingers.7.Slightlytightenthenozzlewiththeprovidedwrench. •DONOTOVERTIGHTEN!8.Screwtheneedlecapandnozzlecapontotheairbrushbody.9.Pushtheneedleallthewayforwarduntilitseatswiththenewnozzle.10. Tighten the needle chucking nut.11. Screw the handle onto the airbrush body.TIP: Keep a spare nozzle on hand for unforeseen accidents.
Needle Needles are subject to easy physical damage because of the long tapered, extremely fine tip. If the needle point becomes severely bent, it must be straightened before pullingitbackthroughthenozzle.Ifnot,thebentneedlemightdamagethenozzleas it’s pulled through.TIP: Keep a spare needle on hand for unforeseen accidents.
Copyright©2010Iwata-MedeaInc.Allrightsreserved.TheIwata-Medealogo,Iwata-Medea®,IwataEclipse™,IwataRevolution™,IwataKustom™,IwataMicron™,SprintJet™,SmartJet™,PowerJetPro™,PowerJetLite™,MedeaSuperLube™,PistolGripFilter™,andallproductsdenotedwith®or™areregisteredtrademarksortrademarksofIwata-MedeaInc.•Iwata®andtheIwatalogoareregisteredtrademarksofAnestIwataJapan.Formoreinformationvisitwww.iwata-medea.com
Rev5 10/14
— w w w . I W A T A N E O . c o m —
ANEST IWATA-MEDEA, Inc.•1336N.MasonSt.,Portland,OR97217
tel: 503-253-7308 • fax: 503-253-0721 • [email protected]
REPLACEMENT PARTS AND ACCESSORIES REFER TO MASTER PARTS LIST ON PAGE 4
WARRANTYAll NEO for Iwata airbrushes are WarrantedagainstallmanufacturingdefectsofmaterialandmanufactureorworkmanshipforaperiodofFIVEyearsfromthedateofpurchase.Thiswarrantydoesnotcoverfluidneedlesorfluidnozzlessincethesepartsneedtobereplacedoccasionallyduetonormalwear.Anyotherpartormaterial that is or becomes defective so as not to be usable within this period will be repaired or replaced. This warranty does not cover damage caused by negligence orairbrushesthathavebeenalteredorabusedinanyway.CalloremailIwata-Medeabeforereturninganairbrushfortheappropriateprocedureforwarrantyrepairs.
5