Nefton Technologies - Mettler Toledo IND310 Weighing ... Guide-EN.pdf · METTLER TOLEDO RESERVES...
52
IND310drive Terminal User’s Guide 71207921 (10/05) R03
Transcript of Nefton Technologies - Mettler Toledo IND310 Weighing ... Guide-EN.pdf · METTLER TOLEDO RESERVES...
IND310drive
Terminal User’s Guide
71207921 (10/05)
R03
© METTLER TOLEDO 2005
No part of this manual may be reproduced or transmitted in any form or by any means, electronic or mechanical, including photocopying and recording, for any purpose without the express written permission of METTLER TOLEDO.
U.S. Government Restricted Rights: This documentation is furnished with Restricted Rights.
Copyright 2005 METTLER TOLEDO. This documentation contains proprietary information of METTLER TOLEDO. It may not be copied in whole or in part without the express written consent of METTLER TOLEDO.
METTLER TOLEDO reserves the right to make refinements or changes to the product or manual without notice.
COPYRIGHT METTLER TOLEDO® is a registered trademark of METTLER TOLEDO. All other brand or product names are trademarks or registered trademarks of their respective companies.
METTLER TOLEDO RESERVES THE RIGHT TO MAKE REFINEMENTS OR CHANGES WITHOUT NOTICE.
FCC Notice This device complies with Part 15 of the FCC Rules and the Radio Interference Requirements of the Canadian Department of Communications. Operation is subject to the following conditions: (1) this device may not cause harmful interference, and (2) this device must accept any interference received, including interference that may cause undesired operation.
This equipment has been tested and found to comply with the limits for a Class A digital device, pursuant to Part 15 of FCC Rules. These limits are designed to provide reasonable protection against harmful interference when the equipment is operated in a commercial environment. This equipment generates, uses, and can radiate radio frequency energy and, if not installed and used in accordance with the instruction manual, may cause harmful interference to radio communications. Operation of this equipment in a residential area is likely to cause harmful interference in which case the user will be required to correct the interference at his or her own expense.
Declaration of conformity is located on the documentation CD.
PRECAUTIONS • READ this manual BEFORE operating or servicing this equipment and FOLLOW
these instructions carefully.
• SAVE this manual for future reference.
WARNING! FOR CONTINUED PROTECTION AGAINST SHOCK HAZARD CONNECT TO PROPERLY GROUNDED OUTLET ONLY. DO NOT REMOVE THE GROUND PRONG.
WARNING! TO AVOID DAMAGE TO THE PCB OR LOAD CELL, REMOVE POWER FROM THE IND310drive TERMINAL AND WAIT AT LEAST 30 SECONDS BEFORE CONNECTING OR DISCONNECTING ANY HARNESS.
CAUTION BEFORE CONNECTING/DISCONNECTING ANY INTERNAL ELECTRONIC COMPONENTS OR INTERCONNECTING WIRING BETWEEN ELECTRONIC EQUIPMENT ALWAYS REMOVE POWER AND WAIT AT LEAST THIRTY (30) SECONDS BEFORE ANY CONNECTIONS OR DISCONNECTIONS ARE MADE. FAILURE TO OBSERVE THESE PRECAUTIONS COULD RESULT IN DAMAGE TO OR DESTRUCTION OF THE EQUIPMENT AND/OR BODILY HARM.
CAUTION OBSERVE PRECAUTIONS FOR HANDLING ELECTROSTATIC SENSITIVE DEVICES.
WARNING! THE IND310drive TERMINAL IS NOT INTRINSICALLY SAFE! DO NOT USE WITHIN AREAS CLASSIFIED AS HAZARDOUS DIVISION 1 OR ZONE 0/1 BECAUSE OF COMBUSTIBLE OR EXPLOSIVE ATMOSPHERES.
WARNING! WHEN THIS EQUIPMENT IS INCLUDED AS A COMPONENT PART OF A SYSTEM, THE RESULTING DESIGN MUST BE REVIEWED BY QUALIFIED PERSONNEL WHO ARE FAMILIAR WITH THE CONSTRUCTION AND OPERATION OF ALL COMPONENTS IN THE SYSTEM AND THE POTENTIAL HAZARDS INVOLVED. FAILURE TO OBSERVE THIS PRECAUTION COULD RESULT IN BODILY HARM AND/OR PROPERTY DAMAGE.
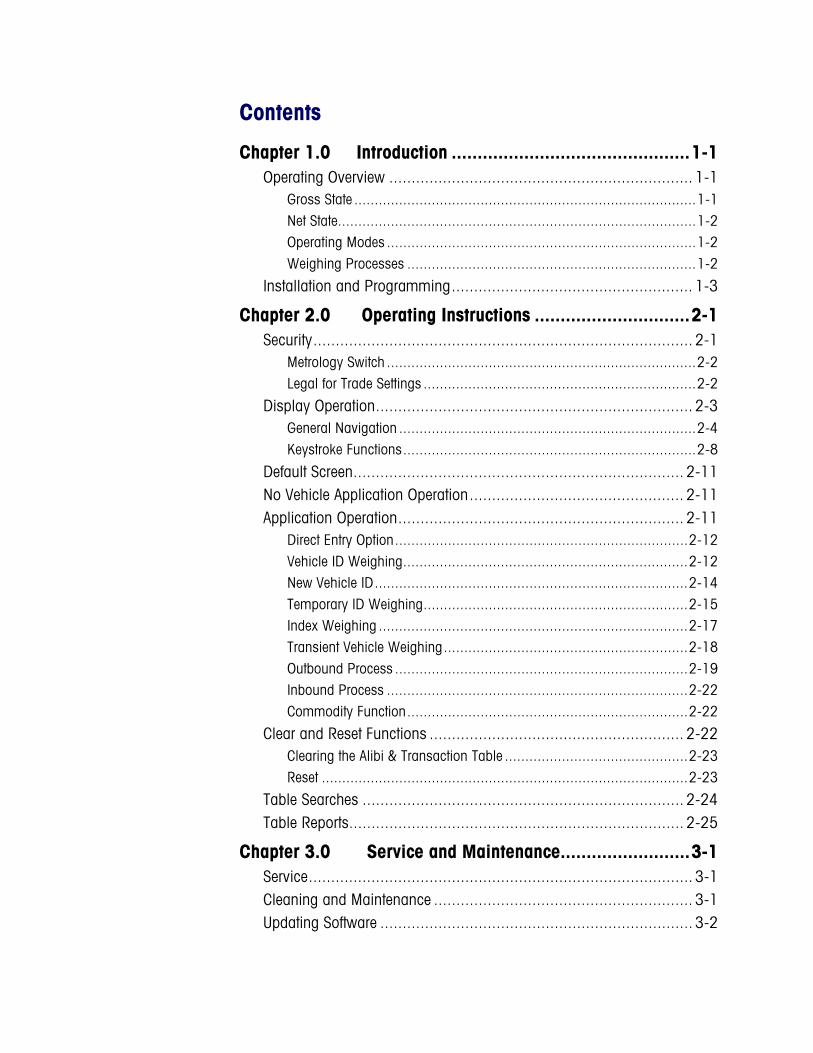
Contents
Chapter 1.0 Introduction .............................................. 4H1-1 Operating Overview .................................................................... 5H1-1
Gross State .................................................................................... 6H1-1 Net State........................................................................................ 7H1-2 Operating Modes ............................................................................ 8H1-2 Weighing Processes ....................................................................... 9H1-2
Installation and Programming...................................................... 10H1-3
Chapter 2.0 Operating Instructions .............................. 11H2-1 Security..................................................................................... 12H2-1
Metrology Switch ............................................................................ 13H2-2 Legal for Trade Settings ................................................................... 14H2-2
Display Operation....................................................................... 15H2-3 General Navigation ......................................................................... 16H2-4 Keystroke Functions........................................................................ 17H2-8
Default Screen.......................................................................... 18H2-11 No Vehicle Application Operation................................................ 19H2-11 Application Operation................................................................ 20H2-11
Direct Entry Option........................................................................ 21H2-12 Vehicle ID Weighing...................................................................... 22H2-12 New Vehicle ID............................................................................. 23H2-14 Temporary ID Weighing................................................................. 24H2-15 Index Weighing ............................................................................ 25H2-17 Transient Vehicle Weighing............................................................ 26H2-18 Outbound Process ........................................................................ 27H2-19 Inbound Process .......................................................................... 28H2-22 Commodity Function..................................................................... 29H2-22
Clear and Reset Functions ......................................................... 30H2-22 Clearing the Alibi & Transaction Table ............................................. 31H2-23 Reset .......................................................................................... 32H2-23
Table Searches ........................................................................ 33H2-24 Table Reports........................................................................... 34H2-25
Chapter 3.0 Service and Maintenance......................... 35H3-1 Service...................................................................................... 36H3-1 Cleaning and Maintenance .......................................................... 37H3-1 Updating Software ...................................................................... 38H3-2

Appendix A Basic Weighing Concepts .......................... 39HA-1 Zero.......................................................................................... 40HA-1 Tare.......................................................................................... 41HA-1
Autotare......................................................................................... 42HA-1 Keyboard Tare................................................................................ 43HA-2 Additive Tare .................................................................................. 44HA-2 Tare Interlocks................................................................................ 45HA-2
Sections.................................................................................... 46HA-2 Setpoints ................................................................................... 47HA-2 Inbound/Outbound Weighing ....................................................... 48HA-3 Net Sign Correction..................................................................... 49HA-3 One-Pass Weighing.................................................................... 50HA-3
Appendix B Application Operation Flowcharts ............... 51HB-1 Vehicle ID Weighing ................................................................... 52HB-3 Temporary ID Weighing .............................................................. 53HB-4 Index Weighing.......................................................................... 54HB-5 Transient Vehicle Weighing.......................................................... 55HB-6

1-1
This chapter covers
• Operating Overview
• Installation and Programming
See Appendix A, Basic Weighing Concepts for more information about basic weighing terminology.
Chapter 1.0 Introduction
The IND310drive Industrial Scale Terminal incorporates the latest design innovations in vehicle weighing applications. The terminal contains functionality not available in previous generations of terminals; it employs a simple setup logic tree that will be carried across future generations of METTLER TOLEDO terminals.
The simplicity of setup and operation coupled with specific configurations for multiple applications reduces training costs and operation setup time. The enhanced software capabilities enable database storage of key information, which reduces operator error and time-consuming entries.
Information on installing, programming, and servicing the IND310drive terminal is located in the IND310drive Installation Manual and the IND310drive Technical Manual. Review all instructions and safety precautions carefully. Only authorized personnel should perform installation and service procedures. Please contact an authorized METTLER TOLEDO representative to resolve any questions not covered in this manual or associated manuals.
Operating Overview To successfully use the IND310drive terminal's various functions, one must understand
• Basic weighing terminology
• Differences between gross and net states
• The terminal's various operating modes and weighing processes
Gross State The IND310drive terminal is in the gross state when a tare (the weight of a container holding the product to be weighed) has not been taken. The full weight of the items on the scale displays on the terminal.
IND310drive User Manual
1-2
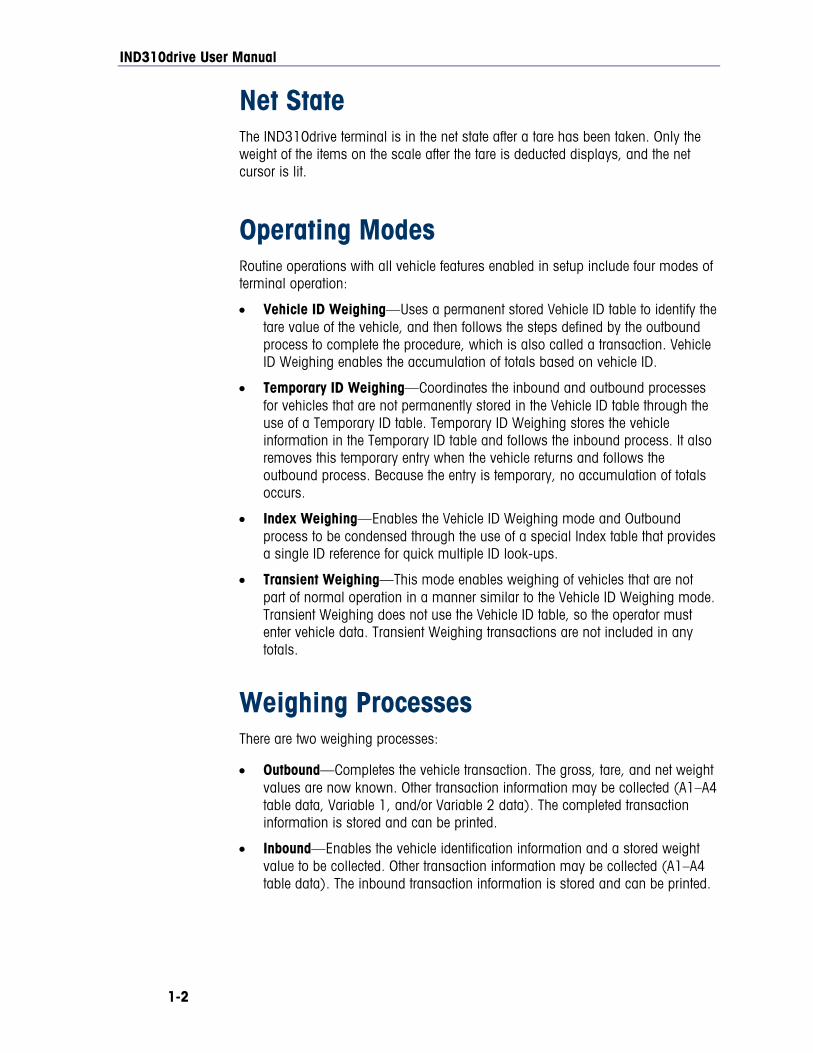
Net State The IND310drive terminal is in the net state after a tare has been taken. Only the weight of the items on the scale after the tare is deducted displays, and the net cursor is lit.
Operating Modes Routine operations with all vehicle features enabled in setup include four modes of terminal operation:
• Vehicle ID Weighing—Uses a permanent stored Vehicle ID table to identify the tare value of the vehicle, and then follows the steps defined by the outbound process to complete the procedure, which is also called a transaction. Vehicle ID Weighing enables the accumulation of totals based on vehicle ID.
• Temporary ID Weighing—Coordinates the inbound and outbound processes for vehicles that are not permanently stored in the Vehicle ID table through the use of a Temporary ID table. Temporary ID Weighing stores the vehicle information in the Temporary ID table and follows the inbound process. It also removes this temporary entry when the vehicle returns and follows the outbound process. Because the entry is temporary, no accumulation of totals occurs.
• Index Weighing—Enables the Vehicle ID Weighing mode and Outbound process to be condensed through the use of a special Index table that provides a single ID reference for quick multiple ID look-ups.
• Transient Weighing—This mode enables weighing of vehicles that are not part of normal operation in a manner similar to the Vehicle ID Weighing mode. Transient Weighing does not use the Vehicle ID table, so the operator must enter vehicle data. Transient Weighing transactions are not included in any totals.
Weighing Processes There are two weighing processes:
• Outbound—Completes the vehicle transaction. The gross, tare, and net weight values are now known. Other transaction information may be collected (A1–A4 table data, Variable 1, and/or Variable 2 data). The completed transaction information is stored and can be printed.
• Inbound—Enables the vehicle identification information and a stored weight value to be collected. Other transaction information may be collected (A1–A4 table data). The inbound transaction information is stored and can be printed.

IND310drive User Manual
1-3
Installation and Programming The IND310drive Installation Manual provides detailed information about installation. This manual is included in printed format and on a CD with the initial delivery of the terminal. Installation information for the IND310drive is also available in the IND310drive Technical Manual, Appendix A.
The IND310drive Technical Manual contains advanced information for IND310drive setup and programming.

IND310drive User Manual
1-4
For your notes
2-1
This chapter covers
• Security
• Display Operation
• Default Screen
• No Application Operation
• Application Operation
• Clear and Reset Functions
• Table Searches
• Table Reports
Chapter 2.0 Operating Instructions
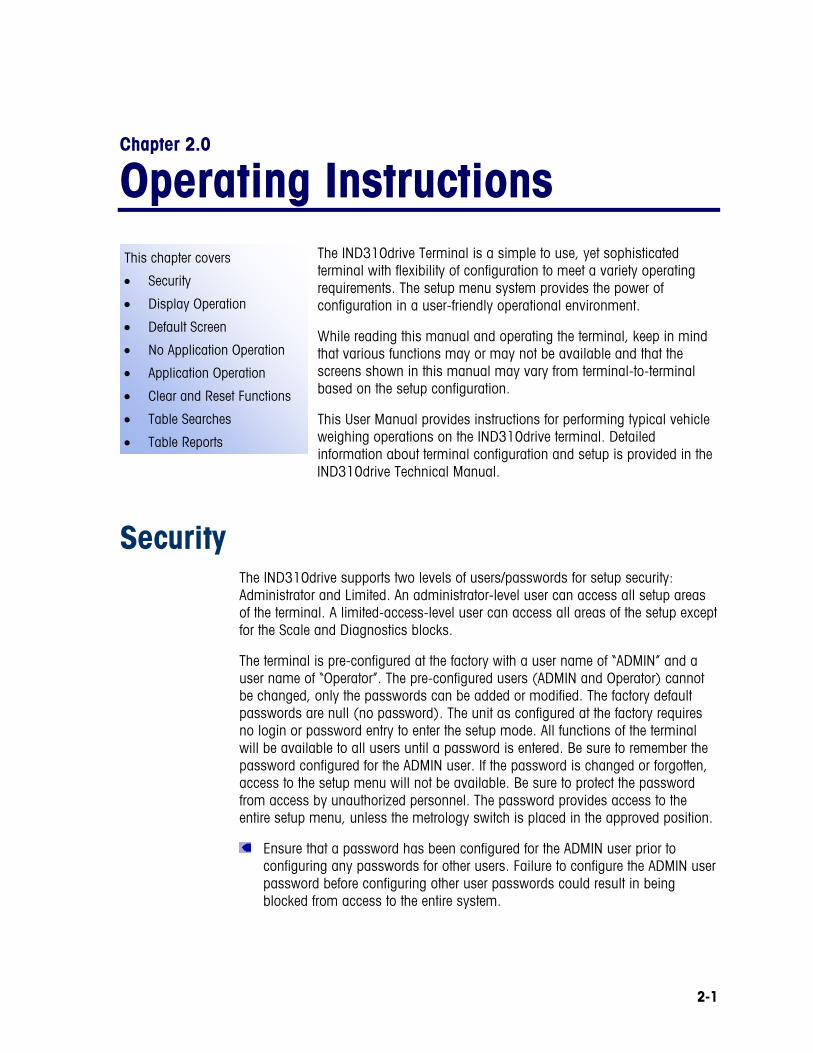
The IND310drive Terminal is a simple to use, yet sophisticated terminal with flexibility of configuration to meet a variety operating requirements. The setup menu system provides the power of configuration in a user-friendly operational environment.
While reading this manual and operating the terminal, keep in mind that various functions may or may not be available and that the screens shown in this manual may vary from terminal-to-terminal based on the setup configuration.
This User Manual provides instructions for performing typical vehicle weighing operations on the IND310drive terminal. Detailed information about terminal configuration and setup is provided in the IND310drive Technical Manual.
Security The IND310drive supports two levels of users/passwords for setup security: Administrator and Limited. An administrator-level user can access all setup areas of the terminal. A limited-access-level user can access all areas of the setup except for the Scale and Diagnostics blocks.
The terminal is pre-configured at the factory with a user name of “ADMIN” and a user name of “Operator”. The pre-configured users (ADMIN and Operator) cannot be changed, only the passwords can be added or modified. The factory default passwords are null (no password). The unit as configured at the factory requires no login or password entry to enter the setup mode. All functions of the terminal will be available to all users until a password is entered. Be sure to remember the password configured for the ADMIN user. If the password is changed or forgotten, access to the setup menu will not be available. Be sure to protect the password from access by unauthorized personnel. The password provides access to the entire setup menu, unless the metrology switch is placed in the approved position.
Ensure that a password has been configured for the ADMIN user prior to configuring any passwords for other users. Failure to configure the ADMIN user password before configuring other user passwords could result in being blocked from access to the entire system.

IND310drive User Manual
2-2
Metrology Switch The metrology switch (Figure 2-1), which is sealed per Weights and Measures, controls access to the scale submenu of the setup menu tree. This submenu includes functions such as calibration, filter settings, tare settings and others.
Figure 2-1: Metrology Switch Location
The Scale submenu is accessible (may be expanded) only when the Metrology switch is in the non-approved position. If the metrology switch is in the approved position (Figure 2-2) the user may enter setup, but will be unable to enter the scale setup submenu. See the IND310drive Technical Manual for further information about the metrology switch and accessing the setup menu tree.
Figure 2-2: Metrology Switch in the Approved Position
Legal for Trade Settings Legal for Trade settings are accessed through the Scale submenu in the menu tree. The IND310drive operates within the weights and measurement rules associated with the Legal for Trade settings. Ensure that the appropriate legal for trade approval type is selected so that the IND310drive will display weight values in accordance with specific local weights and measures rules. See the IND310drive Technical Manual for information on how to change the Legal for Trade settings.
Metrology switch
Approved position
IND310drive User Manual
2-3
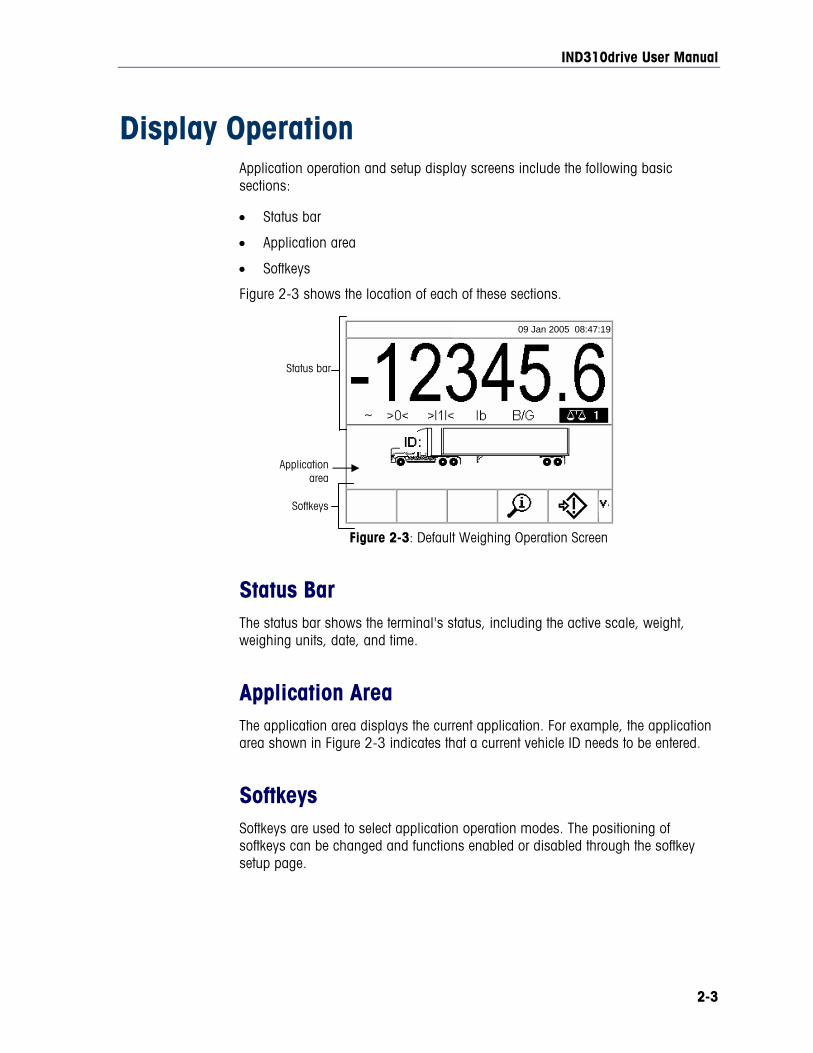
Display Operation Application operation and setup display screens include the following basic sections:
• Status bar
• Application area
• Softkeys
Figure 2-3 shows the location of each of these sections.
Figure 2-3: Default Weighing Operation Screen
Status Bar The status bar shows the terminal's status, including the active scale, weight, weighing units, date, and time.
Application Area The application area displays the current application. For example, the application area shown in Figure 2-3 indicates that a current vehicle ID needs to be entered.
Softkeys Softkeys are used to select application operation modes. The positioning of softkeys can be changed and functions enabled or disabled through the softkey setup page.
Status bar
Application area
Softkeys
09 Jan 2005 08:47:19

IND310drive User Manual
2-4
General Navigation Navigate in the applications and configure the IND310drive using
• Softkeys • Numeric keys
• Application keys • External Keyboard
• Scale function keys • Alpha keys
• Navigation keys
The locations of the above listed keys and the default weighing operation screen are shown in Figure 2-4.
Softkeys The softkey setup page is used to
• Change softkey positions
• Enable softkey functions
• Disable softkey functions
For example, a contrast softkey can be enabled for making quick adjustments to the terminal screen’s contrast setting.
Five softkeys are located along the bottom of the display screen (see Figure 2-4). Some screens might have up to three pages of softkeys for a total of 15 possible
functions. A DOWN ARROW icon displayed on the lower-right corner of the screen (to the far right of the softkey icons) indicates that more softkey selections are available. Press the DOWN arrow navigation key to display additional softkey screens. Press the UP arrow navigation key to display the previous softkey screen.
Figure 2-4: Key Locations and Default Weighing Operation Screen
Default Weighing Operation Screen
Softkeys
Application (A) Keys
Scale Function Keys
Numeric Keys
Navigation Keys
DOWN Arrow Navigation Key
UP Arrow Navigation Key
IND310drive User Manual
2-5
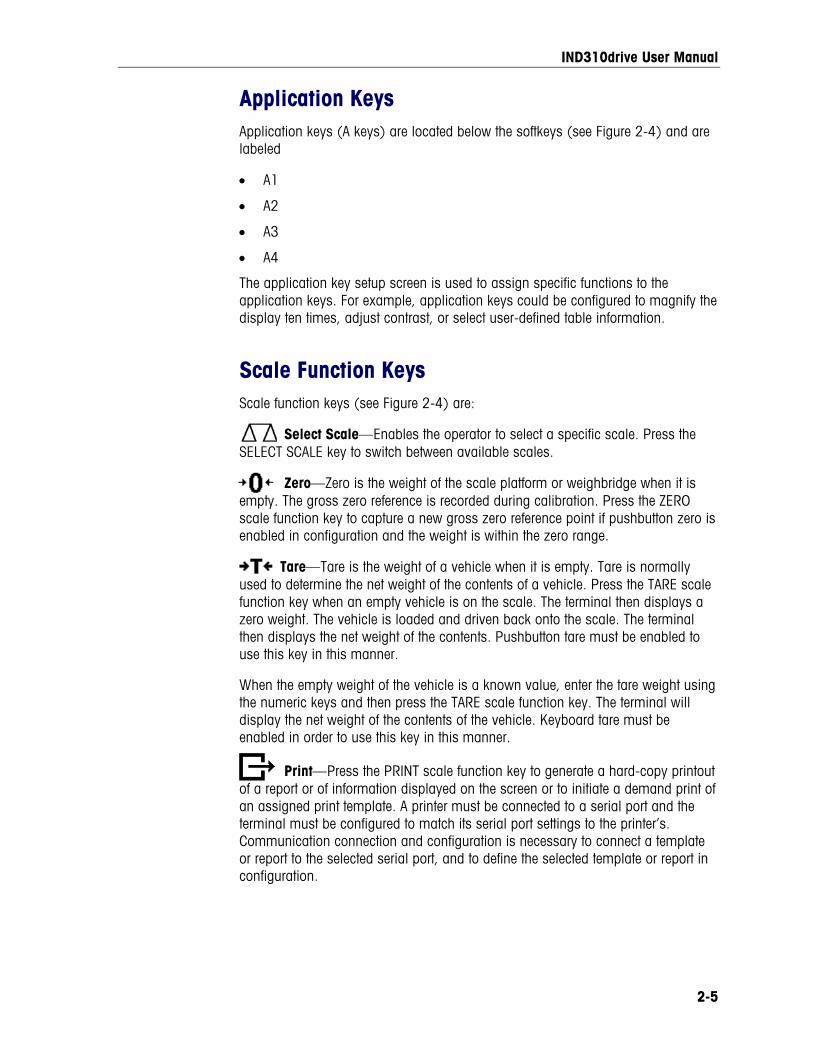
Application Keys Application keys (A keys) are located below the softkeys (see Figure 2-4) and are labeled
• A1
• A2
• A3
• A4
The application key setup screen is used to assign specific functions to the application keys. For example, application keys could be configured to magnify the display ten times, adjust contrast, or select user-defined table information.
Scale Function Keys Scale function keys (see Figure 2-4) are:
Select Scale—Enables the operator to select a specific scale. Press the SELECT SCALE key to switch between available scales.
Zero—Zero is the weight of the scale platform or weighbridge when it is empty. The gross zero reference is recorded during calibration. Press the ZERO scale function key to capture a new gross zero reference point if pushbutton zero is enabled in configuration and the weight is within the zero range.
Tare—Tare is the weight of a vehicle when it is empty. Tare is normally used to determine the net weight of the contents of a vehicle. Press the TARE scale function key when an empty vehicle is on the scale. The terminal then displays a zero weight. The vehicle is loaded and driven back onto the scale. The terminal then displays the net weight of the contents. Pushbutton tare must be enabled to use this key in this manner.
When the empty weight of the vehicle is a known value, enter the tare weight using the numeric keys and then press the TARE scale function key. The terminal will display the net weight of the contents of the vehicle. Keyboard tare must be enabled in order to use this key in this manner.
Print—Press the PRINT scale function key to generate a hard-copy printout of a report or of information displayed on the screen or to initiate a demand print of an assigned print template. A printer must be connected to a serial port and the terminal must be configured to match its serial port settings to the printer’s. Communication connection and configuration is necessary to connect a template or report to the selected serial port, and to define the selected template or report in configuration.
IND310drive User Manual
2-6
Navigation Keys Navigation keys (see Figure 2-4) enable navigation within the setup menu tree, setup screens, and application screens. Navigation keys include:
• Up and down arrows—move the focus up or down to different setup options within the menu tree or to different fields within setup pages. Focus is indicated by highlighted text. These keys are also used to switch to another page of softkeys.
• Left and right arrows—expand (right arrow) or collapse (left arrow) the setup options in the menu tree. These arrows also move the cursor position to a specific character in text areas, and enable left and right scrolling to view all information available on a screen.
• Enter—opens the setup page for viewing and editing setup parameters. The Enter key moves the focus from a field label to a setup value for that field. After entering a value, the enter key is used to accept new values and the focus moves to the next field label.
Numeric Keys Use the terminal’s 12-key numeric keypad (see Figure 2-4) to enter data and commands.
To use numeric keys, position the cursor in the field (see Navigation Keys) and press the numeric keys to enter the appropriate data. Press the DECIMAL key (. key) to enter decimal points where necessary.
The CLEAR key (C key) functions like a backspace key. Position the cursor at the end of data to be deleted and press the C key. Press the C key once for each character to be deleted.
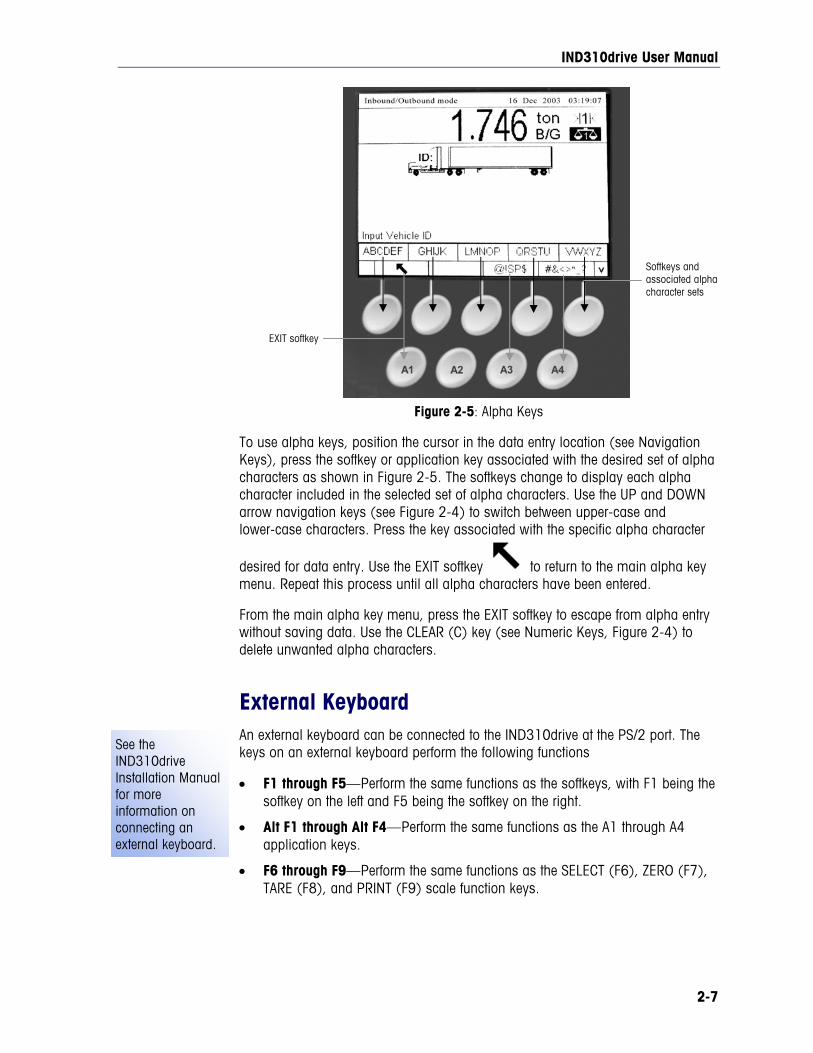
Alpha Keys On some setup pages, softkeys and application keys function as alpha keys (see Figure 2-5) that are used to enter alphabetic characters for setup parameters such as passwords.
IND310drive User Manual
2-7
See the IND310drive Installation Manual for more information on connecting an external keyboard.
Figure 2-5: Alpha Keys
To use alpha keys, position the cursor in the data entry location (see Navigation Keys), press the softkey or application key associated with the desired set of alpha characters as shown in Figure 2-5. The softkeys change to display each alpha character included in the selected set of alpha characters. Use the UP and DOWN arrow navigation keys (see Figure 2-4) to switch between upper-case and lower-case characters. Press the key associated with the specific alpha character
desired for data entry. Use the EXIT softkey to return to the main alpha key menu. Repeat this process until all alpha characters have been entered.
From the main alpha key menu, press the EXIT softkey to escape from alpha entry without saving data. Use the CLEAR (C) key (see Numeric Keys, Figure 2-4) to delete unwanted alpha characters.
External Keyboard An external keyboard can be connected to the IND310drive at the PS/2 port. The keys on an external keyboard perform the following functions
• F1 through F5—Perform the same functions as the softkeys, with F1 being the softkey on the left and F5 being the softkey on the right.
• Alt F1 through Alt F4—Perform the same functions as the A1 through A4 application keys.
• F6 through F9—Perform the same functions as the SELECT (F6), ZERO (F7), TARE (F8), and PRINT (F9) scale function keys.
Softkeys and associated alpha character sets
EXIT softkey
IND310drive User Manual
2-8
• Keyboard numeric and alphabetic keys—Function independently of the softkeys and can be used to enter alphabetic letters and numerals. The Enter key on the keyboard functions the same as the ENTER navigation key. The Backspace key functions the same as the CLEAR (C) key. The arrow keys function the same as the navigation keys.
• Number keys—Function the same as the keys on the terminal’s numeric keypad when the number lock function is engaged.
Keystroke Functions Key names and commands are identified in this manual by upper- and lower-case letters. Key names, such as ENTER, are in all upper-case letters, and commands, such as “select,” are in lower-case (unless they begin a sentence, in which case the first initial is upper-case). For example:
• “Press INDEX...” means to press the INDEX softkey.
• “Select an option...” means to use the UP or DOWN arrow navigation keys to select a setting, then press ENTER.
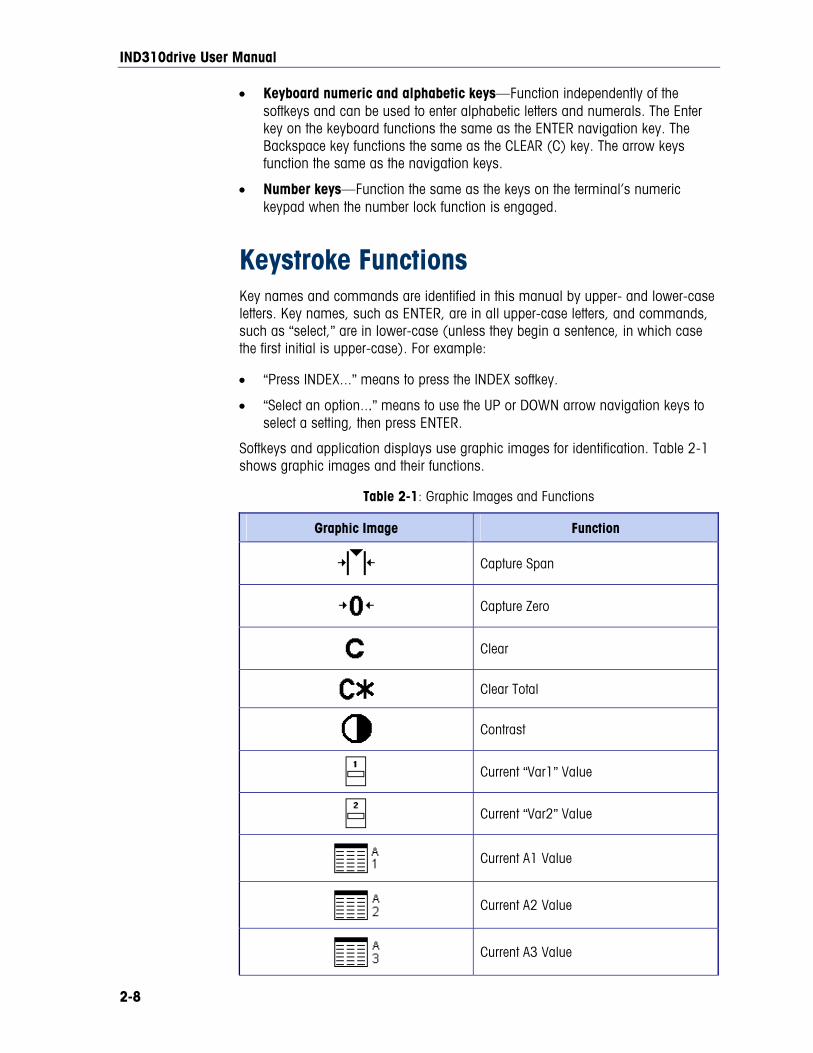
Softkeys and application displays use graphic images for identification. 56HTable 2-1 shows graphic images and their functions.
Table 2-1: Graphic Images and Functions
Graphic Image Function
Capture Span
Capture Zero
Clear
Clear Total
Contrast
Current “Var1” Value
Current “Var2” Value
Current A1 Value
Current A2 Value
Current A3 Value
IND310drive User Manual
2-9
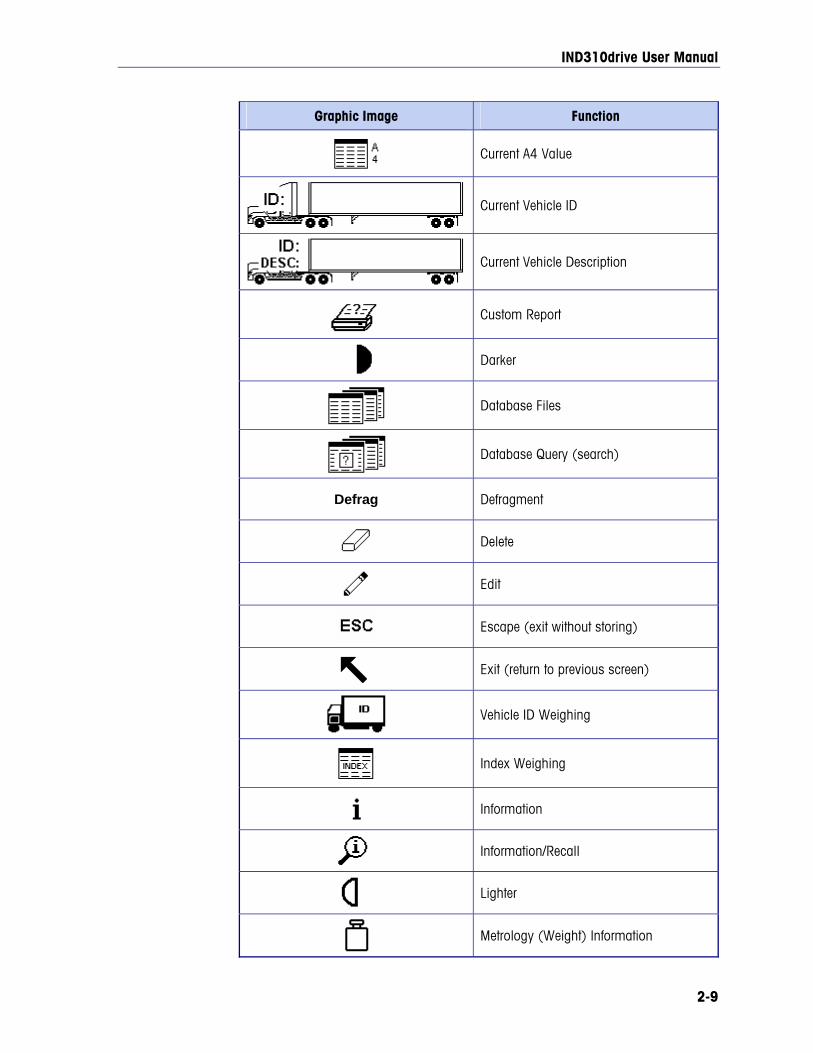
Graphic Image Function
Current A4 Value
Current Vehicle ID
Current Vehicle Description
Custom Report
Darker
Database Files
Database Query (search)
Defrag Defragment
Delete
Edit
Escape (exit without storing)
Exit (return to previous screen)
Vehicle ID Weighing
Index Weighing
Information
Information/Recall
Lighter
Metrology (Weight) Information
IND310drive User Manual
2-10
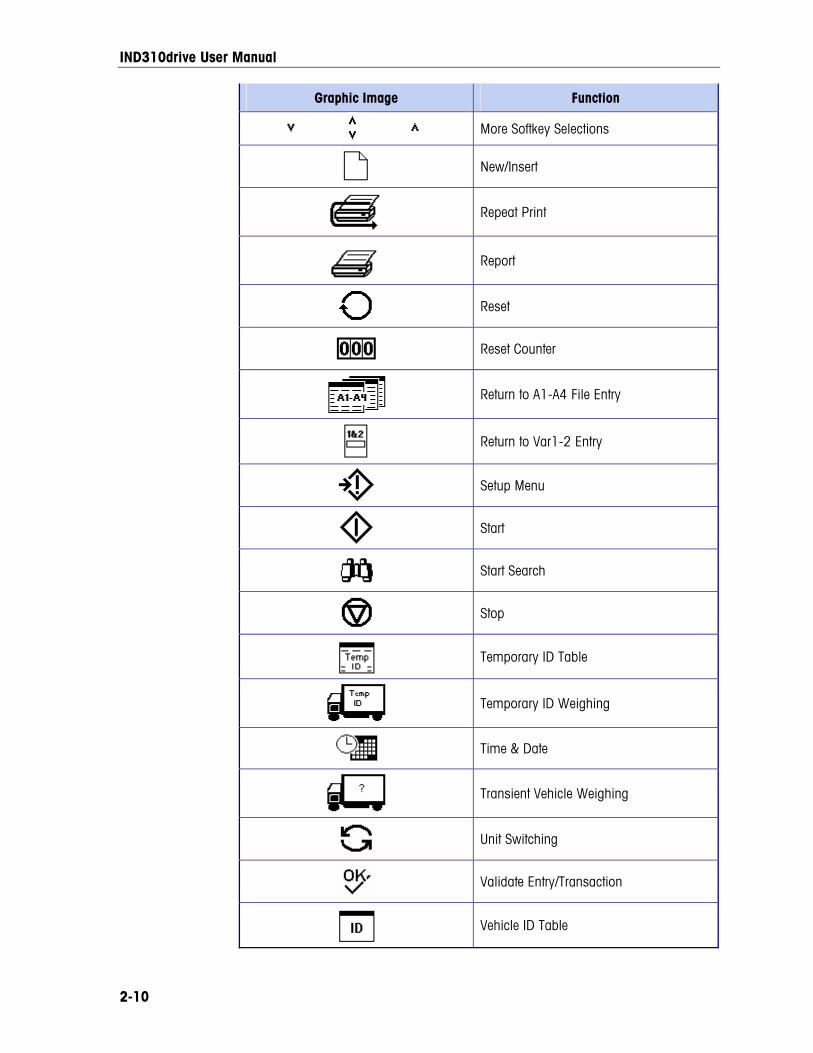
Graphic Image Function
More Softkey Selections
New/Insert
Repeat Print
Report
Reset
Reset Counter
Return to A1-A4 File Entry
Return to Var1-2 Entry
Setup Menu
Start
Start Search
Stop
Temporary ID Table
Temporary ID Weighing
Time & Date
Transient Vehicle Weighing
Unit Switching
Validate Entry/Transaction
Vehicle ID Table
IND310drive User Manual
2-11
See the IND310drive Technical Manual, Chapter 3.0, Configuration, for details about terminal setup.
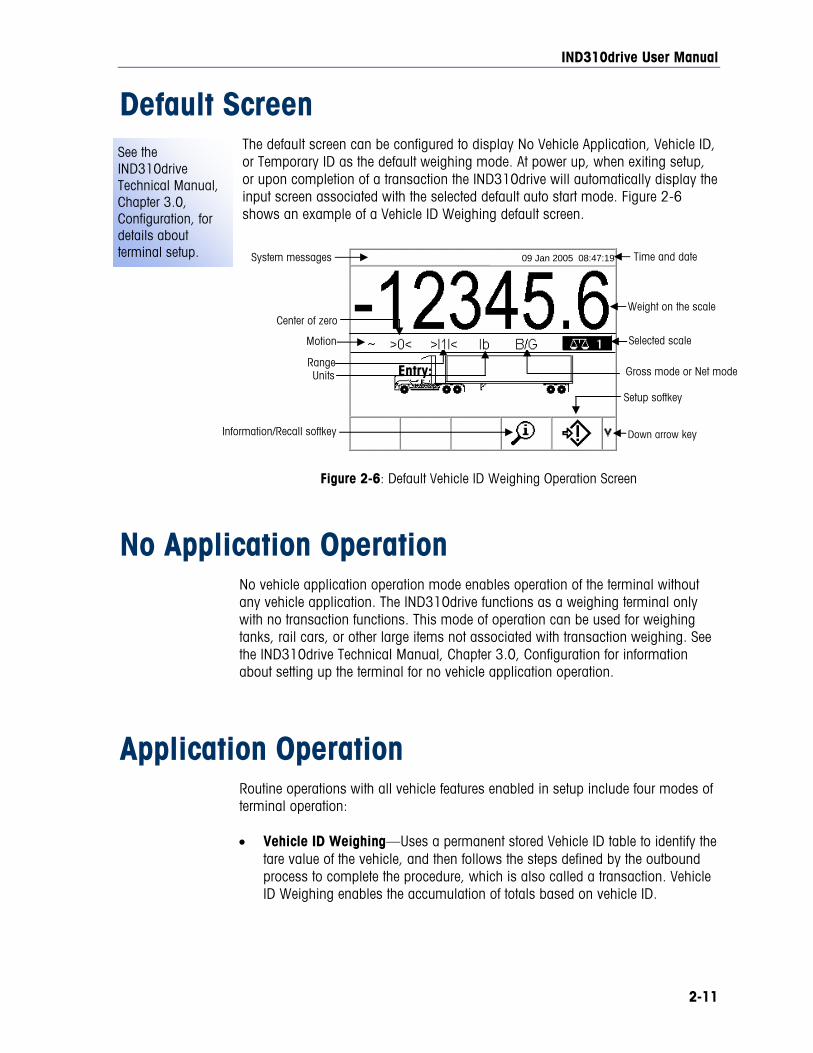
Default Screen The default screen can be configured to display No Vehicle Application, Vehicle ID, or Temporary ID as the default weighing mode. At power up, when exiting setup, or upon completion of a transaction the IND310drive will automatically display the input screen associated with the selected default auto start mode. Figure 2-6 shows an example of a Vehicle ID Weighing default screen.
Figure 2-6: Default Vehicle ID Weighing Operation Screen
No Application Operation No vehicle application operation mode enables operation of the terminal without any vehicle application. The IND310drive functions as a weighing terminal only with no transaction functions. This mode of operation can be used for weighing tanks, rail cars, or other large items not associated with transaction weighing. See the IND310drive Technical Manual, Chapter 3.0, Configuration for information about setting up the terminal for no vehicle application operation.
Application Operation Routine operations with all vehicle features enabled in setup include four modes of terminal operation:
• Vehicle ID Weighing—Uses a permanent stored Vehicle ID table to identify the tare value of the vehicle, and then follows the steps defined by the outbound process to complete the procedure, which is also called a transaction. Vehicle ID Weighing enables the accumulation of totals based on vehicle ID.
Setup softkey
Center of zero
Selected scale
Gross mode or Net modeRangeUnits
Weight on the scale
Time and date
Information/Recall softkey Down arrow key
Motion
System messages 09 Jan 2005 08:47:19
Entry:

IND310drive User Manual
2-12
See Appendix B, Application Operation Flowcharts for a quick reference flowchart that illustrates Vehicle ID Weighing.
• Temporary ID Weighing—Coordinates the inbound and outbound processes for vehicles that are not permanently stored in the Vehicle ID table through the use of a Temporary ID table. Temporary ID Weighing stores the vehicle information in the Temporary ID table and follows the inbound process. It also removes this temporary entry when the vehicle returns and follows the outbound process. The entry is temporary, so accumulation of totals does not occur.
• Index Weighing—Enables the Vehicle ID Weighing mode and Outbound process to be condensed through the use of a special Index table that provides a single ID reference for quick multiple ID look-ups.
• Transient Weighing—This mode enables weighing of vehicles that are not part of normal operation in a manner similar to the Vehicle ID Weighing mode. Transient Weighing does not use the Vehicle ID table, so the operator must enter vehicle data. Transient Weighing transactions are not included in totals.
There are two weighing processes:
• Outbound—Completes the vehicle transaction. The gross, tare, and net weight values are now known. Other transaction information may be collected (A1–A4 table data, Variable 1, and/or Variable 2 data). The completed transaction information is stored and can be printed.
• Inbound—Enables the vehicle identification information and a stored weight value to be collected. Other transaction information may be collected (A1–A4 table data). The inbound transaction information is stored and can be printed.
Direct Entry Option An alternative method to initiate a transaction is direct entry of known data. To use this option, enter any type of known data, such as a tare weight on the main weighing screen to initiate a transaction. Press a softkey or scale function key to select how the terminal uses the information. For example, enter a tare weight and press the TARE scale function key. The data entered becomes a manually-entered tare.
Vehicle ID Weighing Vehicle ID Weighing uses the Vehicle ID Table where vehicle IDs, descriptions, and permanent stored tares are entered prior to operation. Totals of vehicle weights are also maintained in the Vehicle ID Table (if enabled in setup). To view or edit the
Vehicle ID Table, press the VEHICLE ID TABLE softkey at any time.
To use Vehicle ID Weighing:
1. From the default weight screen (Figure 2-6), press the DOWN arrow key to display all available softkeys (see Figure 2-7).
IND310drive User Manual
2-13
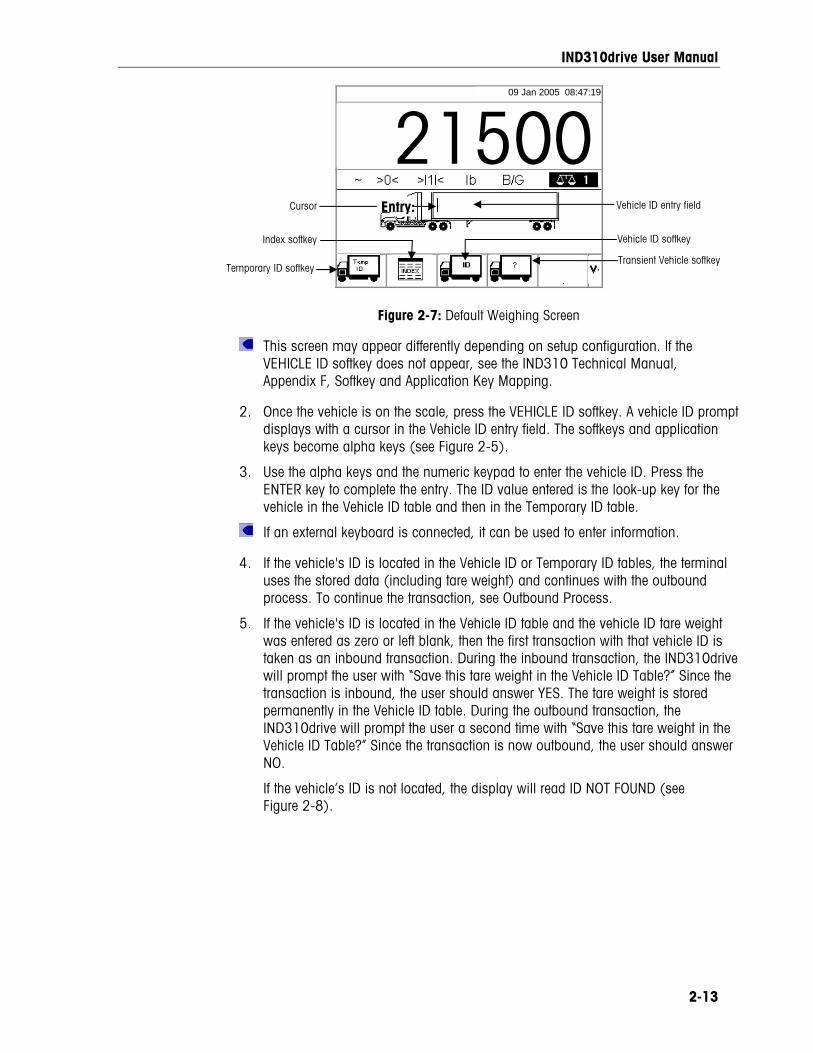
Figure 2-7: Default Weighing Screen
This screen may appear differently depending on setup configuration. If the VEHICLE ID softkey does not appear, see the IND310 Technical Manual, Appendix F, Softkey and Application Key Mapping.
2. Once the vehicle is on the scale, press the VEHICLE ID softkey. A vehicle ID prompt displays with a cursor in the Vehicle ID entry field. The softkeys and application keys become alpha keys (see Figure 2-5).
3. Use the alpha keys and the numeric keypad to enter the vehicle ID. Press the ENTER key to complete the entry. The ID value entered is the look-up key for the vehicle in the Vehicle ID table and then in the Temporary ID table.
If an external keyboard is connected, it can be used to enter information.
4. If the vehicle's ID is located in the Vehicle ID or Temporary ID tables, the terminal uses the stored data (including tare weight) and continues with the outbound process. To continue the transaction, see Outbound Process.
5. If the vehicle's ID is located in the Vehicle ID table and the vehicle ID tare weight was entered as zero or left blank, then the first transaction with that vehicle ID is taken as an inbound transaction. During the inbound transaction, the IND310drive will prompt the user with “Save this tare weight in the Vehicle ID Table?” Since the transaction is inbound, the user should answer YES. The tare weight is stored permanently in the Vehicle ID table. During the outbound transaction, the IND310drive will prompt the user a second time with “Save this tare weight in the Vehicle ID Table?” Since the transaction is now outbound, the user should answer NO.
If the vehicle’s ID is not located, the display will read ID NOT FOUND (see Figure 2-8).
Vehicle ID softkey
Vehicle ID entry field Cursor
Temporary ID softkey
Index softkey
Transient Vehicle softkey
09 Jan 2005 08:47:19
21500Entry:
IND310drive User Manual
2-14
See the Table Searches section for more information about how to search for a vehicle ID.
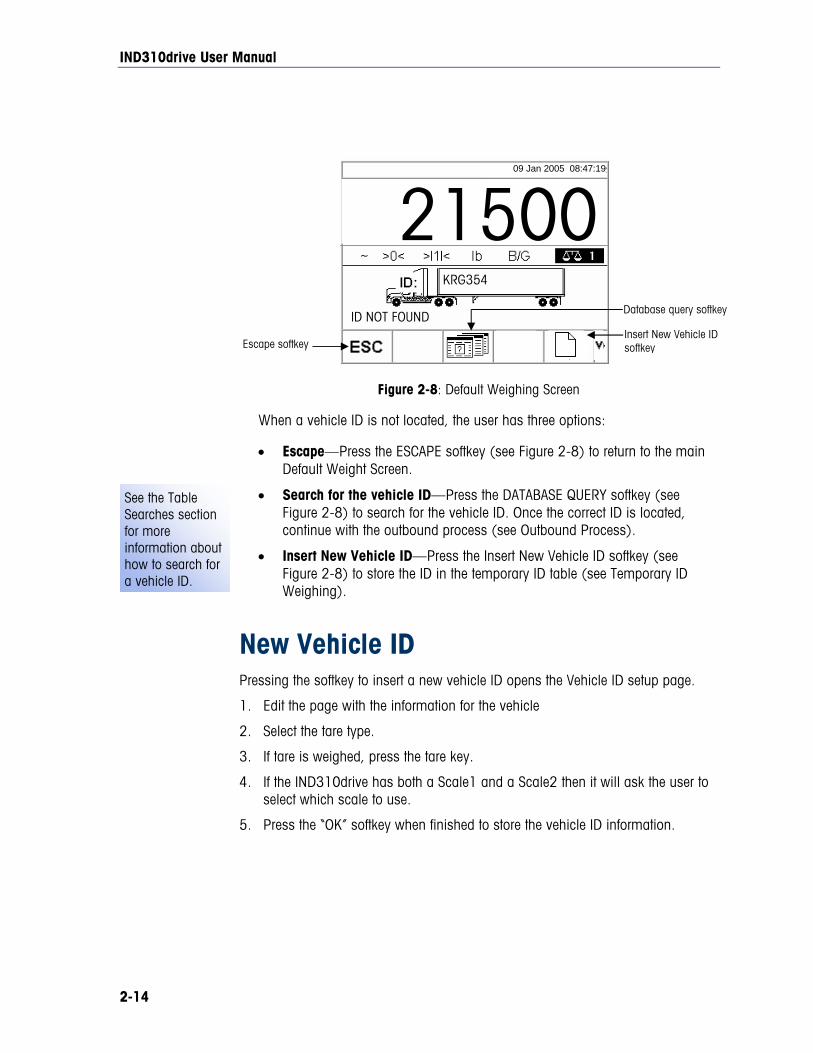
Figure 2-8: Default Weighing Screen
When a vehicle ID is not located, the user has three options:
• Escape—Press the ESCAPE softkey (see Figure 2-8) to return to the main Default Weight Screen.
• Search for the vehicle ID—Press the DATABASE QUERY softkey (see Figure 2-8) to search for the vehicle ID. Once the correct ID is located, continue with the outbound process (see Outbound Process).
• Insert New Vehicle ID—Press the Insert New Vehicle ID softkey (see Figure 2-8) to store the ID in the temporary ID table (see Temporary ID Weighing).
New Vehicle ID Pressing the softkey to insert a new vehicle ID opens the Vehicle ID setup page.
1. Edit the page with the information for the vehicle
2. Select the tare type.
3. If tare is weighed, press the tare key.
4. If the IND310drive has both a Scale1 and a Scale2 then it will ask the user to select which scale to use.
5. Press the “OK” softkey when finished to store the vehicle ID information.
Database query softkeyID NOT FOUND
Escape softkey Insert New Vehicle ID softkey
KRG354
09 Jan 2005 08:47:19
21500
IND310drive User Manual
2-15
See 3Hthe Table Searches section for more information about how to search for a vehicle ID.
See Appendix B, Application Operation Flowcharts for a quick reference flowchart that illustrates Temporary ID Weighing.
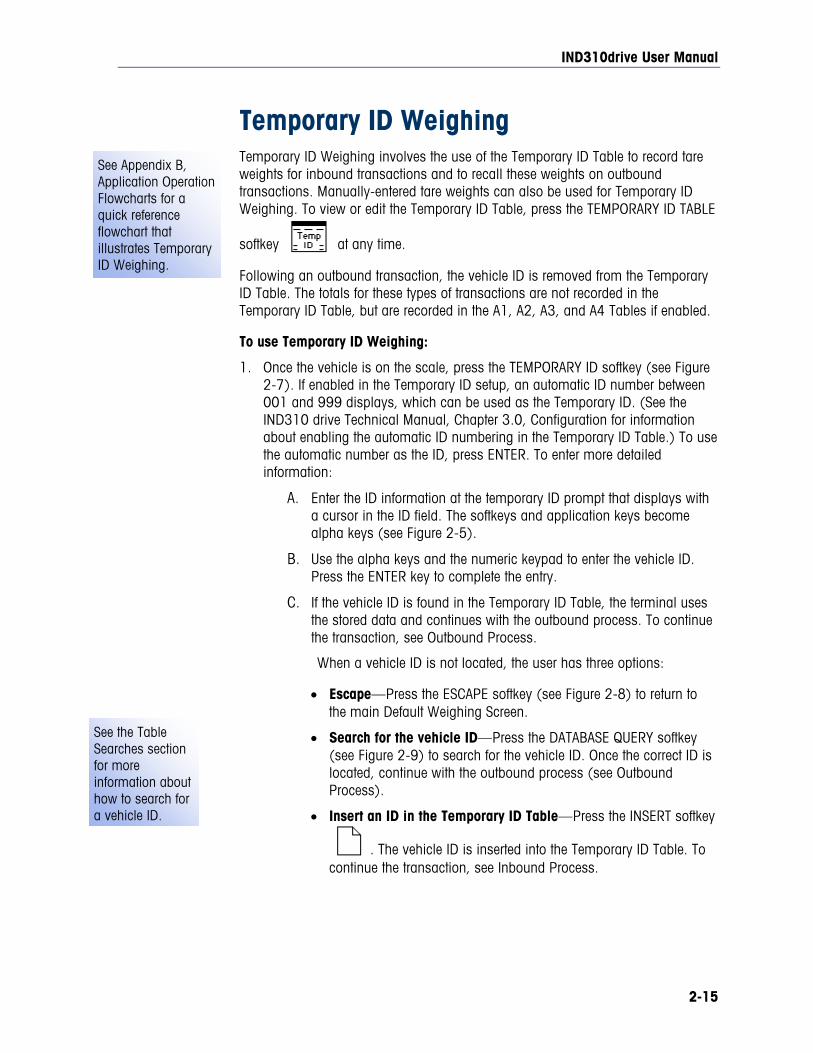
Temporary ID Weighing Temporary ID Weighing involves the use of the Temporary ID Table to record tare weights for inbound transactions and to recall these weights on outbound transactions. Manually-entered tare weights can also be used for Temporary ID Weighing. To view or edit the Temporary ID Table, press the TEMPORARY ID TABLE
softkey at any time.
Following an outbound transaction, the vehicle ID is removed from the Temporary ID Table. The totals for these types of transactions are not recorded in the Temporary ID Table, but are recorded in the A1, A2, A3, and A4 Tables if enabled.
To use Temporary ID Weighing:
1. Once the vehicle is on the scale, press the TEMPORARY ID softkey (see Figure 2-7). If enabled in the Temporary ID setup, an automatic ID number between 001 and 999 displays, which can be used as the Temporary ID. (See the IND310 drive Technical Manual, Chapter 3.0, Configuration for information about enabling the automatic ID numbering in the Temporary ID Table.) To use the automatic number as the ID, press ENTER. To enter more detailed information:
A. Enter the ID information at the temporary ID prompt that displays with a cursor in the ID field. The softkeys and application keys become alpha keys (see Figure 2-5).
B. Use the alpha keys and the numeric keypad to enter the vehicle ID. Press the ENTER key to complete the entry.
C. If the vehicle ID is found in the Temporary ID Table, the terminal uses the stored data and continues with the outbound process. To continue the transaction, see Outbound Process.
When a vehicle ID is not located, the user has three options:
• Escape—Press the ESCAPE softkey (see Figure 2-8) to return to the main Default Weighing Screen.
• Search for the vehicle ID—Press the DATABASE QUERY softkey (see Figure 2-9) to search for the vehicle ID. Once the correct ID is located, continue with the outbound process (see Outbound Process).
• Insert an ID in the Temporary ID Table—Press the INSERT softkey
. The vehicle ID is inserted into the Temporary ID Table. To continue the transaction, see Inbound Process.
IND310drive User Manual
2-16
Using Manually-Entered Tare Weights for Temporary ID Weighing Operators can use manually-entered tare weights rather than stored tare weights in the Temporary ID Weighing mode (if enabled in setup).
To manually enter a tare weight:
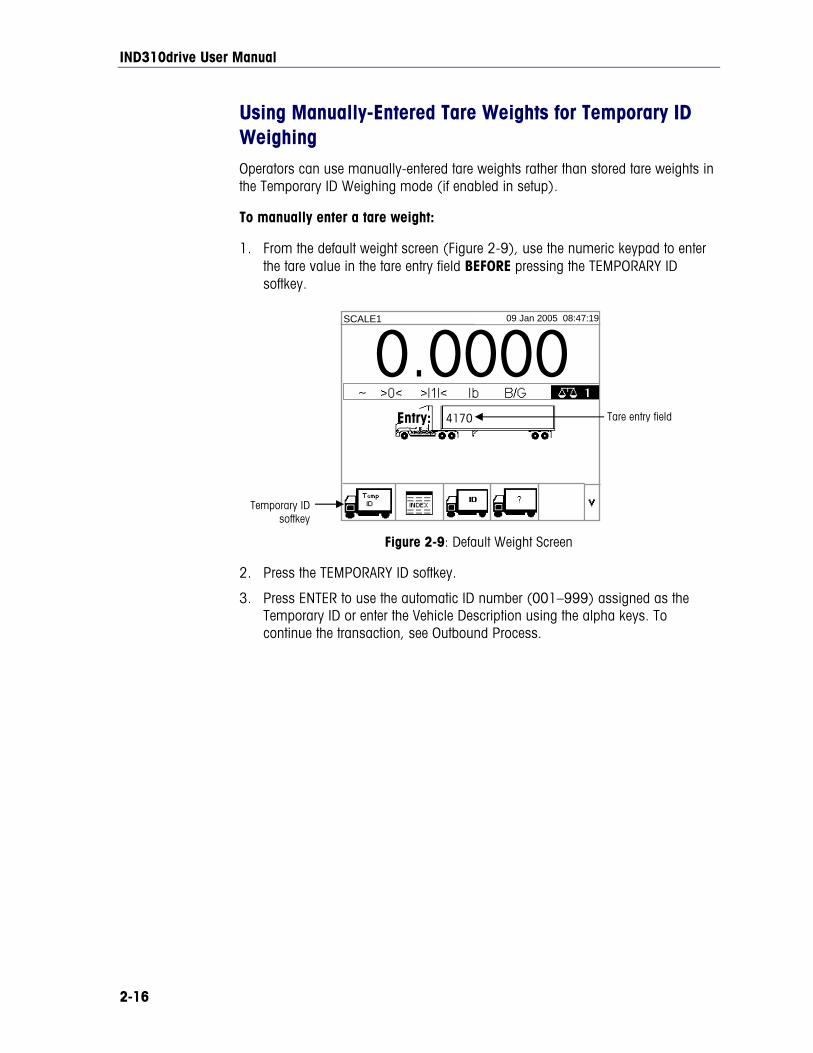
1. From the default weight screen (Figure 2-9), use the numeric keypad to enter the tare value in the tare entry field BEFORE pressing the TEMPORARY ID softkey.
Figure 2-9: Default Weight Screen
2. Press the TEMPORARY ID softkey.
3. Press ENTER to use the automatic ID number (001–999) assigned as the Temporary ID or enter the Vehicle Description using the alpha keys. To continue the transaction, see Outbound Process.
Tare entry field
0.00004170
SCALE1 Nov. 12, 2003
Tare
Temporary ID softkey
Entry:
09 Jan 2005 08:47:19
IND310drive User Manual
2-17
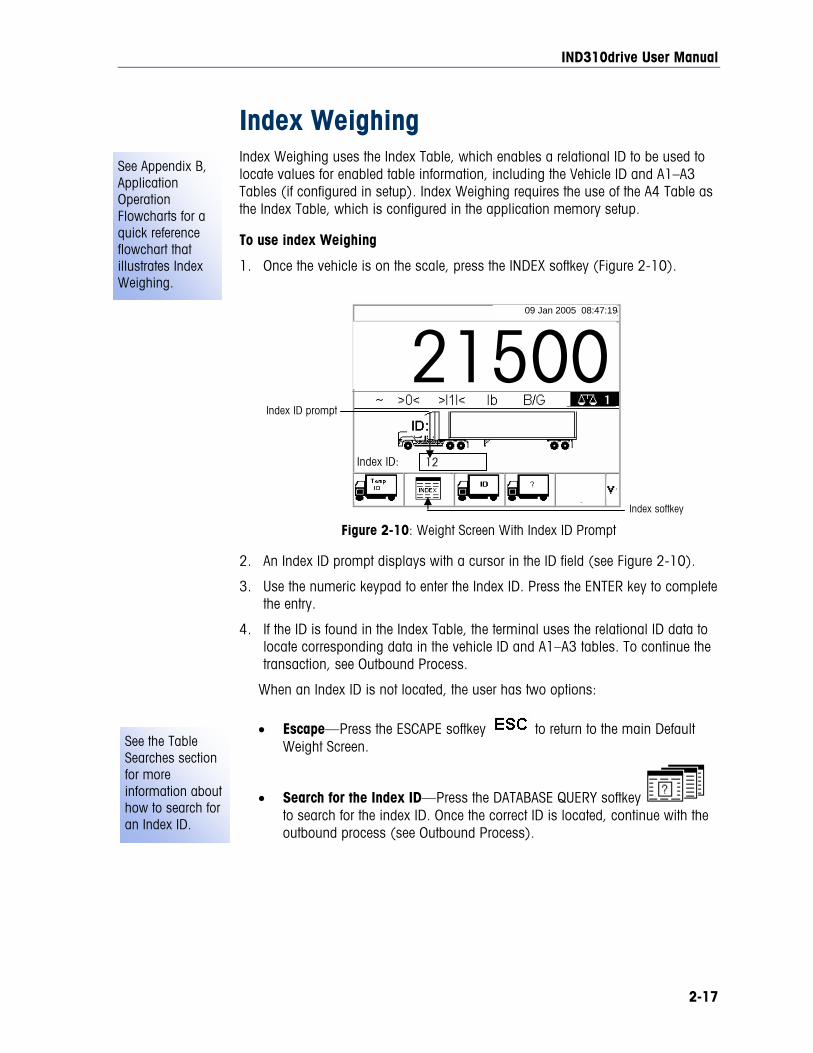
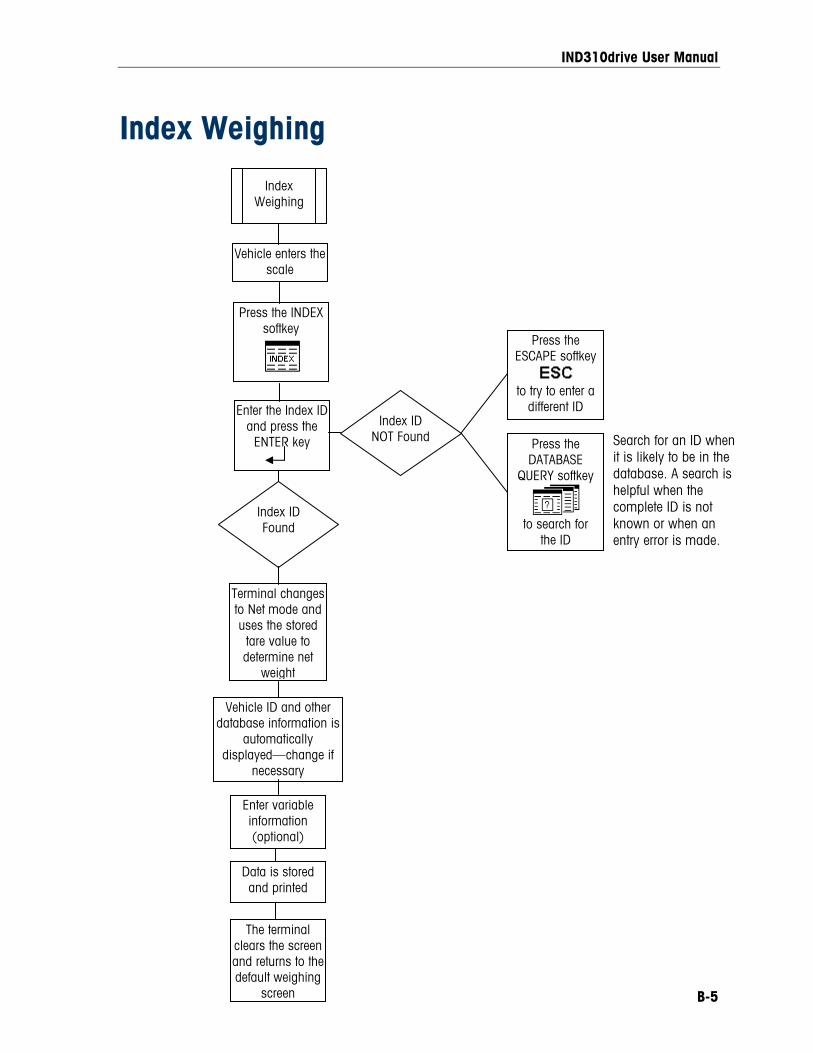
See 2Hthe Table Searches section for more information about how to search for an Index ID.
See Appendix B, Application Operation Flowcharts for a quick reference flowchart that illustrates Index Weighing.
Index Weighing Index Weighing uses the Index Table, which enables a relational ID to be used to locate values for enabled table information, including the Vehicle ID and A1–A3 Tables (if configured in setup). Index Weighing requires the use of the A4 Table as the Index Table, which is configured in the application memory setup.
To use index Weighing
1. Once the vehicle is on the scale, press the INDEX softkey (Figure 2-10).
Figure 2-10: Weight Screen With Index ID Prompt
2. An Index ID prompt displays with a cursor in the ID field (see Figure 2-10).
3. Use the numeric keypad to enter the Index ID. Press the ENTER key to complete the entry.
4. If the ID is found in the Index Table, the terminal uses the relational ID data to locate corresponding data in the vehicle ID and A1–A3 tables. To continue the transaction, see Outbound Process.
When an Index ID is not located, the user has two options:
• Escape—Press the ESCAPE softkey to return to the main Default Weight Screen.
• Search for the Index ID—Press the DATABASE QUERY softkey to search for the index ID. Once the correct ID is located, continue with the outbound process (see Outbound Process).
Index ID: 12
Index softkey
Index ID prompt
09 Jan 2005 08:47:19
21500
IND310drive User Manual
2-18
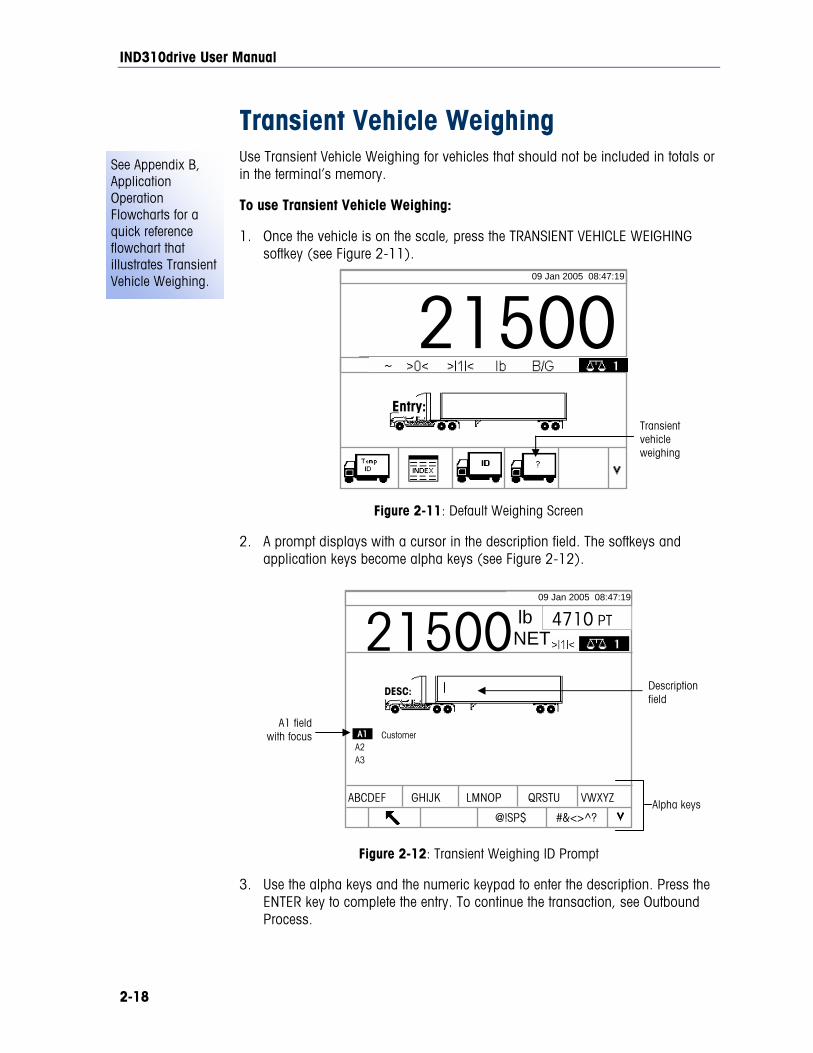
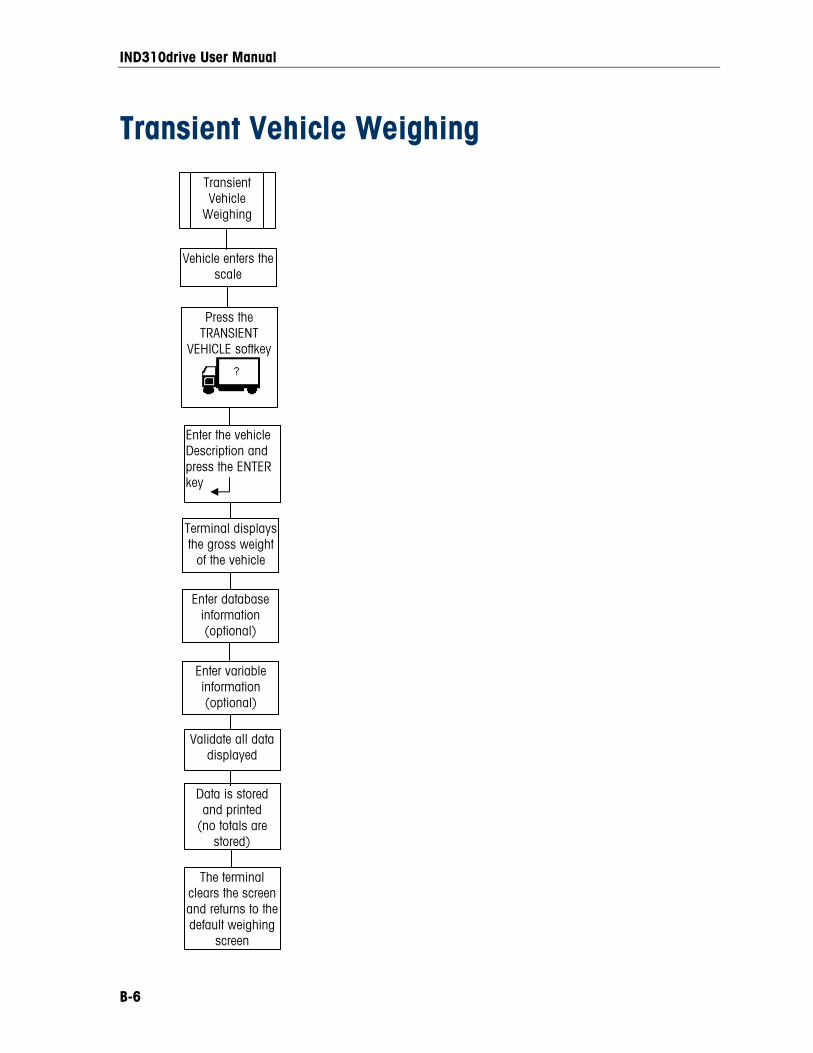
See Appendix B, Application Operation Flowcharts for a quick reference flowchart that illustrates Transient Vehicle Weighing.
Transient Vehicle Weighing Use Transient Vehicle Weighing for vehicles that should not be included in totals or in the terminal’s memory.
To use Transient Vehicle Weighing:
1. Once the vehicle is on the scale, press the TRANSIENT VEHICLE WEIGHING softkey (see Figure 2-11).
Figure 2-11: Default Weighing Screen
2. A prompt displays with a cursor in the description field. The softkeys and application keys become alpha keys (see Figure 2-12).
Figure 2-12: Transient Weighing ID Prompt
3. Use the alpha keys and the numeric keypad to enter the description. Press the ENTER key to complete the entry. To continue the transaction, see Outbound Process.
Transient vehicle weighing
Tare:
09 Jan 2005 08:47:19
21500
21500 lb NET
Alpha keys
Description field
Customer A2 A3
A1 field with focus
4710 PT
#&<>^? @!SP$
ABCDEF GHIJK LMNOP QRSTU VWXYZ
A1
DESC:
09 Jan 2005 08:47:19
Entry:
IND310drive User Manual
2-19
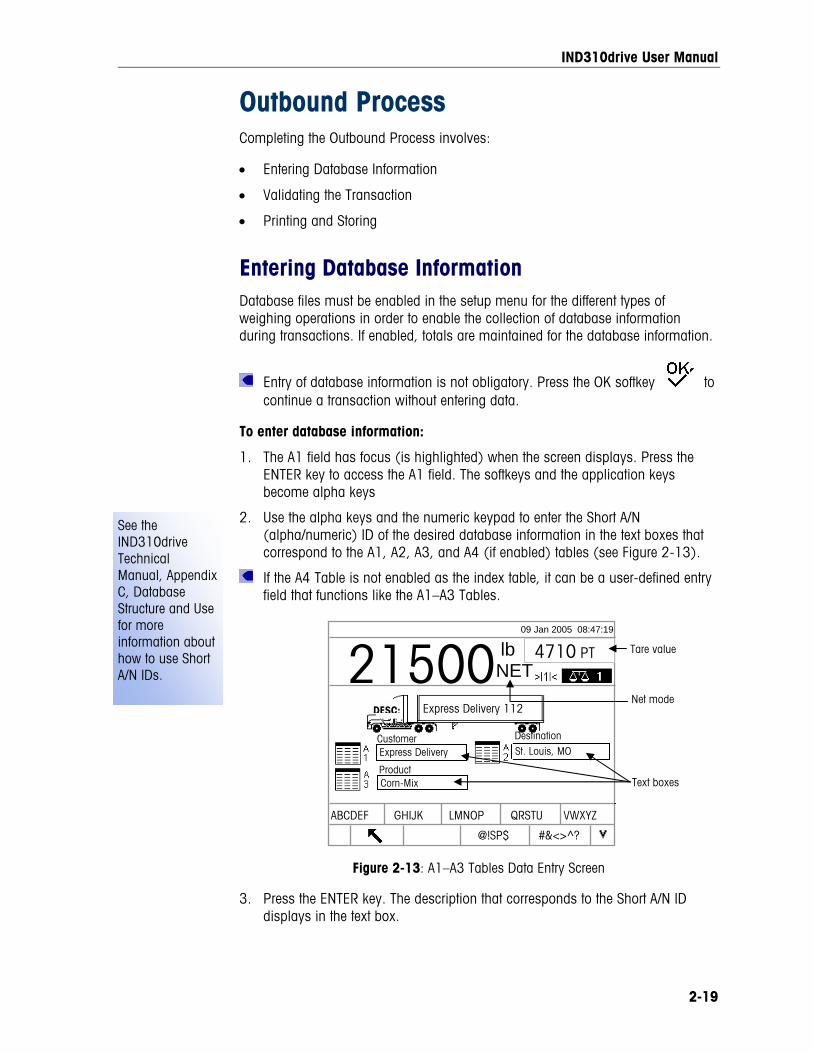
See the IND310drive Technical Manual, Appendix C, Database Structure and Use for more information about how to use Short A/N IDs.
Outbound Process Completing the Outbound Process involves:
• Entering Database Information
• Validating the Transaction
• Printing and Storing
Entering Database Information Database files must be enabled in the setup menu for the different types of weighing operations in order to enable the collection of database information during transactions. If enabled, totals are maintained for the database information.
Entry of database information is not obligatory. Press the OK softkey to continue a transaction without entering data.
To enter database information:
1. The A1 field has focus (is highlighted) when the screen displays. Press the ENTER key to access the A1 field. The softkeys and the application keys become alpha keys
2. Use the alpha keys and the numeric keypad to enter the Short A/N (alpha/numeric) ID of the desired database information in the text boxes that correspond to the A1, A2, A3, and A4 (if enabled) tables (see Figure 2-13).
If the A4 Table is not enabled as the index table, it can be a user-defined entry field that functions like the A1–A3 Tables.
Figure 2-13: A1–A3 Tables Data Entry Screen
3. Press the ENTER key. The description that corresponds to the Short A/N ID displays in the text box.
Corn-Mix
Express Delivery St. Louis, MO
Tare value
Product
Customer Destination
Text boxes
Net mode
#&<>^? @!SP$
ABCDEF GHIJK LMNOP QRSTU VWXYZ
21500 lb NET
4710 PT 09 Jan 2005 08:47:19
Express Delivery 112DESC:
IND310drive User Manual
2-20
See 0Hthe Table Searches section for more information about how to search database tables.
4. If the Short A/N ID is not found in the database, the message “A1 ID NOT FOUND” displays. Search the database by pressing the
DATABASE QUERY softkey .
5. Once all table entries are complete, press the OK softkey to accept the entries.
For Index Weighing, the A1, A2, and A3 table fields (if enabled) will display the database values as referenced in the Index Table. If necessary, change the values by following steps 1–3. A1, A2, and A3 table values that are changed during Index Weighing will not be changed in the Index Table.
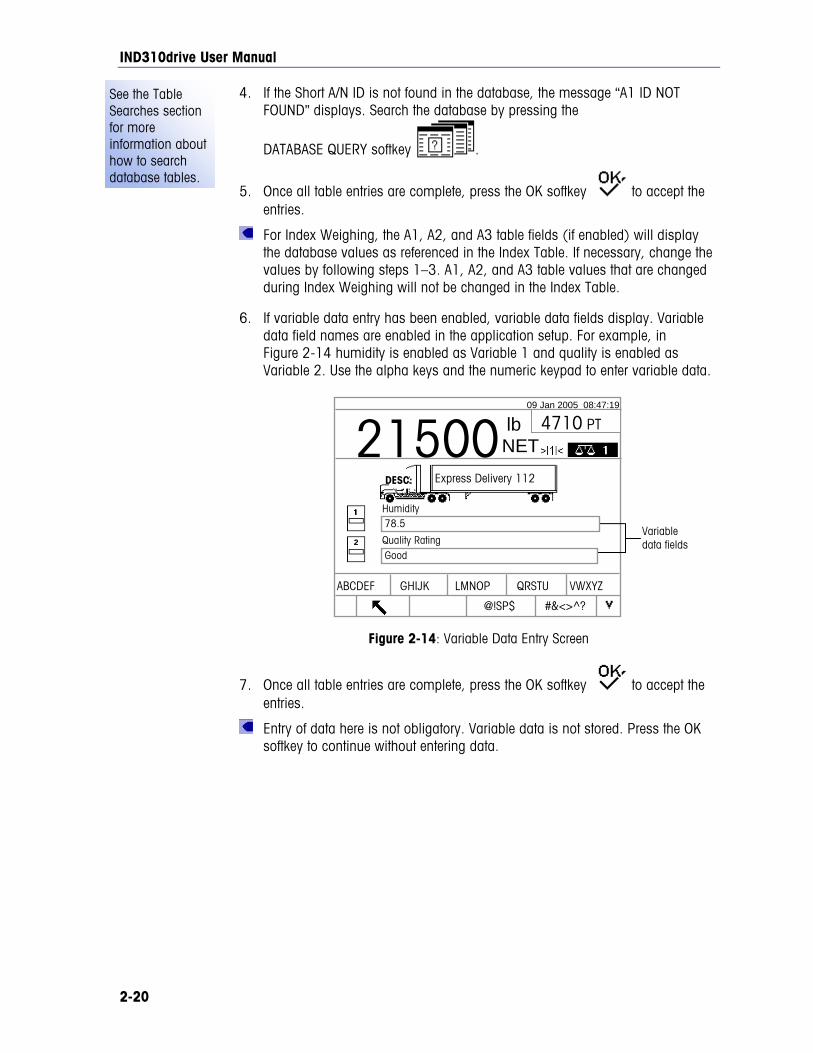
6. If variable data entry has been enabled, variable data fields display. Variable data field names are enabled in the application setup. For example, in Figure 2-14 humidity is enabled as Variable 1 and quality is enabled as Variable 2. Use the alpha keys and the numeric keypad to enter variable data.
Figure 2-14: Variable Data Entry Screen
7. Once all table entries are complete, press the OK softkey to accept the entries.
Entry of data here is not obligatory. Variable data is not stored. Press the OK softkey to continue without entering data.
Variable data fields
78.5
GoodQuality Rating
Humidity
21500 lb NET
09 Jan 2005 08:47:19
Express Delivery 112DESC:
4710 PT
#&<>^? @!SP$
ABCDEF GHIJK LMNOP QRSTU VWXYZ
IND310drive User Manual
2-21
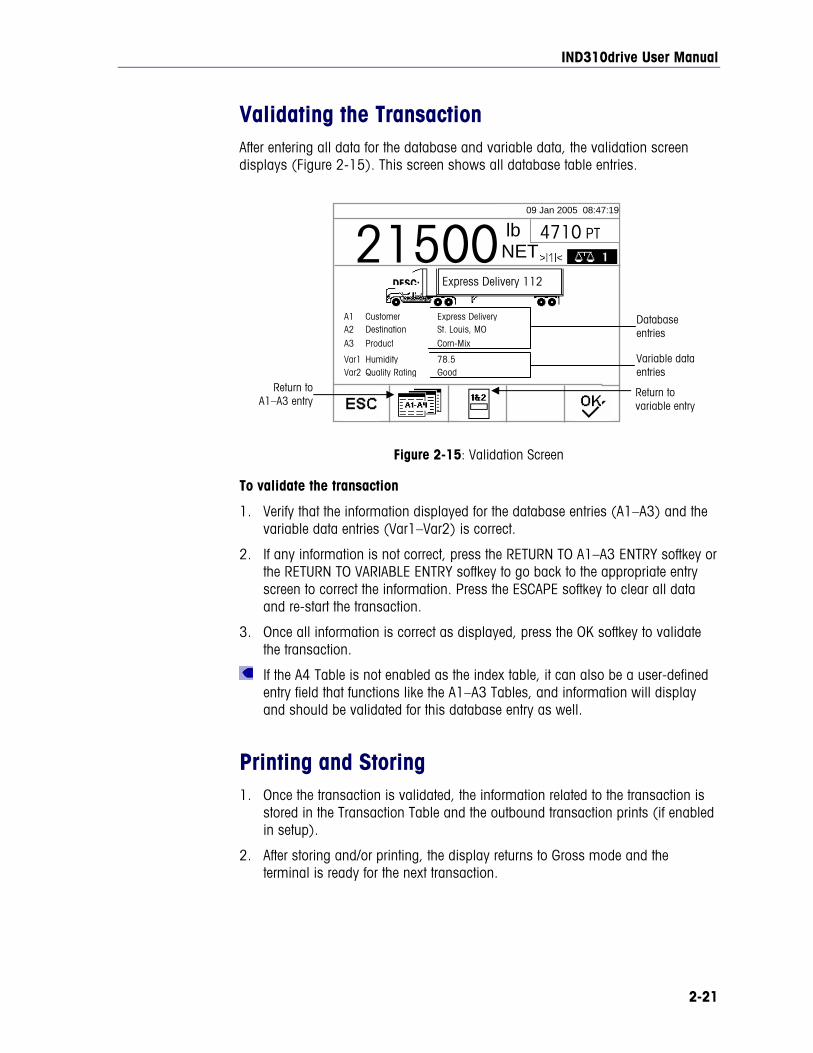
Validating the Transaction After entering all data for the database and variable data, the validation screen displays (Figure 2-15). This screen shows all database table entries.
Figure 2-15: Validation Screen
To validate the transaction
1. Verify that the information displayed for the database entries (A1–A3) and the variable data entries (Var1–Var2) is correct.
2. If any information is not correct, press the RETURN TO A1–A3 ENTRY softkey or the RETURN TO VARIABLE ENTRY softkey to go back to the appropriate entry screen to correct the information. Press the ESCAPE softkey to clear all data and re-start the transaction.
3. Once all information is correct as displayed, press the OK softkey to validate the transaction.
If the A4 Table is not enabled as the index table, it can also be a user-defined entry field that functions like the A1–A3 Tables, and information will display and should be validated for this database entry as well.
Printing and Storing 1. Once the transaction is validated, the information related to the transaction is
stored in the Transaction Table and the outbound transaction prints (if enabled in setup).
2. After storing and/or printing, the display returns to Gross mode and the terminal is ready for the next transaction.
Database entries A2 Destination St. Louis, MO
A1 Customer Express Delivery
Var2 Quality Rating Good
A3 Product Corn-Mix
Var1 Humidity 78.5 Variable data entries
Return to A1–A3 entry
Return to variable entry
Express Delivery 112DESC:
21500 lb NET
4710 PT 09 Jan 2005 08:47:19
IND310drive User Manual
2-22
Repeat Printing Anytime the IND310drive prints, a buffer is created that retains a copy of what was printed. The information in the buffer can be printed repeatedly as needed. To
initiate the Repeat Print function, press the REPEAT PRINT softkey .
Inbound Process Completing the Inbound Process involves:
• Entering Database Information—The same procedures as listed under Entering Database Information for the Outbound Process.
• Validating the Transaction—The same procedures as listed under Validating the Transaction for the Outbound Process.
• Printing and Storing—The same procedures as listed under Printing and Storing for the Outbound Process, except ID, description, and inbound weight information related to the transaction are also stored in the Temporary Table.
Commodity Function The commodity function enables the use of custom units on a per commodity basis (up to 25 different commodities). For example, an operator might want to use a custom unit of bushels for corn rather than kilograms or pounds. The commodity table enables the creation of a table (the A1 Table) that defines the multiplication or division factor that converts kilograms or pounds of corn to bushels. When the commodity (corn) is weighed, the output shows the converted amount and custom unit (bushels).
See the IND310 Technical Manual, Chapter 3.0, Configuration, Application, Memory for further information about configuring the commodity function.
Clear and Reset Functions Clear and reset functions enable users to clear the Alibi & Transaction table and to reset specific parameters or all IND310drive parameters back to the factory default settings.
IND310drive User Manual
2-23
Clearing the Alibi & Transaction Table The user may want to clear the transaction table after the terminal has first been installed or in North American applications, where the user has downloaded the existing data and wishes to continue with a clear table. Clearing the Alibi & Transaction table may take up to three minutes. In addition to clearing the data, the process runs a database defragmentation routine. Further information about clearing the Alibi & Transaction table is available in the IND310drive Technical Manual, Chapter 2.0, Operation.
To clear the Alibi & Transaction table:
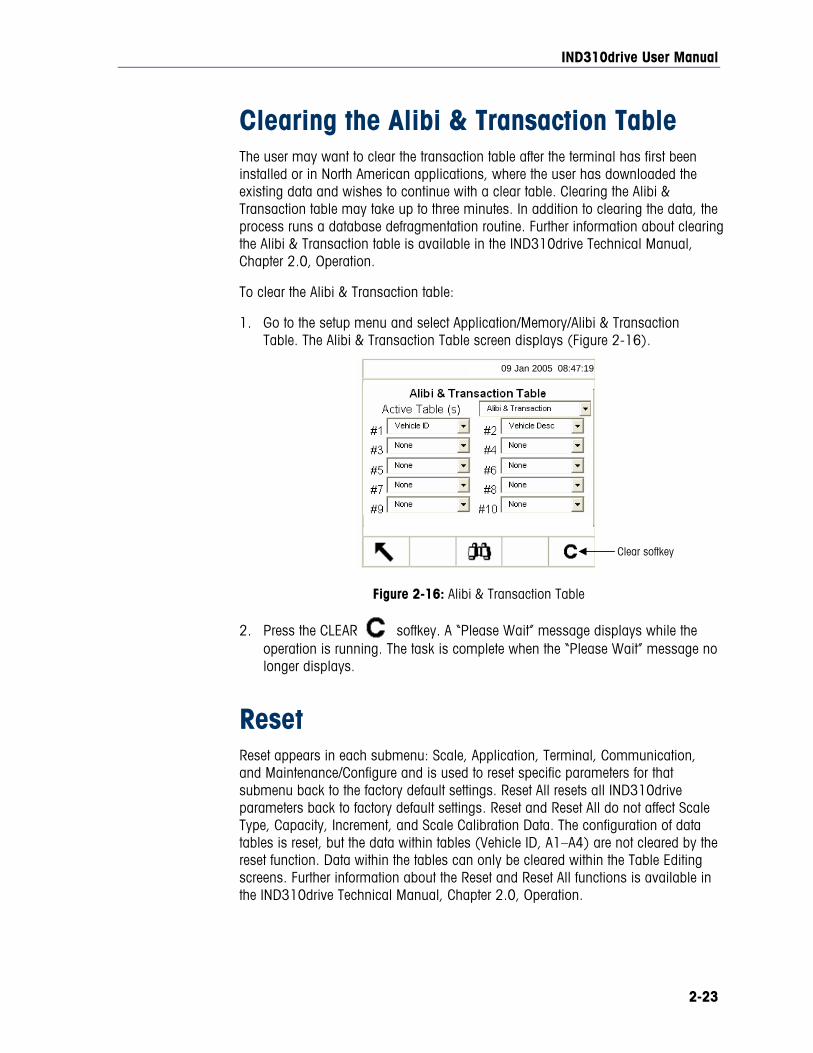
1. Go to the setup menu and select Application/Memory/Alibi & Transaction Table. The Alibi & Transaction Table screen displays (Figure 2-16).
Figure 2-16: Alibi & Transaction Table
2. Press the CLEAR softkey. A “Please Wait” message displays while the operation is running. The task is complete when the “Please Wait” message no longer displays.
Reset Reset appears in each submenu: Scale, Application, Terminal, Communication, and Maintenance/Configure and is used to reset specific parameters for that submenu back to the factory default settings. Reset All resets all IND310drive parameters back to factory default settings. Reset and Reset All do not affect Scale Type, Capacity, Increment, and Scale Calibration Data. The configuration of data tables is reset, but the data within tables (Vehicle ID, A1–A4) are not cleared by the reset function. Data within the tables can only be cleared within the Table Editing screens. Further information about the Reset and Reset All functions is available in the IND310drive Technical Manual, Chapter 2.0, Operation.
Clear softkey
09 Jan 2005 08:47:19
IND310drive User Manual
2-24
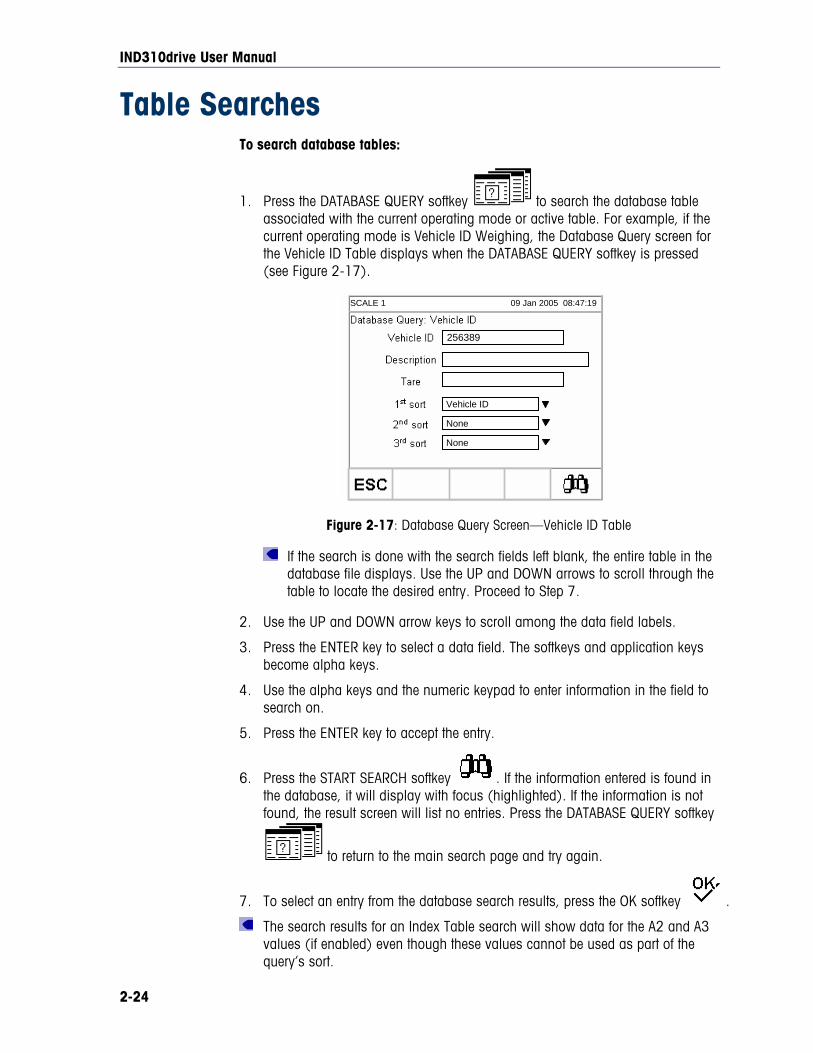
Table Searches To search database tables:
1. Press the DATABASE QUERY softkey to search the database table associated with the current operating mode or active table. For example, if the current operating mode is Vehicle ID Weighing, the Database Query screen for the Vehicle ID Table displays when the DATABASE QUERY softkey is pressed (see Figure 2-17).
Figure 2-17: Database Query Screen—Vehicle ID Table
If the search is done with the search fields left blank, the entire table in the database file displays. Use the UP and DOWN arrows to scroll through the table to locate the desired entry. Proceed to Step 7.
2. Use the UP and DOWN arrow keys to scroll among the data field labels.
3. Press the ENTER key to select a data field. The softkeys and application keys become alpha keys.
4. Use the alpha keys and the numeric keypad to enter information in the field to search on.
5. Press the ENTER key to accept the entry.
6. Press the START SEARCH softkey . If the information entered is found in the database, it will display with focus (highlighted). If the information is not found, the result screen will list no entries. Press the DATABASE QUERY softkey
to return to the main search page and try again.
7. To select an entry from the database search results, press the OK softkey .
The search results for an Index Table search will show data for the A2 and A3 values (if enabled) even though these values cannot be used as part of the query’s sort.
Vehicle ID
None
None
256389
SCALE 1 09 Jan 2005 08:47:19
IND310drive User Manual
2-25
See the IND310drive Technical Manual, Appendix C, Database Structure and Use for more information about database tables and report generation.
Table Reports Reports are generated from database tables including:
• Transaction Table—Stores weighing transaction information
• Vehicle ID Table—Stores specific vehicle information, including vehicle IDs, descriptions, and tare weights
• Temporary ID Table—Temporarily stores vehicle descriptions and tare weights for inbound vehicles to enable the recall of these weights for outbound transactions
• A1, A2, A3, and A4 Tables—Store descriptions of vehicle information defined in the application setup to meet specific operational requirements. The A4 Table can be configured as an Index Table, which is comprised of ID keys that reference data located in other tables.
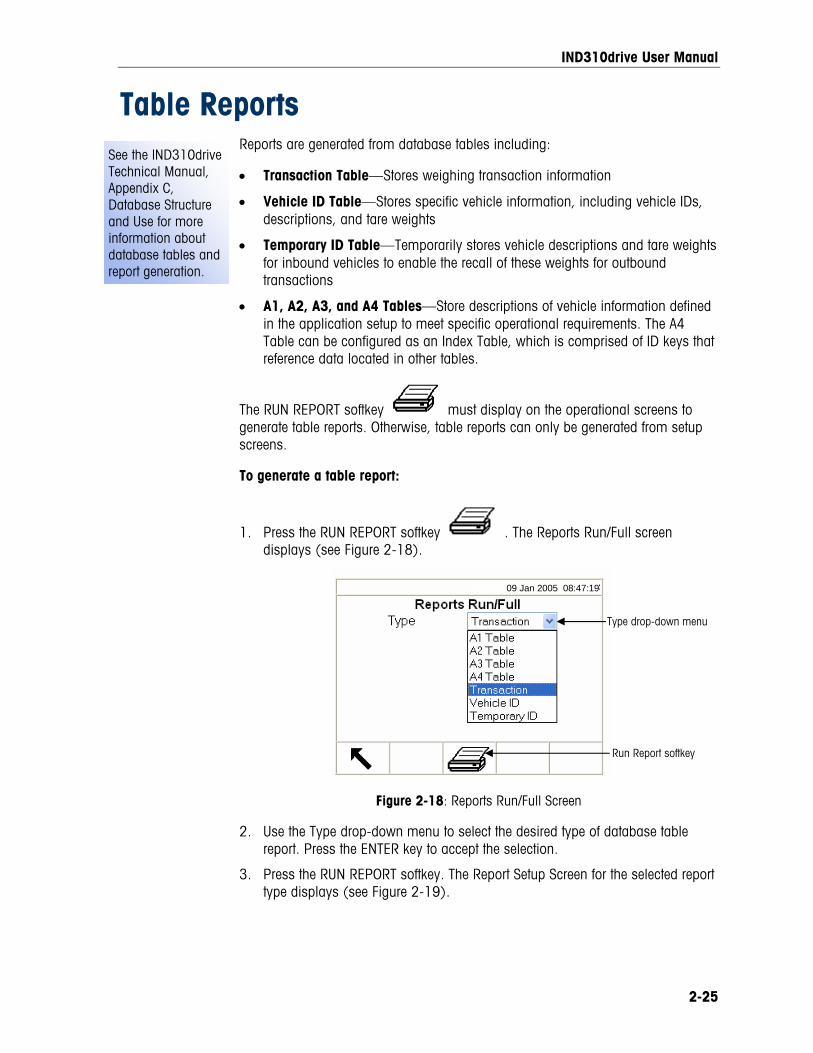
The RUN REPORT softkey must display on the operational screens to generate table reports. Otherwise, table reports can only be generated from setup screens.
To generate a table report:
1. Press the RUN REPORT softkey . The Reports Run/Full screen displays (see Figure 2-18).
Figure 2-18: Reports Run/Full Screen
2. Use the Type drop-down menu to select the desired type of database table report. Press the ENTER key to accept the selection.
3. Press the RUN REPORT softkey. The Report Setup Screen for the selected report type displays (see Figure 2-19).
Type drop-down menu
Run Report softkey
09 Jan 2005 08:47:19
IND310drive User Manual
2-26
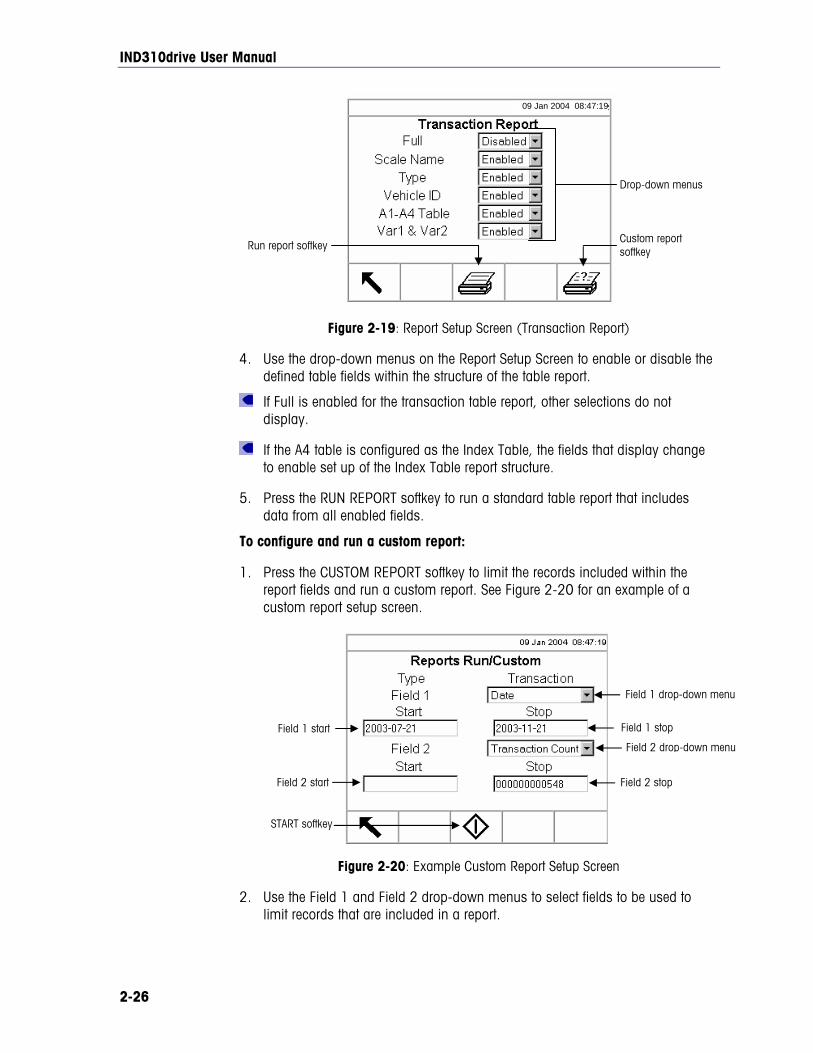
Figure 2-19: Report Setup Screen (Transaction Report)
4. Use the drop-down menus on the Report Setup Screen to enable or disable the defined table fields within the structure of the table report.
If Full is enabled for the transaction table report, other selections do not display.
If the A4 table is configured as the Index Table, the fields that display change to enable set up of the Index Table report structure.
5. Press the RUN REPORT softkey to run a standard table report that includes data from all enabled fields.
To configure and run a custom report:
1. Press the CUSTOM REPORT softkey to limit the records included within the report fields and run a custom report. See Figure 2-20 for an example of a custom report setup screen.
Figure 2-20: Example Custom Report Setup Screen
2. Use the Field 1 and Field 2 drop-down menus to select fields to be used to limit records that are included in a report.
Drop-down menus
Run report softkeyCustom report softkey
09 Jan 2004 08:47:19
Field 1 drop-down menu
Field 2 drop-down menu
START softkey
Field 1 stop
Field 2 stop
Field 1 start
Field 2 start
IND310drive User Manual
2-27
3. Specify the range of reported field values by entering start and stop values for the selected fields. The example in Figure 2-20 shows Date for Field 1, with a start value of 2003-07-21 and a stop value of 2003-11-21. Therefore, only records with dates between July 21, 2003 and November 21, 2003 will be included in the report.
If the stop value is left blank, then any records with values that fall after the start value are included in the report. If the start is left blank, then any records with values that fall before the stop value are included in the report. The example in Figure 2-20 shows Transaction Count for Field 2 with a blank start value and a stop value of 548. All records with transaction counts between 1 and 548 and dates between July 21, 2003 and November 21, 2003 will be included in the report.
The date format is fixed at YYYY-MM-DD for these fields. (This date format might not match the terminal’s date configuration.)
4. Press the START softkey to run the custom report.

IND310drive User Manual
2-28
For your notes

3-1
This chapter covers
• Service
• Cleaning and Maintenance
• 1HUpdating Software
Chapter 3.0 Service and Maintenance
Service Information on installing, programming, and servicing the IND310drive terminal is available in the IND310drive Terminal Installation and Technical Manuals. Only qualified personnel should perform installation, programming, and service. Please contact a local METTLER TOLEDO representative for assistance.
In general, once the IND310drive is installed, programmed, and calibrated for a given application, no other routine service is required.
WARNING! ONLY PERMIT QUALIFIED PERSONNEL TO SERVICE THE TERMINAL. EXERCISE CARE WHEN MAKING CHECKS, TESTS AND ADJUSTMENTS THAT MUST BE MADE WITH POWER ON. FAILING TO OBSERVE THESE PRECAUTIONS CAN RESULT IN BODILY HARM AND/OR PROPERTY DAMAGE.
Cleaning and Maintenance Clean the IND310drive terminal’s keypad and cover with a clean, soft cloth dampened with a mild glass cleaner. Do not use any type of industrial solvent such as toluene or isopropanol (IPA) that could damage the terminal’s finish. Do not spray cleaner directly on the terminal.
Regular maintenance inspections and calibration by a qualified service technician are recommended. The IND310drive is a rugged stainless steel-enclosed instrument; however, the font panel is a vinyl covering over sensitive electronic switches and a lighted LCD display. Take care to avoid any punctures to this surface or any vibrations or shocks to the instrument. Should the front panel become punctured, ensure that steps are taken to prevent dust and moisture from entering the unit.

IND310drive User Manual
3-2
Updating Software IND310drive software updates are performed with a USB memory stick. Only a METTLER TOLEDO provided USB memory stick (available as CIMF number 71208113) should be used to perform this activity. Refer to the IND310drive Technical Manual, Chapter 4.0, Service and Maintenance, for detailed procedures for updating software.
A-1
Appendix A Basic Weighing Concepts
This appendix explains some of the specialized terminology and concepts that are commonly used in the weighing industry, as well as the features of the IND310drive that can be used to make the weighing process more efficient.
Zero Zero is the empty weight of the scale platform or weighbridge. The gross zero reference is recorded during calibration.
Pushbutton Zero is a way for the operator to capture a new gross zero reference point. The weight on the scale must be stable and be within the pushbutton zero capture range, typically ±20% of full scale capacity. The zero of the scale can change because material builds up on the scale or because the temperature changes.
Auto Zero Maintenance (AZM) is a way for the terminal to gradually rezero itself in order to compensate for small changes in zero. Class IIIL legal-for-trade vehicle scales use an AZM range of ±3 displayed increments above/below gross zero. AZM is active any time the weight on the scale is stable and is within the AZM range.
Tare Tare is the empty weight of a vehicle. Tare is normally used to determine the net weight of the contents of a vehicle. There are several different ways tare is used: autotare, keyboard tare, and additive tare.
Autotare An autotare is taken by pressing the TARE key when an empty vehicle is on the scale. The terminal then displays a zero weight with the net cursor lit. The vehicle is loaded and driven back onto the scale. The terminal then displays the net weight of the contents. If the TARE key is pressed while the terminal is in the net mode, the current weight on the scale becomes the new tare value. Tare interlocks inhibit replacement autotare.
IND310drive User Manual
A-2
Keyboard Tare Keyboard entered tare is used when the empty weight of the vehicle is a known value. The known tare weight is entered using the numeric keys, and the TARE scale function key is pressed. The terminal will then display the net weight of the contents of the vehicle.
Additive Tare Additive tare is a rarely used mode of keyboard entered tare. If a tare is entered using the numeric keypad while the terminal is in the net weight mode, the tare value entered is added to the existing tare weight value. Tare interlocks inhibit this mode.
Tare Interlocks Tare interlocks are a set of restrictions on how tare can be used. They are required by some local weights and measures regulations. If tare interlocks are enabled, the terminal must be at gross zero to clear a tare weight or to enter a keyboard tare. Tare interlocks also prevent the terminal from replacing an existing tare with a new tare.
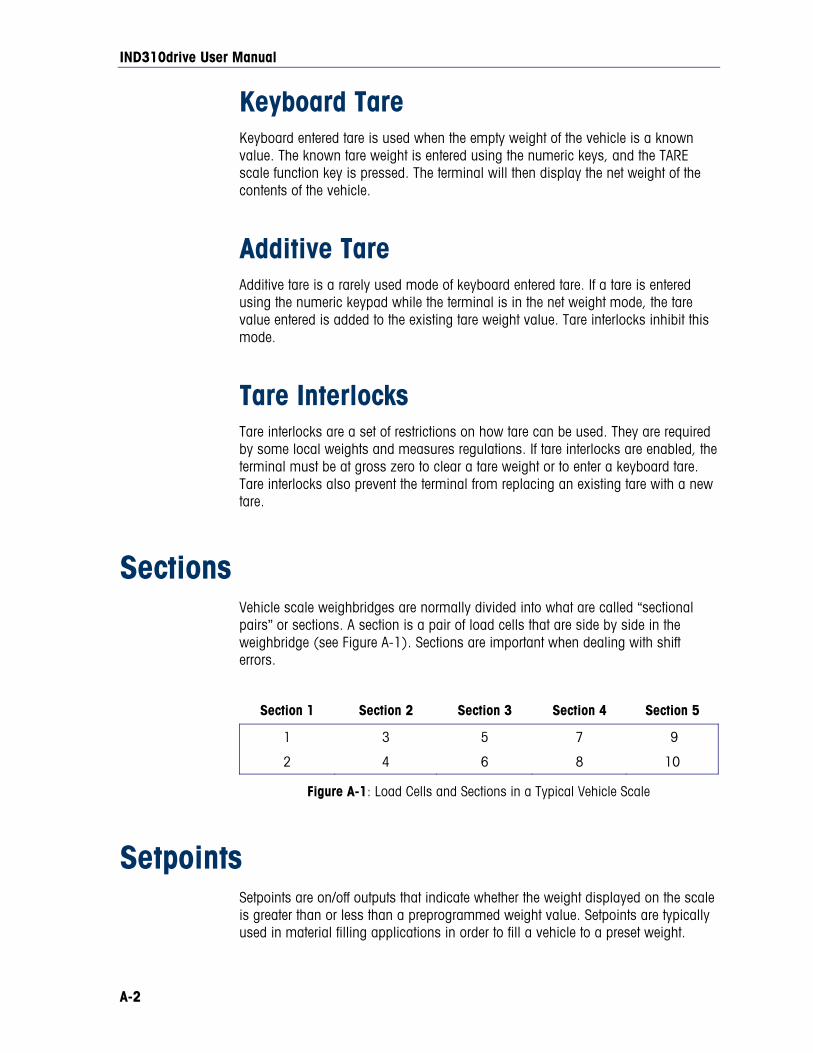
Sections Vehicle scale weighbridges are normally divided into what are called “sectional pairs” or sections. A section is a pair of load cells that are side by side in the weighbridge (see 57HFigure A-1). Sections are important when dealing with shift errors.
Section 1 Section 2 Section 3 Section 4 Section 5
1 3 5 7 9
2 4 6 8 10
Figure A-1: Load Cells and Sections in a Typical Vehicle Scale
Setpoints Setpoints are on/off outputs that indicate whether the weight displayed on the scale is greater than or less than a preprogrammed weight value. Setpoints are typically used in material filling applications in order to fill a vehicle to a preset weight.

IND310drive User Manual
A-3
Inbound/Outbound Weighing Vehicle scales are often used in an inbound/outbound mode of operation where the vehicle is loaded or unloaded at the user’s site. In the inbound/outbound mode the vehicle empty (tare) weight is not known, so the vehicle must be weighed twice (once empty and once loaded). In the past this was normally done by printing the inbound weight, printing the outbound weight, and then calculating the difference (net weight) by hand.
A IND310drive terminal simplifies inbound/outbound weighing by permitting the operator to store the inbound vehicle weight in memory and then recalling that weight at a later time. Once the inbound weight is recalled, the terminal calculates the net weight and prints an outbound ticket.
Net Sign Correction Net sign correction is a feature that permits the IND310drive terminal to be used for both shipping (inbound empty) and receiving (inbound loaded) operations. If net sign correction is enabled, the terminal will swap the gross and tare weight fields on the printed ticket, if necessary, so that the larger weight is the gross weight, the smaller weight is the tare weight, and the difference is always a positive net weight.
One-Pass Weighing One-pass weighing is a mode where the user has a fleet of vehicles with known empty (tare) weight. The tare weight is recalled by ID when the loaded vehicle is on the scale.

IND310drive User Manual
A-4
For your notes
B-1
Appendix B Application Operation Flowcharts
The following pages contain quick reference flowcharts that illustrate the IND310drive terminal’s four modes of operation.
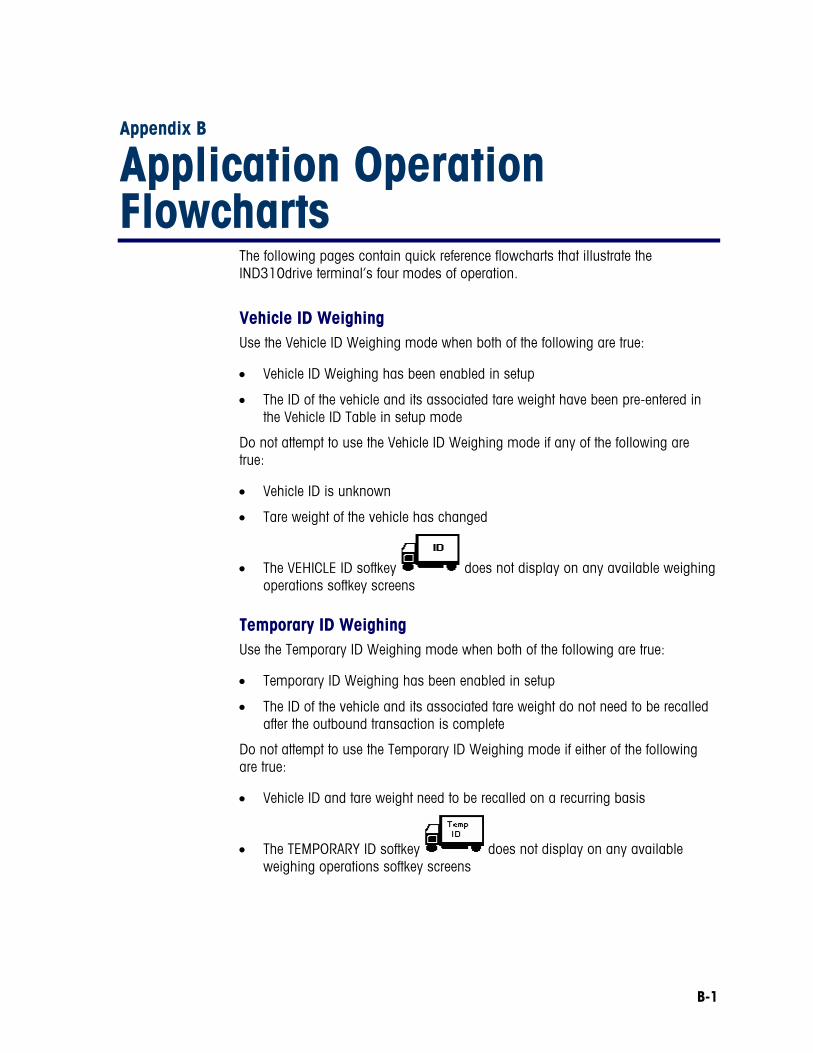
Vehicle ID Weighing Use the Vehicle ID Weighing mode when both of the following are true:
• Vehicle ID Weighing has been enabled in setup
• The ID of the vehicle and its associated tare weight have been pre-entered in the Vehicle ID Table in setup mode
Do not attempt to use the Vehicle ID Weighing mode if any of the following are true:
• Vehicle ID is unknown
• Tare weight of the vehicle has changed
• The VEHICLE ID softkey does not display on any available weighing operations softkey screens
Temporary ID Weighing Use the Temporary ID Weighing mode when both of the following are true:
• Temporary ID Weighing has been enabled in setup
• The ID of the vehicle and its associated tare weight do not need to be recalled after the outbound transaction is complete
Do not attempt to use the Temporary ID Weighing mode if either of the following are true:
• Vehicle ID and tare weight need to be recalled on a recurring basis
• The TEMPORARY ID softkey does not display on any available weighing operations softkey screens
IND310drive User Manual
B-2
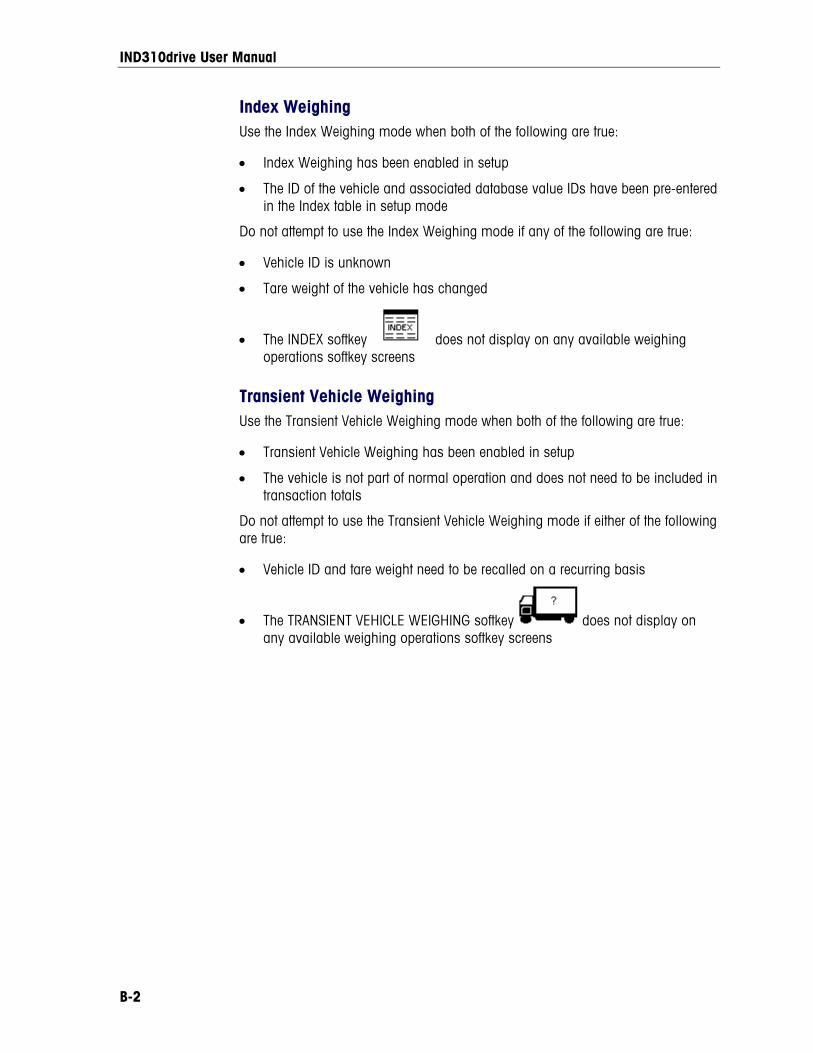
Index Weighing Use the Index Weighing mode when both of the following are true:
• Index Weighing has been enabled in setup
• The ID of the vehicle and associated database value IDs have been pre-entered in the Index table in setup mode
Do not attempt to use the Index Weighing mode if any of the following are true:
• Vehicle ID is unknown
• Tare weight of the vehicle has changed
• The INDEX softkey does not display on any available weighing operations softkey screens
Transient Vehicle Weighing Use the Transient Vehicle Weighing mode when both of the following are true:
• Transient Vehicle Weighing has been enabled in setup
• The vehicle is not part of normal operation and does not need to be included in transaction totals
Do not attempt to use the Transient Vehicle Weighing mode if either of the following are true:
• Vehicle ID and tare weight need to be recalled on a recurring basis
• The TRANSIENT VEHICLE WEIGHING softkey does not display on any available weighing operations softkey screens

IND310drive User Manual
B-3
Vehicle ID Weighing
Vehicle ID Weighing
Vehicle enters the scale
Press the VEHICLE ID
softkey
Enter the vehicle ID and press the
ENTER key
Vehicle ID Found
Vehicle ID NOT Found
Press the ESCAPE softkey
to try to enter a
different ID
Press the DATABASE
QUERY softkey
to search for
the ID
Press the Insert New Vehicle ID
softkey
to create a new
ID
Search for an ID when it is likely to be in the database. A search is helpful when the complete ID is not known or when an entry error is made.
Terminal changes to Net mode and uses the stored tare
value to determine net
weight
Validate all data displayed.
The terminal clears the screen and returns to the default weighing
screen
Enter database information (optional)
Enter variable information (optional)
Terminal switches to Temporary ID
operation mode (see Temporary ID
flowchart)
Data is stored and printed
IND310drive User Manual
B-4
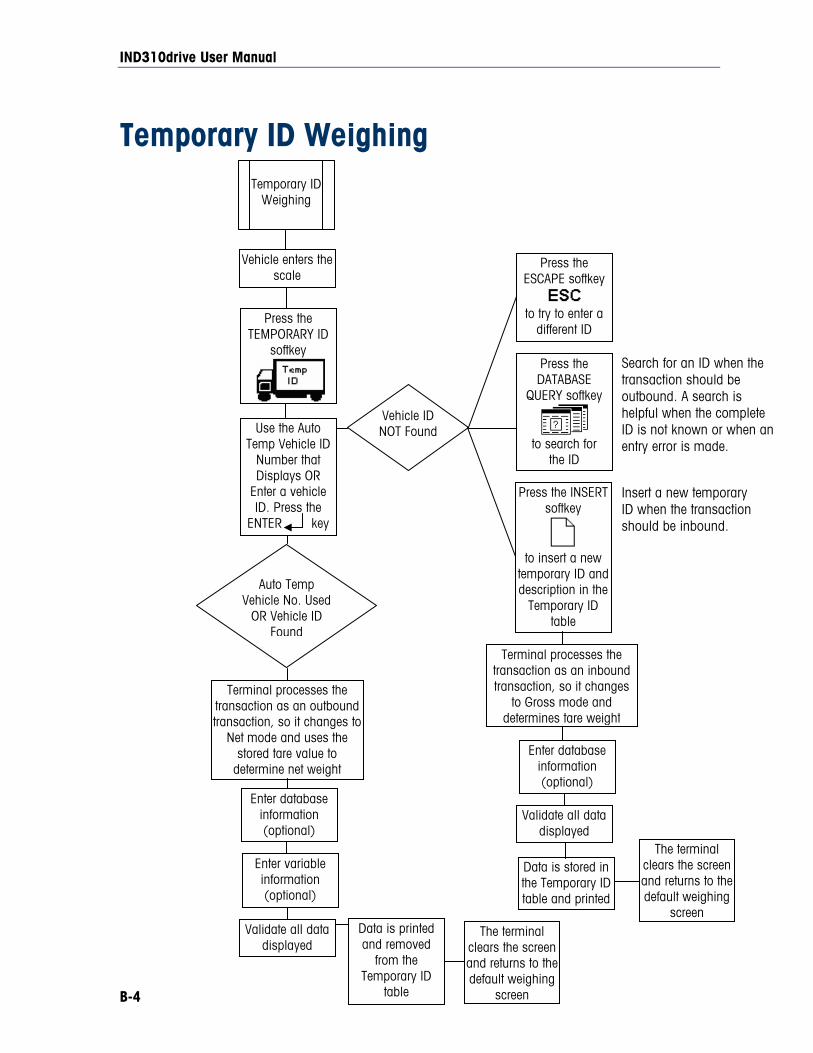
Temporary ID Weighing Temporary ID
Weighing
Vehicle enters the scale
Press the TEMPORARY ID
softkey
Vehicle ID NOT Found
Enter database information (optional)
Enter variable information (optional)
Data is printed and removed
from the Temporary ID
table
The terminal clears the screen and returns to the default weighing
screen
Use the Auto Temp Vehicle ID
Number that Displays OR
Enter a vehicle ID. Press the
ENTER key
Auto Temp Vehicle No. Used
OR Vehicle ID Found
Terminal processes the transaction as an outbound transaction, so it changes to
Net mode and uses the stored tare value to
determine net weight
Press the ESCAPE softkey
to try to enter a
different ID
Press the DATABASE
QUERY softkey
to search for
the ID
Press the INSERT softkey
to insert a new
temporary ID and description in the
Temporary ID table
Search for an ID when thetransaction should be outbound. A search is helpful when the complete ID is not known or when an entry error is made.
Insert a new temporary ID when the transaction should be inbound.
Terminal processes the transaction as an inbound transaction, so it changes
to Gross mode and determines tare weight
Enter database information (optional)
Data is stored in the Temporary ID table and printed
The terminal clears the screen and returns to the default weighing
screen
Validate all data displayed
Validate all data displayed
IND310drive User Manual
B-5
Index Weighing
Index Weighing
Vehicle enters the scale
Press the INDEX softkey
Index ID Found
Enter the Index ID and press the
ENTER key
Terminal changes to Net mode and uses the stored tare value to determine net
weight
Vehicle ID and other database information is
automatically displayed—change if
necessary
Data is stored and printed
The terminal clears the screen and returns to the default weighing
screen
Enter variable information (optional)
Index ID NOT Found
Press the ESCAPE softkey
to try to enter a
different ID
Press the DATABASE
QUERY softkey
to search for
the ID
Search for an ID when it is likely to be in the database. A search is helpful when the complete ID is not known or when an entry error is made.
IND310drive User Manual
B-6
Transient Vehicle Weighing
Terminal displays the gross weight
of the vehicle
Transient Vehicle
Weighing
Vehicle enters the scale
Press the TRANSIENT
VEHICLE softkey
Enter the vehicle Description and press the ENTER key
Enter database information (optional)
Enter variable information (optional)
Data is stored and printed
(no totals are stored)
The terminal clears the screen and returns to the default weighing
screen
Validate all data displayed

71207921
1900 Polaris Parkway Columbus, Ohio 43240
P/N: 71207921
METTLER TOLEDO® is a registered trademark of Mettler-Toledo, Inc.
©2005 Mettler-Toledo, Inc.
Printed in USA
Quality certification. Development, production, and auditing in accordance with ISO9001. Environmental management system in accordance with ISO14001. Worldwide service. Our dense service network, among the best in the world, ensures the maximum availability and lifespan of your product. Conformité Européene This label is your guarantee that our products conform to the latest guidelines. On the Internet. You can find important information about our products and services, as well as
www.mt.com
14001
eDocument – This document is available in PDF only.