
-NEEDED€¦ · before any dekor" landscape lighting is installed, it is the installers...
3
DEKOR ® LANDSCAPE LIGHTING Installation Instructions LIGHT FIXTURES Empress Radiance Spotlight POTENTIAL TOOLS NEEDED - WARNING: 3/4" Auger t·. ✓ (1.9cm) itWta . Ginny Well Light Puck Light Mushroom Light Stepped Mushroom Light Sidewalk Light PLUG-N-PLAY CONNECTORS PlugPlay Plug-N-Play FemaletoFemale "T" Splitter Connor EZ Plug-N-Play 6-Port Splitter Telescoping Spotlight BEFORE ANY DEKOR" LANDSCAPE LIGHTING IS INSTALLED, IT IS THE INSTALLERS RESPONSIBILITY TO ENSURE THAT ALL UNDERGROUND UTILITIES/ LINES ARE LOCATED (GAS LINES, ELECTRICAL LINES, DATA LINES, WATER LINES, ET(.) PRIOR TO ANY WORK BEING DONE. BEFORE YOU DIG -CALL 811 HELPFUL TIPS » Follow the appropriate building and electrical codes when installing all DEKOR ® lighting products. » It is up to you the customer to decide where lighting components are placed. Depending on the distance between lights and/or splitters, the EZPLUGNPLAY HD wire is available for purchase in s; 1 O' and 20' lengths. This wire is approved for direct burial use. » Leave wire slack to make fixture terminations. Remember slack will be required to properly bury wire. » All DEKOR ® landscape lights have male connectors. This allows you to connect all the lights together in one run with the purchase of a Plug-N-Play "T" Splitter or EZ Plug-N-Play 6-Port Splitter. You can purchase female to female connectors to connect distances longer than 20' » Use only a standard household AC GFCI protected outlet to help prevent damage from power surges or lightning. » When using timer, ensure it is in full view of the sun when using the dusk/dawn feature. Timer must be installed with output plugs facing down, 1.5 ft above the ground, timer is only rain proof. » To ensure all components are in working condition it is recom- mended to have power source attached when installing lights. » When burying wire in live sod use spade shovel to make a slit in the soil. Bury the wire 1 "-3" (2.5 cm - 7.6 cm) deep and tamp down the soil. Water heavily to allow the soil to resettle and minimize impact on the installation site. CAUTION: � olarity � ey When making a connection between 8 ® a Plug N Play connector or a splitter; observe the polarity key to make the proper connection. The male and female connectors have a flat side that MUST MATCH UP. DO NOT force the connectors together. Have Questions? Call 1-800-258-0344 | V. 3152018 ©2018 DEKOR ® , Denver, co
Transcript of -NEEDED€¦ · before any dekor" landscape lighting is installed, it is the installers...

DEKOR® LANDSCAPE LIGHTING
Installation Instructions
LIGHT FIXTURES
Empress Radiance Spotlight
POTENTIAL TOOLS NEEDED
-
WARNING:
3/4" Auger t·. ✓ (1.9cm)
itW.Qta .....
Ginny
Well Light
Puck Light Mushroom Light Stepped
Mushroom Light Sidewalk Light
PLUG-N-PLAY CONNECTORS
EZPlug-N-Play Plug-N-Play FemaletoFemale "T" Splitter
Connector
EZ Plug-N-Play 6-Port Splitter
Telescoping Spotlight
BEFORE ANY DEKOR" LANDSCAPE LIGHTING IS INSTALLED, IT IS THE INSTALLERS RESPONSIBILITY TO ENSURE THAT ALL UNDERGROUND UTILITIES/
LINES ARE LOCATED (GAS LINES, ELECTRICAL LINES, DATA LINES, WATER LINES, ET(.) PRIOR TO ANY WORK BEING DONE. BEFORE YOU DIG -CALL 811
HELPFUL TIPS
» Follow the appropriate building and electrical codes wheninstalling all DEKOR® lighting products.
» It is up to you the customer to decide where lightingcomponents are placed. Depending on the distance betweenlights and/or splitters, the EZPLUGNPLAY HD wire is available forpurchase in s; 1 O' and 20' lengths. This wire is approved fordirect burial use.
» Leave wire slack to make fixture terminations. Remember slackwill be required to properly bury wire.
» All DEKOR® landscape lights have male connectors.This allows you to connect all the lights together in one runwith the purchase of a Plug-N-Play "T" Splitter or EZ Plug-N-Play6-Port Splitter. You can purchase female to female connectors toconnect distances longer than 20'.
» Use only a standard household AC GFCI protected outlet to helpprevent damage from power surges or lightning.
» When using timer, ensure it is in full view of the sun when usingthe dusk/dawn feature. Timer must be installed with outputplugs facing down, 1.5 ft above the ground, timer is only rainproof.
» To ensure all components are in working condition it is recommended to have power source attached when installing lights.
» When burying wire in live sod use spade shovel to make a slit inthe soil. Bury the wire 1 "-3" (2.5 cm - 7.6 cm) deep and tampdown the soil. Water heavily to allow the soil to resettle andminimize impact on the installation site.
CAUTION:
�olarity
�ey
When making a connection between 8 ® a Plug N Play connector or a splitter;
observe the polarity key to make the proper connection. The male and female connectors have a flat side that MUST
MATCH UP. DO NOT force the connectors together.
Have Questions? Call 1-800-258-0344 | V. 3152018 ©2018 DEKOR® , Denver, co
DEKOR® LANDSCAPE LIGHTING
Installation Instructions
How to Install DEKOR® Landscape Lighting (Empress, Ginny, Mushroom, Puck, Radiance, Sidewalk, Spot Light, Telescoping Spot, and Well Lights)
» ALWAYS check local codes before beginning your project.
» USE DEKOR® TRANSFORMERS ONLY. Using any other typeof transformer voids the warranty.
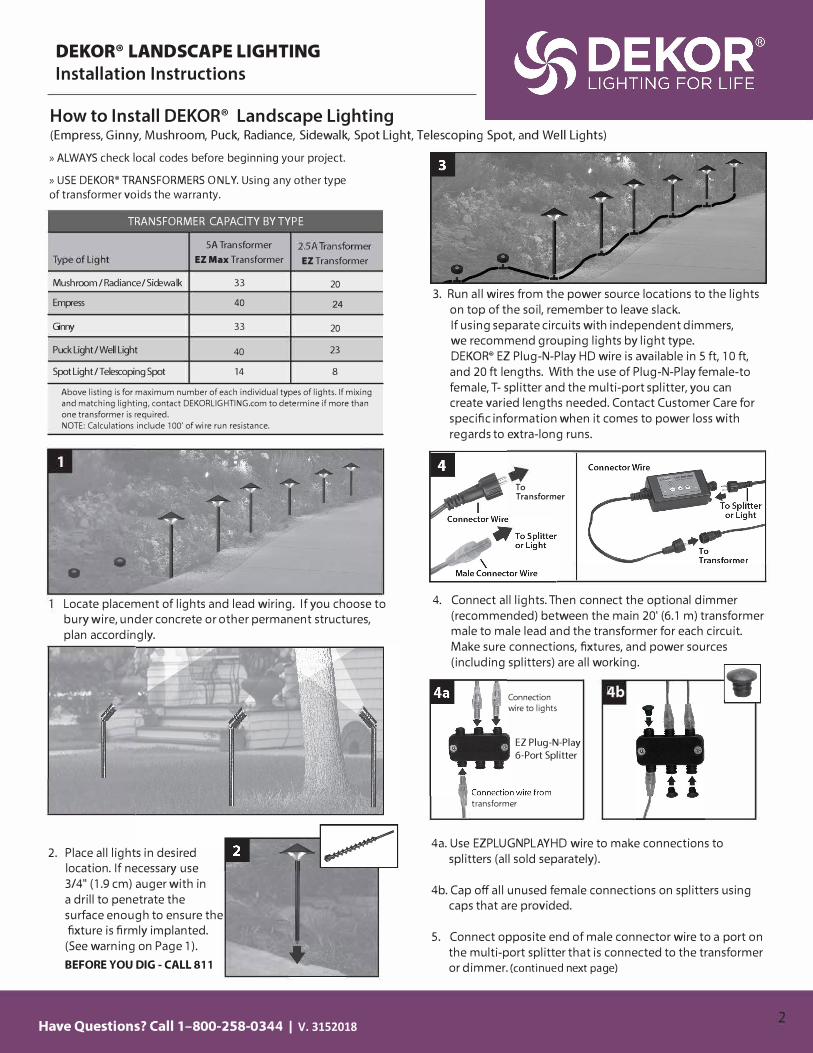
TRANSFORMER CAPACITY BY TYPE
SA Transformer
EZ Max Transformer EZ Transformer
Mushroom/ Radiance/ Sidewalk 33 20
Empress 40 24
Gnny 33 20
Puck Light/Well Light 40 23
Spot Light/Telescoping Spot 14 8
Above listing is for maximum number of each individual types of lights. If mixing
and matching lighting, contact DEKORLIGHTING.com to determine if more than
one transformer is required.
NOTE: Calculations include 100' of wire run resistance.
8
Locate placement of lights and lead wiring. If you choose to
bury wire, under concrete or other permanent structures,
plan accordingly.
2. Place all lights in desired
location. If necessary use
3/4" (1.9 cm) auger with in
a drill to penetrate the
surface enough to ensure the
fixture is firmly implanted.
(See warning on Page 1 ).
BEFORE YOU DIG - CALL 811
Have Questions? Call 1-800-258-0344 | V. 3152018
3. Run all wires from the power source locations to the lights
on top of the soil, remember to leave slack.
If using separate circuits with independent dimmers,
we recommend grouping lights by light type.
DEKOR® EZ Plug-N-Play HD wire is available in S ft, 10 ft,
and 20 ft lengths. With the use of Plug-N-Play female-to
female, T- splitter and the multi-port splitter, you can
create varied lengths needed. Contact Customer Care for
specific information when it comes to power loss with
regards to extra-long runs .
To Transformer
4. Connect all lights. Then connect the optional dimmer
(recommended) between the main 20' (6.1 m) transformer
male to male lead and the transformer for each circuit.
Make sure connections, fixtures, and power sources
(including splitters) are all working.
Connection
wire to lights
EZ Pl ug-N-Pl ay
6-Port S p litter
transformer
' .
4a. Use EZPLUGNPLAYHD wire to make connections to
splitters (all sold separately).
4b. Cap off all unused female connections on splitters using
caps that are provided.
S. Connect opposite end of male connector wire to a port on
the multi-port splitter that is connected to the transformer
or dimmer. (continued next page)
DEKOR® LANDSCAPE LIGHTING
Installation Instructions
How to install DEKOR® Landscape Lighting / continued
5. You can mix and combine all lights on the same circuit butmake sure you do not exceed the maximum number oflights per transformer. If running separate circuits withdimmers on each circuit, using a separate transformer foreach circuit can simplify installation. However, use of a5-way splitter will allow for separate circuits on the sametransformer.
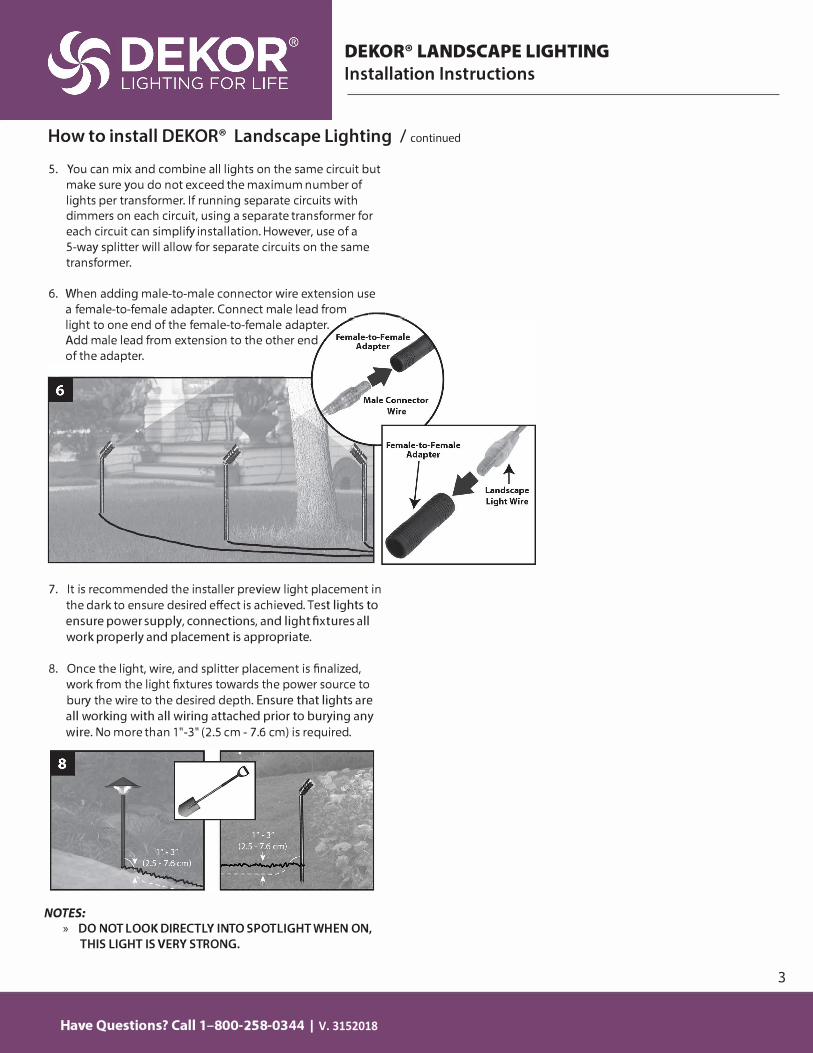
6. When adding male-to-male connector wire extension usea female-to-female adapter. Connect male lead from .---.light to one end of the female-to-female adapter.Add male lead from extension to the other endof the adapter.
7. It is recommended the installer preview light placement inthe dark to ensure desired effect is achieved. Test lights toensure power supply, connections, and light fixtures allwork properly and placement is appropriate.
8. Once the light, wire, and splitter placement is finalized,work from the light fixtures towards the power source tobury the wire to the desired depth. Ensure that lights areall working with all wiring attached prior to burying anywire. No more than 1 "-3" (2.5 cm - 7.6 cm) is required.
NOTES:
» DO NOT LOOK DIRECTLY INTO SPOTLIGHT WHEN ON,
THIS LIGHT IS VERY STRONG.
Have Questions? Call 1-800-258-0344 | V. 3152018
3