NECID - PEROSH · In NECID different icons are used. An overview of these icons is given in table...
64
1 NECID Guidance Nano Exposure & Contextual Information Database Version 2.11 – September 2015
Transcript of NECID - PEROSH · In NECID different icons are used. An overview of these icons is given in table...

1
NECID Guidance
Nano
Exposure &
Contextual
Information
Database
Version 2.11 – September 2015

2
Contents 1 General information........................................................................................................................ 3
1.1 Introduction ............................................................................................................................ 3
1.2 Installation of NECID ............................................................................................................... 3
1.3 Starting NECID ......................................................................................................................... 6
1.4 Linkage in database ................................................................................................................. 7
1.5 Overview of icons and labeling ............................................................................................... 8
2 Measurement ................................................................................................................................ 11
2.1 Lay-out input forms ............................................................................................................... 11
2.2 Measurement series ............................................................................................................. 12
2.2.1 Activity .......................................................................................................................... 14
2.2.2 Premises ........................................................................................................................ 20
2.2.3 Material ......................................................................................................................... 39
2.2.4 Sample information ...................................................................................................... 45
2.2.5 Import raw data ............................................................................................................ 55
3 Protocol (PDF) ............................................................................................................................... 56
4 Timeline ......................................................................................................................................... 57
5 Data Exchange ............................................................................................................................... 58
6 Export (Excel) ................................................................................................................................ 59
7 Basic data Update ......................................................................................................................... 60
8 Overview of print screens ............................................................................................................. 61
9 Overview of tables ........................................................................................................................ 64

3
1 General information
1.1 Introduction For future research in studying exposure to manufactured nanoparticles, agglomerates and aggregates (NOAA), an occupational exposure database is needed. Developing such a database on an international level will enable and facilitate the future sharing of exposure data on NOAA. For this purpose, a PEROSH group led by IFA and TNO developed the NECID database. It supports the user to fulfill the requirements on information gathering for occupational exposure assessment and provides a general overview of results of exposure measurements against nanomaterial in different exposure situations. The exposure data of different research institutes in different countries will be collected and stored in a harmonized way.
The intended user group comprises research institutes and might be extended to third parties. In the project different user-specific rights and legal agreements for the handling and storage of data and the required IT security are addressed – as they play a critical role for the possibility of data sharing between multinational partners. NECID will provide a sustainable source of information for risk management and the development of occupational exposure benchmark levels/limits.
1.2 Installation of NECID Account and change of user profile Before NECID can be used the program should be installed on a computer. The first step is to request for an account at IFA. If the account is established a personal username and password is provided via email by IFA. Username and password should be used to login at http://necid.ifa.dguv.de/, see print screen 1.
Print Screen 1. Login screen for NECID.
After login you get the NECID welcome screen (print screen 2) where on the left on the screen a button can be found to change the user profile. If you want to change your user profile (e. g. your password) please do this before downloading the software. In the middle information is given how to install NECID on your computer and different options for download and update of the software are offered.

4
Take care to choose your right version “Download complete” delivers a version with an empty database. If NECID was already installed the danger of overwriting data is given. “Download program” delivers the new program and your data will be conserved.
Print screen 2. Welcome page NECID. 1: Button to change the user profile. 2: Download and update options to install NECID on your computer.
Print screen 3 presents the input form for the user profile. You have the possibility to change the user profile, the control question in case you have forgotten your password and the password. Before you are able to change the password you have to change the fields in the form ‘Change Question’ (see button 2 in print screen 3).
Print screen 3. Input form ‘User profile’. 1 Overview of user profile and possibility to change the user profile. 2. The possibility to change the question in case you have forgotten your password. 3. Possibility to get a new password.
The table below (table 1) gives an overview of the fields that could be changed.
2
1
3 2
1

5
Table 1. Fields and their explanations to be filled in for ‘User profile’. Field name Explanation Format Priority User name Give the user name Open text field High E-mail Give the e-mail address
of the user and can’t be changed.
High
First name Give users first name Open text field High Last name Give users last name Open text field High Comment Field to include
additional information. Open text field Low
! Important. Please save your entered data by clicking on the save icon. Otherwise, data will not be saved.
The sub form ‘Change Question’ (print screen 4) should be filled before changing your password.
Print screen 4. Sub form ‘Change question’.
The table below (table 2) gives an overview of the fields that could be changed.
Table 2. Fields and their explanations to be filled in for ‘Change question answer’. Field name Explanation Format Priority Password Use the password you
received with your account
Open text field High
Password Question Not adjustable High Password Answer Answer the question Open text field High
! Important. Please save your entered data by clicking on the save icon. Otherwise, data will not be saved.
The sub form ‘New Password’ (print screen 5) should be filled to change your password.

6
Print screen 5. Sub form ‘New Password’.
The table (table 3) below gives an overview of the fields that could be changed.
Table 3. Fields and their explanations to be filled in for ‘New password’. Field name Explanation Format Priority Password Answer Give the answer you
have saved in the sub form ‘Change Question’.
Open text field High
Password Give new password Open text field High Confirm Password Confirm the new
password by including the new password here again.
Open text field High
! Important. Please save your entered data by clicking on the save icon. Otherwise, data will not be saved.
User rights There are two types of user profiles: administrators and users. Administrator can change the institute wide lists on the web portal of NECID (e. g. lists of instruments of the institute).
Installation of NECID NECID can be driven under the operating systems MS Windows XP, Windows 7 (32 and 64 bit), Windows 8.0 + 8.1, Windows Server 2003 – 2008 R2. A guide to install NECID on your computer or on a server of the institute is given on the NECID website: http://necid.ifa.dguv.de/User/ErsteSeite.aspx .
1.3 Starting NECID After login you will see the following screen (print screen 6).

7
Print screen 6. Overview of NECID after login.
On the right you are able to choose one of the following actions:
- Measurement: Inclusion of measurement data in NECID - Protocol (PDF): Creation of PDF files of included measurement data - Timeline: Creation of the “timeline” of your input data including measurement results,
activities and use of RMM. - Data Exchange: Creation of a database exchange file to copy one or more measurement
series to another system - Export (Excel): Possibility to export data to Excel - Basic data Update: Possibility to update the basic data tables on your local NECID version.
Your stored measurement series will not be affected.
On the upper left of the screen you find two tabs: Program and Extra. Clicking on Program gives the opportunity to quit NECID. At the tab Extra you can check if an update is needed, by choosing `Check Update´. By doing so you will see which version you actually are using. Also a help function can be found here.
1.4 Linkage in database Figure 1 gives an overview of the linkage of information in the NECID database. Different measurements IDs can be linked with one study ID. Subsequently, one premise can be linked with one measurement ID and for each premise information can be linked to one or different locations and workers. Different activities can be linked to different use rates of materials which subsequently can be linked to one or more workers. Finally, the results from different collected samples and time series from different instruments can be linked to an activity with a specific use rate.
Risk management measures can be linked to one or more workers. The type of ventilation, used risk management measures and indoor conditions can be linked to one or more locations. Secondary sources can be linked to activities and finally ingredients can be linked to one or more materials.

8
Figure 1. Overview of linkage of information in the NECID database.
1.5 Overview of icons and labeling In NECID different icons are used. An overview of these icons is given in table 4.
Table 4. Description of the different icons and their function in NECID. Icon Function Description
New A new data entry is prepared
Save Save the content of the page of the database. If you do not use
this button, information might be lost.
Delete Delete the selected entry
Discard Discards to the last saved point
Plausibility check Starts the plausibility check about all fields in the selected
measurement series. All required fields without an input will be marked.
NECID help Link to the help file
Upload file Upload dialog to attach a file under the current caption
Open a saved file

9
Apply Apply the changes to the list
Scroll backwards to the previous entry
Scroll forwards to the next entry
Scroll up or down Scroll between header entries
Copy to clipboard The content of on the selected page is copied to the clipboard
Paste from clipboard
Paste the last content from the clipboard on the selected page
Choose activity Multiple choosing to assign one sample or worker to several
activities
Collapse
Expand
Plausibility sensed Plausibility is not sensed
Not entered The empty entry has to be filled
To go to field
Add to used material list
Apply changes to list
List tree open completely
Collapse List tree closed completely
Search
Search below Find the next hit below in the current search
Search above Find the next hit above in the current search
Check Possibility to select multiple entries
The permitted choice
Apply Apply the selected entry
Close Leave the window without a change.

10
The fields in NECID are labeled. The meaning of the labeling is:
- Label for a field with normal font: the input is voluntary. - Label for a field with BOLD font: the input is compulsory for plausibility check. - Label for a field with red BOLD font: the input is mandatory for save the data. - Label for a field which is underlined: with a double click help information for this field will be
shown.
! Important. Please save your entered data by clicking on the save icon at the right ribbon or the check icon at the middle ribbon. Otherwise, data will not be saved.

11
2 Measurement
2.1 Lay-out input forms To include data in NECID you have to go to ‘Measurement’. After clicking ‘Measurement’ you will get the screen ‘Measurement series’ (print screen 7):
Print screen 7. 1: Sitemap, 2: Fill in form, 3: List of entered measurement series, 4: Linkage of activity relationships, 5: Ribbon.
Each input form has the same lay-out. On top of the screen you find a ribbon on the right. On the left you find the sitemap (by clicking on ‘Measurement series’ it can be scrolled out of the screen), on the right an overview of the linkage of activity relationships (lower left side of the screen for small screen) and the fill in form (blank) in the center.
Help function The help function in NECID can be opened in different ways:
- On the right on the ribbon on top of the screen - By clicking F1 - Under ‘Extra’ on the upper left site of the screen. - Also a mouse-over is included for many of the buttons and expressions or abbreviations.
Options on the ribbon The ribbon on the right can be used to open a new data entry, save or delete data, discards to the last saved point, perform a plausibility check or go to the NECID help.
1
5
4
2
3

12
Sitemap The sitemap on the left gives an overview of the different input screens. By clicking on the sitemap you can go to the different input screens.
Linkage of activity relationship The linkage of activity relationship gives an overview of connections to an activity that you have made. By clicking on the activity tree, you can go to the input screens. On small screens this activity relationship is shown on the lower left side.
Fill in form In the middle of screen 7 you find the fill in form. New data should be included the fields here.
Lists of entered measurements series On the bottom there is a list of all measurement series. With double click, you can select a series and this series is showing in the Fill in form.
2.2 Measurement series To enter new data please click on the “white page” pictogram at the ribbon. Print screen 8 will be opened.
After including all the data in the input fields on the screen ‘Measurement’ you can start to define all the relevant contextual information of your sampling data, beginning with activity, the premises, the department, the location and task, risk management measures and personal protective equipment and occupational safety skill of the worker present (at the workplace). Finally, information regarding measurement instruments and the results of the measurements should be included. The sequence of entering data is as free as possible. Some IDs must be entered before subpages can be opened.
If your campaign belongs to a known research program, like an EU-project select a `Study ID´. If the Study ID does not exist ask your institute administrator to create one. Please load up a document of the used `Measurement strategy´ or enter your own measurement strategy in a document and load it up. From the grid lists at bottom a Measurement set can be opened with a double click.

13
Print screen 8. Input form ‘Measurement series’. 1: Ribbon to include new forms, delete forms or save information.
The table (table 5) below gives an overview of the fields on this screen:
Table 5. Fields and their explanations to be filled in for ‘Measurement series’. Field name Explanation Format Priority Measurement ID Identifier to uniquely
identify a set of measurements.
Generated by NECID based on institute and user.
High
Internal-code Free field for the linkage to an internal coding / reference number
Included by user Low
Study ID Identifier to identify the study. A study contains a set of measurement IDs. Suggested by your NECIDadmin
Drop-down menu High
Measurement strategy Up load the measurement strategy
DOC or PDF - File Medium
ENM of interest for this set of measurements
Select one or more nanomaterials form the OECD list
Drop-down menu and free text field
High
Measurement campaign Give a name for the measurement campaign. This is for your own use.
Open text field Low
Date campaign began Give the date of the start of the campaign
Format (DD.MM.YYYY) High
Date campaign ended Give the date of the end of the campaign
Format (DD.MM.YYYY) High
Information for measurement
File load up for additional documents or important information for measurement
Upload of Files Low
1

14
interpretation. Instruction for use of data
Give approval to whom is allowed to access and download the data: -Free for publication for all -Free for use to all project partners -Free for use to all project partners from date -Access to data only after authorization by the data owner/institute -Denied, only for data owner/institute -Denied, in progress -Denied, data not valid -No up-load, local storage only
Drop-down menu High
! Important. Please save your entered data by clicking on the save icon at the right. Otherwise, data will not be saved.
2.2.1 Activity Describe the activity or activities that are performed (see print screen 9). Different activities can be during a measurement ID and different measurement IDs can be included in one study. The functions on the ribbon (see print screen 9) can be used to add activities and scroll between the activities. Saved activities are listed below the input fields.
In the input form information to describe the activity or activities should be obtained, e.g. start and stop time, duration, substance used, a detailed description of the activity or activities based on source domain and activity class, distance to source and work pattern.
Please describe the “Work and process” done during the activity and scroll down to describe the “Exposure” you could observe during the activity. You can change a known activity by clicking on it in the list beneath the blank. At the column on the right you can find a list of activities that are linked (take care, it can be scrolled out of the screen). To see the list you have to close the plausibility check. By double clicking on the activity at the left column you can open a form to fill in secondary sources. This input form needs to be filled in for each activity that was measured within the same measurement series. To enter a new activity, please click on the “white page” pictogram at the ribbon.

15
Print screen 9. Input form ‘Activity’. 1: Ribbon to scroll between different activities and some other options. 2: Overview of included activities. 3: Ribbon to include new forms, delete forms or save information.
The table below (table 6) gives an overview of the fields that have to be filled in.
Table 6. Fields and their explanations to be filled in for ‘Activity’. Field name Explanation Format Priority Activity kind Indicate if ENM are handled
or a no nano activity is performed
Radio button High
Description Give a short description of the activity
Open text field Medium
Time start Give the time at the start of the activity
Format (hh/mm/ss) High
Time stop Give the time at the end of the activity
Format (hh/mm/ss) High
Activity duration The duration of the activity is automatically generated based of the time start and time stop.
Automatically generated n.a.
Total activity duration in shift
Give the total duration of the activity in one shift.
Open numeric field like 2.5
Low
Use of ENM Indicate if the activity is performed on a commercial or non-commercial scale and if the activity is production or down-stream-use of the ENM
Drop-down menu Low
Activity code Chose an activity code. By clicking on the magnifier you open a coding list for the activity class. By clicking on the ‘+’ icon you
Drop-down menu. Choosing an activity code will automatically fill some other fields.
High
1
2
3

16
will come to the source domain and at last to the specific activity class. Please be as specific as possible. See print screen 10 for more information.
Loading type Only asked for if relevant for activity
Drop-down menu Medium
Drop height Only asked for if relevant for activity
Drop-down menu Medium
Agitation Only asked for if relevant for activity: Movement and agitation of powders or granules; Activities with agitated surfaces; Activities with relatively undisturbed surfaces (no aerosol formation). Give the level of agitation: -High: high speed mechanical mixing, boiling and shaking of liquids, e.g. air sparging, pulse-air mixing, high shear mixing and inducing turbulence -Median: rapid, care-free or imprecise dipping, mechanical mixing, bubbling surfaces, aeration tanks, electroplating, -Low: slow, careful or precise dipping, manual stirring or mixing
Drop-down menu Medium
Spray technique Only asked for if relevant for activity. Give the spray technique: -Air-pressurized spraying: e.g.
Using compressed air to clean e.g. machines
-Airless or air-assisted airless spraying: e.g. paint spraying using HVLP or airless techniques; pest control operations using backpack -Techniques with (very) good transfer efficiencies: e.g. use of electrostatic spray equipment or High
Drop-down menu Medium

17
volume, low pressure spray equipment
Spray orientation Only asked for if relevant for activity
Drop-down menu Medium
Blasting technique Only asked for if relevant for activity
Drop-down menu Medium
Distance source to worker
Give the distance between the worker and the source of exposure.
Drop-down menu High
Automation level Only asked for if relevant for activity. Give the level of automation: -Remote working: -Automatic: -Semi automatic: -Manual with restriction: -Manual without restriction:
Drop-down menu Medium
Working pattern Only asked for if relevant for activity. Indicate if the work is performed: Automated: Manually: Discontinuous regular (interruptions): Discontinuous unregular (interruptions):
Drop-down menu Low
Process temperature Give the temperature in the room where the activity/process takes place
Open text field (only numbers)
Low
Process temperature Give the unit in which the temperature is expressed
Drop-down menu Low
Exposure pattern Give the exposure pattern: -Continuous: -Intermittent: -Occasional:
Drop-down menu Low
Exposure situation Only asked for if relevant for activity. Give the exposure situation: -None: -Normal: -Post positive: -Intended exposure: -Worst case: -Malfunction/incidence: -Testing facility:
Drop-down menu High
Remarks Field to include more information if needed regarding the performed activity.
Open text field Low

18
! Important. Please save your entered data by clicking on the save icon at the right. Otherwise, data will not be saved.
Print screen 10. By clicking on the magnifier behind ‘Activity code’ in print screen 9 you open a coding list for the different source domains. By clicking on the ‘+’ icon you will come to the more specific activity classes. With the icons at the top of the window all levels of specification can be opened or closed and search functions can be used. Please be as specific as possible. After selecting an activity the input fields will be automatically filled.
2.2.1.1 Second source For each described activity, one or more secondary sources of exposure can be described in the form ‘Second source’ (see print screen 11). Different secondary sources can be described for one study and one or more secondary sources can be linked to one or more of the described activities. The type of source, place of the source and the distance from the source to the measurement devices should be included in the form.
The functions on the ribbon (see print screen 11) can be used to add secondary sources and scroll between the different secondary sources. Saved secondary sources are listed below the input fields for the different activities. Use the upward or downward arrows at the ribbon to select an activity and then on the “white page” pictogram at the ribbon.

19
Print screen 11. Input form ‘Second source’. 1; Ribbon to scroll between different secondary sources and some other options. 2: Overview of included secondary sources. 3 Ribbon to include new forms, delete forms or save information.
The table below (table 7) gives an overview of the fields that have to be filled in.
Table 7. Fields and their explanations to be filled in for ‘Second source’. Field name Explanation Format Priority Secondary source type
Indicate the type of secondary source: -Machine -Worker -Electro motor (drill machine,..) -Diesel engine (fork lifter, truck,..) -Gas engine (fork lifter, generator,…) -Sprays (spraying, high pressure cleaner, atomize, humidifier,…) -Condensate (solvents,…) -Heater (radiant heater,…) -Metal processing (welding, grinding,….) -Open flame processes -Other hot processes (plastic welding, foil shrinking, hot air gun,…) -Other activity at the same time with ENM -Other activity at the same time without ENM
Drop-down menu Medium
Place of the secondary source
Indicate if the location is: - Workroom indoor: Both the source and the worker are
Drop-down menu Medium
1
2
3

20
located indoors. The indoor environment should be enclosed by walls on each side and a roof on top. A cabin or a room should be treated as an indoor environment. -Area indoor: Both the source and the worker are located indoors. The indoor environment should be enclosed by walls on each side and a roof on top. A garage or production hal should be treated as an workroom indoor. -Area outdoor: Both the source and the worker are located outdoors. The outdoor environment could be enclosed by one or two walls and/or a roof on top. A carport or production hall should be treated as an indoor environment.
Distance source to measurement device
Give the distance from the source to the measurement device.
Drop-down menu Medium
Second work pattern Indicate if the work is performed: -Continuous -Discontinuous regular -Discontinuous irregular -Only manual
Drop-down menu Low
Remarks Field to include more information if needed regarding the secondary source in relation to the measurement devices or the performed activity.
Open text field Low
! Important. Please save your entered data by clicking on the save icon at the right ribbon. Otherwise, data will not be saved.
2.2.2 Premises For each measurement set the details of one premise should be described (see print screen 12).
Information regarding the premises like general information (e.g. name, place, country), premises size and branch code needs to be filled in for each premises where the measurements took place within the same measurement series. To enter a new premises please click on the “white page”

21
pictogram at the ribbon and give the premises an ID number and a name or select a known premises from the list beneath the blank.
Print screen 12. Input form ‘Premises’. 1, Overview of included premises. 2; Ribbon to include new forms, delete forms or save information.
The table below (table 8) gives an overview of the fields that have to be filled in.
Table 8. Fields and their explanations to be filled in for ‘Premises’. Field name Explanation Format Priority Premises ID Give an ID to the premises Open text field
(only numbers) High
Premises name Give the name of the premises Open text field Low Confidentiality regarding company information
Give approval to whom is allowed to access and download the company information data.
Drop-down menu High
Acronym Include an acronym for the premises in case of confidentiality issues.
Open text field Low
Department name
Give a name to the department where the measurements are performed.
Open text field Low
City/town Enter the city where the premise is located.
Open text field Low
Country Enter the country where the premise is located.
Drop-down menu High
Premise size Number of workers in the premise. Open text field Low No of workers category
This field is automatically filled depending on ‘Premises size’
Drop-down menu, or automatically filled
n.a.
Total number of workers exposed
Give the total number of workers exposed to nanomaterials
Open text field Low
Total number of workers
This field is automatically filled depending on ‘Total number of workers
Drop-down menu, or
n.a.
2
1

22
exposed’ automatically filled
Detailed process description
Give an in depth description of the process the measurement is performed.
Open text field Low
Branch-code Please enter a branch-code. By clicking on the magnifier you open a coding list of the Industrial Classification system NACE industries. At the beginning you see the several industry divisions. By clicking on the plus icon you will come to the major group, the industry group and at least to the specific industry. Please be as specific as possible. The NACE – Code is the EU classification of economic activities: http://ec.europa.eu/competition/mergers/cases/index/nace_all.html Please, see print screen 13.
Drop-down menu Low
Shift duration Give the duration of the shift. Open text field (only numbers)
Low
Number of shift per day
Give the number of shift performed per day.
Open text field (only numbers)
Low
Remarks Field to include additional information if needed regarding the premise.
Open text field Low
! Important. Please save your entered data by clicking on the save icon at the right ribbon. Otherwise, data will not be saved.
Print screen 13. By clicking on the magnifier behind ‘Branche code’ in print screen 12 you open a coding list of the Industrial Classification system NACE industries. At the beginning you see the several

23
industry divisions. By clicking on the plus icon you will come to the major group, the industry group and at least to the specific industry. Please be as specific as possible. The NACE – Code is the EU classification of economic activities: http://ec.europa.eu/competition/mergers/cases/index/nace_all.html
2.2.2.1 Location For each premise one or more locations can be described (see print screen 14).
Information about for example the type of the location, room size the number of workers and the general housekeeping should be included for each location where measurements took place. For one premise different locations can be defined simply by clicking on the “white page” pictogram at the ribbon again. To enter a new location please click on the “white page” pictogram at the ribbon and give the location a name or select a known location from the list beneath the blank.
Print screen 14. Input form ‘Locations’. 1; Ribbon to scroll between different locations and some other options. 2: Overview of included locations. 3 Ribbon to include new forms, delete forms or save information.
The table below (table 9) gives an overview of the fields that have to be filled in.
Table 9. Fields and their explanations to be filled in for ‘Locations’. Field name Explanation Format Priority Location name Give a name for the location Open text field Low Description of the workplace
Give a general description of the location and the different activities performed at that location
Open text field Low
Location type Indicate if the location is: - Workroom indoor: Both the source and the worker are located indoors. The indoor
Drop-down menu High
2
1
3

24
environment should be enclosed by walls on each side and a roof on top. A cabin or a room should be treated as an indoor environment. -Area indoor: Both the source and the worker are located indoors. The indoor environment should be enclosed by walls on each side and a roof on top. A garage or production hall should be treated as an workroom indoor. -Area outdoor: Both the source and the worker are located outdoors. The outdoor environment could be enclosed by one or two walls and/or a roof on top. A carport or production hall should be treated as an indoor environment.
Room length This field is optional Open text field (only numbers)
Low
Room width This field is optional Open text field (only numbers)
Low
Room height This field is optional Open text field (only numbers)
Low
Room volume This field can automatically be filled based on room length, width and height, a number can be included, or a drop-down menu can be used
Automatically filled, open text field (only numbers) or drop-down menu
High
Description of the activities/processes
Give an in depth description of the activities or processes that took place during the measurement at this location
Open text field Low
Location drawing Here you can (one by one) upload a sketch or drawing of the location including the position of used devices, risk managements measures, position of the worker etc.
Download Low
Pictures You can (one by one) upload pictures of the location.
Download Low
No. of workers present Indicate the total number of workers present at the location during the measurement
Open text field (only numbers)
Low
No. of involved workers Indicate the number of workers that were involved in the ENM
Open text field (only numbers)
Low

25
handling or processing during the measurement
General housekeeping Indicate the level of general housekeeping and especially consider cleaning practices and contamination of surfaces with dust: - Poor: e.g. no specific cleaning practices, no protective clothing that repel spills, process not fully enclosed) -Average: -General good housekeeping practices: -Demonstrable and effective housekeeping practices: examples include daily cleaning using appropriate methods (e.g. vacuum), preventive maintenance of machinery and control measures, and use of protective clothing that will repel spills and reduce personal cloud -Process fully enclosed: The containment is not breached for example for sampling or routine cleaning The default is set at no specific cleaning practices, process not fully enclosed.
Drop-down menu Medium
Remarks Field to include any additional remarks or information about location.
Open text field Low
! Important. Please save your entered data by clicking on the save icon at the right ribbon. Otherwise, data will not be saved.
2.2.2.1.1 RMM For each location in a premise one or more risk management measures (RMMs) can be described. First select a location (see print screen 15 (button 1)) and subsequently include information regarding the RMMs. RMMs can be linked to one or more activities.
In the input form ‘RMM’ the opportunity to include an activity is given. The user is then redirected to the input form ‘Activity’. To enter a risk management measure (RMM) please click on the “white

26
page” pictogram at the ribbon or select a known RMM from the list beneath the blank. Please define the start time and stop time the RMM were applied.
In the input form there are 3 sub forms that should be completed: Ventilation (print screen 16), Local control (print screen 17) and Indoor condition (print screen 18). Information regarding ventilation, e.g. efficiency rate, number of air changes per hour and level of aggregation should be included in the sub form ‘Ventilation’. In the sub form ‘Local control’ information about the type of control that is used and some details about the control should be included. Finally information like humidity, temperature, air pressure and air velocity can be included in the sub form ‘Indoor climate’.
Print screen 15. Input form ‘RMM’. 1; Ribbon to scroll between different locations. 2: Ribbon to scroll between different RMMs and some other options. 3 Ribbon to include new forms, delete forms or save information. 4: Possibility to include additional activities. 5: Sub forms ‘Ventilation’, ‘Local control’ and ‘Indoor condition’. 6: Overview of included RMM.
The table below (table 10) gives an overview of the fields that have to be filled in as general information that is the same for all sub forms.
Table 10. Fields and their explanations to be filled in for ‘RMM’. Field name Explanation Format Priority Activity If an additional activity
should be included then the user can used button 4 from print screen 15.
Drop-down menu High
Time start This field can automatically be filled based information from the input form ‘Activity’. It is possible to change the time manually.
Automatically filled or open text field (only numbers) format (hh/mm)
High
Time stop This field can automatically be filled based information from
Automatically filled or open text field (only numbers) format
High
2
6
3
4
5
1

27
the input form ‘Activity’. It is possible to change the time manually.
(hh/mm)
! Important. Please save your entered data by clicking on the save icon at the right ribbon. Otherwise, data will not be saved.
Then some specific information is asked for the different sub forms. Print screen 16 presents sub form ‘Ventilation’.
Print screen 16. Sub form RMM – Ventilation. 1: List of RMM.
The table below (table 11) gives an overview of the fields that have to be filled for RMM – sub form ‘Ventilation’.
Table 11. Fields and their explanations to be filled in for RMM – sub form ‘Ventilation’. Field name Explanation Format Priority General ventilation Indicate the type of
general ventilation: -none ventilation -natural ventilation-doors or windows open -natural ventilation-doors or windows closed -natural ventilation-outdoor working -mechanical ventilation
Drop-down menu High
Efficiency of room ventilation
Indicate the level of efficiency: -Poor -Average -High
Drop-down menu Medium
Air changes Give the number of air Open text field (only Low
1

28
changes per hour. numbers) Filter Only asked for if
mechanical ventilation is selected. Indicate if a filter is used in the mechanical ventilation system.
Yes / no option Low
Recirculating air Only asked for if mechanical ventilation is selected. Indicate if the air is recirculated.
Yes / no option Low
Filter group Only asked for if mechanical ventilation is selected and filter selected as ‘yes’. Indicate the type of filter: -F=Dust spot efficiency filters -G=Arrestance filters -H=HEPA filters -U=ULPA filters
Drop-down menu Low
Filter class Only asked for if mechanical ventilation is selected and filter selected as ‘yes’. Indicate the class of filter that is used. The filters that can be selected depends of type of filter selected
Drop-down menu Low
Segregation Indicate the level of segregation which is the level of isolation of the emission source from the worker: -None segregation -Partial segregation without ventilation -Partial segregation with ventilation -Complete segregation without exhaust ventilation -Complete segregation with exhaust ventilation and no air circulation
Drop-down menu Medium
Air velocity at the opening of room ventilation
Give the air velocity in m/s at the opening of the room ventilation.
Open text field (only numbers)
Low
Remarks Field to include additional information regarding ventilation.
Open text field Low

29
! Important. Please save your entered data by clicking on the save icon at the right ribbon. Otherwise, data will not be saved.
Print screen 17 presents sub form ‘Local control’.
Print screen 17. Sub form RMM – Local control. 1: Buttons to add or delete a local control. 2: Overview of saved local controls 3: List of RMM.
The table below (table 12) gives an overview of the fields that have to be filled for RMM – sub form ‘Local control’.
Table 12. Fields and their explanations to be filled in for RMM – sub form ‘Local control’. Field name Explanation Format Priority Used control Indicate the RMM that is used:
0 No localized controls 1 Containment – no extraction 1.1 Low level containment 1.2 Medium level containment 1.3 High level containment 2 Local ventilation systems (LEV) 2.1 Receiving hoods 2.1.1 Canopy hood 2.1.2 Other receiving hoods 2.2 Capturing hoods 2.2.1 Fixed capturing hood 2.2.2 Movable capturing hood 2.2.3 On-tool extraction 2.3 Enclosing hoods 2.3.1 Fume cupboard 2.3.2 Horizontal / downward laminar flow booth 2.3.3 other enclosing hoods 2.4 Other LEV systems 4 Suppression techniques
Drop-down menu High
1
2
3

30
4.1 Wetting at the point of release 4.2 Knock-down suppression 5 Glove bags and glove boxes 5.1 Glove bag 5.1.1 Glove bag (non-ventilated) 5.1.2 Glove bag (ventilated or kept under negative pressure) 5.2 Glove box 5.2.1 Low-specification glove box 5.2.2 Medium-specification glove box 5.2.3 High-specification glove box
Definition After selecting a RMM a description and a picture of the RMM is given automatically
n.a.
Filter Only asked for if RMM 2, 2.1, 2.1.1, 2.1.2, 2.2, 2.2.1, 2.2.2, 2.2.3, 2.3, 2.3.1, 2.3.2 2.3.3, 2.4, 5.1.2, 5.2, 5.2.1, 5.2.2 or 5.2.3 is selected. Indicate if a filter is used.
Yes / no option Low
Recirculating air Only asked for if RMM 2, 2.1, 2.1.1, 2.1.2, 2.2, 2.2.1, 2.2.2, 2.2.3, 2.3, 2.3.1, 2.3.2 2.3.3, 2.4, 5.1.2, 5.2, 5.2.1, 5.2.2 or 5.2.3 is selected. Indicate if the air is recirculated.
Yes / no option Low
Filter group Only asked for if RMM 2, 2.1, 2.1.1, 2.1.2, 2.2, 2.2.1, 2.2.2, 2.2.3, 2.3, 2.3.1, 2.3.2 2.3.3, 2.4, 5.1.2, 5.2, 5.2.1, 5.2.2 or 5.2.3 is selected. Indicate the type of filter: -F=Dust spot efficiency filters -G=Arrestance filters -H=HEPA filters -U=ULPA filters
Drop-down menu Low
Filter class Only asked for if RMM 2, 2.1, 2.1.1, 2.1.2, 2.2, 2.2.1, 2.2.2, 2.2.3, 2.3, 2.3.1, 2.3.2 2.3.3, 2.4, 5.1.2, 5.2, 5.2.1, 5.2.2 or 5.2.3 is selected. Indicate the class of filter that is used. Class of filter that can be selected depends of type of filter selected.
Drop-down menu Low
Efficiency of this ventilation
Only asked for if RMM 2, 2.1, 2.1.1, 2.1.2, 2.2, 2.2.1, 2.2.2, 2.2.3, 2.3, 2.3.1, 2.3.2 2.3.3, 2.4, 5.1.2, 5.2, 5.2.1, 5.2.2 or 5.2.3 is
Drop-down menu Low

31
selected. Indicate the efficiency of the ventilation: -poor -medium -high
Air velocity at the opening of the machine ventilation
Only asked for if RMM 2, 2.1, 2.1.1, 2.1.2, 2.2, 2.2.1, 2.2.2, 2.2.3, 2.3, 2.3.1, 2.3.2 2.3.3, 2.4, 5.1.2, 5.2, 5.2.1, 5.2.2 or 5.2.3 is selected. Give the air velocity in m/s at the opening of the machine ventilation.
Open text field (numbers only)
Low
Volume flow Only asked for if RMM 2, 2.1, 2.1.1, 2.1.2, 2.2, 2.2.1, 2.2.2, 2.2.3, 2.3, 2.3.1, 2.3.2 2.3.3, 2.4, 5.1.2, 5.2, 5.2.1, 5.2.2 or 5.2.3 is selected. Give the volume flow of the local control, in the next field the unit should be indicated.
Open text field (numbers only
Low
Remarks Field to include additional information regarding local control.
Open text field Low
! Important. Please save your entered data by clicking on the save icon at the right ribbon. Otherwise, data will not be saved.
Print screen 18 presents sub form ‘Indoor conditions’.
Print screen 18. Sub form RMM – Indoor conditions. 1: List of RMM.
The table below (table 13) gives an overview of the fields that have to be filled for RMM – sub form ‘Indoor conditions’.
1

32
Table 13. Fields and their explanations to be filled in for RMM – sub form ‘Indoor conditions’.
Field name Explanation Format Priority Relative humidity Give the average
humidity in the working environment
Open text field (numbers only)
Medium
Air velocity at the working spot
Give the average air velocity in m/s.
Open text field (numbers only)
Medium
Airflow direction Indicate the most dominant airflow direction with regard on source and worker.
Drop-down menu Medium
Temperature Give the temperature in the working environment
Open text field (numbers only)
Medium
Temperature Indicate if temperature is given in degrees celcius or kelvin
Drop-down menu Medium
Air pressure Give the air pressure in the working environment in hPa
Open text field (numbers only)
Low
Remarks to indoor climate
Field to include additional information regarding the indoor climate.
Open text field Low
! Important. Please save your entered data by clicking on the save icon at the right ribbon. Otherwise, data will not be saved.
2.2.2.2 Worker For each premise information for one or more workers can be included (see print screen 19). Please describe the job code and the level of training of the worker in the use of PPE and RPE. Subsequently more detailed information about the used PPE and RPE can be included (paragraph 2.2.2.2.1).

33
Print screen 19. Input form ‘worker’. 1: Ribbon to scroll between different workers and some other options. 2: List of workers.
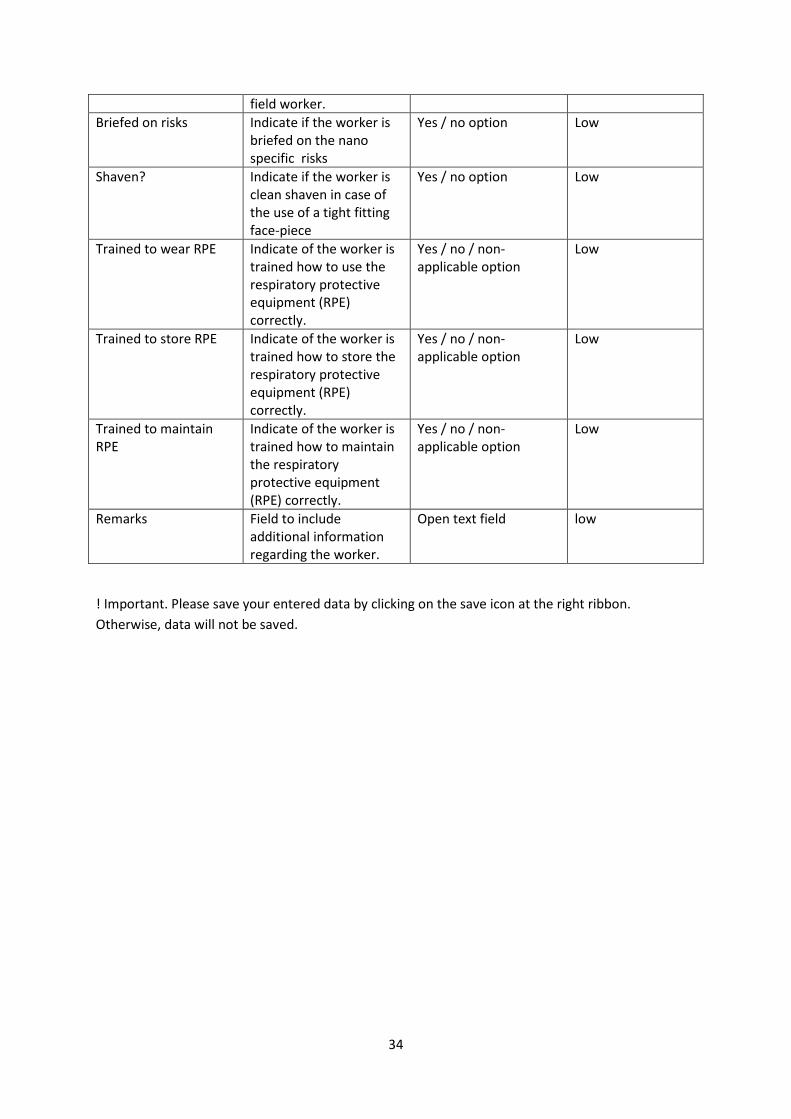
The table below (table 14) gives an overview of the fields that have to be filled for ‘Worker’.
Table 14. Fields and their explanations to be filled in for ‘Worker’. Field name Explanation Format Priority Job title Give a description of the
job title of the worker Open text field Low
Worker Number Give a number to the worker
Open text field (numbers only)
High
ISCO job title Please select a ISCO job title. By clicking on the magnifier behind ‘ISCO Job code’ you will open a coding list form SVZ-ISCO, see print screen 20. Please be as specific as possible.
Drop-down menu High
Trained to PPE Indicate how trained and experienced a worker is: -trained and experienced -trained and unexperienced -untrained and experienced -untrained and unexperienced If a worker is trained should be asked to the worker, experience should be observed during field work by the
Drop-down menu Low
1
2
34
field worker. Briefed on risks Indicate if the worker is
briefed on the nano specific risks
Yes / no option Low
Shaven? Indicate if the worker is clean shaven in case of the use of a tight fitting face-piece
Yes / no option Low
Trained to wear RPE Indicate of the worker is trained how to use the respiratory protective equipment (RPE) correctly.
Yes / no / non-applicable option
Low
Trained to store RPE Indicate of the worker is trained how to store the respiratory protective equipment (RPE) correctly.
Yes / no / non-applicable option
Low
Trained to maintain RPE
Indicate of the worker is trained how to maintain the respiratory protective equipment (RPE) correctly.
Yes / no / non-applicable option
Low
Remarks Field to include additional information regarding the worker.
Open text field low
! Important. Please save your entered data by clicking on the save icon at the right ribbon. Otherwise, data will not be saved.

35
Print screen 20. By clicking on the magnifier behind ‘ISCO Job code’ in print screen 19 you open a coding list form SVZ-ISCO. At the beginning you see major divisions. By clicking on the plus icons you will come to more detailed descriptions. Please be as specific as possible.
2.2.2.2.1 Expos and PPE For each individual worker information regarding the use of PPE can be included (see print screen 21). This worker can be linked to one or more activities.
Print screen 21. Input form ‘Expos and PPE’. 1: Ribbon to scroll between different workers and the activities for each worker and some other options. 2: List of workers and the use of PPE for each activity. 3: Possibility to include additional activities.
2
1
3

36
The table below (table 15) gives an overview of the fields that have to be filled in:
Table 15. Fields and their explanations to be filled in for input form ‘Expos and PPE’. Field name Explanation Format Priority Activity Indicate the activity the worker is
performing. These activities are included in the input form ‘Activity’. If an additional activity should be included then the user can use button 3 from print screen 21.
Drop-down menu High
Work start The field is automatically filled based on the activity selected. However, the user is able to adapt/fill in the time manually.
Automatically filled or open text field (numbers only)
n.a.
Work stop The field is automatically filled based on the activity selected. However, the user is able to adapt/fill in the time manually.
Automatically filled or open text field (numbers only)
n.a.
Working time The field is automatically filled based on the start and stop time of the work
Automatically filled or open text field (numbers only)
n.a.
Remarks Open text field to include additional information regarding the working time
Open text field Low
Separation/personal enclosure
Indicate the level of separation/personal enclosure: -None separation -Partial separation without ventilation -Partial separation with ventilation -Complete separation without ventilation -Complete separation with ventilation
Drop-down menu Medium
Type of RPE Select the type of RPE that is used: -None (this is the default in case no information is available) -Respirator/Filtering Face Piece (FFP1) -Respirator/Filtering Face Piece (FFP2) -Respirator/Filtering Face Piece (FFP3) -Respirator/half mask, particle filter (FMP1 or P1) -Respirator/half mask, particle filter (FMP2 or P2) -Respirator/half mask, particle filter (FMP3 or P3) -Respirator/Full face mask, particle filter (P1) -Respirator/Full face mask, particle filter (P2) -Respirator/Full face mask, particle filter (P3) -Respirator/powered(fan-assisted
Drop-down menu Medium

37
mask)(TM1P) -Respirator/powered(fan-assisted mask)(TM2P) -Respirator/powered(fan-assisted mask)(TM3P) -Respirator/powered(fan-assisted hood)(TH1P) -Respirator/powered(fan-assisted hood)(TH2P) -Respirator/powered(fan-assisted hood)(TH3P) -Breathing apparatus/constant flow airline BA (LDH1) -Breathing apparatus/constant flow airline BA (LDH2,LDM1,LDM2 or half mask) -Breathing apparatus/constant flow airline BA (LDH3,LDM3, hood or full mask) -Breathing apparatus/constant flow airline BA (suit) -Breathing apparatus/continuous flow airline(BA, 1A, 1B) -Breathing apparatus/continuous flow airline(BA, 2A, 2B) -Breathing apparatus/continuous flow airline(BA, 3A, 3B) -Breathing apparatus/continuous flow airline(BA, 4A, 4B) -Breathing apparatus/half mask/Demand valve BA (Airline or self-contained) -Breathing apparatus/full face mask/ Demand valve BA (Airline or self-contained), with positive pressure -Breathing apparatus/full face mask/ Demand valve BA (Airline or self-contained), without positive pressure -Other, specify
RPE model Use this field if the option ‘Other: specify’ is selected in the previous drop-down menu
Open text field Low
Face-piece fit testing
Indicate if the wearer of a tight-fitting face-piece has undergone face-piece fit testing
Yes / No / non-applicable option
Low
Other PPE Indicate if another PPE is used with a respirator or a breathing apparatus.
Yes / No / non-applicable option
Low
Goggles Only asked for is question ‘Other PPE’ is answered with ‘yes’. Indicate the type of goggles that is used:
Drop-down menu Low

38
-None -Eye-protectors, spectacles -Goggles, type 4 against dusts -Goggles, type 5 against gases, fumes, aerosols -Eye-shield attached to industrial helmet
Does the wearer use optic spectacles
Only asked for is question ‘Other PPE’ is answered with ‘yes’. Indicate if the wearer uses optic spectacles.
Yes / No option Low
Face shield Only asked for is question ‘Other PPE’ is answered with ‘yes’. Indicate if the wearer uses a face shield.
Yes / No option Low
Hearing protection Only asked for is question ‘Other PPE’ is answered with ‘yes’. Indicate if the wearer uses: -None -Hearing protection, ear plugs -Hearing protection, ear muffs -Ear muffs attached to industrial helmet -Eye-shield attached to industrial helmet
Drop-down menu Low
Helmet Only asked for is question ‘Other PPE’ is answered with ‘yes’. Indicate if the worker wears a helmet.
Yes / No option Low
Type of coverall Indicate the type of coverall: -None -None protective work wear -Coverall (Chemical type 1) -Coverall (Chemical type 2) -Coverall (Chemical type 3) -Coverall (Chemical type 4) -Coverall (Chemical type 5) -Coverall (Chemical type 6) -Coverall (heat and flame) -Coverall (mechanical) -Coverall (heat and flame) -other: specify
Drop-down menu Low
Type of gloves Indicate the type of gloves: -None -Disposable gloves -Gloves (Chemical) -Gloves (Mechanical) -Gloves (Heat and flame) -Other: specify
Drop-down menu Low
Remarks on PPE Field to include additional information regarding the use of PPE.
Low

39
! Important. Please save your entered data by clicking on the save icon at the right ribbon. Otherwise, data will not be saved.
2.2.3 Material For each material (print screen 22) and the ingredients (print screen 23) of materials information should be included in NECID.
Print screen 22. Input form ‘Material’. 1: Ribbon to scroll between different materials and some other options. 2: Button to include ingredients, linked to the selected material. 3: Overview of included materials and ingredients.
The table below (table 16) gives an overview of the fields that have to be filled in.
Table 16. Fields and their explanations to be filled in for input form ‘Material’. Field name Explanation Format Priority Confidential of material
Indicate the confidentiality of the material: -Free for NECID -Only categorized material information free for NECID -Confidential (only for institute)
Drop-down menu High
Nano material Indicate if the material handled is a nano material. In case ‘No’ is selected, some questions will disappear as they are not relevant in that case.
Yes / No option High
Purity of material Indicate if a pure or raw material is used or a material containing different ingredients.
Yes / No option High
1
3
2

40
Product name Give the common substance or product name.
Open text field High
OECD Indicate the material handled based on the OECD list.
Drop-down menu High
Product form Indicate the form of the product: - liquid -powder -solid object -fibers -paste
Drop-down menu High
Version code Give the version code of the product.
Open text field Low
Product trade name Give the name of the product as it is traded
Open text field Low
Kind of density Select a category of density: -Bulk -Elemental -Agglomerate
Drop-down menu Low
Density Give the density of the material.
Open text field (numbers only)
Low
Density Indicate if the density is in g/cm3 or kg/m3
Drop-down menu Low
Molecular mass Give the molecular mass of the product.
Open text field (numbers only)
Low
BET Give the Brunauer-Emmett-Teller(BET) surface area.
Open text field (numbers only)
Low
BET Indicate the unit in which the BET is expressed.
Drop-down menu Low
Particle size Give the initial particle size of the product
Open text field (numbers only)
Medium
Volume specific surface area
Give the Volume specific surface area.
Open text field (numbers only)
Low
Coating Indicate if the product is coated.
Yes / No option Medium
Doping Indicate if the product is doped. Adding impurities to substance (semiconductor) in order to produce or modify its properties
Yes / No option Medium
Remarks Field to include additional information regarding the used material.
Open text field Low
Viscosity Only asked for if for ‘Product form’ the answer ‘liquid’ or ‘Paste’ is selected. Indicate the viscosity: -Low viscosity: like water -Medium viscosity: like oil -High viscosity: like resin or
Drop-down menu Medium
41
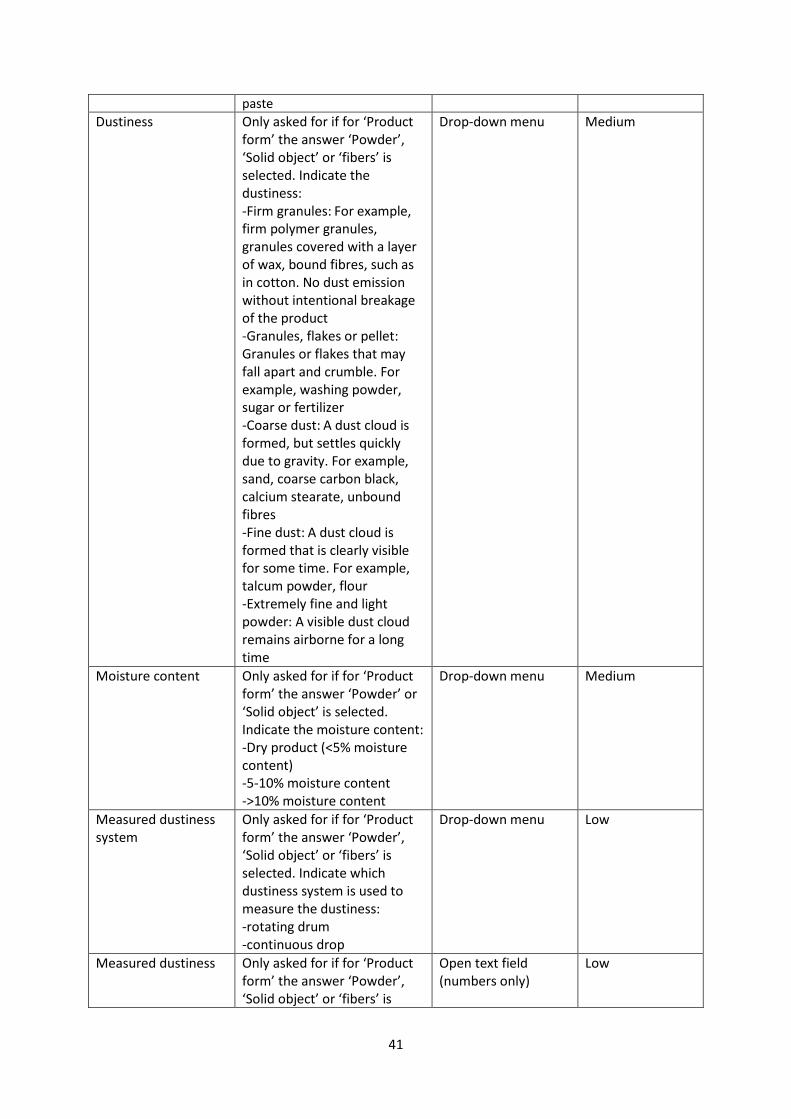
paste Dustiness Only asked for if for ‘Product
form’ the answer ‘Powder’, ‘Solid object’ or ‘fibers’ is selected. Indicate the dustiness: -Firm granules: For example, firm polymer granules, granules covered with a layer of wax, bound fibres, such as in cotton. No dust emission without intentional breakage of the product -Granules, flakes or pellet: Granules or flakes that may fall apart and crumble. For example, washing powder, sugar or fertilizer -Coarse dust: A dust cloud is formed, but settles quickly due to gravity. For example, sand, coarse carbon black, calcium stearate, unbound fibres -Fine dust: A dust cloud is formed that is clearly visible for some time. For example, talcum powder, flour -Extremely fine and light powder: A visible dust cloud remains airborne for a long time
Drop-down menu Medium
Moisture content Only asked for if for ‘Product form’ the answer ‘Powder’ or ‘Solid object’ is selected. Indicate the moisture content: -Dry product (<5% moisture content) -5-10% moisture content ->10% moisture content
Drop-down menu Medium
Measured dustiness system
Only asked for if for ‘Product form’ the answer ‘Powder’, ‘Solid object’ or ‘fibers’ is selected. Indicate which dustiness system is used to measure the dustiness: -rotating drum -continuous drop
Drop-down menu Low
Measured dustiness Only asked for if for ‘Product form’ the answer ‘Powder’, ‘Solid object’ or ‘fibers’ is
Open text field (numbers only)
Low

42
selected. Give the measured dustiness.
Measured dustiness Only asked for if for ‘Product form’ the answer ‘Powder’, ‘Solid object’ or ‘fibers’ is selected. Indicate which unit is used to express the dustiness: -mg/kg
Drop-down menu Low
! Important. Please save your entered data for each individual material and ingredient by clicking on the save icon at the right ribbon. Otherwise, data will not be saved.
Print screen 23. Input form ‘Material’ sub form ‘Ingredients’. 1: Ribbon to scroll between different ingredients and some other options. 2: Overview of included materials and ingredients.
The table below (table 17) gives an overview of the fields that have to be filled in:
Table 17. Fields and their explanations to be filled in for input sub form ‘Ingredients’. Field name Explanation Format Priority Nano material Indicate if the ingredient
is a nano material. In case ‘No’ is selected, some questions will disappear as they are not relevant in that case.
Yes / No option High
Pure material/substance or mixture
Indicate if a pure or raw ingredient is used or a material is a mixture of different ingredients.
Yes / No option High
Product name Give the common substance or product name.
Open text field High
2
1

43
Version code Give the version code of the product.
Open text field Low
CAS Give the Chemical Abstracts Service (CAS)-number
Format, only numbers Low
Concentration Give the concentration of this ingredient in the product
Open text field (numbers only)
High
Concentration Indicate which unit is used to express the concentration: -%mass -%vol
Drop-down menu High
Molecular mass Give the molecular mass of the product in g/mol.
Open text field (numbers only)
Low
BET Give the Brunauer-Emmett-Teller(BET) surface area.
Open text field (numbers only)
Low
BET Indicate the unit in which the BET is expressed.
Drop-down menu Low
Particle size Give the initial particle size of the ingredient.
Open text field (numbers only)
Medium
Volume specific surface area
Give the Volume specific surface area.
Open text field (numbers only)
Low
Coating Indicate if the product is coated.
Yes / No option Medium
Doping Indicate if the product is doped. Doping a special type of coating where metal atoms take over the place of some product atoms in the structure.
Yes / No option Medium
Remarks Field to include additional information regarding the used ingredient.
Open text field Low
! Important. Please save your entered data for each individual material and ingredient by clicking on the save icon at the right ribbon. Otherwise, data will not be saved.
2.2.3.1 Material used rate For each activity the used material and use rate should be described, see print screen 24. Already included activities are linked with already included materials. Subsequently, the amount and use rate should be filled in.

44
Print screen 24. Input form ‘Material used rate’. 1: Ribbon to scroll between different use rates. 2: Ribbon to add, delete and change information for the used materials. 3: Overview of included used materials. 4: Possibility to include additional activities.
The table below (table 18) gives an overview of the fields that have to be filled in:
Table 18. Fields and their explanations to be filled in for input form ‘Material used rate’. Field name Explanation Format Priority Activity Indicate the activity the worker
is performing. These activities are included in the input form ‘Activity’. If an additional activity should be included then the user can use button 4 from print screen 24.
Drop-down menu High
Productname Select the product used during the activity. The products presented in the list are the products included in the input form ‘Material’.
Drop-down menu High
Product ID Automatically filled based on input form ‘Material’
n.a.
Product form Automatically filled based on input form ‘Material’
n.a.
Product type Automatically filled based on input form ‘Material’
n.a.
Nano material Automatically filled based on input form ‘Material’
n.a.
Count of ingredients
Automatically filled based on input form ‘Material’
n.a.
Used as Indicate if the amount of material that is used is the: -Input: Amount of material going into the system.
Drop-down menu High
1
2
3
4

45
-Output: Amount of material going out of the system. -Handled material: Amount of material actually used.
Used amount Give the amount of product that is used.
Open text field (numbers only)
High
During chosen activity
Give the unit of the used amount: -mg: milligram -g: gram -kg : kilogram -t: ton -ml: milliliter -l: liter -m3: cubic meter.
Drop-down menu High
! Important. Please save your entered data by clicking on the save icon at the right ribbon. Otherwise, data will not be saved.
2.2.4 Sample information The forms ‘Sample information’, ‘Sample link’ and ‘Analytical results’ can be used to include data from off-line measurements to NECID. For each sample information about the measurement location, used instruments and measurement time should be included in the form ‘Sample information’, see print screen 25. If more than one instrument should be included, then different forms should be completed.
Print screen 25. Input form ‘Sample information’. 1: Ribbon to scroll between samples and some other options. 2: Overview of included samples.
The table below (table 19) gives an overview of the fields that have to be filled in:
2
1

46
Table 19. Fields and their explanations to be filled in for input form ‘Sample information. Field name Explanation Format Priority Measuring point name
Give a name to the point where one or more measurements are performed of samples are collected
Open text field and drop-down menu.
High
Original sampling ID Free text field to include the original sampling ID
Open text field Low
Sampling start Starting date (DD.MM.YYYY) and time (HH.MM.SS) of the sampling
Open text field (only numbers) format (hh/mm/ss)
High
Sampling stop Ending date (DD.MM.YYYY) and time (HH.MM.SS) of the sampling
Open text field (only numbers) format (hh/mm/ss)
High
Sampling time Total time of the sampling, automatically filled (HH.MM.SS).
Automatically filled n.a.
Sampling specification
Indicate if the sampling is personal or static.
Personal / Static option High
Shift or Task Indicate if the sampling is shift-based or task-based.
Task / Shift option Low
Device ID Click on the magnifying glass button and a list of devices is given, see print screen 26. The devices are also presented in a drop-down menu. Select the device that is used.
Drop-down menu High
Device ID The ID of the device is presented based on the selected device from the list of the institute.
Automatically filled n.a.
Serial No device The serial number of the device is presented based on the selected device from the list of the institute.
Automatically filled n.a.
Device code The device code is presented based on the selected device from the list of the institute.
Automatically filled n.a.
Date Give the date of the measurement.
Open text field (only numbers) format (hh/mm/ss)
High
Collection media Click on the magnifying glass button and a list of collection media is given, see print screen 27. The collection media are also
Drop-down menu Medium

47
presented in a drop-down menu. Select the collection media that is used.
Eg. Manufacturer, Catalogue number, batch number
Only asked for when relevant. Give the Manufacturer, Catalogue number and batch number.
Open text field Low
Collector Remarks Field to include additional information regarding the collector.
Open text field Low
Sample or blank Indicate what type of sample is collected: -Field sample: sample collected in the field (e.g. in a company) -Bulk sample: sample collected form the bulk material -Field blank : Blank sample collected in the field -Lab blank : Blank sample collected in the laboratory
Field sample / Bulk sample / Field blank / Labor blank option
High
Sampling situation Indicate if the sample is collected: -Random -Representative -Compliance
Drop-down menu High
Sampling situation Field to include additional information regarding the sampling situation.
Open text field Low
Volume flow rate Give the volume flow rate during sampling
Open text field (numbers only)
Low
Volume flow rate Give the unit in which the volume flow rate is expressed: -l/min -m3/H
Drop-down menu Low
Time interval Give the logging time/sampling interval of the device
Open text field (only numbers) format (hh/mm/ss)
High
Average interval Give the device average logging time
Open text field (only numbers) format (hh/mm/ss)
Low
Preseperator used Indicate if an impactor or preseparator is used during sampling.
Yes / No option High
Preseperator used Open text field to include additional information regarding the preseparator used.
Open text field. Low
Dilution used Indicate if the sampled air Yes / No option Medium

48
is diluted. Dilution ratio Only asked for if for
‘Dilution used’ the answer ‘yes’ is selected. Give the dilution ratio
Open text field Low
Dilution ratio denominator
Only asked for if for ‘Dilution used’ the answer ‘yes’ is selected. Give the dilution ratio denominator
Open text field Low
Air velocity Give the air velocity at the measuring point
Open text field (numbers only)
Low
Remarks Open text field to include additional information regarding the sampling
Open text field Low
! Important. Please save your entered data by clicking on the save icon at the right ribbon. Otherwise, data will not be saved.
Print screen 26. By clicking on the magnifier behind ‘Device ID’ you open a list of devices used in your institute.

49
Print screen 27. By clicking on the magnifier behind ‘Collection media’ you open a list of collection media.
2.2.4.1 Sample link For each sample information about the function of the measurement and the distance of the sampling point to source, worker and ventilation should be included in the form ‘Sample link’, see print screen 28.
1
2

50
Print screen 28. Input form ‘Sample link’. 1: Ribbon to scroll between samples and some other options. 2: Overview of included samples.
The table below (table 20) gives an overview of the fields that have to be filled in input form ‘Sampling link’:
Table 20. Fields and their explanations to be filled in for input form ‘Sample link’. Field name Explanation Format Priority Sample information Select one of the included
samples Drop-down option in ribbon. See print screen 28 number 1.
High
Activity Select the activity for which the sample is collected.
Drop-down option High
Sampling start Automatically the start time of the sampling is given based on included information about the sampling.
Automatically filled n.a.
Sampling stop Automatically the stop time of the sampling is given based on included information about the sampling.
Automatically filled n.a.
Activity start Automatically the start time of the activity is given based on included information about the activity.
Automatically filled n.a.
Activity stop Automatically the start time of the sampling is given based on included information about the activity.
Automatically filled n.a.
Measuring point ID Automatically filled based on the ID included in the Sample information.
Automatically filled n.a.
Function of measure to activity
Indicate the function of the sampling in connection to the activity. Select the type of air that is measured: -Main: Concentration measured in the workplace in the near field. -Incoming air: Concentration measured coming out of the ventilation system. -Background: Concentration measured in the background. -Second source:
Drop-down menu Low

51
Concentration measured near a secondary source.
Distance source to measurement device
Indicate the distance from the measurement device (end of tube) to the source. Distance in meters.
Drop-down menu High
Distance worker to measurement device
Indicate the distance from the measurement device (end of tube) to the worker. Distance in meters.
Drop-down menu High
Distance ventilation to measurement device
Indicate the distance from the measurement device (end of tube) to the ventilation. Distance in meters.
Drop-down menu Low
Near / far field Indicate if the measurement is performed in the near field or the far field.
Near field / Far field option
High
! Important. Please save your entered data by clicking on the save icon at the right ribbon. Otherwise, data will not be saved.
2.2.4.2 Analytical results Subsequently, to each sample the results from the analysis can be linked, see print screen 29 and 30.
Print screen 29. Input form ‘Analytical results’. 1: Ribbon to scroll between samples. 2: Button to include measurement results. 3: Icon to upload measurement data.
First the user should select a ‘Sample information’ under button 1. Subsequently the user should click on ‘Add VDE’. The input form below (print screen 30) will be presented. Select all relevant information regarding analyzed elements, chemical compounds, dust fraction, fibers, particles and
1 2
3

52
type of analysis technique in the input form. Subsequently, this information is automatically presented in the input form ‘Analytical results’, see print screen 31. Table 21 will give the information an user should include in input form ‘Analytical resulsts’.
Print screen 30. Overview of elements, chemical compounds, dust fraction, fibers, particles and type of analysis technique of which a selection could be made.
Print screen 31. Input form ‘Sample link’. 1: Ribbon to scroll between samples. 2: Button to include measurement results. 3: Input fields for measurement data. 4: Icon to upload measurement data.
The table below (table 21) gives an overview of the fields that have to be filled in.
Table 21. Fields and their explanations to be filled in for input form ‘Analytical results’. Field name Explanation Format Priority Add VDE Open VDE and select all Pick list High
1 2
3
4

53
relevant information regarding analyzed elements, chemical compounds, dust fraction, fibers, particles and type of analysis technique in the input form (see print screen 30).
Nano compound proven, quantitative result / Nano compound not proven, qualitative result
Indicate if the results are quantitative or qualitative.
Two answer option High
Value Only asked for if for ‘Nano compound proven, quantitative result’ is selected. Give the measured concentration.
Open text field (numbers only)
High
value Only asked for if for ‘Nano compound proven, quantitative result’ is selected. Select the unit in which the concentration is expressed: -mg/m3
-µg/m3
-ng/m3 -g/m3 -%
Drop-down menu High
SD Only asked for if for ‘Nano compound proven, quantitative result’ is selected. Give the Standard deviation.
Open text field (numbers only)
Low
Detection limit Only asked for if for ‘Nano compound proven, quantitative result’ is selected. Give the detection limit of the analytical technique.
Open text field (numbers only)
Low
Detection limit Only asked for if for ‘Nano compound proven, quantitative result’ is selected. Select the unit of the detection limit: -mg/m3
-µg/m3
-ng/m3 -g/m3 -%
Drop-down menu Low
Labor Only asked for if for ‘Nano compound proven, quantitative result’ is selected.
Low
Existence of likelihood
Only asked for if for ‘Nano compound not proven,
5-answer option Medium

54
qualitative result’ is selected. Indicate the likelihood of exposure to nano material: -Very likely -Likely -Doubtful -Unlikely -No indication
Qualitative value Only asked for if for ‘Nano compound not proven, qualitative result’ is selected. Give a qualitative value.
Open text field (numbers only)
Low
Qualitative value Only asked for if for ‘Nano compound not proven, qualitative result’ is selected. Select the unit of the qualitative value: -mg/m3
-µg/m3
-ng/m3 -g/m3 -%
Drop-down menu Low
Analysis technique Click on the magnifying glass button and analytical techniques is presented, see print screen 32. Select the analytical technique that is used.
Pick list High
Remarks Open text field to include additional information regarding the performed analysis.
Open text field Low
Results Possibility to link raw data to a sample by uploading the raw data
Not applicable High
! Important. Please save your entered data by clicking on the save icon at the right ribbon. Otherwise, data will not be saved.

55
Print screen 32. Overview of analytical techniques. Use this screen to select the used technique.
2.2.5 Import raw data Finally, raw data can be uploaded for the used online measurement instruments, see print screen 33. Print screen 33 gives an example of how the input form looks like in case in sample information the use of a SMPS and APS is indicated. It is possible to upload data or delete data and to set values for the raw data file.
Print screen 33. Example of input form ‘Import raw data’ in case in sample information the use of a SMPS and APS is indicated. 1. Possibility to upload data or delete data. 2. Button to set the values for the raw dataset.
1 2

56
3 Protocol (PDF) Function to make a PDF file of the selected measurement studies.
Print screen 34. The protocol screen enables the user to create a pdf-file of all data belonging to the selected measurement ID

57
4 Timeline
Function which gives an overview of the measurement series with the focus on the time lapse.

58
5 Data Exchange Function to import and export data included in NECID.
Print screen 35. Example for the Data Exchange screen. 1. List of measurements in this database. 2. Buttons to copy measurements from database to exchange-file or vice versa. 3. Data path of exchange file. 4. Name of exchange file. 5. Empty list of measurements in the exchange file.
To exchange a measurement series at first the path and name of the exchange file must be selected. The ending has to be *.FDB. The software provides the subdirectory “Necidexchange” and the file name “NECIDDBEXCHANGE.FDB”. By pressing the “Export”-button all selected measurement series are copied to the exchange database file completely. If the button “Export (without confidential)” is used the data regarding company and product which are marked as confidential in the database will not be copied.
The new exchange file can be imported in every other NECID database. It is not possible to use this file without the NECID-software. To use data without the NECID-software please use the “Export”-function. In the majority of the cases the file is unfortunately too big to send via email.
1
2
4
3
5

59
6 Export (Excel) Function to export one measurement series in NECID to Excel. The tool enables the user to select which data should be exported and also the store the selection for other exports.

60
7 Basic data Update Function to perform an update of the basic data table.

61
8 Overview of print screens
Print screen 1. Login screen for NECID.
Print screen 2. Welcome page NECID. 1. Button to change the user profile. 2. Documents and files to install NECID on your computer.
Print screen 3. Input form ‘User profile’. 1 Overview of user profile and possibility to change the user profile. 2. The possibility to change the question in case you have forgotten your password . 3. Possibility to get a new password.
Print screen 4. Subform ‘Change question’.
Print screen 5. Sub form ‘New Password’.
Print screen 6. Overview of NECID after login.
Print screen 7. 1: Sitemap, 2: Fill in form, 3: List of entered measurement series, 4: Linkage of activity relationships, 5: Ribbon.
Print screen 8. Input form ‘Measurement’. 1: Ribbon to include new forms, delete forms or save information.
Print screen 9. Input form ‘Activity’. 1: Ribbon to scroll between different activities and some other options. 2: Overview of included activities. 3: Ribbon to include new forms, delete forms or save information.
Print screen 10. By clicking on the magnifier behind ‘Activity code’ in print screen 9 you open a coding list for the different source domains. By clicking on the ‘+’ icon you will come to the more specific activity classes. Please be as specific as possible. After selecting an activity the input fields will be automatically filled.
Print screen 11. Input form ‘Second source’. 1; Ribbon to scroll between different secondary sources and some other options. 2: Overview of included secondary sources. 3 Ribbon to include new forms, delete forms or save information.
Print screen 12. Input form ‘Premises’. 1, Overview of included premises. 2; Ribbon to include new forms, delete forms or save information.
Print screen 13. By clicking on the magnifier behind ‘Branche code’ in print screen 12 you open a coding list of the Industrial Classification system NACE industries. At the beginning you see the several industry divisions. By clicking on the plus icon you will come to the major group, the industry group and at least to the specific industry. Please be as specific as possible. The NACE – Code is the EU classification of economic activities: http://europa.eu.int/eur-lex/lex/JOHtml.do?uri=OJ:L:2006:393:SOM:EN:HTML
Print screen 14. Input form ‘Locations’. 1; Ribbon to scroll between different locations and some other options. 2: Overview of included locations. 3 Ribbon to include new forms, delete forms or save information.

62
Print screen 15. Input form ‘RMM’. 1; Ribbon to scroll between different locations. 2: Ribbon to scroll between different RMMs and some other options. 3 Ribbon to include new forms, delete forms or save information. 4: Possibility to include additional activities. 5: Sub forms ‘Ventilation’, ‘Local control’ and ‘Indoor condition’. 6: Overview of included RMM
Print screen 16. Sub form RMM – Ventilation. 1: List of RMM.
Print screen 17. Sub form RMM – Local control. 1: Buttons to add or delete a local control. 2: Overview of saved local controls 3: List of RMM.
Print screen 18. Sub form RMM – Indoor conditions. 1: List of RMM.
Print screen 19. Input form ‘worker’. 1: Ribbon to scroll between different workers and some other options. 2: List of workers.
Print screen 20. By clicking on the magnifier behind ‘ISCO Job code’ in print screen 19 you open a coding list form SVZ-ISCO. At the beginning you see major divisions. By clicking on the plus icons you will come to more detailed descriptions. Please be as specific as possible.
Print screen 21. Input form ‘Expos and PPE’. 1: Ribbon to scroll between different workers and the activities for each worker and some other options. 2: List of workers and the use of PPE for each activity. 3: Possibility to include additional activities.
Print screen 22. Input form ‘Material’. 1: Ribbon to scroll between different materials and some other options. 2: Button to include ingredients, linked to the selected material. 3: Overview of included materials and ingredients.
Print screen 23. Input form ‘Material’ sub form ‘Ingredients’. 1: Ribbon to scroll between different ingredients and some other options. 2: Overview of included materials and ingredients.
Print screen 24. Input form ‘Material used rate’. 1: Ribbon to scroll between different use rates. 2: Ribbon to add, delete and change information for the used materials. 3: Overview of included used materials. 4: Possibility to include additional activities.
Print screen 25. Input form ‘Sample information’. 1: Ribbon to scroll between samples and some other options. 2: Overview of included samples.
Print screen 26. By clicking on the magnifier behind ‘Device ID’ you open a list of devices used in your institute.
Print screen 27. By clicking on the magnifier behind ‘Collection media’ you open a list of collection media.
Print screen 28. Input form ‘Sample link’. 1: Ribbon to scroll between samples and some other options. 2: Overview of included samples.
Print screen 29. Input form ‘Analytical results’. 1: Ribbon to scroll between samples. 2: Button to include measurement results. 3: Icon to upload measurement data.

63
Print screen 30. Overview of elements, chemical compounds, dust fraction, fibers, particles and type of analyse technique of which a selection could be made.
Print screen 31. Input form ‘Sample link’. 1: Ribbon to scroll between samples. 2: Button to include measurement results. 3: Input fields for measurement data. 4: Icon to upload measurement data.
Print screen 32. Overview of analytical techniques. Use this screen to select the used technique.
Print screen 33. Example of input form ‘Import raw data’ in case in sample information the use of a SMPS and APS is indicated. 1. Possibility to upload data or delete data. 2. Button to set the values for the raw dataset.

64
9 Overview of tables
Table 1. Fields and their explanations to be filled in for ‘User profile’.
Table 2. Fields and their explanations to be filled in for ‘Change question answer’.
Table 3. Fields and their explanations to be filled in for ‘New password’.
Table 4. Description of the different icons and their function in NECID.
Table 5. Fields and their explanations to be filled in for ‘Measurement series’.
Table 6. Fields and their explanations to be filled in for ‘Activity’.
Table 7. Fields and their explanations to be filled in for ‘Second source’.
Table 8. Fields and their explanations to be filled in for ‘Premises’.
Table 9. Fields and their explanations to be filled in for ‘Locations’.
Table 10. Fields and their explanations to be filled in for ‘RMM’.
Table 11. Fields and their explanations to be filled in for RMM – sub form ‘Ventilation’.
Table 12. Fields and their explanations to be filled in for RMM – sub form ‘Local control’.
Table 13. Fields and their explanations to be filled in for RMM – sub form ‘Indoor conditions’.
Table 14. Fields and their explanations to be filled in for ‘Worker’.
Table 15. Fields and their explanations to be filled in for input form ‘Expos and PPE’.
Table 16. Fields and their explanations to be filled in for input form ‘Material’.
Table 17. Fields and their explanations to be filled in for input sub form ‘Ingredients’.
Table 18. Fields and their explanations to be filled in for input form ‘Material used rate’.
Table 19. Fields and their explanations to be filled in for input form ‘Sample information.
Table 20. Fields and their explanations to be filled in for input form ‘Sample link’.
Table 21. Fields and their explanations to be filled in for input form ‘Analytical results’.


