Microsoft Azure Security Overview - Microsoft - CSS Dallas Azure

August 12, 2014
Deployment of NCache for Azure in Microsoft Azure
Contents
1. Introduction .......................................................................................... 3
1.1. Overview ........................................................................................... 3
1.1.1. NCache for Azure Clients ................................................................ 3
1.1.2. NCache for Azure Servers ............................................................... 3
1.2. Evaluation, Activation and Licensing ...................................................... 3
1.2.1. Evaluation Period Expiration and Extension ....................................... 3
1.2.2. Activate NCache for Purchased License ............................................ 6
1.2.3. Activity Reporting ........................................................................ 10
1.2.4. Grace Period ............................................................................... 11
1.3. Deployment Scenarios of NCache for Azure .......................................... 11
1.3.1. Single-Site Deployment ................................................................ 11
1.3.2. Multi-Site Deployment ................................................................. 12
2. Configuring Environment for NCache for Azure ........................................ 14
2.1. Create a Virtual Network for NCache for Azure ...................................... 14
2.2. Create Virtual Machines for NCache for Azure ....................................... 14
2.3. Install NCache for Azure 4.3 on Cache Servers ..................................... 15
2.4. Add Endpoints on NCache for Azure Virtual Machines............................. 15
2.5. Update the Service Configuration File at Server Side ............................. 16
2.6. Configure a Cache Cluster to be Used in Azure ..................................... 17

1. Introduction
1.1. Overview
Microsoft Azure is an open and flexible cloud platform that enables quick
development, deployment and management of applications across global network of Microsoft datacenters.
NCache for Azure is an extremely fast and scalable in-memory distributed cache that caches application data and reduces expensive database trips. NCache for
Azure is bringing this efficient and linearly scalable distributed caching solution for the applications deployed in Microsoft Azure.
1.1.1. NCache for Azure Clients
NCache for Azure clients can be the .NET applications running remotely as Azure Websites, Web Roles, Worker Roles or Virtual Machines in Microsoft Azure.
1.1.2. NCache for Azure Servers
To be used by the clients, first NCache for Azure needs to be installed on Microsoft Azure VMs through a Windows Installer .msi file and then a clustered cache needs to be configured on these VMs.
1.2. Evaluation, Activation and Licensing
1.2.1. Evaluation Period Expiration and Extension
By default, when you install NCache for Azure, it is installed as an Evaluation Copy and is valid for 30 days only. At the end of this period, NCache for Azure will stop working.
Extending Evaluation Period
If the evaluation copy expires, then it’s time for you to either purchase NCache for
Azure license or if you need an extension to your evaluation period, you can get an Extension Key from Alachisoft Sales. Please send an email
to [email protected] (or to your account manager if you're already in touch with him/her) and ask for an extension key. You will be provided a 30-day extension key.
Once you have obtained the extension key, please follow the steps given below to extend your evaluation period:
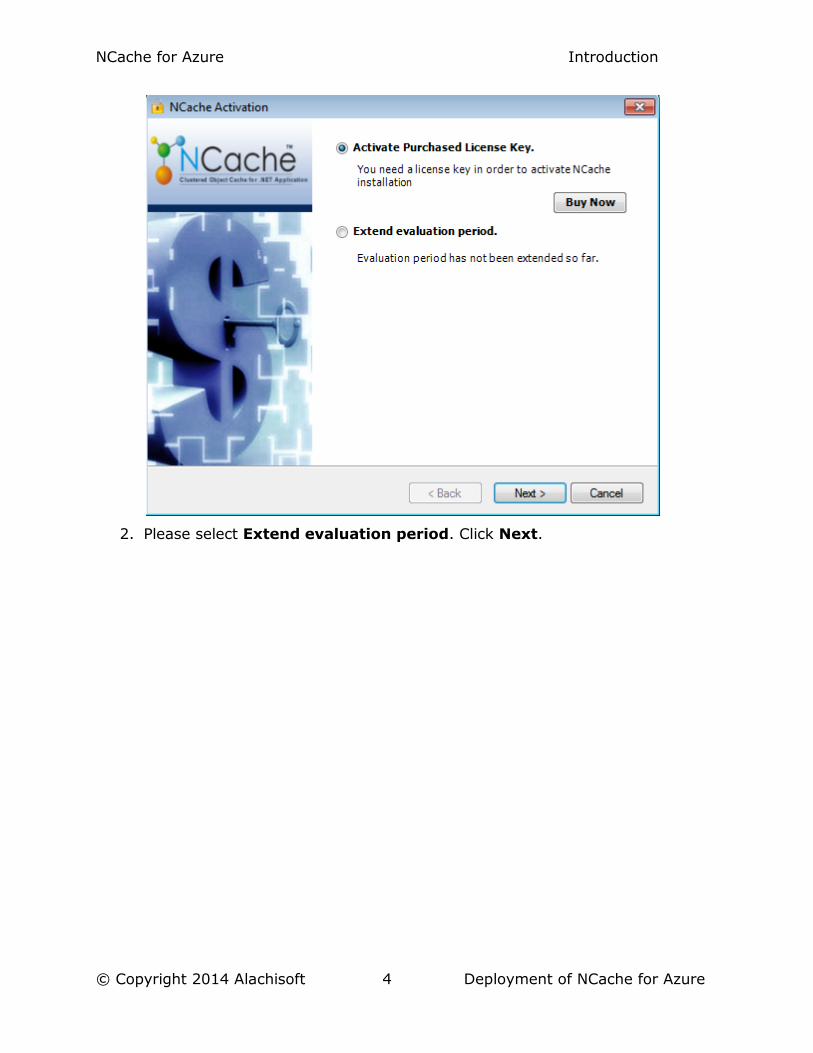
1. Run the NActivateWizard from %Install
Directory%\NCacheForAzure\bin\NActivate path. Below is a screenshot for the
screen that will be displayed:
NCache for Azure Introduction
© Copyright 2014 Alachisoft 4 Deployment of NCache for Azure
2. Please select Extend evaluation period. Click Next.

NCache for Azure Introduction
© Copyright 2014 Alachisoft 5 Deployment of NCache for Azure
3. In the next dialog, enter the extension key provided to you by Alachisoft Sales and press Finish.

NCache for Azure Introduction
© Copyright 2014 Alachisoft 6 Deployment of NCache for Azure
4. If this key is valid, you will be prompted with a success message. If the key
is not valid, you will be prompted accordingly.
Note: A 30-day extension is valid from the original installation date and not from
the day you are trying to extend. So, if you have been waiting for 15 extra days after the initial 30 day evaluation period to extend it, you’ll only get 15 extra days
extension.
1.2.2. Activate NCache for Purchased License
To activate your purchased license key, please follow the steps given below:
1. Make sure that you have a smooth internet connection to connect to Alachisoft License Server since activation is done online.
2. Run the NActivateWizard Tool from %Install
Directory%\NCacheForAzure\bin\NActivate path.
3. NCache Activation dialog will open. Please check Activate Purchased License Key and click Next.

NCache for Azure Introduction
© Copyright 2014 Alachisoft 7 Deployment of NCache for Azure
4. An online activation form will open.

NCache for Azure Introduction
© Copyright 2014 Alachisoft 8 Deployment of NCache for Azure
5. Please enter the required information in this form. License Key, First Name, Last Name and Email are compulsory fields. Enter your purchased license key to proceed. Click Next.
6. You will see the final screen for activating your license. Just press Activate Now and it will activate NCache for Azure license for you immediately.

NCache for Azure Introduction
© Copyright 2014 Alachisoft 9 Deployment of NCache for Azure
7. If for some reason you’re unable to activate, it will display an error message. Your license activation can fail for a number of reasons, some are listed as
following:
Your firewall does not allow HTTP POST from Activation Program to the
Alachisoft License Server.
You do not have Internet access.
Your license key is invalid.
If this happens, please resolve the issue and try later again.
Note: To avoid license activation failure, always use the license key for the same
product edition for which that key was purchased.
Please note that billing will be done on the basis of usage so one license key can be used on an unlimited number of machines. You will be charged for the first hour
starting from the time of key activation on a machine, despite the fact that the service is running or not. After that, billing will be done on the basis of per hour
usage as long as NCache for Azure service is running. NCache for Azure clients are free.
Note: During activation, the Alachisoft License Server recognizes your machine on
the basis of its IP address and MAC address. So if your machine’s IP is changed,

NCache for Azure Introduction
© Copyright 2014 Alachisoft 10 Deployment of NCache for Azure
NCache for Azure service will stop running. In such a case, reactivation of NCache for Azure will be required.
Note: Whenever NCache for Azure is reactivated on a machine, NCache for Azure
service will also need to be restarted.
Note: NCache for Azure service will also stop if there is a change in date and time
of your machine. Therefore before activation, make sure that all your machines are in correct time zone with accurate dates to avoid the need to change them after
activation.
1.2.3. Activity Reporting
Activity reporting is done both locally and remotely, i.e., activity logs are maintained on local machine as well as on Alachisoft License Server. Both the local
and remote reporting is done periodically. The interval for remote reporting is controlled by Alachisoft License Server. This dual reporting allows you to cross verify the usage report that you get from Alachisoft. These log files are generated
on a monthly basis and maintains the activity logs for that month. The generated log files are encrypted and are not readable. If you want to read a particular log
file, you can generate a readable log file using the command line tool loggen provided by Alachisoft. This tool is shipped with NCache for Azure and can be found
at %Install Directory%\NCacheForAzure\bin\tools. It can be used as follows:
1. Open command prompt.
2. Go to the NCache tools directory: cd % install directory%\NCacheForAzure\bin\tools
3. Use loggen and provide the required information.
loggen %install directory%\NCacheForAzure\log-files\license-logs\20.200.20.219-09-2014.clog
4. Hit Enter key. After loggen, write the paths of the encrypted log file which you want to decrypt using loggen tool. If you want to decrypt more than one
log files, separate their paths using commas as follows:
loggen %install directory%\NCacheForAzure\log-files\license-logs\20.200.20.219-09-2014.clog, %install directory%\NCacheForAzure\log-files\license-logs\20.200.20.48-08-2014.clog, %install directory%\NCacheForAzure\log-files\license-logs\20.200.20.48-07-2014.clog, %install directory%\NCacheForAzure\log-files\license-logs\20.200.20.49-09-2014.clog'
5. The readable decrypted files are generated at the following location:
%install directory%\NCacheForAzure\log-files\license-logs\decrypted\

NCache for Azure Introduction
© Copyright 2014 Alachisoft 11 Deployment of NCache for Azure
Please make sure that you don’t delete any of these log files since they are required by NCache for Azure service to run. But if you do want to delete any of
these files, contact Alachisoft Support at [email protected].
Note: If NCache for Azure service detects that a log file is deleted from license
logs, the service may stop after reporting an Error event in event logs. You will
have to contact Alachisoft Support to help you recover from this situation. Also, to continue using NCache for Azure on that machine, its reactivation will be required.
1.2.4. Grace Period
Grace period is the time for which NCache for Azure service can run without
contacting the Alachisoft License Server. If, for some reason such as internet connectivity failure, NCache for Azure service is not able to contact the Alachisoft
License Server, it will still continue to run for grace period. But if grace period expires and you are still not able to make any connection with the Alachisoft License Server, NCache for Azure service will stop. You can restart the service later
on but make sure that there is internet connectivity so that NCache for Azure service is able to contact the Alachisoft License Server.
Note: If your NCache for Azure service stops running, you can view the details of
the reported error in Event Viewer. Open Event Viewer on your machine. In console tree on left side, go to Windows Logs->Application to view the error logged by NCache for Azure service.
1.3. Deployment Scenarios of NCache for Azure
There are two types of deployment scenarios of NCache for Azure:
Single-Site Deployment
Multi-Site Deployment
1.3.1. Single-Site Deployment
In this configuration, the NCache for Azure serves and clients reside on the same Azure Virtual Network and preferably on the same subnet as well.
This is the most recommended scenario as it greatly improves performance. The
NCache for Azure cluster, being in the same Azure Virtual Network as the client application, responds quickly to all its requests. Also, the NCache for Azure client
can access the NCache for Azure server through a direct TCP connection without going through any extra hops. This eliminates the need of any publically addressable endpoint for client server communication, leading not only to a faster
speed but also to total privacy from other Azure Virtual Network.

NCache for Azure Introduction
© Copyright 2014 Alachisoft 12 Deployment of NCache for Azure
Memory Pooled
Windows Server 2012 (64-bit)
Distributed Cache Cluster
(Virtual Machines)
Linear Scalability
Azure Virtual Network
NCache Socket
Protocol
Remote Clients (.NET & Java) Web/Worker Roles and VMs
...
Typical Single-Site Deployment of NCache for Azure
1.3.2. Multi-Site Deployment
In this configuration, NCache for Azure cache cluster is created on Azure VMs which
are part of one Azure Virtual Network whereas NCache for Azure clients belong to another Azure Virtual Network.
This would require an extra NCache for Azure client side configuration to connect to cache via Azure public endpoints configured on cache servers.

NCache for Azure Introduction
© Copyright 2014 Alachisoft 13 Deployment of NCache for Azure
NCache Socket
Protocol
Azure Virtual NetworkAzure Virtual Network
Azure Virtual Network
Memory Pooled
Windows Server 2012 (64-bit)
Distributed Cache Cluster
(Virtual Machines)
Linear Scalability
Port Forwarding
Remote Clients
(.NET & Java) Web/Worker Roles and VMsRemote Clients
(.NET & Java) Web/Worker Roles and VMs
Typical Multi-Site Deployment of NCache in Azure
This configuration has the following benefits:
Use cache from any Microsoft Azure application and website.
Share cache across multiple Microsoft Azure applications and even non-Microsoft Azure applications.
Share cache across multiple regions for same or different applications.

2. Configuring Environment for NCache for Azure
The Azure environment can be configured for NCache for Azure by following the
steps given below:
2.1. Create a Virtual Network for NCache for Azure
NCache for Azure uses TCP/IP based communication protocol for cache server-server and client-server communications. You need to create Azure Virtual Network
that NCache for Azure will use and NCache for Azure VMs will be created later on using this Azure Virtual Network. It is recommended that NCache for Azure cache
servers and remote clients are on same Azure Virtual Network and same subnet.
Here is a step by step guide on how to create and deploy an Azure Virtual Network.
1. Log in to the Microsoft Azure Management Portal.
2. In the lower left-hand corner of the screen, click NEW.
3. In the navigation pane, click NETWORK SERVICES, and then
click VIRTUAL NETWORK. Click CUSTOM CREATE to begin the configuration wizard.
4. On the Azure Virtual Network Details page, enter the NAME for your virtual
network (e.g. NCacheVirtualNetwork).
5. Enter LOCATION- Select desired location from the drop-down list.
Click the arrow key to move to next screen.
6. Choose DNS SERVERS and VPN CONNECTIVITY options on next screen based on your network requirements or go with default values and then click
on arrow key to move next.
7. Add SUBNETS on this screen that you will use for NCache for Azure. You will
add NCache for Azure servers and clients on this subnet later on as a recommended configuration.
8. Complete the wizard and verify that an Azure Virtual Network for NCache for
Azure has been configured and it also belongs to specified affinity group with specified subnets.
2.2. Create Virtual Machines for NCache for Azure
You then need to create Azure Virtual Machines that will be used for NCache for
Azure cache servers and remote clients.
You need to make sure that the Azure Virtual Network which is provided on creation
of NCache for Azure VMs is the one that you created in step 1 of Section 2.1. Similarly, if you want to add more cache servers to be part of cache cluster later on, you need to follow the same process and attach them to the existing cache
server Azure Virtual Network.
Moreover, it is highly recommended to opt for Single-Site Deployment of NCache
for Azure where NCache for Azure cluster is formulated on cache servers that are in

NCache for Azure Configuring Environment for NCache for Azure
© Copyright 2014 Alachisoft 15 Deployment of NCache for Azure
the same Azure Virtual Network and also on the same subnet and later on you add your web roles in same Azure Virtual Network.
Here is how you can create a Virtual Machine in Microsoft Azure environment to be used as NCache for Azure cache servers.
1. On Microsoft Azure Management Portal, click NEW in the left menu bar. Click VIRTUAL MACHINE, and then create an image FROM GALLERY with your desired based OS.
2. Provide the name of virtual machine and User credentials.
3. On next screen, choose virtual network of this machine to be the one that
you created in step 2.1. You also need to specify the subnet of this machine that you created above for NCache for Azure and then click the arrow key to move to the next screen.
4. Next step is to configure Azure service endpoints, review default endpoints that will be created to allow connections to the Virtual Machine. You will
create NCache for Azure specific endpoints later on.
5. Finish the wizard to create a VM by clicking on check mark to create the Virtual Machine.
6. After the Virtual Machine and cloud service are created, the Management Portal lists the new virtual machine under VIRTUAL MACHINES and lists
the cloud service under CLOUD SERVICES. Both the Virtual Machine and the cloud service are started automatically within the Azure Virtual Network.
7. You need to follow this for all cache server and remote client virtual machines one by one.
See how to configure and launch a new Azure Virtual Machine for detailed steps.
2.3. Install NCache for Azure 4.3 on Cache Servers
You need to install NCache for Azure on Azure VMs by logging onto the servers directly. Prerequisite of installing NCache for Azure is .NET Framework 4.0. You can refer NCache installation guide for complete details on NCache for Azure installation
process.
2.4. Add Endpoints on NCache for Azure Virtual Machines
If you opt for Multi-Site Deployment of NCache for Azure where you are using different Azure Virtual Network for cache servers and remote clients, then you need
to create public and private end points for NCache for Azure communication so that clients can connect to cache severs even from outside your Azure Virtual Network.
Here is how you should set these endpoints on cache servers:
Here are steps for configuring NCache for Azure endpoints:
1. Click VIRTUAL MACHINES, and then select NCache for Azure cache server
virtual machines that you have created in above steps.
2. Click ENDPOINTS. The Endpoints page lists all endpoints for the virtual
machine, click ADD.

NCache for Azure Configuring Environment for NCache for Azure
© Copyright 2014 Alachisoft 16 Deployment of NCache for Azure
3. The ADD ENDPOINT dialog box appears. Choose ADD A STAND-ALONE ENDPOINT.
4. In Name, type a NAME for the endpoint and then add the values for PUBLIC PORT and PRIVATE PORT as follows:
NCache for Azure Public Ports: You should specify a public port on each cache server starting from TCP 9800 and increment it by one for each cache server. For example, you should set 9800 for NCache for Azure server 1 and
then use 9801 for NCache for Azure server 2 and so on.
NCache Private Ports: All NCache for Azure server VMs should have TCP
9800 set as private port since actual NCache for Azure client-server communication is carried on port 9800 on each server.
5. Click the check mark to create the endpoint. You will now see the endpoint
listed on the Endpoints page.
Please see adding endpoints on a Virtual Machine in Microsoft Azure for details.
2.5. Update the Service Configuration File at Server Side
In multi-site deployment after creating endpoints through Azure Management
Portal, if NCache for Azure 4.3 is already installed on cache servers, you need to add the endpoints’ mapping information of each NCache for Azure cache server VM
in NCache.Service.exe.config file on that VM. Tags NCacheServer.MgmtEndPoint and NCacheServer.ServerEndPoint must be included in NCache.Service.exe.config file at the server side for mapping. This
should be done as follows:
<add key=" NCacheServer.MgmtEndPoint” value="207.46.129.19:8250" />
<add key=" NCacheServer.ServerEndPoint” value="207.46.129.19:9800" />
NCacheServer.MgmtEndPoint is used for managerial tasks while NCacheServer.ServerEndPoint is used for the usual client-server communication.
When a new cache cluster is created, a server-end-point.ncconf file is generated
on each NCache for Azure cache server VM inside %Install
Directory%\NCacheForAzure\Config. It contains the mapping information of public and
private ports of all server VMs in the cluster. The file server-end-point.ncconf is
created so that when a client node connects to any of the NCache for Azure server VMs from outside of its Azure Virtual Network, it gets the mapping information of all
server VMs for communication. Following is a sample of information contained in server-end-point.ncconf: <configuration> <management-end-point> <end-point public-ip="23.100.94.88" public-port="8250" private-ip="10.0.0.4" private-port="8250"/> <end-point public-ip="23.100.91.33" public-port="8251" private-ip="10.0.0.5" private-port="8250"/> </management-end-point> <server-end-point> <end-point public-ip="23.100.94.88" public-port="9800" private-ip="10.0.0.4" private-port="9800"/>

NCache for Azure Configuring Environment for NCache for Azure
© Copyright 2014 Alachisoft 17 Deployment of NCache for Azure
<end-point public-ip="23.100.91.33" public-port="9801" private-ip="10.0.0.5" private-port="9800"/> </server-end-point> </configuration>
If a cache is already created and you have added a new NCache for Azure cache
server VM or updated endpoints of existing VMs, then run the command line tool updateendpoints.exe to update the mapping information in server-end-
point.ncconf. This tool is shipped with NCache for Azure and can be found at
%Install Directory%\NCacheForAzure\bin\tools. It can be used as follows:
1. Open command prompt.
2. Go to the NCache tools directory: cd % install directory%\NCacheForAzure\bin\tools
3. Use updateendpoints.exe and provide the required information.
updateendpoints.exe ClusteredCache /s 20.100.94.88
4. Hit Enter key, it will successfully update server-end-point.ncconf file(s) for all the server nodes in Clustered Cache. Here 20.100.94.88 is the server
IP where NCache for Azure service is running and a cache with the cache-ID, Clustered Cache, is registered.
Please note that this step is required only if you opt for multi-site deployment of
NCache for Azure.
2.6. Configure a Cache Cluster to be Used in Azure
Once NCache for Azure is installed and NCache for Azure environment is ready, you
need to configure a clustered cache. For example, you can create a two node Partitioned-Replica cache and add NCache for Azure clients (if any) to this cache.
You can refer to NCache for Azure configuration section in our online help for more
details on NCache for Azure configurations.