Navigating in ISIS - Johns Hopkins...
72
Basics and Navigation SCT Matrix Version 2.6.2.x 0-1 © The Johns Hopkins University 2006 – All Rights Reserved. Module 0 Navigating in ISIS Module Time 1.5 hours Module Topics Preface ..................................................................................................... 0-3 Module Objectives .................................................................................. 0-4 Internet Student Information System (ISIS) Overview ........................... 0-5 Why is JHU Implementing ISIS? ..................................................... 0-5 Who Is Involved with the ISIS Project? ........................................... 0-6 Understanding ISIS Application Integration .................................... 0-6 Project Timeline ............................................................................... 0-7 ISIS Key Terms and Concepts ................................................................ 0-9 ISIS Desktop Settings ........................................................................... 0-13 Recommended Computer Configuration ........................................ 0-13 Security Settings ............................................................................. 0-14 Display Settings .............................................................................. 0-19 Font Size ......................................................................................... 0-20 Signing on to ISIS ................................................................................. 0-23 Roles ............................................................................................... 0-23 Windows XP ................................................................................... 0-26 Changing your Password ................................................................ 0-29
Transcript of Navigating in ISIS - Johns Hopkins...
Basics and Navigation
SCT Matrix Version 2.6.2.x 0-1 © The Johns Hopkins University 2006 – All Rights Reserved.
Module 0
Navigating in ISIS
Module Time 1.5 hours
Module Topics
Preface..................................................................................................... 0-3
Module Objectives .................................................................................. 0-4
Internet Student Information System (ISIS) Overview........................... 0-5 Why is JHU Implementing ISIS? ..................................................... 0-5 Who Is Involved with the ISIS Project? ........................................... 0-6 Understanding ISIS Application Integration .................................... 0-6 Project Timeline ............................................................................... 0-7
ISIS Key Terms and Concepts ................................................................ 0-9
ISIS Desktop Settings ........................................................................... 0-13 Recommended Computer Configuration........................................ 0-13 Security Settings ............................................................................. 0-14 Display Settings.............................................................................. 0-19 Font Size ......................................................................................... 0-20
Signing on to ISIS ................................................................................. 0-23 Roles ............................................................................................... 0-23 Windows XP................................................................................... 0-26 Changing your Password ................................................................ 0-29

0. Navigating in ISIS Basics and Navigation
0-2 SCT Matrix Version 2.6.2.x
© The Johns Hopkins University 2006 – All Rights Reserved.
Signing Off of ISIS .........................................................................0-32 Exercise 0–1: The Basics of ISIS....................................................0-34
Window Components ........................................................................... 0-35 Calendar Feature and Dates ............................................................0-37 List of Values (LOV) ......................................................................0-37 Application Toolbar ........................................................................0-38 User Menu.......................................................................................0-42 Keyboard Shortcuts.........................................................................0-42 Exercise 0–2: ISIS Fundamentals ...................................................0-45
Search and Retrieve Data...................................................................... 0-46 Wildcard Characters........................................................................0-47 Navigating between Records of Different Types ............................0-49 Prospect and Applicant Integrated Lookup.....................................0-50 Practicing Searching........................................................................0-50 Stored Queries.................................................................................0-53 Exercise 0–3: Search and Retrieve ISIS Information......................0-55
Customizing Your ISIS Home Page ..................................................... 0-56
Where Can I Get More Information on ISIS?....................................... 0-63 ISIS Website – http://www.jhu.edu/isis ..........................................0-63 ISIS ListServ ...................................................................................0-64 Using Online Help...........................................................................0-64 Exercise 0–4: Customizing ISIS and Getting Help .........................0-67
Module Summary ................................................................................. 0-68
List of Navigating in ISIS Windows .................................................... 0-70

Basics and Navigation 0. Navigating in ISIS
SCT Matrix Version 2.6.2.x 0-3 © The Johns Hopkins University 2006 – All Rights Reserved.
Preface
Navigating in ISIS is intended for Johns Hopkins users who are just beginning to use ISIS and the SCT Matrix Application Suite, or who are recent users of the applications in the suite and want to learn more about basic system features.
The aim of this module is to enable you to navigate and perform basic functions within any of the ISIS windows, regardless of the application.
You will learn the basic information needed to use the system: enter data, retrieve information in the form of a query, maintain data, and access online help.
Note: Report submission and processing is covered in the Reporting module.
Instructions on processing transactions specific to an application will not be covered and users should refer to the specific training modules for information on transaction processing.
The content of this module is designed with an introduction, terms, and a demonstration section that explains how to execute the procedures in a step-by-step manner. Exercises are also used to help reinforce key topics and make the class interactive.
Note: This is intended to be a hands-on computer training course.

0. Navigating in ISIS Basics and Navigation
0-4 SCT Matrix Version 2.6.2.x
© The Johns Hopkins University 2006 – All Rights Reserved.
Module Objectives In this module, you will learn how to:
Name the 4 key reasons that Johns Hopkins University is implementing ISIS
Identify the 4 applications of the SCT Matrix Application Suite that the University is implementing
Log-in to ISIS
List the key components of the ISIS windows
Explain how to use each of the toolbar icons
Search and retrieve data in ISIS
Customize your home page to display specific data
Use the ISIS website as a resource
List where you can get help with ISIS
Basics and Navigation 0. Navigating in ISIS
SCT Matrix Version 2.6.2.x 0-5 © The Johns Hopkins University 2006 – All Rights Reserved.
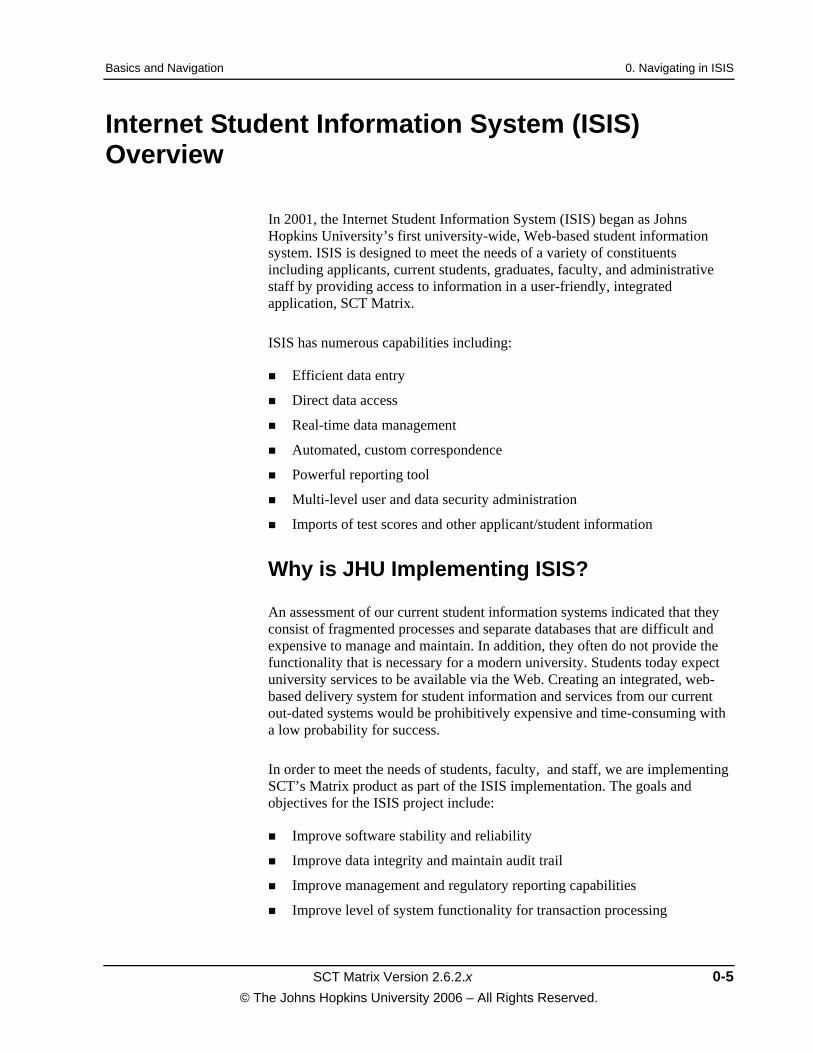
Internet Student Information System (ISIS) Overview
In 2001, the Internet Student Information System (ISIS) began as Johns Hopkins University’s first university-wide, Web-based student information system. ISIS is designed to meet the needs of a variety of constituents including applicants, current students, graduates, faculty, and administrative staff by providing access to information in a user-friendly, integrated application, SCT Matrix.
ISIS has numerous capabilities including:
Efficient data entry
Direct data access
Real-time data management
Automated, custom correspondence
Powerful reporting tool
Multi-level user and data security administration
Imports of test scores and other applicant/student information
Why is JHU Implementing ISIS?
An assessment of our current student information systems indicated that they consist of fragmented processes and separate databases that are difficult and expensive to manage and maintain. In addition, they often do not provide the functionality that is necessary for a modern university. Students today expect university services to be available via the Web. Creating an integrated, web-based delivery system for student information and services from our current out-dated systems would be prohibitively expensive and time-consuming with a low probability for success.
In order to meet the needs of students, faculty, and staff, we are implementing SCT’s Matrix product as part of the ISIS implementation. The goals and objectives for the ISIS project include:
Improve software stability and reliability
Improve data integrity and maintain audit trail
Improve management and regulatory reporting capabilities
Improve level of system functionality for transaction processing

0. Navigating in ISIS Basics and Navigation
0-6 SCT Matrix Version 2.6.2.x
© The Johns Hopkins University 2006 – All Rights Reserved.
Establish a consistent, university-wide student information system
Who Is Involved with the ISIS Project?
ISIS is an initiative unlike any ever undertaken by Johns Hopkins since it first welcomed students in 1876. Implementing ISIS is a combination of talented professionals from the university’s eight academic divisions and the Information Technology (IT) organization. Together, IT staff and student services professionals from admissions, financial aid, registrar, and business offices, along with specialists from other university offices, are working to create an indispensable tool for Johns Hopkins students.
The ISIS team consists of permanent team members, other members assigned full-time for limited duration, and still others who contribute while holding down full-time assignments elsewhere in the university. In addition to the Johns Hopkins personnel, the ISIS project is working with Exeter Consulting Group and partnering with SCT Corporation to ensure a successful implementation.
Understanding ISIS Application Integration
The SCT Matrix Suite is a fully integrated set of four applications and the Common area that allows Johns Hopkins University to manage all of our student information requirements. The SCT Matrix™ Student Suite includes:
Student Marketing System (SMS) – Using the Prospects and Admissions application, your school can store information about prospective students, track students applying to your school throughout the entire admission process, and import student test scores from educational testing services.
Basics and Navigation 0. Navigating in ISIS
SCT Matrix Version 2.6.2.x 0-7 © The Johns Hopkins University 2006 – All Rights Reserved.
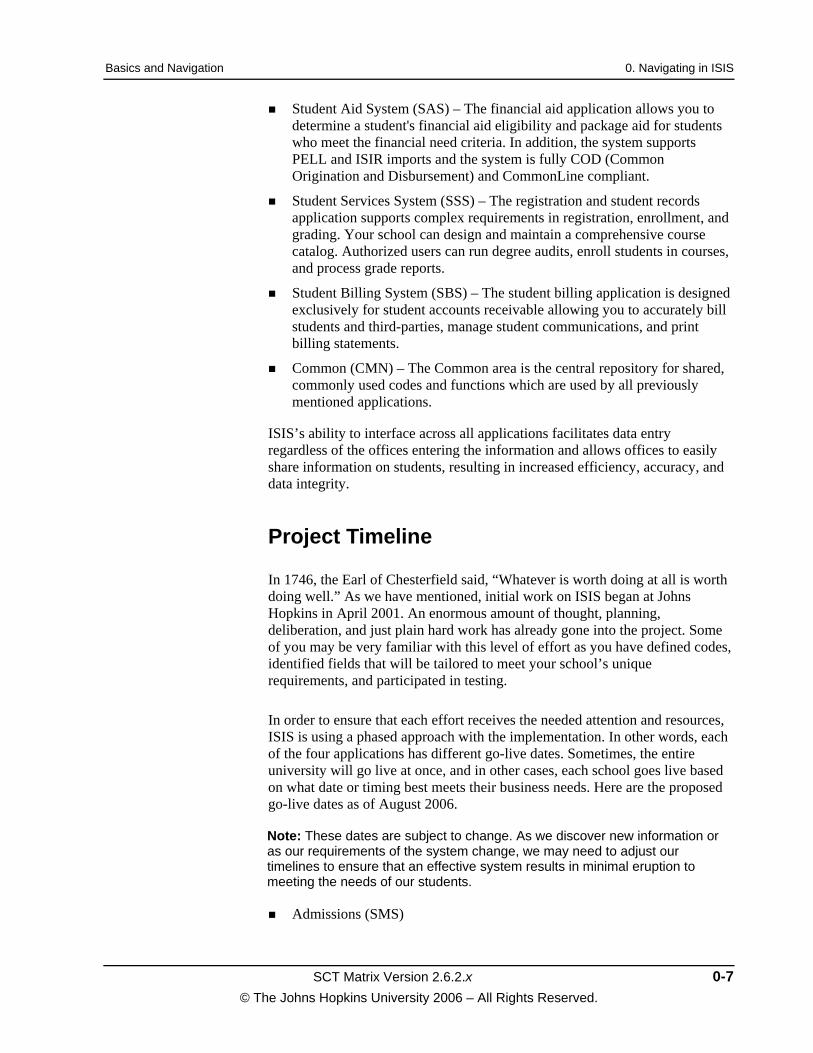
Student Aid System (SAS) – The financial aid application allows you to determine a student's financial aid eligibility and package aid for students who meet the financial need criteria. In addition, the system supports PELL and ISIR imports and the system is fully COD (Common Origination and Disbursement) and CommonLine compliant.
Student Services System (SSS) – The registration and student records application supports complex requirements in registration, enrollment, and grading. Your school can design and maintain a comprehensive course catalog. Authorized users can run degree audits, enroll students in courses, and process grade reports.
Student Billing System (SBS) – The student billing application is designed exclusively for student accounts receivable allowing you to accurately bill students and third-parties, manage student communications, and print billing statements.
Common (CMN) – The Common area is the central repository for shared, commonly used codes and functions which are used by all previously mentioned applications.
ISIS’s ability to interface across all applications facilitates data entry regardless of the offices entering the information and allows offices to easily share information on students, resulting in increased efficiency, accuracy, and data integrity.
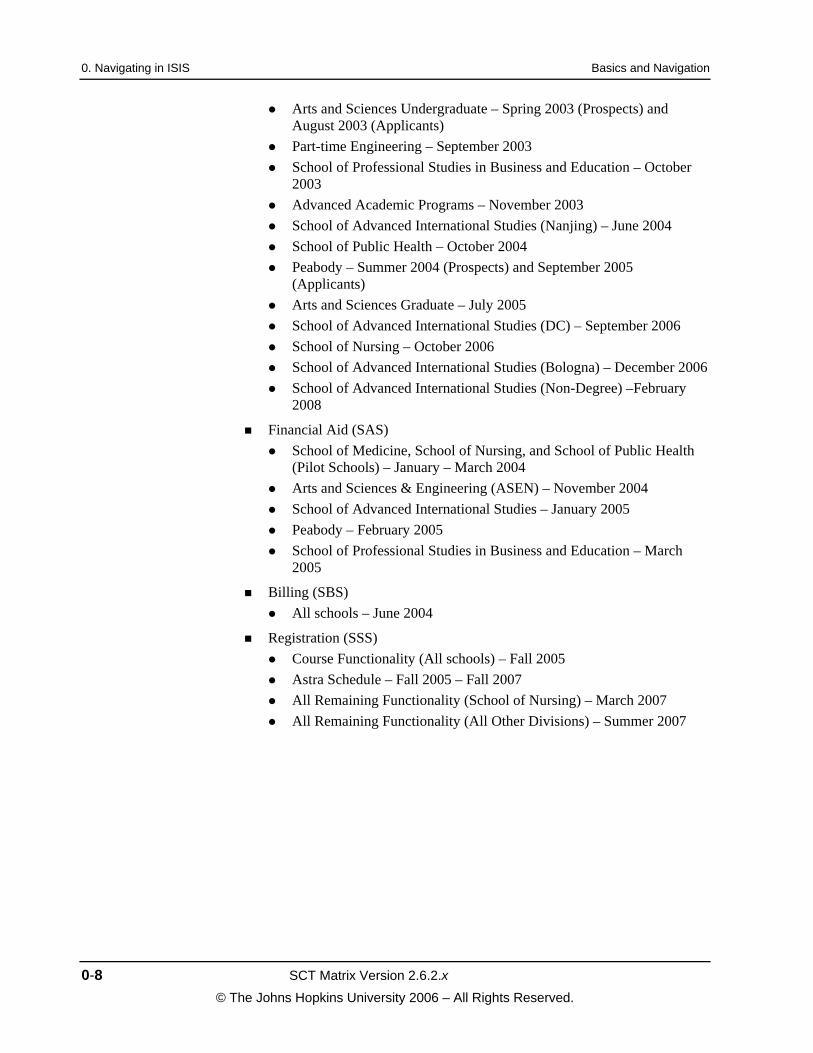
Project Timeline
In 1746, the Earl of Chesterfield said, “Whatever is worth doing at all is worth doing well.” As we have mentioned, initial work on ISIS began at Johns Hopkins in April 2001. An enormous amount of thought, planning, deliberation, and just plain hard work has already gone into the project. Some of you may be very familiar with this level of effort as you have defined codes, identified fields that will be tailored to meet your school’s unique requirements, and participated in testing.
In order to ensure that each effort receives the needed attention and resources, ISIS is using a phased approach with the implementation. In other words, each of the four applications has different go-live dates. Sometimes, the entire university will go live at once, and in other cases, each school goes live based on what date or timing best meets their business needs. Here are the proposed go-live dates as of August 2006.
Note: These dates are subject to change. As we discover new information or as our requirements of the system change, we may need to adjust our timelines to ensure that an effective system results in minimal eruption to meeting the needs of our students.
Admissions (SMS)
0. Navigating in ISIS Basics and Navigation
0-8 SCT Matrix Version 2.6.2.x
© The Johns Hopkins University 2006 – All Rights Reserved.
Arts and Sciences Undergraduate – Spring 2003 (Prospects) and August 2003 (Applicants)
Part-time Engineering – September 2003 School of Professional Studies in Business and Education – October
2003 Advanced Academic Programs – November 2003 School of Advanced International Studies (Nanjing) – June 2004 School of Public Health – October 2004 Peabody – Summer 2004 (Prospects) and September 2005
(Applicants) Arts and Sciences Graduate – July 2005 School of Advanced International Studies (DC) – September 2006 School of Nursing – October 2006 School of Advanced International Studies (Bologna) – December 2006 School of Advanced International Studies (Non-Degree) –February
2008
Financial Aid (SAS) School of Medicine, School of Nursing, and School of Public Health
(Pilot Schools) – January – March 2004 Arts and Sciences & Engineering (ASEN) – November 2004 School of Advanced International Studies – January 2005 Peabody – February 2005 School of Professional Studies in Business and Education – March
2005
Billing (SBS) All schools – June 2004
Registration (SSS) Course Functionality (All schools) – Fall 2005 Astra Schedule – Fall 2005 – Fall 2007 All Remaining Functionality (School of Nursing) – March 2007 All Remaining Functionality (All Other Divisions) – Summer 2007

Basics and Navigation 0. Navigating in ISIS
SCT Matrix Version 2.6.2.x 0-9 © The Johns Hopkins University 2006 – All Rights Reserved.
ISIS Key Terms and Concepts
Any time you implement a new system, there is a new set of terms and concepts that you must understand before you can work effectively. In order to ensure that we are all speaking the same ISIS language, let’s review some of the common terms and concepts.
Applicant Instance
SCT Matrix Student Marketing System (SMS) allows multiple applicant record instances for the same applicant. A new instance of an applicant record may be required when an applicant applies for a specific program and term. For example, an applicant who has applied to both an MBA and a PhD program warrants one applicant instance for each program. When one person has applied to two programs, the student is associated with two applicant instances, but only one person record.
Auto-Functions
ISIS is a rule-based system. Each school has defined and configured rules that tell how the system processes information to reflect the business processes. Auto-functions allows the system to evaluate specific rule criteria configured in the system, and automatically apply changes to the appropriate records in the system based on the evaluations. The logic associated with these rules determines the records to which changes are applied.
You can use the auto-functions feature in ISIS to automatically evaluate the following:
Requirements
Statuses
Communication Groups
In addition to these functions, your school may also require application-specific auto-functions. For example, SAS auto-functions also include rules for Cost of Attendance (COA) Check and Projected Enrollment Check.
Keep in mind that you can trigger auto-functions by selecting the Auto-functions toolbar button or by exiting a record or the system. By using the Auto-functions toolbar button, you can quickly see the updated data. When you use the Auto-functions toolbar button, you are unable to perform other activities in the system. When the auto-functions process is complete, the window is refreshed to reflect the results. The time required to run the auto-

0. Navigating in ISIS Basics and Navigation
0-10 SCT Matrix Version 2.6.2.x
© The Johns Hopkins University 2006 – All Rights Reserved.
functions process is based on the rules configured for your school and the number of records being processed.
Note: You can run auto-functions for persons, prospects, students, schools, and organizations.
Entity
Entity records in ISIS are defined in eight categories:
Account,
Advisor,
Faculty,
Person,
Student/Applicant,
Prospect,
Organization, and
School.
Each prospect and student record is associated with a person record. Person, school, and organization records are stored within the Common area. Prospect and student records are linked to the person record, but are stored within each application that deals directly with those records. For example, someone who has a person record in Common (CMN) can also have a student record in SMS tracking the application and admittance process. Additional student records, or instances, can be created for the same person in Student Aid System (SAS) and SCT Matrix Student Billing System (SBS) to package the student's financial aid, and to create payment plans for the student.

Basics and Navigation 0. Navigating in ISIS
SCT Matrix Version 2.6.2.x 0-11 © The Johns Hopkins University 2006 – All Rights Reserved.
Codes/Code Types
Codes are values that provide a list of predefined choices for specific lists of values (LOVs) and drop down list fields. For example, when you enter a person’s address information in a Fast Entry window, you must select a value for the Address Type field. The values that appear in the Address Type field LOV (Billing, Home, Permanent, and so forth) have been configured by representatives from your school using the Codes window. As with all data in ISIS, codes are assigned to specific zones and data domains to control and restrict access to the code values.
Duplicate Check
The duplicate check is a user-defined algorithm that ensures users do not enter duplicate entity records into the system.
Domains
Domains, or data domains, partition data for security purposes by defining sets of data to which users or responsibilities may have access. Domains are customizable, depending on the needs of your particular school, and are created during implementation.
ISIS Home Page
The ISIS Home Page is the first window that appears after you successfully sign on to the ISIS applications.
Based on your role and security permissions, you can customize your home page to display pending contacts, users actions, letters, emails, and a list of your stored queries.
List of Values (LOV)
A List of Values (LOV) is a pre-defined list of valid values for a specific field. When entering data, you can only select a value from the list. This limited selection ensures the integrity of the data. You can view the list of values
(LOV) by clicking the button next to the field.
Wildcard Characters
Wildcard characters allow you to enter pieces of information and narrow your search criteria. You can use characters such as the percent sign (%), which

0. Navigating in ISIS Basics and Navigation
0-12 SCT Matrix Version 2.6.2.x
© The Johns Hopkins University 2006 – All Rights Reserved.
represents any number of characters, or an underline (_), which represents a single character. We will discuss using wildcard characters in more detail in the Search and Retrieve Data topic later in this module.
Window
A window is an area where the user interacts with ISIS. You will use a variety of windows to perform data entry or search activities.
Window Title
The window title is the text that appears in the title bar which indicates the name of the window and, usually, context information pertinent to the information in the window.
Zones
Zones partition data for security purposes. The difference between a zone and a domain is in the way that users and responsibilities are mapped. Users and responsibilities can be mapped to zones with either only View permission or Full Access permission to the data within a particular zone. Typically, zones are used to further control access to data within a domain; however the two need not always be used in conjunction with each other. The zone setup of your system is configured during implementation prior to your go-live date.
Type and Subtype
Type and Subtype are used to identify each student’s record. The Type, Sub-type and Start Academic Period identify each unique applicant instance in the ISIS application.

Basics and Navigation 0. Navigating in ISIS
SCT Matrix Version 2.6.2.x 0-13 © The Johns Hopkins University 2006 – All Rights Reserved.
ISIS Desktop Settings
In order for any administrative staff to use ISIS, you must configure your Internet Explorer settings. ISIS currently requires Internet Explorer Version 6.0 or higher. ISIS will work on the following operating systems:
Windows XP;
Windows 2000;
Windows NT Workstation 4.0 with Service Pack 6a; and
Windows 98. Note: With the 2.5.1 release, SCT will only support Windows XP and Windows 2000, Service Pack 4 or higher.
In addition, ISIS automatically installs the following programs and controls on the computers of administrative ISIS users:
MaskedNumEdit.ocx
MSMASK32.ocx
MSCAL.ocx
SASMaskedNumEdit.ocx
ISIS automatically checks and prompts for installing the missing components when you access the application for the first time. It is important to note that, based on your browser settings, ISIS may not prompt you for the missing components. To confirm if you have each of the programs and controls installed, navigate to your system32 folder and confirm that each of these is contained there.
Note: You will know that these programs have not installed properly if the Government ID field does not display correctly.
Recommended Computer Configuration
Hopkins Information Technology Services recommends the following minimum computer configuration:
1 Ghz or faster processor
At least 256 MB of RAM
At least 200 MB of free hard disk space
A 10/100 Mbit Ethernet interface

0. Navigating in ISIS Basics and Navigation
0-14 SCT Matrix Version 2.6.2.x
© The Johns Hopkins University 2006 – All Rights Reserved.
Video resolution running at 1024x768 on a 17” monitor Note: Self-service application users (students, faculty, and advisors) have less stringent requirements. These requirements are not covered in this course.
Security Settings
In order for ISIS to work properly, confirm that the following security settings are established for your browser.
Note: These settings are accurate as of April 2004. The settings are subject to change. For the most current information, refer to ITS online document #1037.
To Establish Security Settings for ISIS
Note: The screens that you see may appear slightly different than those shown below based on your operating system and browser settings.
1. Launch Internet Explorer from your desktop or Start menu.
Internet Explorer opens to your designated home page.
Figure 0.1: Internet Explorer at JHU Home Page
2. From the Internet Explorer menu, select Tools Internet Options.
The Internet Options window appears.

Basics and Navigation 0. Navigating in ISIS
SCT Matrix Version 2.6.2.x 0-15 © The Johns Hopkins University 2006 – All Rights Reserved.
Figure 0.2: Internet Options window
3. Click the Security tab.
The Internet Options window displays the Security tab.
Figure 0.3: Internet Options window with Security tab displayed
4. Click Trusted sites.
5. Click the Sites button.
The Trusted Sites window appears.

0. Navigating in ISIS Basics and Navigation
0-16 SCT Matrix Version 2.6.2.x
© The Johns Hopkins University 2006 – All Rights Reserved.
Figure 0.4: Trusted Sites window
6. In the Add this Web site to the Zone field, type each of the addresses listed below and click the Add button after each address:
https://train.isis.jhu.edu
https://test.isis.jhu.edu
https://prod.isis.jhu.edu
Figure 0.5: Trusted Sites window with ISIS URLs
7. Select the Require server verification (https:) for all sites in this zone checkbox for each website.
8. Click OK.
The Internet Options window appears.
9. Click the Custom Level button.
The Security Settings window appears.

Basics and Navigation 0. Navigating in ISIS
SCT Matrix Version 2.6.2.x 0-17 © The Johns Hopkins University 2006 – All Rights Reserved.
Figure 0.6: Security Settings window
10. Select Enable for all of the following Active X controls:
Download signed Active X controls
Download unsigned Active X controls
Initialize and script Active X controls not marked as safe
Run Active X controls and plug-ins
Script Active X controls marked safe for scripting
11. Click OK.
The Internet Options window appears.
Note: Users of Windows XP operating system should also perform the remaining steps. All other users can click OK to close the Internet Options window.
12. Click the Advanced tab.
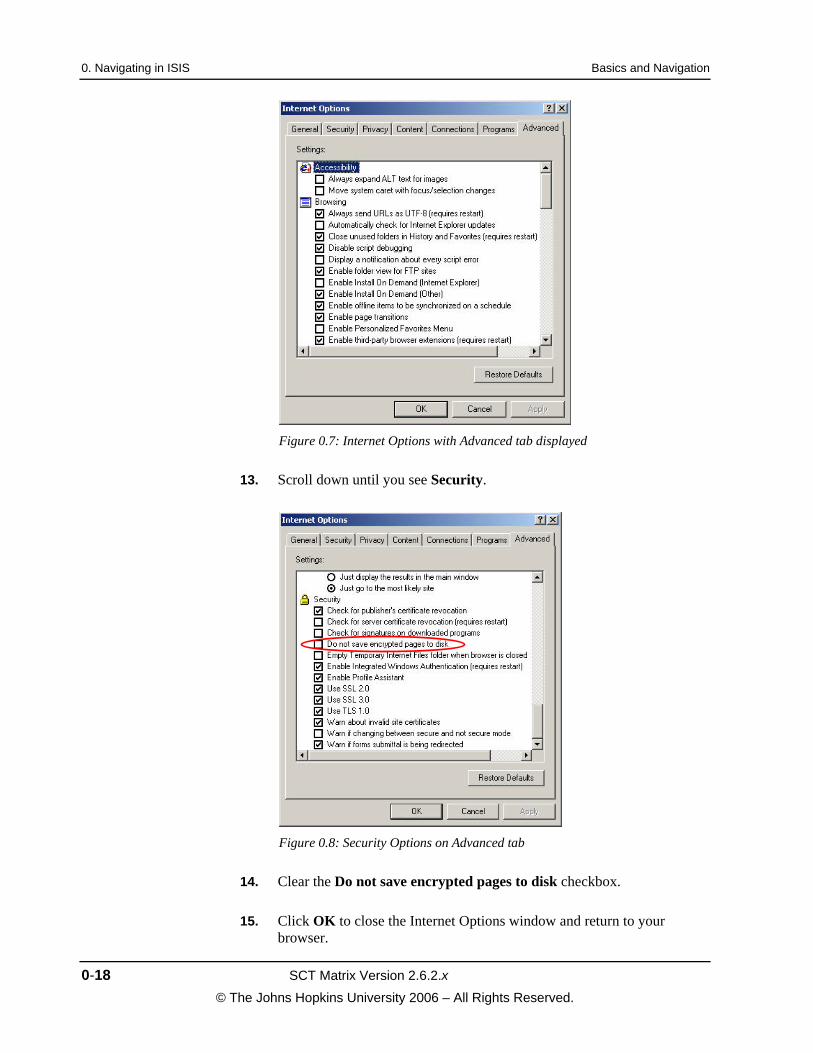
0. Navigating in ISIS Basics and Navigation
0-18 SCT Matrix Version 2.6.2.x
© The Johns Hopkins University 2006 – All Rights Reserved.
Figure 0.7: Internet Options with Advanced tab displayed
13. Scroll down until you see Security.
Figure 0.8: Security Options on Advanced tab
14. Clear the Do not save encrypted pages to disk checkbox.
15. Click OK to close the Internet Options window and return to your browser.

Basics and Navigation 0. Navigating in ISIS
SCT Matrix Version 2.6.2.x 0-19 © The Johns Hopkins University 2006 – All Rights Reserved.
Display Settings
In order you to display ISIS information correctly, you must set your display settings to 1024 x 768. It is also recommended that you use standard font sizes. Large font sizes can create problems with displaying information.
To Establish Display Settings for ISIS
1. From your Start menu, select Settings Control Panel.
2. Double click the Display icon.
The Display Properties window appears.
Figure 0.9: Display Properties window
3. Click the Settings tab.
The Settings tab of the Display Properties window appears.
0. Navigating in ISIS Basics and Navigation
0-20 SCT Matrix Version 2.6.2.x
© The Johns Hopkins University 2006 – All Rights Reserved.
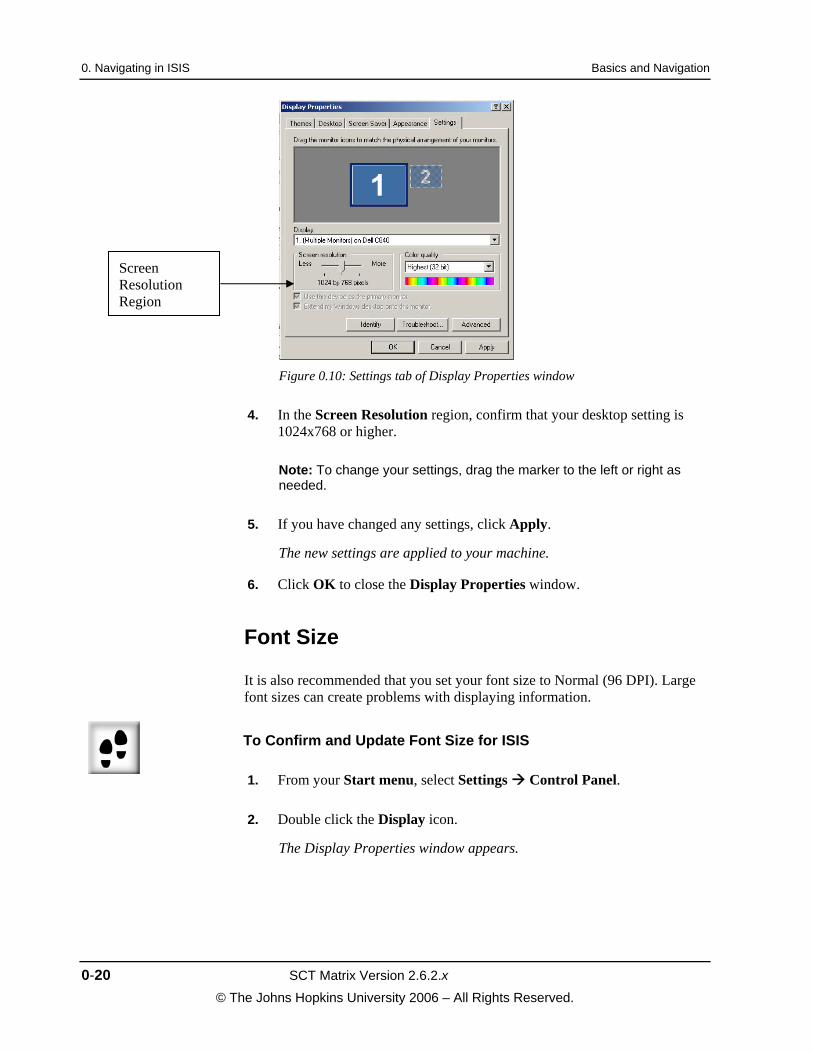
Figure 0.10: Settings tab of Display Properties window
4. In the Screen Resolution region, confirm that your desktop setting is 1024x768 or higher.
Note: To change your settings, drag the marker to the left or right as needed.
5. If you have changed any settings, click Apply.
The new settings are applied to your machine.
6. Click OK to close the Display Properties window.
Font Size
It is also recommended that you set your font size to Normal (96 DPI). Large font sizes can create problems with displaying information.
To Confirm and Update Font Size for ISIS
1. From your Start menu, select Settings Control Panel.
2. Double click the Display icon.
The Display Properties window appears.
Screen Resolution Region

Basics and Navigation 0. Navigating in ISIS
SCT Matrix Version 2.6.2.x 0-21 © The Johns Hopkins University 2006 – All Rights Reserved.
Figure 0.11: Display Properties window
3. Click the Appearance tab.
The Appearance tab of the Display Properties window appears.
Figure 0.12: Appearance tab of Display Properties window
4. In the Font Size field, use the drop-down list to select Normal.
Font Size Field

0. Navigating in ISIS Basics and Navigation
0-22 SCT Matrix Version 2.6.2.x
© The Johns Hopkins University 2006 – All Rights Reserved.
5. Click OK.
The new settings are applied to your machine and the Display Properties window closes.

Basics and Navigation 0. Navigating in ISIS
SCT Matrix Version 2.6.2.x 0-23 © The Johns Hopkins University 2006 – All Rights Reserved.
Signing on to ISIS
ISIS is accessed by administrative users through Internet Explorer (version 5.5 or higher). As a user of ISIS, you will be assigned an individual user name and password. Do not share your User ID or password with anyone. This is especially important since every transaction in the system is linked to a specific User ID. You are responsible if your User ID is used by someone else improperly.
Note: To request an ISIS User ID and password, contact your department manager.
Roles
A role is a level of authority in ISIS that allows you to access only those ISIS functions and data appropriate to complete your tasks in an organization.
Each role enables access to:
A specific application or applications, such as SMS, SAS, or SBS.
A restricted list of windows to which a user can navigate. For example, a role may allow a certain user to only view a window. Another user may have a role allowing them to enter data and make updates in the window.
A restricted list of functions that a user can perform. For example, two roles may have access to the same window, but one role may have additional function buttons that the other role's window does not have.
Each user has at least one role and several users can share the same role.
Note: If you have multiple roles, you can switch your role at any time by clicking the Role toolbar button.
Now that we have a basic understanding of the importance of User IDs, passwords, and responsibilities, let’s practice signing on to ISIS.
To Sign On to ISIS in a Windows Environment (Except XP)
1. Launch Internet Explorer from your desktop or Start menu.
Internet Explorer opens to your designated home page.
0. Navigating in ISIS Basics and Navigation
0-24 SCT Matrix Version 2.6.2.x
© The Johns Hopkins University 2006 – All Rights Reserved.
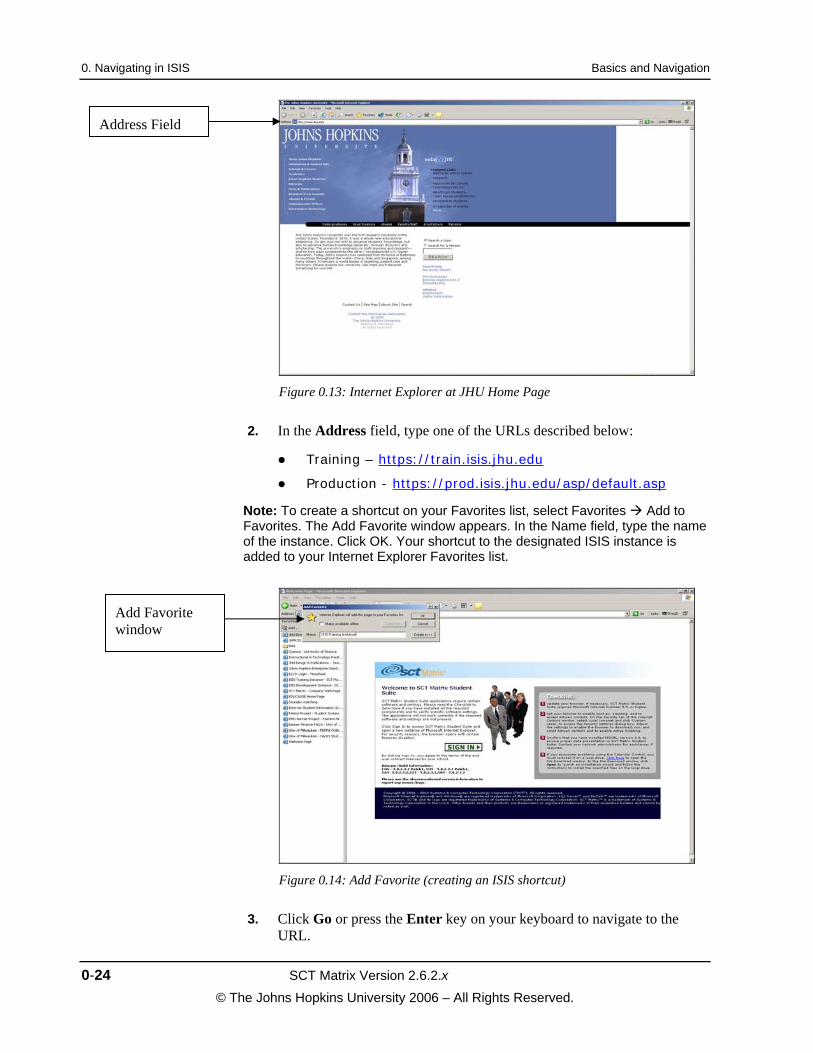
Figure 0.13: Internet Explorer at JHU Home Page
2. In the Address field, type one of the URLs described below:
Training – https://train.isis.jhu.edu
Production - https://prod.isis.jhu.edu/asp/default.asp
Note: To create a shortcut on your Favorites list, select Favorites Add to Favorites. The Add Favorite window appears. In the Name field, type the name of the instance. Click OK. Your shortcut to the designated ISIS instance is added to your Internet Explorer Favorites list.
Figure 0.14: Add Favorite (creating an ISIS shortcut)
3. Click Go or press the Enter key on your keyboard to navigate to the URL.
Address Field
Add Favorite window

Basics and Navigation 0. Navigating in ISIS
SCT Matrix Version 2.6.2.x 0-25 © The Johns Hopkins University 2006 – All Rights Reserved.
Note: If your operating system is Windows XP, use the XP steps that are outlined in the next section.
A window appears, asking for your user name, password, and domain.
Figure 0.15: Enter Network Password window
4. In the User Name field, type your User Name.
Note: For example, Jane Smith (jsmith1) would type “jsmith1.” Your user name is your JHED ID.
5. In the Password field, type your password.
6. In the Domain field, type WIN.
7. Click OK.
The SCT Matrix window appears.

0. Navigating in ISIS Basics and Navigation
0-26 SCT Matrix Version 2.6.2.x
© The Johns Hopkins University 2006 – All Rights Reserved.
Figure 0.16: Welcome to SCT Matrix Student Suite – Continue button
Note: If you are working in any instance other than PROD, you may need to also select which database you wish to work in.
8. Click the Continue button.
Based on your level of access and the number of roles, the Switch Role window may appear.
Figure 0.17: Switch Role window
9. Select the appropriate role for use during the session.
You are now successfully signed on!
Windows XP
Unlike the other versions of Windows, you will not have to enter a domain at the initial user name and password window for Windows XP computers.
Continue button

Basics and Navigation 0. Navigating in ISIS
SCT Matrix Version 2.6.2.x 0-27 © The Johns Hopkins University 2006 – All Rights Reserved.
To Login to ISIS on a Windows XP computer
1. Launch Internet Explorer.
2. In the Address field, type https://prod.isis.jhu.edu.
A window appear, asking for your user name and password.
Figure 0.18: Enter Network Password window for XP users
3. In the User Name field, type WIN\Your User Name.
Note: For example, Jane Smith (jsmith1) would type “WIN\jsmith1.”
4. In the Password field, type your password.
5. Click OK.
The SCT Matrix window appears.

0. Navigating in ISIS Basics and Navigation
0-28 SCT Matrix Version 2.6.2.x
© The Johns Hopkins University 2006 – All Rights Reserved.
Figure 0.19: Welcome to SCT Matrix Student Suite window
6. Click Continue.
The Switch Role window appears.
7. Select the appropriate Role.
The ISIS/SCT Matrix Home Page window appears.
Figure 0.20: ISIS/SCT Matrix Home Page window
Note: Notice that you have two windows for ISIS in your taskbar. Keep both of these windows open at all times.
Congratulations! You are now successfully signed on to ISIS.
Continue button

Basics and Navigation 0. Navigating in ISIS
SCT Matrix Version 2.6.2.x 0-29 © The Johns Hopkins University 2006 – All Rights Reserved.
Changing your Password
Periodically, you should change your password to ensure the security of information in the ISIS system. As we mentioned earlier, you should not share your User ID or password with other users.
As of August 2004, you cannot change your password using the Password button in ISIS. When you click the Password button, the following window will appear:
Figure 0.21: Change Password window from within ISIS
You must now change your password through JHED or by contacting the IT @ Hopkins Help Desk at 410-516-HELP (410-516-4357).
Your password should be an alphanumeric combination that is at least 6 characters long.
What is JHED?
JHED is the Johns Hopkins Enterprise Directory that has been built by the Enterprise Services Group to provide information to people, applications, and online resources about faculty, students, and staff within the Johns Hopkins organization. The Directory is updated nightly from the various systems of record across the institution.
You can access JHED at the following URL: https://jhed.johnshopkins.edu/.
To Change Your ISIS Password
1. Launch Internet Explorer and type https://jhed.johnshopkins.edu/.

0. Navigating in ISIS Basics and Navigation
0-30 SCT Matrix Version 2.6.2.x
© The Johns Hopkins University 2006 – All Rights Reserved.
The JHED Home Page appears.
Figure 0.22: JHED Home page
2. Click the Login tab.
The Login page for JHED appears.
Figure 0.23: JHED Login page
3. In the Login ID (LID) field, type your JHED ID.
4. In the Password field, type your JHED password.
5. Click Submit Login Request Now!.
Basics and Navigation 0. Navigating in ISIS
SCT Matrix Version 2.6.2.x 0-31 © The Johns Hopkins University 2006 – All Rights Reserved.
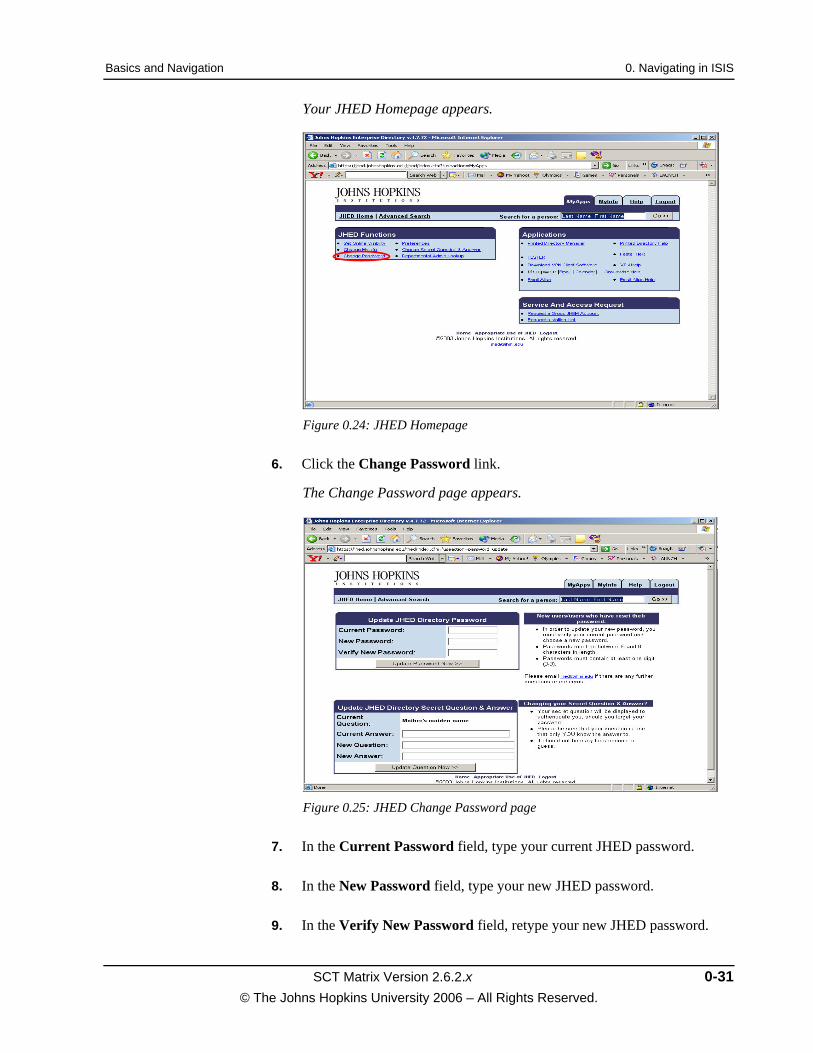
Your JHED Homepage appears.
Figure 0.24: JHED Homepage
6. Click the Change Password link.
The Change Password page appears.
Figure 0.25: JHED Change Password page
7. In the Current Password field, type your current JHED password.
8. In the New Password field, type your new JHED password.
9. In the Verify New Password field, retype your new JHED password.

0. Navigating in ISIS Basics and Navigation
0-32 SCT Matrix Version 2.6.2.x
© The Johns Hopkins University 2006 – All Rights Reserved.
10. Click the Update Password Now button.
A message appears regarding your JHED Password and the LAN/Windows password.
Figure 0.26: LAN/Windows Password message
11. Click OK.
A message appears confirming that your password has been changed.
12. Click OK.
Your password is now changed!
Signing Off of ISIS
It is extremely important to exit the system by following these steps. This will protect your User ID from unauthorized access and ensure that you are cleared from the system. You will notice that some of the windows have changed with the 2.5.1 release.
To Sign Off of ISIS
1. Click the Logout toolbar button.
The SCT Matrix Home Page window closes.

Basics and Navigation 0. Navigating in ISIS
SCT Matrix Version 2.6.2.x 0-33 © The Johns Hopkins University 2006 – All Rights Reserved.
Figure 0.27: Logout window
2. Click Close.
The Sign Off message appears.
Figure 0.28: Sign Off Confirmation message
3. Click Yes to sign out.
You are now successfully signed off of ISIS.

0. Navigating in ISIS Basics and Navigation
0-34 SCT Matrix Version 2.6.2.x
© The Johns Hopkins University 2006 – All Rights Reserved.
Exercise 0–1: The Basics of ISIS
Answer the questions in this section to validate your understanding of the concepts in this topic. Refer to the topic for any help as necessary.
1. Johns Hopkins University is implementing ISIS which consists of __________________ applications.
2. The ISIS project will replace applications related to _______________________________________________________ .
3. Using the User ID and Password provided by your instructor, practice signing on and off the system.
4. True or False. Each user is assigned only one role in order to perform his/her tasks.

Basics and Navigation 0. Navigating in ISIS
SCT Matrix Version 2.6.2.x 0-35 © The Johns Hopkins University 2006 – All Rights Reserved.
Window Components
Unlike some of your current systems, ISIS is a web-based application. Many of you may see similarities with other applications such as Microsoft Word. This section describes the key components which are common to all of the ISIS windows. The following sections outline the components, provide a description, and suggest possible uses for each item.
Figure 0.29: Application window components
Required Fields
System-required fields are designated with a red asterisk. You must populate these fields before saving the record.
Note: There may be fields that your school requires that are not marked with a red asterisk. Follow your school’s business practices and procedures in completing fields.
Title Bar
User Menu
Application Menu Application Toolbar
Status Line
Displays selected records for easy access

0. Navigating in ISIS Basics and Navigation
0-36 SCT Matrix Version 2.6.2.x
© The Johns Hopkins University 2006 – All Rights Reserved.
Status Indicators
There are a number of status indicators to help you when you are processing transactions, searching for records, or performing inquiry tasks. Let’s take a closer look at each of these:
Figure 0.30: SBS Status Indicators
Note: In order to view the Status message, you must maximize the Matrix/ISIS window.
Read-Only Field
Read-only fields contain data that is not editable. When a field is read-only, you either do not have permission within your role to update the data or you may need to access another window in order to edit the information. Read-only fields are shaded a light-gray color.
FERPA-Protected Field
When you are reviewing data in a summary window, data displayed in red is protected under the Family Educational Rights and Privacy Act (FERPA). This information is confidential and cannot be disclosed to a third-party.
Status Indicator
Status Indicator
Status Indicator
Status Message

Basics and Navigation 0. Navigating in ISIS
SCT Matrix Version 2.6.2.x 0-37 © The Johns Hopkins University 2006 – All Rights Reserved.
Drop-Down List
A drop-down list provides a short pre-defined set of values that you can choose from to populate a field. You will click the arrow next to the field to view the list. You can also press Tab to select the drop-down list and use the up and down arrow on your keyboard to select a value.
Calendar Feature and Dates
Figure 0.31: Calendar Selection window
You can quickly populate a date field using the Calendar feature. This allows you to select a date from a calendar rather than manually type the date.
After selecting the date, the Calendar allows you to use left and right arrows to navigate through the months. You can quickly select the year using a drop-down list.
List of Values (LOV)
The List of Values (LOV) feature is very useful while entering data in ISIS. It provides you with a powerful, easy-to-use data entry method that increases your accuracy and productivity. Using the LOV makes data entry an easy task for novice users, and experienced users can enter correct data with a minimum number of keystrokes.
ISIS notifies you when a list of acceptable input values is available for a field
by displaying an LOV icon. When you click on the icon, the list displays – values appear in a window with a title that describes the contents. A value must be present in the List of Values in order to be entered in a LOV field. The Find field within a LOV window is not case sensitive.

0. Navigating in ISIS Basics and Navigation
0-38 SCT Matrix Version 2.6.2.x
© The Johns Hopkins University 2006 – All Rights Reserved.
By using the LOV feature, you can save time and enter data quickly without having to memorize or look up valid data for each field. You can choose data from an online list of valid input choices whenever you want. Additionally, you are relying on ISIS to validate your input since you will know right away if your entry does not match an option from the LOV.
Also, wildcard characters can be used in the find field– you can use the percent “%” wildcard character to represent any character or group of characters. You can also use the underscore “_” character to represent a single character. We will discuss wildcard characters a little later in this module.
Choosing a Value from a List
To choose a value from a list, click on the LOV button. If you do not want to view the entire list selection, you can reduce the length of a list, or select directly from the list by using some of the methods described below:
Click the LOV icon and select a value directly with the mouse by double-clicking on it.
List Search – You can use an AutoReduction feature to reduce a list when you know the first few characters of your name selection. If you do not know the initial characters of your choice, but do know that your choice contains a certain word or set of characters, you can perform a list search to reduce the list. Click in the Find field and enter any group of characters (using wildcard characters as needed) and click the Find button.
Quick Entry – The Quick Entry feature provides an even faster method of data entry. If a field displays List of Values on the status line and you know the value you want, simply enter the first few characters of the value in the field and press the Tab key. Quick Entry will complete the entry for you. You can include wildcard characters with your entry. You do not need to display the list window.
Application Toolbar
The Applications toolbar activates many commonly used menu functions so you can eliminate searching through the menu bar or using keyboard shortcuts.
Figure 0.32: Application Toolbar
Let’s review each of the toolbar icons in greater detail.

Basics and Navigation 0. Navigating in ISIS
SCT Matrix Version 2.6.2.x 0-39 © The Johns Hopkins University 2006 – All Rights Reserved.
Back Button
The Back button returns you to the previously displayed window.
Note: It is important to note that it may not display the data previously displayed.
New Window Button
The New Window button allows you to open a second window in the role which you are currently working. This is especially useful if you are working in the system entering transactions and you need to answer the phone or respond to a student request. Previously, you had to stop what you were working on.
Note: The keyboard shortcut for New Window is CTRL + N.
The new window displays the menu that corresponds to the role used for the initial login.
Figure 0.33: New window
Note: The Role and Logout buttons are not activated on the child windows that you open by clicking the New Window button. Opening multiple windows enables you to work simultaneously with more than one function.
Alert Button
The Alert button displays any warning messages related to the record. When an alert is associated with a record, the Alerts column will be selected on the
Notice the Role and Logout buttons are not available in the secondary windows.

0. Navigating in ISIS Basics and Navigation
0-40 SCT Matrix Version 2.6.2.x
© The Johns Hopkins University 2006 – All Rights Reserved.
Search Results window. A message is also displayed at the top of any window you access for that record.
Note: Alerts notifiy you about a variety of information related to the student’s record. We will discuss specific alerts later in the training.
Quick Find Button
The Quick Find button displays the Quick Find window. From the Quick Find window, you can select the application (SMS, SAS, and so forth), the record, and the field value for which you wish to search. Specify a value that is appropriate for the field that you have selected. For example, if you selected the Last Name field, enter an applicant’s last name as the value for the field. The system then searches for the entity that matches your criteria and displays your all matching entries in the Results window.
Search Button
The Search button allows you to access the associated entity search window. This window is the standard window that appears when you access any of the Summary windows. It allows you to perform a more robust search using any of the fields available. In addition, you can press Ctrl+Shift+F to perform a standard search.
Auto-Functions Button
The Auto-Functions button allows you to run Auto-Functions for the selected record. Keep in mind that auto-functions applies any rules defined for your area based on the changes that you have made to the selected record. As we mentioned earlier, Auto-Functions run automatically when you close a window or exit the system. This button allows you to easily execute this feature without closing a window or exiting the system.
Note: Always remember to save your work prior to clicking the Auto-Functions button.

Basics and Navigation 0. Navigating in ISIS
SCT Matrix Version 2.6.2.x 0-41 © The Johns Hopkins University 2006 – All Rights Reserved.
Results Button
The Results button allows you to access the last results window that you viewed. This is especially useful if you just performed a search, selected a record, and now you wish to review the results and select a different record. In addition, you can press Ctrl+Shift+M to view the most recent results window.
Note: This only displays the Most Recent set of results.
Role Button
The Role button allows you to access the Switch Roles window. You can switch roles between applications from this window. Keep in mind that the role you select determines what data you have access to and whether you can add, update or delete that data. For example, if you want to switch your role from SAS to SMS without logging out of ISIS entirely, click the Role button. In addition, you can press Ctrl+Shift+R to switch roles.
Password Button
As of August 2004, you cannot change your password using the Password button in ISIS. You must now change your password through JHED or by contacting the IT @ Hopkins Help Desk at 410-516-HELP (410-516-4357).
Profile Button
The Profile button takes you to the User Profiles – Web Page Dialog window. The User Profiles feature allows you to define profile values across the application. Profiles are configured to reduce data entry time for users who access the same data values repeatedly on several windows. We will talk about this feature in more detail later in this module.
0. Navigating in ISIS Basics and Navigation
0-42 SCT Matrix Version 2.6.2.x
© The Johns Hopkins University 2006 – All Rights Reserved.
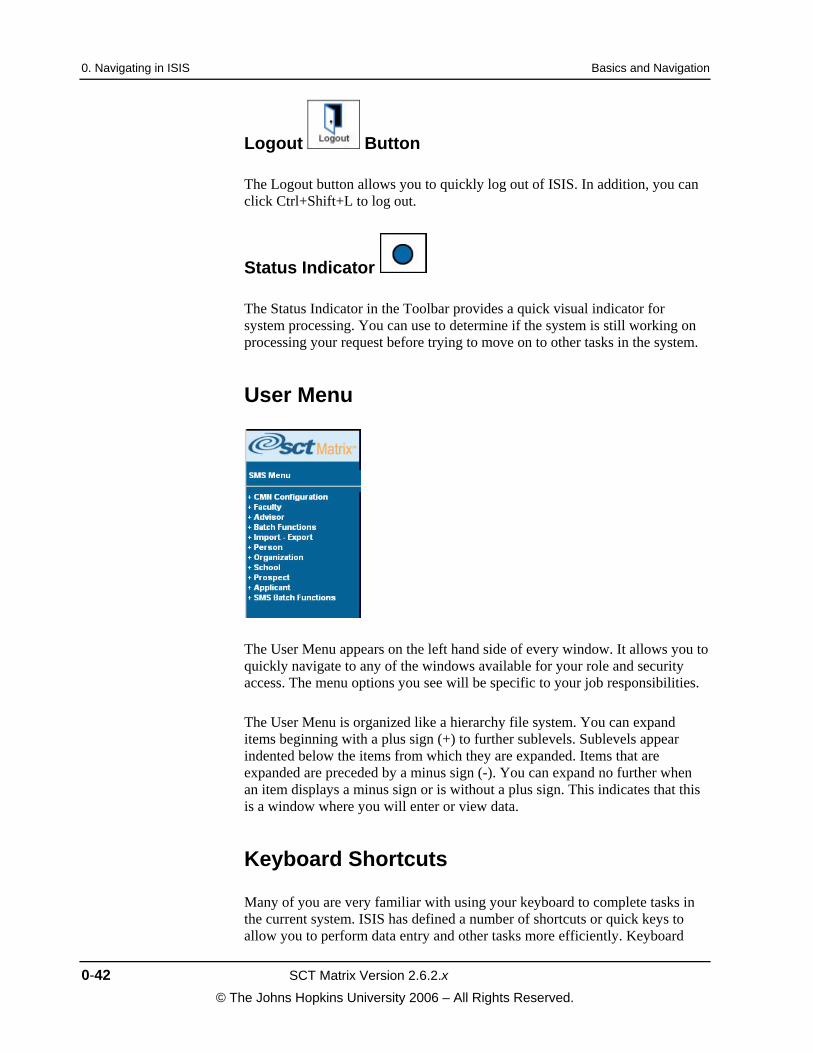
Logout Button
The Logout button allows you to quickly log out of ISIS. In addition, you can click Ctrl+Shift+L to log out.
Status Indicator
The Status Indicator in the Toolbar provides a quick visual indicator for system processing. You can use to determine if the system is still working on processing your request before trying to move on to other tasks in the system.
User Menu
The User Menu appears on the left hand side of every window. It allows you to quickly navigate to any of the windows available for your role and security access. The menu options you see will be specific to your job responsibilities.
The User Menu is organized like a hierarchy file system. You can expand items beginning with a plus sign (+) to further sublevels. Sublevels appear indented below the items from which they are expanded. Items that are expanded are preceded by a minus sign (-). You can expand no further when an item displays a minus sign or is without a plus sign. This indicates that this is a window where you will enter or view data.
Keyboard Shortcuts
Many of you are very familiar with using your keyboard to complete tasks in the current system. ISIS has defined a number of shortcuts or quick keys to allow you to perform data entry and other tasks more efficiently. Keyboard

Basics and Navigation 0. Navigating in ISIS
SCT Matrix Version 2.6.2.x 0-43 © The Johns Hopkins University 2006 – All Rights Reserved.
shortcuts are a quick way to navigate and perform a variety of functions within ISIS without using the mouse.
Note: You will notice as you mouse over many of the Toolbar icons that there is a pop-up that describes the keyboard shortcut to perform the same function.
Keyboard Shortcut Description
F1 Help
Ctrl+Shift+S or
Alt+S
Save
Alt+C or
Esc
Cancel
Alt+D Delete Record
Alt+R Clear Record
Esc Clear the last field that you populated
Esc Esc Clear all fields on the window
Alt+S Select Record
Alt+A or Alt+L Select all records displayed – which shortcut you use is dependent upon which application you are working in
Ctrl+T Add row to data display
Ctrl+Shift+H Home
Ctrl+Shift+B Back
Ctrl+Shift+A Alerts
Ctrl+Shift+Q Quick Find
Ctrl+Shift+F Standard Find
Ctrl+Shift+M Display most recent results
Ctrl+Shift+R Switch Roles
Ctrl+Shift+W Change Password
Ctrl+Shift+U User Profiles
Ctrl+Shift+X Exit Current Window
Ctrl+Shift+L Logoff
Keyboard Shortcuts for Regions
Many of you are very familiar with using your keyboard to complete tasks in Matrix. In order to further enhance the usability of Matrix, keyboard shortcuts have been added to the rollup regions.

0. Navigating in ISIS Basics and Navigation
0-44 SCT Matrix Version 2.6.2.x
© The Johns Hopkins University 2006 – All Rights Reserved.
Figure 0.34: Rollup region – Keyboard shortcuts

Basics and Navigation 0. Navigating in ISIS
SCT Matrix Version 2.6.2.x 0-45 © The Johns Hopkins University 2006 – All Rights Reserved.
Exercise 0–2: ISIS Fundamentals
Answer the questions in this section to validate your understanding of the concepts in this topic. Refer to the topic for any help as necessary.
1. What is an LOV and how do you access it in ISIS? ______________________________________________________________________________________________________________________________________________________________________________
4. Identify two ways to save information in ISIS. _______________________________________________________ .
5. Practice navigating through your ISIS menu. Expand and collapse the menu selections.
6. How do you know when a field is required in ISIS? __________________________________________________________________________________________________________________
7. True or False. There is only one method for selecting a value from a field with a List of Values (LOV).
2. In ISIS, what color is FERPA-protected data?

0. Navigating in ISIS Basics and Navigation
0-46 SCT Matrix Version 2.6.2.x
© The Johns Hopkins University 2006 – All Rights Reserved.
Search and Retrieve Data
A Search for [Entity] window enables you to look up records. From the search results, you have the option to select one or more records. Search windows display specific fields for records defined in eight categories or entities:
Person,
Prospect,
Student/Applicant,
Organization,
Account,
School,
Advisor, and
Faculty.
Figure 0.35: Search for [Entity] window
There are three main actions that will initiate entity look up. The Search for [Entity] window displays when you perform the following actions:
Click a Lookup link. For example, click Person Lookup from the Person Relationships window to search for a specific person to add as a relationship to the selected entity record.

Basics and Navigation 0. Navigating in ISIS
SCT Matrix Version 2.6.2.x 0-47 © The Johns Hopkins University 2006 – All Rights Reserved.
Open an application and select a specific entity window from the entity menu. For example, select Person Summary from the Person menu to access the Person Summary window for one or more person records.
Click the Search button while on an entity window. For example, you are on the Person Letters window for John Acton and you decide that you want to view the letter information for Karen Norwell.
From the Search for [Entity] window, specify search criteria for the pool of entity records that you want to access. Remember that you can use wildcard characters to assist with your search.
You can limit or expand your criteria to search for one or more records at a time. If only one record matches your search criteria, the matching record appears for the appropriate entity function window. If multiple records meet your search criteria, you can select any number of the available records from the [Entity] Search Results window. When you select multiple records, the right pane displays the list of entity records that are not displayed on the main window.
Figure 0.36: [Entity] Search Results window
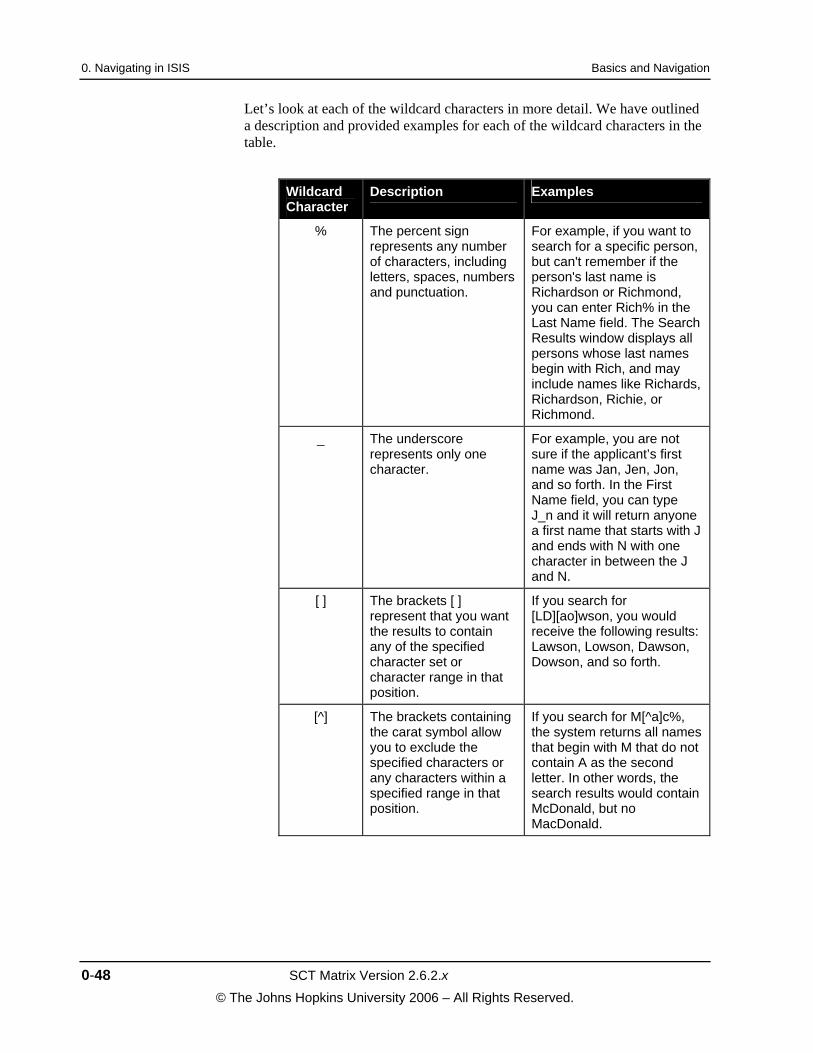
Wildcard Characters
Wildcard characters allow you to enter pieces of information and narrow your search criteria. You can use characters such as the percent sign (%), which represents any number of characters, or an underscore (_), which represents a single character. You can also use brackets to include ([ ]) or exclude ([^]) specific characters from your search criteria.
0. Navigating in ISIS Basics and Navigation
0-48 SCT Matrix Version 2.6.2.x
© The Johns Hopkins University 2006 – All Rights Reserved.
Let’s look at each of the wildcard characters in more detail. We have outlined a description and provided examples for each of the wildcard characters in the table.
Wildcard Character
Description Examples
% The percent sign represents any number of characters, including letters, spaces, numbers and punctuation.
For example, if you want to search for a specific person, but can't remember if the person's last name is Richardson or Richmond, you can enter Rich% in the Last Name field. The Search Results window displays all persons whose last names begin with Rich, and may include names like Richards, Richardson, Richie, or Richmond.
_ The underscore represents only one character.
For example, you are not sure if the applicant’s first name was Jan, Jen, Jon, and so forth. In the First Name field, you can type J_n and it will return anyone a first name that starts with J and ends with N with one character in between the J and N.
[ ] The brackets [ ] represent that you want the results to contain any of the specified character set or character range in that position.
If you search for [LD][ao]wson, you would receive the following results: Lawson, Lowson, Dawson, Dowson, and so forth.
[^] The brackets containing the carat symbol allow you to exclude the specified characters or any characters within a specified range in that position.
If you search for M[^a]c%, the system returns all names that begin with M that do not contain A as the second letter. In other words, the search results would contain McDonald, but no MacDonald.

Basics and Navigation 0. Navigating in ISIS
SCT Matrix Version 2.6.2.x 0-49 © The Johns Hopkins University 2006 – All Rights Reserved.
Navigating between Records of Different Types
The ISIS search feature includes the ability to toggle between records of different types. This feature applies to specific entities, determined by application. For example, you can toggle between the prospect and applicant record on an individual in SMS.
After you select a group of records, you can switch between functions for specific entity types without performing a new search. Functions are typically divided by entity type in the menu. The right pane displays all records you selected from the Search Results window. When a record is displayed in gray, this indicates that a record does not exist for the selected function. For example if you were reviewing applicants and switched to the Prospect menu – those applicants without a prospect record would appear in gray.
You can switch between functions for the following entity types:
account/person – If you are reviewing a student’s account information in SBS, you can also toggle to the person data for the selected students.
person/advisor - When you click a menu item for an advisor from any of the person windows, the advisor instance of the current person displays in the main pane. This toggling feature functions in the same way when navigating from an advisor function to a person function.
person/applicant - When you click a menu item for an applicant from any of the person windows, the applicant instance of the current person displays in the main pane. This toggling feature functions in the same way when navigating from an applicant function to a person function. You may be limited in what applicant records are viewable for a person based on your role and security access.
person/student - When you click a menu item for a student from any of the person windows, the student instance of the current person displays in the main pane. This toggling feature functions in the same way when navigating from a student function to a person function.
person/prospect - When you click a menu item for a prospect from any of the person windows, the prospect instance of the current person displays in the main pane. This toggling feature functions in the same way when navigating from a prospect function to a person function.
prospect/applicant - When you click a menu item for an applicant from any of the prospect windows, the applicant instance of the current prospect displays in the main pane. This toggling feature functions in the same way when navigating from an applicant function to a prospect function.
person/faculty - When you click a menu item for a faculty record from any of the person windows, the faculty instance of the current person displays in the main pane.

0. Navigating in ISIS Basics and Navigation
0-50 SCT Matrix Version 2.6.2.x
© The Johns Hopkins University 2006 – All Rights Reserved.
Prospect and Applicant Integrated Lookup
The Search for Applicants and Search for Prospects windows include a button that enables you to perform a simultaneous search for both prospect and applicant records, using the criteria entered on the search window. If you click Full Prospect/Applicant Search, the results display on a separate Prospect/Applicant Lookup Results window. From this window, you have the option to select only a prospect instance record or only an applicant instance record. The Results window displays name, government identifier, system identifier, type, subtype, and gender information to enable you to select the appropriate record.
Practicing Searching
We are now ready to practice searching for information. We will use the Search for Applicants and Search for Prospects windows, as well as wildcard characters to retrieve information on the system.
In order to facilitate this process, we are going to use the Applicant Summary window to practice searching and retrieving data. Later in the course, you will spend additional time retrieving data specific to your application.
To Search for a Record
1. From the SMS menu, select Applicant Summary.
The Search for Applicants – Web Page Dialog window appears.
Note: You can also select any of the applicant detail menu items to get to the Search for Applicants window.

Basics and Navigation 0. Navigating in ISIS
SCT Matrix Version 2.6.2.x 0-51 © The Johns Hopkins University 2006 – All Rights Reserved.
Figure 0.37: Search for Applicants – Web Page Dialog window
2. Enter criteria in all of the applicable fields to retrieve the applicants to which you want to add or update information.
Note: The easiest search criterion to use is the combination of First and Last Name. Use the wildcard symbol (%) if you are not sure of the spelling of a name.
3. Click Find.
If more than one applicant meets your search criteria, the Applicant Search Results – Web Page Dialog displays all records matching your criteria.

0. Navigating in ISIS Basics and Navigation
0-52 SCT Matrix Version 2.6.2.x
© The Johns Hopkins University 2006 – All Rights Reserved.
Figure 0.38: Applicant Search Results – Web Page Dialog displaying matching records
4. Select the applicant that you want to review or update from the Applicants Search Results – Web Page Dialog box.
Note: The record that is selected is highlighted in blue. You can select multiple student records by holding the CTRL key and clicking each record.
5. Click Select.
The Applicant Summary window appears with the Applicant meeting your search criteria.
Figure 0.39: Applicant Summary Window with list of multiple applicants
This area displays the records selected on the search results window.

Basics and Navigation 0. Navigating in ISIS
SCT Matrix Version 2.6.2.x 0-53 © The Johns Hopkins University 2006 – All Rights Reserved.
Stored Queries
Now that we have an understanding of searching and using queries, let’s review how we can store information for commonly used searches. You can create a stored query to simplify the search for entities for which you frequently search.
Stored queries enable you to perform searches for a specific group of records, without the need to repeatedly enter search criteria each time you look up one or more records. Stored queries are available to specific users. End users can create and save stored queries for their own use, while administrators can create and save stored queries assigned to many users or responsibilities.
Note: You cannot modify a stored query.
It is important to remember to name your stored queries with enough detail and description that you can easily identify the type of data that will be returned. You will not see your query criteria when you select the query from the My Queries list of values (LOV).
To Add a Query to Your My Queries List
1. Navigate to the Search for [Entity] window for which you want to create a stored query.
Figure 0.40: Search for [Entity] window
Add Button

0. Navigating in ISIS Basics and Navigation
0-54 SCT Matrix Version 2.6.2.x
© The Johns Hopkins University 2006 – All Rights Reserved.
2. Type or use the LOV to select a search criteria value in each of the desired fields.
3. Click Add.
The Save Query – Web Page Dialog window appears.
Figure 0.41: Save Query – Web Page Dialog window
4. The Application field defaults to the application in which you are currently working.
5. In the Name field, type a unique name that describes the query. For example, if you are creating a query to search for all persons who have addresses in Massachusetts, you could name your query Persons from Massachusetts.
6. The Valid From date defaults to the current date.
7. In the Valid To field, type or use the calendar feature when you want this query to expire. In other words, the query is no longer available after the Valid To date entered.
8. Click Save.
Your query is now added to the My Queries list of values (LOV).
Basics and Navigation 0. Navigating in ISIS
SCT Matrix Version 2.6.2.x 0-55 © The Johns Hopkins University 2006 – All Rights Reserved.
Exercise 0–3: Search and Retrieve ISIS Information
Answer the following questions to validate your understanding of the concepts in this topic. Refer to the topic for any help as necessary.
1. What are the two wildcard characters used in ISIS and give an example of how you would use each one?
2. Name and describe the appearance of the Application Toolbar button that will take you to the Search for [Entity] window. _______________________________________________________ .
3. Using the search criteria provided by your instructor, practice creating stored queries.
4. Using the information provided by the instructor, search for students and record your answer: _________________________________________ .
5. True or False. When searching from the Prospect Summary window, you can choose to search for both Prospects and Applicants.

0. Navigating in ISIS Basics and Navigation
0-56 SCT Matrix Version 2.6.2.x
© The Johns Hopkins University 2006 – All Rights Reserved.
Customizing Your ISIS Home Page
ISIS allows you to customize the appearance of your home page using the Home Page Maintenance function. The Home Page is the first window that appears after you log in and select a role. Based on your security and permissions, your home page can display a variety of information, including:
Pending contacts,
User actions,
Letters,
E-mails, and
A record of your stored queries.
Using the Home Page Maintenance function, you will specify which sections appear, the information contained in each section, and if any of the sections automatically open when you access your home page.
Note: The more items you select to be shown and expanded on your home page, the longer it will take your home page to load. It is recommended that you expand only one or two items as the default.
To Configure Your Home Page Settings
1. Sign on to ISIS and select your role.
The Home Page window appears.
Figure 0.42: Home Page Maintenance link

Basics and Navigation 0. Navigating in ISIS
SCT Matrix Version 2.6.2.x 0-57 © The Johns Hopkins University 2006 – All Rights Reserved.
2. Click the Home Page Maintenance link.
The Home Page Maintenance window appears.
Figure 0.43: Home Page Maintenance window
Note: You should only select one or two items to display on your home page. The more items you select to be shown and expanded on your home page, the longer it will take your home page to load.
3. To display Pending Contact information on your home page, select the Show Pending Contacts checkbox.
The fields in the Show Pending Contacts region are activated for your selection.
Figure 0.44: Show Pending Contacts region
4. Select the Expanded checkbox to have the Pending Contacts section open when you access your home page.
5. In the Show Contacts drop down list, select the one of the following options identifying which contacts to display:

0. Navigating in ISIS Basics and Navigation
0-58 SCT Matrix Version 2.6.2.x
© The Johns Hopkins University 2006 – All Rights Reserved.
Assigned to me
Assigned to my responsibility
Show all
6. In the Entity drop down list, select the entity for which you want to display pending contacts:
All
Person
Organization
School
Prospect
Student
7. To display pending user actions on your home page, select the Show Pending User Actions checkbox.
The fields in the Show Pending User Actions region are activated for your selection.
Figure 0.45: Show Pending User Actions region
8. Select the Expanded checkbox to have the Pending User Actions section open when you access your home page.
9. In the Show User Actions drop down list, select the one of the following options identifying which contacts to display:
Assigned to me
Assigned to my responsibility
Show all
10. In the Entity drop down list, select the entity for which you want to display pending user actions:
All
Person
Basics and Navigation 0. Navigating in ISIS
SCT Matrix Version 2.6.2.x 0-59 © The Johns Hopkins University 2006 – All Rights Reserved.
Organization
School
Prospect
Student
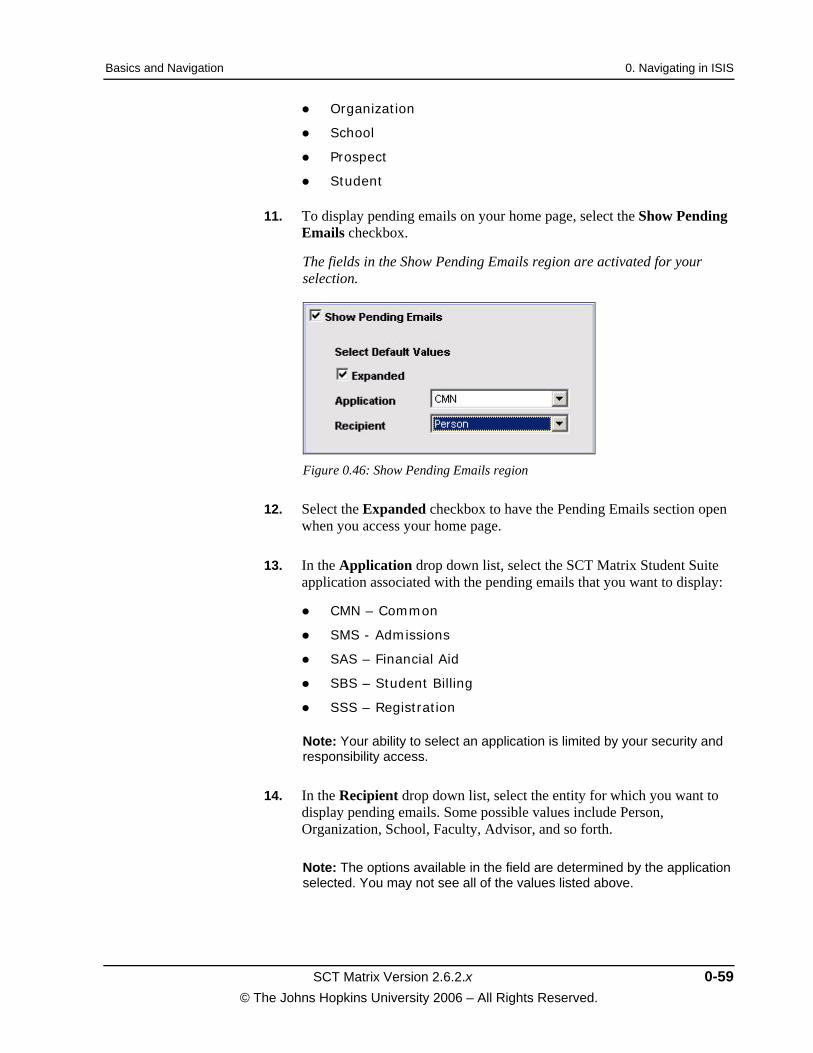
11. To display pending emails on your home page, select the Show Pending Emails checkbox.
The fields in the Show Pending Emails region are activated for your selection.
Figure 0.46: Show Pending Emails region
12. Select the Expanded checkbox to have the Pending Emails section open when you access your home page.
13. In the Application drop down list, select the SCT Matrix Student Suite application associated with the pending emails that you want to display:
CMN – Common
SMS - Admissions
SAS – Financial Aid
SBS – Student Billing
SSS – Registration
Note: Your ability to select an application is limited by your security and responsibility access.
14. In the Recipient drop down list, select the entity for which you want to display pending emails. Some possible values include Person, Organization, School, Faculty, Advisor, and so forth.
Note: The options available in the field are determined by the application selected. You may not see all of the values listed above.

0. Navigating in ISIS Basics and Navigation
0-60 SCT Matrix Version 2.6.2.x
© The Johns Hopkins University 2006 – All Rights Reserved.
15. To display pending letters on your home page, select the Show Pending Letters checkbox.
The fields in the Show Pending Letters region are activated for your selection.
Figure 0.47: Show Pending Letters region
16. Select the Expanded checkbox to have the Pending Emails section open when you access your home page.
17. In the Application drop down list, select the SCT Matrix Student Suite application associated with the pending letters that you want to display:
CMN – Common
SMS - Admissions
SAS – Financial Aid
SBS – Student Billing
SSS – Registration
Note: Your ability to select an application is limited by your security and responsibility access.
18. In the Recipient drop down list, select the entity for which you want to display pending letters. Some possible values include Person, Organization, School, Faculty, Advisor and so forth.
Note: The options available in the field are determined by the application selected. You may not see all of the values listed above.
19. To display queries you have saved on your home page, select the Show Stored Queries checkbox.
The fields in the Show Stored Queries region are activated for your selection.

Basics and Navigation 0. Navigating in ISIS
SCT Matrix Version 2.6.2.x 0-61 © The Johns Hopkins University 2006 – All Rights Reserved.
Figure 0.48: Show Stored Queries region
20. Select the Expanded checkbox to have the Stored Queries section open when you access your home page.
21. In the Show Queries drop down list, select the one of the following options identifying which contacts to display:
Assigned to me
Assigned to my responsibility
Show all
22. In the Application drop down list, select the SCT Matrix Student Suite application associated with the pending emails that you want to display:
CMN – Common
SMS - Admissions
SAS – Financial Aid
SBS – Student Billing
SSS – Registration
Note: Your ability to select an application is limited by your security and responsibility access.
23. In the Recipient drop down list, select the entity for which you want to display pending emails. Some possible values include Person, Organization, School, Faculty, Advisor, and so forth.
Note: The options available in the field are determined by the application selected. You may not see all of the values listed above.
24. Click .
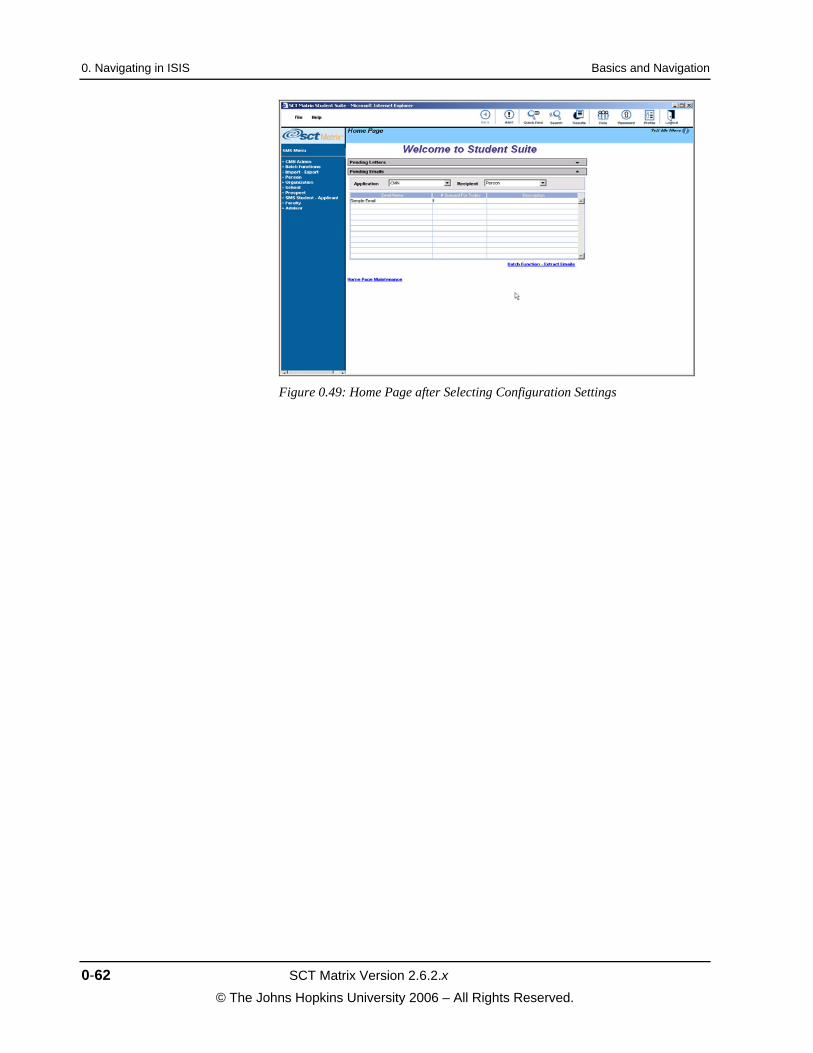
The next time you login to SCT Matrix, your Home Page will be configured as you have specified.
0. Navigating in ISIS Basics and Navigation
0-62 SCT Matrix Version 2.6.2.x
© The Johns Hopkins University 2006 – All Rights Reserved.
Figure 0.49: Home Page after Selecting Configuration Settings
Basics and Navigation 0. Navigating in ISIS
SCT Matrix Version 2.6.2.x 0-63 © The Johns Hopkins University 2006 – All Rights Reserved.
Where Can I Get More Information on ISIS?
There are several sources for additional information on ISIS. First, talk to the people in your school who are involved with the implementation effort. They have been working on configuring the application to meet your school’s needs, testing, validating data conversions, and many other activities. You can also continue to participate in the training courses offered by your school. In addition, you can check out the following:
ISIS Website
ISIS ListServ
ISIS Online Help
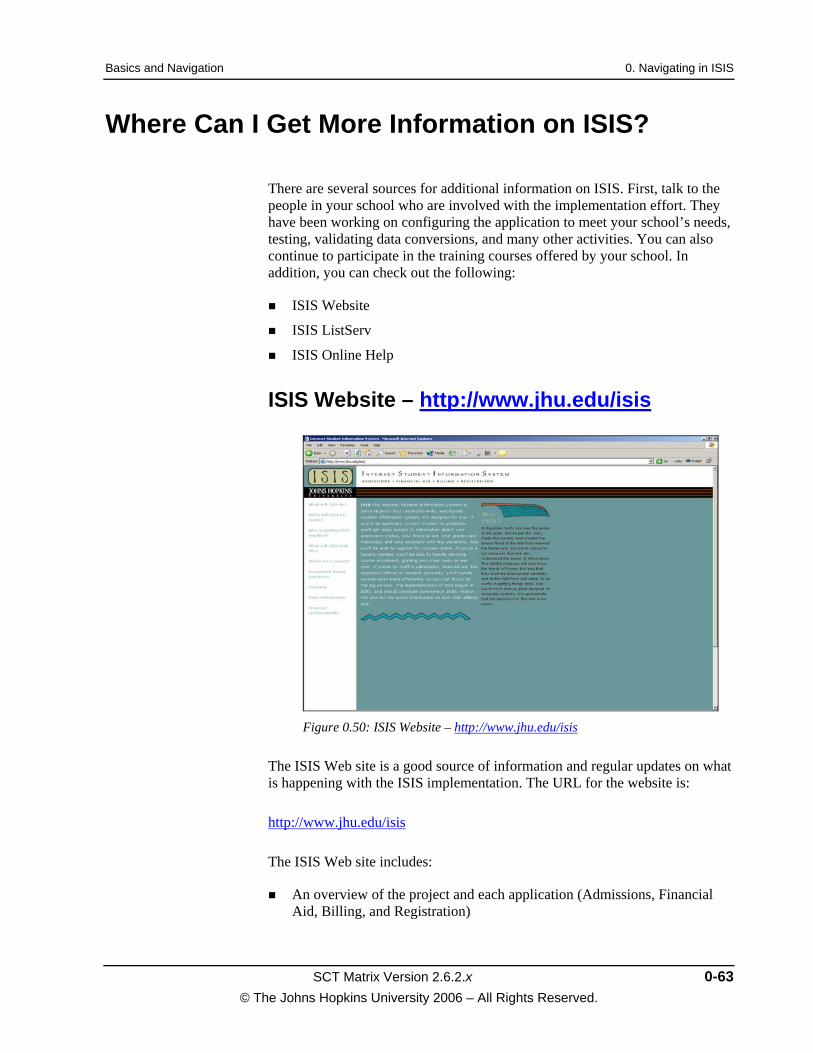
ISIS Website – http://www.jhu.edu/isis
Figure 0.50: ISIS Website – http://www.jhu.edu/isis
The ISIS Web site is a good source of information and regular updates on what is happening with the ISIS implementation. The URL for the website is:
http://www.jhu.edu/isis
The ISIS Web site includes:
An overview of the project and each application (Admissions, Financial Aid, Billing, and Registration)

0. Navigating in ISIS Basics and Navigation
0-64 SCT Matrix Version 2.6.2.x
© The Johns Hopkins University 2006 – All Rights Reserved.
Coming events, including the time, location and agenda
Answers to frequently asked questions (FAQs)
People involved in the project
Business functions included in the project
Major project milestones
Glossary of terms and concepts
ISIS ListServ
The ISIS ListServ is an electronic bulletin board that has been set up at the Johns Hopkins University to provide regular updates on the ISIS project. When you sign up, you will receive messages at least once a month that provide you with news from the ISIS project and related happenings.
To sign up for the ISIS ListServ, send an e-mail message to [email protected]. Leave the subject line blank, and in the body of the message type "subscribe isis <your name>" (no quotes or brackets).
Using Online Help
ISIS provides a context-sensitive online help system to provide additional details on many of the windows that you will complete as you use the system. You can easily access the online help at any time by clicking the Help button.
You can think of online help as a library of general reference information related to the SCT Matrix application suite. The online help contains a table of contents, index, and glossary which are all searchable.

Basics and Navigation 0. Navigating in ISIS
SCT Matrix Version 2.6.2.x 0-65 © The Johns Hopkins University 2006 – All Rights Reserved.
Figure 0.51: ISIS Online Help
The structure within the Online Help is the same regardless of the application. In each online help, you will find the same layout of the index, table of contents, glossary, and search features. The topics addressed within online help are specific to each application, and further divided between user and administrator files. Use the following standard features to quickly locate answers to questions, as well as general (non-school specific) procedural instructions.
Contents – The Table of Contents (TOC) opens by default in the online help. Each folder within the TOC contains one or more topics. Click the folder to open or close it. To view the topics, click the page button for the topic you want to view.
Index provides a comprehensive list of topics and when you click the Index button, a list of all index entries appears in the left-hand pane. Then, you simply need to click the index entry for the topic you wish to view.
Glossary includes the key terms related to major processes and concepts in ISIS. Glossary definitions appear in the lower section of the left page when you select a term from the upper section of the left pane.
Search allows you to search for a specific topic. You can search by clicking the Search button or by typing a term in the Search
field and clicking Go .
The table below outlines the conventions used in the online help.
Note: The colors described in the table below may vary based on your computer and browser settings.

0. Navigating in ISIS Basics and Navigation
0-66 SCT Matrix Version 2.6.2.x
© The Johns Hopkins University 2006 – All Rights Reserved.
Convention Description
Bold, black colored text All bold, black text indicates a field, region, button, or menu option.
Bold, teal colored text All bold, teal colored text indicates a drop down example. These additional illustrative examples appear frequently to provide a more detailed explanation of the topics you are reading about.
• Click the bold, teal text to view the example.
• Click the text once more to hide the example.
Underlined, blue text All underlined, blue colored text indicates a hyperlink. Click the underlined, blue text to view the hyperlink. When you click the text you navigate to a different page in online help. The hyperlink turns purple after you access it.
Click the Field Descriptions icon to view the field descriptions for the selected window. Field descriptions provide a list of all the available fields on the selected window. A field description includes a short explanation of each field, the information that you can enter in each field, and the functions available through each button on the window. The field description also indicates if a field is read-only or required.
Click the Related Topics icon to access additional topics that are related to the topic you are currently viewing.

Basics and Navigation 0. Navigating in ISIS
SCT Matrix Version 2.6.2.x 0-67 © The Johns Hopkins University 2006 – All Rights Reserved.
Exercise 0–4: Customizing ISIS and Getting Help
Answer the questions in this section to validate your understanding of the concepts in this topic. Refer to the topic for any help as necessary.
1. You can quickly navigate to the Online Help by clicking the __________________ button.
2. What is the URL for the ISIS website? _______________________________________________________ .
3. Configure your ISIS Home Page to display Stored Queries and Pending Letters.
4. Identify 3 of the 5 items that you can display on your ISIS Home Page.

0. Navigating in ISIS Basics and Navigation
0-68 SCT Matrix Version 2.6.2.x
© The Johns Hopkins University 2006 – All Rights Reserved.
Module Summary
Internet Student Information System (ISIS) Overview
In 2001, the Internet Student Information System (ISIS) began as Johns Hopkins University’s first university-wide, web-based student information system. ISIS is designed to meet the needs of a variety of constituents including applicants, current students, graduates, faculty, and administrative staff by providing access to information in a user-friendly, integrated application. Various ISIS applications will be going-live through 2005.
Window Components and Navigation
ISIS is accessed by administrative users through Internet Explorer (version 5.5 or higher). As a user of ISIS, you will be assigned an individual user name and password. Do not share your User ID or password with anyone. This is especially important since every transaction in the system is linked to a specific User ID. You are responsible if your User ID is used by someone else improperly.
Unlike some of your current systems, ISIS is a web-based application. You may see similarities with other applications such as Microsoft Word. You will notice that ISIS provides several ways to perform many of the common tasks. For example, you often have a keyboard shortcut, or you can use the Application Toolbar. In some cases, you can also use the File or Help menu to perform functions.
Search and Retrieve Data
ISIS allows you to search for and retrieve data using a variety of methods. A Search for [Entity] window enables you to look up records. From the search results, you have the option to select one or more records. Search windows display specific fields for records defined in eight categories or entities: Person, Prospect, Student/Applicant, Organization, Account, School, Advisor, and Faculty.
Wildcard characters allow you to enter pieces of information and narrow your search criteria. You can use characters such as the percent sign (%), which represents any number of characters, or an underscore (_), which represents a single character.
Stored queries enable you to perform searches for a specific group of records, without the need to repeatedly enter search criteria each time you look up one or more records. Stored queries are available to specific users. End users can

Basics and Navigation 0. Navigating in ISIS
SCT Matrix Version 2.6.2.x 0-69 © The Johns Hopkins University 2006 – All Rights Reserved.
create and save stored queries for their own use, while administrators can create and save stored queries assigned to many users or responsibilities.
Customizing Your Home Page
SCT Matrix allows you to customize the appearance of your home page using the Home Page Maintenance function. The Home Page is the first window that appears after you log in and select a responsibility. The Home Page Maintenance function allows you to display the following: pending contacts, letters, emails, user actions, and so forth.
Getting More Information on ISIS
The ISIS Web site is a good source of information and regular updates on what is happening with the ISIS implementation. The URL for the website is: http://www.jhu.edu/isis.
The ISIS ListServ is an electronic bulletin board that provides regular email updates on the ISIS project.
In addition, ISIS provides a context-sensitive online help system to provide additional details on many of the windows that you will complete as you use the system. You can easily access the online help at any time by clicking the Help button.

0. Navigating in ISIS Basics and Navigation
0-70 SCT Matrix Version 2.6.2.x
© The Johns Hopkins University 2006 – All Rights Reserved.
List of Navigating in ISIS Windows
Figure 0.1: Internet Explorer at JHU Home Page........................................................................................ 14
Figure 0.2: Internet Options window........................................................................................................... 15
Figure 0.3: Internet Options window with Security tab displayed............................................................... 15
Figure 0.4: Trusted Sites window ................................................................................................................ 16
Figure 0.5: Trusted Sites window with ISIS URLs ..................................................................................... 16
Figure 0.6: Security Settings window.......................................................................................................... 17
Figure 0.7: Internet Options with Advanced tab displayed ......................................................................... 18
Figure 0.8: Security Options on Advanced tab ............................................................................................ 18
Figure 0.9: Display Properties window ....................................................................................................... 19
Figure 0.10: Settings tab of Display Properties window ............................................................................. 20
Figure 0.11: Display Properties window ..................................................................................................... 21
Figure 0.12: Appearance tab of Display Properties window ....................................................................... 21
Figure 0.13: Internet Explorer at JHU Home Page...................................................................................... 24
Figure 0.14: Add Favorite (creating an ISIS shortcut)................................................................................. 24
Figure 0.15: Enter Network Password window ........................................................................................... 25
Figure 0.16: Welcome to SCT Matrix Student Suite – Continue button ..................................................... 26
Figure 0.17: Switch Role window ............................................................................................................... 26
Figure 0.18: Enter Network Password window for XP users ...................................................................... 27
Figure 0.19: Welcome to SCT Matrix Student Suite window ..................................................................... 28
Figure 0.20: ISIS/SCT Matrix Home Page window .................................................................................... 28
Basics and Navigation 0. Navigating in ISIS
SCT Matrix Version 2.6.2.x 0-71 © The Johns Hopkins University 2006 – All Rights Reserved.
Figure 0.21: Change Password window from within ISIS ...........................................................................29
Figure 0.22: JHED Home page ....................................................................................................................30
Figure 0.23: JHED Login page.....................................................................................................................30
Figure 0.24: JHED Homepage .....................................................................................................................31
Figure 0.25: JHED Change Password page..................................................................................................31
Figure 0.26: LAN/Windows Password message ..........................................................................................32
Figure 0.27: Logout window........................................................................................................................33
Figure 0.28: Sign Off Confirmation message...............................................................................................33
Figure 0.29: Application window components ............................................................................................35
Figure 0.30: SBS Status Indicators...............................................................................................................36
Figure 0.31: Calendar Selection window .....................................................................................................37
Figure 0.32: Application Toolbar .................................................................................................................38
Figure 0.33: New window............................................................................................................................39
Figure 0.34: Rollup region – Keyboard shortcuts ........................................................................................44
Figure 0.35: Search for [Entity] window......................................................................................................46
Figure 0.36: [Entity] Search Results window...............................................................................................47
Figure 0.37: Search for Applicants – Web Page Dialog window.................................................................51
Figure 0.38: Applicant Search Results – Web Page Dialog displaying matching records...........................52
Figure 0.39: Applicant Summary Window with list of multiple applicants.................................................52
Figure 0.40: Search for [Entity] window......................................................................................................53
Figure 0.41: Save Query – Web Page Dialog window.................................................................................54

0. Navigating in ISIS Basics and Navigation
0-72 SCT Matrix Version 2.6.2.x
© The Johns Hopkins University 2006 – All Rights Reserved.
Figure 0.42: Home Page Maintenance link.................................................................................................. 56
Figure 0.43: Home Page Maintenance window........................................................................................... 57
Figure 0.44: Show Pending Contacts region................................................................................................ 57
Figure 0.45: Show Pending User Actions region......................................................................................... 58
Figure 0.46: Show Pending Emails region .................................................................................................. 59
Figure 0.47: Show Pending Letters region .................................................................................................. 60
Figure 0.48: Show Stored Queries region.................................................................................................... 61
Figure 0.49: Home Page after Selecting Configuration Settings ................................................................. 62
Figure 0.50: ISIS Website – http://www.jhu.edu/isis .................................................................................. 63
Figure 0.51: ISIS Online Help ..................................................................................................................... 65