Name: Level 1 - Functional movement · workout or training plan. ... We use it to test bilateral,...
72
1 Copyright 2015 Functional Movement Systems and Gray Cook Level 1 ONLINE VERSION 2 Name:
Transcript of Name: Level 1 - Functional movement · workout or training plan. ... We use it to test bilateral,...

1Copyright 2015 Functional Movement Systems and Gray Cook
Level 1ONLINE VERSION 2
Name:

2Copyright 2015 Functional Movement Systems and Gray Cook
The information contained herein is not intended to be a substitute for professional medical advice, diagnosis or treatment in any
manner. Always seek the advice of your physician or other qualified health provider with any questions you may have regarding any
medical condition or before engaging in any physical fitness plan. All rights reserved. Printed in the United States of America using
recycled paper. No part of this manual may be reproduced or transmitted in any form whatsoever without written permission from the
author or publisher, with the exception of the inclusion of brief quotations in articles or reviews.
Copyright 2010 Functional Movement Systems and Gray Cook.

1Copyright 2015 Functional Movement Systems and Gray Cook
Table Of ContentsPreface . . . . . . . . . . . . . . . . . . . . . . . . . . . . . . . . . . . . . . . . . . . . . . . . . . . . . . . . . . . . . . . . . . . . . . . . . . . . . . . . . . . . . . . . . . . . . . . . . . . . . . . . . . . . . . . . . . . . . . . . 3
Introduction . . . . . . . . . . . . . . . . . . . . . . . . . . . . . . . . . . . . . . . . . . . . . . . . . . . . . . . . . . . . . . . . . . . . . . . . . . . . . . . . . . . . . . . . . . . . . . . . . . . . . . . . . . . . . . . . . . . 4
Screening Guidelines . . . . . . . . . . . . . . . . . . . . . . . . . . . . . . . . . . . . . . . . . . . . . . . . . . . . . . . . . . . . . . . . . . . . . . . . . . . . . . . . . . . . . . . . . . . . . . . . . . . . . . . . . 5
Deep Squat Movement Pattern . . . . . . . . . . . . . . . . . . . . . . . . . . . . . . . . . . . . . . . . . . . . . . . . . . . . . . . . . . . . . . . . . . . . . . . . . . . . . . . . . . . . . . . . . . . . . . . .7
Hurdle Step Movement Pattern . . . . . . . . . . . . . . . . . . . . . . . . . . . . . . . . . . . . . . . . . . . . . . . . . . . . . . . . . . . . . . . . . . . . . . . . . . . . . . . . . . . . . . . . . . . . . . . 11
Inline Lunge Movement Pattern . . . . . . . . . . . . . . . . . . . . . . . . . . . . . . . . . . . . . . . . . . . . . . . . . . . . . . . . . . . . . . . . . . . . . . . . . . . . . . . . . . . . . . . . . . . . . .15
Shoulder Mobility Movement Pattern . . . . . . . . . . . . . . . . . . . . . . . . . . . . . . . . . . . . . . . . . . . . . . . . . . . . . . . . . . . . . . . . . . . . . . . . . . . . . . . . . . . . . . . .19
Active Straight-Leg Raise Movement Pattern . . . . . . . . . . . . . . . . . . . . . . . . . . . . . . . . . . . . . . . . . . . . . . . . . . . . . . . . . . . . . . . . . . . . . . . . . . . . . . . 23
Trunk Stability Push-Up Movement Pattern . . . . . . . . . . . . . . . . . . . . . . . . . . . . . . . . . . . . . . . . . . . . . . . . . . . . . . . . . . . . . . . . . . . . . . . . . . . . . . . . . 27
Rotary Stability Movement Pattern . . . . . . . . . . . . . . . . . . . . . . . . . . . . . . . . . . . . . . . . . . . . . . . . . . . . . . . . . . . . . . . . . . . . . . . . . . . . . . . . . . . . . . . . . . .31
Documenting FMS Scores . . . . . . . . . . . . . . . . . . . . . . . . . . . . . . . . . . . . . . . . . . . . . . . . . . . . . . . . . . . . . . . . . . . . . . . . . . . . . . . . . . . . . . . . . . . . . . . . . . . 35
Corrective Strategy Algorithm . . . . . . . . . . . . . . . . . . . . . . . . . . . . . . . . . . . . . . . . . . . . . . . . . . . . . . . . . . . . . . . . . . . . . . . . . . . . . . . . . . . . . . . . . . . . . . . 37
The FMS Training Cycle . . . . . . . . . . . . . . . . . . . . . . . . . . . . . . . . . . . . . . . . . . . . . . . . . . . . . . . . . . . . . . . . . . . . . . . . . . . . . . . . . . . . . . . . . . . . . . . . . . . . . . 38
FMS Corrective Exercise . . . . . . . . . . . . . . . . . . . . . . . . . . . . . . . . . . . . . . . . . . . . . . . . . . . . . . . . . . . . . . . . . . . . . . . . . . . . . . . . . . . . . . . . . . . . . . . . . . . . . 39
Notes Section . . . . . . . . . . . . . . . . . . . . . . . . . . . . . . . . . . . . . . . . . . . . . . . . . . . . . . . . . . . . . . . . . . . . . . . . . . . . . . . . . . . . . . . . . . . . . . . . . . . . . . . . . . . . . . . . .41
Scorecards . . . . . . . . . . . . . . . . . . . . . . . . . . . . . . . . . . . . . . . . . . . . . . . . . . . . . . . . . . . . . . . . . . . . . . . . . . . . . . . . . . . . . . . . . . . . . . . . . . . . . . . . . . . . . . . . . . . 63
The Performance Pyramid . . . . . . . . . . . . . . . . . . . . . . . . . . . . . . . . . . . . . . . . . . . . . . . . . . . . . . . . . . . . . . . . . . . . . . . . . . . . . . . . . . . . . . . . . . . . . . . . . . . 66
What’s Next? . . . . . . . . . . . . . . . . . . . . . . . . . . . . . . . . . . . . . . . . . . . . . . . . . . . . . . . . . . . . . . . . . . . . . . . . . . . . . . . . . . . . . . . . . . . . . . . . . . . . . . . . . . . . . . . . . 70

2Copyright 2015 Functional Movement Systems and Gray Cook

3Copyright 2015 Functional Movement Systems and Gray Cook
PrefaceFunctional Movement Systems (FMS) was formed in 2001 to improve the overall scope of performance, fitness,
rehabilitation and management of injury risk in active individuals. It was the intent of the founders of FMS to provide a
better system for sports medicine, fitness and strength and conditioning professionals to identify movement dysfunction
as well as improve communication between the professions. This process began in the mid-90s with Gray knowing that
in order to create the most holistic approach to functional rehabilitation you must first observe fundamental movement
patterns. It was during this process that he began to formulate a systematic way of assessing movement patterns,
which was the origin of what is now the Selective Functional Movement Assessment(SFMA). However, this assessment
process was designed for patients or individuals who were already in pain, so the goal was then to create a screening
process that would allow anyone dealing with active individuals to easily set a baseline of fundamental movements. Once
the fundamental movements were observed better decisions could be made on how to better enhance the individual’s
workout or training plan. The intent was to create a more proactive approach when dealing with movement dysfunction,
we wanted to detect movement dysfunction and intervene as soon as possible. It was this objective that allowed us to
ultimately create the Functional Movement Screen.
Since this system was first introduced the evidence has continued to suggest that this fundamental philosophy should
be followed in order to have the greatest impact for active individuals seeking to improve their level of fitness or patients
looking to get back to function. FMS continues to analyze data, review research and gather feedback from professionals
so that the evolution of our philosophy and message can continue. We will always work to the best of our ability to
bring the latest and greatest information related to movement to the fitness, medical, and strength and conditioning
professions so that we can enhance the lives of the individuals we touch.

4Copyright 2015 Functional Movement Systems and Gray Cook
IntroductionThe Functional Movement Screen captures fundamental movements, motor control within movement patterns, and
competence of basic movements uncomplicated by specific skills. It will determine the greatest areas of movement
deficiency, demonstrate limitations or asymmetries, and eventually correlate these with an outcome. Once you find the
greatest asymmetry or deficiency, you can use additional screens that are more precise if needed.
The original idea of the screen was to portray movement-pattern quality with a simple grading system of movement
appraisal; it’s not intended to diagnose or measure isolated joint movement. Attempting to measure in isolation does a
disservice to the pattern—the body is too complex to take isolated movements seriously in the initial stages of screening.
This system was developed to rate and rank movement patterns in high school athletes, in an effort to determine
who was ready to engage in higher-level activities in the weight room and on the field. However, during the two-year
refining process, we discovered uses well beyond the original intended purpose, the information gathered from its use has
broadened our scope of corrective exercise, training and rehabilitation. The screen has taught us how to use it, and helped
us gain timely and valuable feedback from our attempts at movement correction.
Our collective expertise has come from working against the screen’s standard, not from modifying the screen every
time things got confusing or inconvenient. We have changed the way we look at the screen data many times, but we have
not changed the way we collect the information. In a way, this work represents our evolution, not that of the screen. The
screen patiently waited for us to see and understand all it was providing in return for about 10 minutes worth of time.
The FMS is comprised of seven movement tests that require a balance of mobility and stability. The patterns used
provide observable performance of basic, mobility and stability movements by placing clients in positions where
weaknesses, imbalances, asymmetries and limitations become noticeable by a trained health and fitness professional.
When the screen’s movements mimic athletic moves, it is merely coincidence. The screen is not a training tool, nor is
it a competition tool. It’s purely an instrument for rating and ranking movements.
The screen’s usefulness is its simplicity, practicality and ability to fill a void in the toolbox we use to judge
performance and durability. It is not intended to determine why a dysfunctional or faulty movement pattern exists.
Instead, it’s a discovery of which patterns are problematic. The FMS exposes dysfunction or pain—or both—within basic
movement patterns.
Many people are able to perform a wide range of activities, yet are unable to efficiently execute the movements in
the screen. Those who score poorly on the screens are using compensatory movement patterns during regular activities.
If these compensations continue, sub-optimal movement patterns are reinforced, leading to poor biomechanics and
possibly contributing to a future injury.
The public’s knowledge of the intricacies of the FMS is minimal at best. To introduce your client to the process,
suggest a visit to the Functional Movement Systems website at FunctionalMovement.com.
5Copyright 2015 Functional Movement Systems and Gray Cook
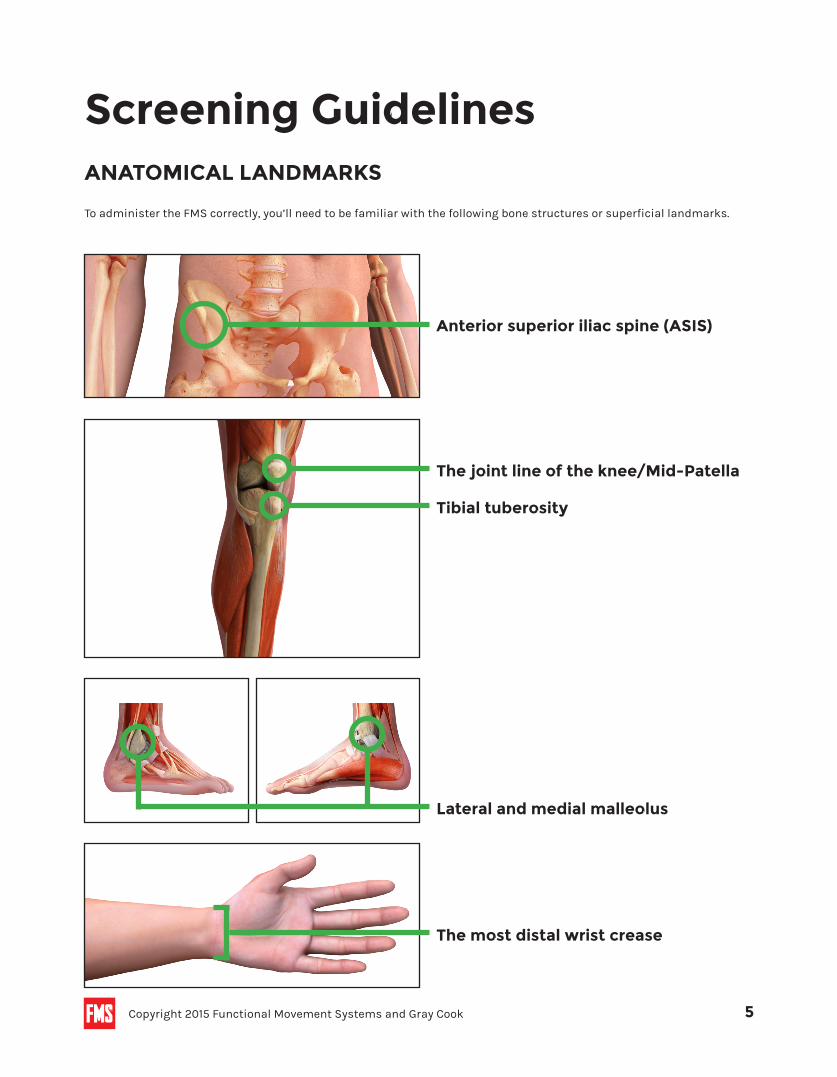
Screening GuidelinesANATOMICAL LANDMARKS
To administer the FMS correctly, you’ll need to be familiar with the following bone structures or superficial landmarks.
Anterior superior iliac spine (ASIS)
Lateral and medial malleolus
The most distal wrist crease
The joint line of the knee/Mid-Patella
Tibial tuberosity

6Copyright 2015 Functional Movement Systems and Gray Cook
PositioningTwo things to consider when observing the movements of the screen are distance and movement. Considering these two
things will take care of most of the issues involved in trying to see everything during the screen.
DistanceStep back from the client to create enough distance, allowing you to see the whole picture at once. Most of the confusion
over where to stand comes from being too close and too focused on one area of the test. Stand far enough away to allow a
more global focus. View the entire movement and let the test criteria become evident.
MovementThe client has three attempts to perform each test, so don’t be afraid to move around during the test. Depending on the
test, standing to the side or facing the person may provide the best vantage point. Take advantage of all three trials and
move around if the score is not obvious from one point of view.
FMS Order:The recommended order for screening takes the client from standing positions to ground-based positions which is a
physically efficient and time efficient process for the client while transitioning from one test to another. Although this is
the recommended order of tests, during groups screens there may be multiple testing stations. The order the clients move
through stations can start and end in any sequence and will not negatively affect the scoring results.
1. Deep Squat
2. Hurdle Step
3. Inline Lunge
4. Shoulder Mobility
5. Active Straight-Leg Raise
6. Trunk Stability Push-Up
7. Rotary Stability
Footwear:We recommend that the client wear the shoes that they train in the most. The goal is to produce consistent and reliable
screening conditions from the first screen to any rescreening conditions. In a majority of cases, our clients live and
function in shoes and this is the most reliable way to look at an individual’s movement that they experience in their
current lifestyle.
Warm-up:The FMS screen is performed with no prior warm-up, stretching or movement preparation. It is important to know what a
persons natural state of movement is when they walk through the door. This is the best indication of the quality and level
of movement competency they experience in their current daily activity.
Verbal Instructions:This manual provides you with specific verbal instructions that should be stated to the client as specifically and
consistently as possible. The verbal instructions are designed to guide the client you are screening into the proper
set up position and instructs them how to execute the movement. These instructions are designed to give them just
enough information to clearly understand how to perform the test without adding coaching or feedback that would alter
their natural movement pattern. This will ensure that you don’t miss anything in the set up as the screener and to also
create consistency for each screen that you administer. As a new screener it is suggested that you consistently use the
Verbal Instructions for the first 50 screens you perform! This ensures that you systematically administer the screen for
consistent results and integrating FMS into your environment.
7Copyright 2015 Functional Movement Systems and Gray Cook
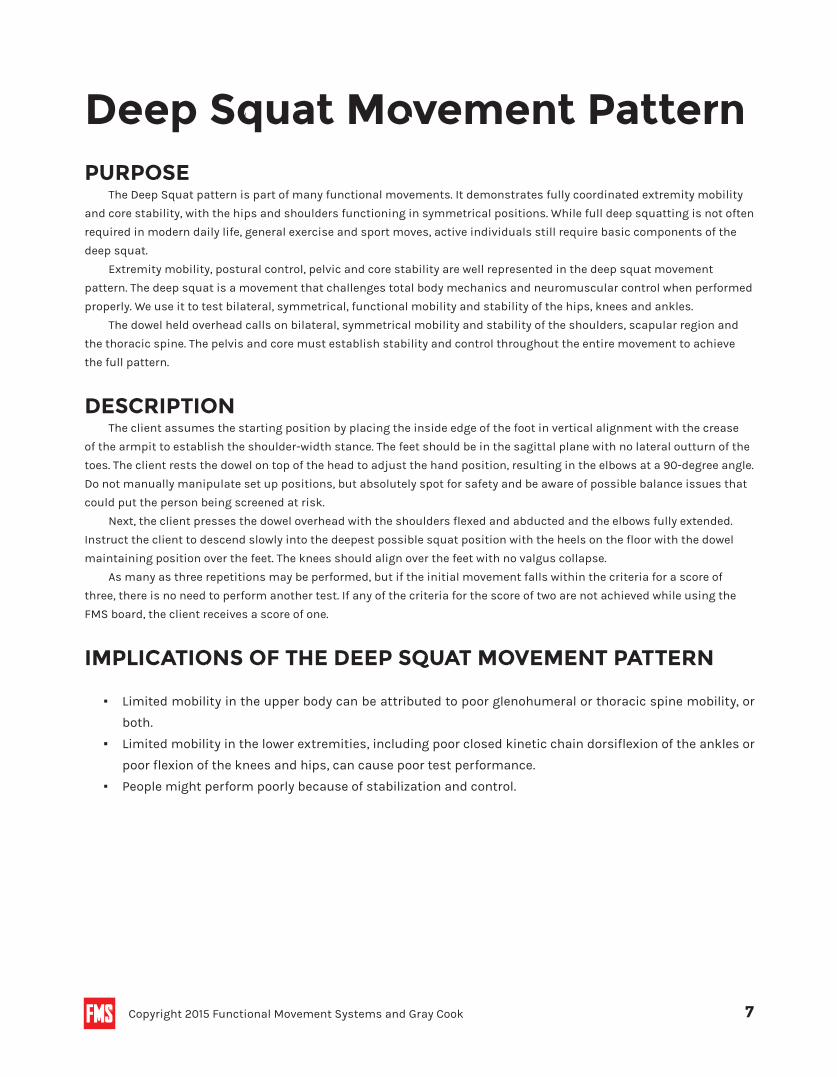
Deep Squat Movement PatternPURPOSE
The Deep Squat pattern is part of many functional movements. It demonstrates fully coordinated extremity mobility
and core stability, with the hips and shoulders functioning in symmetrical positions. While full deep squatting is not often
required in modern daily life, general exercise and sport moves, active individuals still require basic components of the
deep squat.
Extremity mobility, postural control, pelvic and core stability are well represented in the deep squat movement
pattern. The deep squat is a movement that challenges total body mechanics and neuromuscular control when performed
properly. We use it to test bilateral, symmetrical, functional mobility and stability of the hips, knees and ankles.
The dowel held overhead calls on bilateral, symmetrical mobility and stability of the shoulders, scapular region and
the thoracic spine. The pelvis and core must establish stability and control throughout the entire movement to achieve
the full pattern.
DESCRIPTIONThe client assumes the starting position by placing the inside edge of the foot in vertical alignment with the crease
of the armpit to establish the shoulder-width stance. The feet should be in the sagittal plane with no lateral outturn of the
toes. The client rests the dowel on top of the head to adjust the hand position, resulting in the elbows at a 90-degree angle.
Do not manually manipulate set up positions, but absolutely spot for safety and be aware of possible balance issues that
could put the person being screened at risk.
Next, the client presses the dowel overhead with the shoulders flexed and abducted and the elbows fully extended.
Instruct the client to descend slowly into the deepest possible squat position with the heels on the floor with the dowel
maintaining position over the feet. The knees should align over the feet with no valgus collapse.
As many as three repetitions may be performed, but if the initial movement falls within the criteria for a score of
three, there is no need to perform another test. If any of the criteria for the score of two are not achieved while using the
FMS board, the client receives a score of one.
IMPLICATIONS OF THE DEEP SQUAT MOVEMENT PATTERN
▪ Limited mobility in the upper body can be attributed to poor glenohumeral or thoracic spine mobility, or
both.
▪ Limited mobility in the lower extremities, including poor closed kinetic chain dorsiflexion of the ankles or
poor flexion of the knees and hips, can cause poor test performance.
▪ People might perform poorly because of stabilization and control.

8Copyright 2015 Functional Movement Systems and Gray Cook
Deep SquatThe following statement begins the screen and applies to all seven tests.
Please let me know if there is any pain during the following movements. And if at
any time you do not understand the instructions, stop me for clarification. We are
going to perform each movement one at a time and in a smooth and controlled
motion. Please wait for me to confirm that you have the proper set up position and
then I will signal you to begin the movement.
VERBAL INSTRUCTIONSFor consistency throughout all screens, this script should always be used. The bold words below should be repeated to the
client.
▪ Stand tall with your feet shoulder-width apart and toes pointed forward.
▪ Grasp the dowel in both hands and place it on top of your head so your shoulders and elbows are at
90 degrees.
▪ Press the dowel so that it is directly above your head.
▪ While maintaining an upright torso and keeping your heels and the dowel in position, descend into
a squat as deeply as possible.
▪ Hold the bottom position for a count of one, and then return to the starting position.
TIPS FOR TESTING1. The client can perform the movement up to three times if necessary.
2. If a score of three is not achieved, repeat above instructions using the board under the client’s heels.
3. Observe the client from the front and side.
4. All positions, including the foot position, should remain unchanged when the heels are elevated with
either the FMS kit or a similar size board.

9Copyright 2015 Functional Movement Systems and Gray Cook
Scoring the Deep Squat
3 ▪ Torso is parallel with tibia or toward
vertical
▪ Femur is below horizontal
▪ Knees do not track inside of feet
▪ Dowel aligned over feet
2 ▪ Torso is parallel with tibia or toward
vertical
▪ Femur is below horizontal
▪ Knees do not track inside of feet
▪ Dowel aligned over feet
▪ Heels are elevated
1 ▪ Tibia and torso are not parallel
▪ Femur is not below horizontal
▪ Knees track inside of feet
▪ Dowel is not aligned over feet
An individual receives a score of zero if pain is associated with any portion of this test.
A medical professional should perform a thorough evaluation of the painful area.

10Copyright 2015 Functional Movement Systems and Gray Cook
Deep SquatNOTES

11Copyright 2015 Functional Movement Systems and Gray Cook
Hurdle Step Movement PatternPURPOSE
The Hurdle Step pattern is an integral part of locomotion and acceleration. Although we do not step to this level
in most activities, the hurdle step will expose compensation or asymmetry in stepping functions. The hurdle step test
challenges the body’s step and stride mechanics while testing stability and control in a single stance.
The movement requires proper coordination and stability between the hips, moving asymmetrically with one
bearing the load of the body while the other moves freely. The pelvis and core must begin with and maintain stability and
alignment throughout the movement pattern. The arms are still as they hold a dowel across the shoulders, giving the
observer further representation of the static responsibility of the upper body and trunk in the stepping movement.
Excessive upper body movement in basic stepping is viewed as compensation; it is not seen when proper mobility,
stability, posture and balance are available and functioning. The hurdle step challenges bilateral mobility and stability of
the hips, knees and ankles. The test also challenges stability and control of the pelvis and core as it offers an opportunity
to observe functional symmetry.
DESCRIPTIONTo begin the test, use the dowel to measure the height of the tibial tuberosity. Since it can be difficult to find the true
joint line between the tibia and the femur, the top center of the tibial tuberosity serves as a reliable landmark.
To adjust the previously described hurdle to the correct height, have the client stand with feet together and use the
dowel to measure from the floor to the height of the top and center of the tibial tuberosity. Slide the hurdle’s marking
cord to the tibial tuberosity height measured, and adjust the other side until the cord is level and displays accurate tibial
tuberosity height on both indicators.
Have the client stand directly behind the center of the hurdle base, feet touching at both heels and toes and with the
toes aligned and touching the base of the hurdle. Position the dowel across the shoulders, below the neck. Ask the client
to step over the hurdle to touch the heel to the floor while maintaining a tall spine, and then return the moving leg to the
starting position. The hurdle step is performed slowly and under control. Do not manually manipulate set up positions,
but absolutely spot for safety and be aware of possible balance issues that could put the person being screened at risk.
If any of the criteria for a score of three are not achieved, the client receives a score of two. If any of the criteria for the
score of two are not achieved, score this a one.
IMPLICATIONS OF THE HURDLE STEP MOVEMENT PATTERN
▪ Problems may be due to poor stability of the stance leg or poor mobility of the step leg.
▪ The main thing to consider is that no single part is being tested. Imposing maximal hip flexion of the one
leg while maintaining apparent hip extension of the opposite leg requires relative bilateral, asymmetric
hip mobility and dynamic stability.

12Copyright 2015 Functional Movement Systems and Gray Cook
Hurdle StepVERBAL INSTRUCTIONSFor consistency throughout all screens, this script should always be used. The bold words below should be repeated to the
client.
▪ Stand tall with your feet together and toes touching the test kit.
▪ Grasp the dowel in both hands and place it on top of your head so your shoulders and elbows are at
90 degrees. Then while maintaining hand position, lower dowel to the base of the neck and across
the shoulders.
▪ While keeping an upright torso, raise the right leg and step over the hurdle, making sure to raise the
foot towards the shin and maintain foot alignment vertically with the ankle, knee and hip.
▪ Touch the floor with your heel and return to the starting position while maintaining the same
alignment.
Referencing the right Hurdle Step, repeat on the left by changing the indicated side
TIPS FOR TESTING
1. Ensure the cord is aligned properly.
2. Tell the client to stand as tall as possible at the beginning of the test.
3. Score the moving leg.
4. Repeat the test on both sides.
5. The client can perform the movement up to three times on each side if necessary.
6. Watch for a stable torso.
7. Observe from the front and side.
8. Make sure the toes of the stance leg stay in contact with the hurdle during and after each repetition.
9. If the client physically cannot bring the feet together to touch, ask them to bring their feet together as
close as possible with toes touching the test kit, then allow them to perform test from that position.

13Copyright 2015 Functional Movement Systems and Gray Cook
Scoring the Hurdle Step
3 ▪ Hips, knees and ankles remain aligned in
the sagittal plane
▪ Minimal to no movement in lumbar spine
▪ Dowel and hurdle remain parallel
2 ▪ Alignment is lost between hips, knees
and ankles
▪ Movement in Lumbar Spine
▪ Dowel and hurdle do not remain parallel
1 ▪ Inability to clear the cord during the
hurdle step
▪ Loss of Balance
An individual receives a score of zero if pain is associated with any portion of this test.
A medical professional should perform a thorough evaluation of the painful area.

14Copyright 2015 Functional Movement Systems and Gray Cook
Hurdle StepNOTES

15Copyright 2015 Functional Movement Systems and Gray Cook
Inline Lunge Movement PatternPURPOSE
The Inline Lunge pattern is a component of the deceleration movements and direction changes produced in exercise,
activity and sport. Although the inline lunge explores more movement and control than many activities require, it provides
a quick appraisal of left and right functions in the basic pattern. It is intended to place the body in a position to focus on
the stresses as simulated during rotation, deceleration and lateral movements. The narrow base requires appropriate
starting stability and continued dynamic control of the pelvis and core within an asymmetrical hip position equally
sharing the load.
The inline lunge places the lower extremities in a split-stance position while the upper extremities are in an opposite
or reciprocal pattern. This replicates the natural counterbalance the upper and lower extremities use to complement each
other, as it uniquely demands spine stabilization. This test also challenges hip, knee, ankle and foot mobility and stability,
at the same time simultaneously challenging the flexibility of multi-articular muscles such as the latissimus dorsi and
the rectus femoris.
True lunging requires a step and descent. The inline lunge test only provides observation of the descent and return;
the step would present too many variables and inconsistencies for a simple movement screen. The split-stance narrow
base and opposite shoulder position provide enough opportunities to discover the mobility and stability problems of the
lunging pattern.
DESCRIPTIONAttain the client’s tibia length by either measuring it from the floor to the top center of the tibial tuberosity, or
acquiring it from the height of the cord during the hurdle step test. Tell the client to place the toe of the back foot at the
start line on the kit. Using the tibia measurement, have the client put the heel of the front foot at the appropriate mark on
the kit. In most cases, it’s easier to establish proper foot position before introducing the dowel.
Place the dowel behind the back, touching the head, thoracic spine and sacrum. The client’s hand opposite the front
foot should be the hand grasping the dowel at the cervical spine. The other hand grasps the dowel at the lumbar spine.
The dowel must maintain it’s vertical position throughout both the downward and upward movements of the lunge test.
Do not manually manipulate set up positions, but absolutely spot for safety and be aware of possible balance issues that
could put the person being screened at risk.
To perform the inline lunge pattern, the client lowers the back knee to touch the center of the board behind the heel of
the front foot and returns to the starting position. The knee must touch down on either the test kit or the ground and then
return to standing position on the test kit to complete the movement.
If any of the criteria for a score of three are not achieved, the client receives a score of two. If any criteria for the score
of two are not achieved, the client receives a score of one.
IMPLICATIONS OF THE INLINE LUNGE MOVEMENT PATTERN ▪ Ankle, knee and hip mobility may be inadequate for either the front or rear leg.
▪ Dynamic stability may not be adequate to complete the pattern.
▪ There may also be limitations in the thoracic spine region, inhibiting the client from performing the test
well.

16Copyright 2015 Functional Movement Systems and Gray Cook
Inline lungeVERBAL INSTRUCTIONS
For consistency throughout all screens, this script should always be used. The bold words below should be repeated to the
client.
▪ Step onto the center of the board with the right foot and your toe on the zero mark.
▪ The left heel should be placed according to your tibial measurement at "__".
▪ Both toes must be pointing forward with the entire foot in contact with the board.
▪ Place the dowel along the spine so it touches the back of your head, your upper back and your
tailbone.
▪ While grasping the dowel, your right hand should be in the curve of your neck, and the left hand
should be in the curve of your lower back.
▪ Maintaining an upright posture so the dowel stays vertical and you maintain the three points of
contact, descend into a lunge position so your right knee touches the center of the board.
▪ Then, return to the starting position.
Referencing the right Inline Lunge, repeat on the left by changing the indicated side
TIPS FOR TESTING1. The front leg identifies the side you are scoring.
2. The dowel remains vertical and in contact with the head, upper back and tail bone during movement.
3. The front heel remains in contact with the board, and the back heel touches the board when returning
to the starting position. Watch for loss of balance. For inline lunge, a loss of balance is stepping off the
board.
4. Remain close to the client to prevent a complete loss of balance.
5. It’s important to remember that if the person does not at least make contact with the board or ground
with the knee somewhere, it is the inability to complete the movement pattern, this is a score of one.
6. Repeat the test on both sides.
7. The client can perform the movement up to three times on each side if necessary.

17Copyright 2015 Functional Movement Systems and Gray Cook
Scoring the Inline Lunge
3 ▪ Dowel contact maintained
▪ Dowel remains vertical
▪ Minimal to no torso movement
▪ Dowel and feet remain in sagittal plane
▪ Knee touches the center of the board
▪ Front foot remains in start position
2 ▪ Dowel contact not maintained
▪ Dowel does not remain vertical
▪ Movement in torso
▪ Dowel and feet do not remain in sagittal
plane
▪ Knee does not touch center of the board
▪ Flat front foot does not remain in start
position
1 ▪ Loss of balance by stepping off the board
▪ Inability to complete movement pattern
▪ Inability to get into set up position
An individual receives a score of zero if pain is associated with any portion of this test.
A medical professional should perform a thorough evaluation of the painful area.

18Copyright 2015 Functional Movement Systems and Gray Cook
Inline LungeNOTES

19Copyright 2015 Functional Movement Systems and Gray Cook
Shoulder Mobility Movement PatternPURPOSE
The Shoulder Mobility pattern demonstrates the natural complementary rhythm of the scapular-thoracic region,
thoracic spine and rib cage during reciprocal upper extremity shoulder movements. Although the full reciprocal
reaching pattern is not seen in basic activities, it uses each segment to its range of active control, leaving little room for
compensation. Removing compensation provides a clear view of movement ability.
The cervical spine and surrounding musculature should remain relaxed and neutral. The thoracic region should have
a natural extension. There should be internal rotation and adduction in one extremity and flexion, external rotation and
abduction of the other.
DESCRIPTIONFirst, measure the client’s right hand from the distal crease to the longest digit to determine the hand length.
The client will stand with the feet together and make a fist with each hand, thumbs inside the fingers. The client then
simultaneously reaches one fist behind the neck and the other behind the back, assuming a maximally adducted,
extended and internally rotated position with one shoulder and a maximally abducted and externally rotated position with
the other.
During the test, the hands should move in one smooth motion and should remain fisted. Measure the distance
between the two closest points of the hands to determine the client’s symmetrical reach. If there is loss of cervical spine
position, Repeat the verbal instruction to "Stand tall...". If by the 3rd attempt they still lose the setup position with cervical
flexion or rounding of the back, stop the movement at the point they begin to lose position. Then take the measurement.
Have the client perform the shoulder mobility test a maximum of three times bilaterally. If any of the criteria for a
score of three are not achieved, the client receives a score of two. If any of the criteria for the score of two are not achieved,
score this a one.
IMPLICATIONS OF THE SHOULDER MOBILITY MOVEMENT PATTERN ▪ Scapular stability depends on thoracic mobility. This should be the primary focus.
▪ Excessive development and shortening of the pectoralis minor, latissimus dorsi and rectus abdominus
muscles can cause the postural alterations of forward or rounded shoulders. This postural problem
leaves unrestricted mobility of the glenohumeral joint and scapula at a disadvantage.
▪ A scapulothoratic dysfunction may be present, resulting in the decreased glenohumeral mobility
secondary to the poor scapulothoracic mobility or stability.
▪ The test requires an asymmetric movement because the arms travel in opposite directions. The test also
requires both arms reaching simultaneously, coupled with postural control and core stability.
CLEARING EXAMThere is a clearing exam at the end of the shoulder mobility test. You do not score this, but instead watch for a pain
response. If pain is produced, a positive (+) is recorded on the score sheet, and a score of zero is given to the entire
shoulder mobility test.
The client places a palm on the opposite shoulder and lifts the elbow as high as possible while maintaining the palm-
to-shoulder contact. This clearing exam is necessary because shoulder impingement will sometimes go undetected by
shoulder mobility testing alone.

20Copyright 2015 Functional Movement Systems and Gray Cook
Shoulder MobilityVERBAL INSTRUCTIONSFor consistency throughout all screens, this script should always be used. The bold words below should be repeated to the
client.
▪ Stand tall with your feet together and arms hanging comfortably.
▪ Make a fist so your fingers are around your thumbs.
▪ In one motion, reach the right fist over the head and down your back as far as possible while
simultaneously reaching your left fist up your back as far as possible.
▪ Do not "creep" your hands closer after the initial placement.
Equipment needed: measuring device
SHOULDER CLEARING TESTVerbal Instructions
▪ •Standtallwithyourfeettogetherandarmshangingcomfortably.
▪ •Placeyourrightpalmonthefrontofyourleftshoulder.
▪ •Whilemaintainingpalmplacement,raiseyourrightelbowashighaspossible.
▪ •Doyoufeelanypain?
Referencing right Shoulder Mobility, repeat on the left by changing the indicated side
Tips For Testing1. The top shoulder identifies the side being scored.
2. Repeat the verbal instruction to "Stand tall...". If by the 3rd attempt they still lose the setup position
with cervical flexion or rounding of the back, stop the movement at the point they begin to lose
position. Then take the measurement.
3. If the hand measurement is the same as the distance between two points, score low.
4. Make sure the client does not try to walk the hands toward each other following the initial placement.
5. Repeat the test and clearing exam on both sides.
6. The client can perform the movement up to three times on each side if necessary.

21Copyright 2015 Functional Movement Systems and Gray Cook
Scoring the Shoulder Mobility
3 ▪ Fists are within one hand length
2 ▪ Fists are within one and a half hand
lengths
1 ▪ Fists are not within one and a half hand
lengths
CLEARING TESTPerform this clearing test bilaterally. If the individual
receives a positive score, document both scores for future
reference. If there is pain associated with this movement,
give a score of zero and perform a thorough evaluation of the
shoulder or refer out.
An individual receives a score of zero if pain is associated
with any portion of this test.
A medical professional should perform a thorough
evaluation of the painful area.

22Copyright 2015 Functional Movement Systems and Gray Cook
Shoulder MobilityNOTES

23Copyright 2015 Functional Movement Systems and Gray Cook
Active Straight-Leg Raise Movement PatternPURPOSE
The active straight-leg raise may appear to be the least functional screen, but don’t be fooled by its simplicity. This
pattern not only identifies the active mobility of the flexed hip, but also includes the initial and continuous core stability
within the pattern as well as the available hip extension of the alternate hip. This is not so much a test of hip flexion on
one side, as it is an appraisal of the ability to separate the lower extremities in an unloaded position. This movement is
often lost when flexibility of multi-articular muscles is compromised.
The gluteus maximus/iliotibial band complex and the hamstrings are the structures most likely to result in flexion
limitations. Extension limitations are often seen in the iliopsoas and other muscles of the anterior pelvis. This pattern
challenges the ability to dissociate the lower extremities while maintaining stability in the pelvis and core. The movement
also challenges active hamstring and gastroc-soleus flexibility while maintaining a stable pelvis and active extension of
the opposite leg.
DESCRIPTIONThe client lies supine with the arms by the sides, palms up and head flat on the floor. A board is placed under the
knees; this can be either the FMS kit board or a board of similar dimensions as described earlier. Both feet should be in a
neutral position, the soles of the feet perpendicular to the floor. Ask the client to bring the feet together while maintaining
the soles of the feet perpendicular to the floor. If they are unable to touch the inside edges of the feet together, ask them
to bring them as close together as possible and allow them to start from that position.
Find the point between the anterior superior iliac spine (ASIS) and the mid-patella then place a dowel at this position,
perpendicular to the ground. Next, the client lifts the test limb while maintaining the original starting position of the ankle
and knee.
During the test, the opposite knee should remain in contact with the board; the toes should remain pointed upward in
the neutral limb position, and the head remains flat on the floor.
Once reaching the end range, note the position of the upward ankle relative to the non-moving limb. If the malleolus
passes the dowel, record a score of three.
Perform the active straight-leg mobility test a maximum of three times bilaterally. If any of the criteria for a score of
three are not achieved, the client receives a score of two. If any of the criteria for the score of two are not achieved, score
this a one.
IMPLICATIONS OF THE ACTIVE STRAIGHT LEG RAISE PATTERN ▪ Pelvic control may not be sufficient for the execution of a pattern.
▪ The client may have inadequate mobility of the opposite hip, stemming from inflexibility associated with
limited hip extension.
▪ The client may have poor functional hamstring flexibility in the moving limb.
▪ A combination of these factors will be exhibited if a client has relative bilateral, asymmetric hip mobility.
The non-moving limb is at work during the optimal pattern; when the pattern is correct, the non-moving
limb demonstrates stability, (an automatic task), while the moving limb demonstrates mobility, (a
conscious task).

24Copyright 2015 Functional Movement Systems and Gray Cook
Active Straight-Leg RaiseVERBAL INSTRUCTIONSFor consistency throughout all screens, this script should always be used. The bold words below should be repeated to the
client.
▪ Lie flat with the back of your knees against the board, feet together with toes pointing up.
▪ Place both arms next to your body with the palms facing up.
▪ With the scoring leg remaining straight and the back of the opposite knee maintaining contact with
the board, raise your scoring leg as high as possible.
TIPS FOR TESTING1. The moving limb identifies the side being scored.
2. Make sure the non-moving limb maintains a neutral position.
3. Repeat the test on both sides.
4. The client can perform the movement up to three times on each side if necessary.
5. Only move stick if a definitive vertical reference is needed at the border of 1 or 2 at mid-joint line.
6. Ask them to bring their feet together as close as possible. Then perform the test from that position.
Soles of feet still need to be perpendicular to the ground.

25Copyright 2015 Functional Movement Systems and Gray Cook
Scoring the Active-Straight Leg Raise
3 ▪ Vertical line of the malleolus resides
between mid-thigh and ASIS
▪ The non-moving limb remains in neutral
position
2 ▪ Vertical line of the malleolus resides
between mid-thigh and mid-patella
▪ The non-moving limb remains in neutral
position
1 ▪ Vertical line of the malleolus resides
below the mid-patella
▪ The non-moving limb remains in neutral
position
An individual receives a score of zero if pain is associated with any portion of this test.
A medical professional should perform a thorough evaluation of the painful area.

26Copyright 2015 Functional Movement Systems and Gray Cook
Active Straight-Leg RaiseNOTES

27Copyright 2015 Functional Movement Systems and Gray Cook
Trunk Stability Push-Up Movement PatternPURPOSE
The trunk stability push-up is a unique, single-repetition version of the common floor-based pushing exercise. It is
used as a basic observation of the reflex core stabilization and is not a test or measure of upper-body strength. The goal is
to initiate movement with the upper extremities in a push-up position without allowing movement of the spine or hips.
Extension and rotation are the two most common compensatory movements. These compensations indicate the
prime movers within the push-up pattern incorrectly engage before the stabilizers.
The push-up movement pattern tests the ability to stabilize the spine in the sagittal plane during the closed kinetic
chain, upper-body symmetrical pushing movement.
DESCRIPTIONThe client assumes a prone position with the arms extended overhead. They then slide the hands down at shoulder-
width apart until they reach the start position. During the test, men and women have different starting positions. Men
begin with their thumbs at the top of the forehead, while women begin with their thumbs at chin level. The thumbs are
then lowered to the chin or shoulder level, per the scoring criteria. The knees are fully extended, the ankles are neutral and
the soles of the feet are perpendicular to the floor.
Ask the client to perform one push-up in this position. The body should be lifted as a unit; there should be no sway
in the spine during the test. If the client cannot perform a push-up in the initial position, the hands are lowered to the
second designated start position being the chin for males and the clavicle for females.
Perform the trunk stability push-up test a maximum of three times. If any of the criteria for a score of three are not
achieved, move the hands to the appropriate position so the individual can test for a 2. If any of the scoring criteria for a
score of two are not achieved, the individual receives a score of 1.
IMPLICATIONS OF THE TRUNK STABILITY MOVEMENT PATTERN ▪ Limited performance during this test can be attributed to poor reflex stabilization of the core.
▪ Compromised upper-body strength, scapular stability, or both can also be a cause of poor performance
during this test.
▪ Limited hip and thoracic spine mobility can affect a client’s ability to achieve the optimal start position,
also leading to poor performance during the test.
CLEARING EXAMThere is a clearing exam at the end of the trunk stability push-up test. This press up movement is not scored; it is
performed to observe a pain response. If pain is produced, a positive (+) is recorded and a score of zero is given to the
entire push-up test. We clear extension with a press-up from the push-up position. If the client receives a positive score,
document both scores for future reference.

28Copyright 2015 Functional Movement Systems and Gray Cook
Trunk Stability Push-UpVERBAL INSTRUCTIONSFor consistency throughout all screens, this script should always be used. The bold words below should be repeated to the
client.
▪ Lie face down with arms extended overhead at shoulder-width apart.
▪ Pull your thumbs down in line with your (forehead for men, chin for women).
▪ With your legs together, pull your toes toward the shins.
▪ Extend your knees and then lift your elbows slightly off the ground.
▪ While maintaining a rigid torso, push your body as one unit into a push-up position.
Referencing hand position for Score of 3, if needed repeat with hand position for score of 2 that is chin for men, clavicle for women
EXTENSION CLEARING TESTVerbal Instructions
▪ While lying on your stomach, place your hands, palms down, under your shoulders.
▪ With no lower body movement, press your upper body off the ground until your elbows are straight.
▪ Do you feel pain?
TIPS FOR TESTING1. The client should lift the body as a unit.
2. To identify "shoulder-width apart" for hand position, align the web of the thumb with the crease of the
armpit. This will place the hands at the individuals "should-width" position.
3. Be sure that the client starts with arms overhead and then drags the hands down at shoulder-width
apart to the start position. It may be necessary to give them a tactile cue to adjust their hand to the
correct position.
4. On each attempt, make sure the client maintains the hand position and the hands do not slide down as
the client prepares to push.
5. Make sure the chest and stomach come off the floor simultaneously.
6. The client can perform the movement up to three times if necessary.
7. Repeat the instruction with appropriate hand placement if necessary.

29Copyright 2015 Functional Movement Systems and Gray Cook
Scoring the Trunk Stability Push-Up
3 ▪ Men perform a repetition with thumbs
aligned with the top of the forehead
▪ Women perform a repetition with
thumbs aligned with the chin
▪ The body lifts as a unit with no lag in the
spine
2 ▪ Men perform a repetition with thumbs
aligned with the chin
▪ Women perform a repetition with
thumbs aligned with the clavicle
▪ The body lifts as a unit with no lag in the
spine
1 ▪ Men are unable to perform a repetition
with thumbs aligned with the chin
▪ Women are unable to perform a
repetition with thumbs aligned with the
clavicle
An individual receives a score of zero if pain is associated with any portion of this test.
A medical professional should perform a thorough evaluation of the painful area.
EXTENSION CLEARING TESTExtension is cleared by performing a press-up in
from the floor with hands under the shoulders. If there is
pain associated with this motion, give a positive (+) score
with a final score of zero and perform a more thorough
evaluation or refer out. If the individual does receive a
positive score, document both scores for future reference.

30Copyright 2015 Functional Movement Systems and Gray Cook
Trunk Stability Push-UpNOTES

31Copyright 2015 Functional Movement Systems and Gray Cook
Rotary Stability Movement PatternPURPOSE
The rotary stability pattern observes multi-plane pelvis, core and shoulder girdle stability during a combined upper
and lower extremity movement. This pattern is complex, requiring proper neuromuscular coordination and energy transfer
through the torso. It has its roots in the creeping pattern that follows basic crawling in our developmental sequence.
The test has two important implications. It demonstrates reflex stabilization and weight shifting in the transverse
plane, and it represents the coordination efforts of mobility and stability observed in fundamental climbing patterns.
DESCRIPTIONThe client gets into the quadruped position with a board, either the FMS kit board or one of similar size, on the floor
between the hand and knees. The board should be parallel to the spine, and the shoulders and hips should be 90 degrees
relative to the torso, with the ankles neutral and soles of the feet perpendicular to the floor.
Before the movement begins, the hands should be open, with the thumbs, knees and feet all touching the board. The
client should flex the shoulder while extending the same-side hip and knee so that it creates a straight line, and then
bring elbow to the knee while remaining in line over the board. Spine flexion is allowed as the client brings the knee and
elbow together. Do not manually manipulate set up positions, but absolutely spot for safety and be aware of possible
balance issues that could put the person being screened at risk.
This is performed bilaterally for a maximum of three attempts if needed. If one repetition is completed successfully,
there is no reason to perform the test again.
If a score of three is not attained, have the person perform a diagonal pattern using the opposite shoulder and hip
in the same manner described above. During this diagonal variation, the arm and leg need not be aligned over the board;
however, the elbow and knee do need to touch over it.
IMPLICATIONS OF THE ROTARY STABILITY PATTERN ▪ Limited performance during this test can be attributed to poor reflex stabilization of the trunk and core.
▪ Compromised scapular and hip stability can also cause poor performance.
▪ Limited knee, hip, spine and shoulder mobility can reduce the ability to perform the complete pattern,
leading to a poor test score.
CLEARING EXAMA clearing exam is performed at the end of the rotary stability test. This movement is not scored; it is performed to observe
a pain response. If pain is produced, a positive (+) is recorded on the sheet and a score of zero is given to the entire rotary
stability test. We clear flexion from the quadruped position, then rocking back and touching the buttocks to the heels and
the chest to the thighs. The hands remain in front of the body, reaching out as far as possible. If there is pain associated
with this motion, give a zero score. If the client receives a positive score, document both scores for future reference.

32Copyright 2015 Functional Movement Systems and Gray Cook
Rotary StabilityVERBAL INSTRUCTIONSFor consistency throughout all screens, this script should always be used. The bold words below should be repeated to the
client.
▪ Get on your hands and knees over the board so your hands are under your shoulders and your knees
are under your hips.
▪ The thumbs, knees and toes must contact the sides of the board, and the toes must be pulled
toward the shins.
▪ Simultaneously shift and lift your right hand forward and your right leg backward at the same time,
like you are flying and forming a straight line.
▪ Then without touching down, touch your right elbow to your right knee directly over the board.
▪ Re-extend the arm and leg over the board.
▪ Then, return to the start position.
Referencing unilateral movement for Score of 3, if needed repeat with diagonal movement for score of 2
▪ Simultaneously lift your right hand forward and the left leg backward at the same time
▪ Then without touching down, touch your right elbow to your left knee directly over the board.
▪ Re-extend your arm and leg, then return to start position
Referencing right Shoulder Mobility, repeat on the left by changing the indicated side
If client is unable to perform a unilateral repetition, instruct the client to repeat with a diagonal pattern.
FLEXION CLEARING TESTVerbal Instructions
▪ Get into the same start position with feet pointed backwards, and rock your hips toward your heels.
▪ Lower your chest to your knees, and reach your hands in front of your body as far as possible.
▪ Do you feel any pain?
TIPS FOR TESTING1. Have the client perform a unilateral attempt on one side and if they are not able to meet the criteria for
Score of 3, then ask them to attempt the diagonal pattern for the score of 2 on the same side before
moving on to the opposite side.
2. The upper moving limb indicates the side being tested.
3. Make sure the unilateral limbs remain over the board to achieve a score of three.
4. The diagonal knee and elbow must meet over the board to achieve a score of two.
5. Make sure the hips and shoulders are at right angles at the start.
6. Repeat the test on both sides.

33Copyright 2015 Functional Movement Systems and Gray Cook
Scoring the Rotary Stability
3 ▪ Performs a correct unilateral repetition
▪ Unilateral limbs remain over the board
▪ Without touching down, touch the
same-side elbow to the same-side knee
over the board
2 ▪ Performs a correct diagonal repetition
▪ The diagonal knee and elbow meet over
the board
▪ Without touching down, touch the
opposite elbow and knee over the board
1 ▪ Inability to perform a diagonal repetition
An individual receives a score of zero if pain is associated with any portion of this test.
A medical professional should perform a thorough evaluation of the painful area.
FLEXION CLEARING TESTFlexion can be cleared by first assuming a quadruped
position, then rocking back and touching the buttocks to
the heels and chest to the thighs, The hands should remain
in the front of the body, reaching out as far as possible. If
there is pain associated with this motion, give a positive (+)
score with a final score of zero and perform a more thorough
evaluation or refer out. If the individual receives a positive
score, document both scores for future reference.

34Copyright 2015 Functional Movement Systems and Gray Cook
Rotary StabilityNOTES

35Copyright 2015 Functional Movement Systems and Gray Cook
Documenting FMS ScoresWe have provided you with a very basic scoring sheet format. This is just an example, the important aspect when
documenting the scores is to be consistent and follow the rules of the scoring criteria. Over the years we have seen many
different versions of score sheets. You may choose to add verbal instructions, scoring criteria or even more detailed instructions
based on your setting. Feel free to alter the scoring document to fit your needs, just remember when it comes to documenting
your scores follow the rules.
The score sheet we provide was designed to be simple and not create a lot of confusion when documenting your scores.
Remember the FMS is designed to be a quick and simple test where we do not want to create opportunities to overanalyze the
specific tests. When documenting the scores we want to keep this same philosophy, mark the score and move on. Feel free to
add bullets for instruction or scoring criteria if needed and leave an area to make notes for some of your observations.
The FMS scoring sheet provides you with a Raw Score, Final Score and a Total Score, all of these scores are important when
determining your intervention strategies. These scores will be utilized differently depending on your setting, whether you are
a fitness professional working one-on-one or you are a strength and conditioning coach at a high school working with a couple
of hundred athletes. If you are working one-on-one you may be using the Raw Score to determine your priorities for corrective
exercises. In a situation where you have large groups the Final Score may be more important initially in determining next steps
for the entire group. The Total Score may be important when comparing to other groups or other individuals.
When referring to some of the current and future research the Final and Total Scores are often used to determine cut-off for
injury risk and general trends in different populations. However, this doesn’t discount the importance of the Raw Score, this score
gives you the best profile of how the individual is moving. As you become proficient in the FMS system you will find yourself
using all the scores to your benefit.
The Raw Score represents the right and left side results of the five tests that allow for bilateral comparison. The Final Score
is simply the lower of the two Raw Scores. The two tests that do not have a right and left scores, there is only one score recorded.
The Total Score is simply the sum of the Final Scores. This format is certainly easy to follow (example 1).
It is very clear in the scoring criteria that when pain is noted a 0 is given and a more detailed evaluation from a medical
professional is recommended. Now without getting into the debate on what is and isn’t pain, I want to discuss simply how you
should document the 0 score. You should consider two options depending on your professional background and setting. The first
and maybe more appropriate way to document the 0 score would be to give the individual a Raw and Final score of 0, stop the
test and refer. The second option will give you and the healthcare professional more specific information when performing the
evaluation. That is, if a person exhibits pain during a test you could continue on with the rest of the FMS and only document the
0 score in the Final Score section for that test. For example, a person could get a 3 on the Deep Squat test but have pain in the
knee; the Raw Score would be 3 and the Final Score a 0. If you use this option you will now have more information to utilize when
referring or performing a more detailed evaluation (example 2).
There are three screens that use Clearing Tests, which are not scored since they are only used to determine if pain is
provoked. These tests are documented as a "Positive" for pain or a "Negative" for no pain. The clearing tests do influence the
Final Score but not the Raw Score. The results of the clearing tests will make the Final Score a 0 if pain is provoked. Many times
we get the question as to why we would even need to document a Raw Score if the Clearing Tests override it. The answer is
quite simple; if pain is provoked we want to gather as much information on that person as necessary prior to the more detailed
evaluation being performed. For example during the Shoulder Mobility Screen you have two individuals, the first individual gets
a 3 on the Right and 3 on the Left, the second individual gets a 2 on the Right and 1 on the Left and they both get a Positive on
the Clearing Test. The final score for both of these individuals is 0 but they have completely different movement patterns, which
for the second individual may be the cause of pain. By having the Raw Score we can now direct the focus of the evaluation and
intervention strategies (example 3).
Hopefully these few tips will allow you to understand the overall scoring system as well as use the results more effectively.
The FMS was designed to be a simple grading system, however the more proficient you become at using the FMS and its results,
the more effectively you will be able to apply corrective strategies.

36Copyright 2015 Functional Movement Systems and Gray Cook
2
2
2
3
1
2
3
-
+
2
2
3
-
2
2
-
2
1
2
0
2
0Pain in right shoulder
2
EXAMPLE 1
EXAMPLE 3
EXAMPLE 2
Raw Score: This score is used to denote right and left side scoring. The right and left sides are scored in fiveof the seven tests and both are documented in this space.
Final Score: This score is used to denote the overall score for the test. The lowest score for the raw score (each side) is carried over to give a final score for the test. A person who scores a three on the right and a two on the left would receive a final score of two. The final score is then summarized and used as a total score.
Clearing Test: A positive indicates pain. A negative indicates no pain. If pain is present (+),the score for that test would result in a 0.
FUNCTIONAL MOVEMENT SCREEN SCORE SHEET
ADDRESS:
SCHOOL/AFFILIATION:
HEIGHT: WEIGHT: AGE: GENDER:
PRIMARY SPORT: PRIMARY POSITION:
HAND/LEG DOMINANCE:
TEST
DEEP SQUAT
TOTAL SCREEN SCORE
HURDLE STEP
INLINE LUNGE
SHOULDER MOBILITY
SHOULDER CLEARING TEST
FLEXION CLEARING TEST
ACTIVE STRAIGHT-LEG RAISE
TRUNK STABILITY PUSHUP
EXTENSION CLEARING TEST
ROTARY STABILITY
L
L
L
L
L
L
R
R
R
R
R
R
+/-
+/-
+/-
+/-
RAW SCORE FINAL SCORE COMMENTS
PREVIOUS TEST SCORE:
NAME: DATE: DOB:
CITY, STATE, ZIP: PHONE:
37Copyright 2015 Functional Movement Systems and Gray Cook
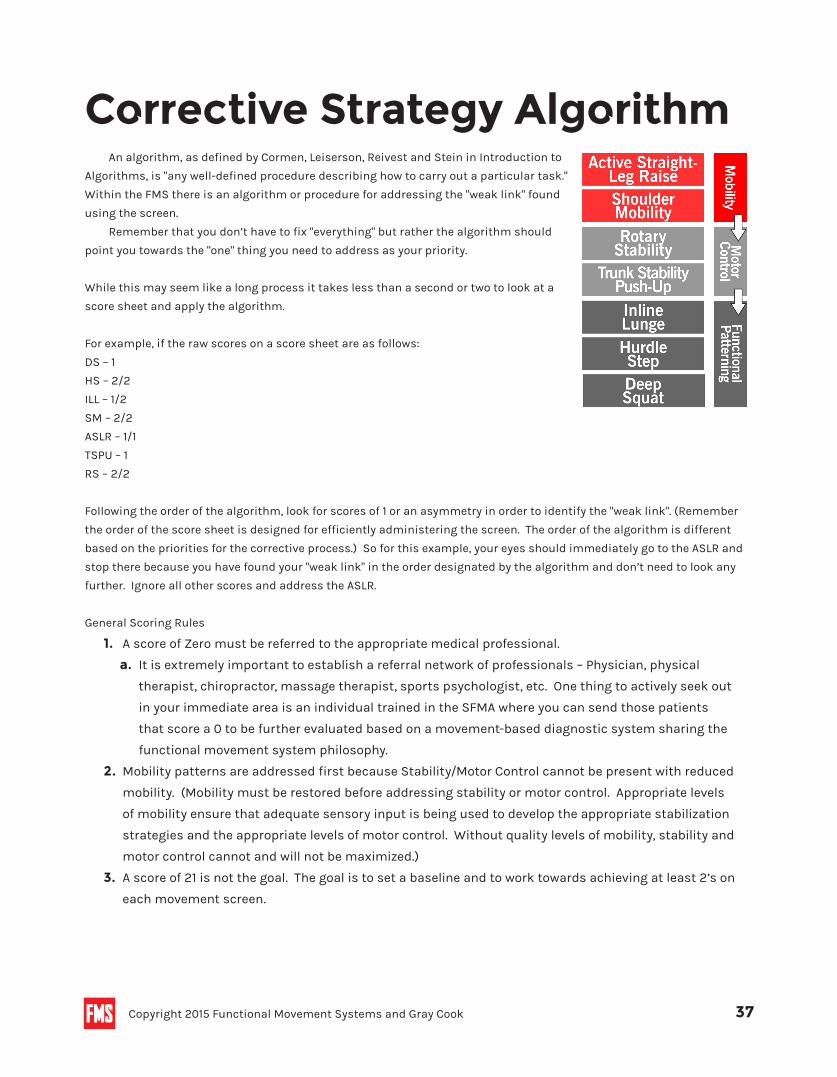
Corrective Strategy AlgorithmAn algorithm, as defined by Cormen, Leiserson, Reivest and Stein in Introduction to
Algorithms, is "any well-defined procedure describing how to carry out a particular task."
Within the FMS there is an algorithm or procedure for addressing the "weak link" found
using the screen.
Remember that you don’t have to fix "everything" but rather the algorithm should
point you towards the "one" thing you need to address as your priority.
While this may seem like a long process it takes less than a second or two to look at a
score sheet and apply the algorithm.
For example, if the raw scores on a score sheet are as follows:
DS – 1
HS – 2/2
ILL – 1/2
SM – 2/2
ASLR – 1/1
TSPU – 1
RS – 2/2
Following the order of the algorithm, look for scores of 1 or an asymmetry in order to identify the "weak link". (Remember
the order of the score sheet is designed for efficiently administering the screen. The order of the algorithm is different
based on the priorities for the corrective process.) So for this example, your eyes should immediately go to the ASLR and
stop there because you have found your "weak link" in the order designated by the algorithm and don’t need to look any
further. Ignore all other scores and address the ASLR.
General Scoring Rules
1. A score of Zero must be referred to the appropriate medical professional.
a. It is extremely important to establish a referral network of professionals – Physician, physical
therapist, chiropractor, massage therapist, sports psychologist, etc. One thing to actively seek out
in your immediate area is an individual trained in the SFMA where you can send those patients
that score a 0 to be further evaluated based on a movement-based diagnostic system sharing the
functional movement system philosophy.
2. Mobility patterns are addressed first because Stability/Motor Control cannot be present with reduced
mobility. (Mobility must be restored before addressing stability or motor control. Appropriate levels
of mobility ensure that adequate sensory input is being used to develop the appropriate stabilization
strategies and the appropriate levels of motor control. Without quality levels of mobility, stability and
motor control cannot and will not be maximized.)
3. A score of 21 is not the goal. The goal is to set a baseline and to work towards achieving at least 2’s on
each movement screen.

38Copyright 2015 Functional Movement Systems and Gray Cook
The FMS Training Cycle
IDENTIFY CORRECT PATTERN
MOBILITY COMPETENCY
STATIC MOTOR CONTROL COMPETENCY
DYNAMIC MOTOR CONTROL COMPETENCY
PERFORMANCE
NOTES

39Copyright 2015 Functional Movement Systems and Gray Cook
FMS Corrective ExerciseAN EXCERPT FROM MOVEMENT BY GRAY COOK
For all practical purposes, the FMS is refined or even broken down by the corrective exercise progressions. This means
exercises associated with each movement pattern in the FMS are actually a continued part of the screen. There’s no need
to score these, but we still pay close attention. The corrective exercises are not simply performed with blind confidence—
they should be used as a gauge to identify proficiency or deficiency for each exercise task.
FMS corrective exercises are grouped two different ways. First, we group the exercises by the seven movement pattern
tests within the screen. Second, the exercises follow a linear path from basic mobility to basic stability to movement
pattern retraining.
Specifically each of the seven movement patterns is linked to—
1. Mobility Exercises— Focused on joint range of motion, tissue length and muscle flexibility.These demonstrate the basic mobility required within each moving segment of a specific movement pattern. The
mobility category includes any form of stretching or joint mobility work within the movement pattern. Exercises in
this category need to explore and eventually demonstrate all the available mobility required for that pattern.
2. Stability/Motor Control Exercises— Focused on basic sequencing of movement.These exercises target postural control of starting and ending positions within each movement pattern. The
stability category includes any form of postural control work, with a particular focus on starting and end-range
postural control. Don’t think strength, think timing. Timing is a quick tap of the breaks, whereas strength is a
force that locks the wheels. Stability is about fine-tuned control, not force. These exercises need to demonstrate
appropriate postural control without verbal coaching or visual cues.
3. Movement Pattern Retraining—Incorporates the use of fundamental mobility and stability into specific
movement patterns to reinforce coordination and timing.These exercises reinforce confidence through repetition and reactive drills and should explore the entire movement
pattern in order for improved mobility and stability to interact and become coordinated.
The corrective exercise progression always starts with mobility exercises. These exercises are performed bilaterally
to confirm mobility limitation and asymmetry. Never assume you know the mobility restriction location or side of the
mobility restriction. Always check both sides and always clear mobility before performing all the mobility exercises.
If these exercises reveal limitation or asymmetry, you have confirmed a mobility problem within the pattern and it
should be the primary focus of the corrective exercise session. If no change in mobility is appreciated, do not proceed to
stability work. Use the exercises to prove mobility is present or continue working on all mobility problems until you note
an appreciable, measurable change. Mobility does not need to become full or normal, but an improvement must be noted.
You can proceed to a stability corrective exercise only if the increased mobility allows the person to successfully get into
the appropriate exercise posture and position.
If there is any question about compromised mobility, always return to mobility exercises at the beginning of each
exercise session before moving to stability/motor control exercises. This will assure that proper tissue length and joint
alignment are available for stabilization exercises.
The mobility exercise will remove stiffness or muscle tone that is performing the role of stability. If optimal mobility is
achieved, it is appropriate to move directly to stability, but periodically reconfirm mobility just to be sure.
The stability exercises demand posture, alignment, balance and control of forces within the newly available range and
without the support of compensatory stiffness or muscle tone. Consider stability exercises as challenges to posture and
position rather than being conventional strength exercises.

40Copyright 2015 Functional Movement Systems and Gray Cook
When no limitation or asymmetry is present in the mobility corrective exercises, move directly to stability corrective
exercises. Seeing no limitation or asymmetry indicates the mobility required for the movement pattern is present, but is
not responding to efficient motor control.
Using the idea of motor control will help you think beyond weakness as the only explanation for poor stabilization.
Motor control is a broad category that includes mobility, alignment, balance, timing, sub-maximal muscle quickness,
coordination and efficient co-activation. The absence of efficient motor control looks like weakness, but strength training
the stabilizers is not the solution.
Stability can be separated from strength by improved motor control demonstrated by rigidity and firmness at end
ranges. This is why many of the stability exercises use a light load, good posture and a hold or a movement into the end
ranges. Quick firmness and adjustments to changes in load are more important than force generation.
Stability in the middle ranges is also important, but particular interest must be taken to assure end-range function.
If end-range function is present, mid-range function is usually acceptable, but the reverse is not necessarily true. Look at
good mid-range tension as strength, and good end-range tension as stability, timing and integrity. This is the main reason
why mobility is important. You must make sure you are testing end-range motor control.
When improved stability is noted, it is possible to progress to movement pattern retraining. Movement pattern
retraining should always follow proper attainment and demonstrations of mobility and stability within corrective
exercises. Perfection is not necessary and is rarely possible, but do not attempt to retrain a movement pattern if the
mobility and stability to support the pattern is not available.
Many forms of assistance facilitation can be provided to reduce compensation and allow quality practice within
movement patterns. The general rule is to only use techniques that improve form and quality of the movement. Overload
is not an effective corrective tool at this level of training.
Quick progressions with load and intensity will usually cause a default to a more limited or dysfunctional movement
pattern.

41Copyright 2015 Functional Movement Systems and Gray Cook
HISTORY OF THE SCREEN: UNIT 1 CHAPTER 1
NOTES
Notes Section

42Copyright 2015 Functional Movement Systems and Gray Cook
UNDERSTANDING WHY: UNIT 1 CHAPTER 2
NOTES

43Copyright 2015 Functional Movement Systems and Gray Cook
OVERVIEW OF THE SCREEN: UNIT 2 CHAPTER 1
NOTES
44Copyright 2015 Functional Movement Systems and Gray Cook
DEEP SQUAT: UNIT 2 CHAPTER 2
NOTES

45Copyright 2015 Functional Movement Systems and Gray Cook
HURDLE STEP: UNIT 2 CHAPTER 3
NOTES

46Copyright 2015 Functional Movement Systems and Gray Cook
INLINE LUNGE: UNIT 2 CHAPTER 4
NOTES
47Copyright 2015 Functional Movement Systems and Gray Cook
BIG 3, LITTLE 4: UNIT 2 CHAPTER 5NOTES

48Copyright 2015 Functional Movement Systems and Gray Cook
SHOULDER MOBILITY: UNIT 2 CHAPTER 6
NOTES

49Copyright 2015 Functional Movement Systems and Gray Cook
ACTIVE STRAIGHT-LEG RAISE: UNIT 2 CHAPTER 7
NOTES

50Copyright 2015 Functional Movement Systems and Gray Cook
TRUNK STABILITY PUSH-UP: UNIT 2 CHAPTER 8
NOTES

51Copyright 2015 Functional Movement Systems and Gray Cook
ROTARY STABILITY: UNIT 2 CHAPTER 9
NOTES

52Copyright 2015 Functional Movement Systems and Gray Cook
TESTING TIPS: UNIT 2 CHAPTER 10
NOTES

53Copyright 2015 Functional Movement Systems and Gray Cook
RECORDING SCORES: UNIT 2 CHAPTER 11
NOTES

54Copyright 2015 Functional Movement Systems and Gray Cook
REPORT OVERVIEW: UNIT 3 CHAPTER 1
NOTES

55Copyright 2015 Functional Movement Systems and Gray Cook
THE LIGHT SYSTEM: UNIT 3 CHAPTER 2
NOTES

56Copyright 2015 Functional Movement Systems and Gray Cook
SHARING THE REPORT: UNIT 3 CHAPTER 3
NOTES

57Copyright 2015 Functional Movement Systems and Gray Cook
INTRO : UNIT 4 CHAPTER 1
NOTES

58Copyright 2015 Functional Movement Systems and Gray Cook
CORRECTIVE EXERCISE GOALS: UNIT 4 CHAPTER 2
NOTES

59Copyright 2015 Functional Movement Systems and Gray Cook
CORRECTIVE EXERCISE RULES: UNIT 4 CHAPTER 3
NOTES

60Copyright 2015 Functional Movement Systems and Gray Cook
LINKING SCORES TO EXERCISES: UNIT 4 CHAPTER 4
NOTES

61Copyright 2015 Functional Movement Systems and Gray Cook
PERFORMANCE PYRAMID: UNIT 4 CHAPTER 5
NOTES

62Copyright 2015 Functional Movement Systems and Gray Cook
Raw Score: This score is used to denote right and left side scoring. The right and left sides are scored in fiveof the seven tests and both are documented in this space.
Final Score: This score is used to denote the overall score for the test. The lowest score for the raw score (each side) is carried over to give a final score for the test. A person who scores a three on the right and a two on the left would receive a final score of two. The final score is then summarized and used as a total score.
Clearing Test: A positive indicates pain. A negative indicates no pain. If pain is present (+),the score for that test would result in a 0.
FUNCTIONAL MOVEMENT SCREEN SCORE SHEET
ADDRESS:
SCHOOL/AFFILIATION:
HEIGHT: WEIGHT: AGE: GENDER:
PRIMARY SPORT: PRIMARY POSITION:
HAND/LEG DOMINANCE:
TEST
DEEP SQUAT
TOTAL SCREEN SCORE
HURDLE STEP
INLINE LUNGE
SHOULDER MOBILITY
SHOULDER CLEARING TEST
FLEXION CLEARING TEST
ACTIVE STRAIGHT-LEG RAISE
TRUNK STABILITY PUSHUP
EXTENSION CLEARING TEST
ROTARY STABILITY
L
L
L
L
L
L
R
R
R
R
R
R
+/-
+/-
+/-
+/-
RAW SCORE FINAL SCORE COMMENTS
PREVIOUS TEST SCORE:
NAME: DATE: DOB:
CITY, STATE, ZIP: PHONE:

63Copyright 2015 Functional Movement Systems and Gray Cook
Scorecards
TEST
DEEP SQUAT
TOTAL SCREEN SCORE
HURDLE STEP
INLINE LUNGE
SHOULDER MOBILITY
SHOULDER CLEARING TEST
FLEXION CLEARING TEST
ACTIVE STRAIGHT-LEG RAISE
TRUNK STABILITY PUSHUP
EXTENSION CLEARING TEST
ROTARY STABILITY
L
L
L
L
L
L
R
R
R
R
R
R
+/-
+/-
+/-
+/-
RAW SCORE FINAL SCORE COMMENTS
TEST
DEEP SQUAT
TOTAL SCREEN SCORE
HURDLE STEP
INLINE LUNGE
SHOULDER MOBILITY
SHOULDER CLEARING TEST
FLEXION CLEARING TEST
ACTIVE STRAIGHT-LEG RAISE
TRUNK STABILITY PUSHUP
EXTENSION CLEARING TEST
ROTARY STABILITY
L
L
L
L
L
L
R
R
R
R
R
R
+/-
+/-
+/-
+/-
RAW SCORE FINAL SCORE COMMENTS

64Copyright 2015 Functional Movement Systems and Gray Cook
TEST
DEEP SQUAT
TOTAL SCREEN SCORE
HURDLE STEP
INLINE LUNGE
SHOULDER MOBILITY
SHOULDER CLEARING TEST
FLEXION CLEARING TEST
ACTIVE STRAIGHT-LEG RAISE
TRUNK STABILITY PUSHUP
EXTENSION CLEARING TEST
ROTARY STABILITY
L
L
L
L
L
L
R
R
R
R
R
R
+/-
+/-
+/-
+/-
RAW SCORE FINAL SCORE COMMENTS
TEST
DEEP SQUAT
TOTAL SCREEN SCORE
HURDLE STEP
INLINE LUNGE
SHOULDER MOBILITY
SHOULDER CLEARING TEST
FLEXION CLEARING TEST
ACTIVE STRAIGHT-LEG RAISE
TRUNK STABILITY PUSHUP
EXTENSION CLEARING TEST
ROTARY STABILITY
L
L
L
L
L
L
R
R
R
R
R
R
+/-
+/-
+/-
+/-
RAW SCORE FINAL SCORE COMMENTS

65Copyright 2015 Functional Movement Systems and Gray Cook
TEST
DEEP SQUAT
TOTAL SCREEN SCORE
HURDLE STEP
INLINE LUNGE
SHOULDER MOBILITY
SHOULDER CLEARING TEST
FLEXION CLEARING TEST
ACTIVE STRAIGHT-LEG RAISE
TRUNK STABILITY PUSHUP
EXTENSION CLEARING TEST
ROTARY STABILITY
L
L
L
L
L
L
R
R
R
R
R
R
+/-
+/-
+/-
+/-
RAW SCORE FINAL SCORE COMMENTS
TEST
DEEP SQUAT
TOTAL SCREEN SCORE
HURDLE STEP
INLINE LUNGE
SHOULDER MOBILITY
SHOULDER CLEARING TEST
FLEXION CLEARING TEST
ACTIVE STRAIGHT-LEG RAISE
TRUNK STABILITY PUSHUP
EXTENSION CLEARING TEST
ROTARY STABILITY
L
L
L
L
L
L
R
R
R
R
R
R
+/-
+/-
+/-
+/-
RAW SCORE FINAL SCORE COMMENTS

66Copyright 2015 Functional Movement Systems and Gray Cook
The Performance PyramidThe performance pyramid is a simple diagram constructed to give you a mental image and understanding of human
movement and movement patterns. It is constructed of three rectangles of diminishing size, with one rectangle building
upon another. Each of these rectangles represents a certain type of movement. The pyramid must always be constructed
from the bottom up and must always have a tapered appearance (a broad base with a narrow top).
The first rectangular level is the base platform or foundation. It represents the ability to move through fundamental
patterns.
The second rectangular level represents performance. Once you have established your ability to move, you must look at
how efficient you are at that movement. This movement efficiency is defined as power. This is not your specific power;
this is your general, measurable power, or gross athleticism. An example of a test of gross athleticism is the vertical leap.
First of all, gravity affects all bodies equally. Therefore, the vertical leap does not discriminate unfairly against body size.
Secondly, even though jumping is very important in some sports (basketball and volleyball) and rarely even considered in
others (cycling and marathon running), it demonstrates your ability to produce or generate power.
From a training standpoint, it is very important to be able to compare individuals of different sports in a general format.
The first two rectangular levels allow us to make this comparison of functional movement ability and power so that
athletes can learn from each other and different training regimes. Moreover, it is important not to get "sport specific" with
testing at this level of the performance pyramid. Sport specificity at this point of testing will reduce the ability to compare
one athlete to another and learn from them. It is also important not to do too many tests at this level. The more tests
you do, the more you complicate matters. A few simple movements will let you know how efficiently the athlete generates
power.
The last level of the pyramid is sport specific skill. This level constitutes a battery of tests to assess the athlete’s ability to
do a given activity, play a specific sport or play a specific position within that sport. It looks at the competition statistics
and any specific testing relative to that sport.
The performance pyramid is only a map and not the territory. Each level of the pyramid should be considered as a ratio of
the athletes score over the optimum score with in the category. Consider four basic appearances of the pyramid. These are
simple generalizations, but they represent how the pyramid can help guide the conditioning program.
1. The Optimum Performance Pyramid
SKILL
PERFORMANCE
BUFFER ZONE
MOVEMENT

67Copyright 2015 Functional Movement Systems and Gray Cook
The first pyramid we will discuss is the optimal pyramid. This pyramid represents a type of athlete whose movement
patterns (demonstrated by the movement screen), movement efficiency (demonstrated by performance testing) and
sports skill (demonstrated by sports specific testing and sport statistics) are balanced and adequate. This does not mean
they cannot improve, but any improvement should not upset the balance and appearance of the performance pyramid.
The optimum performance pyramid has a broad base with a slightly smaller rectangular level in the middle section and
an even smaller rectangular level on the top. This pyramid demonstrates an individual who has appropriate or optimal
functional movement. This individual possesses the ability to explore a full range of movement, demonstrating body
control and movement awareness throughout numerous positions.
This individual has also demonstrated a requisite amount of power. Compared to normative data, this individual has
demonstrated average or above average general power production. This means the individual utilizes well coordinated
linking movements or kinetic linking. For example, during the vertical leap, the individual loads the body in a crouched
position, throws the arms, slightly extends the trunk, and finally explodes through the legs in a well timed, well
coordinated effort so optimal efficiency is present. This individual has the potential to learn other kinetic linking
movements and power production movements with appropriate time, practice and analysis.
Lastly, the third rectangular level demonstrates an average or optimal amount of sport specific or activity specific skill.
Note how the broad base creates a "buffer zone" for the second level and the second level creates a buffer zone for the top
level. This buffer zone is extremely important. Without the buffer zone, there is a greater potential for injury and power
and efficiency could be compromised. This buffer zone simply demonstrates the fact that the individual’s functional
movements are more than adequate to handle the amount of power that they can generate.
Referring to the top of the pyramid, the power they generate can easily control the skill they possess.
2. The Over Powered Performance Pyramid
SKILL
MOVEMENT
PERFORMANCE
The second pyramid will demonstrate athletes who are "over powered." This does not mean that they are too strong – it
only means that their ability to generate power exceeds their ability to move freely. The way to rectify this problem is to
improve their movement patterns while maintaining their current level of power.
This pyramid represents the individual who scores very poorly on mobility and stability tests but very high on power
production (the second level) and adequately in skill (the third level). Their ability to move freely in simple and basic
positions is limited by poor flexibility or poor stability in some of the movement patterns. This causes them to have a less
than optimal functional movement score that would appear as a smaller rectangular level at the base.

68Copyright 2015 Functional Movement Systems and Gray Cook
This individual’s performance does not really have the appearance of a pyramid. The base (functional movement) and
the power (functional performance) seem to be inverted in size. This individual is generating a significant amount of
power with many restrictions and limitations in functional movement. Many highly skilled and well-trained athletes will
appear this way when their performance is viewed in the form of a performance pyramid. This athlete may have never
experienced an injury and may be performing at a high level. But if this individual chooses to train, the best focus for
training would be on functional movement patterns.
Removing the limitations to functional movement would provide a broader base and create a greater buffer zone. There
may not be an immediate tangible improvement in performance. As a matter of fact, sport specific performance and
power production may remain the same or even go down slightly as mobility and stability improve. However, it is
unlikely that this individual would improve in general power production or sport specific skill to any large degree without
first improving general fundamental basic movement patterns. Therefore, whether this individual targets functional
movement patterns for injury prevention or as a way to realize untapped performance, he or she will eventually see
improvements.
3. The Under Powered Performance Pyramid
SKILL
PERFORMANCE
MOVEMENT
The third pyramid represents "under powered" athletes who have excellent freedom of movement but whose efficiency is
poor and could stand improvement. This individual should be involved in training and conditioning that would improve
efficiency or power without negatively affecting the movement patterns.
This pyramid represents the individual who demonstrates a broad base and optimal movement patterns with very poor
power production at the second level while demonstrating optimal or above average skill in a specific movement. This
individual has the requisite movement patterns to perform multiple tasks, activities and sports skills but lacks gross
athleticism or the ability to produce power in simple movement patterns.
This person would benefit greatly from power training, plyometric training or weight training. However, it is important
that they maintain functional movement patterns as they gain strength, power, endurance and speed. This reserve of
power will create the buffer zone for sport specific skill while improving their efficiency. Consider the example of a young
pitcher who has extremely good mobility and stability and has honed his pitching skills through video analysis and expert
instruction. To pitch effectively, this individual must use a very high level of energy expenditure for a short amount of time.
This individual does not need to be on a mobility or stability program and probably does not need to tinker with pitching
mechanics to realize improvement in pitching. This individual should create better strength, power and endurance
reserves within the body, thereby improving gross athleticism. This would create a buffer zone between the second
and third level of the pyramid. This buffer zone would allow the individual to pitch at the same level of effectiveness
with a higher level of efficiency or a lower level of energy expenditure. As this individual improves power, we may not
see maximum pitching speed change at all. However, under normal circumstances we should see an improvement in
consistency, endurance and recovery between pitching bouts.

69Copyright 2015 Functional Movement Systems and Gray Cook
4. The Under Skilled Performance Pyramid
SKILL
PERFORMANCE
MOVEMENT
The last pyramid represents athletes who are "under skilled." This is a situation in which the movement pattern and
efficiency and power generation in the first two blocks of the pyramid are adequate. However, analysis of skill and sport
performance demonstrates an overall weakness or below-average performance. Athletes in this category appear to be
appropriately conditioned but not appropriately skilled. A training program specifically designed around sports skill
fundamentals and techniques would be the best investment of time for this individual.
This pyramid demonstrates an optimal functional movement level, an optimal functional performance level and a below-
average specific skill level. This is simply an individual that either naturally or through work has appropriate functional
movement patterns and good power production but does not have effective mastery of sports skill. This individual would
probably benefit most from technique training to refine or improve mechanics or develop a greater awareness of the
movement needed to perform the skill at a higher level.
CONCLUSION
The whole purpose of the testing proposed in this book is to allow you to acquire the information to construct a simple
performance pyramid. This method will consistently target the areas on which to focus.
Through seasons and training, the performance pyramid will continually change for some individuals. For others, it will
always remain the same. Some individuals will naturally have the ability to generate power but will consistently have to
work on functional movement patterns to maintain optimal freedom of movement. Other individuals will naturally have
excellent freedom of movement and movement patterns but will need to use supplementary training to maintain a level of
gross athleticism and power production. Others will find that they consistently need to work on fundamentals and sports
skills while others are naturally gifted with sports skills and should invest their time in conditioning.
The performance pyramid explains why simply replicating the program of one individual will not consistently yield the
level of results it does for another individual. Many coaches and athletes over the years have somehow intuitively used
this type of approach to consistently expose the category with the greatest weakness and then work on that category. The
performance pyramid simply and effectively keeps body balance in check and aids in communicating with the athlete
about his or her area of weakness.

70Copyright 2015 Functional Movement Systems and Gray Cook
What’s Next?
1. Take the exam online to get certified!
2. One Year Free Certified Membership to
FunctionalMovement.com
3. Free 60-day Trial to FMS Pro 360TM
4. Sign up for a Level 2 Course
PHONE434-432-3677
WEBFunctionalMovement.com
1. Take the ExamTake some time to review the material you received
from the online course. Review Unit 2 and practice up
to 20 screens.
2. Certified Member Benefits
▪ Exercise Library – Over 400 videos, including
unique corrective exercises
▪ Exclusive Content – Member’s only videos,
▪ Discounts – Member’s only discounts on
products
▪ Certified Member Map – Listed on FMS
Certified Member Map
3. Free 60-day Trial to FMS Pro 360FMS Pro 360 is an innovative tool that will help
streamline client management and record keeping,
automate and customize workout programs, and
provide a portal for communication and feedback
with your clients.
4. Sign up for a Level 2 Course
▪ Troubleshoot common mistakes made when
administering the screen
▪ Determine whether someone has a mobility or
motor control restraint
▪ Understand how different tests of the screen
can be related
▪ Learn corrective and essential exercises
▪ Comprehend how to assign proper exercises
based on an individual’s screen
▪ Use the FMS score to determine which
patterns should be trained