
myCWT Client Administrator Guide - Carlson Wagonlit Travel · myCWT Client Administrator Guide ii...
46
© 2017 CWT i myCWT Client Administrator Guide Part 1: General Overview, Company News September 2017 Version 1.1
Transcript of myCWT Client Administrator Guide - Carlson Wagonlit Travel · myCWT Client Administrator Guide ii...

© 2017 CWT
i
myCWT Client Administrator Guide
Part 1: General Overview, Company News
September 2017 Version 1.1
myCWT Client Administrator Guide
ii
Table of Contents
myCWT Overview ................................................................................................................ iii
myCWT Compatibility Details ........................................................................................... iii
Client Sites Organization ..................................................................................................... iii
myCWT Top Navigation ...................................................................................................... iv
Home Page Details ................................................................................................................ v
Client Administrator Functionality ................................................................................... viii
Sites Tab ............................................................................................................................... viii
Language Selector ................................................................................................................ ix
Company News....................................................................................................................... x
Creating a Company News Article ...................................................................................... x
Additional editing available on the Content Section of Company News .................. xii
HTML Editing ......................................................................................................................... xii
Text Options......................................................................................................................... xiii
Attaching images, table or vertical line to an article .................................................. xiii
Editing or Removing a Company News Article ............................................................. xvi
Changing the display name ‘Company News’ ............................................................. xviii
Propagating an article from the client top to all or a subset of subunits ............. xviii
Removing an article from displaying in multiple subunit sites .................................. xx
Selecting an article to display from the Home page of a subunit site .................... xxi
Changing the display order of an article on a subunit Home page ......................... xxii
iii
myCWT Overview
myCWT Compatibility Details
1. URL: https://www.myCWT.com
a. When bookmarking myCWT, please make sure you only bookmark
https://www.myCWT.com and not the page you are redirected to just after you
type in the URL.
b. As an alternative, you can bookmark the Home page once you enter myCWT.
c. Travelers who access myCWT via SSO should not need to bookmark the site.
2. Browser Compatibility
a. Desktop – myCWT is compatible with the latest versions of all major browsers
i. Microsoft Edge
ii. Microsoft Internet Explorer 11
iii. Chrome
iv. Firefox
v. Safari
3. Devices: myCWT features a responsive design and can be viewed on mobile, tablet, and
desktop devices:
a. All iOS smartphone devices using iOS 9 and iOS10 (will continue to support 2
latest versions)
b. iPad with iOS9 or iOS10
c. Any Android device with Android version 5.0 and newer
Client Sites Organization
The following terminology is used for myCWT to reference organizational hierarchies:
Client Top – Usually each CWT client has one Client Top; in myCWT, creation and
propagation of client content to subunits occurs here
Subunit – A child site associated to a client top, assigned a country and/or division;
travelers are assigned to one specific subunit
myCWT provides a top-down propagation approach where the subunits can inherit changes
made at the client top. Some changes can also be made at the subunit level.
Client Administrator’s User Guide
iv
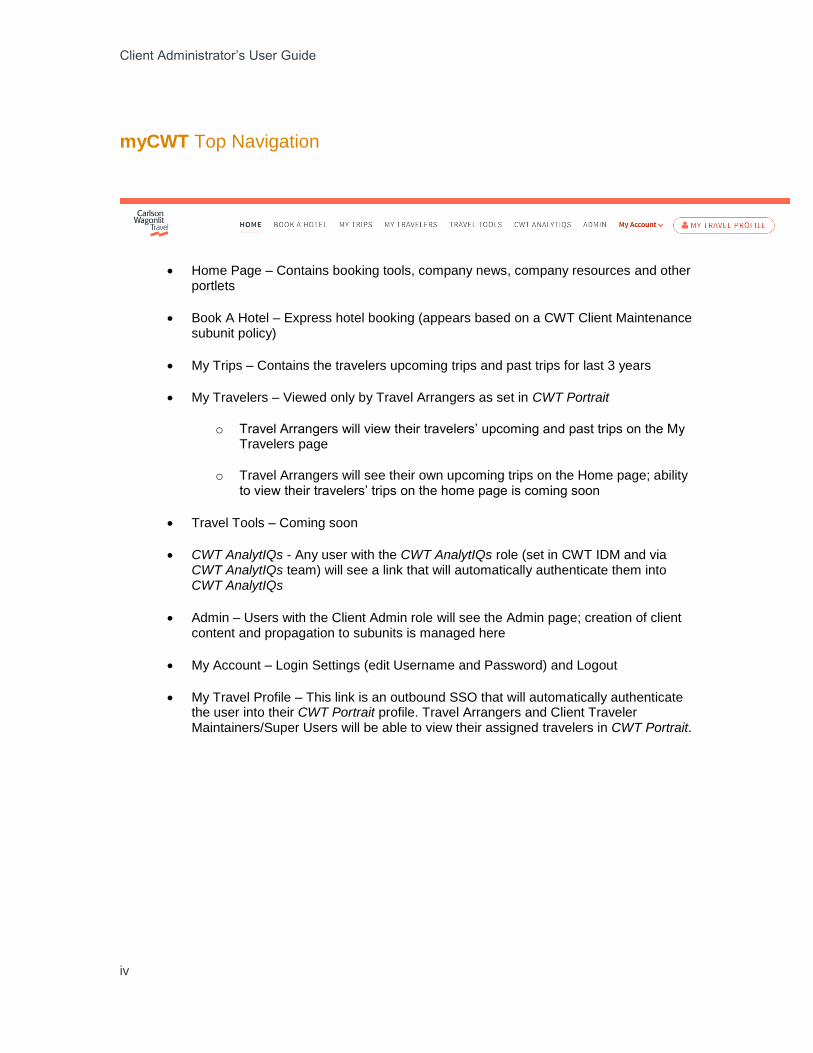
myCWT Top Navigation
Home Page – Contains booking tools, company news, company resources and other portlets
Book A Hotel – Express hotel booking (appears based on a CWT Client Maintenance subunit policy)
My Trips – Contains the travelers upcoming trips and past trips for last 3 years
My Travelers – Viewed only by Travel Arrangers as set in CWT Portrait
o Travel Arrangers will view their travelers’ upcoming and past trips on the My Travelers page
o Travel Arrangers will see their own upcoming trips on the Home page; ability to view their travelers’ trips on the home page is coming soon
Travel Tools – Coming soon
CWT AnalytIQs - Any user with the CWT AnalytIQs role (set in CWT IDM and via CWT AnalytIQs team) will see a link that will automatically authenticate them into CWT AnalytIQs
Admin – Users with the Client Admin role will see the Admin page; creation of client content and propagation to subunits is managed here
My Account – Login Settings (edit Username and Password) and Logout
My Travel Profile – This link is an outbound SSO that will automatically authenticate the user into their CWT Portrait profile. Travel Arrangers and Client Traveler Maintainers/Super Users will be able to view their assigned travelers in CWT Portrait.

Table Of Contents
v
Home Page Details
Welcome Portlet
o Greeting for Traveler
o Background Image – will change based on the traveler’s next trip
Top 10 destinations will have an animated image. With the image above, the London Eye will rotate, boats will travel along the river, cars will drive across the bridge, and clouds will move across the sky.
Top 10: Atlanta, Boston, Chicago, Dallas, Houston, London, New York, Paris, San Francisco, Washington
40 other top destinations will have a static image representing the city:
Amsterdam, Austin, Barcelona, Berlin, Brussels, Calgary, Charlotte, Copenhagen, Delhi, Denver, Dusseldorf, Frankfurt, Las Vegas, Los Angeles, Lyon, Madrid, Melbourne, Mexico City, Miami, Milan, Minneapolis, Mumbai, Munich, Newark, New Orleans, Orlando, Philadelphia, Phoenix, Rio de Janeiro, Rome, San Diego, Sao Paolo, Seattle, Shanghai, Singapore, Stockholm, Sydney, Tel Aviv, Toronto, Vienna, Zurich
If a traveler does not have an upcoming trip or is not traveling to one of the top 50 locations above, a series of generic travel images will display.
o Book My Full Trip – this is an outbound SSO that will authenticate travelers from myCWT into their specific Online Booking Tool (OBT) where the

Client Administrator’s User Guide
vi
traveler can book a flight, hotel, car, etc. The specific OBT is set by CWT Admins in the CWT IDM system.
My Trips Portlet
o Next upcoming trip is displayed
Each part of the trip has its own separate white box or “card”; one for flight, one for hotel, one for car rental, etc.
Arrows in upper right corner allows user to scroll right or left to continue viewing trip details
Map icon will show the trip destination
Clicking on a part of the trip will open up the My Trips page
Company News
o Company News allows Client Admins to post important information for their travelers such as travel news, changes to policies, etc. as well as any relevant travel news.
o A default news article will appear on all new sites welcoming travelers to the new myCWT. Other “global” news articles will be available from time to time from CWT. If a Client Admin wishes to remove this article they can do so from the Client Top Admin site under Manage News.
o Functionality is described in the Company News section of this guide.
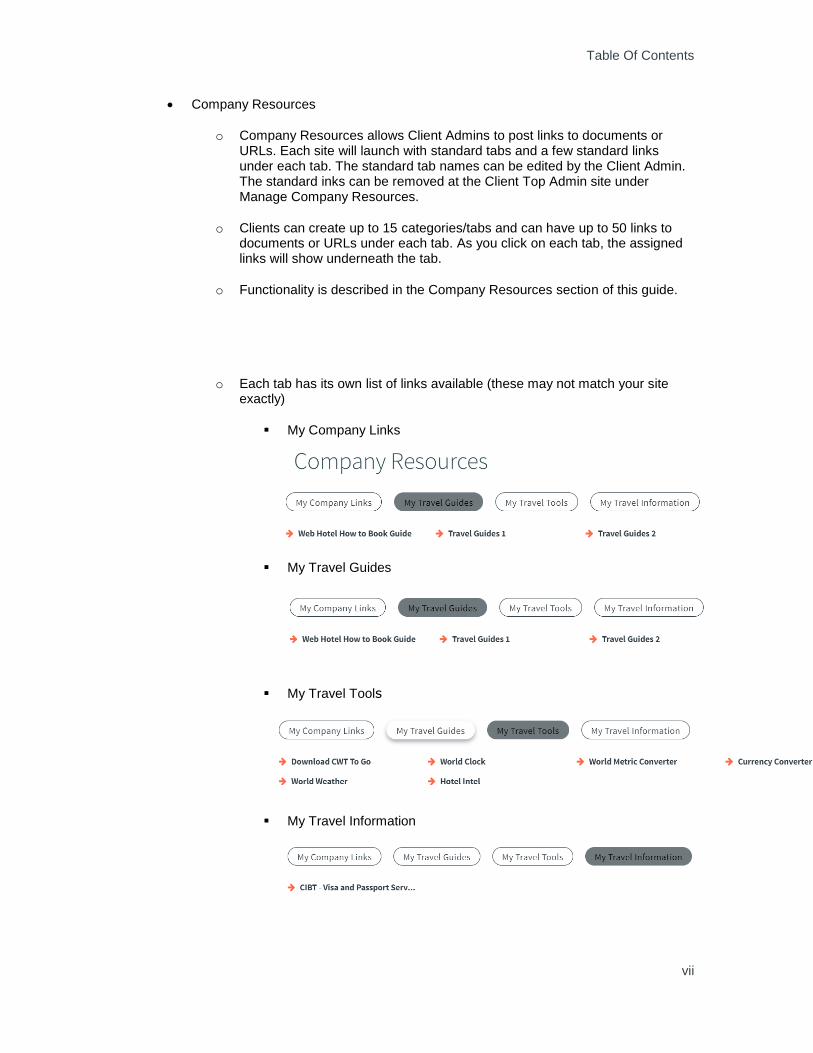
Table Of Contents
vii
Company Resources
o Company Resources allows Client Admins to post links to documents or URLs. Each site will launch with standard tabs and a few standard links under each tab. The standard tab names can be edited by the Client Admin. The standard inks can be removed at the Client Top Admin site under Manage Company Resources.
o Clients can create up to 15 categories/tabs and can have up to 50 links to documents or URLs under each tab. As you click on each tab, the assigned links will show underneath the tab.
o Functionality is described in the Company Resources section of this guide.
o Each tab has its own list of links available (these may not match your site exactly)
My Company Links
My Travel Guides
My Travel Tools
My Travel Information
Client Administrator’s User Guide
viii
Client Administrator Functionality
Client Administrators are able to navigate between the client top and subunits to which they are
assigned.
When logging into myCWT, a client admin will arrive on the home page of the subunit their
traveler profile is associated with.
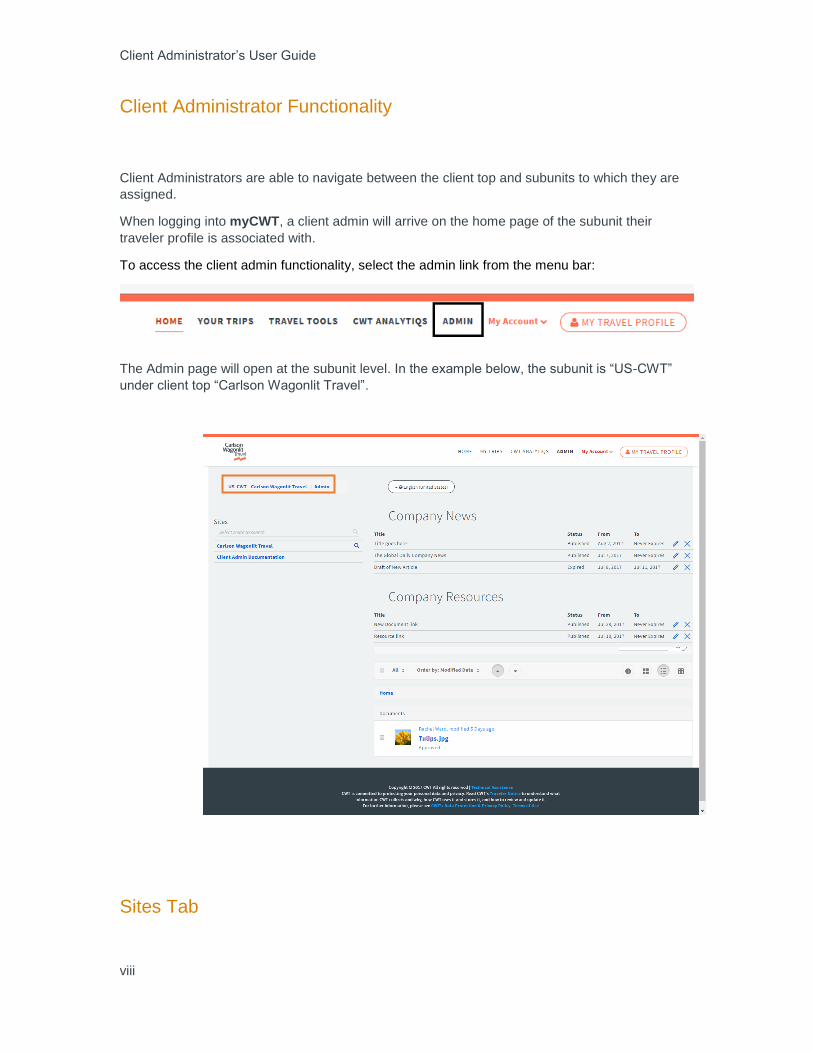
To access the client admin functionality, select the admin link from the menu bar:
The Admin page will open at the subunit level. In the example below, the subunit is “US-CWT”
under client top “Carlson Wagonlit Travel”.
Sites Tab

Table Of Contents
ix
The Sites tab lists your client top as well as a link to the Client Admin Documentation (this full
guide). To view the subunits you have access to under your client top, click on the magnifying
glass.
Results
You can also search for a specific site by typing the name of
the organization in the Search box. As you type, subunits that
match what you’ve typed will appear. If no results are found a
“no results” message will appear.
To navigate to the subunit site, click on the subunit name. This
will open up the Home page for that specific subunit.
You can choose to show fewer or more results or navigate
between result pages by using the icons at the bottom of the
list of sites.
Language Selector
The main admin page defaults to the language
chosen in the client admin’s CWT Portrait profile.
The viewed language can be changed by selecting
another language from the drop-down list in the
language selector. The language change impacts
both the Admin Page and the subunit sites.
This will not change the default language in the
client admin’s CWT Portrait profile.
Client Administrator’s User Guide
x
Company News
The Company News Portlet can provide travelers with company, travel, or CWT news. Articles
are created at the client top and can be launched to either all subunits or a subset of subunits.
CWT news articles will appear in the News Library on a regular basis and can be added or
removed at either the Client Top or Subunit level.
Creating a Company News Article
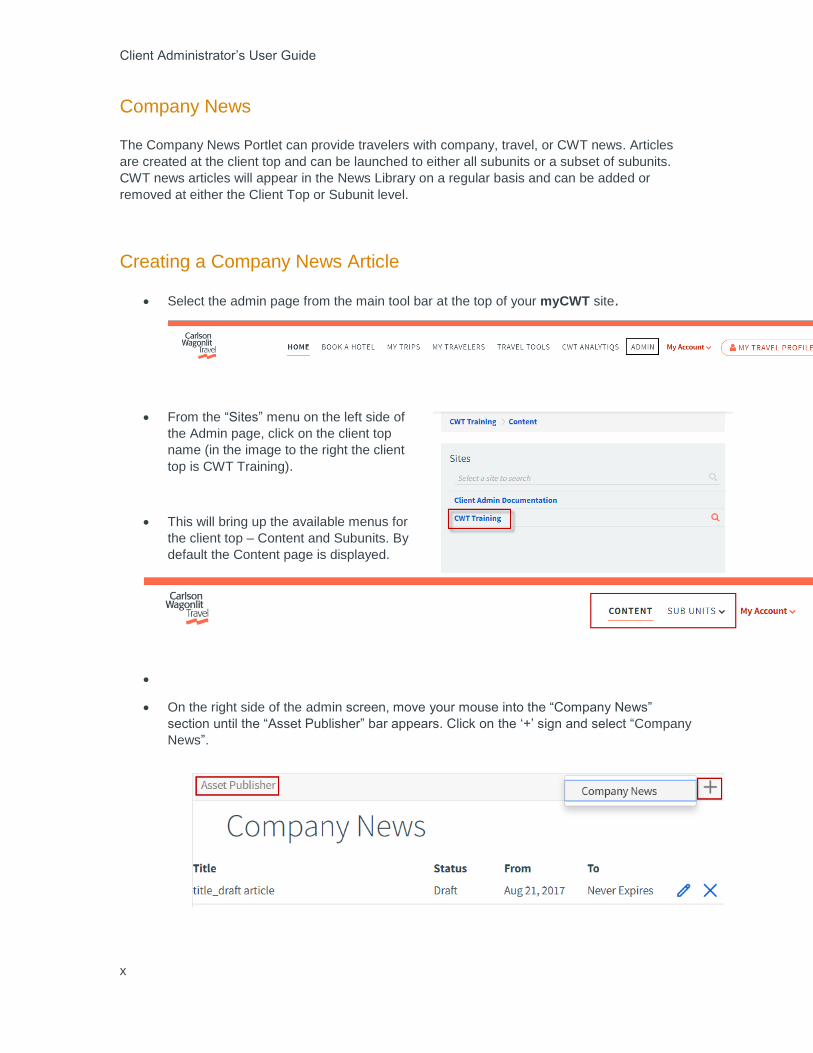
Select the admin page from the main tool bar at the top of your myCWT site.
From the “Sites” menu on the left side of
the Admin page, click on the client top
name (in the image to the right the client
top is CWT Training).
This will bring up the available menus for
the client top – Content and Subunits. By
default the Content page is displayed.
On the right side of the admin screen, move your mouse into the “Company News”
section until the “Asset Publisher” bar appears. Click on the ‘+’ sign and select “Company
News”.
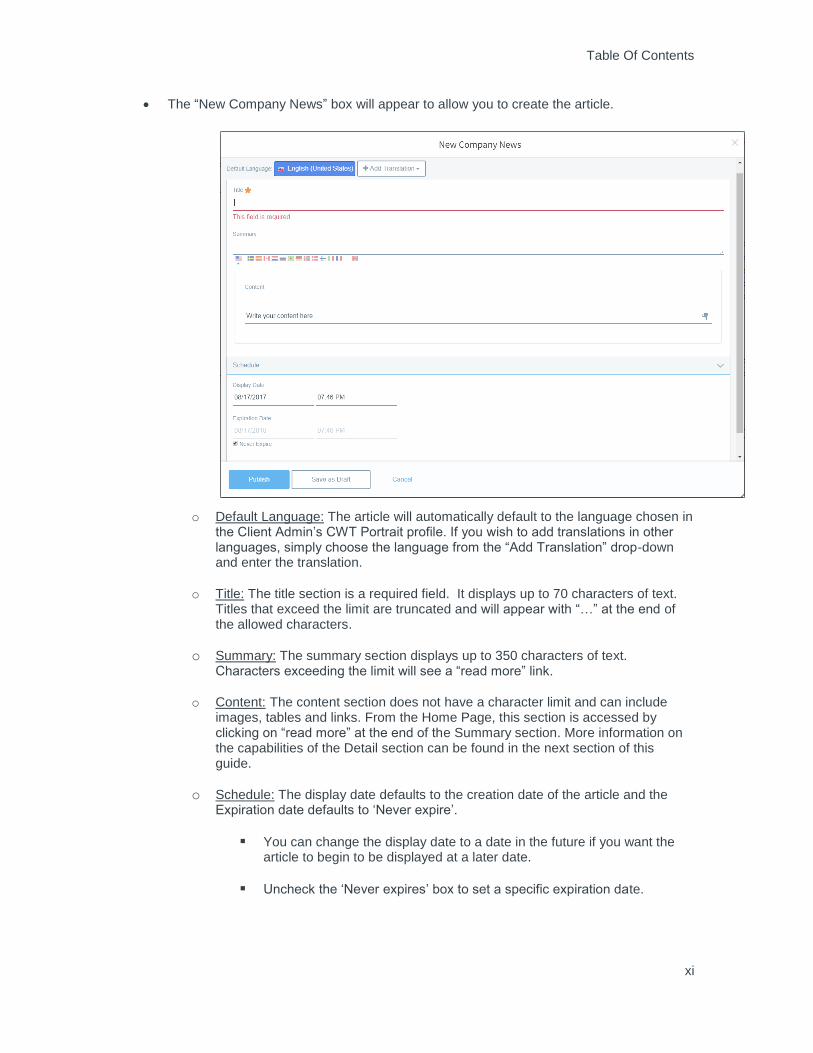
Table Of Contents
xi
The “New Company News” box will appear to allow you to create the article.
o Default Language: The article will automatically default to the language chosen in the Client Admin’s CWT Portrait profile. If you wish to add translations in other languages, simply choose the language from the “Add Translation” drop-down and enter the translation.
o Title: The title section is a required field. It displays up to 70 characters of text. Titles that exceed the limit are truncated and will appear with “…” at the end of the allowed characters.
o Summary: The summary section displays up to 350 characters of text. Characters exceeding the limit will see a “read more” link.
o Content: The content section does not have a character limit and can include images, tables and links. From the Home Page, this section is accessed by clicking on “read more” at the end of the Summary section. More information on the capabilities of the Detail section can be found in the next section of this guide.
o Schedule: The display date defaults to the creation date of the article and the Expiration date defaults to ‘Never expire’.
You can change the display date to a date in the future if you want the article to begin to be displayed at a later date.
Uncheck the ‘Never expires’ box to set a specific expiration date.
Client Administrator’s User Guide
xii
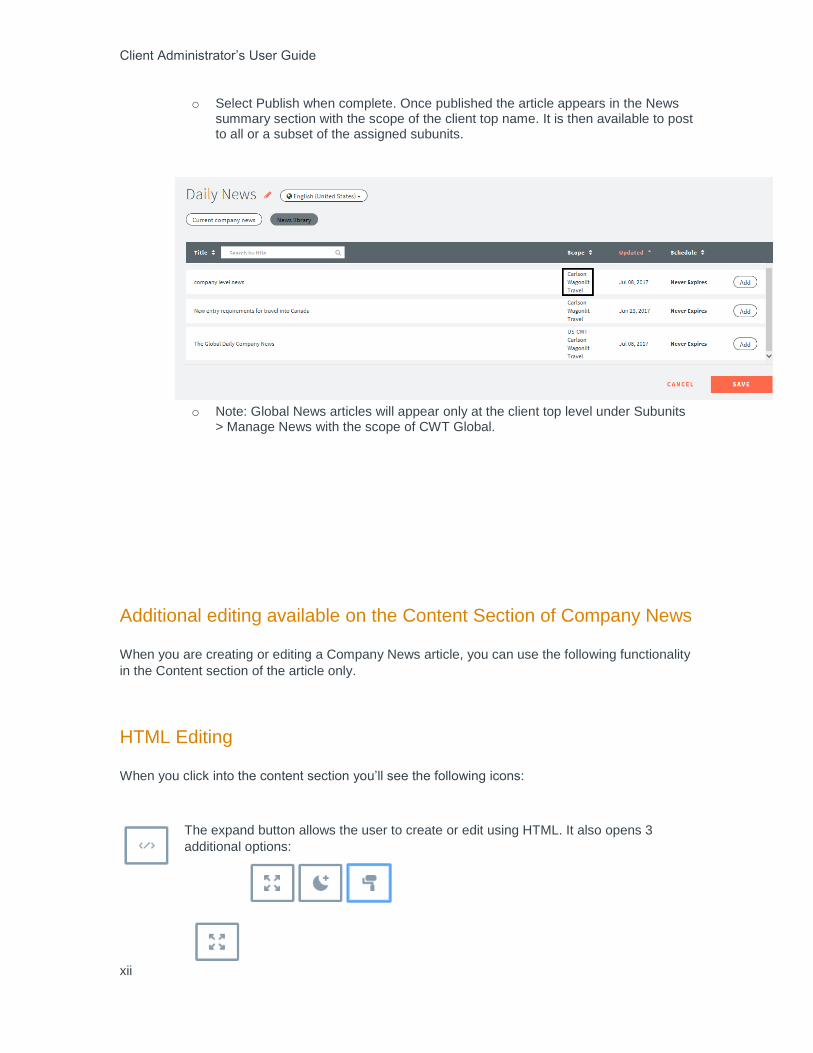
o Select Publish when complete. Once published the article appears in the News summary section with the scope of the client top name. It is then available to post to all or a subset of the assigned subunits.
o Note: Global News articles will appear only at the client top level under Subunits > Manage News with the scope of CWT Global.
Additional editing available on the Content Section of Company News
When you are creating or editing a Company News article, you can use the following functionality
in the Content section of the article only.
HTML Editing
When you click into the content section you’ll see the following icons:
The expand button allows the user to create or edit using HTML. It also opens 3
additional options:

Table Of Contents
xiii
1. Allows user to use HTML editor in full screen
2. Changes the background from white to black (and back to
white)
3. Takes user back to normal edit screen (non HTML)
Text Options
If you highlight a portion of your text, a text menu will appear that will allow you to:
1. Change the font style (default is Normal)
2. Make the selected text bold, in italics or underline
3. Add a numbered list
4. Add a bulleted list
5. Add a URL link
6. Tweet the content you’ve highlighted
Attaching images, table or vertical line to an article
The Plus icon will bring up an additional menu that will allow you to:
1. Add an image
2. Add a table
3. Add a verticle line to your article

Client Administrator’s User Guide
xiv
Admin can upload existing documents from their local or network drive
1. Follow the steps above to create an article.
2. Navigate to the Content section.
3. Select the ‘+’ sign on the left side of the screen.
4. This brings up a new menu where you can add an image, table, or vertical line to your
document.
5. Select the image icon (first one in picture above). This will open a Select File box. Browse
to the image you wish to upload.
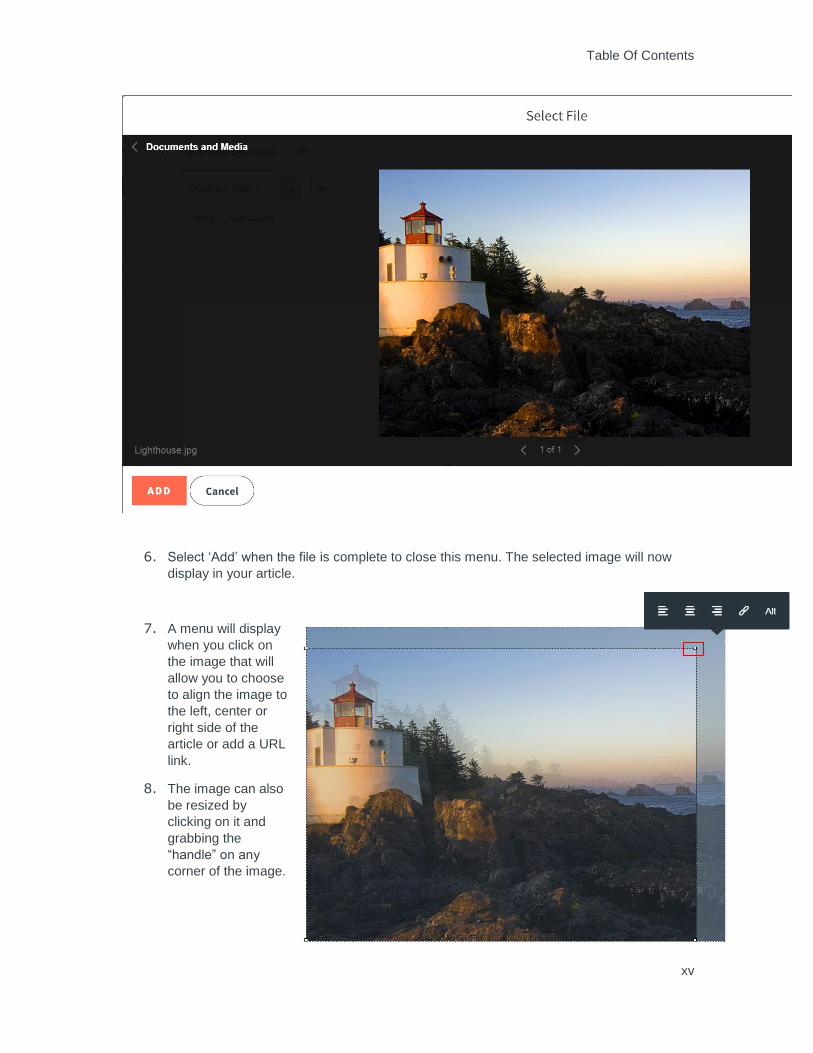
Table Of Contents
xv
6. Select ‘Add’ when the file is complete to close this menu. The selected image will now
display in your article.
7. A menu will display
when you click on
the image that will
allow you to choose
to align the image to
the left, center or
right side of the
article or add a URL
link.
8. The image can also
be resized by
clicking on it and
grabbing the
“handle” on any
corner of the image.

Client Administrator’s User Guide
xvi
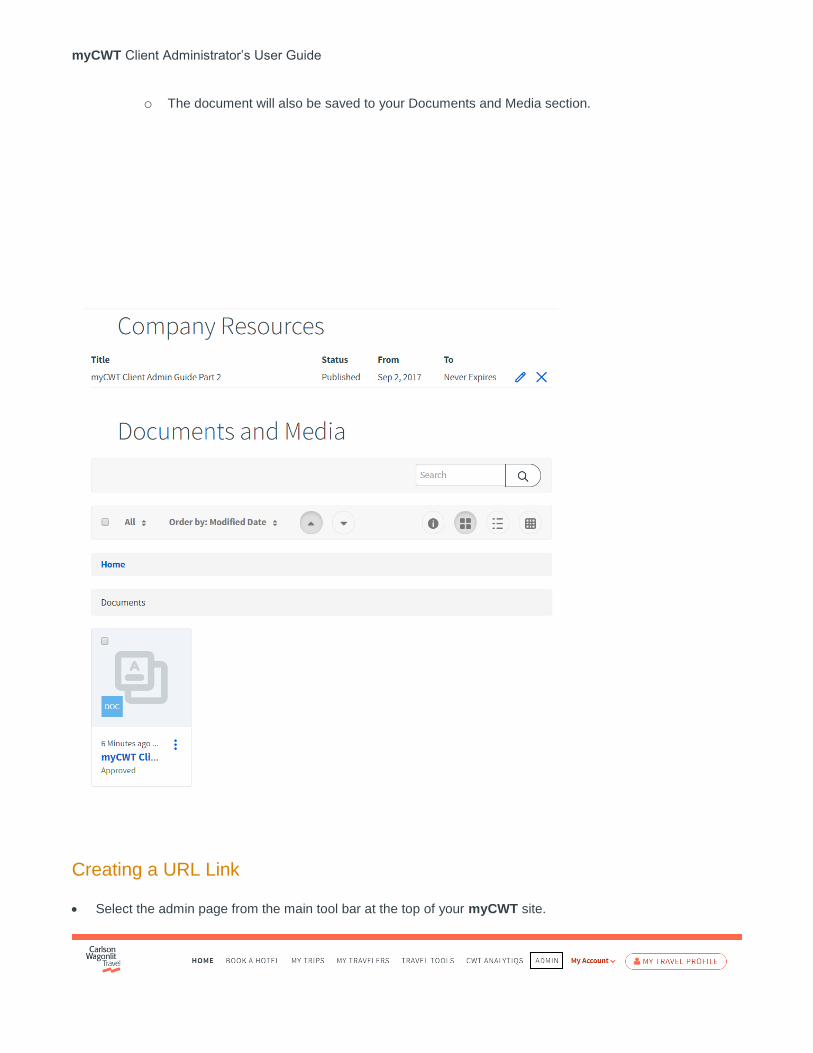
9. The image is automatically add to your Documents and
Media folder under the Client Top Content. Clicking on
the three dots under the image will bring up an edit menu:
Editing or Removing a Company News Article
1. Navigate to the Admin page
2. Click on the Client Top Name
3. Click on the news article you wish to edit or delete
4. On the far right side of the article, click on:
a. The pencil/edit icon to open the edit screen
b. The ‘X’ to delete the article
NOTE: There isn’t any warning to confirm deletion
of the article so make sure you are certain before
you click on the ‘X’. There is not a way to bring the
article back once it’s been deleted.
Changing the display name “Company News” at the client top
1. From the Admin screen, select the Client Top.
2. From the Subunits menu choose Manage News.
3. At the bottom of your screen you’ll find the Manage Company News Titles menu:

Table Of Contents
xvii
4. Click on Select a title to show all available titles (if you have created different titles at the
subunit level they will show here).
5. Choose “Company News”. This will open the translations in the system for Company
News. You can update all of the languages or just the ones you need. Once you are
finished entering the new name, click Update to change this for all subunits.

Client Administrator’s User Guide
xviii
Changing the display name ‘Company News’ at the subunit level
1. On a subunit homepage, select the gear icon to the right of Company News.
2. Select the edit icon (pencil).
3. Type the new name over the existing name.
4. Select the checkbox to confirm.
5. Select save in the lower right corner of the screen.
6. Changes are reflected on the subunit site.
Propagating an article from the client top to all or a subset of subunits
1. Click on the Client Top Name under the Sites tab. This will open the Content and Sub
Units pages (by default the Client Top Admin site will open with the Content page active).

Table Of Contents
xix
2. Click on the Sub Unit page and select Manage News from the drop-down.
3. Click on the article you would like to appear on the subunit site/s to select it.
4. The subunit section will appear below the list of articles.
5. Within the subunit list you can either:
a. Check the box in the top section next to Subunits to select all the subunits.
b. Individually select the subunits sites that should receive the article.
6. Select update when complete to make the articles appear on the appropriate subunits.
Note: Company News Articles appear on the subunit sites with the most recently published article
at the top. You can change the order of the articles at the subunit level only. From the client top,
you can unpublish and then republish to put the articles in the right order (last published = first
displayed).

Client Administrator’s User Guide
xx
Removing an article from displaying in multiple subunit sites
1. From the Admin Screen, click on the Client Top name
2. Click on Sub Units
3. Select Manage News from the drop down menu
4. Select the article to open up the list of subunits
5. Uncheck the individual subunits or uncheck the top check box and all subunits will be
automatically unchecked
6. Select ‘Update’ when finished
7. Confirmation is received.

Table Of Contents
xxi
Selecting an article to display from the Home page of a subunit site
1. Articles can be chosen for display by a Client Admin directly on the subunit site by
selecting the gear icon to the right of Company News
2. The ‘Current company news’ section will show all articles displayed on this subunit.
3. Select the ‘News Library’ button to show all available articles that have not yet been
displayed on this subunit.

Client Administrator’s User Guide
xxii
4. Select ‘Add’ to add a specific article and then click ‘Save’
5. When you refresh the site the newly selected article/s will appear
Changing the display order of an article on a subunit Home page
1. Select the gear icon to the right of Company News
2. Select the list icon to left of the article name
3. Drag and drop where you want it
4. Save the changes

Table Of Contents
xxiii
myCWT Client Administrator Guide
Part 2: Company Resources, Documents and Media
September 2017 Version 1.0

Client Administrator’s User Guide
xxiv
Table of Contents
Client Administrator Functionality ........................................................................................... 25
Sites Tab ................................................................................................................................ 26
Language Selector ................................................................................................................. 26
Company Resources .............................................................................................................. 27
Creating a Document Link ...................................................................................................... 28
Creating a URL Link ............................................................................................................... 31
Editing or Removing a Company Resources Link.................................................................. 34
Changing the display name for Company Resources and Tab Names at the client top ....... 34
Changing the display name ‘Company Resources’ at the subunit level ................................ 36
Creating new Tabs for Company Resources ......................................................................... 37
Propagating a link from the client top to all or a subset of subunits ....................................... 38
Removing a link from displaying in multiple subunit sites ...................................................... 39
Selecting a link to display from the Home page of a subunit site........................................... 41
Changing the display order of a link on a subunit Home page .............................................. 43
Documents and Media ........................................................................................................... 43

25
Client Administrator Functionality
Client Administrators are able to navigate between the client top and subunits to which they are assigned.
When logging into myCWT, a client admin will arrive on the home page of the subunit their traveler profile is
associated with.
To access the client admin functionality, select the admin link from the menu bar:
The Admin page will open at the subunit level. In the example below, the subunit is “US-CWT” under client top
“Carlson Wagonlit Travel”.

Client Administrator’s User Guide
26
Sites Tab
The Sites tab lists your client top as well as a link to the Client Admin Documentation (this full guide). To view the
subunits you have access to under your client top, click on the magnifying glass.
Results
You can also search for a specific site by typing the name of the organization in the Search box. As you type,
subunits that match what you’ve typed will appear. If no results are found a “no results” message will appear.
To navigate to the subunit site, click on the subunit name. This will
open up the Home page for that specific subunit.
You can choose to show fewer or more results or navigate
between result pages by using the icons at the bottom of the list of
sites.
Language Selector
The main admin page defaults to the language
chosen in the client admin’s CWT Portrait profile.

myCWT Client Administrator’s User Guide
27
The viewed language can be changed by selecting another language from the drop-down list in the language
selector. The language change impacts both the Admin Page and the subunit sites.
This will not change the default language in the client admin’s CWT Portrait profile.
Company Resources
Company Resources
o Company Resources allows Client Admins to post links to documents or URLs. Each site will launch with standard tabs and a few standard links under each tab. The default links and other useful links can be found in the Global link directory and can be added or removed at either the Client Top or Subunit level.
o The standard tab names can be edited by the Client Admin. The standard inks can be removed at the Client Top Admin site under Manage Company Resources.
o Clients can create up to 15 categories/tabs and can have up to 50 links to documents or URLs under each tab. As you click on each tab, the assigned links will show underneath the tab.
o Functionality is described in the Company Resources section of this guide.
o Each tab has its own list of links available (these may not match your site exactly)
My Company Links
My Travel Guides
My Travel Tools

Client Administrator’s User Guide
28
My Travel Information
Creating a Document Link
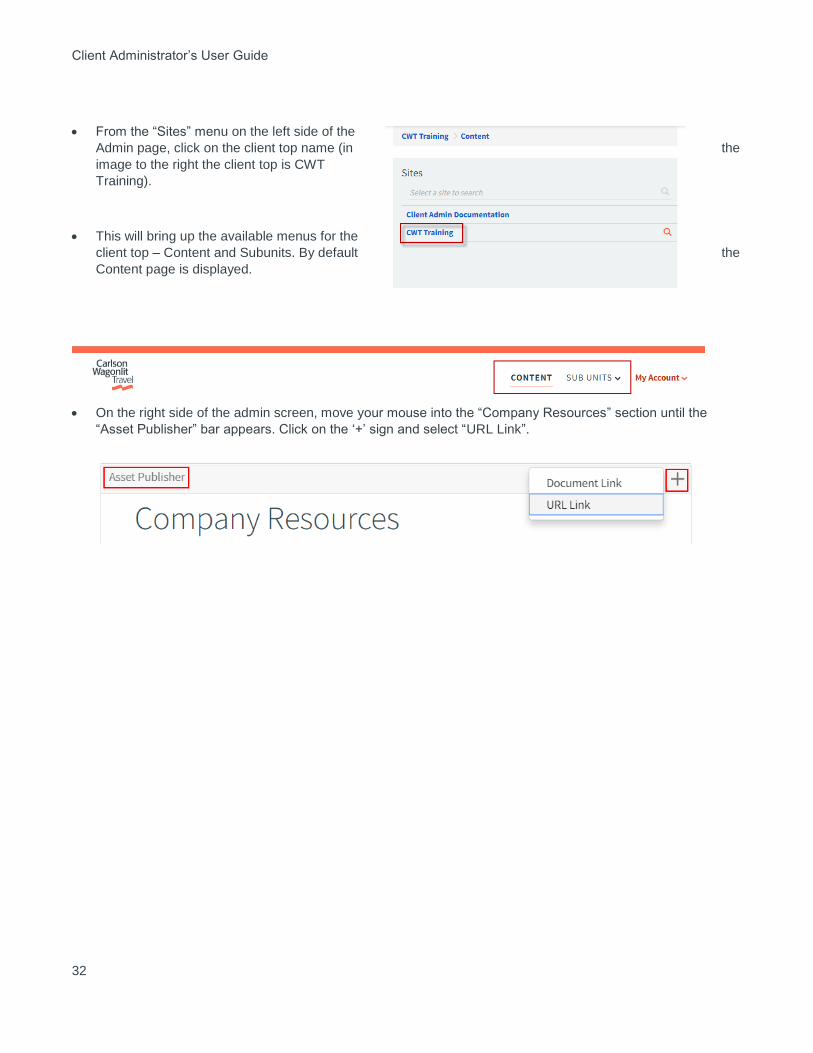
Select the admin page from the main tool bar at the top of your myCWT site.
From the “Sites” menu on the left side of the
Admin page, click on the client top name (in the
image to the right the client top is CWT
Training).
This will bring up the available menus for the
client top – Content and Subunits. By default the
Content page is displayed.
On the right side of the admin screen, move your mouse into the “Company Resources” section until the
“Asset Publisher” bar appears. Click on the ‘+’ sign and select “Document Link”.

myCWT Client Administrator’s User Guide
29
The New Document Link menu will appear:

Client Administrator’s User Guide
30
o Default Language: The article will automatically default to the language chosen in the Client Admin’s CWT Portrait profile. If you wish to add translations in other languages, simply choose the language from the “Add Translation” drop-down and enter the translation.
o Title: The title section is a required field.
o Summary: The summary section is optional.
o Select: Click on “Select” when you are ready to choose your document and the Select File menu will display.
You can either drag and drop a document or click on “Select” to navigate to a file on your computer.
Once you’ve chosen the document, click “Add” to upload it to the site.
Once the document is uploaded it will appear in the New Document Link menu:
o Schedule: The display date defaults to the creation date of the article and the Expiration date defaults to ‘Never expire’.
You can change the display date to a date in the future if you want the article to begin to be displayed at a later date.
Uncheck the ‘Never expires’ box to set a specific expiration date.
o Select “Publish” when complete. Once published the document link appears in the Company Resources section. It is then available to post to all or a subset of the assigned subunits.
myCWT Client Administrator’s User Guide
31
o The document will also be saved to your Documents and Media section.
Creating a URL Link
Select the admin page from the main tool bar at the top of your myCWT site.
Client Administrator’s User Guide
32
From the “Sites” menu on the left side of the
Admin page, click on the client top name (in the
image to the right the client top is CWT
Training).
This will bring up the available menus for the
client top – Content and Subunits. By default the
Content page is displayed.
On the right side of the admin screen, move your mouse into the “Company Resources” section until the
“Asset Publisher” bar appears. Click on the ‘+’ sign and select “URL Link”.
myCWT Client Administrator’s User Guide
33
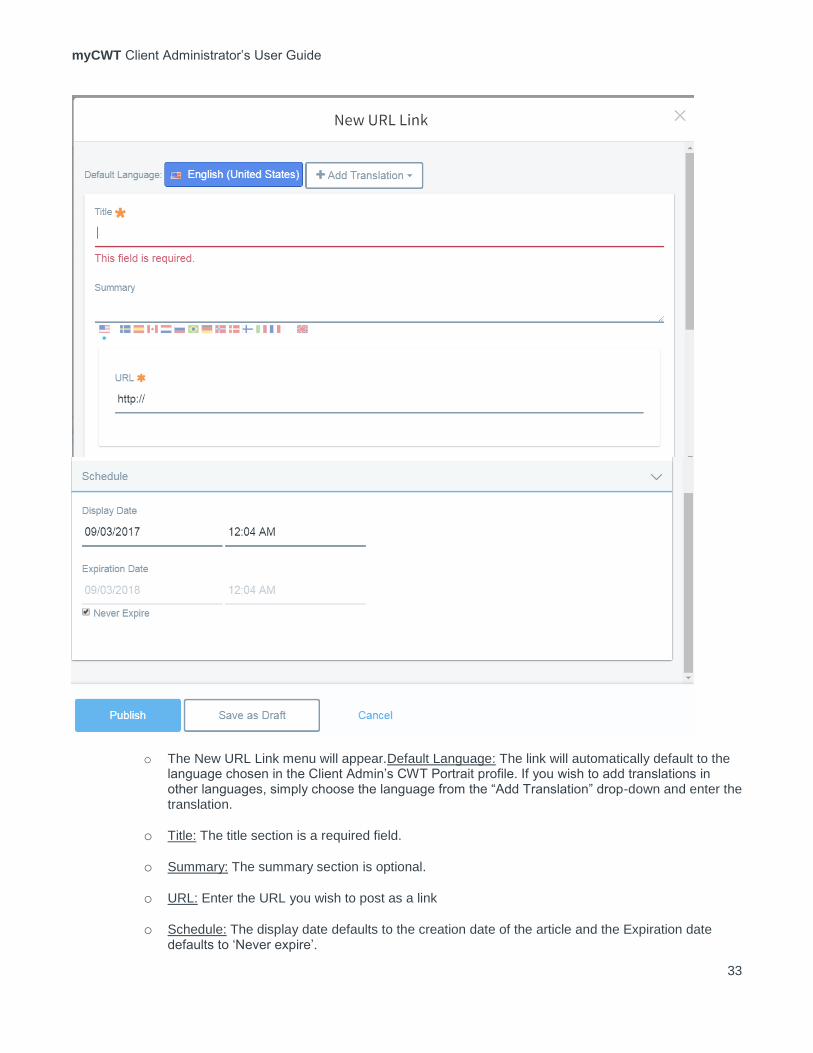
o The New URL Link menu will appear.Default Language: The link will automatically default to the language chosen in the Client Admin’s CWT Portrait profile. If you wish to add translations in other languages, simply choose the language from the “Add Translation” drop-down and enter the translation.
o Title: The title section is a required field.
o Summary: The summary section is optional.
o URL: Enter the URL you wish to post as a link
o Schedule: The display date defaults to the creation date of the article and the Expiration date defaults to ‘Never expire’.

Client Administrator’s User Guide
34
You can change the display date to a date in the future if you want the article to begin to be displayed at a later date.
Uncheck the ‘Never expires’ box to set a specific expiration date.
o Select “Publish” when complete. Once published the URL link appears in the Company Resources section. It is then available to post to all or a subset of the assigned subunits.
Editing or Removing a Company Resources Link
5. Navigate to the Admin page
6. Click on the Client Top Name
7. Click on the link you wish to edit or delete
8. On the far right side of the article, click on:
a. The pencil/edit icon to open the edit screen
b. The ‘X’ to delete the article
NOTE: There isn’t any warning to confirm deletion
of the article so make sure you are certain before
you click on the ‘X’. There is not a way to bring the
article back once it’s been deleted.
Changing the display name for Company Resources and Tab Names at the client
top
6. From the Admin screen, select the Client Top.
7. From the Subunits menu choose Manage Resources.
8. At the bottom of your screen you’ll find the Manage Company Resources Titles menu:

myCWT Client Administrator’s User Guide
35
9. Click on ‘Select a title’ to show all available titles (if you have created different titles at the subunit level
they will show here). You
can also edit your tab
names here.
10. Choose “Company Resources”. This will open the translations in the system for Company Resources.
You can update all of the languages or just the ones you need. Once you are finished entering the new
name, click Update to change this for all subunits.

Client Administrator’s User Guide
36
11. Follow this same process if you wish to change any of the tab names.
Changing the display name ‘Company Resources’ at the subunit level
1. On a subunit site, select the gear icon to the right of Company Resources,
2. Select the edit icon (pencil).
3. Type the new name over the existing name, entering any translations by choosing the language from the
drop-down and entering the translated text.
4. You can also change your tab names on this screen.
5. When you are done editing, select save in the lower right corner of the screen/
myCWT Client Administrator’s User Guide
37
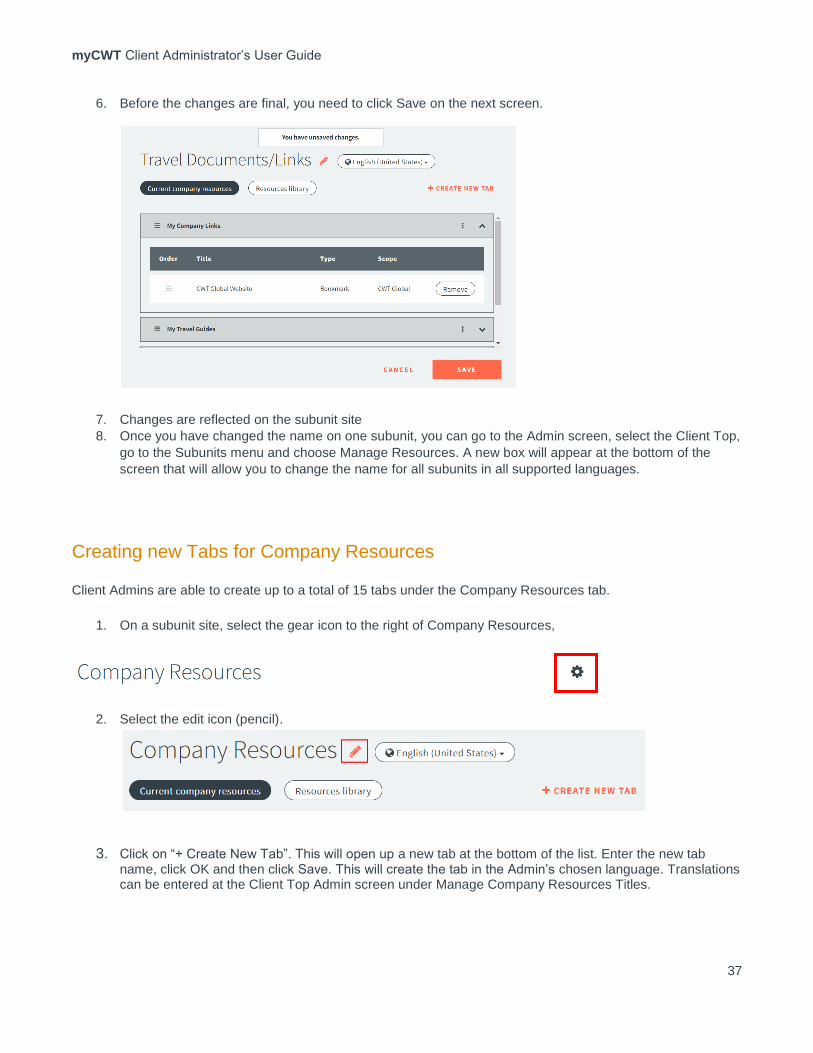
6. Before the changes are final, you need to click Save on the next screen.
7. Changes are reflected on the subunit site
8. Once you have changed the name on one subunit, you can go to the Admin screen, select the Client Top,
go to the Subunits menu and choose Manage Resources. A new box will appear at the bottom of the
screen that will allow you to change the name for all subunits in all supported languages.
Creating new Tabs for Company Resources
Client Admins are able to create up to a total of 15 tabs under the Company Resources tab.
1. On a subunit site, select the gear icon to the right of Company Resources,
2. Select the edit icon (pencil).
3. Click on “+ Create New Tab”. This will open up a new tab at the bottom of the list. Enter the new tab name, click OK and then click Save. This will create the tab in the Admin’s chosen language. Translations can be entered at the Client Top Admin screen under Manage Company Resources Titles.

Client Administrator’s User Guide
38
4. Note: The new tab will not appear on any site until at least one link is added to the tab.
Propagating a link from the client top to all or a subset of subunits
7. Click on the Client Top Name under the Sites tab. This will open the Content and Sub Units pages (by
default the Client Top Admin site will open with the Content page active).
8. Click on the Sub Units menu and select Manage Resources from the drop-down.
9. Click on the URL or Document link you would like to appear on the subunit site/s to select it.
10. The subunit section will appear below the list of articles.
11. Choose which Tab you want to the link to appear under from the drop-down on the right.
12. You can now choose to:

myCWT Client Administrator’s User Guide
39
c. Check the box in the top section next to Subunits to select all the subunits.
d. Individually select the subunits sites that should receive the article.
13. Select update when complete to make the link appear on the appropriate subunits.
Note: Company Resources links appear on the subunit sites with the most recently published article at the top of
the list. You can change the order of the links at the subunit level only. From the client top, you can unpublish and
then republish to put the links in the right order (last published = first displayed).
Removing a link from displaying in multiple subunit sites
8. From the Admin Screen, click on the Client Top name.
9. Click on Sub Units and Manage Resources from the drop-down menu.
10. Select the link to open up the list of subunits.
11. Select the Tab name from the drop-down on the right.

Client Administrator’s User Guide
40
12. Uncheck the individual subunits or uncheck the top check box and all subunits will be automatically
unchecked.
13. Select ‘Update’ when finished.
14. Confirmation is received.

myCWT Client Administrator’s User Guide
41
Selecting a link to display from the Home page of a subunit site
6. Links can be chosen for display and reordered by a Client Admin directly on the subunit site by selecting
the gear icon to the right of Company Resources.
7. The Company Resources menu appears. You can choose to look at either:
a. Current Company Resources - what’s currently showing on the page.
b. Resources Library – all available links which are not yet shown on this subunit.
8. The three lines to the left of the tab name will open/close the display of links.
9. The three dots to the right of the tab name allow you to edit the tab name or remove this tab from the
subunit.

Client Administrator’s User Guide
42
10. The up or down arrow on the far right of each tab name allow change the order the tabs are displayed for
this subunit.
11. If a tab doesn’t yet contain any links, the message below will appear and the tab will not show on the
subunit.
7. To remove a link from display, click on Remove. (Note: this only removes the link from this subunit and does not remove it for all subunits.)
8. To add a link to a tab, click on Resources Library to view all available links that are not yet displayed. Click on Add, then choose the tab where you’d like the link to appear.
myCWT Client Administrator’s User Guide
43
12. When you refresh the site the newly selected link will appear.
Changing the display order of a link on a subunit Home page
5. Select the gear icon to the right of Company Resources.
6. Select the list icon to left of the link name.
7. Click on it and drag it to your preferred location.
8. Save the changes.
Documents and Media
The Documents and Media section within the Admin screen allows you to add to your online library of documents,
images, and other file types to your library.
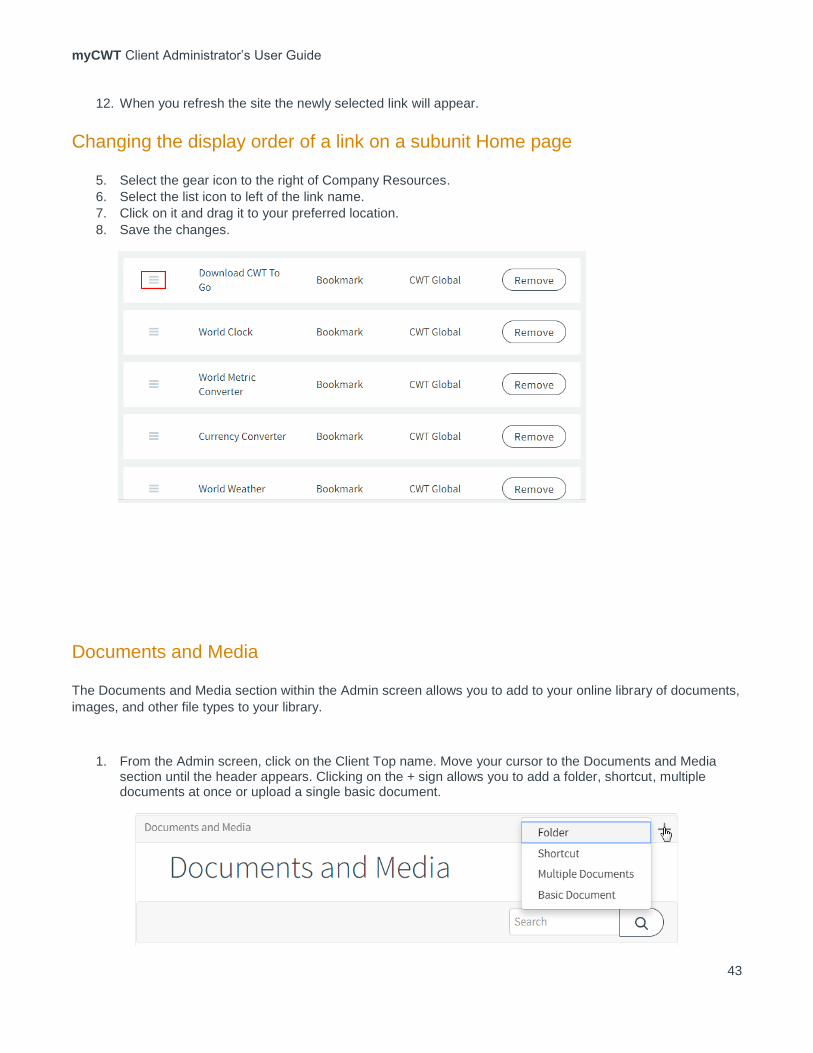
1. From the Admin screen, click on the Client Top name. Move your cursor to the Documents and Media section until the header appears. Clicking on the + sign allows you to add a folder, shortcut, multiple documents at once or upload a single basic document.
Client Administrator’s User Guide
44
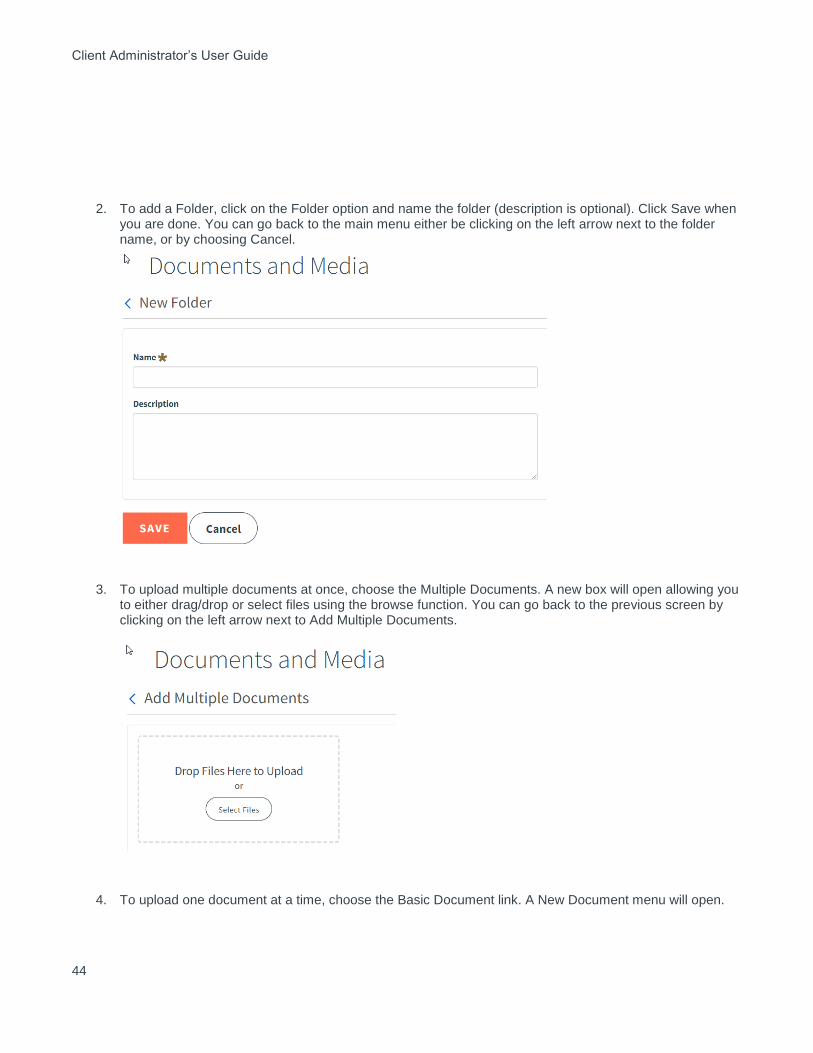
2. To add a Folder, click on the Folder option and name the folder (description is optional). Click Save when you are done. You can go back to the main menu either be clicking on the left arrow next to the folder name, or by choosing Cancel.
3. To upload multiple documents at once, choose the Multiple Documents. A new box will open allowing you to either drag/drop or select files using the browse function. You can go back to the previous screen by clicking on the left arrow next to Add Multiple Documents.
4. To upload one document at a time, choose the Basic Document link. A New Document menu will open.

myCWT Client Administrator’s User Guide
45
5. The document will load in the Admin’s chosen language.
6. You can change the default language by clicking on Change.
7. You can add translated documents by clicking on the Add Translation button and choosing the appropriate language.

Client Administrator’s User Guide
46
8. Choose your file and give it a title (description is optional).
9. You can add tags to the document to help you find it easily.
10. Click Publish when you are finished. This will add the document to the Document Library and make it available to post to subunits.