My Sister Kate - Dollmaker's Journey
8
© Kate Erbach My Sister Kate Cloth Confections • fat quarter high thread count muslin for head and hands • fat quarter for body and arms • fat quarter for legs and feet • buttons • barrel beads beads should have a hole • in electrical wire • yd print fabric for jumper • yd fabric for petticoat or piece of vintage textile • vintage textile piece for apron • fat quarter for bloomers or vintage textile • x heavy cardboard and heavy leather for shoe soles • x piece lt weight leather or ultra suede for shoes • assorted laces ribbons or trims for embellishment • Crepe wool or dyed cotton ragsavailable from Newark Dress Supply for hair • small straw hat • heart button • fat quarter of red batik or deep red cotton fabric if doing cotton rag hair • white paint pen • Prismacolor pencils in crimson red burnt ochre blush pink and carmine red • black and brown gel pens • Textile medium for sealing face • polyester stuffing • threads to match fabrics • turning and stuffing tools • upholstery thread for jointing • dollmakers needle • regular sewing supplies • felting needles if using crepe wool hair • Tacky Glue FabricTac or The Ultimate Glue
Transcript of My Sister Kate - Dollmaker's Journey

© Kate Erbach 2006My Sister Kate
Cloth Confections• fat quarter high thread count muslin for head and hands • fat quarter for body and arms• fat quarter for legs and feet• 4 Ð 1/2Ó buttons• 4 Ð 1/2Ó barrel beads (beads should have a 1/4Ó hole)• 6 in. electrical wire • 1/3 yd. print fabric for jumper• 1/3 yd. fabric for petticoat or piece of vintage textile• vintage textile piece for apron• fat quarter for bloomers or vintage textile• 6Óx6Ó heavy cardboard and heavy leather for shoe soles• 10Óx10Ó piece lt. weight leather or ultra suede for shoes • assorted laces, ribbons or trims for embellishment• Crepe wool or dyed cotton rags(available from NewarkDress Supply) for hair• small straw hat• 1 - 1/2Ó heart button
• fat quarter of red batik or deep red cotton fabric if doingcotton rag hair
• white paint pen• Prismacolor pencils in crimson red, burnt ochre, blush pink,and carmine red• black and brown gel pens• Textile medium for sealing face
• polyester stuffing• threads to match fabrics• turning and stuffing tools• upholstery thread for jointing• 7Ó dollmakers needle• regular sewing supplies• felting needles if using crepe wool hair• Tacky Glue, FabricTac or The Ultimate Glue
Annie La Bouche
Basic InstructionsRead through this pattern book to familiarize yourself with the preparation, tools and construction of these dolls. Ifyou have questions that you can’t find an answer to, please feel free to email me at:
[email protected] should have knowledge of basic sewing and dollmaking skills to complete this pattern.
Doll body pattern pieces are templates except for the feet. I recommend tracing the pieces to freezer paper and ironingthem to the wrong side of doubled fabric. I also trace the feet patterns onto freezer paper to make it easier to cutthem out. The feet have a 1/8” seam allowance included.
Clothing pattern pieces have a 1/4” seam allowance included unless otherwise indicated.
Stitch all body parts with a small stitch. I use a 1.5 on my machine. Back tack when starting and ending a seam.Clothing can be stitched with a normal machine setting.
Illustrations are provided for ease in construction.
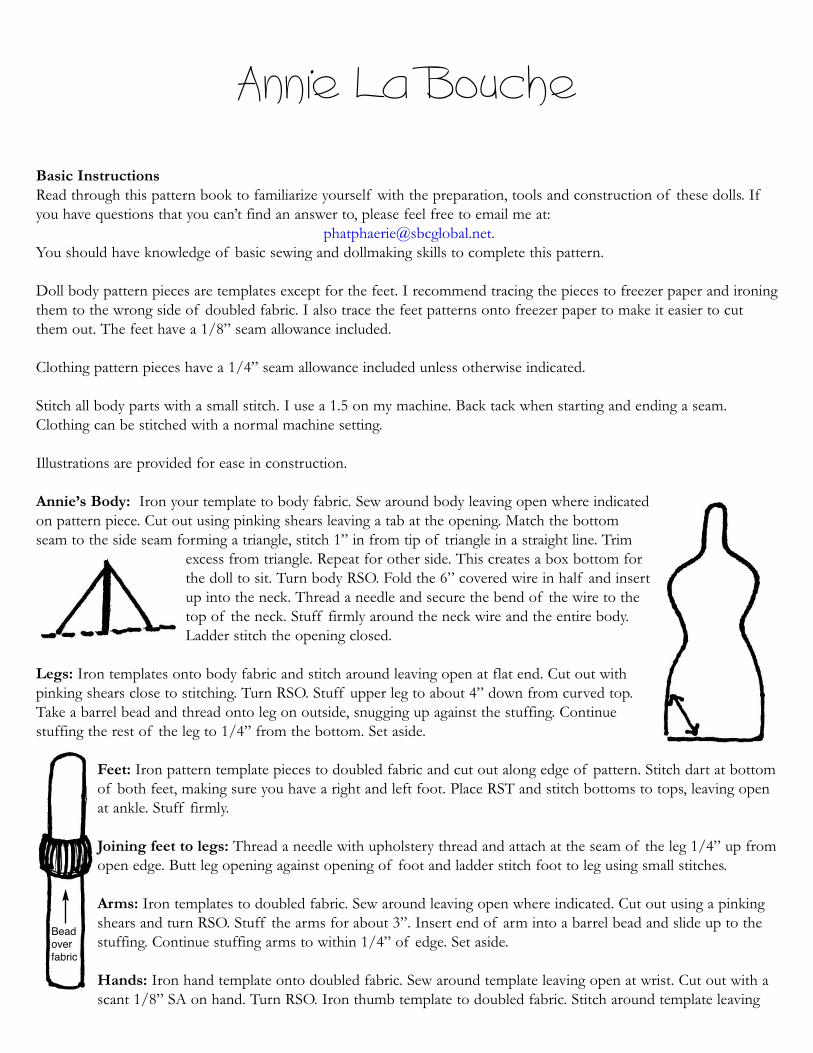
Annie’s Body: Iron your template to body fabric. Sew around body leaving open where indicatedon pattern piece. Cut out using pinking shears leaving a tab at the opening. Match the bottomseam to the side seam forming a triangle, stitch 1” in from tip of triangle in a straight line. Trim
excess from triangle. Repeat for other side. This creates a box bottom forthe doll to sit. Turn body RSO. Fold the 6” covered wire in half and insertup into the neck. Thread a needle and secure the bend of the wire to thetop of the neck. Stuff firmly around the neck wire and the entire body.Ladder stitch the opening closed.
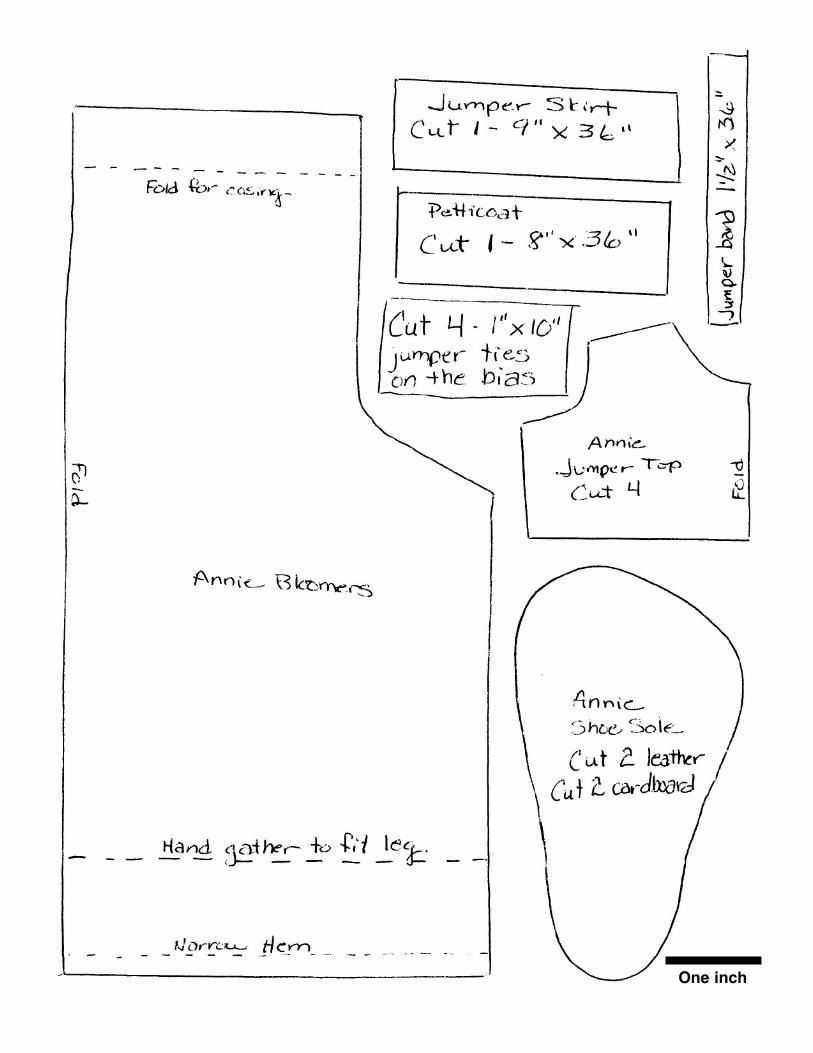
Legs: Iron templates onto body fabric and stitch around leaving open at flat end. Cut out withpinking shears close to stitching. Turn RSO. Stuff upper leg to about 4” down from curved top.Take a barrel bead and thread onto leg on outside, snugging up against the stuffing. Continuestuffing the rest of the leg to 1/4” from the bottom. Set aside.
Feet: Iron pattern template pieces to doubled fabric and cut out along edge of pattern. Stitch dart at bottomof both feet, making sure you have a right and left foot. Place RST and stitch bottoms to tops, leaving openat ankle. Stuff firmly.
Joining feet to legs: Thread a needle with upholstery thread and attach at the seam of the leg 1/4” up fromopen edge. Butt leg opening against opening of foot and ladder stitch foot to leg using small stitches.
Arms: Iron templates to doubled fabric. Sew around leaving open where indicated. Cut out using a pinkingshears and turn RSO. Stuff the arms for about 3”. Insert end of arm into a barrel bead and slide up to thestuffing. Continue stuffing arms to within 1/4” of edge. Set aside.
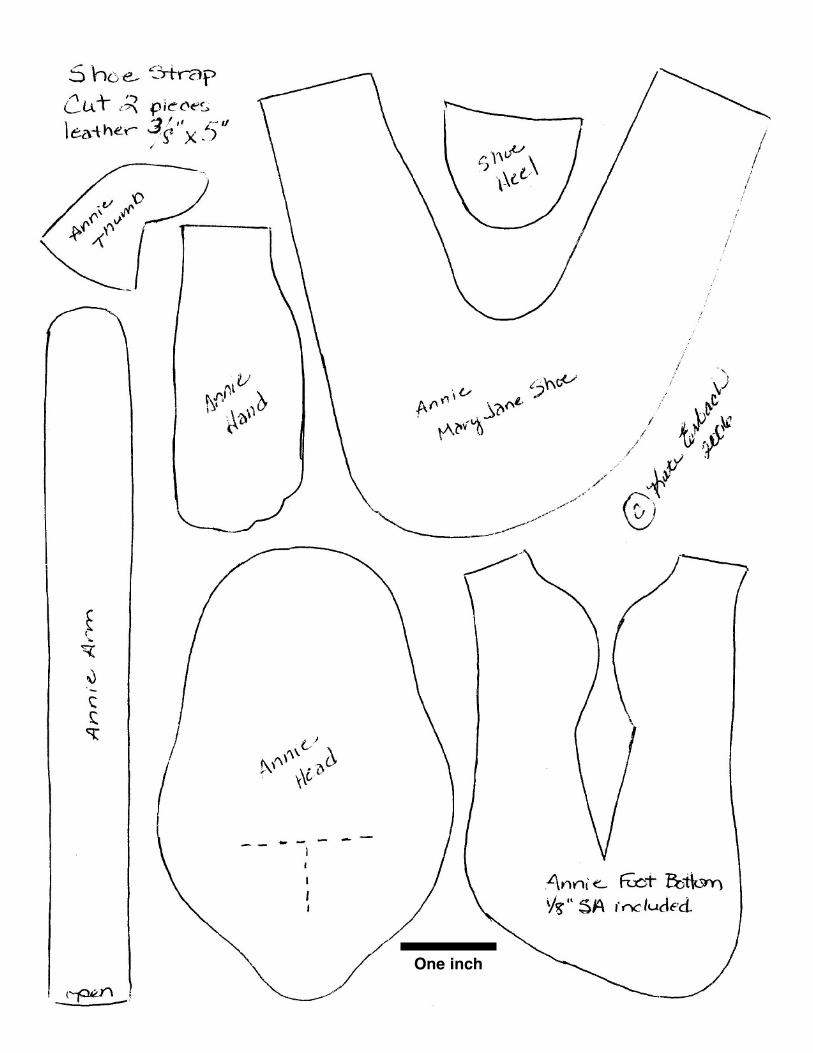
Hands: Iron hand template onto doubled fabric. Sew around template leaving open at wrist. Cut out with ascant 1/8” SA on hand. Turn RSO. Iron thumb template to doubled fabric. Stitch around template leaving
Beadoverfabric
open at bottom curved edge. Cut out with a scant 1/8” SA. Stuff hand firmly to within 1/4” ofopen edge. Stuff thumb firmly. Gather open end closed with a 1/4” SA, place thumb on bot-tom of hand with bend of thumb facing outward and using a ladder stitch, stitch with smallstitches the thumb to the base of the hand.
Joining hands to arms: Butt the opening of the armagainst the opening of the hand and using small stitches,ladder stitch all around to join.
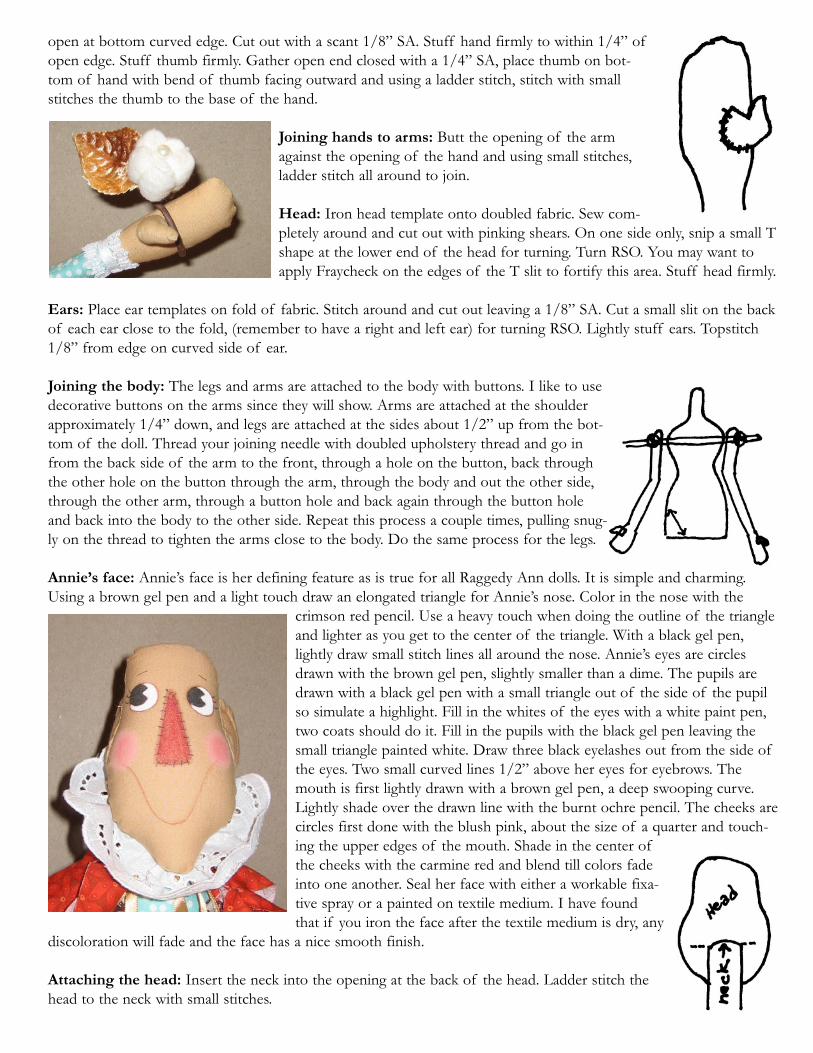
Head: Iron head template onto doubled fabric. Sew com-pletely around and cut out with pinking shears. On one side only, snip a small Tshape at the lower end of the head for turning. Turn RSO. You may want toapply Fraycheck on the edges of the T slit to fortify this area. Stuff head firmly.
Ears: Place ear templates on fold of fabric. Stitch around and cut out leaving a 1/8” SA. Cut a small slit on the backof each ear close to the fold, (remember to have a right and left ear) for turning RSO. Lightly stuff ears. Topstitch1/8” from edge on curved side of ear.
Joining the body: The legs and arms are attached to the body with buttons. I like to usedecorative buttons on the arms since they will show. Arms are attached at the shoulderapproximately 1/4” down, and legs are attached at the sides about 1/2” up from the bot-tom of the doll. Thread your joining needle with doubled upholstery thread and go infrom the back side of the arm to the front, through a hole on the button, back throughthe other hole on the button through the arm, through the body and out the other side,through the other arm, through a button hole and back again through the button holeand back into the body to the other side. Repeat this process a couple times, pulling snug-ly on the thread to tighten the arms close to the body. Do the same process for the legs.
Annie’s face: Annie’s face is her defining feature as is true for all Raggedy Ann dolls. It is simple and charming.Using a brown gel pen and a light touch draw an elongated triangle for Annie’s nose. Color in the nose with the
crimson red pencil. Use a heavy touch when doing the outline of the triangleand lighter as you get to the center of the triangle. With a black gel pen,lightly draw small stitch lines all around the nose. Annie’s eyes are circlesdrawn with the brown gel pen, slightly smaller than a dime. The pupils aredrawn with a black gel pen with a small triangle out of the side of the pupilso simulate a highlight. Fill in the whites of the eyes with a white paint pen,two coats should do it. Fill in the pupils with the black gel pen leaving thesmall triangle painted white. Draw three black eyelashes out from the side ofthe eyes. Two small curved lines 1/2” above her eyes for eyebrows. Themouth is first lightly drawn with a brown gel pen, a deep swooping curve.Lightly shade over the drawn line with the burnt ochre pencil. The cheeks arecircles first done with the blush pink, about the size of a quarter and touch-ing the upper edges of the mouth. Shade in the center ofthe cheeks with the carmine red and blend till colors fadeinto one another. Seal her face with either a workable fixa-tive spray or a painted on textile medium. I have foundthat if you iron the face after the textile medium is dry, any
discoloration will fade and the face has a nice smooth finish.
Attaching the head: Insert the neck into the opening at the back of the head. Ladder stitch thehead to the neck with small stitches.
Attaching the ears: Run a small line of glue close to the fold on the ear. Place the ear on the side seam with the topof the ear even with the top of the eye.
Hair: Annie’s hair can be done two ways. Either using crepe wool available from One and Only Creations: www.one-andonlycreations.com/online_store.php# or using cotton rag hair that can be made (I have also used wool fabric forrag hair with huge success). If using crepe wool hair, cut three sections off the braid in 3-5” lengths. Gently pull thesections apart spreading out the fiber. Take a section and lay it on the back of Annie’s head about 1/2” above the neckjoin seam. With your felting needle felt the fiber into the head at the MIDDLE of the section you placed. Then, folddown the top of the section over the felting and felt at the fold. Apply another section of fiber to the head 1/2” abovethe last section and repeat the process, felting, folding, felting again. Take the final section and place it at the top ofAnnie’s head with one third of the section hanging over onto the face from the head seam. Felt at the head seam andrandom felt the rest of the fiber to the head back. Fluff hair as you go to get a nice full head of hair effect. Add morefiber if you think she needs more.
Making cotton rag hair: I find that using a batik fabric for this kind of hair gives the best results (wool fabric is alsoexcellent). The cover doll’s hair was made using a patterned fabric that gave an added layer of texture to her. You mayalso hand dye muslin with scarlet dye with maybe a dark tea wash after dyeing to give an aged effect to the fabric.
Take your fat quarter fabic and cut 4 strips 3” to 5” wide (depending on how long you want the hair) by the length ofthe fabric. Layer the strips on top of each other and stitch down the center, repeat the stitching again back the otherway. Cut in 1/4” increments from the raw edge of the fabric to the center stitching on both sides. Take this strip to thesink and get it wet, not sopping but dampened through. Place the strip in a fluffy dry towel and rub, rub, rub. .This willrag up the egdges of the fabric and help to start the drying. Toss the towel and the ragged hair into the dryer until dryCut into strips the head width of Annie and hand sew to head or use fabric glue.
Now that Annie is put together let’s get her dressed. Annie’s clothes are a mixture of new fabric and vintage pieces.You may also choose to just do fabric and not use vintage textiles. No problem, she’s YOUR doll.
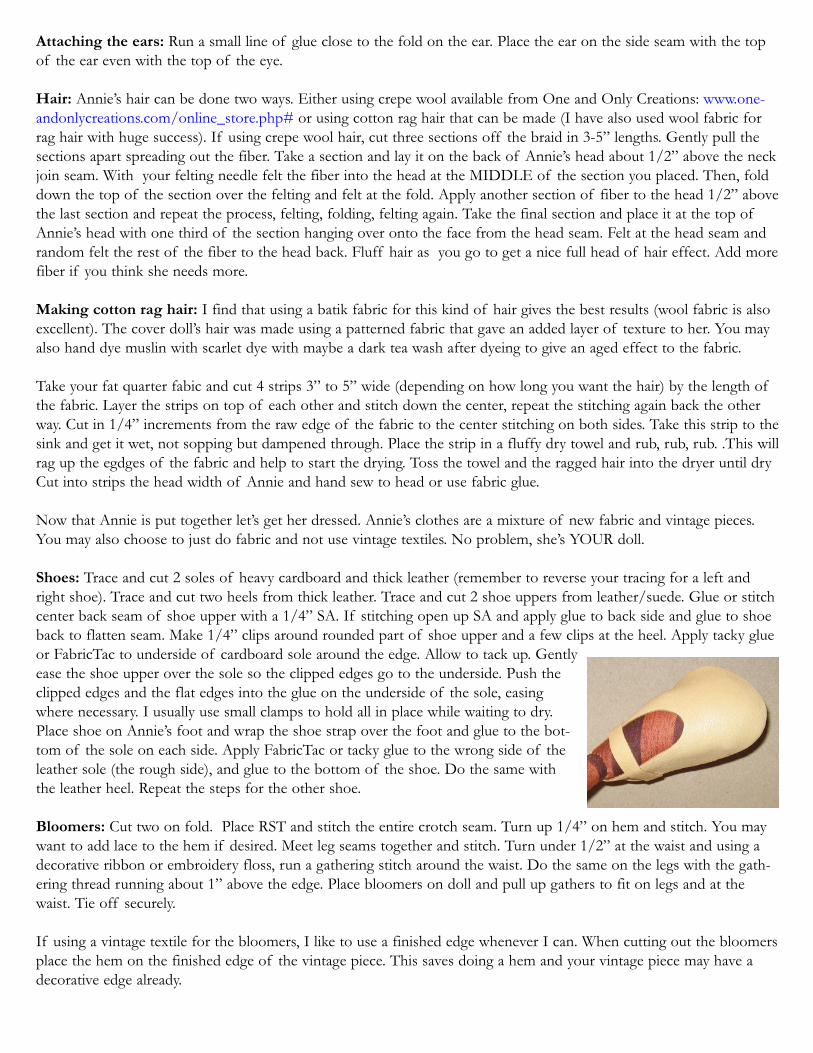
Shoes: Trace and cut 2 soles of heavy cardboard and thick leather (remember to reverse your tracing for a left andright shoe). Trace and cut two heels from thick leather. Trace and cut 2 shoe uppers from leather/suede. Glue or stitchcenter back seam of shoe upper with a 1/4” SA. If stitching open up SA and apply glue to back side and glue to shoeback to flatten seam. Make 1/4” clips around rounded part of shoe upper and a few clips at the heel. Apply tacky glueor FabricTac to underside of cardboard sole around the edge. Allow to tack up. Gentlyease the shoe upper over the sole so the clipped edges go to the underside. Push theclipped edges and the flat edges into the glue on the underside of the sole, easingwhere necessary. I usually use small clamps to hold all in place while waiting to dry.Place shoe on Annie’s foot and wrap the shoe strap over the foot and glue to the bot-tom of the sole on each side. Apply FabricTac or tacky glue to the wrong side of theleather sole (the rough side), and glue to the bottom of the shoe. Do the same withthe leather heel. Repeat the steps for the other shoe.
Bloomers: Cut two on fold. Place RST and stitch the entire crotch seam. Turn up 1/4” on hem and stitch. You maywant to add lace to the hem if desired. Meet leg seams together and stitch. Turn under 1/2” at the waist and using adecorative ribbon or embroidery floss, run a gathering stitch around the waist. Do the same on the legs with the gath-ering thread running about 1” above the edge. Place bloomers on doll and pull up gathers to fit on legs and at thewaist. Tie off securely.
If using a vintage textile for the bloomers, I like to use a finished edge whenever I can. When cutting out the bloomersplace the hem on the finished edge of the vintage piece. This saves doing a hem and your vintage piece may have adecorative edge already.
Petticoat: Cut your fabric for the petticoat and seam the short side with a 1/4” SA. Run two lines of gathering stitch-es around the top edge. At the bottom edge, make a small hem or finish with lace or trim. Place petticoat on doll andpull up gathers to fit the waist. Tie off securely.
The petticoat is another place I like to use vintage pieces. An old tea towel or dresser scarf makes a wonderful petti-coat. Embroidered edges of pillowcases make perfect petticoats. Just cut and seam as above.
Jumper: Cut four bodices from jumper fabric (2 are for lining). Also cut skirt from jumper fabric. Stitch side seams onjumper top and lining. Placetop and lining RST and stitch completely around, starting and ending at side seam. TurnRSO. Press. Staystitch the bottom of the jumper top. Stitch the two short sides of the jumper skirt together. Stitch twolines of gathering stitches around the top of the skirt. Pull up gathers to fit jumper top. Place skirt and jumper topRST and stitch, adjusting gathers if necessary. Turn up a hem at the bottom of the skirt and stitch. The hem width ispersonal preference. Also, the length of the skirt can be adjusted to your preference. For the band on the jumper placethe band long side with RS facing the WS on the bottom of the jumper. Stitch a 1/4” seam, press up and over ontothe top of the jumper. Stitch 1/4” in from the raw edge on the top of the jumper. I like to leave the edge of the bandraw since Annie is, after all, a raggedy doll. Stitch a jumper tie to each of the shoulders of the jumper top. Place thejumper on the doll and tie the jumper ties into bows at the shoulders. Stitch the heart button to the jumper top on theleft side.
Other embellishments: Wrap the wrists with lace and secure. Gather a 10” length of lace or trim to fit the neck andsecure with glue or stitches. Tie a small ribbon bow around her neck.
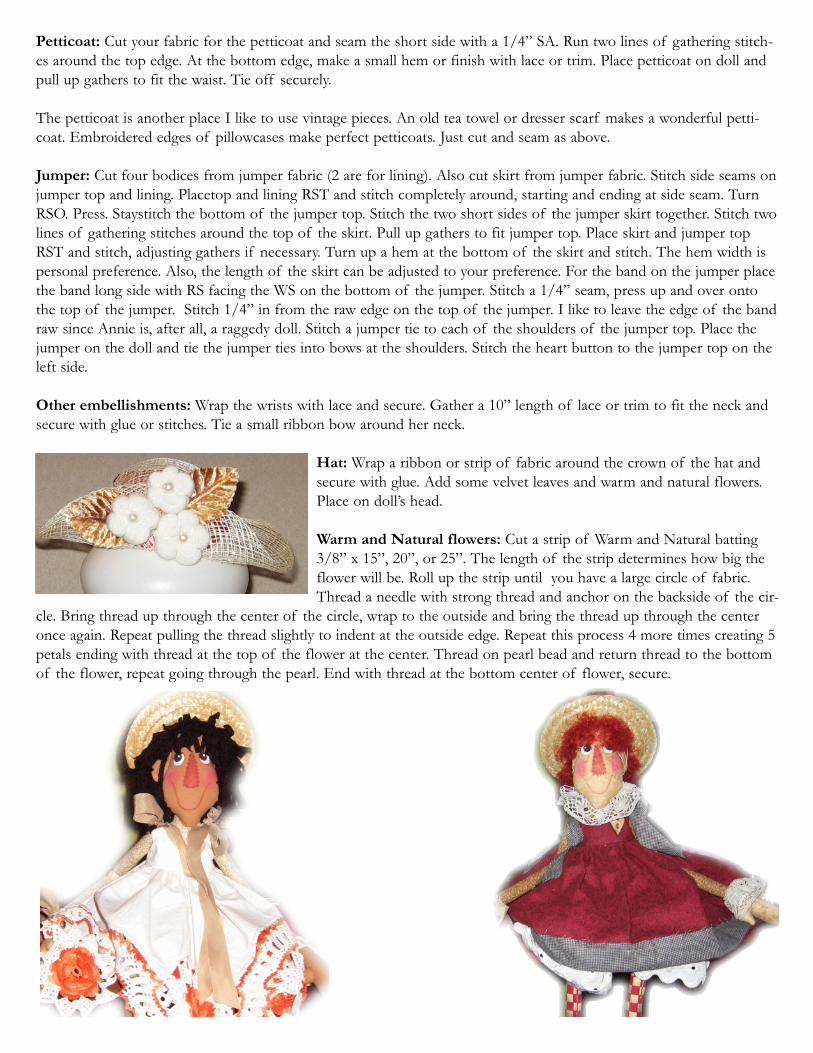
Hat: Wrap a ribbon or strip of fabric around the crown of the hat andsecure with glue. Add some velvet leaves and warm and natural flowers.Place on doll’s head.
Warm and Natural flowers: Cut a strip of Warm and Natural batting3/8” x 15”, 20”, or 25”. The length of the strip determines how big theflower will be. Roll up the strip until you have a large circle of fabric.Thread a needle with strong thread and anchor on the backside of the cir-
cle. Bring thread up through the center of the circle, wrap to the outside and bring the thread up through the centeronce again. Repeat pulling the thread slightly to indent at the outside edge. Repeat this process 4 more times creating 5petals ending with thread at the top of the flower at the center. Thread on pearl bead and return thread to the bottomof the flower, repeat going through the pearl. End with thread at the bottom center of flower, secure.
One inch
One inch

One inch