My Machine - Nespresso USA · PDF filees Br con Teni Do/con TeÚD o Nespresso, un...
40
My Machine
-
Upload
phungkhanh -
Category
Documents
-
view
216 -
download
3
Transcript of My Machine - Nespresso USA · PDF filees Br con Teni Do/con TeÚD o Nespresso, un...

My Machine

ES - BR 4-21
EN - FR 22-39
A B C
1012
11
6
9
21
8
7
5
4
3
13
24
19
20
21
22
23
14 18
15 17
16
25
2827
26 29
31
25
3034
33
32
3
D e s c r i p c i ó n g e n e r a L/V i s ão g e r a L
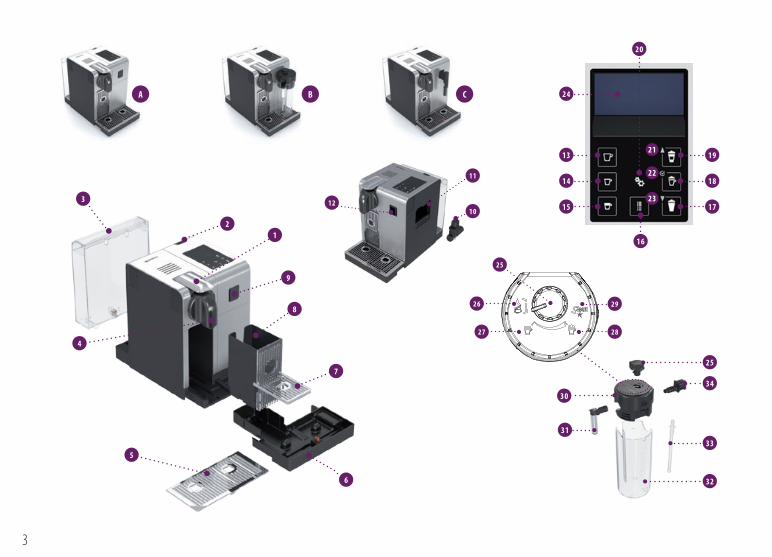
Pantalla (preparaciones)/ Tela (preparo)
13 Lungo/Lungo14 espresso/espresso15 ristretto/ristretto16 agua caliente/Água quente17 Leche caliente/Leite quente 18 cappuccino/cappuccino 19 Latte Macchiato/Latte Macchiato
Pantalla (navegación)/ Tela (navegação)
20 Menú/Menu21 Desplazarse hacia arriba cuando el Menú está activado/
rolar para cima quando o Menu estiver ativado22 seleccionar una opción cuando el Menú está activado/
seleção de opção quando o Menu estiver ativado23 Desplazarse hacia abajo cuando el Menú está activado/
rolar para baixo quando o Menu estiver ativado24 Visualización del Texto/Visor de texto
Sistema Rápido de Cappuccino (S.R.C.)/ Sistema Rápido para Cappuccino (S.R.C.)
25 perilla reguladora de espuma de Leche/ Botão de regulação da espuma de Leite
26 posición de inserción para perilla reguladora de espuma de Leche/escolha a posição do botão de regulação da espuma de leite
27 espuma mín./espuma mín.28 espuma máx./espuma máx.29 Función automática de lavado: «cLean»/
«cLean»: função de enxágue automático30 Tapa del recipiente para leche/Tampa do recipiente de leite31 salida de leche/Bico de leite32 recipiente para leche/recipiente de leite33 Tubo de aspiración de leche/Tubo de aspiração de leite34 conector s.r.c./conector do s.r.c.
Descripción general de la máquina/Visão geral da máquina
A Máquina en configuración de café únicamente/ Máquina na configuração apenas para café
B Máquina con sistema rápido de cappuccino (para cappuccino)/Máquina com sistema rápido de cappuccino (para cappuccino)
C Máquina con salida de agua caliente/ Máquina com bico de água quente
1 palanca/alavanca2 Botón on/oFF/Botão Liga/DesLiga3 Tanque de agua/reservatório de água 4 salida de café/saída de café5 rejilla de goteo/grade de gotejamento6 Bandeja de goteo/Bandeja de gotejamento7 soporte para tazas movible (no extraíble)/
suporte de xícara giratório (não removível)8 contendor para cápsulas usadas/
recipiente coletor de cápsulas usadas9 puerta del conector de vapor/porta bico de vapor
10 Tubo telescópico para salida de agua caliente/ saída telescópica de água quente
11 Área de almacenamiento del tubo de salida de agua caliente/ armazenamento de água quente
12 conector de vapor/Bico de vapor
ES
BR
4
ES
BR
co n T e n i D o/co n T e Ú D o
Nespresso, un sistema exclusivo para crear el espresso perfecto, una y otra vez. Todas las máquinas Nespresso están equipadas con un sistema único de extracción que garantiza hasta 19 bares de presión. cada parámetro ha sido calculado con gran precisión para garantizar que todos los aromas de cada grand cru puedan ser extraídos, así como también para darle cuerpo al café y crear una crema excepcionalmente espesa y suave.
o Nespresso, um sistema exclusivo para criar o espresso perfeito, dia após dia. Todas as máquinas Nespresso são equipadas com um sistema de extração exclusivo que garante até 19 bar de pressão. cada parâmetro foi calculado com grande precisão a fim de garantir que todos os aromas de cada grand cru possam ser extraídos, proporcionando corpo ao café e criando um «crema» excepcionalmente denso e suave.
VolúmEnES PREfijADoS DE fáBRiCA/ ConfiguRAçõES DE fáBRiCA DE VolumE ......................................................DESCAlCifiCACión/DESCAlCifiCAção ..........................................................ConfiguRACión DE lA DuREzA DEl AguA/ ConfiguRAção DE DuREzA DA águA ............................................................SoluCión DE PRoBlEmAS/Solução DE PRoBlEmAS .....................................ESPECifiCACionES/ESPECifiCAçõES .............................................................EliminACión DE RESiDuoS Y ConCiEnCiA ECológiCA/ DESCARTE E PREoCuPAçõES ECológiCAS ..................................................... ConTACTE El CluB NESPRESSO/ ConTATo Com o NESPRESSO CluB .................................................................gARAnTÍA/gARAnTiA ...................................................................................
DESCRiPCión gEnERAl/ViSão gERAl ...............................................................ConTEniDo DEl EmBAlAjE/ConTEúDo DA EmBAlAgEm ....................................mEnú DE nAVEgACión/nAVEgAção PElo mEnu ...............................................liSTA DEl mEnú/liSTA Do mEnu ......................................................................PRimER uSo o DESPuéS DE un PERioDo ExTEnSo DE no uTilizACión/ PRimEiRo uSo ou APóS um longo PERÍoDo SEm uSo ......................................PREPARACión DEl CAfé/PREPARo Do CAfé .......................................................ARmADo/DESARmADo DEl SiSTEmA RáPiDo DE CAPPuCCino (S.R.C.)/ monTAgEm/DESmonTAgEm Do SiSTEmA RáPiDo PARA CAPPuCCino (S.R.C.) .....PREPARACión DE CAPPuCCino Y lATTE mACChiATo/ PREPARAnDo CAPPuCCino E lATTE mACChiATo ................................................CuiDADo DiARio/CuiDADoS DiáRioS ................................................................lAVADo A mAno DEl SiSTEmA RáPiDo DE CAPPuCCino (S.R.C.)/ lAVAgEm mAnuAl Do SiSTEmA RáPiDo PARA CAPPuCCino (S.R.C.) ...................
1516
171819
20
20 21
PRECAuCión: cuando vea esta señal, por favor consulte las precauciones de seguridad para evitar posibles daños y perjuicios. infoRmACión: cuando vea esta señal, por favor, tome nota de los consejos para el uso correcto y seguro de su máquina de café. CuiDADo: ao ver este símbolo, consulte as instruções de segurança para evitar possíveis danos e prejuízos. infoRmAçõES: ao ver este símbolo, observe os conselhos para uma utilização correta e segura de sua máquina de café.
04060607
0810
10
1114
14
5
EN IMPORTANT SAFEGUARDS ........................................................................ 2 FR CONSIGNES DE SECURITE ......................................................................... 3 ES PRECAUCIONES DE SEGURIDAD ................................................................ 4 BR MEDIDAS DE SEGURANÇA......................................................................... 6
ES
BR
M e n Ú D e n aV e g ac i ó n/n aV e g aç ão p e Lo M e n u
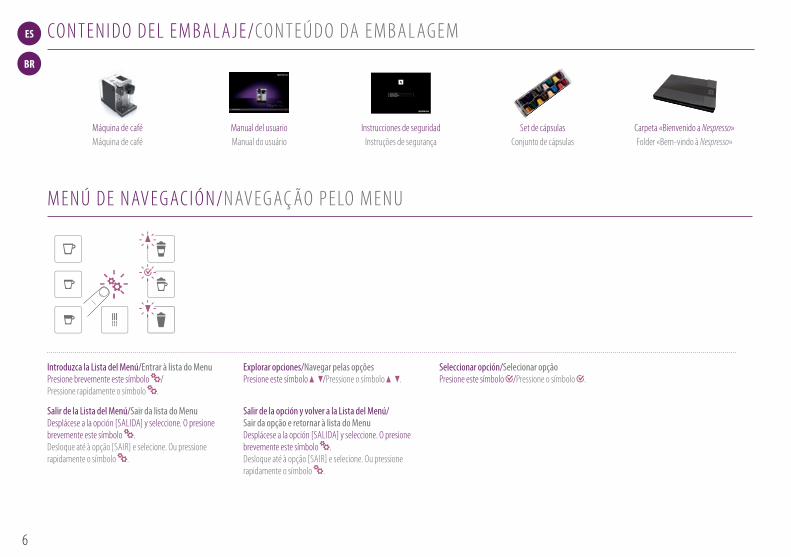
co n T e n i D o D e L e M B a L a j e/co n T e Ú D o Da e M B a L ag e M
Máquina de café Máquina de café
carpeta «Bienvenido a Nespresso» Folder «Bem-vindo à Nespresso»
Manual del usuario Manual do usuário
instrucciones de seguridad instruções de segurança
set de cápsulas conjunto de cápsulas
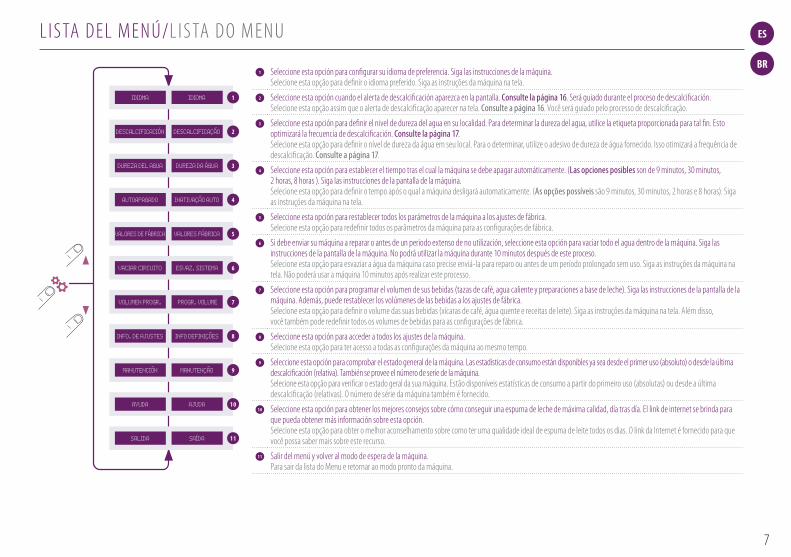
Introduzca la Lista del Menú/Entrar à lista do Menu presione brevemente este símbolo / pressione rapidamente o símbolo .
Explorar opciones/Navegar pelas opções presione este símbolo /pressione o símbolo .
Seleccionar opción/Selecionar opção presione este símbolo /pressione o símbolo .
Salir de la Lista del Menú/Sair da lista do Menu Desplácese a la opción [saLiDa] y seleccione. o presione brevemente este símbolo . Desloque até à opção [sair] e selecione. ou pressione rapidamente o símbolo .
Salir de la opción y volver a la Lista del Menú/ Sair da opção e retornar à lista do Menu Desplácese a la opción [saLiDa] y seleccione. o presione brevemente este símbolo . Desloque até à opção [sair] e selecione. ou pressione rapidamente o símbolo .
6
1idiomaidioma
2descalcificaçãodescalcificaciÓN
3dureza da águadureza del agua
4iNativação autoautoaPagado
5valores fábricavalores de fábrica
6esvaz. sistemavaciar circuito
7 Progr. volumevolumeN Progr.
8iNfo defiNiçõesiNfo. de aJustes
9maNuteNçãomaNuteNciõN
10aJudaaYuda
11saída salida
Text to translate
Text to translate
ES
BR1 seleccione esta opción para configurar su idioma de preferencia. siga las instrucciones de la máquina.
selecione esta opção para definir o idioma preferido. siga as instruções da máquina na tela.2 seleccione esta opción cuando el alerta de descalcificación aparezca en la pantalla. Consulte la página 16. será guiado durante el proceso de descalcificación.
selecione esta opção assim que o alerta de descalcificação aparecer na tela. Consulte a página 16. Você será guiado pelo processo de descalcificação.3 seleccione esta opción para definir el nivel de dureza del agua en su localidad. para determinar la dureza del agua, utilice la etiqueta proporcionada para tal fin. esto
optimizará la frecuencia de descalcificación. Consulte la página 17. selecione esta opção para definir o nível de dureza da água em seu local. para o determinar, utilize o adesivo de dureza de água fornecido. isso otimizará a frequência de descalcificação. Consulte a página 17.
4 seleccione esta opción para establecer el tiempo tras el cual la máquina se debe apagar automáticamente. (Las opciones posibles son de 9 minutos, 30 minutos, 2 horas, 8 horas ). siga las instrucciones de la pantalla de la máquina. selecione esta opção para definir o tempo após o qual a máquina desligará automaticamente. (As opções possíveis são 9 minutos, 30 minutos, 2 horas e 8 horas). siga as instruções da máquina na tela.
5 seleccione esta opción para restablecer todos los parámetros de la máquina a los ajustes de fábrica. selecione esta opção para redefinir todos os parâmetros da máquina para as configurações de fábrica.
6 si debe enviar su máquina a reparar o antes de un periodo extenso de no utilización, seleccione esta opción para vaciar todo el agua dentro de la máquina. siga las instrucciones de la pantalla de la máquina. no podrá utilizar la máquina durante 10 minutos después de este proceso. selecione esta opção para esvaziar a água da máquina caso precise enviá-la para reparo ou antes de um período prolongado sem uso. siga as instruções da máquina na tela. não poderá usar a máquina 10 minutos após realizar este processo.
7 seleccione esta opción para programar el volumen de sus bebidas (tazas de café, agua caliente y preparaciones a base de leche). siga las instrucciones de la pantalla de la máquina. además, puede restablecer los volúmenes de las bebidas a los ajustes de fábrica. selecione esta opção para definir o volume das suas bebidas (xícaras de café, água quente e receitas de leite). siga as instruções da máquina na tela. além disso, você também pode redefinir todos os volumes de bebidas para as configurações de fábrica.
8 seleccione esta opción para acceder a todos los ajustes de la máquina. selecione esta opção para ter acesso a todas as configurações da máquina ao mesmo tempo.
9 seleccione esta opción para comprobar el estado general de la máquina. Las estadísticas de consumo están disponibles ya sea desde el primer uso (absoluto) o desde la última descalcificación (relativa). También se provee el número de serie de la máquina. selecione esta opção para verificar o estado geral da sua máquina. estão disponíveis estatísticas de consumo a partir do primeiro uso (absolutas) ou desde a última descalcificação (relativas). o número de série da máquina também é fornecido.
10 seleccione esta opción para obtener los mejores consejos sobre cómo conseguir una espuma de leche de máxima calidad, día tras día. el link de internet se brinda para que pueda obtener más información sobre esta opción. selecione esta opção para obter o melhor aconselhamento sobre como ter uma qualidade ideal de espuma de leite todos os dias. o link da internet é fornecido para que você possa saber mais sobre este recurso.
11 salir del menú y volver al modo de espera de la máquina. para sair da lista do Menu e retornar ao modo pronto da máquina.
L i s Ta D e L M e n Ú/L i s Ta D o M e n u
7
max
SET LANGUAGE
to continue
LANGUAGEActual value : EN
New value : [ ] to select
05
max
SET LANGUAGE
to continue
LANGUAGEActual value : EN
New value : [ ] to select
05
max
SET LANGUAGE
to continue
LANGUAGEActual value : EN
New value : [ ] to select
05
max
SET LANGUAGE
to continue
LANGUAGEActual value : EN
New value : [ ] to select
05
max
SET LANGUAGE
to continue
LANGUAGEActual value : EN
New value : [ ] to select
05
max
SET LANGUAGE
to continue
LANGUAGEActual value : EN
New value : [ ] to select
05
ES
BR
priMer uso o Después De un perioDo exTenso De no uTiLización/ priMeiro uso ou após uM Longo períoDo seM uso
infoRmACión: primero lea las precauciones de seguridad para evitar riesgos de descarga eléctrica mortal e incendios.
infoRmAçõES: primeiro, leia as instruções de segurança para evitar riscos de incêndio e choques elétricos fatais.
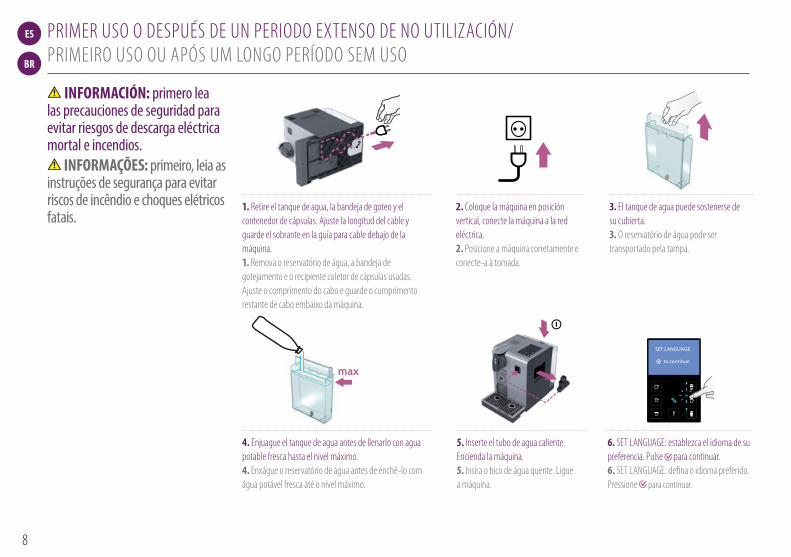
1. retire el tanque de agua, la bandeja de goteo y el contenedor de cápsulas. ajuste la longitud del cable y guarde el sobrante en la guía para cable debajo de la máquina. 1. remova o reservatório de água, a bandeja de gotejamento e o recipiente coletor de cápsulas usadas. ajuste o comprimento do cabo e guarde o cumprimento restante de cabo embaixo da máquina.
5. inserte el tubo de agua caliente. encienda la máquina. 5. insira o bico de água quente. Ligue a máquina.
2. coloque la máquina en posición vertical, conecte la máquina a la red eléctrica. 2. posicione a máquina corretamente e conecte-a à tomada.
6. seT Language: establezca el idioma de su preferencia. pulse para continuar. 6. seT Language: defina o idioma preferido. pressione para continuar.
3. el tanque de agua puede sostenerse de su cubierta. 3. o reservatório de água pode ser transportado pela tampa.
4. enjuague el tanque de agua antes de llenarlo con agua potable fresca hasta el nivel máximo. 4. enxágue o reservatório de água antes de enchê-lo com água potável fresca até o nível máximo.
8
max
SET LANGUAGE
to continue
LANGUAGEActual value : EN
New value : [ ] to select
05
max
First read the safety precautions to avoid risks of fatal electrical shock and fire
Remove the plastic films from grid, lever and machine panels.
Remove the water tank, drip tray, and capsule container. Adjust the cable length and store the excess in the cable guide under the machine.
Put the machine in upright position, plug machine into mains.
The water tank can be carried by its cover.
Rinse the water tank before filling with potable water up to maximum level.
Insert the hot water spout. Switch machine ON
Set your preferred language.Press to continue.
SET LANGUAGE
to continue
Select your language by scrolling the options using up/down arrow. Press to confirm.
LANGUAGE
Actual value : EN
New value : [ ]
to select
Coffee preparation
x3x3
110 ml
40 ml
25 ml
05 06
4°15”
Assembling / disassembling of Rapid Cappuccino system (R.C.S)
07
ES
BR
priMer uso o Después De un perioDo exTenso De no uTiLización/ priMeiro uso ou após uM Longo períoDo seM uso
infoRmACión: las máquinas son verificadas completamente luego de su fabricación. Algunos restos de polvo de café podrían encontrarse en el agua de enjuagado.
infoRmAçõES: as máquinas são totalmente testadas após sua produção. Alguns vestígios de pó de café podem ser encontrados na água do enxágue.
infoRmACión: consulte la sección Armado/Desarmado del Sistema Rápido de Cappuccino. infoRmAçõES: consulte a seção Montagem/Desmontagem do Rapid Cappuccino
System (S.R.C.).
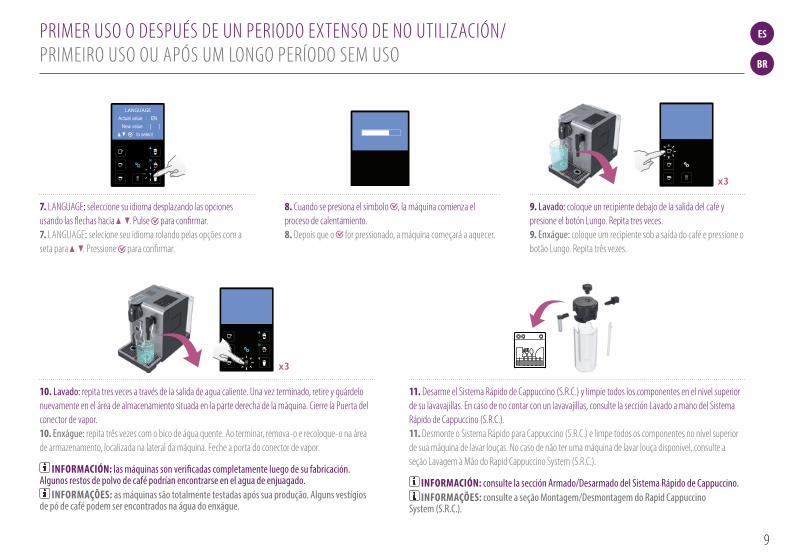
7. Language: seleccione su idioma desplazando las opciones usando las flechas hacia . pulse para confirmar. 7. Language: selecione seu idioma rolando pelas opções com a seta para . pressione para confirmar.
11. Desarme el sistema rápido de cappuccino (s.r.c.) y limpie todos los componentes en el nivel superior de su lavavajillas. en caso de no contar con un lavavajillas, consulte la sección Lavado a mano del sistema rápido de cappuccino (s.r.c.). 11. Desmonte o sistema rápido para cappuccino (s.r.c.) e limpe todos os componentes no nível superior de sua máquina de lavar louças. no caso de não ter uma máquina de lavar louça disponível, consulte a seção Lavagem à Mão do rapid cappuccino system (s.r.c.).
10. Lavado: repita tres veces a través de la salida de agua caliente. una vez terminado, retire y guárdelo nuevamente en el área de almacenamiento situada en la parte derecha de la máquina. cierre la puerta del conector de vapor. 10. Enxágue: repita três vezes com o bico de água quente. ao terminar, remova-o e recoloque-o na área de armazenamento, localizada na lateral da máquina. Feche a porta do conector de vapor.
9. Lavado: coloque un recipiente debajo de la salida del café y presione el botón Lungo. repita tres veces. 9. Enxágue: coloque um recipiente sob a saída do café e pressione o botão Lungo. repita três vezes.
8. cuando se presiona el símbolo , la máquina comienza el proceso de calentamiento. 8. Depois que o for pressionado, a máquina começará a aquecer.
9
max
First read the safety precautions to avoid risks of fatal electrical shock and fire
Remove the plastic films from grid, lever and machine panels.
Remove the water tank, drip tray, and capsule container. Adjust the cable length and store the excess in the cable guide under the machine.
Put the machine in upright position, plug machine into mains.
The water tank can be carried by its cover.
Rinse the water tank before filling with potable water up to maximum level.
Insert the hot water spout. Switch machine ON
Set your preferred language.Press to continue.
SET LANGUAGE
to continue
Select your language by scrolling the options using up/down arrow. Press to confirm.
LANGUAGE
Actual value : EN
New value : [ ]
to select
Coffee preparation
x3x3
110 ml
40 ml
25 ml
05 06
4°15”
Assembling / disassembling of Rapid Cappuccino system (R.C.S)
07
ES
BR
p r e pa r ac i ó n D e L c a F é/ p r e pa r o D o c a F é
a r Ma D o/D e s a r Ma D o D e L s i s T e Ma r Á p i D o D e c a p p u cc i n o ( s.r.c.)/ M o n Tag e M/D e s M o n Tag e M D o s i s T e Ma r Á p i D o pa r a c a p p u cc i n o ( s.r.c.)
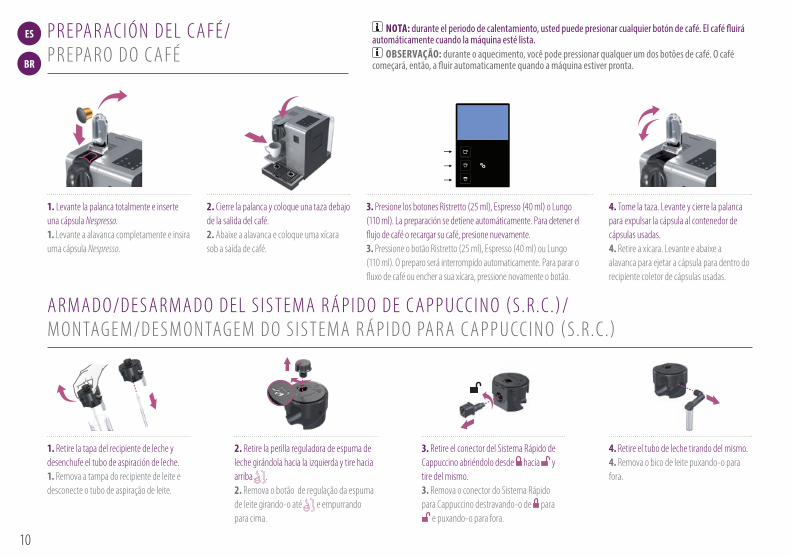
1. Levante la palanca totalmente e inserte una cápsula Nespresso. 1. Levante a alavanca completamente e insira uma cápsula Nespresso.
2. cierre la palanca y coloque una taza debajo de la salida del café. 2. abaixe a alavanca e coloque uma xícara sob a saída de café.
3. presione los botones ristretto (25 ml), espresso (40 ml) o Lungo (110 ml). La preparación se detiene automáticamente. para detener el flujo de café o recargar su café, presione nuevamente. 3. pressione o botão ristretto (25 ml), espresso (40 ml) ou Lungo (110 ml). o preparo será interrompido automaticamente. para parar o fluxo de café ou encher a sua xícara, pressione novamente o botão.
4. Tome la taza. Levante y cierre la palanca para expulsar la cápsula al contenedor de cápsulas usadas. 4. retire a xícara. Levante e abaixe a alavanca para ejetar a cápsula para dentro do recipiente coletor de cápsulas usadas.
1. retire la tapa del recipiente de leche y desenchufe el tubo de aspiración de leche. 1. remova a tampa do recipiente de leite e desconecte o tubo de aspiração de leite.
2. retire la perilla reguladora de espuma de leche girándola hacia la izquierda y tire hacia arriba . 2. remova o botão de regulação da espuma de leite girando-o até e empurrando para cima.
3. retire el conector del sistema rápido de cappuccino abriéndolo desde hacia y tire del mismo. 3. remova o conector do sistema rápido para cappuccino destravando-o de para
e puxando-o para fora.
4. retire el tubo de leche tirando del mismo. 4. remova o bico de leite puxando-o para fora.
noTA: durante el periodo de calentamiento, usted puede presionar cualquier botón de café. El café fluirá automáticamente cuando la máquina esté lista.
oBSERVAção: durante o aquecimento, você pode pressionar qualquer um dos botões de café. O café começará, então, a fluir automaticamente quando a máquina estiver pronta.
10
4°15”
Assembling / disassembling of Rapid Cappuccino system (R.C.S)
07
4°15”
Assembling / disassembling of Rapid Cappuccino system (R.C.S)
07
4°15”
Assembling / disassembling of Rapid Cappuccino system (R.C.S)
07
4°15”
Assembling / disassembling of Rapid Cappuccino system (R.C.S)
07
ES
BR
preparación De cappuccino y LaTTe MacchiaTo/ preparanDo cappuccino e LaTTe MacchiaTo
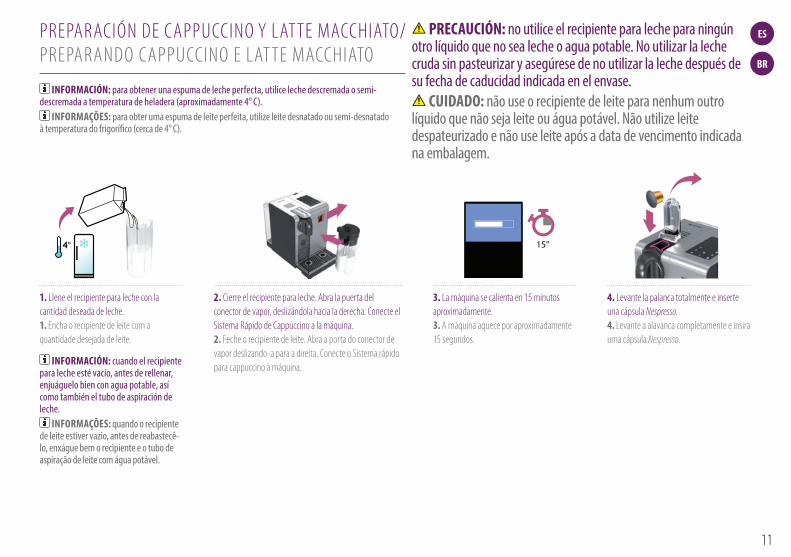
1. Llene el recipiente para leche con la cantidad deseada de leche. 1. encha o recipiente de leite com a quantidade desejada de leite.
2. cierre el recipiente para leche. abra la puerta del conector de vapor, deslizándola hacia la derecha. conecte el sistema rápido de cappuccino a la máquina. 2. Feche o recipiente de leite. abra a porta do conector de vapor deslizando-a para a direita. conecte o sistema rápido para cappuccino à máquina.
3. La máquina se calienta en 15 minutos aproximadamente. 3. a máquina aquece por aproximadamente 15 segundos.
4. Levante la palanca totalmente e inserte una cápsula Nespresso. 4. Levante a alavanca completamente e insira uma cápsula Nespresso.
PRECAuCión: no utilice el recipiente para leche para ningún otro líquido que no sea leche o agua potable. No utilizar la leche cruda sin pasteurizar y asegúrese de no utilizar la leche después de su fecha de caducidad indicada en el envase.
CuiDADo: não use o recipiente de leite para nenhum outro líquido que não seja leite ou água potável. Não utilize leite despateurizado e não use leite após a data de vencimento indicada na embalagem.
infoRmACión: para obtener una espuma de leche perfecta, utilice leche descremada o semi-descremada a temperatura de heladera (aproximadamente 4° C).
infoRmAçõES: para obter uma espuma de leite perfeita, utilize leite desnatado ou semi-desnatado à temperatura do frigorífico (cerca de 4° C).
infoRmACión: cuando el recipiente para leche esté vacío, antes de rellenar, enjuáguelo bien con agua potable, así como también el tubo de aspiración de leche.
infoRmAçõES: quando o recipiente de leite estiver vazio, antes de reabastecê-lo, enxágue bem o recipiente e o tubo de aspiração de leite com água potável.
11
Preparing Cappuccino and Latte Macchiato
4°
i When the milk container is empty, before refilling, thoroughly rinse it and the milk aspiration tube with potable water.
Close the milk container. Open the steam connector door by sliding it to the right. Connect the Rapid Cappuccino System to the machine.
15”
+LATTE MACCHIATO
Clean
15”
i
Remove Rapid Cappuccino System connector by unlocking it from (sign ) to (sign) and pulling it off
Remove the milk container lid and unplug milk aspiration tube.
Remove the milk froth regulator knob by turning it until and pulling it up.
Remove the milk spout by pulling it off.
1 2 3 4
Assembling / disassembling of Rapid Cappuccino system (R.C.S)
RINSE MILK SYSTEM
07 08
ES
BR
preparación De cappuccino y LaTTe MacchiaTo/ preparanDo cappuccino e LaTTe MacchiaTo
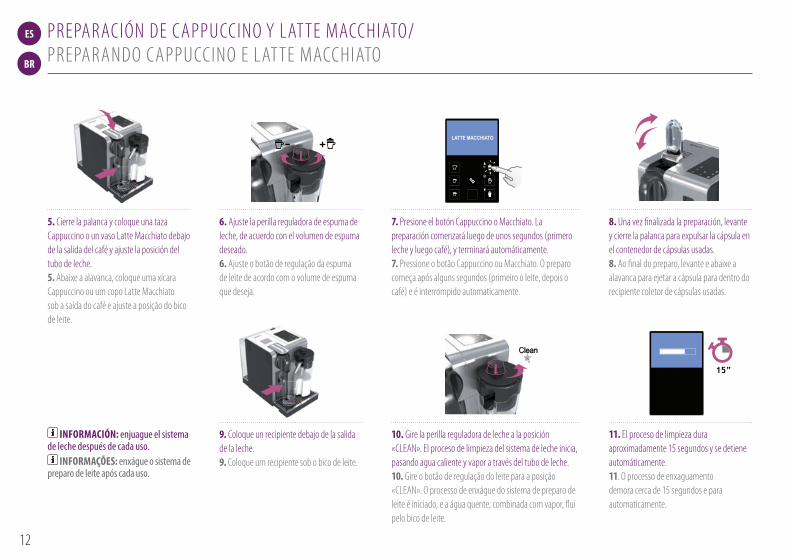
infoRmACión: enjuague el sistema de leche después de cada uso.
infoRmAçõES: enxágue o sistema de preparo de leite após cada uso.
9. coloque un recipiente debajo de la salida de la leche. 9. coloque um recipiente sob o bico de leite.
10. gire la perilla reguladora de leche a la posición «cLean». el proceso de limpieza del sistema de leche inicia, pasando agua caliente y vapor a través del tubo de leche. 10. gire o botão de regulação do leite para a posição «cLean». o processo de enxágue do sistema de preparo de leite é iniciado, e a água quente, combinada com vapor, flui pelo bico de leite.
11. el proceso de limpieza dura aproximadamente 15 segundos y se detiene automáticamente. 11. o processo de enxaguamento demora cerca de 15 segundos e para automaticamente.
5. cierre la palanca y coloque una taza cappuccino o un vaso Latte Macchiato debajo de la salida del café y ajuste la posición del tubo de leche. 5. abaixe a alavanca, coloque uma xícara cappuccino ou um copo Latte Macchiato sob a saída do café e ajuste a posição do bico de leite.
6. ajuste la perilla reguladora de espuma de leche, de acuerdo con el volumen de espuma deseado. 6. ajuste o botão de regulação da espuma de leite de acordo com o volume de espuma que deseja.
7. presione el botón cappuccino o Macchiato. La preparación comenzará luego de unos segundos (primero leche y luego café), y terminará automáticamente. 7. pressione o botão cappuccino ou Macchiato. o preparo começa após alguns segundos (primeiro o leite, depois o café) e é interrompido automaticamente.
8. una vez finalizada la preparación, levante y cierre la palanca para expulsar la cápsula en el contenedor de cápsulas usadas. 8. ao final do preparo, levante e abaixe a alavanca para ejetar a cápsula para dentro do recipiente coletor de cápsulas usadas.
12
PRESS to confirm.The discaling agent flows alternately trough the coffee outlet, hot water nozzle and drip tray.
Descaling
Descaling process: Empty the drip tray and the used capsules container.
Rinsing process: Empty the drip tray and the used capsules container.
Refer to safety precautions
+100 ml500 ml
1 2 3
5 7 8
4
6
Lift and close the lever to eject any capsule in the used capsule container.
Descaling process: Fill water tank with 100 ml of Nespresso descaling agent and 500ml water.
Descaling process: Insert the hot water spout.
Enter the Menu, browse the options and select DESCALING. You will be guided throughout the whole process. Follow machine display instructions.
Descaling process: Place one container of minimum 1 litre under both the coffee outlet and the hot water spout.
4°
Volume factory settings
LANGUAGE
DESCALING
WATER HARDNESS
09 10
ES
BR
preparación De cappuccino y LaTTe MacchiaTo/ preparanDo cappuccino e LaTTe MacchiaTo
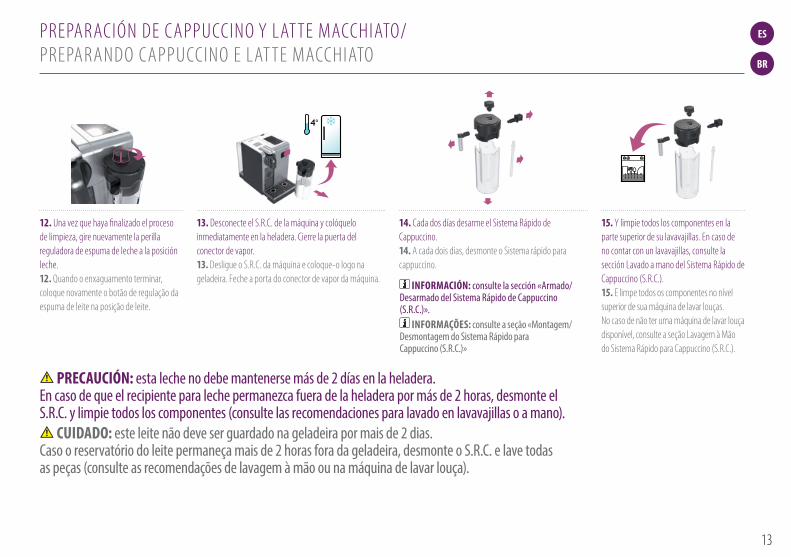
12. una vez que haya finalizado el proceso de limpieza, gire nuevamente la perilla reguladora de espuma de leche a la posición leche. 12. Quando o enxaguamento terminar, coloque novamente o botão de regulação da espuma de leite na posição de leite.
13. Desconecte el s.r.c. de la máquina y colóquelo inmediatamente en la heladera. cierre la puerta del conector de vapor. 13. Desligue o s.r.c. da máquina e coloque-o logo na geladeira. Feche a porta do conector de vapor da máquina.
15. y limpie todos los componentes en la parte superior de su lavavajillas. en caso de no contar con un lavavajillas, consulte la sección Lavado a mano del sistema rápido de cappuccino (s.r.c.). 15. e limpe todos os componentes no nível superior de sua máquina de lavar louças. no caso de não ter uma máquina de lavar louça disponível, consulte a seção Lavagem à Mão do sistema rápido para cappuccino (s.r.c.).
infoRmACión: consulte la sección «Armado/Desarmado del Sistema Rápido de Cappuccino (S.R.C.)».
infoRmAçõES: consulte a seção «Montagem/ Desmontagem do Sistema Rápido para Cappuccino (S.R.C.)»
PRECAuCión: esta leche no debe mantenerse más de 2 días en la heladera. En caso de que el recipiente para leche permanezca fuera de la heladera por más de 2 horas, desmonte el S.R.C. y limpie todos los componentes (consulte las recomendaciones para lavado en lavavajillas o a mano).
CuiDADo: este leite não deve ser guardado na geladeira por mais de 2 dias. Caso o reservatório do leite permaneça mais de 2 horas fora da geladeira, desmonte o S.R.C. e lave todas as peças (consulte as recomendações de lavagem à mão ou na máquina de lavar louça).
14. cada dos días desarme el sistema rápido de cappuccino. 14. a cada dois dias, desmonte o sistema rápido para cappuccino.
13
PRESS to confirm.The discaling agent flows alternately trough the coffee outlet, hot water nozzle and drip tray.
Descaling
Descaling process: Empty the drip tray and the used capsules container.
Rinsing process: Empty the drip tray and the used capsules container.
Refer to safety precautions
+100 ml500 ml
1 2 3
5 7 8
4
6
Lift and close the lever to eject any capsule in the used capsule container.
Descaling process: Fill water tank with 100 ml of Nespresso descaling agent and 500ml water.
Descaling process: Insert the hot water spout.
Enter the Menu, browse the options and select DESCALING. You will be guided throughout the whole process. Follow machine display instructions.
Descaling process: Place one container of minimum 1 litre under both the coffee outlet and the hot water spout.
4°
Volume factory settings
LANGUAGE
DESCALING
WATER HARDNESS
09 10
ES
BR
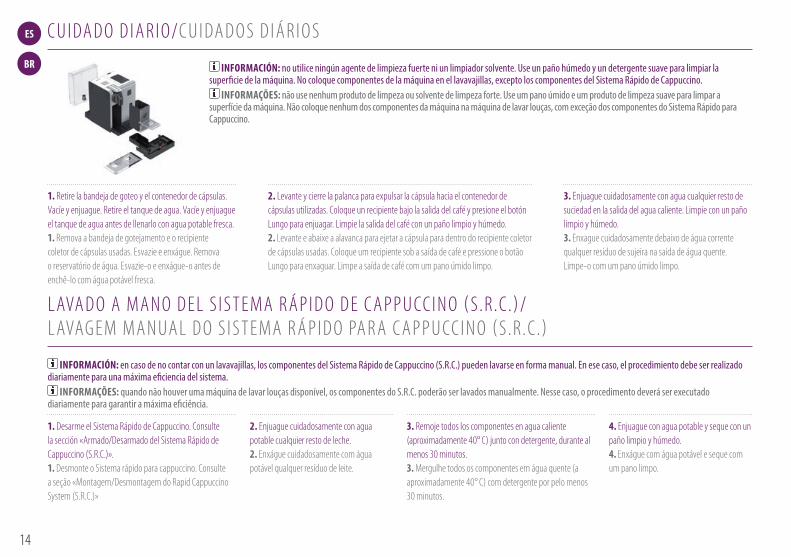
2. Levante y cierre la palanca para expulsar la cápsula hacia el contenedor de cápsulas utilizadas. coloque un recipiente bajo la salida del café y presione el botón Lungo para enjuagar. Limpie la salida del café con un paño limpio y húmedo. 2. Levante e abaixe a alavanca para ejetar a cápsula para dentro do recipiente coletor de cápsulas usadas. coloque um recipiente sob a saída de café e pressione o botão Lungo para enxaguar. Limpe a saída de café com um pano úmido limpo.
3. enjuague cuidadosamente con agua cualquier resto de suciedad en la salida del agua caliente. Limpie con un paño limpio y húmedo. 3. enxague cuidadosamente debaixo de água corrente qualquer resíduo de sujeira na saída de água quente. Limpe-o com um pano úmido limpo.
1. Desarme el sistema rápido de cappuccino. consulte la sección «armado/Desarmado del sistema rápido de cappuccino (s.r.c.)». 1. Desmonte o sistema rápido para cappuccino. consulte a seção «Montagem/Desmontagem do rapid cappuccino system (s.r.c.)»
2. enjuague cuidadosamente con agua potable cualquier resto de leche. 2. enxágue cuidadosamente com água potável qualquer resíduo de leite.
3. remoje todos los componentes en agua caliente (aproximadamente 40° c) junto con detergente, durante al menos 30 minutos. 3. Mergulhe todos os componentes em água quente (a aproximadamente 40° c) com detergente por pelo menos 30 minutos.
4. enjuague con agua potable y seque con un paño limpio y húmedo. 4. enxágue com água potável e seque com um pano limpo.
c u i Da D o D i a r i o/c u i Da D o s D i Á r i o s
infoRmACión: no utilice ningún agente de limpieza fuerte ni un limpiador solvente. Use un paño húmedo y un detergente suave para limpiar la superficie de la máquina. No coloque componentes de la máquina en el lavavajillas, excepto los componentes del Sistema Rápido de Cappuccino.
infoRmAçõES: não use nenhum produto de limpeza ou solvente de limpeza forte. Use um pano úmido e um produto de limpeza suave para limpar a superfície da máquina. Não coloque nenhum dos componentes da máquina na máquina de lavar louças, com exceção dos componentes do Sistema Rápido para Cappuccino.
L aVa D o a Ma n o D e L s i s T e Ma r Á p i D o D e c a p p u cc i n o ( s.r.c.)/ L aVag e M Ma n ua L D o s i s T e Ma r Á p i D o pa r a c a p p u cc i n o ( s.r.c.)
infoRmACión: en caso de no contar con un lavavajillas, los componentes del Sistema Rápido de Cappuccino (S.R.C.) pueden lavarse en forma manual. En ese caso, el procedimiento debe ser realizado diariamente para una máxima eficiencia del sistema.
infoRmAçõES: quando não houver uma máquina de lavar louças disponível, os componentes do S.R.C. poderão ser lavados manualmente. Nesse caso, o procedimento deverá ser executado diariamente para garantir a máxima eficiência.
1. retire la bandeja de goteo y el contenedor de cápsulas. Vacíe y enjuague. retire el tanque de agua. Vacíe y enjuague el tanque de agua antes de llenarlo con agua potable fresca. 1. remova a bandeja de gotejamento e o recipiente coletor de cápsulas usadas. esvazie e enxágue. remova o reservatório de água. esvazie-o e enxágue-o antes de enchê-lo com água potável fresca.
14
PRESS to confirm.The discaling agent flows alternately trough the coffee outlet, hot water nozzle and drip tray.
Descaling
Descaling process: Empty the drip tray and the used capsules container.
Rinsing process: Empty the drip tray and the used capsules container.
Refer to safety precautions
+100 ml500 ml
1 2 3
5 7 8
4
6
Lift and close the lever to eject any capsule in the used capsule container.
Descaling process: Fill water tank with 100 ml of Nespresso descaling agent and 500ml water.
Descaling process: Insert the hot water spout.
Enter the Menu, browse the options and select DESCALING. You will be guided throughout the whole process. Follow machine display instructions.
Descaling process: Place one container of minimum 1 litre under both the coffee outlet and the hot water spout.
4°
Volume factory settings
LANGUAGE
DESCALING
WATER HARDNESS
09 10
ES
BR
noTA: *el volumen de espuma de leche depende del tipo de leche utilizado, de su temperatura y de la posición de la perilla reguladora de leche.
oBSERVAção: *o volume de espuma de leite depende do tipo de leite usado, de sua temperatura e da posição do botão regulador de espuma de leite.
noTA: le recomendamos mantener la configuración de fábrica del Ristretto, Espresso y Lungo para asegurar los mejores resultados en taza para cada una de nuestras variedades de café.
oBSERVAção: recomendamos que mantenha as configurações de origem para as variedades Ristretto, Espresso e Lungo para garantir os melhores resultados na xícara para cada uma das nossas variedades de café.
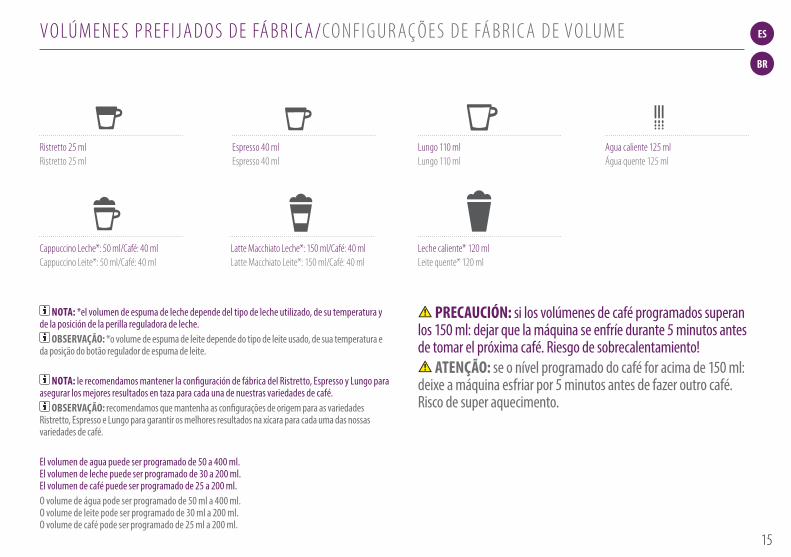
El volumen de agua puede ser programado de 50 a 400 ml. El volumen de leche puede ser programado de 30 a 200 ml. El volumen de café puede ser programado de 25 a 200 ml.O volume de água pode ser programado de 50 ml a 400 ml. O volume de leite pode ser programado de 30 ml a 200 ml. O volume de café pode ser programado de 25 ml a 200 ml.
Vo LÚM e n e s p r e F i j a D o s D e FÁ B r i c a/co n F i g u r açõ e s D e FÁ B r i c a D e Vo LuM e
ristretto 25 ml ristretto 25 ml
cappuccino Leche*: 50 ml/café: 40 ml cappuccino Leite*: 50 ml/café: 40 ml
Lungo 110 ml Lungo 110 ml
Latte Macchiato Leche*: 150 ml/café: 40 ml Latte Macchiato Leite*: 150 ml/café: 40 ml
espresso 40 ml espresso 40 ml
agua caliente 125 ml Água quente 125 ml
Leche caliente* 120 ml Leite quente* 120 ml
PRECAuCión: si los volúmenes de café programados superan los 150 ml: dejar que la máquina se enfríe durante 5 minutos antes de tomar el próxima café. Riesgo de sobrecalentamiento!
ATEnção: se o nível programado do café for acima de 150 ml: deixe a máquina esfriar por 5 minutos antes de fazer outro café. Risco de super aquecimento.
15
+100 ml500 ml
10
+100 ml500 ml
10
+100 ml500 ml
10
+100 ml500 ml
10
+100 ml500 ml
10
+100 ml500 ml
10
+100 ml500 ml
10
+100 ml500 ml
10
ES
BR
D e s c a Lc i F i c ac i ó n/D e s c a Lc i F i c aç ão
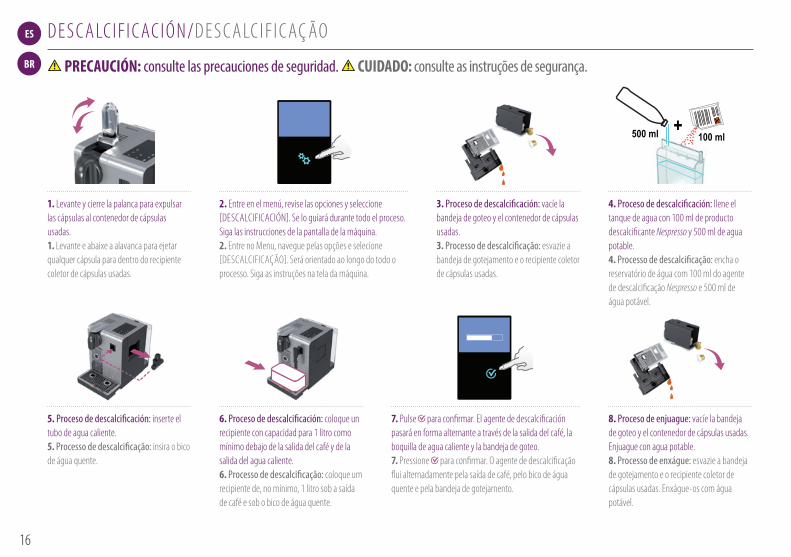
1. Levante y cierre la palanca para expulsar las cápsulas al contenedor de cápsulas usadas. 1. Levante e abaixe a alavanca para ejetar qualquer cápsula para dentro do recipiente coletor de cápsulas usadas.
2. entre en el menú, revise las opciones y seleccione [DescaLciFicación]. se lo guiará durante todo el proceso. siga las instrucciones de la pantalla de la máquina. 2. entre no Menu, navegue pelas opções e selecione [DescaLciFicação]. será orientado ao longo do todo o processo. siga as instruções na tela da máquina.
PRECAuCión: consulte las precauciones de seguridad. CuiDADo: consulte as instruções de segurança.
7. pulse para confirmar. el agente de descalcificación pasará en forma alternante a través de la salida del café, la boquilla de agua caliente y la bandeja de goteo. 7. pressione para confirmar. o agente de descalcificação flui alternadamente pela saída de café, pelo bico de água quente e pela bandeja de gotejamento.
5. Proceso de descalcificación: inserte el tubo de agua caliente. 5. Processo de descalcificação: insira o bico de água quente.
6. Proceso de descalcificación: coloque un recipiente con capacidad para 1 litro como mínimo debajo de la salida del café y de la salida del agua caliente. 6. Processo de descalcificação: coloque um recipiente de, no mínimo, 1 litro sob a saída de café e sob o bico de água quente.
3. Proceso de descalcificación: vacíe la bandeja de goteo y el contenedor de cápsulas usadas. 3. Processo de descalcificação: esvazie a bandeja de gotejamento e o recipiente coletor de cápsulas usadas.
4. Proceso de descalcificación: llene el tanque de agua con 100 ml de producto descalcificante Nespresso y 500 ml de agua potable. 4. Processo de descalcificação: encha o reservatório de água com 100 ml do agente de descalcificação Nespresso e 500 ml de água potável.
8. Proceso de enjuague: vacíe la bandeja de goteo y el contenedor de cápsulas usadas. enjuague con agua potable. 8. Processo de enxágue: esvazie a bandeja de gotejamento e o recipiente coletor de cápsulas usadas. enxágue-os com água potável.
16
max
1”
1
2
3
4
5
11
max
1”
1
2
3
4
5
11
max
1”
1
2
3
4
5
11
max
1”
1
2
3
4
5
11
max
1”
1
2
3
4
5
11
max
1”
1
2
3
4
5
11
max
1”
1
2
3
4
5
11
max
1”
1
2
3
4
5
11
ES
BR
D e s c a Lc i F i c ac i ó n/D e s c a Lc i F i c aç ão
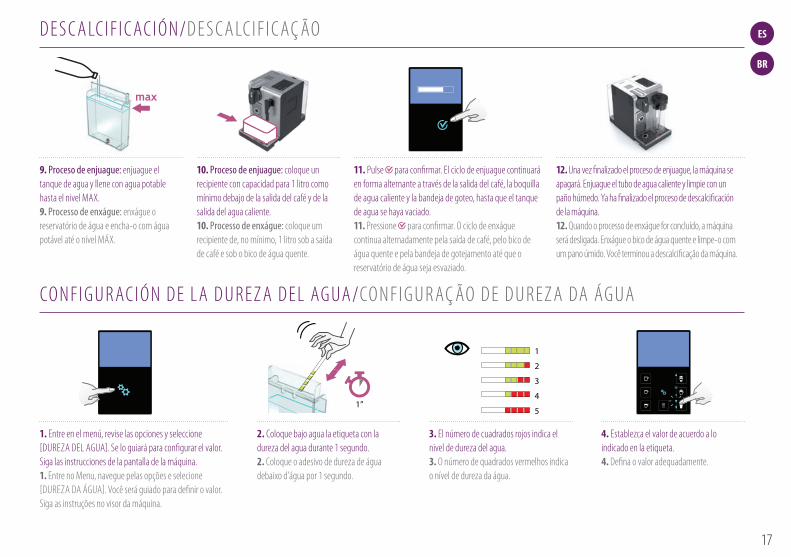
2. coloque bajo agua la etiqueta con la dureza del agua durante 1 segundo. 2. coloque o adesivo de dureza de água debaixo d'água por 1 segundo.
11. pulse para confirmar. el ciclo de enjuague continuará en forma alternante a través de la salida del café, la boquilla de agua caliente y la bandeja de goteo, hasta que el tanque de agua se haya vaciado. 11. pressione para confirmar. o ciclo de enxágue continua alternadamente pela saída de café, pelo bico de água quente e pela bandeja de gotejamento até que o reservatório de água seja esvaziado.
12. una vez finalizado el proceso de enjuague, la máquina se apagará. enjuague el tubo de agua caliente y limpie con un paño húmedo. ya ha finalizado el proceso de descalcificación de la máquina. 12. Quando o processo de enxágue for concluído, a máquina será desligada. enxágue o bico de água quente e limpe-o com um pano úmido. Você terminou a descalcificação da máquina.
3. el número de cuadrados rojos indica el nivel de dureza del agua. 3. o número de quadrados vermelhos indica o nível de dureza da água.
4. establezca el valor de acuerdo a lo indicado en la etiqueta. 4. Defina o valor adequadamente.
co n F i g u r ac i ó n D e L a D u r e z a D e L ag ua/co n F i g u r aç ão D e D u r e z a Da Ág ua
1. entre en el menú, revise las opciones y seleccione [Dureza DeL agua]. se lo guiará para configurar el valor. siga las instrucciones de la pantalla de la máquina. 1. entre no Menu, navegue pelas opções e selecione [Dureza Da Água]. Você será guiado para definir o valor. siga as instruções no visor da máquina.
9. Proceso de enjuague: enjuague el tanque de agua y llene con agua potable hasta el nivel Max. 9. Processo de enxágue: enxágue o reservatório de água e encha-o com água potável até o nível MÁx.
10. Proceso de enjuague: coloque un recipiente con capacidad para 1 litro como mínimo debajo de la salida del café y de la salida del agua caliente. 10. Processo de enxágue: coloque um recipiente de, no mínimo, 1 litro sob a saída de café e sob o bico de água quente.
17
ES
BR
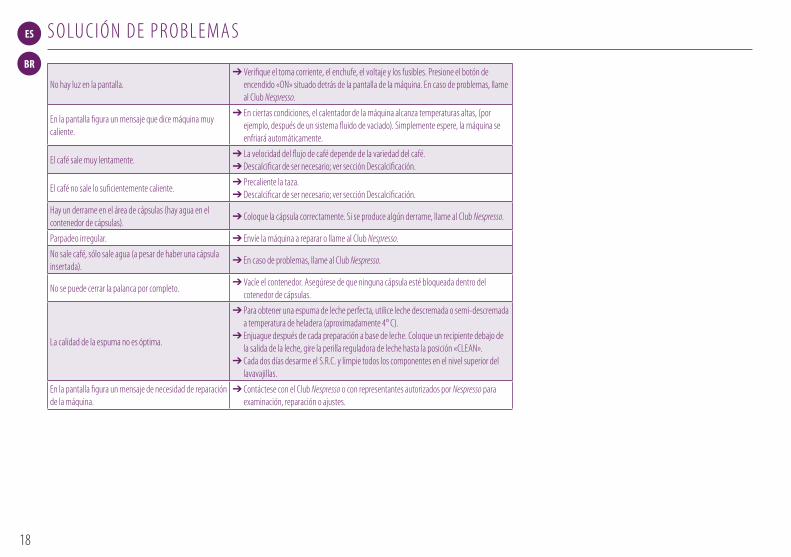
s o Lu c i ó n D e p r o B L e Ma s
no hay luz en la pantalla.➔ Verifique el toma corriente, el enchufe, el voltaje y los fusibles. presione el botón de
encendido «on» situado detrás de la pantalla de la máquina. en caso de problemas, llame al club Nespresso.
en la pantalla figura un mensaje que dice máquina muy caliente.
➔ en ciertas condiciones, el calentador de la máquina alcanza temperaturas altas, (por ejemplo, después de un sistema fluido de vaciado). simplemente espere, la máquina se enfriará automáticamente.
el café sale muy lentamente.➔ La velocidad del flujo de café depende de la variedad del café.➔ Descalcificar de ser necesario; ver sección Descalcificación.
el café no sale lo suficientemente caliente.➔ precaliente la taza.➔ Descalcificar de ser necesario; ver sección Descalcificación.
hay un derrame en el área de cápsulas (hay agua en el contenedor de cápsulas).
➔ coloque la cápsula correctamente. si se produce algún derrame, llame al club Nespresso.
parpadeo irregular. ➔ envíe la máquina a reparar o llame al club Nespresso.no sale café, sólo sale agua (a pesar de haber una cápsula insertada).
➔ en caso de problemas, llame al club Nespresso.
no se puede cerrar la palanca por completo.➔ Vacíe el contenedor. asegúrese de que ninguna cápsula esté bloqueada dentro del
cotenedor de cápsulas.
La calidad de la espuma no es óptima.
➔ para obtener una espuma de leche perfecta, utilice leche descremada o semi-descremada a temperatura de heladera (aproximadamente 4° c).
➔ enjuague después de cada preparación a base de leche. coloque un recipiente debajo de la salida de la leche, gire la perilla reguladora de leche hasta la posición «cLean».
➔ cada dos días desarme el s.r.c. y limpie todos los componentes en el nivel superior del lavavajillas.
en la pantalla figura un mensaje de necesidad de reparación de la máquina.
➔ contáctese con el club Nespresso o con representantes autorizados por Nespresso para examinación, reparación o ajustes.
18
ES
BR
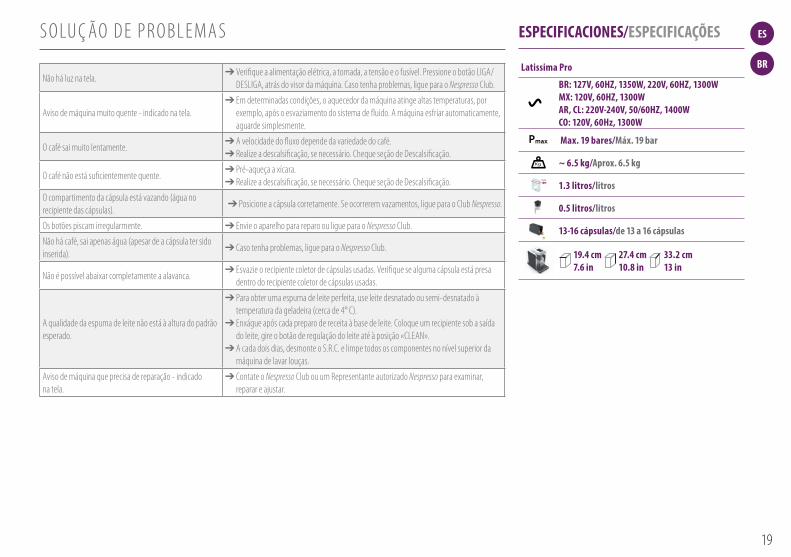
s o Lu ç ão D e p r o B L e Ma s ESPECifiCACionES/ESPECifiCAçõES
não há luz na tela.➔ Verifique a alimentação elétrica, a tomada, a tensão e o fusível. pressione o botão Liga/
DesLiga, atrás do visor da máquina. caso tenha problemas, ligue para o Nespresso club.
aviso de máquina muito quente - indicado na tela.➔ em determinadas condições, o aquecedor da máquina atinge altas temperaturas, por
exemplo, após o esvaziamento do sistema de fluido. a máquina esfriar automaticamente, aguarde simplesmente.
o café sai muito lentamente.➔ a velocidade do fluxo depende da variedade do café.➔ realize a descalsificação, se necessário. cheque seção de Descalsificação.
o café não está suficientemente quente.➔ pré-aqueça a xícara.➔ realize a descalsificação, se necessário. cheque seção de Descalsificação.
o compartimento da cápsula está vazando (água no recipiente das cápsulas).
➔ posicione a cápsula corretamente. se ocorrerem vazamentos, ligue para o club Nespresso.
os botões piscam irregularmente. ➔ envie o aparelho para reparo ou ligue para o Nespresso club.não há café, sai apenas água (apesar de a cápsula ter sido inserida).
➔ caso tenha problemas, ligue para o Nespresso club.
não é possível abaixar completamente a alavanca.➔ esvazie o recipiente coletor de cápsulas usadas. Verifique se alguma cápsula está presa
dentro do recipiente coletor de cápsulas usadas.
a qualidade da espuma de leite não está à altura do padrão esperado.
➔ para obter uma espuma de leite perfeita, use leite desnatado ou semi-desnatado à temperatura da geladeira (cerca de 4° c).
➔ enxágue após cada preparo de receita à base de leite. coloque um recipiente sob a saída do leite, gire o botão de regulação do leite até à posição «cLean».
➔ a cada dois dias, desmonte o s.r.c. e limpe todos os componentes no nível superior da máquina de lavar louças.
aviso de máquina que precisa de reparação - indicado na tela.
➔ contate o Nespresso club ou um representante autorizado Nespresso para examinar, reparar e ajustar.
latissima Pro
EUR,AUS,NZ: 220240 V, 50/60 Hz, 1300 W
US/CA: 120 V, 60 Hz, 1200 W
19 bar
6.5 kg
1,38 litre
500 ml
13-16 capsules
l=19,4 cm . L=33,2 cm . h=27,4 cm
Troubleshooting
Contact the Nespressso Club
For any additional information, in case of problems or simply to seek advise, call the Nespresso Club. Contact details of the Nespresso Club can be found in the 'Welcome to Nespresso' folder in your machine box or at nespresso.com
No light on displayCheck the mains, plug, voltage, and fuse. In case of problems, call the Nespresso Club.
Coffee comes out very slowly.Flow speed depends on the coffee variety.Perform a self check of the machine. Enter the menu list and select Maintenance. Follow instruction
Coffee is not hot enough.Preheat cup.Perform a self check of the machine. Enter the menu list and select Maintenance. Follow instruction
Capsule area is leaking (water in capsule container). Position capsule correctly. If leakages occur, call the Nespresso Club.
Irregular blinking.Send appliance to repair or call the Nespresso Club.
No coffee, just water runs out (despite inserted capsule).In case of problems, call the Nespresso Club.
Lever cannot be closed completelyEmpty capsule container. Make sure that no capsule is blocked inside the capsule container.
Quality of milk froth is not up to standard1) For a perfect milk froth, use skimmed or semi-skimmed milk at refrigerator temperature (about 4° C)2) Rinse after each milk based preparation. Place a recipient under milk outlet, rotate the milk regulator knob until “CLEAN” position.3) Every two days, disassemble the R. C. S. and clean all components in the upper level of a dishwasher
Warranty
Delonghi warrants this product against defects in materials and workmanship for a period of two years from the date of purchase. During this period, Delonghi will either repair or replace, at its discretion, any defective product at no charge to the owner. Replacement products or repaired parts will be guaranteed for only the unexpired portion of the original warranty or six months, whichever is greater. This limited warranty does not apply to any defect resulting from accident, misuse, improper maintenance, or normal wear and tear. Any defect resulting from the usage of non genuine Nespresso capsules will not be covered by this warranty. Except to the extent allowed by applicable law, the terms of this limited warranty do not exclude, restrictor modify, and are in addition to, the mandatory statutory rights applicable to the sale of the product to you. If you believe your product is defective, contact Nespresso for instructions on where to send or bring it for repair. Please visit our website at nespresso.com to discover more about Nespresso
Specifications
Pmax
Once the rinsing process is finished, the machine switches off. Clean the machine using a damp cloth. You have now finished descaling the machine.
9 10 11 12Rinsing process Rinse and fill water with fresh potable water up to MAX level.
Rinsing process Place one container of minimum 1 litre under both the coffee outlet and the hot water spout.
PRESS to confirm.The rinsing cycle continues trough the coffee outlet, hot water spout and drip tray until the water tank is empty.
Water hardness setting
1
programmed buttons blinks 3 times: water hardness is seti
1”2 3 4
1
2
3
4
5
Place the water hardness sticker under water for 1 second.
The number of red squares indicates the water harness level.
Set the value accordinglyEnter the menu, browse the options and select WATER HARDNESS.You will be guided to set the value.Follow machine display instructions.
max
max
Kg
11 12
BR: 127V, 60hz, 1350W, 220V, 60hz, 1300Wmx: 120V, 60hz, 1300WAR, Cl: 220V-240V, 50/60hz, 1400WCo: 120V, 60hz, 1300WEUR,AUS,NZ: 220240 V, 50/60 Hz, 1300 W
US/CA: 120 V, 60 Hz, 1200 W
19 bar
6.5 kg
1,38 litre
500 ml
13-16 capsules
l=19,4 cm . L=33,2 cm . h=27,4 cm
Troubleshooting
Contact the Nespressso Club
For any additional information, in case of problems or simply to seek advise, call the Nespresso Club. Contact details of the Nespresso Club can be found in the 'Welcome to Nespresso' folder in your machine box or at nespresso.com
No light on displayCheck the mains, plug, voltage, and fuse. In case of problems, call the Nespresso Club.
Coffee comes out very slowly.Flow speed depends on the coffee variety.Perform a self check of the machine. Enter the menu list and select Maintenance. Follow instruction
Coffee is not hot enough.Preheat cup.Perform a self check of the machine. Enter the menu list and select Maintenance. Follow instruction
Capsule area is leaking (water in capsule container). Position capsule correctly. If leakages occur, call the Nespresso Club.
Irregular blinking.Send appliance to repair or call the Nespresso Club.
No coffee, just water runs out (despite inserted capsule).In case of problems, call the Nespresso Club.
Lever cannot be closed completelyEmpty capsule container. Make sure that no capsule is blocked inside the capsule container.
Quality of milk froth is not up to standard1) For a perfect milk froth, use skimmed or semi-skimmed milk at refrigerator temperature (about 4° C)2) Rinse after each milk based preparation. Place a recipient under milk outlet, rotate the milk regulator knob until “CLEAN” position.3) Every two days, disassemble the R. C. S. and clean all components in the upper level of a dishwasher
Warranty
Delonghi warrants this product against defects in materials and workmanship for a period of two years from the date of purchase. During this period, Delonghi will either repair or replace, at its discretion, any defective product at no charge to the owner. Replacement products or repaired parts will be guaranteed for only the unexpired portion of the original warranty or six months, whichever is greater. This limited warranty does not apply to any defect resulting from accident, misuse, improper maintenance, or normal wear and tear. Any defect resulting from the usage of non genuine Nespresso capsules will not be covered by this warranty. Except to the extent allowed by applicable law, the terms of this limited warranty do not exclude, restrictor modify, and are in addition to, the mandatory statutory rights applicable to the sale of the product to you. If you believe your product is defective, contact Nespresso for instructions on where to send or bring it for repair. Please visit our website at nespresso.com to discover more about Nespresso
Specifications
Pmax
Once the rinsing process is finished, the machine switches off. Clean the machine using a damp cloth. You have now finished descaling the machine.
9 10 11 12Rinsing process Rinse and fill water with fresh potable water up to MAX level.
Rinsing process Place one container of minimum 1 litre under both the coffee outlet and the hot water spout.
PRESS to confirm.The rinsing cycle continues trough the coffee outlet, hot water spout and drip tray until the water tank is empty.
Water hardness setting
1
programmed buttons blinks 3 times: water hardness is seti
1”2 3 4
1
2
3
4
5
Place the water hardness sticker under water for 1 second.
The number of red squares indicates the water harness level.
Set the value accordinglyEnter the menu, browse the options and select WATER HARDNESS.You will be guided to set the value.Follow machine display instructions.
max
max
Kg
11 12
max. 19 bares/máx. 19 bar
EUR,AUS,NZ: 220240 V, 50/60 Hz, 1300 W
US/CA: 120 V, 60 Hz, 1200 W
19 bar
6.5 kg
1,38 litre
500 ml
13-16 capsules
l=19,4 cm . L=33,2 cm . h=27,4 cm
Troubleshooting
Contact the Nespressso Club
For any additional information, in case of problems or simply to seek advise, call the Nespresso Club. Contact details of the Nespresso Club can be found in the 'Welcome to Nespresso' folder in your machine box or at nespresso.com
No light on displayCheck the mains, plug, voltage, and fuse. In case of problems, call the Nespresso Club.
Coffee comes out very slowly.Flow speed depends on the coffee variety.Perform a self check of the machine. Enter the menu list and select Maintenance. Follow instruction
Coffee is not hot enough.Preheat cup.Perform a self check of the machine. Enter the menu list and select Maintenance. Follow instruction
Capsule area is leaking (water in capsule container). Position capsule correctly. If leakages occur, call the Nespresso Club.
Irregular blinking.Send appliance to repair or call the Nespresso Club.
No coffee, just water runs out (despite inserted capsule).In case of problems, call the Nespresso Club.
Lever cannot be closed completelyEmpty capsule container. Make sure that no capsule is blocked inside the capsule container.
Quality of milk froth is not up to standard1) For a perfect milk froth, use skimmed or semi-skimmed milk at refrigerator temperature (about 4° C)2) Rinse after each milk based preparation. Place a recipient under milk outlet, rotate the milk regulator knob until “CLEAN” position.3) Every two days, disassemble the R. C. S. and clean all components in the upper level of a dishwasher
Warranty
Delonghi warrants this product against defects in materials and workmanship for a period of two years from the date of purchase. During this period, Delonghi will either repair or replace, at its discretion, any defective product at no charge to the owner. Replacement products or repaired parts will be guaranteed for only the unexpired portion of the original warranty or six months, whichever is greater. This limited warranty does not apply to any defect resulting from accident, misuse, improper maintenance, or normal wear and tear. Any defect resulting from the usage of non genuine Nespresso capsules will not be covered by this warranty. Except to the extent allowed by applicable law, the terms of this limited warranty do not exclude, restrictor modify, and are in addition to, the mandatory statutory rights applicable to the sale of the product to you. If you believe your product is defective, contact Nespresso for instructions on where to send or bring it for repair. Please visit our website at nespresso.com to discover more about Nespresso
Specifications
Pmax
Once the rinsing process is finished, the machine switches off. Clean the machine using a damp cloth. You have now finished descaling the machine.
9 10 11 12Rinsing process Rinse and fill water with fresh potable water up to MAX level.
Rinsing process Place one container of minimum 1 litre under both the coffee outlet and the hot water spout.
PRESS to confirm.The rinsing cycle continues trough the coffee outlet, hot water spout and drip tray until the water tank is empty.
Water hardness setting
1
programmed buttons blinks 3 times: water hardness is seti
1”2 3 4
1
2
3
4
5
Place the water hardness sticker under water for 1 second.
The number of red squares indicates the water harness level.
Set the value accordinglyEnter the menu, browse the options and select WATER HARDNESS.You will be guided to set the value.Follow machine display instructions.
max
max
Kg
11 12
~ 6.5 kg/Aprox. 6.5 kg
1.3 litros/litros
0.5 litros/litros
13-16 cápsulas/de 13 a 16 cápsulas
19.4 cm 27.4 cm 33.2 cm 7.6 in 10.8 in 13 in
19
ES
BR
para cualquier información adicional, en caso de problemas o simplemente para buscar asesoramiento, llame al club Nespresso. encontrará los datos de contacto del club Nespresso en la carpeta «Bienvenido a Nespresso», que viene en la caja de la máquina, o en nespresso.com
para obter informações adicionais, em caso de problemas ou simplesmente para obter aconselhamento, ligue para o Nespresso club. as informações de contato do clube Nespresso podem ser encontradas na pasta «Bem-vindo à Nespresso», na caixa da sua máquina ou em www.nespresso.com
co n Tac T e e L c Lu B NESPRESSO/co n TaTo co M o NESPRESSO c Lu B
e L i M i n ac i ó n D e r e s i D u o s y co n c i e n c i a e co Ló g i c a/ D e s c a rT e e p r e o c u paçõ e s e co Ló g i c a s
Eliminación de residuos y Protección Ambiental su electrodoméstico contiene materiales que pueden ser recuperados o reciclados. La separación de los materiales de desecho en diferentes tipos, facilita el reciclado de materia prima valiosa. Deje el electrodoméstico en un punto de recolección. solicite información sobre la eliminación de residuos a las autoridades locales.
Descarte e proteção ambiental seu aparelho contém materiais valiosos que podem ser recuperados ou reciclados. a separação dos resíduos restantes por tipo facilita a reciclagem de matérias-primas valiosas. Leve-os a um ponto de coleta. Você pode obter mais informações sobre descarte com as autoridades locais responsáveis.
20
ES
BR
g a r a n T í a/g a r a n T i a
Nespresso garantiza este producto contra defectos materiales y de fabricación por un período de 1 año. el período de garantía comienza en la fecha de compra y Nespresso requiere la presentación del comprobante de compra original para corroborar dicha fecha.Durante este período, Nespresso reparará o reemplazará, a su criterio, cualquier producto defectuoso. esta máquina cumple con la Directiva eu 1999/44/ec.Los productos reemplazados o las piezas reparadas estarán bajo garantía sólo por el período de garantía original que no hubiera expirado o por seis meses desde la fecha de reparación, rigiendo de estos dos períodos el que sea mayor. La presente garantía limitada no se aplica a todos los desperfectos causados por negligencia, accidente, mal uso, o cualquier otro motivo fuera del control razonable de Nespresso, incluyendo pero no limitado a: uso y desgaste normal, negligencia o incumplimiento de las instrucciones del producto, mantenimiento incorrecto o inadecuado, acumulación de calcio o descalcificación, conexión a fuente de energía inadecuada, modificación o reparación del producto no autorizada, uso para fines comerciales; incendio, tormentas, inundaciones u otras causas externas. esta garantía sólo será válida en el país de compra o en los demás países en los que Nespresso comercialice y provea los servicios del mismo modelo, con idénticas especificaciones técnicas. el servicio de garantía fuera del país de compra estará limitado a los términos y condiciones de la correspondiente garantía del país en cuestión. cuando el costo de las reparaciones o reemplazo no sea cubierto por esta garantía, Nespresso lo comunicará al propietario y el costo estará a cargo del mismo. esta garantía limitada tendrá el alcance de la responsabilidad de Nespresso, cual fuere su causa. hasta el alcance permitido por la ley aplicable, las condiciones de la presente garantía limitada no excluyen, limitan ni modifican los derechos legales obligatorios aplicables a la venta de este producto, sino que se suman a aquellos derechos. La garantía limitada aplica únicamente a este producto Nespresso de marca única. Los productos que posean la marca Nespresso y la marca de otro fabricante, estarán exclusivamente bajo la garantía provista por el otro fabricante. si considera que su producto posee alguna falla, por favor contáctese con Nespresso y recibirá las instrucciones para que el mismo sea reparado. cualquier defecto o disfunción que resulte del uso de cápsulas que no sean las cápsulas originales de Nespresso, no serán cubiertos por esta garantía. por favor visite nuestra página web www.nespresso.com para detalles de contacto.
a Nespresso garante este produto contra defeitos de materiais e fabricação por um período de 1 ano. o período de garantia começa na data da compra, e a Nespresso exige a apresentação da nota fiscal original de compra para determinar a data. Durante o período de garantia, a Nespresso irá reparar ou substituir, a seu critério, qualquer produto com defeito. este aparelho está em conformidade com a Diretiva da ue 1999/44/ec. os produtos de reposição ou as peças consertadas terão garantia apenas durante o período restante da garantia original ou por seis meses, o que for maior. esta garantia limitada não se aplica a nenhum defeito resultante de negligência, acidente, uso incorreto ou outro motivo fora do controle razoável da Nespresso, incluindo, sem limitação: desgaste causado pelo uso normal, negligência ou não observação das instruções do produto, manutenção indevida ou inadequada, depósitos de cálcio ou descalcificação; conexão a fontes de alimentação inadequadas; modificação ou reparo não autorizado do produto; uso para fins comerciais; incêndios, raios, inundações ou outros motivos externos. esta garantia é válida apenas no país de aquisição ou em outros países nos quais a Nespresso comercialize e faça a manutenção do mesmo modelo, com especificações técnicas idênticas. o serviço de garantia fora do país de aquisição está limitado aos termos e condições da garantia correspondente no país de serviço. nos casos em que o custo dos reparos ou da substituição não sejam cobertos por esta garantia, a Nespresso fornecerá aconselhamento ao proprietário, sendo os custos de responsabilidade do proprietário. esta garantia limitada representará a extensão total da responsabilidade da Nespresso, seja qual for o motivo. com exceção do que for permitido pelas leis aplicáveis, os termos desta garantia limitada não excluem, restringem ou alteram os direitos estatutários obrigatórios aplicáveis à venda deste produto e são um adendo a eles. a garantia limitada se aplica apenas a este produto com a marca única Nespresso. os produtos com a marca Nespresso e também com a marca de outro fabricante são regidos exclusivamente pela garantia fornecida por esse outro fabricante. caso acredite que seu produto esteja com defeito, entre em contato com a Nespresso para obter instruções sobre como proceder quanto ao reparo. nenhum defeito ou disfunção resultante do uso de cápsulas que não sejam originais da Nespresso será coberto por esta garantia. Visite nosso site, em www.nespresso.com, para ver os detalhes de contato.www.nespresso.com, for kontaktopplysninger.
21
EN
FR
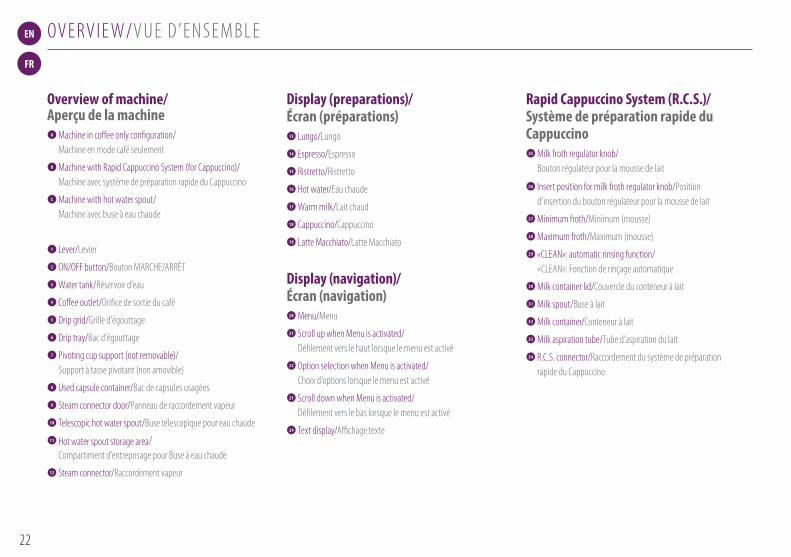
oV e rV i e W/V u e D’e n s e M B L e
Display (preparations)/ écran (préparations)
13 Lungo/Lungo14 espresso/espresso15 ristretto/ristretto16 hot water/eau chaude17 Warm milk/Lait chaud 18 cappuccino/cappuccino 19 Latte Macchiato/Latte Macchiato
Display (navigation)/ écran (navigation)
20 Menu/Menu21 scroll up when Menu is activated/
Défilement vers le haut lorsque le menu est activé22 option selection when Menu is activated/
choix d’options lorsque le menu est activé23 scroll down when Menu is activated/
Défilement vers le bas lorsque le menu est activé24 Text display/affichage texte
Rapid Cappuccino System (R.C.S.)/ Système de préparation rapide du Cappuccino
25 Milk froth regulator knob/ Bouton régulateur pour la mousse de lait
26 insert position for milk froth regulator knob/position d’insertion du bouton régulateur pour la mousse de lait
27 Minimum froth/Minimum (mousse)28 Maximum froth/Maximum (mousse)29 «cLean»: automatic rinsing function/
«cLean»: Fonction de rinçage automatique30 Milk container lid/couvercle du conteneur à lait31 Milk spout/Buse à lait32 Milk container/conteneur à lait33 Milk aspiration tube/Tube d’aspiration du lait34 r.c.s. connector/raccordement du système de préparation
rapide du cappuccino
overview of machine/ Aperçu de la machine
A Machine in coffee only configuration/ Machine en mode café seulement
B Machine with rapid cappuccino system (for cappuccino)/Machine avec système de préparation rapide du cappuccino
C Machine with hot water spout/ Machine avec buse à eau chaude
1 Lever/Levier2 on/oFF button/Bouton Marche/arrÊT3 Water tank/réservoir d’eau4 coffee outlet/orifice de sortie du café 5 Drip grid/grille d’égouttage6 Drip tray/Bac d’égouttage7 pivoting cup support (not removable)/
support à tasse pivotant (non amovible)8 used capsule container/Bac de capsules usagées9 steam connector door/panneau de raccordement vapeur
10 Telescopic hot water spout/Buse télescopique pour eau chaude11 hot water spout storage area/
compartiment d’entreposage pour Buse à eau chaude12 steam connector/raccordement vapeur
22
EN
FR
co n T e n T/co n T e n u
Nespresso is an exclusive system creating the perfect espresso, time after time. all Nespresso machines are equipped with a unique extraction system that guarantees up to 19 bars of pressure. each parameter has been calculated with great precision to ensure that all the aromas from each grand cru can be extracted, to give the coffee body and create an exceptionally thick and smooth crema.
Nespresso, un système exclusif pour reproduire à l’infini un espresso parfait. Toutes les machines Nespresso sont équipées d’un système d’extraction unique à très haute pression (jusqu’à 19 bars). chaque paramètre est calculé avec précision pour révéler la totalité des arômes de chaque grand cru, lui donner du corps et générer une crème de café d’une densité et d’une onctuosité incomparables.
DESCAling/DéTARTRAgE .............................................................................WATER hARDnESS SETTing/niVEAu DE DuRETé DE l’EAu ..............................TRouBlEShooTing/DéPAnnAgE ..................................................................SPECifiCATionS/SPéCifiCATionS .................................................................DiSPoSAl AnD ECologiCAl ConCERnS/ RECYClAgE ET PRoTECTion DE l’EnViRonnEmEnT ....................................... ConTACT ThE NESPRESSO CluB/CommuniQuEz AVEC lE CluB NESPRESSO ......WARRAnTY/gARAnTiE ..................................................................................
oVERViEW/VuE D'EnSEmBlE ............................................................................PACkAging ConTEnT/ConTEnu DE l‘EmBAllAgE ..............................................mEnu nAVigATion/nAVigATion (mEnu) ..........................................................mEnu liST/mEnu PRinCiPAl ............................................................................fiRST uSE oR AfTER A long PERioD of non-uSE/PREmièRE uTiliSATion ou APRèS unE longuE PéRioDE D’inuTiliSATion .................................................CoffEE PREPARATion/PRéPARATion Du CAfé ..................................................ASSEmBling/DiSASSEmBling of RAPiD CAPPuCCino SYSTEm (R.C.S.)/ monTER/DémonTER lE SYSTèmE DE PRéPARATion RAPiDE Du CAPPuCCino .....PREPARing CAPPuCCino AnD lATTE mACChiATo/ PRéPARATion – CAPPuCCino ET lATTE mACChiATo ..........................................DAilY CARE/EnTRETiEn QuoTiDiEn ..................................................................hAnD WAShing of RAPiD CAPPuCCino SYSTEm (R.C.S.)/nETToYAgE à lA mAin Du SYSTèmE DE PRéPARATion RAPiDE Du CAPPuCCino .....................................VolumE fACToRY SETTingS/QuAnTiTéS PAR DéfAuT ........................................
34353637
38 38 39
CAuTion: when you see this sign, please refer to the Important Safeguards to avoid possible harm and damage. infoRmATion: when you see this sign, please take note of the advice for the correct and safe usage of your coffee machine. AVERTiSSEmEnT: Lorsque ce symbole apparaît, veuillez consulter les consignes de sécurité pour éviter d’éventuels dangers et dommages. infoRmATion: Lorsque vous voyez ce symbole, veuillez prendre note des conseils pour utiliser votre machine à café de façon correcte
et sécuritaire.
22242425
2628
28
2932
3233
23
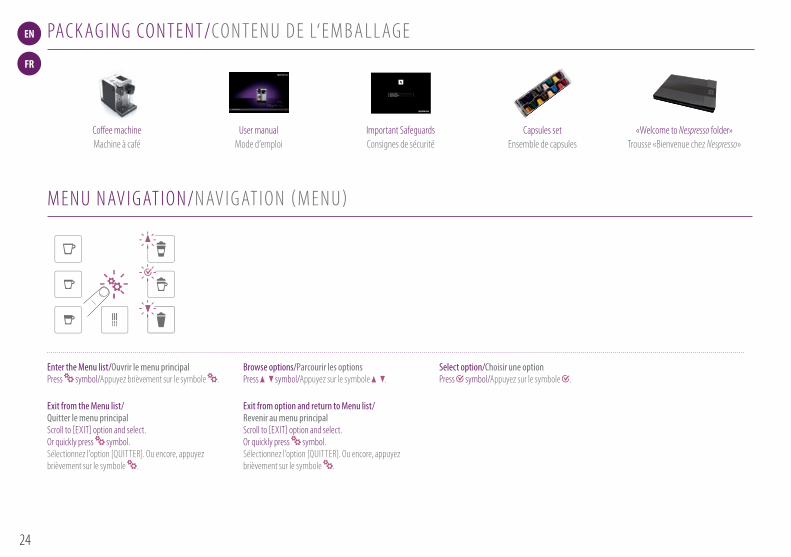
EN IMPORTANT SAFEGUARDS ........................................................................ 2 FR CONSIGNES DE SECURITE ......................................................................... 3 ES PRECAUCIONES DE SEGURIDAD ................................................................ 4 BR MEDIDAS DE SEGURANÇA......................................................................... 6
EN
FR
M e n u n aV i g aT i o n/n aV i g aT i o n ( M e n u )
pac k ag i n g co n T e n T/co n T e n u D e L‘e M B a L L ag e
coffee machineMachine à café
«Welcome to Nespresso folder»Trousse «Bienvenue chez Nespresso»
user manual Mode d’emploi
important safeguards consignes de sécurité
capsules set ensemble de capsules
Enter the Menu list/Ouvrir le menu principal press symbol/appuyez brièvement sur le symbole .
Browse options/Parcourir les options press symbol/appuyez sur le symbole .
Select option/Choisir une option press symbol/appuyez sur le symbole .
Exit from the Menu list/ Quitter le menu principal scroll to [exiT] option and select. or quickly press symbol. sélectionnez l’option [QuiTTer]. ou encore, appuyez brièvement sur le symbole .
Exit from option and return to Menu list/ Revenir au menu principal scroll to [exiT] option and select. or quickly press symbol. sélectionnez l’option [QuiTTer]. ou encore, appuyez brièvement sur le symbole .
24
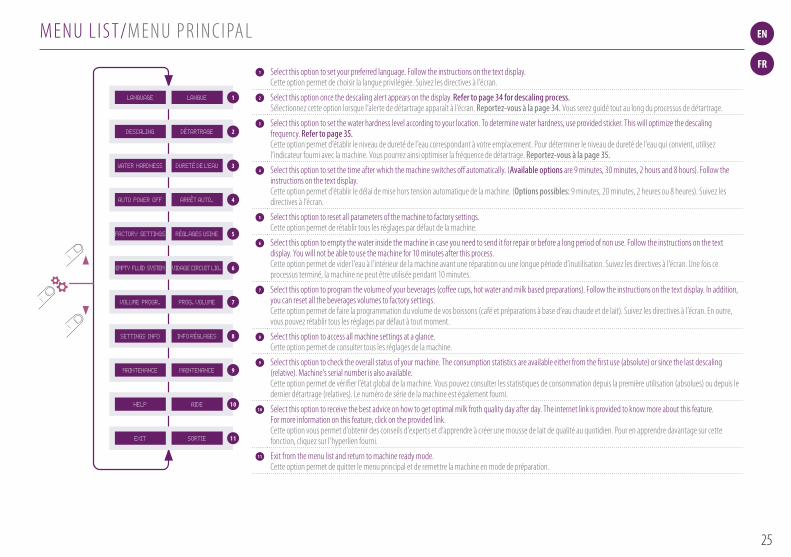
EN
FR
M e n u L i s T/M e n u p r i n c i pa L
1 select this option to set your preferred language. Follow the instructions on the text display. cette option permet de choisir la langue privilégiée. suivez les directives à l’écran.
2 select this option once the descaling alert appears on the display. Refer to page 34 for descaling process. sélectionnez cette option lorsque l’alerte de détartrage apparaît à l’écran. Reportez-vous à la page 34. Vous serez guidé tout au long du processus de détartrage.
3 select this option to set the water hardness level according to your location. To determine water hardness, use provided sticker. This will optimize the descaling frequency. Refer to page 35. cette option permet d’établir le niveau de dureté de l’eau correspondant à votre emplacement. pour déterminer le niveau de dureté de l’eau qui convient, utilisez l’indicateur fourni avec la machine. Vous pourrez ainsi optimiser la fréquence de détartrage. Reportez-vous à la page 35.
4 select this option to set the time after which the machine switches off automatically. (Available options are 9 minutes, 30 minutes, 2 hours and 8 hours). Follow the instructions on the text display. cette option permet d’établir le délai de mise hors tension automatique de la machine. (Options possibles: 9 minutes, 20 minutes, 2 heures ou 8 heures). suivez les directives à l’écran.
5 select this option to reset all parameters of the machine to factory settings. cette option permet de rétablir tous les réglages par défaut de la machine.
6 select this option to empty the water inside the machine in case you need to send it for repair or before a long period of non use. Follow the instructions on the text display. you will not be able to use the machine for 10 minutes after this process. cette option permet de vider l’eau à l’intérieur de la machine avant une réparation ou une longue période d’inutilisation. suivez les directives à l’écran. une fois ce processus terminé, la machine ne peut être utilisée pendant 10 minutes.
7 select this option to program the volume of your beverages (coffee cups, hot water and milk based preparations). Follow the instructions on the text display. in addition, you can reset all the beverages volumes to factory settings. cette option permet de faire la programmation du volume de vos boissons (café et préparations à base d’eau chaude et de lait). suivez les directives à l’écran. en outre, vous pouvez rétablir tous les réglages par défaut à tout moment.
8 select this option to access all machine settings at a glance. cette option permet de consulter tous les réglages de la machine.
9 select this option to check the overall status of your machine. The consumption statistics are available either from the first use (absolute) or since the last descaling (relative). Machine's serial number is also available. cette option permet de vérifier l’état global de la machine. Vous pouvez consulter les statistiques de consommation depuis la première utilisation (absolues) ou depuis le dernier détartrage (relatives). Le numéro de série de la machine est également fourni.
10 select this option to receive the best advice on how to get optimal milk froth quality day after day. The internet link is provided to know more about this feature. For more information on this feature, click on the provided link. cette option vous permet d’obtenir des conseils d’experts et d’apprendre à créer une mousse de lait de qualité au quotidien. pour en apprendre davantage sur cette fonction, cliquez sur l’hyperlien fourni.
11 exit from the menu list and return to machine ready mode. cette option permet de quitter le menu principal et de remettre la machine en mode de préparation.
1laNguelaNguage
2détartragedescaliNg
3dureté de l'eauwater hardNess
4arrêt auto.auto Power off
5réglages usiNefactorY settiNgs
6vidage circuit liq.emPtY fluid sYstem
7Prog. volumevolume Progr.
8iNfo réglagessettiNgs iNfo
9maiNteNaNcemaiNteNaNce
10aidehelP
11sortieexit
25
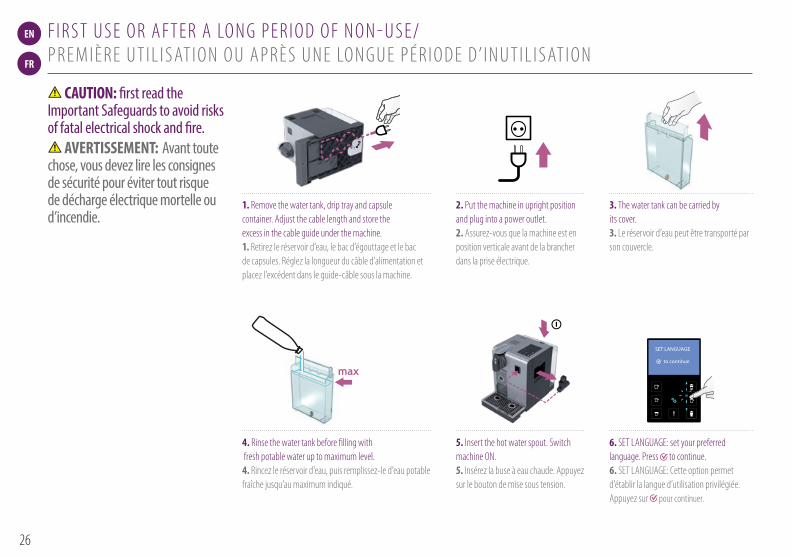
EN
FR
F i r s T u s e o r a F T e r a Lo n g p e r i o D o F n o n - u s e/ p r e M i è r e u T i L i s aT i o n o u a p r è s u n e Lo n g u e p é r i o D e D’ i n u T i L i s aT i o n
CAuTion: first read the Important Safeguards to avoid risks of fatal electrical shock and fire.
AVERTiSSEmEnT: Avant toute chose, vous devez lire les consignes de sécurité pour éviter tout risque de décharge électrique mortelle ou d’incendie.
1. remove the water tank, drip tray and capsule container. adjust the cable length and store the excess in the cable guide under the machine. 1. retirez le réservoir d’eau, le bac d’égouttage et le bac de capsules. réglez la longueur du câble d’alimentation et placez l’excédent dans le guide-câble sous la machine.
5. insert the hot water spout. switch machine on. 5. insérez la buse à eau chaude. appuyez sur le bouton de mise sous tension.
2. put the machine in upright position and plug into a power outlet. 2. assurez-vous que la machine est en position verticale avant de la brancher dans la prise électrique.
6. seT Language: set your preferred language. press to continue. 6. seT Language: cette option permet d’établir la langue d’utilisation privilégiée. appuyez sur pour continuer.
3. The water tank can be carried by its cover. 3. Le réservoir d’eau peut être transporté par son couvercle.
4. rinse the water tank before filling with fresh potable water up to maximum level. 4. rincez le réservoir d’eau, puis remplissez-le d’eau potable fraîche jusqu’au maximum indiqué.
max
SET LANGUAGE
to continue
LANGUAGEActual value : EN
New value : [ ] to select
05
max
SET LANGUAGE
to continue
LANGUAGEActual value : EN
New value : [ ] to select
05
max
SET LANGUAGE
to continue
LANGUAGEActual value : EN
New value : [ ] to select
05
max
SET LANGUAGE
to continue
LANGUAGEActual value : EN
New value : [ ] to select
05
max
SET LANGUAGE
to continue
LANGUAGEActual value : EN
New value : [ ] to select
05
max
SET LANGUAGE
to continue
LANGUAGEActual value : EN
New value : [ ] to select
05
26
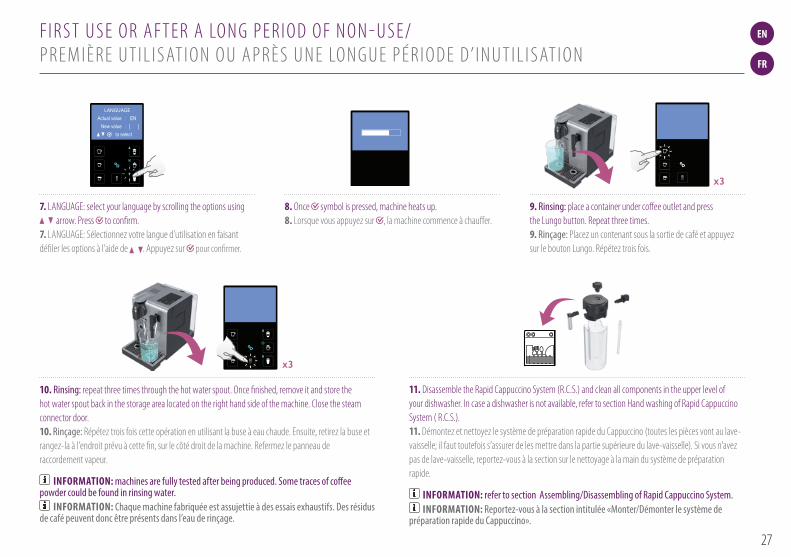
max
First read the safety precautions to avoid risks of fatal electrical shock and fire
Remove the plastic films from grid, lever and machine panels.
Remove the water tank, drip tray, and capsule container. Adjust the cable length and store the excess in the cable guide under the machine.
Put the machine in upright position, plug machine into mains.
The water tank can be carried by its cover.
Rinse the water tank before filling with potable water up to maximum level.
Insert the hot water spout. Switch machine ON
Set your preferred language.Press to continue.
SET LANGUAGE
to continue
Select your language by scrolling the options using up/down arrow. Press to confirm.
LANGUAGE
Actual value : EN
New value : [ ]
to select
Coffee preparation
x3x3
110 ml
40 ml
25 ml
05 06
8. once symbol is pressed, machine heats up. 8. Lorsque vous appuyez sur , la machine commence à chauffer.
EN
FR
F i r s T u s e o r a F T e r a Lo n g p e r i o D o F n o n - u s e/ p r e M i è r e u T i L i s aT i o n o u a p r è s u n e Lo n g u e p é r i o D e D’ i n u T i L i s aT i o n
infoRmATion: refer to section Assembling/Disassembling of Rapid Cappuccino System. infoRmATion: Reportez-vous à la section intitulée «Monter/Démonter le système de
préparation rapide du Cappuccino».
11. Disassemble the rapid cappuccino system (r.c.s.) and clean all components in the upper level of your dishwasher. in case a dishwasher is not available, refer to section hand washing of rapid cappuccino system ( r.c.s.). 11. Démontez et nettoyez le système de préparation rapide du cappuccino (toutes les pièces vont au lave-vaisselle; il faut toutefois s’assurer de les mettre dans la partie supérieure du lave-vaisselle). si vous n’avez pas de lave-vaisselle, reportez-vous à la section sur le nettoyage à la main du système de préparation rapide.
10. Rinsing: repeat three times through the hot water spout. once finished, remove it and store the hot water spout back in the storage area located on the right hand side of the machine. close the steam connector door. 10. Rinçage: répétez trois fois cette opération en utilisant la buse à eau chaude. ensuite, retirez la buse et rangez-la à l’endroit prévu à cette fin, sur le côté droit de la machine. refermez le panneau de raccordement vapeur.
9. Rinsing: place a container under coffee outlet and press the Lungo button. repeat three times. 9. Rinçage: placez un contenant sous la sortie de café et appuyez sur le bouton Lungo. répétez trois fois.
7. Language: select your language by scrolling the options using arrow. press to confirm.
7. Language: sélectionnez votre langue d’utilisation en faisant défiler les options à l’aide de . appuyez sur pour confirmer.
infoRmATion: machines are fully tested after being produced. Some traces of coffee powder could be found in rinsing water.
infoRmATion: Chaque machine fabriquée est assujettie à des essais exhaustifs. Des résidus de café peuvent donc être présents dans l’eau de rinçage.
max
SET LANGUAGE
to continue
LANGUAGEActual value : EN
New value : [ ] to select
05
4°15”
Assembling / disassembling of Rapid Cappuccino system (R.C.S)
07
27
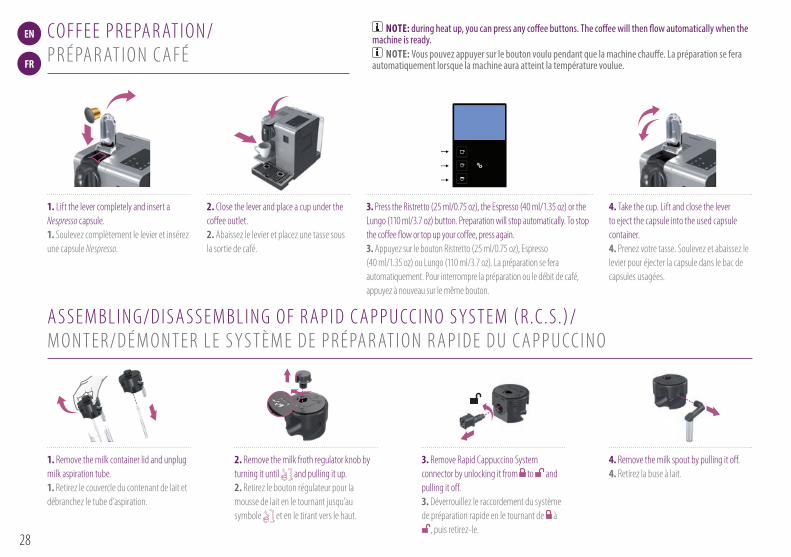
max
First read the safety precautions to avoid risks of fatal electrical shock and fire
Remove the plastic films from grid, lever and machine panels.
Remove the water tank, drip tray, and capsule container. Adjust the cable length and store the excess in the cable guide under the machine.
Put the machine in upright position, plug machine into mains.
The water tank can be carried by its cover.
Rinse the water tank before filling with potable water up to maximum level.
Insert the hot water spout. Switch machine ON
Set your preferred language.Press to continue.
SET LANGUAGE
to continue
Select your language by scrolling the options using up/down arrow. Press to confirm.
LANGUAGE
Actual value : EN
New value : [ ]
to select
Coffee preparation
x3x3
110 ml
40 ml
25 ml
05 06
4°15”
Assembling / disassembling of Rapid Cappuccino system (R.C.S)
07
EN
FR
co F F e e p r e pa r aT i o n/ p r é pa r aT i o n c a F é
a s s e M B L i n g/D i s a s s e M B L i n g o F r a p i D c a p p u cc i n o s ys T e M ( r.c.s .)/ M o n T e r/D é M o n T e r L e s ys T è M e D e p r é pa r aT i o n r a p i D e D u c a p p u cc i n o
1. Lift the lever completely and insert a Nespresso capsule. 1. soulevez complètement le levier et insérez une capsule Nespresso.
2. close the lever and place a cup under the coffee outlet. 2. abaissez le levier et placez une tasse sous la sortie de café.
3. press the ristretto (25 ml/0.75 oz), the espresso (40 ml/1.35 oz) or the Lungo (110 ml/3.7 oz) button. preparation will stop automatically. To stop the coffee flow or top up your coffee, press again. 3. appuyez sur le bouton ristretto (25 ml/0.75 oz), espresso (40 ml/1.35 oz) ou Lungo (110 ml/3.7 oz). La préparation se fera automatiquement. pour interrompre la préparation ou le débit de café, appuyez à nouveau sur le même bouton.
4. Take the cup. Lift and close the lever to eject the capsule into the used capsule container. 4. prenez votre tasse. soulevez et abaissez le levier pour éjecter la capsule dans le bac de capsules usagées.
1. remove the milk container lid and unplug milk aspiration tube. 1. retirez le couvercle du contenant de lait et débranchez le tube d’aspiration.
4. remove the milk spout by pulling it off. 4. retirez la buse à lait.
2. remove the milk froth regulator knob by turning it until and pulling it up. 2. retirez le bouton régulateur pour la mousse de lait en le tournant jusqu’au symbole et en le tirant vers le haut.
3. remove rapid cappuccino system connector by unlocking it from to and pulling it off. 3. Déverrouillez le raccordement du système de préparation rapide en le tournant de à
, puis retirez-le.
noTE: during heat up, you can press any coffee buttons. The coffee will then flow automatically when the machine is ready.
noTE: Vous pouvez appuyer sur le bouton voulu pendant que la machine chauffe. La préparation se fera automatiquement lorsque la machine aura atteint la température voulue.
28
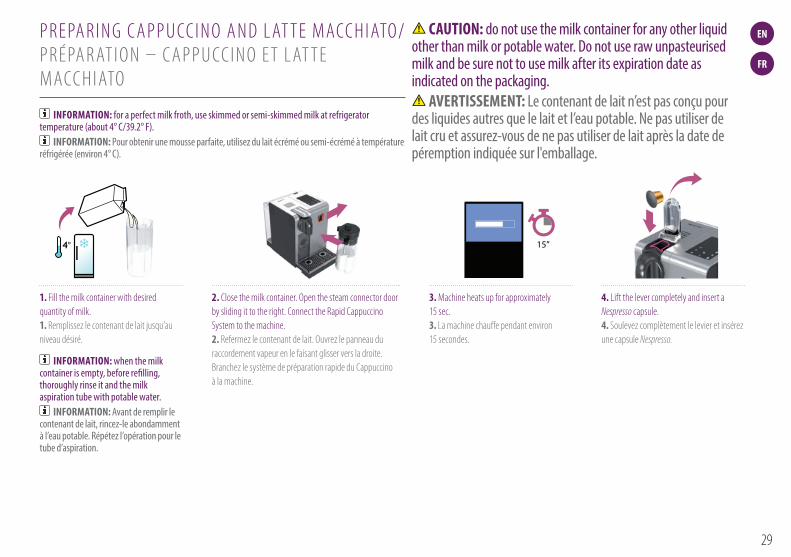
4°15”
Assembling / disassembling of Rapid Cappuccino system (R.C.S)
07
4°15”
Assembling / disassembling of Rapid Cappuccino system (R.C.S)
07
4°15”
Assembling / disassembling of Rapid Cappuccino system (R.C.S)
07
4°15”
Assembling / disassembling of Rapid Cappuccino system (R.C.S)
07
EN
FR
p r e pa r i n g c a p p u cc i n o a n D L aT T e Macc h i aTo/ p r é pa r aT i o n – c a p p u cc i n o e T L aT T e Macc h i aTo
1. Fill the milk container with desired quantity of milk. 1. remplissez le contenant de lait jusqu’au niveau désiré.
2. close the milk container. open the steam connector door by sliding it to the right. connect the rapid cappuccino system to the machine. 2. refermez le contenant de lait. ouvrez le panneau du raccordement vapeur en le faisant glisser vers la droite. Branchez le système de préparation rapide du cappuccino à la machine.
3. Machine heats up for approximately 15 sec. 3. La machine chauffe pendant environ 15 secondes.
4. Lift the lever completely and insert a Nespresso capsule. 4. soulevez complètement le levier et insérez une capsule Nespresso.
CAuTion: do not use the milk container for any other liquid other than milk or potable water. Do not use raw unpasteurised milk and be sure not to use milk after its expiration date as indicated on the packaging.
AVERTiSSEmEnT: Le contenant de lait n’est pas conçu pour des liquides autres que le lait et l’eau potable. Ne pas utiliser de lait cru et assurez-vous de ne pas utiliser de lait après la date de péremption indiquée sur l'emballage.
infoRmATion: for a perfect milk froth, use skimmed or semi-skimmed milk at refrigerator temperature (about 4° C/39.2° F).
infoRmATion: Pour obtenir une mousse parfaite, utilisez du lait écrémé ou semi-écrémé à température réfrigérée (environ 4° C).
infoRmATion: when the milk container is empty, before refilling, thoroughly rinse it and the milk aspiration tube with potable water.
infoRmATion: Avant de remplir le contenant de lait, rincez-le abondamment à l’eau potable. Répétez l’opération pour le tube d’aspiration.
29
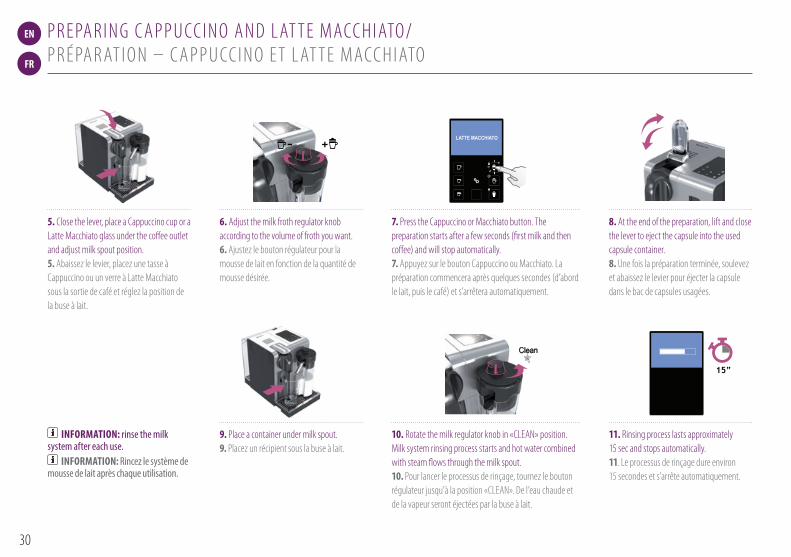
Preparing Cappuccino and Latte Macchiato
4°
i When the milk container is empty, before refilling, thoroughly rinse it and the milk aspiration tube with potable water.
Close the milk container. Open the steam connector door by sliding it to the right. Connect the Rapid Cappuccino System to the machine.
15”
+LATTE MACCHIATO
Clean
15”
i
Remove Rapid Cappuccino System connector by unlocking it from (sign ) to (sign) and pulling it off
Remove the milk container lid and unplug milk aspiration tube.
Remove the milk froth regulator knob by turning it until and pulling it up.
Remove the milk spout by pulling it off.
1 2 3 4
Assembling / disassembling of Rapid Cappuccino system (R.C.S)
RINSE MILK SYSTEM
07 08
EN
FR
p r e pa r i n g c a p p u cc i n o a n D L aT T e Macc h i aTo/ p r é pa r aT i o n – c a p p u cc i n o e T L aT T e Macc h i aTo
infoRmATion: rinse the milk system after each use.
infoRmATion: Rincez le système de mousse de lait après chaque utilisation.
9. place a container under milk spout. 9. placez un récipient sous la buse à lait.
10. rotate the milk regulator knob in «cLean» position. Milk system rinsing process starts and hot water combined with steam flows through the milk spout. 10. pour lancer le processus de rinçage, tournez le bouton régulateur jusqu’à la position «cLean». De l’eau chaude et de la vapeur seront éjectées par la buse à lait.
11. rinsing process lasts approximately 15 sec and stops automatically. 11. Le processus de rinçage dure environ 15 secondes et s’arrête automatiquement.
5. close the lever, place a cappuccino cup or a Latte Macchiato glass under the coffee outlet and adjust milk spout position. 5. abaissez le levier, placez une tasse à cappuccino ou un verre à Latte Macchiato sous la sortie de café et réglez la position de la buse à lait.
6. adjust the milk froth regulator knob according to the volume of froth you want. 6. ajustez le bouton régulateur pour la mousse de lait en fonction de la quantité de mousse désirée.
7. press the cappuccino or Macchiato button. The preparation starts after a few seconds (first milk and then coffee) and will stop automatically. 7. appuyez sur le bouton cappuccino ou Macchiato. La préparation commencera après quelques secondes (d’abord le lait, puis le café) et s’arrêtera automatiquement.
8. at the end of the preparation, lift and close the lever to eject the capsule into the used capsule container. 8. une fois la préparation terminée, soulevez et abaissez le levier pour éjecter la capsule dans le bac de capsules usagées.
30
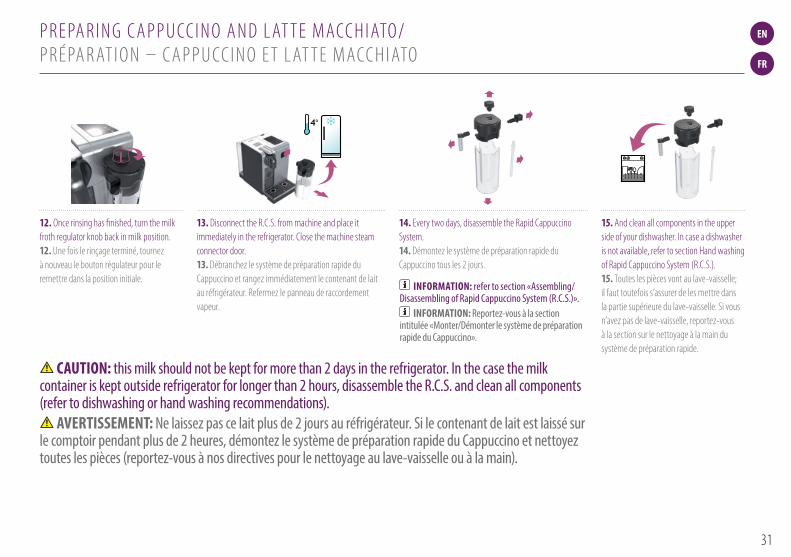
PRESS to confirm.The discaling agent flows alternately trough the coffee outlet, hot water nozzle and drip tray.
Descaling
Descaling process: Empty the drip tray and the used capsules container.
Rinsing process: Empty the drip tray and the used capsules container.
Refer to safety precautions
+100 ml500 ml
1 2 3
5 7 8
4
6
Lift and close the lever to eject any capsule in the used capsule container.
Descaling process: Fill water tank with 100 ml of Nespresso descaling agent and 500ml water.
Descaling process: Insert the hot water spout.
Enter the Menu, browse the options and select DESCALING. You will be guided throughout the whole process. Follow machine display instructions.
Descaling process: Place one container of minimum 1 litre under both the coffee outlet and the hot water spout.
4°
Volume factory settings
LANGUAGE
DESCALING
WATER HARDNESS
09 10
EN
FR
p r e pa r i n g c a p p u cc i n o a n D L aT T e Macc h i aTo/ p r é pa r aT i o n – c a p p u cc i n o e T L aT T e Macc h i aTo
12. once rinsing has finished, turn the milk froth regulator knob back in milk position. 12. une fois le rinçage terminé, tournez à nouveau le bouton régulateur pour le remettre dans la position initiale.
13. Disconnect the r.c.s. from machine and place it immediately in the refrigerator. close the machine steam connector door. 13. Débranchez le système de préparation rapide du cappuccino et rangez immédiatement le contenant de lait au réfrigérateur. refermez le panneau de raccordement vapeur.
15. and clean all components in the upper side of your dishwasher. in case a dishwasher is not available, refer to section hand washing of rapid cappuccino system (r.c.s.). 15. Toutes les pièces vont au lave-vaisselle; il faut toutefois s’assurer de les mettre dans la partie supérieure du lave-vaisselle. si vous n’avez pas de lave-vaisselle, reportez-vous à la section sur le nettoyage à la main du système de préparation rapide.
infoRmATion: refer to section «Assembling/Disassembling of Rapid Cappuccino System (R.C.S.)».
infoRmATion: Reportez-vous à la section intitulée «Monter/Démonter le système de préparation rapide du Cappuccino».
CAuTion: this milk should not be kept for more than 2 days in the refrigerator. In the case the milk container is kept outside refrigerator for longer than 2 hours, disassemble the R.C.S. and clean all components (refer to dishwashing or hand washing recommendations).
AVERTiSSEmEnT: Ne laissez pas ce lait plus de 2 jours au réfrigérateur. Si le contenant de lait est laissé sur le comptoir pendant plus de 2 heures, démontez le système de préparation rapide du Cappuccino et nettoyez toutes les pièces (reportez-vous à nos directives pour le nettoyage au lave-vaisselle ou à la main).
14. every two days, disassemble the rapid cappuccino system. 14. Démontez le système de préparation rapide du cappuccino tous les 2 jours.
31
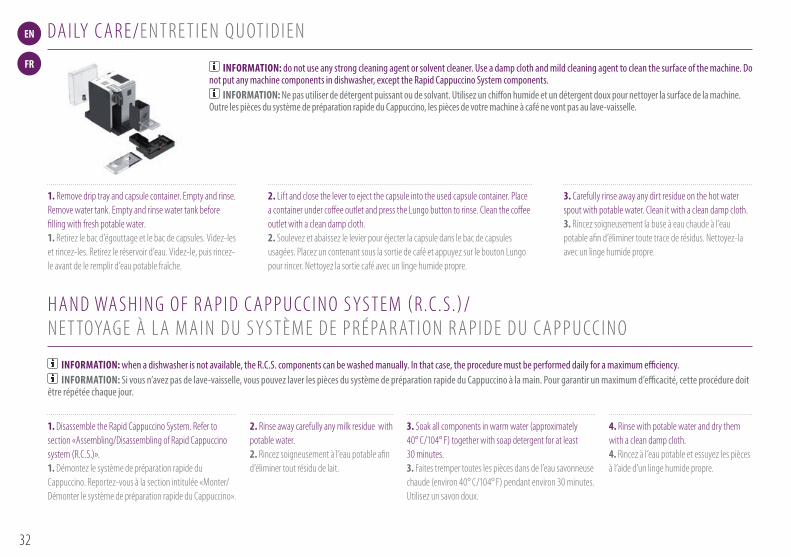
PRESS to confirm.The discaling agent flows alternately trough the coffee outlet, hot water nozzle and drip tray.
Descaling
Descaling process: Empty the drip tray and the used capsules container.
Rinsing process: Empty the drip tray and the used capsules container.
Refer to safety precautions
+100 ml500 ml
1 2 3
5 7 8
4
6
Lift and close the lever to eject any capsule in the used capsule container.
Descaling process: Fill water tank with 100 ml of Nespresso descaling agent and 500ml water.
Descaling process: Insert the hot water spout.
Enter the Menu, browse the options and select DESCALING. You will be guided throughout the whole process. Follow machine display instructions.
Descaling process: Place one container of minimum 1 litre under both the coffee outlet and the hot water spout.
4°
Volume factory settings
LANGUAGE
DESCALING
WATER HARDNESS
09 10
EN
FR
2. Lift and close the lever to eject the capsule into the used capsule container. place a container under coffee outlet and press the Lungo button to rinse. clean the coffee outlet with a clean damp cloth. 2. soulevez et abaissez le levier pour éjecter la capsule dans le bac de capsules usagées. placez un contenant sous la sortie de café et appuyez sur le bouton Lungo pour rincer. nettoyez la sortie café avec un linge humide propre.
3. carefully rinse away any dirt residue on the hot water spout with potable water. clean it with a clean damp cloth. 3. rincez soigneusement la buse à eau chaude à l’eau potable afin d’éliminer toute trace de résidus. nettoyez-la avec un linge humide propre.
1. Disassemble the rapid cappuccino system. refer to section «assembling/Disassembling of rapid cappuccino system (r.c.s.)». 1. Démontez le système de préparation rapide du cappuccino. reportez-vous à la section intitulée «Monter/Démonter le système de préparation rapide du cappuccino».
2. rinse away carefully any milk residue with potable water. 2. rincez soigneusement à l’eau potable afin d’éliminer tout résidu de lait.
3. soak all components in warm water (approximately 40° c/104° F) together with soap detergent for at least 30 minutes. 3. Faites tremper toutes les pièces dans de l’eau savonneuse chaude (environ 40° c/104° F) pendant environ 30 minutes. utilisez un savon doux.
4. rinse with potable water and dry them with a clean damp cloth. 4. rincez à l’eau potable et essuyez les pièces à l’aide d’un linge humide propre.
Da i Ly c a r e/e n T r e T i e n Q u oT i D i e n
infoRmATion: do not use any strong cleaning agent or solvent cleaner. Use a damp cloth and mild cleaning agent to clean the surface of the machine. Do not put any machine components in dishwasher, except the Rapid Cappuccino System components.
infoRmATion: Ne pas utiliser de détergent puissant ou de solvant. Utilisez un chiffon humide et un détergent doux pour nettoyer la surface de la machine. Outre les pièces du système de préparation rapide du Cappuccino, les pièces de votre machine à café ne vont pas au lave-vaisselle.
h a n D Wa s h i n g o F r a p i D c a p p u cc i n o s ys T e M ( r.c.s .)/ n e T Toyag e à L a Ma i n D u s ys T è M e D e p r é pa r aT i o n r a p i D e D u c a p p u cc i n o
infoRmATion: when a dishwasher is not available, the R.C.S. components can be washed manually. In that case, the procedure must be performed daily for a maximum efficiency. infoRmATion: Si vous n’avez pas de lave-vaisselle, vous pouvez laver les pièces du système de préparation rapide du Cappuccino à la main. Pour garantir un maximum d’efficacité, cette procédure doit
être répétée chaque jour.
1. remove drip tray and capsule container. empty and rinse. remove water tank. empty and rinse water tank before filling with fresh potable water. 1. retirez le bac d’égouttage et le bac de capsules. Videz-les et rincez-les. retirez le réservoir d’eau. Videz-le, puis rincez-le avant de le remplir d’eau potable fraîche.
32
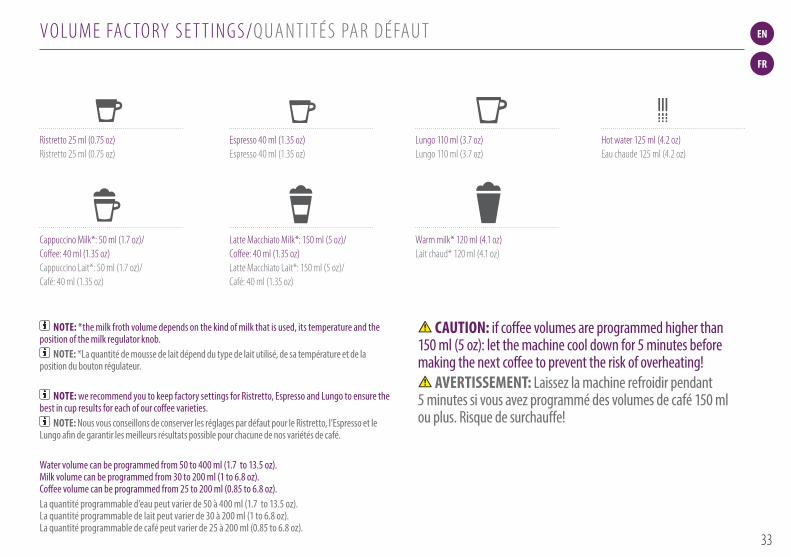
PRESS to confirm.The discaling agent flows alternately trough the coffee outlet, hot water nozzle and drip tray.
Descaling
Descaling process: Empty the drip tray and the used capsules container.
Rinsing process: Empty the drip tray and the used capsules container.
Refer to safety precautions
+100 ml500 ml
1 2 3
5 7 8
4
6
Lift and close the lever to eject any capsule in the used capsule container.
Descaling process: Fill water tank with 100 ml of Nespresso descaling agent and 500ml water.
Descaling process: Insert the hot water spout.
Enter the Menu, browse the options and select DESCALING. You will be guided throughout the whole process. Follow machine display instructions.
Descaling process: Place one container of minimum 1 litre under both the coffee outlet and the hot water spout.
4°
Volume factory settings
LANGUAGE
DESCALING
WATER HARDNESS
09 10
EN
FR
noTE: *the milk froth volume depends on the kind of milk that is used, its temperature and the position of the milk regulator knob.
noTE: *La quantité de mousse de lait dépend du type de lait utilisé, de sa température et de la position du bouton régulateur.
noTE: we recommend you to keep factory settings for Ristretto, Espresso and Lungo to ensure the best in cup results for each of our coffee varieties.
noTE: Nous vous conseillons de conserver les réglages par défaut pour le Ristretto, l’Espresso et le Lungo afin de garantir les meilleurs résultats possible pour chacune de nos variétés de café.
Water volume can be programmed from 50 to 400 ml (1.7 to 13.5 oz). Milk volume can be programmed from 30 to 200 ml (1 to 6.8 oz). Coffee volume can be programmed from 25 to 200 ml (0.85 to 6.8 oz).La quantité programmable d’eau peut varier de 50 à 400 ml (1.7 to 13.5 oz). La quantité programmable de lait peut varier de 30 à 200 ml (1 to 6.8 oz). La quantité programmable de café peut varier de 25 à 200 ml (0.85 to 6.8 oz).
Vo LuM e Fac To ry s e T T i n g s/Q ua n T i T é s pa r D é Fau T
ristretto 25 ml (0.75 oz) ristretto 25 ml (0.75 oz)
cappuccino Milk*: 50 ml (1.7 oz)/ coffee: 40 ml (1.35 oz) cappuccino Lait*: 50 ml (1.7 oz)/ café: 40 ml (1.35 oz)
Lungo 110 ml (3.7 oz) Lungo 110 ml (3.7 oz)
Latte Macchiato Milk*: 150 ml (5 oz)/ coffee: 40 ml (1.35 oz) Latte Macchiato Lait*: 150 ml (5 oz)/ café: 40 ml (1.35 oz)
espresso 40 ml (1.35 oz) espresso 40 ml (1.35 oz)
hot water 125 ml (4.2 oz) eau chaude 125 ml (4.2 oz)
Warm milk* 120 ml (4.1 oz) Lait chaud* 120 ml (4.1 oz)
CAuTion: if coffee volumes are programmed higher than 150 ml (5 oz): let the machine cool down for 5 minutes before making the next coffee to prevent the risk of overheating!
AVERTiSSEmEnT: Laissez la machine refroidir pendant 5 minutes si vous avez programmé des volumes de café 150 ml ou plus. Risque de surchauffe!
33

+100 ml500 ml
10
+100 ml500 ml
10
+100 ml500 ml
10
+100 ml500 ml
10
+100 ml500 ml
10
+100 ml500 ml
10
+100 ml500 ml
10
+100 ml500 ml
10
EN
FR
D e s c a L i n g/D é Ta rT r ag e
1. Lift and close the lever to eject any capsule in the used capsule container. 1. soulevez et abaissez le levier pour éjecter la capsule dans le bac de capsules usagées.
2. enter the Menu, browse the options and select [DescaLing]. you will be guided throughout the whole process. Follow machine display instructions. 2. allez au menu principal, parcourez les options et sélectionnez [DéTarTrage]. Vous serez guidé tout au long du processus de détartrage. suivez les directives à l’écran.
CAuTion: refer to safety precautions. AVERTiSSEmEnT: Reportez-vous aux consignes de sécurité.
7. press to confirm. The descaling agent flows alternately through the coffee outlet, hot water spout and drip tray. 7. appuyez sur pour confirmer. Le détartrant passera tour à tour par la sortie de café, la buse à eau chaude et le bac d’égouttage.
5. Descaling process: insert the hot water spout. 5. Processus de détartrage: insérez la buse à eau chaude.
6. Descaling process: place one container, minimum of 1 liter, under both the coffee outlet and the hot water spout. 6. Processus de détartrage: placez un récipient d’au moins 1 litre sous la sortie de café et la buse à eau chaude.
3. Descaling process: empty the drip tray and the used capsules container. 3. Processus de détartrage: Videz le bac d’égouttage et le bac de capsules usagées.
4. Descaling process: fill water tank with 100 ml (3.4 oz) of Nespresso descaling agent and 500 ml (17 oz) of potable water. 4. Processus de détartrage: remplissez le réservoir d’eau avec 100 ml (3.4 oz) de détartrant Nespresso et 500 ml (17 oz) d’eau potable.
8. Rinsing process: empty the drip tray and the used capsules container. rinse with potable water. 8. Processus de rinçage: Videz le bac d’égouttage et le bac de capsules usagées. rincez-le à l’eau potable.
34

max
1”
1
2
3
4
5
11
max
1”
1
2
3
4
5
11
max
1”
1
2
3
4
5
11
max
1”
1
2
3
4
5
11
max
1”
1
2
3
4
5
11
max
1”
1
2
3
4
5
11
max
1”
1
2
3
4
5
11
max
1”
1
2
3
4
5
11
EN
FR
D e s c a L i n g/D é Ta rT r ag e
2. place the water hardness sticker under water for 1 second. 2. placez l’indicateur de dureté sous l’eau pendant 1 seconde.
11. press to confirm. The rinsing cycle continues alternately through the coffee outlet, hot water spout and drip tray until the water tank runs empty. 11. appuyez sur pour confirmer. Le cycle de rinçage alterne entre la sortie de café, la buse à eau chaude et le bac d’égouttage, et se poursuit jusqu’à ce que le réservoir d’eau soit vide.
3. The number of red squares indicates the water hardness level. 3. Le nombre de carrés rouges indique le niveau de dureté de l’eau.
12. once the rinsing process is finished, the machine switches off. rinse the hot water spout and clean it with a damp cloth. you have now finished descaling the machine. 12. une fois le rinçage terminé, la machine se met automatiquement hors tension. rincez la buse à eau chaude, puis nettoyez-la à l’aide d’un linge humide. Le détartrage est maintenant terminé.
4. set the value accordingly. 4. entrez cette valeur dans votre machine.
WaT e r h a r D n e s s s e T T i n g/n i V e au D e D u r e T é D e L’e au
1. enter the menu, browse the options and select [WaTer harDness]. you will be guided to set the value. Follow machine display instructions. 1. allez au menu principal, parcourez les options et sélectionnez [DureTé eau]. pour établir le niveau de dureté de l’eau approprié, suivez les directives à l’écran.
9. Rinsing process: rinse and fill water tank with potable water up to Max level. 9. Processus de rinçage: rincez le réservoir d’eau, puis remplissez-le d’eau potable jusqu’à la ligne indiquant le niveau maximum.
10. Rinsing process: place one container, minimum of 1 liter, under both the coffee outlet and the hot water spout. 10. Processus de rinçage: placez un récipient d’au moins 1 litre sous la sortie de café et la buse à eau chaude.
35
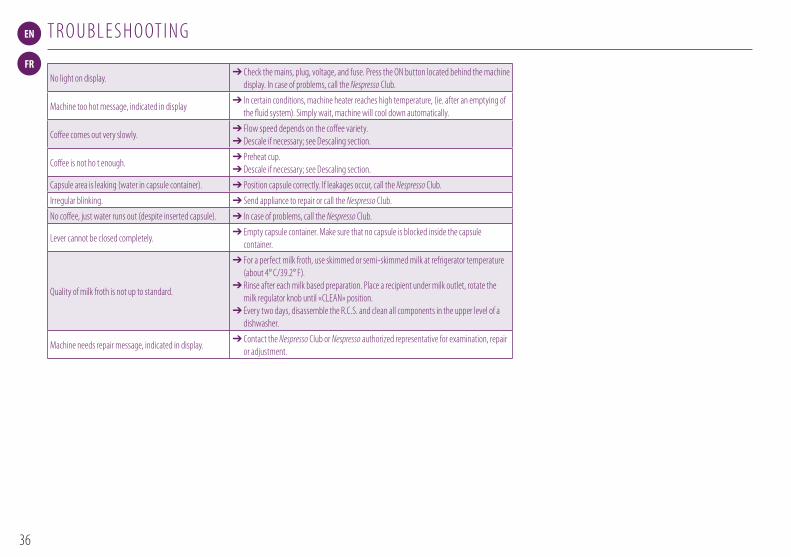
EN
FR
T r o u B L e s h o oT i n g
no light on display.➔ check the mains, plug, voltage, and fuse. press the on button located behind the machine
display. in case of problems, call the Nespresso club.
Machine too hot message, indicated in display➔ in certain conditions, machine heater reaches high temperature, (ie. after an emptying of
the fluid system). simply wait, machine will cool down automatically.
coffee comes out very slowly.➔ Flow speed depends on the coffee variety. ➔ Descale if necessary; see Descaling section.
coffee is not ho t enough.➔ preheat cup.➔ Descale if necessary; see Descaling section.
capsule area is leaking (water in capsule container). ➔ position capsule correctly. if leakages occur, call the Nespresso club.
irregular blinking. ➔ send appliance to repair or call the Nespresso club.
no coffee, just water runs out (despite inserted capsule). ➔ in case of problems, call the Nespresso club.
Lever cannot be closed completely.➔ empty capsule container. Make sure that no capsule is blocked inside the capsule
container.
Quality of milk froth is not up to standard.
➔ For a perfect milk froth, use skimmed or semi-skimmed milk at refrigerator temperature (about 4° c/39.2° F).
➔ rinse after each milk based preparation. place a recipient under milk outlet, rotate the milk regulator knob until «cLean» position.
➔ every two days, disassemble the r.c.s. and clean all components in the upper level of a dishwasher.
Machine needs repair message, indicated in display.➔ contact the Nespresso club or Nespresso authorized representative for examination, repair
or adjustment.
36
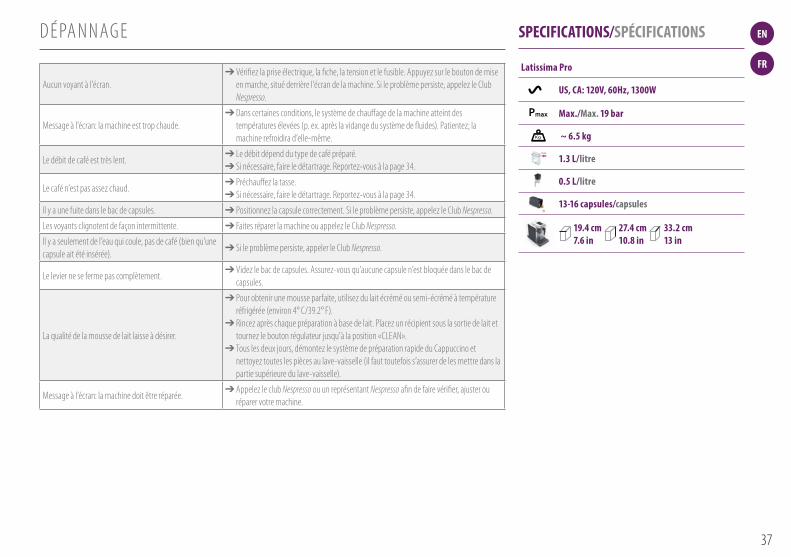
EN
FR
D é pa n n ag e
latissima ProEUR,AUS,NZ: 220240 V, 50/60 Hz, 1300 W
US/CA: 120 V, 60 Hz, 1200 W
19 bar
6.5 kg
1,38 litre
500 ml
13-16 capsules
l=19,4 cm . L=33,2 cm . h=27,4 cm
Troubleshooting
Contact the Nespressso Club
For any additional information, in case of problems or simply to seek advise, call the Nespresso Club. Contact details of the Nespresso Club can be found in the 'Welcome to Nespresso' folder in your machine box or at nespresso.com
No light on displayCheck the mains, plug, voltage, and fuse. In case of problems, call the Nespresso Club.
Coffee comes out very slowly.Flow speed depends on the coffee variety.Perform a self check of the machine. Enter the menu list and select Maintenance. Follow instruction
Coffee is not hot enough.Preheat cup.Perform a self check of the machine. Enter the menu list and select Maintenance. Follow instruction
Capsule area is leaking (water in capsule container). Position capsule correctly. If leakages occur, call the Nespresso Club.
Irregular blinking.Send appliance to repair or call the Nespresso Club.
No coffee, just water runs out (despite inserted capsule).In case of problems, call the Nespresso Club.
Lever cannot be closed completelyEmpty capsule container. Make sure that no capsule is blocked inside the capsule container.
Quality of milk froth is not up to standard1) For a perfect milk froth, use skimmed or semi-skimmed milk at refrigerator temperature (about 4° C)2) Rinse after each milk based preparation. Place a recipient under milk outlet, rotate the milk regulator knob until “CLEAN” position.3) Every two days, disassemble the R. C. S. and clean all components in the upper level of a dishwasher
Warranty
Delonghi warrants this product against defects in materials and workmanship for a period of two years from the date of purchase. During this period, Delonghi will either repair or replace, at its discretion, any defective product at no charge to the owner. Replacement products or repaired parts will be guaranteed for only the unexpired portion of the original warranty or six months, whichever is greater. This limited warranty does not apply to any defect resulting from accident, misuse, improper maintenance, or normal wear and tear. Any defect resulting from the usage of non genuine Nespresso capsules will not be covered by this warranty. Except to the extent allowed by applicable law, the terms of this limited warranty do not exclude, restrictor modify, and are in addition to, the mandatory statutory rights applicable to the sale of the product to you. If you believe your product is defective, contact Nespresso for instructions on where to send or bring it for repair. Please visit our website at nespresso.com to discover more about Nespresso
Specifications
Pmax
Once the rinsing process is finished, the machine switches off. Clean the machine using a damp cloth. You have now finished descaling the machine.
9 10 11 12Rinsing process Rinse and fill water with fresh potable water up to MAX level.
Rinsing process Place one container of minimum 1 litre under both the coffee outlet and the hot water spout.
PRESS to confirm.The rinsing cycle continues trough the coffee outlet, hot water spout and drip tray until the water tank is empty.
Water hardness setting
1
programmed buttons blinks 3 times: water hardness is seti
1”2 3 4
1
2
3
4
5
Place the water hardness sticker under water for 1 second.
The number of red squares indicates the water harness level.
Set the value accordinglyEnter the menu, browse the options and select WATER HARDNESS.You will be guided to set the value.Follow machine display instructions.
max
max
Kg
11 12
uS, CA: 120V, 60hz, 1300WEUR,AUS,NZ: 220240 V, 50/60 Hz, 1300 W
US/CA: 120 V, 60 Hz, 1200 W
19 bar
6.5 kg
1,38 litre
500 ml
13-16 capsules
l=19,4 cm . L=33,2 cm . h=27,4 cm
Troubleshooting
Contact the Nespressso Club
For any additional information, in case of problems or simply to seek advise, call the Nespresso Club. Contact details of the Nespresso Club can be found in the 'Welcome to Nespresso' folder in your machine box or at nespresso.com
No light on displayCheck the mains, plug, voltage, and fuse. In case of problems, call the Nespresso Club.
Coffee comes out very slowly.Flow speed depends on the coffee variety.Perform a self check of the machine. Enter the menu list and select Maintenance. Follow instruction
Coffee is not hot enough.Preheat cup.Perform a self check of the machine. Enter the menu list and select Maintenance. Follow instruction
Capsule area is leaking (water in capsule container). Position capsule correctly. If leakages occur, call the Nespresso Club.
Irregular blinking.Send appliance to repair or call the Nespresso Club.
No coffee, just water runs out (despite inserted capsule).In case of problems, call the Nespresso Club.
Lever cannot be closed completelyEmpty capsule container. Make sure that no capsule is blocked inside the capsule container.
Quality of milk froth is not up to standard1) For a perfect milk froth, use skimmed or semi-skimmed milk at refrigerator temperature (about 4° C)2) Rinse after each milk based preparation. Place a recipient under milk outlet, rotate the milk regulator knob until “CLEAN” position.3) Every two days, disassemble the R. C. S. and clean all components in the upper level of a dishwasher
Warranty
Delonghi warrants this product against defects in materials and workmanship for a period of two years from the date of purchase. During this period, Delonghi will either repair or replace, at its discretion, any defective product at no charge to the owner. Replacement products or repaired parts will be guaranteed for only the unexpired portion of the original warranty or six months, whichever is greater. This limited warranty does not apply to any defect resulting from accident, misuse, improper maintenance, or normal wear and tear. Any defect resulting from the usage of non genuine Nespresso capsules will not be covered by this warranty. Except to the extent allowed by applicable law, the terms of this limited warranty do not exclude, restrictor modify, and are in addition to, the mandatory statutory rights applicable to the sale of the product to you. If you believe your product is defective, contact Nespresso for instructions on where to send or bring it for repair. Please visit our website at nespresso.com to discover more about Nespresso
Specifications
Pmax
Once the rinsing process is finished, the machine switches off. Clean the machine using a damp cloth. You have now finished descaling the machine.
9 10 11 12Rinsing process Rinse and fill water with fresh potable water up to MAX level.
Rinsing process Place one container of minimum 1 litre under both the coffee outlet and the hot water spout.
PRESS to confirm.The rinsing cycle continues trough the coffee outlet, hot water spout and drip tray until the water tank is empty.
Water hardness setting
1
programmed buttons blinks 3 times: water hardness is seti
1”2 3 4
1
2
3
4
5
Place the water hardness sticker under water for 1 second.
The number of red squares indicates the water harness level.
Set the value accordinglyEnter the menu, browse the options and select WATER HARDNESS.You will be guided to set the value.Follow machine display instructions.
max
max
Kg
11 12
max./max. 19 bar
EUR,AUS,NZ: 220240 V, 50/60 Hz, 1300 W
US/CA: 120 V, 60 Hz, 1200 W
19 bar
6.5 kg
1,38 litre
500 ml
13-16 capsules
l=19,4 cm . L=33,2 cm . h=27,4 cm
Troubleshooting
Contact the Nespressso Club
For any additional information, in case of problems or simply to seek advise, call the Nespresso Club. Contact details of the Nespresso Club can be found in the 'Welcome to Nespresso' folder in your machine box or at nespresso.com
No light on displayCheck the mains, plug, voltage, and fuse. In case of problems, call the Nespresso Club.
Coffee comes out very slowly.Flow speed depends on the coffee variety.Perform a self check of the machine. Enter the menu list and select Maintenance. Follow instruction
Coffee is not hot enough.Preheat cup.Perform a self check of the machine. Enter the menu list and select Maintenance. Follow instruction
Capsule area is leaking (water in capsule container). Position capsule correctly. If leakages occur, call the Nespresso Club.
Irregular blinking.Send appliance to repair or call the Nespresso Club.
No coffee, just water runs out (despite inserted capsule).In case of problems, call the Nespresso Club.
Lever cannot be closed completelyEmpty capsule container. Make sure that no capsule is blocked inside the capsule container.
Quality of milk froth is not up to standard1) For a perfect milk froth, use skimmed or semi-skimmed milk at refrigerator temperature (about 4° C)2) Rinse after each milk based preparation. Place a recipient under milk outlet, rotate the milk regulator knob until “CLEAN” position.3) Every two days, disassemble the R. C. S. and clean all components in the upper level of a dishwasher
Warranty
Delonghi warrants this product against defects in materials and workmanship for a period of two years from the date of purchase. During this period, Delonghi will either repair or replace, at its discretion, any defective product at no charge to the owner. Replacement products or repaired parts will be guaranteed for only the unexpired portion of the original warranty or six months, whichever is greater. This limited warranty does not apply to any defect resulting from accident, misuse, improper maintenance, or normal wear and tear. Any defect resulting from the usage of non genuine Nespresso capsules will not be covered by this warranty. Except to the extent allowed by applicable law, the terms of this limited warranty do not exclude, restrictor modify, and are in addition to, the mandatory statutory rights applicable to the sale of the product to you. If you believe your product is defective, contact Nespresso for instructions on where to send or bring it for repair. Please visit our website at nespresso.com to discover more about Nespresso
Specifications
Pmax
Once the rinsing process is finished, the machine switches off. Clean the machine using a damp cloth. You have now finished descaling the machine.
9 10 11 12Rinsing process Rinse and fill water with fresh potable water up to MAX level.
Rinsing process Place one container of minimum 1 litre under both the coffee outlet and the hot water spout.
PRESS to confirm.The rinsing cycle continues trough the coffee outlet, hot water spout and drip tray until the water tank is empty.
Water hardness setting
1
programmed buttons blinks 3 times: water hardness is seti
1”2 3 4
1
2
3
4
5
Place the water hardness sticker under water for 1 second.
The number of red squares indicates the water harness level.
Set the value accordinglyEnter the menu, browse the options and select WATER HARDNESS.You will be guided to set the value.Follow machine display instructions.
max
max
Kg
11 12
~ 6.5 kg
1.3 l/litre
0.5 l/litre
13-16 capsules/capsules
19.4 cm 27.4 cm 33.2 cm 7.6 in 10.8 in 13 in
SPECifiCATionS/SPéCifiCATionS
aucun voyant à l’écran.➔ Vérifiez la prise électrique, la fiche, la tension et le fusible. appuyez sur le bouton de mise
en marche, situé derrière l’écran de la machine. si le problème persiste, appelez le club Nespresso.
Message à l’écran: la machine est trop chaude.➔ Dans certaines conditions, le système de chauffage de la machine atteint des
températures élevées (p. ex. après la vidange du système de fluides). patientez; la machine refroidira d’elle-même.
Le débit de café est très lent.➔ Le débit dépend du type de café préparé. ➔ si nécessaire, faire le détartrage. reportez-vous à la page 34.
Le café n’est pas assez chaud.➔ préchauffez la tasse. ➔ si nécessaire, faire le détartrage. reportez-vous à la page 34.
il y a une fuite dans le bac de capsules. ➔ positionnez la capsule correctement. si le problème persiste, appelez le club Nespresso.
Les voyants clignotent de façon intermittente. ➔ Faites réparer la machine ou appelez le club Nespresso.il y a seulement de l’eau qui coule, pas de café (bien qu’une capsule ait été insérée).
➔ si le problème persiste, appeler le club Nespresso.
Le levier ne se ferme pas complètement.➔ Videz le bac de capsules. assurez-vous qu’aucune capsule n’est bloquée dans le bac de
capsules.
La qualité de la mousse de lait laisse à désirer.
➔ pour obtenir une mousse parfaite, utilisez du lait écrémé ou semi-écrémé à température réfrigérée (environ 4° c/39.2° F).
➔ rincez après chaque préparation à base de lait. placez un récipient sous la sortie de lait et tournez le bouton régulateur jusqu’à la position «cLean».
➔ Tous les deux jours, démontez le système de préparation rapide du cappuccino et nettoyez toutes les pièces au lave-vaisselle (il faut toutefois s’assurer de les mettre dans la partie supérieure du lave-vaisselle).
Message à l’écran: la machine doit être réparée.➔ appelez le club Nespresso ou un représentant Nespresso afin de faire vérifier, ajuster ou
réparer votre machine.
37
EN
FR
For any additional information, in case of problems or simply to seek advise, call the Nespresso club. contact details of the Nespresso club can be found in the «Welcome to Nespresso» folder in your machine box or at nespresso.com
pour obtenir des renseignements supplémentaires, en cas de problème ou pour obtenir des conseils, appelez le club Nespresso. Les coordonnées du club Nespresso sont comprises dans la trousse «Bienvenue chez Nespresso», que vous trouverez dans la boîte de votre machine ou sur le site nespresso.com
co n Tac T T h e NESPRESSO c Lu B/co M M u n i Q u e z aV e c L e c Lu B NESPRESSO
D i s p o s a L a n D e co Lo g i c a L co n c e r n s/r e c yc L ag e e T p r oT e c T i o n D e L’e n V i r o n n e M e n T
Disposal and Environmental Protection your appliance contains valuable materials that can be recovered or recycled. separation of the remaining waste materials into different types facilitates the recycling of valuable raw material. Leave the appliance at a collection point. you can obtain information on disposal from your local authorities.
Recyclage et protection de l’environnement L’appareil contient des matériaux valorisables qui peuvent être récupérés ou recyclés. Le tri des matériaux en différentes catégories facilite le recyclage des matières premières valorisables. Déposer l’appareil à un point de collecte. pour obtenir des renseignements sur le recyclage, communiquer avec les autorités locales.
38
EN
FR
Wa r r a n T y/g a r a n T i e
Nespresso warrants this product against defects in materials and workmanship for a period of 1 years. The warranty period begins on the date of purchase and Nespresso requires presentation of the original proof of purchaseto ascertain the date. During the warranty period, Nespresso will either repair or replace, at its discretion, any defective product at no charge to the owner. replacement products or repaired parts will be warranted only for theunexpired portion of the original warranty or six months, whichever is greater. This limited warranty does not apply to any defect resulting from negligence, accident, misuse, or any other reason beyond Nespresso’s reasonablecontrol, including but not limited to: normal wear and tear, negligence or failure to follow the product instructions, improper or inadequate maintenance, calcium deposits or descaling, connection to improper power supply,unauthorized product modification or repair, use for commercial purposes, fire, lightning, flood or other external causes. This warranty is valid only in the country of purchase or in such other countries where Nespresso sells andservices the same model with identical technical specifications. Warranty service outside the country of purchase is limited to the terms and conditions of the corresponding warranty in the country of service. should the costof repairs or replacement not be covered by this warranty, Nespresso will advise the owner and the cost shall be charged to the owner. This limited warranty shall be the full extent of Nespresso’s liability however caused. exceptto the extent allowed by applicable law, the terms of this limited warranty do not exclude, restrict or modify the mandatory statutory rights applicable to the sale of this product and are in addition to those rights. The limitedwarranty applies only to this single-branded Nespresso products. products marked with both the Nespresso Brand and another producer are governed exclusively by the warranty provided by that other producer. if you believeyour product is defective, contact Nespresso for instructions on how to proceed with a repair. any defect or dysfunction resulting from the use of non-genuine Nespresso capsules will be not covered by this warranty. please visit our website at www.nespresso.com for contact details.
Nespresso garantit ce produit contre les défauts de matériels et de fabrication pour une période de une années. La période de garantie commence à la date d’achat et Nespresso exige la présentation de la preuveoriginale d’achat pour en constater la date. Durant la période de garantie, Nespresso réparera ou remplacera, à sa discrétion, tout produit défectueux sans frais pour le propriétaire. Les produits échangés et les piècesréparées seront garantis uniquement pendant la durée restante de la garantie originale ou durant six mois, l’échéance la plus lointaine faisant foi. cette garantie limitée ne s’applique pas à tout défaut résultant d’unenégligence, d’un accident, d’une utilisation inadaptée ou de toute autre raison hors du contrôle raisonnable de Nespresso, y compris mais sans s’y limiter : l’usure normale, la négligence ou le non-respect du moded’emploi du produit, l’entretien inadapté ou inadéquat, les dépôts calcaires ou le détartrage, le branchement à une sortie électrique inadaptée, la modification ou la réparation non autorisée du produit, l’utilisation à desfins commerciales, les dommages causés par le feu, la foudre, les inondations ou toute autre cause extérieure. cette garantie n’est valable que dans le pays où l’appareil a été acheté et dans les pays où Nespresso vendet assure l’entretien du même modèle avec des caractéristiques techniques identiques. Le service de garantie hors du pays d’achat se limite aux conditions de la garantie correspondante dans le pays où l’entretien esteffectué. si le coût des réparations ou de remplacement n’est pas couvert par cette garantie, Nespresso informera le propriétaire qui devra honorer ces frais. cette garantie limitée constituera l’intégralité de la responsabilitéde Nespresso, quelque soit la cause. Les conditions de la présente garantie limitée s’ajoutent aux droits statutaires obligatoires applicables à la vente du produit et ne les excluent, ni ne les restreignent ou modifient en rien,sauf dans les limites autorisées par la loi. La garantie limitée ne s’applique qu’à ce produit de marque exclusive Nespresso. Les produits de marque Nespresso et d’autres fabricants sont régis par la garantie fournie par l’autrefabricant exclusivement. si vous pensez que votre produit est défectueux, veuillez contacter Nespresso pour obtenir des renseignements concernant la marche à suivre pour le faire réparer. Tous défauts ou dysfonctionnementrésultant de l’utilisation de capsules non authentifiées Nespresso ne seront pas couverts par cette garantie. Veuillez consulter notre site internet au www.nespresso.com pour obtenir les coordonnées de contact.
39