MW25 Patient Care Simulator “Yaye
34
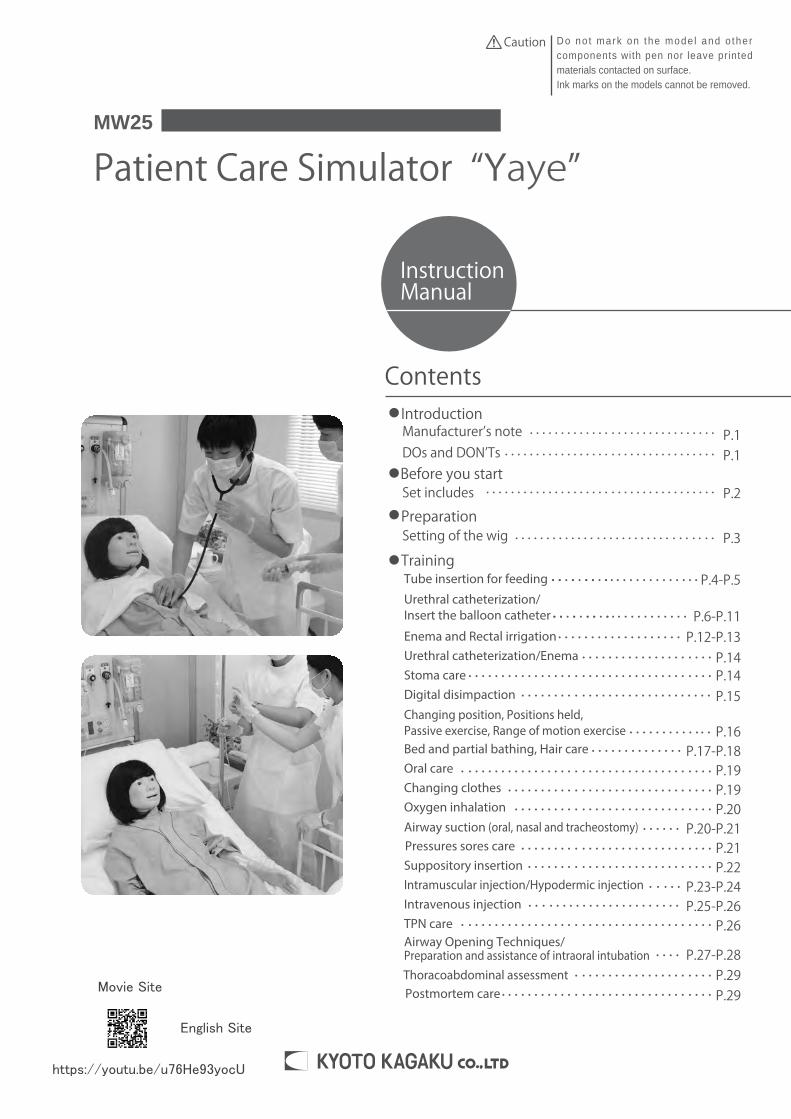
Do not mark on the model and other components with pen nor leave printed materials contacted on surface. Ink marks on the models cannot be removed. Contents Set includes Manufacturer’s note DOs and DON’Ts Before you start Introduction Preparation Training Setting of the wig P.3 P.4-P.5 P.14 P.16 P.14 P.15 P.17-P.18 P.19 P.26 P.29 P.29 P.25-P.26 P.27-P.28 P.19 P.22 P.23-P.24 P.20 P.21 P.20-P.21 P.1 P.2 P.1 Instruction Manual MW25 Patient Care Simulator “Yaye” Caution P.6-P.11 P.12-P.13 Tube insertion for feeding Urethral catheterization/ Insert the balloon catheter Enema and Rectal irrigation Urethral catheterization/Enema Stoma care Digital disimpaction Changing position, Positions held, Passive exercise, Range of motion exercise Bed and partial bathing, Hair care Oral care Changing clothes Oxygen inhalation Airway suction (oral, nasal and tracheostomy) Suppository insertion Intramuscular injection/Hypodermic injection Intravenous injection TPN care Airway Opening Techniques/ Preparation and assistance of intraoral intubation Postmortem care Thoracoabdominal assessment ● ● ● ● Pressures sores care https://youtu.be/u76He93yocU Movie Site English Site
Transcript of MW25 Patient Care Simulator “Yaye
Do no t mark on the mode l and o the r components with pen nor leave printed materials contacted on surface.Ink marks on the models cannot be removed.
Contents
Set includes
Manufacturer’s noteDOs and DON’TsBefore you start
Introduction
Preparation
TrainingSetting of the wig P.3
P.4-P.5
P.14
P.16
P.14P.15
P.17-P.18P.19
P.26
P.29P.29
P.25-P.26
P.27-P.28
P.19
P.22P.23-P.24
P.20
P.21P.20-P.21
P.1
P.2
P.1
InstructionManual
MW25
Patient Care Simulator “Yaye”
Caution
P.6-P.11P.12-P.13
Tube insertion for feeding
Urethral catheterization/ Insert the balloon catheter
Enema and Rectal irrigationUrethral catheterization/EnemaStoma careDigital disimpaction
Changing position, Positions held, Passive exercise, Range of motion exercise Bed and partial bathing, Hair careOral careChanging clothesOxygen inhalation
Airway suction (oral, nasal and tracheostomy)
Suppository insertionIntramuscular injection/Hypodermic injectionIntravenous injectionTPN careAirway Opening Techniques/Preparation and assistance of intraoral intubation
Postmortem careThoracoabdominal assessment
●
●
●
●
Pressures sores care
https://youtu.be/u76He93yocU
Movie Site
English Site


Introduction
Handle the manikin and the components with care. Do not let ink from pens, newspapers, this manual or other sources contact with the manikin, as they cannot be cleaned o� the manikin skin.
Even if color on its surface might be changed across the ages, this does not a�ect the quality of its performance.
Storage in a dark, cool space will help prevent the skin colours from fading.
The manikin skin may be cleaned with a wet cloth,if neccessary, using mildly soapy water or diluted detergent.
1
DOs and DON’Ts
“Yaye” is a multipurpose fullbody training manikin for teaching and learning a wide variety of hospital and community care procedures. Various training features for clinical situations are included.
AttentionThis patient care simulator “Yaye” has been developed for the training of medical and para-medical professionals only. Any other use, or any use not in accordance with the enclosed instructions, is strongly discouraged. The manufacturer cannot be held responsible for any accident or damage resulting from such use. Please use this product carefully and refrain from subjecting to any unnecessary stress or wear.
Features
DOs DON’Ts
Never use organic solvent like paint thinner to clean the skin, as this will damage the simulator.
Do not leave the tapes or dressing materials onto the manikin as the adhesive may be left and the surface may become sticky.
Manufacturer’s note
Life-like assessment
Patient-friendly IV route caring can be trained during infusion.
Intubation assistance in emergency situation can be trained during perioperative period and in ICU.
Face masks, wigs and external genitals are replaceable for various simulation settings and realistic trainings.
-Abdominal inspection, palpation and percussion-Anatomical landmark and soft tissue o�ers realistic training.
● ●
●
●
●
●
●

2
a.
a
c
d tracheotomy
chest cover
TPN care
Stoma
ei
h
f g
o
pk l
n m
u
r s
j
b. c.
esophagus stomach
bronchus
urinary bladder
RectumUterus
d. e. f.
h.
g.
i.
b. i.
j.
k. l.
m. n.
o. p. q. r. s. t. u.
*Photograph which took o� the chest cover
Dentures
Before you start Set includes
Set includes
Before you start, ensure that you have all components listed below.
Female genitalia
Parts
Manikin
Manikin 1
Dentures 1 set
Wig (young) 1
Face mask (young) 1
Injection pad (median vein) 1
Shoulder injection pads 2
Thigh injection pads 2
Hip IM pads 2
Female genitalia (catheterization, enema) 1
Female genitalia (Supporsitory insertion/digital disimpaction) 1
Simulated suppository 1set
Simulated feces 1set
Lubricant (for airway suction etc.) 1
Lubricant (for catheterization etc.) 1
Irrigation bag (large) 1
Irrigation bag (small) 1
Tube for irrigation bag 1
Drainage pump (urinary bladder) 1
Drainage pump (rectum) 1
Drainage hose 1
Pajama and under pants 1set
Instruction manual
●
●
t
q

3
1
③
②
②
②
②
①
①
③
①
①
③ ④
Setting of the wig
Setting of the wig
Set the wig by the magnets at the forehead and in front of right and left ears.
Put the wig on to the head noting the orientetion then �x it with the magnet at the forehead.
Fix the wig with the magnets in front of right and left ears.
Pull down the back side of the wig and �t it to the manikin s back of the head.
Complete.
《Setting the wig》
Preparation
Disengaging the magnet in front of the ears.
Disengaging the magnet of the forehead and slip the wig backward.
《Removing the wig》
Store the wig by following steps.
《Maintenance》
①
①
①②③④
②
②
④
Brush the wig after use. Insert the balled-up papers to avoid deformation.Roll the tips of hairs inward by hands. Store the wig in a bag.
’

1.
3.
2.
4
1 Preparation
Training Tube insertion for feeding
Open the chest coverSet the manikin to the sitting position. Then grasp the upper part of the chest cover with both hands and pull the cover to the front side. (The lower end of the chest cover is connected to the manikin with the belt.) When taking the chest cover off, at first remove the genitalia unit, and then remove the belt attached to inside of abdomen.
Pour the water into the stomachHold the one touch connector between the esophagus and the stomach and disengage the connection. Fill water up to the middle of the stomach. Then reconnect the stomach to the esophagus buy pushing the connectors together.
Close the chest coverFit the upper part of chest cover to the opening in the body and insert the edges into the body.In case that the chest cover was taken off, insert the belt into the slit and attach the belt to magic tape inside the abdomen.
Back side of the chest cover
Slit
imanishi
楕円
imanishi
楕円
imanishi
楕円
imanishi
線
imanishi
楕円

5
3
5
2
After training
Training
Training
Tube insertion for feeding
Training of tube insertion for feeding (NG, OG) with the Fowler s position.Inserting the catheter (NG, OG) and con�rming the placement of the feeding tube by auscultating epigastrium is possible. Use water to simulate nutrients. Training in tube �xation and dressing is possible.
’
Spray the included lubricant to catheter and also cavity of nose and mouth. Shortage of lubricant will causedi�culty in insertion.
12 Fr catheter is recommanded for trainig.
Be sure to perform tube feeding with the manikin in half sitting position. Water may �ow out if the manikin is laid down while water is in the stomach.
Do not leave the tapes on the manikin. If the tape lest on the surface for long time, it may cause persisting stickiness.
Caution
Caution
Please use the lubricant included in the set. Usage of other Jelly-type lubricants may cause damages.
1. Remove the tapes and catheter after the training. Wipe thelubricant on the catheter and skin by wet tissue.
2. Open the chest cover and detouch the one-touch connectionat the esophagus and stomach.
3. Take out the stomach and discharge the water.
*Be careful not to spill the water.
4. Dry the stomach and reconnect, connect it to the esophagus then close the chest cover.
Do not leave the tapes on the manikin. If the tape left on the surface for long time, it may cause persisting stickness.
6
2
②
③
1
Training
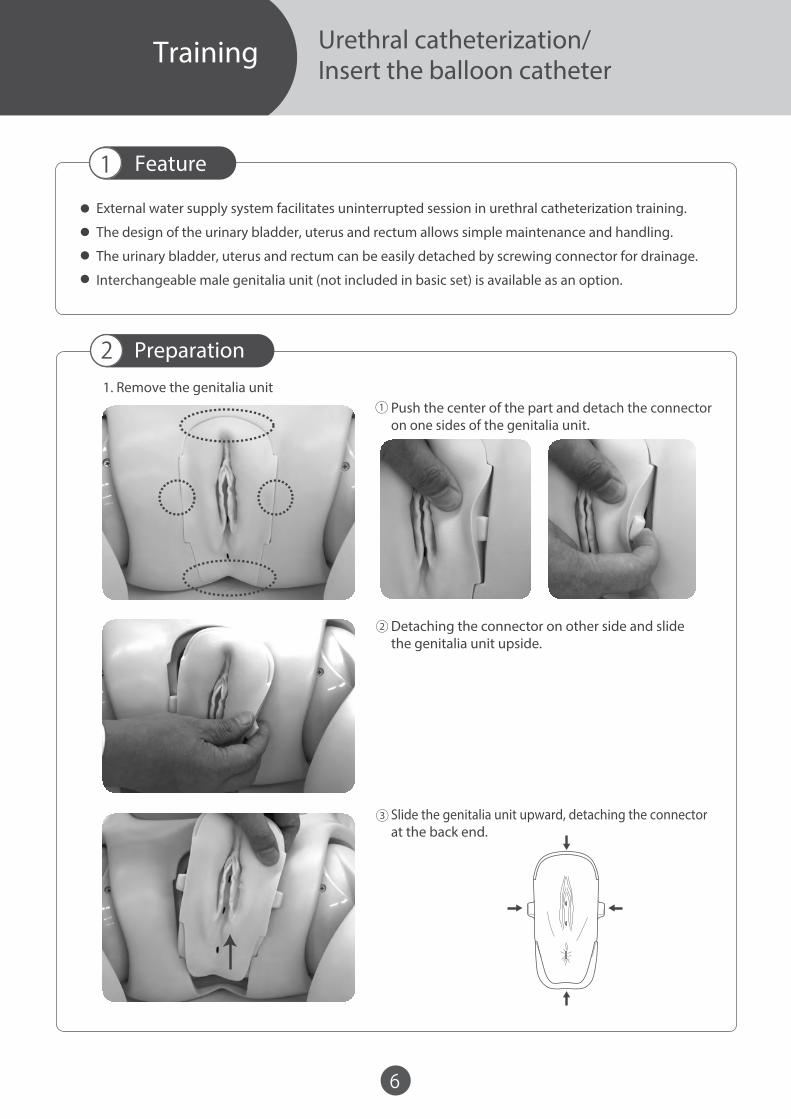
1. Remove the genitalia unit
Feature
Preparation
Urethral catheterization/ Insert the balloon catheter
External water supply system facilitates uninterrupted session in urethral catheterization training.
The design of the urinary bladder, uterus and rectum allows simple maintenance and handling.
The urinary bladder, uterus and rectum can be easily detached by screwing connector for drainage.
Interchangeable male genitalia unit (not included in basic set) is available as an option.
●
●
●
●
Push the center of the part and detach the connector on one sides of the genitalia unit.
Detaching the connector on other side and slide the genitalia unit upside.
①
Slide the genitalia unit upward, detaching the connector at the back end.

7
2
Training
Preparation
Urethral catheterization/ Insert the balloon catheter
2. Urinary bladder, uterus and rectum is connected to female genitalia unit at the time of delivery.Turn the urinary bladder clockwise to verify that it is set �rmly.
Female genitalia unit Male genitalia unit
urinary bladder
urinary bladder
uterus
rectum rectum
screwing up clockwise
Button PUSH
Right position Wrong position
Please note
Attach the tube to the urinary bladder.Pull out a pad placed at the left side of the waist. There is a hole leading to the inside of the waist. Insert a connector of the tube for the irrigation bag (q) and put through the connector to the space of the genitalia unit. (Please refer to the center picture below.) Attach the tube to the connector at the end of the urinary bladder. Fix it firmly by pushing the connector until the click sound is heard.
3.
Make sure that the metal button on the side wall of the tube connector is pushed down.Otherwise, the tube may not be connected.When the button is popped-up, push it back until it clicks.
●
In case the male genitalia unit (an optional part) is being used, remember that it does not havethe uterus container.

8
2
①
③
⑤
②
④
Training
Preparation
Urethral catheterization/ Insert the balloon catheter
4. Setting up the genitalia unit
Insert the bottom of the genitalia unit to the connection guide at the lower end of the body.
Set the genitalia unit in the body.
Slide the genitalia unit downward, leaving no space between the body and genitalia.
Insert the connector on both sides of the genitalia unit to the holes of the body.
Insert the connector at the front end.*Setting the male genitalia unit to the body is the same procedure.

9
2
200
Training
Preparation
Urethral catheterization/ Insert the balloon catheter
5. Setting up the irrigator bagConnect the irrigator bag tube to the irrigator bag.
Fill irrigator bag with water.②①
③
*
The top of the irrigator bag is to be higher than the bladder and lower than 50cm from the bed (table) surface. If the irrigator bag position is too high, excessive water pressure may cause leakage of the �uid from the valve.
Prepare a hook to hang the water bag. Hang the bag as shown below.
lower than 50cm from the bed

10
3・
・・
● ● ● ● ● ● ● ● ● ● ● ● ● ● ● ● ● ● ● ● ● ● ● ● ● ● ● ● ● ● ● ● ● ● ● ● ● ● ● ● ● ● ● ● ● ● ● ● ● ● ● ● ● ● ● ● ● ● ● ● ● ● ● ● ● ● ● ● ● ● ● ● ● ● ● ● ●
5㎝
Training
Training
Caution
Urethral catheterization/ Insert the balloon catheter
Filling the bladder may take a couple of seconds. Wait for a while before starting �rst catheterization for after set-up.When water runs short, add some with a beaker etc.
Caution
Put the catheter in the tray, drip small quantity of lubricant included in the set to its tip. Ensure that about 5cm from the tip is coated by lubricant.
Use 14Fr catheter and 16Fr indwelling catheter. Using larger catheter may cause breakage of the valve.
Please use the genuine lubricant included in the set. Usage of other lubricants will cause damage to the manikin in a short time as in the following cases:
- Water-soluble jelly-type lubricants will be washed out during urethral catheterization, which will decrease lubricating ability.
- Jelly-type lubricants which remain in the pass way and harden will cause damage to the valves.
●
●
●
Apply lubricant to the catheter
Successful catheter insertion is confirmed by flowing out of simulated urine (water).The male genitalia unit is available as an optional part.
*The male genitalia unit is an optional part.
Training in positioning, insertion of a urine catheter and placement of a indwelling catheter can be performed.

3
11
200
Training Urethral catheterization/ Insert the balloon catheter
After training
Caution Be careful not to throw two rubber ring away.
● ● ● ● ● ● ● ● ● ● ● ● ● ● ● ● ● ● ● ● ● ● ● ● ● ● ● ● ● ●
2. Detach the joint of the urinary bladder bypushing the button on the wall of theconnector at the end of the tube.
1. Open the genitalia unit, following the instruction on page 6.3. Attach the drainage pump (small connector)
to the tip of the tube which detach the bladder .*When the connection doesn't go smoothly, push the button
at the side wall of the built-in joint. (See instruction on page 7)
5. Disconnect the tube.4. Prepare a container such as abucket and pour o� the waterfrom the irrigator bag.
6. Put the tip of the tube into the bucket.Then drain water from the tube bysqueezing the drainage pump.
8. Take out the urinary bladder and valve from thegenitalia unit by screwing counter-clockwise anddrain the remaining water. Dry the parts naturally.
7. After all water is discharged from the tube, remove the tube from the left hip and detach the drainage pump (urinary bladder) (r). Then take out the tube for irrigation bag (q) from the inside of the waist.
Attach the urinary bladder and the valve to the genitalia unit. (Refer to Page 14) Then attach the unit to the body. Applying baby powder to the unit helps smoothly attachment.
9.

2
12
1female genitalia unit
Training
Preparation
Training
Enema and Rectal irrigation
Rectal irrigation
Caution
1. Take out the genitalia unit from themanikin
2. Turn the rectum and con�rm that it isinstalled well.
urinary bladderuterus
rectum
Attach the tube to the rectum.
Pull out a pad placed at the left side of the waist.There is a hole leading to the inside of the waist. Insert a connector of the draining hose (t) and put through the connector to the space of the genitalia unit. (Please refer to the right picture below.)
3.
Please note: When the connection doesn't �t smoothly, see instructions on page 7.
4. Attach the tube to the connector at the end of the rectum. Fix it firmly by pushing the connector until the click sound is heard. Prepare a bucket etc. for drainage and put the tip of the drainage hose (t) into the bucket.
Apply enough lubricant to the tool for enema using an instrument.
Training in positioning, enema and bowl irrigation can be performed.
Use 14Fr rectal cleaning catheter for rectal irrigation. Please use the genuine lubricant included in the set, not to use jelly-type lubricants which remain in the model will harden. Enema

3
13
Training
After training
Enema and Rectal irrigation
Water drainage from the tube●
1. Take out the genitalia unit. (See page 6).
2. Detach the joint of the rectum by pushing the button onthe wall of the connector at the end of the tube.
3. Attach the drainage pump(large connector) to the tipof the tube which detach therectum.
4. Put the tip of the tube into thebucket. Then drain water fromthe tube by squeezing thedrainage pump.
6. Take out the rectum and valve from the genitalia unit by screwing counter-clockwise and drainthe remaining water. Dry the parts naturally.
5. After all water is discharged from the tube, remove the tube from the right hip and detach the drainage pump (rectum) (s). Then reattach the injection pad.
screw the rectum part counter-clockwise
Caution Be careful not to throw “o” ring away.● ● ● ● ● ● ● ● ● ● ● ● ● ● ● ● ● ● ● ● ● ● ● ● ● ● ● ● ● ● ● ● ●
7. Dry the inside of the rectum. Before insertion of the rectum valve to the rectum, attach the ring to the valve. Then screwing the rectum on the hole of the genitalia unit, attach the rectum to the unit. On the attaching the genitalia unit to the body, applying baby powder to the unit helps smoothly attachment.

1
14
4
genitalia unit
genitalia unit
rectum
1. Screw the urinary bladder part counter-clockwise.
1. Screw the rectum part counter-clockwise.
Training in replacing stoma pouch (one piece type, two piece type) is possible.Simulated feces (soft) is available as an optional part for realistic training.
2. Take out the valve and set the new one.
2. Take out the valve and the ring, then changethe new valve.
Training Enema
Caution
Caution
urinary bladder
uterus
rectum
Urethral catheterization/Stoma care
Replacement of valve for urethral catheterization and rectum
Stoma care
Urethral catheterizationvalve
Rectal valve ring
Replacement of urethral catheterization valve●
Replacement of rectum valve
When replace the valve, be sure set two rubber Packin or ring. Omitting the rings may lead to leakage of water.
●
3. Reattach the urinary bladder to the genitalia unit.
● Rectum
Attach and detach the urinary bladder, rectumAttach the urinary bladder, uterus and rectum on the inner side of the genitalia unit by screwing up clockwise.Detach the parts from the genitalia unit by screwing up counterclockwise.
Attach the urinary bladder part
Attach the rectum part
vaseline
vaseline
ringvalvegenitalia unit
● Urinary bladder
urinarybladder
rubberring
rubberring
valve
For storage, put the simulated feces into an airtight container or a bag.The simulated feces are made of wheat clay.Dried simulated feces can be soften by water for repeated use.
*Apply Vaseline to both sides of ring/ring and also on the tip of the rectum container that touches the valve.
Rubberpackin
When the rectal valve is twisted, it may cause leakage of water. If it occurs, remove the rectal part, adjust the valve and set the part again.
3.Before insertion of the valve into the rectum part,put the ring over the valve. And then screw therectum on the connector of the genitalia unit.

15
3
1
2 Training
After training
Preparation
The white capThe white capRectum bottleRectum bottle
Training Digital disimpaction
1. Detach the rectum bottle at the internal sideof the unit by screwing clockwise.
2. Put on the white cap, then remount thebottle again.
3. Attach the unit to the manikin. (*See on page 8)
1. Set the simulated feces. Prepare the simulated feces with desired soft/hardness and shape fortraining. The soft/hardness can be controlled by adding water to the included simulated feces.Put enough lubricant to your �nger and push prepared feces into the unit from the anus opening.
2. Training session Always put enough lubricant to the trainees’ gloved �nger and the anus opening.
4. For storage, put the simulated feces into an airtight container or a bag.
soft simulated feceshardness simulated feces lubricant ( for catheterization etc.)
1. Take out the rectum unit (Digital disimpaction and suppository insertion unit) from the manikin.(See on the page 6)
2. Detach the rectum bottle and the white cap from the rectum unit.3. Remove the simulated feces from the rectum unit, and wash it up well.
After the rectum parts gets dry, apply the powder, and put the rectum bottle and the white cap into the rectum unit for storage.
Note: The simulated feces are made of wheat clay. Dried simulated feces can be soften by water for repeated use.
16
1
2
Training
Training
Feature
●
●
●
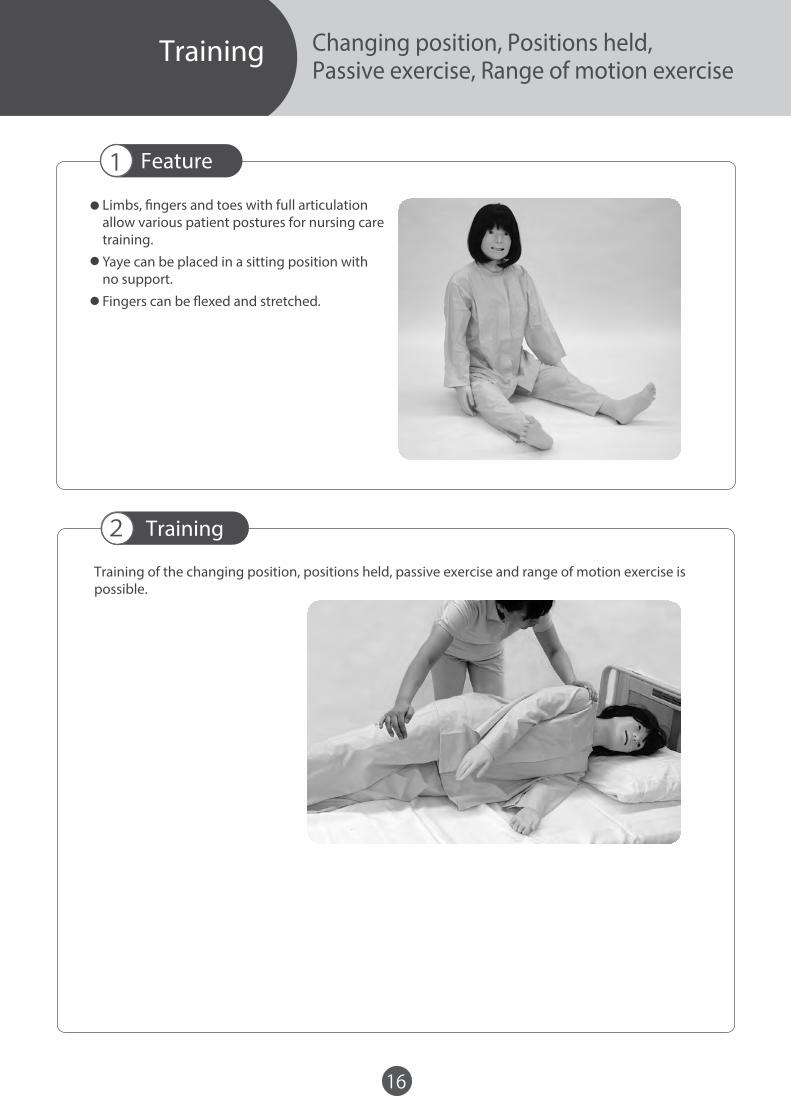
Changing position, Positions held, Passive exercise, Range of motion exercise
Training of the changing position, positions held, passive exercise and range of motion exercise is possible.
Limbs, �ngers and toes with full articulation allow various patient postures for nursing care training.
Yaye can be placed in a sitting position with no support.
Fingers can be �exed and stretched.

17
2
1
《 》
Bed and partial bathing, Hair careTraining
Feature
Preparation
● Seamless arms and legs provide true-to-life trainings in bed-bathing and foot-bathing training.
● Life-like manikin skin surface realize realistic smooth movement of dry towel in bed-bathing
● The artificial human hair wig for Yaye, allows shampooing practice with actual shampoo,conditioner, brush and dryer.
Age setting
● Setting of the wig
● Take o� the face mask
Setting of the wig see on the page 3.
The training of the senior patient is possible by use the optional face mask and wig (elderly).
2. Remove the one side of the band �xing fase mask in the back ofthe head.
3. Take o� the face mask from the neck side.
1. Take o� the plug fortracheotomy.
imanishi
楕円

3
● ● ● ● ● ● ● ● ● ● ● ● ● ● ● ● ● ● ● ● ● ● ● ● ● ● ● ● ● ● ● ● ● ● ● ● ● ● ● ● ● ● ● ● ● ● ● ● ● ● ● ● ● ● ● ● ● ● ● ● ● ● ● ● ● ● ● ● ● ● ● ● ● ● ● ● ● ● ●
After training
1.Taking o� the wig.
18
2
Bed and partial bathing, Hair careTraining
Preparation
● Setting the face mask
5. Insert the skin of the mask to the body and set the plug for tracheotomy.
1. Match the hole of the mask with three places of magnets part which is sum and before both ears.
2. Insert the salient of the mask in the hole of the neighborhood of ear.
4. Fit the belt in the hole ofthe mask in the back ofthe head.
3.
*Set the senior patient with wig and face mask (elderly).
《Maintenance》Do not leave the wig wet. To avoid hairs of the wig getting tangled, maintain the wig by following instruction.
(Follow the instruction on P.3)
2. Water is in the mask in the shampoo training. When water enters, take o� the mask and wipe o�water of the mask and head part enough. Then store the mask after set it again.
Wash the wig in water while brushing, then dry the wig with dry in the shade or a dryer.Brush wig again after dried. Then silicon spray can be used to avoid tangling of hairs.
①②
Hair of wig curls when use it for a long time. Periodical washing in water and brushing are e�ective to avoid it.
Caution
protective cover
Insert the tip of the belt that goes through the protective cover to the hole in the face mask.
imanishi
楕円
imanishi
ノート注釈
imanishi : Marked
inoue
線

●
●
19
1
Training
Training
Oral careChanging clothes
Oral care
Whole body manikin allows oral care training in various patient situation.
Brushing (with the denture )Oral massage (without the denture )Denture care (with the denture)
・・・
《Setting of the dentures》
《Detaching the dentures》
Avoid color migration to the manikin, choose the faint color pajama.Optional pajama is recommended to keep the manikin wear in long-term.
Caution
back side of the dentures
Lift the molar side with both upper and lower dentures and take it o�. Raise the upper denture forward and can remove it
Put the dentures one by one, in the mouth cavity of the manikin. Fit the grove at the back of the denture onto the gum and push them together �rmly.
Changing clothes
Yaye has soft limbs with close-to-human articulation. Yaye facilitates training in changing clothes.

20
2
1
Oxygen inhalation
Oxygen inhalation
Airway suction (oral, nasal and tracheostomy)
Airway suction (oral,nasal and tracheostomy)
Training
Training:
Training:
*The training of the airway suction using the simulated sputum is notpossible.
Three approaches for procedure of suction catheter insertion: oral, nasal and tracheostomy opening.
An oxgen mask can be set to the manikin to simulate oxygen inhalation.
We recommend 12 Fr catheters for this model.
Recommended tracheal tube is PORTEX tracheostomy tube II MY-102 2746-020.Other tubes may not �t to the opening.
Caution
Caution
Please use the genuine lubricant included in the set. Usage of other Jelly-type lubricants which remain in themodel will harden and cause damage to the valves.
2. Apply the included lubricant to the catheter, oral, nasal and tracheotomy opening.
3. Setting of tracheotomy tube.
Take o� the plug for tracheotomy and apply the included lubricantto the tracheotomy tube then insert it to the hole.
Training in changing gauze and cleansing the tube can also beperformed.

21
Training
1
Sacrum bone
Heel
・hygiene and skin care・Body positioning
・Changing diapers
3
1. Remove the catheter or tracheotomy tube.
Airway suction (oral, nasal and tracheotsomy)Pressures sores care
Pressures sores care
Airway suction (oral, nasal and tracheostomy)
Understanding the placeand stage of pressure sores and support to the having pressure sores.
Learning of method of the pressure sores care,washing and pasting up method of wound dressing materials.
After training:
After tracheotomy tube, set the plug to thetracheotomy hole.
2. Wipe o� the remaining lublicant completelywith wet cloth which stuck to catheter,tracheotomy tube, nose and oral cavity part.
Training:
When wash the skin, use the water in substitution for saline.
Caution

22
2
3
1
Training
After training
Preparation
The white capThe white capRectum bottleRectum bottle
Training Suppository insertion
1. Detach the rectum bottle at the internal sideof the unit by screwing clockwise.
2. Take out the white cap, then remount thebottle again.
3. Attach the unit to the manikin. (*See on page 8)
1. Use the included lubricant onto the handand simulated suppository for the training.Simulated suppositories come in the rectalbottle when the procedure is successful.
4. For storage, put the simulated suppositories into an container or a bag.
1. Take out the rectal unit (Digital disimpaction and suppository insertion unit) from the manikin.(See on the page 6)
2. Detach the rectal bottle from the rectal unit.
3. Clean the rectal unit, rectal bottle and simulated suppositories.After the parts gets dry, apply the powder, and put the rectal bottle and the white cap into therectum unit for storage.

2
23
1
●
Attach an injection pad to upper arm.
Attach an injection pad to thigh.
Upper-arm IM injection pad position.
Femoral IM injection pad position.
The attachment plateThe attachment plate
The attachment plateThe attachment plate
Training
Training
Preparation
Caution Ensure to remove the shoulder/thigh injection pads swiftly after use. The impressions on the manikin skin may become persistent.
● ● ● ● ● ● ● ● ● ● ● ● ● ● ● ● ● ● ● ● ● ● ● ● ● ● ● ● ● ● ● ● ● ● ● ● ● ● ● ● ● ● ● ● ● ● ● ● ● ● ● ● ● ● ● ● ● ● ● ● ● ● ● ● ● ● ● ● ● ● ● ● ● ● ● ● ● ● ● ●
Intramuscular injectionHypodermic injection
At the left gluteal, injection fluid training cannot be conducted. Just only puncture training can be conducted.Intramuscular injection needle of 21-23G and hypodermic injection needle of 24-27G are recommended for training.
Attach and detach the IM injection pads for upper arms and thighs.
Attach the pads
●Detach the pads
The shape of each pad is the same.
Open the attachment plate of an
injection site as shown in the pictures.
Open the attachment plate by hand and detach the pad from the manikin.*Open the attachment plate wide enough. Do not pull the pads without opening the attachment plate.Otherwise, it may cause a tear in the manikin skin.
・
・
Discharge all water from the pads after each session. Do not store the pads with water remain inside.
● ● ● ● ● ● ● ● ● ● ● ● ● ● ● ● ● ● ● ● ● ● ● ● ● ●
Caution
The training of Intramuscular injection can be conducted on upper arm and right gluteal.The training of Hypodermic injection can be conducted on upper arm, femoral and right gluteal. At the left gluteal, the just only puncture training can be conducted.
24
3
● ● ● ● ● ● ● ● ● ● ● ● ● ● ● ● ● ● ● ● ● ● ● ● ● ●
●
●
●
●
●
Training
After training
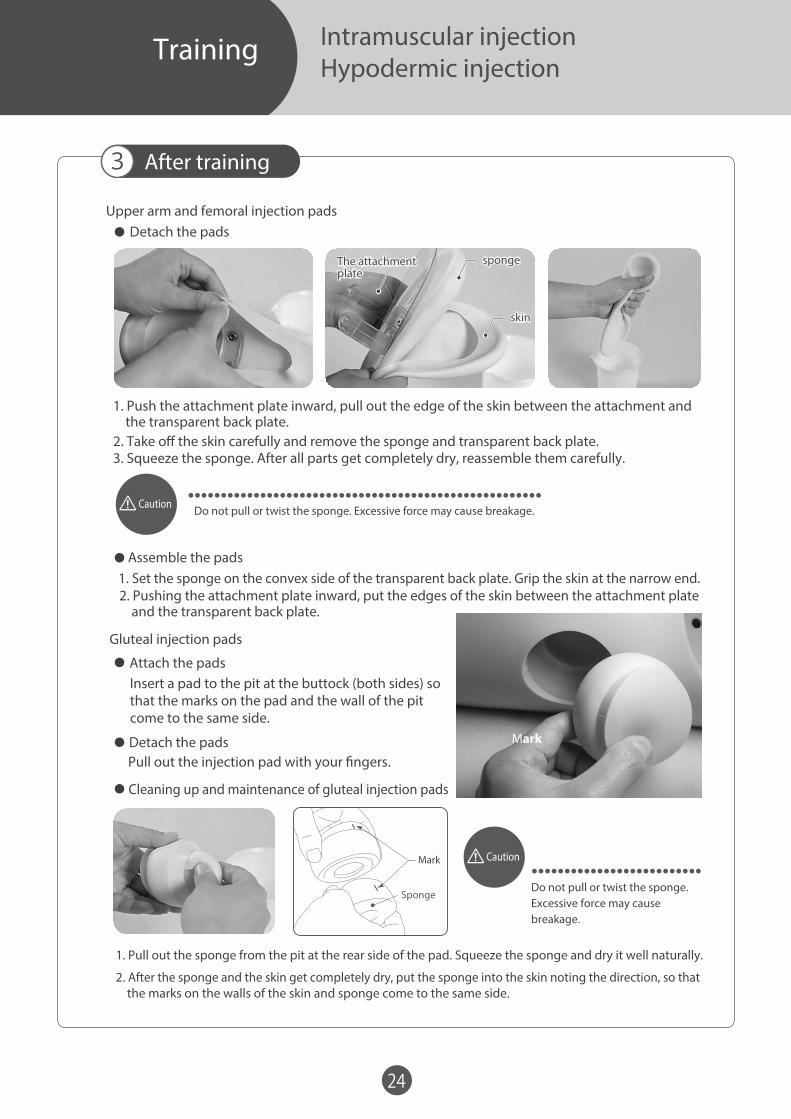
Intramuscular injectionHypodermic injection
sponge
skin
Gluteal injection pads
Mark
Mark
Sponge
sponge
skin
The attachment plate The attachment plate
Caution
Caution
Do not pull or twist the sponge. Excessive force may cause breakage.● ● ● ● ● ● ● ● ● ● ● ● ● ● ● ● ● ● ● ● ● ● ● ● ● ● ● ● ● ● ● ● ● ● ● ● ● ● ● ● ● ● ● ● ● ● ● ● ● ● ● ● ● ●
Upper arm and femoral injection padsDetach the pads
1. Push the attachment plate inward, pull out the edge of the skin between the attachment andthe transparent back plate.
2. Take o� the skin carefully and remove the sponge and transparent back plate.3. Squeeze the sponge. After all parts get completely dry, reassemble them carefully.
Assemble the pads1. Set the sponge on the convex side of the transparent back plate. Grip the skin at the narrow end.2. Pushing the attachment plate inward, put the edges of the skin between the attachment plate
and the transparent back plate.
Attach the padsInsert a pad to the pit at the buttock (both sides) so that the marks on the pad and the wall of the pit come to the same side.
Detach the padsPull out the injection pad with your �ngers.
Cleaning up and maintenance of gluteal injection pads
1. Pull out the sponge from the pit at the rear side of the pad. Squeeze the sponge and dry it well naturally.
2. After the sponge and the skin get completely dry, put the sponge into the skin noting the direction, so thatthe marks on the walls of the skin and sponge come to the same side.
Do not pull or twist the sponge.Excessive force may cause breakage.
imanishi
楕円
imanishi
楕円
imanishi
線
imanishi
線

25
1
2
Intravenous injectionTraining
Training
Preparation
Openings on the left forearm and the back of the hand allow training on intravenous injection and fixing the dressing materials.Median vein on the left forearm which is fixing of the the puncture site allow training on conf irmation of natural instillation
1.
2. Connection of the tube of the irrigation bag and the connector attached to inside of the waist Connect connector of the blue tube attached to the left side inside of the waist and the connector of the tube of the irrigation bag. Then close the chest cover. (Refer to article 3 in page 4.)
Insertion of tube of the irrigation bag It is recommended that following operation should be made with two persons.Detach the genitalia unit from the manikin and peel off the Velcro tape on the inside of the waist. Then lift the leg side of the chest cover up. (In regard to the detail of this operation, please refer to article 1 in page 4.) One person support the chest cover.Another person pull out a pad at the left side of the waist. There is a hole leading to the inside of the waist. Insert a tube of the irrigation bag (small) (p) and put through the tube to the hole at the front face of the waist.
imanishi
ノート注釈
imanishi : Marked
imanishi
楕円
imanishi
楕円
imanishi
楕円

26
1.
3
1
● ● ● ● ● ● ● ● ● ● ● ● ● ● ● ● ● ● ● ● ●
Intravenous injectionTPN care
TPN care
Training
Training:
After training
Detach the Injection pad (median vein) (e). Fill the opening at the median vein with about two pieces of tissue paper and then drain water in the tube with the drainage pump (r). After water drainage from the tube, remove the tissue paper from the opening and wipe inside of the opening as well as the pad. Dry the parts naturally and attach the injection pad.When closing the chest cover, insert the Velcro tape to the waist at first. (Refer to article 1 in page 4)
Use CVC kit for training.Caution
Yaye has an opening for a CVC catheter to allow training in TPN care such as:-�xing and dressing on the catheter route,-cleansing of the site-changing of dressing materials
Water drainage from the tubeClose the tube cock of the irrigation bag (small). Detach the genitalia unit and peel off the Velcro tape on the inside of the waist. Then lift the leg side of the chest cover up. (Refer to article 1 in page 4)Pushing the button of the joint, detach the irrigation bag (small). Connect the joint and Drainage pump (urinary bladder) (r).
imanishi
楕円
imanishi
線
imanishi
楕円
imanishi
楕円
imanishi
線
imanishi
線

27
1
Airway Opening TechniquesTraining
Training
Setting the head at "sni�ng position", intubation withlaryngoscope can be performed.
Training in assistance of tracheal intubation is possible, allowing training in perioperative or ICU scenarios.-preparation of devices –oral airway intubation (laryngoscope, video laryngoscope), con�rmation by auscultation, �xing the tracheal tube –observation of the rise of the chest -chest compression
For oral route airway, spray enough lubricant in the mouthand the tracheal tube before inserting the tracheal tube.
Recommended tools: Macintosh laryngoscope Size: No.4Tracheal tube: 7.0, 7.5 mm (inside diameter)
Use the lubricant included in the set. Others like gel type may remain in the model and become irremovable.
Caution
Preparation and assistance of intraoral intubation
Inserting the tracheal tube●
● Confirmation Successful Intubation
The placement of the tube can be con�rmed byauscultation or movement of thoracoabdominalarea.

28
1
2
Intubation by the video laryngoscope
Securing the tracheal tube
Spray enough lubricant to the video laryngoscope and the oral cavity before training.
Do not leave the tapes on the model. If the tapes remain on the model for long time, its skin surface will become sticky with adhesive of tapes.
Caution
Caution
Airway Opening TechniquesTraining
Training
After training
Preparation and assistance of intraoral intubation
●
●
Wipe off the lublicant●
Use the lubricant included in the set.
Wipe o� the remaining lublicant completelywith wet cloth which stuck to tracheal tubeand oral cavity part.
Caution After the training, be sure that the position of lower jaw is correct. In case that the lower jaw is stored in a distorted condition, it can cause the model to be deformed or damaged.
inoue
楕円
29
1
・・・
1
Training
Training:
Training:
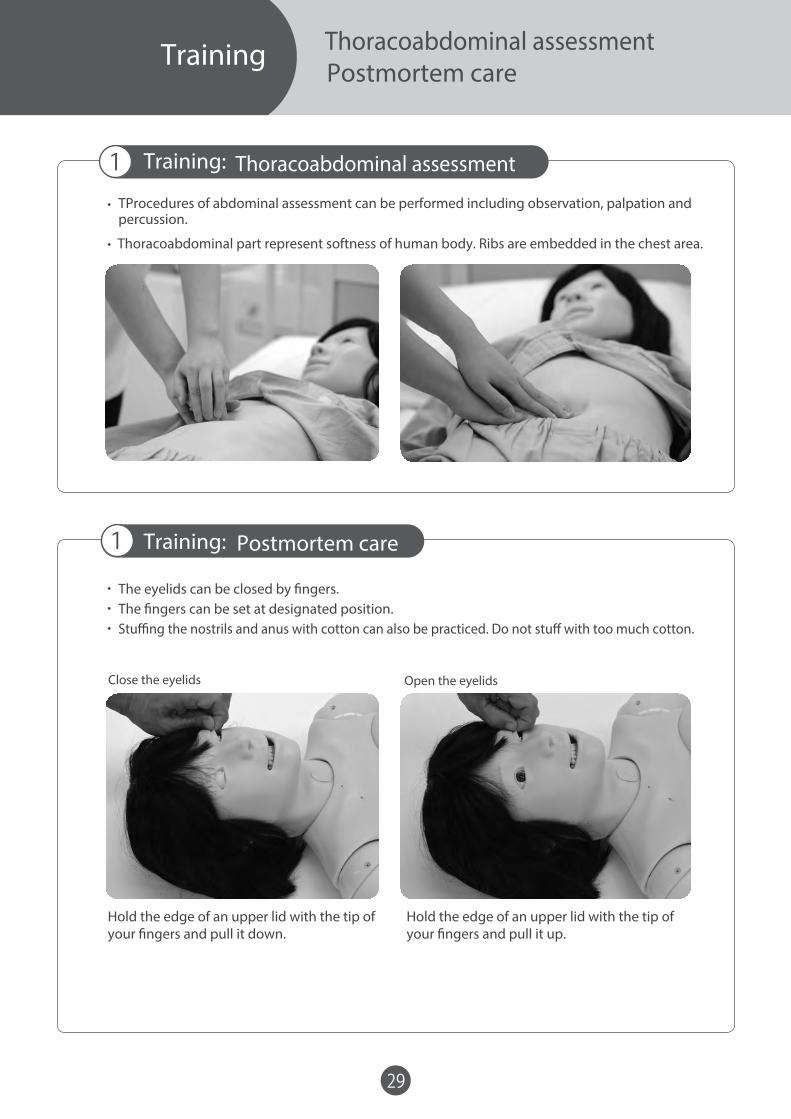
Postmortem care
Postmortem care
Close the eyelids Open the eyelids
Hold the edge of an upper lid with the tip of your �ngers and pull it down.
Hold the edge of an upper lid with the tip of your �ngers and pull it up.
The eyelids can be closed by �ngers.The �ngers can be set at designated position.
・
・
TProcedures of abdominal assessment can be performed including observation, palpation andpercussion.
Stu�ng the nostrils and anus with cotton can also be practiced. Do not stu� with too much cotton.
Thoracoabdominal assessment
Thoracoabdominal assessment
Thoracoabdominal part represent softness of human body. Ribs are embedded in the chest area.

code
11404-04011404-020
name
code name
Wig (young)
Face Mask (young)
Wig (elderly)Face Mask (elderly)
11251-04011251-030
11251-050
11404-060
11404-050
11251-310
11251-350 Rectal valve
11229-050 Lubricant (for airway suction etc.) 11381-800 Lubricant (for catheterization etc.)
11404-08011251-32011251-330
11404-03011404-010
11404-070
6 valves for urinary bladder valveSimulated suppository set
Female genitalia (catheterization, enema)
Female genitalia (suppository insertion, digital disimpaction)
Male genitalia Wig (elderly)Face mask (elderly) Male genitalia
Simulated feses set
2 shoulder injection pads2 thigh injection pads 2 hip IM pads 4 injection pad (median vein)
Wig (young) Face Mask (young)
Rectal valve
Lubricant (for airway suction etc.)
Lubricant (for catheterization etc.)
Urinary bladder valve
Simulated suppository
Female genitalia
Female genitalia
Simulated feses (soft)Simulated feses (hardness)
Shoulder injection pads Thigh injection pads Hip IM pads
Injection pad (median vein)
Optionalparts
Consumableparts
Don’t mark on the model and other components with pen or leave printed materials contacted on their surface. Ink marks on the models will be irremovable.
Caution
The contents of the instruction manual are subject to change without prior notice.No part of this instruction manual may be reproduced or transmitted in any form without permission from the manufacturer. Please contact manufacturer for extra copies of this manual which may contain important updates and revisions. Please contact manufacturer with any discrepancies in this manual or product feedback. Your cooperation is greatly appreciated.
For inquiries and service, please contact your distributor or KYOTO KAGAKU CO., LTD.
2020.11
■ ■(World Wide)
Kyoto Kagaku America Inc.
(catheterization, enema)
(suppository insertion, digital disimpaction)

マスク附属の「首の保護カバー」の取り付け方法
⇒ ⇒
① ②
1. ご購入いただいた首の保護カバーは①の様な状態ですので、②のように片側の 2つの穴にバンドを通してから、マスクの首部の片側の穴に保護カバーのベルトを通して取り付けてください。
2. 頭部にマスクかぶせ、後頭部で保護カバーのもう一方のバンドをマスクの穴にはめ込みます。
首の保護カバーは、モデルの頭を前後に動かしたときに、実習者の皮膚が挟まれないように保護するためのものです。必ず取り付けてご使用ください。
首の保護カバー
首の保護カバー
11404-01011404-020
2019.04
マスク ( 成人女性) ( 高齢者)
11404-01011404-020
2019.04
Use of the Protective Neck Cover for the Face Mask
⇒ ⇒
① ②
1. At the time of delivery, the cover and the band is connected at one side as shown in ①. Thread theother side of the band through the two holes as shown in ②, then thread it through the hole at theside of the neck area of the face mask.
2. Set the face mask on the head of themanikin and thread the tip of theband at the free end of the coverthrough the opening in the facemask, so that both sides of the coverare connected to the face mask.
Be sure to use the protective neck cover. The cover prevents trainee's skin and fingers from being caught or pinched by plastic parts when moving the manikin head.
protective neck cover
protective neck cover
face mask (young) (elderly)

左回しではずしてください
直腸ユニット
弁 ※ ワセリンをリングの両面及び 直腸の弁と接する面に塗布し ます。
2. 中に入っている直腸弁とリングを取り出し、直腸弁を新し
いものと交換します。
1. 直腸部を左側に廻して取り外します。
3. 取り付けは、直腸弁にリングを取り付け、直腸部に
差し込んでから性器ユニットに取り付けます。
リング
ワセリン
直腸
ワセリン
2017/11/20
直腸弁の交換11251-350
screw the rectum part counter-clockwise
1. Screw the rectum part counter-clockwise.
2. Take out the valve and the ring, then change the new valve.
Caution
11251-350 Replacement of rectum valve
genitalia unit rectum
vaseline
vaseline
ring
valve
3. Before insertion of the valve into the rectum part, put the ring over the valve. And then screw the rectum on the connector of the genitalia unit.
*Apply Vaseline to both sides of ring/ ring and also on the tip of the rectum container that touches the valve.
When the rectal valve is twisted, it may cause leakage of water. If it occurs, remove the rectal part, adjust the valve and set the part again.
直腸弁がよじれて取り付けられていると浣腸液が漏れる場合
があります。その場合は一旦取り外し、よじれがないよう取
り付けてください。
URL http://www.kyotokagaku.com e-mail [email protected]