
MUSIC SOFTWARE DEVELOPMENT FOR GHANAIAN MUSIC …
19
MUSIC SOFTWARE DEVELOPMENT FOR GHANAIAN MUSIC EDUCATORS IN TERTIARY INSTITUTIONS. ANTHONY YAW NYAMFUL Lecturer, Music Centre, Methodist University College Ghana Abstract During the 20 th Century, the field of education witnessed dramatic changes in pedagogical strategies engendered by information and communication technology (ICT). Computer-assisted instruction has, in some instances, replaced the student- instructor interaction in the teaching and learning environment. Arts educators, who, for a long time, adopted the apprenticeship approach to teaching, where the master artistes teach the novices, have also embraced the computer-assisted interactive approach. Since the year 2000, Departments of Music in Ghanaian Universities have been exposed to innovative teaching in which ICT is employed. However, in the area of music instructional technology, little has been done by Ghanaian music educators, especially in the area of music software development. The purpose of this paper therefore is to encourage music educators in tertiary institutions to acquire skills in the development of music software and utilize them for the enhancement of teaching and learning.
Transcript of MUSIC SOFTWARE DEVELOPMENT FOR GHANAIAN MUSIC …
MUSIC SOFTWARE DEVELOPMENT FOR GHANAIAN MUSIC
EDUCATORS IN TERTIARY INSTITUTIONS.
ANTHONY YAW NYAMFUL
Lecturer, Music Centre, Methodist University College Ghana
Abstract
During the 20th Century, the field of education witnessed dramatic changes in
pedagogical strategies engendered by information and communication technology
(ICT). Computer-assisted instruction has, in some instances, replaced the student-
instructor interaction in the teaching and learning environment. Arts educators, who,
for a long time, adopted the apprenticeship approach to teaching, where the master
artistes teach the novices, have also embraced the computer-assisted interactive
approach. Since the year 2000, Departments of Music in Ghanaian Universities have
been exposed to innovative teaching in which ICT is employed. However, in the area
of music instructional technology, little has been done by Ghanaian music educators,
especially in the area of music software development. The purpose of this paper
therefore is to encourage music educators in tertiary institutions to acquire skills in the
development of music software and utilize them for the enhancement of teaching and
learning.
2
Introduction
Music software development concerns the development of music application software,
which may either be notation software for the composition of music or tutorial software
for the teaching of music history, theory and applied music. Music tutorial application
software, often referred to as music instructional technology, enhances the teaching
and learning of music. As we move into the 21st century, the need for innovative ways
for the teaching of the performing arts has become compelling.
According to O. M. Hartsell (1971) music instructional technology today consists of far
more than visual aids. It represents a dynamic educational force encompassing the
entire system for learning, the process of instruction, and the total environment for
music education. No music teacher can afford to ignore the currency of such
resources for learning. Current generation of students require from teachers more
relevant, challenging, and commanding modes of education responsive to the times
and the needs of each individual. A research conducted by the author of this paper
revealed that music tutorial application software developed by Ghanaian music
educators for the teaching of African music was nonexistent. The writer of this paper,
therefore, developed a tutorial application software, adowa, to demonstrate that the
acquisition of skills in the development of music software is within the capacity of
Ghanaian music teachers.
Extant Music Application Software
According to Brian and Webster (1995) Music software development began in the
1940s when Frank Codson developed ear training drills using examples on magnetic
recording tape. In the 1950s, Presser invented the first automated teaching machine
based on Skinnerean concepts of behavioral modification. Norman Crowder (1960) on
the other hand proposed the development of programmed instruction to customize
instruction to different ability levels.
In the 1960s, James Carlsen developed the first music programmed instruction for
melodic dictation with prerecorded patterns on magnetic tape. In the 1970s, David
Shrader developed a rhythm teaching machine and David Williams developed the first
Music Instructional Technology software. Nonetheless, it was in the 1980s that CD-
3
ROM, CD audio format and Musical Instrument Digital Interface (MIDI) were
established worldwide.
Furthermore, Delaware established videodisc music series for interactive instruction.
Nonetheless, from the 1990s up to the present time, there has been the influx of
applications software for the teaching and learning of music. Examples are, ‘ear-pro’,
‘finale’, ‘capella’, ‘kamien’, ‘chord wizard’ ‘ music star’, ‘musical tutorial’ etc. Research
has demonstrated that traditional methods of teaching music, dovetailed with music
instructional technology, achieve remarkable results. For example, Lindeman (1979)
created three lessons in rhythm for pre-service elementary teachers using a computer
to present text, printed music notation, and an audio tape. The subjects in her study
found the lessons to be “an interesting way to learn” and “valuable for working at one’s
own pace.”(ibid).
Elckmann and Fowler (1999) on the other hand state:
Computer-assisted instruction encompasses both human and
nonhuman resources; it includes not only electronic
communication media, but a systematic design, implementation,
and evaluation of the entire process of learning and teaching. (p.
34)
However, it must be noted that computer-assisted instructional design is
complementary to the work of the teacher; it does not replace him. Furthermore,
Elckmann and Fowler (1999) assessing the impact of new technologies on the
teaching of music noted:
Current Technologies open vast new possibilities both to the music teacher
and to his students. Music teachers can increase the whole range and impact
of their teaching if they exploit present-day technology to assist them in their
efforts. Technological tools are used in numerous ways. A particular medium
may be used adjunctively to assist in the presentation of material. An
overhead projector shows positions of various chords to a guitar class, or a
map of the countries and cities of Medieval Europe to a class in music
4
history. In this case, the teacher uses the media to supplement his own style
of presentation while remaining in complete control of content.” (p. 39).
In any case various educational media spare the music teacher many redundancies.
For example, teaching and administrative strategies may be shared by means of
prepared programme on closed-circuit television. Elckmann and Fowler (1999) aver
that rudiment of music is taught through a programmed text. In this case, the teacher
steps aside, permitting the technology to replace some of the repetitive aspects of
teaching.
In the preceding discussion it can be observed that the development of music
instructional technology in Western countries is ongoing and progressive. However in
Ghana, the use of instructional technology for the teaching of music began with the
advent of radio cassette and gramophone players in the sixties. This was followed by
computers and overhead projectors in the eighties. In the nineties, music departments
in universities introduced the use of application software for the teaching and learning
of music. However, it was observed that the number of applications available were
limited. The writer, however, has developed two tutorial applications software for
theory and the learning of adowa drum patterns.
Significance
Music instructional technology is new to our present educational system; as a result,
little has been done so far to introduce it in our music educational programmes at all
levels. This is because most Ghanaian music lecturers lack knowledge and skills in the
development and use of music instructional technology. It is therefore hoped that this
paper will enhance the knowledge of music lecturers as regards the significance of
music instructional technology for the learning and teaching of music. According to
Albright and Graf (1992)
Instructional technology permits the addition of visuals, sound, and motion to
information display and can be an effective means of enhancing teaching and
learning.

5
Nonetheless, the significance of instructional technology in the teaching and learning
of music depends on how effectively they are used. Thus when used appropriately and
effectively, they can help enhance the teaching and learning of music in the following
manner: Instructional technology can bring to the classroom situation, places, people,
images, and events which cannot be produced with an orthodox method of teaching
music. For example, during music appreciation lessons, it can help students to
overcome deficiencies through drill and practice. Furthermore, students can be helped
through drill and practice to master the names of the lines and spaces for the bass and
the treble staves, chords, identify intervals and their tones, and rhythmic patterns.
Furthermore, it removes the boredom which would have been inevitable if the student
had learnt music without instructional technology. Instructional technology can help to
increase student and instructor productivity by reducing the time spent on routine
record-keeping and communication between instructors and students.
The development of the adowa application software.
Macromedia Authorware is the main application software that supported the building of
the adowa application software. Lubensky (2003) has noted that authorware integrates
graphics, sound, animation, text, and video into compelling rich-media learning
solutions. According to Lubensky, authorware interface provides a fast and easy
environment for creating interactive applications. Drag-and-drop icons support rapid
application prototyping and development without the need for extensive scripting. The
flow-line provides an intuitive representation of the structure of large, highly branched
learning applications. Thus macromedia Authorware 7.0 and above extends the
power of the visual interface in Authorware by adding the ability to easily synchronize
media and events over time.

6
Figure 1: The interface of authorware application software.
Furthermore, Lubensky (2003) noted that the new Media Synchronization feature
allows an author to display media or trigger any event based on media position in a
sound or movie file. According to him, authorware has always offered a powerful
environment for creating applications driven by user interactions. Now, authors can
easily coordinate media and events over time using a simple, drag-and-drop interface.
Already capable of delivering applications on multiple platforms, Authorware 7.0
streamlines the publishing process with new One-Button Publishing. One-Button
Publishing integrates and automates all the steps in the process, making it easy and
efficient.
The following tools of Authorware were used for the development of adowa application
software. The display icon, the decision icon, the interaction icon, the framework icon,
the map icon, the sound icon, the movie icon, the icon colour palette, the calculation
icon’ the navigation icon and knowledge objects.
7
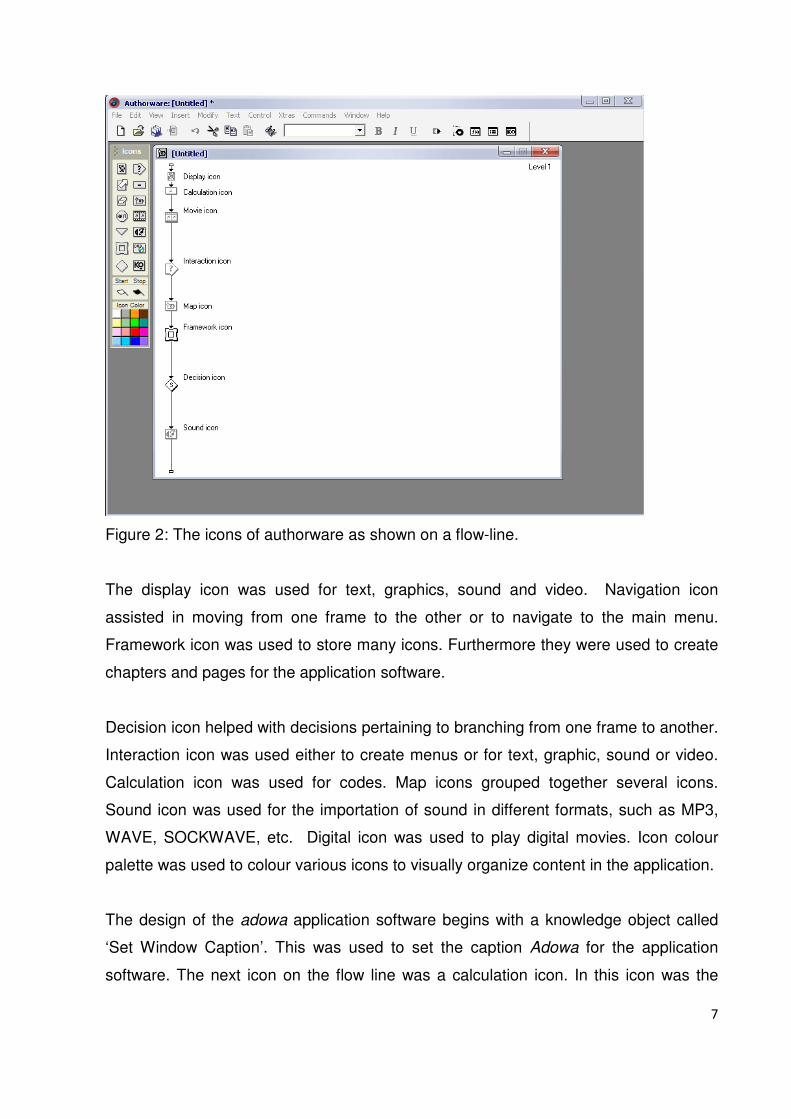
Figure 2: The icons of authorware as shown on a flow-line.
The display icon was used for text, graphics, sound and video. Navigation icon
assisted in moving from one frame to the other or to navigate to the main menu.
Framework icon was used to store many icons. Furthermore they were used to create
chapters and pages for the application software.
Decision icon helped with decisions pertaining to branching from one frame to another.
Interaction icon was used either to create menus or for text, graphic, sound or video.
Calculation icon was used for codes. Map icons grouped together several icons.
Sound icon was used for the importation of sound in different formats, such as MP3,
WAVE, SOCKWAVE, etc. Digital icon was used to play digital movies. Icon colour
palette was used to colour various icons to visually organize content in the application.
The design of the adowa application software begins with a knowledge object called
‘Set Window Caption’. This was used to set the caption Adowa for the application
software. The next icon on the flow line was a calculation icon. In this icon was the

8
following code (AdowaVersion:=Icon Title short (Icon ID). This code made sure that
the title for the application was maintained in all the pages of the application software.
The next icon was a calculation icon which had the following codes: (acNavigation Layer:= 99)
(acNavActive:=True)
(Resize Window (800,600)
The first code helps the user to navigate to every page within the software which
should not be more than 99 pages for each chapter or map icon. The second code
was an auxiliary one which helped to make the first code active. The third code sets
the size of the window for the application software. Thus the first figure (800)
represented the width whilst the second figure (600) represented the height. The third
icon on the main flow line was also a calculation icon. This icon contained the following
codes:
Adowa File:= RecordsLocation ‘Adowa. Log’
acTopicDoneList:=List
(Read Ext File (Adowalogfile)
Temp number 01:=Icon Num.
Children (@ ‘Adowa application framework”) – 2 If List Count (ac topic Arne List &
Temp number 01 then ac Topic Done List: = Array (“0”, Temp number 01)
end if.
The codes above were used to display the topic completion indicators. The acTopic
DoneList helped the user to navigate through each major topic and sub topics.
The next on the main flow line was a display icon which was used to set the
background for the application software. The next icon on the main flow line was a
map icon which contained an interaction icon, two map icons and a calculation icon.
The first map icon contained a decision icon and a navigation icon which helped to
reset or lead back to the main menu of the application software.
9
The second map icon contained a calculation icon followed by a decision icon with a
navigation icon linked to the decision icon. This helped the user to quit the programme.
Thus the calculation icon had the following code. If acITSActive= 1 then call ScriptIcon
(a.SayText+fn, “Are you certain you wish to quit? (OK, cancel).
End if.
The next icon on the flow line was an interaction icon with nine navigation icons which
helped the user to navigate through the nine menu items as follows:
Overview; Bell, Donno, Atumpum, Apentema, Petia, Quiz practical and quiz written
and Manual.
All the major icons on the flow line were put in a framework icon which was named as
adowa application framework. This framework had nine map icons which contained
the pages for the nine menu items or topics. The last icon was a calculation icon which
was used to quit the application software.
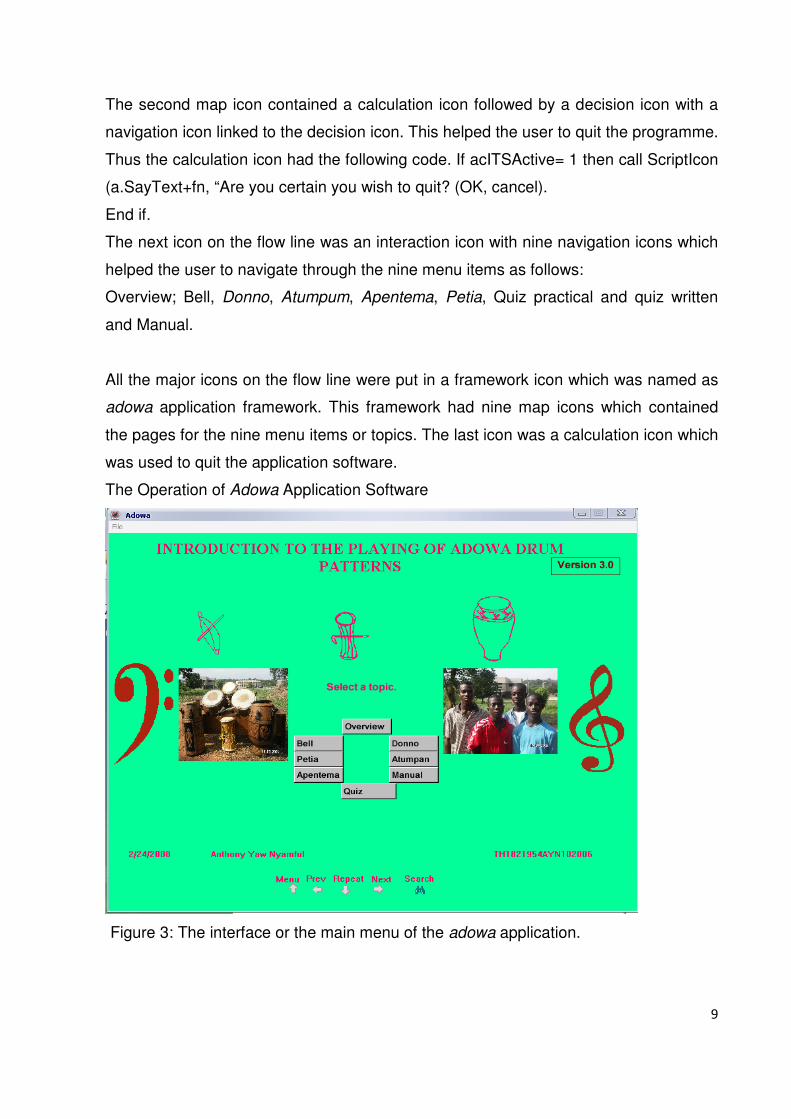
The Operation of Adowa Application Software
Figure 3: The interface or the main menu of the adowa application.

10
The main menu of the adowa application as shown above, was easy to use. The
software was therefore user-friendly because the user clicked on buttons to get
access to various topics. The interface was made up of the following: Main Topic:
Introduction to the playing of Adowa drum patterns. Version 3.0: File menu: The file
menu had the following sub-menu 1. Reset Menu (with Alt + M as the shortcut.) The
reset sub-menu was used to reset the programme. 2. Quit menu: This was used to
quit the programme (with Ctrl + Q as the shortcut.)
The following buttons were used to access the various topics: The Overview button.
The overview button introduced the user to adowa in general. The user was therefore
taken through five pages or screens. With regard to the first page, the user was given
a general view of adowa in a video format. The second page consisted of an
example of a complete video of adowa performance. To play the video, the user had
to click on the play button. Arrow buttons were three in number. The right arrow
button opened the various pages or screens from page one to the highest page. The
left arrow button opened the pages backwards to previous pages. The down arrow
repeated the same page from the top. Search button. This helped users to another
main menu where the user could access directly all major and minor topics. To do
that the user had to use the down button or the up button to select a topic. On the
other hand, the user clicked on a topic to select it. The selected topic was then seen
at the top in yellow colour. The cancel button helped the user to get to the main
menu. Apentema button helped the user through the pages consisting of a brief
write-up on the apentema drum. Quiz button: This button helped the students to test
their knowledge on the write-up by going through a quiz which was practical and
written.
11
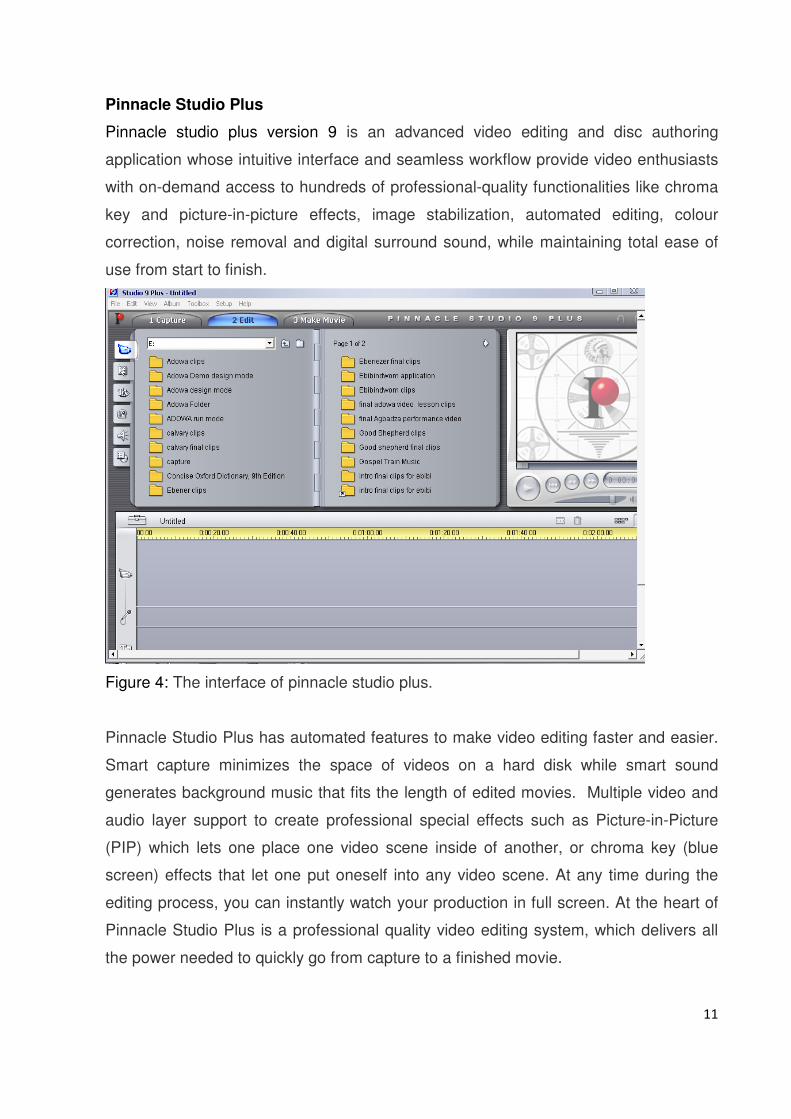
Pinnacle Studio Plus
Pinnacle studio plus version 9 is an advanced video editing and disc authoring
application whose intuitive interface and seamless workflow provide video enthusiasts
with on-demand access to hundreds of professional-quality functionalities like chroma
key and picture-in-picture effects, image stabilization, automated editing, colour
correction, noise removal and digital surround sound, while maintaining total ease of
use from start to finish.
Figure 4: The interface of pinnacle studio plus.
Pinnacle Studio Plus has automated features to make video editing faster and easier.
Smart capture minimizes the space of videos on a hard disk while smart sound
generates background music that fits the length of edited movies. Multiple video and
audio layer support to create professional special effects such as Picture-in-Picture
(PIP) which lets one place one video scene inside of another, or chroma key (blue
screen) effects that let one put oneself into any video scene. At any time during the
editing process, you can instantly watch your production in full screen. At the heart of
Pinnacle Studio Plus is a professional quality video editing system, which delivers all
the power needed to quickly go from capture to a finished movie.
12
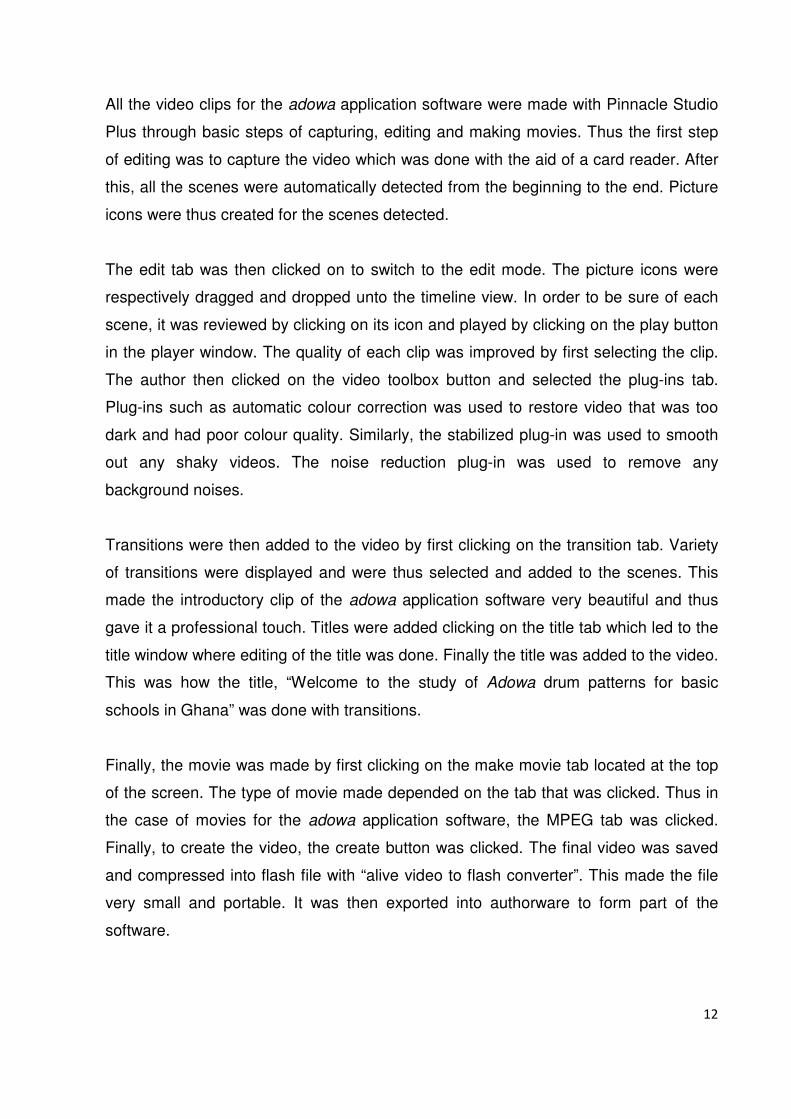
All the video clips for the adowa application software were made with Pinnacle Studio
Plus through basic steps of capturing, editing and making movies. Thus the first step
of editing was to capture the video which was done with the aid of a card reader. After
this, all the scenes were automatically detected from the beginning to the end. Picture
icons were thus created for the scenes detected.
The edit tab was then clicked on to switch to the edit mode. The picture icons were
respectively dragged and dropped unto the timeline view. In order to be sure of each
scene, it was reviewed by clicking on its icon and played by clicking on the play button
in the player window. The quality of each clip was improved by first selecting the clip.
The author then clicked on the video toolbox button and selected the plug-ins tab.
Plug-ins such as automatic colour correction was used to restore video that was too
dark and had poor colour quality. Similarly, the stabilized plug-in was used to smooth
out any shaky videos. The noise reduction plug-in was used to remove any
background noises.
Transitions were then added to the video by first clicking on the transition tab. Variety
of transitions were displayed and were thus selected and added to the scenes. This
made the introductory clip of the adowa application software very beautiful and thus
gave it a professional touch. Titles were added clicking on the title tab which led to the
title window where editing of the title was done. Finally the title was added to the video.
This was how the title, “Welcome to the study of Adowa drum patterns for basic
schools in Ghana” was done with transitions.
Finally, the movie was made by first clicking on the make movie tab located at the top
of the screen. The type of movie made depended on the tab that was clicked. Thus in
the case of movies for the adowa application software, the MPEG tab was clicked.
Finally, to create the video, the create button was clicked. The final video was saved
and compressed into flash file with “alive video to flash converter”. This made the file
very small and portable. It was then exported into authorware to form part of the
software.
13
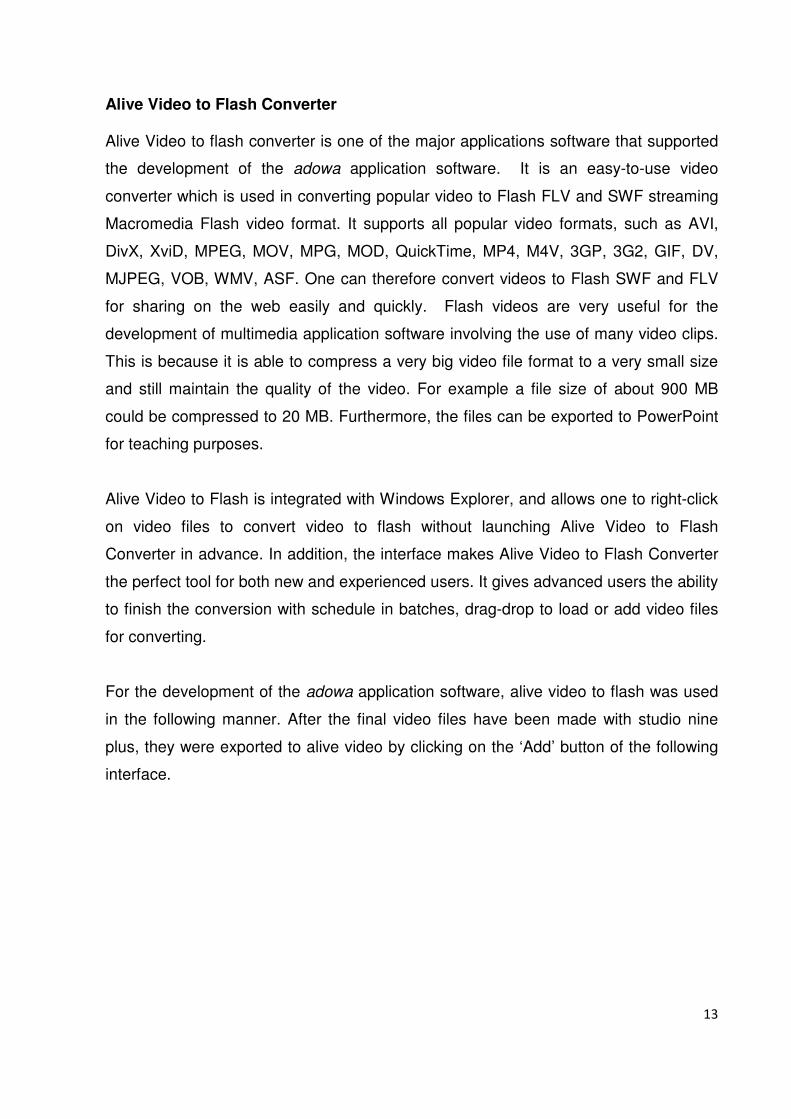
Alive Video to Flash Converter Alive Video to flash converter is one of the major applications software that supported
the development of the adowa application software. It is an easy-to-use video
converter which is used in converting popular video to Flash FLV and SWF streaming
Macromedia Flash video format. It supports all popular video formats, such as AVI,
DivX, XviD, MPEG, MOV, MPG, MOD, QuickTime, MP4, M4V, 3GP, 3G2, GIF, DV,
MJPEG, VOB, WMV, ASF. One can therefore convert videos to Flash SWF and FLV
for sharing on the web easily and quickly. Flash videos are very useful for the
development of multimedia application software involving the use of many video clips.
This is because it is able to compress a very big video file format to a very small size
and still maintain the quality of the video. For example a file size of about 900 MB
could be compressed to 20 MB. Furthermore, the files can be exported to PowerPoint
for teaching purposes.
Alive Video to Flash is integrated with Windows Explorer, and allows one to right-click
on video files to convert video to flash without launching Alive Video to Flash
Converter in advance. In addition, the interface makes Alive Video to Flash Converter
the perfect tool for both new and experienced users. It gives advanced users the ability
to finish the conversion with schedule in batches, drag-drop to load or add video files
for converting.
For the development of the adowa application software, alive video to flash was used
in the following manner. After the final video files have been made with studio nine
plus, they were exported to alive video by clicking on the ‘Add’ button of the following
interface.
14
Figure 9: The interface of Alive video to flash converter.
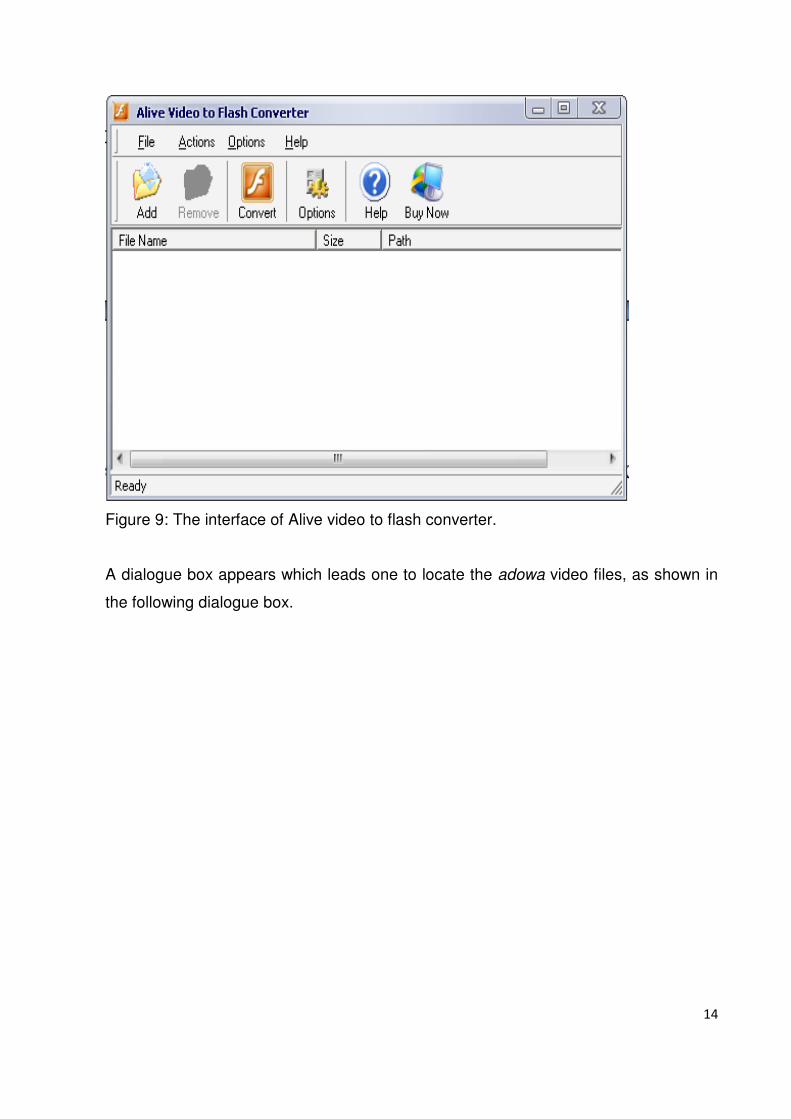
A dialogue box appears which leads one to locate the adowa video files, as shown in
the following dialogue box.
15
Figure 10: A dialogue box 1 for Alive video to flash converter.
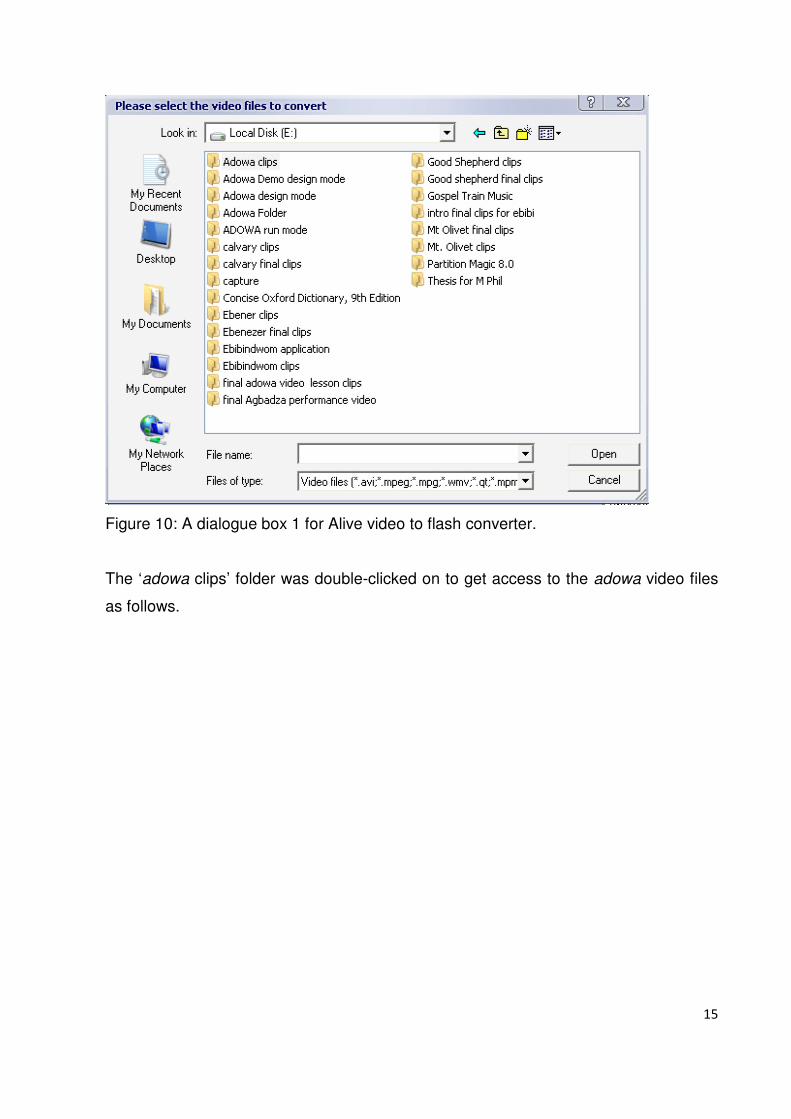
The ‘adowa clips’ folder was double-clicked on to get access to the adowa video files
as follows.

16
Figure 11: A dialogue box 2 for Alive video to flash converter.
The files were then selected and converted to flash video files by clicking on the
convert button. The option button was used to select the required size of the video;
which was 720 by 480. The converted video files were saved and exported into
macromedia author ware for the development of the adowa application software.
Methods that guided the Testing of the adowa application software
It has been established that the adowa application software was built with the aid of
the following applications software; Authorware, Pinnacle Studio Plus, Alive video to
flash converter, Alive video converter and Sound Forge. However, to test the feasibility
of the adowa application programme and its efficacy in helping children to learn adowa
patterns, a total of thirty children were randomly selected from three schools in Accra,
ten from each school. A comparison of the frequency of the test scores before and
after indicated an improvement of the scores after using the software.
Each group of ten children was made up of five boys and five girls. However, during
the teaching process, the children were mixed up with three boys and two girls in the

17
first group. The second group, on the other hand, consisted of three girls and two
boys. The purpose was to give each gender an opportunity to learn all the five adowa
instruments. The children were also required to complete a set of questionnaire and
respond to quiz items to test their knowledge of adowa music. After they had learned
to play adowa drum patterns they were again requested to respond to a quiz. The aim
of the questionnaire and the pre-and-post test on adowa drum patterns was to
undertake a comparative study of children’s ability to play drum patterns before and
after the study of the adowa drum patterns.
The teaching and learning process began with the first group of ten children from the
first school. Adowa instruments had randomly been shared among the group. Each
student was taught how to play their respective instrument, through the use of adowa
interactive software. The children had the opportunity to learn how to play the adowa
patterns. Finally, all children played the various instruments in an ensemble as
demonstrated in the software. The same procedure was used for the second group
from the same school. The same procedure was followed to teach students of the two
other schools. The results of their performance before and after learning to use the
application software were compared to ascertain the efficacy of the software. The
research instrument included performance tests and questionnaire. The questionnaire
was designed in such a manner that arbitrary answers given by any of the children
could be easily detected. For instance, if the student answered question 2 by stating
that he or she listens to classical music five times or more within a week, then he
should be able to name at least one classical composer and the title of one piece of
classical music.
The most important achievement was that, in all the three schools in which the
software was tested, it was possible to teach the students how to play adowa drum
patterns. The children became interested in the use of the software to such an extent
that all the students who took part asked for a repeat of the programme. Some of the
children, who did not obtain high marks, before the use of the software, obtained
higher marks after using the software. An interesting feature of the study was that the
children were able to play the drum patterns together with ease.

18
Conclusion It has been established that there is the need for innovative ways of teaching the
performing arts. It is therefore imperative for music educators in Ghanaian tertiary
institutions to develop their skills in instructional technology for the enhancement of
teaching and learning of music. This is because instructional technology goes beyond
visual aids. It represents a dynamic educational force making the learning process an
easy and fascinating activity which motivates music students to increase their
theoretical, aural and practical skills. Furthermore, students of the present generation
demand something more than the orthodox approach to the teaching and learning of
music. For example, they demand that music lecturers learn to set electronic
questions, write electronic books and develop tutorial applications involving video and
audio formats. Thus in ethnomusicology, music appreciation, and history of music,
lecturers could create in lecture room, real life situations for the enhancement of the
learning and teaching of music. The development of the adowa application software
has demonstrated that creating an interactive computer application for the teaching
and learning of music is within the capacity of music educators in tertiary institutions in
Ghana.

19
References
James s. Coleman (1973) Youth: transition to adulthood
Brian & Webster, (1996). Music technology. Schimer Books, New York
Ron Lubensky (2003) Authoring Multimedia Piece with Authorware
Hartsell, (1971) Music Technololgy for schools
Lindman (1979) The Music Educator and Music Technolgy
Edwards, E. O. (1974). Equipment in developing countries. New York: Colombia
University Press.
Copen, Helen (1969). Aids to teaching and learning, Pergamon Press Limited.
Casciro, J A & Roney, G. R. (1988). Audiovisual tehnology primer, USA; Englewood,
Colorado.
Mark, L. M. (1986). The foundation of contemporary music education (2nd ed.). U S A:
A Division of Macmillan.