MSA 4X4 FRIDGE SLIDE - Sydney | Melbourne | Brisbane · MSA 4X4 FRIDGE SLIDE ... 10 gauge x 20mm...
8
MSA 4X4 FRIDGE SLIDE INSTALLATION INSTRUCTIONS
-
Upload
truongkhue -
Category
Documents
-
view
217 -
download
2
Transcript of MSA 4X4 FRIDGE SLIDE - Sydney | Melbourne | Brisbane · MSA 4X4 FRIDGE SLIDE ... 10 gauge x 20mm...

MSA 4X4 FRIDGE SLIDE INSTALLATION INSTRUCTIONS

CONGRATULATIONS ON YOUR PURCHASE OF A QUALITY MSA 4X4 FRIDGE SLIDE!
Years of design, development and manufacturing knowledge goes into every MSA 4X4 product to ensure that our products are the very best they can be! Established in 2000, MSA 4X4 Accessories are the 4WD market leaders in quality Canvas products which include Certified ADR Compliant Canvas Seat Covers, Rear Wheel Bags, Rear Wheel Rubbish Bins, Vehicle Organisers and more.We pride ourselves on our innovative products which include the world first, revolutionary Fridge Dropslide, the new patent pending Explorer Aluminium Storage Drawer System which delivers a whole new level of access to the drawer contents, the original Water Bra, fully adjustable air lumbar support systems, and an extensive range of 4x4 accessories that have stood the test of time. As testament to our innovative culture, we own 19 patents in Australia & Internationally across our range of products including innovations currently within the patent process. We are a growing team with a vast knowledge of what works and what doesn’t work out in the real world and constantly strive to deliver the highest quality product to our customers. We treat every product design with fear of failure in mind, ensuring our products are always the very best they can be. All our products are designed to be as simple as possible to use and are supported by our MSA 4X4 Lifetime Guarantee.
Our products are available through a network of over 400 stockists Australia wide.

4 5 6 7
Slide Installation Tie Down Straps & Power Cords
Operation & Maintenance
Lifetime Guarantee
CONTENTS

MSA 4X4 SLIDE INSTALLATION
WARNING - Do not use your slide until all installation instructions have been completed and full operation is clearly understood
- Not recommended for use by minors
1. Place slide in position on top of storage unit no more than 110mm back from the front edge of mounting surface. This is a basic measurement guide and will depend on your particular application.2. Unlock slide by key lock on front face of fridge tray and press the Blue Lock Release Button located on the left runner. Slide open far enough to gain access to rear mount holes.3. Install 4 of the self tapping mounting screws (supplied) into the pre-drilled holes in the rear edge of the base frame. Recommended screws - 10 gauge x 20mm long Button Head (supplied).4. As an alternative to self tapping screws, nuts and bolts can be used (not included in kit).5. Extend Slide out further slightly and install all other screws/bolts/fasteners starting from the rear and moving forward (holes pre-drilled). If slide operation is not smooth, loosen screws slightly. This is because the screws will pull the base frame down and cause the slide runners to angle inwards. This is particularly the case if your drawer system is covered in a carpet material.6. When all screws are in place, slide installation is complete. Do Not operate or put weight on slide until all screws are fixed.
4
MSA 4X4 TIE DOWN STRAPS & POWER CORDS
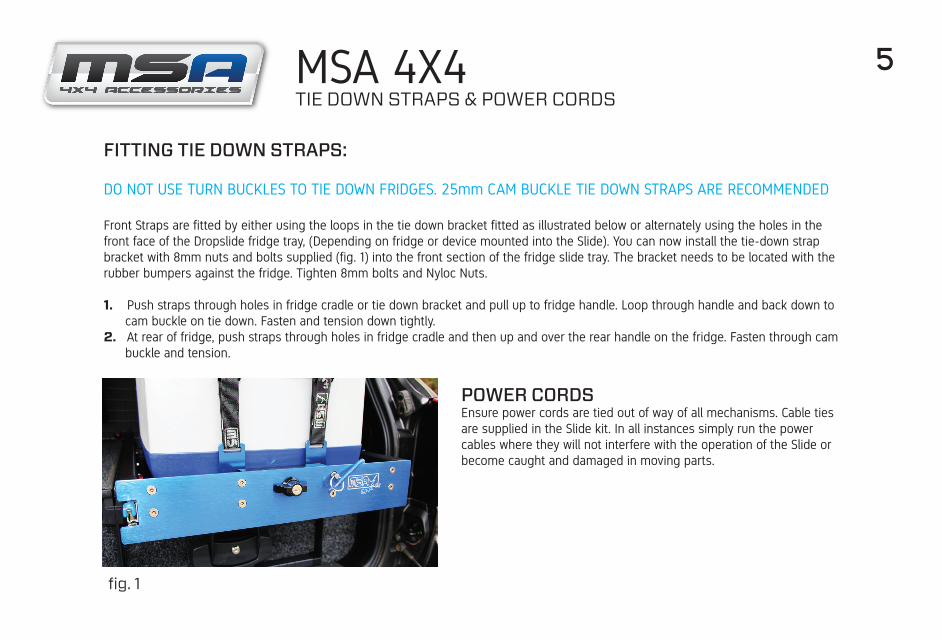
FITTING TIE DOWN STRAPS:
DO NOT USE TURN BUCKLES TO TIE DOWN FRIDGES. 25mm CAM BUCKLE TIE DOWN STRAPS ARE RECOMMENDED
Front Straps are fitted by either using the loops in the tie down bracket fitted as illustrated below or alternately using the holes in the front face of the Dropslide fridge tray, (Depending on fridge or device mounted into the Slide). You can now install the tie-down strap bracket with 8mm nuts and bolts supplied (fig. 1) into the front section of the fridge slide tray. The bracket needs to be located with the rubber bumpers against the fridge. Tighten 8mm bolts and Nyloc Nuts. 1. Push straps through holes in fridge cradle or tie down bracket and pull up to fridge handle. Loop through handle and back down to cam buckle on tie down. Fasten and tension down tightly.2. At rear of fridge, push straps through holes in fridge cradle and then up and over the rear handle on the fridge. Fasten through cam buckle and tension.
fig. 1
5
POWER CORDS Ensure power cords are tied out of way of all mechanisms. Cable ties are supplied in the Slide kit. In all instances simply run the power cables where they will not interfere with the operation of the Slide or become caught and damaged in moving parts.
MSA 4X4 OPERATION & MAINTENANCE
OPERATION: Please Note: It is recommended that the lock on the slide is key locked while in transit.
1. Place key in lock and unlock key lock by turning anti-clockwise (handle on lock is in vertical position)2. On the left you will notice the Blue Lock Release Button.3. Using your thumb, press this button down and pull slide cradle out towards yourself. Once moving, you can release the Blue Lock Release button.4. When slide is at full extension the locking runner will lock into position. This is to prevent the Slide from rolling back in if your vehicle is sloping downhill.5. To close the slide, release the Blue Lock Release Button and start to push slide back in. When slide stops and locking runner has engaged correctly, twist key lock clockwise to lock position (lock with key if needed).6. A Blue spiral bungee has been included to attach your keys to the front face of the Dropslide Tray so you don’t lose them. On the left side of the Key Lock you will see an eyelet which the bungee is attached to.
PLEASE NOTE: The locking runner is not meant to be a major structural lock and should not be used solely to secure your Slide in the closed position.When closed during transit, the Key Lock on the front of the Slide should always be locked off and the key removed.
6
MAINTENANCE
- Please ensure slide runners remain free from dirt, grit & water. Clean regularly & spray with Innox Plus MX5- Please check the Slide tray does not have any forward or backward movement. This can cause failure of the key lock assembly.
To check and adjust, make sure the Slide is in the stowed and locked position. Grabbing the front of the Fridge tray, pull the tray forwards and backwards. If there is any movement or “Clicking”, then unlock the fridge tray and slide forward enough to gain access to the rear of the slide runners. Looking at the back end of each of the slide runners you will notice a small black moulded rubber bump that, when the runner is closed, goes up against a metal tab folded at right angles. Using a shifting spanner, slightly bend this tab forward. You must also do the same adjustment to the other runner as well.

LIFETIME GUARANTEE TERMS & CONDITIONS
7
All MSA 4x4 Accessories products are designed and manufactured to the highest quality standards to perform as they should. We stand behind our products with a Lifetime Manufacturer’s Warranty.All claims under this warranty should be made by returning the product at your cost to MSA 4x4 Accessories Pty Ltd, 43 Harrington Street, Arundel, QLD 4214, with the detail of the fault, proof of purchase, proof of identification and vehicle fitment details where relevant. Lifetime manufacturer’s warranty applies to the original purchaser only. If we determine that an MSA 4x4 Accessories product is defective in materials or workmanship during the Lifetime Warranty, we will either repair or replace the product. Repair or replacement is solely at the discretion of MSA 4x4 Accessories Pty Ltd. This warranty does not apply to failure or damage caused by incorrect or faulty fitment, accidental or intentional damage, misuse or abuse, failure of other products, operation of the product outside of its environmental or technical specifications, or repair or modification carried out by anyone other than MSA 4x4 Accessories Pty Ltd. No charges will be accepted for external labour or materials.Lifetime warranty is applicable to all MSA 4x4 Accessories Fridge Slides, Fridge Barriers, Storage Drawers, and steel or aluminium products. MSA 4x4 Accessories Lifetime warranty does not cover any coating faults, rust, scratches, chips, carpet or battery packs. Fabric product Lifetime Warranty covers all manufacture and fabric components. Lifetime Warranty will not cover any fading of fabrics. MSA 4x4 Accessories products are designed for lifestyle applications. Due to the harshness of the mining environment, MSA 4x4 Accessories products used in mining applications that may be operating outside of their environmental and technical specifications, are therefore excluded from a Lifetime Warranty. MSA 4x4 Accessories products used in mining applications are warranted for up to 1 year.Our goods come with guarantees that cannot be excluded under the Australian Consumer Law. You are entitled to a replacement or refund for a major failure and for compensation for any other reasonably foreseeable loss or damage. You are also entitled to have the goods repaired or replaced if the goods fail to be of acceptable quality and the failure does not amount to a major failure. Address: 43 Harrington Street, Arundel QLD, 4214. ABN: 50 150 429 566 Phone: +61 7 5594 6664. Email: [email protected]. Website: msa4x4.com.au

MSA 4X4 Accessories Pty Ltd ABN: 50 150 429 566 43 Harrington Street Arundel, QLD 4214
+61 7 5594 6664
+61 7 5594 6667
msa4x4.com.au
DISCLAIMER MSA 4X4 Accessories Pty Ltd is not liable to the buyer in contract or in tort arising out of, or in connection with, or relating to; (a) the performance of this product or any breach of these conditions: or (b) any fact, matter of thing relating to this product; or any error (whether negligent or in breach of contract or not) in information supplied to the buyer or a user before or after the date of the purchaser’s or user’s use of this product.