MS PowerPoint - pbdd.orgpbdd.org/wp-content/uploads/2015/06/PowerPoint-2010-Module-1... · MS...
25
Revised 1/1/17 People’s Resource Center MS PowerPoint Module 1
Transcript of MS PowerPoint - pbdd.orgpbdd.org/wp-content/uploads/2015/06/PowerPoint-2010-Module-1... · MS...

Revised 1/1/17 People’s Resource Center
MS PowerPoint
Module 1

MS PowerPoint – Module 1
Page 2 of 25 People’s Resource Center
Course Overview MS PowerPoint will give you a solid foundation in using this software as a presentation tool. Throughout the course, hands-on exercises give practical experience in creating PowerPoint presentations. As a final exercise, students create their own presentation and share it with classmates.
List of Modules
1. Getting Started with PowerPoint 2. Clip Art and Tables 3. Graphic Elements 4. Charts and Media Clips 5. Slide Show Design 6. Animation 7. Student Presentations
Table of Contents Course Overview ........................................................................................................................................................2
List of Modules .......................................................................................................................................................2
Listed below are the objectives for this course. .........................................................................................................5
Module One: Get Started with PowerPoint ...............................................................................................................6
Topics ......................................................................................................................................................................6
Exercises .................................................................................................................................................................6
Objectives ...............................................................................................................................................................6
What is PowerPoint? ..............................................................................................................................................7
What can PowerPoint do for me? ...........................................................................................................................7
Starting PowerPoint ...................................................................................................................................................8
Exercise 1A – Open PowerPoint ..............................................................................................................................9
PowerPoint Window ................................................................................................................................................ 10
............................................................................................................................................................................. 10

MS PowerPoint – Module 1
Page 3 of 25 People’s Resource Center
................... 10
PowerPoint Window ................................................................................................................................................ 10
File Button ........................................................................................................................................................... 10
Quick Access Toolbar ........................................................................................................................................... 10
Ribbon ................................................................................................................................................................. 10
Title Bar ............................................................................................................................................................... 11
Slides Tab / Outline Tab ....................................................................................................................................... 11
Place Holder......................................................................................................................................................... 11
Slide Pane or Presentation Window .................................................................................................................... 11
Notes Pane ........................................................................................................................................................... 11
View Buttons ....................................................................................................................................................... 11
Zoom .................................................................................................................................................................... 11
Exercise 1B – The PowerPoint Window ................................................................................................................... 12
The Home Tab .......................................................................................................................................................... 13
Slides Group ......................................................................................................................................................... 13
Exercise 1C – Office Themes ................................................................................................................................ 15
Adding Text to a Slide .............................................................................................................................................. 17
Bulleted and Numbered Lists .............................................................................................................................. 17
Exercise 1D - Add Text to a Slide .............................................................................................................................. 20
Closing PowerPoint .............................................................................................................................................. 22

MS PowerPoint – Module 1
Page 4 of 25 People’s Resource Center
Exercise 1E – Saving Work and Closing PowerPoint................................................................................................. 24
Module Summary .................................................................................................................................................... 24
Homework ............................................................................................................................................................... 25

MS PowerPoint – Module 1
Page 5 of 25 People’s Resource Center
PowerPoint®
Welcome to the People’s Resource Center’s (PRC) PowerPoint Course. This course will give you a solid foundation in the use of PowerPoint as a presentation tool. Throughout the course, hands-on exercises give practical experience in creating PowerPoint presentations. As a final exercise, students create their own presentation and share it with classmates.
Listed below are the objectives for this course.
At the end of this course participants will be able to: 1. Understand the value of PowerPoint as a presentation tool.
2. Create a complete PowerPoint presentation which includes elements such as text, graphics, charts, tables and animation.
3. Use PowerPoint to convey information to an audience. 4. Deliver a PowerPoint slide show presentation to an audience.

MS PowerPoint – Module 1
Page 6 of 25 People’s Resource Center
Module One: Get Started with PowerPoint
This module introduces you to PowerPoint, Microsoft’s graphic presentation tool. We will begin by answering the question – “What is PowerPoint & what can it do for me?” This will be followed with an exploration of the PowerPoint Window. Some material in this module may be familiar to you if you have used other Microsoft Office products such as Word or Excel.
Topics What is PowerPoint?
PowerPoint Window
PowerPoint Ribbon
Adding Text to a Slide
Exercises Exercise 1A – Open PowerPoint Exercise 1B – The PowerPoint Window Exercise 1C – Office Themes Exercise 1D – Add Text to a Slide Exercise 1E – Saving Work and Closing PowerPoint
Objectives At the end of this module participants will be able to:
Have an understanding of course goals and expectations.
Understand the value of PowerPoint as a presentation tool.
Open PowerPoint
State the function of the File Button, Quick Access Toolbar, Presentation Window, Status Bar, View Buttons, Zoom Control, and the Notes Pane found on the PowerPoint Window.
Create a presentation Title Slide.
Use the Home tab on the PowerPoint Ribbon to format slide text & insert a new slide.
Select an appropriate Slide Theme & add text to a slide.
Save and close a PowerPoint presentation.
MS PowerPoint – Module 1
Page 7 of 25 People’s Resource Center
What is PowerPoint?
PowerPoint, a member of the Microsoft Office suite of applications, is a presentation processor that allows you to produce professional looking visuals containing text and graphics. Templates and on screen prompts guide you along the way. You don’t need to be a graphic artist to achieve high quality results! Text and graphics may be created on screen or imported from other Microsoft Office applications.
What can PowerPoint do for me? Use PowerPoint to:
Enhance a presentation with quick and easy to create high impact visuals
Present fact filled graphs and charts to make your point
Retain audience attention with attractive visuals
Import text or graphics from other Microsoft applications
Customize graphics for a specific audience
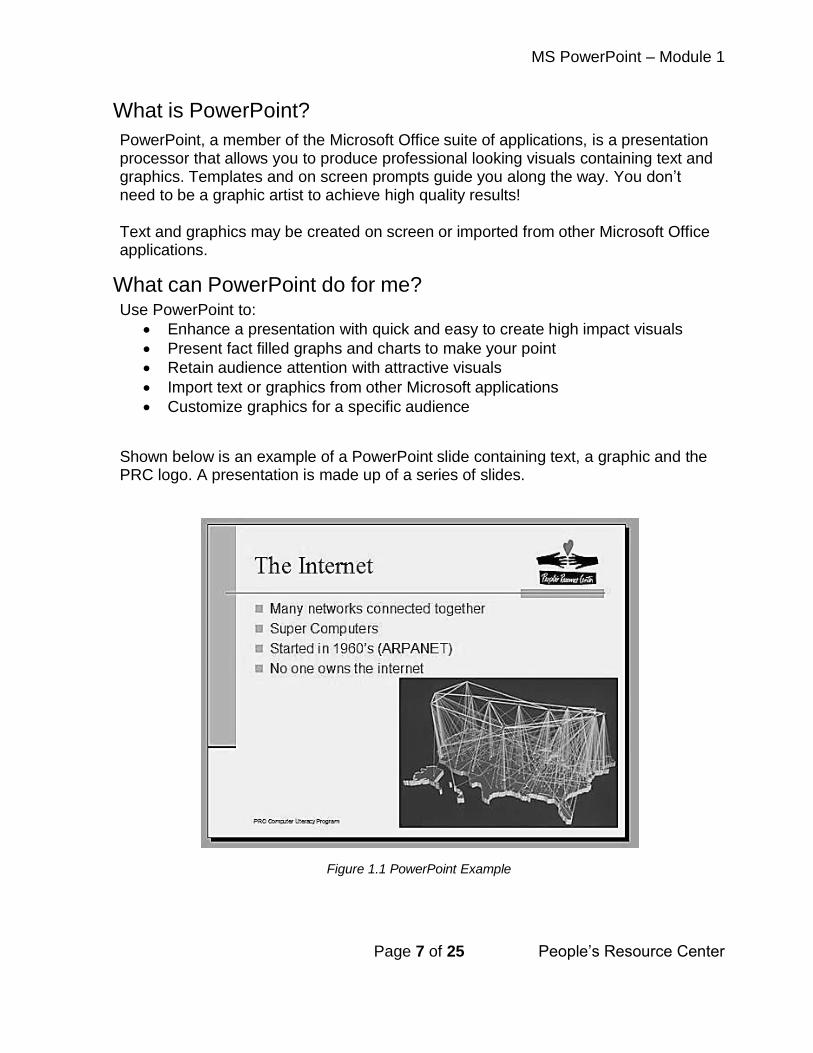
Shown below is an example of a PowerPoint slide containing text, a graphic and the PRC logo. A presentation is made up of a series of slides.
Figure 1.1 PowerPoint Example

MS PowerPoint – Module 1
Page 8 of 25 People’s Resource Center
Starting PowerPoint
To start PowerPoint click on the Start Button at the bottom left of the screen and select PowerPoint from the available choices.
Figure 1.2. Start Power PowerPoint
The screen shown below is displayed when PowerPoint opens.
Figure 1.3 PowerPoint Window
Start Button

MS PowerPoint – Module 1
Page 9 of 25 People’s Resource Center
Exercise 1A – Open PowerPoint In this exercise you will open a new Blank Presentation so you can follow along with your instructor as the features of PowerPoint are demonstrated.
1. Using the instructions shown above open a new PowerPoint presentation. 2. If you are having trouble opening PowerPoint please ask for help. 3. Please ask any questions you may have. 4. It is important to your success that you are able to complete this and all of the
exercises in this module.
5. We will be building on this slide show presentation in the exercises of each of the upcoming modules.

MS PowerPoint – Module 1
Page 10 of 25 People’s Resource Center
PowerPoint Window
Figure 1.4 PowerPoint Window
A slide show is created on the PowerPoint Window.
PowerPoint Window
File Button Clicking on the File Button opens a drop down menu with commands needed to work on files; it is similar to the File menu on earlier versions of PowerPoint.
Quick Access Toolbar The Quick Access Toolbar provides easy access to frequently used commands. It can be customized.
Ribbon The Ribbon is a collection of tabs used to create the slide show. Each tab contains a group of commands related to the tab. In the example above, the Home Tab contains commands related to Clipboard, Slides, Font, Paragraph, Drawing, and Editing. We will be working with the Ribbon tabs and commands as we build a PowerPoint slide show.
File Button Quick Access Toolbar Title Bar Ribbon

MS PowerPoint – Module 1
Page 11 of 25 People’s Resource Center
Title Bar The Title Bar displays the presentation’s file name.
Slides Tab / Outline Tab The Slides Tab shows a thumbnail of each slide this is where slides can be added, rearranged or deleted. Use the Outline Tab to build a text outline of slides.
Place Holder On the previous page is an example of a Title slide. A place holder is provided for the title and subtitle. Clicking in the box places the title text in a predetermined place on the slide.
Slide Pane or Presentation Window The slide is created on the Slide Pane. Think of it as a blank sheet of paper where text and graphics are placed.
Notes Pane Speaker or handout notes pertaining to the slide are placed on the Notes Pane.
View Buttons The View Buttons are similar to the Quick Access Toolbar. They give quick access to frequently used PowerPoint Normal, Slide Sorter and Slide Show views. On the previous page is an example of the Normal View.
Zoom The slider on the Zoom control allows you to zoom in or out decreasing or increasing the displayed slide. The current display percentage is shown.

MS PowerPoint – Module 1
Page 12 of 25 People’s Resource Center
Exercise 1B – The PowerPoint Window In this exercise you will explore the PowerPoint Window.
1. If you haven’t already, start Microsoft PowerPoint by selecting it from among the Programs listed on the Start Menu.
2. Click on the File Button. Do these options look familiar to you? Are any
new?
3. Starting with the Home Tab, move your mouse over the commands. Read the command description in the box that opens. Explore each of the other Ribbon Tabs.
4. Working with the Slides Pane, click in “Click to add a title”. Type in a presentation title “Garden Club Plant Sale”. Type “May 23 at 10 AM” as a subtitle.
5. Use the New Slide button on the Home Tab to add a slide to the
presentation. Type “Flowers” as the title of this slide. 6. Use the Zoom slider to zoom in and out on the current slide. Notice how this
action changes the displayed size of the slide. 7. Use the View Buttons to change to the Slide Sorter View. Does your screen
look like the one shown below? 8. How might you use the Slide Sorter View?
9. Return to the Normal View. 10. Do not close PowerPoint.

MS PowerPoint – Module 1
Page 13 of 25 People’s Resource Center
The Home Tab
The Home Tab contains the Clipboard, Slides, Font, Paragraph, Drawing, and Editing groups. In this module we will address the Slides, Font and Paragraph groups. These groups are useful in working with text on slides.
Drawing and Editing will be covered in a later module.
Slides Group
Figure 1.5 Slides Group
Slides are added and deleted using the Slides Group. The Slides Group is also used to select or change a slide layout.
Clicking on the New Slide dropdown arrow opens the Office Theme selection
m e n u .
Figure 1.6 Office Themes

MS PowerPoint – Module 1
Page 14 of 25 People’s Resource Center
Office Themes
By default, when a new blank presentation is opened, PowerPoint starts with a Title Slide.
Figure 1.7 Title Slide
Place holders provide a spot to enter the presentation title and if needed a subtitle. Other office themes provide the text and graphic placeholders for slides that follow the title slide. Below is an example of a slide that has a placeholder for a Title and Content. The content may include:
Text
Chart
Table
Pictures
Clip Art
Smart Art
Media Clips

MS PowerPoint – Module 1
Page 15 of 25 People’s Resource Center
Figure 1.8 Title and Contents Slide
In this module we will focus on slide text. In module 2 we will start looking at enhancing presentations by including graphic elements.
Exercise 1C – Office Themes
This exercise will give you a chance to explore various Office Themes. 1. Return to the presentation you started in Exercise 1A. 2. Click on the New Slide dropdown arrow. 3. Select the Two Content Theme. 4. How does this differ from the Title and Content theme that was used on the
“Flowers” slide? 5. Title this new slide “Flower Bulbs”. 6. Insert another slide selecting the Blank theme. 7. Are there any placeholders on this slide? 8. Use the Home Tab Slides Group to delete this slide. 9. Use the View Buttons to change to the Slide Sorter View.
10. How many slides are displayed (Hint: the correct answer is three)? 11. Return to the Normal view. 12. Do not close PowerPoint.

MS PowerPoint – Module 1
Page 16 of 25 People’s Resource Center
Working with Text
While placeholders specify text font face and font style, they can be changed using the Font and Paragraph groups on the Home Tab. In Exercise 1B you created a Title slide for a plant sale; it should look like the one shown below.
Figure 1.9 Title Slide
Notice that the subtitle is Calibri font face, 32 point size and the text color is black with the text centered. For emphasis, text font face, style, size, color and placement can be changed. The Live Preview option displays the effect of changes before you commit to making them. Notice the changes made on the example below.
Figure 1.10 Changes on Title Slide

MS PowerPoint – Module 1
Page 17 of 25 People’s Resource Center
Adding Text to a Slide
There are three ways to add text to a slide:
Title text objects – Text inserted in the pre-sized Title and Subtitle boxes that appear on the top of each slide. We are already familiar with this form of slide text.
Bulleted list objects – Text inserted in boxes that accommodate numbered or bulleted lists.
Text box objects – Boxes that contain text that can be placed anywhere
on the slide. We will be working with text boxes in Module 2.
Bulleted and Numbered Lists When adding text to a slide presentation it is always wise to follow the rule “Less is better”. If your slide contains paragraphs of text your audience will be reading instead of listening to you. A bulleted list of short statements can become your talking points. If your slide describes things that need to be done in a specific order, use a numbered list. The Office Themes that contain content provide a placeholder for bulleted lists. PowerPoint assumes that a bulleted list would be found on a content slide. Let’s look at the second slide in your Garden Club Plant Sale presentation.
Figure 1.11 Bulleted List on a Content Slide
Notice the Bullet to the left of the words “Click to add text”. To create the list – just

MS PowerPoint – Module 1
Page 18 of 25 People’s Resource Center
click and start typing.
Shown below is an example of a bulleted list. Remember that text font face, style, size and color can be changed.
Figure 1.12 Bulleted List
To change bullet styles, first select all bulleted items to be changed. Then click on the drop down arrow on the Bullet icon on the Paragraph group of the Home Tab and select a new style.
Figure 1.13 Bullet Styles
MS PowerPoint – Module 1
Page 19 of 25 People’s Resource Center
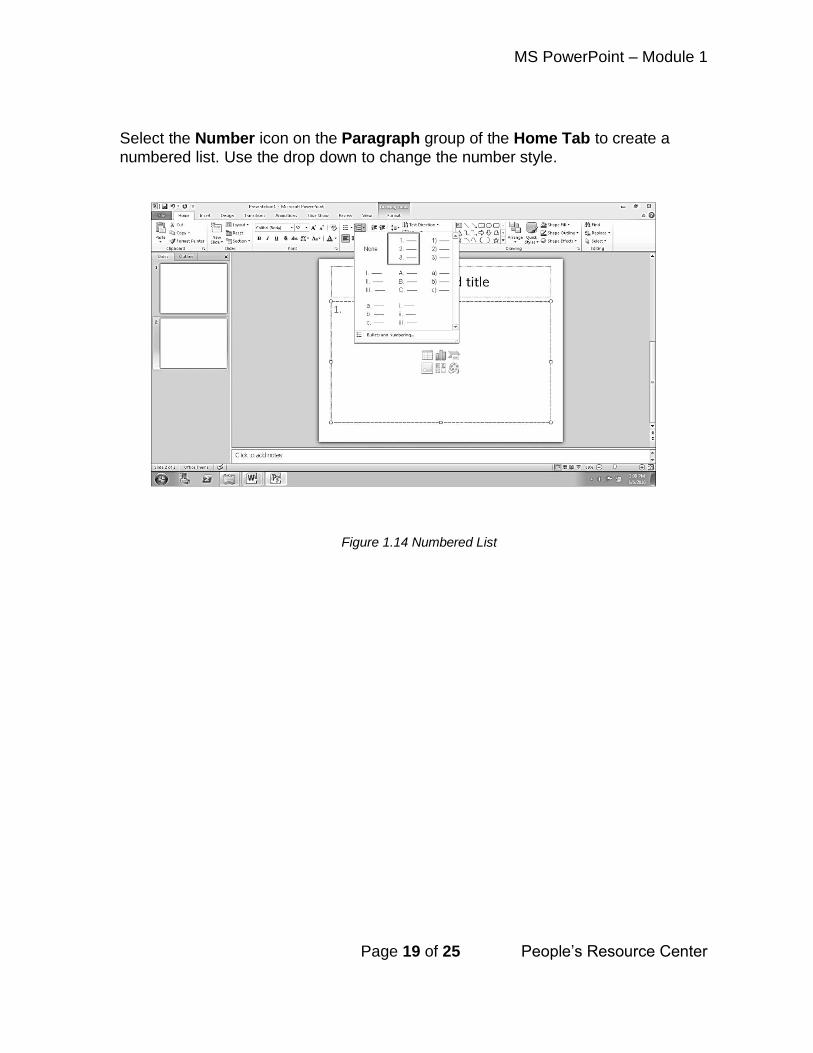
Select the Number icon on the Paragraph group of the Home Tab to create a
numbered list. Use the drop down to change the number style.
Figure 1.14 Numbered List

MS PowerPoint – Module 1
Page 20 of 25 People’s Resource Center
Exercise 1D - Add Text to a Slide
In this exercise you will continue working with the presentation you started in Exercise 1A.
1. Make changes to the font face, style, size, color and placement of the text on the Title slide.
2. On the Flowers slide, add a bulleted list of the flower types that will be for sale.
3. Change the bullet style. 4. Change this to a numbered list. 5. Change the number style. 6. Return to a bulleted list. 7. On the Flower Bulbs slide, add a bulleted list of the bulbs that will be for sale. 8. Do not close PowerPoint.
Saving Your Work
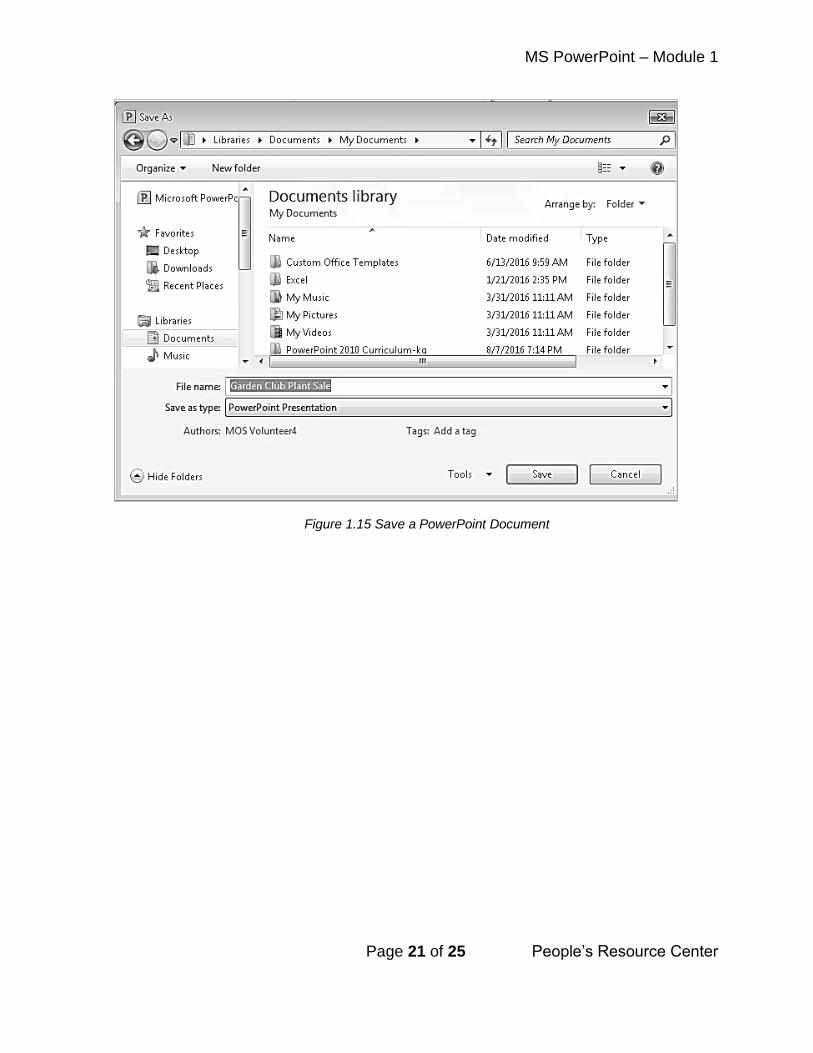
It is strongly suggested that you periodically save your work. Save a PowerPoint document as you would a Word or Excel document. Click on the Save Icon on the Quick Toolbar or click on the File Button and select a save option. If this is the first time you are saving this document you will be asked to name the document and identify the location where it is to be saved.
Save Icon
MS PowerPoint – Module 1
Page 21 of 25 People’s Resource Center
Figure 1.15 Save a PowerPoint Document

MS PowerPoint – Module 1
Page 22 of 25 People’s Resource Center
Closing PowerPoint
To close PowerPoint, click on the PowerPoint Button and select Close.
Figure 1.16 Close
If you have not already saved the document you will be presented with the dialog box shown below; select Save.
Figure 1.17 Save

MS PowerPoint – Module 1
Page 23 of 25 People’s Resource Center
Then name the file and select a location where it will be saved.
Figure 1.18 Name the File

MS PowerPoint – Module 1
Page 24 of 25 People’s Resource Center
Exercise 1E – Saving Work and Closing PowerPoint
1. If you have a portable flash drive, save your presentation to it and close PowerPoint. If you do not have a portable drive, close PowerPoint and do not save. Use the file name Garden Club Plant Sale.
2. Properly remove the flash drive from the computer (if you don’t know how to do this ask for help).
3. Properly shut down the computer (if you don’t know how to do this ask for help).
Module Summary
In this module you gained the skills needed to:
Understand the value of PowerPoint as a presentation tool.
Open PowerPoint
State the function of the File Button, Quick Access Toolbar, Presentation Window, Status Bar, View Buttons, Zoom Control, and the Notes Pane found on the PowerPoint Window.
Create a presentation Title Slide.
Use the Home tab on the PowerPoint Ribbon to format slide text.
Use the Home tab on the PowerPoint Ribbon to insert a new slide.
Select an appropriate Slide Theme.
Add text to a slide.
Save and close a PowerPoint presentation.
Page 25 of 25 People’s Resource Center
Homework
Practice is crucial to your success in this class. Each module will include homework assignments designed to help you practice module skills at home. We will review this assignment in class next week.
In this assignment continue working with the Garden Club presentation you started in class. If you did not save it to a portable drive, recreate the three slides that we created in class.
1. Open the Garden Club presentation. 2. Add the address location (make one up) of the sale below the date on the Title
slide. 3. On the Title slide, align the title text left and the sub-title text right. 4. Insert a new slide using the Two Content theme. 5. Title this slide Trees.
6. On the left content boxes, add a bulleted list of the trees that will be for sale. Use your imagination in coming up with names for the trees.
7. Save your presentation to the portable drive. We will continue building on this presentation next week in class. Remember to bring it with you next week.