MR 32 Manual (New) - ATS Irrigation, Inc. | Agricultural ... For Machine Operation The MR32 is...
12
MR 32 Instruction Manual For Operation and Maintenance KID Group 15250 Sunshine Rd. Yukon, OK. 73099 800-373-9325
Transcript of MR 32 Manual (New) - ATS Irrigation, Inc. | Agricultural ... For Machine Operation The MR32 is...

MR 32 Instruction Manual For Operation
and Maintenance
KID Group 15250 Sunshine Rd. Yukon, OK. 73099
800-373-9325

Introduction Thank you for purchasing a Micro Rain MR32 traveling sprinkler system. Please read this manual carefully before operation in order to become familiar with all components and their function. Safety is the main priority and failure to follow these instructions may cause serious injury. Micro Rain is not responsible for machine failure or personal injury if these procedures and operation instructions are not followed.
Do not operate your Micro Rain traveler without a serious overview of this manual Keep children and unauthorized people away from traveler
Never allow children access to use the traveler
Use caution when disconnecting couplings When the traveler shut-off valve activates, the supply hose remains pressurized at the end of the run. First, relieve the pressure with the relief valve, then disconnect the supply hose.
Use caution with the sprinkler heads Pressurized water from the sprinkler head could cause serious damage to people or objects.
Use caution during transport Travelers are not made for public transit. Do not exceed 7mph on flat roads, or 2 mph on steep inclines.
Never service the traveler when it is in operation Before servicing, stop the traveler and disconnect the supply line. All safety guards and shields must be in place while operating the traveler.
Beware of power lines Irrigation water should never contact power lines or any other power source. Never let any part of the traveler or any irrigation pipe get in contact with power source.
Caution

Identification Data
The identification plate includes the model and serial number for your machine.
Machine Controls & Components
Optional tow hitch
Anti reverse pawl
Cast aluminum turbine w/drain plug on back side
Shut off valve (pull valve-do not turn)
Pressure Gauge
Shut off bar
Level wind guide & level wind bar (under cover)
Shut off valve latch
Grease zerk for inlet seals (Open small valve to add grease)
Gearbox engage/disengage
Drum Gear (under cover)
Drain valve (under shut off valve) Drain valve (bottom side of gun cart)
Speed control lever on bypass valve
Water Connection Point (quick connect)
Sprinkler head with adjustable settings
Extra nozzles

Conditions For Machine Operation
The MR32 is designed for clean water suitable for irrigation. The machine is not designed for water that includes large pieces of debris or slurry/wastewater conditions.
Start Up Procedure/Operation
1) Push the machine to the desired location. Position the ma-chine with the sprinkler cart facing the direction to be irrigated. Insure that the machine is sitting level in order for the tube to wrap properly.
2) Place the gearbox engage/disengage lever in the neutral po-sition to prepare for hose pull out.
3) Move anti-reverse lever to the disengage position as shown.
4) After steps 2 and 3 have been performed, the sprinkler cart can be pulled out. The cart may be pulled out by hand or by connecting the cart chain to a small garden tractor or ATV. IMPORTANT: ALWAYS PULL CART OUT STRAIGHT AND AT A SLOW STEADY SPEED (ABOUT THE PACE OF A WALK). LEAVE 1-2 WRAPS ON THE DRUM TO KEEP FROM PULLING HOSE OFF THE DRUM.

**IMPORTANT: ALWAYS PULL CART OUT STRAIGHT AND TIGHTEN LOOSE WRAPS BEFORE START UP!
Keep Wraps Tight! Always Pull Tube Out Straight!
Start Up Procedure/Operation, continued
5) Move anti-reverse lever to the engage position as shown. Ratchet the drum by hand to remove any loose coils remaining on the drum. Any coils remaining on the drum should be packed over to the edge of the drum and tight!
Keep remaining wraps tight!!
6) Attach supply hose provided to the inlet of the machine and lock into place as shown IMPORTANT: MAKE SURE SUPPLY HOSE IS CLEAN AND FREE OF FOREIGN OBJECTS THAT WOULD PLUG THE TURBINE SYSTEM OR SHUT OFF VALVE!
7) Open shut off valve by pulling the valve handle and latching into the open position. IMPORTANT: PULL VALVE, DO NOT TURN! NOTE: DO NOT PULL VALVE OPEN UNDER PRESSURE. OPEN-ING UNDER PRESSURE WILL DAMAGE VALVE!
VALVE SHOWN IN OPEN, LATCHED POSITION

Start Up Procedure/Operation, continued
8) Turn on the water source to the MR32. The sprinkler equipped with the MR32 can be set to water a full circle pattern or any part of a circle. It is generally recommended to water a half circle pattern behind the cart, away from the direction of travel. Next engage the gearbox lever to the run position.
9) Adjust the speed of cart retraction by moving the bypass lever or speed control lever in the direction shown by the arrow. Closing this valve will increase retraction speed and opening the bypass valve will slow down the retraction speed
10) Once the speed is set, the MR32 will automatically roll the tube on the drum and stop at the end of the run utilizing the shut off valve.
Troubleshooting 1) PROBLEM: NO WATER AT THE SPRINKLER SOLUTION: 1. Make sure shut off valve is open. 2. Potential blockage—clean inlet hose /sprinkler nozzle.
2) PROBLEM: MACHINE WILL NOT ROLL UP SOLUTION: 1. Make sure gearbox is in the engaged or run position. 2. Turbine bypass valve (speed control valve) is opened too far. Close valve to increase speed. 3. Turbine impeller not turning—open turbine housing and check for obstructions
3) PROBLEM: MACHINE STOPPED DURING RETRACTION SOLUTION: 1. Water flow stopped or was lowered during retraction, causing the turbine to stall. Simply turn the bypass valve closed to start retraction once again and adjust speed as needed. 2. The machine’s mis-wrap safety shut down the retraction. Put the gearbox in neutral, disengage the anti-reverse lever and pull the tube out all the way again. The level wind timing may have been interrupted by too many loose wraps on the machine. This is corrected by starting over and making sure the level wind guide is lined up correctly. Call your Micro Rain servicing dealer with any questions regarding machine timing.

Winterization
Options
MR32 Tow Hitch Option Easy attach tow kit for use with ATV or small tractor.
MR32 Depth Control Plate Keeps front of machine level in loose soil conditions.
MR32 Boost Pump Option 110v Booster kits to boost incoming pressures by 30 to 50 psi. Gas driven booster kits also available. Call your Micro Rain dealer for details.
MR32 Air Blow Out Fitting For use with air compressor to winterize machine.

Maintenance Schedule Inlet seals:
Drum gear:
Level Wind:
Grease inlet seals every 100 hours.
Grease drum gear every 100 hours.
Gearbox: Change gearbox oil once a season with 80W/90 gear oil.
Grease level wind every 100 hours, replace level wind knife every 1000 hours.
6 mm Nozzle 80% RUN TIME(HRS)
INLET PSI GPM MAX WIDTH ADJ WIDTH
MAX LENGTH
0.10 INCH
0.25 INCH
0.50 INCH
45 7.5 90 72 287 2.40 6.01 55 8.5 95 76 290 2.24 5.60 65 9.4 100 80 292 2.13 5.33 75 10.4 108 86 296 2.07 5.18 85 11.6 110 88 297 1.90 4.75
7 mm Nozzle 80% RUN TIME(HRS)
INLET PSI GPM MAX WIDTH ADJ WIDTH
MAX LENGTH
0.10 INCH
0.25 INCH
0.50 INCH
50 9.8 92 74 288 1.89 4.73 60 11.1 98 78 291 1.76 4.40 70 12.2 106 85 295 1.75 4.36 80 13.7 112 90 298 1.65 4.11 8.23 90 14.8 118 94 301 1.59 3.98 7.96
8 mm Nozzle 80% RUN TIME(HRS)
INLET PSI GPM MAX WIDTH ADJ WIDTH
MAX LENGTH
0.10 INCH
0.25 INCH
0.50 INCH
55 12.9 99 79 292 1.53 3.84 7.67 65 14.8 110 88 297 1.49 3.72 7.45 75 16 112 90 298 1.41 3.52 7.05 85 17.1 114 91 299 1.33 3.33 6.67 95 18.2 118 94 301 1.29 3.23 6.47
9 mm Nozzle 80% RUN TIME(HRS)
INLET PSI GPM MAX WIDTH ADJ WIDTH
MAX LENGTH
0.10 INCH
0.25 INCH
0.50 INCH
65 16.4 108 86 296 1.31 3.28 6.57 75 17.3 113 90 299 1.30 3.26 6.52 85 18.8 118 94 301 1.25 3.13 6.26 95 21 123 98 304 1.17 2.92 5.85
105 23 130 104 307 1.13 2.83 5.66
10 mm Nozzle 80% RUN TIME(HRS) INLET
PSI GPM MAX WIDTH ADJ WIDTH MAX
LENGTH 0.10
INCH 0.25
INCH 0.50
INCH 75 19.5 108 86 296 1.10 2.76 5.52 85 21.9 116 93 300 1.06 2.66 5.32 95 23.2 120 96 302 1.04 2.59 5.18
105 23.9 121 97 303 1.02 2.54 5.08
NOTICE: These specifications are for a guide only and are based on theoretical calculations and performance tests. This is to be used as a guide only, as performance may vary under field conditions.
Performance Chart
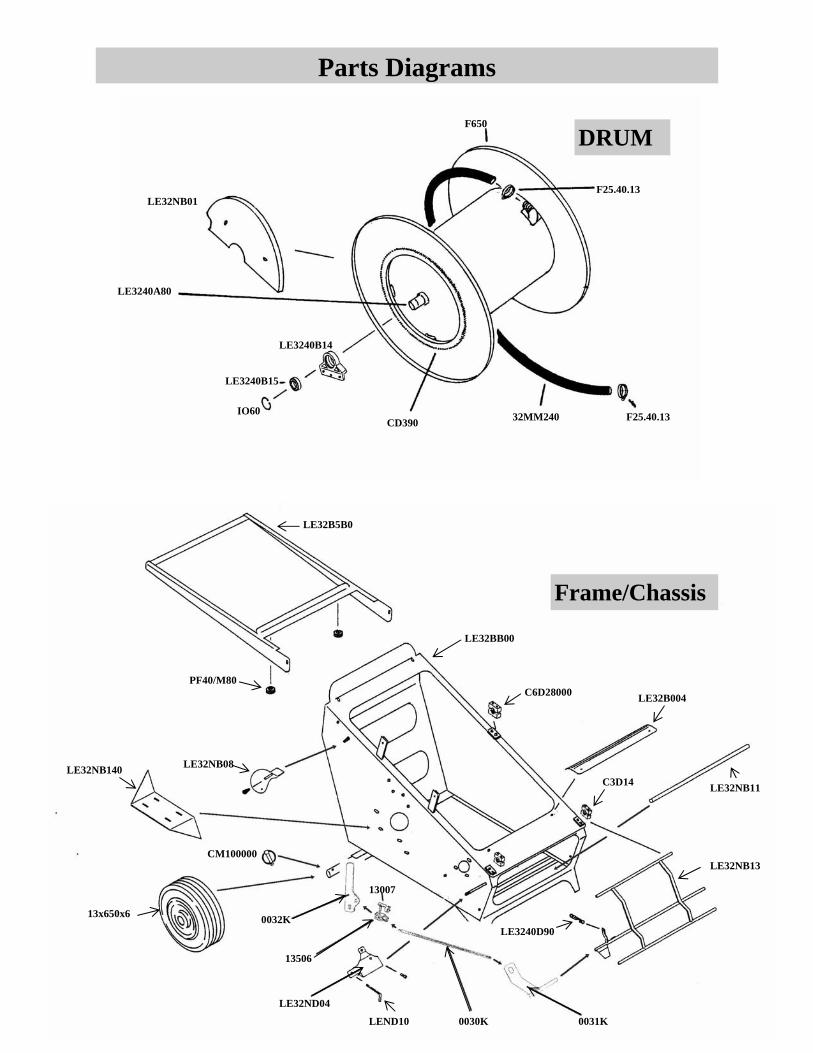
Parts Diagrams
DRUM
Frame/Chassis
F650
LE3240A80
LE32NB01 F25.40.13
F25.40.13 32MM240 CD390
LE3240B14
LE3240B15
IO60
LE32B5B0
PF40/M80
LE32BB00
C6D28000 LE32B004
LE32NB11 C3D14
LE32NB13
LE3240D90
0031K 0030K
LE32ND04
LEND10
13007
13506
0032K
CM100000
LE32NB08 LE32NB140
13x650x6

Parts Diagrams
Drive System
Sprinkler Cart
IN180000
MV18MF00 IO45
P45.35.7
GMAD4535
LE32E140
50252
VZ100
FZ131095
VS3/4MF
50204
50204 TCE06x020 LEE240000
GOR46250
LEE22CN0
GOR30430
AT1110000
E014
LEE170000
LEE020000
LEE32ND01
LEE32ND02
PM100000
LED10000
974100010
IN14L32N (Standard Speed)
IN22L32N (High Speed)
LE32ND14
VIM10000
RZ343800
F100
0073K
0116K
LE32F050
LE32F100

Parts Diagrams
Level Wind Assy. CA50/4950
MC120000
LE32CO800 Chain
LE32C600
VCE08x010
PF204000
CP3x30000
LE3240C10
VB40LE32
PF204000 LE32C050
VCE08x010 Set Screw
PI133206
Funny Sprinkler

KID Group, Inc.
DISTRIBUTOR, DEALER/SELLER, PURCHASER AGREEMENT
LIMITED WARRANTY AND REMEDY: WARRANTY KID Group, Inc. as distributor, warrants to the original purchaser only of the Micro Rain Irrigation Equipment described in the face hereof as of the date of the original invoice, that the equipment is merchantable and free from defects in material and workmanship. This warranty does not apply to certain component parts used on Micro Rain equipment. Warranty shall be provided by the original manufacturer of these components. Such components include, but are not limited to tires and tubes, boost pump mo-tors, PTO drive shafts, valves, and batteries. REMEDY If KID Group, Inc. determines that the above warranty was breached with respect to any part or component provided by the manufacturer (Ocmis Irrigation) of Micro Rain equipment, (and if all conditions set forth below have been satisfied) then, KID Group, Inc. will (at KID Group, Inc.’s option) repair or provide purchaser replacement parts F.O.B. Yukon, OK. As follows:
All components of new Micro Rain system for 1 year from original equipment invoice, free of charge. KID Group, Inc. will repair or provide replacement polyethylene tube for any tube KID Group, Inc. determines has failed,
due to defects in workmanship or materials for 3 years from the date of original invoice, free of charge.
All remedies provided herein are for parts only, no labor or freight allowance for return parts is implied.
This warranty extends only to the original purchaser of Micro Rain equipment purchased from an authorized Micro Rain dealership.
CONDITIONS TO ENFORCEABILITY AND CLAIMS:
Equipment has been maintained and operated within the guidelines outlined in Micro Rain owner’s operation and mainte-nance manual.
Equipment warranty shall be considered void if any component or function of the equipment has been altered in any form other than what has been provided or intended by the original equipment manufacturer .
Any claim must be submitted on form provided by KID Group, Inc. in writing immediately and in no event longer than 20 days from occurrence.
Purchaser/Dealer must return all parts within 45 days of KID Group, Inc.’s authorization date, that have been determined by KID Group, Inc. to be defective to the Purchaser/Dealer with Purchaser/Dealer being responsible for freight.
LIMITATIONS: Neither KID Group, Inc. nor Dealer/Seller shall be liable for any incidental or consequential damages (including but not limited to, damages for injury to the person, property or lost turf, crops or profits) by reason of any defect in the equipment or its manufacture, design, or function. KID Group, Inc. 12/00