MOVING THE FINAL STAGES OF YOUR WAX CARVING...
6
Are we there yet?!? Road-tripping kids in the back seats of cars have been asking this ques- tion for decades — and so have wax carvers. Estimating an arrival time to pacify young passengers is one part fact, two parts fiction, but how do you know when a wax model is really “there”? In most cases, when you think you’re done, you should probably spend a few more minutes finessing the model. That bit of extra time spent on finishing may not seem like much, but it can improve quality, lower the cost of your casting, greatly reduce the time it takes to detail the cast pieces, and reduce breakage of stones. Following the tips and techniques mapped out in this article will move the final steps of your wax carving process in the right direction. MOVING THE FINAL STAGES OF YOUR WAX CARVING PROCESS IN THE RIGHT DIRECTION BY KATE WOLF ROAD THE END OF THE
Transcript of MOVING THE FINAL STAGES OF YOUR WAX CARVING...

Are we there yet?!?Road-tripping kids in the back seats of cars have been asking this ques-
tion for decades—and so have wax carvers. Estimating an
arrival time to pacify young passengers is one part
fact, two parts fiction, but how do you know
when a wax model is really “there”?
In most cases, when you think you’re
done, you should probably spend a few
more minutes finessing the model. That bit
of extra time spent on finishing may not
seem like much, but it can improve quality, lower
the cost of your casting, greatly reduce the time it
takes to detail the cast pieces, and reduce breakage of stones.
Following the tips and techniques mapped out in
this article will move the final steps of
your wax carving process in
the right direction.
MOVING THE FINAL STAGES OF YOUR WAXCARVING PROCESS IN THE RIGHT DIRECTION
BY KATE WOLF
ROADTHE END OF THE

ALL
PH
OTO
S BY
KAT
E W
OLF
.
46
AJM
n the last stages of the wax carving process in particular, it’s
essential to see all the details. For starters, put on your
Optivisor. Good overall lighting, as well as an additional single
bright light source, is essential.
To better see the details in the wax model, use a brush
marker, which can be found in arts and crafts stores, to paint
the surface of the wax. Start by wiping the marker on a bar of
soap to break the surface tension (1), and then allow the ink to
cover the surface of the wax (2). After wiping off the excess ink,
you can clearly see the details. Carve away at any area that
catches your eye (3). Continue to paint the wax and carve until
you can look all around the piece without being distracted by
any areas that need finessing.
odified felt sticks and knife-edge felt wheels make great
buffing tools for wax models. Using an X-acto knife or
scalpel, cut away sections of the felt sticks and wheels so you
can fit them into tiny spaces (4). Rub the felt over the surface
of the wax to smooth any tool marks (5). This process may
reveal areas that need to be re-carved; you may need to go back
a few steps, re-carve the model, paint it to see the details, and
smooth it again.
It’s important to note that not all models are suitable for
buffing. Resist the temptation to buff models for pieces that you
intend to be very crisp and geometric; you don’t want to round
out the edges and lose that sharpness.
M
1 2
3
4
5
YOU CAN’T FIX WHAT YOU CAN’T SEE
BUFF AND READY

47
Augu
st20
05
nce you’ve finished carving and buffing, clean off the ink before filling in
any surface imperfections with Touch-Up Wax. To clean the model, put it
into an ultrasonic cleaner for about a second, or use denatured alcohol or wax sol-
vent to remove the ink. Since Touch-Up Wax melts at 170°F/77°C, and most carv-
ing waxes melt at around 240°F/116°C, your wax pen should be heated to about
185°F/85°C. This is hot enough to flow the Touch-Up Wax, but not hot enough
to melt the surface of the
carving wax.
Flow the Touch-Up Wax
into the surface imperfec-
tions (6), and scrape off any
excess. Touch-Up Wax is
carvable, but it’s softer
than the carving wax,
which makes it easy to
blend into repairs. It’s im-
portant to use Touch-Up
Wax only after you’re done
using felt sticks and sol-
vents, which could erode it.
O
6
JUST A TOUCH
48
AJM
believe that every mark on a piece should be intentional and
contribute to the integrity of the design. For organic, tex-
tured pieces, hollowing out the back with a dimple finish may
be appropriate. On other models, such as those with geometric
or curvilinear forms, a dimple texture may look like a quick,
sloppy solution, and it can detract from the beauty of the design.
If you have a design for which a dimple texture is appropri-
ate, wait until the piece is cast and make overlapping cuts with
a sharp ball bur on the metal model. (Wax offers little resistance
to a bur, making it easy to get a raggedy, uneven texture of vary-
ing depths).
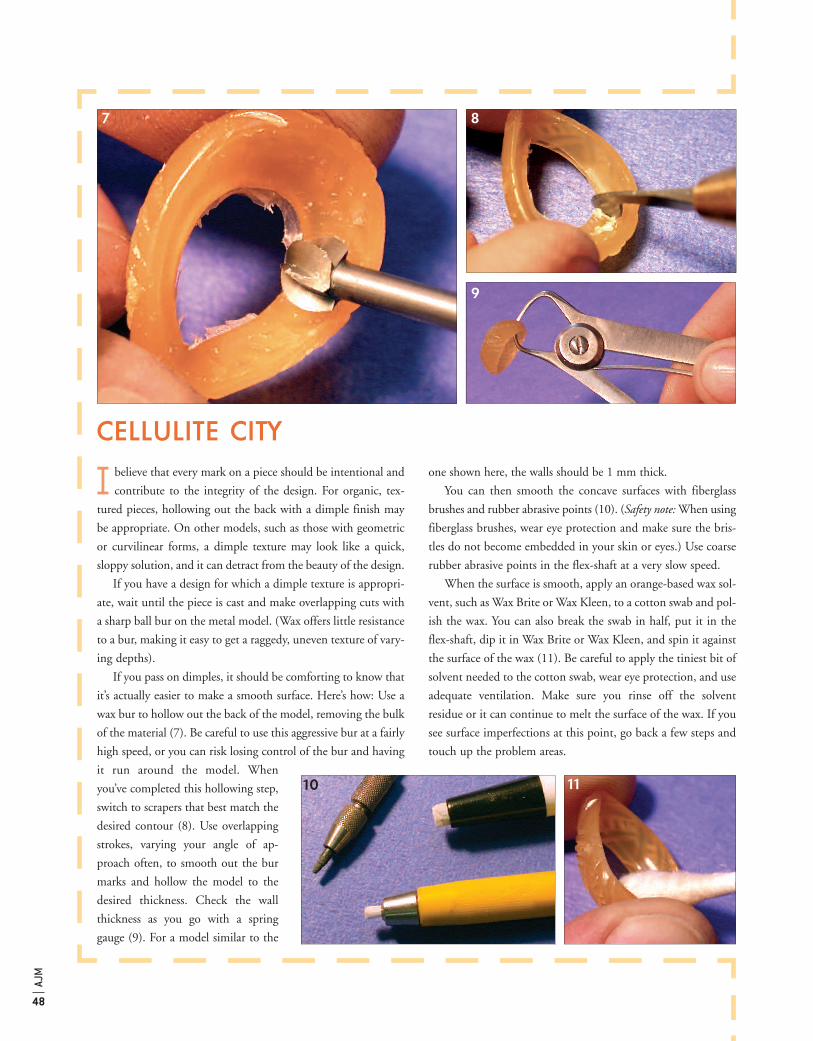
If you pass on dimples, it should be comforting to know that
it’s actually easier to make a smooth surface. Here’s how: Use a
wax bur to hollow out the back of the model, removing the bulk
of the material (7). Be careful to use this aggressive bur at a fairly
high speed, or you can risk losing control of the bur and having
it run around the model. When
you’ve completed this hollowing step,
switch to scrapers that best match the
desired contour (8). Use overlapping
strokes, varying your angle of ap-
proach often, to smooth out the bur
marks and hollow the model to the
desired thickness. Check the wall
thickness as you go with a spring
gauge (9). For a model similar to the
one shown here, the walls should be 1 mm thick.
You can then smooth the concave surfaces with fiberglass
brushes and rubber abrasive points (10). (Safety note:When using
fiberglass brushes, wear eye protection and make sure the bris-
tles do not become embedded in your skin or eyes.) Use coarse
rubber abrasive points in the flex-shaft at a very slow speed.
When the surface is smooth, apply an orange-based wax sol-
vent, such as Wax Brite or Wax Kleen, to a cotton swab and pol-
ish the wax. You can also break the swab in half, put it in the
flex-shaft, dip it in Wax Brite or Wax Kleen, and spin it against
the surface of the wax (11). Be careful to apply the tiniest bit of
solvent needed to the cotton swab, wear eye protection, and use
adequate ventilation. Make sure you rinse off the solvent
residue or it can continue to melt the surface of the wax. If you
see surface imperfections at this point, go back a few steps and
touch up the problem areas.
7 8
9
10 11
CELLULITE CITY

49
Augu
st20
05
hen carving waxes for
stone settings, accuracy
is paramount. (For carving tips
and techniques, read “Cut
Loose” online at www.ajm
-magazine.com. Click on “AJM
Online Tech Articles” in the
Tech Center portion of the
site and scroll down.) After
cutting the seat for the stone,
paint the inside of the setting
with a brush marker, then
push the stone into the setting.
Wherever the stone scrapes the
ink off the wax (12), the bezel
is too tight and could cause the stone to break during setting. To remedy this, scrape
the wax where the stone scraped the marker away, repaint the inside, push the stone
into the wax to see where it is still tight, and re-scrape. Repeat this process until the
stone fits easily in the bezel.
nother valuable tip when
carving models for point-
ed stones comes from stone set-
ting guru Blaine Lewis of the
New Approach School for
Jewelers in Virginia Beach. We
all know that most breakage
occurs at stone points. But did
you know that you can alleviate
this by removing material from
the wax model? Simply make a
small hollow from the girdle of
the point down through the bot-
tom of the pavilion shelf (13).
Now the tip of the stone won’t be
supported, greatly reducing the
chances of breakage.
If there are any gaps in the
bezel, fill them in with Touch-
Up Wax (14) and blend in
the repairs.
12W
13 A
14
DON’T GIVE ME A BREAK
RIGHT TO THE POINT

50
AJM
olten metal has a
consistency similar
to that of heavy cream…
but it’s much warmer. Keep
that in mind when assessing
your wax patterns. Every-
thing that is wax will ulti-
mately be a cavity in the
investment.
Envision molten metal traveling up the sprue and filling in
the cavity that was your wax pattern. Anything you can do,
both in the carving and the spruing of the model, to reduce tur-
bulence and to aid in the ideal progressive solidification of the
molten metal is highly advisable. So, what’s ideal?
This gent’s signet ring is a good example (15). The bottom
of the shank measures 2.25 mm. There is a gradual taper to the
top of the ring, which is hollowed out to 1 mm. The inside cor-
ners are hollowed with a rounded (not angular) radius to reduce
turbulence. Ideally, you want the molten metal to solidify at the
top of the ring first, and then gradually solidify down the
shank, with the sprue solidifying last. Since there are no abrupt
transitions from thick to thin, no sharp angles, and the model
is heaviest at the sprue, you should achieve optimum progres-
sive solidification with little risk of shrinkage porosity.
t’s important to be especially careful with models that have long,
skinny, pierced out windows (16). During the investing process,
these windows will be filled with investment, which can break off
when the molten metal flows into the cavity. The result is nasty
investment inclusions in your casting. To prevent this from hap-
pening, fill in the point of the window with Touch-Up Wax (17),
then blend in the repaired section (18). On the surface of the wax,
carve a deep V. This gives the model the illusion of continuing to a
sharp point, without causing investment inclusions (19).
Another general rule of thumb for preventing investment inclu-
sions is to make sure the depth of a hole or pierced out area is no
greater than its diameter.
y using these tricks in the final stages of your wax carving
process, you can save time, reduce defects, and improve the
quality of your final product. Follow these guidelines closely and
you can confidently say, “We’re there!” �
M
15
16 17 18
19
B
GO WITH THE FLOW
POINTERS FOR POINTS