More Tips and Tricks for Creating Multi-Sheet Microsoft Excel
20
1 More Tips and Tricks for Creating Multi-Sheet Microsoft Excel Workbooks the Easy Way with SAS ® Vincent DelGobbo, SAS Institute Inc, Cary, NC ABSTRACT Transferring SAS data and analytical results between SAS and Microsoft Excel can be difficult, especially when SAS is not installed on a Windows platform. This paper explains how to use the XML support in Base SAS ® 9 software to create multi-sheet Microsoft Excel workbooks (for Excel versions 2002 and later). You will learn step-by-step techniques for quickly and easily creating attractive multi-sheet Excel workbooks that contain your SAS output, and also tips and tricks for working with the ExcelXP ODS tagset. Most importantly, the techniques that are presented in this paper can be used regardless of the platform on which SAS software is installed. You can even use them on a mainframe! The use of SAS server technology is also discussed. Although the title is similar to previous papers by this author, this paper contains new and revised material not previously presented. INTRODUCTION This paper provides you with step-by-step instructions for using Base SAS 9.1 or later to create the Excel workbook shown in Figure 1. Figure 1. Multi-Sheet Excel Workbook Generated by the ODS ExcelXP Tagset Hands-On Workshops NESUG 2009
Transcript of More Tips and Tricks for Creating Multi-Sheet Microsoft Excel

1
More Tips and Tricks for Creating Multi-Sheet Microsoft Excel Workbooks the
Easy Way with SAS®
Vincent DelGobbo, SAS Institute Inc, Cary, NC
ABSTRACT
Transferring SAS data and analytical results between SAS and Microsoft Excel can be difficult, especially when SAS is not installed on a Windows platform. This paper explains how to use the XML support in Base SAS
®9 software to
create multi-sheet Microsoft Excel workbooks (for Excel versions 2002 and later). You will learn step-by-step techniques for quickly and easily creating attractive multi-sheet Excel workbooks that contain your SAS output, and also tips and tricks for working with the ExcelXP ODS tagset. Most importantly, the techniques that are presented in this paper can be used regardless of the platform on which SAS software is installed. You can even use them on a mainframe! The use of SAS server technology is also discussed. Although the title is similar to previous papers by this author, this paper contains new and revised material not previously presented.
INTRODUCTION
This paper provides you with step-by-step instructions for using Base SAS 9.1 or later to create the Excel workbook shown in Figure 1.
Figure 1. Multi-Sheet Excel Workbook Generated by the ODS ExcelXP Tagset
Hands-On WorkshopsNESUG 2009

2
The workbook contains 5 worksheets containing drug approval data for the years 1997 through 2001 (Mathieu 2002). Excel formats, not SAS formats, are used to control the appearance of the numeric and date values. The date values are SAS date values that have been converted to Excel dates, without modifying the original SAS data. Note that the values in the column labeled "Time (in months)" in Figure 1 are not static values, but are calculated from the "Submission Date" and "Approval Date" values using an Excel function. For example, the value in cell F5 is not 13.4, but instead is the Excel formula =ROUND(((E5-D5)/365.24)*12,1) . The raw SAS data is shown in
Figure 2.
Figure 2. Raw SAS Data Displayed Using the SAS VIEWTABLE Application
The remainder of this paper guides you through the steps used to create the Excel workbook shown in Figure 1 using Base SAS
®9 software. You can download a copy of the code and data used in this paper from the SAS
Presents Web site at support.sas.com/saspresents. Find the entry "More Tips and Tricks for Creating Multi-Sheet Microsoft Excel Workbooks the Easy Way with SAS
®".
The code in this paper was tested using SAS 9.1.3 Service Pack 4 and Microsoft Excel 2003 SP2 software.
REQUIREMENTS
To use the techniques described in this paper, you must have the following software:
• Base SAS 9.1.3 or later, on any supported operating system and hardware.
• Microsoft Excel 2002 or later (also referred to as Microsoft Excel XP).
• An updated version of the SAS ExcelXP ODS tagset. For more information about obtaining an updated version of the tagset, see "The ExcelXP Tagset" section later in this paper.
OUTPUT DELIVERY SYSTEM (ODS) BASICS
ODS is the part of Base SAS software that enables you to generate different types of output from your procedure code. An ODS destination controls the type of output that is generated (HTML, RTF, PDF, etc.). An ODS style controls the appearance of the output. In this paper, we use a type of ODS destination, called a tagset, that creates
Hands-On WorkshopsNESUG 2009

3
XML output that can be opened with Excel. This tagset, named ExcelXP, creates an Excel workbook that has multiple worksheets. The Excel workbook in Figure 1 was created using the ExcelXP ODS tagset and the "XLsansPrinter" ODS style. The ExcelXP tagset creates an XML file that, when opened by Excel, is rendered as a multi-sheet workbook. All formatting and layout are performed by SAS; there is no need to "hand-edit" the Excel workbook. You simply use Excel to open the file created by ODS. Here are the general ODS statements needed to generate XML output that is compatible with versions 2002 and later of Microsoft Excel:
� ods listing close; � ods tagsets.ExcelXP file=’ file-name. xml’ style= style-name ... ; * Your SAS code here; � ods tagsets.ExcelXP close;
The first ODS statement (�) closes the LISTING destination, which writes output to either a listing file in batch mode, or to the Output window when SAS is run interactively. Because we want to only generate XML output for use with Excel, we close this destination. The second ODS statement (�) uses the ExcelXP tagset to generate the XML output and then store the output in a file. The STYLE option controls the appearance of the output, such as the font and color scheme. To see a list of ODS styles that are available for use at your site, submit the following SAS code:
ods listing; proc template; list styles; run; quit;
The third ODS statement (�) closes and releases the XML file so that it can be opened with Excel. Although you can store your output on a local disk (where SAS software is installed), or on a network-accessible disk, here are some good reasons to store your SAS output on a Web server:
• The files are available to anyone who has network access.
• The XML files can be accessed by Web-enabled applications other than Excel.
• You can take advantage of Web server authentication and security models.
Note: If you place the files where users can access them over a network, you should set file permissions to prevent accidental alteration.
OPENING ODS OUTPUT WITH EXCEL
To open an ODS-generated file that is stored on a Web server, follow these steps:
1. In Excel, select File ➨ Open (Excel 2002 or 2003) or Office Button ➨ Open (Excel 2007)
2. In the File name field, specify the full URL for the file you want to open. For example,
http:// Web-server/ directory/ file-name.xml .
3. Click Open to import the XML file.
To open ODS-generated files from a local or network-accessible disk, follow the same steps with one exception: in step 2 you should either navigate to the desired file or type the path and file name in the File name field.
Excel will read and convert the XML file to the Excel format. After the conversion, you can perform any Excel function on the data. To save a copy of the file in Excel binary format using Excel 2002 or Excel 2003, select
File ➨ Save As and then, from the Save as type drop-down list, select Microsoft Excel Workbook
(*.xls) . If you're using Excel 2007, click the Microsoft Office Button, and then select Save As ➨ Excel Binary Workbook .
Hands-On WorkshopsNESUG 2009

4
SETTING UP THE ODS ENVIRONMENT
Our sample code employs a user-defined style named "XLsansPrinter" and a modified version of the ExcelXP tagset. The following statements define the location where the style and tagset will be stored on your system:
� libname mylib 'some-directory' ; * Location to store tagsets and styles; � ods path mylib.tmplmst(update) sashelp.tmplmst(read);
The LIBNAME statement (�) specifies where to store the user-defined tagsets and styles. Although you can temporarily store tagsets and styles in the WORK library, it is more efficient to create them once, and then store them in a permanent library so that you can reference them in other SAS programs.
The ODS PATH statement (�) specifies the locations of, and the order in which to search for, ODS tagsets and styles. Notice that the access mode for mylib.tmplmst is specified as update and the access mode for
sashelp.tmplmst is specified as read .
Because ODS searches the path in the order given, and the access mode for mylib.tmplmst is update , PROC
TEMPLATE, used later in this paper, will create and store tagsets and styles in a file named tmplmst.sas7bitm in
the directory that is associated with the MYLIB library.
THE EXCELXP TAGSET
Once you have issued the appropriate ODS PATH statement, you can import the modified version of the ExcelXP tagset and use it in your SAS programs. The version of the tagset used in this paper can be found in the download package on the SAS Presents Web site at support.sas.com/saspresents. Find the entry "More Tips and Tricks for Creating Multi-Sheet Microsoft Excel Workbooks the Easy Way with SAS". The download package contains a file named "ExcelXP.sas", which contains the SAS code for creating the ExcelXP tagset. Save a copy of this file, and submit the following SAS code to make the tagset available:
%include 'ExcelXP.sas'; * Specify path to the file, if necessary; You should need to perform this step only once. The ExcelXP tagset will be imported and stored in the directory corresponding to the MYLIB library. All of your future SAS programs can access the tagset by specifying the correct LIBNAME and ODS PATH statements (see the "Setting up the ODS Environment" section, above). The ExcelXP tagset supports several options that control both the appearance and functionality of the Excel workbook. To see a listing of the supported options, submit the following SAS code:
filename temp temp; ods tagsets.ExcelXP file=temp options(doc='help'); ods tagsets.ExcelXP close;
The tagset information is printed to the SAS log. For your convenience, a listing of the supported options is included in the download package for this paper.
IMPORTANT NOTE
The version of the ExcelXP tagset that was shipped with Base SAS 9.1 has undergone many revisions since its initial release. In order to take advantages of the features discussed in this paper, you must download a recent copy of the tagset and install it on your system as described previously. The version of the tagset used in this paper can be found in the download package on the SAS Presents Web site, as noted above. The most recent version of the tagset is available from the ODS Web site (SAS Institute Inc. 2009. "ODS MARKUP Resources").
A BRIEF ANATOMY OF ODS STYLES
ODS styles control all aspects of the appearance of the output, and Base SAS software ships with over 40 different styles. A style is composed of style elements, each of which controls a particular part of the output. For example, all styles contain a style element named "header" that controls the appearance of column headings. Style elements consist of collections of style attributes, such as the background color and font size.
Hands-On WorkshopsNESUG 2009

5
The definition of the style element named "header" might look like this:
style header / font_face = "Arial, Helvetica" font_size = 11pt font_weight = bold foreground = black background = #bbbbbb;
As you can see, this style element contains the style attributes font_face , font_size , and so on. The
TEMPLATE procedure can be used to modify an existing style or to create a completely new style from scratch. The next section describes using the TEMPLATE procedure to modify an existing style.
CREATING YOUR OWN STYLE: THE XLSANSPRINTER STYLE
Although the appearance of the workbook shown in Figure 1 closely resembles that which is generated using the standard ODS style named "sansPrinter", the workbook was created using a custom ODS style named "XLsansPrinter", which is based on the standard "sansPrinter" style. The "XL" in the "XLsansPrinter" name indicates that this style is intended for use with Microsoft Excel. The "XLsansPrinter" style was created by using the TEMPLATE procedure to modify the "sansPrinter" style, changing an existing style element, and creating new style elements that will be used later. The complete code for creating the XLsansPrinter style can be found in the appendix of this paper, "Code for Creating the XLsansPrinter Style". Although you can use the TEMPLATE procedure to create a new style from scratch, it is usually easier to copy an existing style that is close to what you want, and then make modifications to the copy. The code below creates the "XLsansPrinter" style based on the standard ODS style named "sansPrinter":
proc template; define style styles.XLSansPrinter; parent=styles.sansPrinter; end; run; quit;
Because this TEMPLATE procedure code does not contain statements to change any style elements, the "XLsansPrinter" style is an exact copy of the standard "sansPrinter" style. The background color of the column heading cells is gray when the "sansPrinter" style is used. Figure 1 shows that the background color for these cells should be white. When the code below is added to the initial definition of the "XLsansPrinter" style (above), the background color of the column heading cells will be white, and the text will appear centered using a 10-point font. All other style attributes, such as the foreground color, are inherited from the original "header" style element, and remain unchanged.
style header from header / background=white font_size=10pt just=center;
When you run the TEMPLATE procedure code provided in the appendix, you generate the "XLsansPrinter" style, and also create three new style elements: "data_center", "data_mdy", and "data_monthcalc". The "data_center" style element has all the attributes of the standard "data" style element, the difference being that text is centered within the cells. The "data_center" style element will later be applied to the "Rating" column using a style override. The style element "data_mdy" converts SAS date values to Excel date values. It is based on the standard "data" style element, and has the same appearance characteristics as that style element, except that text is right-justified within the cells. The "tagattr" attribute applies an Excel format and instructs Excel to interpret the value in the cell as an Excel DateTime value. This style element will later be applied to the "SubmissionDate" and "ApprovalDate" columns using a style override. The "data_monthcalc" style element, which is based on the new "data_center" style element, will later be applied to the "ReviewTIme" column using a style override. As a result, the cells in this column will be centered, and contain an Excel formula instead of static values. The values will be displayed using an Excel format that is similar to the SAS w.d format. If a value in the "SubmissionDate" or "ApprovalDate" columns is changed, the formula will recalculate the new value of "ReviewTime".
Hands-On WorkshopsNESUG 2009

6
For more information about Excel formats, type "create a custom number format" into the Excel help system or refer to any of the innumerable books covering Excel. Similarly, for more information about Excel formulas, type "create a formula" into the Excel help system. At this point you should run the code that can be found in the appendix of this paper to create the "XLsansPrinter" style on your system. You should need to perform this step only once because the "XLsansPrinter" style will be stored in the directory corresponding to the MYLIB library, and all of your future SAS programs can access the style by adding the correct LIBNAME and ODS PATH statements (see the "Setting Up the ODS Environment" section). Because an in-depth discussion of creating and using ODS styles is beyond the scope of this paper, see the chapter about the TEMPLATE procedure in the ODS documentation (SAS Institute Inc. 2006. "The TEMPLATE Procedure: Creating a Style Definition").
USING ODS TO CREATE THE MULTI-SHEET EXCEL WORKBOOK
By default, the ExcelXP tagset creates a new worksheet each time a SAS procedure creates new tabular output. And because BY statements create new tabular output for each BY group, and our data has BY groups for 5 years of data, our code outputs a total of 5 worksheets, one for each year.
SAS CODE TO CREATE THE EXCEL WORKBOOK
Here is a listing of the basic SAS code used to create the Excel workbook:
ods listing close; ods tagsets.ExcelXP path=' output-directory ' file='DrugApprovals.xml' style=XLsansPrinter; title1 'U.S. New Drug (NME) Approvals of #BYVAL(Year):'; title2 'NDA Review Times by Drug'; footnote; * Create a separate worksheet for each year; proc print data=sample.DrugApprovals noobs label split='*'; by Year; pageby Year; var Drug Firm; var Rating; var SubmissionDate ApprovalDate; var ReviewTime; run; quit; ods tagsets.ExcelXP close;
As you can see in the ODS statement (�), the ExcelXP tagset generates the output, and the "XLsansPrinter" style controls the appearance of the output. The #BYVAL in the TITLE statement (�) inserts the current value of the BY
variable "Year" into the first title. For example:
U.S. New Drug (NME) Approvals of 1997: Refer to the SAS documentation for the TITLE statement for more information about #BYVAL (SAS Institute Inc. 2007. "TITLE Statement"). Further examination of the code reveals that the PRINT procedure is run with a BY statement (�) to create the worksheets. One worksheet is created for each distinct value of the variable "Year". (The SAS table "DrugApprovals" is included in the download package for this paper.) The multiple VAR statements (�) enable us to apply one ODS style override to the "Rating" column, a different style override to the "SubmissionDate" and "ApprovalDate" columns, and yet another style override to the "ReviewTime" column. This technique will be discussed in the "Changing the Appearance of the 'Rating' Column", "Working with SAS and Excel Dates", and "Adding an Excel Formula to Your Workbook" sections. Figure 3 displays the results of executing the SAS code above and opening the resulting "DrugApprovals.xml" file with Excel.
�
�
�
�
Hands-On WorkshopsNESUG 2009

7
Figure 3. Two Different Views of the Same Worksheet in the ODS ExcelXP-Generated Workbook
Hands-On WorkshopsNESUG 2009

8
Notice that Figure 3 does not match Figure 1. The following problems are exhibited in Figure 3:
1. The values in the "Rating" column should be centered, not left-justified. 2. The date values are displayed using a different format. 3. Values in the "Time (in months)" column are not centered, are not all formatted with one decimal place,
and are static values, instead of an Excel formula. 4. Standard BY group text (Year=1997) precedes the Excel tables, instead of custom titles. 5. Default worksheet names are used, instead of the value of the corresponding year. 6. Some of the columns are wider than they need to be, especially those containing the company and
drug names. We will now change the preceding SAS code to correct these problems.
USING THE XLSANSPRINTER STYLE
As mentioned earlier, the user-defined "XLsansPrinter" style is very similar to the standard ODS "sansPrinter" style. However, there are currently several visual differences between them. For instance, as shown in Figure 4, the column headings background color in the "XLsansPrinter" style is white instead of gray, and the font is centered 10-point instead of left-justified 11-point.
Generic (trade name) Firm Rating
Submission
Date
Approval
Date
Time
(in
months)
Generic (trade name) Firm Rating
Submission
Date
Approval
Date
Time
(in
months)
Figure 4. Column Heading Cells Using the "sansPrinter" Style (Top) and "XLsansPrinter" Style (Bottom) These differences are resolved by changing the attributes of the "header" element in the "XLsansPrinter" style, as shown by the code in the appendix. Additionally, the newly created style elements are applied to specific parts of the output using ODS style overrides, which are covered in the following section. Understanding and Using ODS Style Overrides The TEMPLATE procedure enables you to modify existing style elements. These style elements are then applied to specific parts of SAS output called locations. Figure 5 shows two locations that are pertinent to the PROC PRINT output.
Generic (trade name) Firm Rating
Submision
Date
Approval
Date
Time
(in
months)
Anagrelide (Agrylin Capsules) Roberts 1P 1/31/1996 3/14/1997 13.4
Imiquod (Aldara Cream) 3M 1S 7/26/1996 2/27/1997 7.1
Fomepizole (Antizol Injection) Orphan Medical 1S 12/6/1996 12/4/1997 11.9
Dolasetron mesylate (Anzemet) HMR 1S 9/29/1995 9/11/1997 23.4
Irbesartan (Avapro) BMS 1S 9/26/1996 9/30/1997 12.1
Cerivastatin sodium (Baycol) Bayer 1S 6/26/1996 6/26/1997 12.0
Figure 5. The "Header" and "Data" ODS Style Locations for the PRINT Procedure By default, ODS applies the style element named "header" to the "Header" location, and the appearance of the "Data" location is controlled by the "data" style element. In other words, the "header" style element controls the appearance of the column heading cells, and the "data" style element controls the appearance of the data cells.
Header
Data
Hands-On WorkshopsNESUG 2009

9
Changing the "header" style element, as we have done in the "XLsansPrinter" style, affects all procedure output that makes use of this style element. Thus, you should carefully consider the impact of changing style elements that are part of the default SAS style. Style overrides are supported by the PRINT, TABULATE, and REPORT procedures, and can be specified in several ways, the two most common formats being:
� style( location )=[ style - attribute-name1=value1 style-attribute-name2=value2 ...] � style( location )= style-element-name
The style-attribute-name is the name of a style attribute that you want to override. The style-element-name is the name of the style element that you want to use.
The first format (�) uses individual style attributes defined inline. An example of using this method to change some attributes of the "Header" location follows:
style(Header)=[background=white font_size=10pt just=center] While this is the most commonly used format, it has some disadvantages. To use the same style override for different variables you must apply it in the code in multiple places. Thus, your SAS code becomes harder to read and maintain as the number of instances increase. And, if you want to use the style overrides in other SAS programs, you must replicate the list of attribute name/value pairs. Style overrides of this type should be avoided when possible. The second format (�) overcomes these problems. Using this format involves creating a new or modified style element, setting the style attributes within the element, and then using the style element name in your style override. This results in code that is easier to read, maintain, and re-use. As an example, suppose you want to change the appearance of the column headings in some, but not all, of your output. One solution is to create a new style element based on the original "header" style element, and use a style override to apply the new style element to the "Header" location as needed. Sample code that shows you how to create a new style element follows:
proc template; define style styles.MySansPrinter; parent=styles.sansPrinter; style myheader from header / background=white font_size=10pt just=center; end; run; quit;
This code does not modify the standard SAS style element "header". Instead, a new style element named "myheader" is created, inheriting all the attributes of the standard "header" style elements, except for the values of the "background", "font_size", and "just" attributes, which are changed. The new style element must be specified as a style override before ODS will recognize it. The code below shows how to override the style element used for the "Header" location for the variables "name" and "age":
ods tagsets.ExcelXP style=MySansPrinter ...; proc print data=sashelp.class noobs ...; var name age / style(Header)=myheader ; run; quit; ods tagsets.ExcelXP close;
The result of adding this style override can be seen in the left side of Figure 6. Omitting the style override produces the default appearance for the header cells (Figure 6, right side).
Hands-On WorkshopsNESUG 2009

10
Name Age
Alfred 14
Alice 13
Barbara 13
Carol 14
Name Age
Alfred 14
Alice 13
Barbara 13
Carol 14
Figure 6. PRINT Procedure Output with Style Override (Left) and without (Right)
Changing the Appearance of the "Rating" Column The values in the data cells of the "Rating" column should be centered, but Figure 3 shows that they are left-justified. The "XLsansPrinter" style contains a style element named "data_center" that is exactly the same as the "data" style element, except the justification is set to "center":
/* Used to control the appearance of the Rating "data" cells */ style data_center from data / just=center;
Center the values by using the “data_center” style element for the "Data" location of the “Rating” column:
var Rating / style(Data)=data_center ; Working with SAS and Excel Dates SAS and Microsoft Excel use different date systems. Consequently, you often encounter problems when Excel reads SAS output containing date values. For example, if you double-click on the cell containing "31JAN1996" (Figure 3) and press the ENTER key, Excel will change the date to "31-Jan-96". One way to correct this behavior is to write SAS code to convert SAS date values to Excel date values, but this approach is problematic because you must alter your original SAS data. While you can create a new view or SAS table that contains the new date values, this is a vector for errors and becomes inefficient as your data grows. A better solution, one that does not require you to alter the underlying data, is to use a combination of SAS and Excel formats. First you specify a SAS format using a FORMAT statement, and then you specify an Excel format using a style override. The SAS format changes what is physically written into the XML file, and the Excel format changes the way the value is displayed. Because Excel expects dates to be represented using the ISO 8601 format (YYYY-MM-DD), SAS date values should be formatted using the YYMMDD or IS8601DA formats. We will use the YYMMDD format for the "SubmissionDate" and "ApprovalDate" columns. The "XLsansPrinter" style contains the style element "data_mdy", which inherits all the attributes of the standard "data" style element, except that the text is right-justified. The "tagattr" attribute is used to apply an Excel format to the data, and also to instruct Excel to interpret the value as an Excel datetime value:
/* Used to convert SAS date values to Excel date values */ style data_mdy from data / just=right tagattr='format:m/d/yyyy type:DateTime';
Hands-On WorkshopsNESUG 2009

11
Table 1 shows how the date "June 9, 1997" would be displayed in Excel using different formats, including the format used by the "data_mdy" style element ("m/d/yyyy"). Refer to Figure 1 to see other display values for the Excel "m/d/yyyy" format.
Excel Format Display Value
m/d/yyyy 6/9/1997
mm/d/yyyy 06/9/1997
mm/dd/yyyy 06/09/1997
mmm d, yyyy Jun 9, 1997
mmmm, d, yyyy June 9, 1997
ddmmmyyyy 09Jun1997
m/d/yy 6/9/97
Table 1. Excel Formats and Corresponding Display Values for the Date June 9, 1997 The following PROC PRINT code applies, as a style override, the “data_mdy” style element to the "Data" location of the "SubmissionDate" and "ApprovalDate" columns:
proc print data=sample.DrugApprovals noobs label split='*'; by Year; pageby Year; var Drug Firm; var Rating / style(Data)=data_center; var SubmissionDate ApprovalDate / style(Data)=data_mdy ; var ReviewTime; format SubmissionDate ApprovalDate yymmdd10.; run; quit;
Refer to SAS Usage Note 11206 for information on the ISO 8601 SAS date and datetime formats (SAS Institute Inc. 2009. "Usage Note 11206: IS8601* FORMATS and INFORMATS for DATE, TIME, and DATETIME"). To find out more about Excel date formats, type "display numbers as dates or times" into the Excel help system or refer to a book that covers this topic. Adding an Excel Formula to Your Workbook Excel formulas begin with an equal sign ("="), and usually contain references to other cells in a worksheet. There are two ways to reference cells: the A1 style and the R1C1 style. Although the A1 style is more widely used, the Microsoft XML Spreadsheet Specification requires that R1C1-style references be used when building worksheets with XML because "they are significantly easier to parse and generate than A1-style formulas" (Microsoft Corporation. 2001. "XML Spreadsheet Reference"). Table 2 provides some examples of formulas that use R1C1-style references.
Formula Explanation of the Computation Performed
=R[-2]C Reference the value in the cell 2 rows up and in the same column.
=R[2]C[2]*100 Multiply the value in the cell 2 rows down and 2 columns to the right by 100.
=SUM(RC[-5]:RC[-1]) Sum the values in the cells 5 columns to the left in the same row through 1 column to the left in the same row.
=RC[-1]-R[-4]C[-1] Subtract the value in the cell 4 rows up and 1 column to the left from the value in the cell 1 column to the left.
Table 2. Sample Excel Formulas Using R1C1-Style References
Up to this point we have used the "tagattr" style attribute to apply an Excel format and to specify the Excel data type. This attribute can also be used to assign an Excel formula to all the cells in a column. The "ReviewTime" column contains static values showing the difference, in months, between the "SubmissionDate" and "ApprovalDate" columns. We want to replace the static values with an Excel formula, so a new value of "ReviewTime" will be calculated automatically if one or both dates are changed in the worksheet. Using SAS, the formula would be:
ROUND(((ApprovalDate-SubmissionDate)/365.24)*12,0.1) In Excel, the formula is very similar, except for the R1C1 nomenclature. Because the "ApprovalDate" column is one column to the left of the column containing the formula, it is represented as "RC[-1]". Similarly, the "SubmissionDate" column is represented as "RC[-2]". We do not need to indicate an index for the row for the Excel formula because all calculations are carried out within the row containing the formula.
Hands-On WorkshopsNESUG 2009

12
The resulting Excel formula is:
=ROUND(((RC[-1]-RC[-2])/365.24)*12,1) Note the difference in arguments: the second argument of the Excel ROUND function specifies the number of decimal places to which you want to round the number, while the second argument of the SAS ROUND function represents the rounding unit. Figure 1 shows that insignificant zeroes in the decimal place should be displayed. For example, if the result of a calculation is exactly 12, the value should be displayed as 12.0. This can be accomplished using the Excel format "0.0". The "0" represents any numeric digit or digits, including insignificant zeroes. For example, the raw values 0, .1, and 12 would be displayed as 0.0, 0.1, and 12.0, respectively. As we saw earlier, Excel formats are specified via the "tagattr" attribute. The "XLsansPrinter" style contains a style element named "data_monthcalc" that inherits all the attributes of the custom style element named "data_center", defined earlier, and specifies both the Excel formula and Excel format:
/* Used to add a formula and format to the ReviewTime "data" cells */ style data_monthcalc from data_center / tagattr='formula:=ROUND(((RC[-1]-RC[-2])/365.24)*12,1) format:0.0';
Using the "data_monthcalc" style element for the "Data" location of a column applies both the formula and the format:
var ReviewTime / style(Data)=data_monthcalc ; For more detailed information about the Excel R1C1 reference style, type "about cell and range references" into the Excel help system, or refer to a book that covers this topic.
WORKING WITH THE EXCELXP TAGSET OPTIONS
As mentioned earlier, the ExcelXP tagset supports several options that control both the appearance and functionality of the Excel workbook. Many of these tagset options are simply tied straight into existing Excel options or features. Tagset options are specified on the ODS statement using the OPTIONS keyword:
ods tagsets.ExcelXP options( option-name1=' value1' option-name2=' value2' ...) ... ; It is important to note that tagset options remain in effect until they are either turned off or set to another value. Since multiple ODS statements are allowed, it is good practice, in terms of functionality and code readability, to explicitly reset tagset options to their default value when you are finished using them. For example:
ods tagsets.ExcelXP options( option-name= ' some- value') ... ; * Some SAS code here; ods tagsets.ExcelXP options( option-name= ' default- value') ... ; * Other SAS code here;
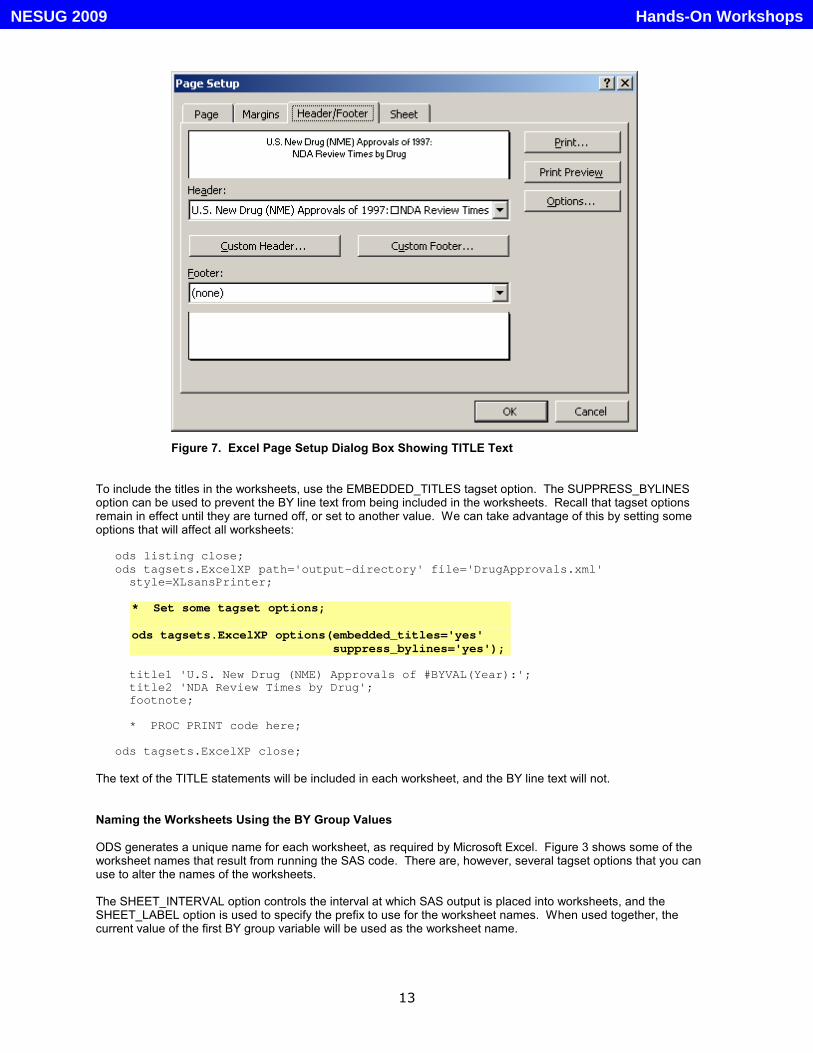
Getting the TITLE Text into the Worksheets BY line text such as "Year=1997" precedes the tables in our worksheets (see Figure 3, top). Instead, we want the text of the two TITLE statements to precede the tables. By default, SAS titles and footnotes appear as Excel print headers and print footers, which are displayed only when the Excel document is printed. You can confirm this by viewing the Excel "Page Setup" dialog box, which is shown in Figure 7.
Hands-On WorkshopsNESUG 2009
13
Figure 7. Excel Page Setup Dialog Box Showing TITLE Text To include the titles in the worksheets, use the EMBEDDED_TITLES tagset option. The SUPPRESS_BYLINES option can be used to prevent the BY line text from being included in the worksheets. Recall that tagset options remain in effect until they are turned off, or set to another value. We can take advantage of this by setting some options that will affect all worksheets:
ods listing close; ods tagsets.ExcelXP path=' output-directory ' file='DrugApprovals.xml' style=XLsansPrinter;
* Set some tagset options; ods tagsets.ExcelXP options(embedded_titles='yes' suppress_bylines='yes');
title1 'U.S. New Drug (NME) Approvals of #BYVAL(Year):'; title2 'NDA Review Times by Drug'; footnote; * PROC PRINT code here; ods tagsets.ExcelXP close;
The text of the TITLE statements will be included in each worksheet, and the BY line text will not. Naming the Worksheets Using the BY Group Values ODS generates a unique name for each worksheet, as required by Microsoft Excel. Figure 3 shows some of the worksheet names that result from running the SAS code. There are, however, several tagset options that you can use to alter the names of the worksheets. The SHEET_INTERVAL option controls the interval at which SAS output is placed into worksheets, and the SHEET_LABEL option is used to specify the prefix to use for the worksheet names. When used together, the current value of the first BY group variable will be used as the worksheet name.
Hands-On WorkshopsNESUG 2009

14
The following code will cause the worksheet names to match those shown in Figure 1.
* Set some tagset options; ods tagsets.ExcelXP options(embedded_titles='yes' suppress_bylines='yes' sheet_interval='bygroup' sheet_label=' ' );
Creating Narrow Columns with Wrapped Text If you view the "DrugApprovals.xml" file using a text editor, you will see that the column definitions for all 5 worksheets look similar to the following:
<ss:Column ss:AutoFitWidth="1" ss:Width="555"/> <ss:Column ss:AutoFitWidth="1" ss:Width="345"/> <ss:Column ss:AutoFitWidth="1" ss:Width="60"/> <ss:Column ss:AutoFitWidth="1" ss:Width="67.5"/> <ss:Column ss:AutoFitWidth="1" ss:Width="67.5"/> <ss:Column ss:AutoFitWidth="1" ss:Width="82.5"/>
The values of the "Width" attribute are specified in points. Notice that the width values for the first two columns are very large. This happens because the algorithm that the tagset uses to compute the width takes into account the length of the variables, which for the first two columns are 74 and 46, respectively. Figure 3 shows that some of the other columns are also wider than they need to be to display the data. You might instinctively try to narrow the columns by using a smaller value for the lengths of the character variables, but that can result in the truncation of data, and will have no effect on the width of the numeric columns. A better solution to finding optimal column widths is to perform the following steps for each worksheet:
1. Manually resize each column using Excel. 2. Save the XML file and reexamine the new value of each "Width" attribute. 3. Use tagset options to specify the new widths.
When you manually resize the columns so that they appear as shown in Figure 1, and then you examine the XML file, you will see something like this:
<Column ss:StyleID="s21" ss:AutoFitWidth="0" ss:Width="143"/> <Column ss:StyleID="s21" ss:Width="110"/> <Column ss:StyleID="s21" ss:Width="36"/> <Column ss:StyleID="s21" ss:Width="58.5" ss:Span="1"/> <Column ss:Index="6" ss:StyleID="s21" ss:Width="57.75"/>
Notice our worksheets contain 6 columns, but the XML created by saving the file using Excel has only 5 "Column" tags. Excel collapsed the 4th and 5th column tags into a single tag because the columns are the same width (58.5 points). The tagset uses the following formula to compute the approximate column width:
width = PointSize * NumberOfCharacters * FudgeFactor The value of "PointSize" is computed based on the metrics of the font. For numeric columns, "NumberOfCharacters" is the largest number of characters in any cell of the column, including the column heading. For character columns, "NumberOfCharacters" is defined as whichever is the larger: the length of the character variable, or the largest number of characters in a cell in the column. "FudgeFactor" has a default value of 0.75, and can be used to make small adjustments to the column width. Values for each of the variables in the above equation can be specified using tagset options. The value for "PointSize" is specified using the WIDTH_POINTS option, "NumberOfCharacters" is specified using the ABSOLUTE_COLUMN_WIDTH option, and the WIDTH_FUDGE option is used to specify the value of "FudgeFactor". We can use the ABSOLUTE_COLUMN_WIDTH option to pass the new column widths to the tagset, but the final width will be recalculated based on the formula above. However, setting the values of "PointSize" and
Hands-On WorkshopsNESUG 2009

15
"FudgeFactor" to 1 will effectively pass the values specified in ABSOLUTE_COLUMN_WIDTH directly into the XML file. Using the first column width as an example:
width = 1 * 143 * 1 Our SAS code now becomes:
* Set some tagset options; ods tagsets.ExcelXP options(embedded_titles='yes' suppress_bylines='yes' sheet_interval='bygroup' sheet_label=' '
width_points='1' width_fudge='1' absolute_column_width='143,110,36,58.5,58.5,57.75' );
Figure 8 shows the result of running the SAS code that includes all of the modifications up to this point.
Figure 8. Multi-Sheet Excel Workbook with Code Modifications
By comparing Figures 1 and 8, you can see that the column widths are the same, but some of the rows in Figure 8 are not as tall as they need to be. For example, the drug name for row 11 should be “Fenoldopam mesylate (Corlopam)”, but only part of the drug name is displayed.
Hands-On WorkshopsNESUG 2009

16
To make the row height adjust to its content, we can use the AUTOFIT_HEIGHT tagset option as follows:
* Set some tagset options; ods tagsets.ExcelXP options(embedded_titles='yes' suppress_bylines='yes' sheet_interval='bygroup' sheet_label=' ' width_points='1' width_fudge='1' absolute_column_width='143,110,36,58.5,58.5,57.75' autofit_height='yes' );
THE FINAL SAS CODE
The final SAS code to create the output of Figure 1 should appear as follows:
ods listing close; ods tagsets.ExcelXP path=' output-directory ' file='DrugApprovals.xml' style=XLsansPrinter; * Set some tagset options;
ods tagsets.ExcelXP options(embedded_titles='yes' suppress_bylines='yes' sheet_interval='bygroup' sheet_label=' ' width_points='1' width_fudge='1' absolute_column_width='143,110,36,58.5,58.5,57.75' autofit_height='yes');
title1 'U.S. New Drug (NME) Approvals of #BYVAL(Year):'; title2 'NDA Review Times by Drug'; footnote; * Create a separate worksheet for each year; proc print data=sample.DrugApprovals noobs label split='*'; by year; pageby year; var Drug Firm; var Rating / style(Data)=data_center; var SubmissionDate ApprovalDate / style(Data)=data_mdy; var ReviewTime / style(Data)=data_monthcalc; format SubmissionDate ApprovalDate yymmdd10.; run; quit; ods tagsets.ExcelXP close;
SAS SERVER TECHNOLOGY
You can incorporate dynamically-generated SAS output into Excel by using the Application Dispatcher, which is part of the SAS/IntrNet
® product. You can do the same with the SAS
® Stored Process Server, new for SAS
®9, and part
of the SAS® Integration Technologies product.
Both of these products enable you to execute SAS programs from a Web browser or any other client that can open an HTTP connection to the Application Dispatcher or the Stored Process Server (both of which can run on any platform where SAS is licensed). SAS software does not need to be installed on the client machine. The SAS programs that you execute from the browser can contain any combination of DATA step, PROC, macro, or SCL code. Thus, all the code that has been shown up to this point can be executed by both the Application Dispatcher and the SAS Stored Process Server. Program execution is typically initiated by accessing a URL that points to the SAS server program. Parameters are passed to the program as name/value pairs in the URL. The SAS server takes these name/value pairs and constructs SAS macro variables that are available to the SAS program. Figure 9 shows a Web page that can deliver SAS output directly to Excel, using the Web browser as the client.
Hands-On WorkshopsNESUG 2009

17
Figure 9. Web Page to Drive a SAS/IntrNet Application
Clicking "Download to Excel" executes of a slightly modified version of the PRINT procedure code that we have been working on. The modifications are as follows:
%let RV=%sysfunc(appsrv_header(Content-type,application/vnd.ms-excel)); %let RV=%sysfunc(appsrv_header(Content-disposition,attachment; filename= "DrugApprovals.xml")); * Ignore line wrapping; ods listing close; ods tagsets.ExcelXP file= _webout style=XLsansPrinter; * Remainder of "final" SAS code; ods tagsets.ExcelXP close;
The first APPSRV_HEADER function sets a MIME header that causes the SAS output to be opened by Excel, instead of being rendered by the Web browser. This statement is required. The second APPSRV_HEADER function sets a MIME header that populates the file name field in the "File Download" dialog box. As you can see from Figure 10, the file name appears as "DrugApprovals.xml". This header might cause problems with some versions of Excel, so be sure to test your applications before deploying them in a production environment. This statement is optional.
Hands-On WorkshopsNESUG 2009

18
Figure 10. File Download Dialog Box
The reserved fileref _WEBOUT is automatically assigned by the SAS server, and is always used to direct output from the SAS server to the client. Modify your existing ODS statement to direct the output to this fileref, instead of an external disk file. When you click the "Download to Excel" button and are presented with the "File Download" dialog box, you can click "Open" to immediately open your SAS output using Excel, or "Save" to save a copy for later use. This is just one example of how you can dynamically deliver SAS output to Excel. For more detailed information and other examples, refer to the SAS/IntrNet Application Dispatcher and SAS Stored Process documentation (SAS Institute Inc. 2005. "About Application Dispatcher"; SAS Institute Inc. 2009. "SAS Stored Processes"), as well as this author's earlier papers (DelGobbo 2002-2004).
CONCLUSION
The SAS®9 ExcelXP ODS tagset provides an easy way to export your SAS data to Excel workbooks that contain
multiple worksheets. By using ODS styles, style overrides, and a tagset that complies with the Microsoft XML Spreadsheet Specification, you can customize the output to achieve your design goals.
APPENDIX
CODE FOR CREATING THE XLSANSPRINTER STYLE
proc template; define style styles.XLSansPrinter; parent=styles.sansPrinter; /* Controls the appearance of all column headings */ style header from header / background=white font_size=10pt just=center; /* Used to control the appearance of the Rating "data" cells */ style data_center from data / just=center; /* Used to convert SAS date values to Excel date values */ style data_mdy from data / just=right tagattr='format:m/d/yyyy type:DateTime'; /* Used to add a formula and format to the ReviewTime "data" cells */ style data_monthcalc from data_center / tagattr='formula:=ROUND(((RC[-1]-RC[-2])/365.24)*12,1) format:0.0'; end; run; quit;
Hands-On WorkshopsNESUG 2009

19
REFERENCES
DelGobbo, Vincent. 2002. "Techniques for SAS® Enabling Microsoft
® Office in a Cross-Platform Environment".
Proceedings of the Twenty-Seventh Annual SAS Users Group International Conference, 27. CD-ROM. Paper 174. Available at http://www2.sas.com/proceedings/sugi27/p174-27.pdf. DelGobbo, Vincent. 2003. "A Beginner’s Guide to Incorporating SAS
® Output in Microsoft
® Office Applications".
Proceedings of the Twenty-Eighth Annual SAS Users Group International Conference, 28. CD-ROM. Paper 52. Available at http://www2.sas.com/proceedings/sugi28/052-28.pdf. DelGobbo, Vincent. 2004. "From SAS
® to Excel via XML". Available at http://support.sas.com/saspresents.
Mathieu, Mark P., ed. 2002. PAREXEL's Pharmaceutical R&D Statistical Sourcebook, 2002/2003. Waltham, MA: PAREXEL International Corporation. Microsoft Corporation. 2001. "XML Spreadsheet Reference". Available at http://msdn2.microsoft.com/en-us/library/aa140066(office.10).aspx. SAS Institute Inc. 2005. "About Application Dispatcher". Available at http://support.sas.com/onlinedoc/913/docMainpage.jsp?_topic=dispatch.hlp/main_contents.htm. SAS Institute Inc. 2009. "ODS MARKUP Resources". Available at http://support.sas.com/rnd/base/topics/odsmarkup/. SAS Institute Inc. 2009. "SAS Stored Processes". Available at http://support.sas.com/rnd/itech/doc9/dev_guide/stprocess/index.html. SAS Institute Inc. 2006. "The TEMPLATE Procedure: Creating a Style Definition". Available at http://support.sas.com/onlinedoc/913/docMainpage.jsp?_topic=odsug.hlp/a002565239.htm. SAS Institute Inc. 2007. "TITLE Statement". Available at http://support.sas.com/onlinedoc/913/docMainpage.jsp?_topic=lrdict.hlp/a000220968.htm. SAS Institute Inc. 2009. SAS Usage Note 11206. "IS8601* FORMATS and INFORMATS for DATE, TIME, and DATETIME". Available at http://support.sas.com/kb/11/206.html.
ACKNOWLEDGMENTS
The author would like to thank Chris Barrett of SAS Institute Inc. for his valuable contributions to this paper.
RECOMMENDED READING
DelGobbo, Vincent. 2006. "Creating AND Importing Multi-Sheet Excel Workbooks they Easy Way with SAS®".
Available at http://www2.sas.com/proceedings/sugi31/115-31.pdf. DelGobbo, Vincent. 2007. "Creating Multi-Sheet Excel Workbooks they Easy Way with SAS
®".
Available at http://www2.sas.com/proceedings/forum2007/120-2007.pdf. DelGobbo, Vincent. 2008. "Tips and Tricks for Creating Multi-Sheet Microsoft Excel Workbooks the Easy Way with SAS
®". Available http://www2.sas.com/proceedings/forum2008/192-2008.pdf.
CONTACT INFORMATION
Your comments and questions are valued and encouraged. Contact the author at:
Vincent DelGobbo SAS Institute Inc. SAS Campus Drive Cary, NC 27513 [email protected]
If your registered in-house or local SAS users group would like to request this presentation as your annual SAS presentation (as a seminar, talk, or workshop) at an upcoming meeting, please submit an online User Group Request Form (support.sas.com/usergroups/namerica/lug-form.html) at least eight weeks in advance.
Hands-On WorkshopsNESUG 2009

20
SAS and all other SAS Institute Inc. product or service names are registered trademarks or trademarks of SAS Institute Inc. in the USA and other countries. ® indicates USA registration. Other brand and product names are trademarks of their respective companies.
Hands-On WorkshopsNESUG 2009