Moodle Checklist Module
14
Checklist Module North Dakota University System Advanced Learning Technologies Moodle 2.2
-
Upload
patti-heisler -
Category
Documents
-
view
225 -
download
0
description
How to use Moodle's Checklist module.
Transcript of Moodle Checklist Module
Checklist Module
North Dakota Universi ty System
Advanced Learning Technologies
Moodle 2.2

NDUS Advanced Learning Technologies 2 | P a g e
Copyright Information
This is a document of Advanced Learning Technologies of the North Dakota University System. North
Dakota University System institutions and its users are allowed to create, develop, copy, and use this
document or derivatives thereof for internal training purposes, pursuant to any licensing or copyright
issues.
With this document, portions were taken verbatim from http://docs.moodle.org. Moodle
documentation is Copyright @2005 onwards by the individual authors as noted. It is provided to all
under the terms of the GNU Public License.
NDUS Advanced Learning Technologies 3 | P a g e
New Checklist Activity for Moodle
Goal of this manual
The goal of this document is to provide users with comprehensive knowledge of the Checklist activity
available in Moodle. After reading this manual, users will:
1. Understand what the Checklist Module is and how it might be used.
2. Identify the three types of Checklists.
3. Understand how to add a Checklist to a course and work through the settings.
4. Navigate the Checklist interface.
5. Understand how to check student progress.
6. Be able to add the Checklist block to a course.
7. Make the Checklist worth zero points in the Moodle Gradebook.
8. Be able to export the Checklist to an Excel file
Prerequisite: Readers should have a basic understanding of Moodle.
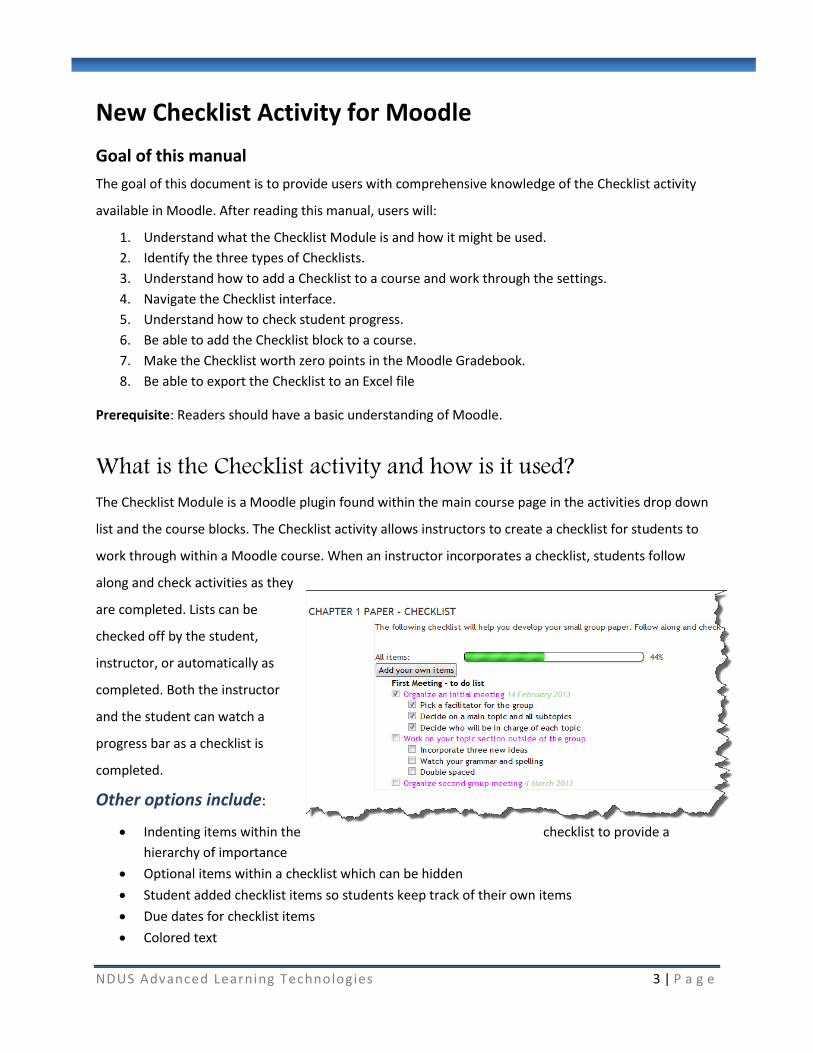
What is the Checklist activity and how is it used? The Checklist Module is a Moodle plugin found within the main course page in the activities drop down
list and the course blocks. The Checklist activity allows instructors to create a checklist for students to
work through within a Moodle course. When an instructor incorporates a checklist, students follow
along and check activities as they
are completed. Lists can be
checked off by the student,
instructor, or automatically as
completed. Both the instructor
and the student can watch a
progress bar as a checklist is
completed.
Other options include:
Indenting items within the checklist to provide a
hierarchy of importance
Optional items within a checklist which can be hidden
Student added checklist items so students keep track of their own items
Due dates for checklist items
Colored text
NDUS Advanced Learning Technologies 4 | P a g e
Instructors can add a single checklist within their course to watch student progress, or multiple
checklists could be added to drill down more specifically to identify progress within an activity.
Checklist Types There are three main types of checklists:
1. Course checklists allow the instructor to build a checklist that will automatically populate with
activities and resources found within the Moodle course.
2. Section checklists allow the instructor to build a checklist that will automatically populate only
those activities or resources that are within a certain topic or weekly section.
3. Instructor-built checklists allow the instructor to build independent checklists for students.
Checklist progress can be updated automatically by Moodle, by the instructor, by the student, or by a
combination as indicated by the following:
1. Student and teacher:
a. Within course and section checklists, Moodle automatically verifies progress from
activity completion and the instructor must also verify before progress is recognized.
b. Within an instructor-built checklist, the student can check off the list and the instructor
must verify.
2. Teacher only:
a. Within a course checklist or section checklist, the instructor must verify completion.
b. Within an instructor-built checklist, the instructor must verify completion before
progress is recognized.
3. Student only:
a. Within a course checklist or section checklist, Moodle automatically verifies progress as
indicated by the settings of each activity or resource’s completion tracking.
b. Within an instructor-built checklist, only student verification is needed.
Adding a checklist and working through the settings
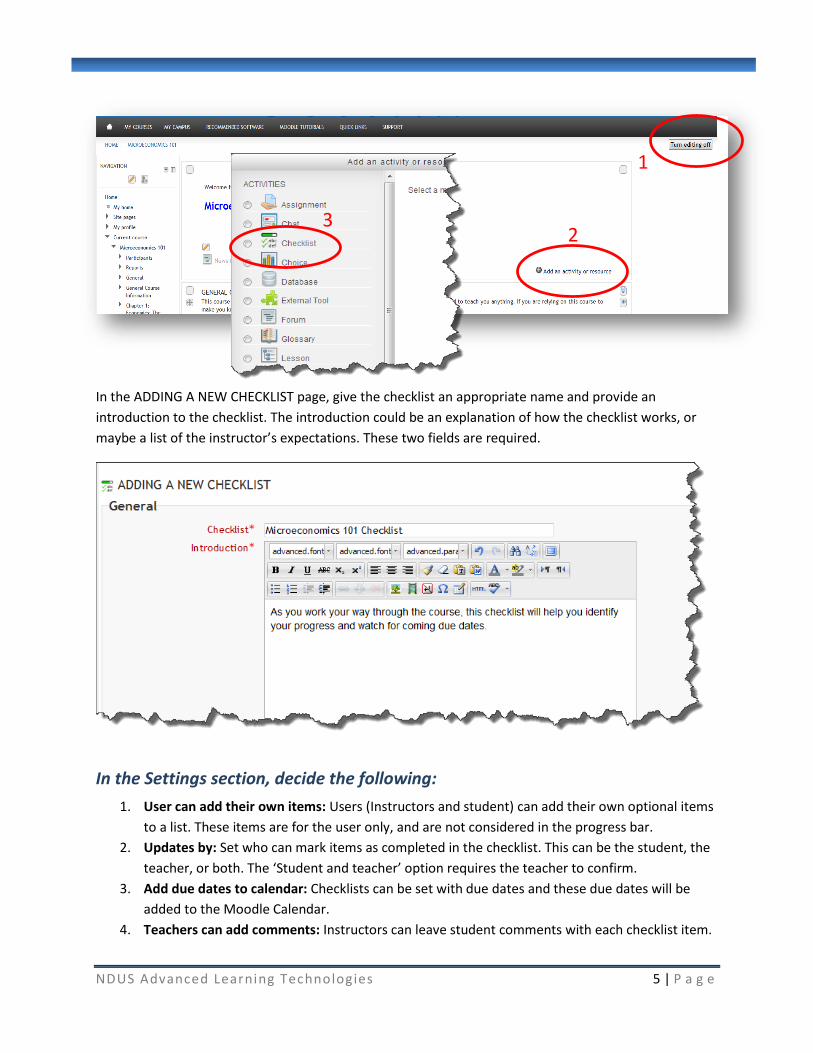
Checklists can be added to any topic section or weekly section within a course. To do this,
1. Turn on course editing,
2. Click Add an activity or resource link, or activity drop-down list.
3. Within the list, choose Checklist and click Add at the bottom of the page.
NDUS Advanced Learning Technologies 5 | P a g e
In the ADDING A NEW CHECKLIST page, give the checklist an appropriate name and provide an
introduction to the checklist. The introduction could be an explanation of how the checklist works, or
maybe a list of the instructor’s expectations. These two fields are required.
In the Settings section, decide the following:
1. User can add their own items: Users (Instructors and student) can add their own optional items
to a list. These items are for the user only, and are not considered in the progress bar.
2. Updates by: Set who can mark items as completed in the checklist. This can be the student, the
teacher, or both. The ‘Student and teacher’ option requires the teacher to confirm.
3. Add due dates to calendar: Checklists can be set with due dates and these due dates will be
added to the Moodle Calendar.
4. Teachers can add comments: Instructors can leave student comments with each checklist item.
1
23
NDUS Advanced Learning Technologies 6 | P a g e
5. Maximum grade: Every Checklist is added as a column in the Moodle gradebook. Decide the
maximum grade that can be given for the checklist.
6. Email Teachers when complete: When a checklist is complete, a notification email notification
will be sent to the student, the instructor, or both.
7. Show course modules in checklist: This will automatically add a list of all the resources and
activities in the current course, or current section, into the checklist. Choosing No allows the
instructor to construct their own check list.
8. Check-off when modules are complete: This will automatically check-off items in a checklist as
students complete activities or resources as defined in the completion tracking settings of each
item. When completion tracking is switched on for a particular activity or resource, then the
completion of that activity will be used to tick-off the item in the list.
Note: it can take up to 60 seconds for a student's activity to be reflected in their checklist.
9. Lock teacher marks: When this setting is enabled, once an instructor has saved a 'Yes' mark,
they will be unable to change it.
The Common module settings, Restrict access settings, and Activity completion settings can be
utilized as needed. When your settings are complete, click Save and display.
Navigate the Checklist interface.
The Checklist is now added to the course and if the checklist is set to populate from the course, the
Checklist is displayed.
The Checklist is divided into three tabbed sections:
View checklist: Checklist and progress bar are viewed by instructor as a student would see.
View Progress: View Student progress and check or verify progress as needed.
Edit checklist: Checklist is created, or edited.
If you are set to pre-populate the checklist from the course, then the View checklist tab will appear. If
you have not pre-populated, then the Edit Checklist tab will appear.
NDUS Advanced Learning Technologies 7 | P a g e
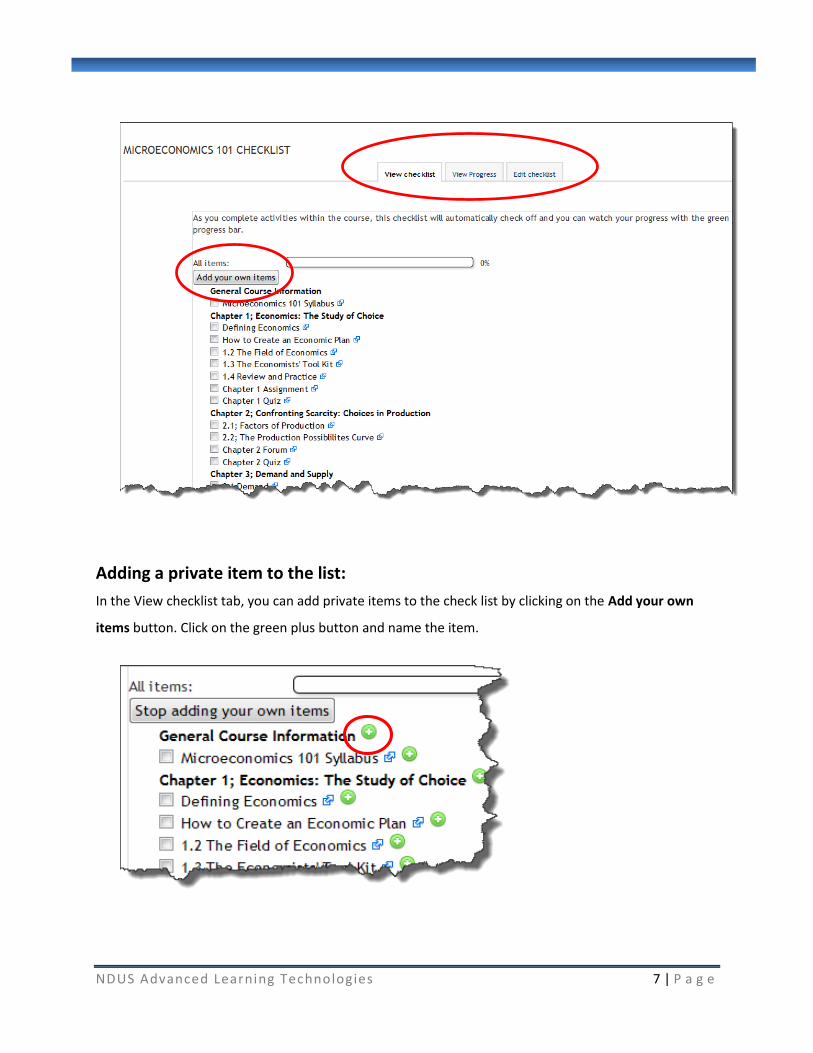
Adding a private item to the list:
In the View checklist tab, you can add private items to the check list by clicking on the Add your own
items button. Click on the green plus button and name the item.
NDUS Advanced Learning Technologies 8 | P a g e
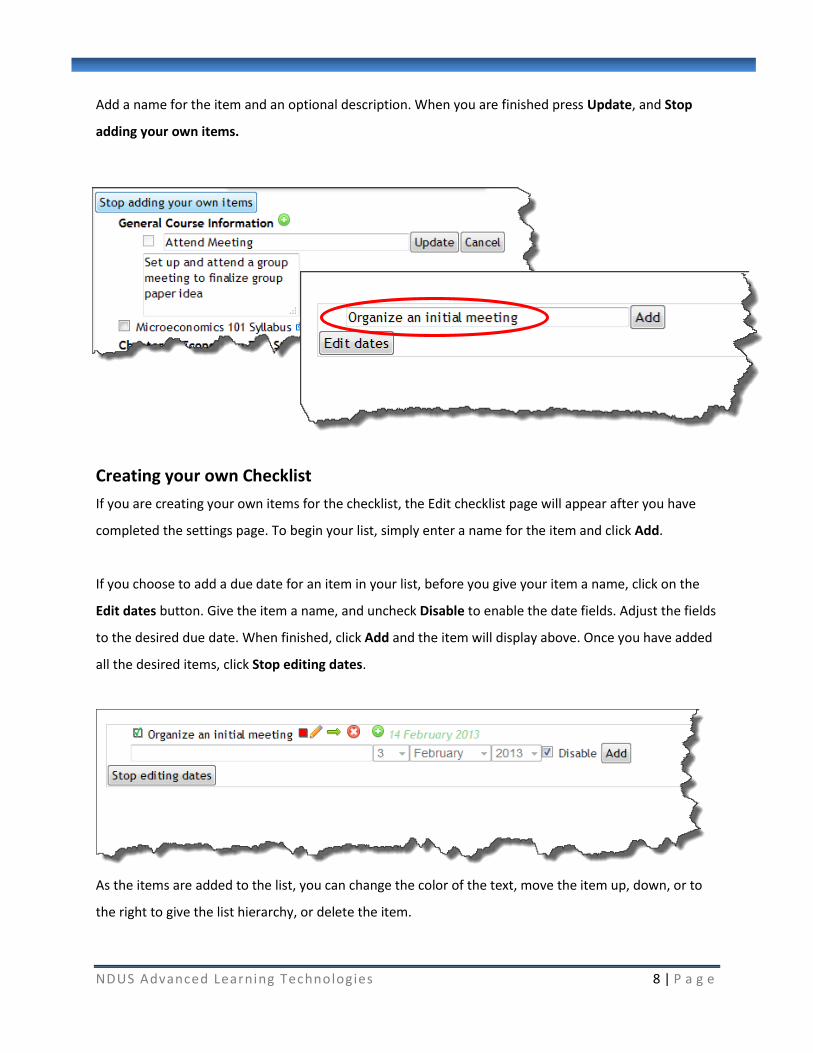
Add a name for the item and an optional description. When you are finished press Update, and Stop
adding your own items.
Creating your own Checklist
If you are creating your own items for the checklist, the Edit checklist page will appear after you have
completed the settings page. To begin your list, simply enter a name for the item and click Add.
If you choose to add a due date for an item in your list, before you give your item a name, click on the
Edit dates button. Give the item a name, and uncheck Disable to enable the date fields. Adjust the fields
to the desired due date. When finished, click Add and the item will display above. Once you have added
all the desired items, click Stop editing dates.
As the items are added to the list, you can change the color of the text, move the item up, down, or to
the right to give the list hierarchy, or delete the item.
NDUS Advanced Learning Technologies 9 | P a g e
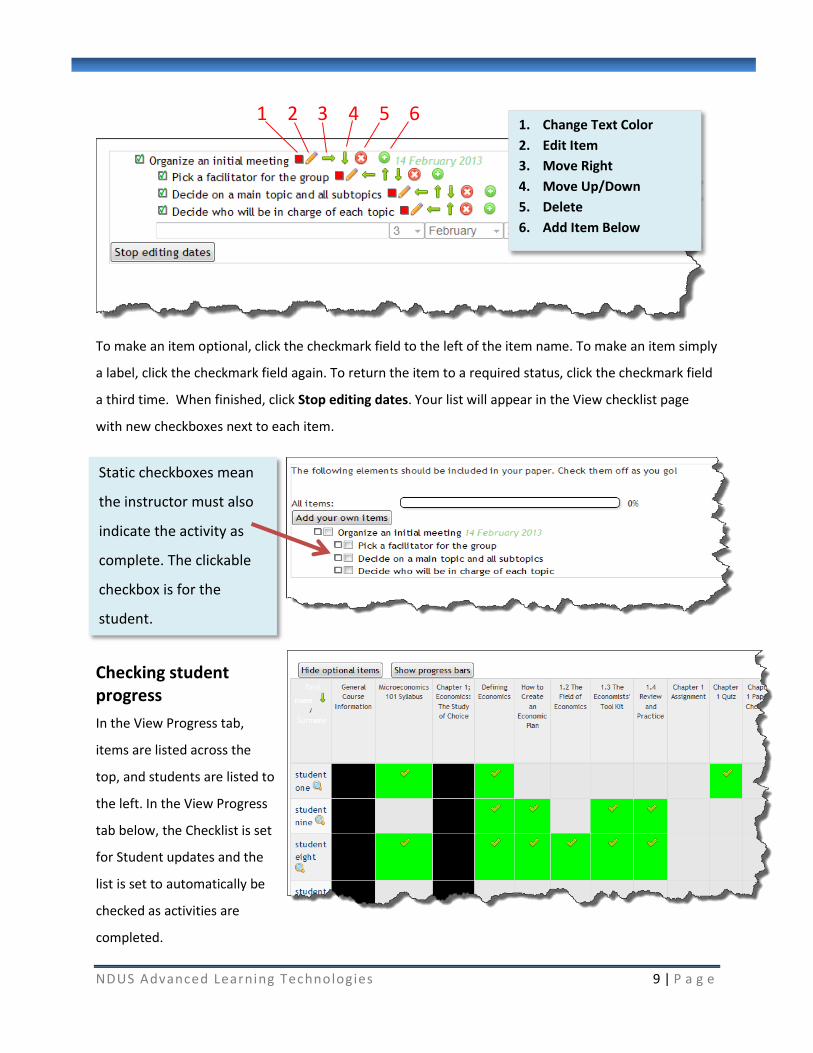
To make an item optional, click the checkmark field to the left of the item name. To make an item simply
a label, click the checkmark field again. To return the item to a required status, click the checkmark field
a third time. When finished, click Stop editing dates. Your list will appear in the View checklist page
with new checkboxes next to each item.
Checking student progress
In the View Progress tab,
items are listed across the
top, and students are listed to
the left. In the View Progress
tab below, the Checklist is set
for Student updates and the
list is set to automatically be
checked as activities are
completed.
Static checkboxes mean
the instructor must also
indicate the activity as
complete. The clickable
checkbox is for the
student.
1 2 3 4 5 61. Change Text Color
2. Edit Item
3. Move Right
4. Move Up/Down
5. Delete
6. Add Item Below
NDUS Advanced Learning Technologies 10 | P a g e
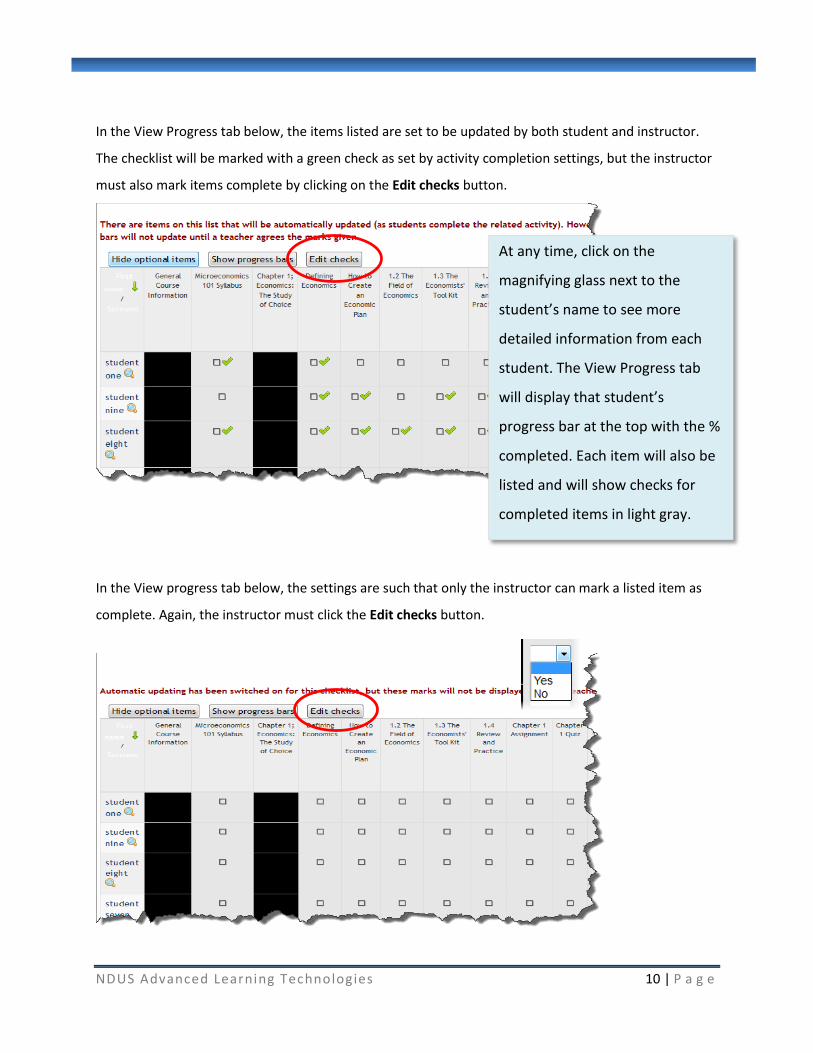
In the View Progress tab below, the items listed are set to be updated by both student and instructor.
The checklist will be marked with a green check as set by activity completion settings, but the instructor
must also mark items complete by clicking on the Edit checks button.
In the View progress tab below, the settings are such that only the instructor can mark a listed item as
complete. Again, the instructor must click the Edit checks button.
At any time, click on the
magnifying glass next to the
student’s name to see more
detailed information from each
student. The View Progress tab
will display that student’s
progress bar at the top with the %
completed. Each item will also be
listed and will show checks for
completed items in light gray.

NDUS Advanced Learning Technologies 11 | P a g e
Once the Edit checks button is clicked, instructors will have a Yes or No dropdown list to verify or mark a listed item as complete. An instructor can also click on Hide Optional items to remove optional items from the list. The Show progress bar button changes the progress view to an overview of progress bars.
Click Hide optional items to not include optional items in the status bar. Click Show full details to return to full detail page.
Click the Add comments button and a text field will display next to each item to write comments to the student regarding the item.
Click the Toggle
names & dates
button to show due
dates.
Insert comments to
students here!
NDUS Advanced Learning Technologies 12 | P a g e
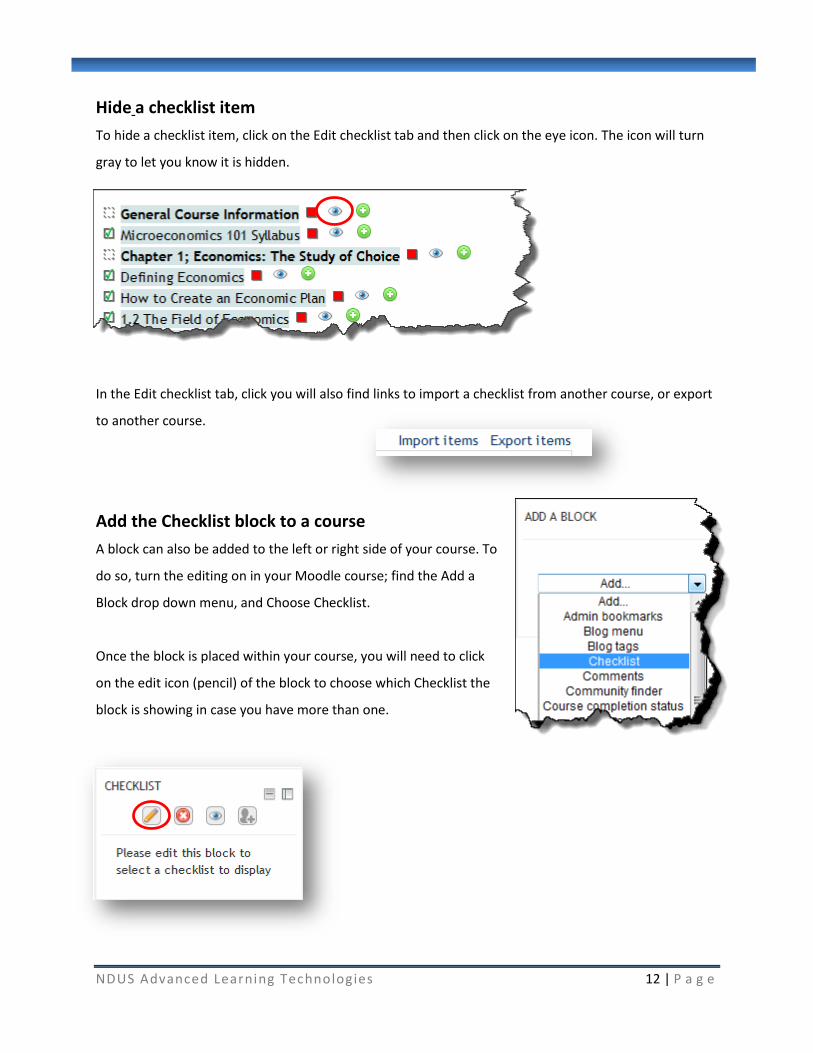
Hide a checklist item
To hide a checklist item, click on the Edit checklist tab and then click on the eye icon. The icon will turn
gray to let you know it is hidden.
In the Edit checklist tab, click you will also find links to import a checklist from another course, or export
to another course.
Add the Checklist block to a course
A block can also be added to the left or right side of your course. To
do so, turn the editing on in your Moodle course; find the Add a
Block drop down menu, and Choose Checklist.
Once the block is placed within your course, you will need to click
on the edit icon (pencil) of the block to choose which Checklist the
block is showing in case you have more than one.
NDUS Advanced Learning Technologies 13 | P a g e
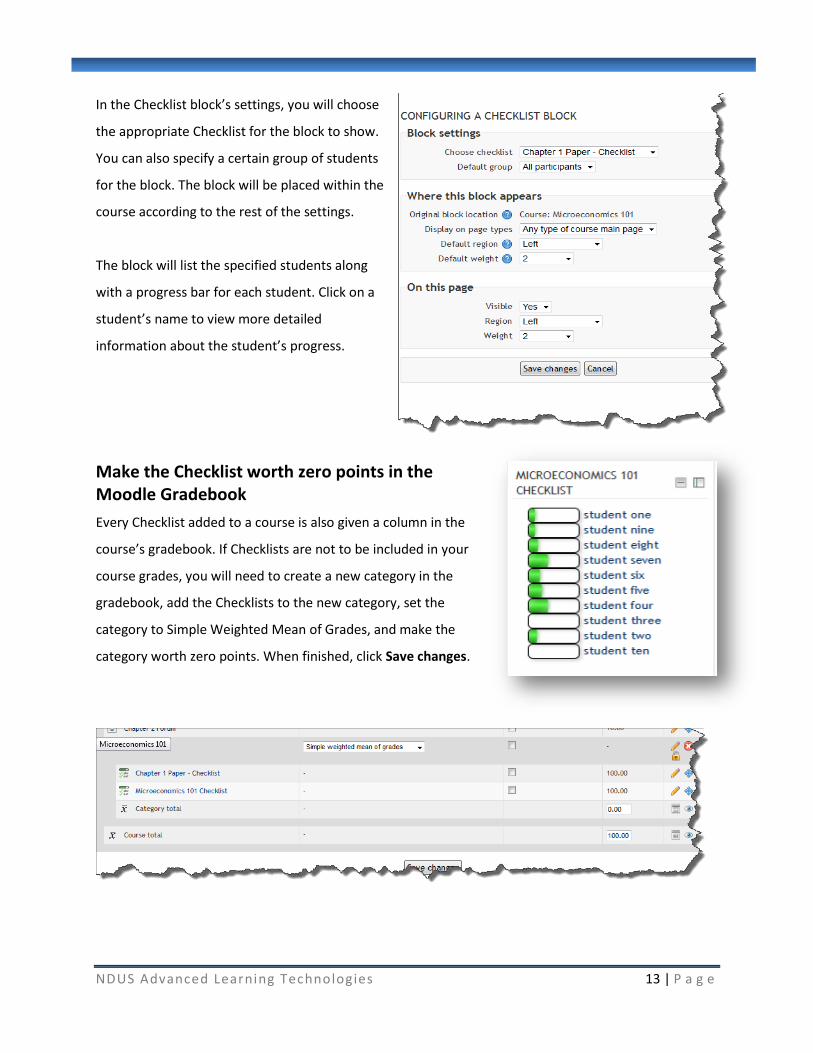
In the Checklist block’s settings, you will choose
the appropriate Checklist for the block to show.
You can also specify a certain group of students
for the block. The block will be placed within the
course according to the rest of the settings.
The block will list the specified students along
with a progress bar for each student. Click on a
student’s name to view more detailed
information about the student’s progress.
Make the Checklist worth zero points in the Moodle Gradebook
Every Checklist added to a course is also given a column in the
course’s gradebook. If Checklists are not to be included in your
course grades, you will need to create a new category in the
gradebook, add the Checklists to the new category, set the
category to Simple Weighted Mean of Grades, and make the
category worth zero points. When finished, click Save changes.

NDUS Advanced Learning Technologies 14 | P a g e
Export the Checklist to an Excel file
To export a Checklist to an Excel file, click on the Export tab within the course’s gradebook and then click
on Checklist. Choose the Checklist to export and decide whether or not to include optional items. Check
if you would like to show percentage of complete for required items, percentage of students who have
ticked each item, and percentage of required items checked under each heading. When you have your
settings set correct, click Export Excel file.