Module 4: Importing Germplasm List Web viewLearning Objectives. ... Hover mouse pointer over the...
17
Module 4: Importing Germplasm List Link to video ‘Import Germplasm Lists from Excel Files’ https://www.integratedbreeding.net/221/breeding-management-system/tutorials/ maize-import-germplasm-lists-from-excel-files Learning Objectives Access a program added earlier Be able to create a new germplasm list by importing and saving germplasm not present in the database Module Map Introduction Selecting Program Import File Template File Format Description Sheet Observations Sheet Preparing Import File Importing First Germplasm List Note on Multiple Matches Importing Second Germplasm List Review Imported Lists Summary Applied Learning Activity Crop Improvement ALA –ALA 11 on BMS platform (Importing germplasm list made in excel to BMS)
Transcript of Module 4: Importing Germplasm List Web viewLearning Objectives. ... Hover mouse pointer over the...

Module 4: Importing Germplasm List Link to video ‘Import Germplasm Lists from Excel Files’ https://www.integratedbreeding.net/221/breeding-management-system/tutorials/maize-import-germplasm-lists-from-excel-files
Learning Objectives Access a program added earlier Be able to create a new germplasm list by importing and saving germplasm not present in
the database
Module MapIntroductionSelecting ProgramImport File TemplateFile FormatDescription SheetObservations SheetPreparing Import FileImporting First Germplasm ListNote on Multiple MatchesImporting Second Germplasm ListReview Imported ListsSummary
Applied Learning ActivityCrop Improvement ALA –ALA 11 on BMS platform (Importing germplasm list made in excel to BMS)
IntroductionFor a new crop breeding program at your station, there will be need to obtain germplasm that contains the traits you are interested in improving with a wide range of variability to allow for gains from selection. You may obtain germplasm via various means (letters, emails, online requests, or phone calls). Germplasm sources include released varieties within, or most likely outside of, the country, national collections, advanced breeding lines from regional and international centers, other regional programs, etc. Next you will prepare a list of germplasm for your inventory records and a list to use to start the program.

Recall that you planned already and added a new program and users. Now you are going to access the program you have added to the database, check the file directories and lists in the database, and import a germplasm list. The following steps will enable you accomplish these tasks.
Selecting the program Highlight the added program and file directories associated with Lists and
Nurseries & Trials display in the right pane of the screen (Fig. 1).
Figure 1 Click the dropdown menu to view and select desired list. (Fig. 2).
Figure 2 Click the white arrow next to the crop name ( ) in the program
window (Figure 1) to display the Manage List window, with ‘View List’ tab is selected by default (Fig. 3).
Figure 3 Click the back arrow next to the program name ( ) to collapse the
Breeding Activities pane on the left in order to expand the list manager view (Fig. 4)
Figure 4

Import File TemplatesEnsure that entries into the import file follow specific formats.
The Germplasm Import tool allows you to create and save a new list of germplasm to the database by importing a spreadsheet file (with or without additional genealogy data) which must follow strict formatting requirements. It matches germplasm to existing germplasm IDs (GIDs) or assigns new GIDs. Importing a germplasm list ensures that each germplasm entry is assigned a unique GID, which will allow pedigree and genotype tracking by the database.
Sample import file templates are available in the Examples folder in the documentation provided with the BMS. The BMS will enforce unique GID on germplasm without matches to the public database. The BMS is also capable of importing parental pedigree information for germplasm. However, this tutorial only considers the simple import of germplasm lists without pedigrees.
File Format SpecificsAll BMS import and export (.xls) files contain two sheets - Description and Observation. When importing germplasm data you can leave empty the cells denoting list name, description, date, and type on the description sheet. You will be able to specify this information when you save the list to the BMS database.
Description Sheet The Description sheet contains the metadata about the file that is user provided data, such as List Name, Description, Date and Type (Fig. 5).
Figure 5
Observation Sheet The observation sheet contains specific information about the germplasm, showing required or mandatory data (Entry and Designation) and optional data (Cross and Source) (Fig. 6).

In order to import, the observation sheet only requires two columns of data, ENTRY and DESIGNATION (that is, name of the entry). The other columns of data in the template are optional and can be left blank.
Figure 6Required Data
ENTRY: numerical sequence
DESIGNATION: name of the germplasm in your breeding program
Optional Data
GID: Specific to the BMS database
CROSS: Parental pedigrees (female parent/male parent)
SOURCE
ENTRY CODE
File ImportHaving met the formatting requirements, you will now learn how to do it electronically. You are going to import a germplasm list and save to the database by working through the Crop Improvement ALA 11 (Import germplasm list made in excel to database) in completing the steps that follow. To accomplish this task you need to know the names of the genotypes you would like to use and have them available to you.
Preparing the import file First download the germplasm import template available at the IBP site
using the following link https://www.integratedbreeding.net/ . Hover mouse pointer over the word ‘Training’ and click on ‘Tutorials’ on
the orange popup (Fig. 7).

Figure 7 Under ‘Maize Tutorials’, for example, click on ‘Import Germplasm List
from Excel Files’ Under ‘Maize: Import Germplasm Lists from Excel Files’ click on
‘Germplasm Import Template (.xls)’ hyperlink to display a Save/open/Cancel dialog box (Fig. 8).
Figure 8 Click ‘Open’ to open the excel file of the template, click ‘Save’ then
‘Open’ or ‘Open folder’ to open the excel file, or ‘View Downloads’ to open the file, or ‘Save As’ to save to a location of your choice (Fig. 8)
Complete the list name, list description and list date cells in the ‘Description’ sheet (Fig. 5), and enter the germplasm names in the ‘Designation’ column of the Observation sheet, numbering the ‘Entry’ column sequentially according the number of entries in your list (Fig. 6)
Importing first germplasm list file1. Click on ‘Import’ hyperlink in the Manage Lists window (Fig. 9) to open
the Import Germplasm window (Fig. 10).
Figure 9

2. Click on ‘Browse’ button on the Import Germplasm window to open ‘Choose File to Upload’ window. Highlight the desired file, and click the ‘Open’ button to read in the file (Fig. 10).
Figure 10
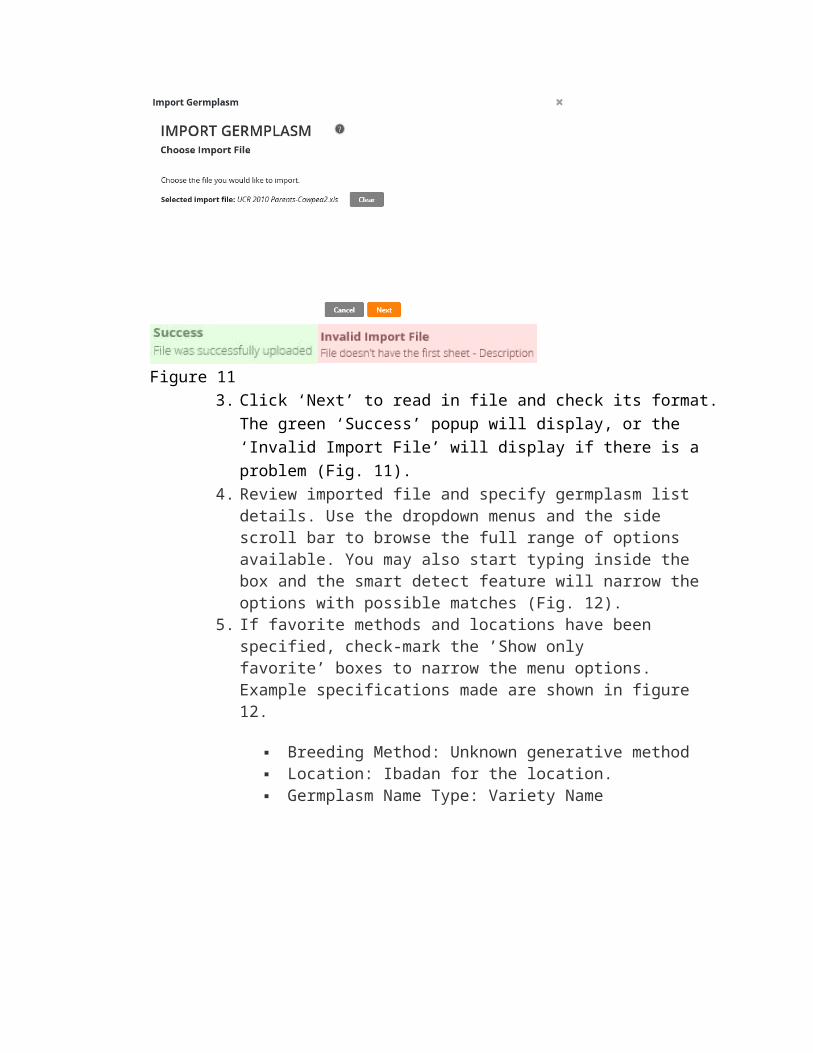
Figure 113. Click ‘Next’ to read in file and check its format. The green ‘Success’
popup will display, or the ‘Invalid Import File’ will display if there is a problem (Fig. 11).
4. Review imported file and specify germplasm list details. Use the dropdown menus and the side scroll bar to browse the full range of options available. You may also start typing inside the box and the smart detect feature will narrow the options with possible matches (Fig. 12).
5. If favorite methods and locations have been specified, check-mark the ’Show only favorite’ boxes to narrow the menu options. Example specifications made are shown in figure 12.
Breeding Method: Unknown generative method

Location: Ibadan for the location. Germplasm Name Type: Variety Name
Figure 12
Figure 13
6. Check the box next to ‘Automatically accept single matches whenever found’ to match imported germplasm with the pedigrees of existing germplasm. This will avoid user having to manually confirm each selection (Fig. 13).
7. Since the Pedigree Option is set to ‘Add all entries with new records connecting to existing sources’, the BMS will attempt to match the imported germplasm to similarly designated germplasm in the database. If a questionable match is identified, the user will be asked to choose from a list of possible matches (Fig. 13).
8. Take note of the details designations. They will be required for subsequent imports.
9. Select Finish (Fig. 13).
Note on Multiple Matches FoundThe Breeding Management System requires that each germplasm has a unique GID. By choosing to add all entries with new germplasm records connecting to existing germplasm, the BMS assigns each entry a new GID, but a database connection is made to existing database entries. When multiple name matches are found, the user is asked to choose the appropriate match. (What criteria will you use to choose the appropriate match?)
o Choose the germplasm with GID 18694, for example, and Continue (Fig. 14).
Figure 14o Additional multiple name matches are identified for this list.
Select desired GIDs. E.g. 36794, 39606, and 38540, and click ‘Continue’ (Fig. 15)
Figure 15

o Selecting 36794 results in additional multiple name matches (Fig. 15), select desired GIDs, e.g. 31589 and click ‘Continue’ (Fig. 16)
Figure 16
o Continue to select (e.g. 36791) until you are finished.
10. Click Save to save as ‘filename’, e.g., UCR2010Parents (Fig. 17).

Figure 17
Importing second germplasm List fileFollow the steps used for importing first germplasm list file earlier, to import second list file, e.g. Trial Germplasm-Cowpea.xls.
1. Click Import (Fig. 18)2. Click Browse to open Choose File Upload window, then select file to
upload, and click Open to read file into Import window (Fig. 19)3. Click Next to read in file and check format, then specify the germplasm
list details and pedigree options (Fig. 20). These are germplasm breeding method, location, type, and pedigree options, the same as those used for Importing first germplasm list file

4. Click Finish to open the Save List As window (Fig. 21)5. For questionable matches, choose from a list of possible matches. For
example, choose the germplasm with GID 195314 (use germplasm appropriate for your list) and click Continue.
6. Review the list name and description, and Save the list to the database (Fig. 21).
Figure 18
Figure 19
Figure 20

Figure 21

7. Once all entries have been loaded the ‘Germplasm List Details’ form appears and you can click Save to save the list (Fig. 21).
8. After saving List Detail form will show a tab labeled Trial Germplasm List and display the entries saved (Fig. 22)
Figure 22
Reviewing Imported Listso Launch the ‘Manage List’ under Breeding Activities menu o Click ‘Browse’ in Manage Lists paneo Expand ‘Program Lists’ and browse through the list created, ‘Trial
Germplasm List’ tab is selected here
Close the ‘Browse for Lists’ window and review the list details. Positive GIDs indicate that imported germplasm were matched to the public database. Negative GID (e.g. -33, -34, -35,

etc.) indicates that no match was found in the public database and that a new entry was made, unique to the crop database e.g. cowpea program. (With version 4.0 all GIDs will be positive because not local database)
SummaryYou have successfully created germplasm lists by importing and saving germplasm to the database. The next step in your breeding program is to make crosses to generate segregation populations for subsequent selection. Knowing the unique characteristics of the entries in your lists, you will decide which will be used as females and which males. In the next module, you will designate female and male entries to use for crossing and create an F1 nursery list for generation advance.
For your maize program, why will you use some entries as females and others as males?