Module 3 - The Annie E. Casey Foundation · Page | 1 Module 3—Money Management: Cashing in on...
46
Keys to Your Financial Future Module 3 Module 3_divider.pdf 1 6/9/13 9:06 PM
-
Upload
nguyendien -
Category
Documents
-
view
215 -
download
0
Transcript of Module 3 - The Annie E. Casey Foundation · Page | 1 Module 3—Money Management: Cashing in on...

Keys to Your Financial Future
Module 3
Module 3_divider.pdf 1 6/9/13 9:06 PM

Module 3_divider.pdf 2 6/9/13 9:06 PM

P a g e | 1
Module 3—Money Management: Cashing in on Financial Success
Keys to Your Financial Future Module 3-Money Management:
Cashing in on financial success Session Outcomes
By the end of the training, participants will be able to:
� Explain the benefits of having a money management system and the risks of not having one.
� Describe ways to earn and manage income. � Read and interpret the information on a paycheck stub. � Explain how taxes are deducted from pay and the reason for taxes. � Explain both paper-‐based and electronic systems for keeping track of bills to ensure
on time and consistent bill paying � Explain similarities and differences between banks and credit unions. � List and explain some key services at banks and credit unions and how they can help
effectively and efficiently manage your money. � Explain how bank-‐ and credit union-‐based services are different from alternative
(non-‐deposit taking) financial service providers. � Develop and use a budget or budgeting system. � List critical documents and explain how to keep them safe and secure.
. Materials Needed
Flip charts Markers for facilitator and participants Tape Post-‐Training Assessments Session Evaluations Financial products activity cards (Section 7) Credit card, debit card and ATM card activity cards (Section 7)
Station 1 (Section 8) Instruction card with income and expenses (following this section).
Make enough copies for each group to start with a blank instruction card. Play money—include ones, fives, tens, twenties and hundreds Envelopes Each group will need a new set of envelopes (12 envelopes)
Station 2 (Section 8) Instruction card. Make enough copies for each group to start with a blank
instruction card.

2 | P a g e
Module 3—Money Management: Cashing in on Financial Success
Participants will need their workbooks at this station. Use the information in the workbook (KEY ACTIVITY—Complete Nayeli’s Budget).
Station 3 (Section 8) Instruction card. Make enough copies for each group to start with a blank
instruction card. Participants will need their workbooks at this station. Use the information
in the workbook (KEY ACTIVITY—Complete Nayeli’s Budget).
One sticker or self-‐adhesive note per participant (Section 10) Post-‐Training Assessment copies for all participants (Section 11) Option 1: Keys cut from card stock (similar to those used in Module 1)
( Section 12) Option 1: Optional—give each young person a ring full of keys using the card stock
keys with holes punched in the corner and loaded onto a loose leaf ring. (Section 12)
Option 1: If using the optional activity, give each participant a Sharpie-‐like marker for writing on their keys. (Section 12)
Option 2: Something to use as a talking stick (Section 12) Option 3: Ball of yarn (Section 12) Option 4: Nice stationary and envelopes (Section 12)
Prepared flip charts or PowerPoint slides including:
Tools of Money Management (Visual Aid 3.1) Places to Put Savings (Visual Aid 3.2) Saving with a Paycheck (Visual Aid 3.3) Banks versus Credit Unions (Visual Aid 3.4) Are Loans Assets? (Visual Aid 3.5) Budget Definition (Visual Aid 3.6) Inputs for a Budget (Visual Aid 3.7) List of Online Budgeting Options (Visual Aid 3.8) Critical Documents (Visual Aid 3.9) Tips for Taking the Post-‐Training Assessment (Visual Aid 3.10) Talking Stick Questions (Visual Aid 3.11) Web of Connectivity Questions (Visual Aid 3.12) Questions to guide your letter (Visual Aid 3.13)
Examples are provided in the PowerPoint Slides that accompany this module. They can be transferred to flip chart paper or used as a slide show.

P a g e | 3
Module 3—Money Management: Cashing in on Financial Success
Overview of Key Activities
Key Activities Covered in the
Training
NOT Covered in
the Training KEY ACTIVITY—Ways to Get Your Income: Benefits and Risks KEY ACTIVITY—Getting and Managing Income KEY ACTIVITY—Reading a Paycheck and Paycheck Stub KEY ACTIVITY—Estimating Taxes Owed KEY ACTIVITY—What Do Taxes Pay For? KEY ACTIVITY—Better Ways to Save KEY ACTIVITY—Benefits and Risks of Different Ways to Pay KEY ACTIVITY—Bill Paying Calendar KEY ACTIVITY—How Banks and Credit Unions Make Money KEY ACTIVITY—ATM Cards vs. Debit Cards vs. Credit Cards KEY ACTIVITY—Saving for the Opportunity Passport™ Matched Savings KEY ACTIVITY—Complete Nayeli’s Budget KEY ACTIVITY—Read Nayeli’s Cash Flow Budget
X X X X X X X X X X X
X X
Keys to Your Financial Future Steps
This is a list of the steps to building the Asset Building Plan within Module 3: Money Management: Cashing in on financial success
� Keys to Your Financial Future Step 3.1: Create Your Bill Payment Calendar � Keys to Your Financial Future Step 3.2: Saving for the
Opportunity Passport™ Matched Savings � Keys to Your Financial Future Step 3.3: Plan for Using a Bank or Credit Union � Keys to Your Financial Future Step 3.4: Making Your Budget � Keys to Your Financial Future Step 3.5: Getting Your Critical Documents

4 | P a g e
Module 3—Money Management: Cashing in on Financial Success
Keys to Timing the Facilitation of the Module
This module contains 3.5 hours worth of material. This provides the facilitator with options for:
1. Keeping the training as is leaving out the optional sections. 2. Replacing sections of the training determined less relevant for the young people
they serve with other material. 3. Adding another session to ensure young people have ample time to explore this
topic.
Section in Facilitator’s Guide ONLY
Name of Section in Facilitator’s Guide ONLY
Pages in Participant Workbook
Time Without Optional Sections
Optional Sections
Section 1 Introduction You select from appendix
None 10 minutes
Section 2
Managing Your Money Facilitated Discussion
10 minutes
Section 3
Income Brainstorm Carousel (Optional) Case Study (Optional) Paycheck Scavenger Hunt
15 minutes 10 minutes 10 minutes
Section 4
Income and Taxes (Optional) Facilitated Discussion and
Calculation Small Group Brainstorm
20 minutes
Section 5 Tools for Saving Facilitated Discussion Case Study (Optional)
10 minutes
10 minutes
Section 6 Tools for Paying Bills (Optional)
Facilitated Discussion and Exercise in Pairs
15 minutes
Section 7 Financial Institutions and Money Management
Facilitated Discussion and Chart Analysis
Facilitated Discussion Option 1: Card Sort Option 2: Credit Card,
Debit Card or ATM Card Sort
Brainstorm Facilitated Discussion
30 minutes With option 1 OR 2

P a g e | 5
Module 3—Money Management: Cashing in on Financial Success
Facilitated Discussion
10 minutes
Section 8
Making a Plan to Reach Your Goals: Budgeting
Facilitated Discussion Budget Rotation Stations
35 minutes
Section 9 Online Budgeting (OPTIONAL) Facilitated Discussion
10 minutes
Section 10 Critical Documents Nominal Group Process Facilitated Discussion
10 minutes
Section 11 Post-Training Assessment
10 minutes
Section 12 Closing (OPTIONAL) You select from options
10 minutes
Time estimate
120 minutes
Not including 2, 10 minute
breaks
105 minutes Not including
breaks

6 | P a g e
Module 3—Money Management: Cashing in on Financial Success
Facilitation Materials—Module 3: Money Management
Please note that the numbers indicating different sections in the facilitator’s guide do not correspond to section numbers in the participant workbook. These are included to help you keep track of the overall order of activities in the facilitator’s guide and during the training. Please consult the “pages in the participant workbook” section at the beginning of each activity as well as the page number references throughout the instructions to ensure you are properly referencing the participant workbook. Section 1: Introduction Activity Estimate of Time:
10 minutes Page in Participant Workbook:
None
Materials Required: Varies
Facilitator Instructions
Materials, Visual Aids & Notes
Select one of the introduction activities from the appendix section of the facilitator’s guide.

P a g e | 7
Module 3—Money Management: Cashing in on Financial Success
Section 2: Managing Your Money Estimate of Time:
10 minutes Pages in Participant Workbook:
Module 3:1-2
Materials Required: Blank flip charts for recording participant responses Markers Tape Prepared visual aid: Tools of Money Management (Visual Aid 3.1)
Facilitator Instructions
Materials, Visual Aids & Notes
Facilitated Discussion Use the following talking points and questions to facilitate a discussion.
? What do you think it means to manage your money? After a few responses, add the following:
o Managing your money means being able to use your money to achieve your goals. It’s more than having a budget, it means having a system to help you:
Keep track of your income Pay all of your bills on time Avoid late fees and other penalties Save money and reach your goals Live within your means
? Do you think this topic matters to you if you don’t have
income right now? Why? Ask participants to share their opinions. Note to Facilitator: There is a risk that participants may feel (overwhelmingly) that the topic does not matter to them since they are not earning income (have no money to manage at this point in time). If this is the case, you may choose to facilitate a discussion asking these questions:
� Have you ever known someone who was not good at managing their money?
� How could you tell they were not good at managing their money?
� What could have helped them? � How do you think learning about money management now
could keep you from those situations in the future?
Page 2 Write participant responses on flip chart paper. Page 2 Write responses on a 2 flip charts: one labeled “Money Management Matters” and the other labeled “Money Management Does Not Matter.”

8 | P a g e
Module 3—Money Management: Cashing in on Financial Success
Section 2: Managing Your Money Summarize using the following: � In this module on money management, you will learn about basic tools to
help you: – Get and manage your income – Save money – Pay your bills – Get key documents in order – Protect your identity – Stay organized
TRANSITION Whether you earn income now or have not yet earned an income, learning to manage your money is a key to your financial future. In fact, some people would say it’s the most important key.
Tools of Money Management (Visual Aid 3.1)

P a g e | 9
Module 3—Money Management: Cashing in on Financial Success
Section #3: Income Estimate of Time:
35 minutes with optional activities 20 minutes without optional activities
Pages in Participant Workbook: Module 3:3-10
Materials Required: Blank flip charts for recording participant responses Markers Tape
Facilitator Instructions
Materials, Visual Aids & Notes
Brainstorm Use the following instructions to facilitate the activity.
? Where can you (do you/will you) earn income? After a few responses, add the following:
o Youth board o Part-‐time job o Full-‐time job o Summer employment program o Gifts o Own business or self-‐employment o Child support o Public benefits—food stamps, cash assistance, Social Security,
disability payments o Loans can also give you income, but generally restricted to
purchase something—an education or a car. Furthermore, loans obligate future income because you have to pay them back.
Many people make ends meet by putting together multiple source of income.
Ask participants to share examples of this.
? What are all of the different ways you can get income? After a few responses, add the following:
o Cash o Personal check o Paycheck o Direct deposit o Payroll card o Electronic benefits transfer o Credit card payments (self -‐employed)
Page 3 Write participant responses on flip chart paper. Page 4

10 | P a g e
Module 3—Money Management: Cashing in on Financial Success
Section #3: Income Carousel (Optional) Use the following instructions to facilitate the activity. Count participants off 1 through 6 to form groups. Instruct them to stand by the flip chart that has their number with only a
marker. Explain that there are many ways to get income and that each way comes
with risks and benefits. Take some time briefly explain without sharing risks and benefits of:
o Payroll card o Direct Deposit o Electronic Benefits Transfer
Explain that they will rotate in groups from chart to chart and brainstorm
the benefits and risks they associate with each way to get income. Provide only 30 seconds to a minute early in the process; a little
more time later so participants have time to read contributions of groups that have previously visited.
Once every team visits, review the benefits and risks the participants have identified.
Add any that are missing. Invite participants to add notes from the carousel to their workbooks
KEY ACTIVITY—Ways to Get Your Income: Benefits and Risks. Case Study (Optional) Use the following instructions to facilitate the activity Get participants into small groups. Instruct them to read the case studies KEY ACTIVITY—Getting and
Managing Income and answer the questions that follow with the other young people at their table.
After 10 minutes, review answers together. TRANSITION While you may not be getting a paycheck now, you should know that understanding the information in your paycheck stub can help you better manage your income. Paycheck Scavenger Hunt Use the following instructions to facilitate the activity Have participant work with a partner and instruct them to answer the
questions that follow the paycheck and paycheck stub which is part of KEY ACTIVITY—Reading a Paycheck and Paycheck Stub.
After 7 minutes, go through each question. 1. What is the gross pay? What you earn—hourly rate X hours worked
for example. 2. What is the net pay? What you take home. Gross pay minus
deductions.
Prior to the training set up 6 flip charts labeled with one of 6 ways to get income and number them 1 through 6 around the room. On each, label half of the chart “benefits” and the other half “risks.” Hang up flip charts:
1. Cash 2. Personal Check 3. Paycheck 4. Direct deposit 5. Payroll Card 6. EBT
Page 4 Pages 4-‐7 Page 8 Pages 9 and 10

P a g e | 11
Module 3—Money Management: Cashing in on Financial Success
Section #3: Income 3. Which amount should Kobe use in creating a budget? Why? There
may be different opinions. Net pay is easier. If gross pay is used, the budget must account for all deductions including taxes.
4. How much does he person make per hour? $10.25 For overtime? Nothing
5. How many hours did he work this pay period? 73 hours 6. How much has he earned this year? $1,547.75 (Gross) $1,034.67
(Net) 7. How much does he have taken out of his paycheck for withholding
for taxes for this period? $144.41 8. How much does he have taken out of his paycheck for FICA for this
period? $57.24 9. What is FICA? Federal Insurance Contributions Act for Medicare and
Social Security 10. What benefits are deducted from his paycheck?
Section #4: Income and Taxes (Optional) Estimate of Time:
20 minutes Pages in Participant Workbook:
Module 3:10-
Materials Required: Blank flip charts for recording participant responses Markers Tape
Facilitator Instructions
Materials, Visual Aids & Notes
Facilitated Discussion and Calculation Use the following instructions and talking points to facilitate the discussion and activity.
? How is an employer taking money out of your paycheck a benefit to you?
After a few responses, add the following:
o By paying a little bit toward your taxes as you go, you don’t owe a lot on April 15 and you avoid penalties for not paying taxes as you go. Your employer doing this for you is a benefit to you.
Review the tax chart on in the Participant’s Workbook. Explain the W-‐2. Ask participants to calculate Sofia’s taxes using KEY ACTIVITY—
Estimating Taxes Owed. Give them 3 – 4 minutes and then ask participants to share what they
calculated using the answer below. 17,500 Income
Page 10 Write participant responses on flip chart paper. Page 11-‐12 Page 13

12 | P a g e
Module 3—Money Management: Cashing in on Financial Success
Section #4: Income and Taxes (Optional)
5,950 Standard Deduction 11,550 Taxable Income 11,550 -‐8,700 $870 taxes owed on first $8,700 2,850 $427.50 ($2,900 X 15%) $870 + $427.50 = $1,297.50 total taxes owed
Small Group Brainstorm Use the following instructions and talking points to facilitate the activity.
? Why do you pay taxes? After a few responses, add the following:
o Taxes pay for services from the government and these are services that are often too costly for one person or business to do on their own.
� With your small group using KEY ACTIVITY—What Do Taxes Pay For?
brainstorm a list of how taxes are used by the local government (city), state government and federal government.
After 5 minutes, ask participants to share their thoughts.
TRANSITION Now that you have learned about income and taxes, you are going to explore saving money.
Write the calculations on a flip chart after groups share their answers. Write participant responses on flip chart paper. Pages 13-‐14 Write their ideas in on a flip chart with columns labeled “local government,” “state government,” and “federal government.”

P a g e | 13
Module 3—Money Management: Cashing in on Financial Success
Section #5: Tools for Saving Estimate of Time:
20 minutes with optional activities 10 minutes without optional activities
Pages in Participant Workbook: Module 3:14-
Materials Required: Blank flip charts for recording participant responses Markers Tape Prepared visual aid: Places to Put Savings (Visual Aid 3.2) Prepared visual aid: Saving with a Paycheck (Visual Aid 3.3)
Facilitator Instructions
Materials, Visual Aids & Notes
Facilitated Discussion Use the following instructions and talking points to facilitate the discussion. � People who save a lot generally save through their paycheck because
they set up a system to save. � Often, they make a decision, fill out paperwork and then the savings
happens every paycheck without them really even thinking about it. � If you do not have a paycheck yet, you can’t do this. � If you receive cash for odd jobs, you can set up rules for your cash
income. – “Half of what I get I will save. The other half will be for
spending.” – “25% of what I get I will save. Another 25% will be for
charitable contributions. The other 50% is for me to use with friends or on other things I want.”
? What are other rules for saving that you can think of?
Share “no paycheck” methods using the following notes:
– Envelopes—label them with your rules. Put the amount you are
supposed to be saving into the savings envelope every time you get cash.
– Savings account—you can set up a savings account at a bank or
credit union. If you are over 18, you can set up your own account without a custodian or joint owner. If you are under 18, you may need a custodian or adult to co-‐sign with you.
– Online savings accounts—in addition to banks or credit unions
you can visit in your community, you can open a savings account at an online bank.
Write participant ideas on flip chart paper. Pages 14-‐15 Places to Put Savings (Visual Aid 3.2)

14 | P a g e
Module 3—Money Management: Cashing in on Financial Success
Section #5: Tools for Saving
– Reloadable prepaid debit card—some prepaid debit cards offer a savings account feature.
Share “paycheck” methods using the following notes:
– Direct Deposit—you can have your paycheck directly deposited
into your savings account or checking account. If you use a checking account, you can then have a fixed amount automatically transferred to a savings account or some other kind of account. Money saved this way is not missed by you. It is easier than having cash and then depositing it into an account.
– Workplace-‐based savings opportunities—you may be lucky to
work at a place that offers work-‐place based savings opportunities. For example, some employers will help you save for your retirement. You may be thinking—retirement; why in the world would I save for retirement! But sometimes it is worth looking into even at a young age if the employer matches your contributions. Another example of matched savings. If you don’t take advantage of these savings opportunities, you are leaving free money on the table.
Also money saved through work-‐place based retirement programs is not subject to income tax. So you also save on the amount of taxes you pay. Again, this may not be applicable to you now, but one day it will be!
Case Study (Optional) Use the following instructions and talking points to facilitate the activity. Put participants into small groups and assign half of the groups the case
study about Arameka and her youth board stipend. Assign the other group the case study about Javier and his paycheck using KEY ACTIVITY—Better Ways to Save.
Have one of the groups that examined Arameka provide a quick synopsis of the case study and then answers to one question.
Ask the other groups to share answers to the remaining question. Repeat the process with the Javier case study.
? If you want to save some of your income, what method do you think would work the best for you?
TRANSITION Now that you have looked at saving again, you are going to spend a little time looking at paying your bills on time.
Page 15 Saving with a Paycheck (Visual Aid 3.3) Page 16

P a g e | 15
Module 3—Money Management: Cashing in on Financial Success
Section #6: Tools for Paying Bills (Optional) Estimate of Time:
15 minutes Pages in Participant Workbook:
Module 3:17-
Materials Required: Blank flip charts for recording participant responses Markers Tape
Facilitator Instructions
Materials, Visual Aids & Notes
Facilitated Discussion and Exercise in Pairs Use the following talking points and questions to facilitate a discussion and activity.
? What are the benefits of paying your bills (when you have them) on time?
After getting a few responses, add the following if not included:
o Avoid penalties and late fees—you save money! o Avoid loss of service due to late payments or nonpayment o Maintain or improve your credit history and scores
? What are some of the different ways you can pay your
bills?
After getting a few responses, summarize by stating: o Cash, money orders, checks and online bill paying
Discuss some of the pros and cons of each approach using KEY
ACTIVITY—Benefits and Risks of Different Ways to Pay. Introduce the bill calendar and review example in Participant Workbook.
? Do you use the actual due date on the bill calendar?
After getting a few responses, summarize by stating:
o It depends on how you pay your bills. o If you are using the mail to send in your payment, you write the “due
date” 5 to 7 days before the actual due date to ensure the payment arrives on time.
o If you are paying in person, you may want to write the due date a few days before the actual due date (just in case you are too busy on the actual due date; it’s better to be early with a bill than late)
o If you use online bill pay, you may want to put the due date a few days before the actual due date in case you are too busy to make payment on the date the bill is due.
Write participant ideas on flip chart paper. Page 17 Page 17 Page 18 Page 19

16 | P a g e
Module 3—Money Management: Cashing in on Financial Success
Section #6: Tools for Paying Bills (Optional)
o If you use automatic bill payment, then you write the actual due date onto the calendar.
Instruct participants to complete a bill paying calendar for Theo using KEY ACTIVITY—Bill Calendar.
Give teams 7 – 10 minutes to complete. Review each item and ask where participants put the item on the calendar
use the answer key that follows.
Pages 20-‐25
SUNDAY MONDAY TUESDAY WEDNESDAY THURSDAY FRIDAY SATURDAY
1 2 3 4 5 6 7Rent due to Platinum
Properties$425
(in person payment)
Southbell Cell $59.99 Community Credit Union $130.95
Nat'l Credit Card Company $50
8 9 10 11 12 13 14Department Store Charge Card $50
State USA Auto Insurance $102
15 16 17 18 19 20 21 Pay day $550
(approximately)
22 23 24 25 26 27 28Super Satellite TV
$22.50Community Hospital
$37.86
29 30 31Rent for Feburary
due $425
Bill Calendar for January

P a g e | 17
Module 3—Money Management: Cashing in on Financial Success
Section #7: Financial Institutions and Money Management Estimate of Time:
40 minutes Pages in Participant Workbook:
Module 3:25-40
Materials Required: Blank flip charts for recording participant responses Markers Tape Financial products activity cards Credit card, debit card and ATM card activity cards Prepared visual aid: Loan Analysis Questions (Visual Aid 3.4) Prepared visual aid: Banks versus Credit Unions (Visual Aid 3.5) Prepared visual aid: Are Loans Assets? (Visual Aid 3.6)
Facilitator Instructions
Materials, Visual Aids & Notes
Note to Facilitator: See the end of this section for alternative approaches to this section. Facilitated Discussion and Chart Analysis Use the following talking points and questions to facilitate a discussion and activity.
? What kinds of businesses offer financial services? After getting a few responses, add the following if not included:
o Banks, credit unions, check cashing businesses, payday lenders, pawn shops, auto dealers, department stores, grocery stores, convenience stores, investment companies, brokerages and government to name a few.
? Why do businesses offer financial services?
After getting a few responses, summarize by stating:
o While some financial services are a big service to us, the bottom line is that these businesses make money from the services they provide.
� Some financial service providers are watched closely by the government
to make sure they are careful with your money. � These institutions accept deposits in savings accounts, checking accounts
and other kinds of accounts. � The government insures these institutions. � There are financial service providers that do not take deposits. � The government watches these businesses too, but they work differently. � They include check-‐cashing outlets, payday lenders, car title lenders and
pawnshops. � These institutions do not take deposits.
Write participant ideas on flip chart paper. Page 26 Page 26

18 | P a g e
Module 3—Money Management: Cashing in on Financial Success
Section #7: Financial Institutions and Money Management � They often offer services that get you access to credit and often charge
higher prices for their services. Ask participants to look at the personal loan example (the chart) in their
workbooks with a partner. Ask them to examine the difference in the costs of the loans. Use the following questions to help facilitate the discussion if the group is
does not understand the data. Answers follow. ? How much is borrowed?
o $500 ? What is the interest rate for the pawnshop loan?
o 108% per year ? What is the interest rate for the credit union loan?
o 12% per year ? What collateral is required by the pawn shop? The
credit union? o Pawn shop would be an item worth more than $500 and
probably something that would be worth close to $1,000 -‐ $2,000.
o With the credit union, it may depend. At the maximum, it would be a $500 deposit in a secured account.
? How much does the pawn shop loan cost? o $580
? How much does the credit union loan cost? o $80
? Why would people ever choose a pawn shop loan? After getting a few responses, summarize by stating:
o No credit checks o Need very little personal information o People in these businesses are often friendly o People use them when they have no other place to turn o Can get the money right away; no drawn out decision-‐making
process Facilitated Discussion Use the following instructions, talking points and questions to facilitate a discussion. � Banks and credit unions provide a broad range of financial services. � Deposits in them are insured up to $250,000. � The FDIC insures banks—this stands for Federal Deposit Insurance
Corporation. � NCUA insures credit unions—this stands for National Credit Union
Administration. � The products and services available at banks and credit unions are similar,
but there are differences between banks and credit unions.
Page 26 Loan Analysis Questions (Visual Aid 3.4) Page 26-‐27 Write participant ideas on flip chart paper. Banks versus Credit Unions (Visual Aid 3.5) Page 27-‐29

P a g e | 19
Module 3—Money Management: Cashing in on Financial Success
Section #7: Financial Institutions and Money Management
Use the visual aid to discuss the different between banks and credit
unions.
Note to Facilitator: This and the following activity are similar. You can consider changing one to a presentation although the tactile nature of each will make the information more memorable. Option 1: Card Sort Use the following instructions to facilitate the activity. Ask them to read the description. Tell them to be prepared to explain the
product or service they have and put in in the right category: o Depository account o Loan o Other services
Use round robin technique to have participants or pairs present their card and categorize it.
Make appropriate additional comments further explaining the products or services explained by participants.
Note to Facilitator: You can also ask poll-type questions (How many of you have used this product before?) or opinion questions (What was your experience with this product? Did you experience any obstacles getting this product or service? When do you think this product or service would be most useful to you?) to facilitate discussion about the products and services available at banks and credit unions. After the cards are sorted, ask:
? Are loans assets? After getting a few responses, summarize by stating:
o Loans are not assets. o Loans are liabilities—when you have a loan, you owe someone money. o Loans can help you get assets, though. In fact, most people use loans to
get cars, educations and homes. o A loan gives you the ability to get an asset today, but obligates future
income until the debt is paid off. Option 2: Credit Card, Debit Card or ATM Card Sort Use the following instructions to facilitate the activity. Explain that they have attributes of credit cards, debit cards or ATM cards. Explain that people often get these cards mixed up, but that there are
differences among them even though they look alike. Have each participant take a turn and hang their card (or cards) under the
Give each participant or pair of participants a card with a financial product and its description. Pages 29-‐31 Are Loans Assets? (Visual Aid 3.6) Make 3 category cards: Credit Card, Debit Card, ATM Card. Hang these cards on a wall. Distribute cards, one per participant, until all of the cards have been distributed.

20 | P a g e
Module 3—Money Management: Cashing in on Financial Success
Section #7: Financial Institutions and Money Management
category card (Credit Card, Debit Card, ATM Card) where they think it belongs.
Instruct participants to fill in KEY ACTIVITY—ATM Cards vs. Debit Cards vs. Credit Cards.
Make corrections as the cards are posted by the participants. Costs (Risks) and Benefits of Using Banks or Credit Unions Brainstorm Use the following instructions to facilitate the activity. Ask participants to brainstorm benefits or costs they see to using banks or
credit unions. If not included, ensure the following benefits and costs are included: BENEFITS
o Safety—Your money is safe from theft, loss and fires. FDIC or NCUA insures your deposits. This means that if the bank or credit union gets robbed, is managed poorly or catches on fire, your money will be replaced up to $250,000 per account—as long as the institution is insured.
o Convenience—You can get money quickly and easily. You may be able to use an ATM, debit card, electronic payment or visit the bank or credit union in person.
o Cost—Using a credit union or a bank is often less expensive than using
other businesses to cash your checks, pay bills and get loans. Also, cash checking businesses and payday lenders don’t have savings accounts. So you cannot build up savings if you use these businesses.
o Financial Future—Building a relationship with a credit union or a
bank will establish a record. It can also help you build savings. This may help you get a loan from a bank or credit union in the future.
COSTS o Fees—Banks and credit unions also make money by charging their
customers or members fees for some services. Often the fees increase when customers cannot keep the right minimum balances in their accounts. Ask bank or credit union staff about fees for each kind of account you have with them.
o Nonsufficient Funds—If you have a checking account and you write
checks for more money than you have, it can end up costing you a lot of money. Nonsufficient funds (NSF) charges can make a checking account very costly. Learning how to handle a checking account can help prevent these fees.
o Information—Banks and credit unions may ask you for a lot of
personal information to use some of their products or services. Some people use payday lenders or check-‐cashing businesses because they ask for very little information to use their services or products.
Page 32-‐34 Write participant ideas on flip chart paper. Pages 34-‐35 Page 35

P a g e | 21
Module 3—Money Management: Cashing in on Financial Success
Section #7: Financial Institutions and Money Management
o Confusion—There are many choices for accounts. Each account has different rules. This can be confusing and lead to people to misusing accounts.
o ChexSystems Rating—If you mishandle an account at a bank, you may
have a negative ChexSystems rating. Most people don’t even know this system exists. A negative ChexSystems rating can prevent you from opening a savings or checking account.
Facilitated Discussion on Saving for the Opportunity Passport™ Matched Savings Use the following instructions to facilitate the discussion. � There are no requirements about where you should put your savings for
the Opportunity Passport™ Matched Savings. ? What do you think about the benefits or risks of keeping
your savings: Where You Live (in a jar, under your mattress, etc.) On a Stored Value Card In a Savings Account In a Checking Account?
Instruct participants to take notes during the discussion in their
workbooks in KEY ACTIVITY—Saving for the Opportunity Passport™ Matched Savings.
Summarize using the following: � Explain to participants that they now have the information they need to
complete Keys to Your Financial Future Step 3.2: Saving for the Opportunity Passport™ Matched Savings.
Facilitated Discussion on Choosing a Bank or Credit Union (Optional) Use the following instructions to facilitate the discussion.
? How would you pick a bank or credit union?
After getting a few responses, summarize by stating: o These are all good ideas. o In your workbook, you will find a decision matrix to help you pick a
credit union or bank to meet your needs. Keys to Your Financial Future Step 3.3: Plan for Using a Bank or Credit Union.
o Completing it will require research. o You may want to actually visit possible banks or credit unions to
complete the chart.
Page 36 Page 37 Write participant ideas on flip chart paper. Pages 37-‐40

22 | P a g e
Module 3—Money Management: Cashing in on Financial Success
Section #7: Financial Institutions and Money Management Alternative Activities—Using Community Resource People Alternative 1: This section of the training could be turned into a field trip to a credit union and/or a bank. Staff at the credit union or bank can provide tour of the facility, explain the products and services covered in the section and even show participants how to open an account. Have participants begin to complete Keys to Your Financial Future Step 3.3: Plan for Using a Bank or Credit Union based on information provided on the field trip. Alternative 2: This section of the training could be supplanted by a panel of financial institution representatives. Invite someone from a bank and someone from a credit union to present to your group about their products and services, the ways in which they are similar and the ways they are different. Invite participants to ask questions to complete Keys to Your Financial Future Step 3.3: Plan for Using a Bank or Credit Union.

P a g e | 23
Module 3—Money Management: Cashing in on Financial Success
Section #8: Making a Plan to Reach Your Goals: Budgeting Estimate of Time:
35 minutes Pages in Participant Workbook:
Module 3:40-57
Materials Required: Station 1
Instruction card with income and expenses (following this section). Make enough copies for each group to start with a blank instruction card.
Play money—include ones, fives, tens, twenties and hundreds Envelopes Each group will need a new set of envelopes (12 envelopes)
Station 2 Instruction card. Make enough copies for each group to start with a blank
instruction card. Participants will need their workbooks at this station. Use the information in the
workbook (KEY ACTIVITY—Complete Nayeli’s Budget). Station 3
Instruction card. Make enough copies for each group to start with a blank instruction card.
Participants will need their workbooks at this station. Use the information in the workbook (KEY ACTIVITY—Complete Nayeli’s Budget).
Prepared visual aid: Budget Definition (Visual Aid 3.7) Prepared visual aid: Inputs for a Budget (Visual Aid 3.8)
Facilitator Instructions
Materials, Visual Aids & Notes
Facilitated Discussion Use the following talking point and instructions to lead a facilitated discussion.
? What does budgeting mean for you? After getting a few responses, summarize by stating:
o A lot of people see budgeting like they see dieting—a restriction on spending.
o Actually, a budget is really just a plan for how you will use your money to reach your goals. You set the goals. You make the plan using the resources you have.
� There are many approaches. � No matter what approach you chose, to make a budget you will need to
know your sources of income and your uses of income, which will include savings, sharing (charitable contributions), debt repayment and expenses.
� You are going to experience three approaches through a rotation.
Budget Rotation Stations Use the following talking point and instructions to lead a facilitated discussion.
Set up each station as instructed. Be sure to have enough station worksheets (following) for each participant to have his/her own. Pages 40-‐41 You may also want to include pencils at each station. Budget Definition (Visual Aid 3.7) Inputs for a Budget (Visual Aid 3.8)

24 | P a g e
Module 3—Money Management: Cashing in on Financial Success
Section #8: Making a Plan to Reach Your Goals: Budgeting Have participants count off 1 through 3. Each group should start at the station that corresponds to their number. Note to Facilitator: You can choose not to set up all the stations. Alternatively, you can set up additional stations. For example, you could create a simulation to do on an online budgeting site and set up some computers for participants to work through the example. Have them visit each station and complete the activity at each station. To keep things moving, inform participants they only have 10 -‐ 15
minutes at each station. When they are done, facilitate a discussion about the method they like the
best. Station 1—The Envelope Method Materials Needed: Instruction card with income and expenses (following this section). Make
enough copies for each group to start with a blank instruction card. Play money—include ones, fives, tens, twenties and hundreds. Envelopes. Each group will need a new set of envelopes (12 envelopes). During the rotation, empty the money out of the envelopes. Station 2—The Monthly Budget Materials Needed: Instruction card. Make enough copies for each group to start with a blank
instruction card. Participants will need their workbooks at this station. Use the information
in the workbook (KEY ACTIVITY—Complete Nayeli’s Budget). Station 3—The Cash Flow Budget Materials Needed: Instruction card. Make enough copies for each group to start with a blank
instruction card. Participants will need their workbooks at this station. Use the information
in the workbook (KEY ACTIVITY—Read Nayeli’s Cash Flow).
? What did you learn from this activity?
? Which budgeting system did you like the best? Explain the reasons you liked it.
Summarize using the following: � The key to using a budgeting system is finding an approach you like and
can keep up. � There are even more approaches than what you experienced today
including online approaches. � Remember, a budgeting system is just a plan for how you will use your
money to reach your goals.
You may want to make table tents for each station. If you have more than 15 participants, you may want to consider having double stations to keep small group size manageable. Pages 41-‐42 Page 42 Pages 43-‐48 Pages 49-‐51 Page 51
P a g e | 25
Module 3—Money Management: Cashing in on Financial Success
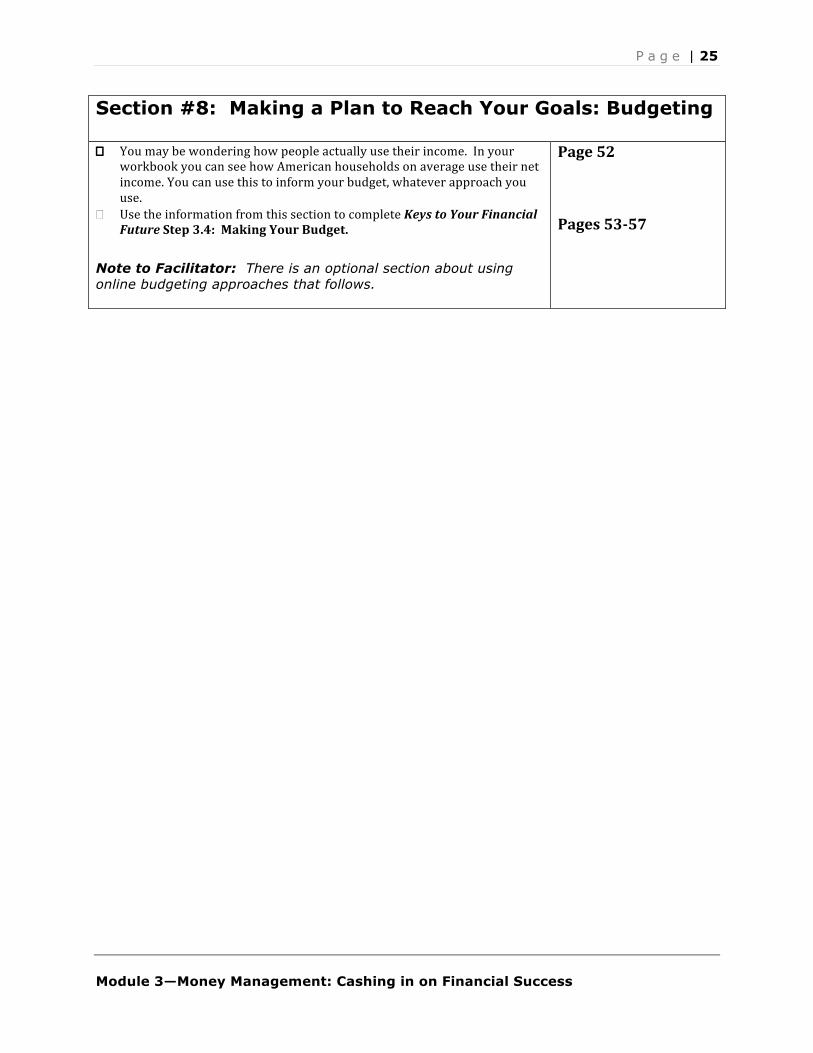
Section #8: Making a Plan to Reach Your Goals: Budgeting � You may be wondering how people actually use their income. In your
workbook you can see how American households on average use their net income. You can use this to inform your budget, whatever approach you use.
� Use the information from this section to complete Keys to Your Financial Future Step 3.4: Making Your Budget.
Note to Facilitator: There is an optional section about using online budgeting approaches that follows.
Page 52 Pages 53-‐57

26 | P a g e
Module 3—Money Management: Cashing in on Financial Success
Section #9: Online Budgeting (Optional) Estimate of Time:
10 minutes Pages in Participant Workbook:
Module 3:51-52
Materials Required: Blank flip charts for recording participant responses Markers and tape Prepared visual aid: List of Online Budgeting Options (Visual Aid 3.9)
Facilitator Instructions
Materials, Visual Aids & Notes
Facilitated Discussion Use the following instructions, talking points and questions to lead the facilitated discussion. Note to Facilitator: If you have access to computers, you could teach a more in-depth session about using some of these technology-based or online tools. � You can also use technology to make and keep a budget. � There are four basic approaches: 1) Spreadsheet on Your Computer � The forms you completed by hand can be done electronically on your
computer. There are two advantages to using the electronic versions of the form: 1) You don’t have to keep track of the paper 2) The math is calculated for you
� Excel also has a number of templates for financial forms that you can use. 2) Budgeting Software � You can buy budgeting software for your computer. � Quicken, Ace Money and YNAB (You Need a Budget) are examples of
software you can buy. Most of these programs are linked to bank and investing accounts, allowing you to pay bills through them and can be used to complete your tax returns.
� If you are still in foster care or have a simple budget, these programs are probably more than you need right now. However, you will have a more complicated budget one day. When you get to that point, you may want to research software options.
3) Website-‐Based Budgeting � There are many online sites that allow you to make and track a budget,
cash flow and sometimes even pay bills. Some of these sites can link up with your electronic calendar and send you text message reminders for bills. Some can link to your accounts and credit cards. Some of these sites include
Mint.com Budgetpulse.com Yodlee.com
List of Online Budgeting Options (Visual Aid 3.9) Page 51

P a g e | 27
Module 3—Money Management: Cashing in on Financial Success
Section #9: Online Budgeting (Optional)
Pearbudget.com Mvelopes.com (an online version of the envelope system)
4) Apps for Smart Devices � There are many applications or apps available for smart devices (iPhones
and Android). Some apps are companions to online sites while others operate as a sole budget source.
� While some budget apps are free, others charge to purchase the app. Summarize using the following: � If you have regular access to a computer or smart device, you may want to
consider using some of these online tools. � Maintaining security, however, will be something to think about. Facilitated Discussion Use the following instructions, talking points and questions to lead the facilitated discussion.
? Who knows on strategy to keep your identity and other information protected online?
Write participant responses on a flip chart. Add the following if not shared:
o Never access budgeting or banking sites from public computer or using an unsecure network (often public wireless is unsecure).
o Only access online budgeting or banking sites from you own computer using a secure Internet connection.
o Never store passwords on your computer. o Try to use passwords that include letters and numbers. o Use passwords that do not actually have words in them. o Ideally they should be 14 characters long with letters and numbers
(alphanumeric).
TRANSITION Now we that you know a little bit about online options and keeping your information safe online, we are going to look at another set of documents you need to keep safe—your critical documents.
Write participant responses on flip chart paper.
28 | P a g e
Module 3—Money Management: Cashing in on Financial Success
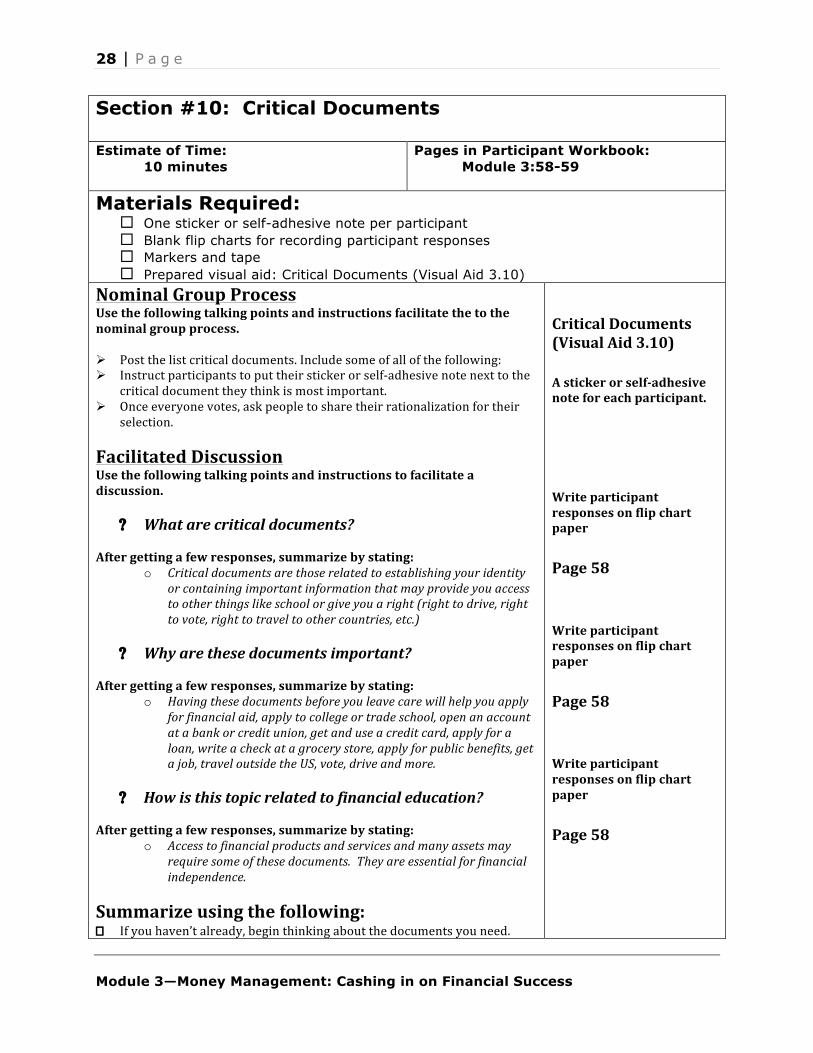
Section #10: Critical Documents Estimate of Time:
10 minutes Pages in Participant Workbook:
Module 3:58-59
Materials Required: One sticker or self-adhesive note per participant Blank flip charts for recording participant responses Markers and tape Prepared visual aid: Critical Documents (Visual Aid 3.10)
Nominal Group Process Use the following talking points and instructions facilitate the to the nominal group process. Post the list critical documents. Include some of all of the following: Instruct participants to put their sticker or self-‐adhesive note next to the
critical document they think is most important. Once everyone votes, ask people to share their rationalization for their
selection. Facilitated Discussion Use the following talking points and instructions to facilitate a discussion.
? What are critical documents? After getting a few responses, summarize by stating:
o Critical documents are those related to establishing your identity or containing important information that may provide you access to other things like school or give you a right (right to drive, right to vote, right to travel to other countries, etc.)
? Why are these documents important?
After getting a few responses, summarize by stating:
o Having these documents before you leave care will help you apply for financial aid, apply to college or trade school, open an account at a bank or credit union, get and use a credit card, apply for a loan, write a check at a grocery store, apply for public benefits, get a job, travel outside the US, vote, drive and more.
? How is this topic related to financial education?
After getting a few responses, summarize by stating:
o Access to financial products and services and many assets may require some of these documents. They are essential for financial independence.
Summarize using the following: � If you haven’t already, begin thinking about the documents you need.
Critical Documents (Visual Aid 3.10) A sticker or self-‐adhesive note for each participant. Write participant responses on flip chart paper Page 58 Write participant responses on flip chart paper Page 58 Write participant responses on flip chart paper Page 58

P a g e | 29
Module 3—Money Management: Cashing in on Financial Success
Section #10: Critical Documents � Use Keys to Your Financial Future Step 3.5: Getting Your Critical
Documents to continue to build your asset building plan. This will help you inventory those documents you do have and those that you need.
� Once you have your key documents, you need to keep them safe. Facilitated Discussion Use the following talking points and instructions to facilitate a discussion.
? Why is keeping your critical documents safe so
important? After getting a few responses, summarize by stating:
o Your critical documents contain information that someone could use to steal your identity. Keeping these documents safe and secure is one of the more important things you can do to protect your identity.
? How can you keep these documents safe?
After getting a few responses, summarize by stating:
o There is no surefire method. Here are some things to think about: o Carry your driver’s license with you when and if you get one. DO
NOT carry your passport, social security card, birth certificate or other documents with you unless you need them for a specific purpose. Once you use them (birth certificate to get a license) return them to their safe place.
o If you keep them where you live, consider a fireproof lock box. o If you can afford it, consider a safe deposit box.
Summarize using the following: � For more help completing Keys to Your Financial Future Step 3.5:
Getting Your Critical Documents or developing a plan to keep your critical documents safe, visit with Opportunity Passport™ Site Staff to make a plan.
Write participant responses on flip chart paper Page 58 Write participant responses on flip chart paper Page 59

30 | P a g e
Module 3—Money Management: Cashing in on Financial Success
Section #11: Post-Training Assessment Estimate of Time:
10 minutes Page in Participant Workbook:
Pages following Module 3 in Participants Workbook
Materials Required: Handout: Post-Training Assessment Prepared visual aid: Tips for Taking the Post-Training Assessment (Visual Aid 3.11)
Facilitator Instructions
Materials, Visual Aids & Notes
Individual Activity Use the following talking points to provide instructions. � Now that you have finished the core modules, it is time to take the post-‐
training assessment. � Why? It helps us see whether we are doing a good job in providing the
training. � By looking at your assessment before the training and after the training,
we will be able to see whether we did what we were supposed to do.
Post and review tips for taking the post-‐training assessment. Collect completed post-‐training assessments. Use recording grid
available on website to enter data from post-‐training assessments. Be sure to include date on which post-‐training assessment was administered.
Distribute Post-‐Training Assessments to Participants Tips for Taking the Post-‐Training Assessment (Visual Aid 3.11)

P a g e | 31
Module 3—Money Management: Cashing in on Financial Success
Section #12: Closing Estimate of Time:
10 minutes Page in Participant Workbook:
None
Materials Required: Blank flip charts for recording participant responses Markers and tape Option 1: Keys cut from card stock (similar to those used in Module 1) Option 1: Optional—give each young person a ring full of keys using the card stock
keys with holes punched in the corner and loaded onto a loose leaf ring. Option 1: If using the optional activity, give each participant a Sharpie-like marker
for writing on their keys Option 2: Something to use as a talking stick Option 3: Ball of yarn Option 4: Nice stationary and envelopes. Prepared visual aid: Talking Stick Questions (Visual Aid 3.12) Prepared visual aid: Web of Connectivity Questions (Visual Aid 3.13) Prepared visual aid: Post-dated Letters to Self: Questions to guide your letter
(Visual Aid 3.14)
Facilitator Instructions
Materials, Visual Aids & Notes
Note to Facilitator: There are four (4) options to close the core section of the training. Each activity is fairly simple to implement. Please refer back to these options for closing ideas for other modules of the training where you feel a closing activity is needed or appropriate. OPTION 1: Keys to Our Financial Future Use the following talking points and instructions to facilitate the closing activity. Get participants into groups of 3 to 5 young people. Note to Facilitator: You can use the template from Module 1. As a group, have them brainstorm the new keys they have to their
financial future. After 3 – 5 minutes, have them present the keys (each participant
presenting one key from their group) to the entire group. Hang them on the wall as they share their keys.
? Are there any keys missing? What are they? Note to Facilitator: Depending on your time and resources, you can give each participant a key ring full of these keys. They can then write down the groups’ ideas on each key in their ring. You may want to give them extra in case you do some large group brainstorming of other keys possibly missed by the small groups.
Distribute keys cut from card stock to each participant; 1 per participant. There is no template for the key. If using the optional approach, give each young person a ring full of keys using the card stock keys with holes punched in the corner and loaded onto a loose leaf ring. You may want to distribute a finer point marker to each participant (like a Sharpie) to complete the activity.

32 | P a g e
Module 3—Money Management: Cashing in on Financial Success
Section #12: Closing Summarize using the following: � You have completed the core modules of Keys to Your Financial Future
with more keys. � Some of you will use these keys right away; for some of you, it may be a
year or more before you start really needing these keys. � Whether you need them now or at some point in the future, you have
these keys. They are now your productive assets—you have knowledge, skills and resources that will help you get and keep other assets.
� Remember, your workbook is a resource for you as is the Opportunity Passport™ staff.
OPTION 2: Talking Stick Use the following talking points and instructions to facilitate the closing activity. Note to Facilitator: Talking Sticks are a Northwest-area Native American Tradition. Ask participants to get into a circle—standing or sitting. Explain that the talking stick is a NW-‐area Native American Tradition.
Whoever is holding the talking stick is the one who can talk. Everybody else should be listening.
Ask participants to share answers to one of the following sets of questions when the talking stick is passed to them: SET 1 ? As a result of this training, what is one money management
related thing you are going to start? ? As a result of this training, what is one money management
related thing you are going to continue doing? ? As a result of this training, what is one money management
related thing you are going to stop? SET 2 Finish these sentences.
� In this training, I learned . . . � As a result of what I learned, I plan to . . .
Note to Facilitator: You can make up your own questions for this activity.
OPTION 3: Web of Connectivity Use the following talking points and instructions to facilitate the closing activity. Have participants get into a circle. Start with a ball of yarn. Instruct participants that they are to answer one of the questions posted
and then toss the ball of yarn to someone else in the circle. Explain that
Start with the talking stick in your own hands. Hold onto it while you share the instructions. Then pass it to another participant. Generally, it works best to let the talking stick work its way around the circle as opposed to letting participants pick someone to whom to give the talking stick. Talking Stick Questions (Visual Aid 3.12) Ball of yarn; facilitator should be the one who starts with it for this exercise.

P a g e | 33
Module 3—Money Management: Cashing in on Financial Success
Section #12: Closing
they should hold onto the yarn and then toss the ball. Allow the ball to be tossed to each participant at least two times. Example questions
1. What is the most important thing you have learned? 2. What asset is it most important for you to build? What step will you
take tomorrow to start building this asset? 3. What is something—information, skill, resource or tool—that you
will be able to use starting tomorrow? 4. How has your social capital been strengthened or built through your
experience? 5. Etc.
Note to Facilitator: You can make up your own questions for this activity. Summarize using the following: � You have learned a lot during the short time together in this training. � You have completed the core modules of Keys to Your Financial Future
with more keys to your financial future. � Some of you will use these keys right away; for some of you, it may be a
year or more before you start really needing these keys. � Whether you need them now or at some point in the future, you have
these keys. They are now your productive assets—you have knowledge, skills and resources that will help you get and keep other assets.
� As important as these keys are what you shared and learned from one another. You are all connected through this experience, through the support you provided to one another and through the opportunity you have before you to continue supporting one another as you develop financial capability and transition to financial independence.
OPTION 4: Letter to Self Use the following talking points and instructions to facilitate the closing activity. Instruct participants to write a post-‐dated letter to themselves exactly 3
months from today—write this date on a flip chart. Instruct them to use these questions as a guide to writing their letters. Example questions
1. What progress have you made toward your short and long terms goals?
2. Have you built any assets? Which ones? 3. Have you built your social capital? How? 4. How have you overcome obstacles? 5. How have you used the knowledge and skills gained through your
participation in Keys to Your Financial Future to become more financially capable?
6. Etc.
Web of Connectivity Questions (Visual Aid 3.13) Instruct participants to hold onto the yarn while you cut through the middle of it. Invite participants to each take a strand of the web with them to remind them of their connections to one another and the Opportunity Passport™ and its staff. Distribute stationary, envelopes and pens to participants. Post-‐dated Letters to Self: Questions to guide your letter (Visual Aid 3.14)

34 | P a g e
Module 3—Money Management: Cashing in on Financial Success
Section #12: Closing
Note to Facilitator: You can make up your own questions for this activity.
Provide participants with up to ten minutes to complete. Instruct participants to put their letters into the envelope and address
the envelope to themselves. Explain that they will receive the letter in about 3 months. They can see
whether they are on track as they predicted in their letters. Note to Facilitator: You must plan to send the letters near the 3-month mark. Note to Facilitator: Since this is an independent activity, it may work well to combine this closing activity with one of the other three options. Summarize using the following: � You have envisioned how you will use the information and skills gained
through your participation in Keys to Your Financial Future. � Seeing something is the first step to making it happen—just as was
discussed during the first session together. � You have completed the core modules of Keys to Your Financial Future
with more keys. � Some of you will use these keys right away; for some of you, it may be a
year or more before you start really needing these keys. � Whether you need them now or at some point in the future, you have
these keys. They are now your productive assets—you have knowledge, skills and resources that will help you get and keep other assets.
� Remember, your workbook is a resource for you as is the Opportunity Passport™ staff.
P a g e | 35
Module 3—Money Management: Cashing in on Financial Success
Tools to Facilitate Module 3
Section 7
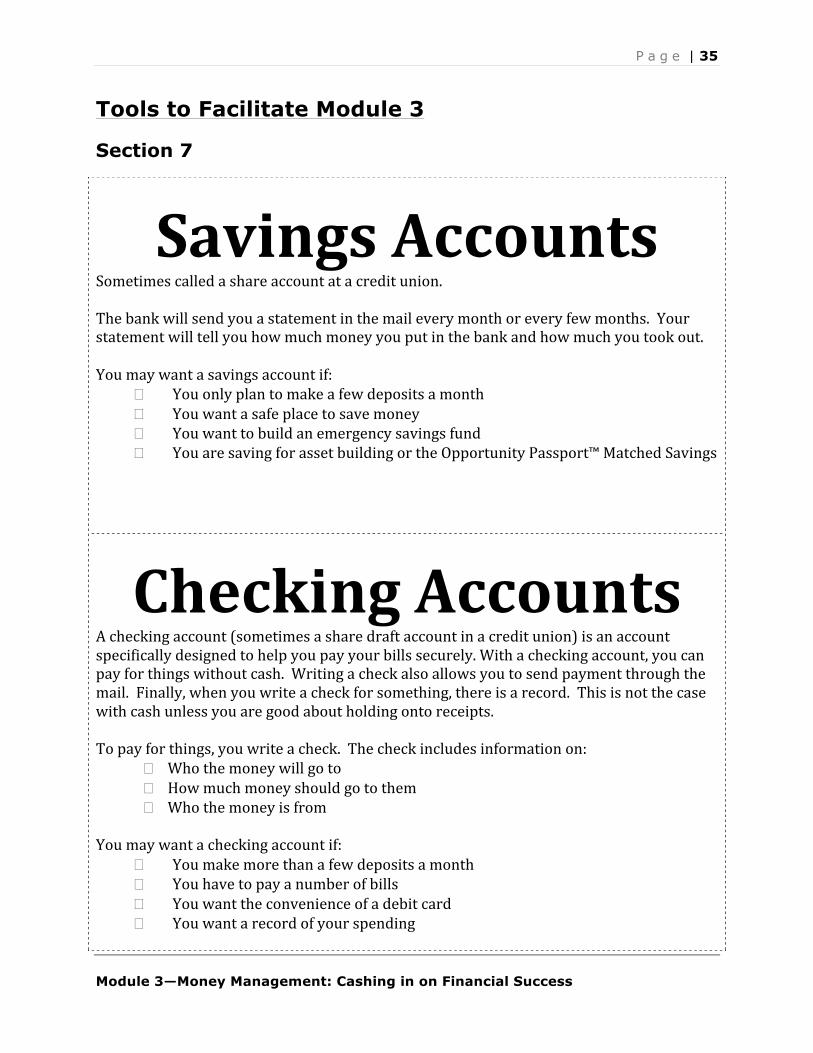
Savings Accounts Sometimes called a share account at a credit union. The bank will send you a statement in the mail every month or every few months. Your statement will tell you how much money you put in the bank and how much you took out.
You may want a savings account if:
� You only plan to make a few deposits a month � You want a safe place to save money � You want to build an emergency savings fund � You are saving for asset building or the Opportunity Passport™ Matched Savings
Checking Accounts A checking account (sometimes a share draft account in a credit union) is an account specifically designed to help you pay your bills securely. With a checking account, you can pay for things without cash. Writing a check also allows you to send payment through the mail. Finally, when you write a check for something, there is a record. This is not the case with cash unless you are good about holding onto receipts. To pay for things, you write a check. The check includes information on:
� Who the money will go to � How much money should go to them � Who the money is from
You may want a checking account if:
� You make more than a few deposits a month � You have to pay a number of bills � You want the convenience of a debit card � You want a record of your spending

36 | P a g e
Module 3—Money Management: Cashing in on Financial Success
Certificates of Deposit
A certificate of deposit (CD) is a fixed amount of money deposited with a bank for a fixed amount of time. Usually, the interest rate is fixed. The interest rate is usually higher than that of a savings account. A $1,000 CD invested for one year at 2.7% in 12 months, would be worth $1,027. You can use your Opportunity Passport™ Matched Savings to open one of these You may want a certificate of deposit if:
� You have a large sum of money ($500 or more) that you will not need for 6 months or longer
� You want to earn a little more interest
Credit Cards Banks and credit unions have a number of different credit card programs available for their customers. Credit cards are considered revolving credit. You can borrow over and over again up to credit limit as long as you pay the minimum balance when it’s due monthly. Once you are 18, you can apply for a credit card if you have a regular source of income or a co-‐signor. Otherwise, you will have to wait until you are 21 years old. You may want a credit card if:
� You want to buy things on line � You want to build credit (history and scores) � You want a record of your spending

P a g e | 37
Module 3—Money Management: Cashing in on Financial Success
Lines of Credit Similar to a revolving credit card, lines of credit allow you to borrow up to a certain amount. Usually, this must be completely paid off once per year. Businesses often apply for lines of credit for purchasing inventory. Getting a line of credit is harder than getting a credit card. You may want a line of credit if:
� You have a business with inventory � You can easily qualify for a loan (lines of credit will generally be less expensive
than credit cards) � You want protection attached to your checking account in case you overdraw
(much less expensive than overdraft protection)
Installment Loans This is when you borrow money for something specific such as refrigerators and vacations, automobiles, and homes. They can be used to finance postsecondary education or training education, and they can be used to finance a business. These must be paid back in even payments over a certain period of time.
You may want an installment loan if:
� You want to buy an asset, but do not have enough cash to get it � You want to build your credit (history and scores)
38 | P a g e
Module 3—Money Management: Cashing in on Financial Success
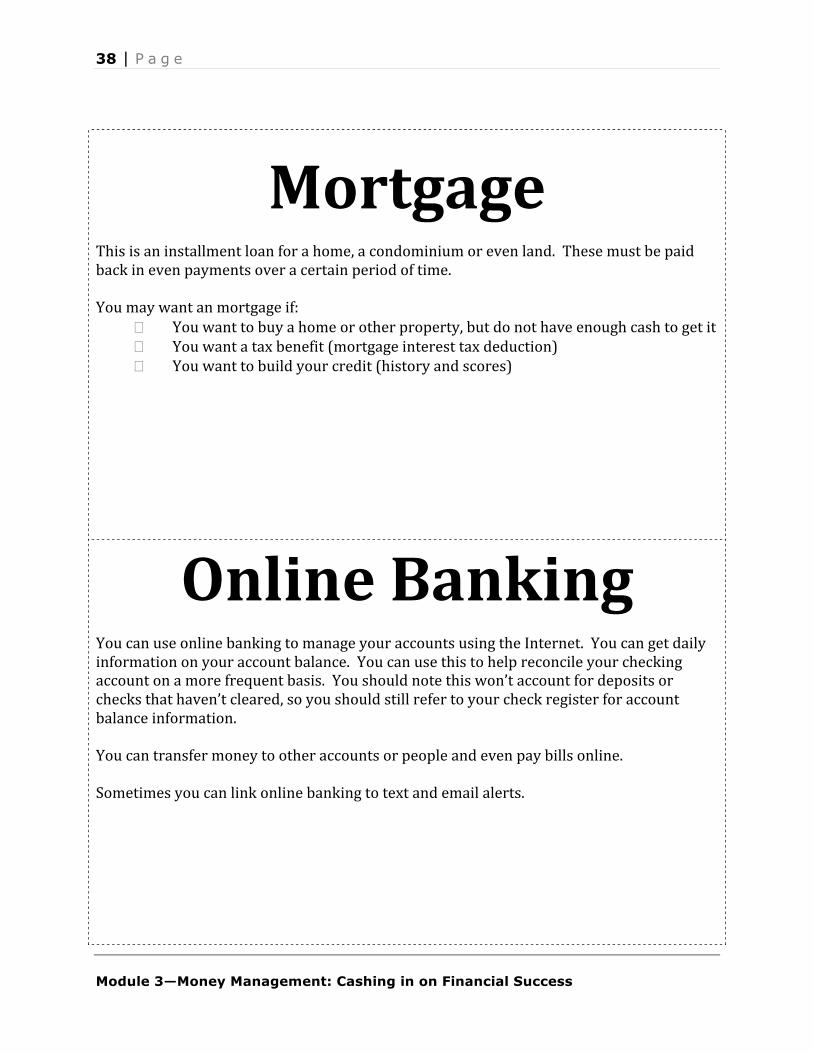
Mortgage This is an installment loan for a home, a condominium or even land. These must be paid back in even payments over a certain period of time.
You may want an mortgage if:
� You want to buy a home or other property, but do not have enough cash to get it � You want a tax benefit (mortgage interest tax deduction) � You want to build your credit (history and scores)
Online Banking You can use online banking to manage your accounts using the Internet. You can get daily information on your account balance. You can use this to help reconcile your checking account on a more frequent basis. You should note this won’t account for deposits or checks that haven’t cleared, so you should still refer to your check register for account balance information. You can transfer money to other accounts or people and even pay bills online. Sometimes you can link online banking to text and email alerts.

P a g e | 39
Module 3—Money Management: Cashing in on Financial Success
Money Orders Money orders can be used to pay for bills through the mail without sending cash. Money orders at banks and credit unions are usually less expensive than money orders sold in other businesses such as convenience stores or grocery stores. With money orders, you have a record if you save the money order stub.
Check cashing When you have a check—paycheck or personal check—you can cash it for free if you have an account at a bank or credit union. If you do not have an account, you will have to pay for this service at a checking cashing outlet, store or the bank the check was written against.

40 | P a g e
Module 3—Money Management: Cashing in on Financial Success
Direct Deposit You must have a regular paycheck to use direct deposit. Most employers will allow you to directly deposit your paycheck into your account. You will need to give your employer your bank account information, including the routing and transit number for the bank. Direct deposit will save you time and money. When you use direct deposit, you will also have access to your money right away.
Automated Teller Machines (ATMs)
ATMs allow you to get cash or deposit cash from many different locations and when your bank or credit unions are closed (after hours). Using an ATM that does not belong to your bank or credit union can be expensive as you will pay anywhere between $1 and $3.50 per transaction. .

P a g e | 41
Module 3—Money Management: Cashing in on Financial Success
Section 8
Station 1: The Envelope System
Monthly Expenses for Royce
Royce has been sharing a place with another young person he met on youth board. He has a really good job, and he hopes to go to college part-time in a year or so. As part of the Opportunity Passport™ Financial Education Training, he wants to try the envelopebudgeting system. Use the information below, the money and the envelopes to set up the envelope system for Royce. Before setting up the system, identify whether each expense is a need/obligation or a want. Be sure to write the category, the due date if applicable and amount on each envelope. Put the amount allocated on each envelope.
Description Amount Due DateNeed or
Obligation Want Rent (included utilities)-split with roommate 450.00$ 1stCell phone data plan 54.00$ 15thCable television 23.00$ 15thFood and household supplies 180.00$ Car payment 159.00$ 22ndEntertainmentEating outGasoline 120.00$ Charitable contribution to faith community 20.00$ Opportunity Passport™ Matched Savings 50.00$ Just in Case Money 100.00$
Total Expenses for the Month 1,156.00$
Your Pay Check ResultsBi-weekly Gross Pay $1,600.00 Tax Year 2012Federal Withholding $190.10 Gross Pay $1,600.00
Social Security $67.20 Pay Frequency Bi-weeklyMedicare $23.20 Federal Filing Status Single
Oklahoma $64.00 # of Federal Exemptions 1Additional Federal W/H $0.00
Net Pay $1,256 State OklahomaFiling status SingleAllowances 0
Additional State W/H $0.00
Note: Net pay calculation from Paycheck City (www.paycheckcity.com)
Calculation Based On
Answers questions on reverse side.

42 | P a g e
Module 3—Money Management: Cashing in on Financial Success
If there was money left after needs and obligations were covered, how did you budget it?
Describe what you think are the strengths and weaknesses to this approach to budgeting?
Strengths Weaknesses
P a g e | 43
Module 3—Money Management: Cashing in on Financial Success
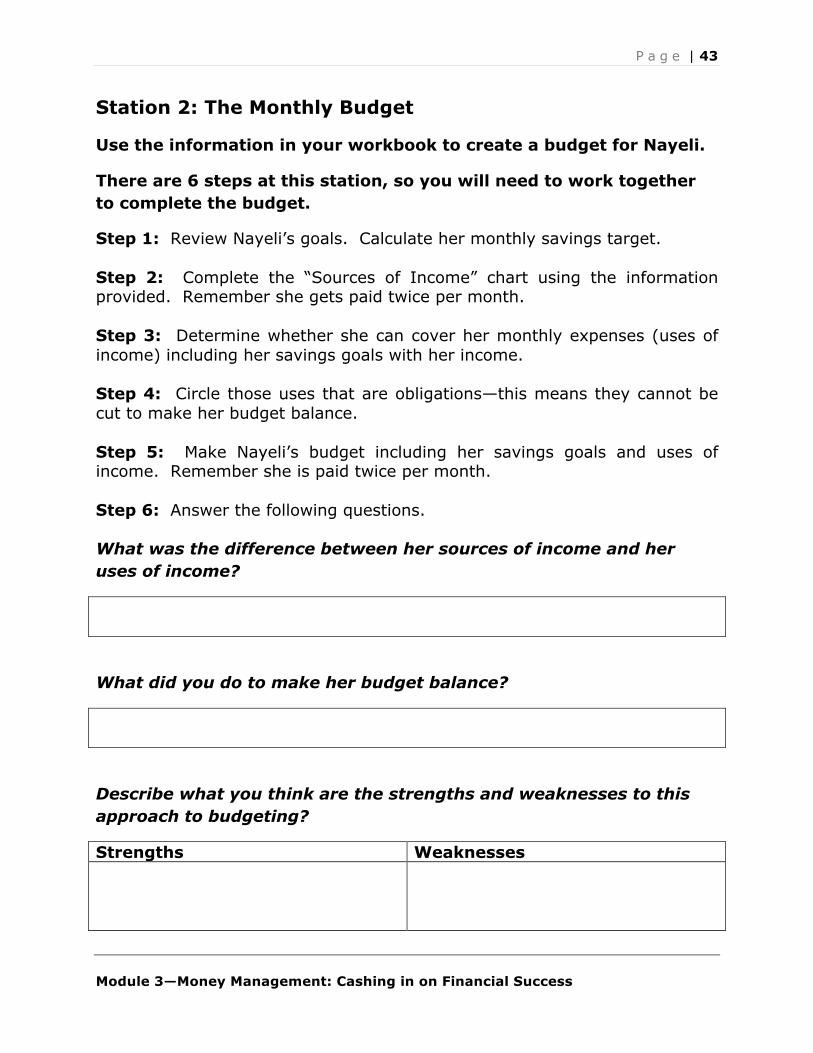
Station 2: The Monthly Budget
Use the information in your workbook to create a budget for Nayeli.
There are 6 steps at this station, so you will need to work together to complete the budget.
Step 1: Review Nayeli’s goals. Calculate her monthly savings target. Step 2: Complete the “Sources of Income” chart using the information provided. Remember she gets paid twice per month. Step 3: Determine whether she can cover her monthly expenses (uses of income) including her savings goals with her income. Step 4: Circle those uses that are obligations—this means they cannot be cut to make her budget balance. Step 5: Make Nayeli’s budget including her savings goals and uses of income. Remember she is paid twice per month. Step 6: Answer the following questions. What was the difference between her sources of income and her uses of income?
What did you do to make her budget balance?
Describe what you think are the strengths and weaknesses to this approach to budgeting?
Strengths Weaknesses

44 | P a g e
Module 3—Money Management: Cashing in on Financial Success
Station 3: The Cash Flow Budget
Use the information in your workbook to analyze the cash flow budget for Nayeli.
Read the information about the cash flow budget. Read the cash flow budget for Nayeli in your workbook. Answer the following questions with your team: Can Nayeli make ends meet each week?
If not, what would you recommend to her to bring her cash flow budget into balance?
If she has a “$0” ending cash balance for the week of February 25th, how much cash will she have to work with the next week? What should she do in this situation?
Describe what you think are the strengths and weaknesses to this approach to budgeting?
Strengths Weaknesses