Module 12 ::Programming in Eclipse - INSEL · Module 12 ::Programming in Eclipse ... welcome you...
39
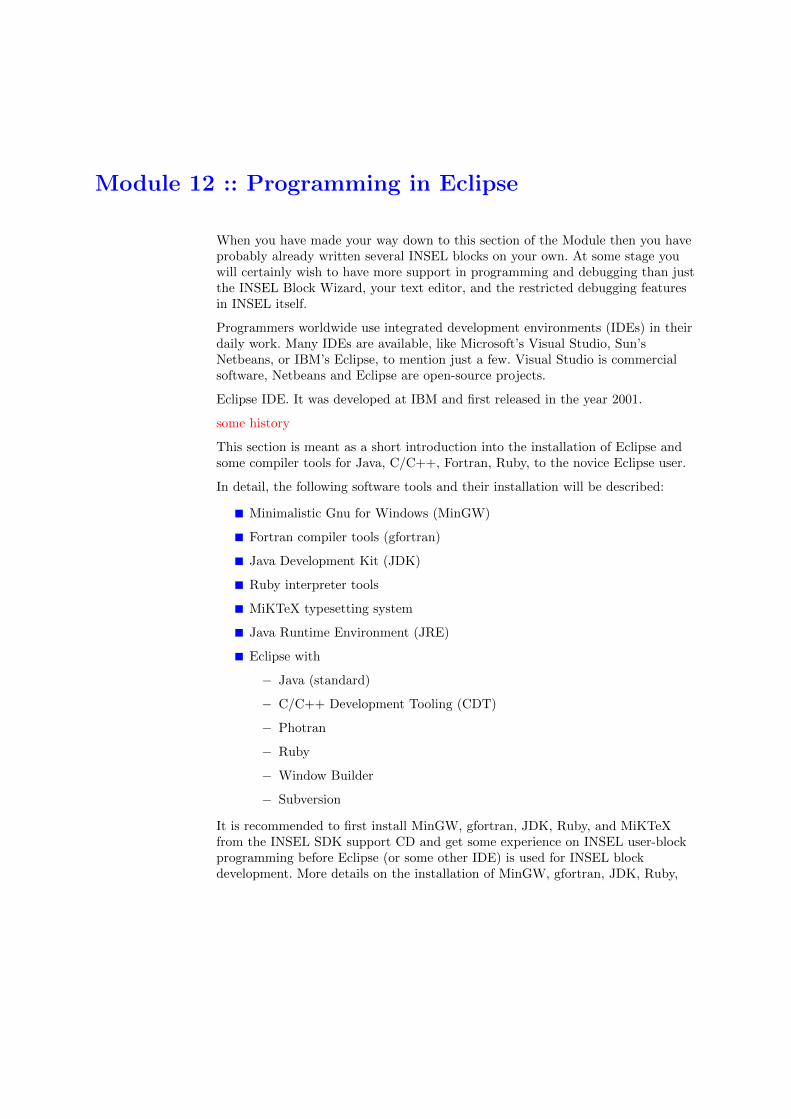
Module 12 :: Programming in Eclipse When you have made your way down to this section of the Module then you have probably already written several INSEL blocks on your own. At some stage you will certainly wish to have more support in programming and debugging than just the INSEL Block Wizard, your text editor, and the restricted debugging features in INSEL itself. Programmers worldwide use integrated development environments (IDEs) in their daily work. Many IDEs are available, like Microsoft’s Visual Studio, Sun’s Netbeans, or IBM’s Eclipse, to mention just a few. Visual Studio is commercial software, Netbeans and Eclipse are open-source projects. Eclipse IDE. It was developed at IBM and first released in the year 2001. some history This section is meant as a short introduction into the installation of Eclipse and some compiler tools for Java, C/C++, Fortran, Ruby, to the novice Eclipse user. In detail, the following software tools and their installation will be described: Minimalistic Gnu for Windows (MinGW) Fortran compiler tools (gfortran) Java Development Kit (JDK) Ruby interpreter tools MiKTeX typesetting system Java Runtime Environment (JRE) Eclipse with - Java (standard) - C/C++ Development Tooling (CDT) - Photran - Ruby - Window Builder - Subversion It is recommended to first install MinGW, gfortran, JDK, Ruby, and MiKTeX from the INSEL SDK support CD and get some experience on INSEL user-block programming before Eclipse (or some other IDE) is used for INSEL block development. More details on the installation of MinGW, gfortran, JDK, Ruby,
Transcript of Module 12 ::Programming in Eclipse - INSEL · Module 12 ::Programming in Eclipse ... welcome you...
Module 12 :: Programming in Eclipse
When you have made your way down to this section of the Module then you haveprobably already written several INSEL blocks on your own. At some stage youwill certainly wish to have more support in programming and debugging than justthe INSEL Block Wizard, your text editor, and the restricted debugging featuresin INSEL itself.
Programmers worldwide use integrated development environments (IDEs) in theirdaily work. Many IDEs are available, like Microsoft’s Visual Studio, Sun’sNetbeans, or IBM’s Eclipse, to mention just a few. Visual Studio is commercialsoftware, Netbeans and Eclipse are open-source projects.
Eclipse IDE. It was developed at IBM and first released in the year 2001.
some history
This section is meant as a short introduction into the installation of Eclipse andsome compiler tools for Java, C/C++, Fortran, Ruby, to the novice Eclipse user.
In detail, the following software tools and their installation will be described:
Minimalistic Gnu for Windows (MinGW)
Fortran compiler tools (gfortran)
Java Development Kit (JDK)
Ruby interpreter tools
MiKTeX typesetting system
Java Runtime Environment (JRE)
Eclipse with
− Java (standard)
− C/C++ Development Tooling (CDT)
− Photran
− Ruby
− Window Builder
− Subversion
It is recommended to first install MinGW, gfortran, JDK, Ruby, and MiKTeXfrom the INSEL SDK support CD and get some experience on INSEL user-blockprogramming before Eclipse (or some other IDE) is used for INSEL blockdevelopment. More details on the installation of MinGW, gfortran, JDK, Ruby,
290 12.1 Getting started with Eclipse
and MiKTeX can be found in the Getting Started manual and Module 1 of theTutorial.
In particular, please notice that the standard block development support uses aJava structure, which is part of the installation directory of INSEL. In this sense,Java is not really “installed” on the computer on which INSEL is running andtherefore Java needs to be installed before Eclipse can be used.
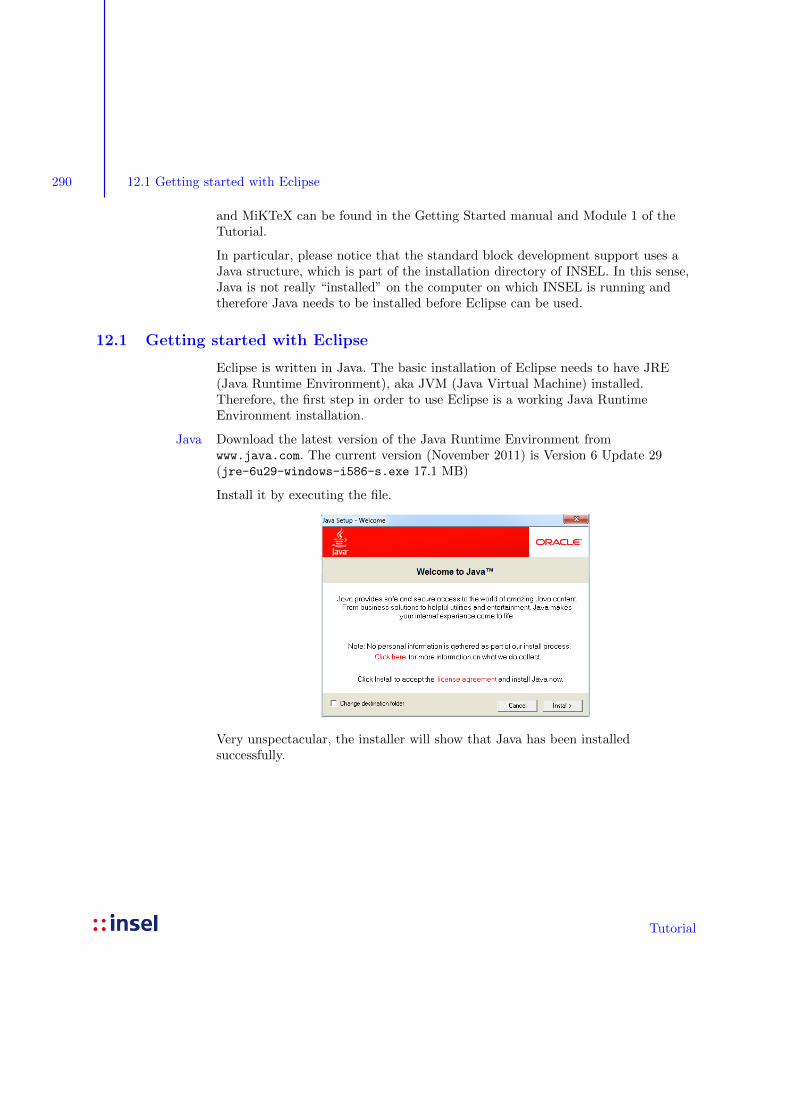
12.1 Getting started with Eclipse
Eclipse is written in Java. The basic installation of Eclipse needs to have JRE(Java Runtime Environment), aka JVM (Java Virtual Machine) installed.Therefore, the first step in order to use Eclipse is a working Java RuntimeEnvironment installation.
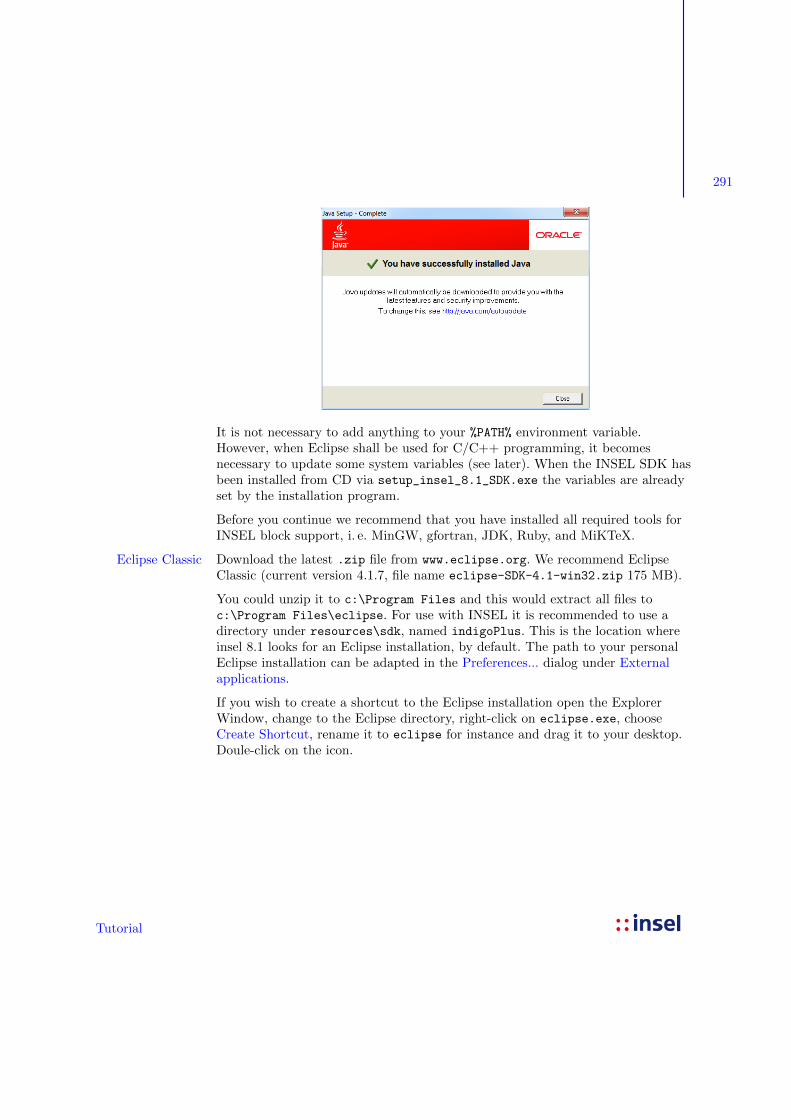
Download the latest version of the Java Runtime Environment fromJavawww.java.com. The current version (November 2011) is Version 6 Update 29(jre-6u29-windows-i586-s.exe 17.1 MB)
Install it by executing the file.
Very unspectacular, the installer will show that Java has been installedsuccessfully.
Tutorial
291
It is not necessary to add anything to your %PATH% environment variable.However, when Eclipse shall be used for C/C++ programming, it becomesnecessary to update some system variables (see later). When the INSEL SDK hasbeen installed from CD via setup_insel_8.1_SDK.exe the variables are alreadyset by the installation program.
Before you continue we recommend that you have installed all required tools forINSEL block support, i. e. MinGW, gfortran, JDK, Ruby, and MiKTeX.
Download the latest .zip file from www.eclipse.org. We recommend EclipseEclipse ClassicClassic (current version 4.1.7, file name eclipse-SDK-4.1-win32.zip 175 MB).
You could unzip it to c:\Program Files and this would extract all files toc:\Program Files\eclipse. For use with INSEL it is recommended to use adirectory under resources\sdk, named indigoPlus. This is the location whereinsel 8.1 looks for an Eclipse installation, by default. The path to your personalEclipse installation can be adapted in the Preferences... dialog under Externalapplications.
If you wish to create a shortcut to the Eclipse installation open the ExplorerWindow, change to the Eclipse directory, right-click on eclipse.exe, chooseCreate Shortcut, rename it to eclipse for instance and drag it to your desktop.Doule-click on the icon.
Tutorial
292 12.1 Getting started with Eclipse
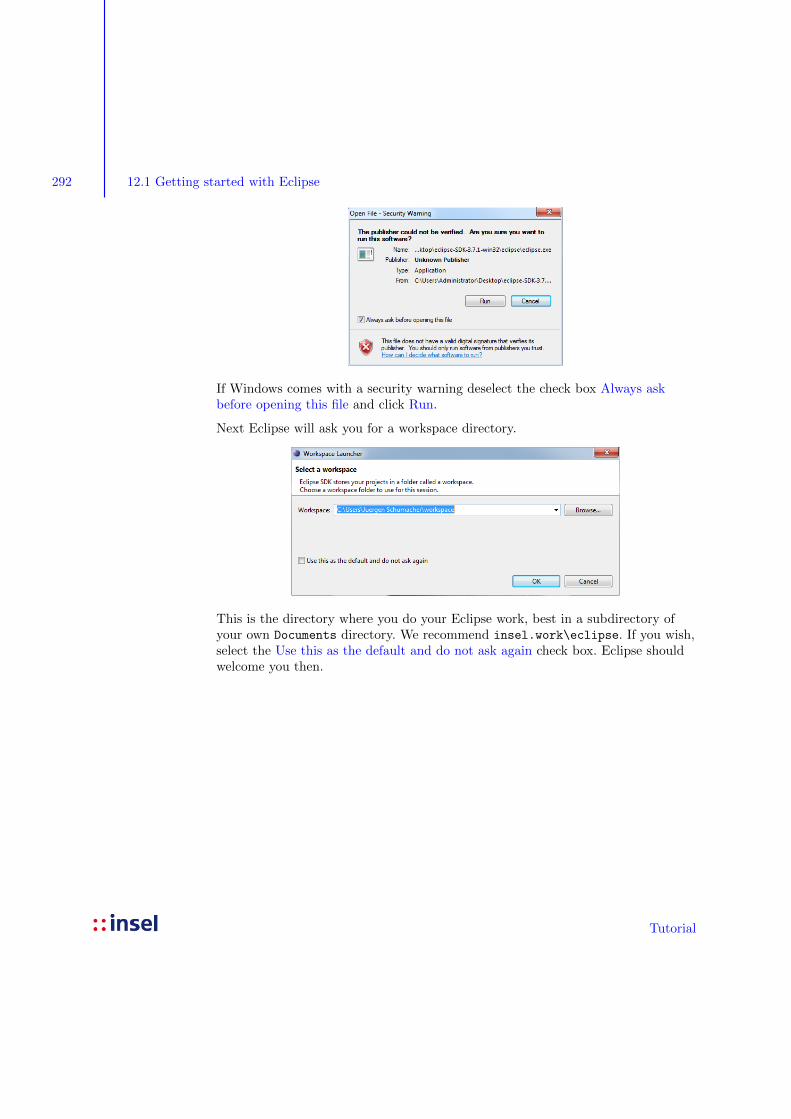
If Windows comes with a security warning deselect the check box Always askbefore opening this file and click Run.
Next Eclipse will ask you for a workspace directory.
This is the directory where you do your Eclipse work, best in a subdirectory ofyour own Documents directory. We recommend insel.work\eclipse. If you wish,select the Use this as the default and do not ask again check box. Eclipse shouldwelcome you then.
Tutorial
293
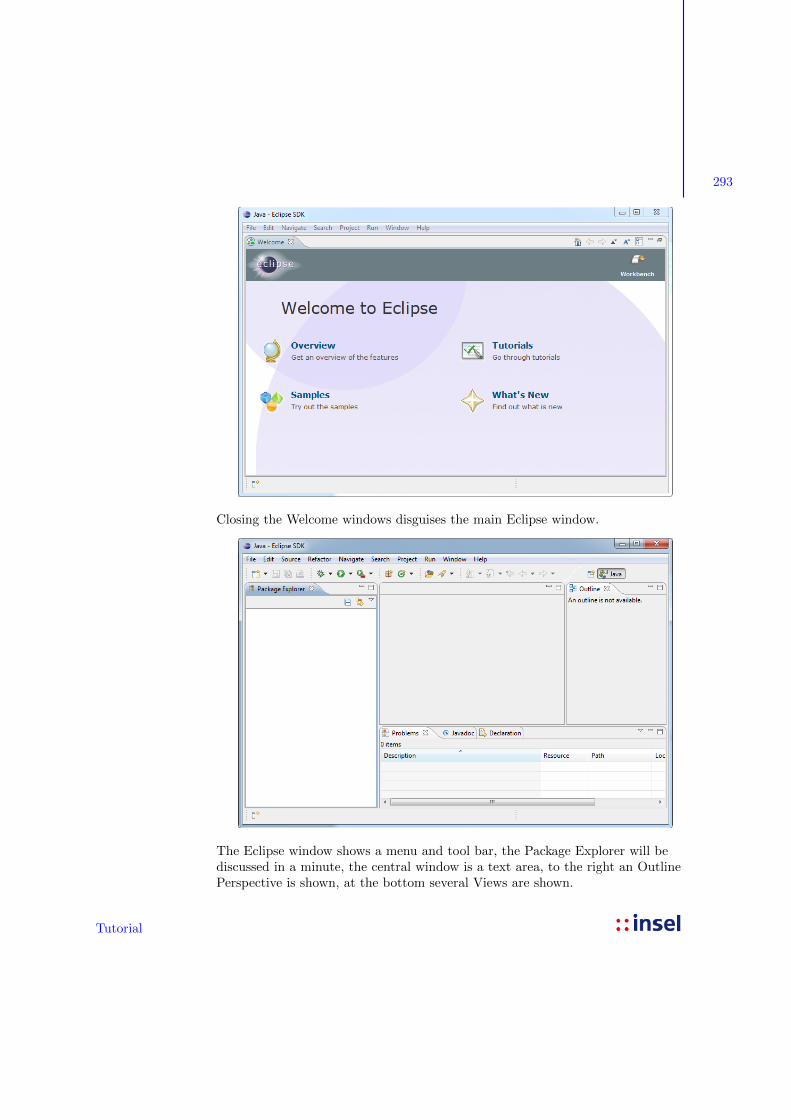
Closing the Welcome windows disguises the main Eclipse window.
The Eclipse window shows a menu and tool bar, the Package Explorer will bediscussed in a minute, the central window is a text area, to the right an OutlinePerspective is shown, at the bottom several Views are shown.
Tutorial

294 12.2 Java project
If you are connected to the Internet via a Proxy server open the dialog Window –Preferences... – General – Network Connections and set the proxy configuration.
12.2 Java project
In order to test the Eclipse installation, start Eclipse – if not already started.Create a new Java project via File – New – Project – Java Project.
The only thing to do here is to give the project a name, helloJava, for instance,and click the Finish button.
The Package Explorer window shows that Eclipse has created a project with thedesired name and a directory named src for the .java source file.
The next idea is to create a new Java class via File – New – Class. At first, thehint that class names in Java should always start with an uppercase letter. So, thenatural name for our first Java class is HelloJava.
Tutorial
295
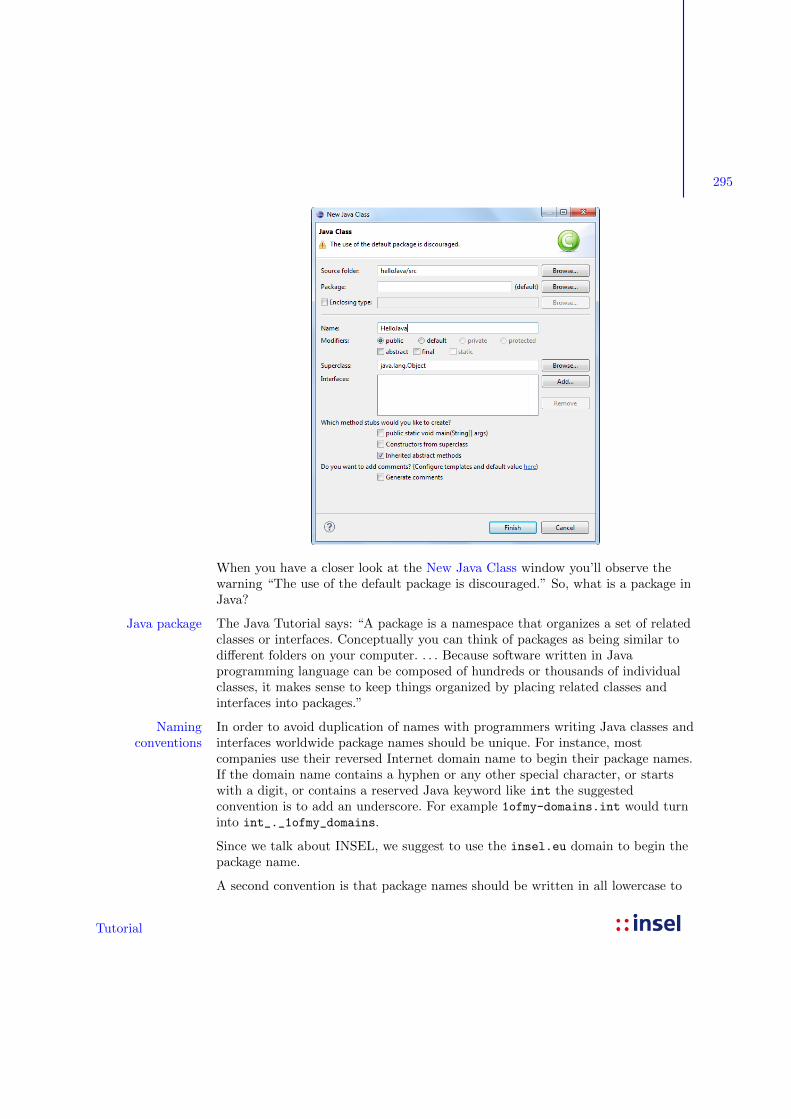
When you have a closer look at the New Java Class window you’ll observe thewarning “The use of the default package is discouraged.” So, what is a package inJava?
The Java Tutorial says: “A package is a namespace that organizes a set of relatedJava packageclasses or interfaces. Conceptually you can think of packages as being similar todifferent folders on your computer. . . . Because software written in Javaprogramming language can be composed of hundreds or thousands of individualclasses, it makes sense to keep things organized by placing related classes andinterfaces into packages.”
In order to avoid duplication of names with programmers writing Java classes andNamingconventions interfaces worldwide package names should be unique. For instance, most
companies use their reversed Internet domain name to begin their package names.If the domain name contains a hyphen or any other special character, or startswith a digit, or contains a reserved Java keyword like int the suggestedconvention is to add an underscore. For example 1ofmy-domains.int would turninto int_._1ofmy_domains.
Since we talk about INSEL, we suggest to use the insel.eu domain to begin thepackage name.
A second convention is that package names should be written in all lowercase to
Tutorial
296 12.2 Java project
avoid conflicts with class or interface names which should always start with anuppercase letter.
In the context of INSEL development, we have reserved the following packagenames for us:
eu.insel.vseit
eu.insel.block
eu.insel.userblock
eu.insel.opensource
If you intend to write a package for use with INSEL, please contact us, so that wecan register your package name. If you intend to write a proprietary package,please name it using your research centers or companies Internet domain, e. g.de.dlr.csp or com.firm.ourpackage.
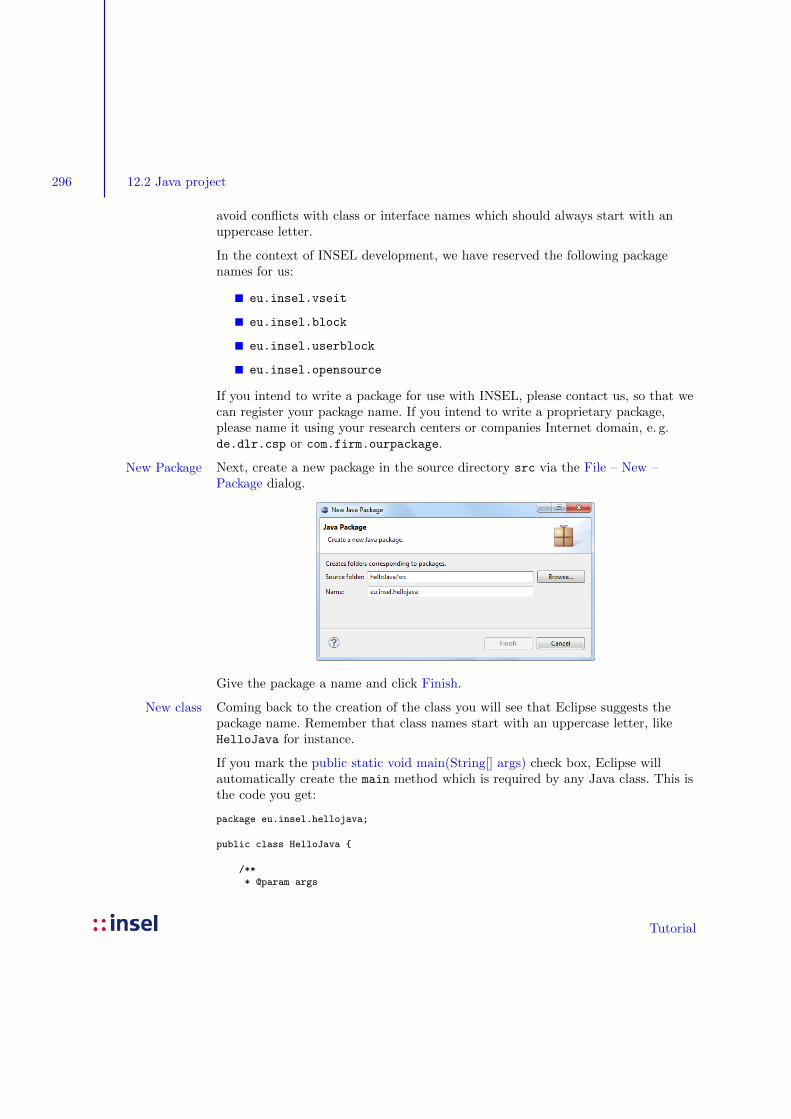
Next, create a new package in the source directory src via the File – New –New PackagePackage dialog.
Give the package a name and click Finish.
Coming back to the creation of the class you will see that Eclipse suggests theNew classpackage name. Remember that class names start with an uppercase letter, likeHelloJava for instance.
If you mark the public static void main(String[] args) check box, Eclipse willautomatically create the main method which is required by any Java class. This isthe code you get:
package eu.insel.hellojava;
public class HelloJava {
/**
* @param args
Tutorial
297
*/
public static void main(String[] args) {
// TODO Auto-generated method stub
}
}
You may now wish to add something like
System.out.println("Hello Java");
to the main method, save the file and press the Run button (the round green onewith the white triangle) and observe how the string Hello Java is displayed in theConsole pane at the bottom of the Eclipse window.
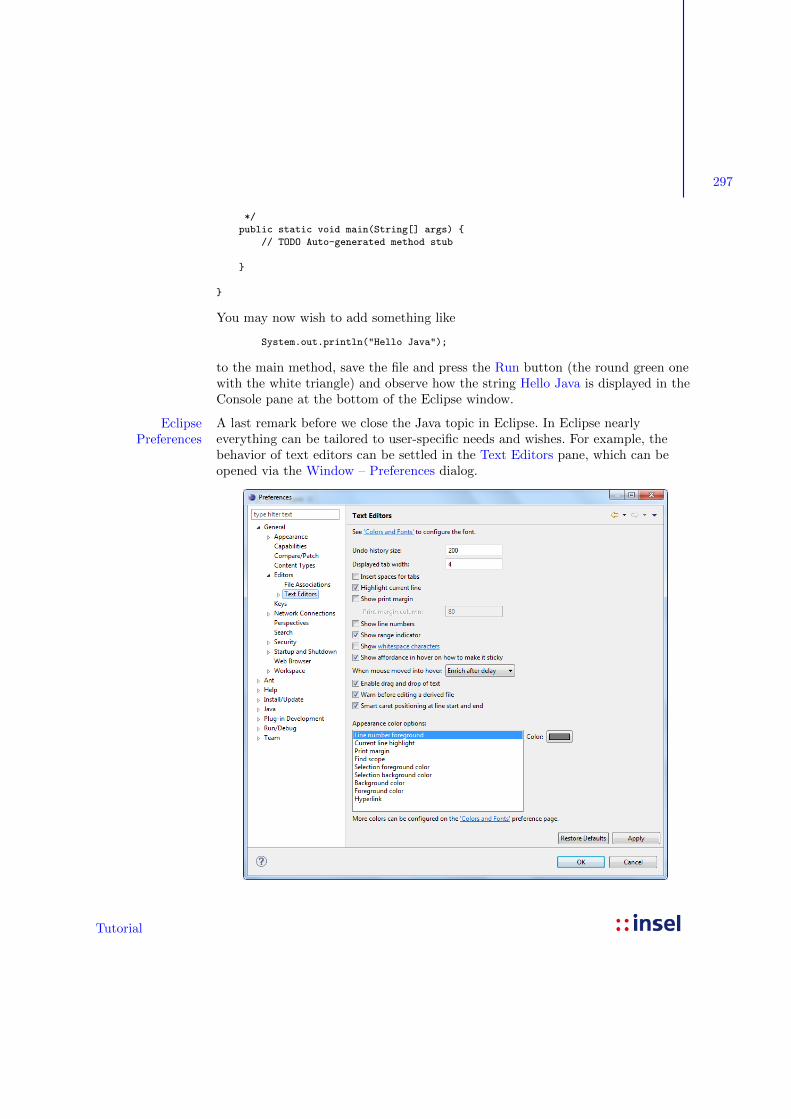
A last remark before we close the Java topic in Eclipse. In Eclipse nearlyEclipsePreferences everything can be tailored to user-specific needs and wishes. For example, the
behavior of text editors can be settled in the Text Editors pane, which can beopened via the Window – Preferences dialog.
Tutorial
298 12.2 Java project
When you examine the generated code in more detail you will see, that theindention of the code lines is four characters by default. However, there aren’t fourblank characters in the code, but tab characters with a displayed width of fourspaces – as defined in the Text Editors pane.
Everybody wishes and has his or her own style. Our style, the INSEL-developerstyle, is to use three bytes and space characters instead of tabs. One reason being,that the complete INSEL documentation is written in LATEX, and LATEX doesn’tlike tabs that much. So we don’t either and recommend to change the Displayedtab width value to 3 and set the Insert spaces for tabs check box.
Line numbers are programmer’s friends. They often help to understand compilermessages better. So you might like to set the Show line numbers check box.
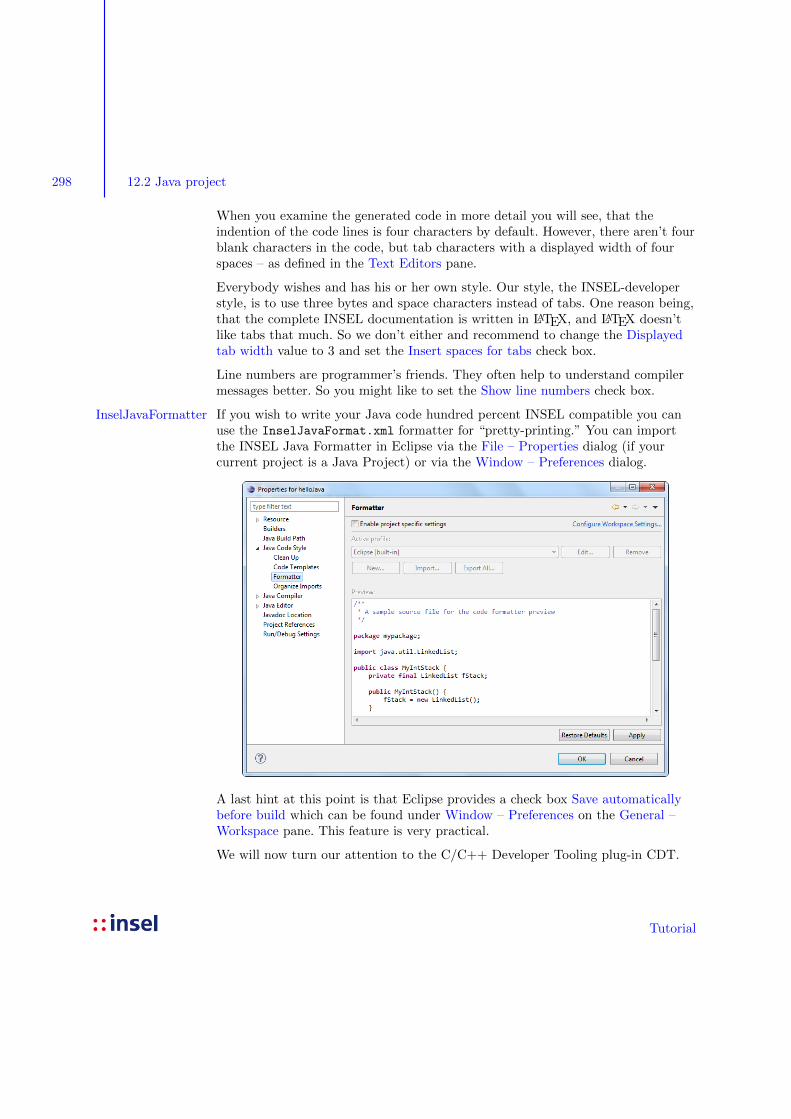
If you wish to write your Java code hundred percent INSEL compatible you canInselJavaFormatteruse the InselJavaFormat.xml formatter for “pretty-printing.” You can importthe INSEL Java Formatter in Eclipse via the File – Properties dialog (if yourcurrent project is a Java Project) or via the Window – Preferences dialog.
A last hint at this point is that Eclipse provides a check box Save automaticallybefore build which can be found under Window – Preferences on the General –Workspace pane. This feature is very practical.
We will now turn our attention to the C/C++ Developer Tooling plug-in CDT.
Tutorial
299
12.3 C/C++ Development Tooling
Eclipse provides much more than just an IDE for Java programmers. Hundreds ofplug-ins are available for all kind of Eclipse extension. For C/C++ programmers,the most important Eclipse plug-in is CDT (C/C++ Development Tooling), aplug-in for the development of C or C++ code. CDT does not include a C orC++ compiler. Therefore, an installation of a C/C++ compiler is a necessaryprerequisite if you want to use CDT. Our preferred candidate is MinGW, asmentioned several times.
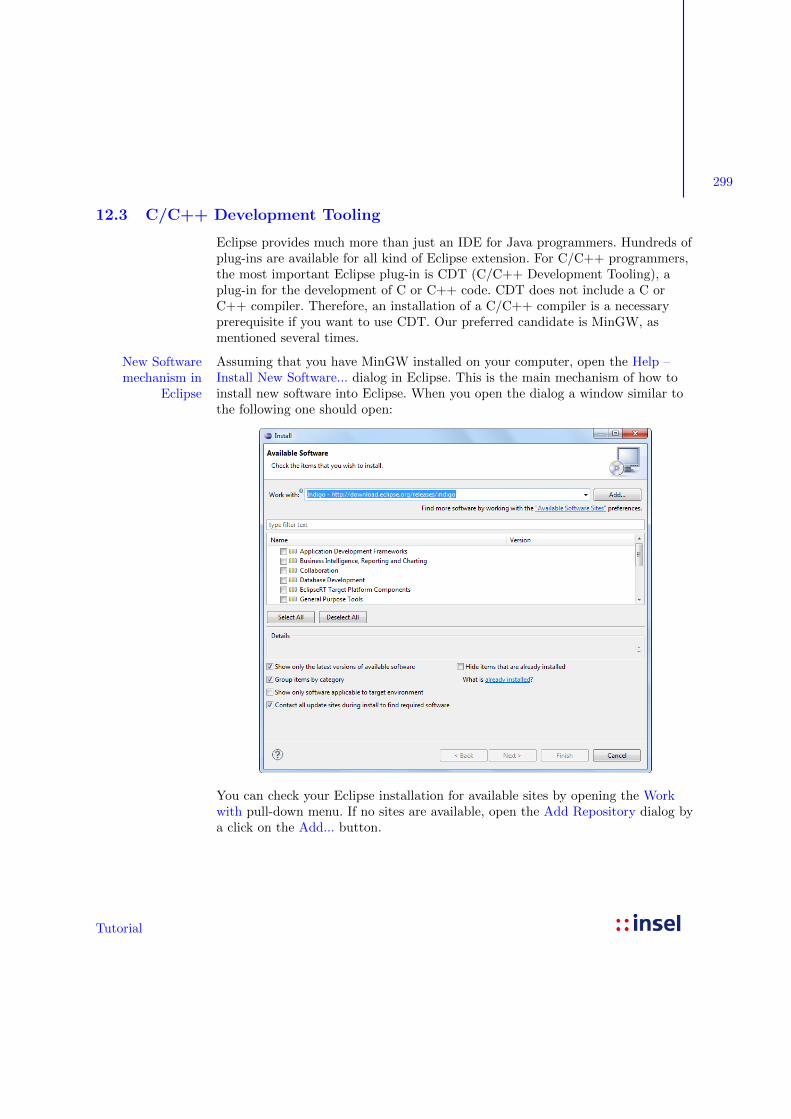
Assuming that you have MinGW installed on your computer, open the Help –New Softwaremechanism in
EclipseInstall New Software... dialog in Eclipse. This is the main mechanism of how toinstall new software into Eclipse. When you open the dialog a window similar tothe following one should open:
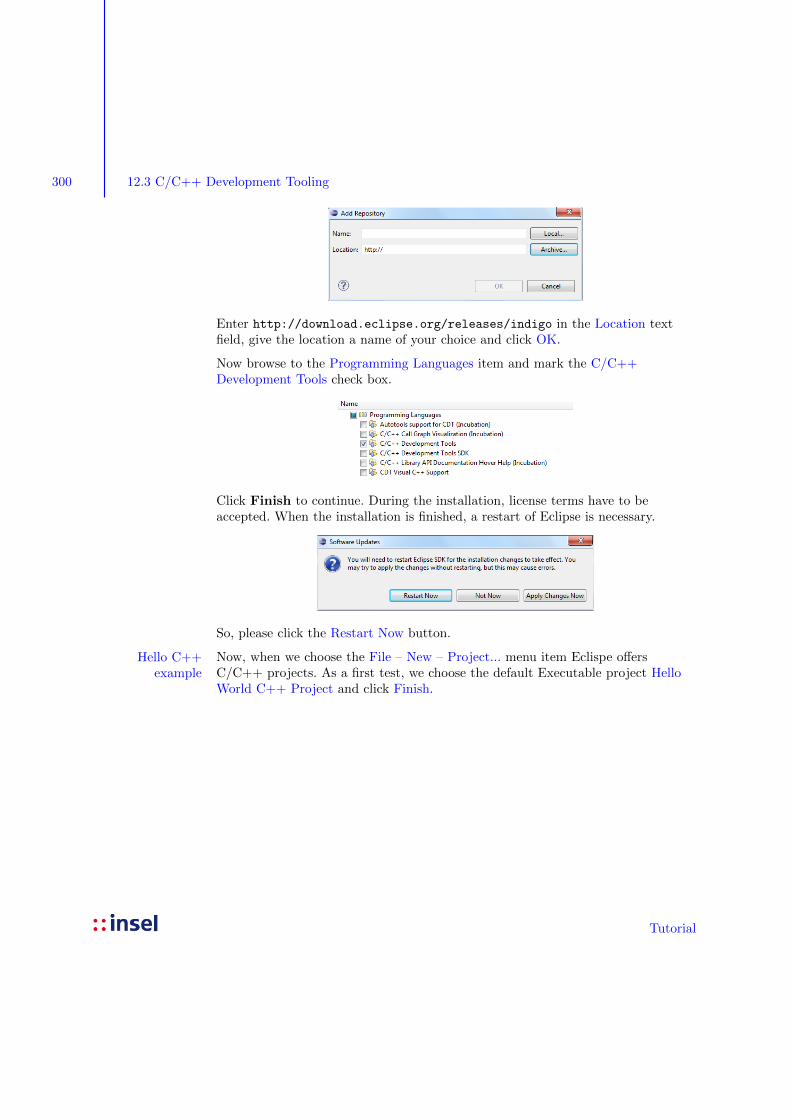
You can check your Eclipse installation for available sites by opening the Workwith pull-down menu. If no sites are available, open the Add Repository dialog bya click on the Add... button.
Tutorial
300 12.3 C/C++ Development Tooling
Enter http://download.eclipse.org/releases/indigo in the Location textfield, give the location a name of your choice and click OK.
Now browse to the Programming Languages item and mark the C/C++Development Tools check box.
Click Finish to continue. During the installation, license terms have to beaccepted. When the installation is finished, a restart of Eclipse is necessary.
So, please click the Restart Now button.
Now, when we choose the File – New – Project... menu item Eclispe offersHello C++example C/C++ projects. As a first test, we choose the default Executable project Hello
World C++ Project and click Finish.
Tutorial

301
Please observe that Eclipse automatically suggests to use the MinGW“Toolchain,” i. e. our pre-installed MinGW gcc compiler installation.
Eclipse suggests to change to the C/C++ perspective, i. e. a view which isadapted to C/C++ programmers. Hence, we agree.
Tutorial
302 12.4 Fortran Development Tools
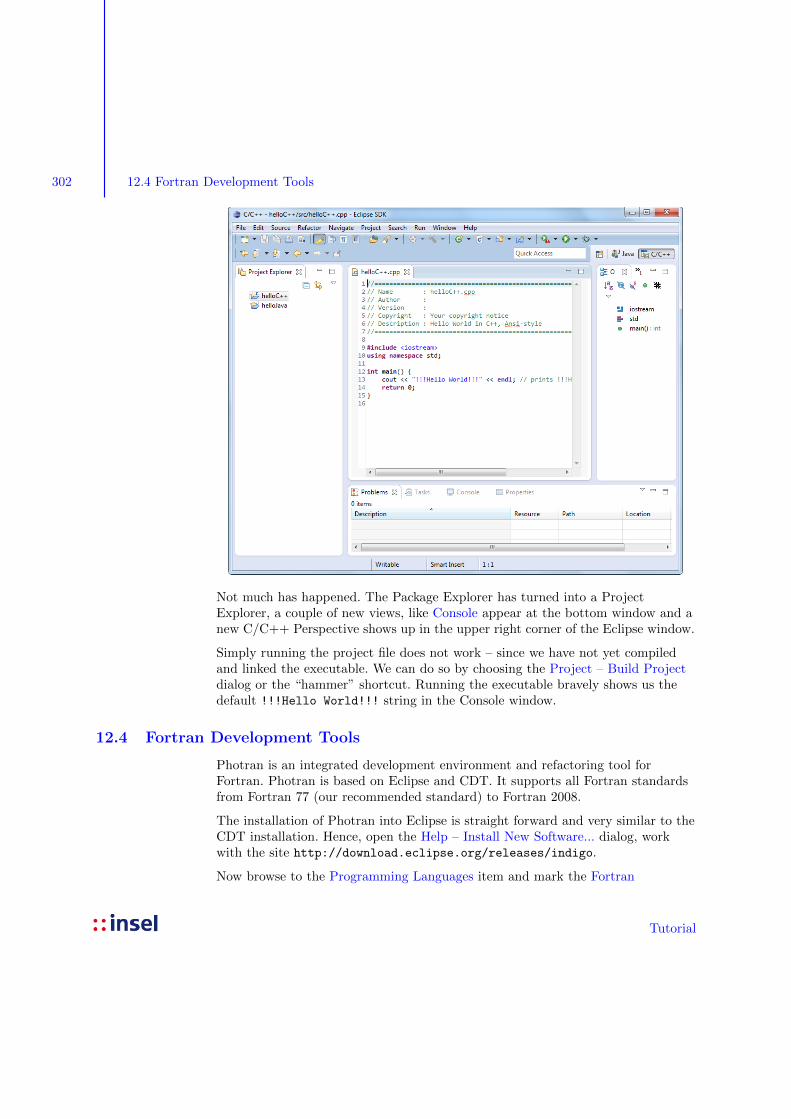
Not much has happened. The Package Explorer has turned into a ProjectExplorer, a couple of new views, like Console appear at the bottom window and anew C/C++ Perspective shows up in the upper right corner of the Eclipse window.
Simply running the project file does not work – since we have not yet compiledand linked the executable. We can do so by choosing the Project – Build Projectdialog or the “hammer” shortcut. Running the executable bravely shows us thedefault !!!Hello World!!! string in the Console window.
12.4 Fortran Development Tools
Photran is an integrated development environment and refactoring tool forFortran. Photran is based on Eclipse and CDT. It supports all Fortran standardsfrom Fortran 77 (our recommended standard) to Fortran 2008.
The installation of Photran into Eclipse is straight forward and very similar to theCDT installation. Hence, open the Help – Install New Software... dialog, workwith the site http://download.eclipse.org/releases/indigo.
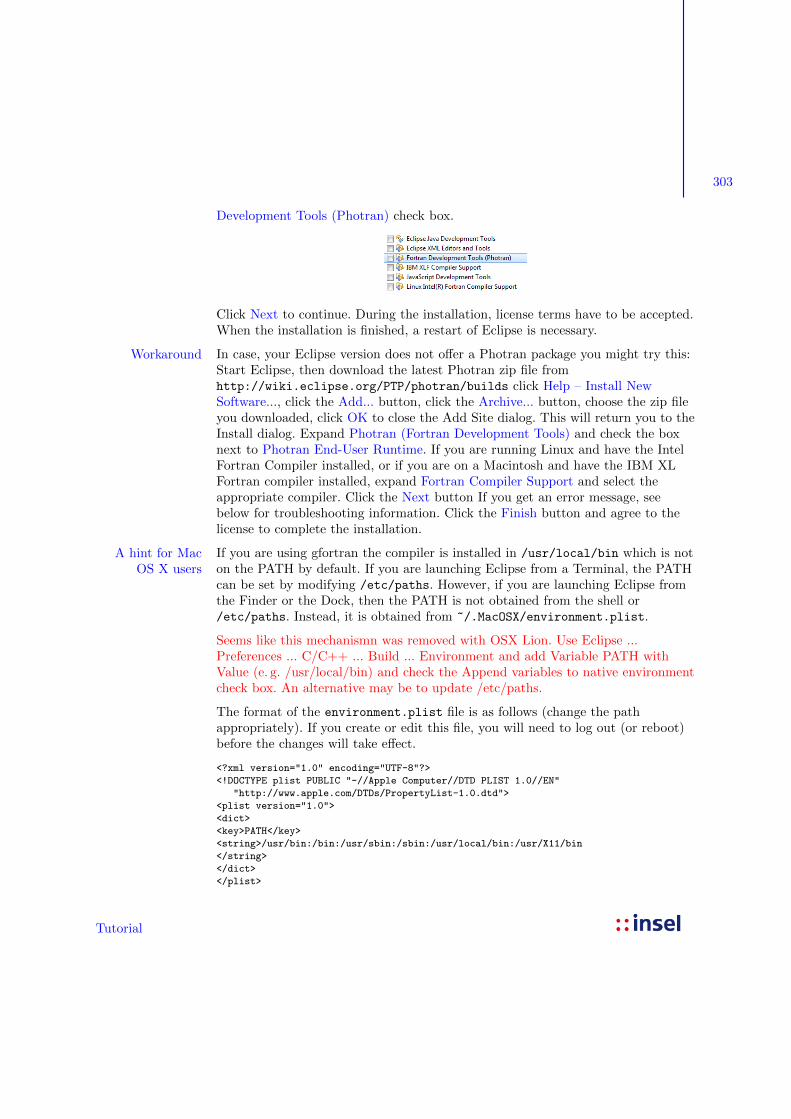
Now browse to the Programming Languages item and mark the Fortran
Tutorial
303
Development Tools (Photran) check box.
Click Next to continue. During the installation, license terms have to be accepted.When the installation is finished, a restart of Eclipse is necessary.
In case, your Eclipse version does not offer a Photran package you might try this:WorkaroundStart Eclipse, then download the latest Photran zip file fromhttp://wiki.eclipse.org/PTP/photran/builds click Help – Install NewSoftware..., click the Add... button, click the Archive... button, choose the zip fileyou downloaded, click OK to close the Add Site dialog. This will return you to theInstall dialog. Expand Photran (Fortran Development Tools) and check the boxnext to Photran End-User Runtime. If you are running Linux and have the IntelFortran Compiler installed, or if you are on a Macintosh and have the IBM XLFortran compiler installed, expand Fortran Compiler Support and select theappropriate compiler. Click the Next button If you get an error message, seebelow for troubleshooting information. Click the Finish button and agree to thelicense to complete the installation.
If you are using gfortran the compiler is installed in /usr/local/bin which is notA hint for MacOS X users on the PATH by default. If you are launching Eclipse from a Terminal, the PATH
can be set by modifying /etc/paths. However, if you are launching Eclipse fromthe Finder or the Dock, then the PATH is not obtained from the shell or/etc/paths. Instead, it is obtained from ~/.MacOSX/environment.plist.
Seems like this mechanismn was removed with OSX Lion. Use Eclipse ...Preferences ... C/C++ ... Build ... Environment and add Variable PATH withValue (e. g. /usr/local/bin) and check the Append variables to native environmentcheck box. An alternative may be to update /etc/paths.
The format of the environment.plist file is as follows (change the pathappropriately). If you create or edit this file, you will need to log out (or reboot)before the changes will take effect.
<?xml version="1.0" encoding="UTF-8"?>
<!DOCTYPE plist PUBLIC "-//Apple Computer//DTD PLIST 1.0//EN"
"http://www.apple.com/DTDs/PropertyList-1.0.dtd">
<plist version="1.0">
<dict>
<key>PATH</key>
<string>/usr/bin:/bin:/usr/sbin:/sbin:/usr/local/bin:/usr/X11/bin
</string>
</dict>
</plist>
Tutorial

304 12.4 Fortran Development Tools
Now, when we choose the File – New – Project... menu item Eclispe offers FortranHello Fortranexample projects. As a first test, we choose the Executable (Gnu Fortran on Windows) and
click Finish. Please observe that Eclipse automatically suggests to use the GCCFortran toolchain.
Now Eclipse suggests to change to the Fortran perspective again, we agree. Wefind the new project helloFortran in the Fortran Projects tree – remembering thathelloC++ and helloJava are not Fortran projects – confusing.
In order to be compatible with the CDT and Java project structure, we create asrc folder for the Fortran sources via File – New – Source Folder and type in theFolder name src.
The next step is to create a new Fortran source file, named helloFortran.f, forexample, via File – New – Source File.
We choose the Default fixed-form Fortran source file template and click Finish.When we try to build the executable – remember the hammer – we get a list of 7errors:
../src/helloFortran.f:1.1: Error: Non-numeric character in statement label at (1)
../src/helloFortran.f:1.1: Error: Unclassifiable statement at (1)
../src/helloFortran.f:2.5: Error: Non-numeric character in statement label at (1)
../src/helloFortran.f:2.5: Error: Unclassifiable statement at (1)
../src/helloFortran.f:3.1: Error: Non-numeric character in statement label at (1)
../src/helloFortran.f:3.1: Error: Unclassifiable statement at (1)
make: *** [src/helloFortran.o] Error 1
Not bad, for a start. What happened? Since we have decided to use the Fortran 77standard in two places, i. e. (i) by using the .f extension and (ii) by choosing thedefault fixed-form Fortran source file template, the gfortran compiler parses forFortran 77 compatible statements. And these start in column 7, as indicated bythe marked sixth column – the column for continuation lines, as you may alreadyknow or remember from our Fortran crash course. Hence, we indent the codecorrespondingly with space characters, recompile and see the errors vanishing.
Tutorial

305
The program is correct but does nothing. So we add the statement
print*,"Hello Fortran!"
recompile and admire the result in the Console window.
Depending on you got here, you might be surprised to see theTroubleshooting!!!Hello World!!! string from our helloC++ example. In this case highlight thehelloFortran project, and click the Run button again. Now Eclipse will display adialog and asks you to select a Run configuration.
Choose Local Fortran Application and click OK. Depending on your installationEclipse offers several configurations.
A double-click on MinGW gdb finally achieves the desired result and we see Hello
Fortran! in the Console pane.
By the way, gdb stands for the Gnu Project Debugger. More about informationDebuggingabout debugging can be found at the project’s web page www.gnu.org/s/gdb, forexample. If you wish to try debugging on the fly, just click the Debug button inEclipe’s toolbar (the little six-leg bug, next to the Run button).
Tutorial
306 12.5 Ruby Development Tools
There is not much to debug in our helloFortran example. In general, debuggingcode is extremely helpful in, yeah, debugging code and locating bugs.
In order to see the debugger work, you must set at least one Breakpoint where youwish the debugger to pause execution. You can do so by a double-click on thecorresponding line margin. A small blue circle appears, indicating that there is abreakpoint. As usual, Eclipse will ask you to confirm a switch of perspective.
And indeed, the execution pauses at the breakpoint and waits for your input,which means that you are “in” the program. When your Fortran program containsvariables, you can observe their current values and many things more.
It is really worthwhile to learn more about debugging – but not here. We will shiftour attention to the next programing language: Ruby.
12.5 Ruby Development Tools
By now it should be straigh forward to install the Ruby tools into Eclipse.
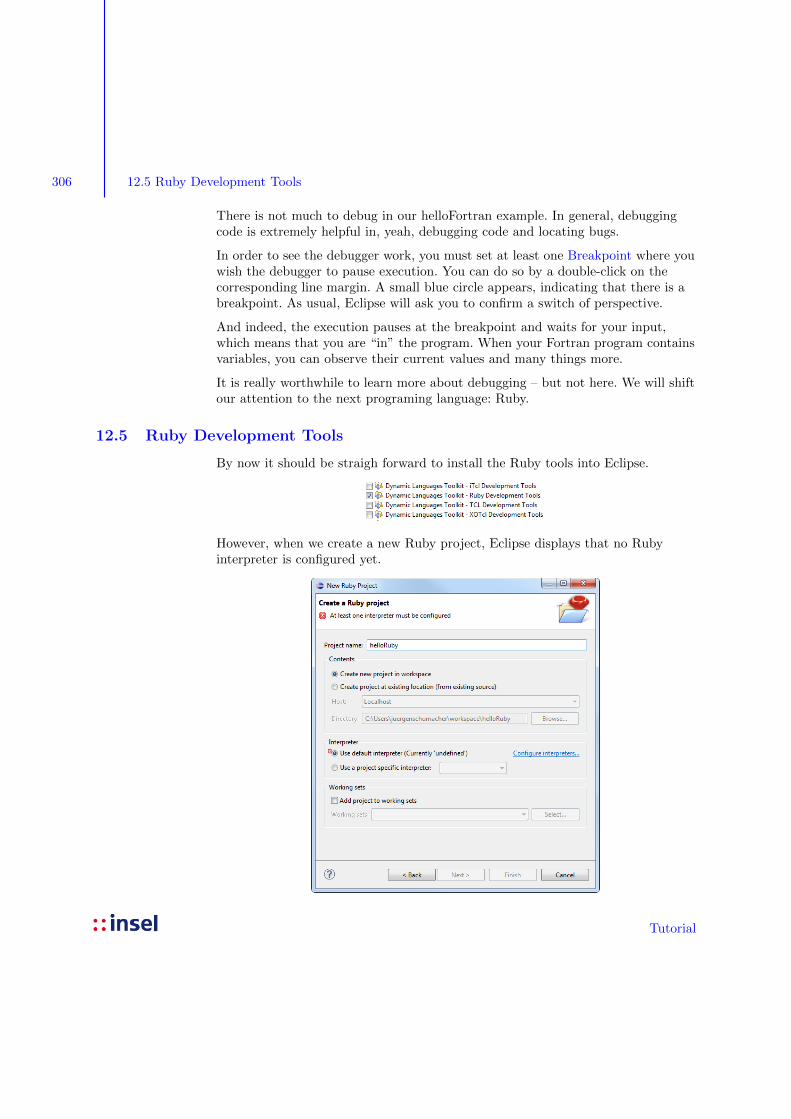
However, when we create a new Ruby project, Eclipse displays that no Rubyinterpreter is configured yet.
Tutorial
307
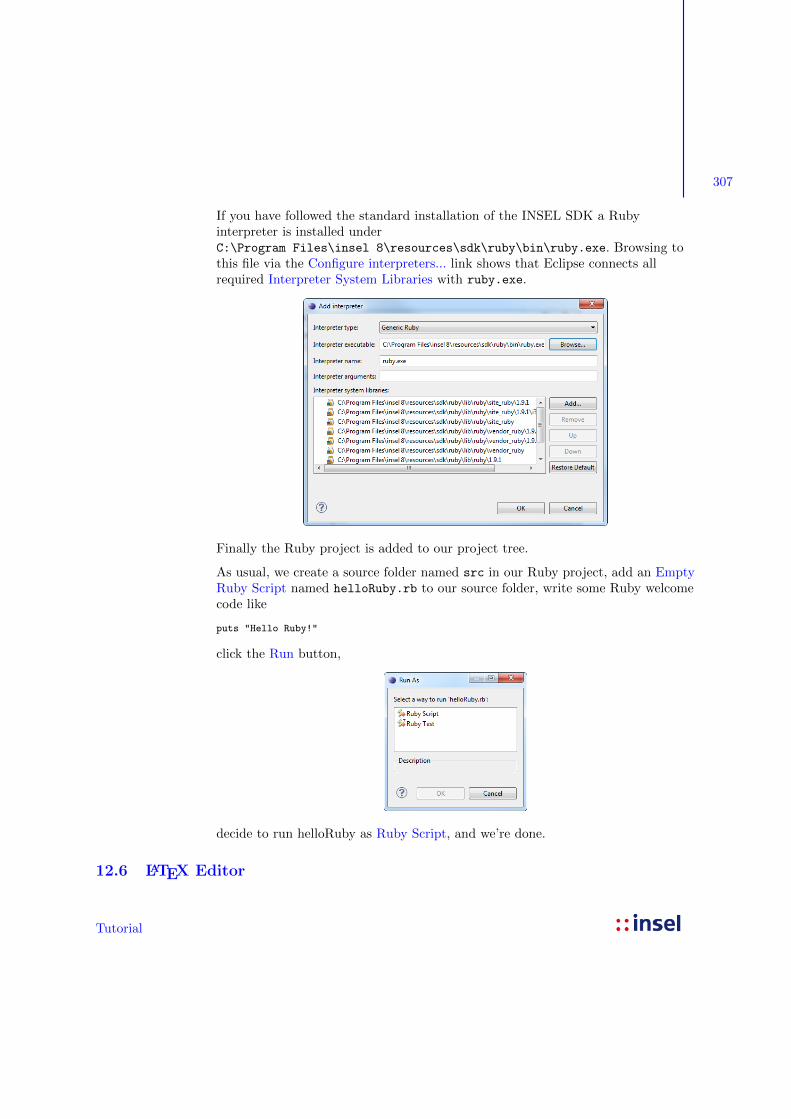
If you have followed the standard installation of the INSEL SDK a Rubyinterpreter is installed underC:\Program Files\insel 8\resources\sdk\ruby\bin\ruby.exe. Browsing tothis file via the Configure interpreters... link shows that Eclipse connects allrequired Interpreter System Libraries with ruby.exe.
Finally the Ruby project is added to our project tree.
As usual, we create a source folder named src in our Ruby project, add an EmptyRuby Script named helloRuby.rb to our source folder, write some Ruby welcomecode like
puts "Hello Ruby!"
click the Run button,
decide to run helloRuby as Ruby Script, and we’re done.
12.6 LATEX Editor
Tutorial
308 12.7 WindowBuilder
So far (November 2011) no LATEX Editor is available for Eclipse. However, aproject with the working name LaPsE is currently in planning state. Ongoingprogress is documented under http://eclipse-latex.sourceforge.net/.
12.7 WindowBuilder
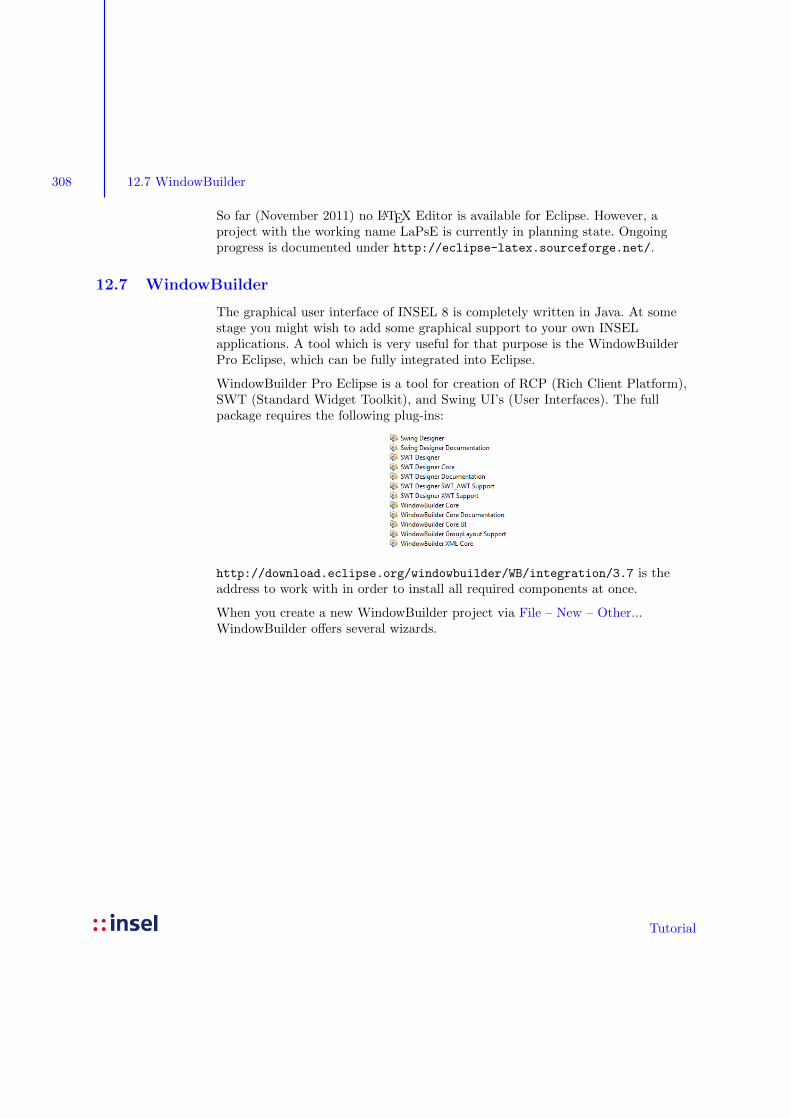
The graphical user interface of INSEL 8 is completely written in Java. At somestage you might wish to add some graphical support to your own INSELapplications. A tool which is very useful for that purpose is the WindowBuilderPro Eclipse, which can be fully integrated into Eclipse.
WindowBuilder Pro Eclipse is a tool for creation of RCP (Rich Client Platform),SWT (Standard Widget Toolkit), and Swing UI’s (User Interfaces). The fullpackage requires the following plug-ins:
http://download.eclipse.org/windowbuilder/WB/integration/3.7 is theaddress to work with in order to install all required components at once.
When you create a new WindowBuilder project via File – New – Other...WindowBuilder offers several wizards.
Tutorial
309
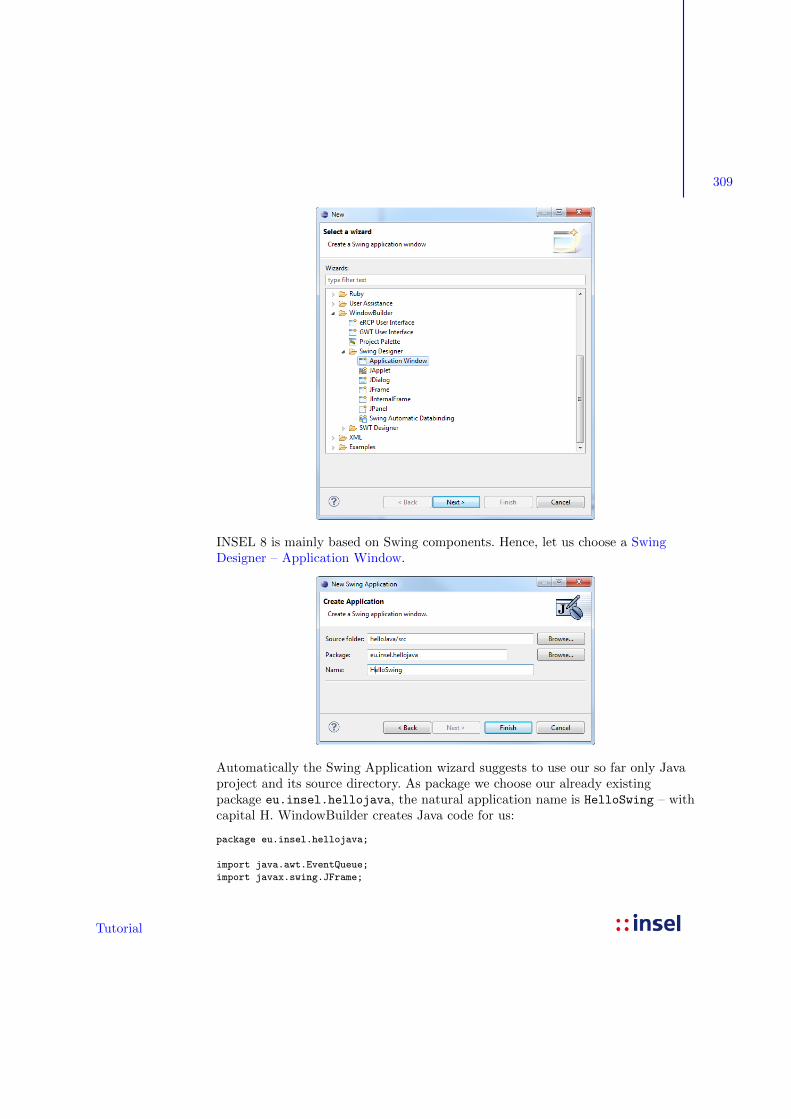
INSEL 8 is mainly based on Swing components. Hence, let us choose a SwingDesigner – Application Window.
Automatically the Swing Application wizard suggests to use our so far only Javaproject and its source directory. As package we choose our already existingpackage eu.insel.hellojava, the natural application name is HelloSwing – withcapital H. WindowBuilder creates Java code for us:
package eu.insel.hellojava;
import java.awt.EventQueue;
import javax.swing.JFrame;
Tutorial
310 12.7 WindowBuilder
public class HelloSwing
{
private JFrame frame;
/**
* Launch the application.
*/
public static void main(String[] args) {
EventQueue.invokeLater(new Runnable() {
public void run() {
try {
HelloSwing window = new HelloSwing();
window.frame.setVisible(true);
} catch (Exception e) {
e.printStackTrace();
}
}
});
}
/**
* Create the application.
*/
public HelloSwing() {
initialize();
}
/**
* Initialize the contents of the frame.
*/
private void initialize() {
frame = new JFrame();
frame.setBounds(100, 100, 450, 300);
frame.setDefaultCloseOperation(JFrame.EXIT_ON_CLOSE);
}
}
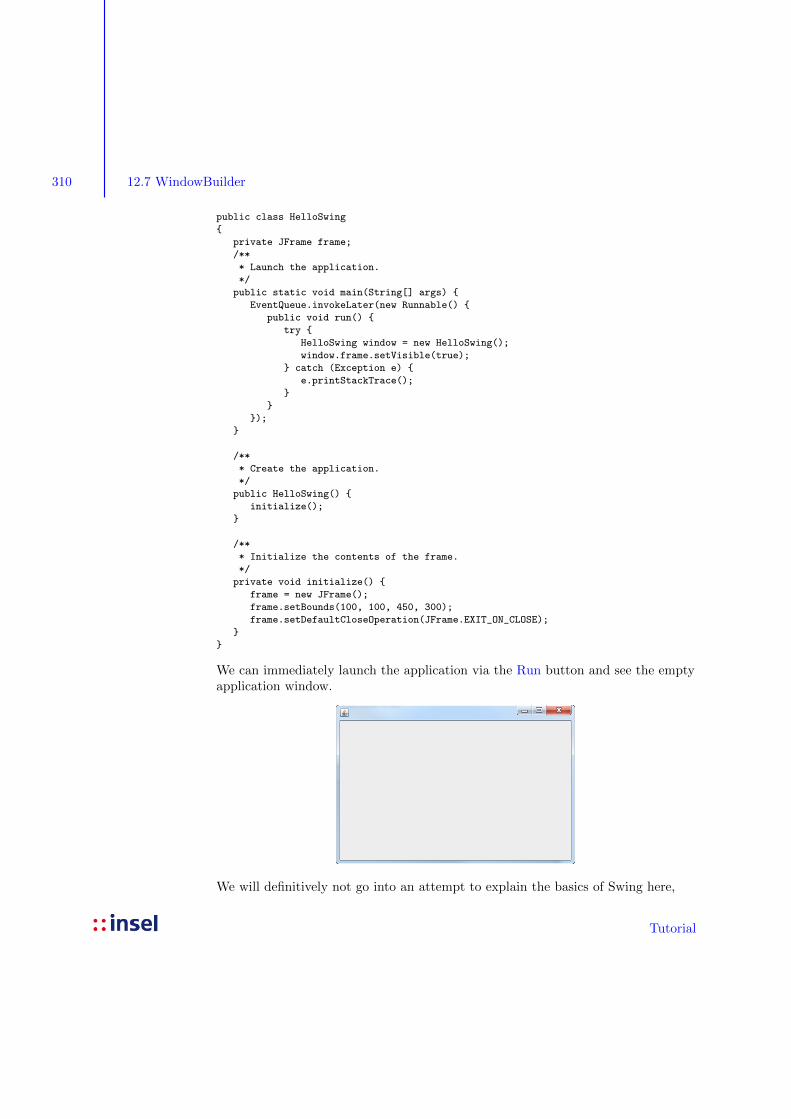
We can immediately launch the application via the Run button and see the emptyapplication window.
We will definitively not go into an attempt to explain the basics of Swing here,
Tutorial
311
but at least, we want to see a Hello Swing! in the window. Hence, we enter theWindowBuilder’s Design window.
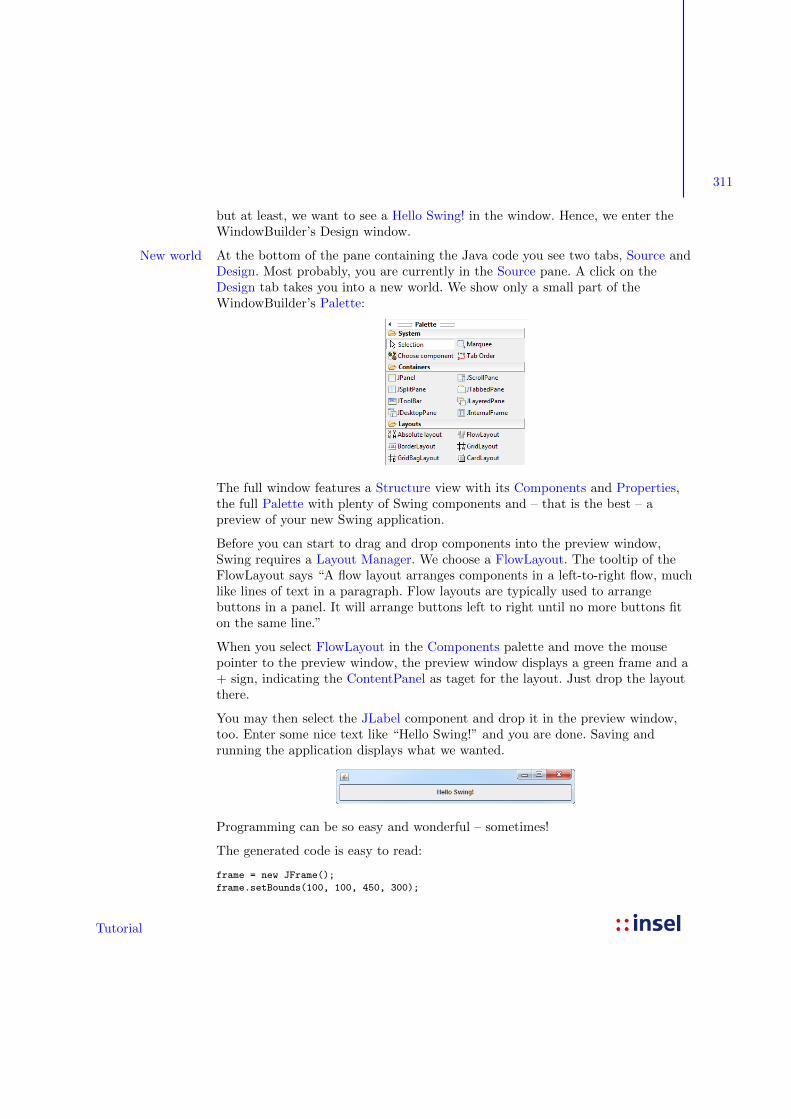
At the bottom of the pane containing the Java code you see two tabs, Source andNew worldDesign. Most probably, you are currently in the Source pane. A click on theDesign tab takes you into a new world. We show only a small part of theWindowBuilder’s Palette:
The full window features a Structure view with its Components and Properties,the full Palette with plenty of Swing components and – that is the best – apreview of your new Swing application.
Before you can start to drag and drop components into the preview window,Swing requires a Layout Manager. We choose a FlowLayout. The tooltip of theFlowLayout says “A flow layout arranges components in a left-to-right flow, muchlike lines of text in a paragraph. Flow layouts are typically used to arrangebuttons in a panel. It will arrange buttons left to right until no more buttons fiton the same line.”
When you select FlowLayout in the Components palette and move the mousepointer to the preview window, the preview window displays a green frame and a+ sign, indicating the ContentPanel as taget for the layout. Just drop the layoutthere.
You may then select the JLabel component and drop it in the preview window,too. Enter some nice text like “Hello Swing!” and you are done. Saving andrunning the application displays what we wanted.
Programming can be so easy and wonderful – sometimes!
The generated code is easy to read:
frame = new JFrame();
frame.setBounds(100, 100, 450, 300);
Tutorial
312 12.8 Subversion (SVN)
frame.setDefaultCloseOperation(JFrame.EXIT_ON_CLOSE);
frame.getContentPane().setLayout(new FlowLayout(FlowLayout.CENTER, 5, 5));
JLabel lblNewLabel = new JLabel("Hello Swing!");
lblNewLabel.setHorizontalAlignment(SwingConstants.LEFT);
frame.getContentPane().add(lblNewLabel);
We stop our excursion to the WindowBuilder tool here. But we’ll come back atthe end of this section, when we use WindowBuilder to create an interface for abrand new INSEL block.
We have gone a long path to reach this point, used four different programminglanguages and could start working on new software. One part, however, is stillmissing and that is Version Control – out next topic.
12.8 Subversion (SVN)
Work on large software projects and/or projects in which more than one developeris involved require proper organization and a software tool for version control.Such a tool is Subversion. The Eclipse support for Subversion is in the hands ofthe Subversive project http://www.eclipse.org/subversive.
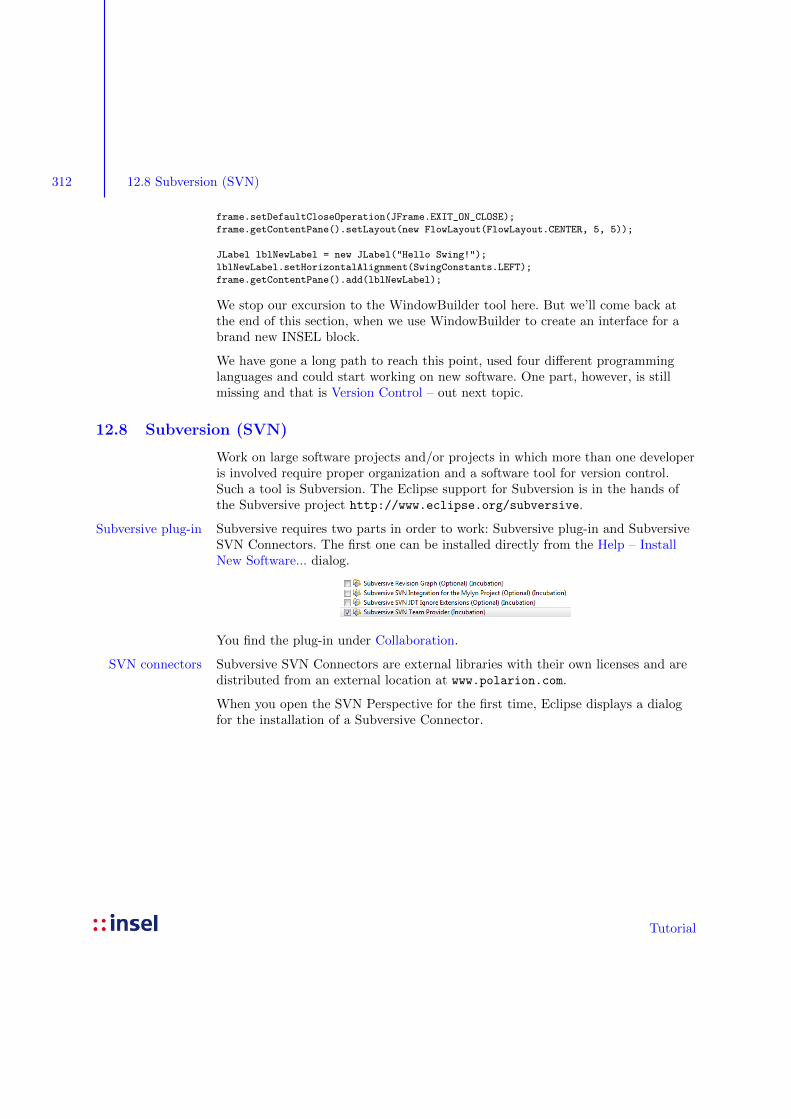
Subversive requires two parts in order to work: Subversive plug-in and SubversiveSubversive plug-inSVN Connectors. The first one can be installed directly from the Help – InstallNew Software... dialog.
You find the plug-in under Collaboration.
Subversive SVN Connectors are external libraries with their own licenses and areSVN connectorsdistributed from an external location at www.polarion.com.
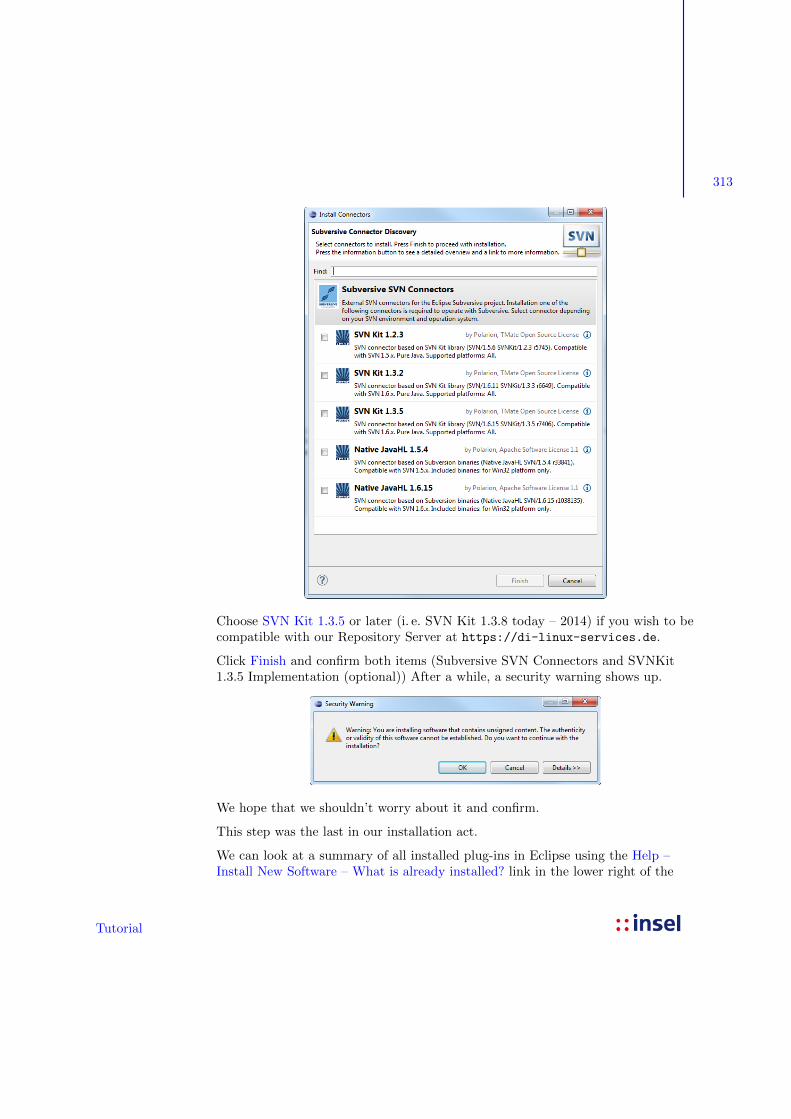
When you open the SVN Perspective for the first time, Eclipse displays a dialogfor the installation of a Subversive Connector.
Tutorial
313
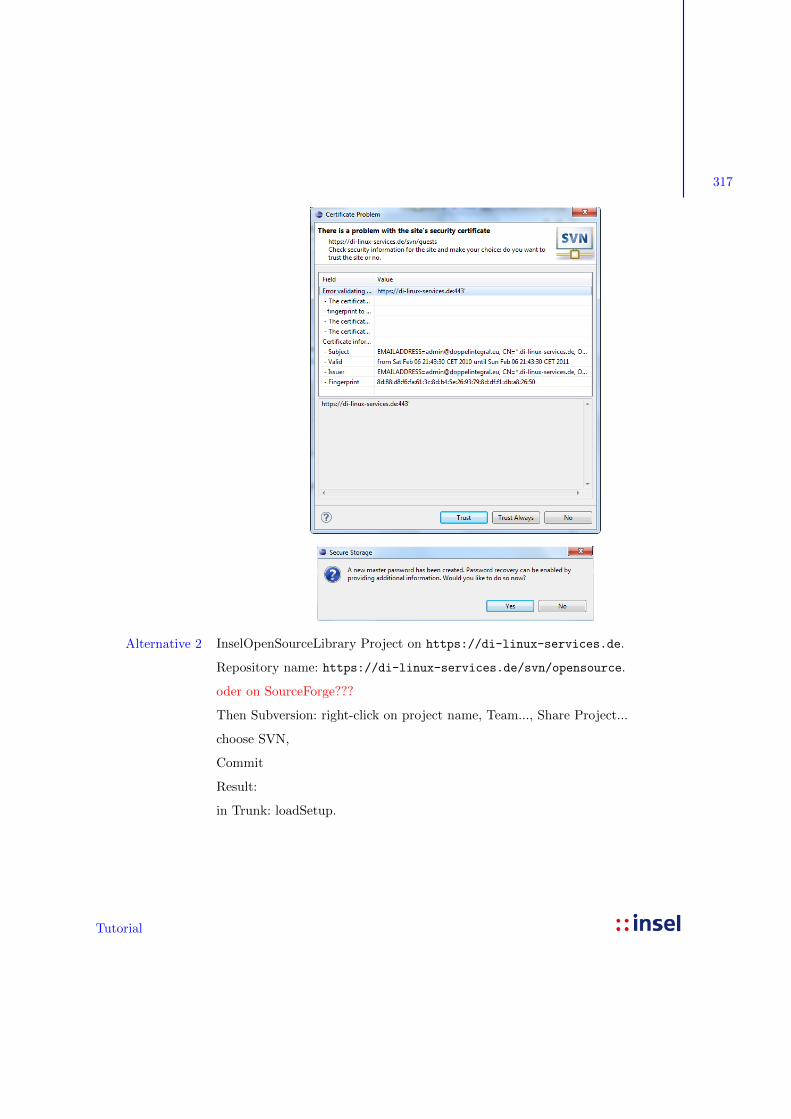
Choose SVN Kit 1.3.5 or later (i. e. SVN Kit 1.3.8 today – 2014) if you wish to becompatible with our Repository Server at https://di-linux-services.de.
Click Finish and confirm both items (Subversive SVN Connectors and SVNKit1.3.5 Implementation (optional)) After a while, a security warning shows up.
We hope that we shouldn’t worry about it and confirm.
This step was the last in our installation act.
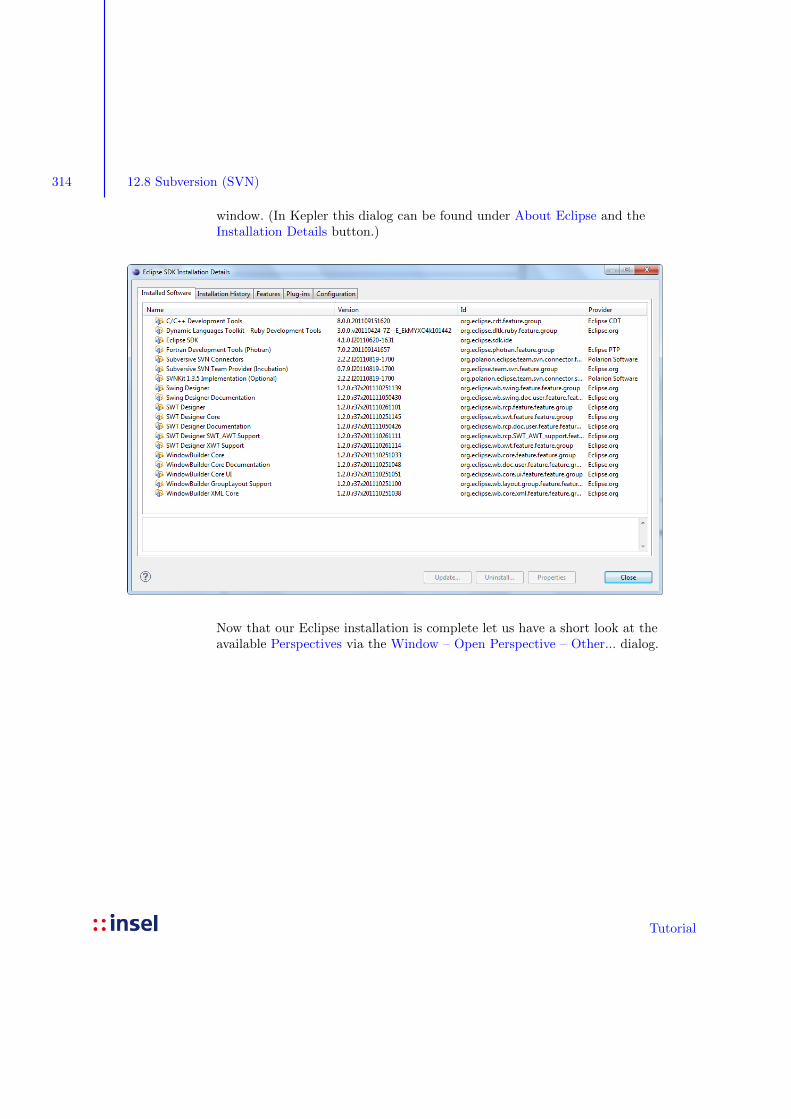
We can look at a summary of all installed plug-ins in Eclipse using the Help –Install New Software – What is already installed? link in the lower right of the
Tutorial
314 12.8 Subversion (SVN)
window. (In Kepler this dialog can be found under About Eclipse and theInstallation Details button.)
Now that our Eclipse installation is complete let us have a short look at theavailable Perspectives via the Window – Open Perspective – Other... dialog.
Tutorial
315
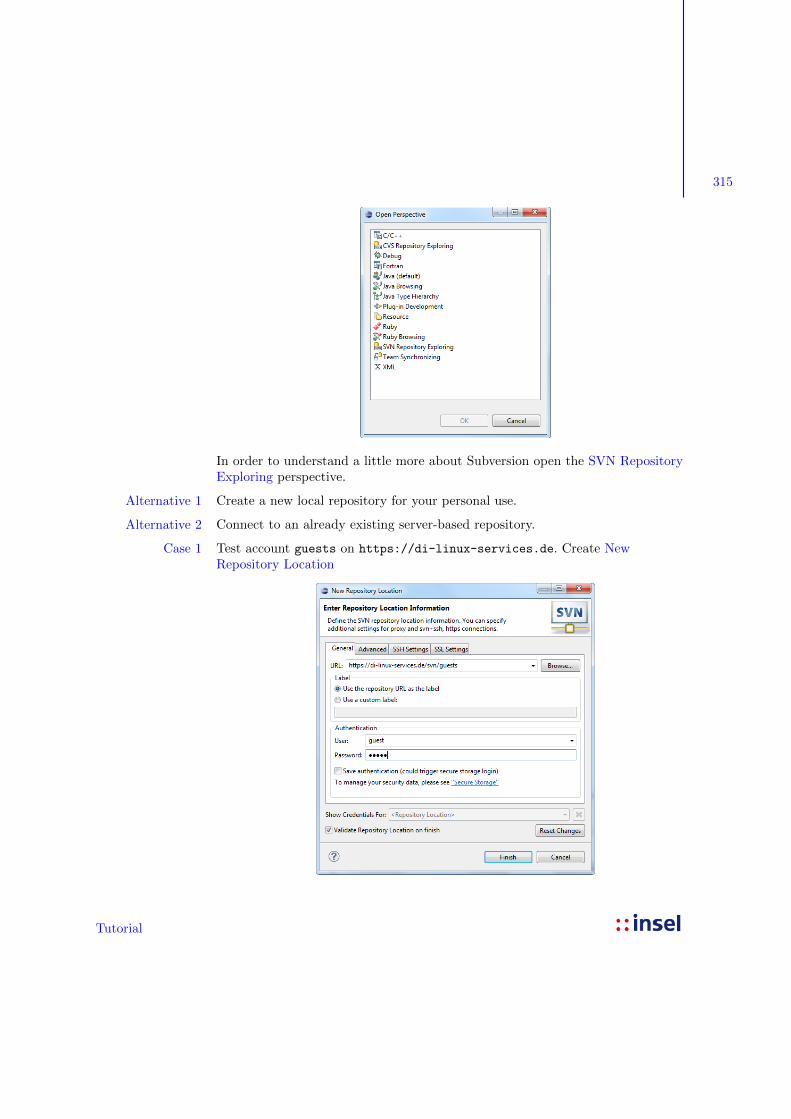
In order to understand a little more about Subversion open the SVN RepositoryExploring perspective.
Create a new local repository for your personal use.Alternative 1
Connect to an already existing server-based repository.Alternative 2
Test account guests on https://di-linux-services.de. Create NewCase 1Repository Location
Tutorial
316 12.8 Subversion (SVN)
Tutorial
317
InselOpenSourceLibrary Project on https://di-linux-services.de.Alternative 2
Repository name: https://di-linux-services.de/svn/opensource.
oder on SourceForge???
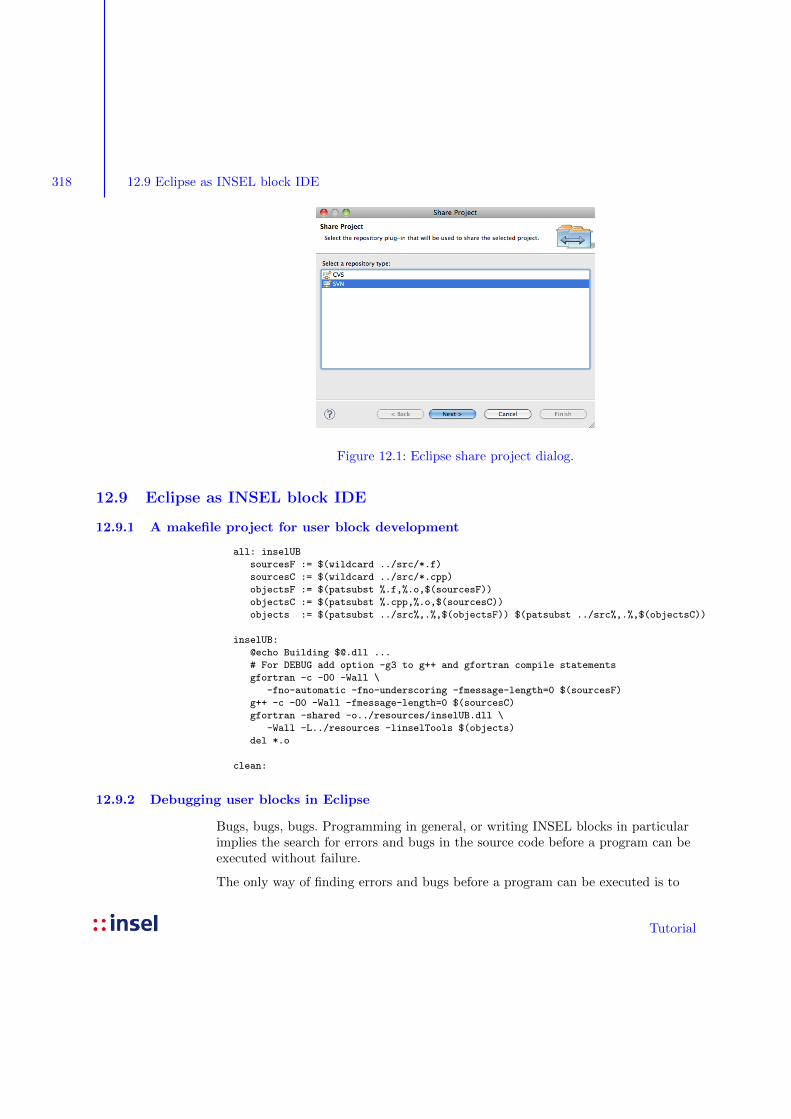
Then Subversion: right-click on project name, Team..., Share Project...
choose SVN,
Commit
Result:
in Trunk: loadSetup.
Tutorial
318 12.9 Eclipse as INSEL block IDE
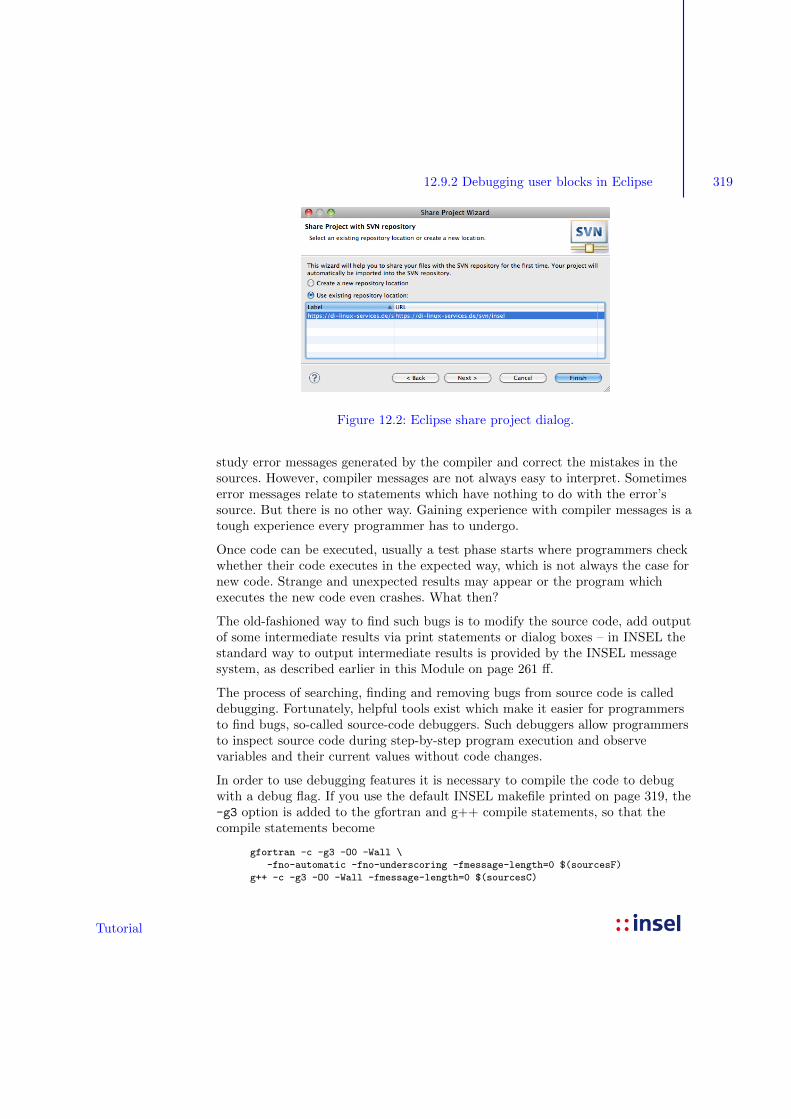
Figure 12.1: Eclipse share project dialog.
12.9 Eclipse as INSEL block IDE
12.9.1 A makefile project for user block development
all: inselUB
sourcesF := $(wildcard ../src/*.f)
sourcesC := $(wildcard ../src/*.cpp)
objectsF := $(patsubst %.f,%.o,$(sourcesF))
objectsC := $(patsubst %.cpp,%.o,$(sourcesC))
objects := $(patsubst ../src%,.%,$(objectsF)) $(patsubst ../src%,.%,$(objectsC))
inselUB:
@echo Building [email protected] ...
# For DEBUG add option -g3 to g++ and gfortran compile statements
gfortran -c -O0 -Wall \
-fno-automatic -fno-underscoring -fmessage-length=0 $(sourcesF)
g++ -c -O0 -Wall -fmessage-length=0 $(sourcesC)
gfortran -shared -o../resources/inselUB.dll \
-Wall -L../resources -linselTools $(objects)
del *.o
clean:
12.9.2 Debugging user blocks in Eclipse
Bugs, bugs, bugs. Programming in general, or writing INSEL blocks in particularimplies the search for errors and bugs in the source code before a program can beexecuted without failure.
The only way of finding errors and bugs before a program can be executed is to
Tutorial
12.9.2 Debugging user blocks in Eclipse 319
Figure 12.2: Eclipse share project dialog.
study error messages generated by the compiler and correct the mistakes in thesources. However, compiler messages are not always easy to interpret. Sometimeserror messages relate to statements which have nothing to do with the error’ssource. But there is no other way. Gaining experience with compiler messages is atough experience every programmer has to undergo.
Once code can be executed, usually a test phase starts where programmers checkwhether their code executes in the expected way, which is not always the case fornew code. Strange and unexpected results may appear or the program whichexecutes the new code even crashes. What then?
The old-fashioned way to find such bugs is to modify the source code, add outputof some intermediate results via print statements or dialog boxes – in INSEL thestandard way to output intermediate results is provided by the INSEL messagesystem, as described earlier in this Module on page 261 ff.
The process of searching, finding and removing bugs from source code is calleddebugging. Fortunately, helpful tools exist which make it easier for programmersto find bugs, so-called source-code debuggers. Such debuggers allow programmersto inspect source code during step-by-step program execution and observevariables and their current values without code changes.
In order to use debugging features it is necessary to compile the code to debugwith a debug flag. If you use the default INSEL makefile printed on page 319, the-g3 option is added to the gfortran and g++ compile statements, so that thecompile statements become
gfortran -c -g3 -O0 -Wall \
-fno-automatic -fno-underscoring -fmessage-length=0 $(sourcesF)
g++ -c -g3 -O0 -Wall -fmessage-length=0 $(sourcesC)
Tutorial
320 12.9 Eclipse as INSEL block IDE
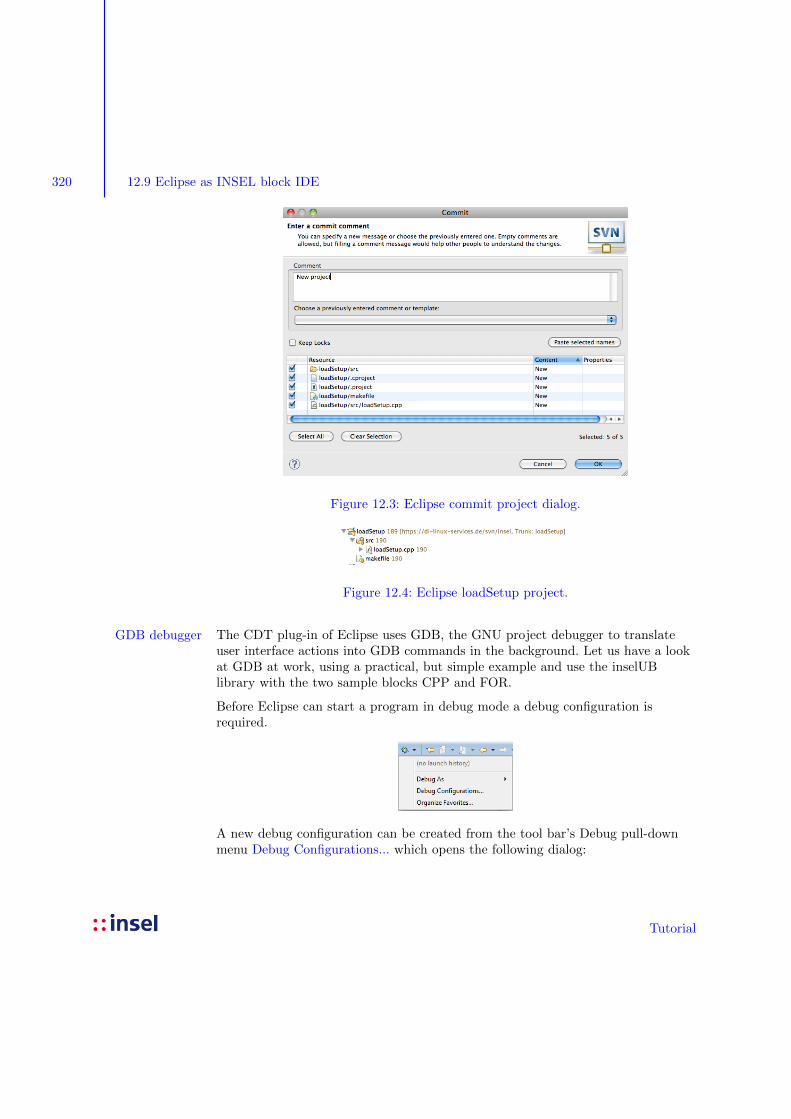
Figure 12.3: Eclipse commit project dialog.
Figure 12.4: Eclipse loadSetup project.
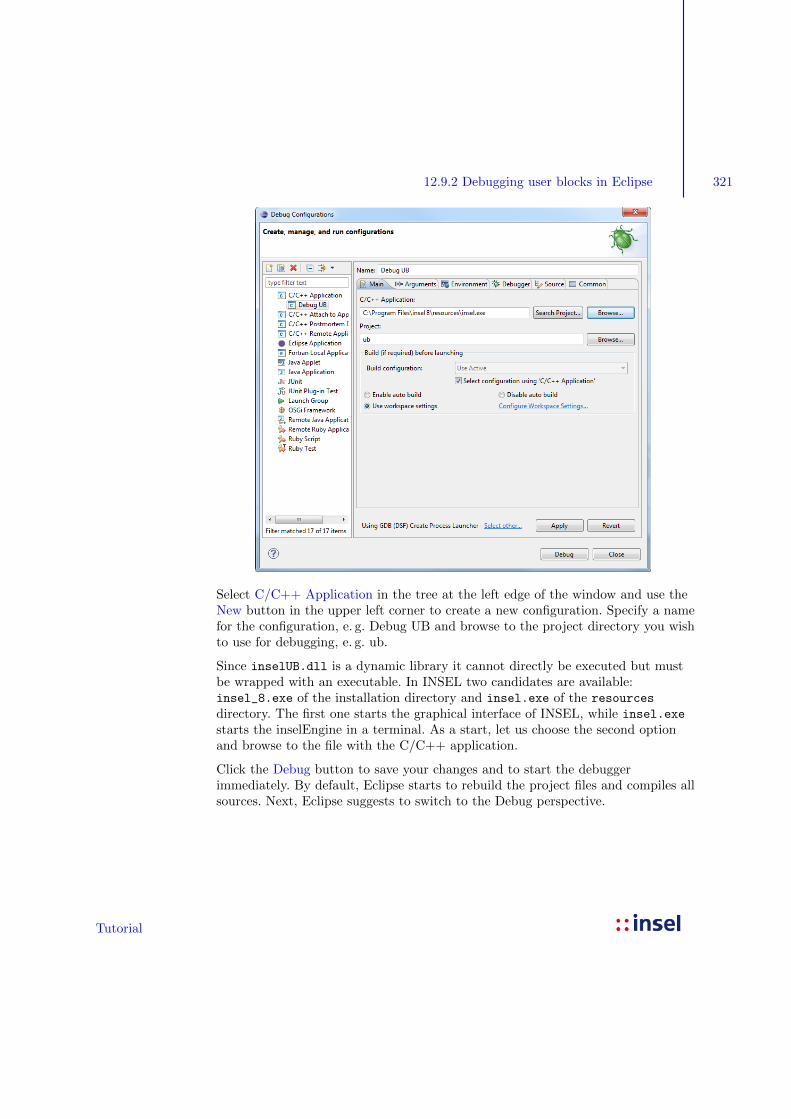
The CDT plug-in of Eclipse uses GDB, the GNU project debugger to translateGDB debuggeruser interface actions into GDB commands in the background. Let us have a lookat GDB at work, using a practical, but simple example and use the inselUBlibrary with the two sample blocks CPP and FOR.
Before Eclipse can start a program in debug mode a debug configuration isrequired.
A new debug configuration can be created from the tool bar’s Debug pull-downmenu Debug Configurations... which opens the following dialog:
Tutorial
12.9.2 Debugging user blocks in Eclipse 321
Select C/C++ Application in the tree at the left edge of the window and use theNew button in the upper left corner to create a new configuration. Specify a namefor the configuration, e. g. Debug UB and browse to the project directory you wishto use for debugging, e. g. ub.
Since inselUB.dll is a dynamic library it cannot directly be executed but mustbe wrapped with an executable. In INSEL two candidates are available:insel_8.exe of the installation directory and insel.exe of the resources
directory. The first one starts the graphical interface of INSEL, while insel.exe
starts the inselEngine in a terminal. As a start, let us choose the second optionand browse to the file with the C/C++ application.
Click the Debug button to save your changes and to start the debuggerimmediately. By default, Eclipse starts to rebuild the project files and compiles allsources. Next, Eclipse suggests to switch to the Debug perspective.
Tutorial
322 12.9 Eclipse as INSEL block IDE
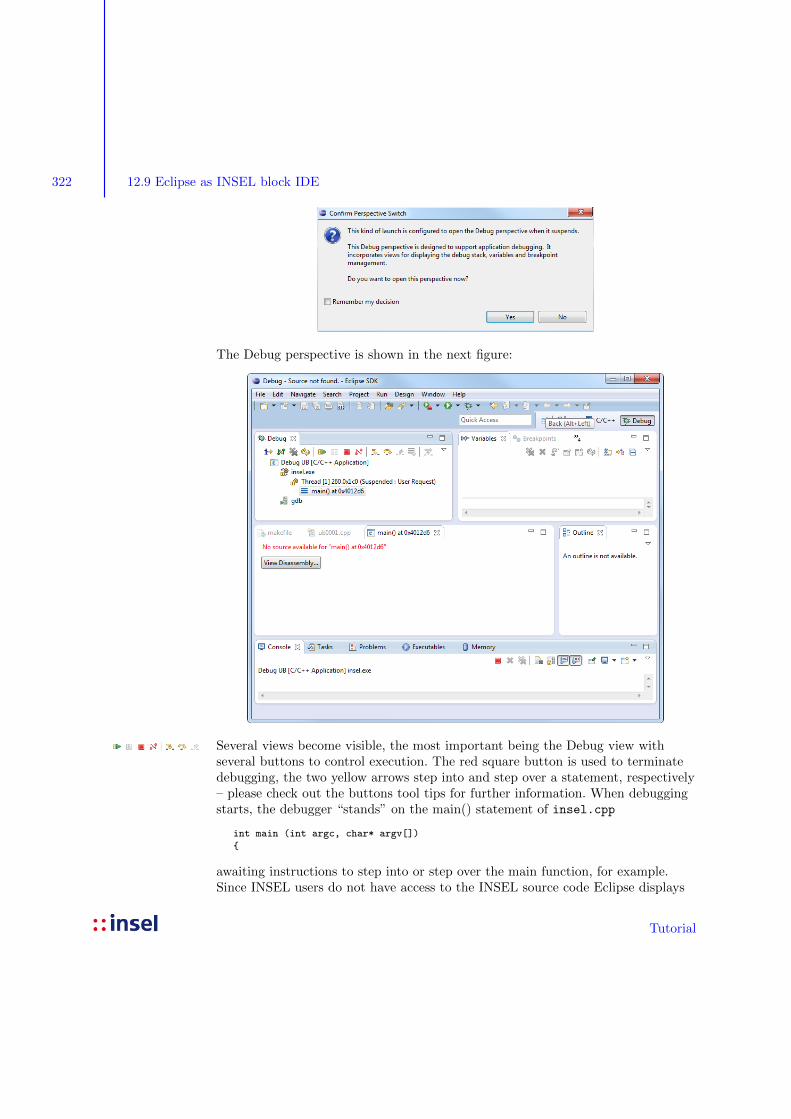
The Debug perspective is shown in the next figure:
Several views become visible, the most important being the Debug view withseveral buttons to control execution. The red square button is used to terminatedebugging, the two yellow arrows step into and step over a statement, respectively– please check out the buttons tool tips for further information. When debuggingstarts, the debugger “stands” on the main() statement of insel.cpp
int main (int argc, char* argv[])
{
awaiting instructions to step into or step over the main function, for example.Since INSEL users do not have access to the INSEL source code Eclipse displays
Tutorial
12.9.2 Debugging user blocks in Eclipse 323
some warnings in the windows’ title bar and in the text editor view. A click on theView Disassemby... button shows some assembler code, like
004012d3: sub $0x28,%esp
004012d6: and $0xfffffff0,%esp
004012d9: mov $0x0,%eax
004012de: add $0xf,%eax
004012e1: add $0xf,%eax
004012e4: shr $0x4,%eax
which is not of much use for most of us. So let’s step into the main function andsee what happens. This is the console output:
(no debugging symbols found)
No source file named ub0001.cpp in loaded symbols.
No source file named ub0001.cpp in loaded symbols.
[New thread 3060.0xe8c]
(no debugging symbols found)
(no debugging symbols found)
(no debugging symbols found)
(no debugging symbols found)
(no debugging symbols found)
Single stepping until exit from function main,
which has no line number information.
Not too interesting. A second click on the Step Into button brings us to the end ofthe main function and ends the debugger. insel.exe displays some text andinforms us about its usage and that a filename is missing:
This is insel 8.2 (c) 1986-2014 doppelintegral GmbH
Missing filename
Usage: insel filename [options]
filename
Any .insel model
[options]
-d Debug mode
-j insel called from Java
-l Show calculation list
-m Show .insel file
-s Syntax check only
Now, you are going to write your first real INSEL model – without the help ofcpp.insel
VSEit. Enter the following lines in a text editor
s 1 const
p 1 17
s 2 cpp 1
p 2 3.14
s 3 screen 1 2
and save the file as cpp.insel for example. The name is arbitrary, but the fileextension has to be .insel. What does the text mean?
Tutorial
324 12.9 Eclipse as INSEL block IDE
As an experienced INSEL user you see three block names: CONST, CPP, and.insel syntax
SCREEN – not case sensitive – and three (arbitrary but unique) user-blocknumbers 1, 2, 3 for the three blocks. The blocks are defined through a leading swhich is short for structure.
A one follows the name of the CPP block which means that the CPP block usesthe first output of block number one as an input. The one and two following thename of the SCREEN block mean that the SCREEN block gets inputs from blocknumber one (the CONST block) and from block number two (the CPP block).
Parameters are assigned to two blocks via p statements (short for parameter). Theconnection between the block and the parameter values is associated through theunique user-block number.
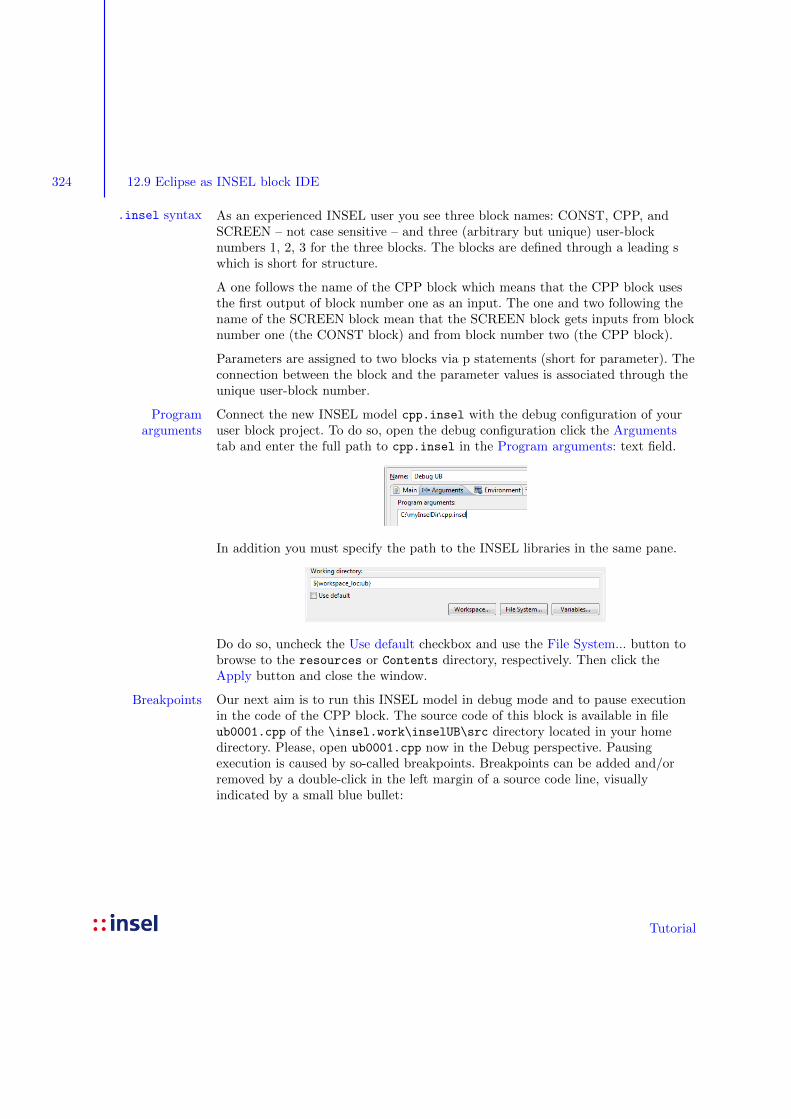
Connect the new INSEL model cpp.insel with the debug configuration of yourProgramarguments user block project. To do so, open the debug configuration click the Arguments
tab and enter the full path to cpp.insel in the Program arguments: text field.
In addition you must specify the path to the INSEL libraries in the same pane.
Do do so, uncheck the Use default checkbox and use the File System... button tobrowse to the resources or Contents directory, respectively. Then click theApply button and close the window.
Our next aim is to run this INSEL model in debug mode and to pause executionBreakpointsin the code of the CPP block. The source code of this block is available in fileub0001.cpp of the \insel.work\inselUB\src directory located in your homedirectory. Please, open ub0001.cpp now in the Debug perspective. Pausingexecution is caused by so-called breakpoints. Breakpoints can be added and/orremoved by a double-click in the left margin of a source code line, visuallyindicated by a small blue bullet:
Tutorial
12.9.2 Debugging user blocks in Eclipse 325
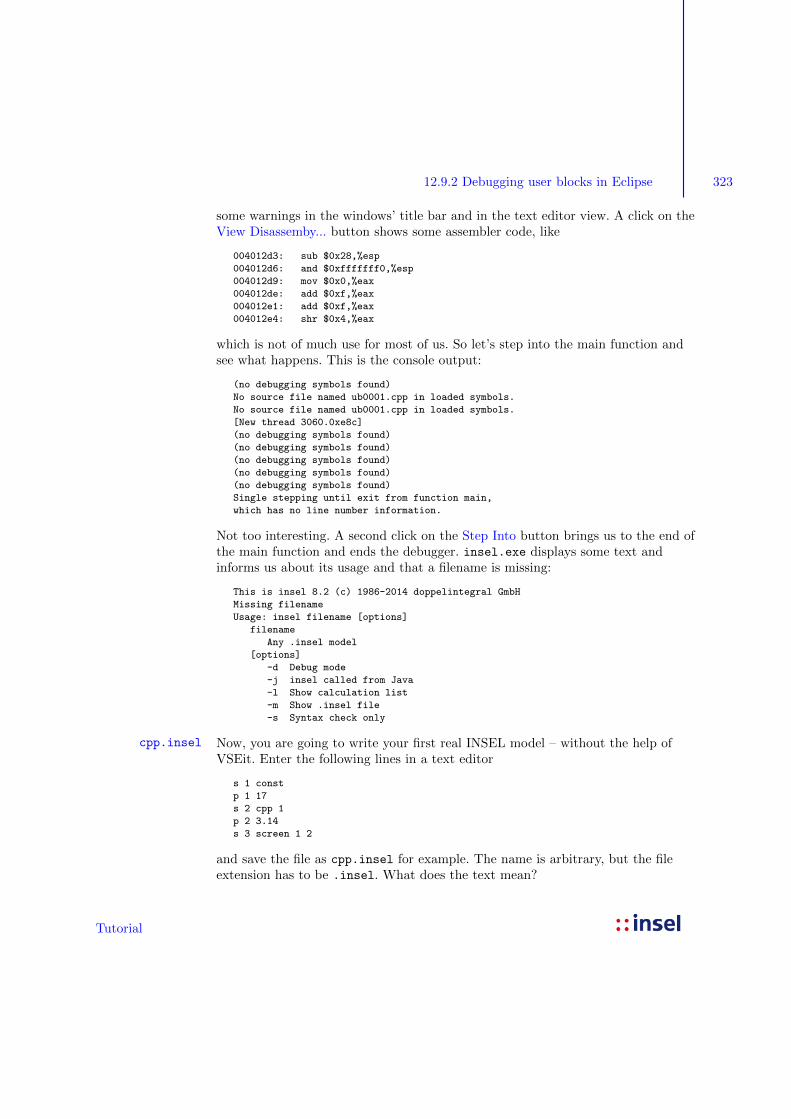
The screenshot shows two breakpoints in ub0001.cpp, one at the if statementwhich checks for non-Standard calls, and one breakpoint at the statement whichsets the first output as sum of first input and first block parameter – in C notationas out[0] etc.
When you run the debug configuration now and click the step-into arrow, thedebugger does not run through the complete program but pauses at the firstbreakpoint that you’ve set at the if statement, indicated by highlighting the codeline.
Now you are free to wander through the code while it is executed – step intostatements, step out of statements, and so on. When you remember, how INSELblocks work, the first stop at if (IP[1] != 0) should result in an identificationcall. You can observe this now by stepping into the if statement.
In conclusion, the first huge advantage of using a debugger is that you can observeProgram flowhow your code “really” executes – sometimes you will see that there is a bigdifference compared to what you “thought” how your code executes.
The second advantage is that you can observe the current values of all variablesCurrent values ofvariables your code uses at any time. The Variables view shows all relevant variables in the
current program status. Have a look at the status of the variables at the very firstbreakpoint stop in ub0001.cpp:
Tutorial
326 12.9 Eclipse as INSEL block IDE
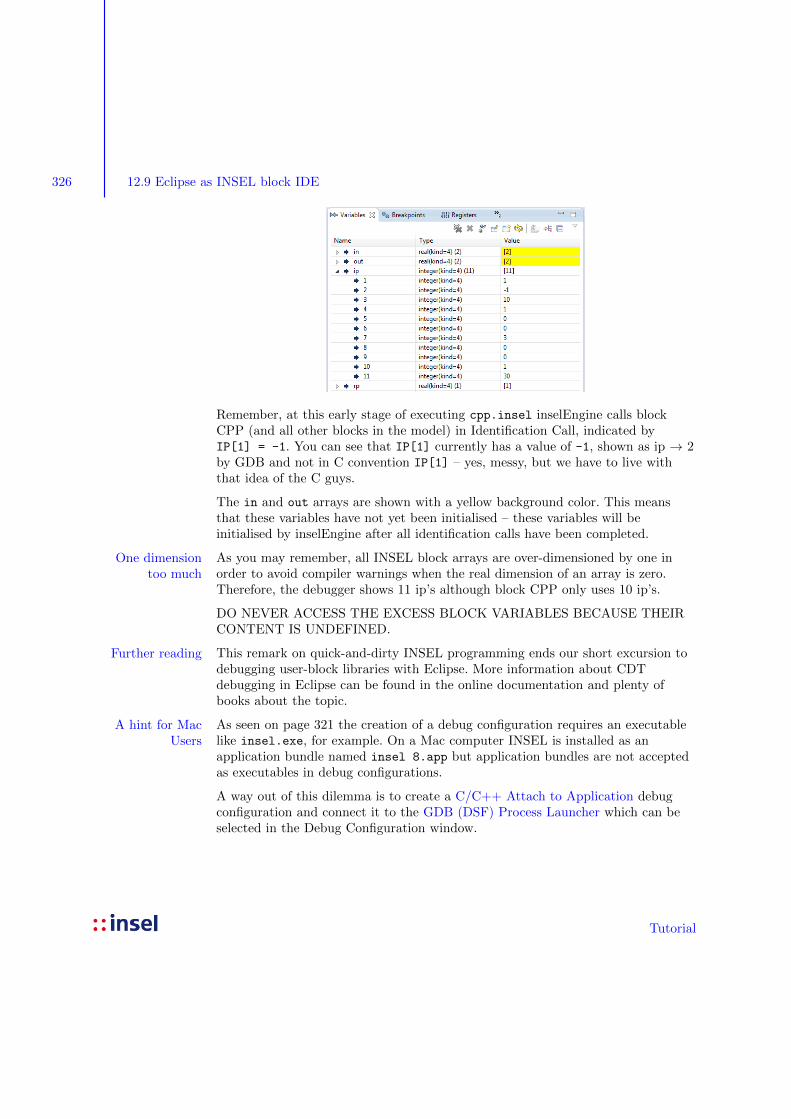
Remember, at this early stage of executing cpp.insel inselEngine calls blockCPP (and all other blocks in the model) in Identification Call, indicated byIP[1] = -1. You can see that IP[1] currently has a value of -1, shown as ip → 2by GDB and not in C convention IP[1] – yes, messy, but we have to live withthat idea of the C guys.
The in and out arrays are shown with a yellow background color. This meansthat these variables have not yet been initialised – these variables will beinitialised by inselEngine after all identification calls have been completed.
As you may remember, all INSEL block arrays are over-dimensioned by one inOne dimensiontoo much order to avoid compiler warnings when the real dimension of an array is zero.
Therefore, the debugger shows 11 ip’s although block CPP only uses 10 ip’s.
DO NEVER ACCESS THE EXCESS BLOCK VARIABLES BECAUSE THEIRCONTENT IS UNDEFINED.
This remark on quick-and-dirty INSEL programming ends our short excursion toFurther readingdebugging user-block libraries with Eclipse. More information about CDTdebugging in Eclipse can be found in the online documentation and plenty ofbooks about the topic.
As seen on page 321 the creation of a debug configuration requires an executableA hint for MacUsers like insel.exe, for example. On a Mac computer INSEL is installed as an
application bundle named insel 8.app but application bundles are not acceptedas executables in debug configurations.
A way out of this dilemma is to create a C/C++ Attach to Application debugconfiguration and connect it to the GDB (DSF) Process Launcher which can beselected in the Debug Configuration window.
Tutorial
12.9.2 Debugging user blocks in Eclipse 327
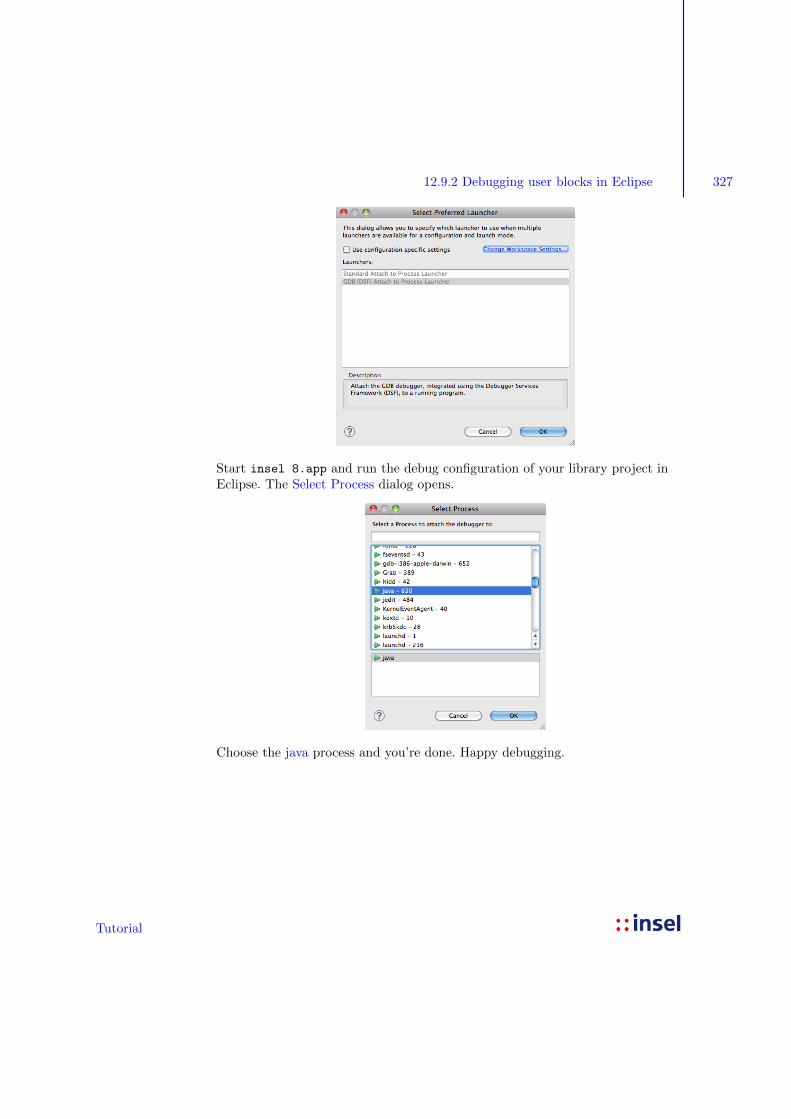
Start insel 8.app and run the debug configuration of your library project inEclipse. The Select Process dialog opens.
Choose the java process and you’re done. Happy debugging.
Tutorial