Installing ArcPad 7 - Esri - GIS Mapping Software, Solutions

50 ArcUser Fall 2009 www.esri.com
Modifying Values in ArcPadLetting field-workers “have it their way”
By Craig Gallant, LJB Inc.
Every good form for field data collection needs some user input. However, no matter the amount of front planning, that field crew worker is always going to want one more choice. With the release of ArcPad 8.0 (which now includes ArcPad Studio), it is a good time to optimize existing code or begin planning more efficient code for new projects. This article assumes you already have a project and want to improve the interaction of users with your form using combo boxes and simple INI files. A ComboBox is a commonly used graphical user interface that is a combination of a drop-down list and a text box. It allows the user to either directly type a value in the field or choose a value from a list. A ComboBox could be used on a form for locating fire hydrants. The names of several types of fire hydrants could be stored in a ComboBox so the user chooses rather than enters the name. Values are added to the ComboBox using the List Values tab. The downside to this approach is that every time a new item needs to be added to the combo box, that change must be made in the office, then saved to each field unit. Another solution might be to use an external list from a database. The advantage with this approach is that values aren’t added to the form. Any database table can be used as a list for the combo box. However, with both approaches, values can’t be easily changed in the field. However, storing all ComboBox values in a list in an INI file will allow users to change the ComboBox values in the field. An INI file is a simple text file with a header in brackets and a list of items. This type of file has been around for a long time. While it might be considered out of date, especially given the popularity of using XML files, an INI file is particularly beneficial in this situation because the end user can open a simple text file editor, such as NotePad, and simply add to the list. The end user doesn’t have to worry about the nodes and structure of an XML file.
While being able to edit the combo boxes outside ArcPad has its merits, there needs to be a way to edit the values inside the program too.
The Solution: Add a Preference FormOne way to edit values in ArcPad is to add a preference form to the application. Here’s how to do it. Open an existing applet or create a new applet. Click the Forms button on the main toolbar. When the Forms dialog box opens, click the Add button to add a generic form to the applet that is not associated with any layer. Because this form isn’t associated with a layer makes it good for a preference form that can be used for several different applications. On the new form, place a label, combo box, check box, text box, and three buttons. This format can be used for multiple pages to help keep a consistent look and feel for the preference dialog box. Now that the controls are on the form, events can be wired up for each control.
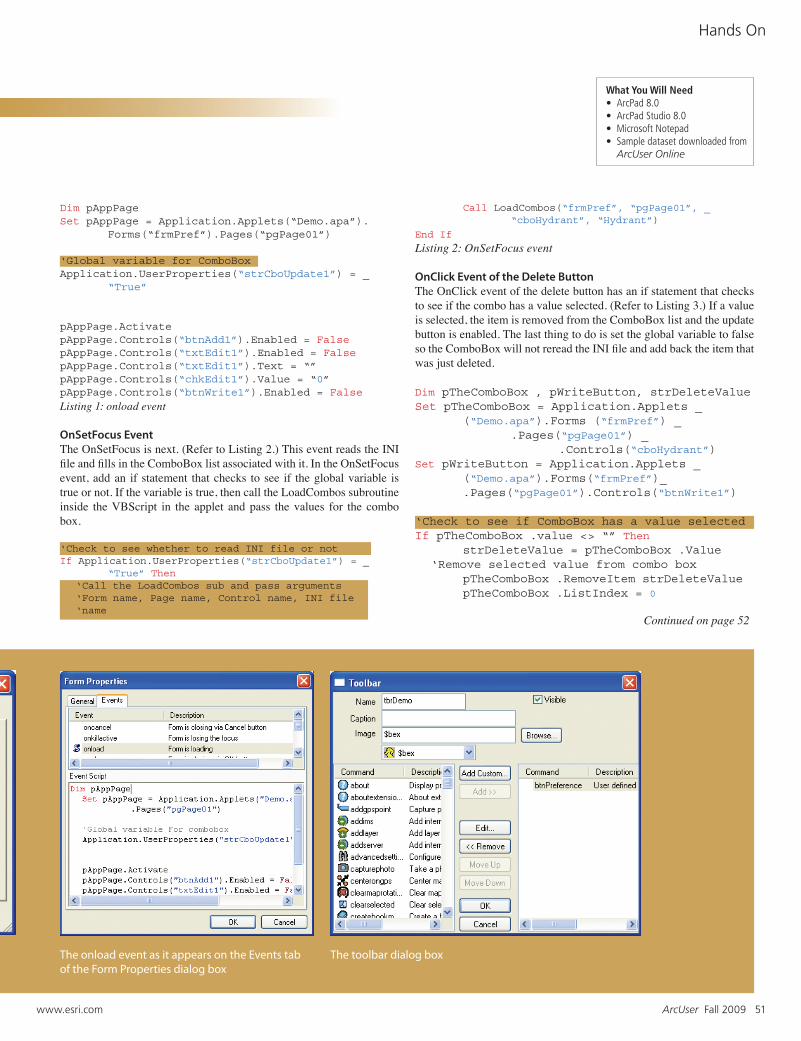
Onload Event for the FormLet’s start with the onload event of the form. (Refer to Listing 1.) First, add a global variable with a value of true. This will be used throughout the form to tell the ComboBox whether to read the INI file every time this control gets the focus. Set the initial status of the controls as shown in Listing 1. Set the enabled property for the Add button, update button, and text box values to false. Then set the check box value to 0. This is the unchecked value.
The properties of the ComboBox controls are shown on the List Values tab.
The Hydrant INI file from the sample application is shown in Microsoft Notepad.
The completed Preferences dialog box.
www.esri.com ArcUser Fall 2009 51
Dim pAppPageSet pAppPage = Application.Applets(“Demo.apa”). Forms(“frmPref”).Pages(“pgPage01”)
‘Global variable for ComboBox Application.UserProperties(“strCboUpdate1”) = _ “True”
pAppPage.ActivatepAppPage.Controls(“btnAdd1”).Enabled = FalsepAppPage.Controls(“txtEdit1”).Enabled = FalsepAppPage.Controls(“txtEdit1”).Text = “”pAppPage.Controls(“chkEdit1”).Value = “0”pAppPage.Controls(“btnWrite1”).Enabled = FalseListing 1: onload event
OnSetFocus EventThe OnSetFocus is next. (Refer to Listing 2.) This event reads the INI file and fills in the ComboBox list associated with it. In the OnSetFocus event, add an if statement that checks to see if the global variable is true or not. If the variable is true, then call the LoadCombos subroutine inside the VBScript in the applet and pass the values for the combo box.
‘Check to see whether to read INI file or not If Application.UserProperties(“strCboUpdate1”) = _ “True” Then ‘Call the LoadCombos sub and pass arguments ‘Form name, Page name, Control name, INI file ‘name
Hands On
What You Will Need• ArcPad8.0• ArcPadStudio8.0• MicrosoftNotepad• Sampledatasetdownloadedfrom ArcUser Online
Call LoadCombos(“frmPref”, “pgPage01”, _ “cboHydrant”, “Hydrant”)
End If
Listing 2: OnSetFocus event
OnClick Event of the Delete Button The OnClick event of the delete button has an if statement that checks to see if the combo has a value selected. (Refer to Listing 3.) If a value is selected, the item is removed from the ComboBox list and the update button is enabled. The last thing to do is set the global variable to false so the ComboBox will not reread the INI file and add back the item that was just deleted.
Dim pTheComboBox , pWriteButton, strDeleteValueSet pTheComboBox = Application.Applets _ (“Demo.apa”).Forms (“frmPref”) _ .Pages(“pgPage01”) _ .Controls(“cboHydrant”)Set pWriteButton = Application.Applets _ (“Demo.apa”).Forms(“frmPref”)_ .Pages(“pgPage01”).Controls(“btnWrite1”)
‘Check to see if ComboBox has a value selectedIf pTheComboBox .value <> “” Then strDeleteValue = pTheComboBox .Value ‘Remove selected value from combo box pTheComboBox .RemoveItem strDeleteValue pTheComboBox .ListIndex = 0
The onload event as it appears on the Events tab of the Form Properties dialog box
The toolbar dialog box
Continued on page 52
52 ArcUser Fall 2009 www.esri.com
‘Enable the save button pWriteButton.Enabled = True
‘Do not reread INI file Application.UserProperties _ (“strCboUpdate1”) = “False”
End If
‘Clear variablesSet pTheComboBox = NothingSet pWriteButton = NothingSet strDeleteValue = NothingListing 3: OnClick event of the Delete button
OnClick Event for the Update ButtonThe update button writes the INI file from the list in the combo box. (Refer to Listing 4.) In the OnClick event of the update button, add the call to the WritePrefs subroutine in the applet’s VBScript to pass it the values for the INI file. Next, set the update button to enabled and its value to false. This is done so the event cannot be called again until something changes.
Dim pWriteButtonSet pWriteButton = Application.Applets _ (“Demo.apa”).Forms(“frmPref”)_ .Pages(“pgPage01”)_ .Controls(“btnWrite1”)
‘Call the WritePrefs sub and pass arguments‘Form name, Page name, Control name, INI file ‘name, Header titleCall WritePrefs(“frmPref”, “pgPage01”, _ “cboHydrant”, “Hydrant”, “Hydrant”)
‘Disable the save buttonpWriteButton.Enabled = False
‘Clear variablesSet pWriteButton = NothingListing 4: OnClick event for the Update button
OnClick Event for the Check BoxThe check box OnClick event enables the text box to be editable. (Refer to Listing 5.) Modify the check box by adding an if statement to verify if the value has been checked. If the value is checked, the enabled value is set to true for the text box and the add button. If the value is false, the enabled value is set to false for the text box and the add button.
Dim pTheCheckBox, pTheTextBox, pAddButtonSet pTheCheckBox = Application.Applets _ (“Demo.apa”).Forms(“frmPref”)_ .Pages(“pgPage01”) _ .Controls(“chkEdit1”)Set pTheTextBox = Application.Applets _ (“Demo.apa”).Forms(“frmPref”)_
Modifying Values in ArcPadContinued from page 51
.Pages(“pgPage01”) _ .Controls(“txtEdit1”)Set pAddButton = Application.Applets_ (“Demo.apa”).Forms(“frmPref”)_ .Pages(“pgPage01”) _ .Controls(“btnAdd1”)
If pTheCheckBox.Value = ‘Enable the textbox and the add button pAddButton.Enabled = True pTheTextBox.Enabled = TrueElse ‘Disable the textbox and the add button pAddButton.Enabled = False pTheTextBox.Text = “” pTheTextBox.Enabled = FalseEnd If
‘Clear variablesSet pTheCheckBox = NothingSet pTheTextBox = NothingSet pAddButton = NothingListing 5: OnClick event for the check box
OnClick Event for the Add ButtonThe last thing on this form is the OnClick event for the add button. (Refer to Listing 6.) Add an if statement to verify if the text box has a value. If the text box contains a value, add that value to the list for the ComboBox and clear the value from the text box. Next, enable the Update button and set the global variable to false so the ComboBox will not reread the INI file and erase the value that was just added.
Dim pTheComboBox , pTheTextBox, pWriteButton, _ strAddValueSet pTheComboBox = Application.Applets _ (“Demo.apa”).Forms(“frmPref”)_ .Pages(“pgPage01”) _ .Controls(“cboHydrant”)Set pTheTextBox = Application.Applets _ (“Demo.apa”).Forms(“frmPref”)_ .Pages(“pgPage01”) _ .Controls(“txtEdit1”)Set pWriteButton = Application.Applets _ (“Demo.apa”).Forms(“frmPref”)_ .Pages(“pgPage01”) _ .Controls(“btnWrite1”)
‘Check to see if textbox has a valueIf pTheTextBox.Value <> “” Then strAddValue = pTheTextBox.Value ‘Add textbox value to combo box pTheComboBox .AddItem strAddValue, _ strAddValue pTheComboBox .ListIndex = 0
www.esri.com ArcUser Fall 2009 53
Hands On
Continued on page 54
pTheTextBox.Text=””
‘Enable the save button pWriteButton.Enabled = True
‘Do not reread INI file Application.UserProperties _ (“strCboUpdate1”) = “False”End If ‘Clear variablesSet pTheComboBox = NothingSet pTheTextBox = NothingSet pWriteButton = NothingSet strAddValue = NothingListing 6: OnClick event for the Add button
That is all that needs to be done to the preference dialog. If you have multiple combo boxes on a form, add more pages to the preference form. With very little change to the code above (e.g., renaming buttons and INI files), the code can be used for many different combo boxes. The final thing to do is add some code to the script file of the applet.
Combos SubroutineBy putting the code in subroutines, this code can be accessed and (mostly) reused by multiple forms. First, add the Update global variable in the script file to tell the ComboBox to load the first time it gets the focus. Second, add the variable INIPath. (Refer to Listing 7.) The INIPath variable saves the location where the INI files are stored on the computer. It is a good idea to keep all INI files for a particular application together. This allows the use of only one variable, and it makes it easier to locate them outside of ArcPad.
Application.UserProperties(“strCboUpdate1”) _ = “True”
Dim INIPath‘Path for the INI fileINIPath = “C:\temp\Water\INI\”Listing 7: Update the global variable.
Next, add the subroutine LoadCombos. (Refer to Listing 8.) This subroutine is the major component of this project. It is called by all combo boxes to fill in the list for each combo box from INI files. This subroutine is passed four values: the form name that is calling it, the page the ComboBox is on, the name of the combo box, and the name of the INI file to read. After the values are passed to the subroutine, the subroutine reads each line in the INI file and adds it to the list in the combo box. When the end of the file is reached, the subroutine closes the file and erases the variables.
‘Generic sub to fill ComboBoxes from INI files‘arguments(Form name, Page name, Control name, ‘INI file name)Sub LoadCombos(strForm, strPage, strControl, _ strINI) Dim AplFile, INIvalue
‘Open INI file Set AplFile = Application. _ CreateAppObject(“file”) AplFile.Open INIPath & “\” & strINI _ &”.ini”, 1 Dim pTheComboBox Set pTheComboBox = Application.Applets _ (“Demo.apa”).Forms(strForm) _ .Pages(strPage) _ .Controls(strControl) ‘Clear contents of the combo box pTheComboBox .Clear
INIvalue = AplFile.ReadLine
‘Add values from INI file to ComboBox Do While Not AplFile.EOF INIvalue = AplFile.ReadLine pTheComboBox .AddItem INIvalue, INIvalue Loop
‘Close INI file AplFile.Close
‘Clear variables Set AplFile = Nothing Set pTheComboBox = Nothing Set INIvalue = Nothing
End SubListing 8: Add the subroutine LoadCombos.
The last thing to be added to this script is the WritePrefs subroutine. (Refer to Listing 9.) This subroutine is passed five values—the name of the calling form, the page the ComboBox is on, the name of the combo box, the name of the INI file to write to, and the header for the INI file. This subroutine begins by opening the INI file to write in all the values from the ComboBox. Then it writes the first line of the INI file (which is the header). Next, it goes through each item in the ComboBox and writes the value to the INI file. When it gets to the end of the list, the INI file is closed and the variables are erased. This is all that needs to be added to the script file.
‘Generic sub to write INI file from ComboBox ‘arguments(Form name, Page name, Control name, ‘INI file name, Header title)Sub WritePrefs(strForm, strPage, strControl, _ strINI, strHeader) Dim AplFile, pTheComboBox , a
‘Open INI file for output Set AplFile = Application. _ CreateAppObject(“file”)
54 ArcUser Fall 2009 www.esri.com
Modifying Values in ArcPadContinued from page 53
ConclusionIn summary, there are two parts to this strategy. The first part creates a preference dialog that allows editing of the INI files that the combo boxes use for values inside the applet. This allows a simple option to add choices to the combo boxes in the field, when needed, by just pressing a button on the toolbar. Plus, it still allows users to edit the INI text file outside of ArcPad. The second part is adding the LoadCombos subroutine. This is the subroutine called by all combo boxes, either on the preference form or any form, which has a ComboBox with values stored in an INI file. If you didn’t want to create the preference form, you could just add the LoadCombos sub and the OnSetFocus event. The combo boxes will still read the INI files for their values, and the user can still edit the INI file outside of ArcPad with a simple text editor. The disadvantage of reading INI files for combo boxes is that it takes far more programming to get a list of values for a combo box. But, it does add the most flexibility for adding new values. This is just another choice to pick from when using a ComboBox and is not perfect to use in every instance. Sometimes, just filling in the list values is the best choice when you know all the items and you know the list won’t change. This is why a well-planned application is always a good first step to any new project. For more information, contact Craig GallantSenior DesignerLJB Inc.E-mail: [email protected]
Hands On
AplFile.Open INIPath & “\” + strINI + _ “.ini”,2
Set pTheComboBox = Application. _ Applets(“Demo.apa”) _ .Forms(strForm)_ .Pages(strPage) _ .Controls(strControl)
‘Write the header of the INI file AplFile.WriteLine(“[“ + strHeader + “]”) For a = 0 To pTheComboBox .ListCount - 1 ‘Move to each item in ComboBox pTheComboBox .ListIndex = a AplFile.WriteLine(pTheComboBox .Value) Next
pTheComboBox .ListIndex = 0 ‘Close INI file AplFile.Close
‘Clear variables Set AplFile = Nothing Set pTheComboBox = Nothing Set a = Nothing
End SubListing 9: Add the WritePrefs subroutine.
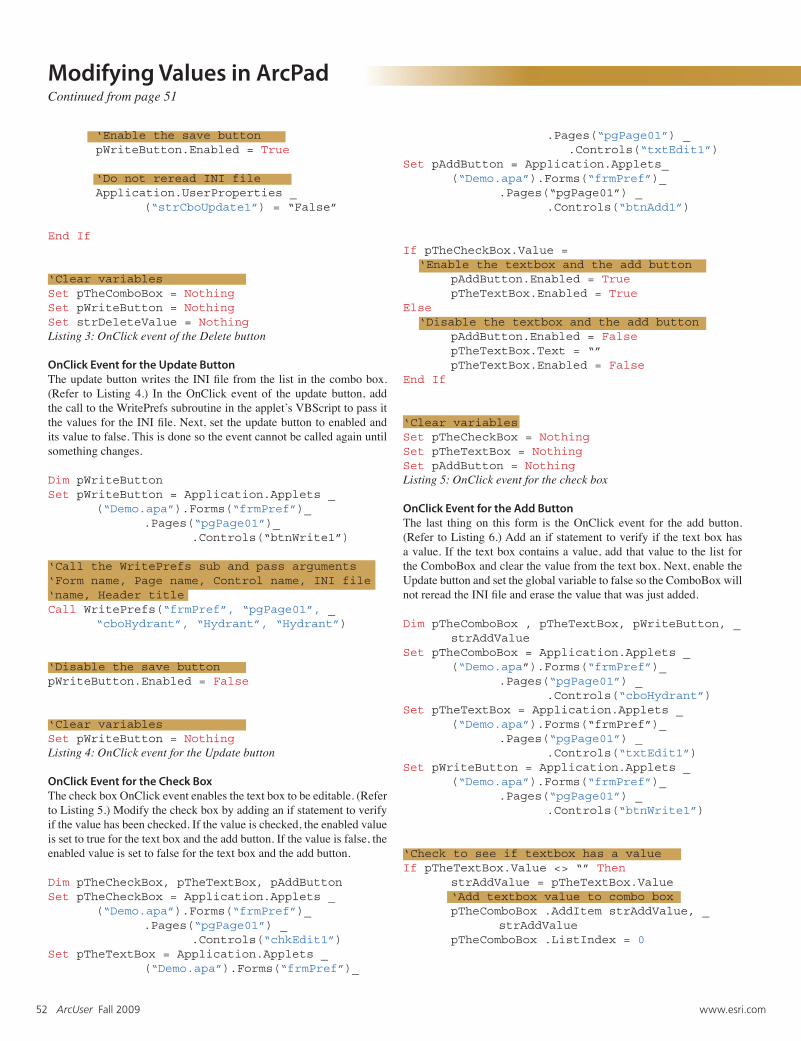
One last piece of code needs to be added to the applet for the preference dialog to work. If there is already a toolbar in the applet, all that needs to be done is add a button to the toolbar. If not, add a toolbar to the applet first, then add the preference button to the toolbar. On the OnClick event of the button, add the code
Applet.Forms(“thePreferenceFormName”).Show
This code will display the preference dialog when the button is pressed on the toolbar.