Modern Bookshelf Bench| Building Plans
15
Modern Bookshelf Bench | Building Plans Elisha Albretsen @PneumaticAddict Sponsored by: SawStop
Transcript of Modern Bookshelf Bench| Building Plans

Modern Bookshelf Bench | Building Plans
Elisha Albretsen @PneumaticAddict Sponsored by: SawStop

Modern Bookshelf Bench | Building Plans
Material & Tool ListQty. Material
Poplar Lumber - Optional Plywood
19 1/2"x2" Hard Wood Dowels6 figure-eight fasteners8 #8 - 1- 1/4" wood screws
1-1/4” brad nailsWood glue17” x 15” x 2-3/4” upholstered foam seat cushion
Required Tools Optional Tools
SawStop 10” Jobsite Pro Table saw Circular Saw or Track Saw
Cordless Drill Brad Nailer
Bar Clamps Doweling Jig
Measuring Tape Glue Spreader
Speed Square Crosscut Sled
Drill Bits ⅛” & ½”
This bench was built completely on a SawStop Jobsite Pro. It offers much needed storage while looking
stylish and flexible enough to work within any room in your house. Follow the step-by-step instructions
below on how to customize the bench to your exact needs.
Caution
Furniture building comes with inherent risk. Use caution when handling and operating tools. Before
starting the project, make sure you are familiar with safe operating procedures. Follow manufacturer’s
recommendations for all products and equipment used.
Elisha Albretsen @PneumaticAddict Sponsored by: SawStop

Modern Bookshelf Bench | Building Plans
1. Top and Bottom PanelsA. Preparation
To join stock, plane, square, and glue-up edges to create 16” wide panels. I used 1-½” thick poplar
hardwood boards because it is easy to work with — and I had plenty on hand.
Alternative: Consider plywood panels if you want to save time preparing the material or
prefer a more rustic aesthetic. Note, you will still need to glue up the panels to create 1-½”
substrate. To do this, simply rip ¾” plywood sheets into 16” wide strips. Laminate pairs of
strips together to create 1-1/2” thick panels. From your prepared material cut one 41-1/2”
length panel and one 60” length panel.
B. Create Rabbet JoineryRabbet joints require a modest level of skill and effort and are an efficient way to add strength and
style to the piece. Before marking -up the panels, take a moment to consider if there is character in
the wood that you want to feature (or flaws to conceal). Of course, the most visible side of the top
panel will be opposite the side of the rabbets, while the most visible side of the bottom panel will be
the side with the rabbets.
Top Panel (41.5” x 16”)
Using your preferred method (I used the
table saw) cut 16” x 1-1/2” x 3/4” rabbets
flush to both ends. Then measure 18-1/2”
from the inside cheek of both rabbets.
Create a 16”x1-1/2”x3/4” dado, centered
on the panel.
Bottom Panel (60” x 16”)
Using your preferred method cut 16” x 1-1/2” x
3/4” rabbets flush to both ends. Create two
additional 16” x 1-1/2” x 3/4” dados at 18-1/2”
from the inside cheek of an end rabbet and 17”
from the inside cheek of the opposite rabbet
(FYI: the seat will be located on the 17” side).
Elisha Albretsen @PneumaticAddict Sponsored by: SawStop

Modern Bookshelf Bench | Building Plans
2. Vertical Dividers & Horizontal Seat SupportA.Prepare Dividers
The dimensions of the vertical dividers will also be 1-½“ thick and 16” deep. Like the top and bottom
panels, use 1-½” thick hardwood boards, joint edges, plane, and join together to create 16” wide
panels.
Alternative: If you’ve elected to use plywood panels, rip ¾” plywood sheets into 16” wide
strips. Laminate pairs of strips together to create 1-1/2” thick panels.
B.Cut to LengthFrom your prepared material cut (3) 13-1/2” length Vertical Dividers, (1) 10-1/2” length Vertical
Divider, and (1) 18-1/2” length Horizontal Seat Support.
C. Create Rabbet Joinery for Seat SupportThe 16” x 18-1/2” panel is the Horizontal Seat Support. Using your preferred method cut a
16”x1-1/2”x3/4” rabbet flush to one end.
Elisha Albretsen @PneumaticAddict Sponsored by: SawStop

Modern Bookshelf Bench | Building Plans
3. Base LegsA. Prep
Using prepared
material, cut (4)
5” x 5” x 1-1/2” blocks.
B. Outside Leg AngleMake a reference mark
9/16” in from the lower
left corner. From this
mark, use a table saw
with miter gauge or
cross-cut sled to cut 10o
off square from the
bottom corner to the
top edge as shown.
C. Inside Leg AngleMeasure 3” along the
top and 1-1/2” along
the bottom edges. Use a
straight edge and pencil
to connect these points.
Use a table saw with
miter gauge or cross-cut
sled to cut along this
line.
RESULT
Elisha Albretsen @PneumaticAddict Sponsored by: SawStop
Modern Bookshelf Bench | Building Plans
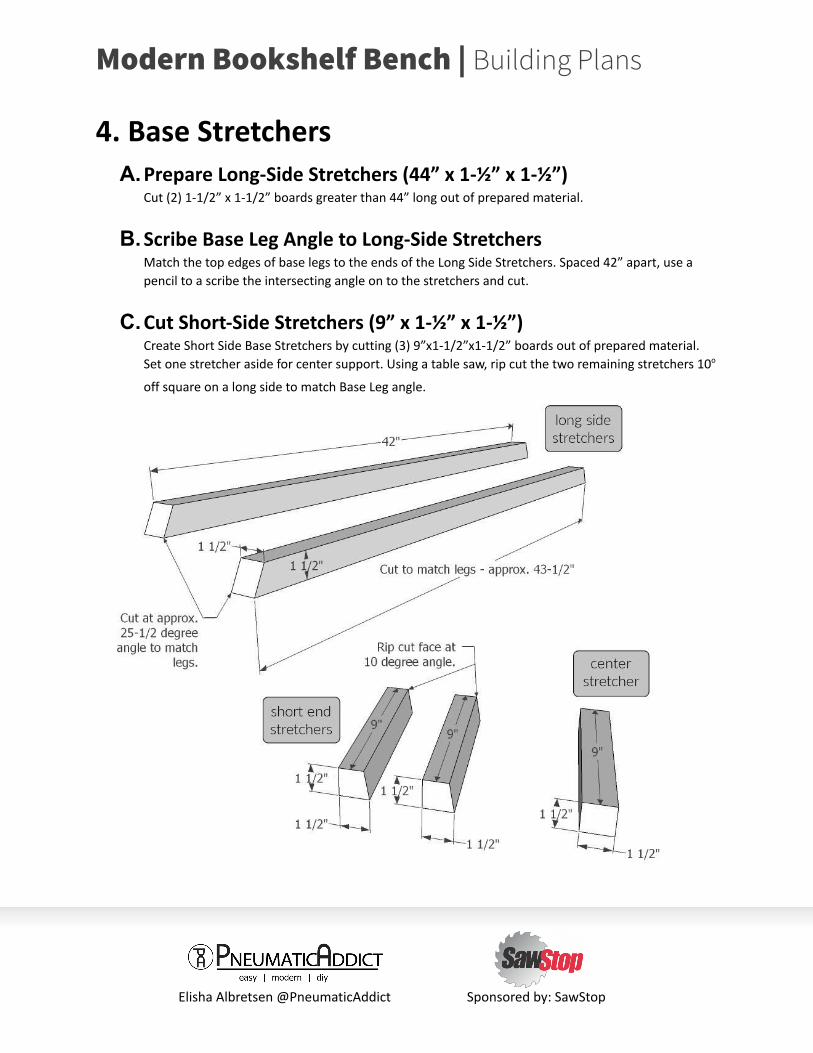
4. Base StretchersA.Prepare Long-Side Stretchers (44” x 1-½” x 1-½”)
Cut (2) 1-1/2” x 1-1/2” boards greater than 44” long out of prepared material.
B.Scribe Base Leg Angle to Long-Side StretchersMatch the top edges of base legs to the ends of the Long Side Stretchers. Spaced 42” apart, use a
pencil to a scribe the intersecting angle on to the stretchers and cut.
C.Cut Short-Side Stretchers (9” x 1-½” x 1-½”)Create Short Side Base Stretchers by cutting (3) 9”x1-1/2”x1-1/2” boards out of prepared material.
Set one stretcher aside for center support. Using a table saw, rip cut the two remaining stretchers 10o
off square on a long side to match Base Leg angle.
Elisha Albretsen @PneumaticAddict Sponsored by: SawStop

Modern Bookshelf Bench | Building Plans
5. Seat AssemblyAlign the horizontal seat support, perpendicularly to vertical divider #2, 9-3/4" from the bottom
edge and 2-1/4" from the top edge. On the intersecting edge of the seat support and face of the
divider, mark the location for 3, ½” dowels. Drill coordinating 1/2" x 1" holes in marked dowel
locations. Connect components together via wood glue and 1/2" x 2" dowels. Apply clamps to
hold components together and set seat assembly aside to allow glue to cure.
Elisha Albretsen @PneumaticAddict Sponsored by: SawStop

Modern Bookshelf Bench | Building Plans
6. Vertical DividersAlign vertical dividers #1, 3, & 4 within rabbets and dados as show in the diagram below.
Connect components together via glue applied to the joint areas. Apply clamps to hold
components together while glue cures.
Elisha Albretsen @PneumaticAddict Sponsored by: SawStop

Modern Bookshelf Bench | Building Plans
7. Attaching SeatOnce fully cured, align the dowel-joined seat assembly within the last remaining dado and flush
to the top edge of divider #1. Connect components together via glue applied to the joint areas.
Apply clamps to hold components together while glue cures.
Elisha Albretsen @PneumaticAddict Sponsored by: SawStop

Modern Bookshelf Bench | Building Plans
8. Top PanelAlign the top panel onto the top edges of vertical dividers. Connect the components together
via glue applied to joint area. Apply clamps to hold components together while glue cures.
Elisha Albretsen @PneumaticAddict Sponsored by: SawStop

Modern Bookshelf Bench | Building Plans
9. End Leg AssembliesDesignate pairs of legs to be connected together. Between each pair of legs, align a 9" angled
short stretcher along their 10° faces, flush to the top edge. Connect components together via
glue & 1/2" x 2" dowels. Apply clamps and allow the glue to fully cure.
Elisha Albretsen @PneumaticAddict Sponsored by: SawStop

Modern Bookshelf Bench | Building Plans
10. Center StretcherCenter the 9" center stretcher, perpendicularly on the inside face of both long stretchers.
Connect all 3 components together, via glue & 1/2" x 2" dowels. Apply clamps and allow glue to
fully cure.
Elisha Albretsen @PneumaticAddict Sponsored by: SawStop

Modern Bookshelf Bench | Building Plans
11. Connect Leg Assemblies to StretchersConnect the long base stretchers to the shorter end leg assemblies, via glue and 1/2" x 2"
dowels. Apply clamps and allow glue to fully cure.
Elisha Albretsen @PneumaticAddict Sponsored by: SawStop

Modern Bookshelf Bench | Building Plans
12. Connect Base to BoxCarefully, flip the box assembly top-side down onto a soft worksurface. Invert the base assembly
onto the bottom face of the bottom panel, spaced 2” from the long sides of the box and 6” from
either end. Connect the base assembly to the box assembly via “figure-8” fasteners and 1-1/4”
screws.
Elisha Albretsen @PneumaticAddict Sponsored by: SawStop

Modern Bookshelf Bench | Building Plans
13. Add CushionCenter a 17" x 15" x 2-3/4" upholstered cushion in recessed seat area.
Optional: Attach cushion to the horizontal seat support, via 2" pre-drilled screws driven
from the inside of the bookshelf.
Thank you for building with us.
Be sure to share your finished project (or whatever you make)
with us on social media, @pneumaticaddict & @SawStop.
Elisha Albretsen @PneumaticAddict Sponsored by: SawStop