MODEL N° 51544 OWNER’S MANUAL
52
Keep this Product ID Number and use when contacting Customer Service: OWNER’S MANUAL MODEL N° 51544
Transcript of MODEL N° 51544 OWNER’S MANUAL

1
Keep this Product ID Number and use when contacting Customer Service:
OWNER’S MANUALMODEL N° 51544

2INSTRUCTION #1056584 D 9/10/2010
Save this owner’s manual for future reference and in the event that the manufacturer has to be contacted.
**U.S. and Canada customers ONLY**IF ASSISTANCE IS NEEDED,
DO NOT CONTACT THE STORE!CALL OUR CUSTOMER SERVICE DEPARTMENT at
1 (800) 225-3865HOURS: 7:00 a.m. to 5:00 p.m. Monday through Friday (Mountain Standard Time)
**Call or visit our Web site for Saturday hours**
Lifetime Products, Inc.
**For customers outside the U.S. or Canada, please contact the store for assistance.**
REGISTER YOUR LIFETIME PRODUCT TODAY!
We invite you to read our privacy policy at www.lifetime.com
as NEW product notifi cations and special closeout promotions!
product, your warranty rights will not be diminished. But you will need to provide a sales receipt to verify your product purchase date before warranty service will be provided.
Maintaining your privacy is our long-standing policy at Lifetime. And you can rest as-sured that Lifetime will not sell or provide your personal data to other third parties, or allow them to use your personal data for their own purposes.

3
Most injuries are caused by misuse and/or not following instructions. Use caution when using this product.
To ensure safety, do not attempt to assemble this product without reading and following all instructions carefully. Check the entire box and inside all packing materials for parts and/or additional instruction material. Before beginning assembly, identify and inventory all parts and hardware using the parts and hardware lists and identifi ers in this document. Proper and complete assembly, use and supervision are essential for proper orientation and to reduce the risk of accident or injury. A high probability of serious injury exists if this product is not installed, maintained, and/or operated properly. Failure to comply with any of the warnings in this instruction manual may result in serious personal injuries such as cuts, broken bones, nerve damage, paralysis, brain injury, or death. Failure to comply may also result in property damage. Please heed all warnings and cautions.
sections to separate during play or transport.
SAFETY INSTRUCTIONS
BEFORE BEGINNING ASSEMBLYKeep the hardware bags and their contents separate. If any parts are missing, call our Customer Service Department.
Identify and inventory all parts and hardware using the parts and hardware lists and identifi ers in this document.
Test fi t all Bolts by inserting them into their respective holes. If necessary, carefully scrape away any excess powder coating buildup from inside the holes. Do not scrape away all of the powder coating. Bare metal may rust. You may need to pound some Bolts into place with a hammer or mallet.

4
Electric Drill
TOOLS AND PARTS REQUIRED FOR THIS ASSEMBLY
*Two adults required to complete assembly*
Phillips Screwdriver
(1)
(1)
(2)
(1)
Sand
(362 lb)
(1)
Pliers
Rubber Mallet
(1)
(2)
(1)
(1)
(2)
(2)

5
This area is located at the top, left-hand corner of the page and indicates which tools and hardware are needed to
on a page.
Note:!
Refer to the following areas throughout the instructions to assist in the assembly process:
bottom, left-hand corner of a step and indicates that special attention is needed to perform a particular part of a step.
the bottom, right-hand corner of a step and indicate that damage to
occur if the caution or warning is not heeded.
ASSEMBLY GUIDES
TOOLS AND HARDWARE REQUIRED FOR THIS PAGE
CAUTION

6
PARTS LISTID Item Description Qty
Top Pole 1Middle Pole 1Bottom Pole 1
AJK Right Backboard Bracket 1AJJ 1AJI Backboard 1
Rim 1AKZ Net 1AJY Counterbalance Spring 1AKC Short Extension Arm 2AKB 2
Outer Tube 1AKQ Inner Channel 1AMN Trigger 1
1AKN Right Handle 1
Pole Bracket 1Plastic Guard 1
AJM Base 1Pole Brace 2
AMU Wheel 2AJC 1/2” x 15 3/4” Axle 1AJE 1/2” x 7” Axle 1AEF Base Plug 2
Pole Pad 1Corner Frame Pad 2
AJQ Center Frame Pad 1AKP Height Sticker (not shown) 1AMT Warning Sticker (Applied to Middle Pole) 1
HARDWARE LISTID Item Description Qty
Pole Assembly Hardware (1066288)ADS 1/4” x 3/4” Screw 2ABH 3/8” x 3 1/2” Hex Bolt 2ADA 1/2” x 2.91” Spacer 2AAF 3/8” Washer 2ABB 3/8” Centerlock Nut 2CIH Domed Countersink Washer 2
Pole to Base Assembly Hardware (1066284)AAO 5/16” Nylock Nut 2ABD 5/16” Washer 4AAE 5/16” x 1” Hex Bolt 2ABN 1/2” x 1/8” Spacer 2

7
HARDWARE LISTID Item Description Qty
Pole to Base Assembly Hardware (1066284) ContinuedBTS 1/4” Barrel Nut 1BZO 1/4” x 3” Shoulder Bolt 1
3/16” Allen Wrench 2Backboard to Rim Assembly Hardware (1045426)
AAS 1/4” x 2 3/4” Hex Bolt 2ABS 1/2” x 2 5/16” Galvanized Spacer 2ABC 5/16” x 1 1/4” Carriage Bolt 2ACS .38” x 1” Steel Spacer 2AAB 1/4” Centerlock Nut 2AAJ 2ABD 5/16” Washer 2ABF 7/16” Rubber Washer 2ABG 5/16” x 2 1/2” Tap Bolt 2AOU 1ABK 5/16” Nylock Flange Nut 6AJW Compression Spring 2AOW Spring Retainer Plate 1AAV 5/16” Jam Nut 2
Backboard to Pole Assembly Hardware (1047601)ADG 1/2” x 6 5/8” Hex Bolt 4
1/2” Centerlock Nut 4.69” x .59” Black Spacer 4
ABP 1/2” x 3/8” Clear Poly Spacer 4Handle Assembly Hardware (1046834)
AAN 5/16” Cap Nut 11/4” x 1 1/4” Hex Bolt 1
ABA 3/8” x 6 1/2” Hex Bolt 1AAM 5/16” x 1 1/2” Tap Bolt 1ADG 1/2” x 6 5/8” Hex Bolt 1
1/2” Centerlock Nut 1AAU 1/4” Cap Nut 1ABB 3/8” Centerlock Nut 1AAP #6 x 3/8” Phillips Pan Head Screw 2ADT #6 x 5/8” Screw 7ACZ .69” x 1.4” Spacer 2AQH Trigger Spring 1AQG 1
Frame Pad Assembly Hardware (HH00700)ADP 10

8
Parts shown at 10% of Actual Size
ALH (x1) Top Pole
(x1)Middle Pole
ALE (x1)Bottom Pole
PARTS IDENTIFIER
(x1)
(x1)Right Backboard Bracket
(x1)1/2” x 15 3/4” Axle
15 ”3/4
7” (x1)
1/2” x 7” Axle
30 1/2”
43 ”
43 ”
15 3/4”AKC (x2)Short Extension Arm
ALI (x2)Pole Brace
26”AKB (x2)
40”
33 1/3”AKQ (x1)Inner Channel
ALB (x1)Outer Tube

9
AKZ (x1)Net
ALX (x1)Rim
(x1)Backboard
(x1)Base
Parts shown at 5% of Actual Size
Parts shown at 10% of Actual Size
PARTS IDENTIFIER
ALN (x1)Pole Pad
(x1)Center Frame Pad
(x2)Corner Frame Pad

10
Parts shown at 25% of Actual Size
PARTS IDENTIFIER
AMU (x2)Wheel
ALD (x1)Plastic Guard
ALL (x1) Pole Bracket
AMN (x1)Trigger
AKL (x1) AKN (x1)Right Handle
(x1)Counterbalance Spring
(x2)Base Plug
Part shown at Actual Size
11
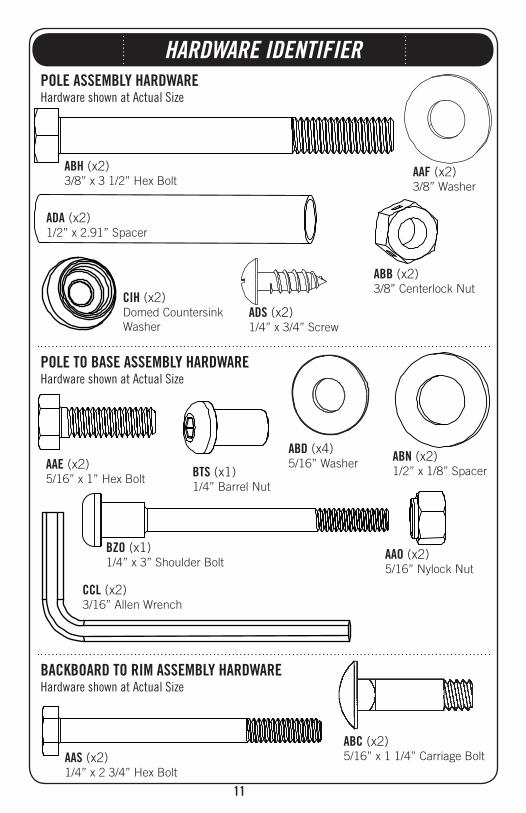
HARDWARE IDENTIFIER
Hardware shown at Actual Size
ABN (x2)1/2” x 1/8” SpacerAAE (x2)
5/16” x 1” Hex Bolt
AAO (x2)5/16” Nylock Nut
BTS (x1)1/4” Barrel Nut
ABD (x4)5/16” Washer
BZO (x1)1/4” x 3” Shoulder Bolt
Hardware shown at Actual Size
Hardware shown at Actual Size
ADS (x2)1/4” x 3/4” Screw
(x2)3/8” Washer
ABB (x2)3/8” Centerlock Nut
ABH (x2)3/8” x 3 1/2” Hex Bolt
ADA (x2)1/2” x 2.91” Spacer
CCL (x2)3/16” Allen Wrench
CIH (x2)Domed Countersink Washer
AAS (x2)1/4” x 2 3/4” Hex Bolt
ABC (x2)5/16” x 1 1/4” Carriage Bolt

12
HARDWARE IDENTIFIER
AAB (x2)1/4” Centerlock Nut
(x2)5/16” x 2 1/2” Tap Bolt
Hardware shown at Actual Size
Hardware shown at 25% of Actual Size
(x2)Compression Spring
AOU (x1)
(x1)Spring Retainer Plate
Hardware shown at Actual Size
AAX (x4)1/2” Centerlock Nut
ABL (x4).69” x .59” Black Spacer
(x4)1/2” x 6 5/8” Hex Bolt
ABP (x4)1/2” x 3/8” Clear Poly Spacer
6 5/8”
(Not actual length)
(x2) ABD (x2)5/16” Washer
(x2)7/16” Rubber Washer
ABK (x6)5/16” Nylock Flange Nut
ABS (x2)1/2” x 2 5/16” Galvanized Spacer
ACS (x2).38” x 1” Steel Spacer
AAV (x2)5/16”Jam Nut

13
HARDWARE IDENTIFIER
Hardware shown at Actual Size
AAN (x1)5/16” Cap Nut
AAL (x1)1/4” x 1 1/4” Hex Bolt
(x1)1/2” x 6 5/8” Hex Bolt
6 5/8”
(Not actual length)
(Not actual length)
6 1/2”
ABA (x1)3/8” x 6 1/2” Hex Bolt
AAM (x1)5/16” x 1 1/2” Tap Bolt
AAX (x1)1/2” Centerlock Nut
AAU (x1)1/4” Cap Nut
ABB (x1)3/8” Centerlock Nut
AAP (x2)#6 x 3/8” Phillips Pan Head Screw
ADT (x7)#6 x 5/8” Screw
ACZ (x2).69” x 1.4” Spacer
AQH (x1)Trigger Spring
(x1)
ADP (x10)
Hardware shown at Actual Size

14
POLE ASSEMBLY
HARDWARE REQUIRED
PARTS REQUIRED
TOOLS REQUIRED
SEC 1
Parts shown at 10% of Actual Size
Phillips Screwdriver
Hardware shown at Actual Size
ADS (x2)1/4” x 3/4” Screw
ALH (x1) Top Pole
(x1)Middle Pole
ALE (x1)Bottom Pole
30 1/2”
43 ”
43 ”
(x2)3/8” Washer
ABB (x2)3/8” Centerlock Nut
ABH (x2)3/8” x 3 1/2” Hex Bolt
ADA (x2)1/2” x 2.91” Spacer
(x2)
Part shown at 25% of Actual Size
ALL (x1) Pole Bracket
CIH (x2) Domed Countersink Washer

15
TOOLS AND HARDWARE REQUIRED FOR THIS PAGE
ALH
ADS
Align the hole in the Top Pole (ALH) with the slot in the and slide the Top Pole over the Middle Pole. Insert a 1/4” x 3/4” Screw (ADS) through a and into the small hole in the Top Pole and into the slot in the Middle Pole as shown.
SEC
1.1
ADS (x1)
ALH
CIH (x1)
CIH
Note: The 1/4” x 3/4” Screw and Domed Countersink Washer should be fl ush with the Pole, but will spin freely once installed. Do not jam the Poles together until instructed.
!

16
TOOLS AND HARDWARE REQUIRED FOR THIS PAGE
Align the hole in the with the slot in the Bottom Pole (ALE) and slide the Middle Pole over the Bottom Pole. Insert a 1/4” x 3/4” Screw (ADS) through a and into the small hole in the Middle Pole and into the slot in the Bottom Pole as shown.
SEC
1.2
ALE
ADS
ALE
ADS (x1)
CIH (x1)
CIH
Note: The 1/4” x 3/4” Screw and Domed Countersink Washer should be fl ush with the Pole, but will spin freely once installed. Do not jam the Poles together until instructed.
!

17
TOOLS AND HARDWARE REQUIRED FOR THIS PAGE
Insert the 3/8” x 3 1/2” Hex Bolts (ABH) with the into the as shown. Then slide the 1/2” x 2.91” Spacers (ADA) onto the Hex Bolts. Place the onto the 3/8” x 3 1/2” Hex Bolts, and attach it to the Middle Pole with the hardware shown.
SEC
1.3
9/16” (x2)
(x2)
ABB (x2)
ABH (x2)
ADA (x2)
ABH
ADA
ABB
ALLLarge holesSmall holes

18
TOOLS AND HARDWARE REQUIRED FOR THIS PAGE
WARNINGThe Poles must be seated together! Even if the Poles cover the slots before seating, they must be struck on a hard surface fi ve to six times! Failure to seat the Poles correctly could allow the Poles to separate during use, which could lead to serious personal injuries or property damage.
Note: Do not hit your feet with the Pole sections, as serious injury could occur.!
If the do not completely cover the slots on the after seating, DO NOT COMPLETE ASSEMBLY.
Call our Customer Service Department.
In order to seat the Poles, strike each end of the Pole very hard fi ve to six times on a piece of scrap wood or cardboard. This must be done even if the Poles cover the slots before seating has occurred.
SEC
1.4
ATTENTION: THIS STEP CANNOT BE REVERSED!
ALE
ALH

19
(x1)Base
ALI (x2)Pole Brace
(x1)1/2” x 15 3/4” Axle
AMU (x2)Wheel
15 ”3/4 7” (x1)
1/2” x 7” Axle
Parts shown at 10% of Actual Size
Part shown at 25% of Actual Size
POLE TO BASE ASSEMBLY
HARDWARE REQUIRED
PARTS REQUIRED
TOOLS REQUIRED
SEC 2
Parts shown at 5% of Actual Size
Hardware shown at Actual Size
ABN (x2)1/2” x 1/8” Spacer
AAE (x2)5/16” x 1” Hex Bolt
AAO (x2)5/16” Nylock Nut
BTS (x1)1/4” Barrel Nut
ABD (x4)5/16” Washer
BZO (x1)1/4” x 3” Shoulder Screw
Pliers (x2)3/16” Allen
(x2)

20
TOOLS AND HARDWARE REQUIRED FOR THIS PAGE
ALI
AAEABD
ABD
AAO
AAE (x2)
ABD (x4) ABN (x2)AAO (x2)
Attach the fl attened end of the Pole Brace (ALI) to the with the hardware shown. Remove any residual plastic in the hole with pliers. Only fi nger tighten the hardware.
SEC
2.1
Note: Repeat this step to install the other Pole Brace to the other side of the Base.!
Slide the through the and the holes at the end of the Bottom Pole (ALE) as shown. Slide the through the second set of holes at the end of the Bottom Pole as shown. Then slide two 1/2” x 1/8” Spacers (ABN) onto the 1/2” x 15 3/4” Axle and position them against the Wheels.
SEC
2.2
ABN
ABN
AMUAMU
ALE

21
TOOLS AND HARDWARE REQUIRED FOR THIS PAGE
Place the Pole assembly on the ground with the on the facing down. Position the under the bottom slots of the as shown, and step onto the Base so the Axle snaps into the slots. Then rotate the Pole assembly upward so that the snaps into the upper slots of the Base as shown.
SEC
2.3
BTS (x1)
1/2" (x2)
BZO (x1)
Attach the Pole Braces (ALI) to the Bottom Pole (ALE) with the hardware shown, and tighten all Pole to Base assembly hardware.
SEC
2.4
BTS BZO
ALE
ALI
Note: Tip the system backward so the Pole rests on the ground. Do not stand the system up until it is fi lled with either sand or water later in the assembly.!
3/16" (x2)
22
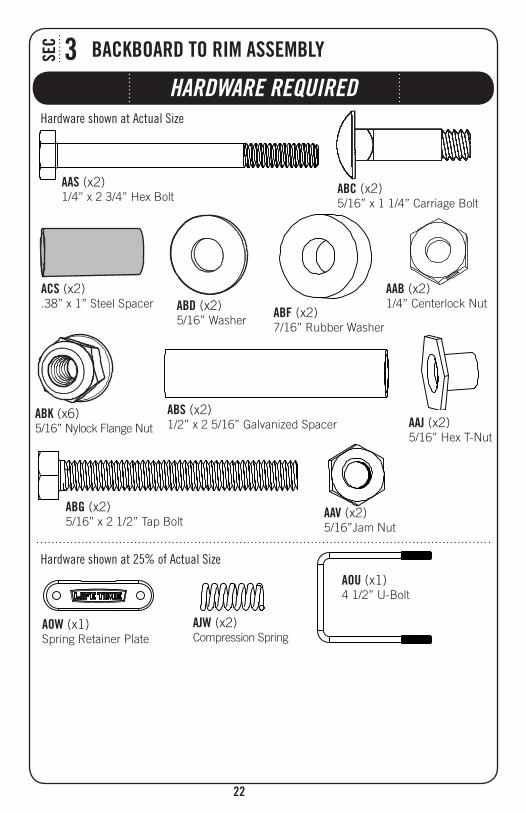
BACKBOARD TO RIM ASSEMBLYSEC 3
Hardware shown at Actual Size
AAS (x2)1/4” x 2 3/4” Hex Bolt
ABS (x2)1/2” x 2 5/16” Galvanized Spacer
ABC (x2)5/16” x 1 1/4” Carriage Bolt
ACS (x2).38” x 1” Steel Spacer
AAB (x2)1/4” Centerlock Nut
(x2)
ABD (x2)5/16” Washer
(x2)7/16” Rubber Washer
(x2)5/16” x 2 1/2” Tap Bolt
Hardware shown at 25% of Actual Size
ABK (x6)5/16” Nylock Flange Nut
(x2)Compression Spring
AOU (x1)
(x1)Spring Retainer Plate
AAV (x2)5/16”Jam Nut
HARDWARE REQUIRED

23
BACKBOARD TO RIM ASSEMBLYSEC 3
PARTS REQUIRED
(x1)Backboard
ALX (x1)Rim (x1)
(x1)Right Backboard Bracket
Parts shown at 10% of Actual Size
Part shown at 5% of Actual Size
Pliers (x2)
TOOLS REQUIRED
ALD (x1)Plastic Guard
Part shown at 25% of Actual Size

24
TOOLS AND HARDWARE REQUIRED FOR THIS PAGE
Slide the 4 1/2” U-Bolt (AOU) through the
as shown.
Connect the Backboard Brackets together using two 1/4” x 2 3/4” Hex Bolts (AAS), two , and two 1/4”
.
SEC
3.1
SEC
3.2
(Not to scale)
AOU (x1)AAS (x2)
ABS (x2) AAB (x2)
7/16” (x2)
AAB
ABS
AAB
AAS
AAS
Note: Tighten the hardware securely now.!
AOUNotch
AOU

25
TOOLS AND HARDWARE REQUIRED FOR THIS PAGE
1/2”
(x2) ABD (x2) (x2)
ABD
ALX
Insert two with the and the through the bottom holes in the back of the Rim
(ALX) as shown, and secure the hardware with two .
SEC
3.3
Note: Do not overtighten the hardware so that the 7/16” Rubber Washers bulge outward as shown.!
Note: Make sure that the 5/16” x 2 1/2” Tap Bolts are positioned on the outside edge of the holes as shown.!
CorrectIncorrect
ALX
(x2)

26
TOOLS AND HARDWARE REQUIRED FOR THIS PAGE
Insert the 4 1/2” U-Bolt (AOU) through the upper part of the opening on the backside of the as shown.
SEC
3.4
Connect the Rim (ALX) and to the with the hardware shown. Thread the all the way down on the 4 1/2” U-Bolt (AOU). On the underside of the Backboard, place .38” x 1” Steel Spacers (ACS) onto the , and secure the 5/16”
onto the Tap Bolts.
SEC
3.5
1/2”
ACS (x2)ABK (x2)
AAV (x2)
AOU
ABK
Underside View
ABK
ACS
ALD
AAV AAV
ALX

27
TOOLS AND HARDWARE REQUIRED FOR THIS PAGE
1/2”
(Not to scale)
ABK (x2)
(x2) (x1)
(Not to scale)
Slide the onto the 4 1/2” U-Bolt (AOU), and place the over the Compression Springs. Tighten the until the Rim (ALX) does not wobble to complete this step.
SEC
3.6
Note: DO NOT COMPLETELY TIGHTEN THE 5/16” NYLOCK FLANGE NUTS IN THIS STEP! Only tighten the Nuts until the Rim (ALX) does not wobble. Tightening the Nuts will adjust the Rim tension.
!
ABK
AOU
ALX

28
TOOLS AND HARDWARE REQUIRED FOR THIS PAGE
1/2”
ABC (x2)ABK (x2)
Slide a 5/16” x 1 1/4” Carriage Bolt (ABC) into the crimped slot in each Backboard Channel as shown.
SEC
3.7
Bend the Backboard Brackets outward by hand and gently lift them over the 5/16” x 1 1/4” Carriage Bolts (ABC). Then securely fasten the Backboard Brackets to the Backboard Channels with the hardware shown.
SEC
3.8
Note: Tighten the 5/16” Nylock Flange Nuts (ABK) until they are fl ush with the ends of the Bolts.!
ABC ABC
ABKABKABC ABC

29
BACKBOARD TO POLE ASSEMBLY
HARDWARE REQUIRED
PARTS REQUIRED
TOOLS REQUIRED
SEC 4
Parts shown at 10% of Actual Size
Hardware shown at Actual Size
Rubber Mallet(x2)
AAX (x4)1/2” Centerlock Nut
ABL (x4).69” x .59” Black Spacer
(x4)1/2” x 6 5/8” Hex Bolt
ABP (x4)1/2” x 3/8” Clear Poly Spacer
6 5/8”
(Not actual length)
15 3/4”AKC (x2)Short Extension Arm
26”AKB (x2)
(x1)Counterbalance Spring
Part shown at 25% of Actual Size
(x2)

30
TOOLS AND HARDWARE REQUIRED FOR THIS PAGE
Place one end of the over the lower as shown.
SEC
4.1
Note: It may be necessary to use a Rubber Mallet to snap the Counterbalance Spring into place. If the Rubber Mallet does not work , undo the hardware in the image that has been shaded gray. Slide the Counterbalance Spring over the Spacer after it has been detached. Then replace and re-secure the hardware.
!
ABS
7/16” (x2)

31
TOOLS AND HARDWARE REQUIRED FOR THIS PAGE
SEC
4.2
Note: Tighten the 1/2” Centerlock Nut (AAX) until it is fl ush with the end of the Bolt.!
Secure the Short Extension Arms (AKC) to the Backboard Brackets in the location shown with the hardware indicated.
3/4” (x2)
AAX (x1)ABL (x2)
6 5/8”
(Not actual length)
(x1)
AKC AKC
ABL ABLAAX
AKC

32
TOOLS AND HARDWARE REQUIRED FOR THIS PAGE
3/4” (x2)
AAX (x1)ABL (x2)
6 5/8”
(Not actual length)
(x1)
SEC
4.3Secure the Long Extension Arms (AKB) to the Backboard Brackets in the location shown with the hardware indicated.
Note: Tighten the 1/2” Centerlock Nut (AAX) until it is fl ush with the end of the Bolt.!
AAXABL ABL
AKB AKB
AKB

33
TOOLS AND HARDWARE REQUIRED FOR THIS PAGE
Pole assembly. Rest the Rim on cardboard to prevent scratching. Then secure the Short and Long Extension Arms (AKC & AKB) to the Pole Assembly with the hardware shown.
SEC
4.4
CAUTION: HAVE ONE ADULT HOLD THE BACKBOARD IN PLACE UNTIL ASSEMBLY HAS BEEN COMPLETED!
3/4” (x2)
AAX (x2)ABP (x4)
6 5/8”
(Not actual length)
(x2)
AAX
AAX
ABP ABP
AKC
AKB
ABPABP
Note: Tighten the 1/2” Centerlock Nut (AAX) until it is fl ush with the end of the Bolt.!

34
AAN (x1)5/16” Cap Nut
AAL (x1)1/4” x 1 1/4” Hex Bolt
(x1)1/2” x 6 5/8” Hex Bolt
6 5/8”
(Not actual length)
(Not actual length)
6 1/2”
ABA (x1)3/8” x 6 1/2” Hex Bolt
AAM (x1)5/16” x 1 1/2” Tap Bolt
AAX (x1)1/2” Centerlock Nut
AAU (x1)1/4” Cap Nut
ABB (x1)3/8” Centerlock Nut
AAP (x2)#6 x 3/8” Phillips Pan Head Screw
ADT (x7)#6 x 5/8” Screw
ACZ (x2).69” x 1.4” Spacer
AQH (x1)Trigger Spring
(x1)
HANDLE ASSEMBLY
HARDWARE REQUIRED
SEC 5
Hardware shown at Actual Size

35
HANDLE ASSEMBLYSEC 5
PARTS REQUIREDParts shown at 10% of Actual Size
(x2) (x2)
TOOLS REQUIRED
Phillips Screwdriver
(x2) (x2)
AMN (x1)Trigger
AKL (x1) AKN (x1)Right Handle
40”
33 1/3”AKQ (x1)Inner Channel
ALB (x1)Outer Tube
Parts shown at 25% of Actual Size

36
TOOLS AND HARDWARE REQUIRED FOR THIS PAGE
AAP (x2)
(x1)
SEC
5.1Secure the to the Trigger (AMN) with the hardware shown.
Note: Make sure the Lock Tab is oriented as shown when attaching the Tab to the Trigger.!
AAP AAP
AMN
SEC
5.2Place the Right Handle (AKN) onto the Outer Tube (ALB) so that the notch of the Outer Tube fi ts within the Handle as shown.
AKN
ALB
Note: Make sure that the Inner Channel (AKQ) has been removed from the Outer Tube before performing this step.!

37
TOOLS AND HARDWARE REQUIRED FOR THIS PAGE
AQH (x1)
SEC
5.3Place the Trigger Spring (AQH) onto the Trigger (AMN) as shown. Then place the Trigger inside the Right Handle (AKN) so that the fi ts into the slot on the Outer Tube (ALB) as shown.
SEC
5.4Place the Left Handle (AKL) over the Right Handle (AKN) as shown, and attach the Handles to the Outer Tube (ALB) with the hardware shown.
Note: Pull the Trigger to ensure it moves correctly before attaching the Left Handle (AKL).!
AQHAMN
AKN
ALB
Note: To prevent stripping the holes in the Handles, do not overtighten the #6 x 5/8” Screws (ADT).!
ADT (x7)
AKL
ALB
ADT
ADT
ADT
ADT
ADT
AKN
38
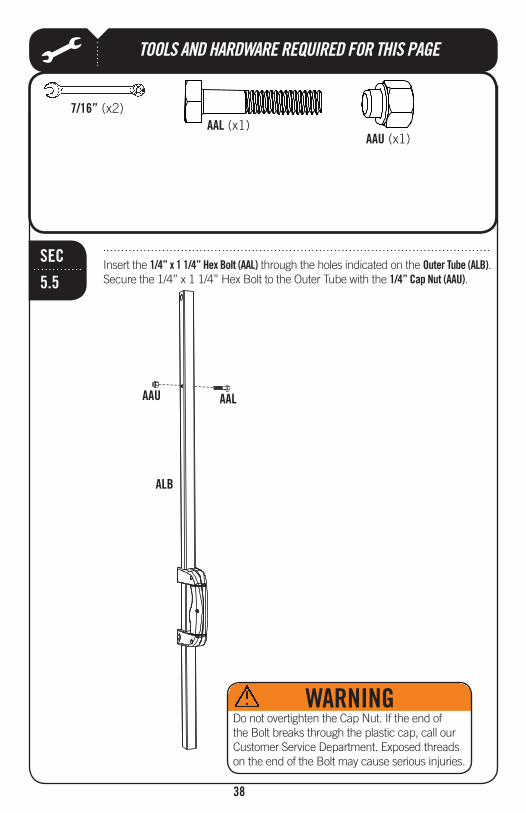
TOOLS AND HARDWARE REQUIRED FOR THIS PAGE
SEC
5.5Insert the 1/4” x 1 1/4” Hex Bolt (AAL) through the holes indicated on the Outer Tube (ALB). Secure the 1/4” x 1 1/4” Hex Bolt to the Outer Tube with the 1/4” Cap Nut (AAU).
Do not overtighten the Cap Nut. If the end of the Bolt breaks through the plastic cap, call our Customer Service Department. Exposed threads on the end of the Bolt may cause serious injuries.
AAL (x1)AAU (x1)
7/16” (x2)
ALB
AALAAU

39
TOOLS AND HARDWARE REQUIRED FOR THIS PAGE
SEC
5.6While holding the Trigger (AMN) in, insert the notched end of the Inner Channel (AKQ) into the Outer Tube (ALB). Continue to insert the Inner Channel into the Outer Tube until the Trigger clicks into the fi rst slot. Then release the Trigger.
Note: Ensure that the notches on the Inner Channel face the Handle as shown.!
ALB
AKQ
SEC
5.7Attach the Inner Channel (AKQ) to the with the hardware shown.
Do not overtighten the Cap Nut.
AAN (x1)AAM (x1)
1/2” (x2)
AAM
AAN
ALL

40
TOOLS AND HARDWARE REQUIRED FOR THIS PAGE
SEC
5.8Secure the Outer Tube (ALB) to the Long Extension Arms (AKB) with the hardware shown.
(x1)
6 5/8”
(Not actual length)
AAX (x1)ACZ (x2)
3/4” (x2)
AAX
ACZ
ACZ
Note: Tighten the 1/2” Centerlock Nut (AAX) until it is fl ush with the end of the Bolt.!
ALBAKB
AKB

41
TOOLS AND HARDWARE REQUIRED FOR THIS PAGE
SEC
5.9Insert the 3/8” x 6 1/2” Hex Bolt (ABA) through the holes in the Short Extension Arms (AKC) that are closest to the Pole. Secure the 3/8” x 6 1/2” Hex Bolt to the Short Extension Arms with the .
Note: Tighten the 3/8” Centerlock Nut until it is fl ush with the end of the Bolt.!
(Not actual length)
6 1/2”
ABA (x1) ABB (x1)
9/16” (x2)
ABA
ABB
AKC
AKC

42
TOOLS AND HARDWARE REQUIRED FOR THIS PAGETOOLS AND HARDWARE REQUIRED FOR THIS PAGE
SEC
5.10Using the closed end of a Wrench, stretch the up and over the 3/8” x 6 1/2” Hex Bolt (ABA) as shown.
ABA
Note: Make sure all hardware has been securely tightened before moving to the next section.!

43
HARDWARE REQUIRED
PARTS REQUIRED
TOOLS REQUIRED
SEC 6
Part shown at 10% of Actual Size
AKZ (x1)Net
(x2)Base Plug
Sand(362 lb)
Part shown at Actual Size Part shown at 5% of Actual Size
ALN (x1)Pole Pad
(x2)Corner Frame Guard
(x1)Center Frame Guard
Hardware shown at Actual Size
ADP (x10)
Electric Drill

44
TOOLS AND HARDWARE REQUIRED FOR THIS PAGE
SEC
6.1Remove the plastic fi lm from the , and attach the
to the Backboard in the location shown with the hardware indicated. Make sure that the Center Frame Pad is centered on the metal piece of the Backboard as shown.
SEC
6.2Attach the to the in the locations shown with the hardware indicated.
ADP
ADP
ADP
ADP
ADP
ADP
ADP (x8)

45
TOOLS AND HARDWARE REQUIRED FOR THIS PAGE
(362 lb)
SEC
6.3 (362 lb of sand required)a. Insert a into the in the hole closest to the Pole.b. Using a funnel, fi ll the Base with sand through the hole furthest from
the Pole until the sand is just below the hole.c. Using two adults, stand the Base up on a fl at surface and fi nish fi lling
the Base with sand.d. Insert the other Base Plug into the hole furthest from the Pole.
For safety reasons, we recommend that sand be used instead of water to fi ll the Base. If a leak develops, water could run out unnoticed, allowing the system to fall over, resulting in serious personal injuries, or property damage. If using Water, check the Base carefully for leaks. If a leak is found, lay the system down on the ground and call Customer Service. Do not use, stand up, or play on a leaking system.

46
TOOLS AND HARDWARE REQUIRED FOR THIS PAGE
SEC
6.3 a. Insert a into the in the hole closest to the Pole.b. Fill the Base with cold water through the hole furthest from the Pole
until the water is just below the hole.c. Using two adults, stand the Base up on a fl at
surface and fi nish fi lling the Base with water.d. Add one tablespoon of chlorine bleach to the
water to prevent algae formation.e. Insert the other Base Plug into the
hole furthest from the Pole.

47
TOOLS AND HARDWARE REQUIRED FOR THIS PAGE
SEC
6.4ALX
AKZ
Attach Net (AKZ) to the Rim (ALX).
Note: If a replacement Net is needed, please call our Customer Service Department. Our Nets are shorter than average to reduce the risk of entanglement.!
SEC
6.5Pull the Handle all the way down so the system is at the highest setting.
with the arrow on the Left Handle (AKL), and apply the Sticker to the back of the Pole as shown.
8’
8.5’
9’
9.5’
10’
AKP
AKL
48
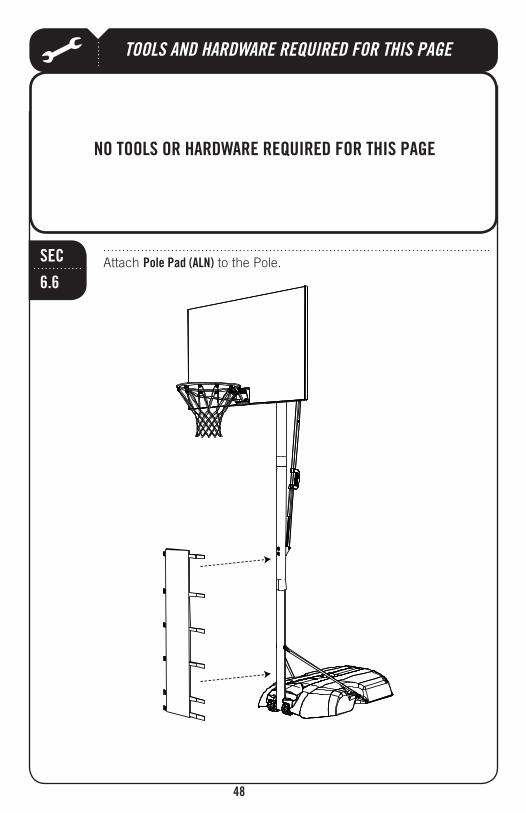
TOOLS AND HARDWARE REQUIRED FOR THIS PAGE
SEC
6.6Attach Pole Pad (ALN) to the Pole.

49
The basketball system may be adjusted from 8 feet to 10 feet.
the Backboard. Raising the Handle will lower the Backboard.
OPERATION OF HEIGHT ADJUSTMENT SYSTEM
The system must only be moved by people capable of handling its weight. Children should not be allowed to move the system.
CAUTION: The system must only be moved on its Wheels. Sliding the Base may damage the Base which could result in leakage and the
system tipping over.
MOVING THE SYSTEM
a. Adjust the system to its lowest position, and use caution to prevent the height mechanism from adjusting.b. Stand in front of the system and pull on the Pole until the unit is balanced on its Wheels.c. Move the system to the desired location and carefully set the Base down.
The life of your basketball system depends on many variables. The climate, exposure to corrosives such as salt, pesticides, or herbicides, and excessive use or misuse can all contribute to Pole failure, which may cause property damage or personal injury.
Check your basketball system frequently for loose hardware, excessive wear, and signs of corrosion. For safety reasons, and to prolong the life of your basketball system, you must take the following preventive measures.a. Check all Nuts and Bolts. If any are loose, tighten them.b. Check all parts for excessive wear and tear. If necessary, replace any parts that have been worn or damaged through usage. Contact our Customer Service Department for replacement parts.c. Inspect the Warning Sticker on the Pole. If it is ripped, faded, or illegible, call our Customer Service Department to request a replacement Sticker.d. Check all Pole sections for visible rust or chipped or cracked paint. If either are present, do the following: 1. Use an emery cloth to completely remove any rust or chipped paint. 2. Clean the area with a damp cloth and allow it to dry. 3. Apply two coats of a rust preventative, high gloss enamel paint to the
area. Allow the paint to dry between coats.
POLE CARE AND SYSTEM MAINTENANCE

50
ENHANCE YOUR LIFETIME® PURCHASE BY ADDING ACCESSORIES OR OTHER GREAT PRODUCTS:
Or call: 1-800-424-3865
To purchase accessories or other Lifetime Products, visit us at:
www.lifetime.com

51
DAÑOS A LA PROPIEDAD.
El propietario del sistema debe asegurarse de que todos los jugadores conozcan y respeten estas reglas para que el sistema se use en forma
segura.
Owners must ensure that all players know and follow these rules for safe operation of the system.
the rim as soon as safely possible.
away from the backboard, rim, and net. Serious injury could occur if teeth/face come in contact with the backboard, rim, or net. Player should wear a mouth guard during play.
unit standing in an upright position without fi rst fi lling the base with weight or the system will tip quickly causing serious personal injury.
moving parts.
entangle in net.
corrosion and/or deterioration.
con seguridad.Durante el juego, especialmente al embocar violentamente de alto, la cara
de los jugadores debe mantenerse alejada del tablero, el aro y la red. Pueden producirse lesiones graves si los dientes o la cara entran en contacto con el
el juego.No se deslice, no trepe ni juegue sobre la base o el poste.
causar graves lesiones personales.Mantenga las manos y los dedos alejados de las piezas movibles cuando
regule la altura o desplace el sistema.No deje que los niños regulen ni desplacen el sistema.No use joyas (anillos, relojes, collares o gargantillas, etc.) durante el juego.
Estos objetos pueden engancharse en la red.
No permita que la base del poste entre en contacto con materiales
deterioros.
penetrado cualquier pieza de acero, reemplace esa pieza de inmediato.
Nunca juegue con un equipo dañado.
almacenamiento y/o en una zona a resguardo del viento, lejos de propiedades personales que puedan dañarse si el sistema se cae, y de líneas de suministro de energía.
para elevar solamente el peso del tablero con el aro. No cuelgue nada de la
dañar el sistema y anular la garantía.
possible.
graves blessures si ses dents ou son visage entrent en contact avec le panneau,
blessures.
gardez vos mains et doigts loin des pièces mobiles.
autre objet qui pourrait trouer la base entraînant ainsi une fuite ce qui pourrait
pièce en question.
#FS16400 10/12/2004 www.lifetime.com
Punctures cause leakage and could cause system to tip over.
chipping). Completely remove rust and repaint with exterior enamel. If rust has penetrated any steel part, replace that part immediately.
wear, instability, and signs of corrosion and repair before use.
system in an area protected from the wind or in an area away from property that may be damaged if the system falls, and from overhead power lines.
to lift only the weight of the backboard and rim. Do not hang anything from the handle, rim backboard, or lifter arms as this will damage the system and void the warranty.
WARNING
ADVERTENCIA AVERTISSEMENT

52
UNAVAILABLE OR OBSOLETE.
material or workmanship for a period of fi ve years from the date of original retail purchase. The word “defects” is defi ned as imperfections that impair the use of the product. Defects resulting from misuse, abuse or negligence will void this warranty. This warranty does not cover defects due to improper installation, alteration or accident. This warranty does not cover damage caused by vandalism, rusting, “acts of nature” or any other event beyond the control of the manufacturer.
2. This warranty is nontransferable and is expressly limited to the repair or replacement of defective
Inc. will repair or replace defective parts at no cost to the purchaser. Shipping charges to and from
expenses for removal, installation or replacement of the basketball system or its components are not covered under this warranty.
3. This warranty does not cover scratching or scuffi ng of the product that may result from normal usage. In addition, defects resulting from intentional damage, negligence, unreasonable use or hanging from the net or rim will void this warranty.
every attempt is made to embody the highest degree of safety in all equipment, freedom from injury cannot be guaranteed. The user assumes all risk of injury resulting from the use of this product. All merchandise is sold on this condition, and no representative of the company may waive or change this policy.
any liability for such use. Institutional or commercial use will void the warranty.
6. This warranty is expressly in lieu of all other warranties, expressed or implied, including warranties
Products, Inc., nor any representative assumes any other liability in connection with this product. This warranty gives you specifi c legal rights, and you may also have other rights which vary from state to state.
**Call or visit our Web site for Saturday hours**
Please include your dated sales receipt and photographs of damaged parts.
WARRANTY INFORMATION
www.lifetime.com