MODEL MX-M550U MX-M620U MX-M700U MX-M550N...
200
PART 1: GENERAL INFORMATION • BEFORE USING THE PRODUCT • MANAGING THE MACHINE • PERIPHERAL DEVICES PART 2: COPIER OPERATION • MAKING COPIES • CONVENIENT COPY FUNCTIONS • MACHINE MAINTENANCE (FOR COPYING) • DOCUMENT FILING FUNCTION • SPECIFICATIONS 1-1 2-1 3-1 4-1 5-1 6-1 7-1 8-1 Page OPERATION MANUAL (for general information and copier operation) MODEL MX-M550U MX-M620U MX-M700U MX-M550N MX-M620N MX-M700N DIGITAL MULTIFUNCTIONAL SYSTEM Be sure to become thoroughly familiar with this manual to gain the maximum benefit from the product. Before installing this product, be sure to read the installation requirements and cautions sections. Be sure to keep all operation manuals handy for reference including this manual, the "Operation manual (for general information and copier operation)" and operation manuals for any optional equipment which has been installed.
Transcript of MODEL MX-M550U MX-M620U MX-M700U MX-M550N...
PART 1: GENERAL INFORMATION
• BEFORE USING THE PRODUCT
• MANAGING THE MACHINE• PERIPHERAL DEVICESPART 2: COPIER OPERATION
• MAKING COPIES• CONVENIENT COPY
FUNCTIONS• MACHINE MAINTENANCE
(FOR COPYING) • DOCUMENT FILING
FUNCTION• SPECIFICATIONS
1-12-13-1
4-1
5-1
6-1
7-18-1
Page
OPERATION MANUAL(for general information and copier operation)
MODEL
MX-M550UMX-M620UMX-M700UMX-M550NMX-M620NMX-M700N
DIGITAL MULTIFUNCTIONALSYSTEM
NAKS1CZZ
Be sure to become thoroughly familiar with this manual to gain the maximum benefit from the product.
Before installing this product, be sure to read the installation requirements and cautions sections.
Be sure to keep all operation manuals handy for reference including this manual, the "Operation manual (for general information and copier operation)" and operation manuals for any optional equipment which has been installed.
MX
-M550U
/MX
-M620U
/MX
-M700U
/MX
-M550N
/MX
-M620N
/MX
-M700N
OP
ER
ATIO
N M
AN
UA
L (for general information and copier operation)
dragonII_copy_sec.book 1 ページ 2006年10月18日 水曜日 午後7時39分
Note:
This equipment has been tested and found to comply with the limits for a Class B digital device, pursuant to Part 15of the FCC Rules. These limits are designed to provide reasonable protection against harmful interference in aresidential installation. This equipment generates, uses and can radiate radio frequency energy and, if not installedand used in accordance with the instructions, may cause harmful interference to radio communications. However,there is no guarantee that interference will not occur in a particular installation. If this equipment does cause harmfulinterference to radio or television reception, which can be determined by turning the equipment off and on, the useris encouraged to try to correct the interference by one or more of the following measures:
● Reorient or relocate the receiving antenna.● Increase the separation between the equipment and receiver.● Connect the equipment into an outlet on a circuit different from that to which the receiver is connected.● Consult the dealer or an experienced radio/TV technician for help.
Model Number: MX-M550U/MX-M550N/MX-M620U/MX-M620N/MX-M700U/MX-M700NMX-M550U J/MX-M620U J/MX-M700U J
Declaration of ConformityThis device complies with Part 15 of the FCC Rules. Operation is subject to the following two conditions:(1) This device may not cause harmful interference, and (2) this device must accept any interference received,including interference that may cause undersired operation.
Responsible Party: SHARP ELECTRONICS CORPORATION Sharp Plaza, Mahwah, New Jersey 07430TEL:1-800-BE-SHARP
Each instruction also covers the optional units used with these products.
The power switch positions are marked " I " to indicate power "ON" and " " to indicate stand-by.In the stand-by position, power is being supplied to a drying heater within the paper tray and sensor system in theprinter.Caution:
For complete electrical disconnection, pull out the main plug.The socket-outlet shall be installed near the equipment and shall be easily accessible.
FOR YOUR RECORDS ...
To protect against loss or theft, record and retain for reference the machine's serial number located on the backof the unit.
Model Number
Serial Number
Date of Purchase
Place of Purchase
Authorized Sharp Printer
Service Department Number
WARNING:
FCC Regulations state that any unauthorized changes or modifications to this equipment not expressly approvedby the manufacturer could void the user's authority to operate this equipment.
Shielded interface cables must be used with this equipment to maintain compliance with EMC regulations.
dragon_cover2.fm 1 ページ 2006年11月29日 水曜日 午後8時25分
Trademark acknowledgmentsThe following trademarks and registered trademarks are used in conjunction with the machine and its peripheral devices andaccessories.• Microsoft®, Windows®, Windows® 98, Windows® Me, Windows NT® 4.0, Windows® 2000, Windows® XP, Windows® Server
2003 and Internet Explorer® are registered trademarks or trademarks of Microsoft Corporation in the U.S.A. and other countries.
• PostScript is a registered trademark of Adobe Systems Incorporated.
• Macintosh, Mac OS, AppleTalk, EtherTalk, LaserWriter, and Safari are registered trademarks or trademarks of Apple Computer, Inc.
• Netscape Navigator is a trademark of Netscape Communications Corporation.• Adobe, the Adobe logo, Acrobat, the Adobe PDF logo, and Reader are registered trademarks or trademarks of Adobe
Systems Incorporated in the United States and other countries.
• PCL is a registered trademark of the Hewlett-Packard Company.
• IBM, PC/AT, and PowerPC are trademarks of International Business Machines Corporation.• Sharpdesk is a trademark of Sharp Corporation.
• All other trademarks and copyrights are the property of their respective owners.
Candid and Taffy are trademarks of Monotype Imaging, Inc. registered in the United States Patent and Trademark Office and maybe registered in certain jurisdictions. CG Omega, CG Times, Garamond Antiqua, Garamond Halbfett, Garamond Kursiv,Garamond and Halbfett Kursiv are trademarks of Monotype Imaging, Inc. and may be registered in certain jurisdictions. Albertus,Arial, Coronet, Gill Sans, Joanna and Times New Roman are trademarks of The Monotype Corporation registered in the UnitedStates Patent and Trademark Office and may be registered in certain jurisdictions. Avant Garde, ITC Bookman, Lubalin Graph,Mona Lisa, Zapf Chancery and Zapf Dingbats are trademarks of International Typeface Corporation registered in the UnitedStates Patent and Trademark Office and may be registered in certain jurisdictions. Clarendon, Eurostile, Helvetica, Optima,Palatino, Stempel Garamond, Times and Univers are trademarks of Heidelberger Druckmaschinen AG, which may be registeredin certain jurisdictions, exclusively licensed through Linotype Library GmbH, a wholly owned subsidiary of HeidelbergerDruckmaschinen AG. Apple Chancery, Chicago, Geneva, Monaco and New York are trademarks of Apple Computer Inc. and maybe registered in certain jurisdictions. HGGothicB, HGMinchoL, HGPGothicB and HGPMinchoL are trademarks of Ricoh Company,Ltd. and may be registered in some jurisdictions. Wingdings is a registered trademark of Microsoft Corporation in the United Statesand other countries. Marigold and Oxford are trademarks of Arthur Baker and may be registered in some jurisdictions. AntiqueOlive is a trademark of Marcel Olive and may be registered in certain jurisdictions. Hoefler Text is a trademark of JohnathanHoefler and may be registered in some jurisdictions. ITC is a trademark of International Typeface Corporation registered in theUnited States Patent and Trademark Office and may be registered in certain jurisdictions. Agfa is a trademark of the Agfa-GevaertGroup and may be registered in certain jurisdictions. Intellifont, MicroType and UFST are trademarks of Monotype Imaging, Inc.registered in the United States Patent and Trademark Office and may be registered in certain jurisdictions. Macintosh andTrueType are trademarks of Apple Computer Inc. registered in the United States Patent and Trademark Office and other countries.PostScript is a trademark of Adobe Systems Incorporated and may be registered in some jurisdictions. HP, PCL, FontSmart andLaserJet are trademarks of Hewlett-Packard Company and may be registered in some jurisdictions. The Type 1 processor residentin Monotype Imaging's UFST product is under license from Electronics For Imaging, Inc. All other trademarks are the property oftheir respective owners.
The Environmental Choice Program guidelines are applied to the products only in Canada. Theproducts that meet the Environmental Choice Program guidelines carry the logo shown to the left. Theproducts without the logo may not meet the Environmental Choice Program guidelines.
dragonII_copy_sec.book 2 ページ 2006年10月18日 水曜日 午後7時39分

dragonII_copy_sec.book 3 ページ 2006年10月18日 水曜日 午後7時39分

Part 1: General Information
dragonII_copy_sec.book 1 ページ 2006年10月18日 水曜日 午後7時39分

dragonII_copy_sec.book 2 ページ 2006年10月18日 水曜日 午後7時39分
0-1
WarrantyWhile every effort has been made to make this document as accurate and helpful as possible, SHARP Corporation makesno warranty of any kind with regard to its content. All information included herein is subject to change without notice. SHARPis not responsible for any loss or damages, direct or indirect, arising from or related to the use of this operation manual.
© Copyright SHARP Corporation 2006. All rights reserved. Reproduction, adaptation or translation without priorwritten permission is prohibited, except as allowed under copyright laws.
OPERATION MANUALSThe following operation manuals are provided for the machine. Please read the appropriate manuals as needed forthe features you wish to learn about.
● Operation manual (for general information and copier operation) (this manual)The first half of this manual provides general information about the machine, including safety information, loadingpaper, removing misfeeds, and regular maintenance.The second half of the manual explains how to use the copy and document filing functions.● Administrator settings guideThe administrator settings are used by the administrator of the machine to configure functions to meet the needsof your workplace.This guide explains administrator settings for machine management, copying, and document filing. Administratorsettings for the fax, printer, network scanner and Internet fax functions are explained in the manuals for thosefunctions.● Software setup guideThis manual mainly explains how to install and configure the software that allows the machine to be used as aprinter.● Operation manual (for printer)*1
This manual explains the procedures for using the machine as a printer.● Operation manual (for image send)*1
This manual explains the procedures for using the image send feature of the machine, including the networkscanner and Internet fax functions.To use the network scanner function, the network function of the machine must be in a useable state*2 and thenetwork scanner expansion kit must be installed.To use the Internet fax function, the network function of the machine must be in a useable state*2 and the networkscanner expansion kit and the Internet fax expansion kit must be installed.
*1 The Operation manual (for printer) and the Operation manual (for image send) are provided as PDF files in theCD-ROM.These manuals are not provided as printed manuals.
*2 On the MX-M550U/M620U/M700U, the network expansion kit is required.
NOTES● Considerable care has been taken in preparing this manual. If you have any comments or concerns about the
manual, please contact your nearest SHARP Service Department.● This product has undergone strict quality control and inspection procedures. In the unlikely event that a defect
or other problem is discovered, please contact your dealer or nearest SHARP Service Department.● Aside from instances provided for by law, SHARP is not responsible for failures occurring during use of the
product or its options, or failures due to incorrect operation of the product and its options, or other failures, or forany damage that occurs due to use of the product.
The display screens, messages, and key names shown in the manual may differ from those on the actual machinedue to product improvements and modifications.
dragon_00.fm 1 ページ 2006年10月20日 金曜日 午前11時48分
0-2
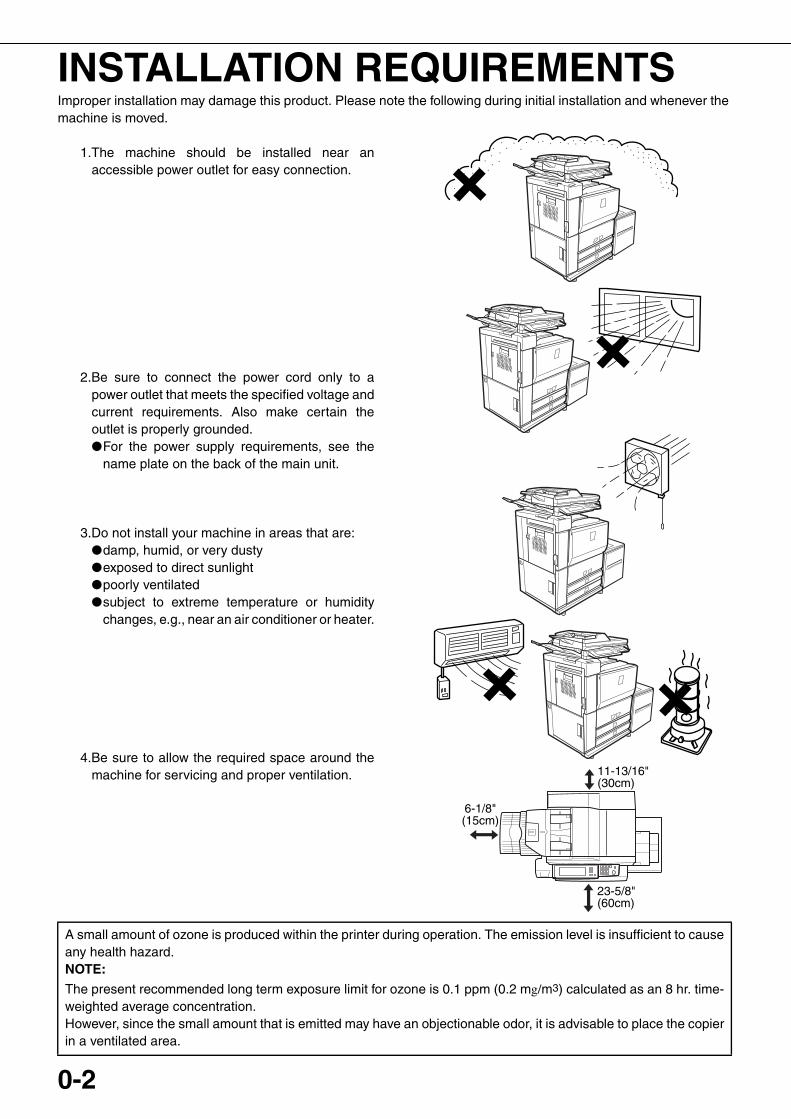
Improper installation may damage this product. Please note the following during initial installation and whenever themachine is moved.
1.The machine should be installed near anaccessible power outlet for easy connection.
2.Be sure to connect the power cord only to apower outlet that meets the specified voltage andcurrent requirements. Also make certain theoutlet is properly grounded.●For the power supply requirements, see the
name plate on the back of the main unit.
3.Do not install your machine in areas that are:●damp, humid, or very dusty ●exposed to direct sunlight ●poorly ventilated ●subject to extreme temperature or humidity
changes, e.g., near an air conditioner or heater.
4.Be sure to allow the required space around themachine for servicing and proper ventilation.
A small amount of ozone is produced within the printer during operation. The emission level is insufficient to causeany health hazard.NOTE:
The present recommended long term exposure limit for ozone is 0.1 ppm (0.2 mg/m3) calculated as an 8 hr. time-weighted average concentration.However, since the small amount that is emitted may have an objectionable odor, it is advisable to place the copierin a ventilated area.
6-1/8"(15cm)
23-5/8"(60cm)
11-13/16"(30cm)
INSTALLATION REQUIREMENTS
dragonII_copy_sec.book 2 ページ 2006年10月18日 水曜日 午後7時39分
0-3
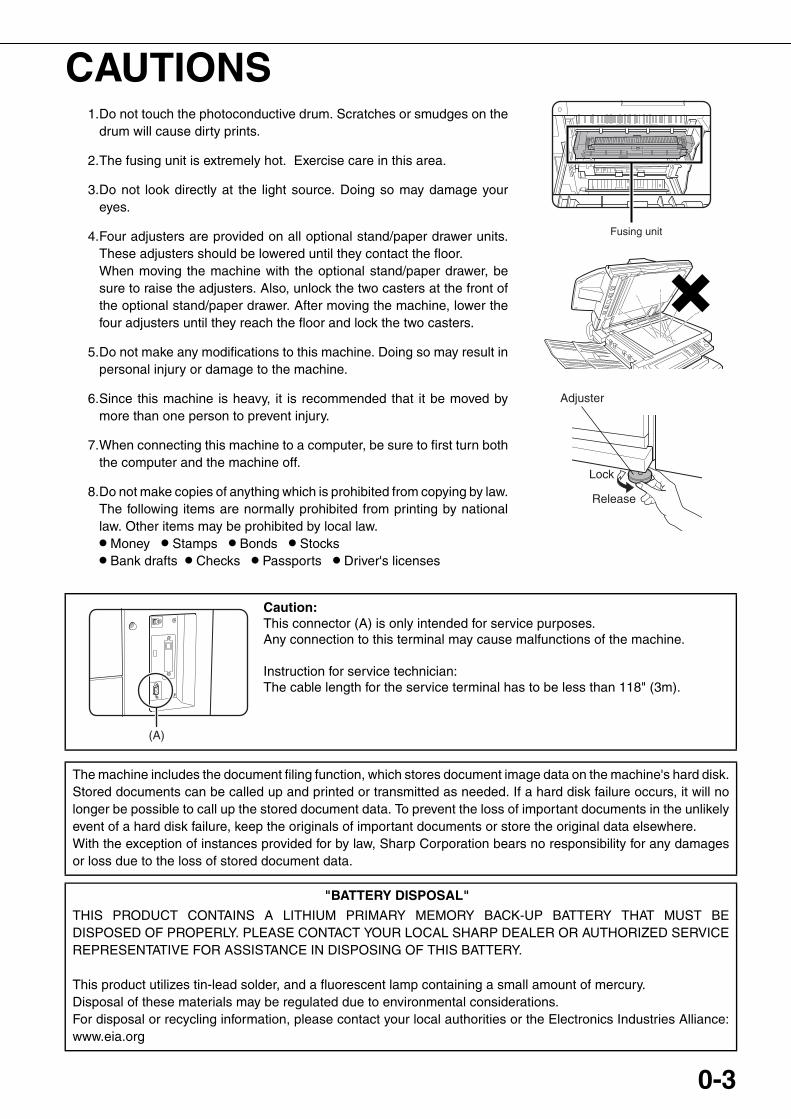
CAUTIONS1.Do not touch the photoconductive drum. Scratches or smudges on the
drum will cause dirty prints.
2.The fusing unit is extremely hot. Exercise care in this area.
3.Do not look directly at the light source. Doing so may damage youreyes.
4.Four adjusters are provided on all optional stand/paper drawer units.These adjusters should be lowered until they contact the floor. When moving the machine with the optional stand/paper drawer, besure to raise the adjusters. Also, unlock the two casters at the front ofthe optional stand/paper drawer. After moving the machine, lower thefour adjusters until they reach the floor and lock the two casters.
5.Do not make any modifications to this machine. Doing so may result inpersonal injury or damage to the machine.
6.Since this machine is heavy, it is recommended that it be moved bymore than one person to prevent injury.
7.When connecting this machine to a computer, be sure to first turn boththe computer and the machine off.
8.Do not make copies of anything which is prohibited from copying by law.The following items are normally prohibited from printing by nationallaw. Other items may be prohibited by local law.● Money ● Stamps ● Bonds ● Stocks ● Bank drafts ● Checks ● Passports ● Driver's licenses
Caution:This connector (A) is only intended for service purposes.Any connection to this terminal may cause malfunctions of the machine.
Instruction for service technician:The cable length for the service terminal has to be less than 118" (3m).
The machine includes the document filing function, which stores document image data on the machine's hard disk.Stored documents can be called up and printed or transmitted as needed. If a hard disk failure occurs, it will nolonger be possible to call up the stored document data. To prevent the loss of important documents in the unlikelyevent of a hard disk failure, keep the originals of important documents or store the original data elsewhere. With the exception of instances provided for by law, Sharp Corporation bears no responsibility for any damagesor loss due to the loss of stored document data.
"BATTERY DISPOSAL"
THIS PRODUCT CONTAINS A LITHIUM PRIMARY MEMORY BACK-UP BATTERY THAT MUST BEDISPOSED OF PROPERLY. PLEASE CONTACT YOUR LOCAL SHARP DEALER OR AUTHORIZED SERVICEREPRESENTATIVE FOR ASSISTANCE IN DISPOSING OF THIS BATTERY.
This product utilizes tin-lead solder, and a fluorescent lamp containing a small amount of mercury. Disposal of these materials may be regulated due to environmental considerations.For disposal or recycling information, please contact your local authorities or the Electronics Industries Alliance:www.eia.org
Fusing unit
Adjuster
Lock
Release
(A)
dragon_00.fm 3 ページ 2006年11月29日 水曜日 午後8時26分
CAUTIONS
0-4
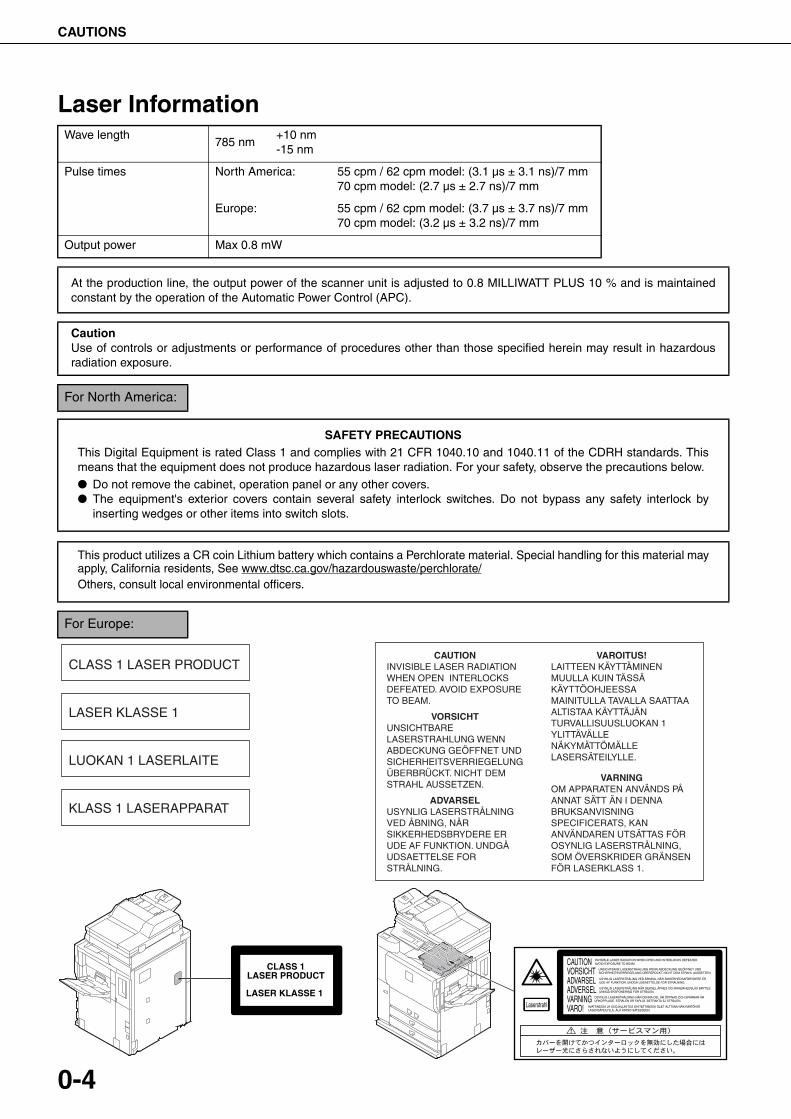
Laser InformationWave length
785 nm+10 nm-15 nm
Pulse times North America: 55 cpm / 62 cpm model: (3.1 µs ± 3.1 ns)/7 mm70 cpm model: (2.7 µs ± 2.7 ns)/7 mm
Europe: 55 cpm / 62 cpm model: (3.7 µs ± 3.7 ns)/7 mm70 cpm model: (3.2 µs ± 3.2 ns)/7 mm
Output power Max 0.8 mW
At the production line, the output power of the scanner unit is adjusted to 0.8 MILLIWATT PLUS 10 % and is maintainedconstant by the operation of the Automatic Power Control (APC).
CautionUse of controls or adjustments or performance of procedures other than those specified herein may result in hazardousradiation exposure.
For North America:
SAFETY PRECAUTIONSThis Digital Equipment is rated Class 1 and complies with 21 CFR 1040.10 and 1040.11 of the CDRH standards. Thismeans that the equipment does not produce hazardous laser radiation. For your safety, observe the precautions below.
● Do not remove the cabinet, operation panel or any other covers.● The equipment's exterior covers contain several safety interlock switches. Do not bypass any safety interlock by
inserting wedges or other items into switch slots.
This product utilizes a CR coin Lithium battery which contains a Perchlorate material. Special handling for this material mayapply, California residents, See www.dtsc.ca.gov/hazardouswaste/perchlorate/Others, consult local environmental officers.
For Europe:
CLASS 1 LASER PRODUCT
LASER KLASSE 1
LUOKAN 1 LASERLAITE
KLASS 1 LASERAPPARAT
CAUTIONINVISIBLE LASER RADIATION WHEN OPEN INTERLOCKS DEFEATED. AVOID EXPOSURE TO BEAM.
VORSICHTUNSICHTBARE LASERSTRAHLUNG WENN ABDECKUNG GEÖFFNET UND SICHERHEITSVERRIEGELUNG ÜBERBRÜCKT. NICHT DEM STRAHL AUSSETZEN.
ADVARSELUSYNLIG LASERSTRÅLNING VED ÅBNING, NÅR SIKKERHEDSBRYDERE ER UDE AF FUNKTION. UNDGÅ UDSAETTELSE FOR STRÅLNING.
VAROITUS!LAITTEEN KÄYTTÄMINEN MUULLA KUIN TÄSSÄ KÄYTTÖOHJEESSA MAINITULLA TAVALLA SAATTAA ALTISTAA KÄYTTÄJÄN TURVALLISUUSLUOKAN 1 YLITTÄVÄLLE NÄKYMÄTTÖMÄLLE LASERSÄTEILYLLE.
VARNINGOM APPARATEN ANVÄNDS PÅ ANNAT SÄTT ÄN I DENNA BRUKSANVISNING SPECIFICERATS, KAN ANVÄNDAREN UTSÄTTAS FÖR OSYNLIG LASERSTRÅLNING, SOM ÖVERSKRIDER GRÄNSEN FÖR LASERKLASS 1.
CLASS 1LASER PRODUCT
LASER KLASSE 1
CAUTIONVORSICHTADVARSELADVERSELVARNINGVARO!
INVISIBLE LASER RADIATION WHEN OPEN AND INTERLOCKS DEFEATED. AVOID EXPOSURE TO BEAM.
Laserstrahl
UNSICHTBARE LASERSTRAHLUNG WENN ABDECKUNG GEÖFFNET UND SICHERHEITSVERRIEGELUNG ÜBERERÜCKT. NICHT DEM STRAHL AUSSETZEN.
USYNLIG LASERSTRÅLING VED ÅBNING, NÅR SIKKERHEDSAFBRYDERE ER UDE AF FUNKTION. UNDGÅ UDSAETTELSE FOR STRÅLNING.
USYNLIG LASERSTRÅLING NÅR DEKSEL ÅPNES OG SIKKERHEDSLÅS BRYTES.UNNGÅ EKSPONERING FOR STRÅLEN.
OSYNLIG LASERSTRÅLNING NÄR DENNA DEL ÄR ÖPPNAD OCH SPÄRRAR ÄR URKOPPLADE. STRÅLEN ÄR FARLIG. BETRAKTA EJ STRÅLEN.
AVATTAESSA JA SUOJALUKITUS OHITETTAESSA OLET ALTTIINA NÄKYMÄTÖNTÄLASERSÄTEILYLLE. ÄLÄ KATSO SÄTEESEEN.
dragon_00.fm 4 ページ 2006年11月29日 水曜日 午後8時36分
0-5
CONTENTSPage
OPERATION MANUALS .............................................. 0-1INSTALLATION REQUIREMENTS............................... 0-2CAUTIONS................................................................... 0-3
● Laser Information ................................................. 0-4CONTENTS ................................................................. 0-5
CHAPTER 1BEFORE USING THE PRODUCT
INTRODUCTION.......................................................... 1-2MAIN FEATURES ........................................................ 1-3PART NAMES AND FUNCTIONS................................ 1-10
● Exterior................................................................. 1-10● Interior .................................................................. 1-11● Operation panel.................................................... 1-13● Touch panel .......................................................... 1-14
TURNING THE POWER ON AND OFF ....................... 1-17AUDITING MODE ........................................................ 1-18
● Using the machine when the auditing mode isenabled................................................................. 1-18
CHAPTER 2MANAGING THE MACHINE
LOADING PAPER ........................................................ 2-2● Identifying the trays .............................................. 2-2● Loading paper in paper tray 1 - tray 2 .................. 2-2● Changing the paper size in paper tray 1 - tray 2 .. 2-3● Loading paper in paper tray 3 .............................. 2-5● Changing the paper size in paper tray 3 .............. 2-5● Changing the paper size in paper tray 4 .............. 2-6● Loading paper in paper tray 5 (optional large
capacity tray AR-LC6) ..................................................2-7● Loading paper in paper tray 5 (optional large
capacity tray AR-LC7) ..................................................2-8● Loading paper in the bypass tray ......................... 2-10● Specifications of paper trays (Types and sizes of
paper that can be used in the trays)..................... 2-12● Setting the paper type and paper size.................. 2-14● Setting the paper size when a special size is
loaded .................................................................. 2-17SYSTEM SETTINGS ................................................... 2-18
● General procedure for system settings ................ 2-18● About the settings ................................................ 2-20
REPLACING THE TONER CARTRIDGES .................. 2-21STORAGE OF SUPPLIES ........................................... 2-22MISFEED REMOVAL ................................................... 2-23
● Misfeed removal guidance.................................... 2-23● Misfeed in the transport area, fusing area, and
exit area................................................................ 2-24● Misfeed in the duplex unit..................................... 2-25● Misfeed in the paper feed area............................. 2-26
REMOVING AN ORIGINAL MISFEED......................... 2-31● Removing a misfed original from the automatic
document feeder .................................................. 2-31TROUBLESHOOTING ................................................. 2-32
CHAPTER 3PERIPHERAL DEVICES
FINISHER AND SADDLE STITCH FINISHER .............3-2● Part names ...........................................................3-2● Specifications .......................................................3-2● Finishing methods ................................................3-4● Finishing modes and finisher functions ................3-6● Staple cartridge replacement and staple jam
removal .................................................................3-7● Removing a misfeed .............................................3-11● Troubleshooting finisher/saddle stitch finisher
problems...............................................................3-13INSERTER ...................................................................3-14
● Part names ...........................................................3-14● Specifications .......................................................3-14● Loading paper.......................................................3-15● Manual operation of the inserter...........................3-15● Misfeed removal ...................................................3-17● Troubleshooting inserter problems .......................3-18
SHARP OSA.................................................................3-19APPLICATION COMMUNICATION MODULE (MX-
AMX2)...........................................................................3-19● Standard application setup ...................................3-19● Selecting a standard application...........................3-19● Operation in OSA mode .......................................3-20
EXTERNAL ACCOUNT MODULE (MX-AMX3)............3-21● External account application setup.......................3-21● Operation in external account mode.....................3-21
CHAPTER 4MAKING COPIES
AUTOMATIC DOCUMENT FEEDER............................4-2● Acceptable originals .............................................4-2
PLACING ORIGINALS .................................................4-3CHECKING THE SIZE OF A PLACED ORIGINAL.......4-5
● Manually setting the scanning size .......................4-5STORING, DELETING, AND USING ORIGINALSIZES ...........................................................................4-6
● Storing or deleting an original size .......................4-6NORMAL COPYING.....................................................4-7
● Making copies with the automatic documentfeeding function ....................................................4-7
● Automatic two-sided copying using the automaticdocument feeding function....................................4-10
● Copying from the document glass ........................4-11● Automatic two-sided copying from the document
glass .....................................................................4-13ADJUSTING THE EXPOSURE ....................................4-14REDUCTION/ENLARGEMENT/ZOOM ........................4-15
● Automatic selection (auto image) .........................4-15● Manual selection (preset copy ratios/zoom) .........4-16● XY ZOOM .............................................................4-18
SPECIAL PAPERS .......................................................4-20
dragon_00.fm 5 ページ 2006年10月18日 水曜日 午後8時27分
CONTENTS
0-6
CHAPTER 5CONVENIENT COPY FUNCTIONS
SPECIAL MODES ........................................................5-2● General procedure for using special functions .....5-2● Margin shift ...........................................................5-3● Erase ....................................................................5-4● Dual page copy.....................................................5-5● Pamphlet copy ......................................................5-6● Job build ...............................................................5-8● Tandem copy ........................................................5-10● Covers/inserts.......................................................5-12● Transparency film with insert sheets ....................5-23● Multi shot ..............................................................5-24● Book copy.............................................................5-26● Tab copy ...............................................................5-27● Card shot ................................................................. 5-29● Mirror image .........................................................5-31● B/W reverse..........................................................5-31● Print menu ............................................................5-32
STORING, USING AND DELETING JOB
PROGRAMS.................................................................5-44● Storing a job program...........................................5-44● Calling up a job program ......................................5-45● Deleting a stored job program ..............................5-45
INTERRUPTING A COPY RUN ...................................5-46
CHAPTER 6MACHINE MAINTENANCE (FORCOPYING)
USER MAINTENANCE ................................................6-2● Cleaning the document glass and the automatic
document feeder...................................................6-2TROUBLESHOOTING..................................................6-3
CHAPTER 7DOCUMENT FILING FUNCTION
OVERVIEW ..................................................................7-2● Document filing function .......................................7-2
TO USE THE DOCUMENT FILING FUNCTION ..........7-4● A look at the operation panel................................7-4● Saving files ...........................................................7-4● Main screen of document filing.............................7-5● Document filing icons ...........................................7-5
SAVING A DOCUMENT IMAGE FILE..........................7-6● Quick File..............................................................7-6● Filing .....................................................................7-7● Print jobs ..............................................................7-9● Scan Save ............................................................7-10
CALLING UP AND USING A FILE ...............................7-13● Searching for and calling up a saved file .............. 7-13● Calling up and using a saved file ..........................7-15
SYSTEM SETTINGS....................................................7-24● Creating, editing, and deleting user names and
folders...................................................................7-24ENTERING CHARACTERS .........................................7-29TROUBLESHOOTING..................................................7-31
CHAPTER 8SPECIFICATIONS
SPECIFICATIONS ....................................................... 8-2INDEX.......................................................................... 8-4
dragonII_copy_sec.book 6 ページ 2006年10月18日 水曜日 午後7時39分
1-1
CHAPTER 1BEFORE USING THE
PRODUCTThis chapter contains basic information that should be read before usingthe product.
Page
INTRODUCTION..................................................................................... 1-2MAIN FEATURES ................................................................................... 1-3
PART NAMES AND FUNCTIONS........................................................... 1-10● Exterior............................................................................................ 1-10● Interior ............................................................................................. 1-11● Operation panel............................................................................... 1-13● Touch panel..................................................................................... 1-14
TURNING THE POWER ON AND OFF.................................................. 1-17
AUDITING MODE ................................................................................... 1-18● Using the machine when the auditing mode is enabled.................. 1-18
dragonII_copy_sec.book 1 ページ 2006年10月18日 水曜日 午後7時39分
1-2
INTRODUCTIONThank you for purchasing a SHARP digital multifunction copier.Please read this manual before using the machine. In particular, be sure to read "INSTALLATION REQUIREMENTS"before using the machine.Please keep this manual close at hand for reference whenever necessary.This manual provides general information on using the machine, such as routine maintenance and how to load paperand remove misfeeds. It also explains how to use the copier and document filing functions.Separate manuals have been provided for the fax function, printer function, and network scanner function.
■ Original and paper sizesThis machine allows use of standard sizes in both the inch and AB systems.These are shown in the tables below.
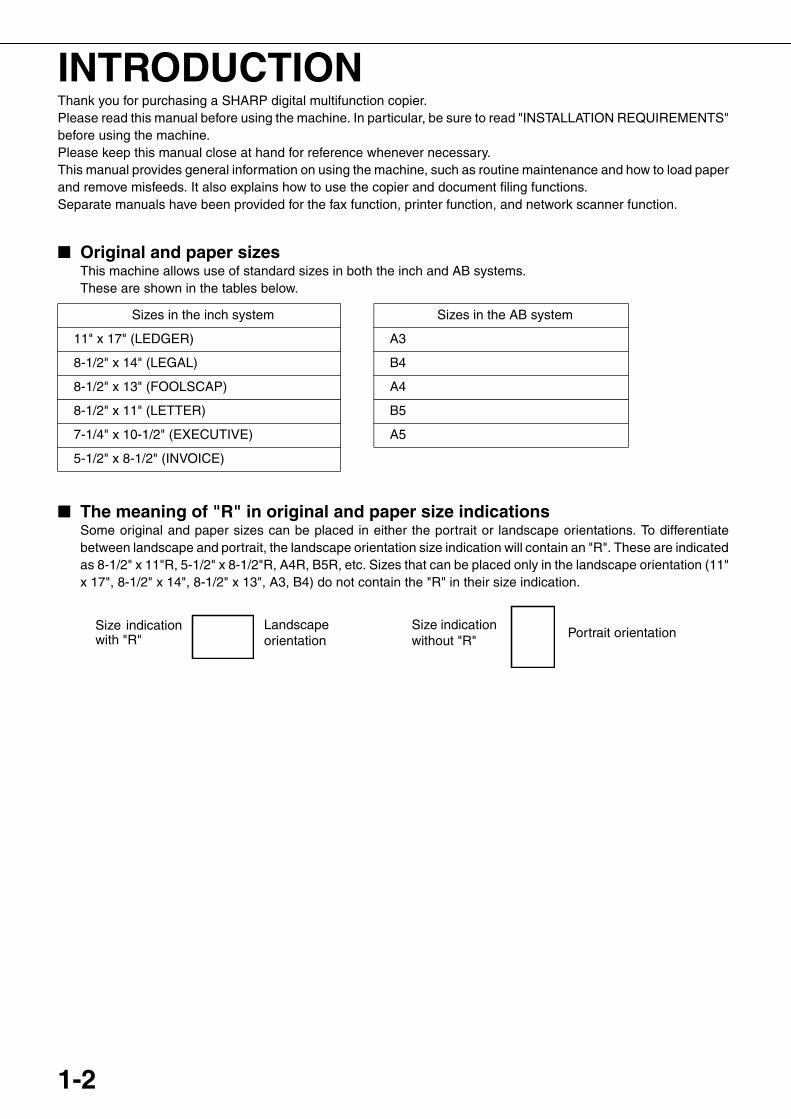
■ The meaning of "R" in original and paper size indicationsSome original and paper sizes can be placed in either the portrait or landscape orientations. To differentiatebetween landscape and portrait, the landscape orientation size indication will contain an "R". These are indicatedas 8-1/2" x 11"R, 5-1/2" x 8-1/2"R, A4R, B5R, etc. Sizes that can be placed only in the landscape orientation (11"x 17", 8-1/2" x 14", 8-1/2" x 13", A3, B4) do not contain the "R" in their size indication.
Sizes in the inch system Sizes in the AB system
11" x 17" (LEDGER) A3
8-1/2" x 14" (LEGAL) B4
8-1/2" x 13" (FOOLSCAP) A4
8-1/2" x 11" (LETTER) B5
7-1/4" x 10-1/2" (EXECUTIVE) A5
5-1/2" x 8-1/2" (INVOICE)
Size indicationwith "R"
Landscapeorientation
Size indicationwithout "R"
Portrait orientation
dragonII_copy_sec.book 2 ページ 2006年10月18日 水曜日 午後7時39分
1-3
1
MAIN FEATURESThe digital multifunction copier is capable of performing a variety of functions. This page shows features related tothe copy function.
● Sort mode See page 1-3● Group mode See page 1-3● 2-sided Copy See page 1-3● Exposure Adjustments See page 1-3● Reduction/Enlargement See page 1-4● XY Zoom See page 1-4● Margin Shift See page 1-4● Erase See page 1-4● Dual Page Copy See page 1-4● Pamphlet Copy See page 1-4● Job Build See page 1-5● Tandem Copy See page 1-5
(When using the MX-M550U, MX-M620U, orMX-M700U, the network expansion kit is required.)
● Covers/inserts See page 1-5● Transparency Insert See page 1-5● Multi Shot See page 1-5● Book Copy See page 1-5● Tab Copy See page 1-6● Card Shot See page 1-6
● Job programs See page 1-6● Mirror Image See page 1-6● B/W Reverse See page 1-6● Date print See page 1-6● Stamp See page 1-7● Page numbering See page 1-7● Text See page 1-7● Interrupting a copy run See page 1-7● Offset mode See page 1-7
(When the Finisher or Saddle stitch finisher is installed.)● Staple sort mode See page 1-7
(When the Finisher or Saddle stitch finisher is installed.)● Saddle stitch See page 1-8
(When the Saddle stitch finisher is installed.)● Hole punching See page 1-8
(When the Punch Module is installed.)● Inserter mode See page 1-8
(When the Inserter is installed.)● Document filing function See page 1-8
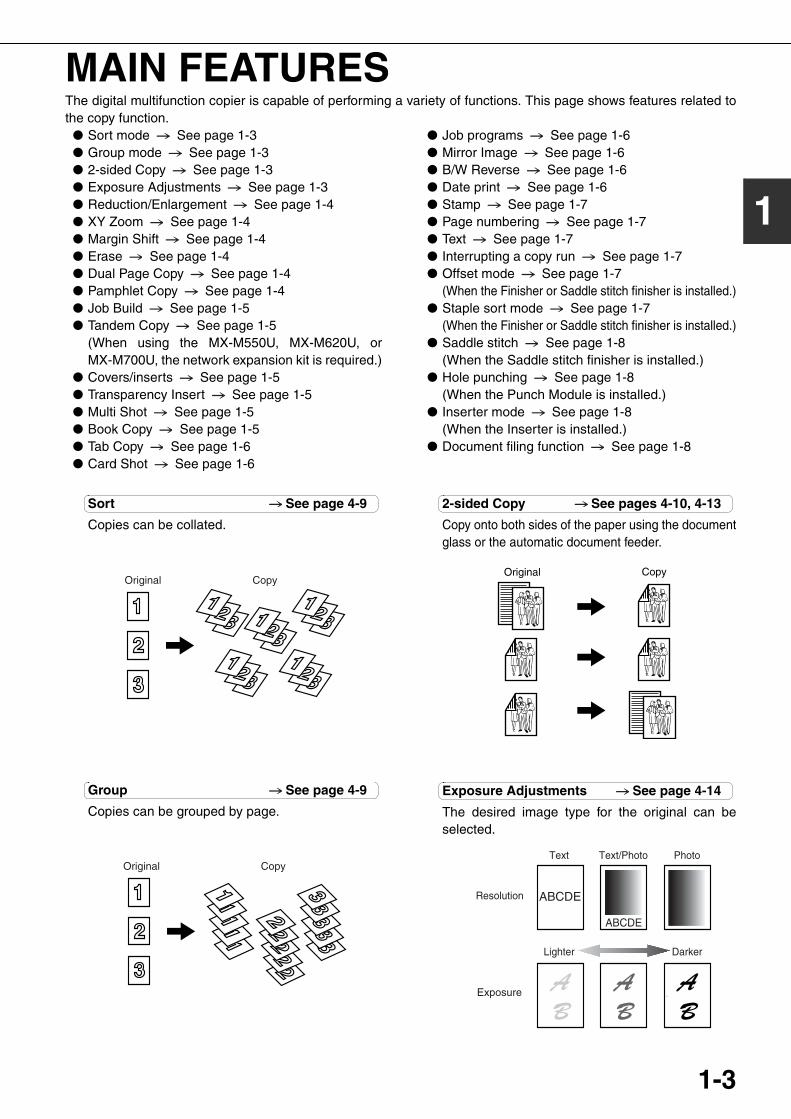
Sort See page 4-9
Copies can be collated.
Group See page 4-9
Copies can be grouped by page.
2-sided Copy See pages 4-10, 4-13
Copy onto both sides of the paper using the documentglass or the automatic document feeder.
Exposure Adjustments See page 4-14
The desired image type for the original can beselected.
Original Copy
Original Copy
Original Copy
Exposure
Text Text/Photo Photo
Resolution ABCDE
ABCDE
DarkerLighter
dragonII_copy_sec.book 3 ページ 2006年10月18日 水曜日 午後7時39分
MAIN FEATURES
1-4
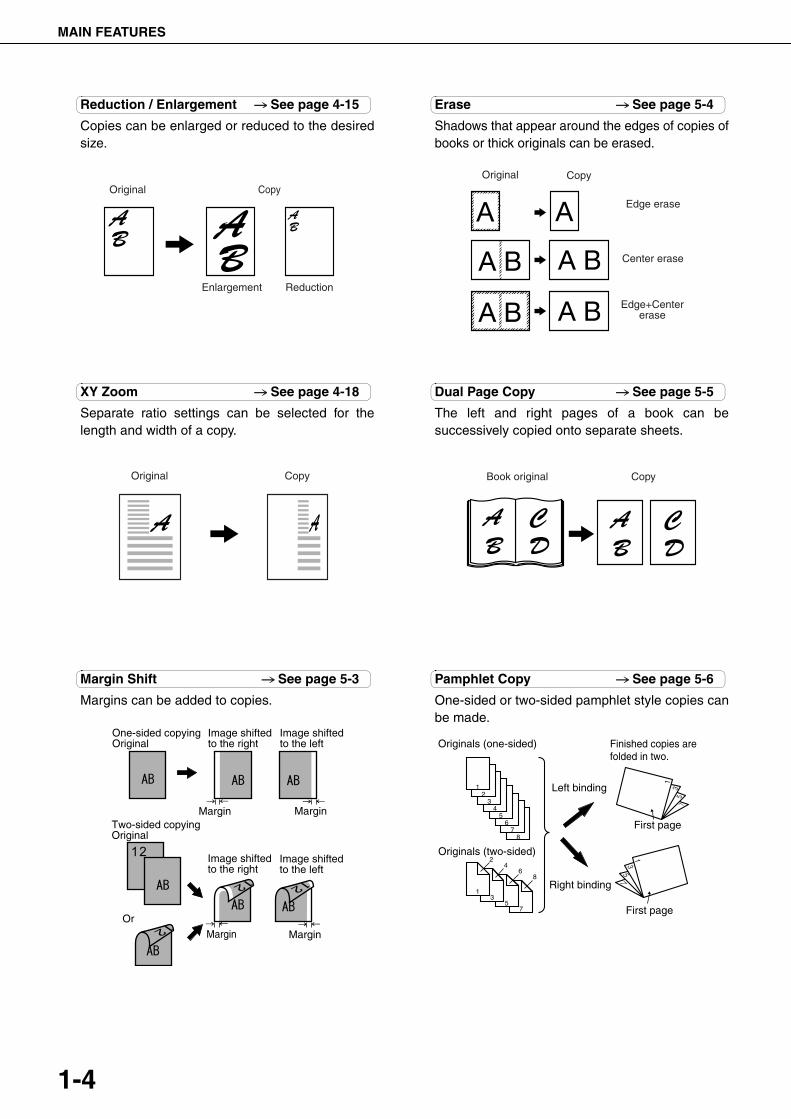
Reduction / Enlargement See page 4-15
Copies can be enlarged or reduced to the desiredsize.
XY Zoom See page 4-18
Separate ratio settings can be selected for thelength and width of a copy.
Margin Shift See page 5-3
Margins can be added to copies.
Erase See page 5-4
Shadows that appear around the edges of copies ofbooks or thick originals can be erased.
Dual Page Copy See page 5-5
The left and right pages of a book can besuccessively copied onto separate sheets.
Pamphlet Copy See page 5-6
One-sided or two-sided pamphlet style copies canbe made.
Original
Enlargement Reduction
Copy
Original Copy
Image shiftedto the right
Image shiftedto the left
MarginMargin
One-sided copyingOriginal
Two-sided copyingOriginal
Image shiftedto the right
Margin
Image shiftedto the left
Margin
Or
Original Copy
Edge erase
Center erase
Edge+Centererase
CopyBook original
Finished copies arefolded in two.
Originals (one-sided)
12
34
56
78
7
8
5
6
3
4
Originals (two-sided)
1
2
Left binding
Right binding
First page
First page
dragonII_copy_sec.book 4 ページ 2006年10月18日 水曜日 午後7時39分
MAIN FEATURES
1-5
1
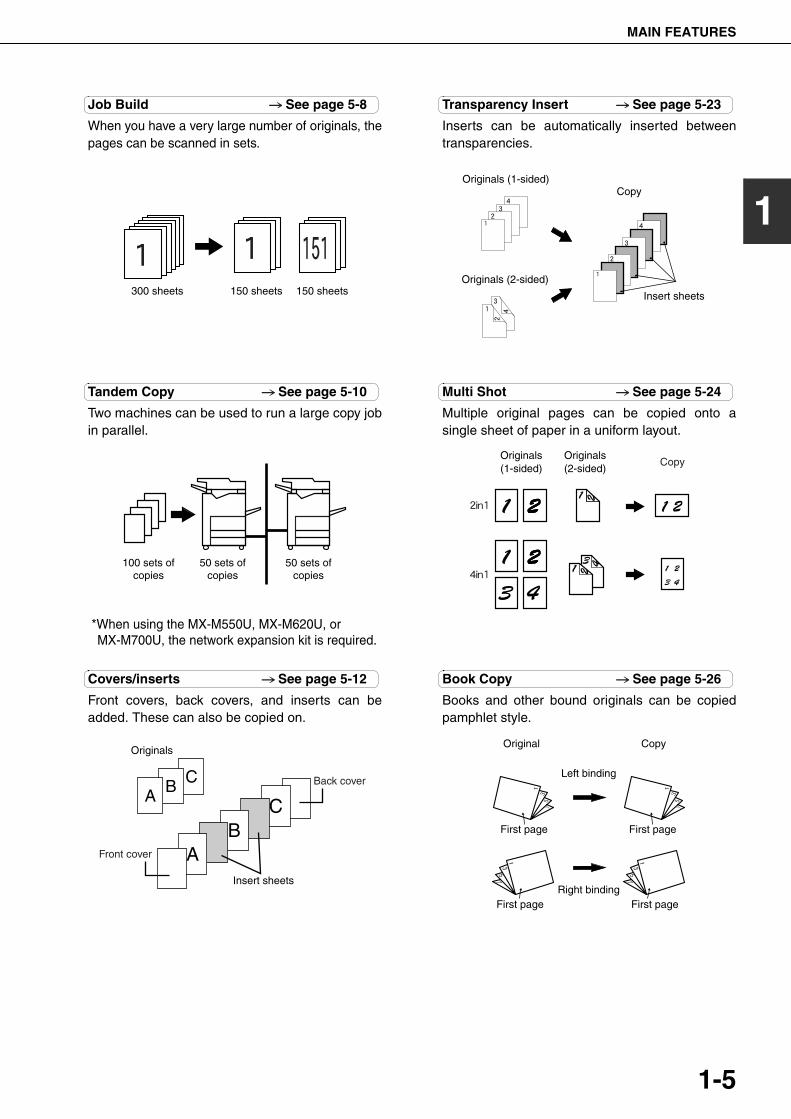
Job Build See page 5-8
When you have a very large number of originals, thepages can be scanned in sets.
Tandem Copy See page 5-10
Two machines can be used to run a large copy jobin parallel.
Covers/inserts See page 5-12
Front covers, back covers, and inserts can beadded. These can also be copied on.
Transparency Insert See page 5-23
Inserts can be automatically inserted betweentransparencies.
Multi Shot See page 5-24
Multiple original pages can be copied onto asingle sheet of paper in a uniform layout.
Book Copy See page 5-26
Books and other bound originals can be copiedpamphlet style.
150 sheets300 sheets 150 sheets
50 sets ofcopies
100 sets ofcopies
50 sets ofcopies
*When using the MX-M550U, MX-M620U, or MX-M700U, the network expansion kit is required.
Front cover
Back cover
Originals
Insert sheets
Insert sheets
Originals (1-sided)
Originals (2-sided)
Copy
Originals(1-sided)
Originals(2-sided)
Copy
CopyOriginal
Left binding
Right binding
First page
First page
First page
First page
dragonII_copy_sec.book 5 ページ 2006年10月18日 水曜日 午後7時39分
MAIN FEATURES
1-6
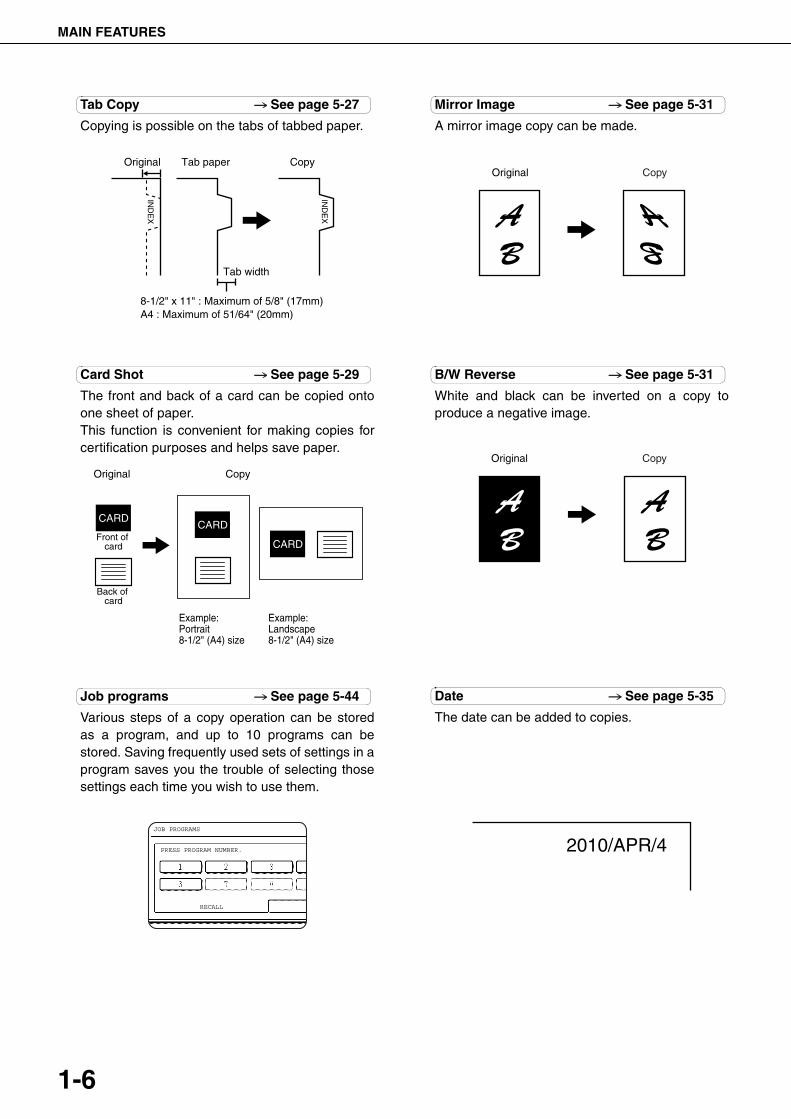
Tab Copy See page 5-27
Copying is possible on the tabs of tabbed paper.
Card Shot See page 5-29
The front and back of a card can be copied ontoone sheet of paper.This function is convenient for making copies forcertification purposes and helps save paper.
Job programs See page 5-44
Various steps of a copy operation can be storedas a program, and up to 10 programs can bestored. Saving frequently used sets of settings in aprogram saves you the trouble of selecting thosesettings each time you wish to use them.
Mirror Image See page 5-31
A mirror image copy can be made.
B/W Reverse See page 5-31
White and black can be inverted on a copy toproduce a negative image.
Date See page 5-35
The date can be added to copies.
Original Tab paper Copy
IND
EX
IND
EX
Tab width
A4 : Maximum of 51/64" (20mm)8-1/2" x 11" : Maximum of 5/8" (17mm)
Original
Example:Portrait 8-1/2" (A4) size
Example:Landscape 8-1/2" (A4) size
Copy
Back of card
Front of card
CARDCARD
CARD
JOB PROGRAMS
PRESS PROGRAM NUMBER.
RECALL
Original Copy
Original Copy
2010/APR/4
dragonII_copy_sec.book 6 ページ 2006年10月18日 水曜日 午後7時39分
MAIN FEATURES
1-7
1
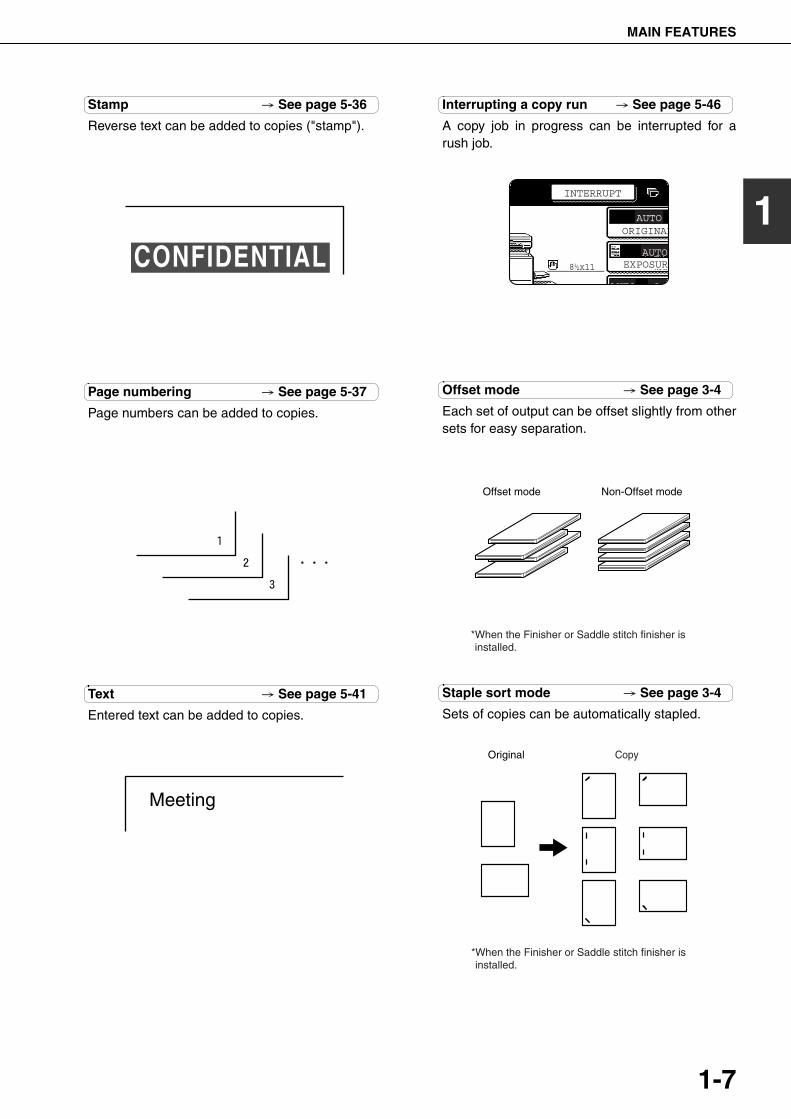
Stamp See page 5-36
Reverse text can be added to copies ("stamp").
Page numbering See page 5-37
Page numbers can be added to copies.
Text See page 5-41
Entered text can be added to copies.
Interrupting a copy run See page 5-46
A copy job in progress can be interrupted for arush job.
Offset mode See page 3-4
Each set of output can be offset slightly from othersets for easy separation.
Staple sort mode See page 3-4
Sets of copies can be automatically stapled.
CONFIDENTIAL
Meeting
AUTO
AUTO
AUTO A4
ORIGINAL
EXPOSUR
INTERRUPT
8 x111 / 2
Offset mode Non-Offset mode
*When the Finisher or Saddle stitch finisher is installed.
Original Copy
*When the Finisher or Saddle stitch finisher is installed.
dragon_01.fm 7 ページ 2006年10月18日 水曜日 午後8時34分
MAIN FEATURES
1-8
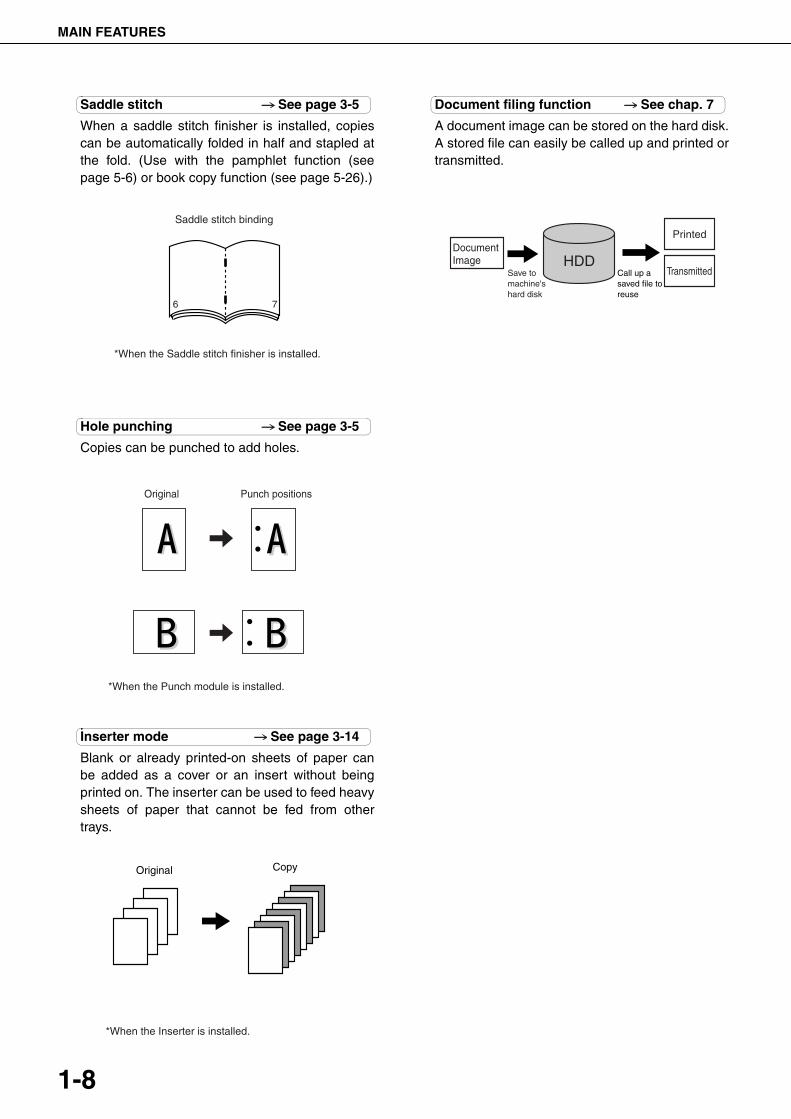
Saddle stitch See page 3-5
When a saddle stitch finisher is installed, copiescan be automatically folded in half and stapled atthe fold. (Use with the pamphlet function (seepage 5-6) or book copy function (see page 5-26).)
Hole punching See page 3-5
Copies can be punched to add holes.
Inserter mode See page 3-14
Blank or already printed-on sheets of paper canbe added as a cover or an insert without beingprinted on. The inserter can be used to feed heavysheets of paper that cannot be fed from othertrays.
Document filing function See chap. 7
A document image can be stored on the hard disk.A stored file can easily be called up and printed ortransmitted.
6 7
Saddle stitch binding
*When the Saddle stitch finisher is installed.
Original Punch positions
*When the Punch module is installed.
Original Copy
*When the Inserter is installed.
Save tomachine'shard disk
HDDDocumentImage
Call up a saved file to reuse
Printed
Transmitted
dragonII_copy_sec.book 8 ページ 2006年10月18日 水曜日 午後7時39分

MAIN FEATURES
1-9
1
Energy saving features
This product has the following two power reducing modes that conform to theEnergy Star guidelines to help conserve natural resources and reduceenvironmental pollution.
Preheat modeThe preheat mode is the first level of power reduction. The power is reducedto the fuser unit a preset time after the machine has completed a job and nofurther machine operations have been performed. The machine can recoverto the ready condition within a short period of time. The preset time to enterthe mode can be set by a administrator settings.
Auto power shut-off modeThe auto power shut-off mode is the second level of power reduction. In this mode power is shut off to thefusing unit and the touch panel. In this state more energy is saved than in the preheat mode but the time torecover to the ready condition will be longer. The preset time to enter this mode can be set by a administratorsettings.
When this product is used as a printer, and either of the above modes is active, the mode will be deactivatedautomatically by an incoming job and the machine will automatically warm up and start to print when it hasreached the ready temperature.When this product is configured for multi-function operation, and either of the above modes is active, the modewill be deactivated as above by an incoming print job. Either mode will also be deactivated by operation ofDOCUMENT FILING, IMAGE SEND or COPY mode key.
Products that have earned the ENERGY STAR® are designed to protect the environment through superior energy efficiency.
dragonII_copy_sec.book 9 ページ 2006年10月18日 水曜日 午後7時39分
1-10
PART NAMES AND FUNCTIONSExterior
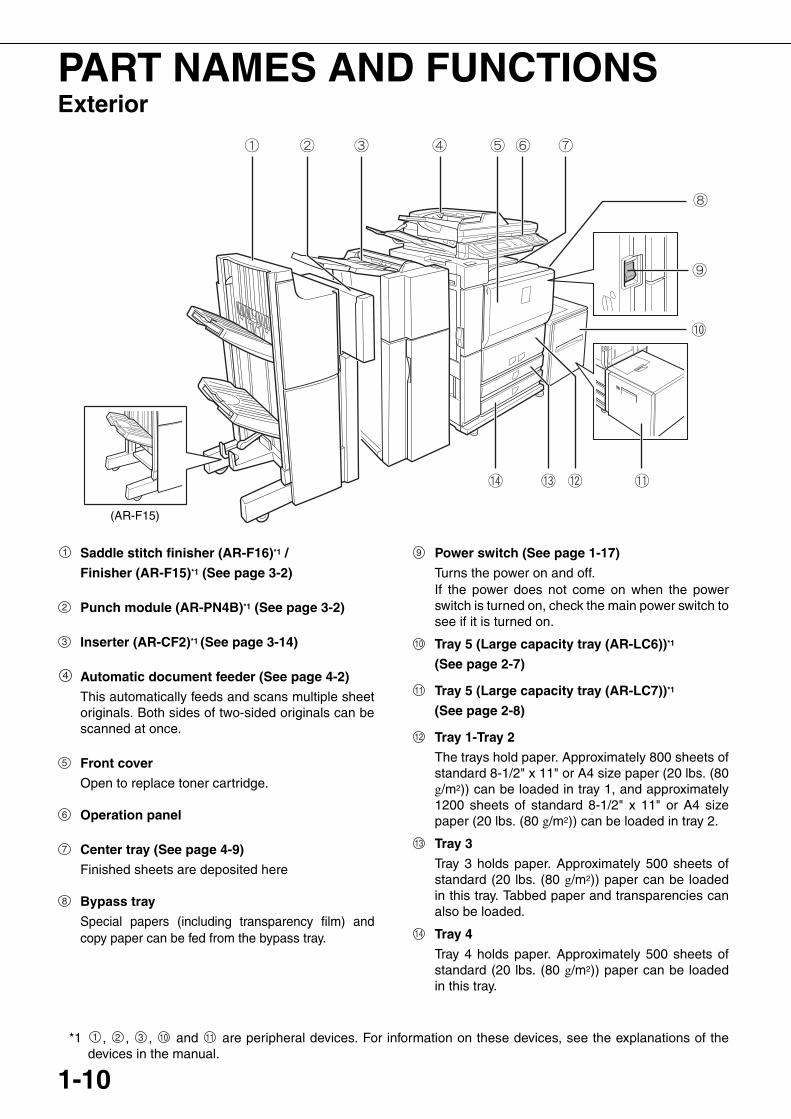
Saddle stitch finisher (AR-F16)*1 /
Finisher (AR-F15)*1 (See page 3-2)
Punch module (AR-PN4B)*1 (See page 3-2)
Inserter (AR-CF2)*1 (See page 3-14)
Automatic document feeder (See page 4-2)
This automatically feeds and scans multiple sheetoriginals. Both sides of two-sided originals can bescanned at once.
Front cover
Open to replace toner cartridge.
Operation panel
Center tray (See page 4-9)
Finished sheets are deposited here
Bypass tray
Special papers (including transparency film) andcopy paper can be fed from the bypass tray.
Power switch (See page 1-17)
Turns the power on and off.If the power does not come on when the powerswitch is turned on, check the main power switch tosee if it is turned on.
Tray 5 (Large capacity tray (AR-LC6))*1
(See page 2-7)
Tray 5 (Large capacity tray (AR-LC7))*1
(See page 2-8)
Tray 1-Tray 2
The trays hold paper. Approximately 800 sheets ofstandard 8-1/2" x 11" or A4 size paper (20 lbs. (80g/m2)) can be loaded in tray 1, and approximately1200 sheets of standard 8-1/2" x 11" or A4 sizepaper (20 lbs. (80 g/m2)) can be loaded in tray 2.
Tray 3
Tray 3 holds paper. Approximately 500 sheets ofstandard (20 lbs. (80 g/m2)) paper can be loadedin this tray. Tabbed paper and transparencies canalso be loaded.
Tray 4
Tray 4 holds paper. Approximately 500 sheets ofstandard (20 lbs. (80 g/m2)) paper can be loadedin this tray.
*1 , , , and are peripheral devices. For information on these devices, see the explanations of thedevices in the manual.
(AR-F15)
1
2
3
4
5
6
7
8
9
10
11
12
13
14
1 2 3 10 11
dragonII_copy_sec.book 10 ページ 2006年10月18日 水曜日 午後7時39分
PART NAMES AND FUNCTIONS
1-11
1
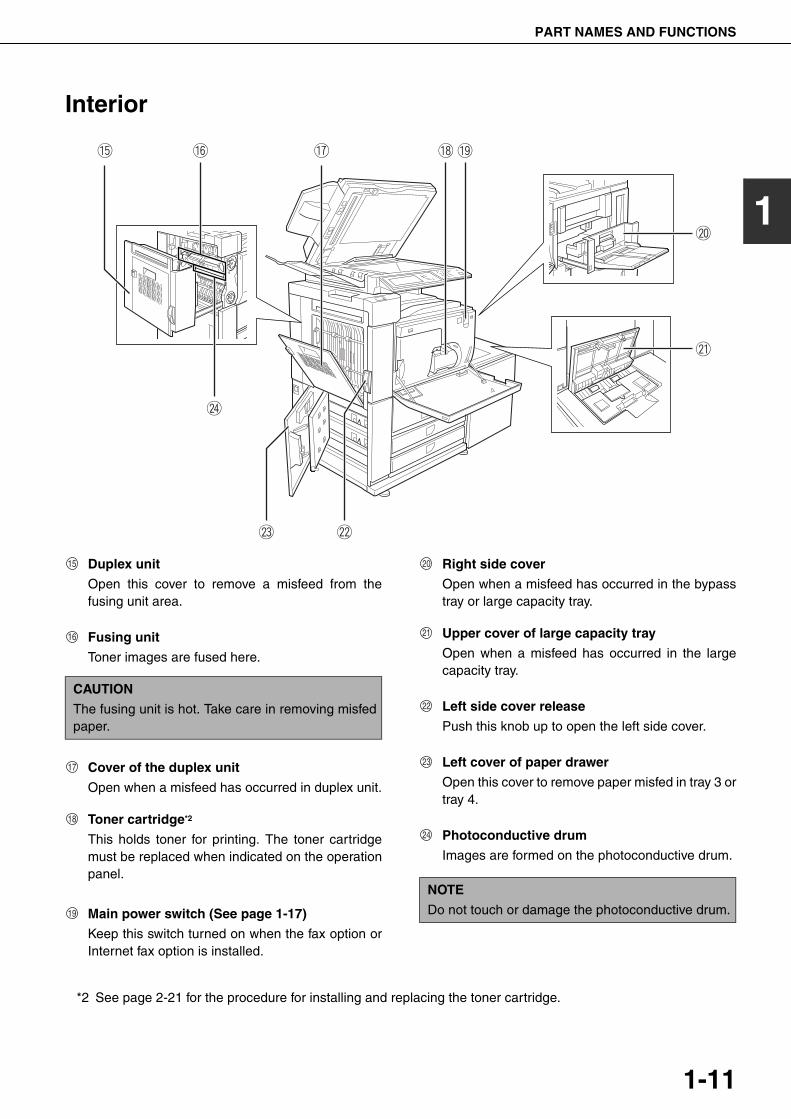
Interior
Duplex unit
Open this cover to remove a misfeed from thefusing unit area.
Fusing unit
Toner images are fused here.
Cover of the duplex unit
Open when a misfeed has occurred in duplex unit.
Toner cartridge*2
This holds toner for printing. The toner cartridgemust be replaced when indicated on the operationpanel.
Main power switch (See page 1-17)
Keep this switch turned on when the fax option orInternet fax option is installed.
Right side cover
Open when a misfeed has occurred in the bypasstray or large capacity tray.
Upper cover of large capacity tray
Open when a misfeed has occurred in the largecapacity tray.
Left side cover release
Push this knob up to open the left side cover.
Left cover of paper drawer
Open this cover to remove paper misfed in tray 3 ortray 4.
Photoconductive drum
Images are formed on the photoconductive drum.
*2 See page 2-21 for the procedure for installing and replacing the toner cartridge.
CAUTION
The fusing unit is hot. Take care in removing misfedpaper.
15
16
17
18
19
NOTE
Do not touch or damage the photoconductive drum.
20
21
22
23
24
dragonII_copy_sec.book 11 ページ 2006年10月18日 水曜日 午後7時39分
PART NAMES AND FUNCTIONS
1-12
■ Other optional equipment
●Network expansion kit (MX-NBX1)This kit is required to add on the network function.When this expansion kit is installed, the machinecan be used as a network printer.
●Barcode font kit (AR-PF1)This kit adds bar code fonts to the machine.
● Data security kit (MX-FRX5)This kit is used to erase electronic data from thehard disk and memory immediately after adocument is printed or transmitted.
●PS3 expansion kit (MX-PKX1)This kit provides compatibility of PostScript level 3to the printer.
●Facsimile expansion kit (AR-FX8)This kit is required to add fax function.
●Additional fax memory (8 MB) (AR-MM9)
●256MB expansion mamory board (AR-SM5)This extends the memory of the machine.
●Network scanner expansion kit (MX-NSX1)This kit is required to add the network scanningfeature.To add the network scanner function to theMX-M550U, MX-M620U, or MX-M700U, thenetwork expansion kit is required.
●Internet fax expansion kit (MX-FWX1)This kit is required to use the Internet fax function.To add the Internet fax function, the networkscanner expansion kit is required.
●Application integration module (MX-AMX1)The application integration module can becombined with the network scanner function toappend a metadata file to a scanned image file.
●Application communication module (MX-AMX2)This allows the machine to be linked over a networkto an external software application.
●External account module (MX-AMX3)This is required to use an external accountapplication on the machine.
Peripheral devices are basically optional, but are incorporated in some models as standard equipment.
dragon_01.fm 12 ページ 2006年10月19日 木曜日 午後2時57分
PART NAMES AND FUNCTIONS
1-13
1
Operation panel
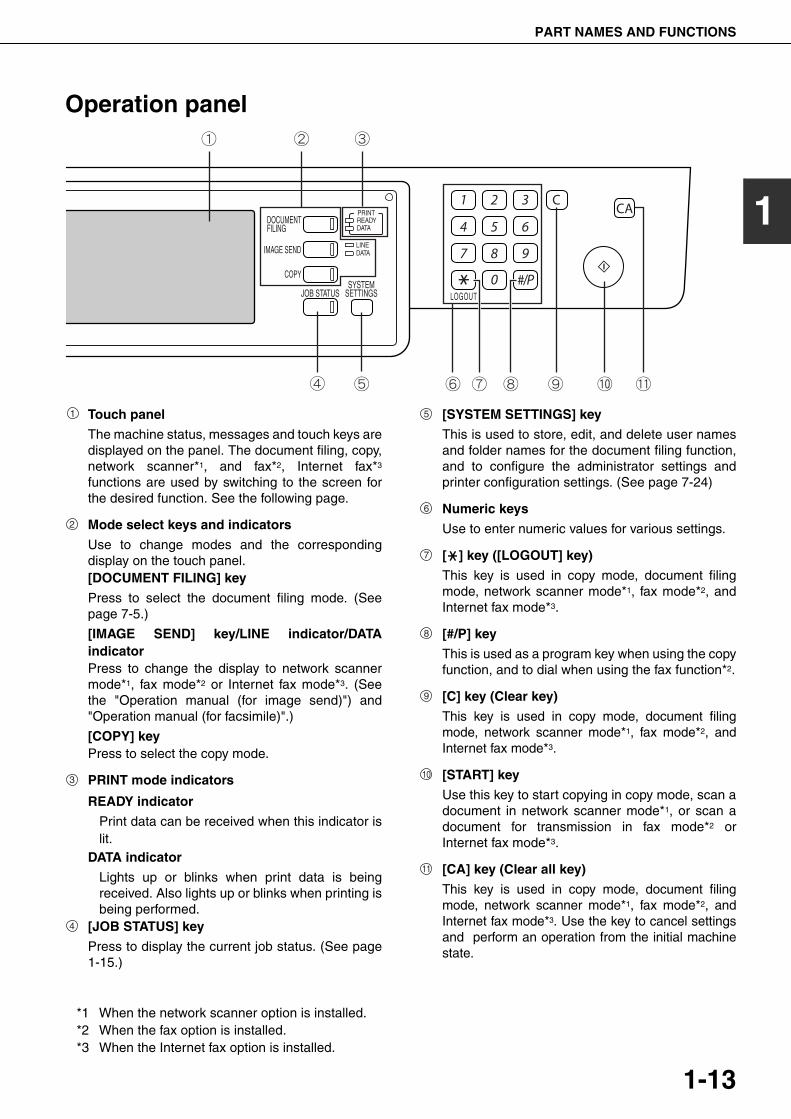
Touch panel
The machine status, messages and touch keys aredisplayed on the panel. The document filing, copy,network scanner*1, and fax*2, Internet fax*3
functions are used by switching to the screen forthe desired function. See the following page.
Mode select keys and indicators
Use to change modes and the correspondingdisplay on the touch panel.[DOCUMENT FILING] key
Press to select the document filing mode. (Seepage 7-5.)
[IMAGE SEND] key/LINE indicator/DATAindicatorPress to change the display to network scannermode*1, fax mode*2 or Internet fax mode*3. (Seethe "Operation manual (for image send)") and"Operation manual (for facsimile)".)
[COPY] keyPress to select the copy mode.
PRINT mode indicators
READY indicator
Print data can be received when this indicator islit.
DATA indicator
Lights up or blinks when print data is beingreceived. Also lights up or blinks when printing isbeing performed.
[JOB STATUS] key
Press to display the current job status. (See page1-15.)
[SYSTEM SETTINGS] key
This is used to store, edit, and delete user namesand folder names for the document filing function,and to configure the administrator settings andprinter configuration settings. (See page 7-24)
Numeric keys
Use to enter numeric values for various settings.
[ ] key ([LOGOUT] key)
This key is used in copy mode, document filingmode, network scanner mode*1, fax mode*2, andInternet fax mode*3.
[#/P] key
This is used as a program key when using the copyfunction, and to dial when using the fax function*2.
[C] key (Clear key)
This key is used in copy mode, document filingmode, network scanner mode*1, fax mode*2, andInternet fax mode*3.
[START] key
Use this key to start copying in copy mode, scan adocument in network scanner mode*1, or scan adocument for transmission in fax mode*2 orInternet fax mode*3.
[CA] key (Clear all key)
This key is used in copy mode, document filingmode, network scanner mode*1, fax mode*2, andInternet fax mode*3. Use the key to cancel settingsand perform an operation from the initial machinestate.
*1 When the network scanner option is installed.*2 When the fax option is installed.*3 When the Internet fax option is installed.
LOGOUT
DOCUMENTFILING
IMAGE SEND
COPY
JOB STATUSSYSTEM
SETTINGS
LINEDATA
PRINTREADYDATA
1
2
3
4
5
6
7
8
9
10
11
dragonII_copy_sec.book 13 ページ 2006年10月18日 水曜日 午後7時39分
PART NAMES AND FUNCTIONS
1-14
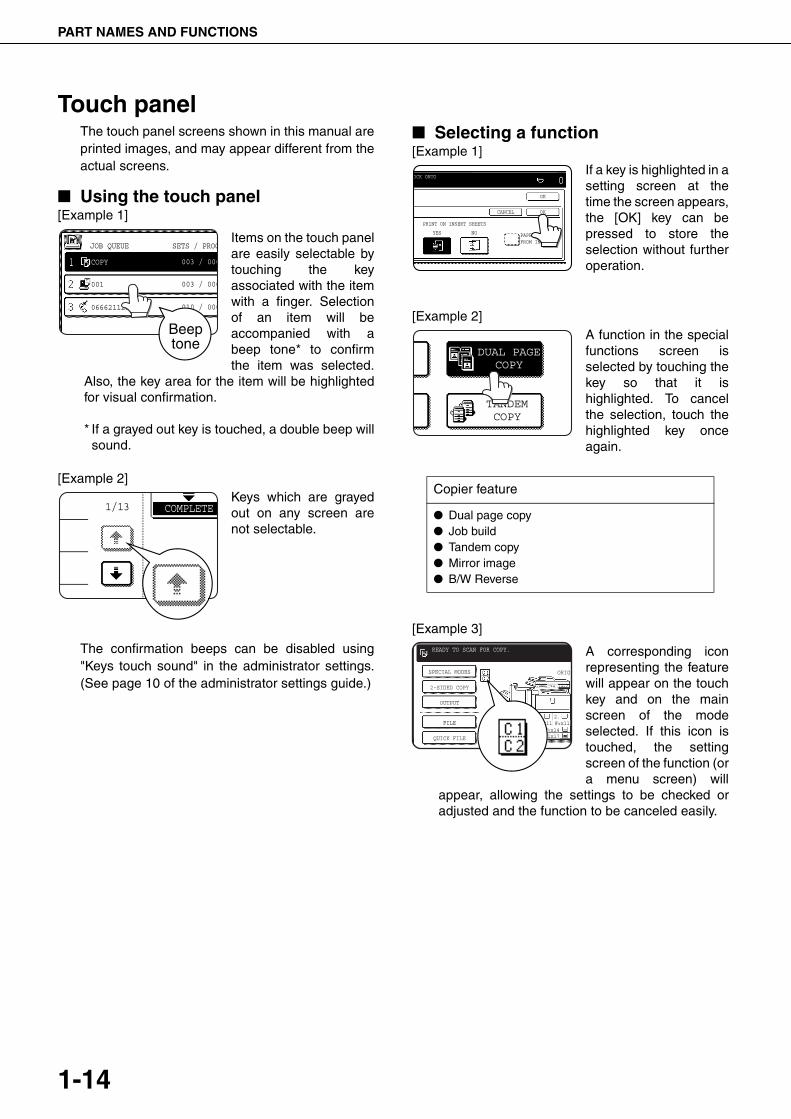
Touch panelThe touch panel screens shown in this manual areprinted images, and may appear different from theactual screens.
■ Using the touch panel[Example 1]
Items on the touch panelare easily selectable bytouching the keyassociated with the itemwith a finger. Selectionof an item will beaccompanied with abeep tone* to confirmthe item was selected.
Also, the key area for the item will be highlightedfor visual confirmation.
* If a grayed out key is touched, a double beep willsound.
[Example 2]Keys which are grayedout on any screen arenot selectable.
The confirmation beeps can be disabled using"Keys touch sound" in the administrator settings.(See page 10 of the administrator settings guide.)
■ Selecting a function[Example 1]
If a key is highlighted in asetting screen at thetime the screen appears,the [OK] key can bepressed to store theselection without furtheroperation.
[Example 2]A function in the specialfunctions screen isselected by touching thekey so that it ishighlighted. To cancelthe selection, touch thehighlighted key onceagain.
[Example 3]
A corresponding iconrepresenting the featurewill appear on the touchkey and on the mainscreen of the modeselected. If this icon istouched, the settingscreen of the function (ora menu screen) will
appear, allowing the settings to be checked oradjusted and the function to be canceled easily.
JOB QUEUE
COPY
001
0666211221
003 / 000
003 / 000
010 / 000
SETS / PROG
Beeptone
1/13 COMPLETE
Copier feature
● Dual page copy● Job build● Tandem copy● Mirror image● B/W Reverse
OCK ONTO 0
PRINT ON INSERT SHEETS
PAPER IS FEDFROM INSERTER
YES NO
CANCEL OK
OK
DUAL PAGECOPY
TANDEMCOPY
8 x111 / 2
8 x1411x17
1 / 2
8 x111 / 2
1.
3.4.
2.
READY TO SCAN FOR COPY.
SPECIAL MODES ORIGI
2-SIDED COPY
OUTPUT
QUICK FILE
FILE
dragon_01.fm 14 ページ 2006年10月19日 木曜日 午後12時55分

PART NAMES AND FUNCTIONS
1-15
1
■ Job status screen (common to print, scan, fax and Internet fax)This screen is displayed when the [JOB STATUS] key on the operation panel is pressed.This screen can be used to display the "JOB QUEUE" (showing stored jobs and the current job) or the"COMPLETE" job list (showing finished jobs). This screen is used to check jobs, move a job to the top of the JOBQUEUE, or delete a job.
Job list
The displayed jobs in the job list are themselvesoperation keys. To cancel printing or to give a jobthe highest print priority, touch the relevant job keyto select the job and execute the desired operationusing the keys described in and .This shows the current job and the jobs waiting tobe run. The icons to the left of the jobs in thequeue show the job mode. The document filingreprint job icon is highlighted.Note that the icon does not become highlightedduring retransmission of a fax/image transmissionjob.
*1 "PAPER EMPTY" in the job status displayWhen a job status display indicates "PAPEREMPTY", the specified paper size for the job is notloaded in any of the trays. In this case, the job will be suspended until therequired paper is loaded. Other stored jobs will beprinted (if possible) until the required paper is loaded.(Other jobs will not be printed if the paper runs outduring printing.) If you need to change the paper sizebecause the specified paper size is not available,touch the current job key to select it and then touchthe [DETAIL] key described in .
Mode select key
This switches the job list display between "JOBQUEUE" and "COMPLETE".
"JOB QUEUE": Shows stored jobs and the job inprogress.
"COMPLETE": Shows finished jobs.
Files saved using the "FILE" and "QUICK FILE"functions and finished broadcast transmissionjobs appear as keys in the finished job screen.The "FILE" or "QUICK FILE" job keys in thefinished job screen can be touched, followed bythe [CALL] key, to call up a finished job and printor transmit it. A finished broadcast transmissionjob key can be touched followed by the [DETAIL]key to check the result of the transmission.
JOB QUEUE
COPY
COPY
Suzuki
066211221
STATUS
020 / 001
020 / 000
020 / 000
002 / 000
PRINT JOB SCAN TO FAX JOB INTERNET-FAX INTERNET-FAX
JOB QUEUE
COMPLETE
JOB QUEUE
COMPLETE
DETAIL
PRIORITY
STOP/DELETE
DETAIL
CALL
PAPER EMPTY
WAITING
WAITING
1/1
SETS / PROGRESS
COPYING
"JOB QUEUE" screen"COMPLETE" job screen
*1
1
8 9
Print mode Copy mode
Scan to e-mail job Scan to FTP job
Scan to Desktop job
Scan to Network folder job
Fax send job Fax reception job
PC-Fax send job
i-Fax send job i-Fax reception job
PC-Internet Fax send job
Internet Fax mode
SCAN mode
Fax mode
10
2
dragon_01.fm 15 ページ 2006年12月1日 金曜日 午前8時52分
PART NAMES AND FUNCTIONS
1-16
[PRINT JOB] key
This displays the print job list of print mode(copying, printing, fax reception, Internet faxreception, and self printing).
[SCAN TO] key
This displays the transmission status and finishedjobs of scan mode (Scan to e-mail, Scan to FTP,Scan to Desktop, and Scan to Network Folder)when the network scanner option is installed.
[FAX JOB] key
This displays the transmission/reception statusand finished jobs of fax mode (fax and PC-Fax)when the fax option is installed.
Display switching keys
Use to switch the page of the displayed job list.
[INTERNET-FAX] key
This displays the transmission/reception statusand finished jobs of Internet fax mode and PCInternet fax mode when the Internet fax option isinstalled.
[STOP/DELETE] key
Use to cancel or delete the current job or deletethe selected reserved job. Note that printing ofreceived faxes and received Internet faxes cannotbe canceled or deleted.
[PRIORITY] key
A stored job in the "JOB QUEUE" job list can beprinted ahead of all other stored jobs by selectingthe job and then touching this key.
[DETAIL] key
This shows detailed information on the selectedjob. Files saved using the "FILE" and "QUICKFILE" functions and finished broadcasttransmission jobs appear as keys in the finishedjob screen. A Quick File in the finished job screenor the [Filing] key can be touched, followed by the[CALL] key, to call up a finished job and print ortransmit it. A finished broadcast transmission jobkey can be touched followed by the [DETAIL] key tocheck the result of the transmission.
[CALL] key
When this key is touched after selecting a job inthe COMPLETE job status screen (a job storedusing the FILE or QUICK FILE keys of thedocument filing function), the "JOB SETTINGS"menu screen appears to let you resend or reprintthe finished job. (See "Document filing function"on page 7-2.)
3
4
5
6
7
8
9
10
11
dragon_01.fm 16 ページ 2006年12月1日 金曜日 午前8時52分
1-17
1
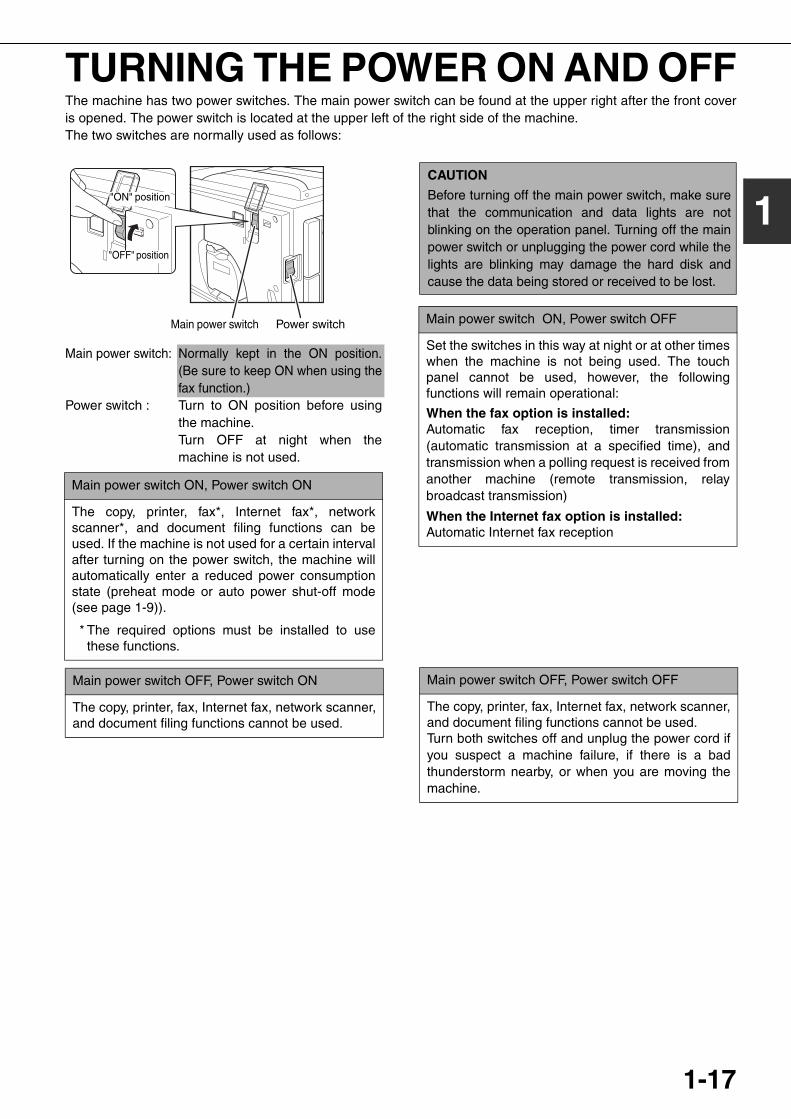
TURNING THE POWER ON AND OFFThe machine has two power switches. The main power switch can be found at the upper right after the front coveris opened. The power switch is located at the upper left of the right side of the machine.The two switches are normally used as follows:
Main power switch: Normally kept in the ON position.(Be sure to keep ON when using thefax function.)
Power switch : Turn to ON position before usingthe machine.Turn OFF at night when themachine is not used.
Main power switch ON, Power switch ON
The copy, printer, fax*, Internet fax*, networkscanner*, and document filing functions can beused. If the machine is not used for a certain intervalafter turning on the power switch, the machine willautomatically enter a reduced power consumptionstate (preheat mode or auto power shut-off mode(see page 1-9)).
* The required options must be installed to usethese functions.
Main power switch OFF, Power switch ON
The copy, printer, fax, Internet fax, network scanner,and document filing functions cannot be used.
Power switchMain power switch
"OFF" position
"ON" position
CAUTION
Before turning off the main power switch, make surethat the communication and data lights are notblinking on the operation panel. Turning off the mainpower switch or unplugging the power cord while thelights are blinking may damage the hard disk andcause the data being stored or received to be lost.
Main power switch ON, Power switch OFF
Set the switches in this way at night or at other timeswhen the machine is not being used. The touchpanel cannot be used, however, the followingfunctions will remain operational:
When the fax option is installed:Automatic fax reception, timer transmission(automatic transmission at a specified time), andtransmission when a polling request is received fromanother machine (remote transmission, relaybroadcast transmission)
When the Internet fax option is installed:Automatic Internet fax reception
Main power switch OFF, Power switch OFF
The copy, printer, fax, Internet fax, network scanner,and document filing functions cannot be used.Turn both switches off and unplug the power cord ifyou suspect a machine failure, if there is a badthunderstorm nearby, or when you are moving themachine.
dragonII_copy_sec.book 17 ページ 2006年10月18日 水曜日 午後7時39分
1-18
AUDITING MODEAuditing mode can be enabled to keep track of the number of pages printed and transmitted (scanned) by eachaccount (up to 500 accounts can be established). The page counts can be viewed and totaled as needed.<This mode is enabled in the administrator settings separately for the copy, printer, fax, Internet fax, network scanner,and document filing functions (page 7 of the administrator settings guide)>
Using the machine when the auditing mode is enabledThe procedure for making copies when auditing mode has been enabled for the copy function is explained below.
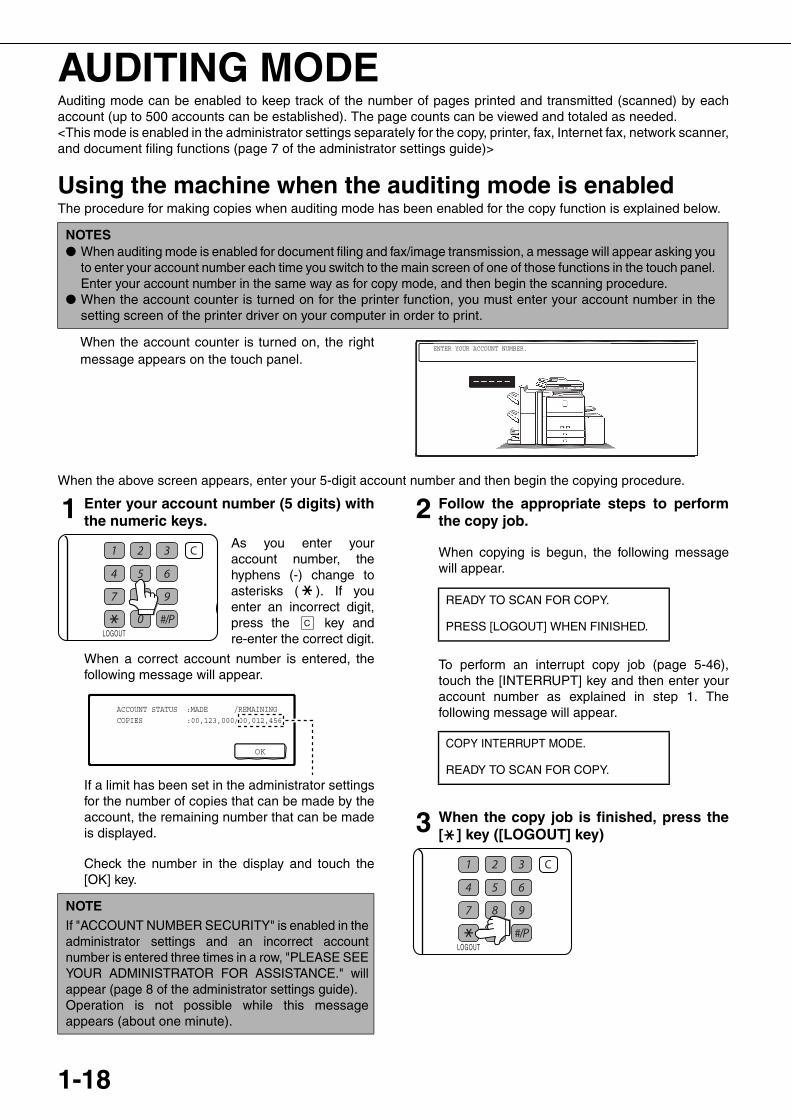
When the account counter is turned on, the rightmessage appears on the touch panel.
When the above screen appears, enter your 5-digit account number and then begin the copying procedure.
1 Enter your account number (5 digits) withthe numeric keys.
As you enter youraccount number, thehyphens (-) change toasterisks ( ). If youenter an incorrect digit,press the key andre-enter the correct digit.
When a correct account number is entered, thefollowing message will appear.
If a limit has been set in the administrator settingsfor the number of copies that can be made by theaccount, the remaining number that can be madeis displayed.
Check the number in the display and touch the[OK] key.
2 Follow the appropriate steps to performthe copy job.
When copying is begun, the following messagewill appear.
To perform an interrupt copy job (page 5-46),touch the [INTERRUPT] key and then enter youraccount number as explained in step 1. Thefollowing message will appear.
3 When the copy job is finished, press the[ ] key ([LOGOUT] key)
NOTES● When auditing mode is enabled for document filing and fax/image transmission, a message will appear asking you
to enter your account number each time you switch to the main screen of one of those functions in the touch panel.Enter your account number in the same way as for copy mode, and then begin the scanning procedure.
● When the account counter is turned on for the printer function, you must enter your account number in thesetting screen of the printer driver on your computer in order to print.
ENTER YOUR ACCOUNT NUMBER.
NOTEIf "ACCOUNT NUMBER SECURITY" is enabled in theadministrator settings and an incorrect accountnumber is entered three times in a row, "PLEASE SEEYOUR ADMINISTRATOR FOR ASSISTANCE." willappear (page 8 of the administrator settings guide).Operation is not possible while this messageappears (about one minute).
LOGOUT
ACCOUNT STATUS :MADE /REMAININGCOPIES :00,123,000/00,012,456
OK
READY TO SCAN FOR COPY.
PRESS [LOGOUT] WHEN FINISHED.
COPY INTERRUPT MODE.
READY TO SCAN FOR COPY.
LOGOUT
dragonII_copy_sec.book 18 ページ 2006年10月18日 水曜日 午後7時39分
2-1
CHAPTER 2MANAGING THE MACHINE
This chapter explains how to load paper, replace the toner cartridge, andremove paper misfeeds. It also contains information about supplies.
Page
LOADING PAPER ................................................................................... 2-2● Identifying the trays ......................................................................... 2-2● Loading paper in paper tray 1 - tray 2 ............................................. 2-2● Changing the paper size in paper tray 1 - tray 2 ............................. 2-3● Loading paper in paper tray 3 ......................................................... 2-5● Changing the paper size in paper tray 3 ......................................... 2-5● Changing the paper size in paper tray 4 ......................................... 2-6● Loading paper in paper tray 5 (optional large capacity tray AR-LC6)... 2-7● Loading paper in paper tray 5 (optional large capacity tray AR-LC7)... 2-8● Loading paper in the bypass tray .................................................... 2-10● Specifications of paper trays (Types and sizes of paper that can be
used in the trays)............................................................................. 2-12● Setting the paper type and paper size ............................................ 2-14● Setting the paper size when a special size is loaded...................... 2-17
SYSTEM SETTINGS .............................................................................. 2-18● General procedure for system settings ........................................... 2-18● About the settings ........................................................................... 2-20
REPLACING THE TONER CARTRIDGES ............................................. 2-21
STORAGE OF SUPPLIES ...................................................................... 2-22MISFEED REMOVAL.............................................................................. 2-23
● Misfeed removal guidance .............................................................. 2-23● Misfeed in the transport area, fusing area, and exit area................ 2-24● Misfeed in the duplex unit................................................................ 2-25● Misfeed in the paper feed area........................................................ 2-26
REMOVING AN ORIGINAL MISFEED ................................................... 2-31● Removing a misfed original from the automatic document feeder .. 2-31
TROUBLESHOOTING ............................................................................ 2-32
dragon_02-1.fm 1 ページ 2006年10月18日 水曜日 午後8時20分
2-2
LOADING PAPERIf the paper runs out during printing, a message will appear in the display.Follow the procedure below to load paper.
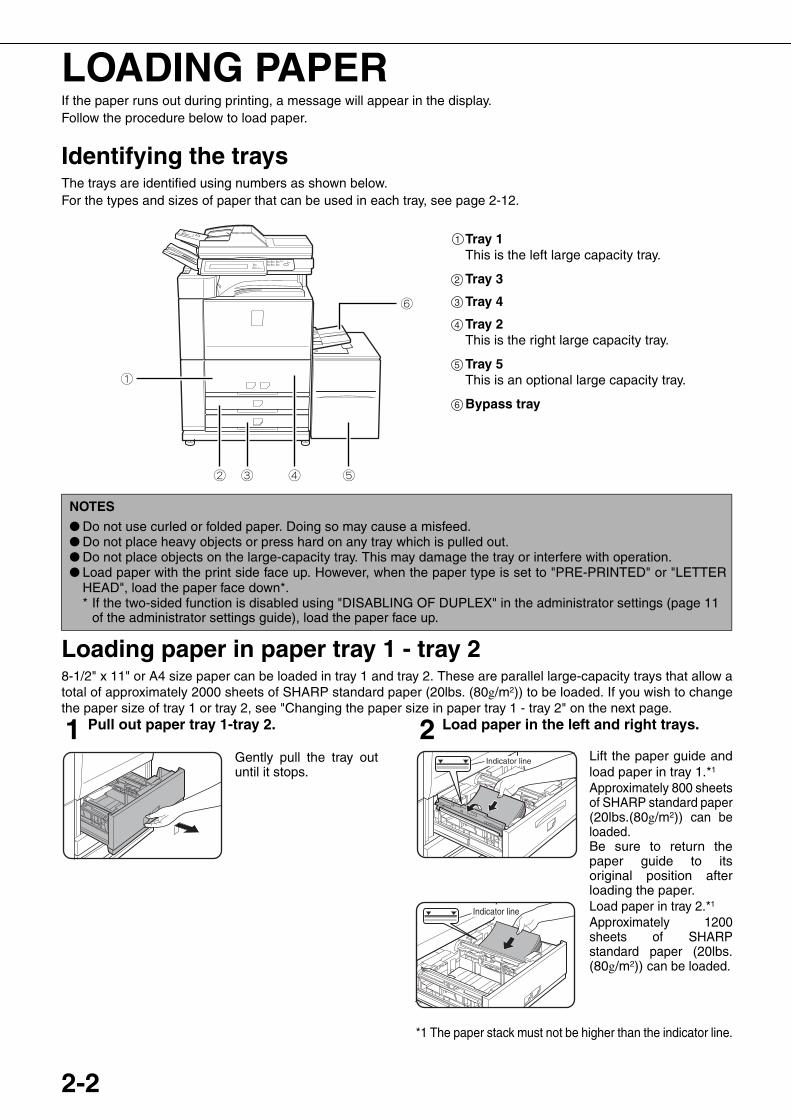
Identifying the traysThe trays are identified using numbers as shown below.For the types and sizes of paper that can be used in each tray, see page 2-12.
Loading paper in paper tray 1 - tray 28-1/2" x 11" or A4 size paper can be loaded in tray 1 and tray 2. These are parallel large-capacity trays that allow atotal of approximately 2000 sheets of SHARP standard paper (20lbs. (80g/m2)) to be loaded. If you wish to changethe paper size of tray 1 or tray 2, see "Changing the paper size in paper tray 1 - tray 2" on the next page.
1 Pull out paper tray 1-tray 2.
Gently pull the tray outuntil it stops.
2 Load paper in the left and right trays.
Lift the paper guide andload paper in tray 1.*1
Approximately 800 sheetsof SHARP standard paper(20lbs.(80g/m2)) can beloaded.Be sure to return thepaper guide to itsoriginal position afterloading the paper.Load paper in tray 2.*1
Approximately 1200sheets of SHARPstandard paper (20lbs.(80g/m2)) can be loaded.
*1 The paper stack must not be higher than the indicator line.
Tray 1This is the left large capacity tray.
Tray 3
Tray 4
Tray 2This is the right large capacity tray.
Tray 5This is an optional large capacity tray.
Bypass tray
1
2
3
4
5
6
NOTES
● Do not use curled or folded paper. Doing so may cause a misfeed.● Do not place heavy objects or press hard on any tray which is pulled out.● Do not place objects on the large-capacity tray. This may damage the tray or interfere with operation.● Load paper with the print side face up. However, when the paper type is set to "PRE-PRINTED" or "LETTER
HEAD", load the paper face down*.* If the two-sided function is disabled using "DISABLING OF DUPLEX" in the administrator settings (page 11
of the administrator settings guide), load the paper face up.
Indicator line
Indicator line
dragon_02-1.fm 2 ページ 2006年10月20日 金曜日 午前9時22分
LOADING PAPER
2-3
2
3 Gently push tray 1-tray 2 into the machine.
Push the tray firmly allthe way into themachine.
4 Set the paper type.
If the paper size was changed from an inch size to anAB size, or from an AB size to an inch size, or if thepaper type was changed, be sure to change theappropriate settings as explained in "Setting thepaper type and paper size" (See page 2-14).
5 Loading paper in paper tray 1/tray 2 is nowcomplete.
Changing the paper size in paper tray 1 - tray 2To change the paper size of tray 1 - tray 2, follow the steps below.This section only explains how to change the paper size. For the procedures for opening/closing the tray and loadingpaper, see "Loading paper in paper tray 1 - tray 2" (page 2-2).
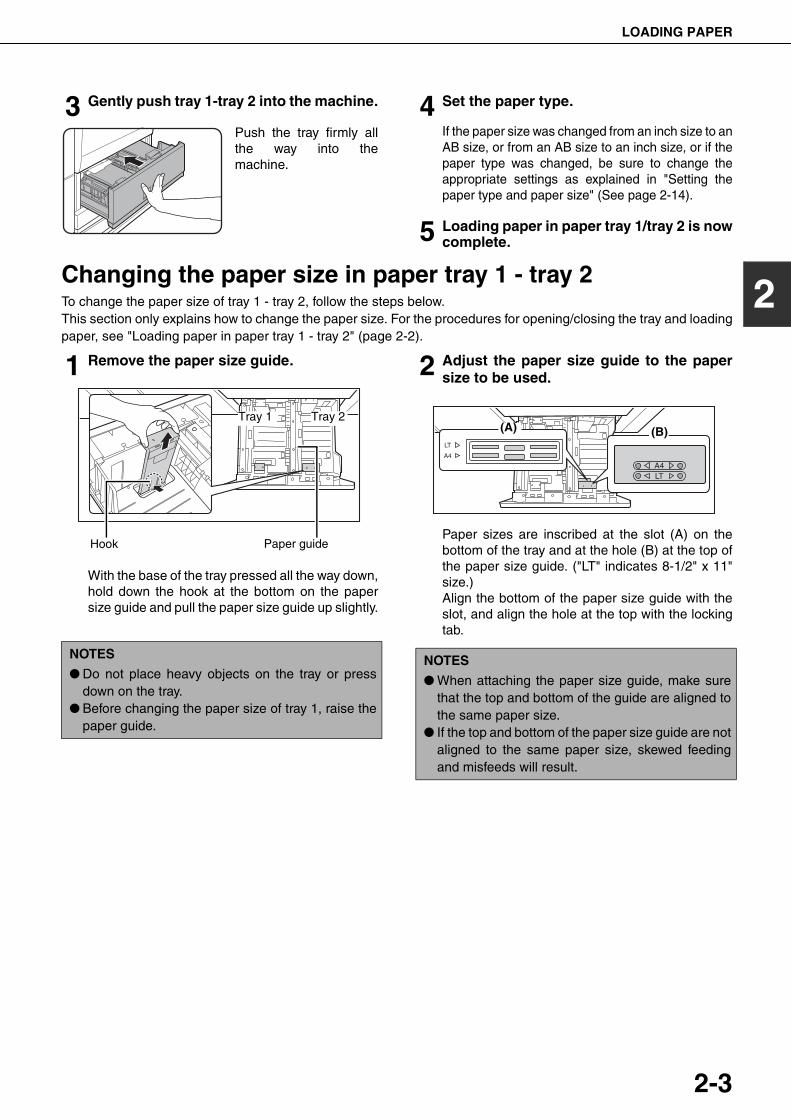
1 Remove the paper size guide.
With the base of the tray pressed all the way down,hold down the hook at the bottom on the papersize guide and pull the paper size guide up slightly.
2 Adjust the paper size guide to the papersize to be used.
Paper sizes are inscribed at the slot (A) on thebottom of the tray and at the hole (B) at the top ofthe paper size guide. ("LT" indicates 8-1/2" x 11"size.) Align the bottom of the paper size guide with theslot, and align the hole at the top with the lockingtab.
NOTES
● Do not place heavy objects on the tray or pressdown on the tray.
● Before changing the paper size of tray 1, raise thepaper guide.
Hook
Tray 1 Tray 2
Paper guide
NOTES
● When attaching the paper size guide, make surethat the top and bottom of the guide are aligned tothe same paper size.
● If the top and bottom of the paper size guide are notaligned to the same paper size, skewed feedingand misfeeds will result.
A4LT
LT
A4
(A) (B)
dragonII_copy_sec.book 3 ページ 2006年10月18日 水曜日 午後7時39分
LOADING PAPER
2-4
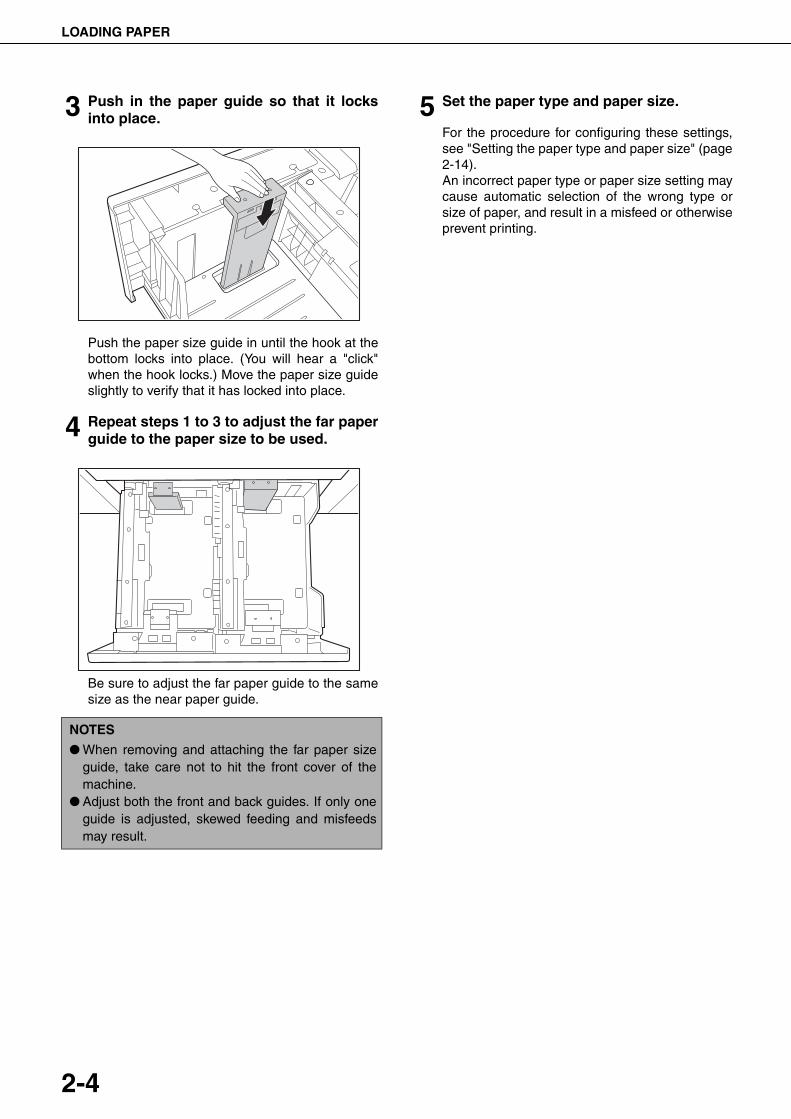
3 Push in the paper guide so that it locksinto place.
Push the paper size guide in until the hook at thebottom locks into place. (You will hear a "click"when the hook locks.) Move the paper size guideslightly to verify that it has locked into place.
4 Repeat steps 1 to 3 to adjust the far paperguide to the paper size to be used.
Be sure to adjust the far paper guide to the samesize as the near paper guide.
5 Set the paper type and paper size.
For the procedure for configuring these settings,see "Setting the paper type and paper size" (page2-14).An incorrect paper type or paper size setting maycause automatic selection of the wrong type orsize of paper, and result in a misfeed or otherwiseprevent printing.
NOTES
● When removing and attaching the far paper sizeguide, take care not to hit the front cover of themachine.
● Adjust both the front and back guides. If only oneguide is adjusted, skewed feeding and misfeedsmay result.
dragon_02-1.fm 4 ページ 2006年10月18日 水曜日 午後8時44分
LOADING PAPER
2-5
2
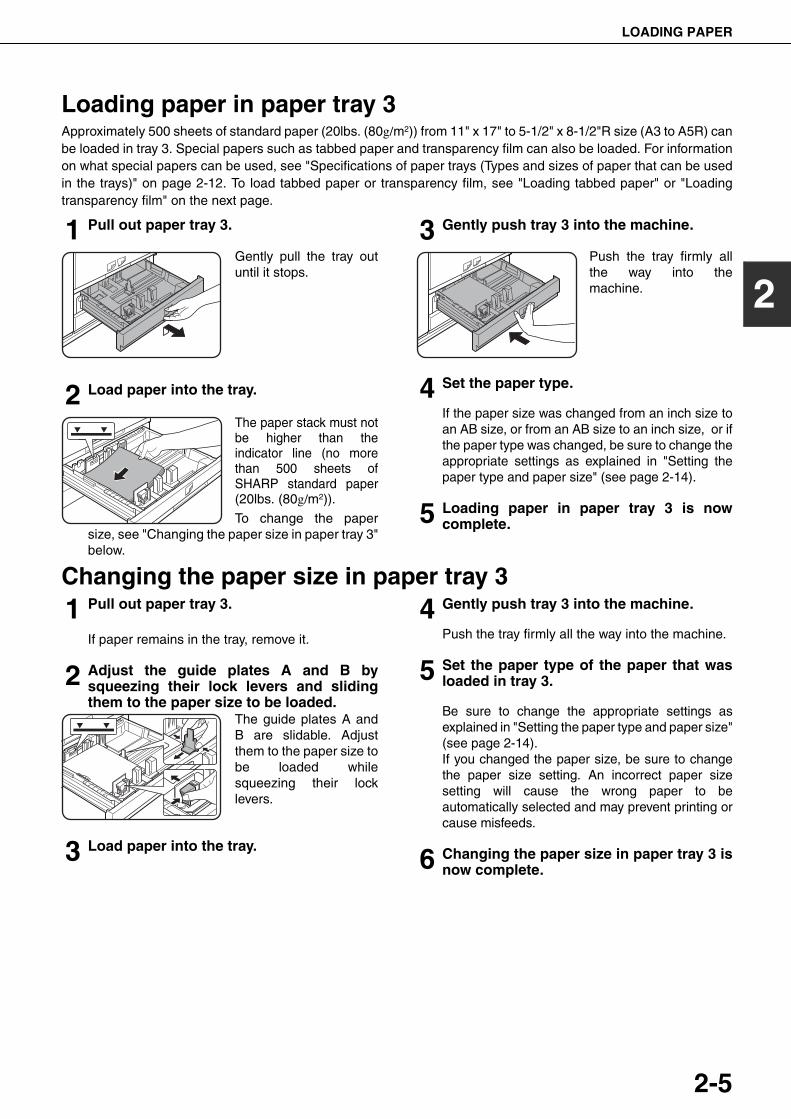
Loading paper in paper tray 3Approximately 500 sheets of standard paper (20lbs. (80g/m2)) from 11" x 17" to 5-1/2" x 8-1/2"R size (A3 to A5R) canbe loaded in tray 3. Special papers such as tabbed paper and transparency film can also be loaded. For informationon what special papers can be used, see "Specifications of paper trays (Types and sizes of paper that can be usedin the trays)" on page 2-12. To load tabbed paper or transparency film, see "Loading tabbed paper" or "Loadingtransparency film" on the next page.
1 Pull out paper tray 3.
Gently pull the tray outuntil it stops.
2 Load paper into the tray.
The paper stack must notbe higher than theindicator line (no morethan 500 sheets ofSHARP standard paper(20lbs. (80g/m2)).
To change the papersize, see "Changing the paper size in paper tray 3"below.
3 Gently push tray 3 into the machine.
Push the tray firmly allthe way into themachine.
4 Set the paper type.
If the paper size was changed from an inch size toan AB size, or from an AB size to an inch size, or ifthe paper type was changed, be sure to change theappropriate settings as explained in "Setting thepaper type and paper size" (see page 2-14).
5 Loading paper in paper tray 3 is nowcomplete.
Changing the paper size in paper tray 31 Pull out paper tray 3.
If paper remains in the tray, remove it.
2 Adjust the guide plates A and B bysqueezing their lock levers and slidingthem to the paper size to be loaded.
The guide plates A andB are slidable. Adjustthem to the paper size tobe loaded whilesqueezing their locklevers.
3 Load paper into the tray.
4 Gently push tray 3 into the machine.
Push the tray firmly all the way into the machine.
5 Set the paper type of the paper that wasloaded in tray 3.
Be sure to change the appropriate settings asexplained in "Setting the paper type and paper size"(see page 2-14).If you changed the paper size, be sure to changethe paper size setting. An incorrect paper sizesetting will cause the wrong paper to beautomatically selected and may prevent printing orcause misfeeds.
6 Changing the paper size in paper tray 3 isnow complete.
dragonII_copy_sec.book 5 ページ 2006年10月18日 水曜日 午後7時39分
LOADING PAPER
2-6
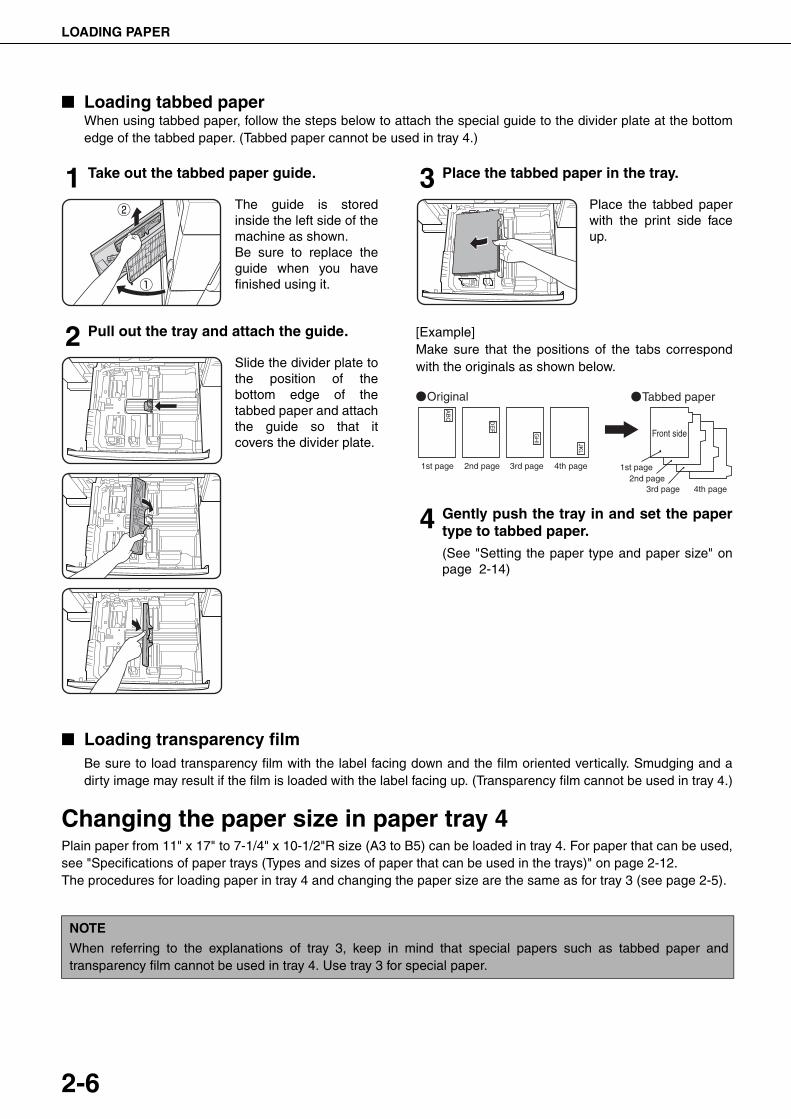
■ Loading tabbed paperWhen using tabbed paper, follow the steps below to attach the special guide to the divider plate at the bottomedge of the tabbed paper. (Tabbed paper cannot be used in tray 4.)
1 Take out the tabbed paper guide.
The guide is storedinside the left side of themachine as shown.Be sure to replace theguide when you havefinished using it.
2 Pull out the tray and attach the guide.
Slide the divider plate tothe position of thebottom edge of thetabbed paper and attachthe guide so that itcovers the divider plate.
3 Place the tabbed paper in the tray.
Place the tabbed paperwith the print side faceup.
[Example]Make sure that the positions of the tabs correspondwith the originals as shown below.
4 Gently push the tray in and set the papertype to tabbed paper.(See "Setting the paper type and paper size" onpage 2-14)
■ Loading transparency filmBe sure to load transparency film with the label facing down and the film oriented vertically. Smudging and adirty image may result if the film is loaded with the label facing up. (Transparency film cannot be used in tray 4.)
Changing the paper size in paper tray 4Plain paper from 11" x 17" to 7-1/4" x 10-1/2"R size (A3 to B5) can be loaded in tray 4. For paper that can be used,see "Specifications of paper trays (Types and sizes of paper that can be used in the trays)" on page 2-12.The procedures for loading paper in tray 4 and changing the paper size are the same as for tray 3 (see page 2-5).
AB
C
DE
F
GH
I JKL
Front side
1st page 1st page2nd page
2nd page
3rd page
3rd page 4th page
4th page
Tabbed paperOriginal
NOTE
When referring to the explanations of tray 3, keep in mind that special papers such as tabbed paper andtransparency film cannot be used in tray 4. Use tray 3 for special paper.
dragonII_copy_sec.book 6 ページ 2006年10月18日 水曜日 午後7時39分
LOADING PAPER
2-7
2
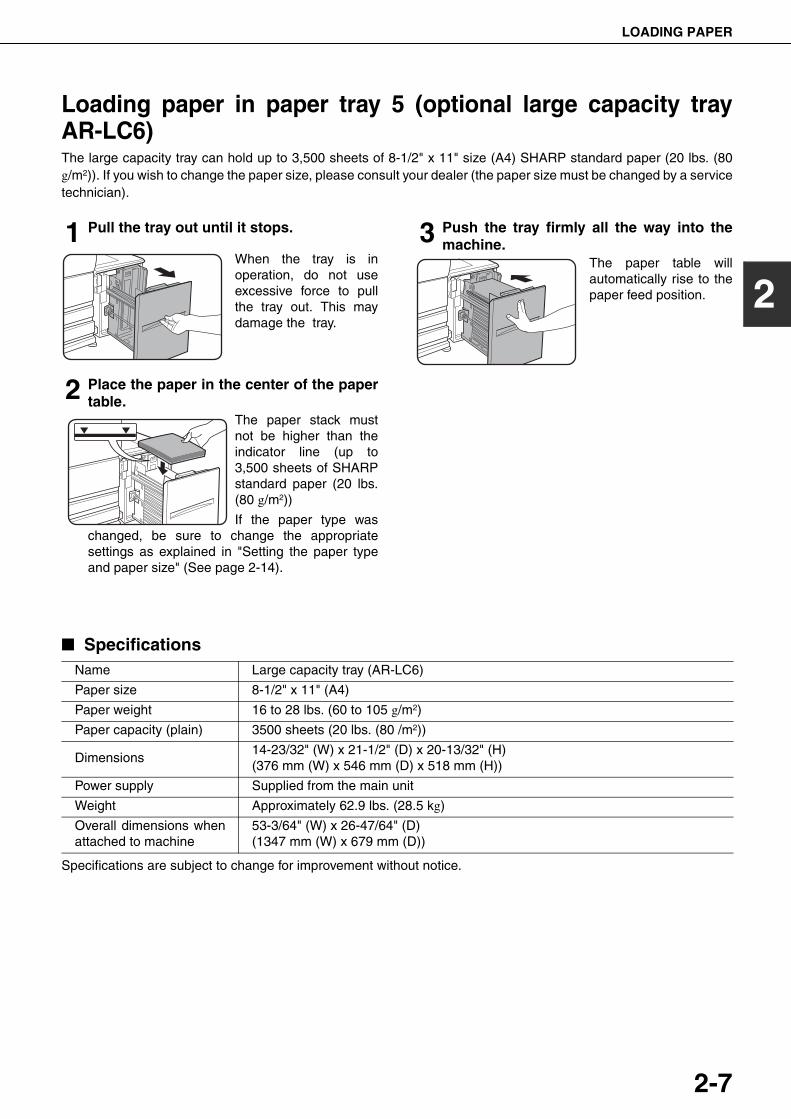
Loading paper in paper tray 5 (optional large capacity trayAR-LC6)The large capacity tray can hold up to 3,500 sheets of 8-1/2" x 11" size (A4) SHARP standard paper (20 lbs. (80g/m2)). If you wish to change the paper size, please consult your dealer (the paper size must be changed by a servicetechnician).
1 Pull the tray out until it stops.
When the tray is inoperation, do not useexcessive force to pullthe tray out. This maydamage the tray.
2 Place the paper in the center of the papertable.
The paper stack mustnot be higher than theindicator line (up to3,500 sheets of SHARPstandard paper (20 lbs.(80 g/m2))
If the paper type waschanged, be sure to change the appropriatesettings as explained in "Setting the paper typeand paper size" (See page 2-14).
3 Push the tray firmly all the way into themachine.
The paper table willautomatically rise to thepaper feed position.
■ Specifications
Specifications are subject to change for improvement without notice.
Name Large capacity tray (AR-LC6)
Paper size 8-1/2" x 11" (A4)
Paper weight 16 to 28 lbs. (60 to 105 g/m2)
Paper capacity (plain) 3500 sheets (20 lbs. (80 /m2))
Dimensions14-23/32" (W) x 21-1/2" (D) x 20-13/32" (H) (376 mm (W) x 546 mm (D) x 518 mm (H))
Power supply Supplied from the main unit
Weight Approximately 62.9 lbs. (28.5 kg)
Overall dimensions whenattached to machine
53-3/64" (W) x 26-47/64" (D)(1347 mm (W) x 679 mm (D))
dragonII_copy_sec.book 7 ページ 2006年10月18日 水曜日 午後7時39分
LOADING PAPER
2-8
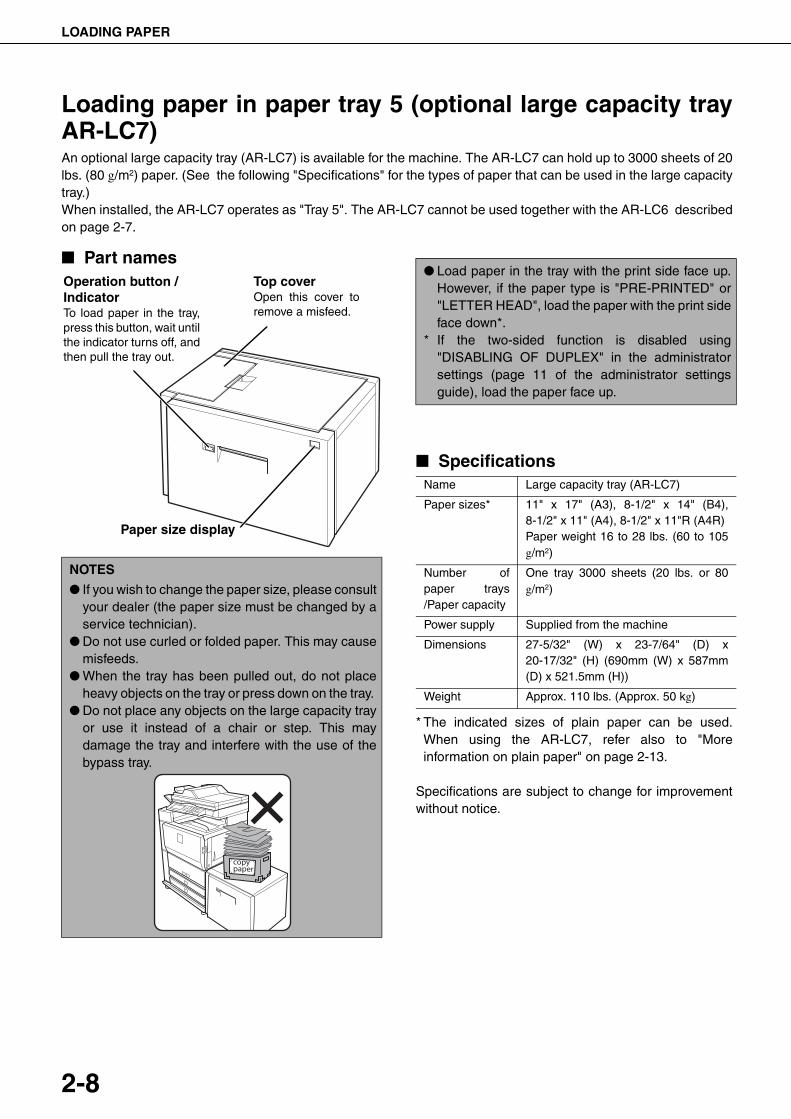
Loading paper in paper tray 5 (optional large capacity trayAR-LC7)An optional large capacity tray (AR-LC7) is available for the machine. The AR-LC7 can hold up to 3000 sheets of 20lbs. (80 g/m2) paper. (See the following "Specifications" for the types of paper that can be used in the large capacitytray.)When installed, the AR-LC7 operates as "Tray 5". The AR-LC7 cannot be used together with the AR-LC6 describedon page 2-7.
■ Part names
■ Specifications
* The indicated sizes of plain paper can be used.When using the AR-LC7, refer also to "Moreinformation on plain paper" on page 2-13.
Specifications are subject to change for improvementwithout notice.
NOTES
● If you wish to change the paper size, please consultyour dealer (the paper size must be changed by aservice technician).
● Do not use curled or folded paper. This may causemisfeeds.
● When the tray has been pulled out, do not placeheavy objects on the tray or press down on the tray.
● Do not place any objects on the large capacity trayor use it instead of a chair or step. This maydamage the tray and interfere with the use of thebypass tray.
Operation button / IndicatorTo load paper in the tray,press this button, wait untilthe indicator turns off, andthen pull the tray out.
Top coverOpen this cover toremove a misfeed.
Paper size display
● Load paper in the tray with the print side face up.However, if the paper type is "PRE-PRINTED" or"LETTER HEAD", load the paper with the print sideface down*.
* If the two-sided function is disabled using"DISABLING OF DUPLEX" in the administratorsettings (page 11 of the administrator settingsguide), load the paper face up.
Name Large capacity tray (AR-LC7)
Paper sizes* 11" x 17" (A3), 8-1/2" x 14" (B4),8-1/2" x 11" (A4), 8-1/2" x 11"R (A4R)Paper weight 16 to 28 lbs. (60 to 105g/m2)
Number ofpaper trays/Paper capacity
One tray 3000 sheets (20 lbs. or 80g/m2)
Power supply Supplied from the machine
Dimensions 27-5/32" (W) x 23-7/64" (D) x20-17/32" (H) (690mm (W) x 587mm(D) x 521.5mm (H))
Weight Approx. 110 lbs. (Approx. 50 kg)
dragonII_copy_sec.book 8 ページ 2006年10月18日 水曜日 午後7時39分
LOADING PAPER
2-9
2
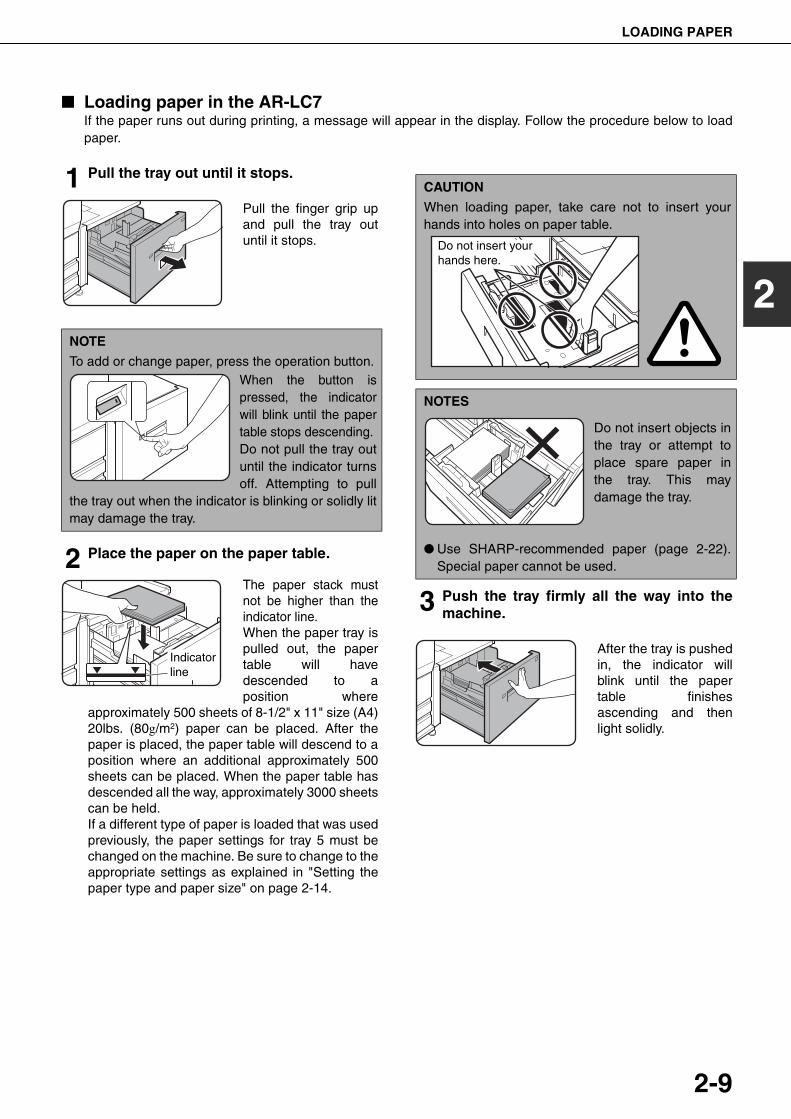
■ Loading paper in the AR-LC7If the paper runs out during printing, a message will appear in the display. Follow the procedure below to loadpaper.
1 Pull the tray out until it stops.
Pull the finger grip upand pull the tray outuntil it stops.
2 Place the paper on the paper table.
The paper stack mustnot be higher than theindicator line.When the paper tray ispulled out, the papertable will havedescended to aposition where
approximately 500 sheets of 8-1/2" x 11" size (A4)20lbs. (80g/m2) paper can be placed. After thepaper is placed, the paper table will descend to aposition where an additional approximately 500sheets can be placed. When the paper table hasdescended all the way, approximately 3000 sheetscan be held.If a different type of paper is loaded that was usedpreviously, the paper settings for tray 5 must bechanged on the machine. Be sure to change to theappropriate settings as explained in "Setting thepaper type and paper size" on page 2-14.
3 Push the tray firmly all the way into themachine.
After the tray is pushedin, the indicator willblink until the papertable finishesascending and thenlight solidly.
NOTE
To add or change paper, press the operation button.When the button ispressed, the indicatorwill blink until the papertable stops descending.Do not pull the tray outuntil the indicator turnsoff. Attempting to pull
the tray out when the indicator is blinking or solidly litmay damage the tray.
Indicatorline
CAUTION
When loading paper, take care not to insert yourhands into holes on paper table.
NOTES
Do not insert objects inthe tray or attempt toplace spare paper inthe tray. This maydamage the tray.
● Use SHARP-recommended paper (page 2-22).Special paper cannot be used.
Do not insert yourhands here.
dragonII_copy_sec.book 9 ページ 2006年10月18日 水曜日 午後7時39分
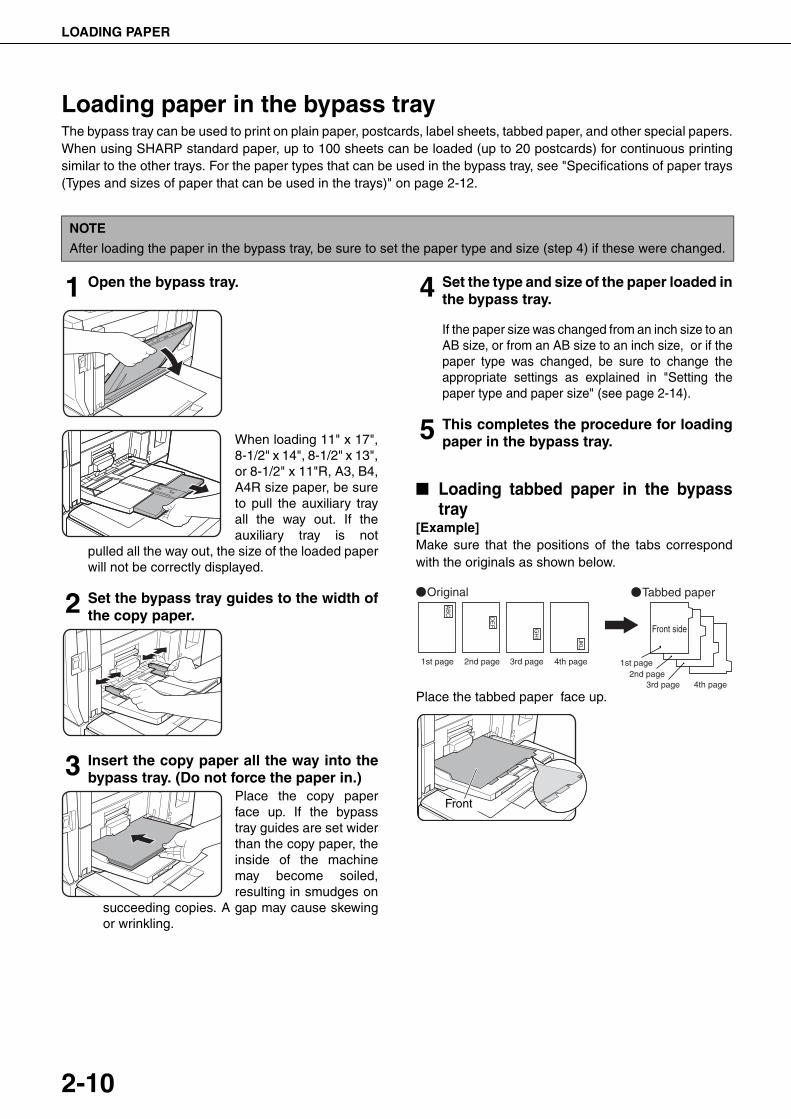
LOADING PAPER
2-10
Loading paper in the bypass trayThe bypass tray can be used to print on plain paper, postcards, label sheets, tabbed paper, and other special papers.When using SHARP standard paper, up to 100 sheets can be loaded (up to 20 postcards) for continuous printingsimilar to the other trays. For the paper types that can be used in the bypass tray, see "Specifications of paper trays(Types and sizes of paper that can be used in the trays)" on page 2-12.
1 Open the bypass tray.
When loading 11" x 17",8-1/2" x 14", 8-1/2" x 13",or 8-1/2" x 11"R, A3, B4,A4R size paper, be sureto pull the auxiliary trayall the way out. If theauxiliary tray is not
pulled all the way out, the size of the loaded paperwill not be correctly displayed.
2 Set the bypass tray guides to the width ofthe copy paper.
3 Insert the copy paper all the way into thebypass tray. (Do not force the paper in.)
Place the copy paperface up. If the bypasstray guides are set widerthan the copy paper, theinside of the machinemay become soiled,resulting in smudges on
succeeding copies. A gap may cause skewingor wrinkling.
4 Set the type and size of the paper loaded inthe bypass tray.
If the paper size was changed from an inch size to anAB size, or from an AB size to an inch size, or if thepaper type was changed, be sure to change theappropriate settings as explained in "Setting thepaper type and paper size" (see page 2-14).
5 This completes the procedure for loadingpaper in the bypass tray.
■ Loading tabbed paper in the bypasstray
[Example]Make sure that the positions of the tabs correspondwith the originals as shown below.
Place the tabbed paper face up.
NOTE
After loading the paper in the bypass tray, be sure to set the paper type and size (step 4) if these were changed.
AB
C
DE
F
GH
I JKL
Front side
1st page 1st page2nd page
2nd page
3rd page
3rd page 4th page
4th page
Tabbed paperOriginal
Front
dragonII_copy_sec.book 10 ページ 2006年10月18日 水曜日 午後7時39分

LOADING PAPER
2-11
2
■ Important points when using thebypass tray● Be sure to load 5-1/2" x 8-1/2" paper, A5 paper,
and postcards as shown (1) horizontal loading inthe diagram below.
(1):Horizontal loading(2):Vertical loading
● When loading plain paper other than SHARPstandard paper, special media other thanpostcards, SHARP-recommended transparencyfilm, or paper to be printed on the back, thepaper must be loaded one sheet at a time.Loading more than one sheet at a time will causemisfeeds.
● Before loading heavy paper, straighten anycurling in the paper.
● When adding paper, remove any paperremaining in the tray, combine it with the paper tobe added, and reload as a single stack.
● Do not use paper that has already been printedon by a plain paper fax machine or a laserprinter. This may cause printed images tobecome dirty.
● When printing on transparency film, be sure toremove each sheet as it exits the machine.Allowing sheets to stack in the output tray maycause curling.
● Use only Sharp-recommended transparencyfilm. Transparency film should be loaded in thebypass tray with the label facing down and thefilm oriented vertically. Smudging and a dirtyimage may result if the film is placed with thelabel facing up.
● When loading multiple sheets of transparencyfilm in the bypass tray, be sure to fan the sheetsseveral times before loading.
● Use only tabbed sheets that are made of paper.Tabbed sheets made of film or other materialcannot be used.
(1) (2)
Label facing down
dragonII_copy_sec.book 11 ページ 2006年10月18日 水曜日 午後7時39分
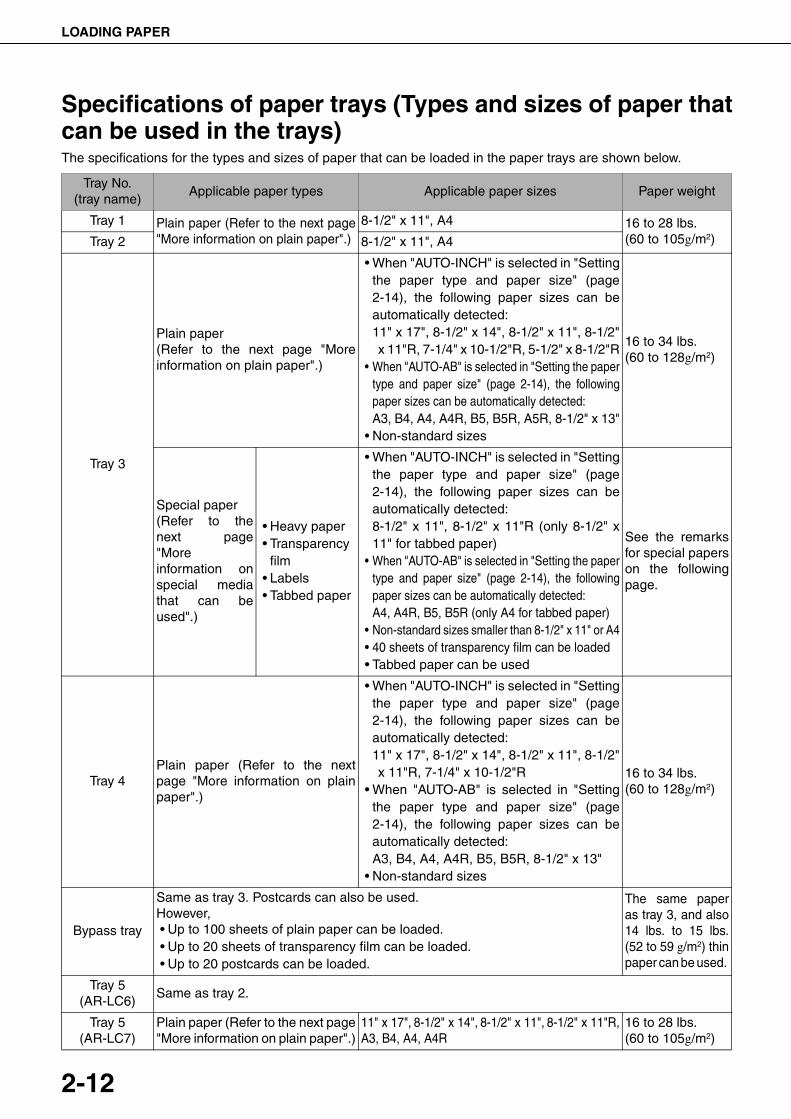
LOADING PAPER
2-12
Specifications of paper trays (Types and sizes of paper thatcan be used in the trays)The specifications for the types and sizes of paper that can be loaded in the paper trays are shown below.
Tray No. (tray name)
Applicable paper types Applicable paper sizes Paper weight
Tray 1 Plain paper (Refer to the next page"More information on plain paper".)
8-1/2" x 11", A4 16 to 28 lbs.(60 to 105g/m2)Tray 2 8-1/2" x 11", A4
Tray 3
Plain paper(Refer to the next page "Moreinformation on plain paper".)
• When "AUTO-INCH" is selected in "Settingthe paper type and paper size" (page2-14), the following paper sizes can beautomatically detected:11" x 17", 8-1/2" x 14", 8-1/2" x 11", 8-1/2"x 11"R, 7-1/4" x 10-1/2"R, 5-1/2" x 8-1/2"R
• When "AUTO-AB" is selected in "Setting the papertype and paper size" (page 2-14), the followingpaper sizes can be automatically detected:A3, B4, A4, A4R, B5, B5R, A5R, 8-1/2" x 13"
• Non-standard sizes
16 to 34 lbs.(60 to 128g/m2)
Special paper(Refer to thenext page"Moreinformation onspecial mediathat can beused".)
• Heavy paper• Transparency
film• Labels• Tabbed paper
• When "AUTO-INCH" is selected in "Settingthe paper type and paper size" (page2-14), the following paper sizes can beautomatically detected:8-1/2" x 11", 8-1/2" x 11"R (only 8-1/2" x11" for tabbed paper)
• When "AUTO-AB" is selected in "Setting the papertype and paper size" (page 2-14), the followingpaper sizes can be automatically detected:A4, A4R, B5, B5R (only A4 for tabbed paper)
• Non-standard sizes smaller than 8-1/2" x 11" or A4• 40 sheets of transparency film can be loaded• Tabbed paper can be used
See the remarksfor special paperson the followingpage.
Tray 4Plain paper (Refer to the nextpage "More information on plainpaper".)
• When "AUTO-INCH" is selected in "Settingthe paper type and paper size" (page2-14), the following paper sizes can beautomatically detected:11" x 17", 8-1/2" x 14", 8-1/2" x 11", 8-1/2"x 11"R, 7-1/4" x 10-1/2"R
• When "AUTO-AB" is selected in "Settingthe paper type and paper size" (page2-14), the following paper sizes can beautomatically detected:A3, B4, A4, A4R, B5, B5R, 8-1/2" x 13"
• Non-standard sizes
16 to 34 lbs.(60 to 128g/m2)
Bypass tray
Same as tray 3. Postcards can also be used.However,• Up to 100 sheets of plain paper can be loaded.• Up to 20 sheets of transparency film can be loaded.• Up to 20 postcards can be loaded.
The same paperas tray 3, and also14 lbs. to 15 lbs.(52 to 59 g/m2) thinpaper can be used.
Tray 5 (AR-LC6)
Same as tray 2.
Tray 5 (AR-LC7)
Plain paper (Refer to the next page"More information on plain paper".)
11" x 17", 8-1/2" x 14", 8-1/2" x 11", 8-1/2" x 11"R,A3, B4, A4, A4R
16 to 28 lbs.(60 to 105g/m2)
dragon_02-1.fm 12 ページ 2006年11月29日 水曜日 午後8時44分
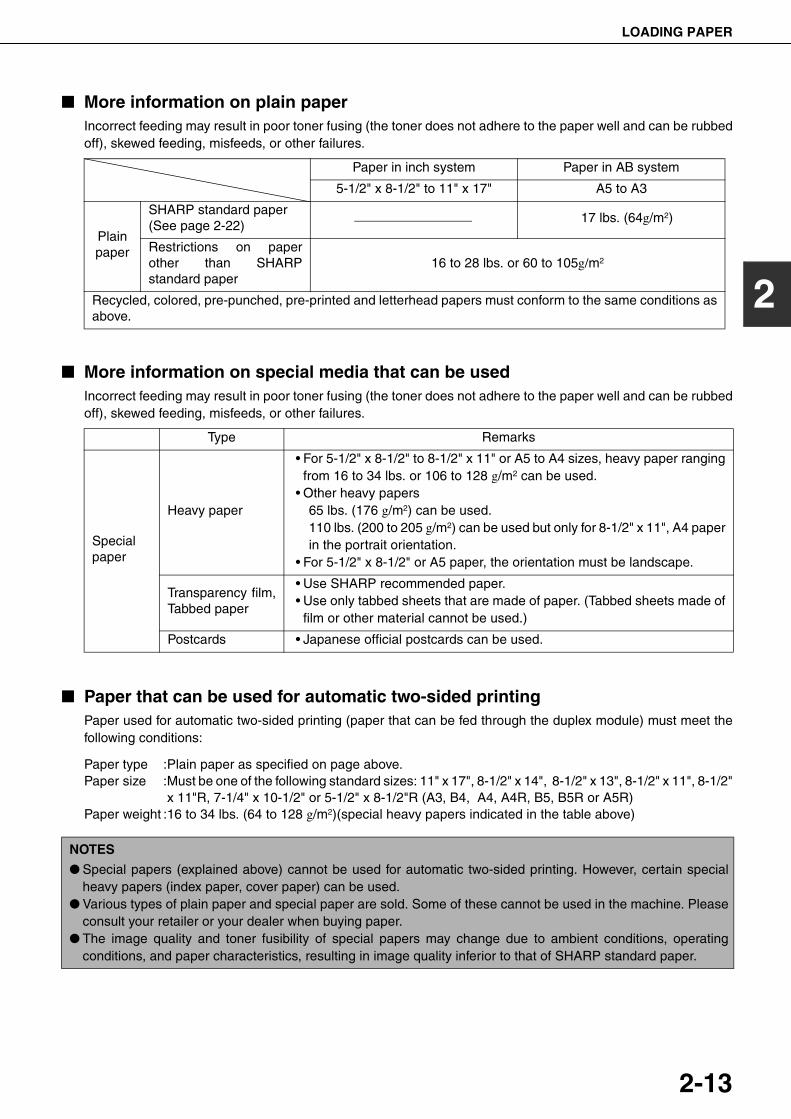
LOADING PAPER
2-13
2
■ More information on plain paperIncorrect feeding may result in poor toner fusing (the toner does not adhere to the paper well and can be rubbedoff), skewed feeding, misfeeds, or other failures.
■ More information on special media that can be usedIncorrect feeding may result in poor toner fusing (the toner does not adhere to the paper well and can be rubbedoff), skewed feeding, misfeeds, or other failures.
■ Paper that can be used for automatic two-sided printingPaper used for automatic two-sided printing (paper that can be fed through the duplex module) must meet thefollowing conditions:
Paper type :Plain paper as specified on page above.Paper size :Must be one of the following standard sizes: 11" x 17", 8-1/2" x 14", 8-1/2" x 13", 8-1/2" x 11", 8-1/2"
x 11"R, 7-1/4" x 10-1/2" or 5-1/2" x 8-1/2"R (A3, B4, A4, A4R, B5, B5R or A5R)Paper weight :16 to 34 lbs. (64 to 128 g/m2)(special heavy papers indicated in the table above)
Paper in inch system Paper in AB system
5-1/2" x 8-1/2" to 11" x 17" A5 to A3
Plain paper
SHARP standard paper(See page 2-22)
17 lbs. (64g/m2)
Restrictions on paperother than SHARPstandard paper
16 to 28 lbs. or 60 to 105g/m2
Recycled, colored, pre-punched, pre-printed and letterhead papers must conform to the same conditions asabove.
Type Remarks
Specialpaper
Heavy paper
• For 5-1/2" x 8-1/2" to 8-1/2" x 11" or A5 to A4 sizes, heavy paper rangingfrom 16 to 34 lbs. or 106 to 128 g/m2 can be used.
• Other heavy papers65 lbs. (176 g/m2) can be used.110 lbs. (200 to 205 g/m2) can be used but only for 8-1/2" x 11", A4 paperin the portrait orientation.
• For 5-1/2" x 8-1/2" or A5 paper, the orientation must be landscape.
Transparency film,Tabbed paper
• Use SHARP recommended paper.• Use only tabbed sheets that are made of paper. (Tabbed sheets made of
film or other material cannot be used.)
Postcards • Japanese official postcards can be used.
NOTES
● Special papers (explained above) cannot be used for automatic two-sided printing. However, certain specialheavy papers (index paper, cover paper) can be used.
● Various types of plain paper and special paper are sold. Some of these cannot be used in the machine. Pleaseconsult your retailer or your dealer when buying paper.
● The image quality and toner fusibility of special papers may change due to ambient conditions, operatingconditions, and paper characteristics, resulting in image quality inferior to that of SHARP standard paper.
dragonII_copy_sec.book 13 ページ 2006年10月18日 水曜日 午後7時39分
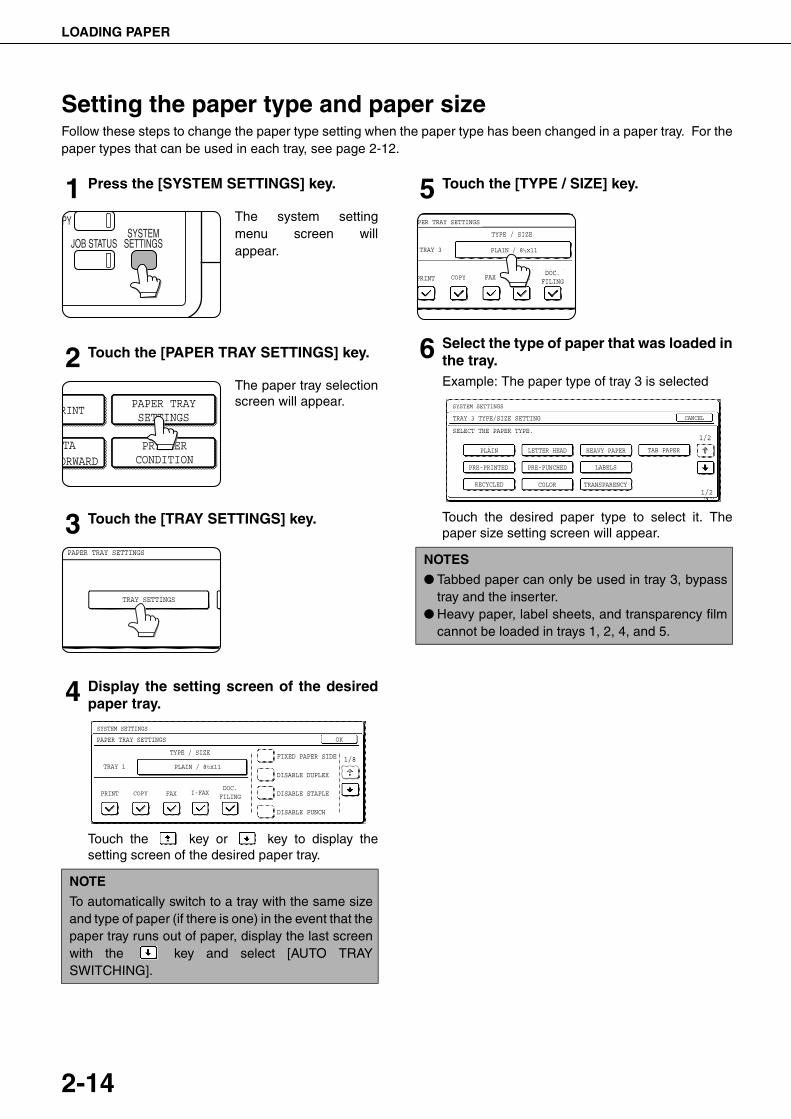
LOADING PAPER
2-14
Setting the paper type and paper sizeFollow these steps to change the paper type setting when the paper type has been changed in a paper tray. For thepaper types that can be used in each tray, see page 2-12.
1 Press the [SYSTEM SETTINGS] key.
The system settingmenu screen willappear.
2 Touch the [PAPER TRAY SETTINGS] key.
The paper tray selectionscreen will appear.
3 Touch the [TRAY SETTINGS] key.
4 Display the setting screen of the desiredpaper tray.
Touch the key or key to display thesetting screen of the desired paper tray.
5 Touch the [TYPE / SIZE] key.
6 Select the type of paper that was loaded inthe tray.Example: The paper type of tray 3 is selected
Touch the desired paper type to select it. Thepaper size setting screen will appear.
NOTE
To automatically switch to a tray with the same sizeand type of paper (if there is one) in the event that thepaper tray runs out of paper, display the last screenwith the key and select [AUTO TRAYSWITCHING].
PY
JOB STATUSSYSTEM
SETTINGS
PAPER TRAY SETTINGS
ATAORWARD
RINT
PRINTERCONDITION
TRAY SETTINGS
PAPER TRAY SETTINGS
1/8PLAIN / 8 x11
OK
PAPER TRAY SETTINGS
TYPE / SIZE
SYSTEM SETTINGS
TRAY 1
FAX I-FAXCOPYDOC.
FILING
FIXED PAPER SIDE
DISABLE DUPLEX
DISABLE STAPLE
DISABLE PUNCH
1 / 2
NOTES
● Tabbed paper can only be used in tray 3, bypasstray and the inserter.
● Heavy paper, label sheets, and transparency filmcannot be loaded in trays 1, 2, 4, and 5.
TYPE / SIZE
TRAY 3
PER TRAY SETTINGS
PRINT COPY I-FAXDOC. FILING
FAX
PLAIN / 8 x111 / 2
CANCEL
1/2
PLAIN
RECYCLED
PRE-PRINTED PRE-PUNCHED
LETTER HEAD
COLOR
HEAVY PAPER TAB PAPER
LABELS
TRANSPARENCY
TRAY 3 TYPE/SIZE SETTING
SELECT THE PAPER TYPE.
SYSTEM SETTINGS
1/2
dragonII_copy_sec.book 14 ページ 2006年10月18日 水曜日 午後7時39分
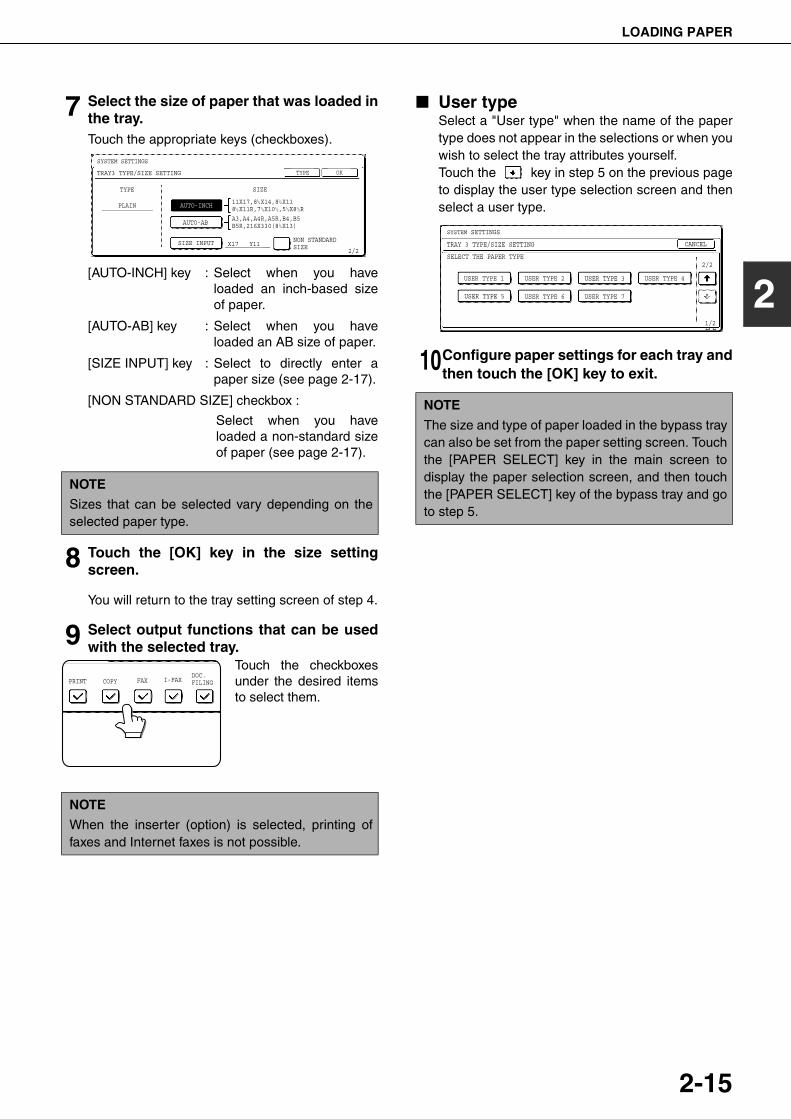
LOADING PAPER
2-15
2
7 Select the size of paper that was loaded inthe tray.Touch the appropriate keys (checkboxes).
8 Touch the [OK] key in the size settingscreen.
You will return to the tray setting screen of step 4.
9 Select output functions that can be usedwith the selected tray.
Touch the checkboxesunder the desired itemsto select them.
■ User typeSelect a "User type" when the name of the papertype does not appear in the selections or when youwish to select the tray attributes yourself.Touch the key in step 5 on the previous pageto display the user type selection screen and thenselect a user type.
10Configure paper settings for each tray andthen touch the [OK] key to exit.
[AUTO-INCH] key : Select when you haveloaded an inch-based sizeof paper.
[AUTO-AB] key : Select when you haveloaded an AB size of paper.
[SIZE INPUT] key : Select to directly enter apaper size (see page 2-17).
[NON STANDARD SIZE] checkbox :
Select when you haveloaded a non-standard sizeof paper (see page 2-17).
NOTE
Sizes that can be selected vary depending on theselected paper type.
NOTE
When the inserter (option) is selected, printing offaxes and Internet faxes is not possible.
11X17,8 X14,8 X118 X11R,7 X10 ,5 X8 R
1 / 21 / 2
1 / 21 / 2
1 / 41 / 2
1 / 2
A3,A4,A4R,A5R,B4,B5B5R,216X330(8 X13)1 / 2
TYPE OK
PLAIN
TRAY3 TYPE/SIZE SETTING
SYSTEM SETTINGS
TYPE
AUTO-INCH
SIZE INPUT
AUTO-AB
SIZE
X17 Y11 NON STANDARD SIZE
2/2
PRINT COPY FAX I-FAXDOC. FILING
NOTE
The size and type of paper loaded in the bypass traycan also be set from the paper setting screen. Touchthe [PAPER SELECT] key in the main screen todisplay the paper selection screen, and then touchthe [PAPER SELECT] key of the bypass tray and goto step 5.
SYSTEM SETTINGS
TRAY 3 TYPE/SIZE SETTING
2/2
USER TYPE 1
CANCEL
SELECT THE PAPER TYPE
USER TYPE 5
USER TYPE 2
USER TYPE 6
USER TYPE 3
USER TYPE 7
USER TYPE 4
1/2
dragonII_copy_sec.book 15 ページ 2006年10月18日 水曜日 午後7時39分
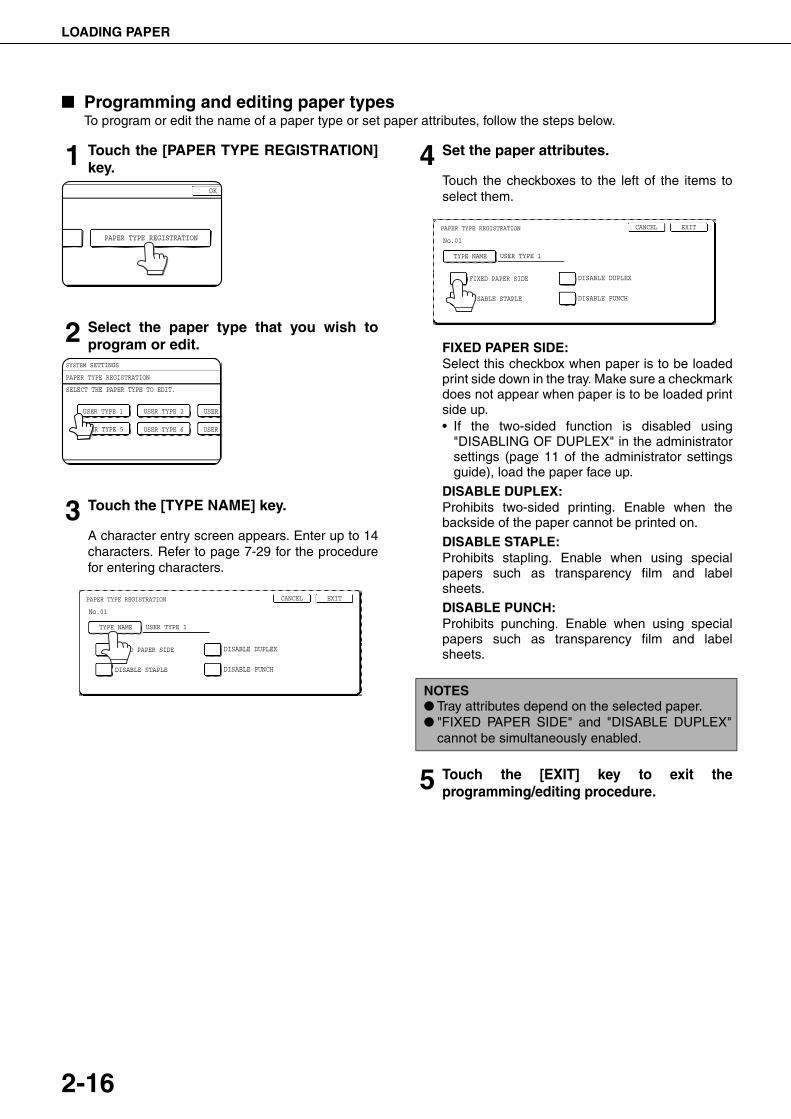
LOADING PAPER
2-16
■ Programming and editing paper typesTo program or edit the name of a paper type or set paper attributes, follow the steps below.
1 Touch the [PAPER TYPE REGISTRATION]key.
2 Select the paper type that you wish toprogram or edit.
3 Touch the [TYPE NAME] key.
A character entry screen appears. Enter up to 14characters. Refer to page 7-29 for the procedurefor entering characters.
4 Set the paper attributes.
Touch the checkboxes to the left of the items toselect them.
FIXED PAPER SIDE:Select this checkbox when paper is to be loadedprint side down in the tray. Make sure a checkmarkdoes not appear when paper is to be loaded printside up.• If the two-sided function is disabled using
"DISABLING OF DUPLEX" in the administratorsettings (page 11 of the administrator settingsguide), load the paper face up.
DISABLE DUPLEX:Prohibits two-sided printing. Enable when thebackside of the paper cannot be printed on.
DISABLE STAPLE:Prohibits stapling. Enable when using specialpapers such as transparency film and labelsheets.
DISABLE PUNCH:Prohibits punching. Enable when using specialpapers such as transparency film and labelsheets.
5 Touch the [EXIT] key to exit theprogramming/editing procedure.
OK
PAPER TYPE REGISTRATION
OK
PAPER TYPE REGISTRATION
OK
PAPER TYPE REGISTRATION
SYSTEM SETTINGS
PAPER TYPE REGISTRATION
USER TYPE 1
SELECT THE PAPER TYPE TO EDIT.
USER TYPE 5
USER TYPE 2
USER TYPE 6
USER
USER
FIXED PAPER SIDE
TYPE NAME
PAPER TYPE REGISTRATION
No.01
USER TYPE 1
DISABLE STAPLE
DISABLE DUPLEX
DISABLE PUNCH
EXITCANCEL
NOTES● Tray attributes depend on the selected paper.● "FIXED PAPER SIDE" and "DISABLE DUPLEX"
cannot be simultaneously enabled.
DISABLE STAPLE
FIXED PAPER SIDE
TYPE NAME
PAPER TYPE REGISTRATION
No.01
USER TYPE 1
DISABLE DUPLEX
DISABLE PUNCH
EXITCANCEL
dragonII_copy_sec.book 16 ページ 2006年10月18日 水曜日 午後7時39分
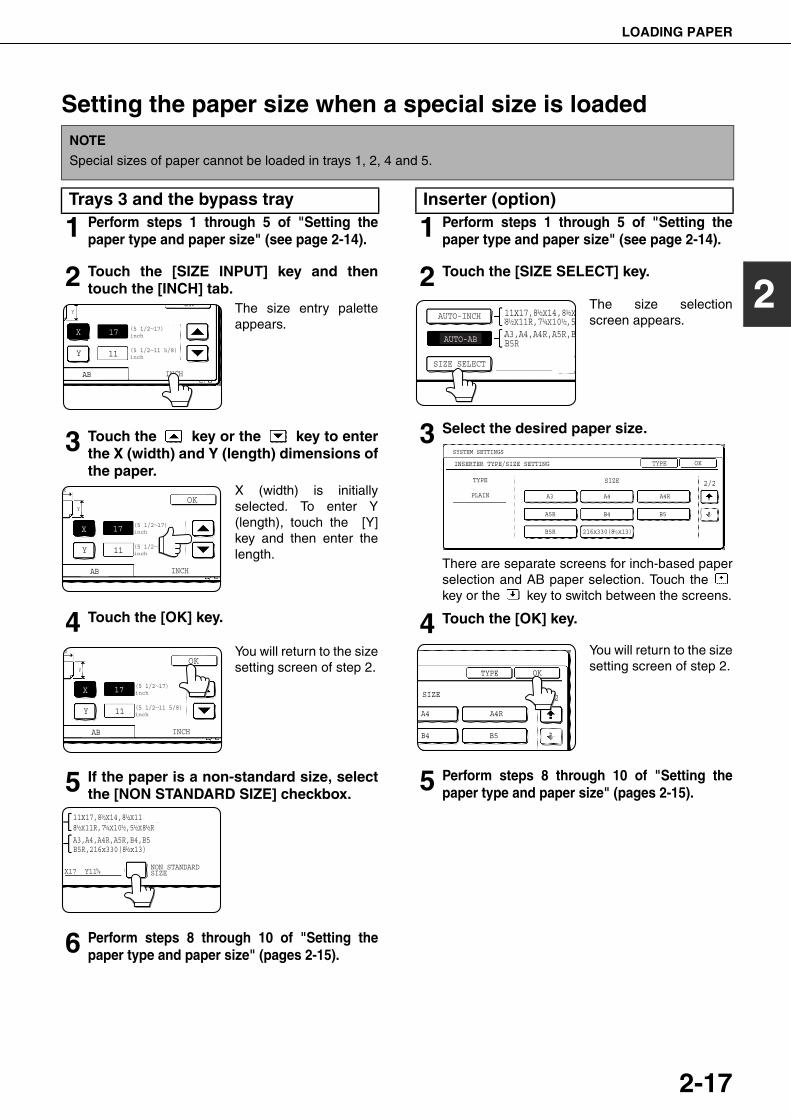
LOADING PAPER
2-17
2
Setting the paper size when a special size is loaded
1 Perform steps 1 through 5 of "Setting thepaper type and paper size" (see page 2-14).
2 Touch the [SIZE INPUT] key and thentouch the [INCH] tab.
The size entry paletteappears.
3 Touch the key or the key to enterthe X (width) and Y (length) dimensions ofthe paper.
X (width) is initiallyselected. To enter Y(length), touch the [Y]key and then enter thelength.
4 Touch the [OK] key.
You will return to the sizesetting screen of step 2.
5 If the paper is a non-standard size, selectthe [NON STANDARD SIZE] checkbox.
6 Perform steps 8 through 10 of "Setting thepaper type and paper size" (pages 2-15).
1 Perform steps 1 through 5 of "Setting thepaper type and paper size" (see page 2-14).
2 Touch the [SIZE SELECT] key.
The size selectionscreen appears.
3 Select the desired paper size.
There are separate screens for inch-based paperselection and AB paper selection. Touch the key or the key to switch between the screens.
4 Touch the [OK] key.
You will return to the sizesetting screen of step 2.
5 Perform steps 8 through 10 of "Setting thepaper type and paper size" (pages 2-15).
NOTE
Special sizes of paper cannot be loaded in trays 1, 2, 4 and 5.
Trays 3 and the bypass tray
AB
Y 11
17X (5 1/2 17)inch
INCH
OK
(5 1/2 11 5/8)inch
Y
X
AB
Y 11
17
Y
X
INCH
OK
(5 1/2 17)inch
(5 1/2 11 5/8)inch
X
AB
Y 11
17
Y
X
INCH
OK
(5 1/2 17)inch
(5 1/2 11 5/8)inch
NON STANDARDSIZE
11X17,8 X14,8 X111 / 2 1 / 2
8 X11R,7 X10 ,5 X8 R1 / 21 / 4 1 / 2 1 / 21 / 2
A3,A4,A4R,A5R,B4,B5B5R,216x330(8 x13)
X17 Y115 / 8
1 / 2
Inserter (option)
SIZE SELECT
11X17,8 X14,8 X1 / 2 1 / 2
8 X11R,7 X10 ,51 / 21 / 4 1 / 2
A3,A4,A4R,A5R,B
AUTO-INCH
AUTO-AB B5R
2/2
PLAIN A3
OKTYPEINSERTER TYPE/SIZE SETTING
TYPE
SYSTEM SETTINGS
A4 A4R
A5R B4
B5R
B5
SIZE
216x330(8 x13)1 / 2
2/2
OKTYPE
A4 A4R
B4 B5
SIZE
dragonII_copy_sec.book 17 ページ 2006年10月18日 水曜日 午後7時39分
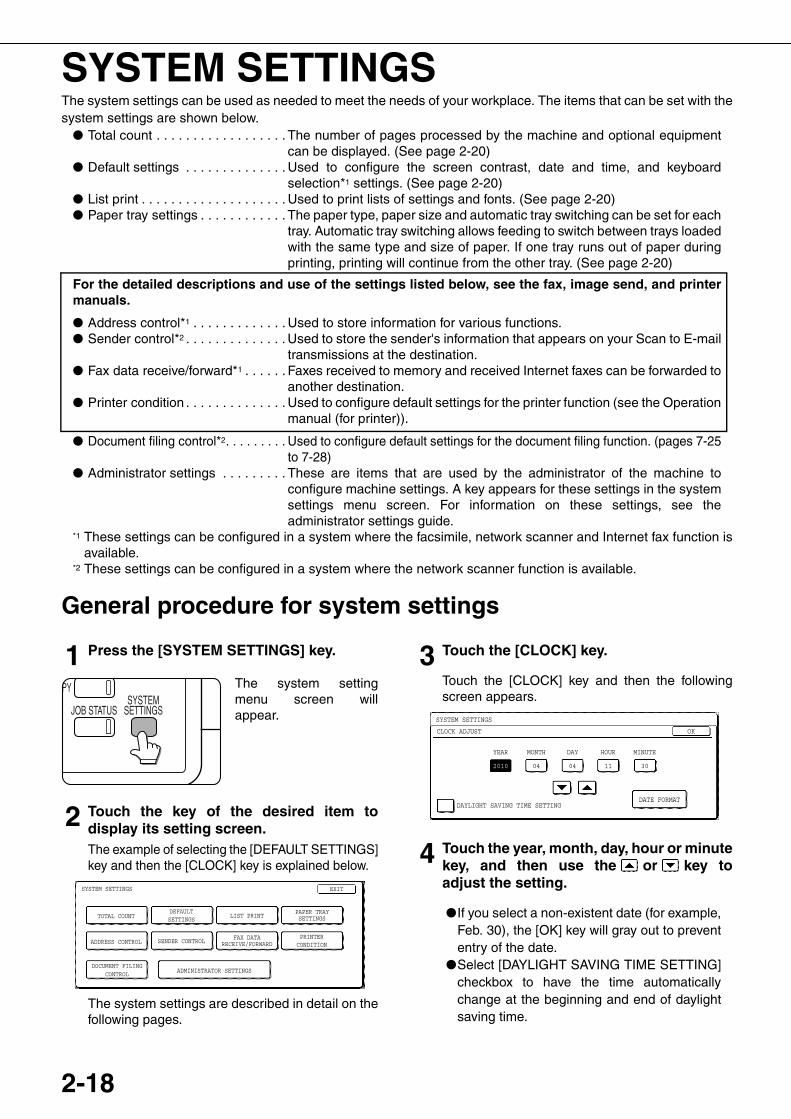
2-18
SYSTEM SETTINGSThe system settings can be used as needed to meet the needs of your workplace. The items that can be set with thesystem settings are shown below.
● Total count . . . . . . . . . . . . . . . . . . The number of pages processed by the machine and optional equipmentcan be displayed. (See page 2-20)
● Default settings . . . . . . . . . . . . . . Used to configure the screen contrast, date and time, and keyboardselection*1 settings. (See page 2-20)
● List print . . . . . . . . . . . . . . . . . . . . Used to print lists of settings and fonts. (See page 2-20)● Paper tray settings . . . . . . . . . . . . The paper type, paper size and automatic tray switching can be set for each
tray. Automatic tray switching allows feeding to switch between trays loadedwith the same type and size of paper. If one tray runs out of paper duringprinting, printing will continue from the other tray. (See page 2-20)
For the detailed descriptions and use of the settings listed below, see the fax, image send, and printermanuals.
● Address control*1 . . . . . . . . . . . . . Used to store information for various functions.● Sender control*2 . . . . . . . . . . . . . . Used to store the sender's information that appears on your Scan to E-mail
transmissions at the destination.● Fax data receive/forward*1 . . . . . . Faxes received to memory and received Internet faxes can be forwarded to
another destination.● Printer condition . . . . . . . . . . . . . . Used to configure default settings for the printer function (see the Operation
manual (for printer)).
● Document filing control*2. . . . . . . . . Used to configure default settings for the document filing function. (pages 7-25to 7-28)
● Administrator settings . . . . . . . . . These are items that are used by the administrator of the machine toconfigure machine settings. A key appears for these settings in the systemsettings menu screen. For information on these settings, see theadministrator settings guide.
*1 These settings can be configured in a system where the facsimile, network scanner and Internet fax function isavailable.
*2 These settings can be configured in a system where the network scanner function is available.
General procedure for system settings
1 Press the [SYSTEM SETTINGS] key.
The system settingmenu screen willappear.
2 Touch the key of the desired item todisplay its setting screen.The example of selecting the [DEFAULT SETTINGS]key and then the [CLOCK] key is explained below.
The system settings are described in detail on thefollowing pages.
3 Touch the [CLOCK] key.
Touch the [CLOCK] key and then the followingscreen appears.
4 Touch the year, month, day, hour or minutekey, and then use the or key toadjust the setting.
●If you select a non-existent date (for example,Feb. 30), the [OK] key will gray out to prevententry of the date.
●Select [DAYLIGHT SAVING TIME SETTING]checkbox to have the time automaticallychange at the beginning and end of daylightsaving time.
PY
JOB STATUSSYSTEM
SETTINGS
SYSTEM SETTINGS
LIST PRINT
FAX DATARECEIVE/FORWARD
PAPER TRAYSETTINGS
PRINTERCONDITION
EXIT
DEFAULTSETTINGS
SENDER CONTROL
ADMINISTRATOR SETTINGS
ADDRESS CONTROL
TOTAL COUNT
DOCUMENT FILINGCONTROL
SYSTEM SETTINGS
CLOCK ADJUST
DATE FORMAT
YEAR MONTH DAY HOUR MINUTE
2010 04 04 11 30
OK
DAYLIGHT SAVING TIME SETTING
dragon_02-2.fm 18 ページ 2006年11月30日 木曜日 午後2時13分
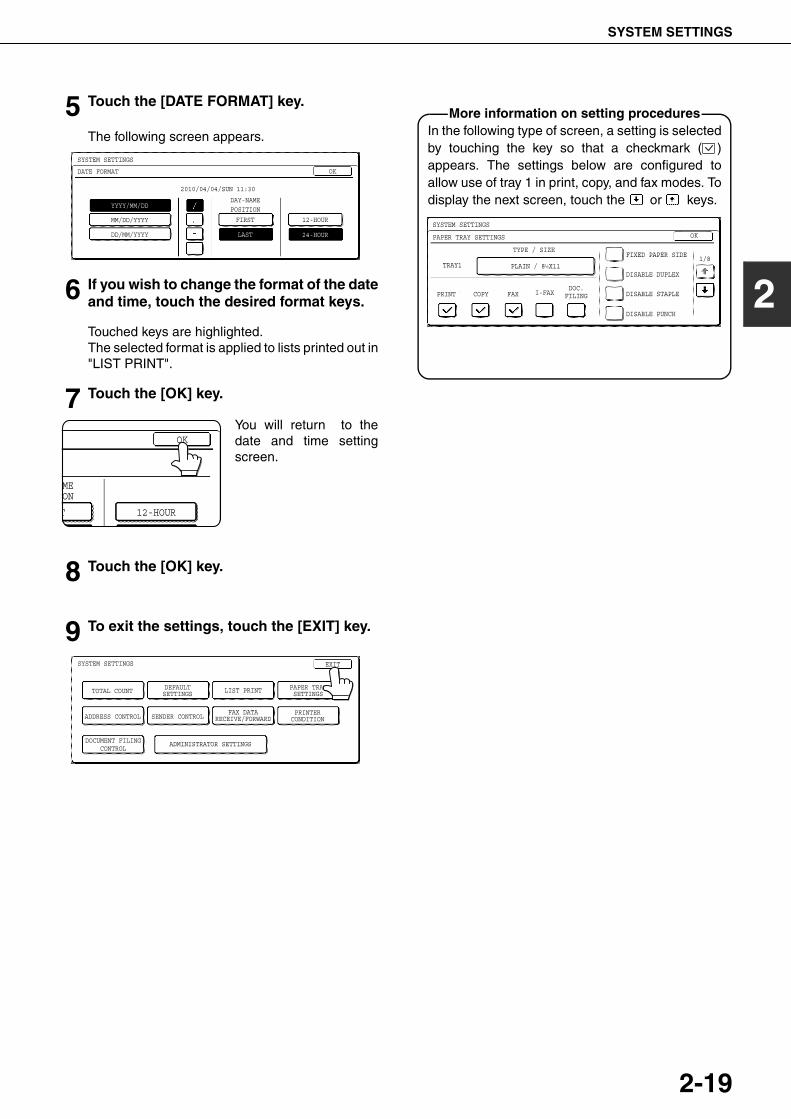
SYSTEM SETTINGS
2-19
2
5 Touch the [DATE FORMAT] key.
The following screen appears.
6 If you wish to change the format of the dateand time, touch the desired format keys.
Touched keys are highlighted.The selected format is applied to lists printed out in"LIST PRINT".
7 Touch the [OK] key.
You will return to thedate and time settingscreen.
8 Touch the [OK] key.
9 To exit the settings, touch the [EXIT] key.
SYSTEM SETTINGS
DATE FORMAT
YYYY/MM/DD
MM/DD/YYYY
DAY-NAMEPOSITION
OK
FIRST 12-HOUR
24-HOURLAST
2010/04/04/SUN 11:30
DD/MM/YYYY
AMEON
OK
T 12-HOUR
SYSTEM SETTINGS
LIST PRINT
FAX DATARECEIVE/FORWARD
PAPER TRAYSETTINGS
EXIT
DEFAULTSETTINGS
SENDER CONTROL
ADMINISTRATOR SETTINGS
ADDRESS CONTROL
TOTAL COUNT
DOCUMENT FILINGCONTROL
PRINTER CONDITION
More information on setting proceduresIn the following type of screen, a setting is selectedby touching the key so that a checkmark ( )appears. The settings below are configured toallow use of tray 1 in print, copy, and fax modes. Todisplay the next screen, touch the or keys.
FAXCOPYPRINT
TRAY1
TYPE / SIZE
SYSTEM SETTINGS
PAPER TRAY SETTINGS
PLAIN / 8 X111 / 2
FIXED PAPER SIDE1/8
OK
DOC. FILINGI-FAX
DISABLE DUPLEX
DISABLE STAPLE
DISABLE PUNCH
dragonII_copy_sec.book 19 ページ 2006年10月18日 水曜日 午後7時39分
SYSTEM SETTINGS
2-20
About the settings■ Total count
This displays the following sheet counts (thecounts that can be displayed vary depending onthe options installed):
Number of pages output by the machine.Number of original pages transmitted by themachine.Number of times the automatic document feederwas used to feed original pages and number oftimes the stapler was used (if installed).Number of pages stored by document filing.
In the case of only,●11" x 17" (A3) size paper is counted as two
sheets.●Each sheet of paper used for automatic two-
sided copying is counted as two sheets (11" x17" (A3) paper is counted as four sheets).
●Paper with an entered size of 15-1/8" (384 mm)or larger is counted as two sheets (four sheetsduring automatic two-sided copying).
■ Default settingsThe following settings can be configured:
●Display contrastScreen contrast adjustment is used to make theLCD touch panel easier to view under variouslighting conditions. Touch the [LIGHTER] key tomake the screen lighter, or the [DARKER] key tomake the screen darker.
●ClockUse this to set the date and time in themachine's built-in clock. This clock is used byfunctions that require date and time information.
●Keyboard selectThe layout of the keyboard that appears in letterentry screens can be changed.Select the arrangement of the letter keys thatyou find easiest to use.
The following three alphabet keyboardconfigurations are available:● Keyboard 1 (QWERT... configuration)*● Keyboard 2 (AZERTY...configuration)● Keyboard 3 (ABCDEF...configuration)* The default setting is "Keyboard 1".
(Example: Character entry screen whenKeyboard 3 is selected)
■ List printThis is used to print lists of machine settings and atest page to check resident fonts.The following lists and pages are available:
●All custom setting listShows the hardware status, software status,printer configuration settings, tray settings, andcounts.
●Printer test pageShows the PCL symbol set list, fonts, networkinterface (NIC interface) settings, and settingsused for the NIC card.
●Sending address listOne touch destination list, group list, programlist, and memory box list.
●Document filing user / folder listShows the user names and folder names fordocument filing.
●Sender control listShows the senders that have been stored.
■ Paper tray settingsThe paper type, paper size, enabled modes andautomatic tray switching can be set for each tray.See page 2-14 for details on setting the paper typeand paper size. Automatic switching to anotherpaper tray is used to automatically switch toanother tray with the same size and type of paper inthe event that the paper runs out during continuousprinting. This requires that the trays be loaded withthe same size of paper. The paper tray settings canbe enabled or disabled for each tray, and for printermode, copy mode, fax mode, Internet fax mode,and document filing mode. To enable any function,touch the check box key so that a checkmark ( )appears.
1
2
3
4
1
ABC abc
NOTE
A test page cannot be printed if "PROHIBIT TESTPAGE PRINTING" (See the "Operation manual (forprinter)".) has been set to "prohibited" in theadministrator settings.
dragonII_copy_sec.book 20 ページ 2006年10月18日 水曜日 午後7時39分
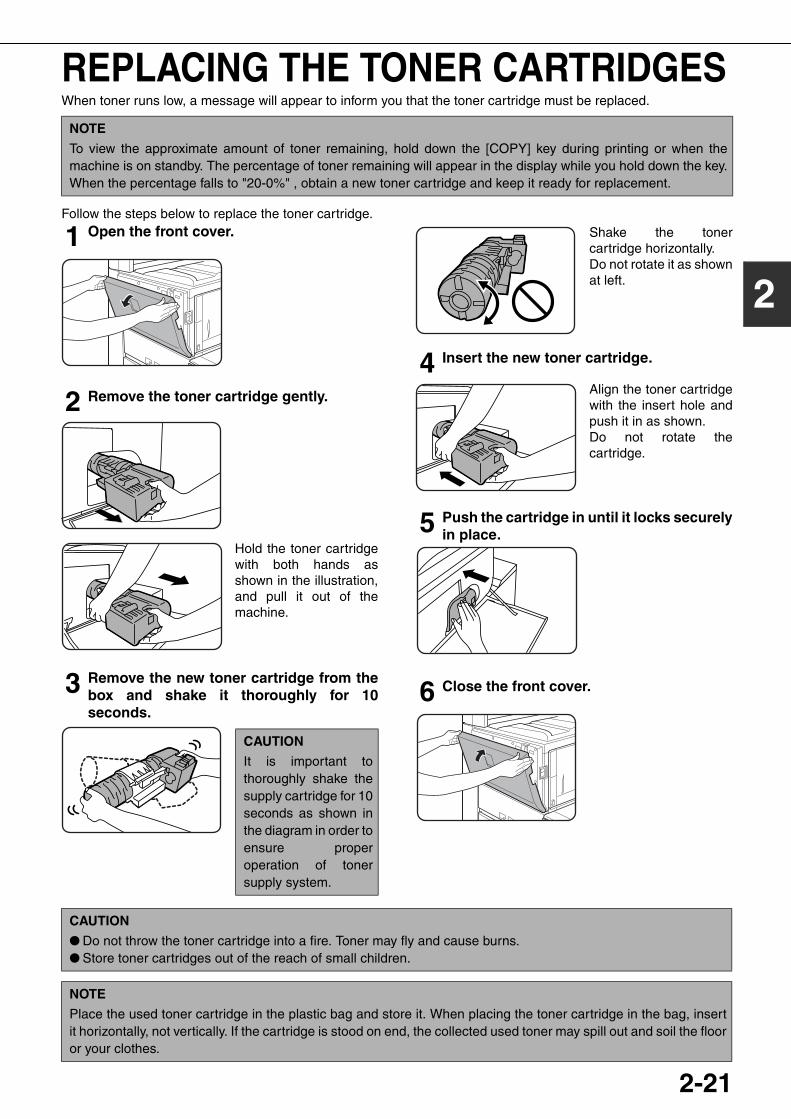
2-21
2
REPLACING THE TONER CARTRIDGESWhen toner runs low, a message will appear to inform you that the toner cartridge must be replaced.
Follow the steps below to replace the toner cartridge.
1 Open the front cover.
2 Remove the toner cartridge gently.
Hold the toner cartridgewith both hands asshown in the illustration,and pull it out of themachine.
3 Remove the new toner cartridge from thebox and shake it thoroughly for 10seconds.
Shake the tonercartridge horizontally.Do not rotate it as shownat left.
4 Insert the new toner cartridge.
Align the toner cartridgewith the insert hole andpush it in as shown.Do not rotate thecartridge.
5 Push the cartridge in until it locks securelyin place.
6 Close the front cover.
NOTE
To view the approximate amount of toner remaining, hold down the [COPY] key during printing or when themachine is on standby. The percentage of toner remaining will appear in the display while you hold down the key.When the percentage falls to "20-0%" , obtain a new toner cartridge and keep it ready for replacement.
CAUTION
It is important tothoroughly shake thesupply cartridge for 10seconds as shown inthe diagram in order toensure properoperation of tonersupply system.
CAUTION
● Do not throw the toner cartridge into a fire. Toner may fly and cause burns.● Store toner cartridges out of the reach of small children.
NOTE
Place the used toner cartridge in the plastic bag and store it. When placing the toner cartridge in the bag, insertit horizontally, not vertically. If the cartridge is stood on end, the collected used toner may spill out and soil the flooror your clothes.
dragon_02-2.fm 21 ページ 2006年10月23日 月曜日 午後12時55分
2-22
STORAGE OF SUPPLIESStandard supplies for this product that can replaced by the user include paper, toner cartridges, and staple cartridgesfor the finisher.
■ Proper storage1. Store the supplies in a location that is:● clean and dry,● at a stable temperature,● not exposed to direct sunlight.
2. Store paper in the wrapper and lying flat.3. Paper stored in packages standing up or out of
the wrapper may curl or become damp, resultingin paper misfeeds.
4. Store a new toner cartridge box horizontally. Donot store it standing on end. If stored standing onend, the toner may not distribute well even aftershaking the cartridge vigorously, and will remaininside the cartridge without flowing out.
For best copying results, be sure to use only Sharp Genuine Supplies which are designed,engineered, and tested to maximize the life and performance of Sharp products. Look forthe Genuine Supplies label on the toner package.
GENUINE SUPPLIES
Supply and Consumables The supply of spare parts for a repair of the appliance is guaranteed for at least 7 years following the terminationof production. Spare parts are those parts of the apparatus which may break down within the scope of the ordinaryuse of the product - whereas those parts which normally exceed the life of the product are not to be consideredas spare parts. Consumables too, are available for 7 years following the termination of production.
dragonII_copy_sec.book 22 ページ 2006年10月18日 水曜日 午後7時39分
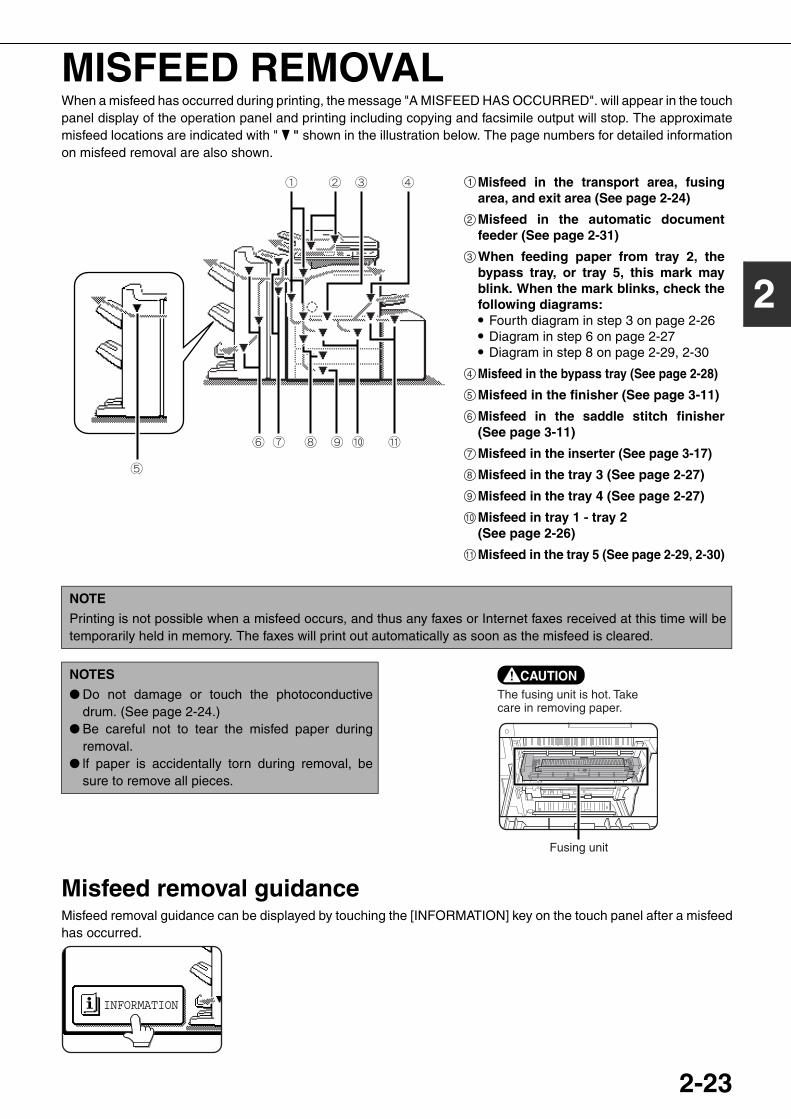
2-23
2
MISFEED REMOVALWhen a misfeed has occurred during printing, the message "A MISFEED HAS OCCURRED". will appear in the touchpanel display of the operation panel and printing including copying and facsimile output will stop. The approximatemisfeed locations are indicated with " " shown in the illustration below. The page numbers for detailed informationon misfeed removal are also shown.
Misfeed removal guidanceMisfeed removal guidance can be displayed by touching the [INFORMATION] key on the touch panel after a misfeedhas occurred.
Misfeed in the transport area, fusingarea, and exit area (See page 2-24)
Misfeed in the automatic documentfeeder (See page 2-31)
When feeding paper from tray 2, thebypass tray, or tray 5, this mark mayblink. When the mark blinks, check thefollowing diagrams:● Fourth diagram in step 3 on page 2-26● Diagram in step 6 on page 2-27● Diagram in step 8 on page 2-29, 2-30
Misfeed in the bypass tray (See page 2-28)
Misfeed in the finisher (See page 3-11)
Misfeed in the saddle stitch finisher(See page 3-11)
Misfeed in the inserter (See page 3-17)
Misfeed in the tray 3 (See page 2-27)
Misfeed in the tray 4 (See page 2-27)
Misfeed in tray 1 - tray 2(See page 2-26)
Misfeed in the tray 5 (See page 2-29, 2-30)
1
2
3
4
5
6
7
8
9
10
11
NOTE
Printing is not possible when a misfeed occurs, and thus any faxes or Internet faxes received at this time will betemporarily held in memory. The faxes will print out automatically as soon as the misfeed is cleared.
NOTES
● Do not damage or touch the photoconductivedrum. (See page 2-24.)
● Be careful not to tear the misfed paper duringremoval.
● lf paper is accidentally torn during removal, besure to remove all pieces.
Fusing unit
CAUTIONThe fusing unit is hot. Take care in removing paper.
INFORMATION
dragonII_copy_sec.book 23 ページ 2006年10月18日 水曜日 午後7時39分
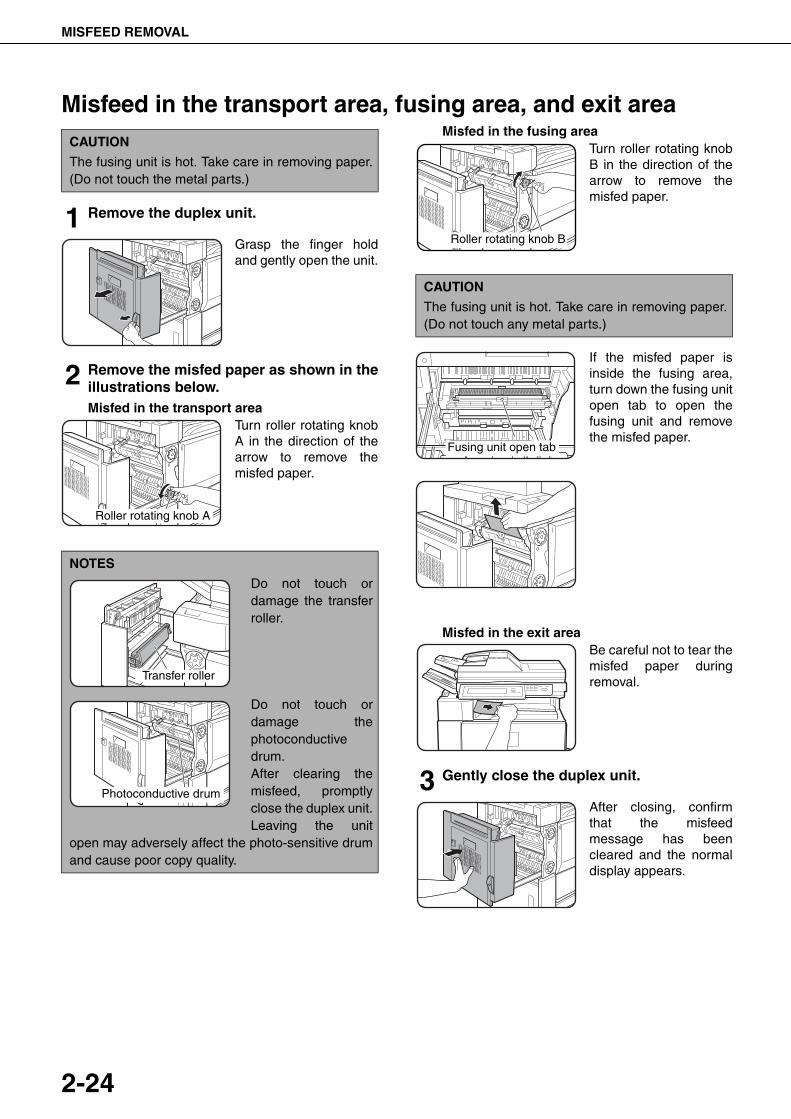
MISFEED REMOVAL
2-24
Misfeed in the transport area, fusing area, and exit area
1 Remove the duplex unit.
Grasp the finger holdand gently open the unit.
2 Remove the misfed paper as shown in theillustrations below.Misfed in the transport area
Turn roller rotating knobA in the direction of thearrow to remove themisfed paper.
Misfed in the fusing areao
Turn roller rotating knobB in the direction of thearrow to remove themisfed paper.
If the misfed paper isinside the fusing area,turn down the fusing unitopen tab to open thefusing unit and removethe misfed paper.
Misfed in the exit areaBe careful not to tear themisfed paper duringremoval.
3 Gently close the duplex unit.
After closing, confirmthat the misfeedmessage has beencleared and the normaldisplay appears.
CAUTION
The fusing unit is hot. Take care in removing paper.(Do not touch the metal parts.)
NOTES
Do not touch ordamage the transferroller.
Do not touch ordamage thephotoconductivedrum.After clearing themisfeed, promptlyclose the duplex unit.Leaving the unit
open may adversely affect the photo-sensitive drumand cause poor copy quality.
Roller rotating knob A
Transfer roller
Photoconductive drum
CAUTION
The fusing unit is hot. Take care in removing paper.(Do not touch any metal parts.)
Roller rotating knob B
Fusing unit open tab
dragonII_copy_sec.book 24 ページ 2006年10月18日 水曜日 午後7時39分
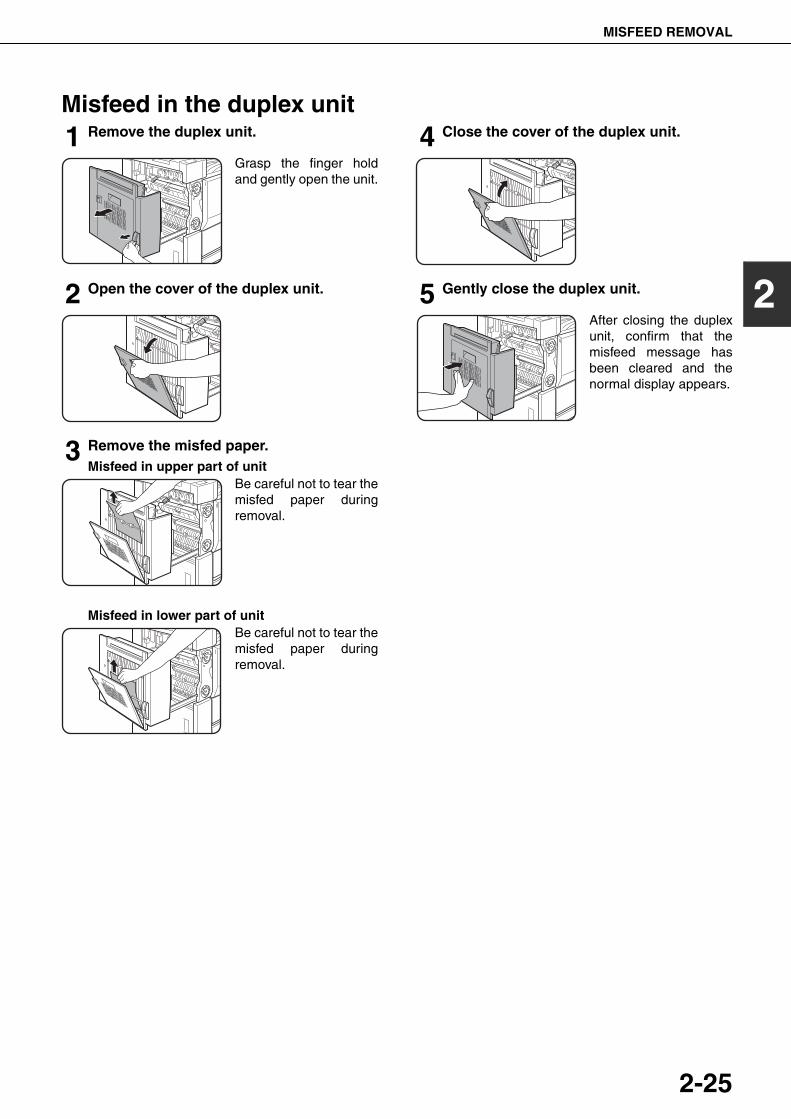
MISFEED REMOVAL
2-25
2
Misfeed in the duplex unit1 Remove the duplex unit.
Grasp the finger holdand gently open the unit.
2 Open the cover of the duplex unit.
3 Remove the misfed paper.Misfeed in upper part of unit
Be careful not to tear themisfed paper duringremoval.
Misfeed in lower part of unitBe careful not to tear themisfed paper duringremoval.
4 Close the cover of the duplex unit.
5 Gently close the duplex unit.
After closing the duplexunit, confirm that themisfeed message hasbeen cleared and thenormal display appears.
dragonII_copy_sec.book 25 ページ 2006年10月18日 水曜日 午後7時39分
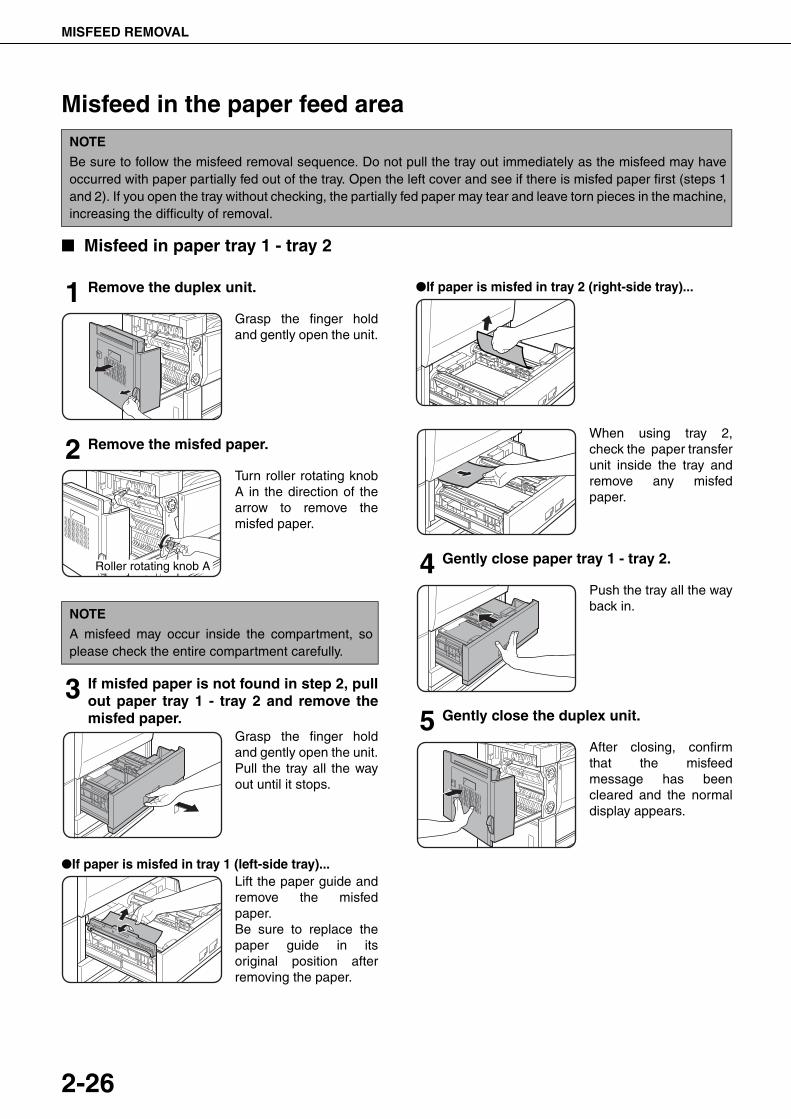
MISFEED REMOVAL
2-26
Misfeed in the paper feed area
■ Misfeed in paper tray 1 - tray 2
1 Remove the duplex unit.
Grasp the finger holdand gently open the unit.
2 Remove the misfed paper.
Turn roller rotating knobA in the direction of thearrow to remove themisfed paper.
3 If misfed paper is not found in step 2, pullout paper tray 1 - tray 2 and remove themisfed paper.
Grasp the finger holdand gently open the unit.Pull the tray all the wayout until it stops.
●If paper is misfed in tray 1 (left-side tray)...Lift the paper guide andremove the misfedpaper.Be sure to replace thepaper guide in itsoriginal position afterremoving the paper.
●If paper is misfed in tray 2 (right-side tray)...
When using tray 2,check the paper transferunit inside the tray andremove any misfedpaper.
4 Gently close paper tray 1 - tray 2.
Push the tray all the wayback in.
5 Gently close the duplex unit.
After closing, confirmthat the misfeedmessage has beencleared and the normaldisplay appears.
NOTE
Be sure to follow the misfeed removal sequence. Do not pull the tray out immediately as the misfeed may haveoccurred with paper partially fed out of the tray. Open the left cover and see if there is misfed paper first (steps 1and 2). If you open the tray without checking, the partially fed paper may tear and leave torn pieces in the machine,increasing the difficulty of removal.
NOTE
A misfeed may occur inside the compartment, soplease check the entire compartment carefully.
Roller rotating knob A
dragonII_copy_sec.book 26 ページ 2006年10月18日 水曜日 午後7時39分

MISFEED REMOVAL
2-27
2
■ Misfeed in paper tray 3
1 Remove the duplex unit.
Grasp the finger holdand gently open the unit.
2 Remove the misfed paper.
Turn roller rotating knobA in the direction of thearrow to remove themisfed paper.
3 Open the lower cover on the left side of themachine.
Grasp the finger holdand gently open the unit.
4 Remove the misfed paper.
Be careful not to tear themisfed paper duringremoval.
5 Close the lower cover on the left side ofthe machine.
6 If misfed paper is not found in step 3, pull outpaper tray 3 and remove the misfed paper.
Pull the tray all the wayout until it stops.Check the papertransfer unit inside thetray.Be careful not to tear themisfed paper duringremoval.
7 Gently close paper tray 3.
Push the tray all the wayback in.
8 Gently close the duplex unit.
After closing, confirmthat the misfeedmessage has beencleared and the normaldisplay appears.
■ Misfeed in the tray 4To remove a misfeed in tray 4, follow the same steps as in "Misfeed in paper tray 3".
NOTE
A misfeed may occur inside the compartment, soplease check the entire compartment carefully.
Roller rotating knob A
dragonII_copy_sec.book 27 ページ 2006年10月18日 水曜日 午後7時39分
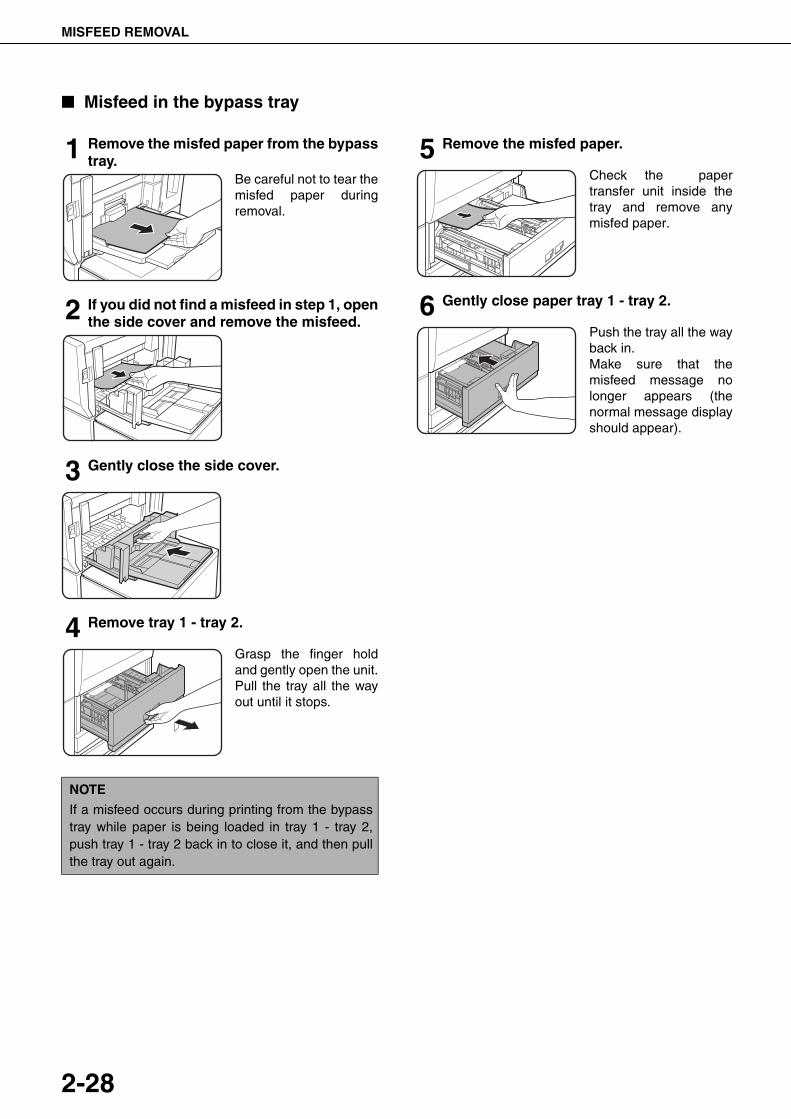
MISFEED REMOVAL
2-28
■ Misfeed in the bypass tray
1 Remove the misfed paper from the bypasstray.
Be careful not to tear themisfed paper duringremoval.
2 If you did not find a misfeed in step 1, openthe side cover and remove the misfeed.
3 Gently close the side cover.
4 Remove tray 1 - tray 2.
Grasp the finger holdand gently open the unit.Pull the tray all the wayout until it stops.
5 Remove the misfed paper.
Check the papertransfer unit inside thetray and remove anymisfed paper.
6 Gently close paper tray 1 - tray 2.
Push the tray all the wayback in.Make sure that themisfeed message nolonger appears (thenormal message displayshould appear).
NOTE
If a misfeed occurs during printing from the bypasstray while paper is being loaded in tray 1 - tray 2,push tray 1 - tray 2 back in to close it, and then pullthe tray out again.
dragonII_copy_sec.book 28 ページ 2006年10月18日 水曜日 午後7時39分
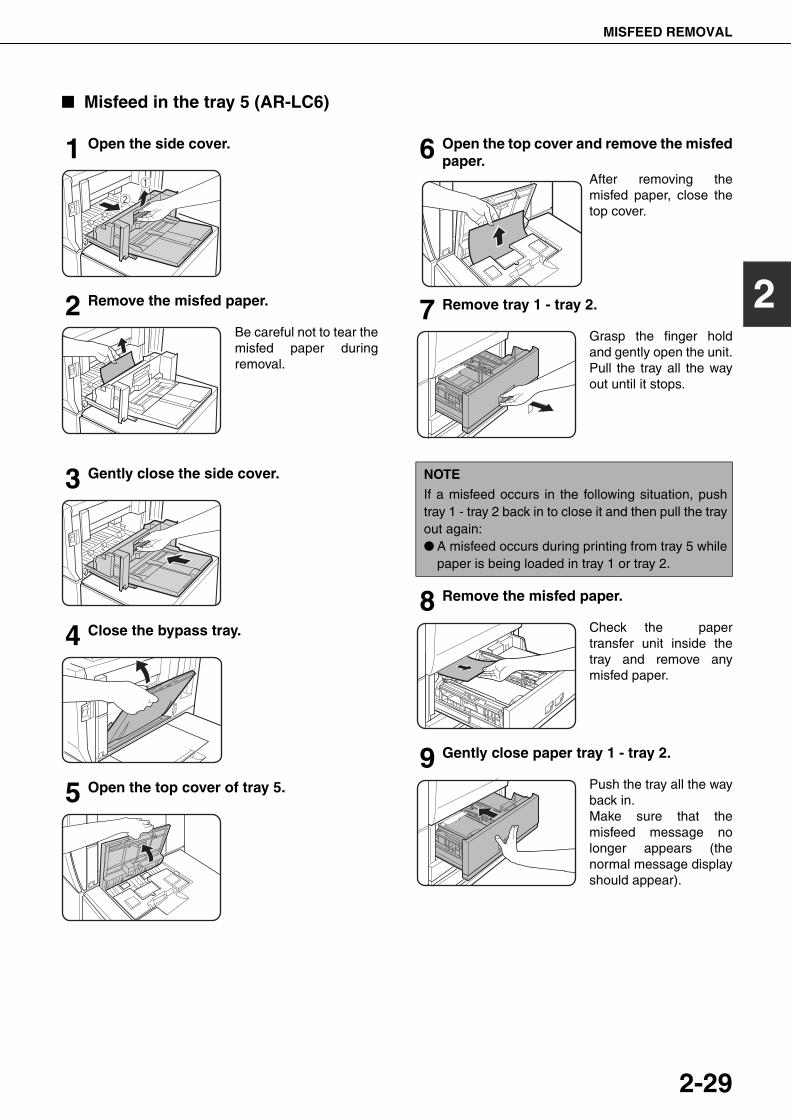
MISFEED REMOVAL
2-29
2
■ Misfeed in the tray 5 (AR-LC6)
1 Open the side cover.
2 Remove the misfed paper.
Be careful not to tear themisfed paper duringremoval.
3 Gently close the side cover.
4 Close the bypass tray.
5 Open the top cover of tray 5.
6 Open the top cover and remove the misfedpaper.
After removing themisfed paper, close thetop cover.
7 Remove tray 1 - tray 2.
Grasp the finger holdand gently open the unit.Pull the tray all the wayout until it stops.
8 Remove the misfed paper.
Check the papertransfer unit inside thetray and remove anymisfed paper.
9 Gently close paper tray 1 - tray 2.
Push the tray all the wayback in.Make sure that themisfeed message nolonger appears (thenormal message displayshould appear).
NOTE
If a misfeed occurs in the following situation, pushtray 1 - tray 2 back in to close it and then pull the trayout again:● A misfeed occurs during printing from tray 5 while
paper is being loaded in tray 1 or tray 2.
dragonII_copy_sec.book 29 ページ 2006年10月18日 水曜日 午後7時39分
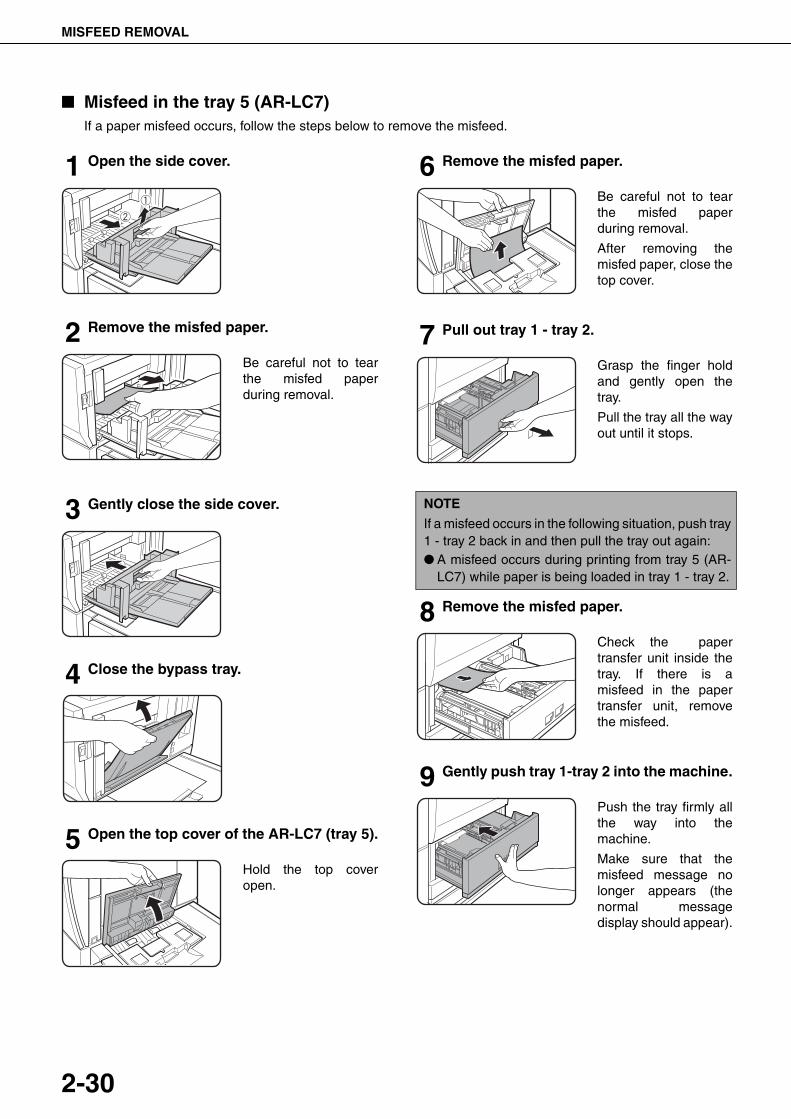
MISFEED REMOVAL
2-30
■ Misfeed in the tray 5 (AR-LC7)If a paper misfeed occurs, follow the steps below to remove the misfeed.
1 Open the side cover.
2 Remove the misfed paper.
Be careful not to tearthe misfed paperduring removal.
3 Gently close the side cover.
4 Close the bypass tray.
5 Open the top cover of the AR-LC7 (tray 5).
Hold the top coveropen.
6 Remove the misfed paper.
Be careful not to tearthe misfed paperduring removal.
After removing themisfed paper, close thetop cover.
7 Pull out tray 1 - tray 2.
Grasp the finger holdand gently open thetray.
Pull the tray all the wayout until it stops.
8 Remove the misfed paper.
Check the papertransfer unit inside thetray. If there is amisfeed in the papertransfer unit, removethe misfeed.
9 Gently push tray 1-tray 2 into the machine.
Push the tray firmly allthe way into themachine.
Make sure that themisfeed message nolonger appears (thenormal messagedisplay should appear).
NOTE
If a misfeed occurs in the following situation, push tray1 - tray 2 back in and then pull the tray out again:● A misfeed occurs during printing from tray 5 (AR-
LC7) while paper is being loaded in tray 1 - tray 2.
dragonII_copy_sec.book 30 ページ 2006年10月18日 水曜日 午後7時39分
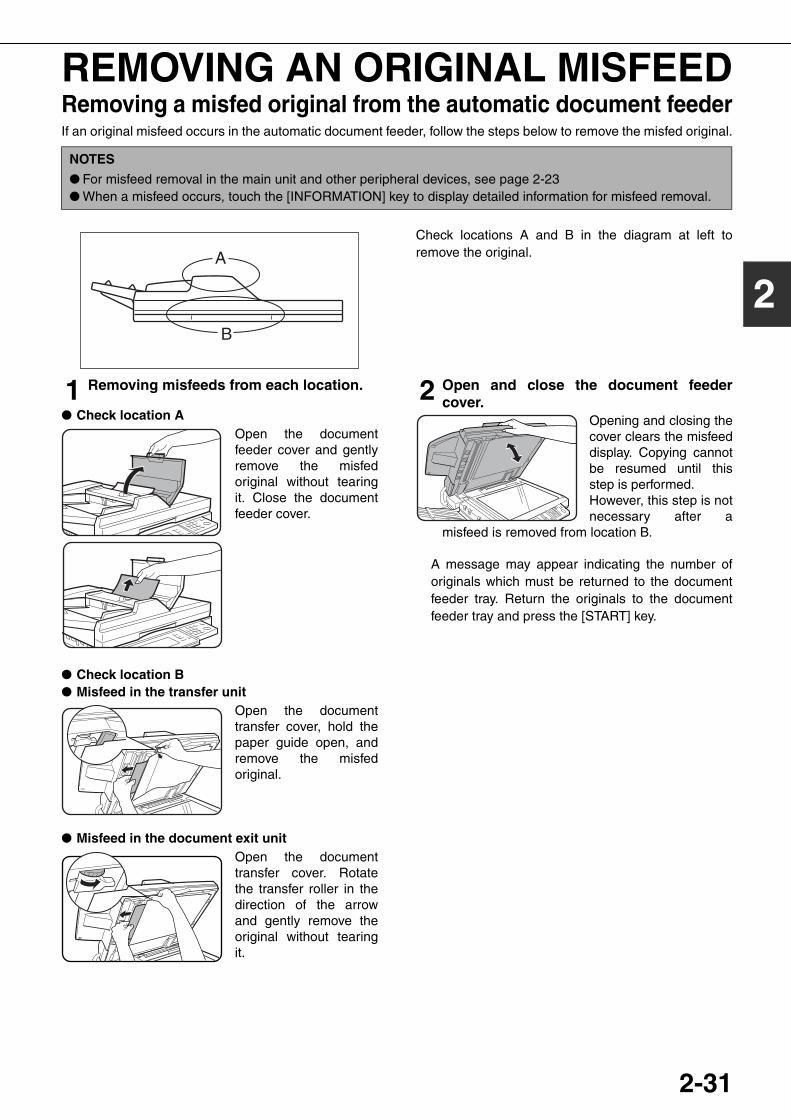
2-31
2
REMOVING AN ORIGINAL MISFEEDRemoving a misfed original from the automatic document feederIf an original misfeed occurs in the automatic document feeder, follow the steps below to remove the misfed original.
Check locations A and B in the diagram at left toremove the original.
1 Removing misfeeds from each location.
● Check location AOpen the documentfeeder cover and gentlyremove the misfedoriginal without tearingit. Close the documentfeeder cover.
● Check location B● Misfeed in the transfer unit
Open the documenttransfer cover, hold thepaper guide open, andremove the misfedoriginal.
● Misfeed in the document exit unitOpen the documenttransfer cover. Rotatethe transfer roller in thedirection of the arrowand gently remove theoriginal without tearingit.
2 Open and close the document feedercover.
Opening and closing thecover clears the misfeeddisplay. Copying cannotbe resumed until thisstep is performed.However, this step is notnecessary after a
misfeed is removed from location B.
A message may appear indicating the number oforiginals which must be returned to the documentfeeder tray. Return the originals to the documentfeeder tray and press the [START] key.
NOTES
● For misfeed removal in the main unit and other peripheral devices, see page 2-23● When a misfeed occurs, touch the [INFORMATION] key to display detailed information for misfeed removal.
dragonII_copy_sec.book 31 ページ 2006年10月18日 水曜日 午後7時39分
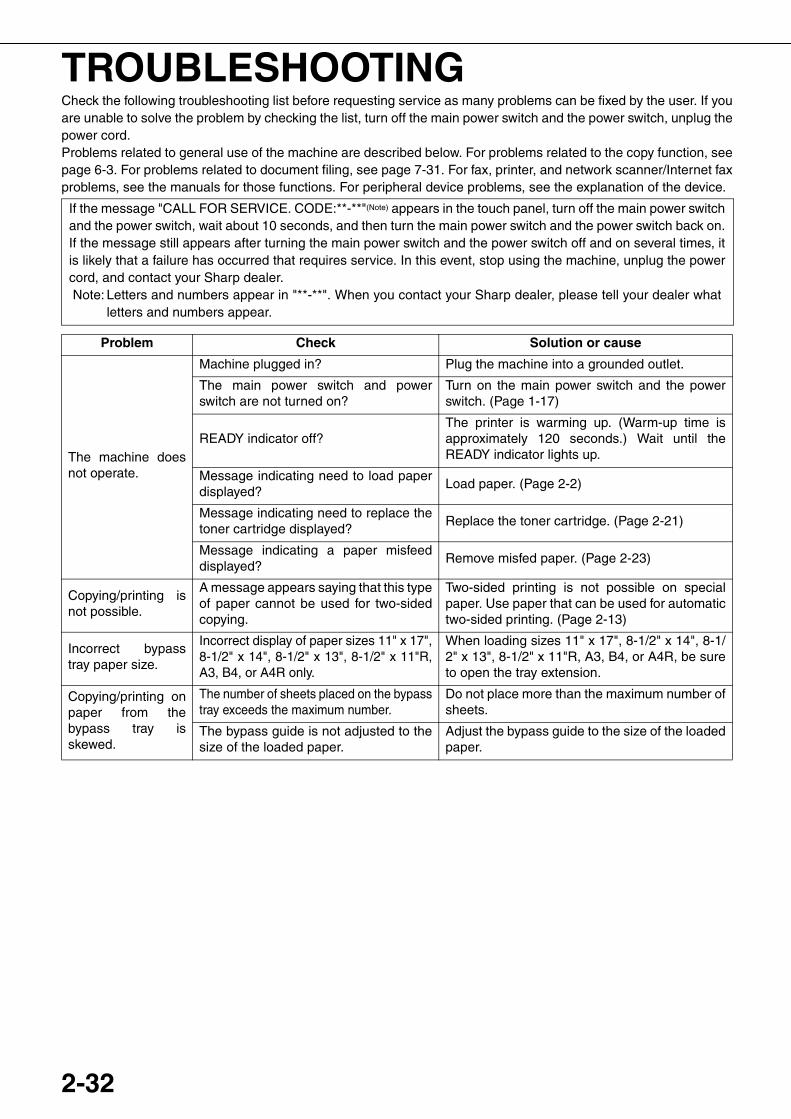
2-32
TROUBLESHOOTINGCheck the following troubleshooting list before requesting service as many problems can be fixed by the user. If youare unable to solve the problem by checking the list, turn off the main power switch and the power switch, unplug thepower cord.Problems related to general use of the machine are described below. For problems related to the copy function, seepage 6-3. For problems related to document filing, see page 7-31. For fax, printer, and network scanner/Internet faxproblems, see the manuals for those functions. For peripheral device problems, see the explanation of the device.
If the message "CALL FOR SERVICE. CODE:**-**"(Note) appears in the touch panel, turn off the main power switchand the power switch, wait about 10 seconds, and then turn the main power switch and the power switch back on.If the message still appears after turning the main power switch and the power switch off and on several times, itis likely that a failure has occurred that requires service. In this event, stop using the machine, unplug the powercord, and contact your Sharp dealer.Note: Letters and numbers appear in "**-**". When you contact your Sharp dealer, please tell your dealer what
letters and numbers appear.
Problem Check Solution or cause
The machine doesnot operate.
Machine plugged in? Plug the machine into a grounded outlet.
The main power switch and powerswitch are not turned on?
Turn on the main power switch and the powerswitch. (Page 1-17)
READY indicator off?The printer is warming up. (Warm-up time isapproximately 120 seconds.) Wait until theREADY indicator lights up.
Message indicating need to load paperdisplayed?
Load paper. (Page 2-2)
Message indicating need to replace thetoner cartridge displayed?
Replace the toner cartridge. (Page 2-21)
Message indicating a paper misfeeddisplayed?
Remove misfed paper. (Page 2-23)
Copying/printing isnot possible.
A message appears saying that this typeof paper cannot be used for two-sidedcopying.
Two-sided printing is not possible on specialpaper. Use paper that can be used for automatictwo-sided printing. (Page 2-13)
Incorrect bypasstray paper size.
Incorrect display of paper sizes 11" x 17",8-1/2" x 14", 8-1/2" x 13", 8-1/2" x 11"R,A3, B4, or A4R only.
When loading sizes 11" x 17", 8-1/2" x 14", 8-1/2" x 13", 8-1/2" x 11"R, A3, B4, or A4R, be sureto open the tray extension.
Copying/printing onpaper from thebypass tray isskewed.
The number of sheets placed on the bypasstray exceeds the maximum number.
Do not place more than the maximum number ofsheets.
The bypass guide is not adjusted to thesize of the loaded paper.
Adjust the bypass guide to the size of the loadedpaper.
dragonII_copy_sec.book 32 ページ 2006年10月18日 水曜日 午後7時39分
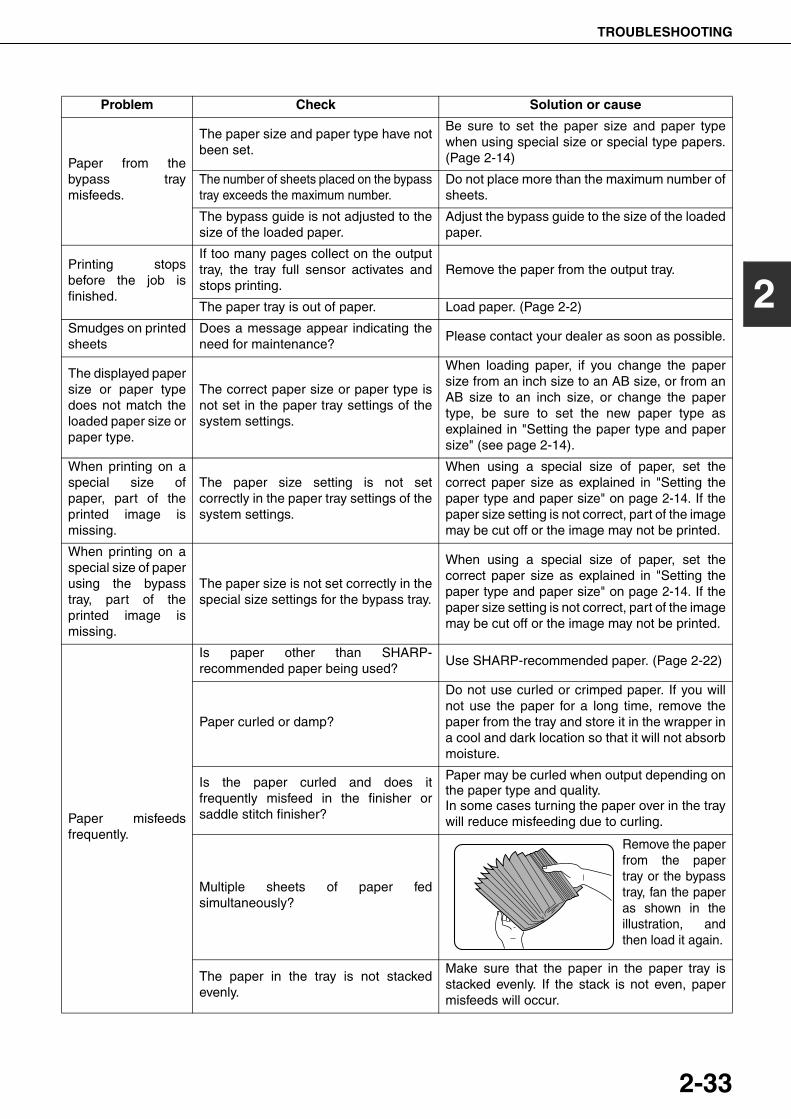
TROUBLESHOOTING
2-33
2
Paper from thebypass traymisfeeds.
The paper size and paper type have notbeen set.
Be sure to set the paper size and paper typewhen using special size or special type papers.(Page 2-14)
The number of sheets placed on the bypasstray exceeds the maximum number.
Do not place more than the maximum number ofsheets.
The bypass guide is not adjusted to thesize of the loaded paper.
Adjust the bypass guide to the size of the loadedpaper.
Printing stopsbefore the job isfinished.
If too many pages collect on the outputtray, the tray full sensor activates andstops printing.
Remove the paper from the output tray.
The paper tray is out of paper. Load paper. (Page 2-2)
Smudges on printedsheets
Does a message appear indicating theneed for maintenance?
Please contact your dealer as soon as possible.
The displayed papersize or paper typedoes not match theloaded paper size orpaper type.
The correct paper size or paper type isnot set in the paper tray settings of thesystem settings.
When loading paper, if you change the papersize from an inch size to an AB size, or from anAB size to an inch size, or change the papertype, be sure to set the new paper type asexplained in "Setting the paper type and papersize" (see page 2-14).
When printing on aspecial size ofpaper, part of theprinted image ismissing.
The paper size setting is not setcorrectly in the paper tray settings of thesystem settings.
When using a special size of paper, set thecorrect paper size as explained in "Setting thepaper type and paper size" on page 2-14. If thepaper size setting is not correct, part of the imagemay be cut off or the image may not be printed.
When printing on aspecial size of paperusing the bypasstray, part of theprinted image ismissing.
The paper size is not set correctly in thespecial size settings for the bypass tray.
When using a special size of paper, set thecorrect paper size as explained in "Setting thepaper type and paper size" on page 2-14. If thepaper size setting is not correct, part of the imagemay be cut off or the image may not be printed.
Paper misfeedsfrequently.
Is paper other than SHARP-recommended paper being used?
Use SHARP-recommended paper. (Page 2-22)
Paper curled or damp?
Do not use curled or crimped paper. If you willnot use the paper for a long time, remove thepaper from the tray and store it in the wrapper ina cool and dark location so that it will not absorbmoisture.
Is the paper curled and does itfrequently misfeed in the finisher orsaddle stitch finisher?
Paper may be curled when output depending onthe paper type and quality.In some cases turning the paper over in the traywill reduce misfeeding due to curling.
Multiple sheets of paper fedsimultaneously?
Remove the paperfrom the papertray or the bypasstray, fan the paperas shown in theillustration, andthen load it again.
The paper in the tray is not stackedevenly.
Make sure that the paper in the paper tray isstacked evenly. If the stack is not even, papermisfeeds will occur.
Problem Check Solution or cause
dragonII_copy_sec.book 33 ページ 2006年10月18日 水曜日 午後7時39分
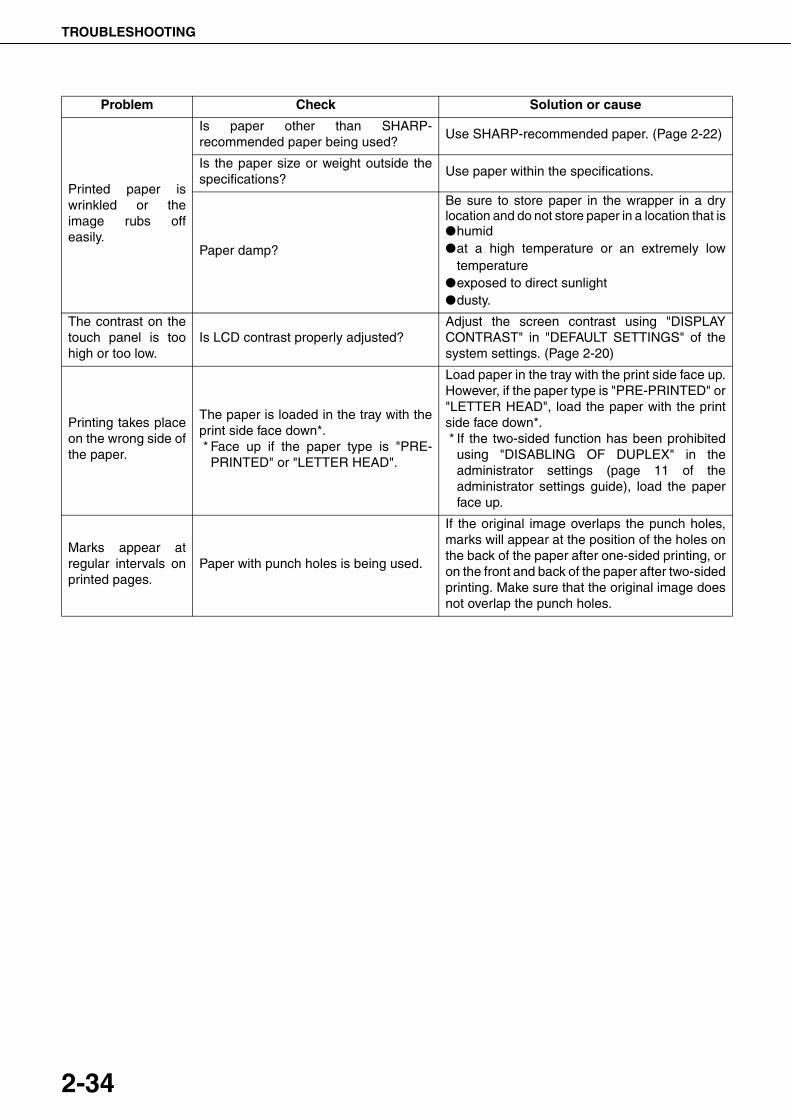
TROUBLESHOOTING
2-34
Printed paper iswrinkled or theimage rubs offeasily.
Is paper other than SHARP-recommended paper being used?
Use SHARP-recommended paper. (Page 2-22)
Is the paper size or weight outside thespecifications?
Use paper within the specifications.
Paper damp?
Be sure to store paper in the wrapper in a drylocation and do not store paper in a location that is●humid●at a high temperature or an extremely low
temperature●exposed to direct sunlight●dusty.
The contrast on thetouch panel is toohigh or too low.
Is LCD contrast properly adjusted?Adjust the screen contrast using "DISPLAYCONTRAST" in "DEFAULT SETTINGS" of thesystem settings. (Page 2-20)
Printing takes placeon the wrong side ofthe paper.
The paper is loaded in the tray with theprint side face down*.* Face up if the paper type is "PRE-
PRINTED" or "LETTER HEAD".
Load paper in the tray with the print side face up.However, if the paper type is "PRE-PRINTED" or"LETTER HEAD", load the paper with the printside face down*.* If the two-sided function has been prohibited
using "DISABLING OF DUPLEX" in theadministrator settings (page 11 of theadministrator settings guide), load the paperface up.
Marks appear atregular intervals onprinted pages.
Paper with punch holes is being used.
If the original image overlaps the punch holes,marks will appear at the position of the holes onthe back of the paper after one-sided printing, oron the front and back of the paper after two-sidedprinting. Make sure that the original image doesnot overlap the punch holes.
Problem Check Solution or cause
dragonII_copy_sec.book 34 ページ 2006年10月18日 水曜日 午後7時39分
3-1
CHAPTER 3PERIPHERAL DEVICES
This chapter explains the procedures for using the optional finisher,saddle stitch finisher, and inserter, as well as Sharp OSA (applicationcommunication module and external account module).
Page
FINISHER AND SADDLE STITCH FINISHER........................................ 3-2● Part names...................................................................................... 3-2● Specifications.................................................................................. 3-2● Finishing methods........................................................................... 3-4● Finishing modes and finisher functions ........................................... 3-6● Staple cartridge replacement and staple jam removal .................... 3-7● Removing a misfeed........................................................................ 3-11● Troubleshooting finisher/saddle stitch finisher problems................. 3-13
INSERTER.............................................................................................. 3-14● Part names...................................................................................... 3-14● Specifications.................................................................................. 3-14● Loading paper ................................................................................. 3-15● Manual operation of the inserter ..................................................... 3-15● Misfeed removal .............................................................................. 3-17● Troubleshooting inserter problems.................................................. 3-18
SHARP OSA ........................................................................................... 3-19APPLICATION COMMUNICATION MODULE (MX-AMX2)..................... 3-19
● Standard application setup.............................................................. 3-19● Selecting a standard application ..................................................... 3-19● Operation in OSA mode.................................................................. 3-20
EXTERNAL ACCOUNT MODULE (MX-AMX3) ...................................... 3-21● External account application setup ................................................. 3-21● Operation in external account mode ............................................... 3-21
dragonII_copy_sec.book 1 ページ 2006年10月18日 水曜日 午後7時39分
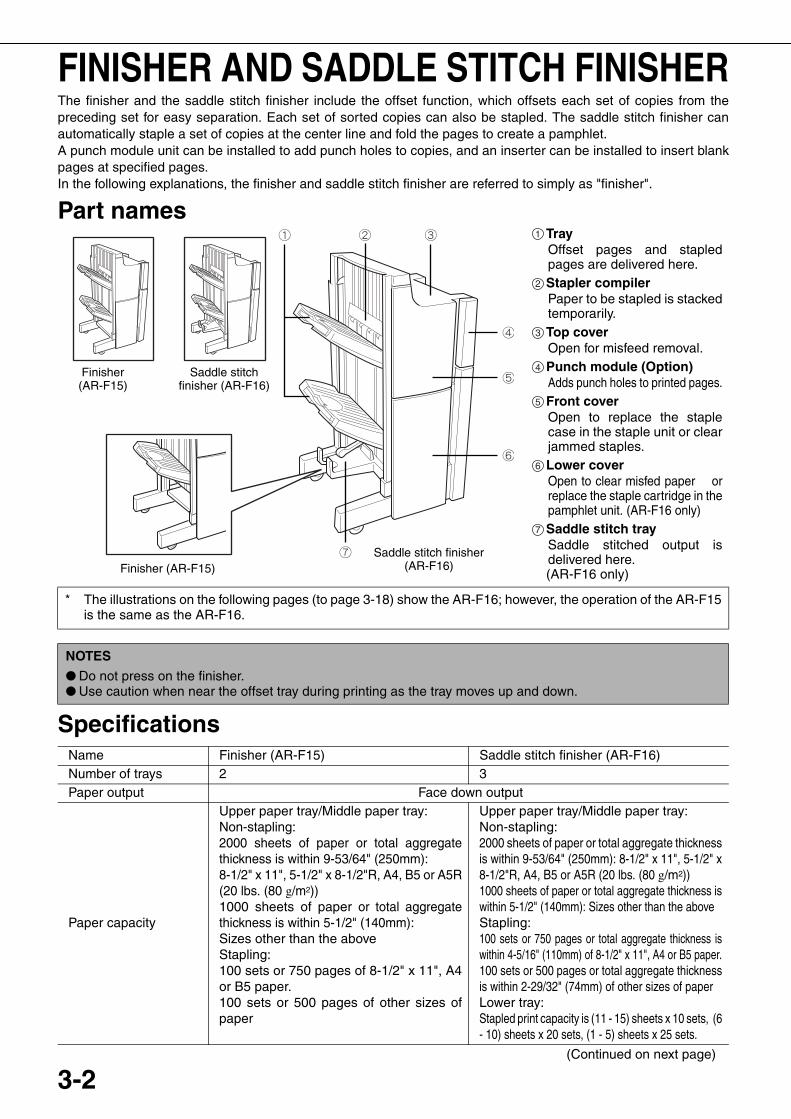
3-2
FINISHER AND SADDLE STITCH FINISHERThe finisher and the saddle stitch finisher include the offset function, which offsets each set of copies from thepreceding set for easy separation. Each set of sorted copies can also be stapled. The saddle stitch finisher canautomatically staple a set of copies at the center line and fold the pages to create a pamphlet.A punch module unit can be installed to add punch holes to copies, and an inserter can be installed to insert blankpages at specified pages.In the following explanations, the finisher and saddle stitch finisher are referred to simply as "finisher".
Part names
Specifications
* The illustrations on the following pages (to page 3-18) show the AR-F16; however, the operation of the AR-F15is the same as the AR-F16.
NOTES
● Do not press on the finisher.● Use caution when near the offset tray during printing as the tray moves up and down.
Name Finisher (AR-F15) Saddle stitch finisher (AR-F16)Number of trays 2 3Paper output Face down output
Paper capacity
Upper paper tray/Middle paper tray:Non-stapling:2000 sheets of paper or total aggregatethickness is within 9-53/64" (250mm): 8-1/2" x 11", 5-1/2" x 8-1/2"R, A4, B5 or A5R(20 lbs. (80 g/m2))1000 sheets of paper or total aggregatethickness is within 5-1/2" (140mm): Sizes other than the aboveStapling: 100 sets or 750 pages of 8-1/2" x 11", A4or B5 paper.100 sets or 500 pages of other sizes ofpaper
Upper paper tray/Middle paper tray: Non-stapling:2000 sheets of paper or total aggregate thicknessis within 9-53/64" (250mm): 8-1/2" x 11", 5-1/2" x8-1/2"R, A4, B5 or A5R (20 lbs. (80 g/m2))1000 sheets of paper or total aggregate thickness iswithin 5-1/2" (140mm): Sizes other than the aboveStapling: 100 sets or 750 pages or total aggregate thickness iswithin 4-5/16" (110mm) of 8-1/2" x 11", A4 or B5 paper.100 sets or 500 pages or total aggregate thicknessis within 2-29/32" (74mm) of other sizes of paperLower tray: Stapled print capacity is (11 - 15) sheets x 10 sets, (6- 10) sheets x 20 sets, (1 - 5) sheets x 25 sets.
TrayOffset pages and stapledpages are delivered here.Stapler compilerPaper to be stapled is stackedtemporarily.Top coverOpen for misfeed removal.Punch module (Option)Adds punch holes to printed pages.Front coverOpen to replace the staplecase in the staple unit or clearjammed staples.Lower coverOpen to clear misfed paper orreplace the staple cartridge in thepamphlet unit. (AR-F16 only)Saddle stitch traySaddle stitched output isdelivered here.(AR-F16 only)
1
2
3
4
5
6
7
Finisher(AR-F15)
Saddle stitch finisher (AR-F16)
Finisher (AR-F15)Saddle stitch finisher
(AR-F16)
(Continued on next page)
dragonII_copy_sec.book 2 ページ 2006年10月18日 水曜日 午後7時39分
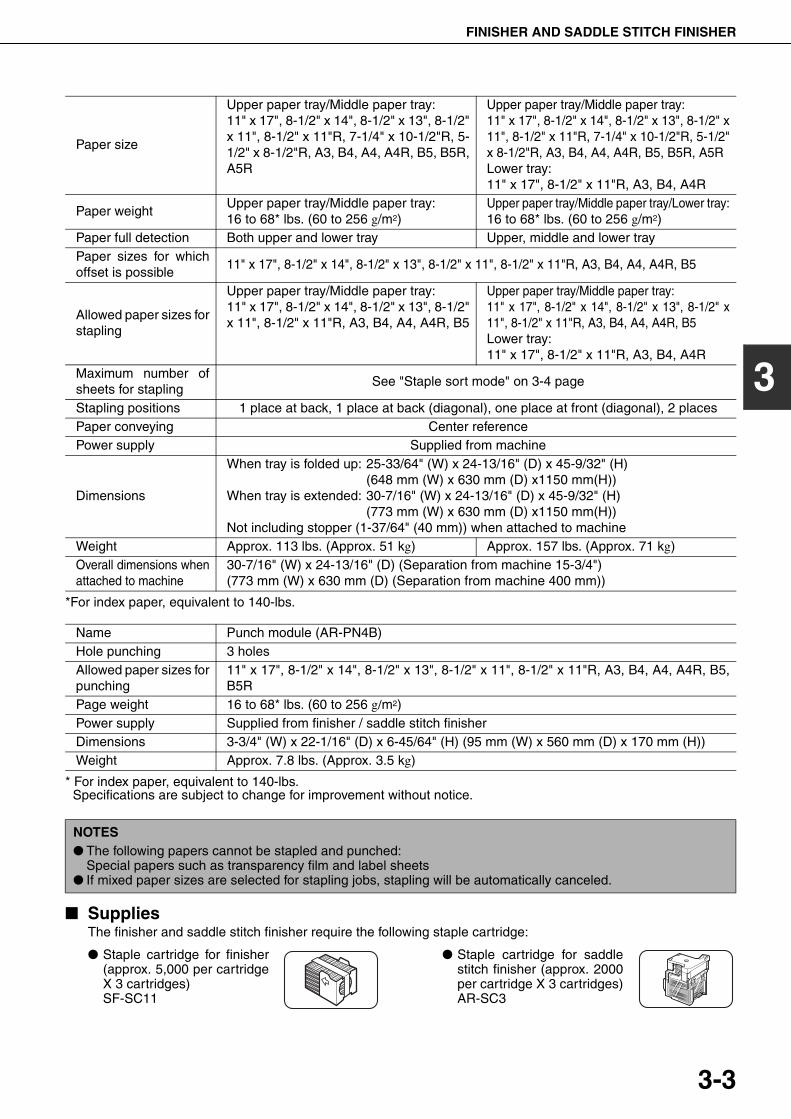
FINISHER AND SADDLE STITCH FINISHER
3-3
3
*For index paper, equivalent to 140-lbs.
* For index paper, equivalent to 140-lbs. Specifications are subject to change for improvement without notice.
■ SuppliesThe finisher and saddle stitch finisher require the following staple cartridge:
● Staple cartridge for finisher(approx. 5,000 per cartridgeX 3 cartridges)SF-SC11
● Staple cartridge for saddlestitch finisher (approx. 2000per cartridge X 3 cartridges)AR-SC3
Paper size
Upper paper tray/Middle paper tray:11" x 17", 8-1/2" x 14", 8-1/2" x 13", 8-1/2"x 11", 8-1/2" x 11"R, 7-1/4" x 10-1/2"R, 5-1/2" x 8-1/2"R, A3, B4, A4, A4R, B5, B5R,A5R
Upper paper tray/Middle paper tray:11" x 17", 8-1/2" x 14", 8-1/2" x 13", 8-1/2" x11", 8-1/2" x 11"R, 7-1/4" x 10-1/2"R, 5-1/2"x 8-1/2"R, A3, B4, A4, A4R, B5, B5R, A5RLower tray: 11" x 17", 8-1/2" x 11"R, A3, B4, A4R
Paper weightUpper paper tray/Middle paper tray:16 to 68* lbs. (60 to 256 g/m2)
Upper paper tray/Middle paper tray/Lower tray:16 to 68* lbs. (60 to 256 g/m2)
Paper full detection Both upper and lower tray Upper, middle and lower trayPaper sizes for whichoffset is possible
11" x 17", 8-1/2" x 14", 8-1/2" x 13", 8-1/2" x 11", 8-1/2" x 11"R, A3, B4, A4, A4R, B5
Allowed paper sizes forstapling
Upper paper tray/Middle paper tray:11" x 17", 8-1/2" x 14", 8-1/2" x 13", 8-1/2"x 11", 8-1/2" x 11"R, A3, B4, A4, A4R, B5
Upper paper tray/Middle paper tray:11" x 17", 8-1/2" x 14", 8-1/2" x 13", 8-1/2" x11", 8-1/2" x 11"R, A3, B4, A4, A4R, B5Lower tray:11" x 17", 8-1/2" x 11"R, A3, B4, A4R
Maximum number ofsheets for stapling
See "Staple sort mode" on 3-4 page
Stapling positions 1 place at back, 1 place at back (diagonal), one place at front (diagonal), 2 placesPaper conveying Center referencePower supply Supplied from machine
Dimensions
When tray is folded up: 25-33/64" (W) x 24-13/16" (D) x 45-9/32" (H)(648 mm (W) x 630 mm (D) x1150 mm(H))
When tray is extended: 30-7/16" (W) x 24-13/16" (D) x 45-9/32" (H)(773 mm (W) x 630 mm (D) x1150 mm(H))
Not including stopper (1-37/64" (40 mm)) when attached to machineWeight Approx. 113 lbs. (Approx. 51 kg) Approx. 157 lbs. (Approx. 71 kg)Overall dimensions whenattached to machine
30-7/16" (W) x 24-13/16" (D) (Separation from machine 15-3/4")(773 mm (W) x 630 mm (D) (Separation from machine 400 mm))
Name Punch module (AR-PN4B)Hole punching 3 holesAllowed paper sizes forpunching
11" x 17", 8-1/2" x 14", 8-1/2" x 13", 8-1/2" x 11", 8-1/2" x 11"R, A3, B4, A4, A4R, B5,B5R
Page weight 16 to 68* lbs. (60 to 256 g/m2)Power supply Supplied from finisher / saddle stitch finisherDimensions 3-3/4" (W) x 22-1/16" (D) x 6-45/64" (H) (95 mm (W) x 560 mm (D) x 170 mm (H))Weight Approx. 7.8 lbs. (Approx. 3.5 kg)
NOTES● The following papers cannot be stapled and punched:
Special papers such as transparency film and label sheets● If mixed paper sizes are selected for stapling jobs, stapling will be automatically canceled.
dragonII_copy_sec.book 3 ページ 2006年10月18日 水曜日 午後7時39分
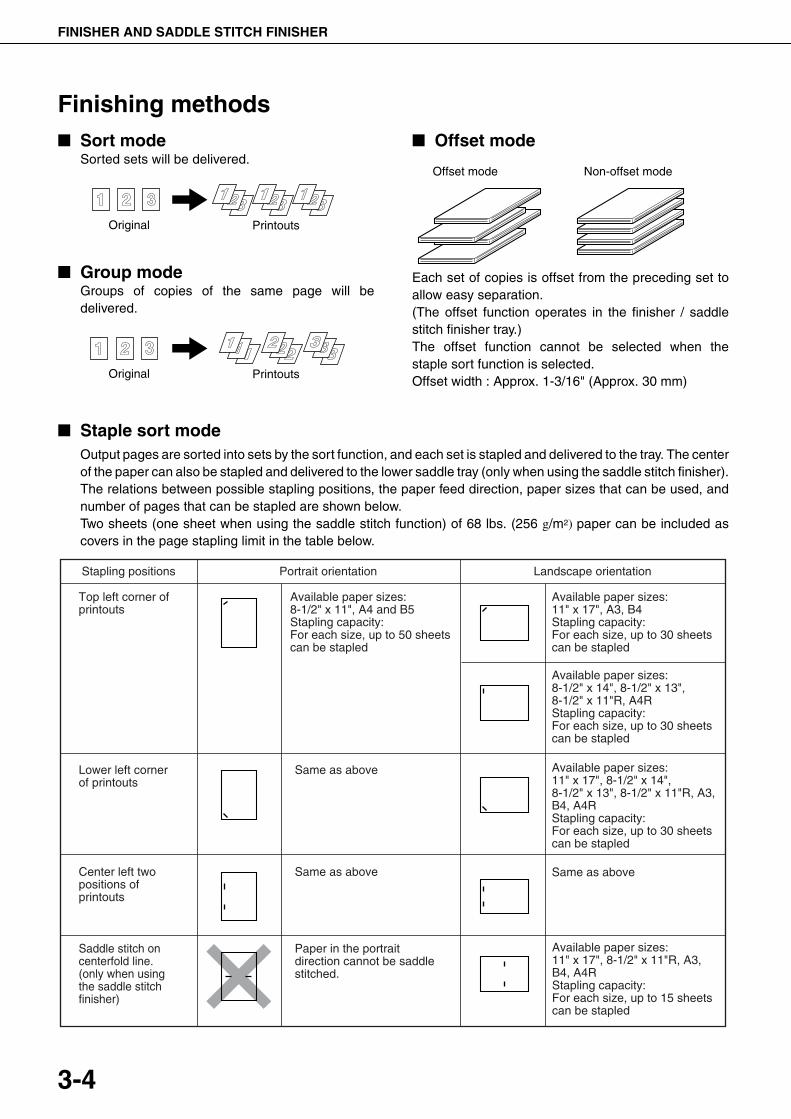
FINISHER AND SADDLE STITCH FINISHER
3-4
Finishing methods■ Sort mode
Sorted sets will be delivered.
■ Group modeGroups of copies of the same page will bedelivered.
■ Offset mode
Each set of copies is offset from the preceding set toallow easy separation.(The offset function operates in the finisher / saddlestitch finisher tray.)The offset function cannot be selected when thestaple sort function is selected.Offset width : Approx. 1-3/16" (Approx. 30 mm)
■ Staple sort modeOutput pages are sorted into sets by the sort function, and each set is stapled and delivered to the tray. The centerof the paper can also be stapled and delivered to the lower saddle tray (only when using the saddle stitch finisher).The relations between possible stapling positions, the paper feed direction, paper sizes that can be used, andnumber of pages that can be stapled are shown below.Two sheets (one sheet when using the saddle stitch function) of 68 lbs. (256 g/m2) paper can be included ascovers in the page stapling limit in the table below.
Original Printouts
Original Printouts
Offset mode Non-offset mode
Saddle stitch oncenterfold line.(only when using the saddle stitch finisher)
Stapling positions
Top left corner of printouts
Lower left cornerof printouts
Center left twopositions ofprintouts
Portrait orientation Landscape orientation
Available paper sizes: 8-1/2" x 11", A4 and B5Stapling capacity: For each size, up to 50 sheets can be stapled
Same as above
Same as above
Paper in the portrait direction cannot be saddle stitched.
Available paper sizes: 11" x 17", A3, B4 Stapling capacity: For each size, up to 30 sheets can be stapled
Available paper sizes: 8-1/2" x 14", 8-1/2" x 13", 8-1/2" x 11"R, A4RStapling capacity: For each size, up to 30 sheets can be stapled
Available paper sizes: 11" x 17", 8-1/2" x 14", 8-1/2" x 13", 8-1/2" x 11"R, A3, B4, A4RStapling capacity: For each size, up to 30 sheets can be stapled
Same as above
Available paper sizes: 11" x 17", 8-1/2" x 11"R, A3, B4, A4RStapling capacity: For each size, up to 15 sheets can be stapled
dragonII_copy_sec.book 4 ページ 2006年10月18日 水曜日 午後7時39分
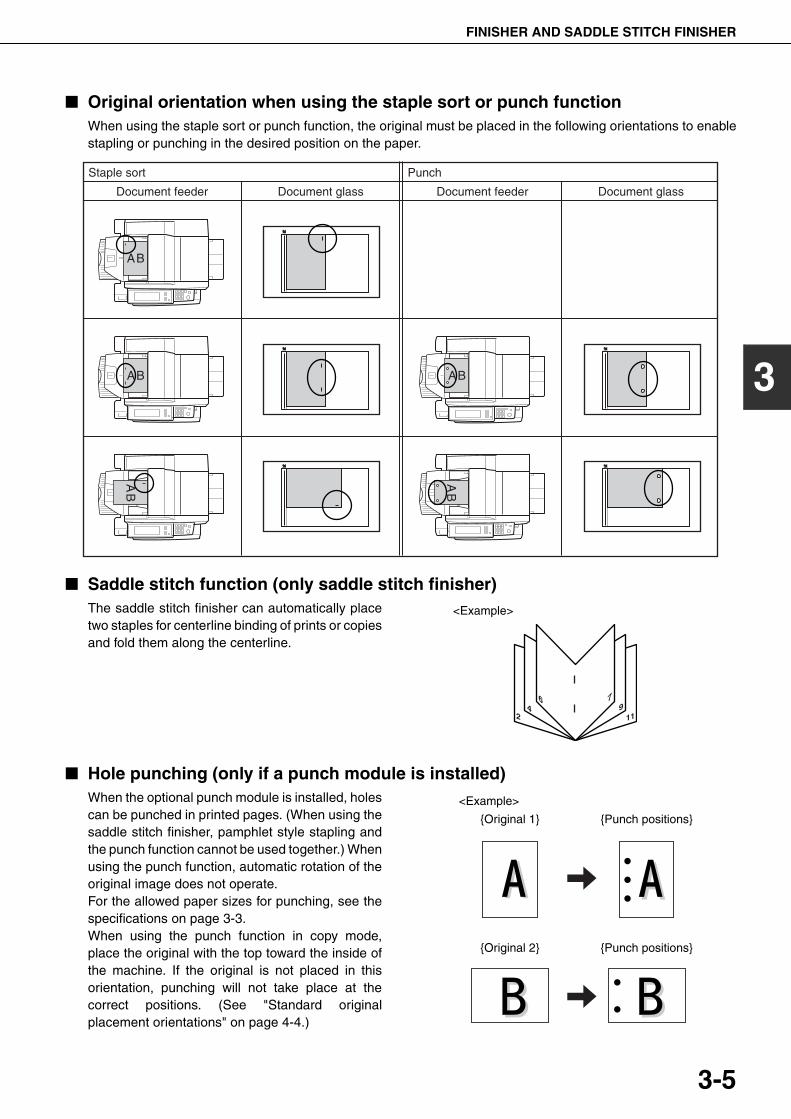
FINISHER AND SADDLE STITCH FINISHER
3-5
3
■ Original orientation when using the staple sort or punch functionWhen using the staple sort or punch function, the original must be placed in the following orientations to enablestapling or punching in the desired position on the paper.
■ Saddle stitch function (only saddle stitch finisher)The saddle stitch finisher can automatically placetwo staples for centerline binding of prints or copiesand fold them along the centerline.
■ Hole punching (only if a punch module is installed)When the optional punch module is installed, holescan be punched in printed pages. (When using thesaddle stitch finisher, pamphlet style stapling andthe punch function cannot be used together.) Whenusing the punch function, automatic rotation of theoriginal image does not operate.For the allowed paper sizes for punching, see thespecifications on page 3-3.When using the punch function in copy mode,place the original with the top toward the inside ofthe machine. If the original is not placed in thisorientation, punching will not take place at thecorrect positions. (See "Standard originalplacement orientations" on page 4-4.)
Staple sort
Document feeder Document glass
Punch
Document feeder Document glass
911
7
24
6
<Example>
{Original 1} {Punch positions}
{Original 2} {Punch positions}
<Example>
dragonII_copy_sec.book 5 ページ 2006年10月18日 水曜日 午後7時39分
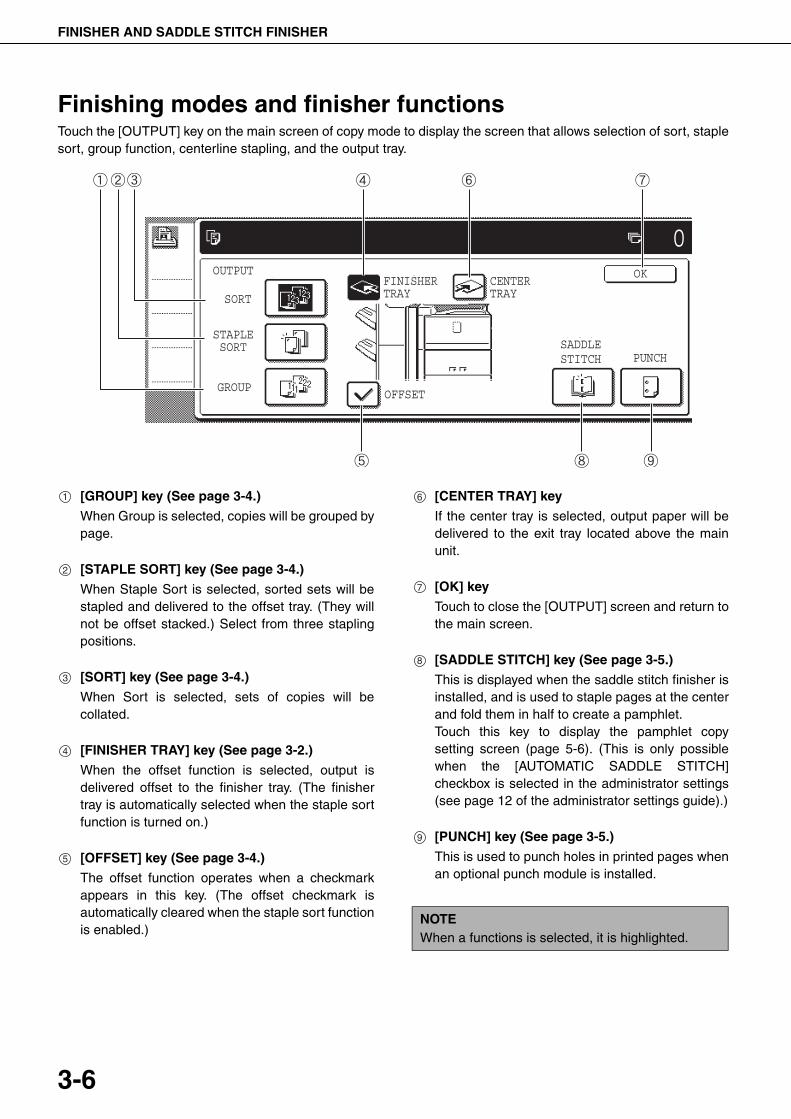
FINISHER AND SADDLE STITCH FINISHER
3-6
Finishing modes and finisher functionsTouch the [OUTPUT] key on the main screen of copy mode to display the screen that allows selection of sort, staplesort, group function, centerline stapling, and the output tray.
[GROUP] key (See page 3-4.)
When Group is selected, copies will be grouped bypage.
[STAPLE SORT] key (See page 3-4.)
When Staple Sort is selected, sorted sets will bestapled and delivered to the offset tray. (They willnot be offset stacked.) Select from three staplingpositions.
[SORT] key (See page 3-4.)
When Sort is selected, sets of copies will becollated.
[FINISHER TRAY] key (See page 3-2.)
When the offset function is selected, output isdelivered offset to the finisher tray. (The finishertray is automatically selected when the staple sortfunction is turned on.)
[OFFSET] key (See page 3-4.)
The offset function operates when a checkmarkappears in this key. (The offset checkmark isautomatically cleared when the staple sort functionis enabled.)
[CENTER TRAY] key
If the center tray is selected, output paper will bedelivered to the exit tray located above the mainunit.
[OK] key
Touch to close the [OUTPUT] screen and return tothe main screen.
[SADDLE STITCH] key (See page 3-5.)
This is displayed when the saddle stitch finisher isinstalled, and is used to staple pages at the centerand fold them in half to create a pamphlet.Touch this key to display the pamphlet copysetting screen (page 5-6). (This is only possiblewhen the [AUTOMATIC SADDLE STITCH]checkbox is selected in the administrator settings(see page 12 of the administrator settings guide).)
[PUNCH] key (See page 3-5.)
This is used to punch holes in printed pages whenan optional punch module is installed.
OUTPUT
SORT
STAPLESORT
GROUP
FINISHERTRAY
CENTERTRAY
OFFSET
SADDLESTITCH PUNCH
OK
0
1
2
3
4
5
NOTEWhen a functions is selected, it is highlighted.
6
7
8
9
dragonII_copy_sec.book 6 ページ 2006年10月18日 水曜日 午後7時39分
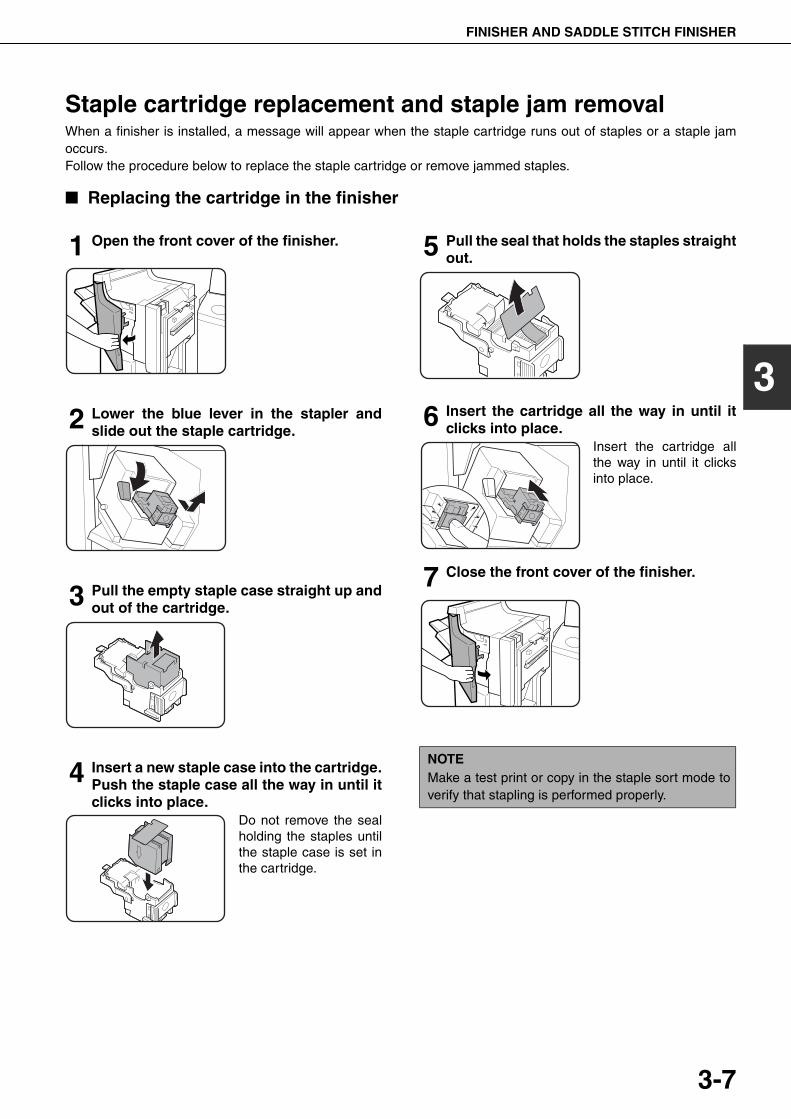
FINISHER AND SADDLE STITCH FINISHER
3-7
3
Staple cartridge replacement and staple jam removalWhen a finisher is installed, a message will appear when the staple cartridge runs out of staples or a staple jamoccurs.Follow the procedure below to replace the staple cartridge or remove jammed staples.
■ Replacing the cartridge in the finisher
1 Open the front cover of the finisher.
2 Lower the blue lever in the stapler andslide out the staple cartridge.
3 Pull the empty staple case straight up andout of the cartridge.
4 Insert a new staple case into the cartridge.Push the staple case all the way in until itclicks into place.
Do not remove the sealholding the staples untilthe staple case is set inthe cartridge.
5 Pull the seal that holds the staples straightout.
6 Insert the cartridge all the way in until itclicks into place.
Insert the cartridge allthe way in until it clicksinto place.
7 Close the front cover of the finisher.
NOTEMake a test print or copy in the staple sort mode toverify that stapling is performed properly.
dragonII_copy_sec.book 7 ページ 2006年10月18日 水曜日 午後7時39分
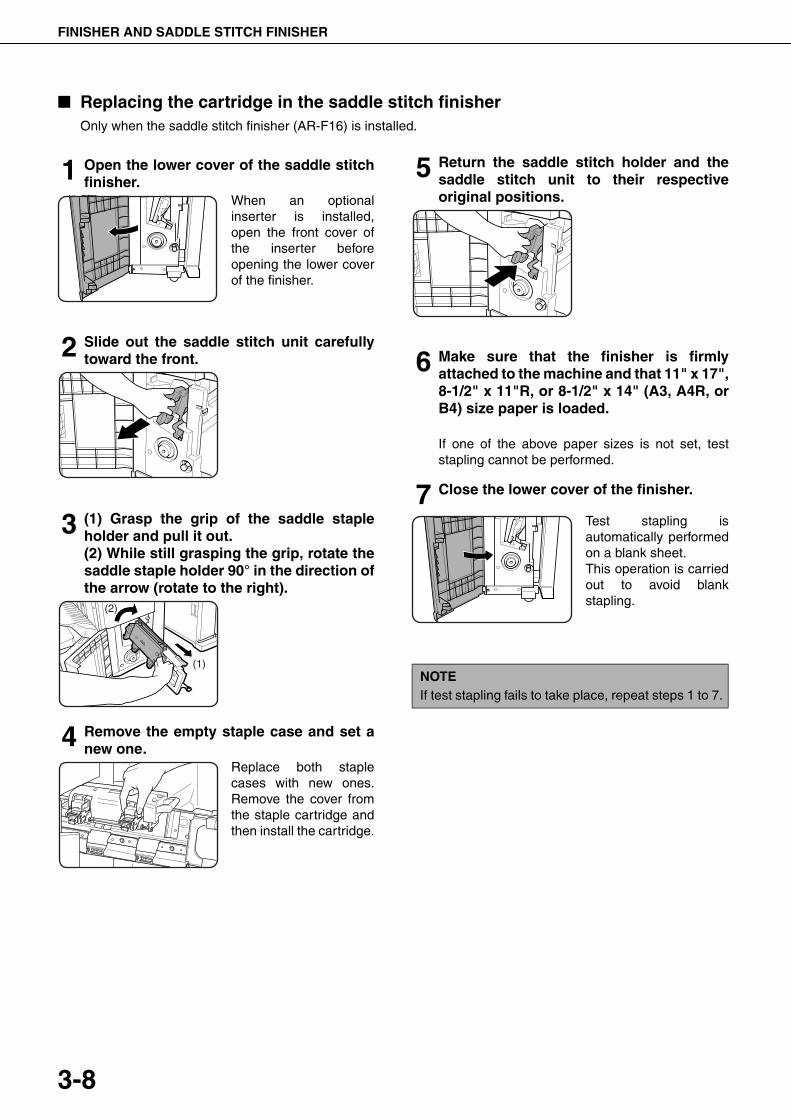
FINISHER AND SADDLE STITCH FINISHER
3-8
■ Replacing the cartridge in the saddle stitch finisherOnly when the saddle stitch finisher (AR-F16) is installed.
1 Open the lower cover of the saddle stitchfinisher.
When an optionalinserter is installed,open the front cover ofthe inserter beforeopening the lower coverof the finisher.
2 Slide out the saddle stitch unit carefullytoward the front.
3 (1) Grasp the grip of the saddle stapleholder and pull it out.(2) While still grasping the grip, rotate thesaddle staple holder 90° in the direction ofthe arrow (rotate to the right).
4 Remove the empty staple case and set anew one.
Replace both staplecases with new ones.Remove the cover fromthe staple cartridge andthen install the cartridge.
5 Return the saddle stitch holder and thesaddle stitch unit to their respectiveoriginal positions.
6 Make sure that the finisher is firmlyattached to the machine and that 11" x 17",8-1/2" x 11"R, or 8-1/2" x 14" (A3, A4R, orB4) size paper is loaded.
If one of the above paper sizes is not set, teststapling cannot be performed.
7 Close the lower cover of the finisher.
Test stapling isautomatically performedon a blank sheet.This operation is carriedout to avoid blankstapling.
(1)
(2)
NOTEIf test stapling fails to take place, repeat steps 1 to 7.
dragonII_copy_sec.book 8 ページ 2006年10月18日 水曜日 午後7時39分
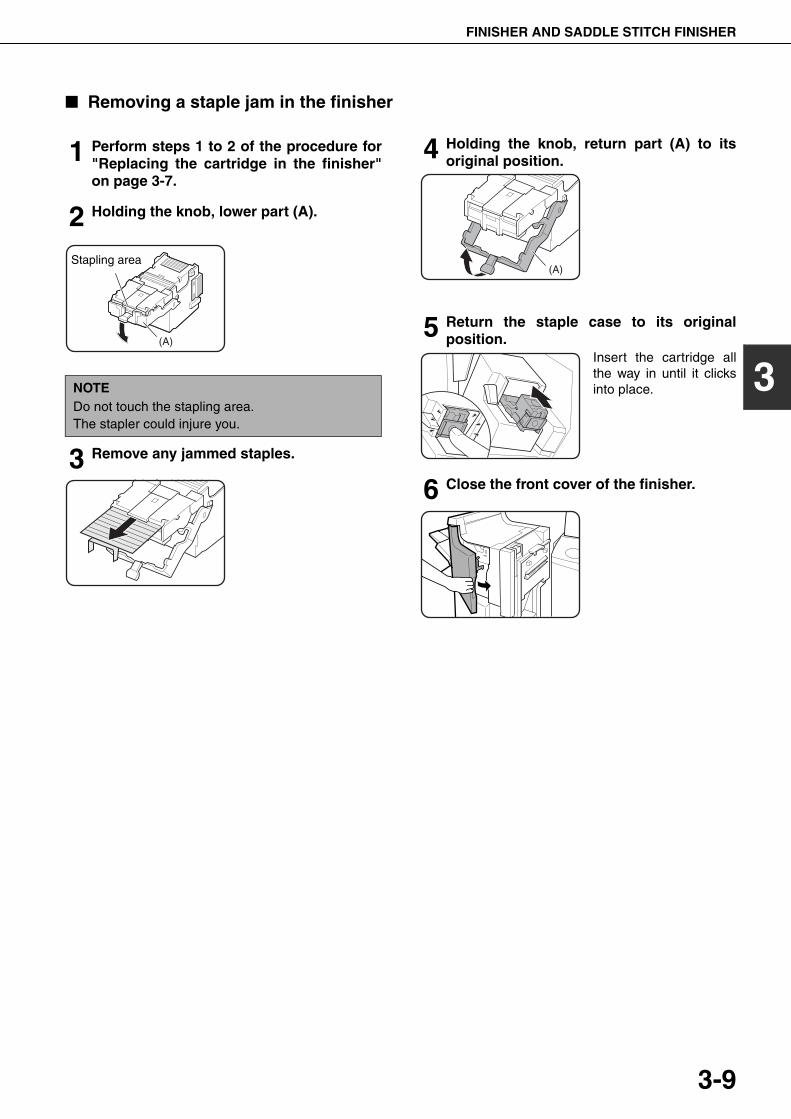
FINISHER AND SADDLE STITCH FINISHER
3-9
3
■ Removing a staple jam in the finisher
1 Perform steps 1 to 2 of the procedure for"Replacing the cartridge in the finisher"on page 3-7.
2 Holding the knob, lower part (A).
3 Remove any jammed staples.
4 Holding the knob, return part (A) to itsoriginal position.
5 Return the staple case to its originalposition.
Insert the cartridge allthe way in until it clicksinto place.
6 Close the front cover of the finisher.
NOTEDo not touch the stapling area.The stapler could injure you.
(A)
Stapling area(A)
dragonII_copy_sec.book 9 ページ 2006年10月18日 水曜日 午後7時39分
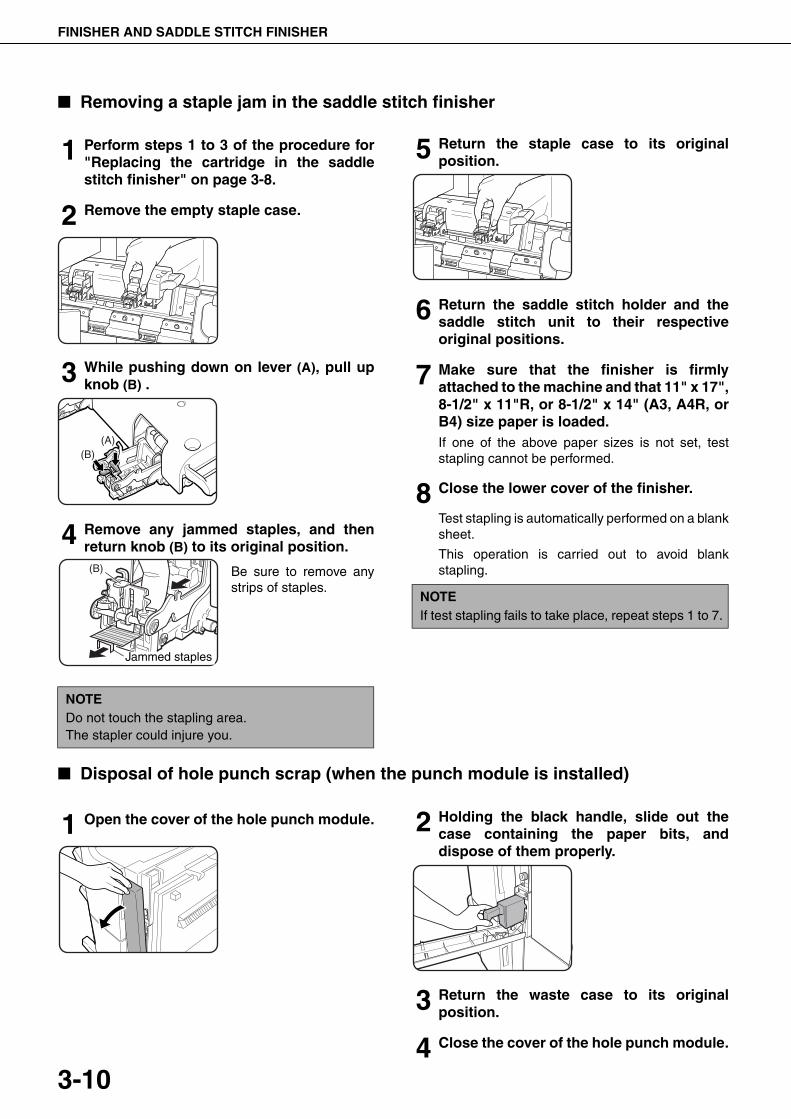
FINISHER AND SADDLE STITCH FINISHER
3-10
■ Removing a staple jam in the saddle stitch finisher
1 Perform steps 1 to 3 of the procedure for"Replacing the cartridge in the saddlestitch finisher" on page 3-8.
2 Remove the empty staple case.
3 While pushing down on lever (A), pull upknob (B) .
4 Remove any jammed staples, and thenreturn knob (B) to its original position.
Be sure to remove anystrips of staples.
5 Return the staple case to its originalposition.
6 Return the saddle stitch holder and thesaddle stitch unit to their respectiveoriginal positions.
7 Make sure that the finisher is firmlyattached to the machine and that 11" x 17",8-1/2" x 11"R, or 8-1/2" x 14" (A3, A4R, orB4) size paper is loaded.If one of the above paper sizes is not set, teststapling cannot be performed.
8 Close the lower cover of the finisher.
Test stapling is automatically performed on a blanksheet.
This operation is carried out to avoid blankstapling.
■ Disposal of hole punch scrap (when the punch module is installed)
1 Open the cover of the hole punch module. 2 Holding the black handle, slide out thecase containing the paper bits, anddispose of them properly.
3 Return the waste case to its originalposition.
4 Close the cover of the hole punch module.
NOTEDo not touch the stapling area.The stapler could injure you.
(A)(B)
(B)
Jammed staples
NOTEIf test stapling fails to take place, repeat steps 1 to 7.
dragonII_copy_sec.book 10 ページ 2006年10月18日 水曜日 午後7時39分
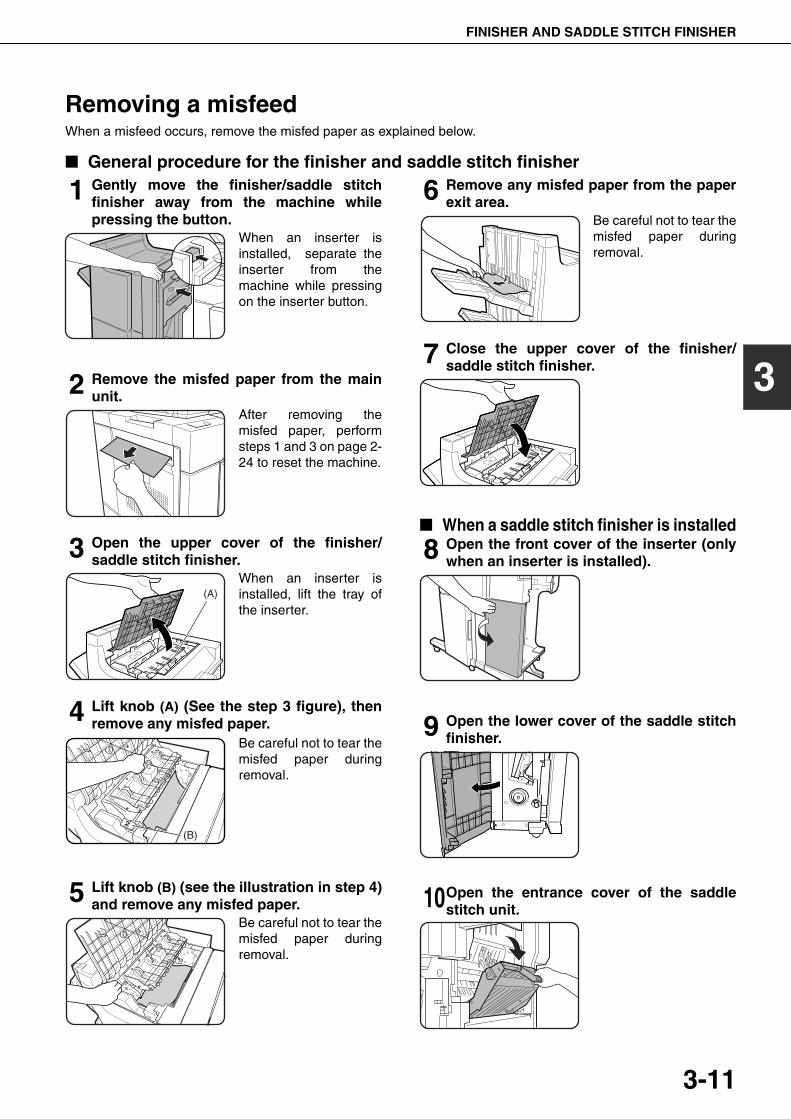
FINISHER AND SADDLE STITCH FINISHER
3-11
3
Removing a misfeedWhen a misfeed occurs, remove the misfed paper as explained below.
■ General procedure for the finisher and saddle stitch finisher
1 Gently move the finisher/saddle stitchfinisher away from the machine whilepressing the button.
When an inserter isinstalled, separate theinserter from themachine while pressingon the inserter button.
2 Remove the misfed paper from the mainunit.
After removing themisfed paper, performsteps 1 and 3 on page 2-24 to reset the machine.
3 Open the upper cover of the finisher/saddle stitch finisher.
When an inserter isinstalled, lift the tray ofthe inserter.
4 Lift knob (A) (See the step 3 figure), thenremove any misfed paper.
Be careful not to tear themisfed paper duringremoval.
5 Lift knob (B) (see the illustration in step 4)and remove any misfed paper.
Be careful not to tear themisfed paper duringremoval.
6 Remove any misfed paper from the paperexit area.
Be careful not to tear themisfed paper duringremoval.
7 Close the upper cover of the finisher/saddle stitch finisher.
■ When a saddle stitch finisher is installed
8 Open the front cover of the inserter (onlywhen an inserter is installed).
9 Open the lower cover of the saddle stitchfinisher.
10Open the entrance cover of the saddlestitch unit.
(A)
(B)
dragonII_copy_sec.book 11 ページ 2006年10月18日 水曜日 午後7時39分
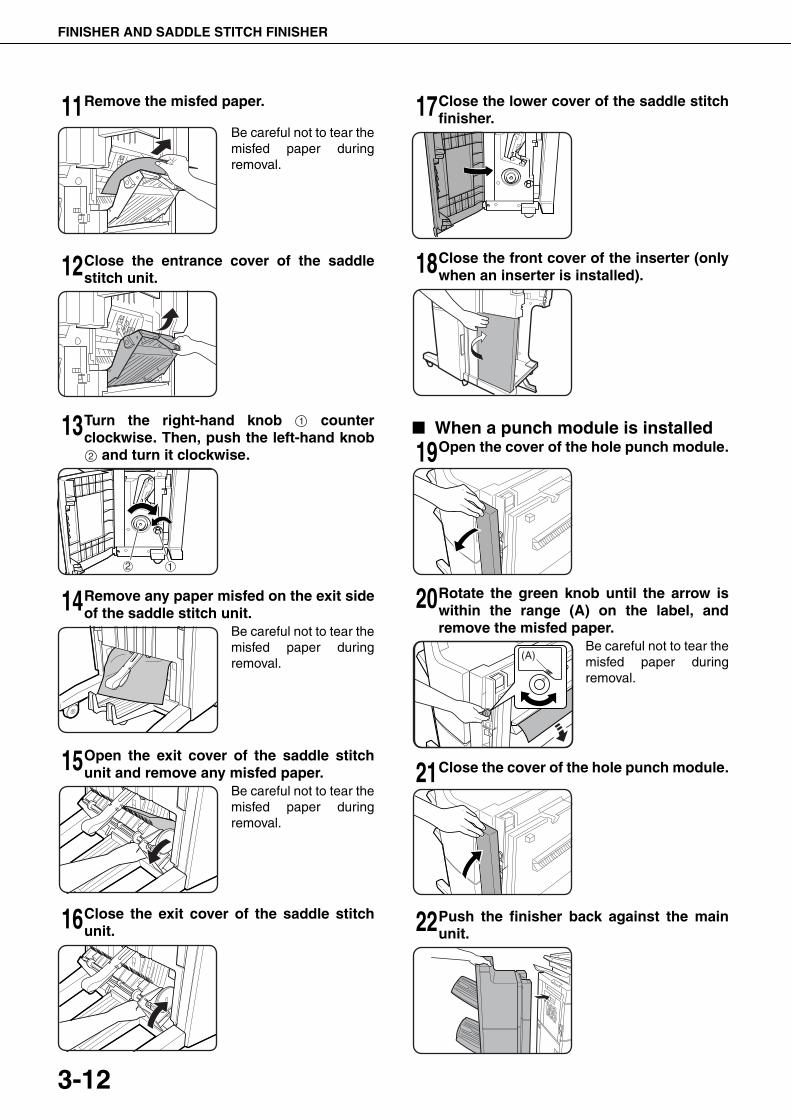
FINISHER AND SADDLE STITCH FINISHER
3-12
11Remove the misfed paper.
Be careful not to tear themisfed paper duringremoval.
12Close the entrance cover of the saddlestitch unit.
13Turn the right-hand knob counterclockwise. Then, push the left-hand knob
and turn it clockwise.
14Remove any paper misfed on the exit sideof the saddle stitch unit.
Be careful not to tear themisfed paper duringremoval.
15Open the exit cover of the saddle stitchunit and remove any misfed paper.
Be careful not to tear themisfed paper duringremoval.
16Close the exit cover of the saddle stitchunit.
17Close the lower cover of the saddle stitchfinisher.
18Close the front cover of the inserter (onlywhen an inserter is installed).
■ When a punch module is installed
19Open the cover of the hole punch module.
20Rotate the green knob until the arrow iswithin the range (A) on the label, andremove the misfed paper.
Be careful not to tear themisfed paper duringremoval.
21Close the cover of the hole punch module.
22Push the finisher back against the mainunit.
1
2
(A)
dragonII_copy_sec.book 12 ページ 2006年10月18日 水曜日 午後7時39分
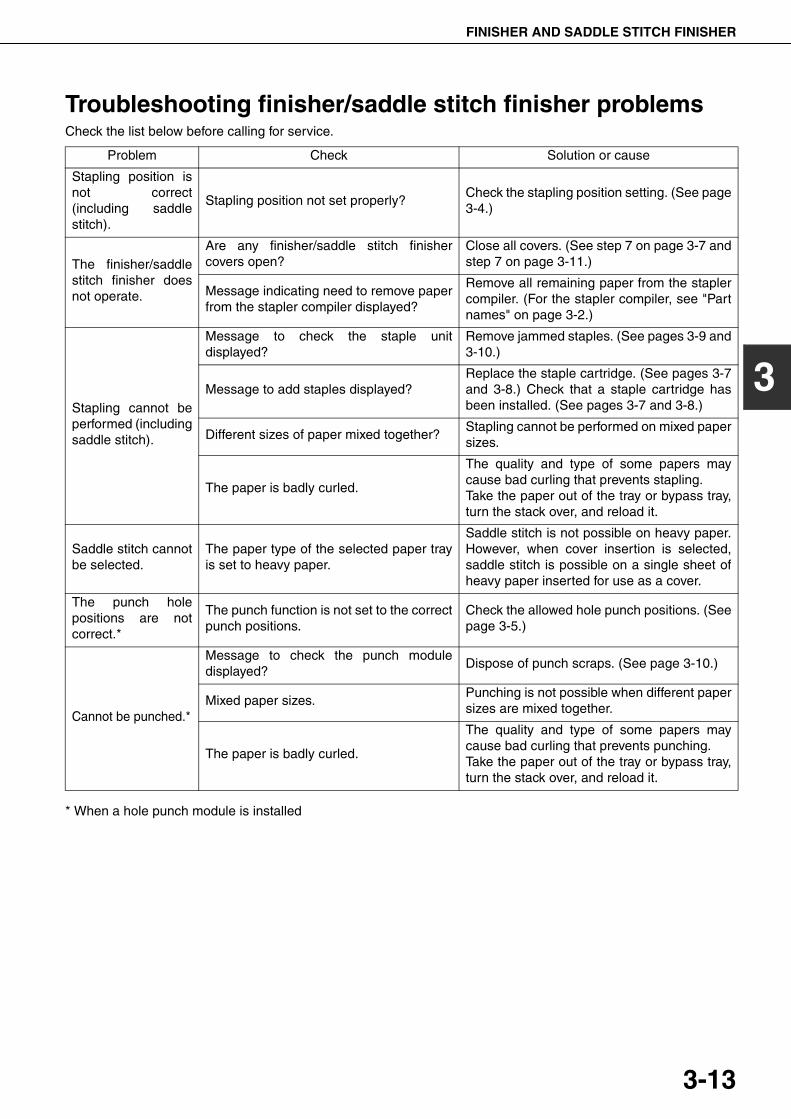
FINISHER AND SADDLE STITCH FINISHER
3-13
3
Troubleshooting finisher/saddle stitch finisher problemsCheck the list below before calling for service.
* When a hole punch module is installed
Problem Check Solution or cause
Stapling position isnot correct(including saddlestitch).
Stapling position not set properly?Check the stapling position setting. (See page3-4.)
The finisher/saddlestitch finisher doesnot operate.
Are any finisher/saddle stitch finishercovers open?
Close all covers. (See step 7 on page 3-7 andstep 7 on page 3-11.)
Message indicating need to remove paperfrom the stapler compiler displayed?
Remove all remaining paper from the staplercompiler. (For the stapler compiler, see "Partnames" on page 3-2.)
Stapling cannot beperformed (includingsaddle stitch).
Message to check the staple unitdisplayed?
Remove jammed staples. (See pages 3-9 and3-10.)
Message to add staples displayed?Replace the staple cartridge. (See pages 3-7and 3-8.) Check that a staple cartridge hasbeen installed. (See pages 3-7 and 3-8.)
Different sizes of paper mixed together?Stapling cannot be performed on mixed papersizes.
The paper is badly curled.
The quality and type of some papers maycause bad curling that prevents stapling.Take the paper out of the tray or bypass tray,turn the stack over, and reload it.
Saddle stitch cannotbe selected.
The paper type of the selected paper trayis set to heavy paper.
Saddle stitch is not possible on heavy paper.However, when cover insertion is selected,saddle stitch is possible on a single sheet ofheavy paper inserted for use as a cover.
The punch holepositions are notcorrect.*
The punch function is not set to the correctpunch positions.
Check the allowed hole punch positions. (Seepage 3-5.)
Cannot be punched.*
Message to check the punch moduledisplayed?
Dispose of punch scraps. (See page 3-10.)
Mixed paper sizes.Punching is not possible when different papersizes are mixed together.
The paper is badly curled.
The quality and type of some papers maycause bad curling that prevents punching.Take the paper out of the tray or bypass tray,turn the stack over, and reload it.
dragonII_copy_sec.book 13 ページ 2006年10月18日 水曜日 午後7時39分
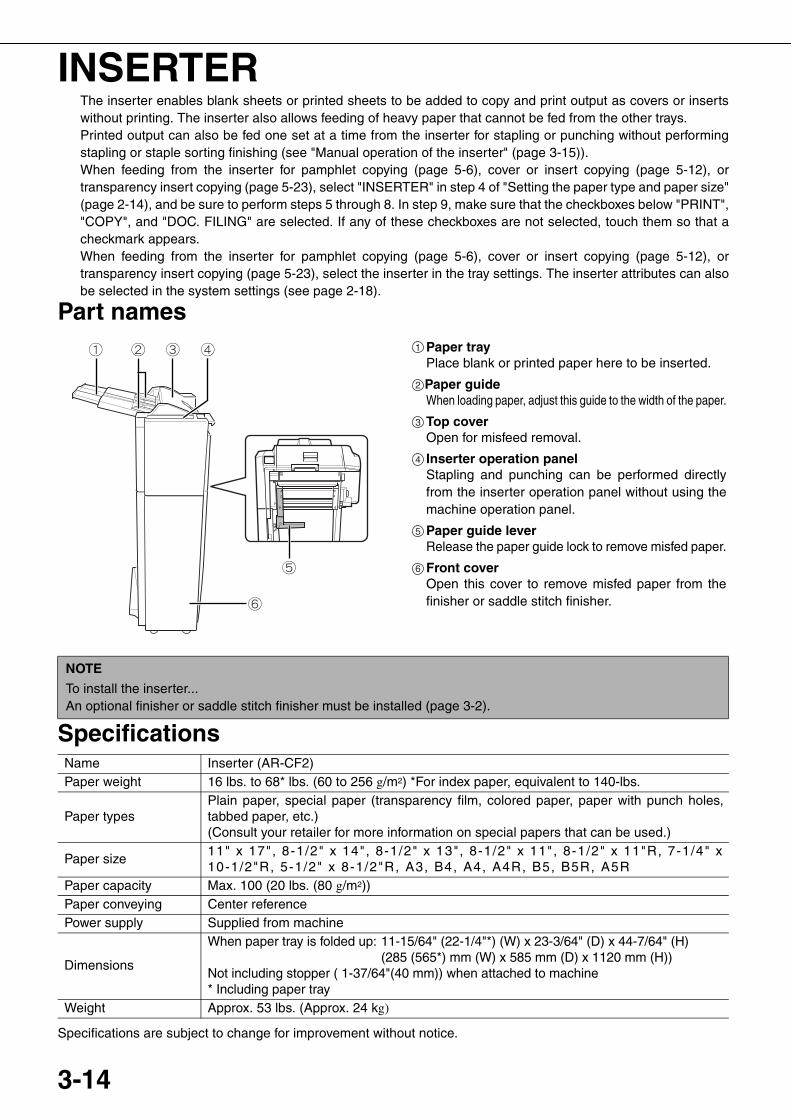
3-14
INSERTERThe inserter enables blank sheets or printed sheets to be added to copy and print output as covers or insertswithout printing. The inserter also allows feeding of heavy paper that cannot be fed from the other trays.Printed output can also be fed one set at a time from the inserter for stapling or punching without performingstapling or staple sorting finishing (see "Manual operation of the inserter" (page 3-15)).When feeding from the inserter for pamphlet copying (page 5-6), cover or insert copying (page 5-12), ortransparency insert copying (page 5-23), select "INSERTER" in step 4 of "Setting the paper type and paper size"(page 2-14), and be sure to perform steps 5 through 8. In step 9, make sure that the checkboxes below "PRINT","COPY", and "DOC. FILING" are selected. If any of these checkboxes are not selected, touch them so that acheckmark appears.When feeding from the inserter for pamphlet copying (page 5-6), cover or insert copying (page 5-12), ortransparency insert copying (page 5-23), select the inserter in the tray settings. The inserter attributes can alsobe selected in the system settings (see page 2-18).
Part names
Specifications
Specifications are subject to change for improvement without notice.
Paper trayPlace blank or printed paper here to be inserted.
Paper guideWhen loading paper, adjust this guide to the width of the paper.
Top coverOpen for misfeed removal.
Inserter operation panelStapling and punching can be performed directlyfrom the inserter operation panel without using themachine operation panel.
Paper guide leverRelease the paper guide lock to remove misfed paper.
Front coverOpen this cover to remove misfed paper from thefinisher or saddle stitch finisher.
1
2
3
4
5
6
NOTE
To install the inserter...An optional finisher or saddle stitch finisher must be installed (page 3-2).
Name Inserter (AR-CF2)Paper weight 16 lbs. to 68* lbs. (60 to 256 g/m2) *For index paper, equivalent to 140-lbs.
Paper typesPlain paper, special paper (transparency film, colored paper, paper with punch holes,tabbed paper, etc.)(Consult your retailer for more information on special papers that can be used.)
Paper size11" x 17", 8-1/2" x 14", 8-1/2" x 13", 8-1/2" x 11", 8-1/2" x 11"R, 7-1/4" x10-1/2"R, 5-1/2" x 8-1/2"R, A3, B4, A4, A4R, B5, B5R, A5R
Paper capacity Max. 100 (20 lbs. (80 g/m2))Paper conveying Center referencePower supply Supplied from machine
Dimensions
When paper tray is folded up: 11-15/64" (22-1/4"*) (W) x 23-3/64" (D) x 44-7/64" (H)(285 (565*) mm (W) x 585 mm (D) x 1120 mm (H))
Not including stopper ( 1-37/64"(40 mm)) when attached to machine* Including paper tray
Weight Approx. 53 lbs. (Approx. 24 kg)
dragon_03.fm 14 ページ 2006年11月29日 水曜日 午後8時47分
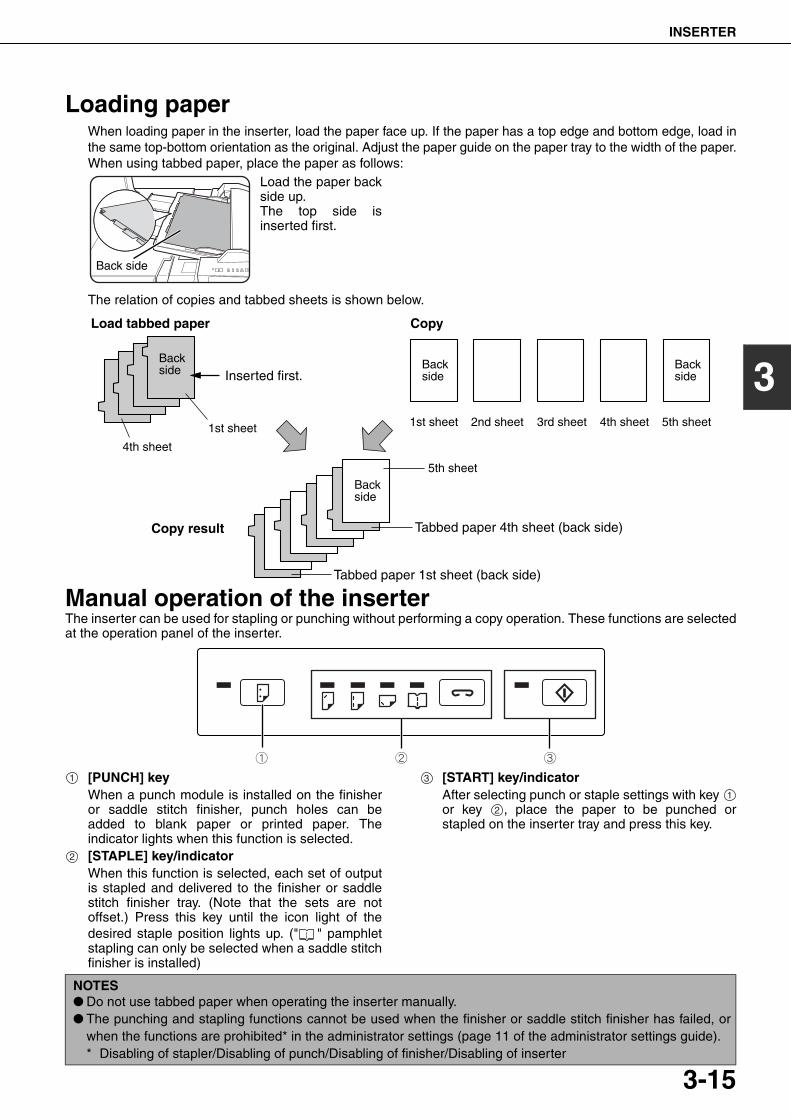
INSERTER
3-15
3
Loading paperWhen loading paper in the inserter, load the paper face up. If the paper has a top edge and bottom edge, load inthe same top-bottom orientation as the original. Adjust the paper guide on the paper tray to the width of the paper.When using tabbed paper, place the paper as follows:
Load the paper backside up. The top side isinserted first.
The relation of copies and tabbed sheets is shown below.
Manual operation of the inserterThe inserter can be used for stapling or punching without performing a copy operation. These functions are selectedat the operation panel of the inserter.
[PUNCH] keyWhen a punch module is installed on the finisheror saddle stitch finisher, punch holes can beadded to blank paper or printed paper. Theindicator lights when this function is selected.[STAPLE] key/indicatorWhen this function is selected, each set of outputis stapled and delivered to the finisher or saddlestitch finisher tray. (Note that the sets are notoffset.) Press this key until the icon light of thedesired staple position lights up. (" " pamphletstapling can only be selected when a saddle stitchfinisher is installed)
[START] key/indicatorAfter selecting punch or staple settings with key or key , place the paper to be punched orstapled on the inserter tray and press this key.
Back side
Copy
Copy result
Load tabbed paper
Inserted first.Backside
1st sheet
4th sheet
1st sheet
Backside
2nd sheet 3rd sheet 4th sheet 5th sheet
Backside
Tabbed paper 4th sheet (back side)
Tabbed paper 1st sheet (back side)
5th sheetBackside
1
2
3
1
2
NOTES● Do not use tabbed paper when operating the inserter manually.● The punching and stapling functions cannot be used when the finisher or saddle stitch finisher has failed, or
when the functions are prohibited* in the administrator settings (page 11 of the administrator settings guide).* Disabling of stapler/Disabling of punch/Disabling of finisher/Disabling of inserter
dragonII_copy_sec.book 15 ページ 2006年10月18日 水曜日 午後7時39分
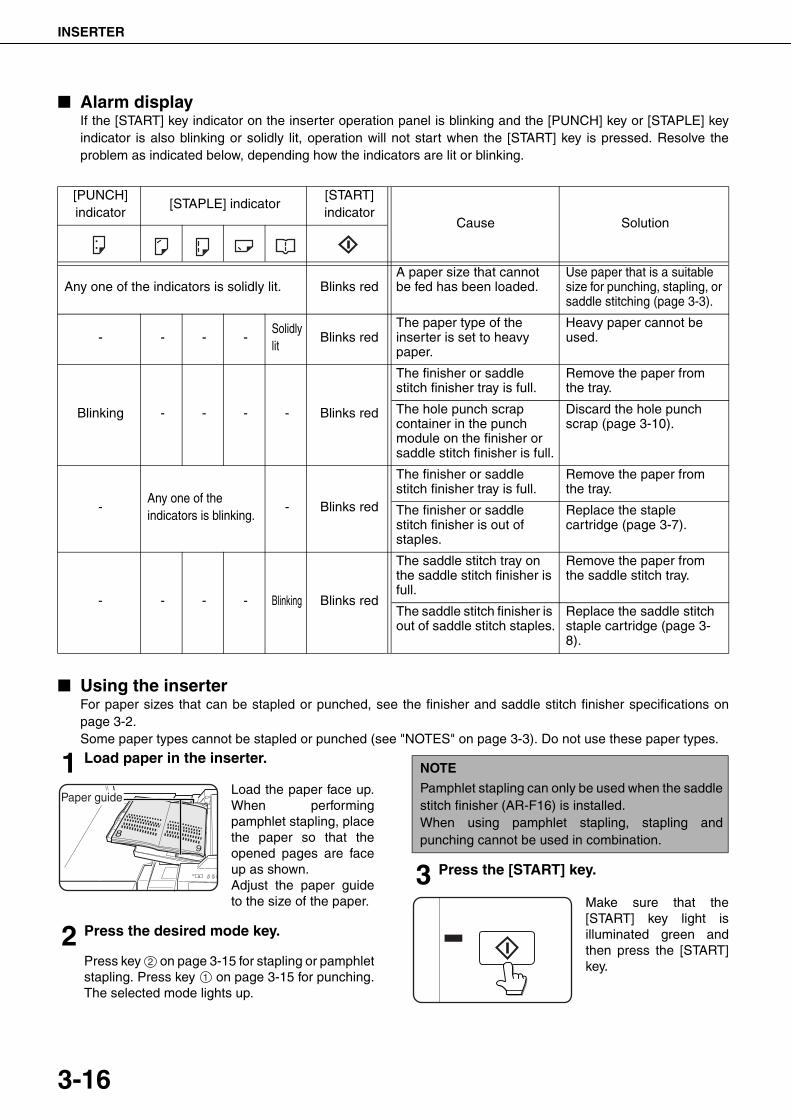
INSERTER
3-16
■ Alarm displayIf the [START] key indicator on the inserter operation panel is blinking and the [PUNCH] key or [STAPLE] keyindicator is also blinking or solidly lit, operation will not start when the [START] key is pressed. Resolve theproblem as indicated below, depending how the indicators are lit or blinking.
■ Using the inserterFor paper sizes that can be stapled or punched, see the finisher and saddle stitch finisher specifications onpage 3-2.Some paper types cannot be stapled or punched (see "NOTES" on page 3-3). Do not use these paper types.
1 Load paper in the inserter.
Load the paper face up.When performingpamphlet stapling, placethe paper so that theopened pages are faceup as shown.Adjust the paper guideto the size of the paper.
2 Press the desired mode key.
Press key on page 3-15 for stapling or pamphletstapling. Press key on page 3-15 for punching.The selected mode lights up.
3 Press the [START] key.
Make sure that the[START] key light isilluminated green andthen press the [START]key.
[PUNCH]indicator
[STAPLE] indicator[START]indicator
Cause Solution
Any one of the indicators is solidly lit. Blinks redA paper size that cannot be fed has been loaded.
Use paper that is a suitable size for punching, stapling, or saddle stitching (page 3-3).
- - - -Solidly lit
Blinks redThe paper type of the inserter is set to heavy paper.
Heavy paper cannot be used.
Blinking - - - - Blinks red
The finisher or saddle stitch finisher tray is full.
Remove the paper from the tray.
The hole punch scrap container in the punch module on the finisher or saddle stitch finisher is full.
Discard the hole punch scrap (page 3-10).
-Any one of the indicators is blinking.
- Blinks red
The finisher or saddle stitch finisher tray is full.
Remove the paper from the tray.
The finisher or saddle stitch finisher is out of staples.
Replace the staple cartridge (page 3-7).
- - - - Blinking Blinks red
The saddle stitch tray on the saddle stitch finisher is full.
Remove the paper from the saddle stitch tray.
The saddle stitch finisher is out of saddle stitch staples.
Replace the saddle stitch staple cartridge (page 3-8).
Paper guide
2
1
NOTE
Pamphlet stapling can only be used when the saddlestitch finisher (AR-F16) is installed.When using pamphlet stapling, stapling andpunching cannot be used in combination.
dragonII_copy_sec.book 16 ページ 2006年10月18日 水曜日 午後7時39分
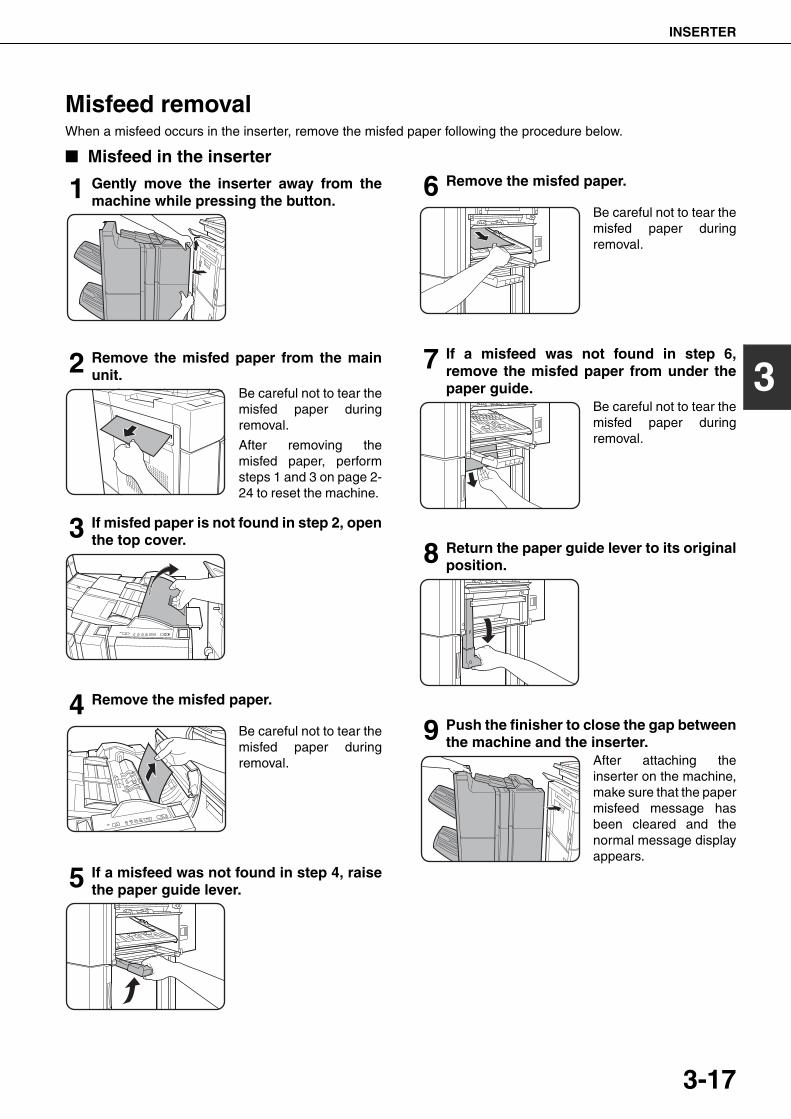
INSERTER
3-17
3
Misfeed removalWhen a misfeed occurs in the inserter, remove the misfed paper following the procedure below.
■ Misfeed in the inserter
1 Gently move the inserter away from themachine while pressing the button.
2 Remove the misfed paper from the mainunit.
Be careful not to tear themisfed paper duringremoval.
After removing themisfed paper, performsteps 1 and 3 on page 2-24 to reset the machine.
3 If misfed paper is not found in step 2, openthe top cover.
4 Remove the misfed paper.
Be careful not to tear themisfed paper duringremoval.
5 If a misfeed was not found in step 4, raisethe paper guide lever.
6 Remove the misfed paper.
Be careful not to tear themisfed paper duringremoval.
7 If a misfeed was not found in step 6,remove the misfed paper from under thepaper guide.
Be careful not to tear themisfed paper duringremoval.
8 Return the paper guide lever to its originalposition.
9 Push the finisher to close the gap betweenthe machine and the inserter.
After attaching theinserter on the machine,make sure that the papermisfeed message hasbeen cleared and thenormal message displayappears.
dragonII_copy_sec.book 17 ページ 2006年10月18日 水曜日 午後7時39分
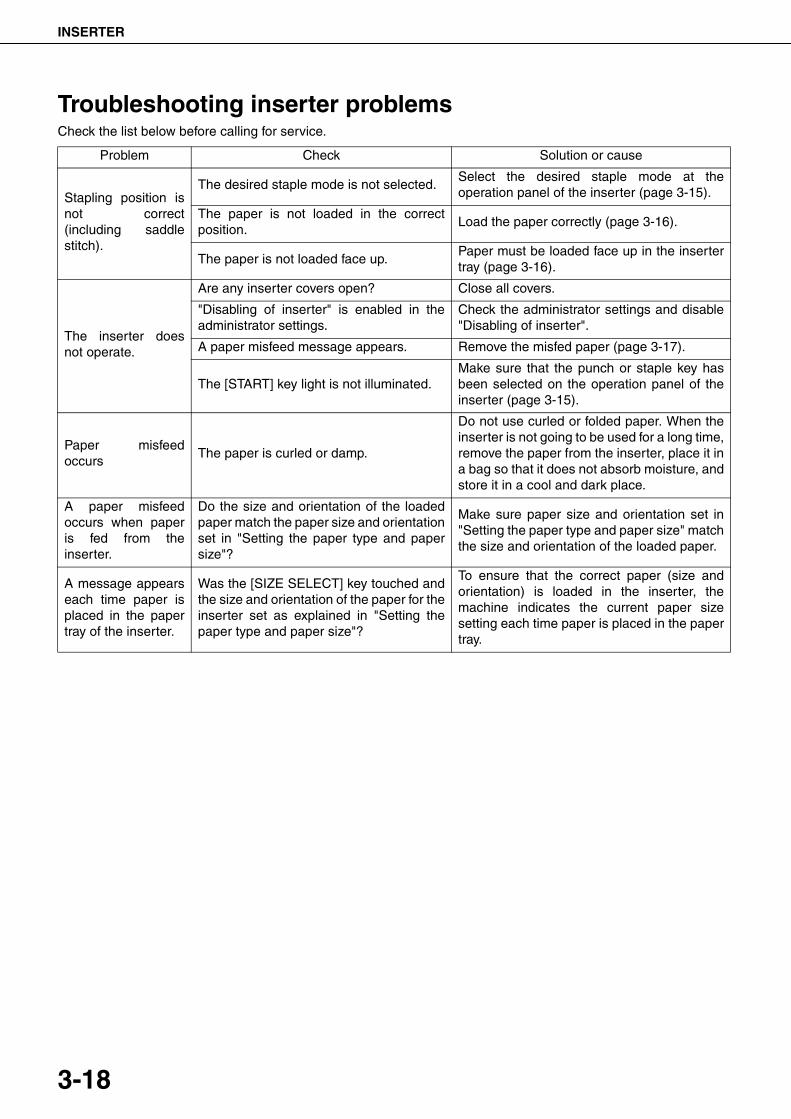
INSERTER
3-18
Troubleshooting inserter problemsCheck the list below before calling for service.
Problem Check Solution or cause
Stapling position isnot correct(including saddlestitch).
The desired staple mode is not selected.Select the desired staple mode at theoperation panel of the inserter (page 3-15).
The paper is not loaded in the correctposition.
Load the paper correctly (page 3-16).
The paper is not loaded face up.Paper must be loaded face up in the insertertray (page 3-16).
The inserter doesnot operate.
Are any inserter covers open? Close all covers.
"Disabling of inserter" is enabled in theadministrator settings.
Check the administrator settings and disable"Disabling of inserter".
A paper misfeed message appears. Remove the misfed paper (page 3-17).
The [START] key light is not illuminated.Make sure that the punch or staple key hasbeen selected on the operation panel of theinserter (page 3-15).
Paper misfeedoccurs
The paper is curled or damp.
Do not use curled or folded paper. When theinserter is not going to be used for a long time,remove the paper from the inserter, place it ina bag so that it does not absorb moisture, andstore it in a cool and dark place.
A paper misfeedoccurs when paperis fed from theinserter.
Do the size and orientation of the loadedpaper match the paper size and orientationset in "Setting the paper type and papersize"?
Make sure paper size and orientation set in"Setting the paper type and paper size" matchthe size and orientation of the loaded paper.
A message appearseach time paper isplaced in the papertray of the inserter.
Was the [SIZE SELECT] key touched andthe size and orientation of the paper for theinserter set as explained in "Setting thepaper type and paper size"?
To ensure that the correct paper (size andorientation) is loaded in the inserter, themachine indicates the current paper sizesetting each time paper is placed in the papertray.
dragonII_copy_sec.book 18 ページ 2006年10月18日 水曜日 午後7時39分
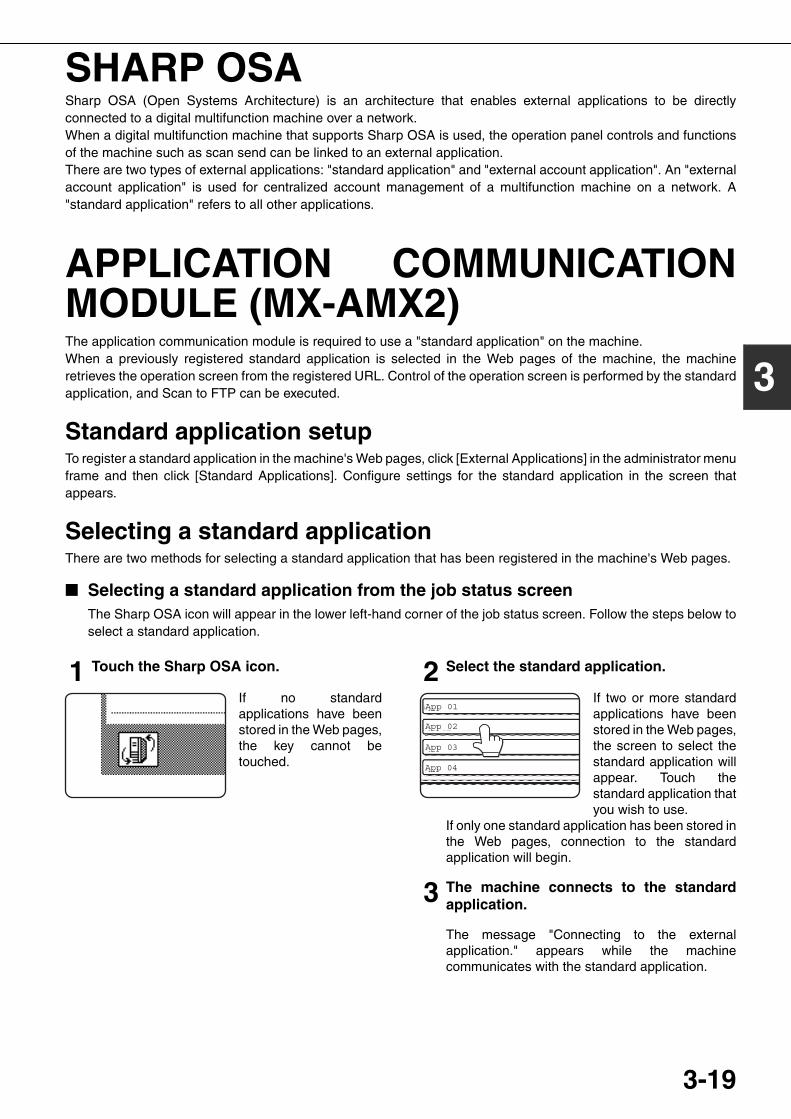
3-19
3
SHARP OSASharp OSA (Open Systems Architecture) is an architecture that enables external applications to be directlyconnected to a digital multifunction machine over a network.When a digital multifunction machine that supports Sharp OSA is used, the operation panel controls and functionsof the machine such as scan send can be linked to an external application.There are two types of external applications: "standard application" and "external account application". An "externalaccount application" is used for centralized account management of a multifunction machine on a network. A"standard application" refers to all other applications.
APPLICATION COMMUNICATIONMODULE (MX-AMX2)The application communication module is required to use a "standard application" on the machine.When a previously registered standard application is selected in the Web pages of the machine, the machineretrieves the operation screen from the registered URL. Control of the operation screen is performed by the standardapplication, and Scan to FTP can be executed.
Standard application setupTo register a standard application in the machine's Web pages, click [External Applications] in the administrator menuframe and then click [Standard Applications]. Configure settings for the standard application in the screen thatappears.
Selecting a standard applicationThere are two methods for selecting a standard application that has been registered in the machine's Web pages.
■ Selecting a standard application from the job status screenThe Sharp OSA icon will appear in the lower left-hand corner of the job status screen. Follow the steps below toselect a standard application.
1 Touch the Sharp OSA icon.
If no standardapplications have beenstored in the Web pages,the key cannot betouched.
2 Select the standard application.
If two or more standardapplications have beenstored in the Web pages,the screen to select thestandard application willappear. Touch thestandard application thatyou wish to use.
If only one standard application has been stored inthe Web pages, connection to the standardapplication will begin.
3 The machine connects to the standardapplication.
The message "Connecting to the externalapplication." appears while the machinecommunicates with the standard application.
App 04
App 03
App 02
App 01
dragonII_copy_sec.book 19 ページ 2006年10月18日 水曜日 午後7時39分
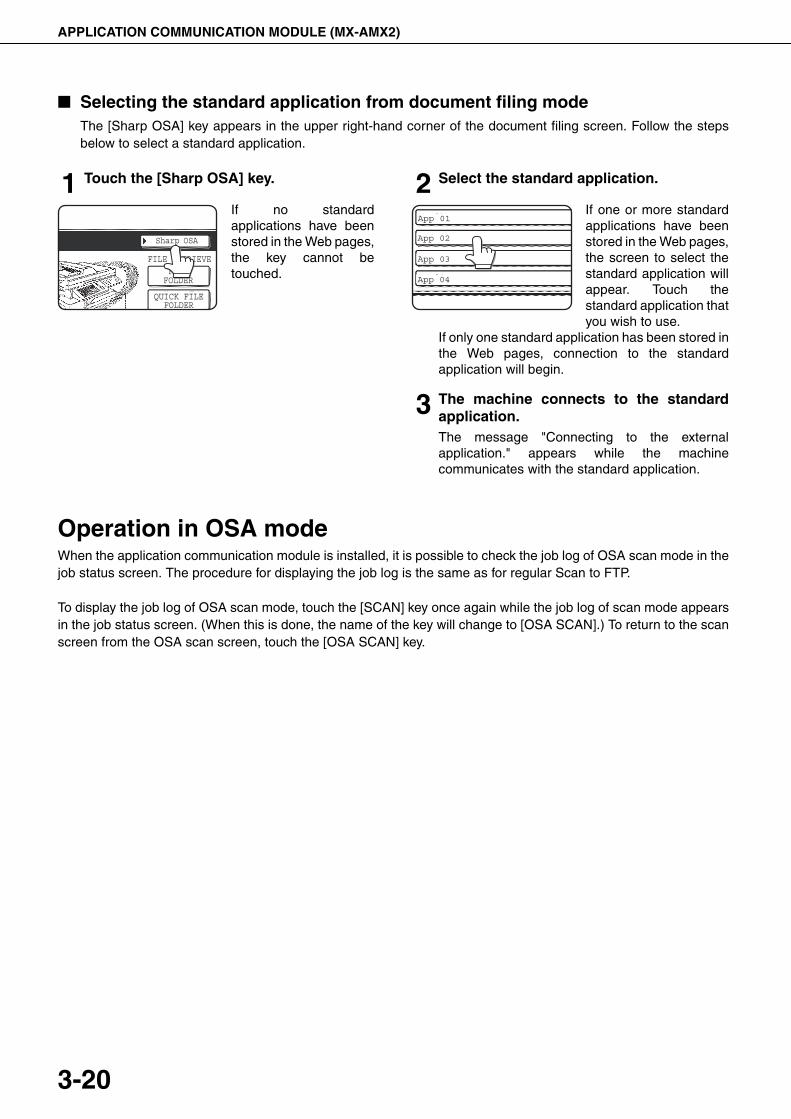
APPLICATION COMMUNICATION MODULE (MX-AMX2)
3-20
■ Selecting the standard application from document filing modeThe [Sharp OSA] key appears in the upper right-hand corner of the document filing screen. Follow the stepsbelow to select a standard application.
1 Touch the [Sharp OSA] key.
If no standardapplications have beenstored in the Web pages,the key cannot betouched.
2 Select the standard application.
If one or more standardapplications have beenstored in the Web pages,the screen to select thestandard application willappear. Touch thestandard application thatyou wish to use.
If only one standard application has been stored inthe Web pages, connection to the standardapplication will begin.
3 The machine connects to the standardapplication.The message "Connecting to the externalapplication." appears while the machinecommunicates with the standard application.
Operation in OSA modeWhen the application communication module is installed, it is possible to check the job log of OSA scan mode in thejob status screen. The procedure for displaying the job log is the same as for regular Scan to FTP.
To display the job log of OSA scan mode, touch the [SCAN] key once again while the job log of scan mode appearsin the job status screen. (When this is done, the name of the key will change to [OSA SCAN].) To return to the scanscreen from the OSA scan screen, touch the [OSA SCAN] key.
FILE RETRIEVE
Sharp OSA
QUICK FILEFOLDER
FILEFOLDER App 04
App 03
App 02
App 01
dragon_03.fm 20 ページ 2006年11月29日 水曜日 午後8時49分
3-21
3
EXTERNAL ACCOUNT MODULE (MX-AMX3)The external account module is required to use a "external account application" on the machine.An external account application can be used in "external authentication mode" or "external count mode". Whenexternal authentication mode is used, the login screen is retrieved from the application when the machine is started.When a job ends, a job notification screen is sent to the application to enable counts to be kept for each authenticateduser.When "external count mode" is used, the login screen is not displayed when the machine is started. Only a job resultnotification is sent to the application. User authentication by the external account application cannot be used,however, the external account application can be used in combination with the internal account function.
External account application setupTo register an external account application in the machine's Web pages, click [External Applications] in theadministrator menu frame and then click [External Accounting]. Configure settings for the external accountapplication in the screen that appears. To make the settings in the Web page take effect, restart the machine.
Operation in external account modeThe two modes for using an external account application operate as explained below.
■ External authentication modeWhen the [ENABLE AUTHENTICATION BY EXTERNAL SERVER] checkbox is selected in "External accountsetting" of "Sharp OSA settings" in the administrator settings, the machine enters external authentication mode.When the machine is powered on in external authentication mode, the machine accesses the external accountapplication and displays the login screen. The login screen also appears when the [CALL] key is touched to runa job in the job status complete screen. (The login screen does not appear if the user has already logged in bythe normal method.)The [JOB STATUS] key can be pressed while the login screen appears to show the job status screen. To returnto the previous state, press the mode select key.
■ External count modeWhen only the [ENABLE EXTERNAL ACCOUNT CONTROL] setting is enabled in "External account setting" of"Sharp OSA settings" in the administrator settings, the machine enters external count mode.Unlike external authentication mode, when the machine is started in "external count mode", the login screen ofthe external account application is not displayed. Only the job result is sent to the external account application.External count mode can be used together with the user control function of the machine. (External count modecan also be used when the user control function is disabled.)
NOTES● The user control function of the machine cannot be used in external authentication mode.● The [SYSTEM SETTINGS] key can be pressed while the login screen appears to show the system settings
screen. To return to the initial state, touch the [EXIT] key.
If login failsIf the login screen fails to appear or the application does not operate correctly, the machine may also stop operatingcorrectly. In this event, it is recommended that you quit external account mode from the Web pages of the machine.For more information, see [Help] in the Web pages.If it is necessary to forcibly terminate external account mode using the operation panel of the machine, follow thesteps below.Press the [SYSTEM SETTINGS] key and change "External account setting" in the administrator settings (see page14 of the administrator settings guide). After changing the setting, restart the machine.
dragon_03.fm 21 ページ 2006年10月23日 月曜日 午後12時0分

dragon_03.fm 22 ページ 2006年10月19日 木曜日 午後1時16分

Part 2: Copier Operation
dragonII_copy_sec.book 1 ページ 2006年10月18日 水曜日 午後7時39分

dragonII_copy_sec.book 2 ページ 2006年10月18日 水曜日 午後7時39分
4-1
CHAPTER 4MAKING COPIES
This chapter explains the basic procedures for making copies, includingselection of the copy ratio and other copy settings.
Page
AUTOMATIC DOCUMENT FEEDER ...................................................... 4-2● Acceptable originals ........................................................................ 4-2
PLACING ORIGINALS............................................................................ 4-3
CHECKING THE SIZE OF A PLACED ORIGINAL ................................. 4-5● Manually setting the scanning size ................................................. 4-5
STORING, DELETING, AND USING ORIGINAL SIZES ........................ 4-6● Storing or deleting an original size.................................................. 4-6
NORMAL COPYING ............................................................................... 4-7● Making copies with the automatic document feeding function ........ 4-7● Automatic two-sided copying using the automatic document feeding
function............................................................................................ 4-10● Copying from the document glass................................................... 4-11● Automatic two-sided copying from the document glass .................. 4-13
ADJUSTING THE EXPOSURE .....................................................................4-14REDUCTION/ENLARGEMENT/ZOOM................................................... 4-15
● Automatic selection (auto image).................................................... 4-15● Manual selection (preset copy ratios/zoom).................................... 4-16● XY ZOOM........................................................................................ 4-18
SPECIAL PAPERS.................................................................................. 4-20
dragonII_copy_sec.book 1 ページ 2006年10月18日 水曜日 午後7時39分
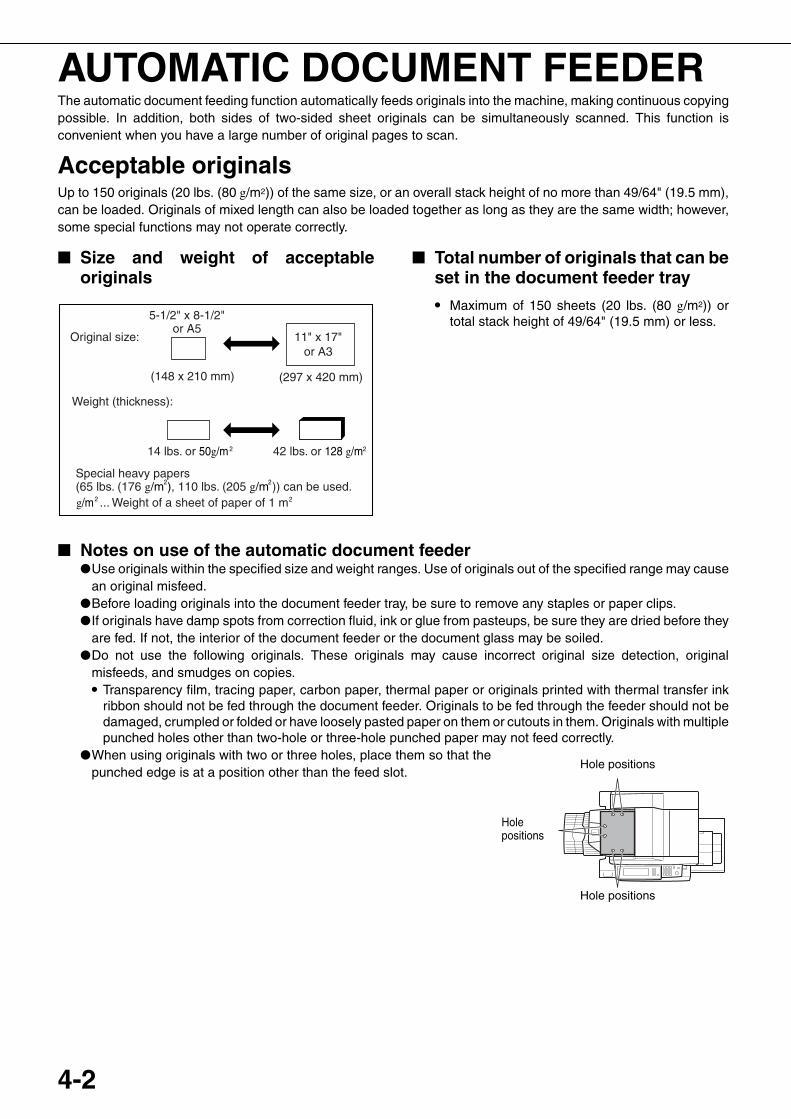
4-2
AUTOMATIC DOCUMENT FEEDERThe automatic document feeding function automatically feeds originals into the machine, making continuous copyingpossible. In addition, both sides of two-sided sheet originals can be simultaneously scanned. This function isconvenient when you have a large number of original pages to scan.
Acceptable originalsUp to 150 originals (20 lbs. (80 g/m2)) of the same size, or an overall stack height of no more than 49/64" (19.5 mm),can be loaded. Originals of mixed length can also be loaded together as long as they are the same width; however,some special functions may not operate correctly.
■ Size and weight of acceptableoriginals
■ Total number of originals that can beset in the document feeder tray● Maximum of 150 sheets (20 lbs. (80 g/m2)) or
total stack height of 49/64" (19.5 mm) or less.
■ Notes on use of the automatic document feeder●Use originals within the specified size and weight ranges. Use of originals out of the specified range may cause
an original misfeed.●Before loading originals into the document feeder tray, be sure to remove any staples or paper clips.●If originals have damp spots from correction fluid, ink or glue from pasteups, be sure they are dried before they
are fed. If not, the interior of the document feeder or the document glass may be soiled.●Do not use the following originals. These originals may cause incorrect original size detection, original
misfeeds, and smudges on copies.● Transparency film, tracing paper, carbon paper, thermal paper or originals printed with thermal transfer ink
ribbon should not be fed through the document feeder. Originals to be fed through the feeder should not bedamaged, crumpled or folded or have loosely pasted paper on them or cutouts in them. Originals with multiplepunched holes other than two-hole or three-hole punched paper may not feed correctly.
●When using originals with two or three holes, place them so that thepunched edge is at a position other than the feed slot.
22
Original size:
(148 x 210 mm)
5-1/2" x 8-1/2"or A5
11" x 17"or A3
(297 x 420 mm)
Weight (thickness):
14 lbs. or 50g/m2 42 lbs. or 128 g/m2
g/m ... Weight of a sheet of paper of 1 m
Special heavy papers(65 lbs. (176 g/m ), 110 lbs. (205 g/m )) can be used.22
Hole positions
Hole positions
Hole positions
dragonII_copy_sec.book 2 ページ 2006年10月18日 水曜日 午後7時39分
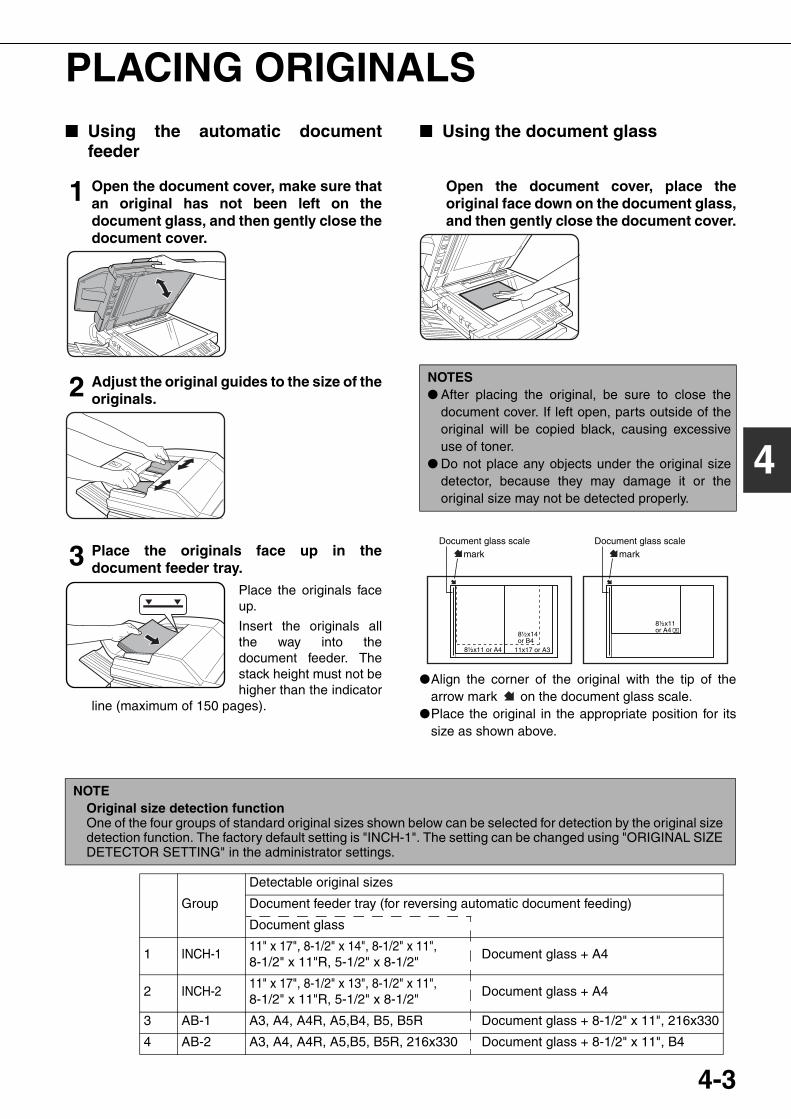
4-3
4
PLACING ORIGINALS■ Using the automatic document
feeder
1 Open the document cover, make sure thatan original has not been left on thedocument glass, and then gently close thedocument cover.
2 Adjust the original guides to the size of theoriginals.
3 Place the originals face up in thedocument feeder tray.
Place the originals faceup.
Insert the originals allthe way into thedocument feeder. Thestack height must not behigher than the indicator
line (maximum of 150 pages).
■ Using the document glass
Open the document cover, place theoriginal face down on the document glass,and then gently close the document cover.
●Align the corner of the original with the tip of thearrow mark on the document glass scale.
●Place the original in the appropriate position for itssize as shown above.
NOTES● After placing the original, be sure to close the
document cover. If left open, parts outside of theoriginal will be copied black, causing excessiveuse of toner.
● Do not place any objects under the original sizedetector, because they may damage it or theoriginal size may not be detected properly.
8½x11 or A4
8½x14or B4
11x17 or A38½x11 or A4
Document glass scalemark
Document glass scalemark
NOTEOriginal size detection functionOne of the four groups of standard original sizes shown below can be selected for detection by the original sizedetection function. The factory default setting is "INCH-1". The setting can be changed using "ORIGINAL SIZEDETECTOR SETTING" in the administrator settings.
Group
Detectable original sizes
Document feeder tray (for reversing automatic document feeding)
Document glass
1 INCH-111" x 17", 8-1/2" x 14", 8-1/2" x 11", 8-1/2" x 11"R, 5-1/2" x 8-1/2"
Document glass + A4
2 INCH-211" x 17", 8-1/2" x 13", 8-1/2" x 11", 8-1/2" x 11"R, 5-1/2" x 8-1/2"
Document glass + A4
3 AB-1 A3, A4, A4R, A5,B4, B5, B5R Document glass + 8-1/2" x 11", 216x330
4 AB-2 A3, A4, A4R, A5,B5, B5R, 216x330 Document glass + 8-1/2" x 11", B4
dragon_04.fm 3 ページ 2006年11月29日 水曜日 午後8時51分
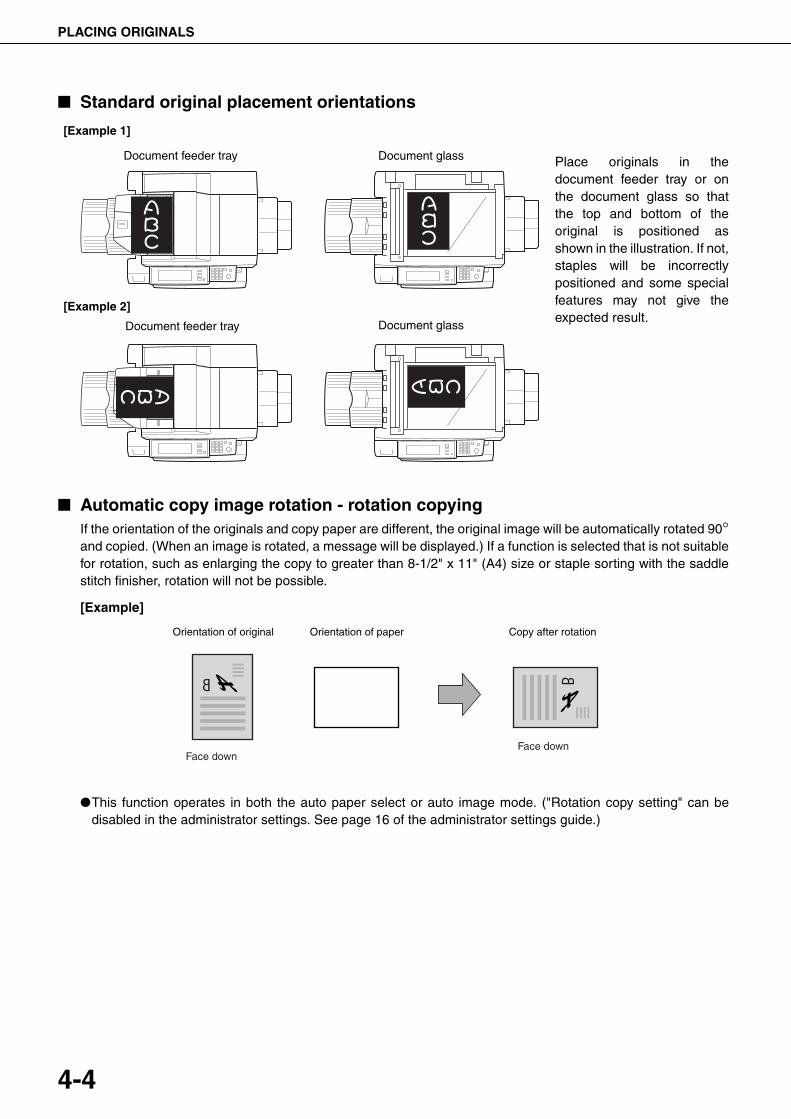
PLACING ORIGINALS
4-4
■ Standard original placement orientations
Place originals in thedocument feeder tray or onthe document glass so thatthe top and bottom of theoriginal is positioned asshown in the illustration. If not,staples will be incorrectlypositioned and some specialfeatures may not give theexpected result.
■ Automatic copy image rotation - rotation copyingIf the orientation of the originals and copy paper are different, the original image will be automatically rotated 90°and copied. (When an image is rotated, a message will be displayed.) If a function is selected that is not suitablefor rotation, such as enlarging the copy to greater than 8-1/2" x 11" (A4) size or staple sorting with the saddlestitch finisher, rotation will not be possible.
[Example]
●This function operates in both the auto paper select or auto image mode. ("Rotation copy setting" can bedisabled in the administrator settings. See page 16 of the administrator settings guide.)
Document feeder tray Document glass
Document feeder tray Document glass
[Example 1]
[Example 2]
Orientation of original Orientation of paper Copy after rotation
Face downFace down
dragon_04.fm 4 ページ 2006年10月19日 木曜日 午後12時58分
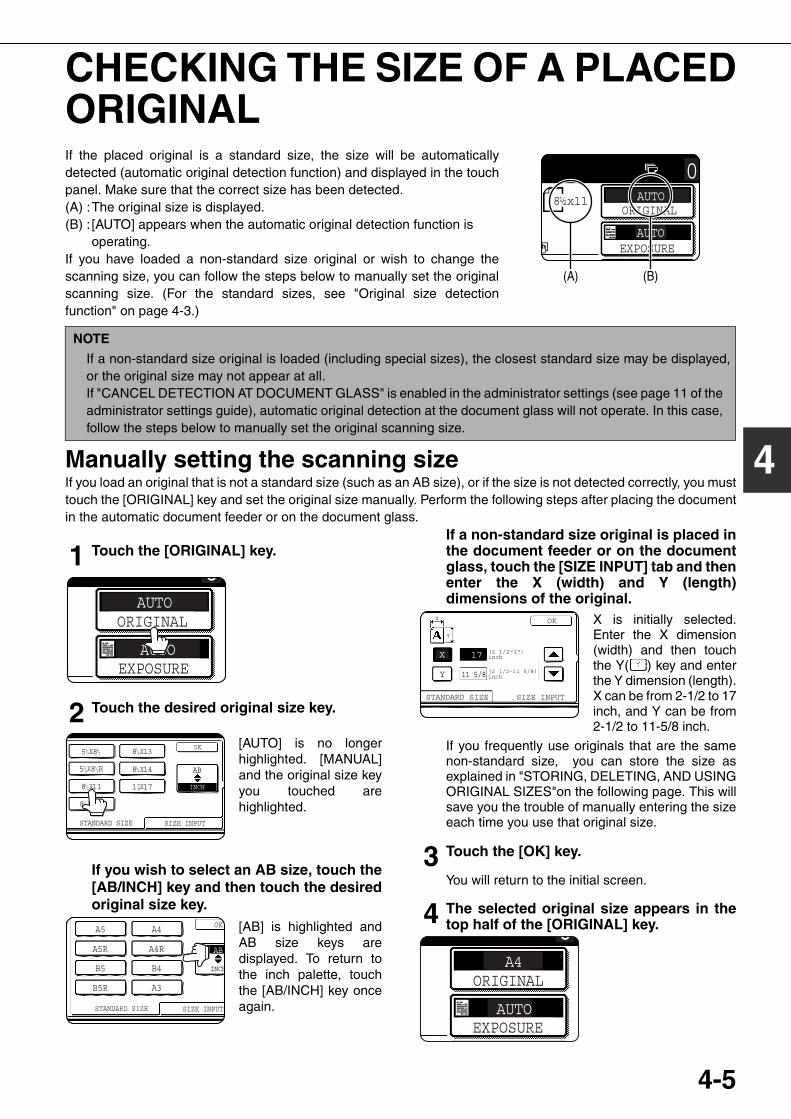
4-5
4
CHECKING THE SIZE OF A PLACEDORIGINALIf the placed original is a standard size, the size will be automaticallydetected (automatic original detection function) and displayed in the touchpanel. Make sure that the correct size has been detected.(A) :The original size is displayed.(B) : [AUTO] appears when the automatic original detection function is
operating.If you have loaded a non-standard size original or wish to change thescanning size, you can follow the steps below to manually set the originalscanning size. (For the standard sizes, see "Original size detectionfunction" on page 4-3.)
Manually setting the scanning sizeIf you load an original that is not a standard size (such as an AB size), or if the size is not detected correctly, you musttouch the [ORIGINAL] key and set the original size manually. Perform the following steps after placing the documentin the automatic document feeder or on the document glass.
1 Touch the [ORIGINAL] key.
2 Touch the desired original size key.
[AUTO] is no longerhighlighted. [MANUAL]and the original size keyyou touched arehighlighted.
If you wish to select an AB size, touch the[AB/INCH] key and then touch the desiredoriginal size key.
[AB] is highlighted andAB size keys aredisplayed. To return tothe inch palette, touchthe [AB/INCH] key onceagain.
If a non-standard size original is placed inthe document feeder or on the documentglass, touch the [SIZE INPUT] tab and thenenter the X (width) and Y (length)dimensions of the original.
X is initially selected.Enter the X dimension(width) and then touchthe Y( ) key and enterthe Y dimension (length).X can be from 2-1/2 to 17inch, and Y can be from2-1/2 to 11-5/8 inch.
If you frequently use originals that are the samenon-standard size, you can store the size asexplained in "STORING, DELETING, AND USINGORIGINAL SIZES"on the following page. This willsave you the trouble of manually entering the sizeeach time you use that original size.
3 Touch the [OK] key.
You will return to the initial screen.
4 The selected original size appears in thetop half of the [ORIGINAL] key.
AUTO
AUTO
ORIGINAL
EXPOSURE
08 x111 / 2
(B)(A)
NOTE
If a non-standard size original is loaded (including special sizes), the closest standard size may be displayed,or the original size may not appear at all.If "CANCEL DETECTION AT DOCUMENT GLASS" is enabled in the administrator settings (see page 11 of theadministrator settings guide), automatic original detection at the document glass will not operate. In this case,follow the steps below to manually set the original scanning size.
AUTO
AUTO
ORIGINAL
EXPOSURE
0
STANDARD SIZE SIZE INPUT
INCH
AB
OK5 X8
5 X8 R
8 X11R
8 X11
8 X13
8 X14
11X17
1 / 21 / 2
1 / 21 / 2
1 / 2
1 / 2
1 / 2
1 / 2
A5
B5
A5R
A4
B4
A3
STANDARD SIZE SIZE INPUT
INCH
AB
OK
A4R
B5R
(2 1/2 11 5/8)inch
(2 1/2 17)inchX
Y
X
Y
STANDARD SIZE SIZE INPUT
17
11 5/8
OK
AUTO
ORIGINAL
EXPOSURE
0 A4
dragonII_copy_sec.book 5 ページ 2006年10月18日 水曜日 午後7時39分
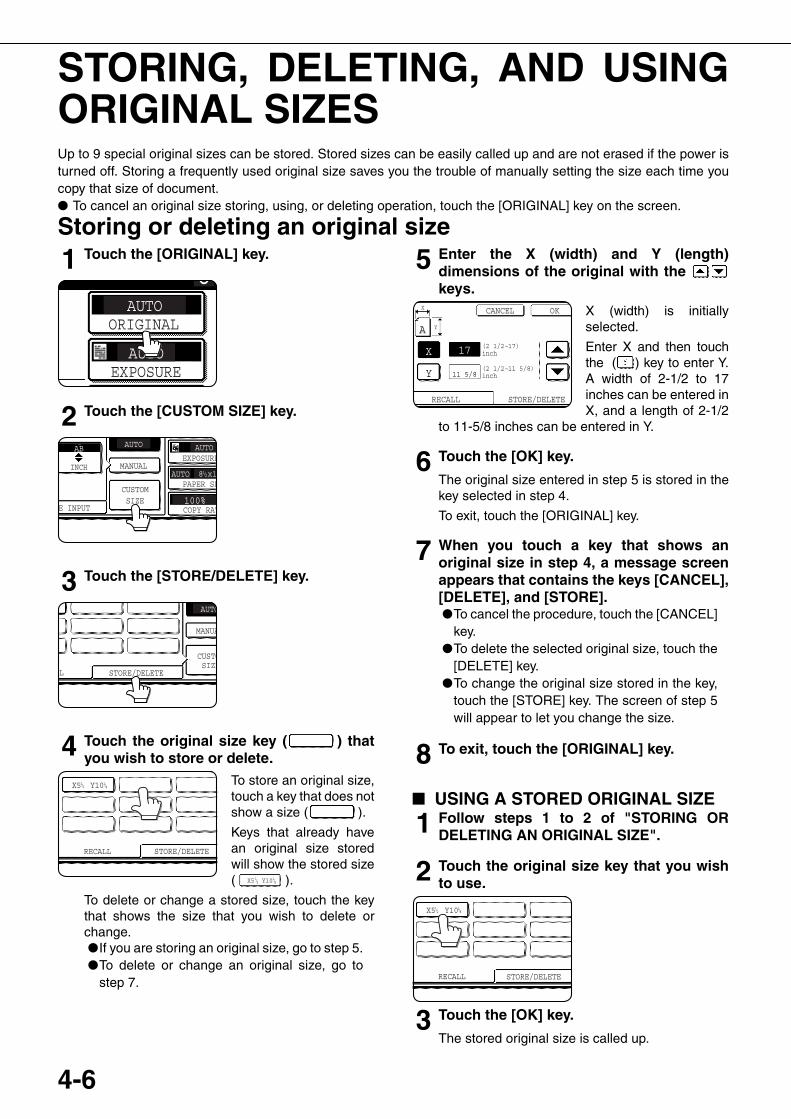
4-6
STORING, DELETING, AND USINGORIGINAL SIZESUp to 9 special original sizes can be stored. Stored sizes can be easily called up and are not erased if the power isturned off. Storing a frequently used original size saves you the trouble of manually setting the size each time youcopy that size of document.● To cancel an original size storing, using, or deleting operation, touch the [ORIGINAL] key on the screen.
Storing or deleting an original size1 Touch the [ORIGINAL] key.
2 Touch the [CUSTOM SIZE] key.
3 Touch the [STORE/DELETE] key.
4 Touch the original size key ( ) thatyou wish to store or delete.
To store an original size,touch a key that does notshow a size ( ).
Keys that already havean original size storedwill show the stored size( ).
To delete or change a stored size, touch the keythat shows the size that you wish to delete orchange.●If you are storing an original size, go to step 5.●To delete or change an original size, go to
step 7.
5 Enter the X (width) and Y (length)dimensions of the original with the keys.
X (width) is initiallyselected.
Enter X and then touchthe ( ) key to enter Y.A width of 2-1/2 to 17inches can be entered inX, and a length of 2-1/2
to 11-5/8 inches can be entered in Y.
6 Touch the [OK] key.
The original size entered in step 5 is stored in thekey selected in step 4.
To exit, touch the [ORIGINAL] key.
7 When you touch a key that shows anoriginal size in step 4, a message screenappears that contains the keys [CANCEL],[DELETE], and [STORE].●To cancel the procedure, touch the [CANCEL]
key.●To delete the selected original size, touch the
[DELETE] key.●To change the original size stored in the key,
touch the [STORE] key. The screen of step 5will appear to let you change the size.
8 To exit, touch the [ORIGINAL] key.
■ USING A STORED ORIGINAL SIZE
1 Follow steps 1 to 2 of "STORING ORDELETING AN ORIGINAL SIZE".
2 Touch the original size key that you wishto use.
3 Touch the [OK] key.
The stored original size is called up.
AUTO
ORIGINAL
EXPOSURE
0AUTO
E INPUT
CUSTOMSIZE
EXPOSURE
PAPER SE
COPY RAT100%
AUTO
AUTOMANUAL
8 x11 / 2
AUTO
INCH
AB
LL STORE/DELETE
CUSTOSIZE
MANUA
AUTO
RECALL STORE/DELETE
X5 Y101 / 21 / 8
X5 Y101 / 21 / 8
CANCEL OK
17
11 5/8
(2 1/2 17)inch
RECALL
Y
X
A
X
Y
STORE/DELETE
(2 1/2 11 5/8)inch
RECALL STORE/DELETE
X5 Y101 / 21 / 8
dragonII_copy_sec.book 6 ページ 2006年10月18日 水曜日 午後7時39分
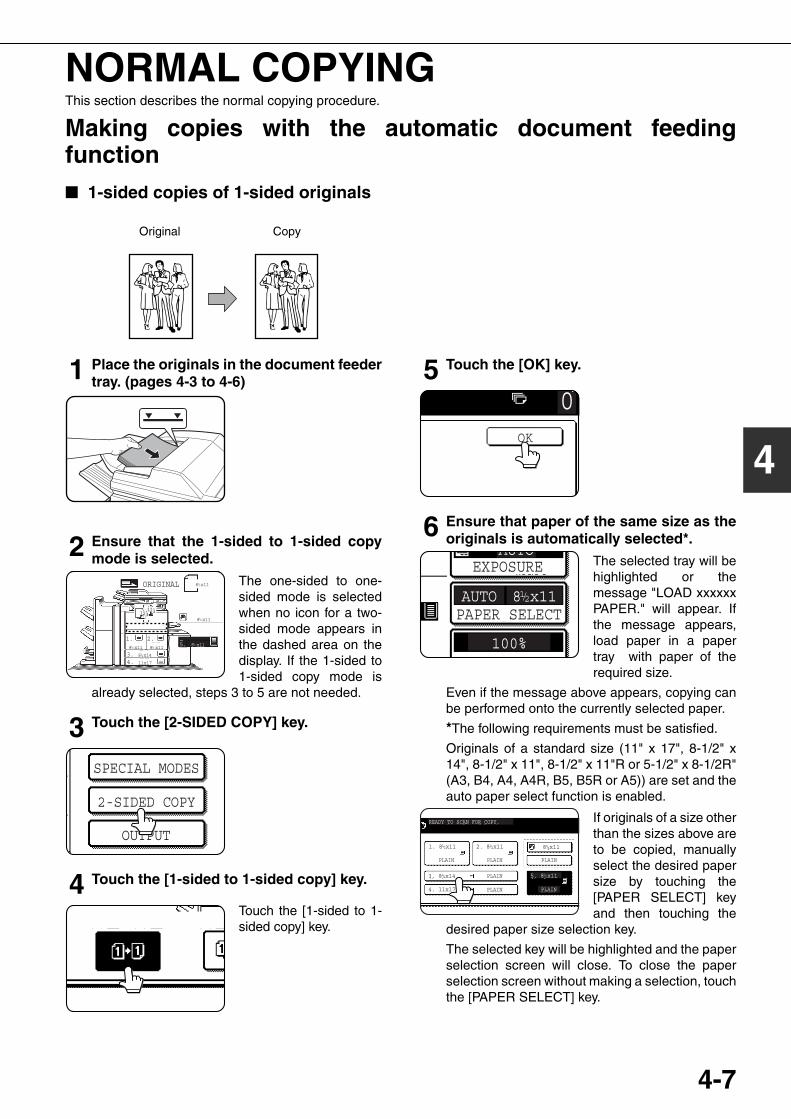
4-7
4
NORMAL COPYINGThis section describes the normal copying procedure.
Making copies with the automatic document feedingfunction■ 1-sided copies of 1-sided originals
1 Place the originals in the document feedertray. (pages 4-3 to 4-6)
2 Ensure that the 1-sided to 1-sided copymode is selected.
The one-sided to one-sided mode is selectedwhen no icon for a two-sided mode appears inthe dashed area on thedisplay. If the 1-sided to1-sided copy mode is
already selected, steps 3 to 5 are not needed.
3 Touch the [2-SIDED COPY] key.
4 Touch the [1-sided to 1-sided copy] key.
Touch the [1-sided to 1-sided copy] key.
5 Touch the [OK] key.
6 Ensure that paper of the same size as theoriginals is automatically selected*.
The selected tray will behighlighted or themessage "LOAD xxxxxxPAPER." will appear. Ifthe message appears,load paper in a papertray with paper of therequired size.
Even if the message above appears, copying canbe performed onto the currently selected paper.
*The following requirements must be satisfied.
Originals of a standard size (11" x 17", 8-1/2" x14", 8-1/2" x 11", 8-1/2" x 11"R or 5-1/2" x 8-1/2R"(A3, B4, A4, A4R, B5, B5R or A5)) are set and theauto paper select function is enabled.
If originals of a size otherthan the sizes above areto be copied, manuallyselect the desired papersize by touching the[PAPER SELECT] keyand then touching the
desired paper size selection key.
The selected key will be highlighted and the paperselection screen will close. To close the paperselection screen without making a selection, touchthe [PAPER SELECT] key.
Original Copy
1.
3.4.
5.8 x11
B48 x14
11x17
8 x11 8 x11
8 x11
2.
ORIGINAL 8 x11
123123
1 / 2
1 / 2
1 / 2
1 / 2
1 / 2
1 / 2
SPECIAL MODES
2-SIDED COPY
OUTPUT
OK
0
AUTO
AUTO
100%
8 x11PAPER SELECT
O
EXPOSURE
1 / 2
PLAIN
READY TO SCAN FOR COPY.
1. 8 x11
PLAIN PLAIN PLAIN
PLAIN PLAIN
3. 8 x14
4. 11x17
2. 8 x11
5. 8 x11
8 x111 / 2 1 / 2 1 / 2
1 / 21 / 2
dragonII_copy_sec.book 7 ページ 2006年10月18日 水曜日 午後7時39分
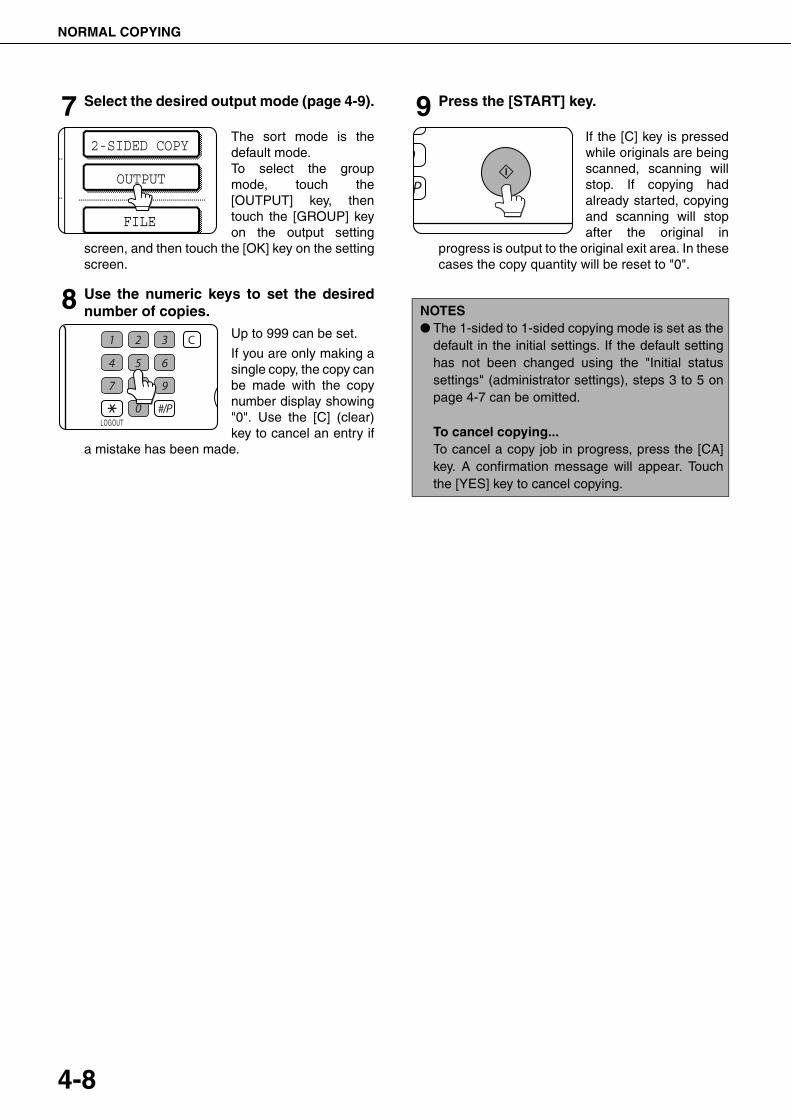
NORMAL COPYING
4-8
7 Select the desired output mode (page 4-9).
The sort mode is thedefault mode.To select the groupmode, touch the[OUTPUT] key, thentouch the [GROUP] keyon the output setting
screen, and then touch the [OK] key on the settingscreen.
8 Use the numeric keys to set the desirednumber of copies.
Up to 999 can be set.
If you are only making asingle copy, the copy canbe made with the copynumber display showing"0". Use the [C] (clear)key to cancel an entry if
a mistake has been made.
9 Press the [START] key.
If the [C] key is pressedwhile originals are beingscanned, scanning willstop. If copying hadalready started, copyingand scanning will stopafter the original in
progress is output to the original exit area. In thesecases the copy quantity will be reset to "0".
2-SIDED COPY
OUTPUT
FILE
LOGOUT
NOTES● The 1-sided to 1-sided copying mode is set as the
default in the initial settings. If the default settinghas not been changed using the "Initial statussettings" (administrator settings), steps 3 to 5 onpage 4-7 can be omitted.
To cancel copying...To cancel a copy job in progress, press the [CA]key. A confirmation message will appear. Touchthe [YES] key to cancel copying.
dragonII_copy_sec.book 8 ページ 2006年10月18日 水曜日 午後7時39分
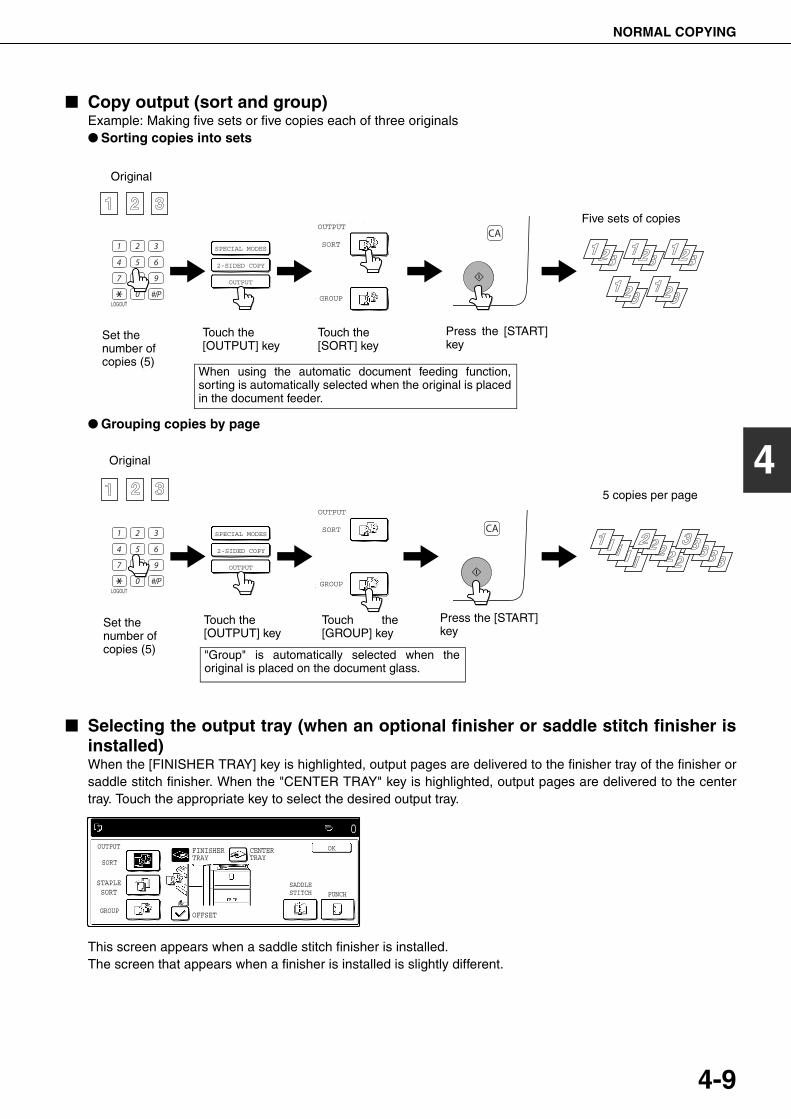
NORMAL COPYING
4-9
4
■ Copy output (sort and group)Example: Making five sets or five copies each of three originals● Sorting copies into sets
● Grouping copies by page
■ Selecting the output tray (when an optional finisher or saddle stitch finisher isinstalled)When the [FINISHER TRAY] key is highlighted, output pages are delivered to the finisher tray of the finisher orsaddle stitch finisher. When the "CENTER TRAY" key is highlighted, output pages are delivered to the centertray. Touch the appropriate key to select the desired output tray.
This screen appears when a saddle stitch finisher is installed.The screen that appears when a finisher is installed is slightly different.
SPECIAL MODES
2-SIDED COPY
OUTPUT
LOGOUT
OUTPUT
SORT
GROUP
Original
Press the [START]key
Set the number of copies (5)
Touch the [OUTPUT] key
Touch the [SORT] key
Five sets of copies
When using the automatic document feeding function,sorting is automatically selected when the original is placedin the document feeder.
LOGOUT
SPECIAL MODES
2-SIDED COPY
OUTPUT
OUTPUT
SORT
GROUP
Press the [START]key
Set the number of copies (5)
Touch the [OUTPUT] key
Touch the[GROUP] key
"Group" is automatically selected when theoriginal is placed on the document glass.
5 copies per page
Original
OUTPUT
SORT
GROUP
STAPLESORT
0OK
PUNCHSADDLESTITCH
FINISHERTRAY
CENTERTRAY
OFFSET
dragonII_copy_sec.book 9 ページ 2006年10月18日 水曜日 午後7時39分
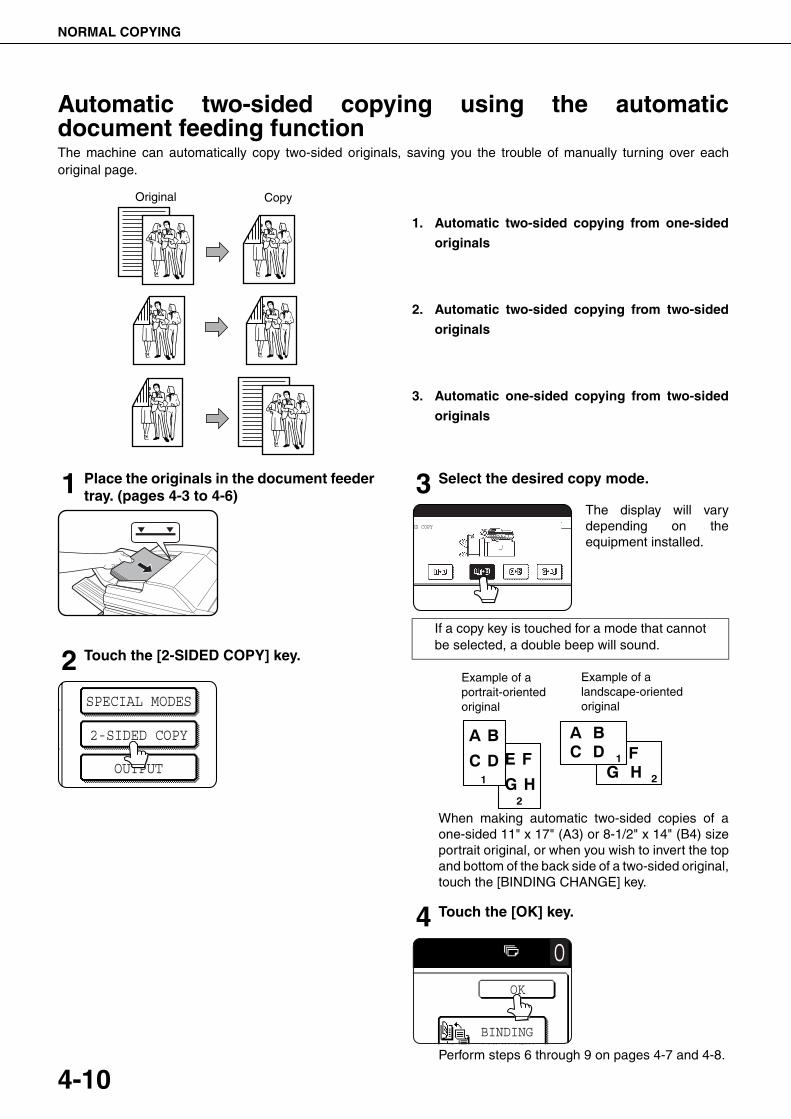
NORMAL COPYING
4-10
Automatic two-sided copying using the automaticdocument feeding functionThe machine can automatically copy two-sided originals, saving you the trouble of manually turning over eachoriginal page.
1. Automatic two-sided copying from one-sided
originals
2. Automatic two-sided copying from two-sided
originals
3. Automatic one-sided copying from two-sided
originals
1 Place the originals in the document feedertray. (pages 4-3 to 4-6)
2 Touch the [2-SIDED COPY] key.
3 Select the desired copy mode.
The display will varydepending on theequipment installed.
When making automatic two-sided copies of aone-sided 11" x 17" (A3) or 8-1/2" x 14" (B4) sizeportrait original, or when you wish to invert the topand bottom of the back side of a two-sided original,touch the [BINDING CHANGE] key.
4 Touch the [OK] key.
Perform steps 6 through 9 on pages 4-7 and 4-8.
Original Copy
SPECIAL MODES
2-SIDED COPY
OUTPUT
If a copy key is touched for a mode that cannotbe selected, a double beep will sound.
ED COPY
Example of a portrait-oriented original
Example of a landscape-oriented original
OK
0
BINDING
dragon_04.fm 10 ページ 2006年11月29日 水曜日 午後8時52分
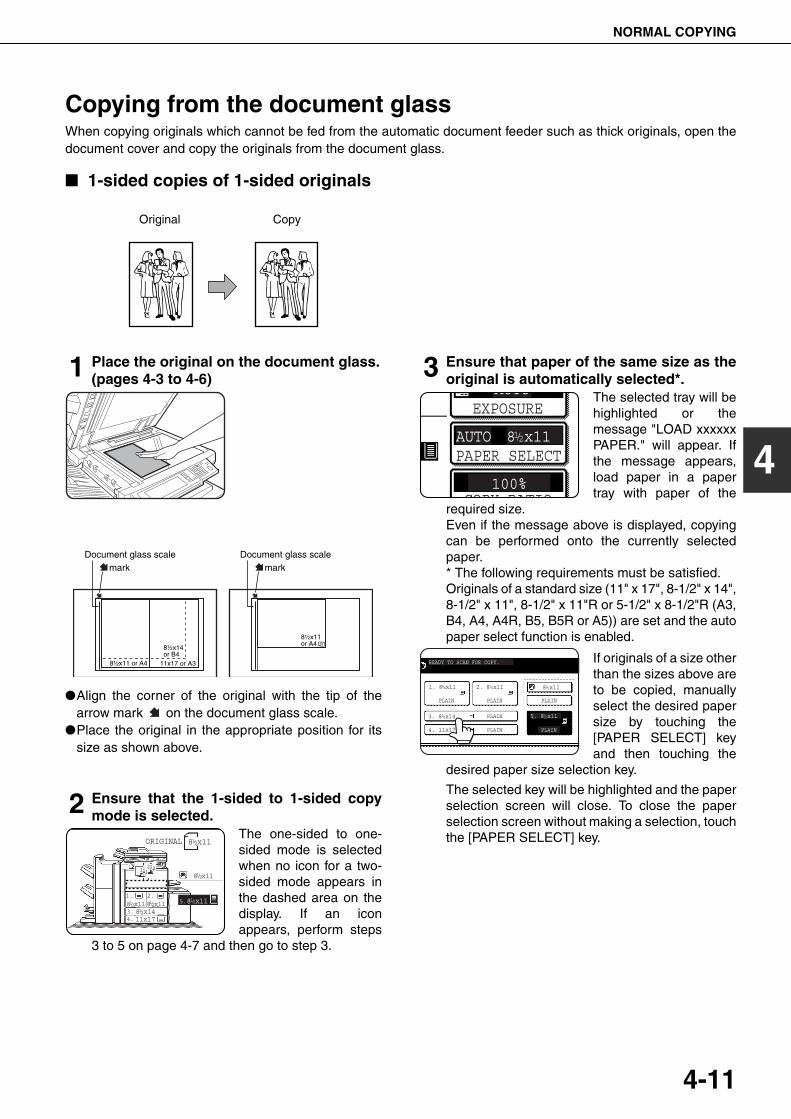
NORMAL COPYING
4-11
4
Copying from the document glassWhen copying originals which cannot be fed from the automatic document feeder such as thick originals, open thedocument cover and copy the originals from the document glass.
■ 1-sided copies of 1-sided originals
1 Place the original on the document glass.(pages 4-3 to 4-6)
●Align the corner of the original with the tip of thearrow mark on the document glass scale.
●Place the original in the appropriate position for itssize as shown above.
2 Ensure that the 1-sided to 1-sided copymode is selected.
The one-sided to one-sided mode is selectedwhen no icon for a two-sided mode appears inthe dashed area on thedisplay. If an iconappears, perform steps
3 to 5 on page 4-7 and then go to step 3.
3 Ensure that paper of the same size as theoriginal is automatically selected*.
The selected tray will behighlighted or themessage "LOAD xxxxxxPAPER." will appear. Ifthe message appears,load paper in a papertray with paper of the
required size. Even if the message above is displayed, copyingcan be performed onto the currently selectedpaper.* The following requirements must be satisfied.Originals of a standard size (11" x 17", 8-1/2" x 14",8-1/2" x 11", 8-1/2" x 11"R or 5-1/2" x 8-1/2"R (A3,B4, A4, A4R, B5, B5R or A5)) are set and the autopaper select function is enabled.
If originals of a size otherthan the sizes above areto be copied, manuallyselect the desired papersize by touching the[PAPER SELECT] keyand then touching the
desired paper size selection key.
The selected key will be highlighted and the paperselection screen will close. To close the paperselection screen without making a selection, touchthe [PAPER SELECT] key.
Original Copy
8½x11 or A4
8½x14or B4
11x17 or A38½x11 or A4
Document glass scalemark
Document glass scalemark
1.
3.4.
5.8 x11B48 x14
11x17
8 x11 8 x11
8 x11
2.
ORIGINAL 8 x11
111222
1 / 2
1 / 2 1 / 21 / 2
1 / 2
1 / 2
AUTO
AUTO
100%
8 x11PAPER SELECT
COPY RATIO
EXPOSURE
1 / 2
PLAIN
READY TO SCAN FOR COPY.
1. 8 x11
PLAIN PLAIN PLAIN
PLAIN PLAIN
3. 8 x14
4. 11x17
2. 8 x11
5. 8 x11
8 x111 / 2 1 / 2 1 / 2
1 / 21 / 2
dragonII_copy_sec.book 11 ページ 2006年10月18日 水曜日 午後7時39分
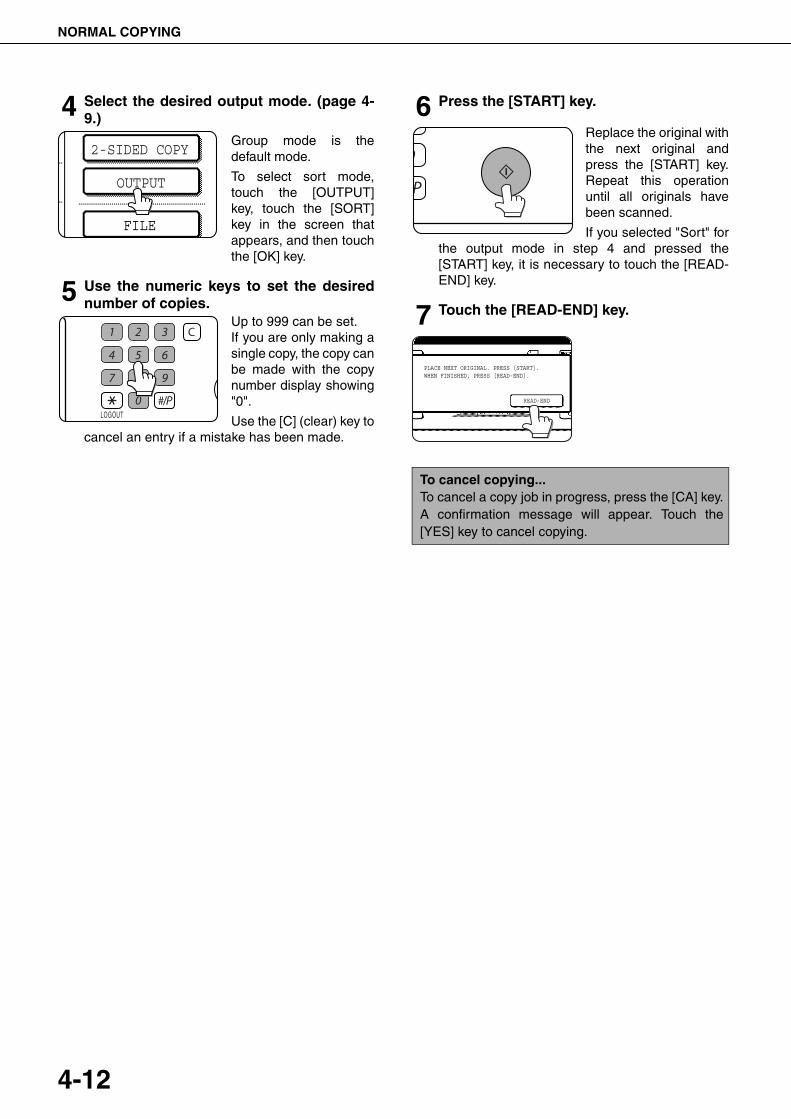
NORMAL COPYING
4-12
4 Select the desired output mode. (page 4-9.)
Group mode is thedefault mode.
To select sort mode,touch the [OUTPUT]key, touch the [SORT]key in the screen thatappears, and then touchthe [OK] key.
5 Use the numeric keys to set the desirednumber of copies.
Up to 999 can be set.If you are only making asingle copy, the copy canbe made with the copynumber display showing"0".
Use the [C] (clear) key tocancel an entry if a mistake has been made.
6 Press the [START] key.
Replace the original withthe next original andpress the [START] key.Repeat this operationuntil all originals havebeen scanned.
If you selected "Sort" forthe output mode in step 4 and pressed the[START] key, it is necessary to touch the [READ-END] key.
7 Touch the [READ-END] key.
2-SIDED COPY
OUTPUT
FILE
LOGOUT
To cancel copying...To cancel a copy job in progress, press the [CA] key.A confirmation message will appear. Touch the[YES] key to cancel copying.
READ-END
PLACE NEXT ORIGINAL. PRESS [START].WHEN FINISHED, PRESS [READ-END].
dragonII_copy_sec.book 12 ページ 2006年10月18日 水曜日 午後7時39分
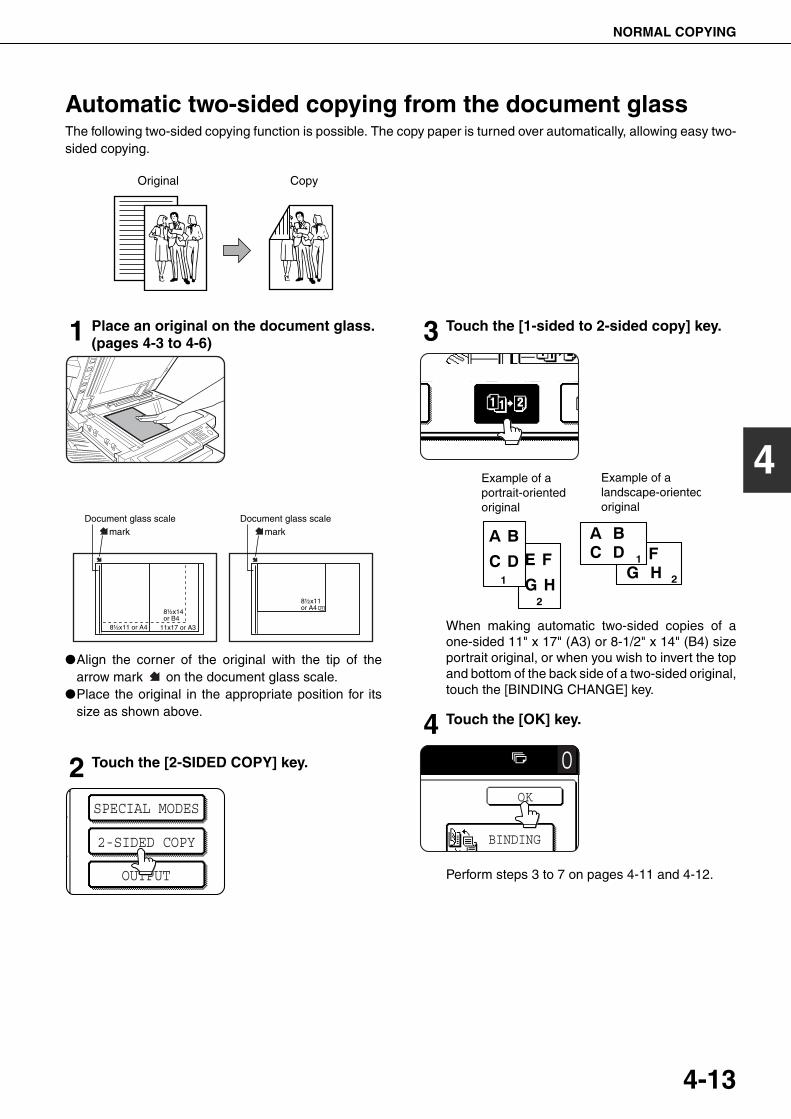
NORMAL COPYING
4-13
4
Automatic two-sided copying from the document glassThe following two-sided copying function is possible. The copy paper is turned over automatically, allowing easy two-sided copying.
1 Place an original on the document glass.(pages 4-3 to 4-6)
●Align the corner of the original with the tip of thearrow mark on the document glass scale.
●Place the original in the appropriate position for itssize as shown above.
2 Touch the [2-SIDED COPY] key.
3 Touch the [1-sided to 2-sided copy] key.
When making automatic two-sided copies of aone-sided 11" x 17" (A3) or 8-1/2" x 14" (B4) sizeportrait original, or when you wish to invert the topand bottom of the back side of a two-sided original,touch the [BINDING CHANGE] key.
4 Touch the [OK] key.
Perform steps 3 to 7 on pages 4-11 and 4-12.
Original Copy
8½x11 or A4
8½x14or B4
11x17 or A38½x11 or A4
Document glass scalemark
Document glass scalemark
SPECIAL MODES
2-SIDED COPY
OUTPUT
Example of a portrait-oriented original
Example of a landscape-orientedoriginal
OK
0
BINDING
dragon_04.fm 13 ページ 2006年11月30日 木曜日 午後4時19分
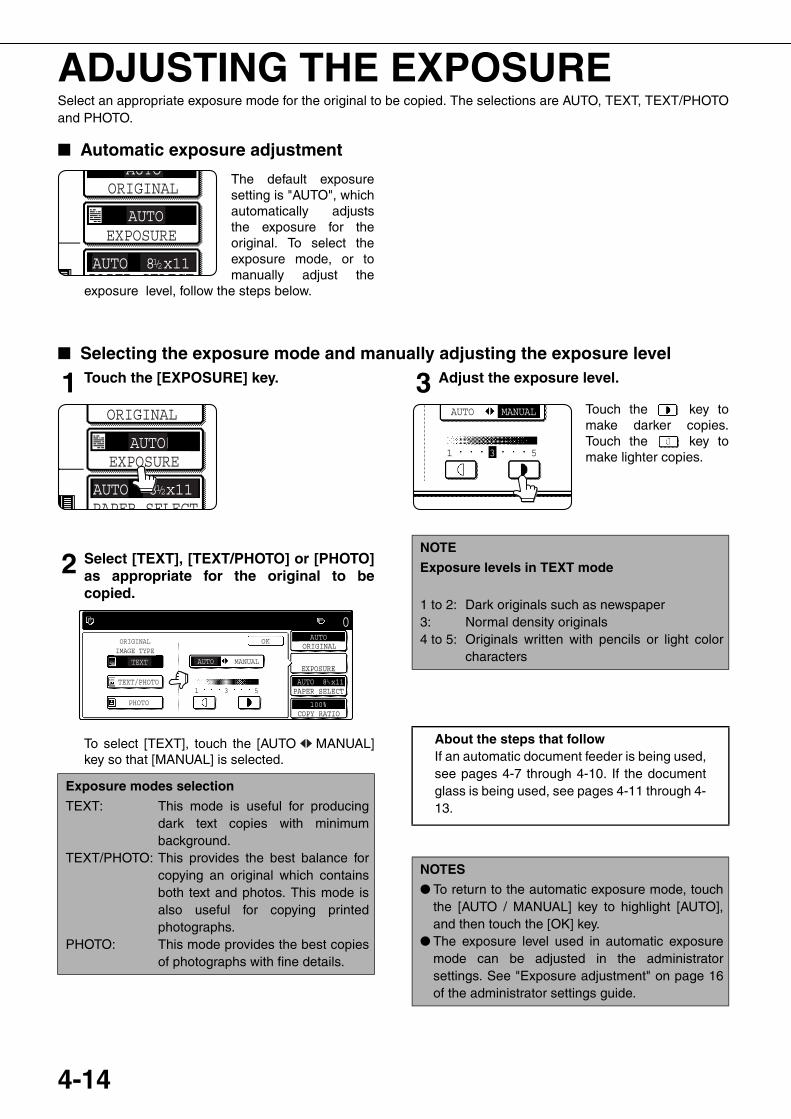
4-14
ADJUSTING THE EXPOSURESelect an appropriate exposure mode for the original to be copied. The selections are AUTO, TEXT, TEXT/PHOTOand PHOTO.
■ Automatic exposure adjustment
The default exposuresetting is "AUTO", whichautomatically adjuststhe exposure for theoriginal. To select theexposure mode, or tomanually adjust the
exposure level, follow the steps below.
■ Selecting the exposure mode and manually adjusting the exposure level
1 Touch the [EXPOSURE] key.
2 Select [TEXT], [TEXT/PHOTO] or [PHOTO]as appropriate for the original to becopied.
To select [TEXT], touch the [AUTO MANUAL]key so that [MANUAL] is selected.
3 Adjust the exposure level.
Touch the key tomake darker copies.Touch the key tomake lighter copies.
AUTO
AUTO
AUTO 8 x11
ORIGINAL
PAPER SELECT
EXPOSURE
1 / 2
Exposure modes selection
TEXT: This mode is useful for producingdark text copies with minimumbackground.
TEXT/PHOTO: This provides the best balance forcopying an original which containsboth text and photos. This mode isalso useful for copying printedphotographs.
PHOTO: This mode provides the best copiesof photographs with fine details.
AUTO
AUTO 8 x11
ORIGINAL
PAPER SELECT
EXPOSURE
1 / 2
ORIGINALIMAGE TYPE
TEXT AUTO MANUAL
531
OK
TEXT/PHOTO
PHOTO
AUTO
AUTO 8 x11
100%
ORIGINAL
PAPER SELECT
COPY RATIO
EXPOSURE
0
1 / 2
NOTE
Exposure levels in TEXT mode
1 to 2: Dark originals such as newspaper3: Normal density originals4 to 5: Originals written with pencils or light color
characters
About the steps that followIf an automatic document feeder is being used,see pages 4-7 through 4-10. If the documentglass is being used, see pages 4-11 through 4-13.
NOTES
● To return to the automatic exposure mode, touchthe [AUTO / MANUAL] key to highlight [AUTO],and then touch the [OK] key.
● The exposure level used in automatic exposuremode can be adjusted in the administratorsettings. See "Exposure adjustment" on page 16of the administrator settings guide.
AUTO MANUAL
1 3 5
dragon_04.fm 14 ページ 2006年10月19日 木曜日 午後12時58分
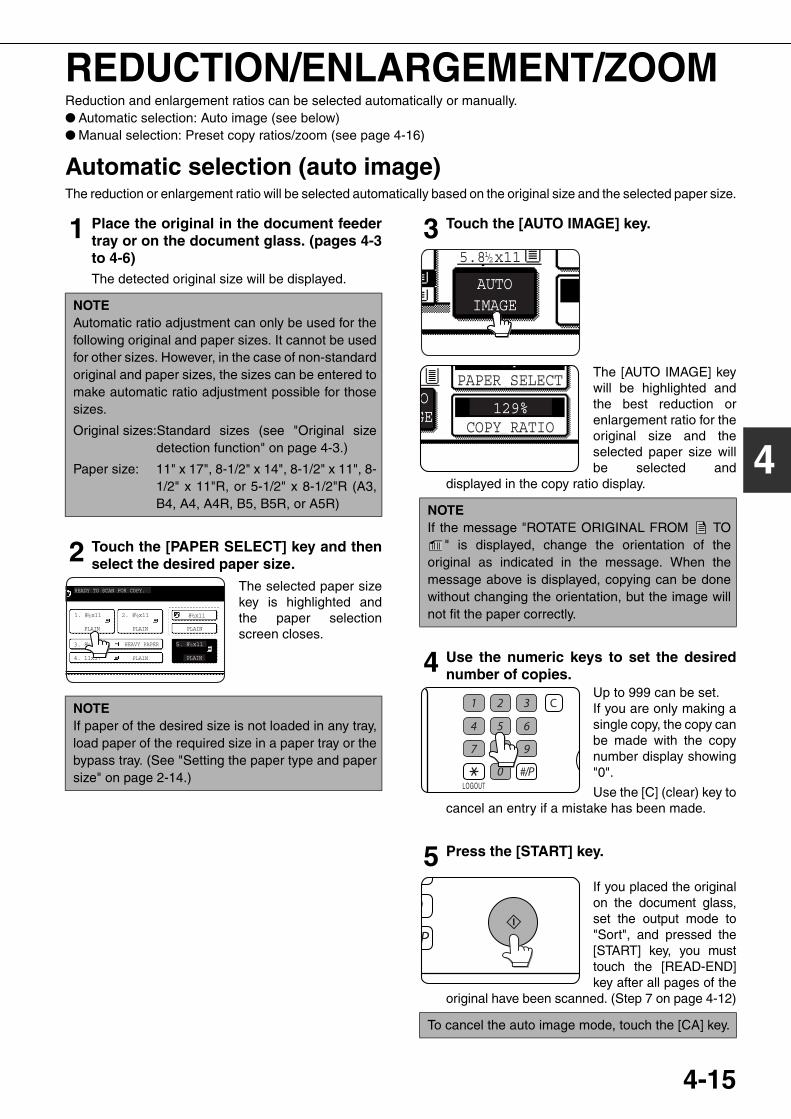
4-15
4
REDUCTION/ENLARGEMENT/ZOOMReduction and enlargement ratios can be selected automatically or manually.● Automatic selection: Auto image (see below)● Manual selection: Preset copy ratios/zoom (see page 4-16)
Automatic selection (auto image)The reduction or enlargement ratio will be selected automatically based on the original size and the selected paper size.
1 Place the original in the document feedertray or on the document glass. (pages 4-3to 4-6)The detected original size will be displayed.
2 Touch the [PAPER SELECT] key and thenselect the desired paper size.
The selected paper sizekey is highlighted andthe paper selectionscreen closes.
3 Touch the [AUTO IMAGE] key.
The [AUTO IMAGE] keywill be highlighted andthe best reduction orenlargement ratio for theoriginal size and theselected paper size willbe selected and
displayed in the copy ratio display.
4 Use the numeric keys to set the desirednumber of copies.
Up to 999 can be set.If you are only making asingle copy, the copy canbe made with the copynumber display showing"0".
Use the [C] (clear) key tocancel an entry if a mistake has been made.
5 Press the [START] key.
If you placed the originalon the document glass,set the output mode to"Sort", and pressed the[START] key, you musttouch the [READ-END]key after all pages of the
original have been scanned. (Step 7 on page 4-12)
NOTEAutomatic ratio adjustment can only be used for thefollowing original and paper sizes. It cannot be usedfor other sizes. However, in the case of non-standardoriginal and paper sizes, the sizes can be entered tomake automatic ratio adjustment possible for thosesizes.
Original sizes:Standard sizes (see "Original sizedetection function" on page 4-3.)
Paper size: 11" x 17", 8-1/2" x 14", 8-1/2" x 11", 8-1/2" x 11"R, or 5-1/2" x 8-1/2"R (A3,B4, A4, A4R, B5, B5R, or A5R)
NOTEIf paper of the desired size is not loaded in any tray,load paper of the required size in a paper tray or thebypass tray. (See "Setting the paper type and papersize" on page 2-14.)
READY TO SCAN FOR COPY.
1. 8 x11
PLAIN PLAIN PLAIN
HEAVY PAPER
PLAIN PLAIN
3. 8 x11
4. 11x17
2. 8 x11
5. 8 x11
8 x111 / 21 / 2
1 / 2
1 / 2
1 / 2
NOTEIf the message "ROTATE ORIGINAL FROM TO
" is displayed, change the orientation of theoriginal as indicated in the message. When themessage above is displayed, copying can be donewithout changing the orientation, but the image willnot fit the paper correctly.
To cancel the auto image mode, touch the [CA] key.
5.8 x11
AUTOIMAGE
1 / 2
OGE 129%
PAPER SELECT
COPY RATIO
LOGOUT
dragonII_copy_sec.book 15 ページ 2006年10月18日 水曜日 午後7時39分
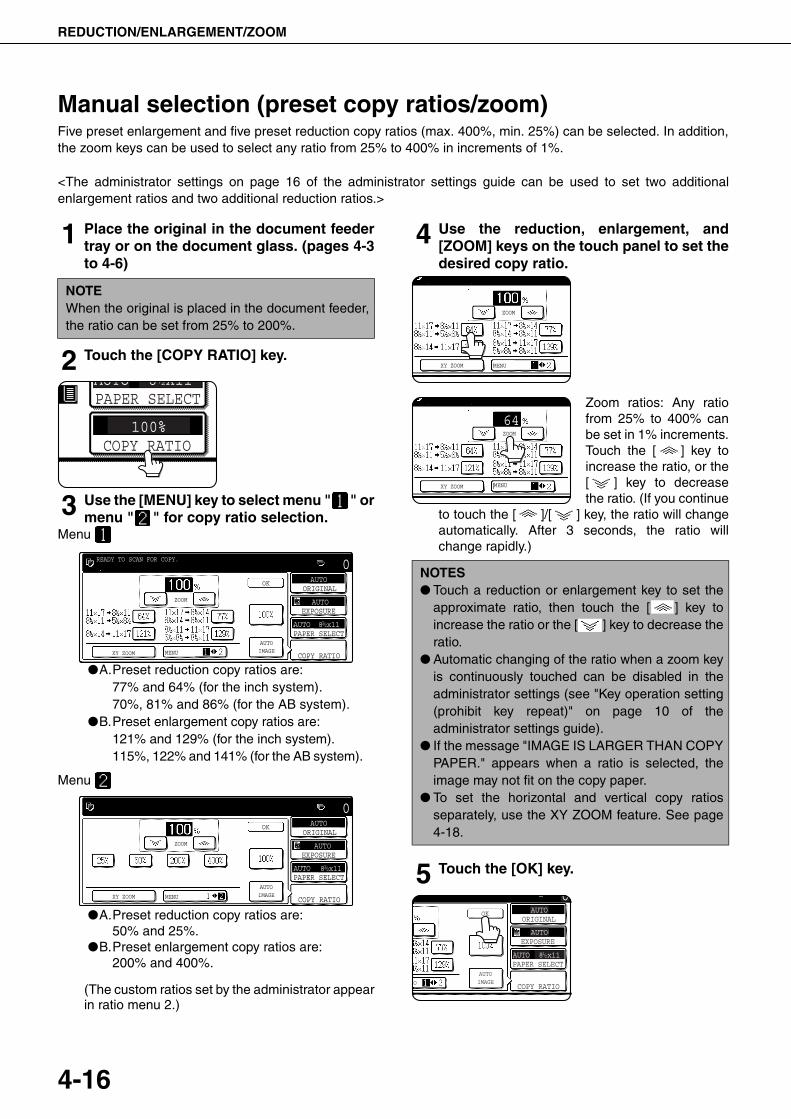
REDUCTION/ENLARGEMENT/ZOOM
4-16
Manual selection (preset copy ratios/zoom)Five preset enlargement and five preset reduction copy ratios (max. 400%, min. 25%) can be selected. In addition,the zoom keys can be used to select any ratio from 25% to 400% in increments of 1%.
<The administrator settings on page 16 of the administrator settings guide can be used to set two additionalenlargement ratios and two additional reduction ratios.>
1 Place the original in the document feedertray or on the document glass. (pages 4-3to 4-6)
2 Touch the [COPY RATIO] key.
3 Use the [MENU] key to select menu " " ormenu " " for copy ratio selection.
Menu
●A.Preset reduction copy ratios are:77% and 64% (for the inch system).70%, 81% and 86% (for the AB system).
●B.Preset enlargement copy ratios are:121% and 129% (for the inch system).115%, 122% and 141% (for the AB system).
Menu
●A.Preset reduction copy ratios are: 50% and 25%.
●B.Preset enlargement copy ratios are: 200% and 400%.
(The custom ratios set by the administrator appearin ratio menu 2.)
4 Use the reduction, enlargement, and[ZOOM] keys on the touch panel to set thedesired copy ratio.
Zoom ratios: Any ratiofrom 25% to 400% canbe set in 1% increments.Touch the [ ] key toincrease the ratio, or the[ ] key to decreasethe ratio. (If you continue
to touch the [ ]/[ ] key, the ratio will changeautomatically. After 3 seconds, the ratio willchange rapidly.)
5 Touch the [OK] key.
NOTEWhen the original is placed in the document feeder,the ratio can be set from 25% to 200%.
AUTO
100%
8 X11/ 2
PAPER SELECT
COPY RATIO
AUTO
AUTO
AUTO 8 x11
ORIGINAL
PAPER SELECT
COPY RATIO
AUTOIMAGE
EXPOSURE
0
XY ZOOM MENU
ZOOM
READY TO SCAN FOR COPY.
OK
1 / 2
AUTO
AUTO
AUTO 8 x11
ORIGINAL
PAPER SELECT
COPY RATIO
AUTOIMAGE
EXPOSURE
0
XY ZOOM
OK
MENU
ZOOM
1 / 2
NOTES● Touch a reduction or enlargement key to set the
approximate ratio, then touch the [ ] key toincrease the ratio or the [ ] key to decrease theratio.
● Automatic changing of the ratio when a zoom keyis continuously touched can be disabled in theadministrator settings (see "Key operation setting(prohibit key repeat)" on page 10 of theadministrator settings guide).
● If the message "IMAGE IS LARGER THAN COPYPAPER." appears when a ratio is selected, theimage may not fit on the copy paper.
● To set the horizontal and vertical copy ratiosseparately, use the XY ZOOM feature. See page4-18.
XY ZOOM MENU
ZOOM
XY ZOOM MENU
ZOOM
64
AUTO
AUTO
AUTO 8 x11
ORIGINAL
PAPER SELECT
COPY RATIO
AUTOIMAGE
EXPOSURE
0
IO
OK
1 / 2
dragon_04.fm 16 ページ 2006年10月19日 木曜日 午後12時59分
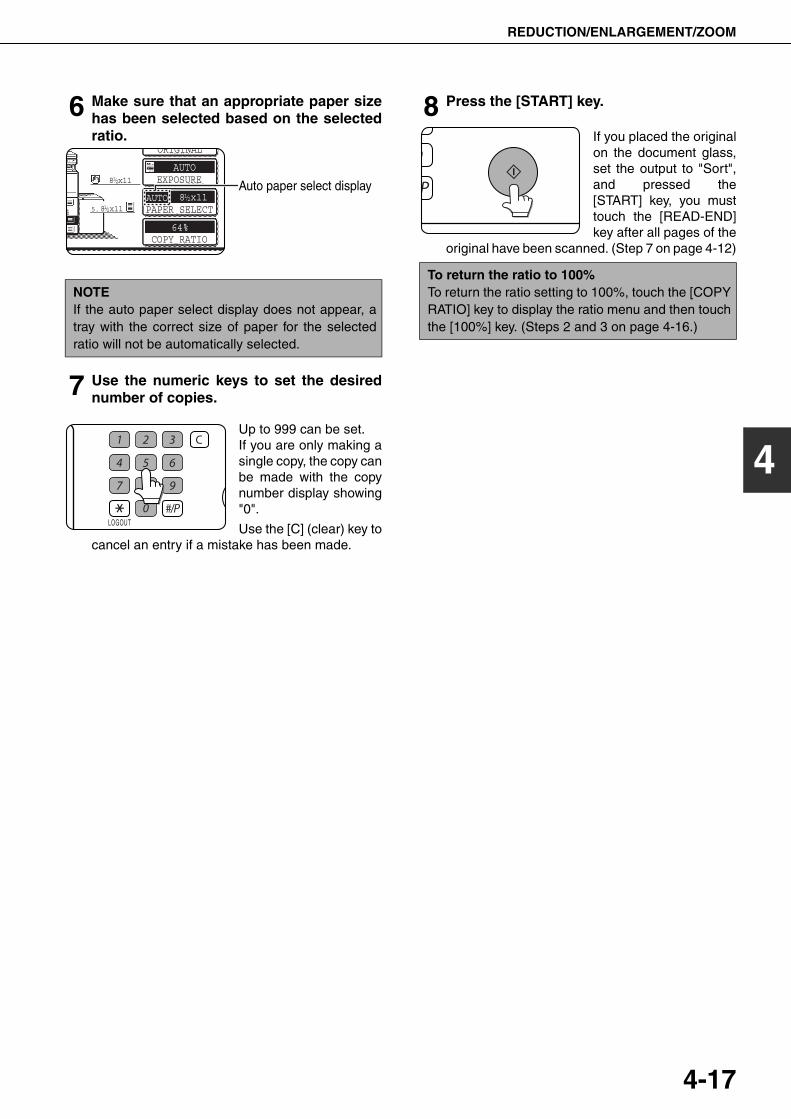
REDUCTION/ENLARGEMENT/ZOOM
4-17
4
6 Make sure that an appropriate paper sizehas been selected based on the selectedratio.
Auto paper select display
7 Use the numeric keys to set the desirednumber of copies.
Up to 999 can be set.If you are only making asingle copy, the copy canbe made with the copynumber display showing"0".
Use the [C] (clear) key tocancel an entry if a mistake has been made.
8 Press the [START] key.
If you placed the originalon the document glass,set the output to "Sort",and pressed the[START] key, you musttouch the [READ-END]key after all pages of the
original have been scanned. (Step 7 on page 4-12)
NOTEIf the auto paper select display does not appear, atray with the correct size of paper for the selectedratio will not be automatically selected.
5.4
AUTO
AUTO
64%
8 x11
ORIGINAL
PAPER SELECT
COPY RATIO
EXPOSURE8 x111 / 2
8 x111 / 2
1 / 2
LOGOUT
To return the ratio to 100%To return the ratio setting to 100%, touch the [COPYRATIO] key to display the ratio menu and then touchthe [100%] key. (Steps 2 and 3 on page 4-16.)
dragonII_copy_sec.book 17 ページ 2006年10月18日 水曜日 午後7時39分
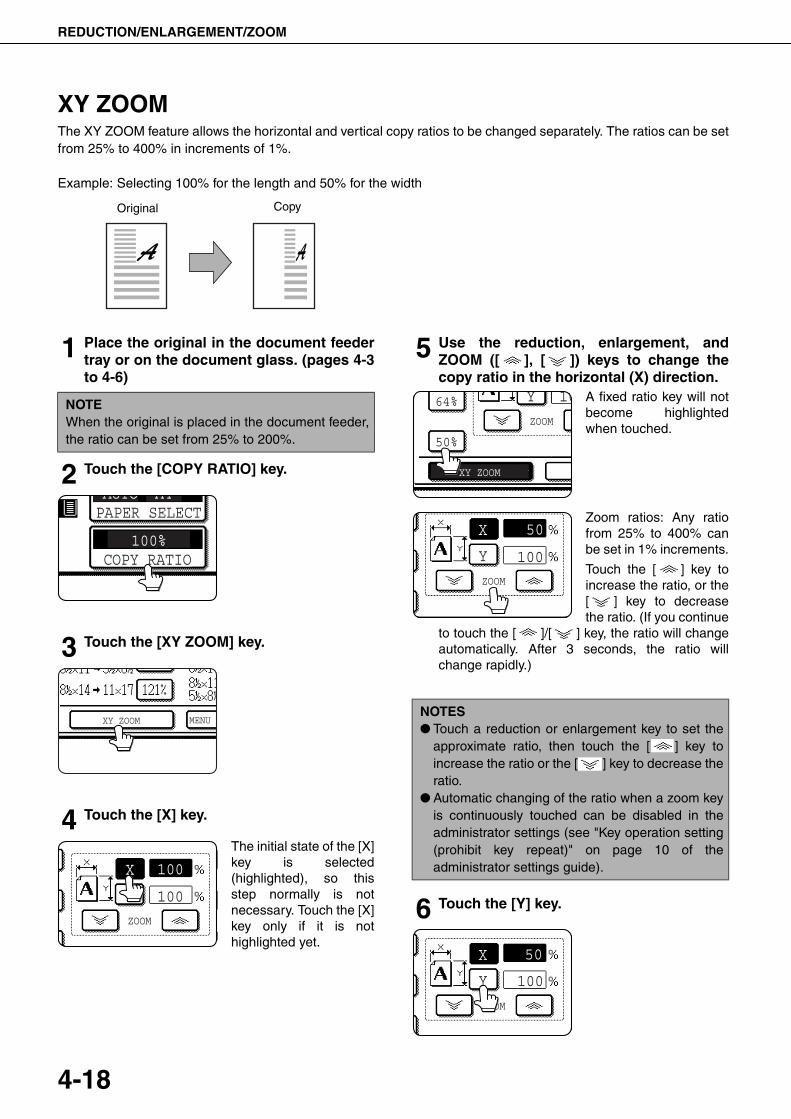
REDUCTION/ENLARGEMENT/ZOOM
4-18
XY ZOOMThe XY ZOOM feature allows the horizontal and vertical copy ratios to be changed separately. The ratios can be setfrom 25% to 400% in increments of 1%.
Example: Selecting 100% for the length and 50% for the width
1 Place the original in the document feedertray or on the document glass. (pages 4-3to 4-6)
2 Touch the [COPY RATIO] key.
3 Touch the [XY ZOOM] key.
4 Touch the [X] key.
The initial state of the [X]key is selected(highlighted), so thisstep normally is notnecessary. Touch the [X]key only if it is nothighlighted yet.
5 Use the reduction, enlargement, andZOOM ([ ], [ ]) keys to change thecopy ratio in the horizontal (X) direction.
A fixed ratio key will notbecome highlightedwhen touched.
Zoom ratios: Any ratiofrom 25% to 400% canbe set in 1% increments.
Touch the [ ] key toincrease the ratio, or the[ ] key to decreasethe ratio. (If you continue
to touch the [ ]/[ ] key, the ratio will changeautomatically. After 3 seconds, the ratio willchange rapidly.)
6 Touch the [Y] key.
Original Copy
NOTEWhen the original is placed in the document feeder,the ratio can be set from 25% to 200%.
AUTO
100%
A4PAPER SELECT
COPY RATIO
XY ZOOM MENU
ZOOM
100
100Y
X
NOTES● Touch a reduction or enlargement key to set the
approximate ratio, then touch the [ ] key toincrease the ratio or the [ ] key to decrease theratio.
● Automatic changing of the ratio when a zoom keyis continuously touched can be disabled in theadministrator settings (see "Key operation setting(prohibit key repeat)" on page 10 of theadministrator settings guide).
XY ZOOM
ZOOM
50%
10Y64%
ZOOM
50
100Y
X
ZOOM
50
100Y
X
dragon_04.fm 18 ページ 2006年10月18日 水曜日 午後8時55分
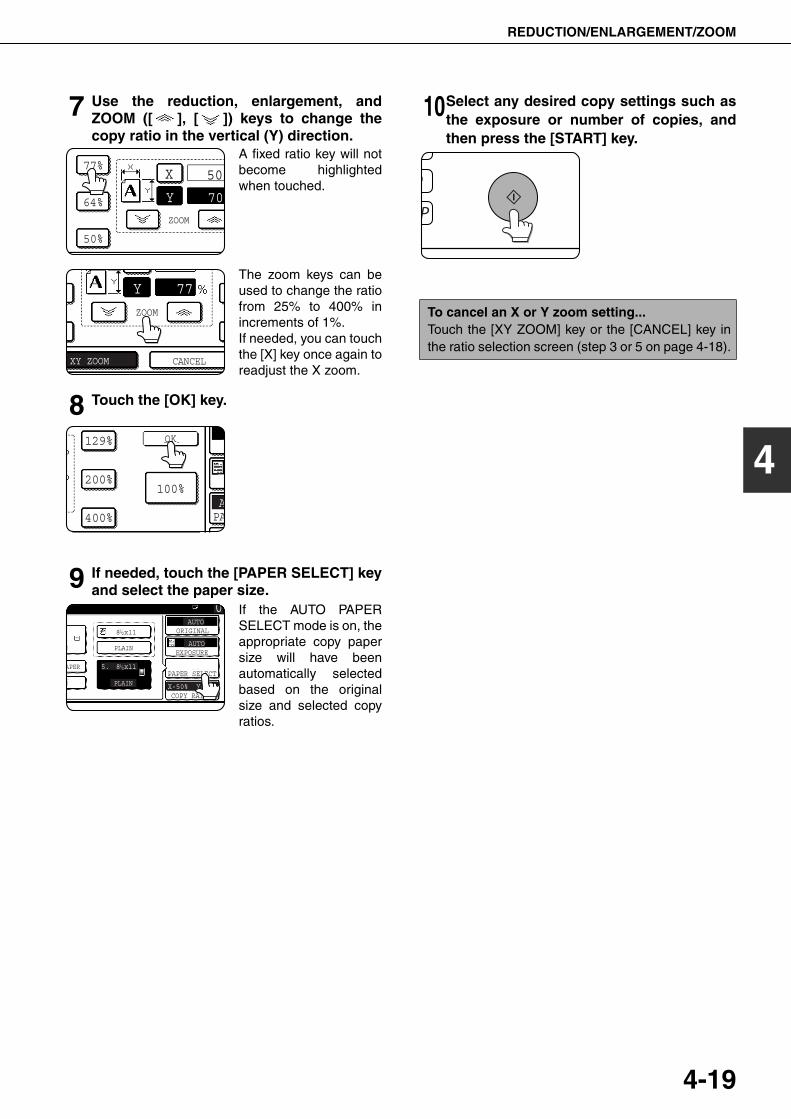
REDUCTION/ENLARGEMENT/ZOOM
4-19
4
7 Use the reduction, enlargement, andZOOM ([ ], [ ]) keys to change thecopy ratio in the vertical (Y) direction.
A fixed ratio key will notbecome highlightedwhen touched.
The zoom keys can beused to change the ratiofrom 25% to 400% inincrements of 1%.If needed, you can touchthe [X] key once again toreadjust the X zoom.
8 Touch the [OK] key.
9 If needed, touch the [PAPER SELECT] keyand select the paper size.
If the AUTO PAPERSELECT mode is on, theappropriate copy papersize will have beenautomatically selectedbased on the originalsize and selected copyratios.
10Select any desired copy settings such asthe exposure or number of copies, andthen press the [START] key.
ZOOM
50%
50
70Y
X
64%
77%
XY ZOOM CANCEL
ZOOM
50
77Y
A
OK
PA400%
200%100%
129%
AUTO
AUTO
X-50% Y-70%
ORIGINAL
PAPER SELECT
COPY RATIO
EXPOSURE
0
N PLAIN
APER
N PLAIN
5. 8 x11
8 x111 / 2
1 / 2
To cancel an X or Y zoom setting...Touch the [XY ZOOM] key or the [CANCEL] key inthe ratio selection screen (step 3 or 5 on page 4-18).
dragonII_copy_sec.book 19 ページ 2006年10月18日 水曜日 午後7時39分
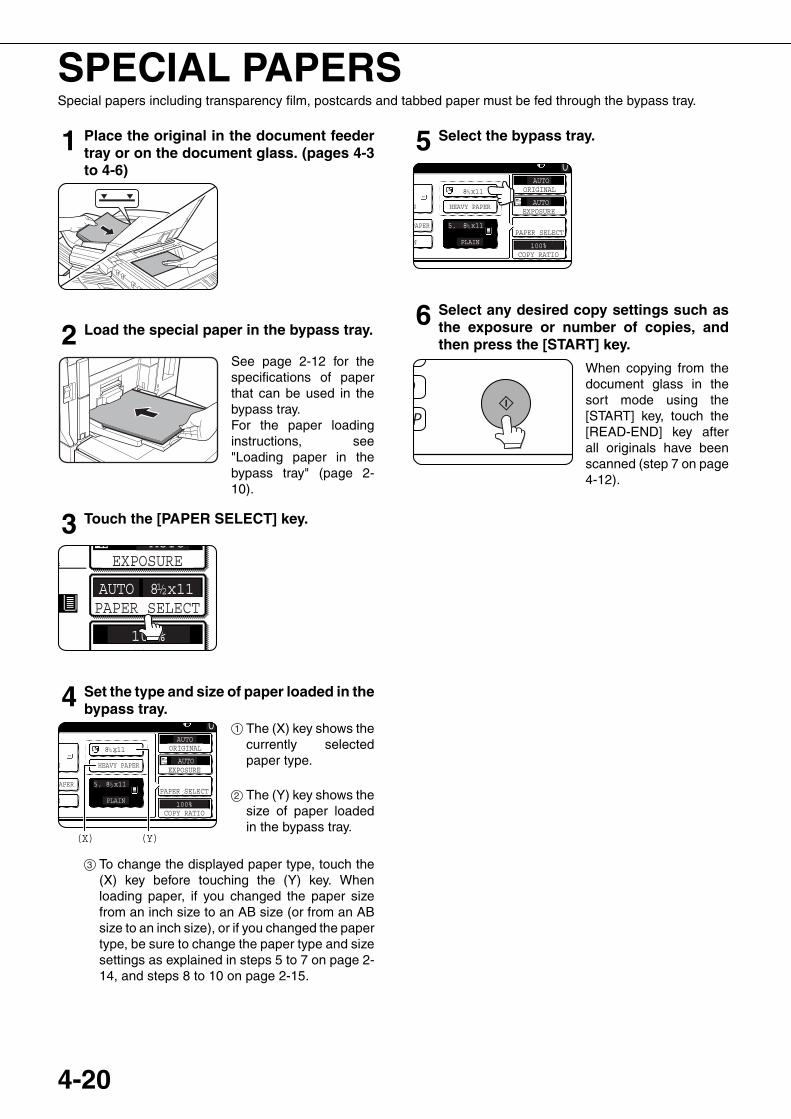
4-20
SPECIAL PAPERSSpecial papers including transparency film, postcards and tabbed paper must be fed through the bypass tray.
1 Place the original in the document feedertray or on the document glass. (pages 4-3to 4-6)
2 Load the special paper in the bypass tray.
See page 2-12 for thespecifications of paperthat can be used in thebypass tray.For the paper loadinginstructions, see"Loading paper in thebypass tray" (page 2-10).
3 Touch the [PAPER SELECT] key.
4 Set the type and size of paper loaded in thebypass tray.
The (X) key shows thecurrently selectedpaper type.
The (Y) key shows thesize of paper loadedin the bypass tray.
To change the displayed paper type, touch the(X) key before touching the (Y) key. Whenloading paper, if you changed the paper sizefrom an inch size to an AB size (or from an ABsize to an inch size), or if you changed the papertype, be sure to change the paper type and sizesettings as explained in steps 5 to 7 on page 2-14, and steps 8 to 10 on page 2-15.
5 Select the bypass tray.
6 Select any desired copy settings such asthe exposure or number of copies, andthen press the [START] key.
When copying from thedocument glass in thesort mode using the[START] key, touch the[READ-END] key afterall originals have beenscanned (step 7 on page4-12).
AUTO
AUTO
100%
8 x11PAPER SELECT
COPY
EXPOSURE4
1 / 2
AUTO
AUTO
100%
ORIGINAL
PAPER SELECT
COPY RATIO
EXPOSURE
0
N HEAVY PAPER
APER
N PLAIN
5. 8 x11
8 x11
(X) (Y)
1 / 2
1 / 2
1
2
3
AUTO
AUTO
100%
ORIGINAL
PAPER SELECT
COPY RATIO
EXPOSURE
0
N HEAVY PAPER
PAPER
N PLAIN
5. 8 x11
8 x111 / 2
1 / 2
dragonII_copy_sec.book 20 ページ 2006年10月18日 水曜日 午後7時39分
5-1
CHAPTER 5CONVENIENT COPY
FUNCTIONSThis chapter explains special-purpose functions, storing of copysettings, and other convenient functions. Please select and readsections of this chapter as needed.
Page
SPECIAL MODES................................................................................... 5-2● General procedure for using special functions................................ 5-2● Margin shift...................................................................................... 5-3● Erase............................................................................................... 5-4● Dual page copy ............................................................................... 5-5● Pamphlet copy................................................................................. 5-6● Job build.......................................................................................... 5-8● Tandem copy................................................................................... 5-10● Covers/inserts ................................................................................. 5-12● Transparency film with insert sheets ............................................... 5-23● Multi shot......................................................................................... 5-24● Book copy ....................................................................................... 5-26● Tab copy.......................................................................................... 5-27● Card shot......................................................................................... 5-29● Mirror image.................................................................................... 5-31● B/W reverse..................................................................................... 5-31● Print menu....................................................................................... 5-32
STORING, USING AND DELETING JOB PROGRAMS......................... 5-44● Storing a job program...................................................................... 5-44● Calling up a job program ................................................................. 5-45● Deleting a stored job program......................................................... 5-45
INTERRUPTING A COPY RUN.............................................................. 5-46
dragonII_copy_sec.book 1 ページ 2006年10月18日 水曜日 午後7時39分
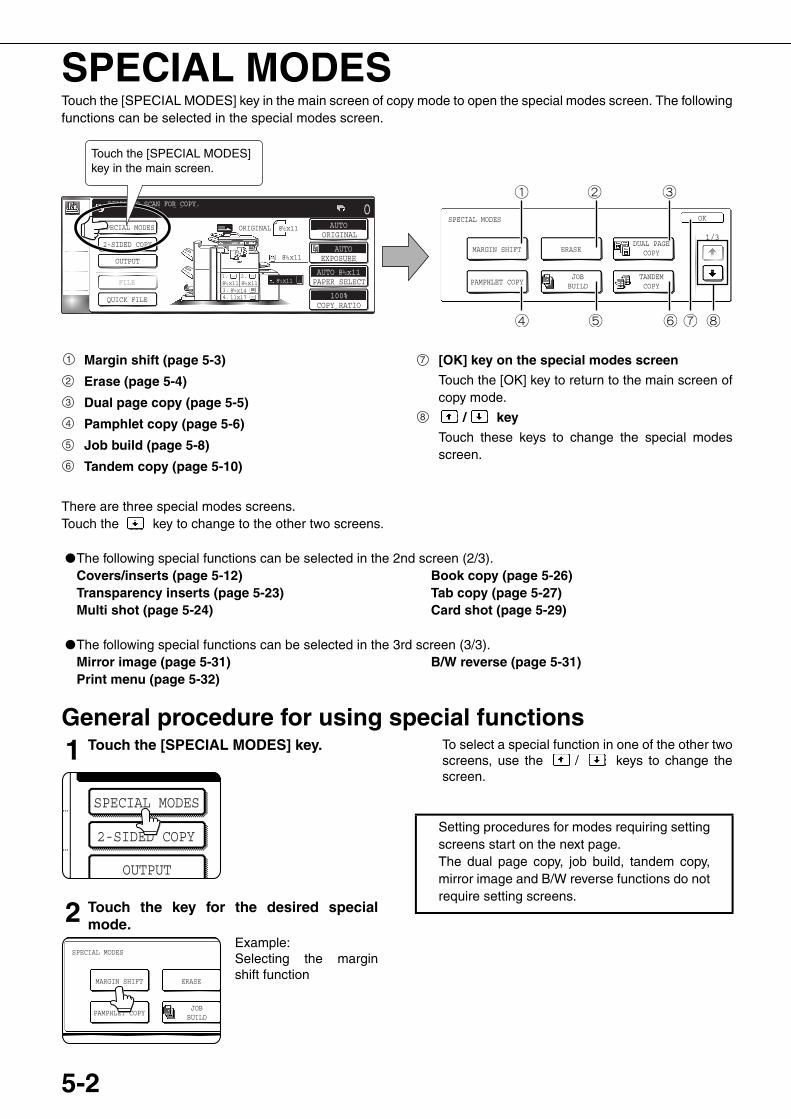
5-2
SPECIAL MODESTouch the [SPECIAL MODES] key in the main screen of copy mode to open the special modes screen. The followingfunctions can be selected in the special modes screen.
Margin shift (page 5-3)
Erase (page 5-4)
Dual page copy (page 5-5)
Pamphlet copy (page 5-6)
Job build (page 5-8)
Tandem copy (page 5-10)
[OK] key on the special modes screen
Touch the [OK] key to return to the main screen ofcopy mode.
/ key
Touch these keys to change the special modesscreen.
There are three special modes screens.Touch the key to change to the other two screens.
●The following special functions can be selected in the 2nd screen (2/3).Covers/inserts (page 5-12)Transparency inserts (page 5-23)Multi shot (page 5-24)
Book copy (page 5-26)Tab copy (page 5-27)Card shot (page 5-29)
●The following special functions can be selected in the 3rd screen (3/3).Mirror image (page 5-31)Print menu (page 5-32)
B/W reverse (page 5-31)
General procedure for using special functions1 Touch the [SPECIAL MODES] key.
2 Touch the key for the desired specialmode.
Example:Selecting the marginshift function
To select a special function in one of the other twoscreens, use the / keys to change thescreen.
SPECIAL MODES
MARGIN SHIFT
PAMPHLET COPY
ERASE
OK
1/3DUAL PAGE
COPY
JOBBUILD
TANDEMCOPY
SPECIAL MODES
2-SIDED COPY
OUTPUT
QUICK FILE
FILE
READY TO SCAN FOR COPY.
AUTO
AUTO
AUTO
100%
8 x11
ORIGINAL
PAPER SELECT
COPY RATIO
EXPOSURE
0ORIGINAL
8 x111 / 2
8 x1411x17
1 / 2
8 x111 / 2
1.
3.4.
2.8 x111 / 2
8 x111 / 2
8 x111 / 2
1 / 2
Touch the [SPECIAL MODES] key in the main screen.
1
2
3
4
5
6
7
8
SPECIAL MODES
2-SIDED COPY
OUTPUT
SPECIAL MODES
MARGIN SHIFT
PAMPHLET COPY
ERASE
JOBBUILD
Setting procedures for modes requiring settingscreens start on the next page.The dual page copy, job build, tandem copy,mirror image and B/W reverse functions do notrequire setting screens.
dragonII_copy_sec.book 2 ページ 2006年10月18日 水曜日 午後7時39分
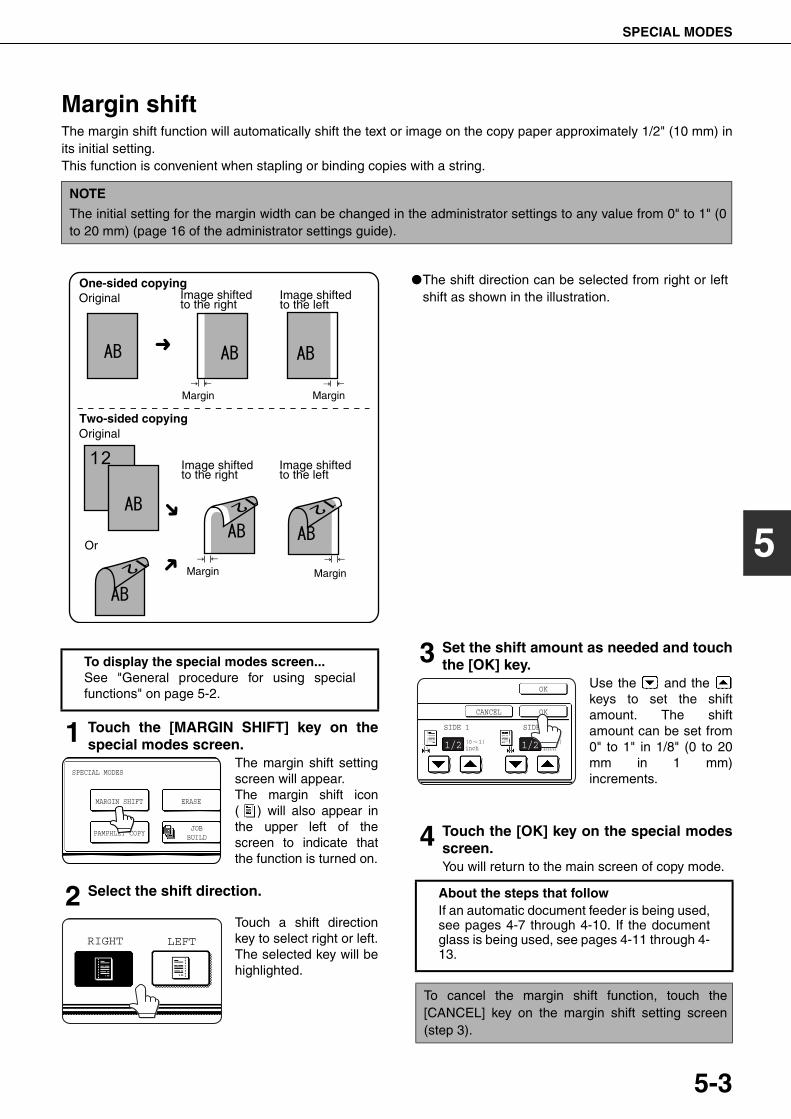
SPECIAL MODES
5-3
5
Margin shiftThe margin shift function will automatically shift the text or image on the copy paper approximately 1/2" (10 mm) inits initial setting. This function is convenient when stapling or binding copies with a string.
1 Touch the [MARGIN SHIFT] key on thespecial modes screen.
The margin shift settingscreen will appear.The margin shift icon( ) will also appear inthe upper left of thescreen to indicate thatthe function is turned on.
2 Select the shift direction.
Touch a shift directionkey to select right or left.The selected key will behighlighted.
3 Set the shift amount as needed and touchthe [OK] key.
Use the and the keys to set the shiftamount. The shiftamount can be set from0" to 1" in 1/8" (0 to 20mm in 1 mm)increments.
4 Touch the [OK] key on the special modesscreen.You will return to the main screen of copy mode.
NOTE
The initial setting for the margin width can be changed in the administrator settings to any value from 0" to 1" (0to 20 mm) (page 16 of the administrator settings guide).
Image shiftedto the right
Image shiftedto the left
MarginMargin
Original
Two-sided copying
Image shiftedto the right
Margin
Image shiftedto the left
Margin
Or
One-sided copying
Original
●The shift direction can be selected from right or leftshift as shown in the illustration.
To display the special modes screen...See "General procedure for using specialfunctions" on page 5-2.
SPECIAL MODES
MARGIN SHIFT
PAMPHLET COPY
ERASE
JOBBUILD
RIGHT LEFT
About the steps that followIf an automatic document feeder is being used,see pages 4-7 through 4-10. If the documentglass is being used, see pages 4-11 through 4-13.
To cancel the margin shift function, touch the[CANCEL] key on the margin shift setting screen(step 3).
SIDE 1
(0 1)inch
(0 1)inch
SIDE 2
OKCANCEL
OK
1/2 1/2
dragon_05.fm 3 ページ 2006年10月19日 木曜日 午後1時0分
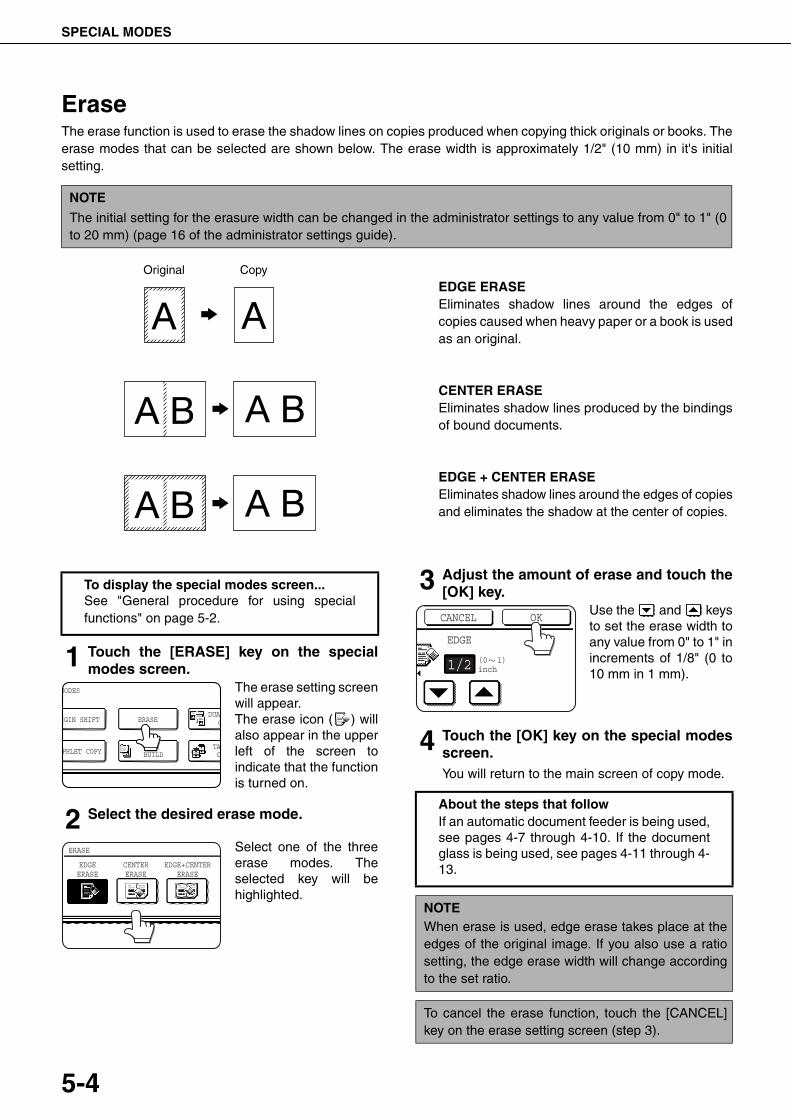
SPECIAL MODES
5-4
EraseThe erase function is used to erase the shadow lines on copies produced when copying thick originals or books. Theerase modes that can be selected are shown below. The erase width is approximately 1/2" (10 mm) in it's initialsetting.
EDGE ERASEEliminates shadow lines around the edges ofcopies caused when heavy paper or a book is usedas an original.
CENTER ERASEEliminates shadow lines produced by the bindingsof bound documents.
EDGE + CENTER ERASEEliminates shadow lines around the edges of copiesand eliminates the shadow at the center of copies.
1 Touch the [ERASE] key on the specialmodes screen.
The erase setting screenwill appear.The erase icon ( ) willalso appear in the upperleft of the screen toindicate that the functionis turned on.
2 Select the desired erase mode.
Select one of the threeerase modes. Theselected key will behighlighted.
3 Adjust the amount of erase and touch the[OK] key.
Use the and keysto set the erase width toany value from 0" to 1" inincrements of 1/8" (0 to10 mm in 1 mm).
4 Touch the [OK] key on the special modesscreen.You will return to the main screen of copy mode.
NOTE
The initial setting for the erasure width can be changed in the administrator settings to any value from 0" to 1" (0to 20 mm) (page 16 of the administrator settings guide).
Original Copy
To display the special modes screen...See "General procedure for using specialfunctions" on page 5-2.
MODES
RGIN SHIFT
PHLET COPY
ERASEDUAL
C
JOBBUILD
TANC
EDGEERASE
ERASE
CENTERERASE
EDGE+CENTERERASE
About the steps that followIf an automatic document feeder is being used,see pages 4-7 through 4-10. If the documentglass is being used, see pages 4-11 through 4-13.
NOTEWhen erase is used, edge erase takes place at theedges of the original image. If you also use a ratiosetting, the edge erase width will change accordingto the set ratio.
To cancel the erase function, touch the [CANCEL]key on the erase setting screen (step 3).
EDGE
CANCEL OK
1/2 (0 1)inch
dragon_05.fm 4 ページ 2006年10月19日 木曜日 午後1時0分
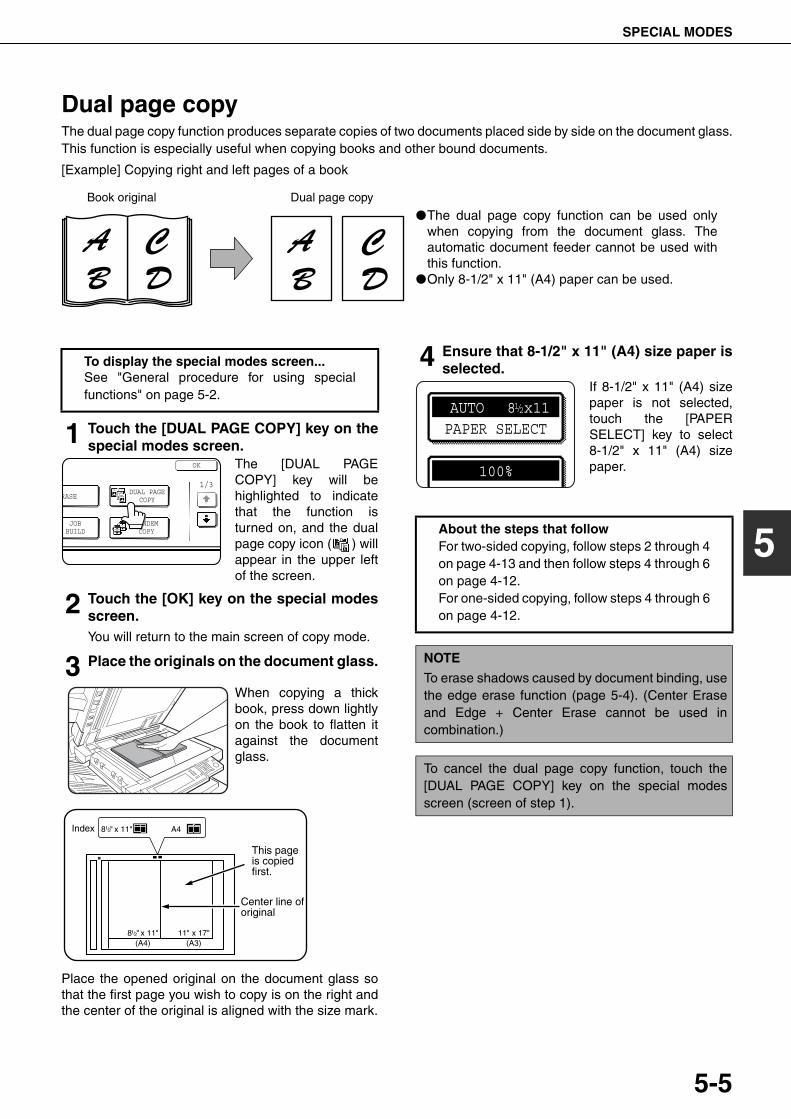
SPECIAL MODES
5-5
5
Dual page copyThe dual page copy function produces separate copies of two documents placed side by side on the document glass.This function is especially useful when copying books and other bound documents.
[Example] Copying right and left pages of a book
1 Touch the [DUAL PAGE COPY] key on thespecial modes screen.
The [DUAL PAGECOPY] key will behighlighted to indicatethat the function isturned on, and the dualpage copy icon ( ) willappear in the upper leftof the screen.
2 Touch the [OK] key on the special modesscreen.You will return to the main screen of copy mode.
3 Place the originals on the document glass.
When copying a thickbook, press down lightlyon the book to flatten itagainst the documentglass.
Place the opened original on the document glass sothat the first page you wish to copy is on the right andthe center of the original is aligned with the size mark.
4 Ensure that 8-1/2" x 11" (A4) size paper isselected.
If 8-1/2" x 11" (A4) sizepaper is not selected,touch the [PAPERSELECT] key to select8-1/2" x 11" (A4) sizepaper.
●The dual page copy function can be used onlywhen copying from the document glass. Theautomatic document feeder cannot be used withthis function.
●Only 8-1/2" x 11" (A4) paper can be used.
Book original Dual page copy
To display the special modes screen...See "General procedure for using specialfunctions" on page 5-2.
RASE
OK
1/3DUAL PAGE
COPY
JOBBUILD
TANDEMCOPY
Index
11" x 17"
Center line oforiginal
A4
This pageis copiedfirst.
8 " x 11"
8 " x 11"1 / 2
1 / 2
(A4) (A3)
About the steps that followFor two-sided copying, follow steps 2 through 4on page 4-13 and then follow steps 4 through 6on page 4-12.For one-sided copying, follow steps 4 through 6on page 4-12.
NOTE
To erase shadows caused by document binding, usethe edge erase function (page 5-4). (Center Eraseand Edge + Center Erase cannot be used incombination.)
To cancel the dual page copy function, touch the[DUAL PAGE COPY] key on the special modesscreen (screen of step 1).
PAPER SELECT AUTO 8 x111 / 2
100%
dragonII_copy_sec.book 5 ページ 2006年10月18日 水曜日 午後7時39分
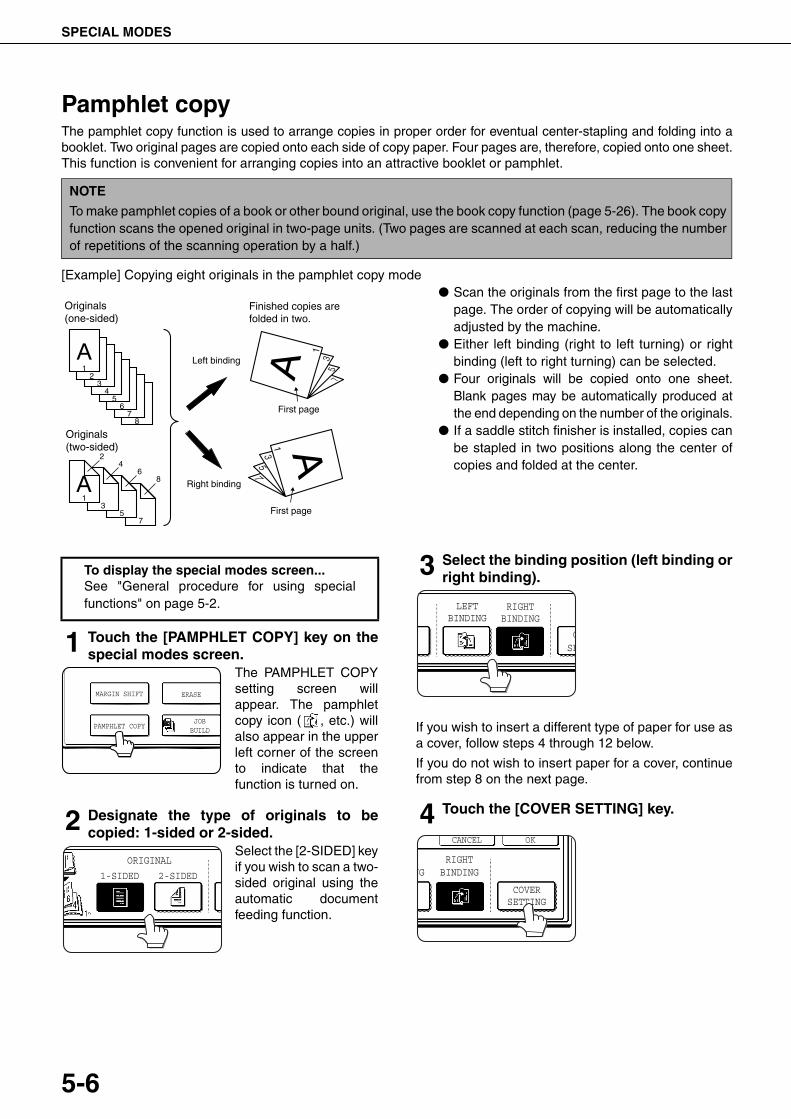
SPECIAL MODES
5-6
Pamphlet copyThe pamphlet copy function is used to arrange copies in proper order for eventual center-stapling and folding into abooklet. Two original pages are copied onto each side of copy paper. Four pages are, therefore, copied onto one sheet.This function is convenient for arranging copies into an attractive booklet or pamphlet.
[Example] Copying eight originals in the pamphlet copy mode● Scan the originals from the first page to the last
page. The order of copying will be automaticallyadjusted by the machine.
● Either left binding (right to left turning) or rightbinding (left to right turning) can be selected.
● Four originals will be copied onto one sheet.Blank pages may be automatically produced atthe end depending on the number of the originals.
● If a saddle stitch finisher is installed, copies canbe stapled in two positions along the center ofcopies and folded at the center.
1 Touch the [PAMPHLET COPY] key on thespecial modes screen.
The PAMPHLET COPYsetting screen willappear. The pamphletcopy icon ( , etc.) willalso appear in the upperleft corner of the screento indicate that thefunction is turned on.
2 Designate the type of originals to becopied: 1-sided or 2-sided.
Select the [2-SIDED] keyif you wish to scan a two-sided original using theautomatic documentfeeding function.
3 Select the binding position (left binding orright binding).
If you wish to insert a different type of paper for use asa cover, follow steps 4 through 12 below.
If you do not wish to insert paper for a cover, continuefrom step 8 on the next page.
4 Touch the [COVER SETTING] key.
NOTE
To make pamphlet copies of a book or other bound original, use the book copy function (page 5-26). The book copyfunction scans the opened original in two-page units. (Two pages are scanned at each scan, reducing the numberof repetitions of the scanning operation by a half.)
Finished copies arefolded in two.
Originals (one-sided)
12
34
56
78
7
8
5
6
3
4
Originals (two-sided)
1
2
Left binding
Right binding
First page
First page
To display the special modes screen...See "General procedure for using specialfunctions" on page 5-2.
SPECIAL MODES
MARGIN SHIFT
PAMPHLET COPY
ERASE
JOBBUILD
2-SIDED
ORIGINAL
1-SIDED
RIGHTBINDING
CSE
LEFTBINDING
CANCEL OK
RIGHTBINDING
COVERSETTING
NG
dragonII_copy_sec.book 6 ページ 2006年10月18日 水曜日 午後7時39分
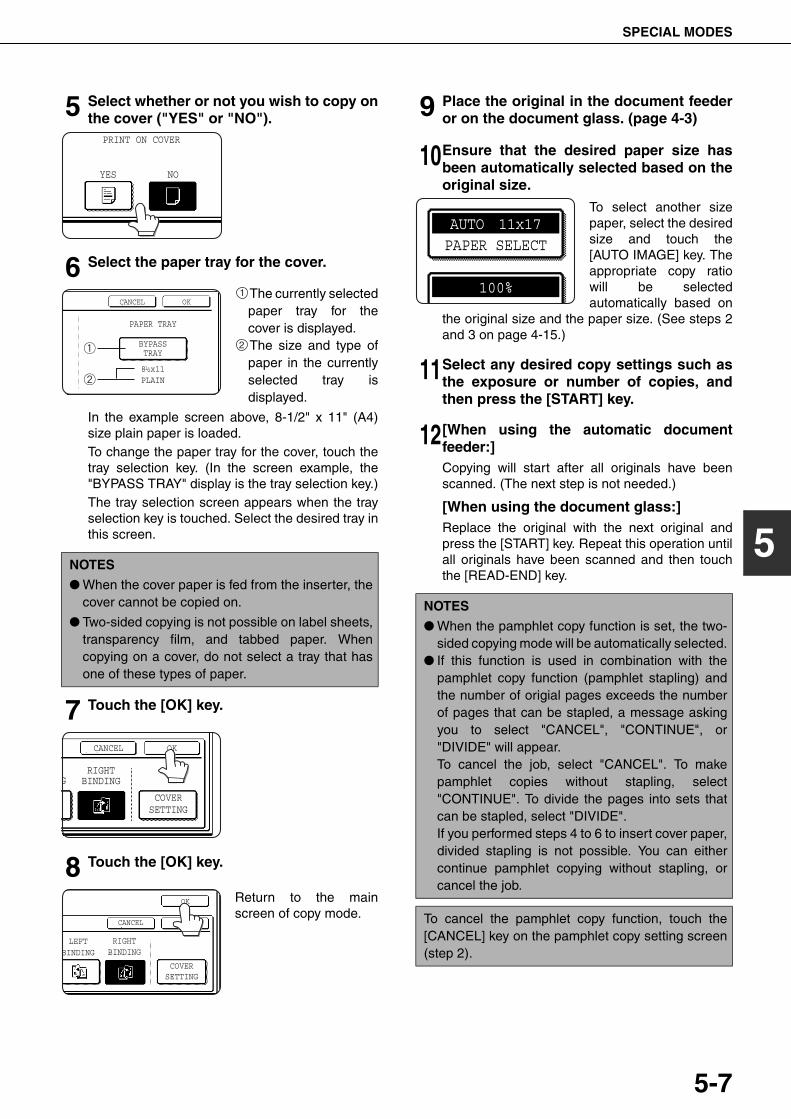
SPECIAL MODES
5-7
5
5 Select whether or not you wish to copy onthe cover ("YES" or "NO").
6 Select the paper tray for the cover.
The currently selectedpaper tray for thecover is displayed.The size and type ofpaper in the currentlyselected tray isdisplayed.
In the example screen above, 8-1/2" x 11" (A4)size plain paper is loaded.To change the paper tray for the cover, touch thetray selection key. (In the screen example, the"BYPASS TRAY" display is the tray selection key.)The tray selection screen appears when the trayselection key is touched. Select the desired tray inthis screen.
7 Touch the [OK] key.
8 Touch the [OK] key.
Return to the mainscreen of copy mode.
9 Place the original in the document feederor on the document glass. (page 4-3)
10Ensure that the desired paper size hasbeen automatically selected based on theoriginal size.
To select another sizepaper, select the desiredsize and touch the[AUTO IMAGE] key. Theappropriate copy ratiowill be selectedautomatically based on
the original size and the paper size. (See steps 2and 3 on page 4-15.)
11Select any desired copy settings such asthe exposure or number of copies, andthen press the [START] key.
12[When using the automatic documentfeeder:]Copying will start after all originals have beenscanned. (The next step is not needed.)
[When using the document glass:]Replace the original with the next original andpress the [START] key. Repeat this operation untilall originals have been scanned and then touchthe [READ-END] key.
NOTES
● When the cover paper is fed from the inserter, thecover cannot be copied on.
● Two-sided copying is not possible on label sheets,transparency film, and tabbed paper. Whencopying on a cover, do not select a tray that hasone of these types of paper.
NO
PRINT ON COVER
YES
CANCEL OK
BYPASSTRAY
PAPER TRAY
8 x11PLAIN
1 / 2
1
2
CANCEL OK
RIGHTBINDING
COVERSETTING
G
CANCEL OK
OK
RIGHTBINDING
COVERSETTING
LEFTBINDING
NOTES
● When the pamphlet copy function is set, the two-sided copying mode will be automatically selected.
● If this function is used in combination with thepamphlet copy function (pamphlet stapling) andthe number of origial pages exceeds the numberof pages that can be stapled, a message askingyou to select "CANCEL", "CONTINUE", or"DIVIDE" will appear.To cancel the job, select "CANCEL". To makepamphlet copies without stapling, select"CONTINUE". To divide the pages into sets thatcan be stapled, select "DIVIDE".If you performed steps 4 to 6 to insert cover paper,divided stapling is not possible. You can eithercontinue pamphlet copying without stapling, orcancel the job.
To cancel the pamphlet copy function, touch the[CANCEL] key on the pamphlet copy setting screen(step 2).
PAPER SELECT AUTO 11x17
100%
dragonII_copy_sec.book 7 ページ 2006年10月18日 水曜日 午後7時39分
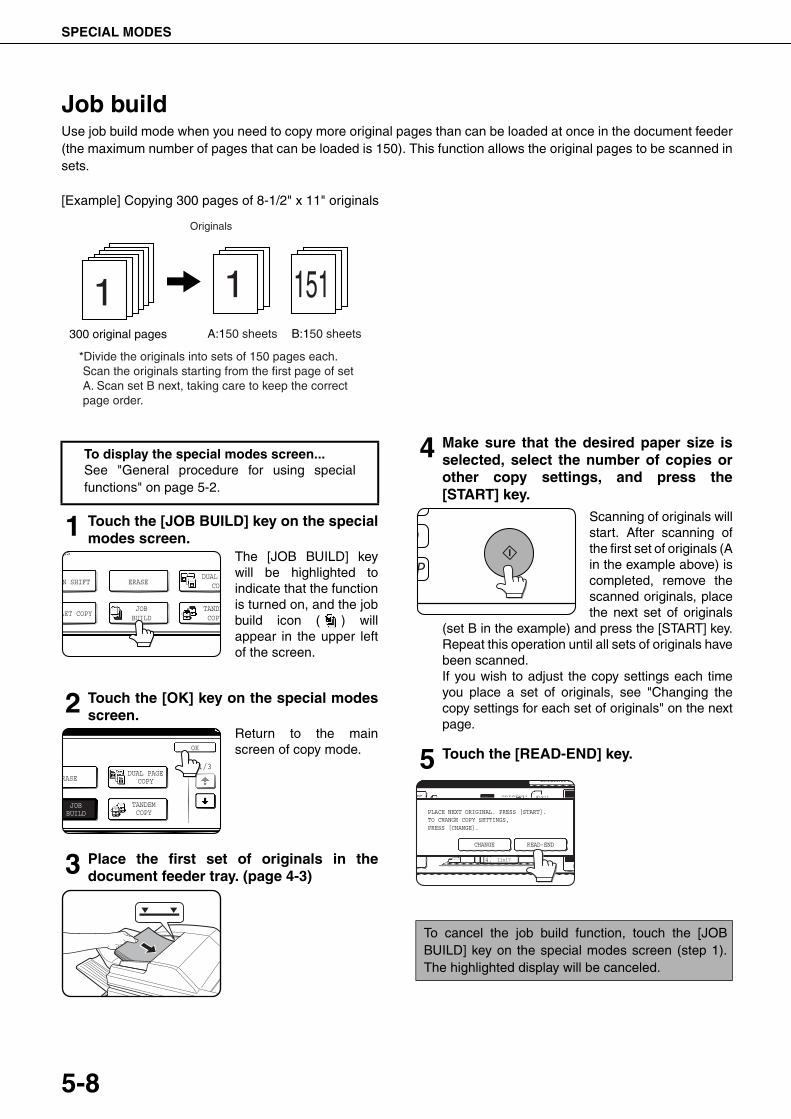
SPECIAL MODES
5-8
Job buildUse job build mode when you need to copy more original pages than can be loaded at once in the document feeder(the maximum number of pages that can be loaded is 150). This function allows the original pages to be scanned insets.
[Example] Copying 300 pages of 8-1/2" x 11" originals
1 Touch the [JOB BUILD] key on the specialmodes screen.
The [JOB BUILD] keywill be highlighted toindicate that the functionis turned on, and the jobbuild icon ( ) willappear in the upper leftof the screen.
2 Touch the [OK] key on the special modesscreen.
Return to the mainscreen of copy mode.
3 Place the first set of originals in thedocument feeder tray. (page 4-3)
4 Make sure that the desired paper size isselected, select the number of copies orother copy settings, and press the[START] key.
Scanning of originals willstart. After scanning ofthe first set of originals (Ain the example above) iscompleted, remove thescanned originals, placethe next set of originals
(set B in the example) and press the [START] key.Repeat this operation until all sets of originals havebeen scanned.If you wish to adjust the copy settings each timeyou place a set of originals, see "Changing thecopy settings for each set of originals" on the nextpage.
5 Touch the [READ-END] key.
Originals
*Divide the originals into sets of 150 pages each. Scan the originals starting from the first page of set A. Scan set B next, taking care to keep the correct page order.
A:150 sheets B:150 sheets300 original pages
1 1 151
To display the special modes screen...See "General procedure for using specialfunctions" on page 5-2.
ES
N SHIFT
LET COPY
ERASEDUAL
COP
JOBBUILD
TANDECOPY
RASE
OK
1/3DUAL PAGE
COPY
JOBBUILD
TANDEMCOPY
To cancel the job build function, touch the [JOBBUILD] key on the special modes screen (step 1).The highlighted display will be canceled.
READ-END
PLACE NEXT ORIGINAL. PRESS [START].TO CHANGE COPY SETTINGS,PRESS [CHANGE].
INTERRUPT
CHANGE
4. 11x17
ORIGINAL 8 x111 /2ES
C
dragonII_copy_sec.book 8 ページ 2006年10月18日 水曜日 午後7時39分
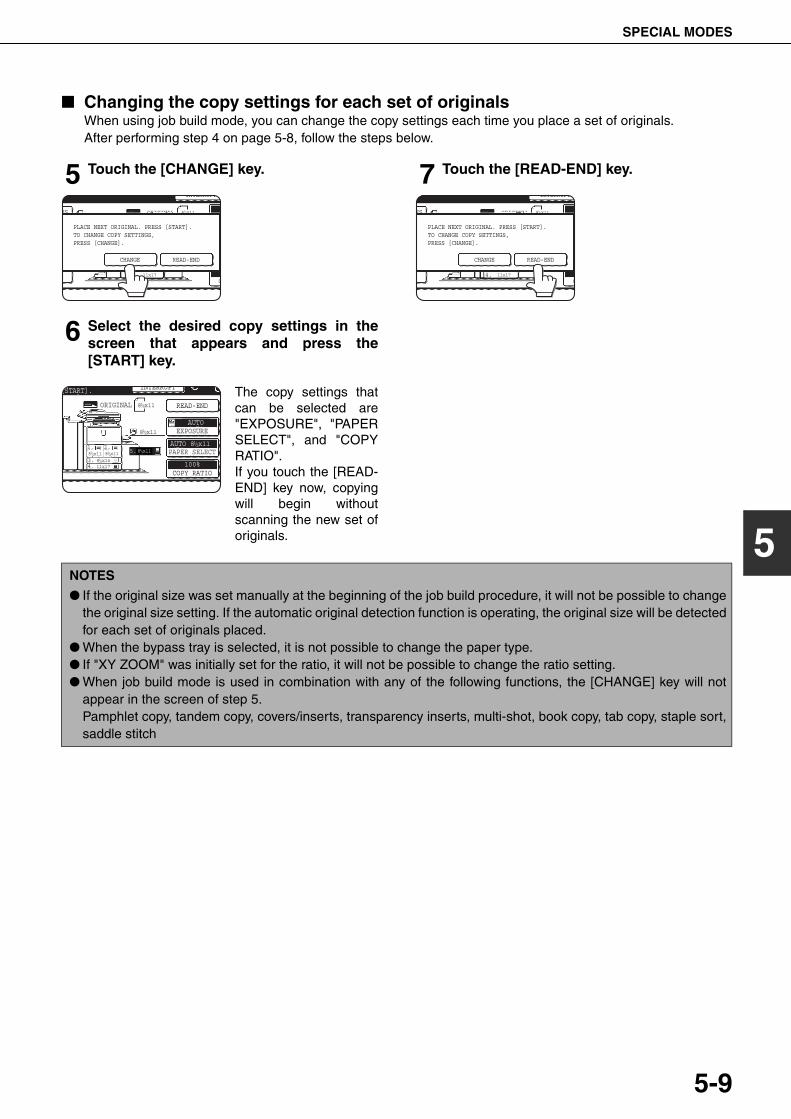
SPECIAL MODES
5-9
5
■ Changing the copy settings for each set of originalsWhen using job build mode, you can change the copy settings each time you place a set of originals.After performing step 4 on page 5-8, follow the steps below.
5 Touch the [CHANGE] key.
6 Select the desired copy settings in thescreen that appears and press the[START] key.
The copy settings thatcan be selected are"EXPOSURE", "PAPERSELECT", and "COPYRATIO".If you touch the [READ-END] key now, copyingwill begin withoutscanning the new set oforiginals.
7 Touch the [READ-END] key.
READ-END
PLACE NEXT ORIGINAL. PRESS [START].TO CHANGE COPY SETTINGS,PRESS [CHANGE].
INTERRUPT
CHANGE
4. 11x17
ORIGINAL 8 x111 /2ES
C
READ-END
INTERRUPT
4. 11x17
COPY RATIO
[START].
3. 8 x141 / 2
8 x111 / 28 x111 / 2
1. 2.5. 8 x111 / 2
EXPOSURE
PAPER SELECT
100%
AUTO
AUTO 8 x11
ORIGINAL 8 x111 / 2
8 x111 / 2
1 / 2
READ-END
PLACE NEXT ORIGINAL. PRESS [START].TO CHANGE COPY SETTINGS,PRESS [CHANGE].
INTERRUPT
CHANGE
4. 11x17
ORIGINAL 8 x111 /2ES
C
NOTES
● If the original size was set manually at the beginning of the job build procedure, it will not be possible to changethe original size setting. If the automatic original detection function is operating, the original size will be detectedfor each set of originals placed.
● When the bypass tray is selected, it is not possible to change the paper type.● If "XY ZOOM" was initially set for the ratio, it will not be possible to change the ratio setting.● When job build mode is used in combination with any of the following functions, the [CHANGE] key will not
appear in the screen of step 5.Pamphlet copy, tandem copy, covers/inserts, transparency inserts, multi-shot, book copy, tab copy, staple sort,saddle stitch
dragonII_copy_sec.book 9 ページ 2006年10月18日 水曜日 午後7時39分
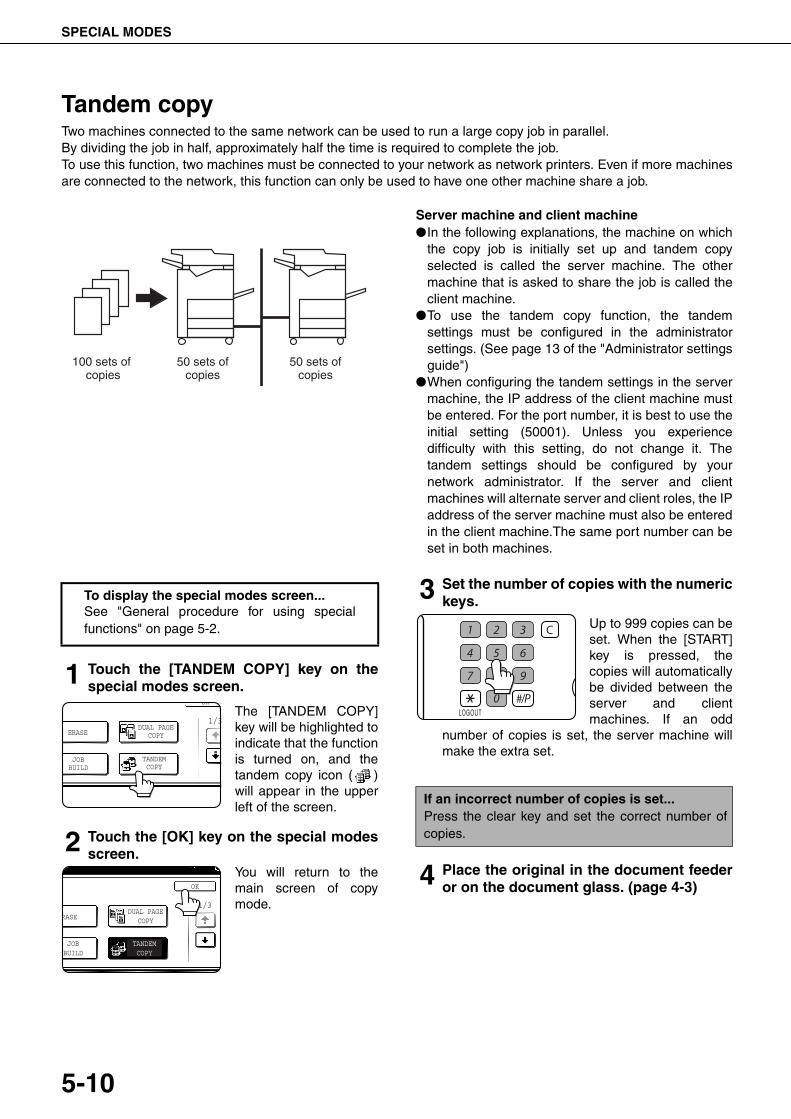
SPECIAL MODES
5-10
Tandem copyTwo machines connected to the same network can be used to run a large copy job in parallel.By dividing the job in half, approximately half the time is required to complete the job.To use this function, two machines must be connected to your network as network printers. Even if more machinesare connected to the network, this function can only be used to have one other machine share a job.
Server machine and client machine●In the following explanations, the machine on which
the copy job is initially set up and tandem copyselected is called the server machine. The othermachine that is asked to share the job is called theclient machine.
●To use the tandem copy function, the tandemsettings must be configured in the administratorsettings. (See page 13 of the "Administrator settingsguide")
●When configuring the tandem settings in the servermachine, the IP address of the client machine mustbe entered. For the port number, it is best to use theinitial setting (50001). Unless you experiencedifficulty with this setting, do not change it. Thetandem settings should be configured by yournetwork administrator. If the server and clientmachines will alternate server and client roles, the IPaddress of the server machine must also be enteredin the client machine.The same port number can beset in both machines.
1 Touch the [TANDEM COPY] key on thespecial modes screen.
The [TANDEM COPY]key will be highlighted toindicate that the functionis turned on, and thetandem copy icon ( )will appear in the upperleft of the screen.
2 Touch the [OK] key on the special modesscreen.
You will return to themain screen of copymode.
3 Set the number of copies with the numerickeys.
Up to 999 copies can beset. When the [START]key is pressed, thecopies will automaticallybe divided between theserver and clientmachines. If an odd
number of copies is set, the server machine willmake the extra set.
4 Place the original in the document feederor on the document glass. (page 4-3)
100 sets of copies
50 sets ofcopies
50 sets ofcopies
To display the special modes screen...See "General procedure for using specialfunctions" on page 5-2.
ERASE
OK
1/3DUAL PAGE
COPY
JOBBUILD
TANDEMCOPY
RASE
OK
1/3DUAL PAGE
COPY
JOBBUILD
TANDEMCOPY
If an incorrect number of copies is set...Press the clear key and set the correct number ofcopies.
LOGOUT
dragon_05.fm 10 ページ 2006年10月19日 木曜日 午後1時0分
SPECIAL MODES
5-11
5
5 Press the [START] key.
NOTES
● To perform tandem copying, the server machineand client machine must meet certain conditions.
After the [START] key is pressed on the servermachine, the server machine verifies that theconditions have been met. If the conditions havenot been met, tandem copying does not beginand "TANDEM OUTPUT IS NOT ALLOWED.OUTPUT ALL SETS USING MASTERMACHINE?" appears in the display. To have theserver machine make all the copies, touch the[OK] key. To cancel the job, touch the [CANCEL]key.• As an example, the following conditions must
be met when a staple finisher is installed on theserver machine and not on the client machine:(1) If tandem copying is executed for a two-
sided copy job with the number of copiesset to 999 and "Non-staple" is selected,tandem copying will take place.
(2) If tandem copying is executed for a two-sided copy job with the number of copiesset to 999 and "Staple" is selected,tandem copying will not take placebecause the client machine does not havea finisher.
● After the [START] key is pressed, if the clientmachine cannot print because it is out of paper orother reason, the server machine will print its halfof the job. The other half of the job will be stored inthe client machine and the job will be printed whenthe client machine is able to print.
● If auditing mode is enabled on both the server andclient machines, the same account number mustbe entered on both machines.
● If auditing mode is enabled on the client machinebut not on the server machine, tandem copyingcannot be performed.
To cancel the tandem copy function, touch the[TANDEM COPY] key on the special modes screen(step 1). The highlighted display will be canceled.
dragonII_copy_sec.book 11 ページ 2006年10月18日 水曜日 午後7時39分
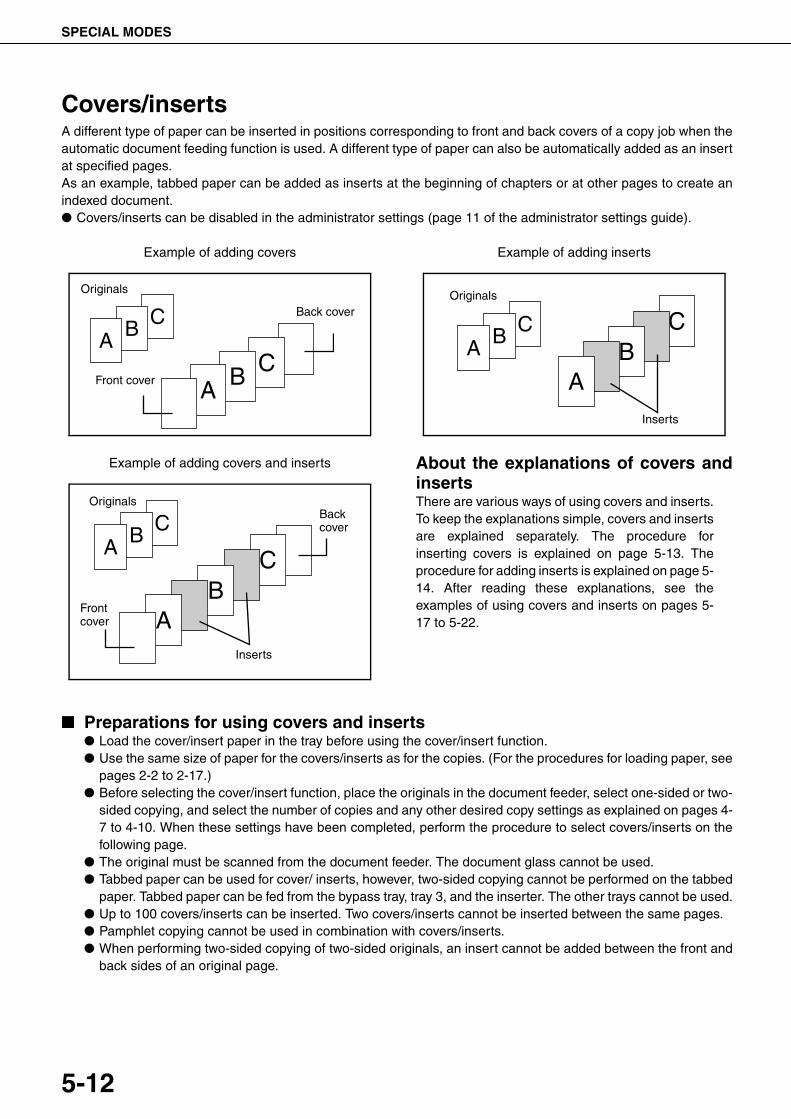
SPECIAL MODES
5-12
Covers/insertsA different type of paper can be inserted in positions corresponding to front and back covers of a copy job when theautomatic document feeding function is used. A different type of paper can also be automatically added as an insertat specified pages.As an example, tabbed paper can be added as inserts at the beginning of chapters or at other pages to create anindexed document.● Covers/inserts can be disabled in the administrator settings (page 11 of the administrator settings guide).
Example of adding covers
Example of adding covers and inserts
Example of adding inserts
About the explanations of covers andinsertsThere are various ways of using covers and inserts.To keep the explanations simple, covers and insertsare explained separately. The procedure forinserting covers is explained on page 5-13. Theprocedure for adding inserts is explained on page 5-14. After reading these explanations, see theexamples of using covers and inserts on pages 5-17 to 5-22.
■ Preparations for using covers and inserts● Load the cover/insert paper in the tray before using the cover/insert function.● Use the same size of paper for the covers/inserts as for the copies. (For the procedures for loading paper, see
pages 2-2 to 2-17.)● Before selecting the cover/insert function, place the originals in the document feeder, select one-sided or two-
sided copying, and select the number of copies and any other desired copy settings as explained on pages 4-7 to 4-10. When these settings have been completed, perform the procedure to select covers/inserts on thefollowing page.
● The original must be scanned from the document feeder. The document glass cannot be used.● Tabbed paper can be used for cover/ inserts, however, two-sided copying cannot be performed on the tabbed
paper. Tabbed paper can be fed from the bypass tray, tray 3, and the inserter. The other trays cannot be used.● Up to 100 covers/inserts can be inserted. Two covers/inserts cannot be inserted between the same pages.● Pamphlet copying cannot be used in combination with covers/inserts.● When performing two-sided copying of two-sided originals, an insert cannot be added between the front and
back sides of an original page.
Front cover
Back cover
Originals
Inserts
Frontcover
Backcover
Originals
Originals
Inserts
dragonII_copy_sec.book 12 ページ 2006年10月18日 水曜日 午後7時39分
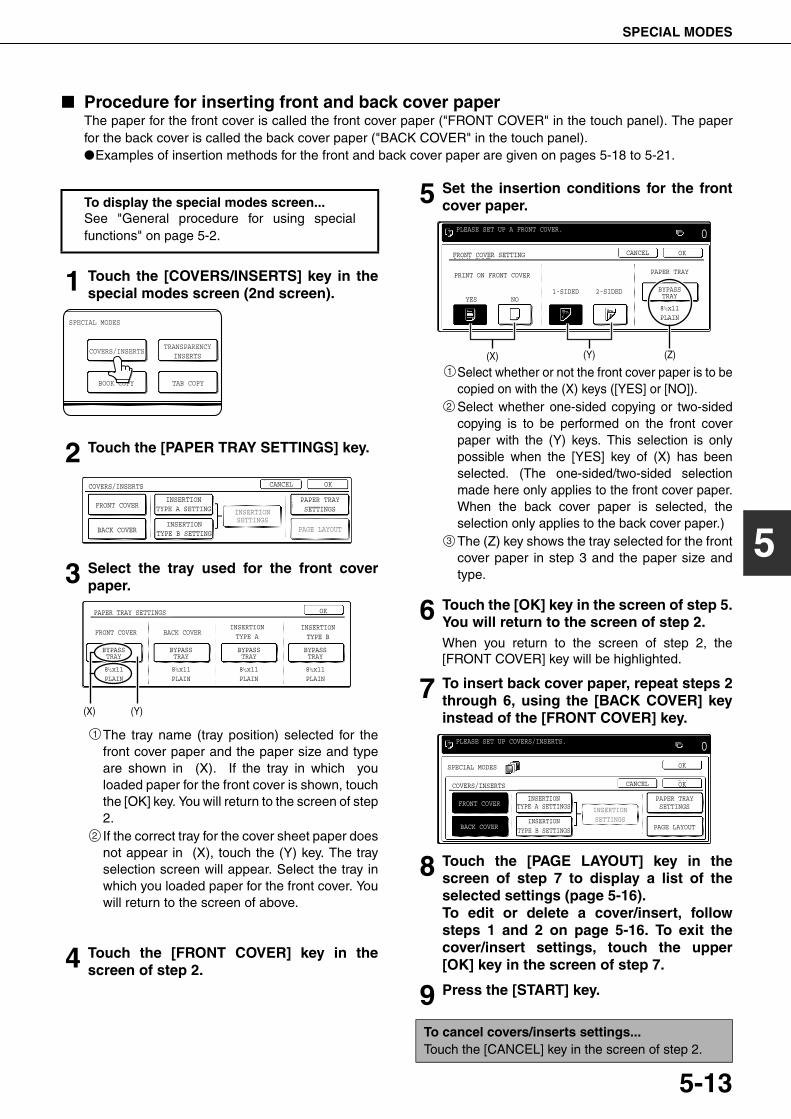
SPECIAL MODES
5-13
5
■ Procedure for inserting front and back cover paperThe paper for the front cover is called the front cover paper ("FRONT COVER" in the touch panel). The paperfor the back cover is called the back cover paper ("BACK COVER" in the touch panel).●Examples of insertion methods for the front and back cover paper are given on pages 5-18 to 5-21.
1 Touch the [COVERS/INSERTS] key in thespecial modes screen (2nd screen).
2 Touch the [PAPER TRAY SETTINGS] key.
3 Select the tray used for the front coverpaper.
The tray name (tray position) selected for thefront cover paper and the paper size and typeare shown in (X). If the tray in which youloaded paper for the front cover is shown, touchthe [OK] key. You will return to the screen of step2.If the correct tray for the cover sheet paper doesnot appear in (X), touch the (Y) key. The trayselection screen will appear. Select the tray inwhich you loaded paper for the front cover. Youwill return to the screen of above.
4 Touch the [FRONT COVER] key in thescreen of step 2.
5 Set the insertion conditions for the frontcover paper.
Select whether or not the front cover paper is to becopied on with the (X) keys ([YES] or [NO]).Select whether one-sided copying or two-sidedcopying is to be performed on the front coverpaper with the (Y) keys. This selection is onlypossible when the [YES] key of (X) has beenselected. (The one-sided/two-sided selectionmade here only applies to the front cover paper.When the back cover paper is selected, theselection only applies to the back cover paper.)The (Z) key shows the tray selected for the frontcover paper in step 3 and the paper size andtype.
6 Touch the [OK] key in the screen of step 5.You will return to the screen of step 2.When you return to the screen of step 2, the[FRONT COVER] key will be highlighted.
7 To insert back cover paper, repeat steps 2through 6, using the [BACK COVER] keyinstead of the [FRONT COVER] key.
8 Touch the [PAGE LAYOUT] key in thescreen of step 7 to display a list of theselected settings (page 5-16).To edit or delete a cover/insert, followsteps 1 and 2 on page 5-16. To exit thecover/insert settings, touch the upper[OK] key in the screen of step 7.
9 Press the [START] key.
To display the special modes screen...See "General procedure for using specialfunctions" on page 5-2.
SPECIAL MODES
COVERS/INSERTSTRANSPARENCY
INSERTS
TAB COPYBOOK COPY
FRONT COVER
BACK COVER
INSERTIONTYPE A SETTING
PAPER TRAYSETTINGS
PAGE LAYOUT
CANCEL OK
INSERTIONSETTINGS
COVERS/INSERTS
INSERTIONTYPE B SETTING
8 x11PLAIN
1 / 2
PAPER TRAY SETTINGS
FRONT COVER
BYPASSTRAY
BYPASSTRAY
BYPASSTRAY
BYPASSTRAY
BACK COVERINSERTIONTYPE A
INSERTIONTYPE B
OK
8 x11PLAIN
1 / 2 8 x11PLAIN
1 / 2 8 x11PLAIN
1 / 2
(X) (Y)
1
2
To cancel covers/inserts settings...Touch the [CANCEL] key in the screen of step 2.
PLEASE SET UP A FRONT COVER.
FRONT COVER SETTING
PRINT ON FRONT COVER
YES NO1-SIDED 2-SIDED
0OKCANCEL
PAPER TRAY
BYPASSTRAY
8 x11PLAIN
1 / 2
(X) (Y) (Z)
1
2
3
PLEASE SET UP COVERS/INSERTS.
SPECIAL MODES
COVERS/INSERTS
FRONT COVERINSERTION
TYPE A SETTINGSPAPER TRAYSETTINGS
PAGE LAYOUT
INSERTIONSETTINGSINSERTION
TYPE B SETTINGSBACK COVER
0OK
OKCANCEL
dragonII_copy_sec.book 13 ページ 2006年10月18日 水曜日 午後7時39分
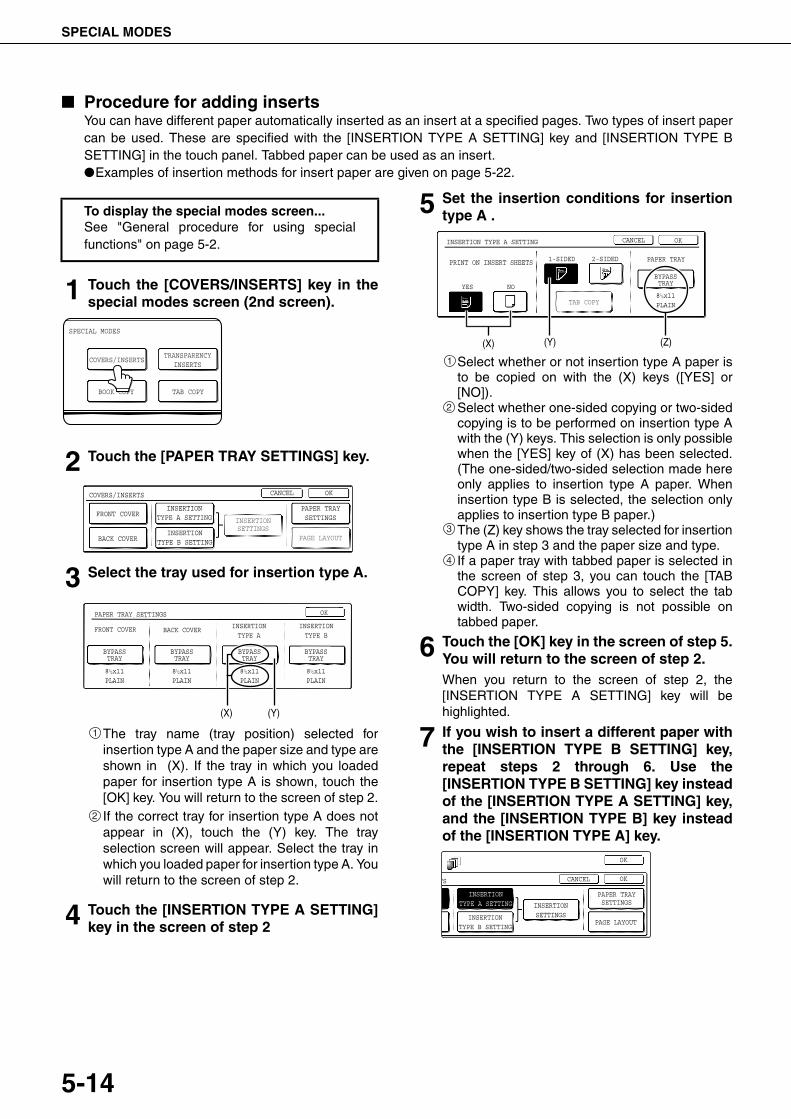
SPECIAL MODES
5-14
■ Procedure for adding insertsYou can have different paper automatically inserted as an insert at a specified pages. Two types of insert papercan be used. These are specified with the [INSERTION TYPE A SETTING] key and [INSERTION TYPE BSETTING] in the touch panel. Tabbed paper can be used as an insert.●Examples of insertion methods for insert paper are given on page 5-22.
1 Touch the [COVERS/INSERTS] key in thespecial modes screen (2nd screen).
2 Touch the [PAPER TRAY SETTINGS] key.
3 Select the tray used for insertion type A.
The tray name (tray position) selected forinsertion type A and the paper size and type areshown in (X). If the tray in which you loadedpaper for insertion type A is shown, touch the[OK] key. You will return to the screen of step 2.If the correct tray for insertion type A does notappear in (X), touch the (Y) key. The trayselection screen will appear. Select the tray inwhich you loaded paper for insertion type A. Youwill return to the screen of step 2.
4 Touch the [INSERTION TYPE A SETTING]key in the screen of step 2
5 Set the insertion conditions for insertiontype A .
Select whether or not insertion type A paper isto be copied on with the (X) keys ([YES] or[NO]).Select whether one-sided copying or two-sidedcopying is to be performed on insertion type Awith the (Y) keys. This selection is only possiblewhen the [YES] key of (X) has been selected.(The one-sided/two-sided selection made hereonly applies to insertion type A paper. Wheninsertion type B is selected, the selection onlyapplies to insertion type B paper.)The (Z) key shows the tray selected for insertiontype A in step 3 and the paper size and type.If a paper tray with tabbed paper is selected inthe screen of step 3, you can touch the [TABCOPY] key. This allows you to select the tabwidth. Two-sided copying is not possible ontabbed paper.
6 Touch the [OK] key in the screen of step 5.You will return to the screen of step 2.When you return to the screen of step 2, the[INSERTION TYPE A SETTING] key will behighlighted.
7 If you wish to insert a different paper withthe [INSERTION TYPE B SETTING] key,repeat steps 2 through 6. Use the[INSERTION TYPE B SETTING] key insteadof the [INSERTION TYPE A SETTING] key,and the [INSERTION TYPE B] key insteadof the [INSERTION TYPE A] key.
To display the special modes screen...See "General procedure for using specialfunctions" on page 5-2.
SPECIAL MODES
COVERS/INSERTSTRANSPARENCY
INSERTS
TAB COPYBOOK COPY
FRONT COVER
BACK COVER
INSERTIONTYPE A SETTING
PAPER TRAYSETTINGS
PAGE LAYOUT
CANCEL OK
INSERTIONSETTINGS
COVERS/INSERTS
INSERTIONTYPE B SETTING
PAPER TRAY SETTINGS
FRONT COVER
BYPASSTRAY
BYPASSTRAY
BYPASSTRAY
BYPASSTRAY
BACK COVERINSERTIONTYPE A
INSERTIONTYPE B
OK
8 x11PLAIN
1 / 2 8 x11PLAIN
8 x11PLAIN
1 / 21 / 2 8 x11
PLAIN
1 / 2
(X) (Y)
1
2
INSERTION TYPE A SETTING
PRINT ON INSERT SHEETS
YES NO
1-SIDED 2-SIDED
OKCANCEL
PAPER TRAY
TAB COPY8 x11PLAIN
1 / 2
BYPASSTRAY
(X) (Y) (Z)
1
2
3
4
TS
INSERTIONTYPE A SETTING
PAPER TRAYSETTINGS
PAGE LAYOUT
INSERTIONSETTINGSINSERTION
TYPE B SETTING
OK
OKCANCEL
dragonII_copy_sec.book 14 ページ 2006年10月18日 水曜日 午後7時39分
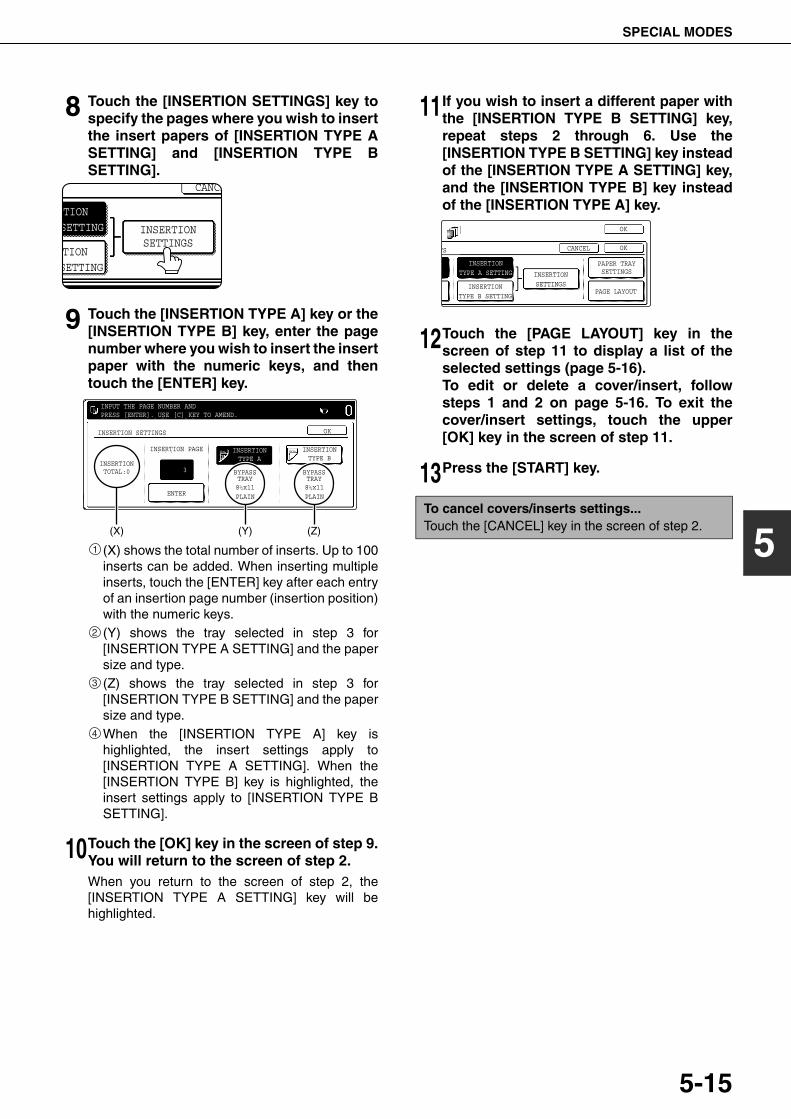
SPECIAL MODES
5-15
5
8 Touch the [INSERTION SETTINGS] key tospecify the pages where you wish to insertthe insert papers of [INSERTION TYPE ASETTING] and [INSERTION TYPE BSETTING].
9 Touch the [INSERTION TYPE A] key or the[INSERTION TYPE B] key, enter the pagenumber where you wish to insert the insertpaper with the numeric keys, and thentouch the [ENTER] key.
(X) shows the total number of inserts. Up to 100inserts can be added. When inserting multipleinserts, touch the [ENTER] key after each entryof an insertion page number (insertion position)with the numeric keys.(Y) shows the tray selected in step 3 for[INSERTION TYPE A SETTING] and the papersize and type.(Z) shows the tray selected in step 3 for[INSERTION TYPE B SETTING] and the papersize and type.When the [INSERTION TYPE A] key ishighlighted, the insert settings apply to[INSERTION TYPE A SETTING]. When the[INSERTION TYPE B] key is highlighted, theinsert settings apply to [INSERTION TYPE BSETTING].
10Touch the [OK] key in the screen of step 9.You will return to the screen of step 2.When you return to the screen of step 2, the[INSERTION TYPE A SETTING] key will behighlighted.
11If you wish to insert a different paper withthe [INSERTION TYPE B SETTING] key,repeat steps 2 through 6. Use the[INSERTION TYPE B SETTING] key insteadof the [INSERTION TYPE A SETTING] key,and the [INSERTION TYPE B] key insteadof the [INSERTION TYPE A] key.
12Touch the [PAGE LAYOUT] key in thescreen of step 11 to display a list of theselected settings (page 5-16).To edit or delete a cover/insert, followsteps 1 and 2 on page 5-16. To exit thecover/insert settings, touch the upper[OK] key in the screen of step 11.
13Press the [START] key.
INSERTIONSETTINGS
RTIONSETTING
TIONSETTING
CANCE
INSERTION SETTINGS
INPUT THE PAGE NUMBER ANDPRESS [ENTER]. USE [C] KEY TO AMEND.
INSERTIONTOTAL:0
ENTER8 x11PLAIN
1 / 2
INSERTION PAGE
BYPASSTRAY
BYPASSTRAY8 x11PLAIN
1 / 28 x11PLAIN
1 / 2
INSERTIONTYPE A
3
INSERTIONTYPE B
OK
(X) (Y) (Z)
1
2
3
4
To cancel covers/inserts settings...Touch the [CANCEL] key in the screen of step 2.
TS
INSERTIONTYPE A SETTING
PAPER TRAYSETTINGS
PAGE LAYOUT
INSERTIONSETTINGSINSERTION
TYPE B SETTING
OK
OKCANCEL
dragonII_copy_sec.book 15 ページ 2006年10月18日 水曜日 午後7時39分
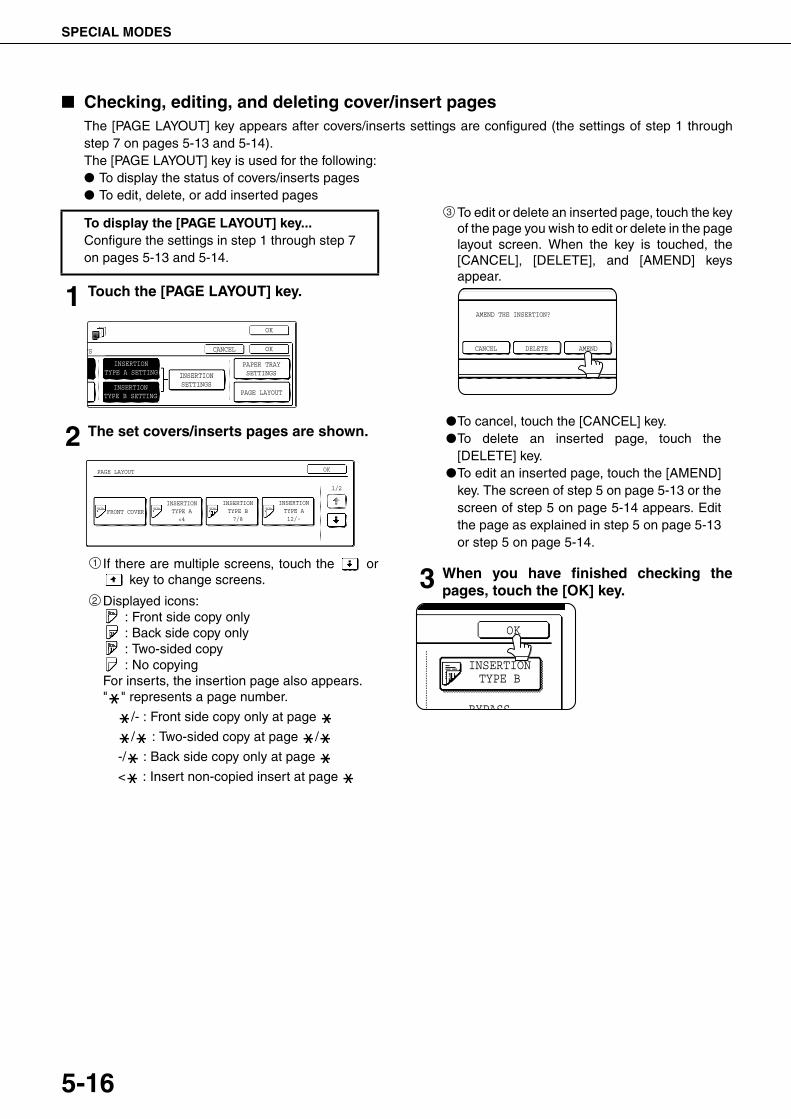
SPECIAL MODES
5-16
■ Checking, editing, and deleting cover/insert pagesThe [PAGE LAYOUT] key appears after covers/inserts settings are configured (the settings of step 1 throughstep 7 on pages 5-13 and 5-14).The [PAGE LAYOUT] key is used for the following:● To display the status of covers/inserts pages● To edit, delete, or add inserted pages
1 Touch the [PAGE LAYOUT] key.
2 The set covers/inserts pages are shown.
If there are multiple screens, touch the or key to change screens.
Displayed icons: : Front side copy only : Back side copy only : Two-sided copy : No copying
For inserts, the insertion page also appears." " represents a page number.
/- : Front side copy only at page
/ : Two-sided copy at page /
-/ : Back side copy only at page
< : Insert non-copied insert at page
To edit or delete an inserted page, touch the keyof the page you wish to edit or delete in the pagelayout screen. When the key is touched, the[CANCEL], [DELETE], and [AMEND] keysappear.
●To cancel, touch the [CANCEL] key.●To delete an inserted page, touch the
[DELETE] key.●To edit an inserted page, touch the [AMEND]
key. The screen of step 5 on page 5-13 or thescreen of step 5 on page 5-14 appears. Editthe page as explained in step 5 on page 5-13or step 5 on page 5-14.
3 When you have finished checking thepages, touch the [OK] key.
To display the [PAGE LAYOUT] key...Configure the settings in step 1 through step 7on pages 5-13 and 5-14.
TS
INSERTIONTYPE A SETTING
PAPER TRAYSETTINGS
PAGE LAYOUT
INSERTIONSETTINGSINSERTION
TYPE B SETTING
OK
OKCANCEL
PAGE LAYOUT
FRONT COVERINSERTIONTYPE A
<4
INSERTIONTYPE B7/8
INSERTIONTYPE A12/-
OK
1/2
1
2
3
AMEND THE INSERTION?
CANCEL DELETE AMEND
INSERTIONTYPE B
BYPASS
OK
dragonII_copy_sec.book 16 ページ 2006年10月18日 水曜日 午後7時39分
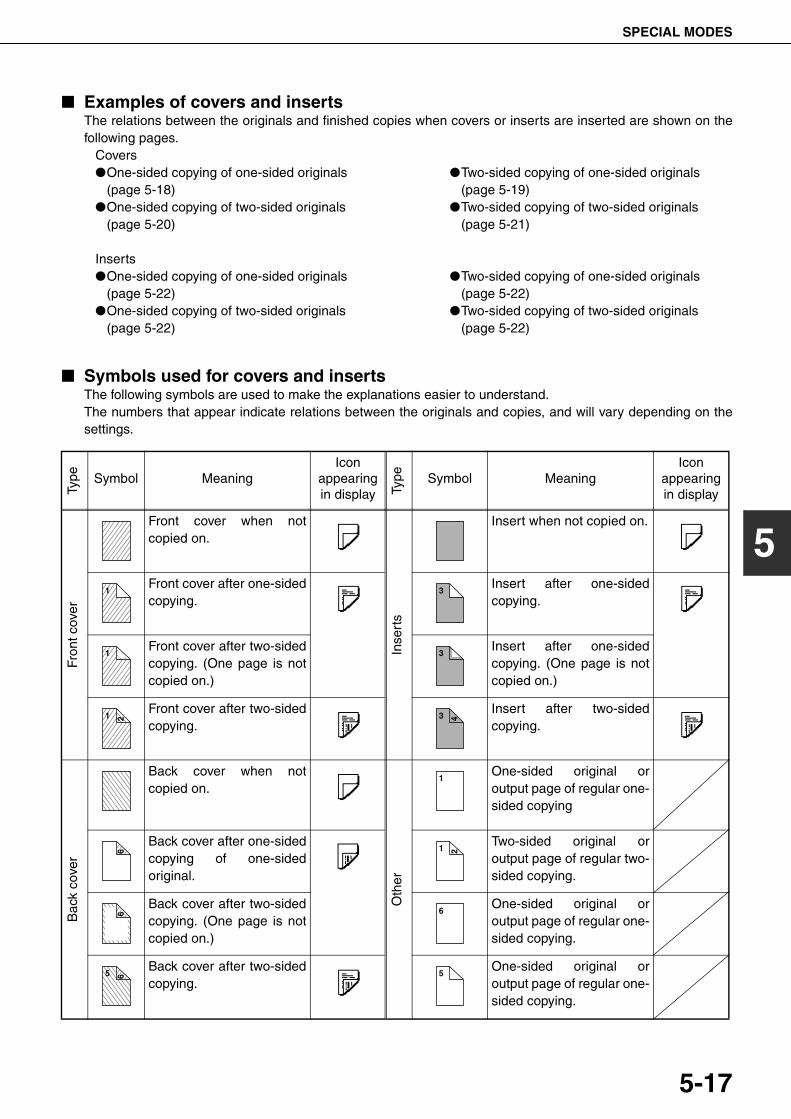
SPECIAL MODES
5-17
5
■ Examples of covers and insertsThe relations between the originals and finished copies when covers or inserts are inserted are shown on thefollowing pages.
Covers●One-sided copying of one-sided originals
(page 5-18)●One-sided copying of two-sided originals
(page 5-20)
●Two-sided copying of one-sided originals(page 5-19)
●Two-sided copying of two-sided originals(page 5-21)
Inserts●One-sided copying of one-sided originals
(page 5-22)●One-sided copying of two-sided originals
(page 5-22)
●Two-sided copying of one-sided originals(page 5-22)
●Two-sided copying of two-sided originals(page 5-22)
■ Symbols used for covers and insertsThe following symbols are used to make the explanations easier to understand.The numbers that appear indicate relations between the originals and copies, and will vary depending on thesettings.
Type Symbol Meaning
Icon appearing in display Ty
pe Symbol MeaningIcon
appearing in display
Fron
t cov
er
Front cover when notcopied on.
Inse
rts
Insert when not copied on.
Front cover after one-sidedcopying.
Insert after one-sidedcopying.
Front cover after two-sidedcopying. (One page is notcopied on.)
Insert after one-sidedcopying. (One page is notcopied on.)
Front cover after two-sidedcopying.
Insert after two-sidedcopying.
Bac
k co
ver
Back cover when notcopied on.
Oth
er
One-sided original oroutput page of regular one-sided copying
Back cover after one-sidedcopying of one-sidedoriginal.
Two-sided original oroutput page of regular two-sided copying.
Back cover after two-sidedcopying. (One page is notcopied on.)
One-sided original oroutput page of regular one-sided copying.
Back cover after two-sidedcopying.
One-sided original oroutput page of regular one-sided copying.
1 3
1 3
1 2 3 4
1
6 1 2
6 6
65 5
dragonII_copy_sec.book 17 ページ 2006年10月18日 水曜日 午後7時39分
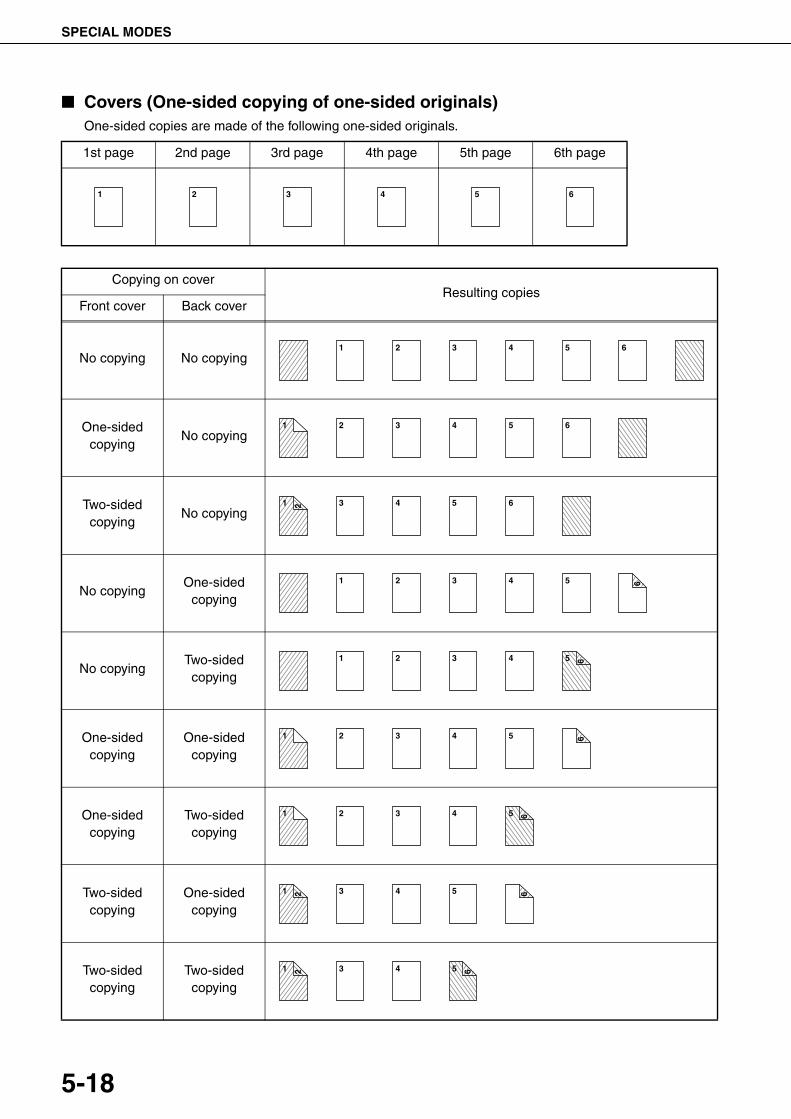
SPECIAL MODES
5-18
■ Covers (One-sided copying of one-sided originals)One-sided copies are made of the following one-sided originals.
1st page 2nd page 3rd page 4th page 5th page 6th page
1 2 3 4 5 6
Copying on coverResulting copies
Front cover Back cover
No copying No copying
One-sided copying
No copying
Two-sided copying
No copying
No copyingOne-sided
copying
No copyingTwo-sided copying
One-sided copying
One-sided copying
One-sided copying
Two-sided copying
Two-sided copying
One-sided copying
Two-sided copying
Two-sided copying
1 2 3 4 5 6
1 2 3 4 5 6
1 2 3 4 5 6
1 2 3 4 5 6
1 2 3 4 65
1 2 3 4 5 6
1 2 3 4 65
1 2 3 4 5 6
1 2 3 4 65
dragonII_copy_sec.book 18 ページ 2006年10月18日 水曜日 午後7時39分
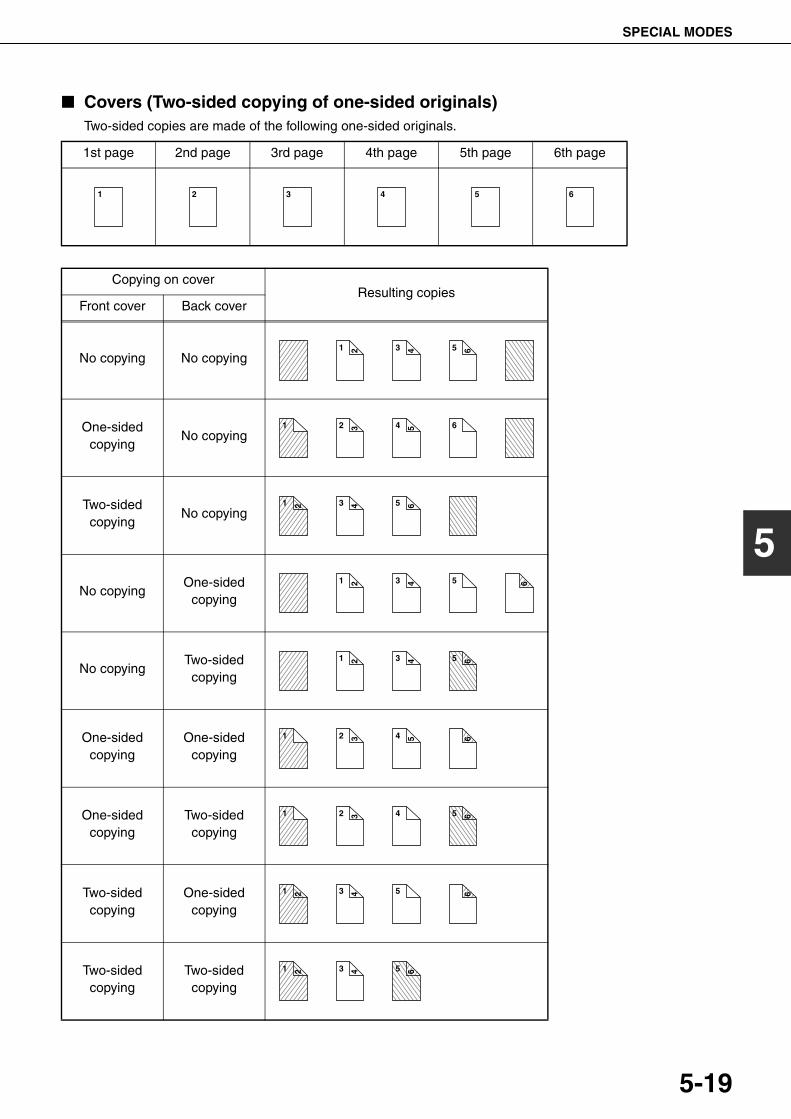
SPECIAL MODES
5-19
5
■ Covers (Two-sided copying of one-sided originals)Two-sided copies are made of the following one-sided originals.
1st page 2nd page 3rd page 4th page 5th page 6th page
1 2 3 4 5 6
Copying on coverResulting copies
Front cover Back cover
No copying No copying
One-sided copying
No copying
Two-sided copying
No copying
No copyingOne-sided
copying
No copyingTwo-sided copying
One-sided copying
One-sided copying
One-sided copying
Two-sided copying
Two-sided copying
One-sided copying
Two-sided copying
Two-sided copying
1 2 3 4 5 6
1 2 3 4 5 6
1 2 3 4 5 6
1 2 3 4 5 6
1 2 3 4 65
1 2 3 4 5 6
1 2 3 4 65
1 2 3 4 5 6
1 2 3 4 65
dragonII_copy_sec.book 19 ページ 2006年10月18日 水曜日 午後7時39分
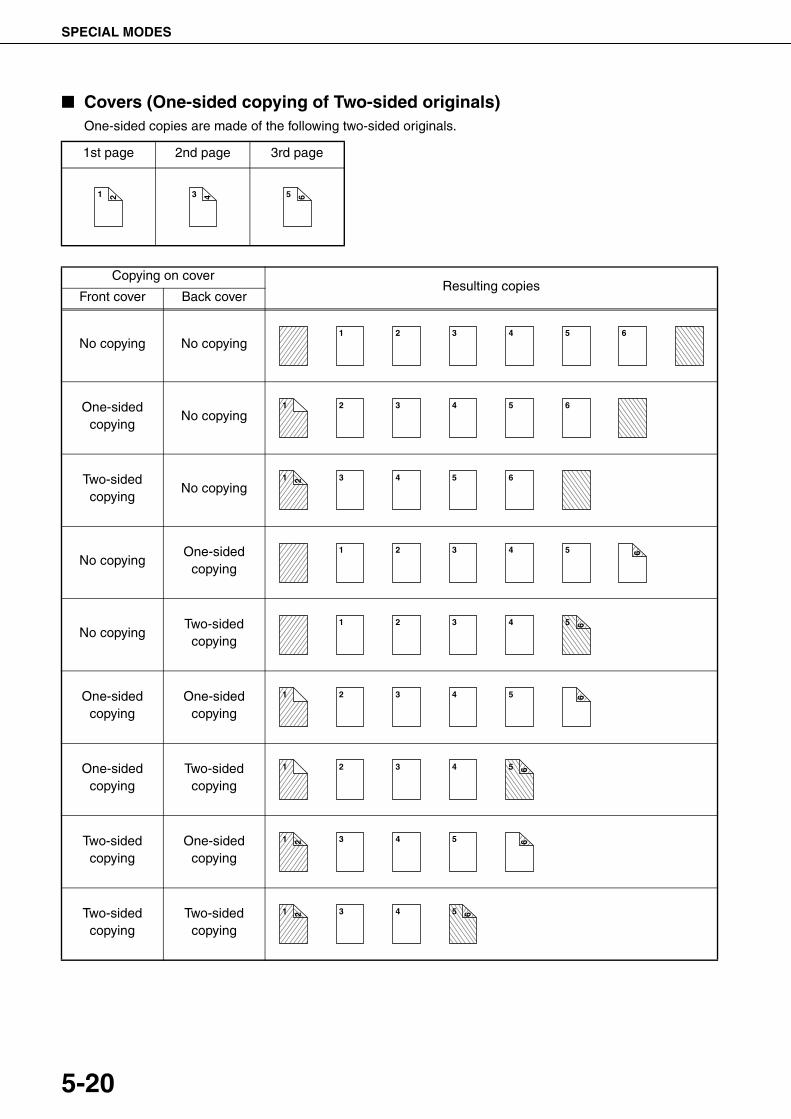
SPECIAL MODES
5-20
■ Covers (One-sided copying of Two-sided originals)One-sided copies are made of the following two-sided originals.
1st page 2nd page 3rd page
1 2 3 4 5 6
Copying on coverResulting copies
Front cover Back cover
No copying No copying
One-sided copying
No copying
Two-sided copying
No copying
No copyingOne-sided
copying
No copyingTwo-sided copying
One-sided copying
One-sided copying
One-sided copying
Two-sided copying
Two-sided copying
One-sided copying
Two-sided copying
Two-sided copying
1 2 3 4 5 6
1 2 3 4 5 6
1 2 3 4 5 6
1 2 3 4 5 61 2 3 4 65
1 2 3 4 5 6
1 2 3 4 65
1 2 3 4 5 6
1 2 3 4 65
dragonII_copy_sec.book 20 ページ 2006年10月18日 水曜日 午後7時39分

SPECIAL MODES
5-21
5
■ Covers (Two-sided copying of two-sided originals)Two-sided copies are made of the following two-sided originals.
1st page 2nd page 3rd page
1 2 3 4 5 6
Copying on coverResulting copies
Front cover Back cover
No copying No copying
One-sided copying
No copying
Two-sided copying
No copying
No copyingOne-sided
copying
No copyingTwo-sided copying
One-sided copying
One-sided copying
One-sided copying
Two-sided copying
Two-sided copying
One-sided copying
Two-sided copying
Two-sided copying
1 2 3 4 5 6
1 3 4 5 6
1 2 3 4 5 6
1 2 3 4 6
1 2 3 4 65
1 3 4 6
1 3 4 65
1 2 3 4 6
1 2 3 4 65
dragonII_copy_sec.book 21 ページ 2006年10月18日 水曜日 午後7時39分
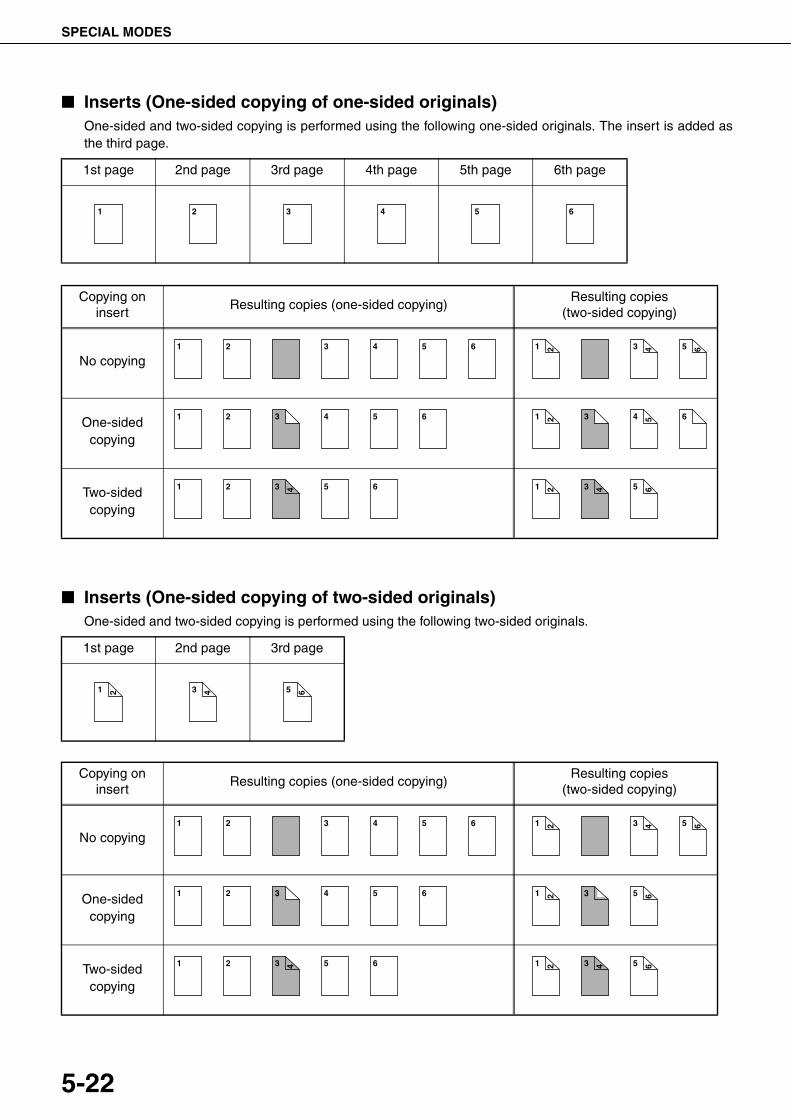
SPECIAL MODES
5-22
■ Inserts (One-sided copying of one-sided originals)One-sided and two-sided copying is performed using the following one-sided originals. The insert is added asthe third page.
■ Inserts (One-sided copying of two-sided originals)One-sided and two-sided copying is performed using the following two-sided originals.
1st page 2nd page 3rd page 4th page 5th page 6th page
1 2 3 4 5 6
Copying on insert
Resulting copies (one-sided copying)Resulting copies
(two-sided copying)
No copying
One-sided copying
Two-sided copying
1 2 3 4 5 6 1 2 3 4 5 6
1 2 3 4 5 6 1 2 3 4 5 6
1 2 3 4 5 6 1 2 3 4 5 61st page 2nd page 3rd page
1 2 3 4 5 6
Copying on insert
Resulting copies (one-sided copying)Resulting copies
(two-sided copying)
No copying
One-sided copying
Two-sided copying
1 2 3 4 5 6 1 2 3 4 5 6
1 2 3 4 5 6 1 2 3 5 6
1 2 3 4 5 6 1 2 3 4 5 6
dragonII_copy_sec.book 22 ページ 2006年10月18日 水曜日 午後7時39分
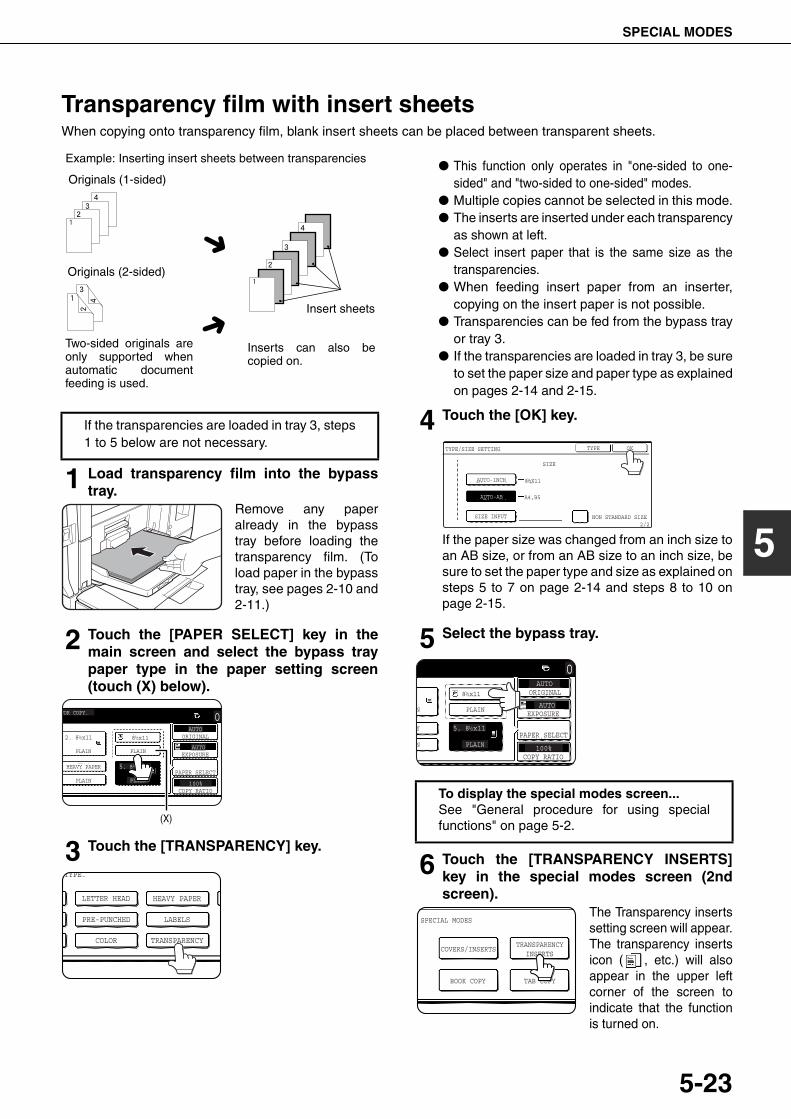
SPECIAL MODES
5-23
5
Transparency film with insert sheetsWhen copying onto transparency film, blank insert sheets can be placed between transparent sheets.
● This function only operates in "one-sided to one-sided" and "two-sided to one-sided" modes.
● Multiple copies cannot be selected in this mode.● The inserts are inserted under each transparency
as shown at left.● Select insert paper that is the same size as the
transparencies.● When feeding insert paper from an inserter,
copying on the insert paper is not possible.● Transparencies can be fed from the bypass tray
or tray 3.● If the transparencies are loaded in tray 3, be sure
to set the paper size and paper type as explainedon pages 2-14 and 2-15.
1 Load transparency film into the bypasstray.
Remove any paperalready in the bypasstray before loading thetransparency film. (Toload paper in the bypasstray, see pages 2-10 and2-11.)
2 Touch the [PAPER SELECT] key in themain screen and select the bypass traypaper type in the paper setting screen(touch (X) below).
3 Touch the [TRANSPARENCY] key.
4 Touch the [OK] key.
If the paper size was changed from an inch size toan AB size, or from an AB size to an inch size, besure to set the paper type and size as explained onsteps 5 to 7 on page 2-14 and steps 8 to 10 onpage 2-15.
5 Select the bypass tray.
6 Touch the [TRANSPARENCY INSERTS]key in the special modes screen (2ndscreen).
The Transparency insertssetting screen will appear.The transparency insertsicon ( , etc.) will alsoappear in the upper leftcorner of the screen toindicate that the functionis turned on.
Insert sheets
Example: Inserting insert sheets between transparencies
Originals (1-sided)
Originals (2-sided)
Two-sided originals areonly supported whenautomatic documentfeeding is used.
Inserts can also becopied on.
If the transparencies are loaded in tray 3, steps1 to 5 below are not necessary.
FOR COPY.
AUTO
AUTO
100%
ORIGINAL
PAPER SELECT
COPY RATIO
EXPOSURE
0
PLAIN PLAIN
HEAVY PAPER
PLAIN PLAIN
2. 8 x11
5. 8 x111 / 2
8 x111 / 2 1 / 2
(X)
HEAVY PAPER
TYPE.
LETTER HEAD
LABELSPRE-PUNCHED
COLOR TRANSPARENCY
To display the special modes screen...See "General procedure for using specialfunctions" on page 5-2.
TYPE
NON STANDARD SIZE
OK
SIZE
AUTO-INCH
AUTO-AB
SIZE INPUT
8 X11
A4,B5
TYPE/SIZE SETTING
2/2
1 / 2
AUTO
AUTO
100%
ORIGINAL
PAPER SELECT
COPY RATIO
EXPOSURE
0
N PLAIN
Y
N PLAIN
5. 8 x11
8 x111 / 2
1 / 2
SPECIAL MODES
COVERS/INSERTSTRANSPARENCY
INSERTS
TAB COPYBOOK COPY
dragonII_copy_sec.book 23 ページ 2006年10月18日 水曜日 午後7時39分
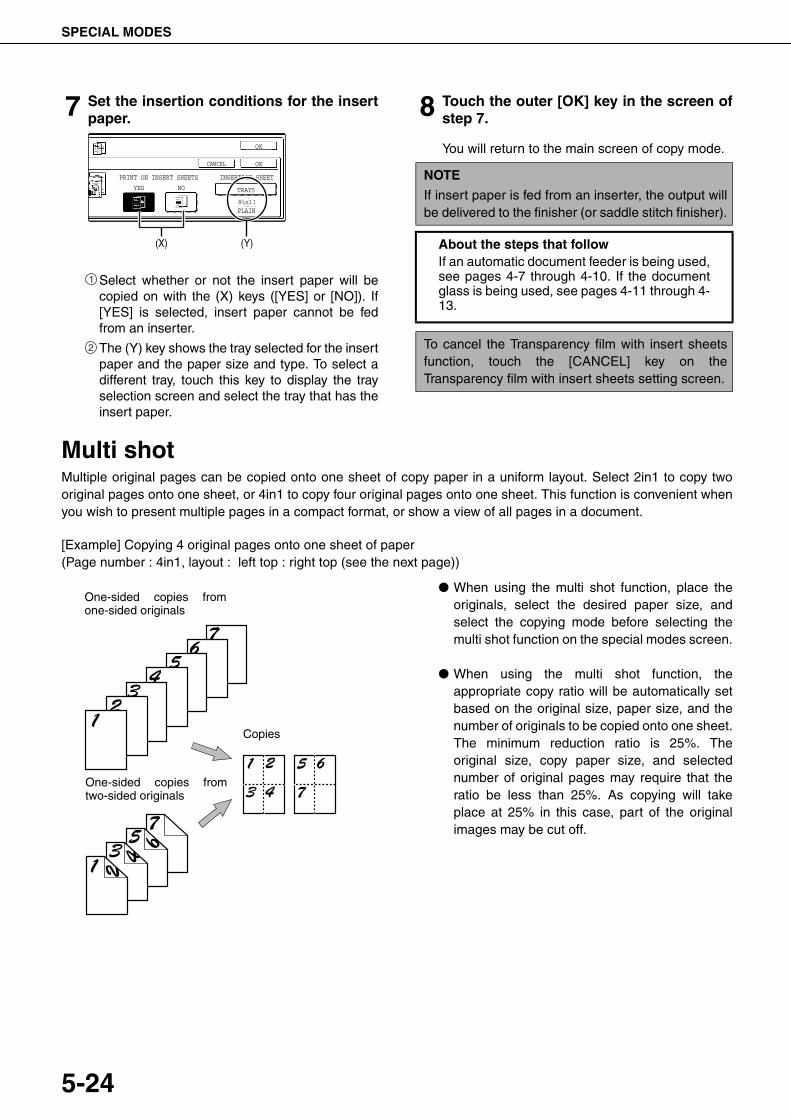
SPECIAL MODES
5-24
7 Set the insertion conditions for the insertpaper.
Select whether or not the insert paper will becopied on with the (X) keys ([YES] or [NO]). If[YES] is selected, insert paper cannot be fedfrom an inserter.
The (Y) key shows the tray selected for the insertpaper and the paper size and type. To select adifferent tray, touch this key to display the trayselection screen and select the tray that has theinsert paper.
8 Touch the outer [OK] key in the screen ofstep 7.
You will return to the main screen of copy mode.
Multi shotMultiple original pages can be copied onto one sheet of copy paper in a uniform layout. Select 2in1 to copy twooriginal pages onto one sheet, or 4in1 to copy four original pages onto one sheet. This function is convenient whenyou wish to present multiple pages in a compact format, or show a view of all pages in a document.
[Example] Copying 4 original pages onto one sheet of paper(Page number : 4in1, layout : left top : right top (see the next page))
● When using the multi shot function, place theoriginals, select the desired paper size, andselect the copying mode before selecting themulti shot function on the special modes screen.
● When using the multi shot function, theappropriate copy ratio will be automatically setbased on the original size, paper size, and thenumber of originals to be copied onto one sheet.The minimum reduction ratio is 25%. Theoriginal size, copy paper size, and selectednumber of original pages may require that theratio be less than 25%. As copying will takeplace at 25% in this case, part of the originalimages may be cut off.
PRINT ON INSERT SHEETS
YES NO
OK
OKCANCEL
INSERTION SHEET
TRAY5
8 x111 / 2
PLAIN
(X) (Y)
1
2
NOTE
If insert paper is fed from an inserter, the output willbe delivered to the finisher (or saddle stitch finisher).
About the steps that followIf an automatic document feeder is being used,see pages 4-7 through 4-10. If the documentglass is being used, see pages 4-11 through 4-13.
To cancel the Transparency film with insert sheetsfunction, touch the [CANCEL] key on theTransparency film with insert sheets setting screen.
One-sided copies fromone-sided originals
One-sided copies fromtwo-sided originals
Copies
dragonII_copy_sec.book 24 ページ 2006年10月18日 水曜日 午後7時39分
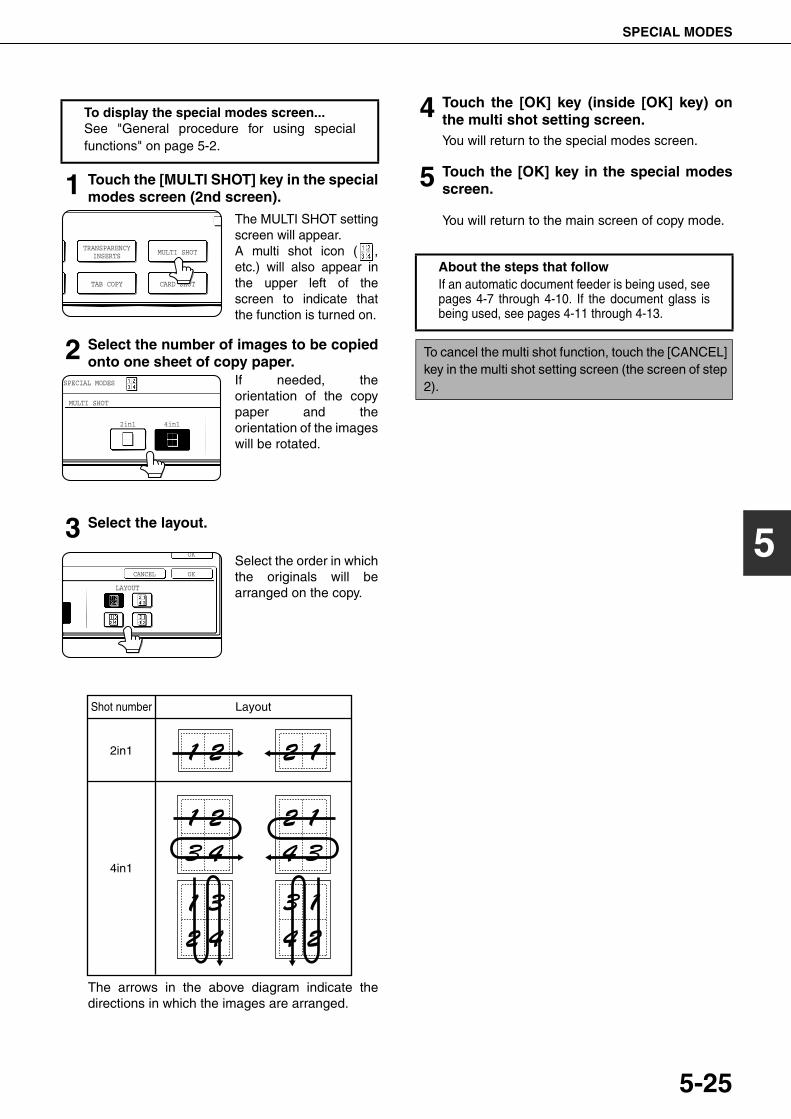
SPECIAL MODES
5-25
5
1 Touch the [MULTI SHOT] key in the specialmodes screen (2nd screen).
The MULTI SHOT settingscreen will appear.A multi shot icon ( ,etc.) will also appear inthe upper left of thescreen to indicate thatthe function is turned on.
2 Select the number of images to be copiedonto one sheet of copy paper.
If needed, theorientation of the copypaper and theorientation of the imageswill be rotated.
3 Select the layout.
Select the order in whichthe originals will bearranged on the copy.
The arrows in the above diagram indicate thedirections in which the images are arranged.
4 Touch the [OK] key (inside [OK] key) onthe multi shot setting screen.You will return to the special modes screen.
5 Touch the [OK] key in the special modesscreen.
You will return to the main screen of copy mode.
To display the special modes screen...See "General procedure for using specialfunctions" on page 5-2.
TRANSPARENCYINSERTS MULTI SHOT
CARD SHOTTAB COPY
SPECIAL MODES
MULTI SHOT
2in1 4in1
LAYOUT
CANCEL OK
OK
2in1
4in1
Shot number Layout
About the steps that followIf an automatic document feeder is being used, seepages 4-7 through 4-10. If the document glass isbeing used, see pages 4-11 through 4-13.
To cancel the multi shot function, touch the [CANCEL]key in the multi shot setting screen (the screen of step2).
dragonII_copy_sec.book 25 ページ 2006年10月18日 水曜日 午後7時39分
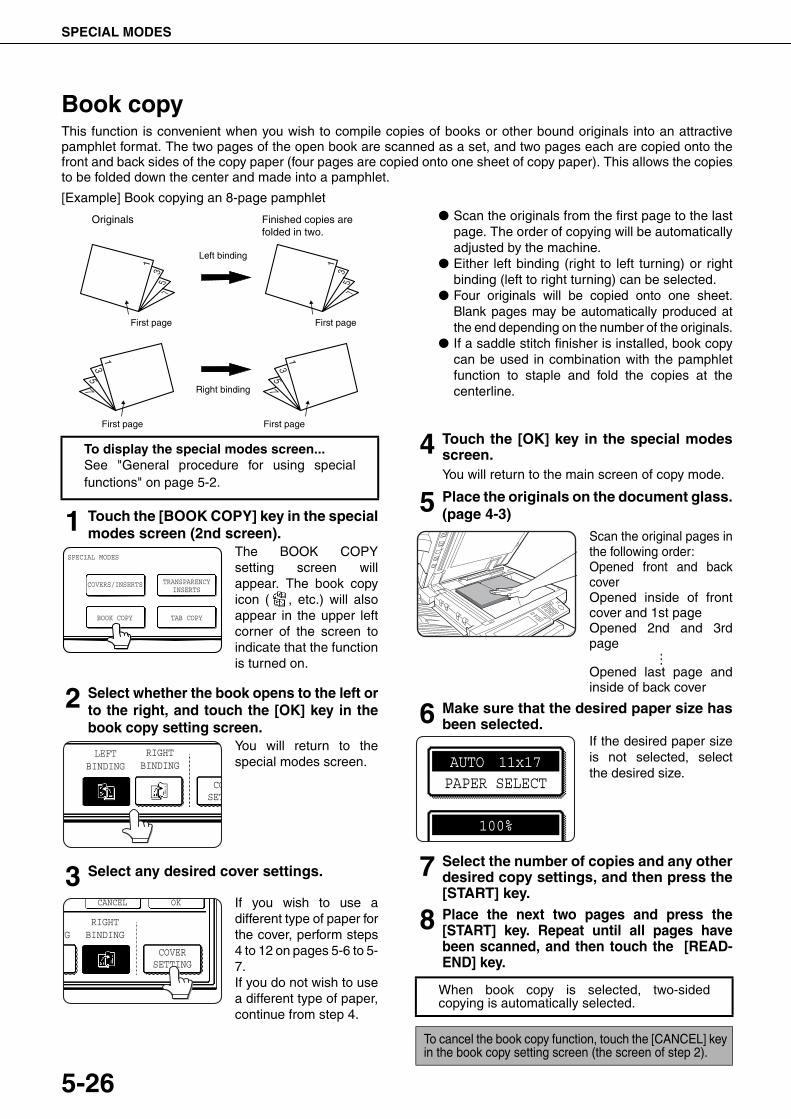
SPECIAL MODES
5-26
Book copyThis function is convenient when you wish to compile copies of books or other bound originals into an attractivepamphlet format. The two pages of the open book are scanned as a set, and two pages each are copied onto thefront and back sides of the copy paper (four pages are copied onto one sheet of copy paper). This allows the copiesto be folded down the center and made into a pamphlet.
[Example] Book copying an 8-page pamphlet● Scan the originals from the first page to the last
page. The order of copying will be automaticallyadjusted by the machine.
● Either left binding (right to left turning) or rightbinding (left to right turning) can be selected.
● Four originals will be copied onto one sheet.Blank pages may be automatically produced atthe end depending on the number of the originals.
● If a saddle stitch finisher is installed, book copycan be used in combination with the pamphletfunction to staple and fold the copies at thecenterline.
1 Touch the [BOOK COPY] key in the specialmodes screen (2nd screen).
The BOOK COPYsetting screen willappear. The book copyicon ( , etc.) will alsoappear in the upper leftcorner of the screen toindicate that the functionis turned on.
2 Select whether the book opens to the left orto the right, and touch the [OK] key in thebook copy setting screen.
You will return to thespecial modes screen.
3 Select any desired cover settings.
If you wish to use adifferent type of paper forthe cover, perform steps4 to 12 on pages 5-6 to 5-7.If you do not wish to usea different type of paper,continue from step 4.
4 Touch the [OK] key in the special modesscreen.You will return to the main screen of copy mode.
5 Place the originals on the document glass.(page 4-3)
Scan the original pages inthe following order:Opened front and backcoverOpened inside of frontcover and 1st pageOpened 2nd and 3rdpage
Opened last page andinside of back cover
6 Make sure that the desired paper size hasbeen selected.
If the desired paper sizeis not selected, selectthe desired size.
7 Select the number of copies and any otherdesired copy settings, and then press the[START] key.
8 Place the next two pages and press the[START] key. Repeat until all pages havebeen scanned, and then touch the [READ-END] key.
Finished copies arefolded in two.
Originals
Left binding
Right binding
First page
First page
First page
First page
To display the special modes screen...See "General procedure for using specialfunctions" on page 5-2.
SPECIAL MODES
COVERS/INSERTS TRANSPARENCYINSERTS
TAB COPYBOOK COPY
RIGHTBINDING
COSET
LEFTBINDING
CANCEL OK
RIGHTBINDING
COVERSETTING
NG
When book copy is selected, two-sidedcopying is automatically selected.
To cancel the book copy function, touch the [CANCEL] keyin the book copy setting screen (the screen of step 2).
PAPER SELECT AUTO 11x17
100%
dragonII_copy_sec.book 26 ページ 2006年10月18日 水曜日 午後7時39分
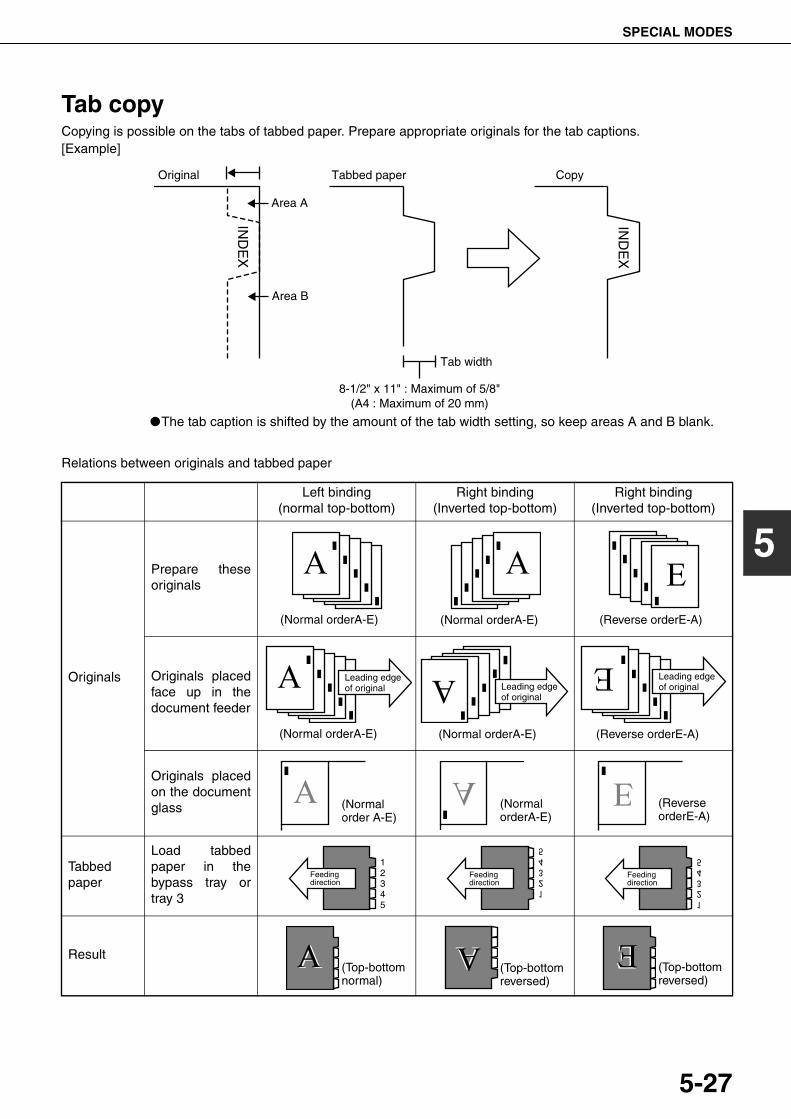
SPECIAL MODES
5-27
5
Tab copyCopying is possible on the tabs of tabbed paper. Prepare appropriate originals for the tab captions.[Example]
Relations between originals and tabbed paper
Original Tabbed paper Copy
Tab width
8-1/2" x 11" : Maximum of 5/8"(A4 : Maximum of 20 mm)
IND
EX
IND
EX
Area A
Area B
●The tab caption is shifted by the amount of the tab width setting, so keep areas A and B blank.
Left binding(normal top-bottom)
Right binding (Inverted top-bottom)
Right binding (Inverted top-bottom)
Originals
Prepare theseoriginals
Originals placedface up in thedocument feeder
Originals placedon the documentglass
Tabbedpaper
Load tabbedpaper in thebypass tray ortray 3
Result
(Normal orderA-E) (Normal orderA-E) (Reverse orderE-A)
Leading edgeof original
(Normal orderA-E)
Leading edgeof original
(Normal orderA-E)
Leading edgeof original
(Reverse orderE-A)
(Normalorder A-E)
(NormalorderA-E)
(ReverseorderE-A)
12345
Feedingdirection
Feedingdirection
Feedingdirection
(Top-bottomnormal)
(Top-bottomreversed)
(Top-bottomreversed)
dragonII_copy_sec.book 27 ページ 2006年10月18日 水曜日 午後7時39分
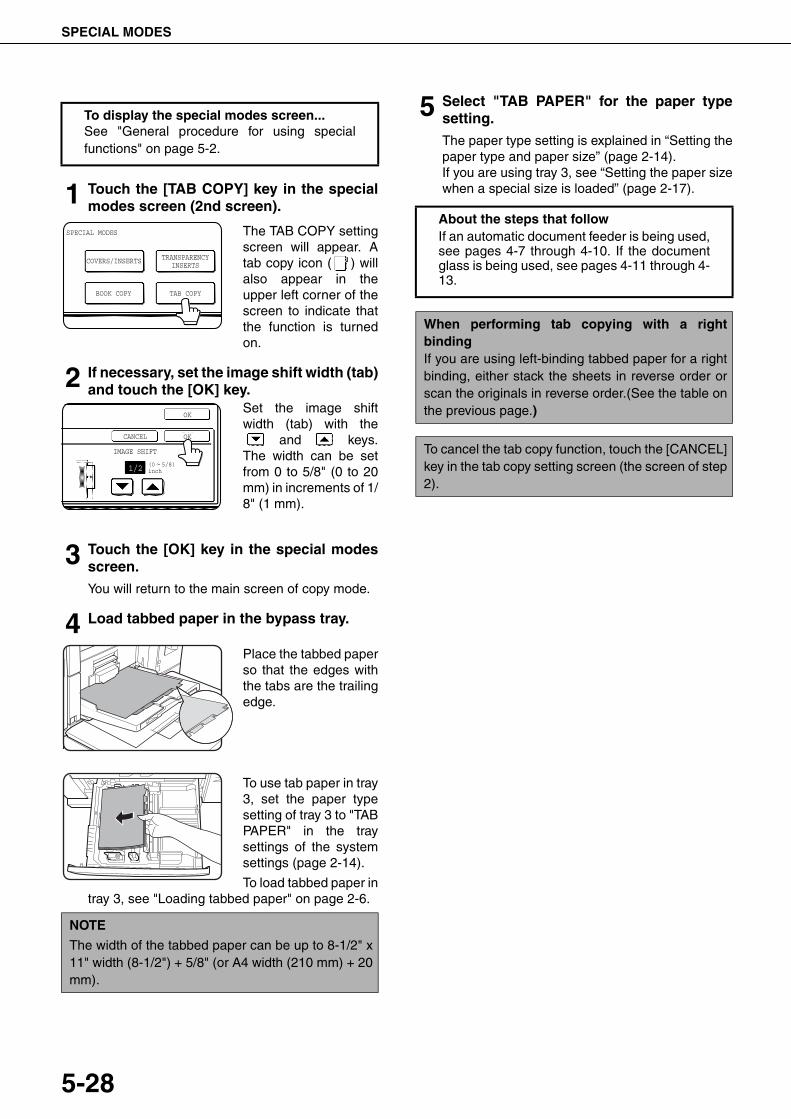
SPECIAL MODES
5-28
1 Touch the [TAB COPY] key in the specialmodes screen (2nd screen).
The TAB COPY settingscreen will appear. Atab copy icon ( ) willalso appear in theupper left corner of thescreen to indicate thatthe function is turnedon.
2 If necessary, set the image shift width (tab)and touch the [OK] key.
Set the image shiftwidth (tab) with the
and keys.The width can be setfrom 0 to 5/8" (0 to 20mm) in increments of 1/8" (1 mm).
3 Touch the [OK] key in the special modesscreen.You will return to the main screen of copy mode.
4 Load tabbed paper in the bypass tray.
Place the tabbed paperso that the edges withthe tabs are the trailingedge.
To use tab paper in tray3, set the paper typesetting of tray 3 to "TABPAPER" in the traysettings of the systemsettings (page 2-14).
To load tabbed paper intray 3, see "Loading tabbed paper" on page 2-6.
5 Select "TAB PAPER" for the paper typesetting.The paper type setting is explained in “Setting thepaper type and paper size” (page 2-14).If you are using tray 3, see “Setting the paper sizewhen a special size is loaded” (page 2-17).
To display the special modes screen...See "General procedure for using specialfunctions" on page 5-2.
NOTE
The width of the tabbed paper can be up to 8-1/2" x11" width (8-1/2") + 5/8" (or A4 width (210 mm) + 20mm).
SPECIAL MODES
COVERS/INSERTS TRANSPARENCYINSERTS
TAB COPYBOOK COPY
IMAGE SHIFT
1/2
OK
OKCANCEL
(0 5/8)inch
About the steps that followIf an automatic document feeder is being used,see pages 4-7 through 4-10. If the documentglass is being used, see pages 4-11 through 4-13.
When performing tab copying with a rightbindingIf you are using left-binding tabbed paper for a rightbinding, either stack the sheets in reverse order orscan the originals in reverse order.(See the table onthe previous page.)
To cancel the tab copy function, touch the [CANCEL]key in the tab copy setting screen (the screen of step2).
dragonII_copy_sec.book 28 ページ 2006年10月18日 水曜日 午後7時39分
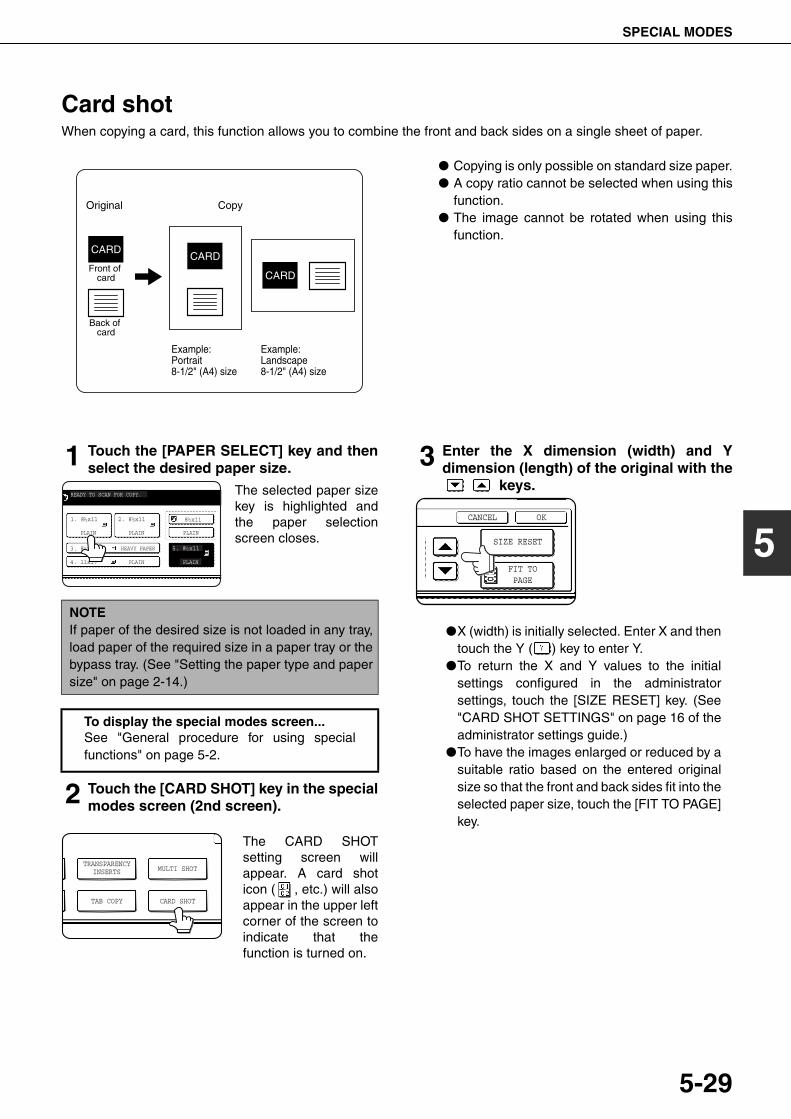
SPECIAL MODES
5-29
5
Card shotWhen copying a card, this function allows you to combine the front and back sides on a single sheet of paper.
● Copying is only possible on standard size paper.● A copy ratio cannot be selected when using this
function.● The image cannot be rotated when using this
function.
1 Touch the [PAPER SELECT] key and thenselect the desired paper size.
The selected paper sizekey is highlighted andthe paper selectionscreen closes.
2 Touch the [CARD SHOT] key in the specialmodes screen (2nd screen).
The CARD SHOTsetting screen willappear. A card shoticon ( , etc.) will alsoappear in the upper leftcorner of the screen toindicate that thefunction is turned on.
3 Enter the X dimension (width) and Ydimension (length) of the original with the
keys.
●X (width) is initially selected. Enter X and thentouch the Y ( ) key to enter Y.
●To return the X and Y values to the initialsettings configured in the administratorsettings, touch the [SIZE RESET] key. (See"CARD SHOT SETTINGS" on page 16 of theadministrator settings guide.)
●To have the images enlarged or reduced by asuitable ratio based on the entered originalsize so that the front and back sides fit into theselected paper size, touch the [FIT TO PAGE]key.
Original
Example:Portrait 8-1/2" (A4) size
Example:Landscape 8-1/2" (A4) size
Copy
Back of card
Front of card
CARDCARD
CARD
NOTEIf paper of the desired size is not loaded in any tray,load paper of the required size in a paper tray or thebypass tray. (See "Setting the paper type and papersize" on page 2-14.)
To display the special modes screen...See "General procedure for using specialfunctions" on page 5-2.
READY TO SCAN FOR COPY.
1. 8 x11
PLAIN PLAIN PLAIN
HEAVY PAPER
PLAIN PLAIN
3. 8 x11
4. 11x17
2. 8 x11
5. 8 x11
8 x111 / 21 / 2
1 / 2
1 / 2
1 / 2
TRANSPARENCYINSERTS MULTI SHOT
CARD SHOTTAB COPY
SIZE RESET
CANCEL OK
FIT TOPAGE
dragon_05.fm 29 ページ 2006年11月2日 木曜日 午後12時7分
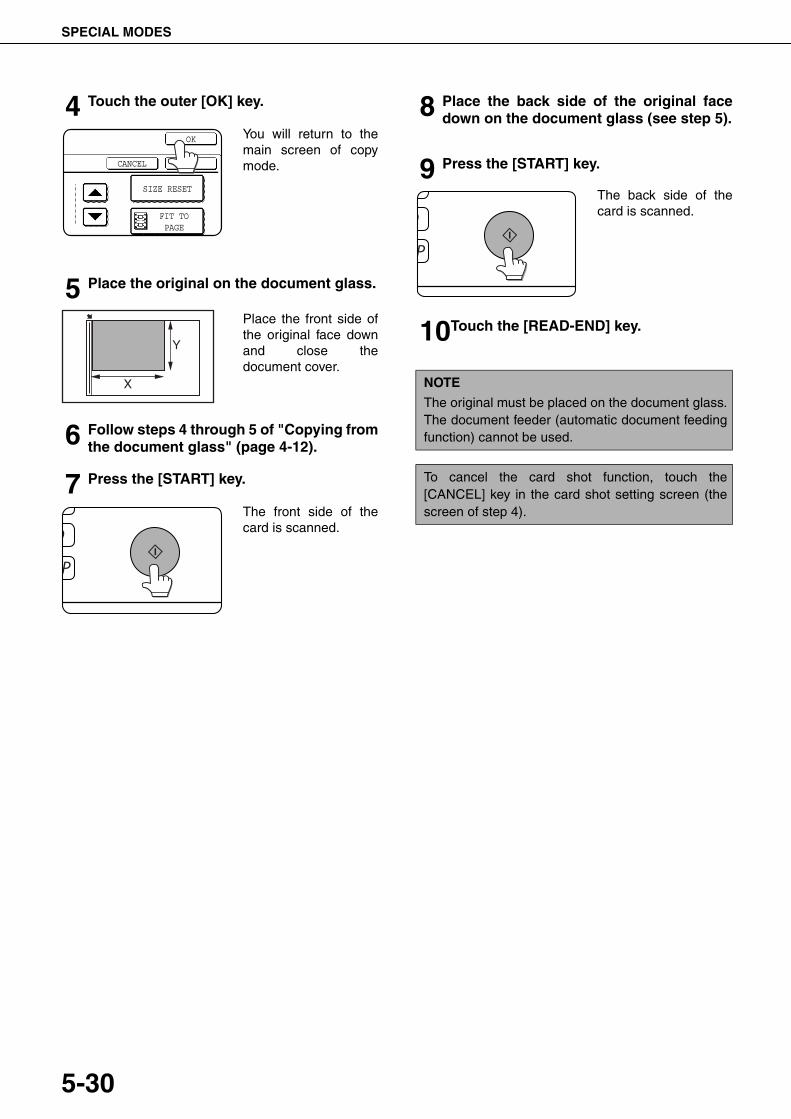
SPECIAL MODES
5-30
4 Touch the outer [OK] key.
You will return to themain screen of copymode.
5 Place the original on the document glass.
Place the front side ofthe original face downand close thedocument cover.
6 Follow steps 4 through 5 of "Copying fromthe document glass" (page 4-12).
7 Press the [START] key.
The front side of thecard is scanned.
8 Place the back side of the original facedown on the document glass (see step 5).
9 Press the [START] key.
The back side of thecard is scanned.
10Touch the [READ-END] key.
SIZE RESET
CANCEL OK
OK
FIT TOPAGE
NOTE
The original must be placed on the document glass.The document feeder (automatic document feedingfunction) cannot be used.
To cancel the card shot function, touch the[CANCEL] key in the card shot setting screen (thescreen of step 4).
dragonII_copy_sec.book 30 ページ 2006年10月18日 水曜日 午後7時39分
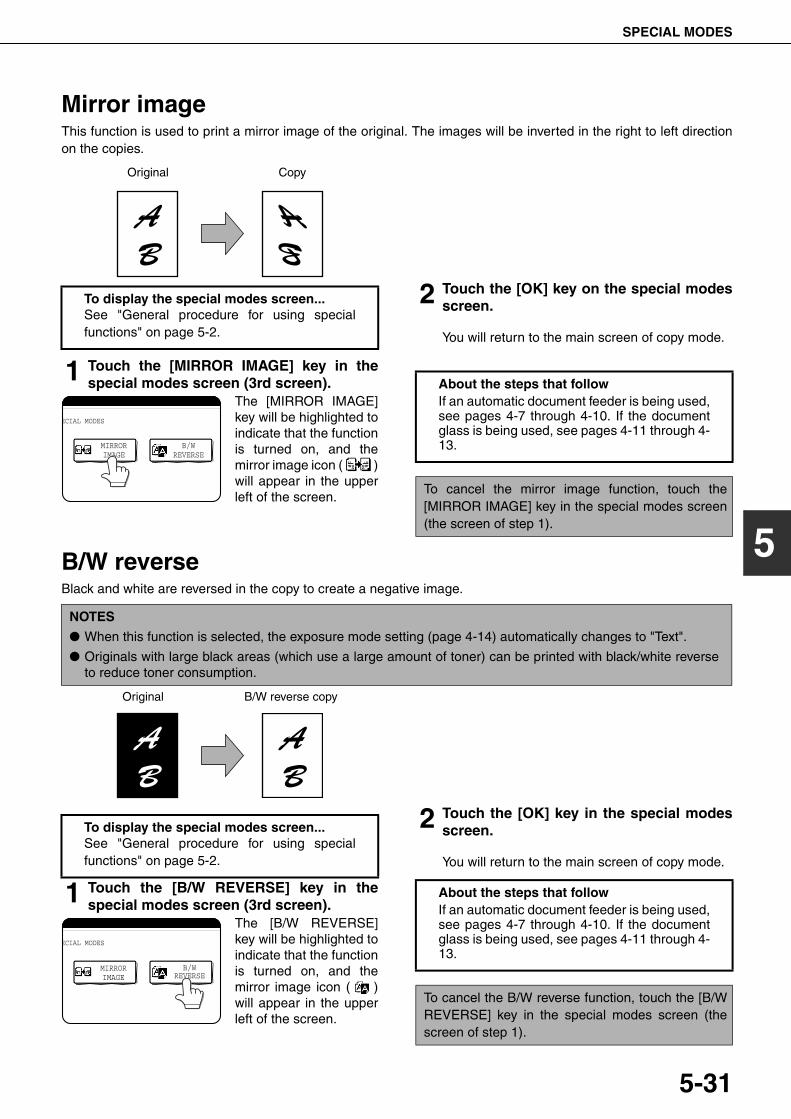
SPECIAL MODES
5-31
5
Mirror imageThis function is used to print a mirror image of the original. The images will be inverted in the right to left directionon the copies.
1 Touch the [MIRROR IMAGE] key in thespecial modes screen (3rd screen).
The [MIRROR IMAGE]key will be highlighted toindicate that the functionis turned on, and themirror image icon ( )will appear in the upperleft of the screen.
2 Touch the [OK] key on the special modesscreen.
You will return to the main screen of copy mode.
B/W reverseBlack and white are reversed in the copy to create a negative image.
1 Touch the [B/W REVERSE] key in thespecial modes screen (3rd screen).
The [B/W REVERSE]key will be highlighted toindicate that the functionis turned on, and themirror image icon ( )will appear in the upperleft of the screen.
2 Touch the [OK] key in the special modesscreen.
You will return to the main screen of copy mode.
Original Copy
To display the special modes screen...See "General procedure for using specialfunctions" on page 5-2.
ECIAL MODES
MIRRORIMAGE
B/WREVERSE
About the steps that followIf an automatic document feeder is being used,see pages 4-7 through 4-10. If the documentglass is being used, see pages 4-11 through 4-13.
To cancel the mirror image function, touch the[MIRROR IMAGE] key in the special modes screen(the screen of step 1).
NOTES
● When this function is selected, the exposure mode setting (page 4-14) automatically changes to "Text".
● Originals with large black areas (which use a large amount of toner) can be printed with black/white reverseto reduce toner consumption.
Original B/W reverse copy
To display the special modes screen...See "General procedure for using specialfunctions" on page 5-2.
ECIAL MODES
MIRRORIMAGE
B/WREVERSE
About the steps that followIf an automatic document feeder is being used,see pages 4-7 through 4-10. If the documentglass is being used, see pages 4-11 through 4-13.
To cancel the B/W reverse function, touch the [B/WREVERSE] key in the special modes screen (thescreen of step 1).
dragonII_copy_sec.book 31 ページ 2006年10月18日 水曜日 午後7時39分
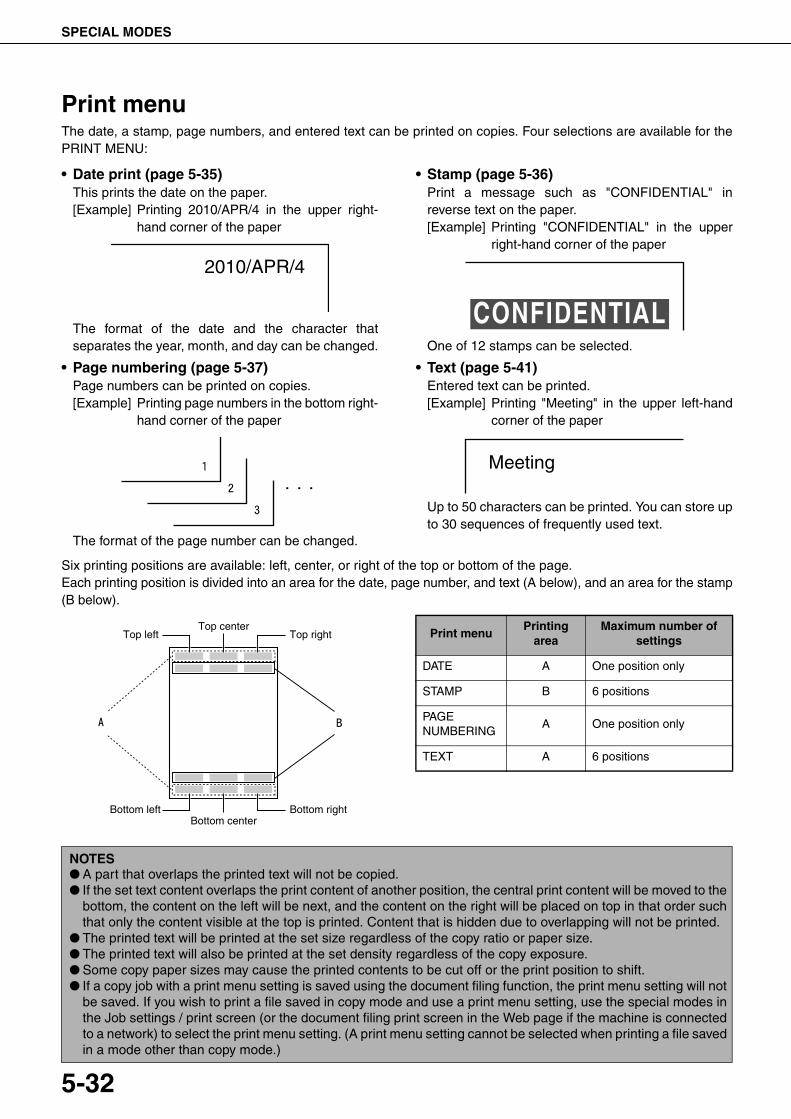
SPECIAL MODES
5-32
Print menuThe date, a stamp, page numbers, and entered text can be printed on copies. Four selections are available for thePRINT MENU:
• Date print (page 5-35)This prints the date on the paper.[Example] Printing 2010/APR/4 in the upper right-
hand corner of the paper
The format of the date and the character thatseparates the year, month, and day can be changed.
• Page numbering (page 5-37)Page numbers can be printed on copies.[Example] Printing page numbers in the bottom right-
hand corner of the paper
The format of the page number can be changed.
• Stamp (page 5-36)Print a message such as "CONFIDENTIAL" inreverse text on the paper.[Example] Printing "CONFIDENTIAL" in the upper
right-hand corner of the paper
One of 12 stamps can be selected.
• Text (page 5-41)Entered text can be printed.[Example] Printing "Meeting" in the upper left-hand
corner of the paper
Up to 50 characters can be printed. You can store upto 30 sequences of frequently used text.
Six printing positions are available: left, center, or right of the top or bottom of the page.Each printing position is divided into an area for the date, page number, and text (A below), and an area for the stamp(B below).
2010/APR/4
CONFIDENTIAL
Meeting
Top left Top rightTop center
Bottom left Bottom rightBottom center
Print menuPrinting
areaMaximum number of
settings
DATE A One position only
STAMP B 6 positions
PAGE NUMBERING
A One position only
TEXT A 6 positions
NOTES● A part that overlaps the printed text will not be copied.● If the set text content overlaps the print content of another position, the central print content will be moved to the
bottom, the content on the left will be next, and the content on the right will be placed on top in that order suchthat only the content visible at the top is printed. Content that is hidden due to overlapping will not be printed.
● The printed text will be printed at the set size regardless of the copy ratio or paper size.● The printed text will also be printed at the set density regardless of the copy exposure.● Some copy paper sizes may cause the printed contents to be cut off or the print position to shift.● If a copy job with a print menu setting is saved using the document filing function, the print menu setting will not
be saved. If you wish to print a file saved in copy mode and use a print menu setting, use the special modes inthe Job settings / print screen (or the document filing print screen in the Web page if the machine is connectedto a network) to select the print menu setting. (A print menu setting cannot be selected when printing a file savedin a mode other than copy mode.)
dragonII_copy_sec.book 32 ページ 2006年10月18日 水曜日 午後7時39分
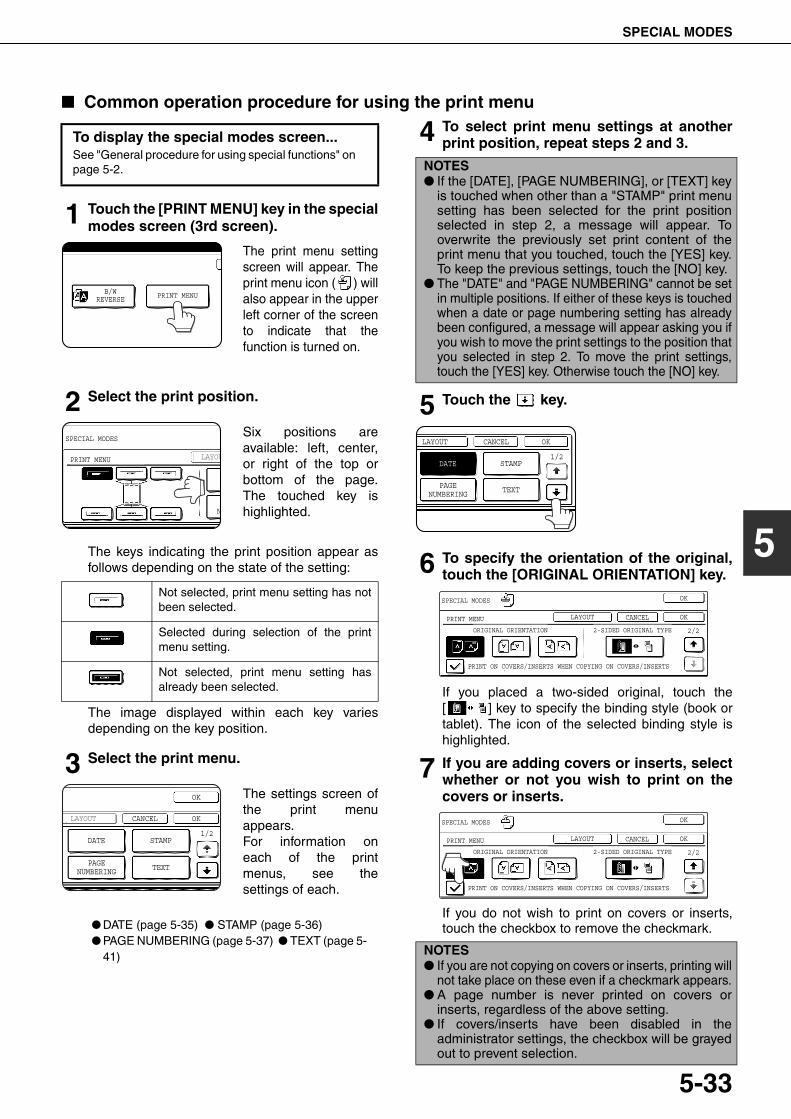
SPECIAL MODES
5-33
5
■ Common operation procedure for using the print menu
1 Touch the [PRINT MENU] key in the specialmodes screen (3rd screen).
The print menu settingscreen will appear. Theprint menu icon ( ) willalso appear in the upperleft corner of the screento indicate that thefunction is turned on.
2 Select the print position.
Six positions areavailable: left, center,or right of the top orbottom of the page.The touched key ishighlighted.
The keys indicating the print position appear asfollows depending on the state of the setting:
The image displayed within each key variesdepending on the key position.
3 Select the print menu.
The settings screen ofthe print menuappears.For information oneach of the printmenus, see thesettings of each.
● DATE (page 5-35) ● STAMP (page 5-36)● PAGE NUMBERING (page 5-37) ● TEXT (page 5-
41)
4 To select print menu settings at anotherprint position, repeat steps 2 and 3.
5 Touch the key.
6 To specify the orientation of the original,touch the [ORIGINAL ORIENTATION] key.
If you placed a two-sided original, touch the[ ] key to specify the binding style (book ortablet). The icon of the selected binding style ishighlighted.
7 If you are adding covers or inserts, selectwhether or not you wish to print on thecovers or inserts.
If you do not wish to print on covers or inserts,touch the checkbox to remove the checkmark.
To display the special modes screen...See "General procedure for using special functions" onpage 5-2.
Not selected, print menu setting has notbeen selected.
Selected during selection of the printmenu setting.
Not selected, print menu setting hasalready been selected.
PRINT MENUB/WREVERSE
SPECIAL MODES
PRINT MENU LAYOU
N
OK
OKCANCELLAYOUT
DATE STAMP
TEXTPAGENUMBERING
1/2
NOTES● If the [DATE], [PAGE NUMBERING], or [TEXT] key
is touched when other than a "STAMP" print menusetting has been selected for the print positionselected in step 2, a message will appear. Tooverwrite the previously set print content of theprint menu that you touched, touch the [YES] key.To keep the previous settings, touch the [NO] key.
● The "DATE" and "PAGE NUMBERING" cannot be setin multiple positions. If either of these keys is touchedwhen a date or page numbering setting has alreadybeen configured, a message will appear asking you ifyou wish to move the print settings to the position thatyou selected in step 2. To move the print settings,touch the [YES] key. Otherwise touch the [NO] key.
NOTES● If you are not copying on covers or inserts, printing will
not take place on these even if a checkmark appears.● A page number is never printed on covers or
inserts, regardless of the above setting.● If covers/inserts have been disabled in the
administrator settings, the checkbox will be grayedout to prevent selection.
1/2
LAYOUT CANCEL OK
STAMP
TEXT
DATE
PAGENUMBERING
OKCANCEL
OK
LAYOUT
SPECIAL MODES
PRINT MENU
ORIGINAL ORIENTATION 2-SIDED ORIGINAL TYPE
PRINT ON COVERS/INSERTS WHEN COPYING ON COVERS/INSERTS
2/2
OKCANCEL
OK
LAYOUT
SPECIAL MODES
PRINT MENU
ORIGINAL ORIENTATION 2-SIDED ORIGINAL TYPE
PRINT ON COVERS/INSERTS WHEN COPYING ON COVERS/INSERTS
2/2
dragonII_copy_sec.book 33 ページ 2006年10月18日 水曜日 午後7時39分
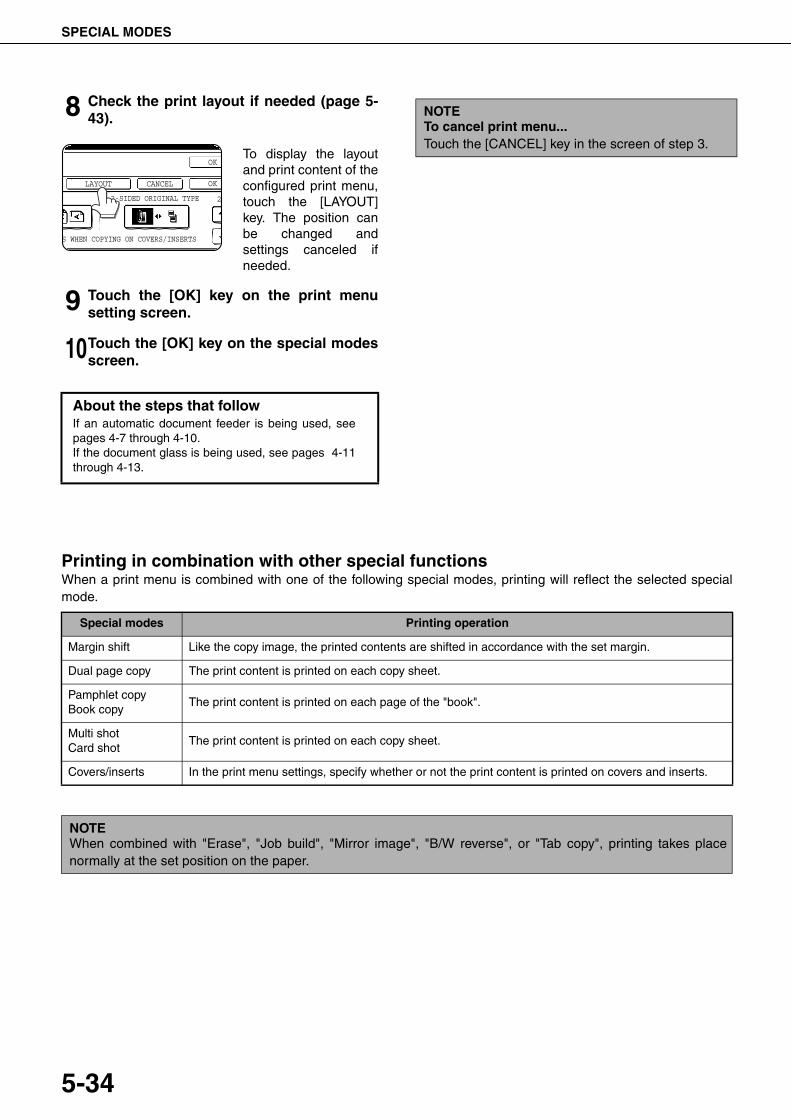
SPECIAL MODES
5-34
8 Check the print layout if needed (page 5-43).
To display the layoutand print content of theconfigured print menu,touch the [LAYOUT]key. The position canbe changed andsettings canceled ifneeded.
9 Touch the [OK] key on the print menusetting screen.
10Touch the [OK] key on the special modesscreen.
Printing in combination with other special functionsWhen a print menu is combined with one of the following special modes, printing will reflect the selected specialmode.
About the steps that followIf an automatic document feeder is being used, seepages 4-7 through 4-10.If the document glass is being used, see pages 4-11through 4-13.
2
OK
OKLAYOUT CANCEL
S WHEN COPYING ON COVERS/INSERTS
2-SIDED ORIGINAL TYPE
NOTETo cancel print menu...Touch the [CANCEL] key in the screen of step 3.
Special modes Printing operation
Margin shift Like the copy image, the printed contents are shifted in accordance with the set margin.
Dual page copy The print content is printed on each copy sheet.
Pamphlet copyBook copy
The print content is printed on each page of the "book".
Multi shotCard shot
The print content is printed on each copy sheet.
Covers/inserts In the print menu settings, specify whether or not the print content is printed on covers and inserts.
NOTEWhen combined with "Erase", "Job build", "Mirror image", "B/W reverse", or "Tab copy", printing takes placenormally at the set position on the paper.
dragonII_copy_sec.book 34 ページ 2006年10月18日 水曜日 午後7時39分
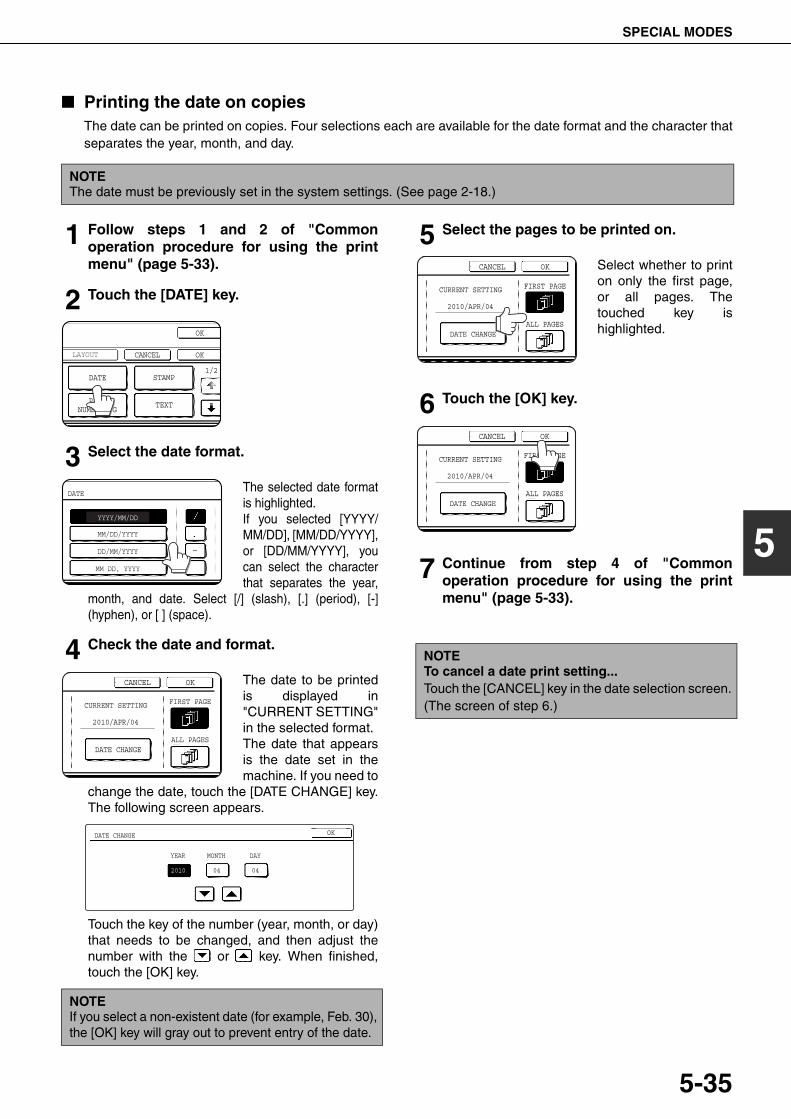
SPECIAL MODES
5-35
5
■ Printing the date on copiesThe date can be printed on copies. Four selections each are available for the date format and the character thatseparates the year, month, and day.
1 Follow steps 1 and 2 of "Commonoperation procedure for using the printmenu" (page 5-33).
2 Touch the [DATE] key.
3 Select the date format.
The selected date formatis highlighted.If you selected [YYYY/MM/DD], [MM/DD/YYYY],or [DD/MM/YYYY], youcan select the characterthat separates the year,
month, and date. Select [/] (slash), [.] (period), [-](hyphen), or [ ] (space).
4 Check the date and format.
The date to be printedis displayed in"CURRENT SETTING"in the selected format.The date that appearsis the date set in themachine. If you need to
change the date, touch the [DATE CHANGE] key.The following screen appears.
Touch the key of the number (year, month, or day)that needs to be changed, and then adjust thenumber with the or key. When finished,touch the [OK] key.
5 Select the pages to be printed on.
Select whether to printon only the first page,or all pages. Thetouched key ishighlighted.
6 Touch the [OK] key.
7 Continue from step 4 of "Commonoperation procedure for using the printmenu" (page 5-33).
NOTEThe date must be previously set in the system settings. (See page 2-18.)
NOTEIf you select a non-existent date (for example, Feb. 30),the [OK] key will gray out to prevent entry of the date.
PAGENUMBERING
OK
OKCANCELLAYOUT
STAMPDATE
TEXT
1/2
DATE
YYYY/MM/DD
MM/DD/YYYY
DD/MM/YYYY
MM DD, YYYY
OKCANCEL
FIRST PAGE
ALL PAGES
CURRENT SETTING
2010/APR/04
DATE CHANGE
OKDATE CHANGE
04 042010
YEAR MONTH DAY
NOTETo cancel a date print setting...Touch the [CANCEL] key in the date selection screen.(The screen of step 6.)
OKCANCEL
FIRST PAGE
ALL PAGES
CURRENT SETTING
2010/APR/04
DATE CHANGE
OKCANCEL
FIRST PAGE
ALL PAGES
CURRENT SETTING
2010/APR/04
DATE CHANGE
dragonII_copy_sec.book 35 ページ 2006年10月18日 水曜日 午後7時39分

SPECIAL MODES
5-36
■ Printing a stamp (reverse text) on copiesA message such as "CONFIDENTIAL" can be printed in reverse text on copies.The following 12 messages are available.
You can select from three density levels for the background of the stamp.Two selections are available for the size of the stamp.
1 Follow steps 1 and 2 of "Commonoperation procedure for using the printmenu" (page 5-33).
2 Touch the [STAMP] key.
3 Select the stamp that you wish to print.
The selected stamp ishighlighted. If thedesired stamp does notappear, changescreens with the or key.
4 Adjust the exposure as needed.
The density of thebackground of thestamp can be adjusted.Touch the [EXPOSURE]key to display thefollowing screen.
Touch the key for adarker background.Touch the key for alighter background (3levels).When finished, touchthe [OK] key.
5 Select the desired stamp size.
"LARGER" is initiallyselected. To make thestamp smaller, touchthe [LARGER/SMALLER] key."Smaller" is selectedwhen [SMALLER] ishighlighted.
6 Select the pages to be printed on.
Select whether to printon only the first page,or all pages. Thetouched key ishighlighted.
7 Touch the [OK] key.
8 Continue from step 4 of "Commonoperation procedure for using the printmenu" (page 5-33).
CONFIDENTIAL PRIORITY PRELIMINARY FINAL
FOR YOUR INFO. DO NOT COPY IMPORTANT COPY
URGENT DRAFT TOP SECRET PLEASE REPLY
NOTEThe text of the stamp cannot be edited.
PAGENUMBERING
OK
OKCANCELLAYOUT
STAMPDATE
TEXT
1/2
1/2PRIORITY
STAMP
CONFIDENTIAL
FOR YOUR INFO. DO NOT COPY
URGENT DRAFT
CANCEL OK
1/2EXPOSURE
SMALLER
FIRST PAGE
ALL PAGES
1 32
LARGER
SIZE
21 3
EXPOSURE
NOTETo cancel a stamp setting...Touch the [CANCEL] key in the stamp selectionscreen. (The screen of step 7.)
CANCEL OK
1/2EXPOSURE
SMALLER
FIRST PAGE
ALL PAGES
1 32
LARGER
SIZE
CANCEL OK
1/2EXPOSURE
SMALLER
FIRST PAGE
ALL PAGES
1 32
LARGER
SIZE
CANCEL OK
1/2EXPOSURE
SMALLER
FIRST PAGE
ALL PAGES
1 32
LARGER
SIZE
dragonII_copy_sec.book 36 ページ 2006年10月18日 水曜日 午後7時39分
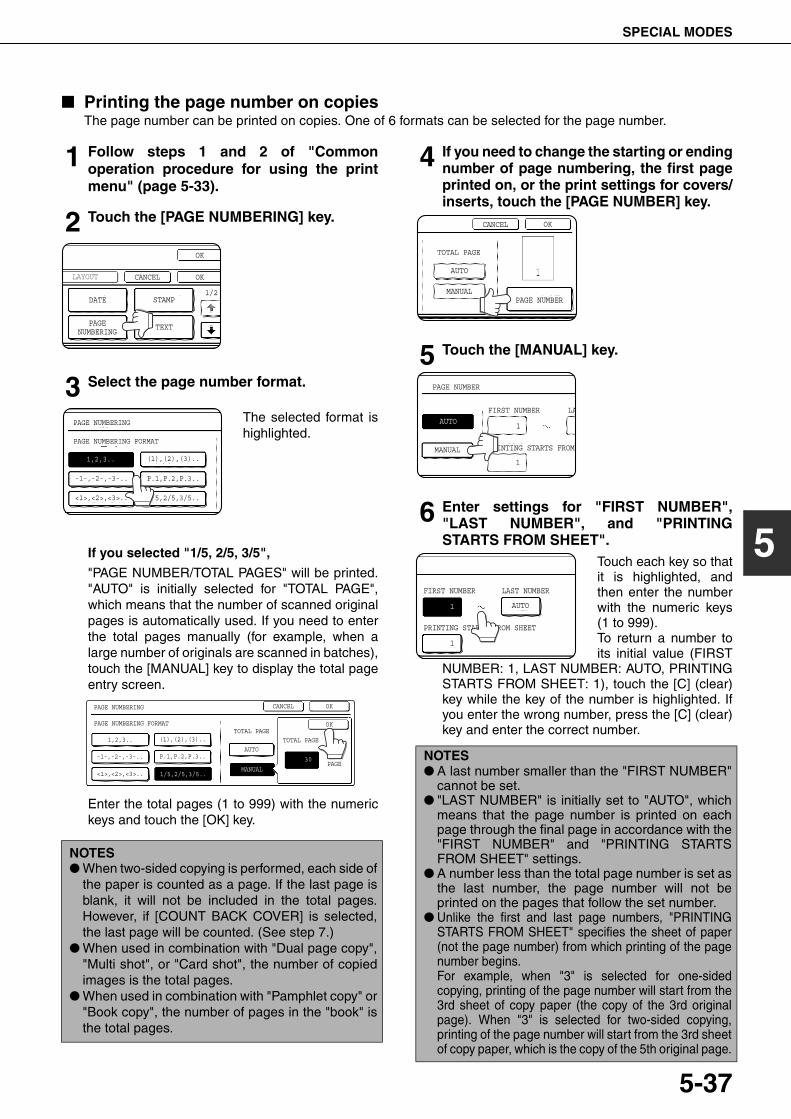
SPECIAL MODES
5-37
5
■ Printing the page number on copiesThe page number can be printed on copies. One of 6 formats can be selected for the page number.
1 Follow steps 1 and 2 of "Commonoperation procedure for using the printmenu" (page 5-33).
2 Touch the [PAGE NUMBERING] key.
3 Select the page number format.
The selected format ishighlighted.
If you selected "1/5, 2/5, 3/5",
"PAGE NUMBER/TOTAL PAGES" will be printed."AUTO" is initially selected for "TOTAL PAGE",which means that the number of scanned originalpages is automatically used. If you need to enterthe total pages manually (for example, when alarge number of originals are scanned in batches),touch the [MANUAL] key to display the total pageentry screen.
Enter the total pages (1 to 999) with the numerickeys and touch the [OK] key.
4 If you need to change the starting or endingnumber of page numbering, the first pageprinted on, or the print settings for covers/inserts, touch the [PAGE NUMBER] key.
5 Touch the [MANUAL] key.
6 Enter settings for "FIRST NUMBER","LAST NUMBER", and "PRINTINGSTARTS FROM SHEET".
Touch each key so thatit is highlighted, andthen enter the numberwith the numeric keys(1 to 999).To return a number toits initial value (FIRST
NUMBER: 1, LAST NUMBER: AUTO, PRINTINGSTARTS FROM SHEET: 1), touch the [C] (clear)key while the key of the number is highlighted. Ifyou enter the wrong number, press the [C] (clear)key and enter the correct number.
NOTES● When two-sided copying is performed, each side of
the paper is counted as a page. If the last page isblank, it will not be included in the total pages.However, if [COUNT BACK COVER] is selected,the last page will be counted. (See step 7.)
● When used in combination with "Dual page copy","Multi shot", or "Card shot", the number of copiedimages is the total pages.
● When used in combination with "Pamphlet copy" or"Book copy", the number of pages in the "book" isthe total pages.
PAGENUMBERING
OK
OKCANCELLAYOUT
STAMPDATE
TEXT
1/2
PAGE NUMBERING
PAGE NUMBERING FORMAT
1,2,3.. (1),(2),(3)..
P.1,P.2,P.3..-1-,-2-,-3-..
<1>,<2>,<3>.. 1/5,2/5,3/5..
PAGE NUMBERING
PAGE NUMBERING FORMAT
1,2,3..
-1-,-2-,-3-..
<1>,<2>,<3>..
(1),(2),(3)..
P.1,P.2,P.3..
1/5,2/5,3/5..
OKCANCEL
OK
TOTAL PAGETOTAL PAGE
AUTO
MANUAL
30PAGE
NOTES● A last number smaller than the "FIRST NUMBER"
cannot be set.● "LAST NUMBER" is initially set to "AUTO", which
means that the page number is printed on eachpage through the final page in accordance with the"FIRST NUMBER" and "PRINTING STARTSFROM SHEET" settings.
● A number less than the total page number is set asthe last number, the page number will not beprinted on the pages that follow the set number.
● Unlike the first and last page numbers, "PRINTINGSTARTS FROM SHEET" specifies the sheet of paper(not the page number) from which printing of the pagenumber begins.For example, when "3" is selected for one-sidedcopying, printing of the page number will start from the3rd sheet of copy paper (the copy of the 3rd originalpage). When "3" is selected for two-sided copying,printing of the page number will start from the 3rd sheetof copy paper, which is the copy of the 5th original page.
CANCEL OK
TOTAL PAGE
AUTO
MANUALPAGE NUMBER
PAGE NUMBER
AUTO
MANUAL
FIRST NUMBER
PRINTING STARTS FROM
LA
1
1
FIRST NUMBER
PRINTING STARTS FROM SHEET
1
1
LAST NUMBER
AUTO
dragonII_copy_sec.book 37 ページ 2006年10月18日 水曜日 午後7時39分
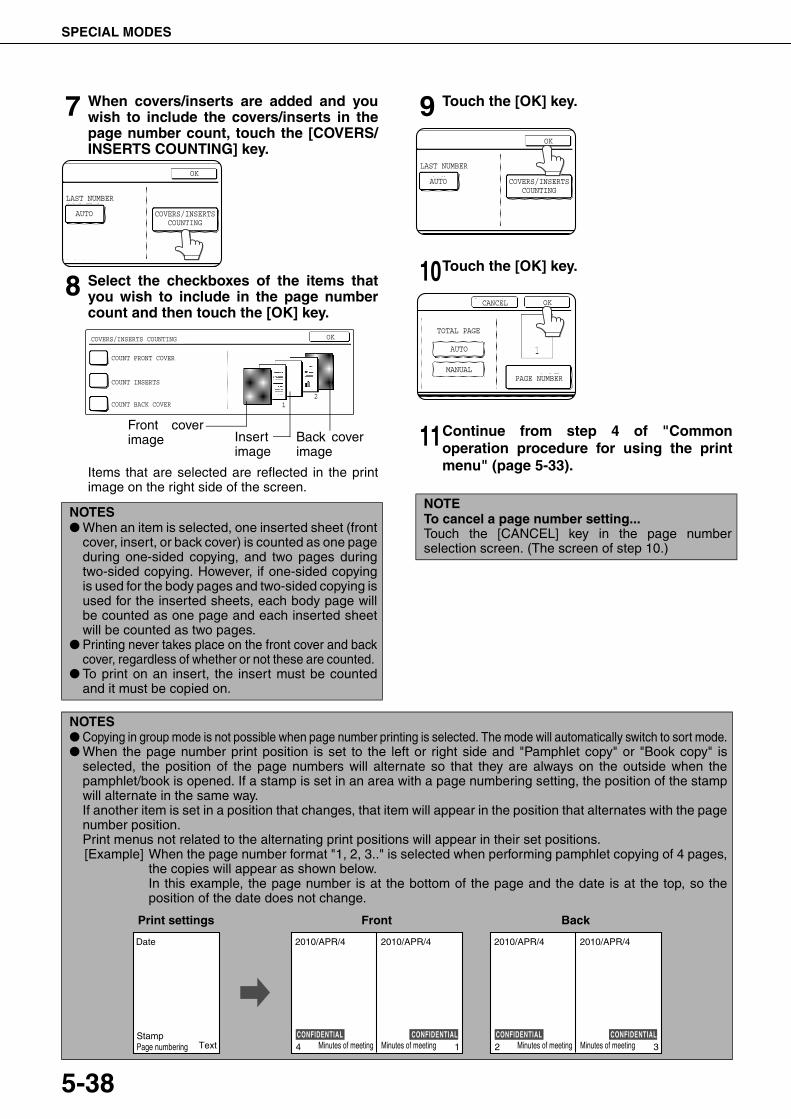
SPECIAL MODES
5-38
7 When covers/inserts are added and youwish to include the covers/inserts in thepage number count, touch the [COVERS/INSERTS COUNTING] key.
8 Select the checkboxes of the items thatyou wish to include in the page numbercount and then touch the [OK] key.
Items that are selected are reflected in the printimage on the right side of the screen.
9 Touch the [OK] key.
10Touch the [OK] key.
11Continue from step 4 of "Commonoperation procedure for using the printmenu" (page 5-33).
NOTES● When an item is selected, one inserted sheet (front
cover, insert, or back cover) is counted as one pageduring one-sided copying, and two pages duringtwo-sided copying. However, if one-sided copyingis used for the body pages and two-sided copying isused for the inserted sheets, each body page willbe counted as one page and each inserted sheetwill be counted as two pages.
● Printing never takes place on the front cover and backcover, regardless of whether or not these are counted.
● To print on an insert, the insert must be countedand it must be copied on.
OK
LAST NUMBER
AUTO COVERS/INSERTSCOUNTING
OKCOVERS/INSERTS COUNTING
COUNT FRONT COVER
COUNT INSERTS
COUNT BACK COVER2
1
Front coverimage Back cover
imageInsertimage
NOTETo cancel a page number setting...Touch the [CANCEL] key in the page numberselection screen. (The screen of step 10.)
OK
LAST NUMBER
AUTO COVERS/INSERTSCOUNTING
CANCEL OK
TOTAL PAGE
AUTO
MANUALPAGE NUMBER
NOTES● Copying in group mode is not possible when page number printing is selected. The mode will automatically switch to sort mode.● When the page number print position is set to the left or right side and "Pamphlet copy" or "Book copy" is
selected, the position of the page numbers will alternate so that they are always on the outside when thepamphlet/book is opened. If a stamp is set in an area with a page numbering setting, the position of the stampwill alternate in the same way.If another item is set in a position that changes, that item will appear in the position that alternates with the pagenumber position.Print menus not related to the alternating print positions will appear in their set positions.[Example] When the page number format "1, 2, 3.." is selected when performing pamphlet copying of 4 pages,
the copies will appear as shown below.In this example, the page number is at the bottom of the page and the date is at the top, so theposition of the date does not change.
Date
Page numbering TextStamp
2010/APR/4 2010/APR/4
4 1
Print settings Front
2010/APR/4 2010/APR/4
2 Minutes of meeting 3
Back
Minutes of meetingMinutes of meetingMinutes of meetingCONFIDENTIAL CONFIDENTIAL CONFIDENTIALCONFIDENTIAL
dragonII_copy_sec.book 38 ページ 2006年10月18日 水曜日 午後7時39分
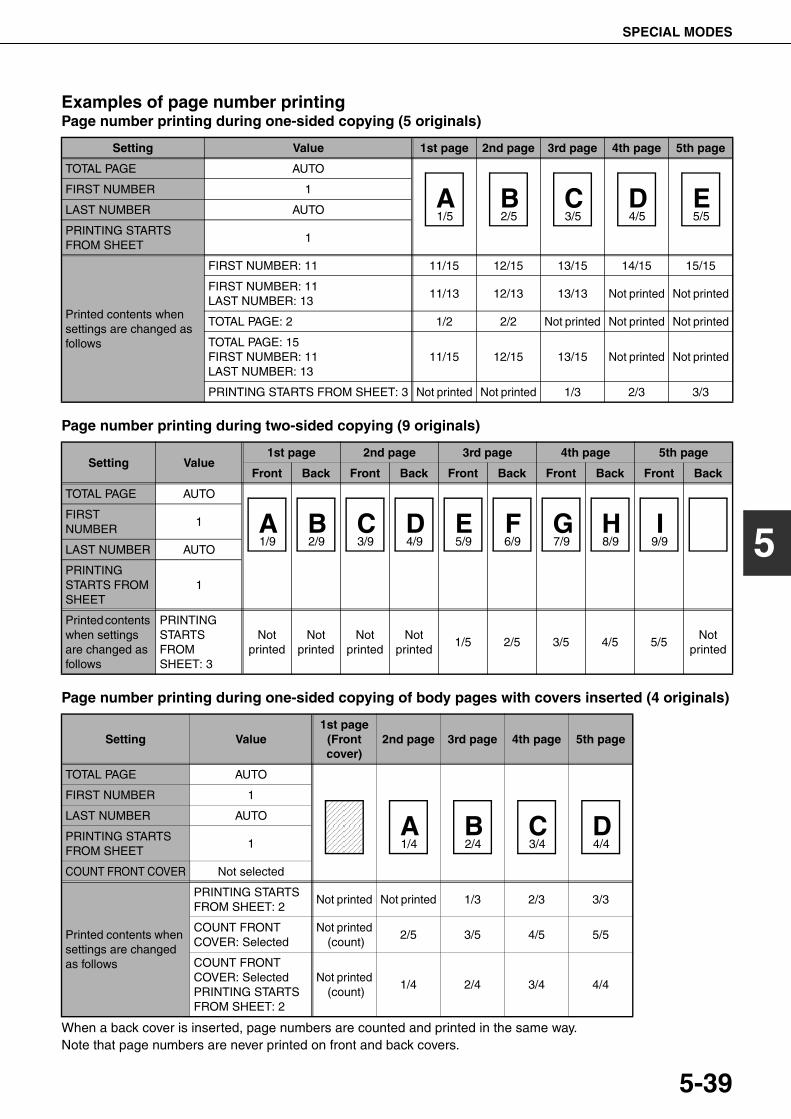
SPECIAL MODES
5-39
5
Examples of page number printingPage number printing during one-sided copying (5 originals)
Page number printing during two-sided copying (9 originals)
Page number printing during one-sided copying of body pages with covers inserted (4 originals)
When a back cover is inserted, page numbers are counted and printed in the same way.Note that page numbers are never printed on front and back covers.
Setting Value 1st page 2nd page 3rd page 4th page 5th page
TOTAL PAGE AUTO
FIRST NUMBER 1
LAST NUMBER AUTO
PRINTING STARTS FROM SHEET
1
Printed contents when settings are changed as follows
FIRST NUMBER: 11 11/15 12/15 13/15 14/15 15/15
FIRST NUMBER: 11LAST NUMBER: 13
11/13 12/13 13/13 Not printed Not printed
TOTAL PAGE: 2 1/2 2/2 Not printed Not printed Not printed
TOTAL PAGE: 15FIRST NUMBER: 11LAST NUMBER: 13
11/15 12/15 13/15 Not printed Not printed
PRINTING STARTS FROM SHEET: 3 Not printed Not printed 1/3 2/3 3/3
A1/5
B2/5
C3/5
D4/5
E5/5
Setting Value1st page 2nd page 3rd page 4th page 5th page
Front Back Front Back Front Back Front Back Front Back
TOTAL PAGE AUTO
FIRST NUMBER
1
LAST NUMBER AUTO
PRINTING STARTS FROM SHEET
1
Printed contents when settings are changed as follows
PRINTING STARTS FROM SHEET: 3
Not printed
Not printed
Not printed
Not printed
1/5 2/5 3/5 4/5 5/5Not
printed
A1/9
B2/9
C3/9
D4/9
E5/9
F6/9
G7/9
H8/9
I9/9
Setting Value1st page
(Front cover)
2nd page 3rd page 4th page 5th page
TOTAL PAGE AUTO
FIRST NUMBER 1
LAST NUMBER AUTO
PRINTING STARTS FROM SHEET
1
COUNT FRONT COVER Not selected
Printed contents when settings are changed as follows
PRINTING STARTS FROM SHEET: 2
Not printed Not printed 1/3 2/3 3/3
COUNT FRONT COVER: Selected
Not printed (count)
2/5 3/5 4/5 5/5
COUNT FRONT COVER: SelectedPRINTING STARTS FROM SHEET: 2
Not printed (count)
1/4 2/4 3/4 4/4
A1/4
B2/4
C3/4
D4/4
dragonII_copy_sec.book 39 ページ 2006年10月18日 水曜日 午後7時39分
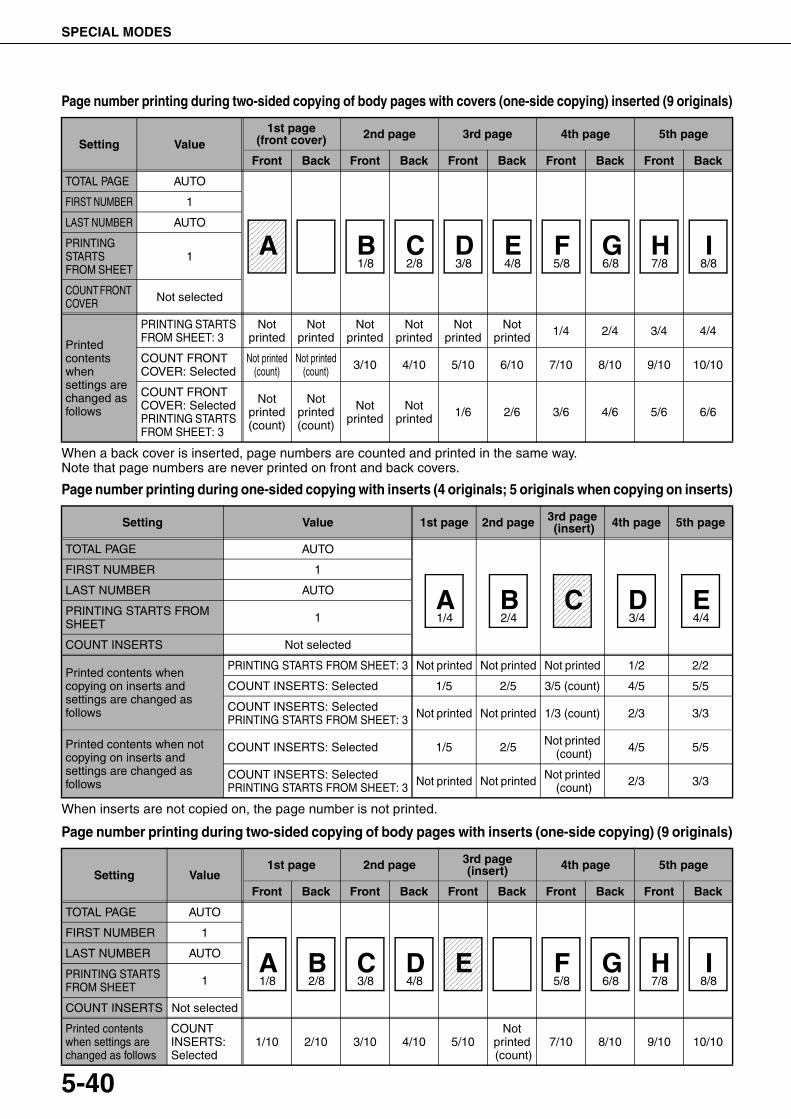
SPECIAL MODES
5-40
Page number printing during two-sided copying of body pages with covers (one-side copying) inserted (9 originals)
When a back cover is inserted, page numbers are counted and printed in the same way.Note that page numbers are never printed on front and back covers.
Page number printing during one-sided copying with inserts (4 originals; 5 originals when copying on inserts)
When inserts are not copied on, the page number is not printed.
Page number printing during two-sided copying of body pages with inserts (one-side copying) (9 originals)
Setting Value1st page
(front cover) 2nd page 3rd page 4th page 5th page
Front Back Front Back Front Back Front Back Front Back
TOTAL PAGE AUTO
FIRST NUMBER 1
LAST NUMBER AUTO
PRINTING STARTS FROM SHEET
1
COUNT FRONT COVER Not selected
Printed contents when settings are changed as follows
PRINTING STARTS FROM SHEET: 3
Not printed
Not printed
Not printed
Not printed
Not printed
Not printed 1/4 2/4 3/4 4/4
COUNT FRONT COVER: Selected
Not printed(count)
Not printed(count) 3/10 4/10 5/10 6/10 7/10 8/10 9/10 10/10
COUNT FRONT COVER: SelectedPRINTING STARTS FROM SHEET: 3
Not printed(count)
Not printed(count)
Not printed
Not printed 1/6 2/6 3/6 4/6 5/6 6/6
A B1/8
C2/8
D3/8
E4/8
F5/8
G6/8
H7/8
I8/8
Setting Value 1st page 2nd page 3rd page (insert) 4th page 5th page
TOTAL PAGE AUTO
FIRST NUMBER 1
LAST NUMBER AUTO
PRINTING STARTS FROM SHEET 1
COUNT INSERTS Not selected
Printed contents when copying on inserts and settings are changed as follows
PRINTING STARTS FROM SHEET: 3 Not printed Not printed Not printed 1/2 2/2
COUNT INSERTS: Selected 1/5 2/5 3/5 (count) 4/5 5/5
COUNT INSERTS: SelectedPRINTING STARTS FROM SHEET: 3 Not printed Not printed 1/3 (count) 2/3 3/3
Printed contents when not copying on inserts and settings are changed as follows
COUNT INSERTS: Selected 1/5 2/5 Not printed (count) 4/5 5/5
COUNT INSERTS: SelectedPRINTING STARTS FROM SHEET: 3 Not printed Not printed Not printed
(count) 2/3 3/3
A1/4
B2/4
C D3/4
E4/4
Setting Value1st page 2nd page 3rd page
(insert) 4th page 5th page
Front Back Front Back Front Back Front Back Front Back
TOTAL PAGE AUTO
FIRST NUMBER 1
LAST NUMBER AUTO
PRINTING STARTS FROM SHEET 1
COUNT INSERTS Not selected
Printed contents when settings are changed as follows
COUNT INSERTS: Selected
1/10 2/10 3/10 4/10 5/10Not
printed (count)
7/10 8/10 9/10 10/10
A1/8
B2/8
C3/8
D4/8
E F5/8
G6/8
H7/8
I8/8
dragonII_copy_sec.book 40 ページ 2006年10月18日 水曜日 午後7時39分
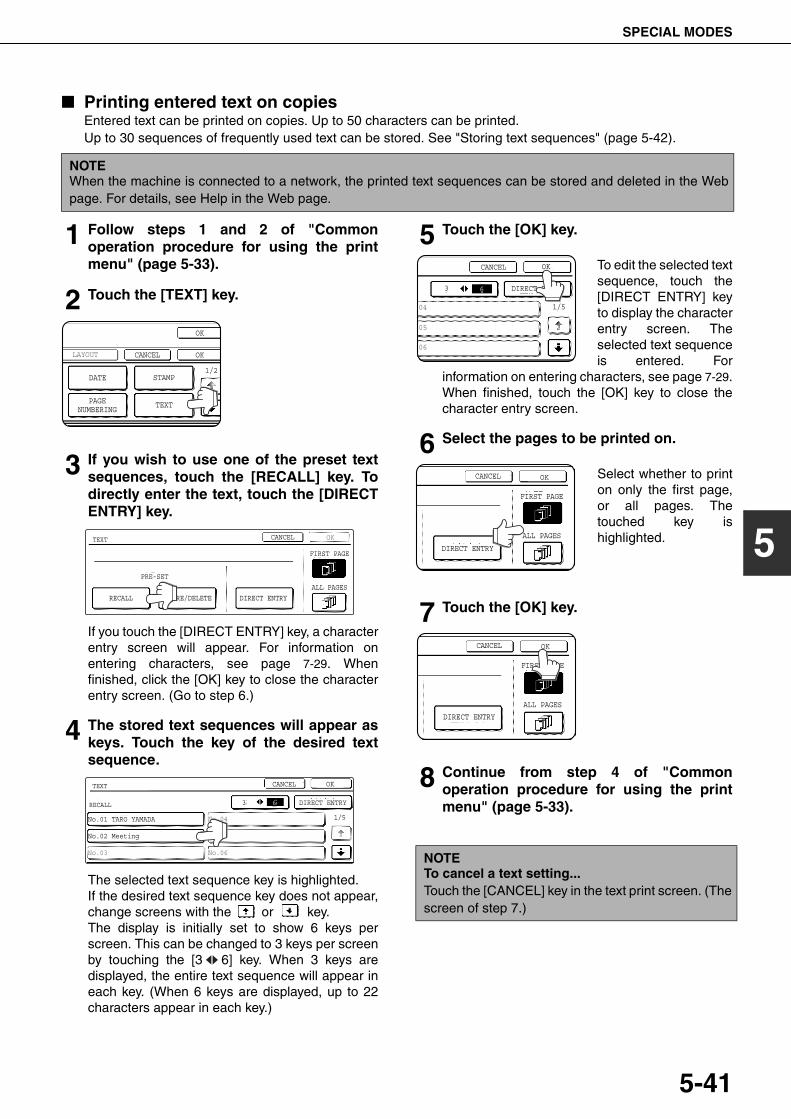
SPECIAL MODES
5-41
5
■ Printing entered text on copiesEntered text can be printed on copies. Up to 50 characters can be printed.Up to 30 sequences of frequently used text can be stored. See "Storing text sequences" (page 5-42).
1 Follow steps 1 and 2 of "Commonoperation procedure for using the printmenu" (page 5-33).
2 Touch the [TEXT] key.
3 If you wish to use one of the preset textsequences, touch the [RECALL] key. Todirectly enter the text, touch the [DIRECTENTRY] key.
If you touch the [DIRECT ENTRY] key, a characterentry screen will appear. For information onentering characters, see page 7-29. Whenfinished, click the [OK] key to close the characterentry screen. (Go to step 6.)
4 The stored text sequences will appear askeys. Touch the key of the desired textsequence.
The selected text sequence key is highlighted.If the desired text sequence key does not appear,change screens with the or key.The display is initially set to show 6 keys perscreen. This can be changed to 3 keys per screenby touching the [3 6] key. When 3 keys aredisplayed, the entire text sequence will appear ineach key. (When 6 keys are displayed, up to 22characters appear in each key.)
5 Touch the [OK] key.
To edit the selected textsequence, touch the[DIRECT ENTRY] keyto display the characterentry screen. Theselected text sequenceis entered. For
information on entering characters, see page 7-29.When finished, touch the [OK] key to close thecharacter entry screen.
6 Select the pages to be printed on.
Select whether to printon only the first page,or all pages. Thetouched key ishighlighted.
7 Touch the [OK] key.
8 Continue from step 4 of "Commonoperation procedure for using the printmenu" (page 5-33).
NOTEWhen the machine is connected to a network, the printed text sequences can be stored and deleted in the Webpage. For details, see Help in the Web page.
PAGENUMBERING
OK
OKCANCELLAYOUT
STAMPDATE
TEXT
1/2
TEXT OKCANCEL
FIRST PAGE
PRE-SET
ALL PAGES
DIRECT ENTRYSTORE/DELETERECALL
TEXT
RECALL
No.01 TARO YAMADA
No.02 Meeting
No.03
No.04
No.05
No.06
3 6 DIRECT ENTRY
1/5
OKCANCEL
NOTETo cancel a text setting...Touch the [CANCEL] key in the text print screen. (Thescreen of step 7.)
OKCANCEL
DIRECT ENTRY
1/5
63
04
05
06
OKCANCEL
FIRST PAGE
DIRECT ENTRY
ALL PAGES
OKCANCEL
FIRST PAGE
DIRECT ENTRY
ALL PAGES
dragonII_copy_sec.book 41 ページ 2006年10月18日 水曜日 午後7時39分

SPECIAL MODES
5-42
Storing text sequences
1 Follow steps 1 and 2 of "Commonoperation procedure for using the printmenu" (page 5-33).
2 Touch the [TEXT] key.
3 Touch the [STORE/DELETE] key.
4 Touch a key that has not beenprogrammed (a key in which No. xxappears).
When touched, the character entry screenappears. Enter the text (max. 50 characters). Forinformation on entering characters, see page 7-29.When finished, touch the [OK] key to close thecharacter entry screen.If no free keys appear, change screens with the
or key.
5 Touch the [BACK] key.
The entered text isstored.
Editing and deleting stored text
1 Follow steps 1 and 2 of "Commonoperation procedure for using the printmenu" (page 5-33).
2 Touch the [TEXT] key.
3 Touch the [STORE/DELETE] key.
4 Touch the text key that you wish to edit ordelete.
5 To edit the text, touch the [AMEND] key. Todelete the text, touch the [DELETE] key.
When the [AMEND] key istouched, the characterentry screen appears.The selected textsequence is entered. Forinformation on enteringcharacters, see page 7-
29. When finished, touch the [OK] key to close thecharacter entry screen.If you touch the [DELETE] key, the text will be deletedand you will return to the screen of step 4.To cancel editing or deletion, touch the [CANCEL] key.
6 Touch the [BACK] key.
PAGENUMBERING
OK
OKCANCELLAYOUT
STAMPDATE
TEXT
1/2
RECALL STORE/DELETE
PRE-SET
TEXT
STORE/DELETE
No.01 TARO YAMADA
No.02 Meeting
No.03
No.04
No.05
No.06
BACK
1/5
3 6
3 6 BACK
1/5
06
05
04 Minutes of meeting
PAGENUMBERING
OK
OKCANCELLAYOUT
STAMPDATE
TEXT
1/2
RECALL STORE/DELETE
PRE-SET
TEXT
STORE/DELETE
No.01 TARO YAMADA
No.02 Meeting
No.03
No.04 Minutes of meeting
No.05
No.06
BACK
1/5
3 6
A TEXT HAS BEEN ALREADY STORED TO LOCATION. CHANGE THE TEXT?
No.06
CANCEL DELETE AMEND
3 6 BACK
1/5
06
05
04 Minutes of meeting
dragonII_copy_sec.book 42 ページ 2006年10月18日 水曜日 午後7時39分
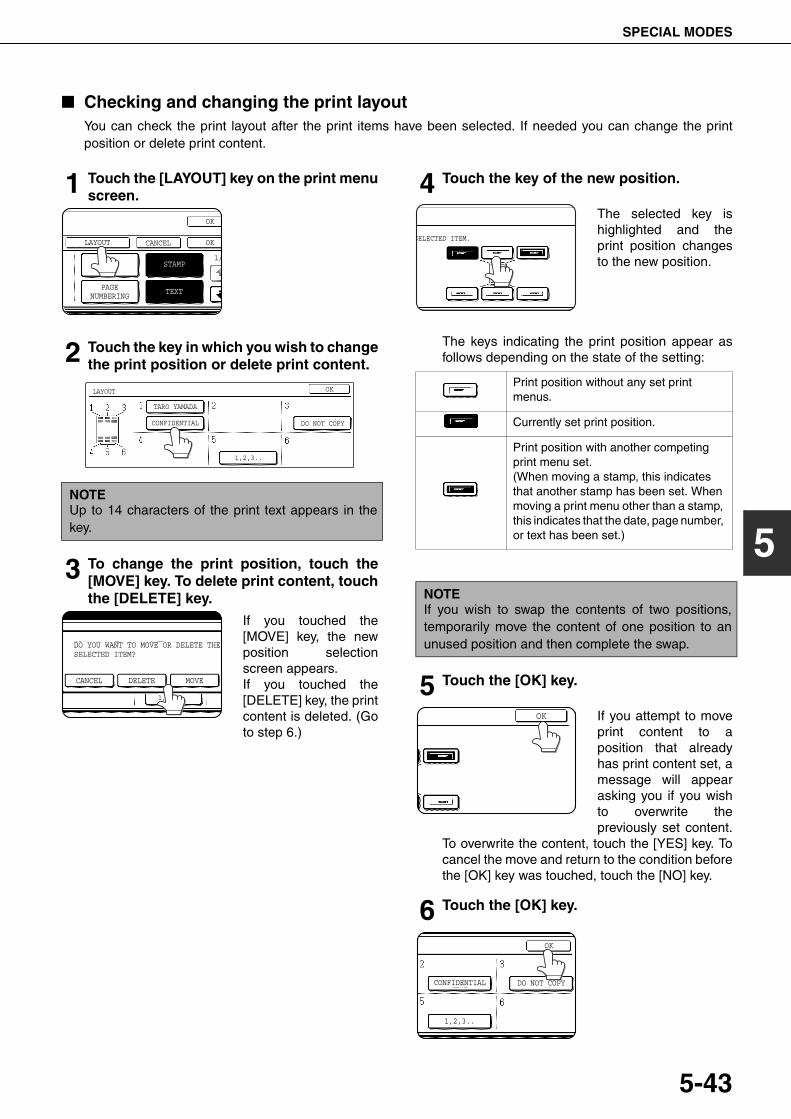
SPECIAL MODES
5-43
5
■ Checking and changing the print layoutYou can check the print layout after the print items have been selected. If needed you can change the printposition or delete print content.
1 Touch the [LAYOUT] key on the print menuscreen.
2 Touch the key in which you wish to changethe print position or delete print content.
3 To change the print position, touch the[MOVE] key. To delete print content, touchthe [DELETE] key.
If you touched the[MOVE] key, the newposition selectionscreen appears.If you touched the[DELETE] key, the printcontent is deleted. (Goto step 6.)
4 Touch the key of the new position.
The selected key ishighlighted and theprint position changesto the new position.
The keys indicating the print position appear asfollows depending on the state of the setting:
5 Touch the [OK] key.
If you attempt to moveprint content to aposition that alreadyhas print content set, amessage will appearasking you if you wishto overwrite thepreviously set content.
To overwrite the content, touch the [YES] key. Tocancel the move and return to the condition beforethe [OK] key was touched, touch the [NO] key.
6 Touch the [OK] key.
NOTEUp to 14 characters of the print text appears in thekey.
OK
OKCANCEL
STAMP
TEXT
1/
LAYOUT
DATE
PAGENUMBERING
LAYOUT
TARO YAMADA
CONFIDENTIAL
OK
DO NOT COPY
1,2,3..
DO YOU WANT TO MOVE OR DELETE THESELECTED ITEM?
CANCEL DELETE MOVE
1,2,3..
Print position without any set print menus.
Currently set print position.
Print position with another competing print menu set.(When moving a stamp, this indicates that another stamp has been set. When moving a print menu other than a stamp, this indicates that the date, page number, or text has been set.)
NOTEIf you wish to swap the contents of two positions,temporarily move the content of one position to anunused position and then complete the swap.
SELECTED ITEM.
OK
OK
DO NOT COPY
1,2,3..
CONFIDENTIAL
dragonII_copy_sec.book 43 ページ 2006年10月18日 水曜日 午後7時39分
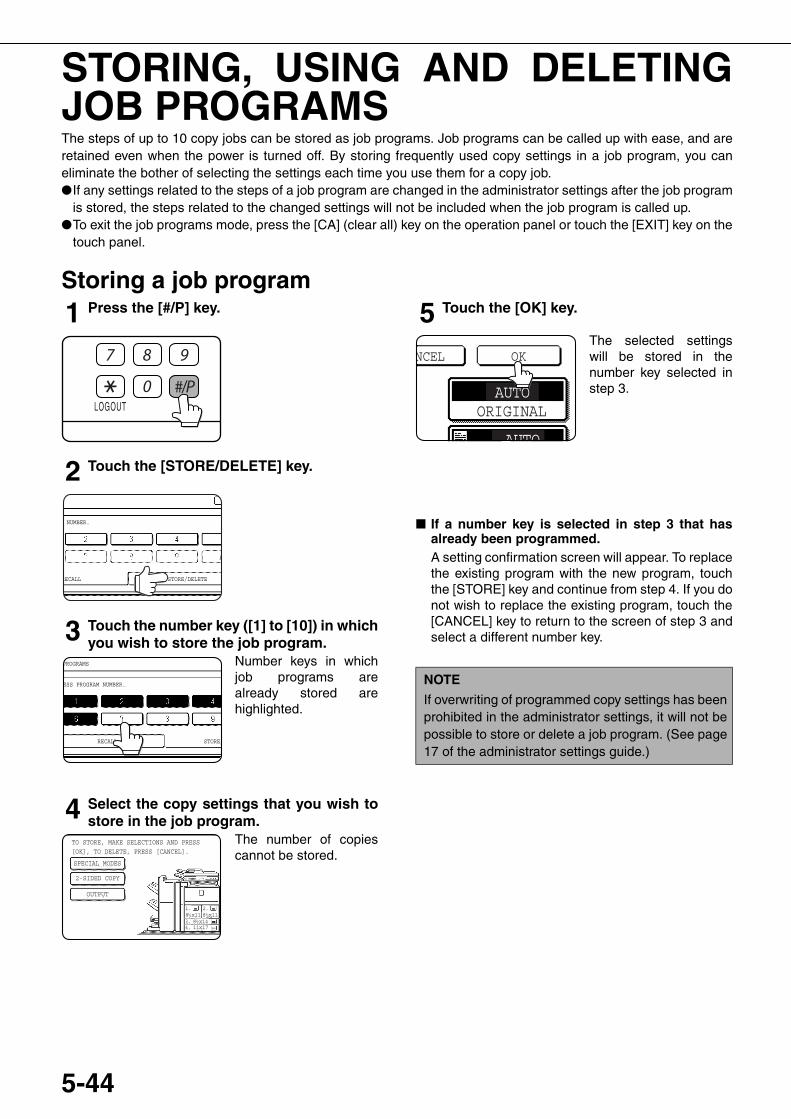
5-44
STORING, USING AND DELETINGJOB PROGRAMSThe steps of up to 10 copy jobs can be stored as job programs. Job programs can be called up with ease, and areretained even when the power is turned off. By storing frequently used copy settings in a job program, you caneliminate the bother of selecting the settings each time you use them for a copy job.●If any settings related to the steps of a job program are changed in the administrator settings after the job program
is stored, the steps related to the changed settings will not be included when the job program is called up.●To exit the job programs mode, press the [CA] (clear all) key on the operation panel or touch the [EXIT] key on the
touch panel.
Storing a job program1 Press the [#/P] key.
2 Touch the [STORE/DELETE] key.
3 Touch the number key ([1] to [10]) in whichyou wish to store the job program.
Number keys in whichjob programs arealready stored arehighlighted.
4 Select the copy settings that you wish tostore in the job program.
The number of copiescannot be stored.
5 Touch the [OK] key.
The selected settingswill be stored in thenumber key selected instep 3.
■ If a number key is selected in step 3 that hasalready been programmed.A setting confirmation screen will appear. To replacethe existing program with the new program, touchthe [STORE] key and continue from step 4. If you donot wish to replace the existing program, touch the[CANCEL] key to return to the screen of step 3 andselect a different number key.
LOGOUT
M NUMBER.
RECALL STORE/DELETE
PROGRAMS
ESS PROGRAM NUMBER.
RECALL STORE/
8 x111 / 2
8 x1411x171 / 2
8 x111 / 2
1.
3.4.
2.
SPECIAL MODES
TO STORE, MAKE SELECTIONS AND PRESS[OK], TO DELETE, PRESS [CANCEL].
2-SIDED COPY
OUTPUT
NOTE
If overwriting of programmed copy settings has beenprohibited in the administrator settings, it will not bepossible to store or delete a job program. (See page17 of the administrator settings guide.)
AUTO
AUTO
ORIGINAL
OKNCEL
dragon_05.fm 44 ページ 2006年10月19日 木曜日 午後1時0分
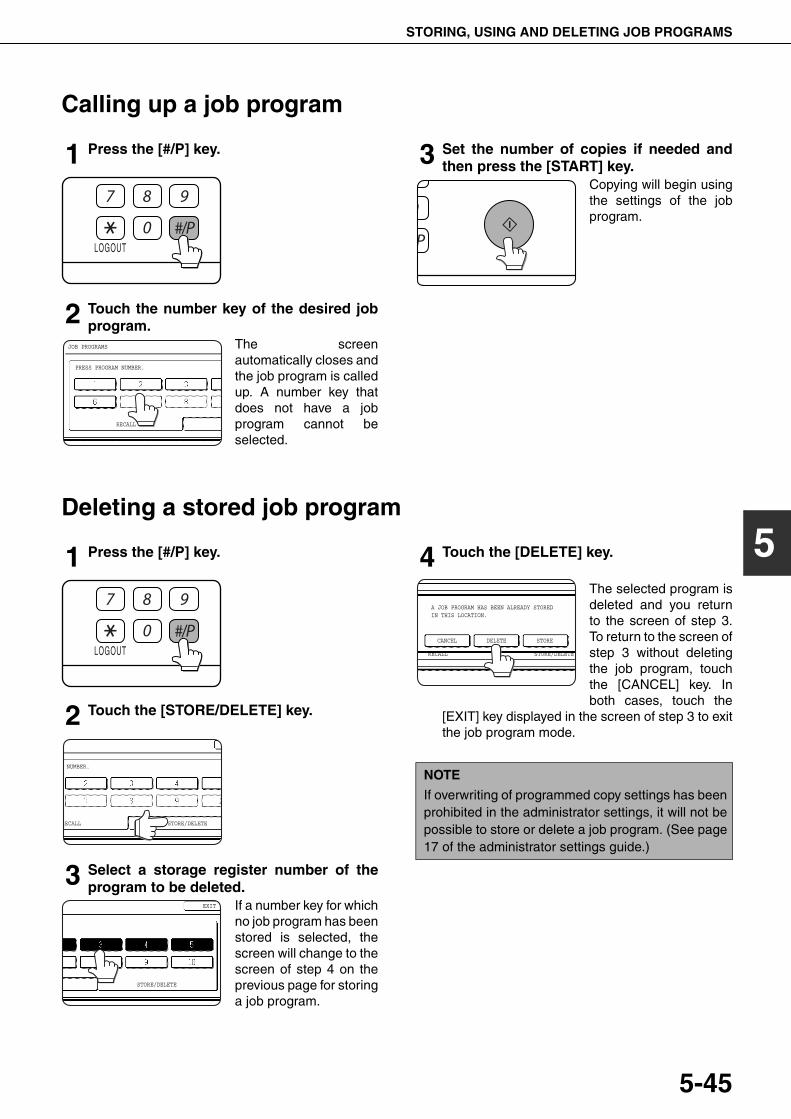
STORING, USING AND DELETING JOB PROGRAMS
5-45
5
Calling up a job program
1 Press the [#/P] key.
2 Touch the number key of the desired jobprogram.
The screenautomatically closes andthe job program is calledup. A number key thatdoes not have a jobprogram cannot beselected.
3 Set the number of copies if needed andthen press the [START] key.
Copying will begin usingthe settings of the jobprogram.
Deleting a stored job program
1 Press the [#/P] key.
2 Touch the [STORE/DELETE] key.
3 Select a storage register number of theprogram to be deleted.
If a number key for whichno job program has beenstored is selected, thescreen will change to thescreen of step 4 on theprevious page for storinga job program.
4 Touch the [DELETE] key.
The selected program isdeleted and you returnto the screen of step 3.To return to the screen ofstep 3 without deletingthe job program, touchthe [CANCEL] key. Inboth cases, touch the
[EXIT] key displayed in the screen of step 3 to exitthe job program mode.
LOGOUT
JOB PROGRAMS
PRESS PROGRAM NUMBER.
RECALL
LOGOUT
M NUMBER.
RECALL STORE/DELETE
EXIT
STORE/DELETE
NOTE
If overwriting of programmed copy settings has beenprohibited in the administrator settings, it will not bepossible to store or delete a job program. (See page17 of the administrator settings guide.)
RECALL STORE/DELETE
A JOB PROGRAM HAS BEEN ALREADY STOREDIN THIS LOCATION.
CANCEL DELETE STORE
dragon_05.fm 45 ページ 2006年10月19日 木曜日 午後1時1分
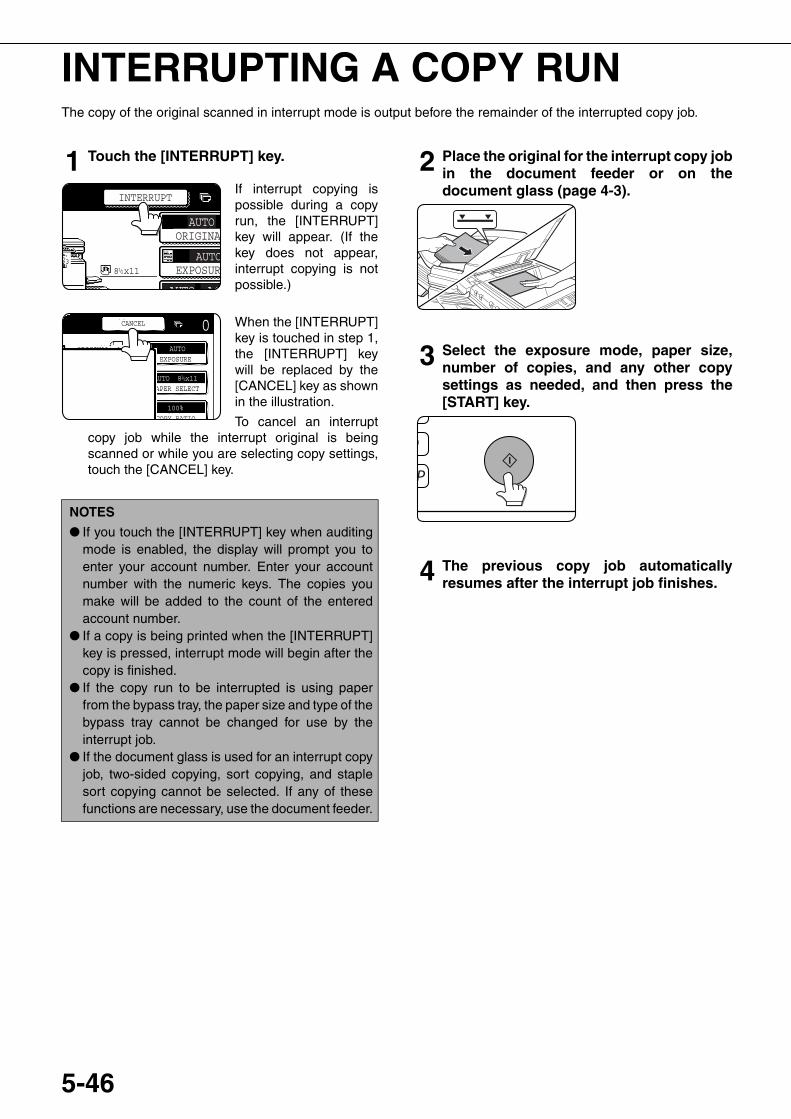
5-46
INTERRUPTING A COPY RUNThe copy of the original scanned in interrupt mode is output before the remainder of the interrupted copy job.
1 Touch the [INTERRUPT] key.
If interrupt copying ispossible during a copyrun, the [INTERRUPT]key will appear. (If thekey does not appear,interrupt copying is notpossible.)
When the [INTERRUPT]key is touched in step 1,the [INTERRUPT] keywill be replaced by the[CANCEL] key as shownin the illustration.
To cancel an interruptcopy job while the interrupt original is beingscanned or while you are selecting copy settings,touch the [CANCEL] key.
2 Place the original for the interrupt copy jobin the document feeder or on thedocument glass (page 4-3).
3 Select the exposure mode, paper size,number of copies, and any other copysettings as needed, and then press the[START] key.
4 The previous copy job automaticallyresumes after the interrupt job finishes.
NOTES
● If you touch the [INTERRUPT] key when auditingmode is enabled, the display will prompt you toenter your account number. Enter your accountnumber with the numeric keys. The copies youmake will be added to the count of the enteredaccount number.
● If a copy is being printed when the [INTERRUPT]key is pressed, interrupt mode will begin after thecopy is finished.
● If the copy run to be interrupted is using paperfrom the bypass tray, the paper size and type of thebypass tray cannot be changed for use by theinterrupt job.
● If the document glass is used for an interrupt copyjob, two-sided copying, sort copying, and staplesort copying cannot be selected. If any of thesefunctions are necessary, use the document feeder.
AUTO
AUTO
AUTO A4
ORIGINA
EXPOSUR8 x1123
INTERRUPT
1 / 2
AUTO
EXPOSURE
AUTO 8 x111 / 2
PAPER SELECT
100%
COPY RATIO
CANCEL
ORIGINAL
0A4
dragonII_copy_sec.book 46 ページ 2006年10月18日 水曜日 午後7時39分
6-1
CHAPTER 6MACHINE MAINTENANCE
(FOR COPYING)This chapter explains procedures for cleaning the machine, andtroubleshooting.
Page
USER MAINTENANCE........................................................................... 6-2● Cleaning the document glass and the automatic document feeder ....... 6-2
TROUBLESHOOTING ............................................................................ 6-3
dragonII_copy_sec.book 1 ページ 2006年10月18日 水曜日 午後7時39分
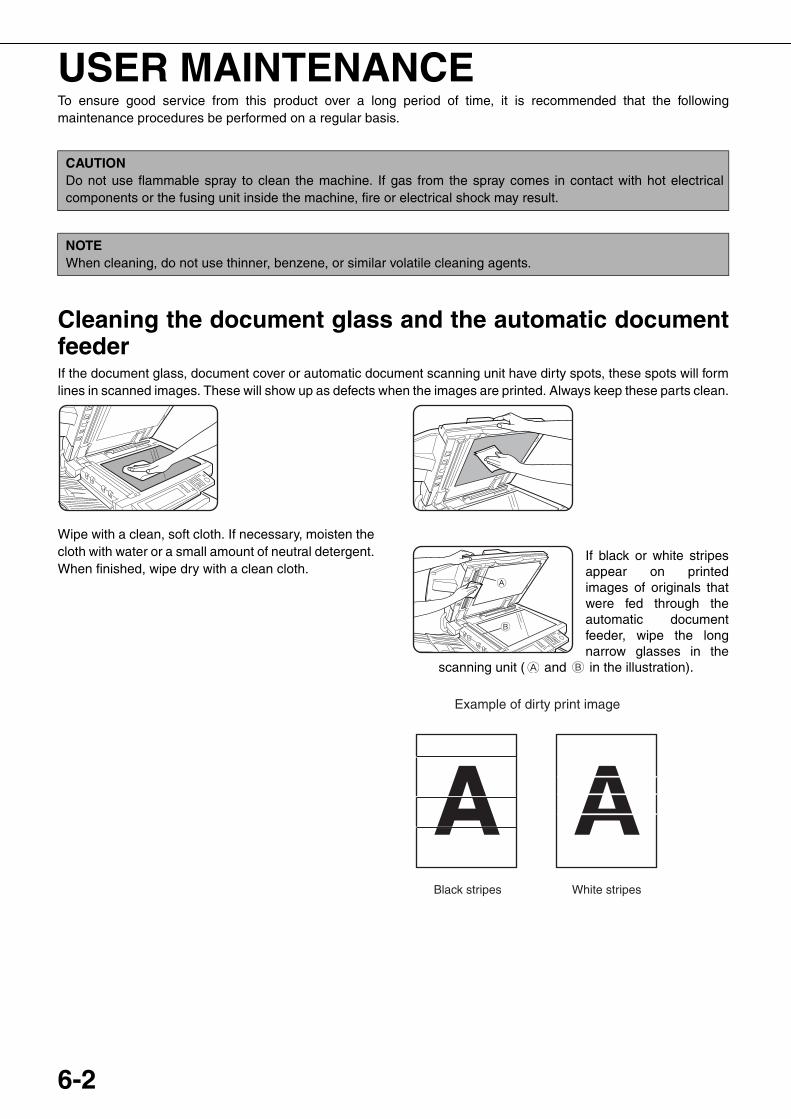
6-2
USER MAINTENANCETo ensure good service from this product over a long period of time, it is recommended that the followingmaintenance procedures be performed on a regular basis.
Cleaning the document glass and the automatic documentfeederIf the document glass, document cover or automatic document scanning unit have dirty spots, these spots will formlines in scanned images. These will show up as defects when the images are printed. Always keep these parts clean.
Wipe with a clean, soft cloth. If necessary, moisten thecloth with water or a small amount of neutral detergent.When finished, wipe dry with a clean cloth.
If black or white stripesappear on printedimages of originals thatwere fed through theautomatic documentfeeder, wipe the longnarrow glasses in the
scanning unit ( and in the illustration).
CAUTIONDo not use flammable spray to clean the machine. If gas from the spray comes in contact with hot electricalcomponents or the fusing unit inside the machine, fire or electrical shock may result.
NOTEWhen cleaning, do not use thinner, benzene, or similar volatile cleaning agents.
Example of dirty print image
Black stripes White stripes
dragonII_copy_sec.book 2 ページ 2006年10月18日 水曜日 午後7時39分
6-3
6
TROUBLESHOOTINGCheck the following troubleshooting list before requesting service as many problems can be fixed by the user. If youare unable to solve the problem by checking the list, turn off the main power switch and the power switch, and unplugthe power cord.Problems related to the copy function are described below. For problems related to general use of the machine, seepage 2-32.
Problem Check Solution
Machine does notoperate.
Is the [START] key indicator off? This indicates that the machine is warmingup (warming up lasts no more than 120seconds after the power switch is turned on).Copying is not possible during this time. Waituntil the [START] key light illuminates.
Copies are too darkor too light.
Is the original image too dark or too light? Select an appropriate exposure mode for theoriginal being copied and adjust the copyexposure. (See page 4-14.)
Is the exposure mode set to "AUTO"? The exposure level for "AUTO" can beadjusted using "Exposure adjustment" in theadministrator settings. Contact youradministrator. (See page 16 of theadministrator settings guide.)
An appropriate exposure mode for theoriginal has not been selected.
Change the exposure mode to "AUTO" ormanually select an appropriate resolutionsetting. (See page 4-14.)
Text is not clear on acopy.
An appropriate exposure mode for theoriginal has not been selected.
Change the exposure mode to "TEXT". (Seepage 4-14.)
Smudges appear oncopies.
Document glass or document cover dirty? Clean regularly. (See page 6-2.)
Black lines appear on copies when theautomatic document feeding function isused.
Clean the original scanning area. (See page6-2.)
Original smudged or blotchy? Use a clean original.
Image cannot berotated.
Is the auto paper select or auto imagefunction selected?
Rotation copy functions only if the machineis either in the auto paper select mode or inthe auto image mode. (See page 4-15.)
Part of originalimage is not copied.
Is the original positioned correctly? Set the original properly. (See page 4-3.)
Is the copy ratio proper for the original andpaper sizes?
Use the auto image function to select theappropriate copy ratio based on the originaland copy sizes. (See page 4-15.)
Blank copies Is the original placed correctly? When using the document glass, place theoriginal face down. When using the automatic document feeder,place original face up. (See page 4-3.)
Order of copiesincorrect
Is the order of originals correct? When using the document glass, place theoriginals from the first page one sheet at atime.When using the automatic document feeder,place the originals with the first page up.
Job cancelationneeded
Is a message requesting cancelation of jobdisplayed?
Press the [CA] key to cancel the current job.
dragon_06.fm 3 ページ 2006年10月19日 木曜日 午後1時1分

dragonII_copy_sec.book 4 ページ 2006年10月18日 水曜日 午後7時39分
7-1
CHAPTER 7DOCUMENT FILING
FUNCTION
Page
OVERVIEW ............................................................................................. 7-2● Document filing function.................................................................. 7-2
TO USE THE DOCUMENT FILING FUNCTION..................................... 7-4● A look at the operation panel .......................................................... 7-4● Saving files...................................................................................... 7-4● Main screen of document filing ....................................................... 7-5● Document filing icons ...................................................................... 7-5
SAVING A DOCUMENT IMAGE FILE .................................................... 7-6● Quick File ........................................................................................ 7-6● Filing................................................................................................ 7-7● Print jobs ......................................................................................... 7-9● Scan Save....................................................................................... 7-10
CALLING UP AND USING A FILE.......................................................... 7-13● Searching for and calling up a saved file......................................... 7-13● Calling up and using a saved file..................................................... 7-15
SYSTEM SETTINGS .............................................................................. 7-24● Creating, editing, and deleting user names and folders.................. 7-24
ENTERING CHARACTERS.................................................................... 7-29
TROUBLESHOOTING ............................................................................ 7-31
dragonII_copy_sec.book 1 ページ 2006年10月18日 水曜日 午後7時39分
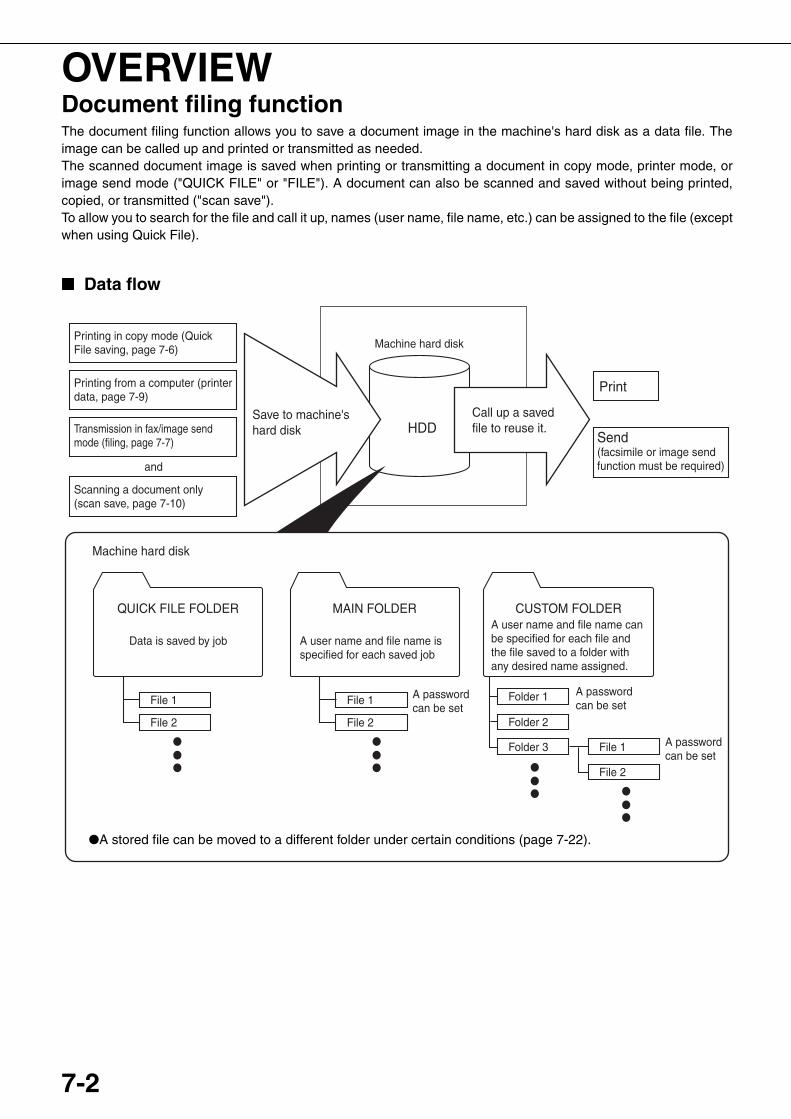
7-2
OVERVIEWDocument filing functionThe document filing function allows you to save a document image in the machine's hard disk as a data file. Theimage can be called up and printed or transmitted as needed.The scanned document image is saved when printing or transmitting a document in copy mode, printer mode, orimage send mode ("QUICK FILE" or "FILE"). A document can also be scanned and saved without being printed,copied, or transmitted ("scan save").To allow you to search for the file and call it up, names (user name, file name, etc.) can be assigned to the file (exceptwhen using Quick File).
■ Data flow
File 1
File 2
QUICK FILE FOLDER
File 1
File 2
MAIN FOLDER CUSTOM FOLDER
A password can be set
A password can be set
A password can be set
Folder 1
Folder 2
Folder 3 File 1
File 2
Machine hard disk
Machine hard disk
Save to machine's hard disk HDD
and
Send(facsimile or image send function must be required)
Printing in copy mode (Quick File saving, page 7-6)
Printing from a computer (printer data, page 7-9)
Transmission in fax/image send mode (filing, page 7-7)
Scanning a document only (scan save, page 7-10)
Data is saved by job A user name and file name is specified for each saved job
A user name and file name can be specified for each file and the file saved to a folder with any desired name assigned.
Call up a saved file to reuse it.
●A stored file can be moved to a different folder under certain conditions (page 7-22).
dragonII_copy_sec.book 2 ページ 2006年10月18日 水曜日 午後7時39分
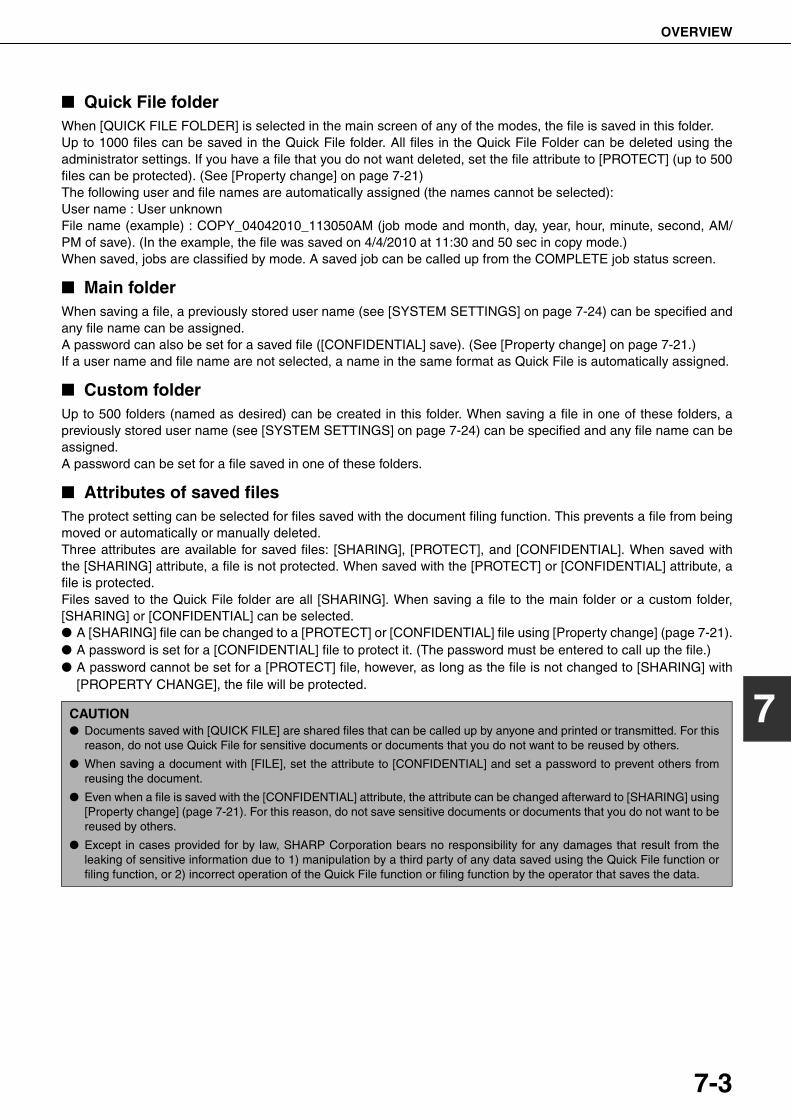
OVERVIEW
7-3
7
■ Quick File folderWhen [QUICK FILE FOLDER] is selected in the main screen of any of the modes, the file is saved in this folder.Up to 1000 files can be saved in the Quick File folder. All files in the Quick File Folder can be deleted using theadministrator settings. If you have a file that you do not want deleted, set the file attribute to [PROTECT] (up to 500files can be protected). (See [Property change] on page 7-21)The following user and file names are automatically assigned (the names cannot be selected):User name : User unknownFile name (example) : COPY_04042010_113050AM (job mode and month, day, year, hour, minute, second, AM/PM of save). (In the example, the file was saved on 4/4/2010 at 11:30 and 50 sec in copy mode.) When saved, jobs are classified by mode. A saved job can be called up from the COMPLETE job status screen.
■ Main folderWhen saving a file, a previously stored user name (see [SYSTEM SETTINGS] on page 7-24) can be specified andany file name can be assigned.A password can also be set for a saved file ([CONFIDENTIAL] save). (See [Property change] on page 7-21.)If a user name and file name are not selected, a name in the same format as Quick File is automatically assigned.
■ Custom folderUp to 500 folders (named as desired) can be created in this folder. When saving a file in one of these folders, apreviously stored user name (see [SYSTEM SETTINGS] on page 7-24) can be specified and any file name can beassigned.A password can be set for a file saved in one of these folders.
■ Attributes of saved filesThe protect setting can be selected for files saved with the document filing function. This prevents a file from beingmoved or automatically or manually deleted.Three attributes are available for saved files: [SHARING], [PROTECT], and [CONFIDENTIAL]. When saved withthe [SHARING] attribute, a file is not protected. When saved with the [PROTECT] or [CONFIDENTIAL] attribute, afile is protected.Files saved to the Quick File folder are all [SHARING]. When saving a file to the main folder or a custom folder,[SHARING] or [CONFIDENTIAL] can be selected.● A [SHARING] file can be changed to a [PROTECT] or [CONFIDENTIAL] file using [Property change] (page 7-21).● A password is set for a [CONFIDENTIAL] file to protect it. (The password must be entered to call up the file.)● A password cannot be set for a [PROTECT] file, however, as long as the file is not changed to [SHARING] with
[PROPERTY CHANGE], the file will be protected.
CAUTION● Documents saved with [QUICK FILE] are shared files that can be called up by anyone and printed or transmitted. For this
reason, do not use Quick File for sensitive documents or documents that you do not want to be reused by others.
● When saving a document with [FILE], set the attribute to [CONFIDENTIAL] and set a password to prevent others fromreusing the document.
● Even when a file is saved with the [CONFIDENTIAL] attribute, the attribute can be changed afterward to [SHARING] using[Property change] (page 7-21). For this reason, do not save sensitive documents or documents that you do not want to bereused by others.
● Except in cases provided for by law, SHARP Corporation bears no responsibility for any damages that result from theleaking of sensitive information due to 1) manipulation by a third party of any data saved using the Quick File function orfiling function, or 2) incorrect operation of the Quick File function or filing function by the operator that saves the data.
dragonII_copy_sec.book 3 ページ 2006年10月18日 水曜日 午後7時39分
7-4
TO USE THE DOCUMENT FILING FUNCTIONA look at the operation panel
Touch panel (see the next page)
This displays messages and keys. Keys can betouched to select and enter settings.When a key is touched, a beep will sound and thekey will be highlighted to indicate that it is selected.When a key cannot be selected in a screen, it willbe grayed out. If touched, a warning beep willsound to alert you that it cannot be selected.
Mode select keys
Use this key to select the mode.
[DOCUMENT FILING] key
Touch this key to display the main screen ofdocument filing mode.
Numeric keys
Use these keys to enter a password or a numericvalue for a setting.
[C] key (Clear key)
Use this key if you make a mistake when entering apassword or numeric setting.This key is also used to cancel scanning of adocument.
[CA] key (Clear all key)
Use this key to cancel a setting procedure andreturn to the main screen. The key is also used tocancel a special function.
[SYSTEM SETTINGS] key
Use this key to store, edit or delete a user name orcustom folder.
Saving filesTo save files to the main folder or custom folders, a user name must be previously stored. To create a folder in thecustom folder, the folder name must be stored. These settings are configured in the system settings.Follow the procedures explained in "Programming a user name", "Editing and deleting a user name", "Creating acustom folder", and "Editing/deleting a custom folder" on pages 7-25 to 7-28.
LOGOUT
DOCUMENTFILING
IMAGE SEND
COPY
JOB STATUSSYSTEM
SETTINGS
LINEDATA
PRINTREADYDATA
1
2
3
4
5
6
7
dragonII_copy_sec.book 4 ページ 2006年10月18日 水曜日 午後7時39分
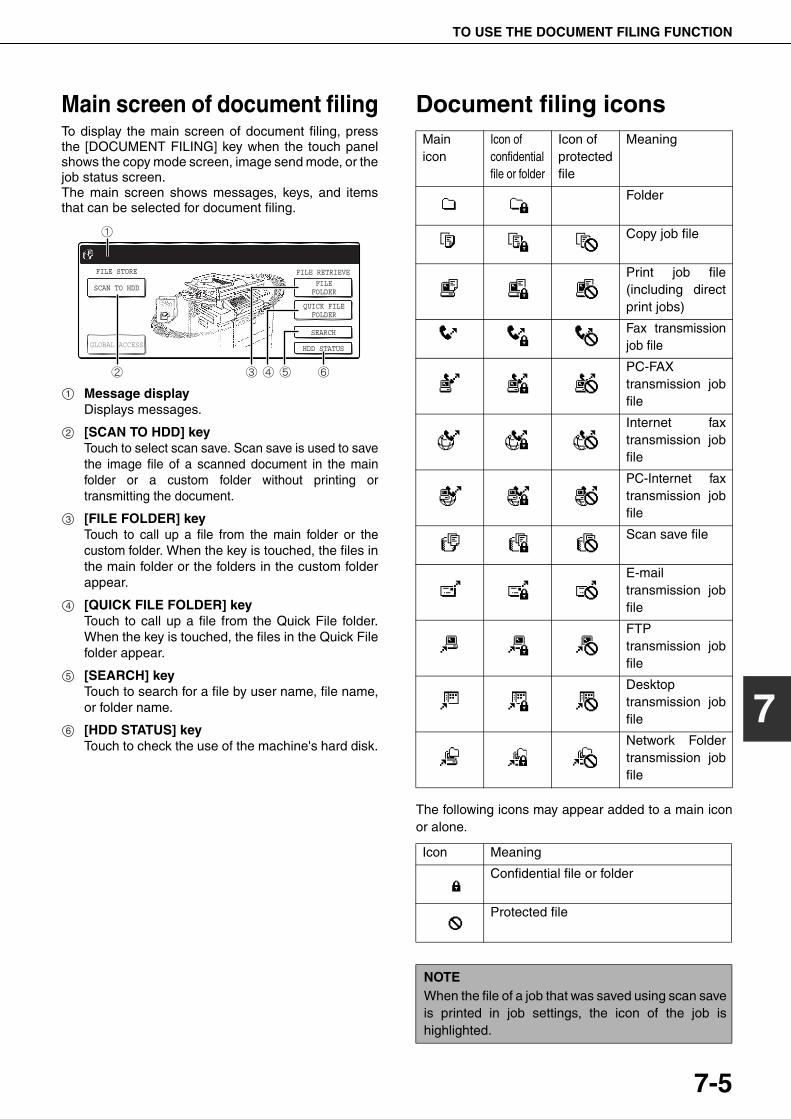
TO USE THE DOCUMENT FILING FUNCTION
7-5
7
Main screen of document filingTo display the main screen of document filing, pressthe [DOCUMENT FILING] key when the touch panelshows the copy mode screen, image send mode, or thejob status screen.The main screen shows messages, keys, and itemsthat can be selected for document filing.
Message displayDisplays messages.
[SCAN TO HDD] keyTouch to select scan save. Scan save is used to savethe image file of a scanned document in the mainfolder or a custom folder without printing ortransmitting the document.
[FILE FOLDER] keyTouch to call up a file from the main folder or thecustom folder. When the key is touched, the files inthe main folder or the folders in the custom folderappear.
[QUICK FILE FOLDER] keyTouch to call up a file from the Quick File folder.When the key is touched, the files in the Quick Filefolder appear.
[SEARCH] keyTouch to search for a file by user name, file name,or folder name.
[HDD STATUS] keyTouch to check the use of the machine's hard disk.
Document filing icons
The following icons may appear added to a main iconor alone.
HDD STATUS
SEARCH
SCAN TO HDDFILE
FOLDER
QUICK FILEFOLDER
FILE RETRIEVEFILE STORE
GLOBAL ACCESS
1
2
3
4
5
6
Main icon
Icon of confidential file or folder
Icon of protected file
Meaning
Folder
Copy job file
Print job file(including directprint jobs)
Fax transmissionjob file
PC-FAXtransmission jobfile
Internet faxtransmission jobfile
PC-Internet faxtransmission jobfile
Scan save file
E-mailtransmission jobfile
FTPtransmission jobfile
Desktoptransmission jobfile
Network Foldertransmission jobfile
Icon Meaning
Confidential file or folder
Protected file
NOTEWhen the file of a job that was saved using scan saveis printed in job settings, the icon of the job ishighlighted.
dragon_07-1.fm 5 ページ 2006年11月29日 水曜日 午後9時40分
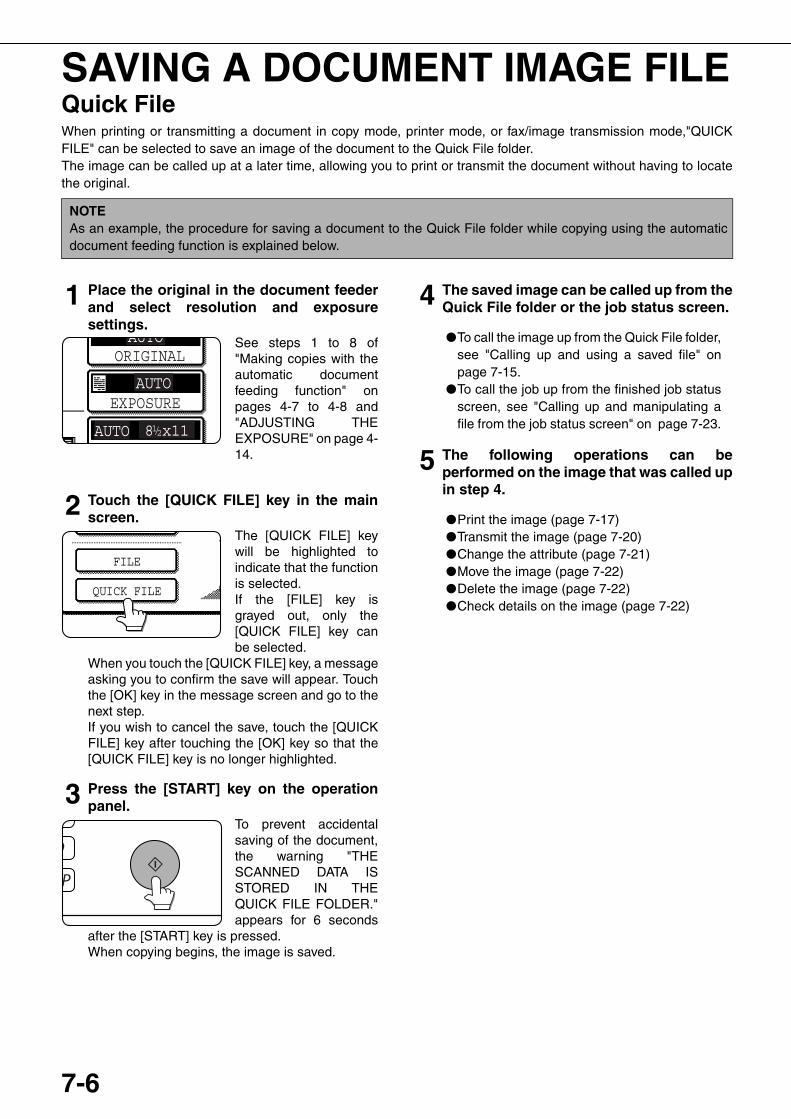
7-6
SAVING A DOCUMENT IMAGE FILEQuick FileWhen printing or transmitting a document in copy mode, printer mode, or fax/image transmission mode,"QUICKFILE" can be selected to save an image of the document to the Quick File folder.The image can be called up at a later time, allowing you to print or transmit the document without having to locatethe original.
1 Place the original in the document feederand select resolution and exposuresettings.
See steps 1 to 8 of"Making copies with theautomatic documentfeeding function" onpages 4-7 to 4-8 and"ADJUSTING THEEXPOSURE" on page 4-14.
2 Touch the [QUICK FILE] key in the mainscreen.
The [QUICK FILE] keywill be highlighted toindicate that the functionis selected.If the [FILE] key isgrayed out, only the[QUICK FILE] key canbe selected.
When you touch the [QUICK FILE] key, a messageasking you to confirm the save will appear. Touchthe [OK] key in the message screen and go to thenext step.If you wish to cancel the save, touch the [QUICKFILE] key after touching the [OK] key so that the[QUICK FILE] key is no longer highlighted.
3 Press the [START] key on the operationpanel.
To prevent accidentalsaving of the document,the warning "THESCANNED DATA ISSTORED IN THEQUICK FILE FOLDER."appears for 6 seconds
after the [START] key is pressed.When copying begins, the image is saved.
4 The saved image can be called up from theQuick File folder or the job status screen.
●To call the image up from the Quick File folder,see "Calling up and using a saved file" onpage 7-15.
●To call the job up from the finished job statusscreen, see "Calling up and manipulating afile from the job status screen" on page 7-23.
5 The following operations can beperformed on the image that was called upin step 4.
●Print the image (page 7-17)●Transmit the image (page 7-20)●Change the attribute (page 7-21)●Move the image (page 7-22)●Delete the image (page 7-22)●Check details on the image (page 7-22)
NOTEAs an example, the procedure for saving a document to the Quick File folder while copying using the automaticdocument feeding function is explained below.
AUTO
AUTO
AUTO
ORIGINAL
EXPOSURE
8 x111 / 2
QUICK FILE
FILE
dragonII_copy_sec.book 6 ページ 2006年10月18日 水曜日 午後7時39分
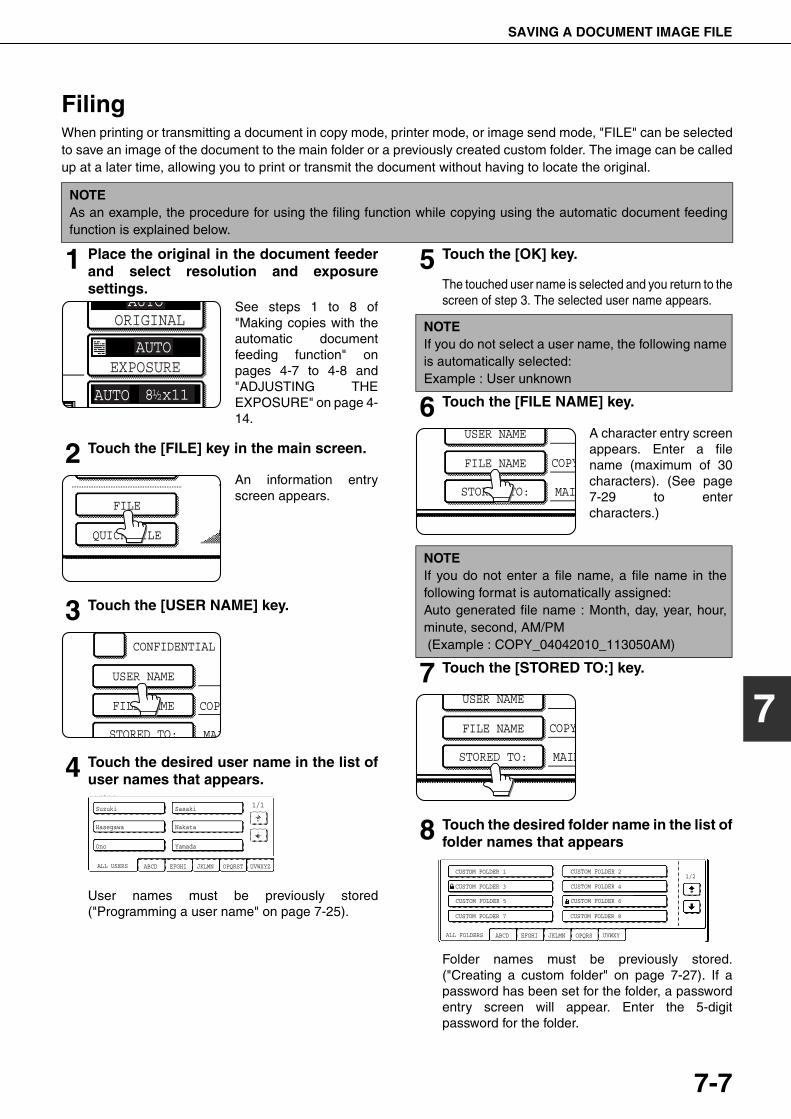
SAVING A DOCUMENT IMAGE FILE
7-7
7
FilingWhen printing or transmitting a document in copy mode, printer mode, or image send mode, "FILE" can be selectedto save an image of the document to the main folder or a previously created custom folder. The image can be calledup at a later time, allowing you to print or transmit the document without having to locate the original.
1 Place the original in the document feederand select resolution and exposuresettings.
See steps 1 to 8 of"Making copies with theautomatic documentfeeding function" onpages 4-7 to 4-8 and"ADJUSTING THEEXPOSURE" on page 4-14.
2 Touch the [FILE] key in the main screen.
An information entryscreen appears.
3 Touch the [USER NAME] key.
4 Touch the desired user name in the list ofuser names that appears.
User names must be previously stored("Programming a user name" on page 7-25).
5 Touch the [OK] key.
The touched user name is selected and you return to thescreen of step 3. The selected user name appears.
6 Touch the [FILE NAME] key.
A character entry screenappears. Enter a filename (maximum of 30characters). (See page7-29 to entercharacters.)
7 Touch the [STORED TO:] key.
8 Touch the desired folder name in the list offolder names that appears
Folder names must be previously stored.("Creating a custom folder" on page 7-27). If apassword has been set for the folder, a passwordentry screen will appear. Enter the 5-digitpassword for the folder.
NOTEAs an example, the procedure for using the filing function while copying using the automatic document feedingfunction is explained below.
AUTO
AUTO
AUTO
ORIGINAL
EXPOSURE
8 x111 / 2
QUICK FILE
FILE
USER NAME
CONFIDENTIAL
MAI
COPYFILE NAME
STORED TO:
Suzuki
Ono
Hasegawa
Sasaki
UVWXYZOPQRSTJKLMNEFGHIABCDALL USERS
Yamada
Nakata
1/1
NOTEIf you do not select a user name, the following nameis automatically selected:Example : User unknown
NOTEIf you do not enter a file name, a file name in thefollowing format is automatically assigned:Auto generated file name : Month, day, year, hour,minute, second, AM/PM (Example : COPY_04042010_113050AM)
USER NAME
FILE NAME
STORED TO: MAI
COPY
USER NAME
FILE NAME
STORED TO: MAIN
COPY
ALL FOLDERS
CUSTOM FOLDER 1
CUSTOM FOLDER 3
CUSTOM FOLDER 5
CUSTOM FOLDER 7
CUSTOM FOLDER 6
CUSTOM FOLDER 4
CUSTOM FOLDER 2
CUSTOM FOLDER 8
ABCD EFGHI JKLMN OPQRS UVWXY
1/2
dragonII_copy_sec.book 7 ページ 2006年10月18日 水曜日 午後7時39分
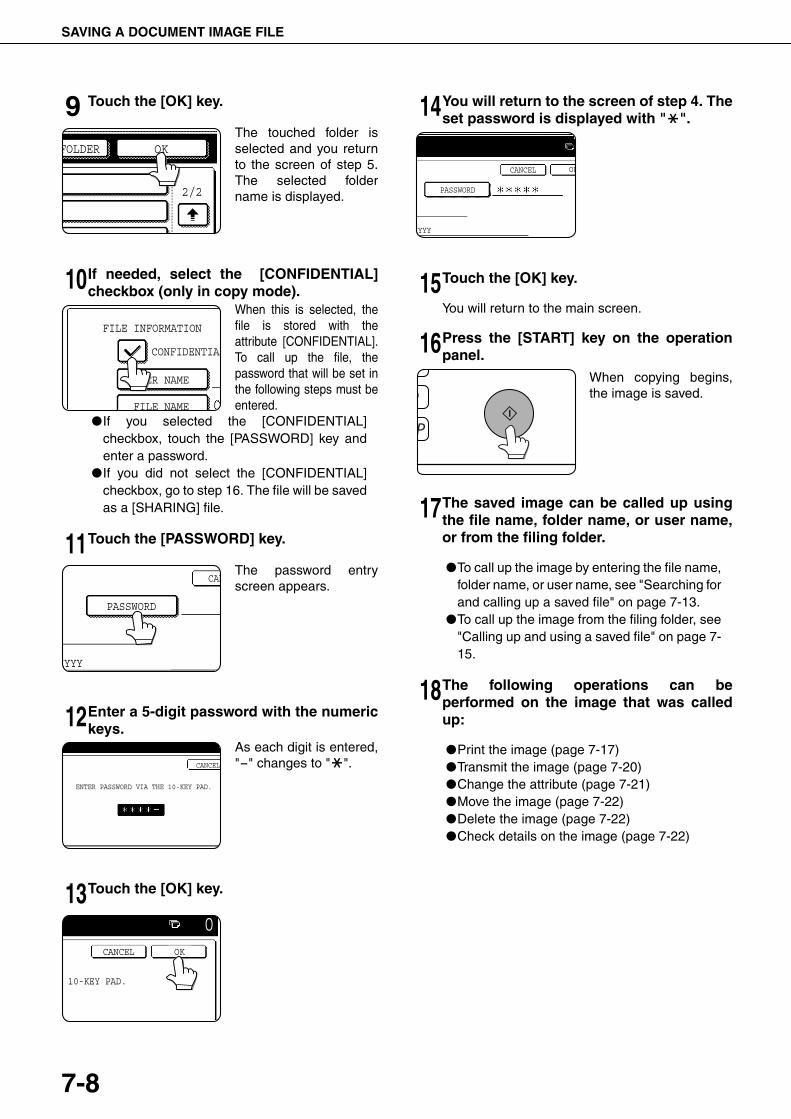
SAVING A DOCUMENT IMAGE FILE
7-8
9 Touch the [OK] key.
The touched folder isselected and you returnto the screen of step 5.The selected foldername is displayed.
10If needed, select the [CONFIDENTIAL]checkbox (only in copy mode).
When this is selected, thefile is stored with theattribute [CONFIDENTIAL].To call up the file, thepassword that will be set inthe following steps must beentered.
●If you selected the [CONFIDENTIAL]checkbox, touch the [PASSWORD] key andenter a password.
●If you did not select the [CONFIDENTIAL]checkbox, go to step 16. The file will be savedas a [SHARING] file.
11Touch the [PASSWORD] key.
The password entryscreen appears.
12Enter a 5-digit password with the numerickeys.
As each digit is entered,"-" changes to " ".
13Touch the [OK] key.
14You will return to the screen of step 4. Theset password is displayed with " ".
15Touch the [OK] key.
You will return to the main screen.
16Press the [START] key on the operationpanel.
When copying begins,the image is saved.
17The saved image can be called up usingthe file name, folder name, or user name,or from the filing folder.
●To call up the image by entering the file name,folder name, or user name, see "Searching forand calling up a saved file" on page 7-13.
●To call up the image from the filing folder, see"Calling up and using a saved file" on page 7-15.
18The following operations can beperformed on the image that was calledup:
●Print the image (page 7-17)●Transmit the image (page 7-20)●Change the attribute (page 7-21)●Move the image (page 7-22)●Delete the image (page 7-22)●Check details on the image (page 7-22)
OKFOLDER
2/2
USER NAME
FILE NAME
CONFIDENTIAL
FILE INFORMATION
PASSWORD
CAN
XYYY
ENTER PASSWORD VIA THE 10-KEY PAD.
CANCEL
CANCEL
0OK
10-KEY PAD.
XYYY
OKCANCEL
PASSWORD
dragonII_copy_sec.book 8 ページ 2006年10月18日 水曜日 午後7時39分
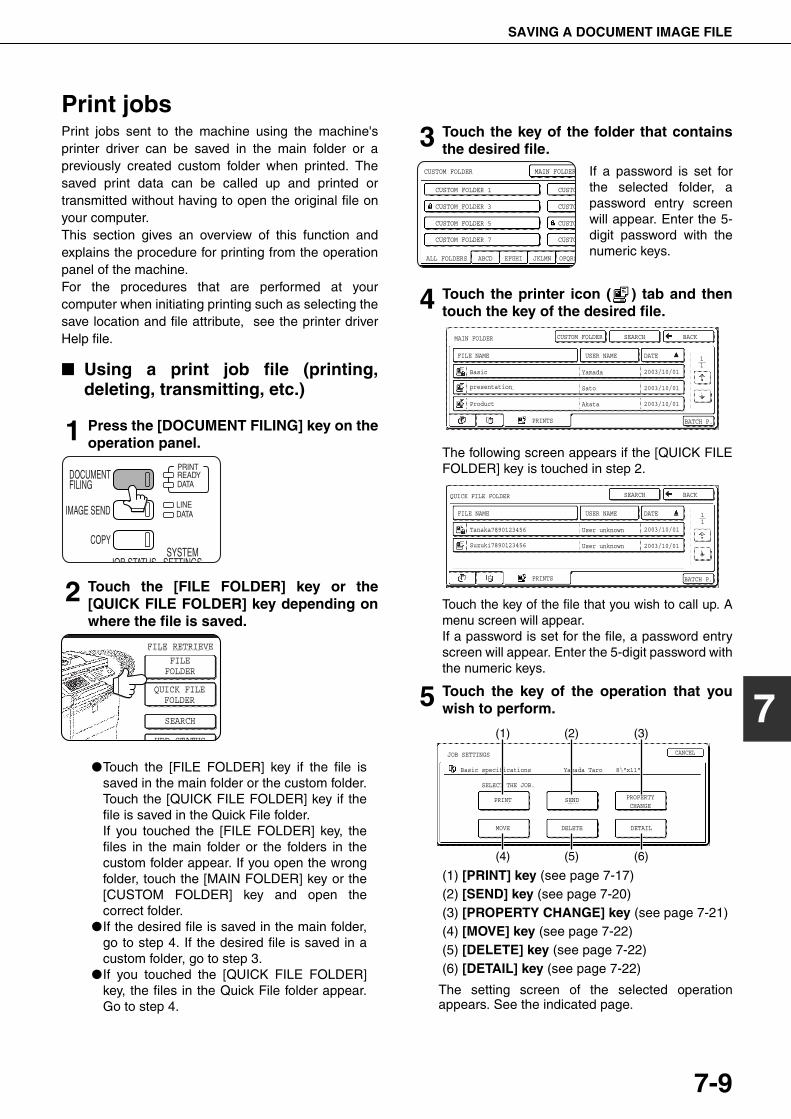
SAVING A DOCUMENT IMAGE FILE
7-9
7
Print jobsPrint jobs sent to the machine using the machine'sprinter driver can be saved in the main folder or apreviously created custom folder when printed. Thesaved print data can be called up and printed ortransmitted without having to open the original file onyour computer.This section gives an overview of this function andexplains the procedure for printing from the operationpanel of the machine.For the procedures that are performed at yourcomputer when initiating printing such as selecting thesave location and file attribute, see the printer driverHelp file.
■ Using a print job file (printing,deleting, transmitting, etc.)
1 Press the [DOCUMENT FILING] key on theoperation panel.
2 Touch the [FILE FOLDER] key or the[QUICK FILE FOLDER] key depending onwhere the file is saved.
●Touch the [FILE FOLDER] key if the file issaved in the main folder or the custom folder.Touch the [QUICK FILE FOLDER] key if thefile is saved in the Quick File folder.If you touched the [FILE FOLDER] key, thefiles in the main folder or the folders in thecustom folder appear. If you open the wrongfolder, touch the [MAIN FOLDER] key or the[CUSTOM FOLDER] key and open thecorrect folder.
●If the desired file is saved in the main folder,go to step 4. If the desired file is saved in acustom folder, go to step 3.
●If you touched the [QUICK FILE FOLDER]key, the files in the Quick File folder appear.Go to step 4.
3 Touch the key of the folder that containsthe desired file.
If a password is set forthe selected folder, apassword entry screenwill appear. Enter the 5-digit password with thenumeric keys.
4 Touch the printer icon ( ) tab and thentouch the key of the desired file.
The following screen appears if the [QUICK FILEFOLDER] key is touched in step 2.
Touch the key of the file that you wish to call up. Amenu screen will appear. If a password is set for the file, a password entryscreen will appear. Enter the 5-digit password withthe numeric keys.
5 Touch the key of the operation that youwish to perform.
(1) [PRINT] key (see page 7-17)(2) [SEND] key (see page 7-20)(3) [PROPERTY CHANGE] key (see page 7-21)(4) [MOVE] key (see page 7-22)(5) [DELETE] key (see page 7-22)(6) [DETAIL] key (see page 7-22)
The setting screen of the selected operationappears. See the indicated page.
DOCUMENTFILING
IMAGE SEND
COPY
JOB STATUSSYSTEM
SETTINGS
LINEDATA
PRINTREADYDATA
FILEFOLDER
QUICK FILEFOLDER
FILE RETRIEVE
SEARCH
HDD STATUS
OPQRSJKLMNEFGHIABCD
CUSTOM FOLDER
CUSTOM FOLDER 1
CUSTOM FOLDER 3
CUSTOM FOLDER 5
CUSTOM FOLDER 7
CUSTO
CUSTO
CUSTO
CUSTO
ALL FOLDERS
MAIN FOLDER
MAIN FOLDER SEARCHCUSTOM FOLDER BACK
1/1FILE NAME
Basic Yamada 2003/10/01
2003/10/01
2003/10/01
Sato
Akata
presentation
Product
PRINTS
USER NAME DATE
BATCH P.
11
QUICK FILE FOLDER SEARCH BACK
FILE NAME
Tanaka7890123456 User unknown 2003/10/01
2003/10/01User unknownSuzuki7890123456
PRINTS
USER NAME DATE 11
BATCH P.
(1) (2) (3)
(4) (5) (6)
SELECT THE JOB.
MOVE
SEND
DELETE
PROPERTYCHANGE
DETAIL
JOB SETTINGS
Basic specifications Yamada Taro
CANCEL
8 "x11"1 / 2
dragon_07-1.fm 9 ページ 2006年11月30日 木曜日 午前9時34分
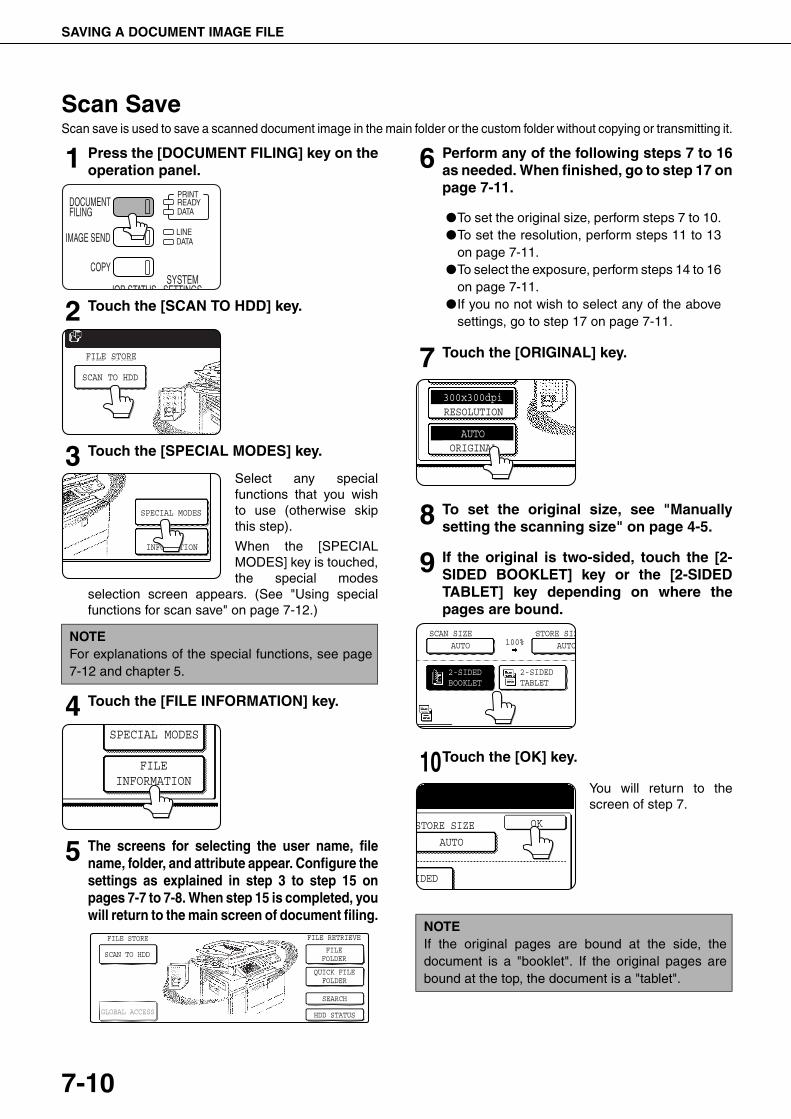
SAVING A DOCUMENT IMAGE FILE
7-10
Scan SaveScan save is used to save a scanned document image in the main folder or the custom folder without copying or transmitting it.
1 Press the [DOCUMENT FILING] key on theoperation panel.
2 Touch the [SCAN TO HDD] key.
3 Touch the [SPECIAL MODES] key.
Select any specialfunctions that you wishto use (otherwise skipthis step).
When the [SPECIALMODES] key is touched,the special modes
selection screen appears. (See "Using specialfunctions for scan save" on page 7-12.)
4 Touch the [FILE INFORMATION] key.
5 The screens for selecting the user name, filename, folder, and attribute appear. Configure thesettings as explained in step 3 to step 15 onpages 7-7 to 7-8. When step 15 is completed, youwill return to the main screen of document filing.
6 Perform any of the following steps 7 to 16as needed. When finished, go to step 17 onpage 7-11.
●To set the original size, perform steps 7 to 10.●To set the resolution, perform steps 11 to 13
on page 7-11.●To select the exposure, perform steps 14 to 16
on page 7-11.●If you no not wish to select any of the above
settings, go to step 17 on page 7-11.
7 Touch the [ORIGINAL] key.
8 To set the original size, see "Manuallysetting the scanning size" on page 4-5.
9 If the original is two-sided, touch the [2-SIDED BOOKLET] key or the [2-SIDEDTABLET] key depending on where thepages are bound.
10Touch the [OK] key.
You will return to thescreen of step 7.
NOTEFor explanations of the special functions, see page7-12 and chapter 5.
DOCUMENTFILING
IMAGE SEND
COPY
JOB STATUSSYSTEM
SETTINGS
LINEDATA
PRINTREADYDATA
SCAN TO HDD
FILE STORE
SPECIAL MODES
FILEINFORMATION
FILEINFORMATION
SPECIAL MODES
SCAN TO HDDFILE
FOLDER
QUICK FILEFOLDER
FILE STORE FILE RETRIEVE
SEARCH
HDD STATUSGLOBAL ACCESS
NOTEIf the original pages are bound at the side, thedocument is a "booklet". If the original pages arebound at the top, the document is a "tablet".
ORIGINAL
RESOLUTION
AUTO
300x300dpi
2-SIDEDBOOKLET
2-SIDEDTABLET
SCAN SIZE STORE SIZ100%AUTO AUTO
OKSTORE SIZE
AUTO
IDED
dragon_07-1.fm 10 ページ 2006年11月30日 木曜日 午前9時0分
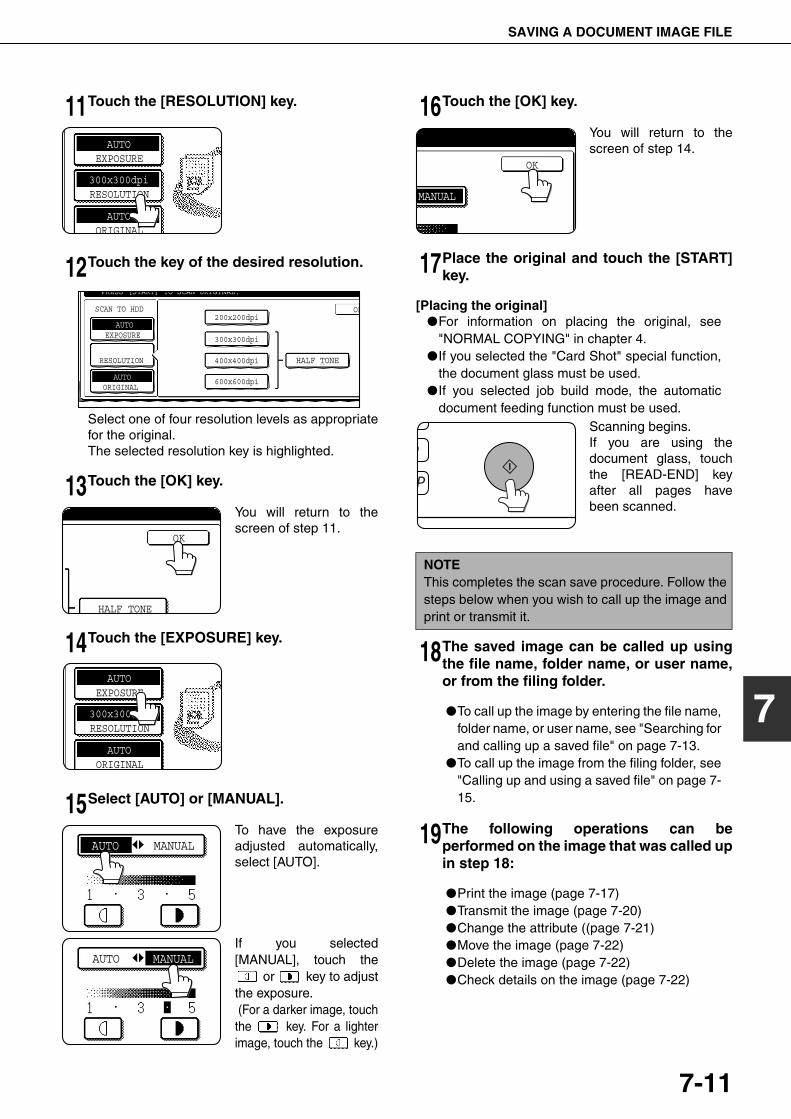
SAVING A DOCUMENT IMAGE FILE
7-11
7
11Touch the [RESOLUTION] key.
12Touch the key of the desired resolution.
Select one of four resolution levels as appropriatefor the original. The selected resolution key is highlighted.
13Touch the [OK] key.
You will return to thescreen of step 11.
14Touch the [EXPOSURE] key.
15Select [AUTO] or [MANUAL].
To have the exposureadjusted automatically,select [AUTO].
If you selected[MANUAL], touch the
or key to adjustthe exposure. (For a darker image, touchthe key. For a lighterimage, touch the key.)
16Touch the [OK] key.
You will return to thescreen of step 14.
17Place the original and touch the [START]key.
[Placing the original]●For information on placing the original, see
"NORMAL COPYING" in chapter 4.●If you selected the "Card Shot" special function,
the document glass must be used.●If you selected job build mode, the automatic
document feeding function must be used.Scanning begins.If you are using thedocument glass, touchthe [READ-END] keyafter all pages havebeen scanned.
18The saved image can be called up usingthe file name, folder name, or user name,or from the filing folder.
●To call up the image by entering the file name,folder name, or user name, see "Searching forand calling up a saved file" on page 7-13.
●To call up the image from the filing folder, see"Calling up and using a saved file" on page 7-15.
19The following operations can beperformed on the image that was called upin step 18:
●Print the image (page 7-17)●Transmit the image (page 7-20)●Change the attribute ((page 7-21)●Move the image (page 7-22)●Delete the image (page 7-22)●Check details on the image (page 7-22)
ORIGINAL
RESOLUTION
EXPOSURE
AUTO
AUTO
300x300dpi
PRESS [START] TO SCAN ORIGINAL.
SCAN TO HDD
EXPOSURE
ORIGINAL
RESOLUTION
200x200dpiOK
400x400dpi
600x600dpi
300x300dpi
HALF TONE
AUTO
AUTO
OK
HALF TONE
ORIGINAL
RESOLUTION
EXPOSURE
AUTO
AUTO
300x300dpi
MANUALAUTO
MANUALAUTO
NOTEThis completes the scan save procedure. Follow thesteps below when you wish to call up the image andprint or transmit it.
MANUAL
OK
dragonII_copy_sec.book 11 ページ 2006年10月18日 水曜日 午後7時39分
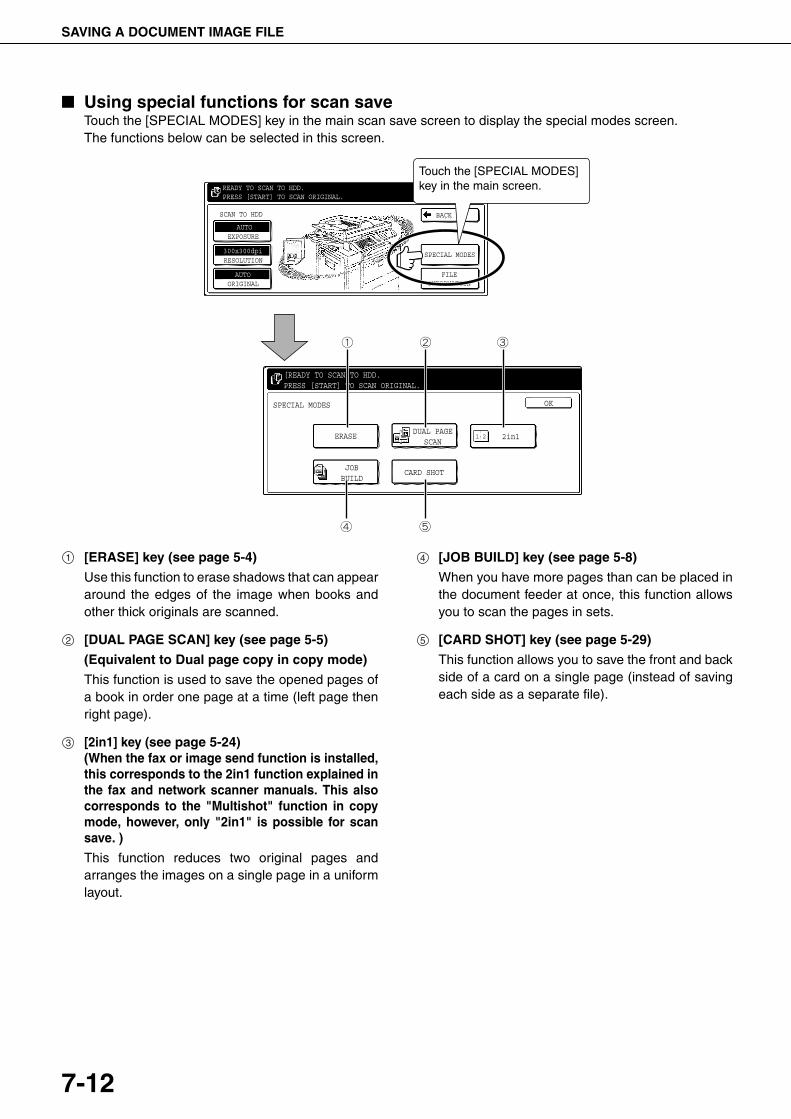
SAVING A DOCUMENT IMAGE FILE
7-12
■ Using special functions for scan saveTouch the [SPECIAL MODES] key in the main scan save screen to display the special modes screen.The functions below can be selected in this screen.
[ERASE] key (see page 5-4)
Use this function to erase shadows that can appeararound the edges of the image when books andother thick originals are scanned.
[DUAL PAGE SCAN] key (see page 5-5)
(Equivalent to Dual page copy in copy mode)
This function is used to save the opened pages ofa book in order one page at a time (left page thenright page).
[2in1] key (see page 5-24)(When the fax or image send function is installed,this corresponds to the 2in1 function explained inthe fax and network scanner manuals. This alsocorresponds to the "Multishot" function in copymode, however, only "2in1" is possible for scansave. )
This function reduces two original pages andarranges the images on a single page in a uniformlayout.
[JOB BUILD] key (see page 5-8)
When you have more pages than can be placed inthe document feeder at once, this function allowsyou to scan the pages in sets.
[CARD SHOT] key (see page 5-29)
This function allows you to save the front and backside of a card on a single page (instead of savingeach side as a separate file).
ORIGINAL
RESOLUTION
BACK
SPECIAL MODES
FILEINFORMATION
EXPOSURE
SCAN TO HDD
AUTO
AUTO
READY TO SCAN TO HDD.PRESS [START] TO SCAN ORIGINAL.
300x300dpi
[READY TO SCAN TO HDD.PRESS [START] TO SCAN ORIGINAL.
SPECIAL MODES
ERASEDUAL PAGE
SCAN
CARD SHOTJOBBUILD
2in121
OK
Touch the [SPECIAL MODES] key in the main screen.
1
2
3
4
5
dragonII_copy_sec.book 12 ページ 2006年10月18日 水曜日 午後7時39分
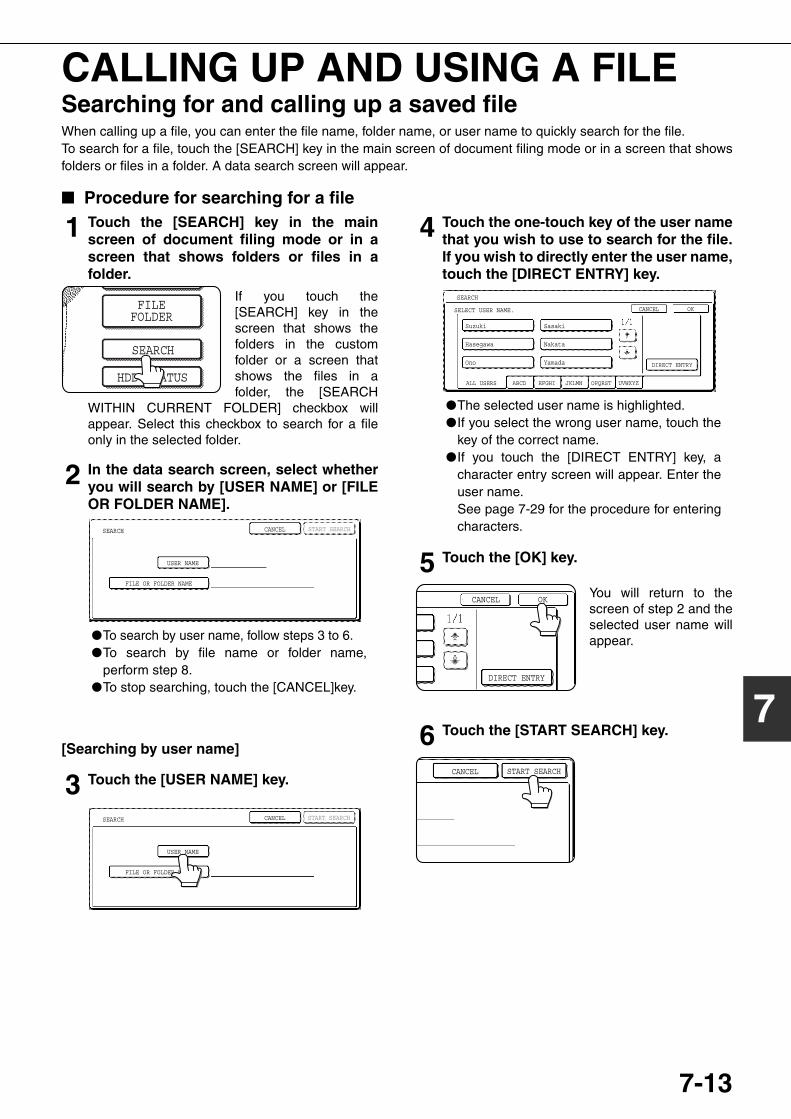
7-13
7
CALLING UP AND USING A FILESearching for and calling up a saved fileWhen calling up a file, you can enter the file name, folder name, or user name to quickly search for the file.To search for a file, touch the [SEARCH] key in the main screen of document filing mode or in a screen that showsfolders or files in a folder. A data search screen will appear.
■ Procedure for searching for a file
1 Touch the [SEARCH] key in the mainscreen of document filing mode or in ascreen that shows folders or files in afolder.
If you touch the[SEARCH] key in thescreen that shows thefolders in the customfolder or a screen thatshows the files in afolder, the [SEARCH
WITHIN CURRENT FOLDER] checkbox willappear. Select this checkbox to search for a fileonly in the selected folder.
2 In the data search screen, select whetheryou will search by [USER NAME] or [FILEOR FOLDER NAME].
●To search by user name, follow steps 3 to 6.●To search by file name or folder name,
perform step 8.●To stop searching, touch the [CANCEL]key.
[Searching by user name]
3 Touch the [USER NAME] key.
4 Touch the one-touch key of the user namethat you wish to use to search for the file.If you wish to directly enter the user name,touch the [DIRECT ENTRY] key.
●The selected user name is highlighted.●If you select the wrong user name, touch the
key of the correct name.●If you touch the [DIRECT ENTRY] key, a
character entry screen will appear. Enter theuser name.See page 7-29 for the procedure for enteringcharacters.
5 Touch the [OK] key.
You will return to thescreen of step 2 and theselected user name willappear.
6 Touch the [START SEARCH] key.
HDD STATUS
SEARCH
FILEFOLDER
CANCEL
USER NAME
SEARCH
FILE OR FOLDER NAME
START SEARCH
CANCEL
USER NAME
SEARCH
FILE OR FOLDER NAME
START SEARCH
SEARCH
SELECT USER NAME.
Suzuki
Ono
Hasegawa
Sasaki
CANCEL
DIRECT ENTRY
UVWXYZOPQRSTJKLMNEFGHIABCDALL USERS
OK
Yamada
Nakata
CANCEL
DIRECT ENTRY
OK
CANCEL START SEARCH
dragon_07-2.fm 13 ページ 2006年11月29日 水曜日 午後10時6分
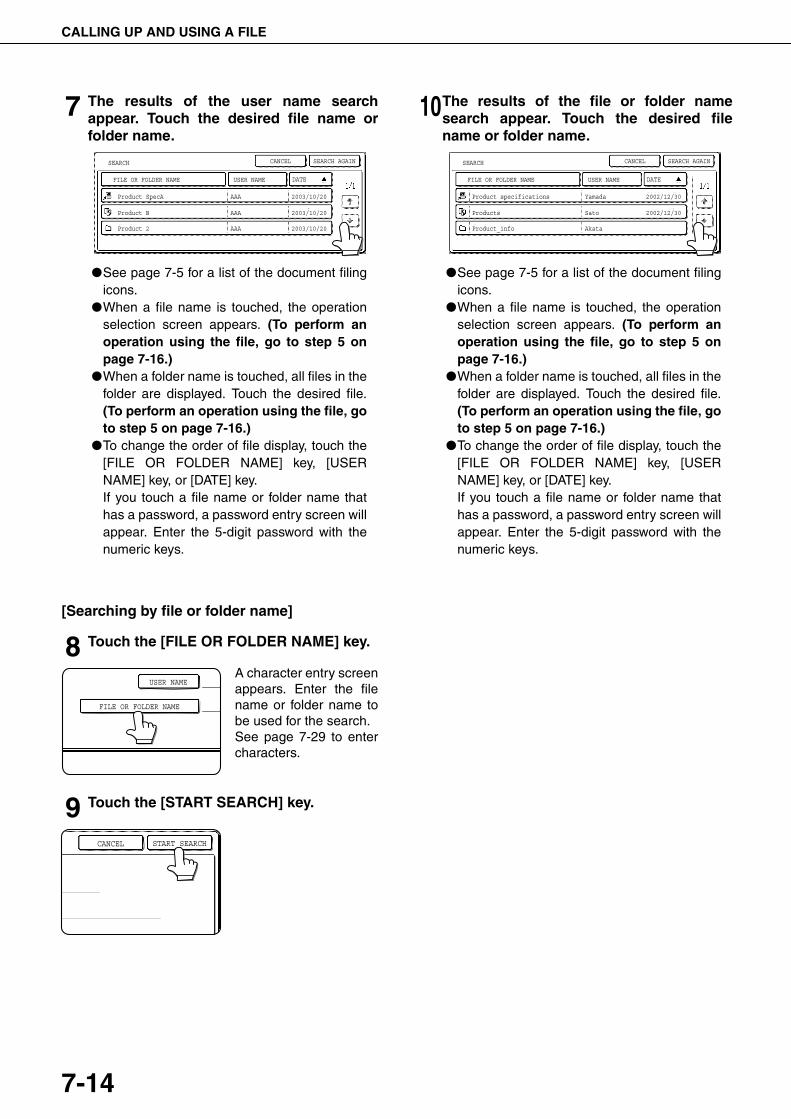
CALLING UP AND USING A FILE
7-14
7 The results of the user name searchappear. Touch the desired file name orfolder name.
●See page 7-5 for a list of the document filingicons.
●When a file name is touched, the operationselection screen appears. (To perform anoperation using the file, go to step 5 onpage 7-16.)
●When a folder name is touched, all files in thefolder are displayed. Touch the desired file.(To perform an operation using the file, goto step 5 on page 7-16.)
●To change the order of file display, touch the[FILE OR FOLDER NAME] key, [USERNAME] key, or [DATE] key.If you touch a file name or folder name thathas a password, a password entry screen willappear. Enter the 5-digit password with thenumeric keys.
[Searching by file or folder name]
8 Touch the [FILE OR FOLDER NAME] key.
A character entry screenappears. Enter the filename or folder name tobe used for the search.See page 7-29 to entercharacters.
9 Touch the [START SEARCH] key.
10The results of the file or folder namesearch appear. Touch the desired filename or folder name.
●See page 7-5 for a list of the document filingicons.
●When a file name is touched, the operationselection screen appears. (To perform anoperation using the file, go to step 5 onpage 7-16.)
●When a folder name is touched, all files in thefolder are displayed. Touch the desired file.(To perform an operation using the file, goto step 5 on page 7-16.)
●To change the order of file display, touch the[FILE OR FOLDER NAME] key, [USERNAME] key, or [DATE] key.If you touch a file name or folder name thathas a password, a password entry screen willappear. Enter the 5-digit password with thenumeric keys.
SEARCH
FILE OR FOLDER NAME USER NAME
AAA
AAA
AAA
Product SpecA
Product B
Product 2
2003/10/20
2003/10/20
2003/10/20
SEARCH AGAINCANCEL
DATE
USER NAME
FILE OR FOLDER NAME
CANCEL START SEARCH
SEARCH
FILE OR FOLDER NAME USER NAME
SEARCH AGAINCANCEL
DATE
Yamada
Sato
Akata
Product specifications
Products
Product_info
2002/12/30
2002/12/30
dragonII_copy_sec.book 14 ページ 2006年10月18日 水曜日 午後7時39分
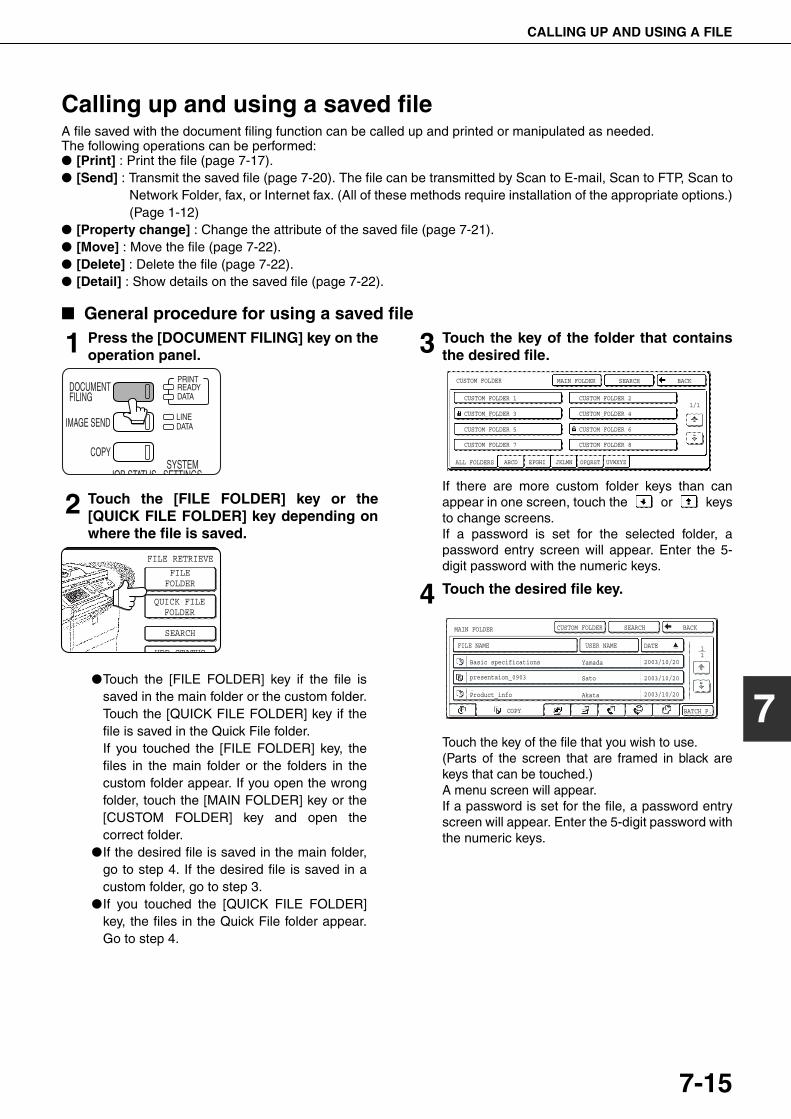
CALLING UP AND USING A FILE
7-15
7
Calling up and using a saved fileA file saved with the document filing function can be called up and printed or manipulated as needed.The following operations can be performed:● [Print] : Print the file (page 7-17).● [Send] : Transmit the saved file (page 7-20). The file can be transmitted by Scan to E-mail, Scan to FTP, Scan to
Network Folder, fax, or Internet fax. (All of these methods require installation of the appropriate options.)(Page 1-12)
● [Property change] : Change the attribute of the saved file (page 7-21).● [Move] : Move the file (page 7-22).● [Delete] : Delete the file (page 7-22).● [Detail] : Show details on the saved file (page 7-22).
■ General procedure for using a saved file
1 Press the [DOCUMENT FILING] key on theoperation panel.
2 Touch the [FILE FOLDER] key or the[QUICK FILE FOLDER] key depending onwhere the file is saved.
●Touch the [FILE FOLDER] key if the file issaved in the main folder or the custom folder.Touch the [QUICK FILE FOLDER] key if thefile is saved in the Quick File folder.If you touched the [FILE FOLDER] key, thefiles in the main folder or the folders in thecustom folder appear. If you open the wrongfolder, touch the [MAIN FOLDER] key or the[CUSTOM FOLDER] key and open thecorrect folder.
●If the desired file is saved in the main folder,go to step 4. If the desired file is saved in acustom folder, go to step 3.
●If you touched the [QUICK FILE FOLDER]key, the files in the Quick File folder appear.Go to step 4.
3 Touch the key of the folder that containsthe desired file.
If there are more custom folder keys than canappear in one screen, touch the or keysto change screens.If a password is set for the selected folder, apassword entry screen will appear. Enter the 5-digit password with the numeric keys.
4 Touch the desired file key.
Touch the key of the file that you wish to use. (Parts of the screen that are framed in black arekeys that can be touched.)A menu screen will appear. If a password is set for the file, a password entryscreen will appear. Enter the 5-digit password withthe numeric keys.
DOCUMENTFILING
IMAGE SEND
COPY
JOB STATUSSYSTEM
SETTINGS
LINEDATA
PRINTREADYDATA
FILEFOLDER
QUICK FILEFOLDER
FILE RETRIEVE
SEARCH
HDD STATUS
UVWXYZOPQRSTJKLMNEFGHIABCD
CUSTOM FOLDER
CUSTOM FOLDER 1
CUSTOM FOLDER 3
CUSTOM FOLDER 5
CUSTOM FOLDER 7
CUSTOM FOLDER 2
CUSTOM FOLDER 4
CUSTOM FOLDER 6
CUSTOM FOLDER 8
ALL FOLDERS
MAIN FOLDER SEARCH BACK
1/1
MAIN FOLDER SEARCHCUSTOM FOLDER BACK
FILE NAME
Basic specifications Yamada 2003/10/20
2003/10/20
2003/10/20
Sato
Akata
presentaion_0903
Product_info
COPY
USER NAME DATE
BATCH P.
11
dragon_07-2.fm 15 ページ 2006年11月30日 木曜日 午前9時39分
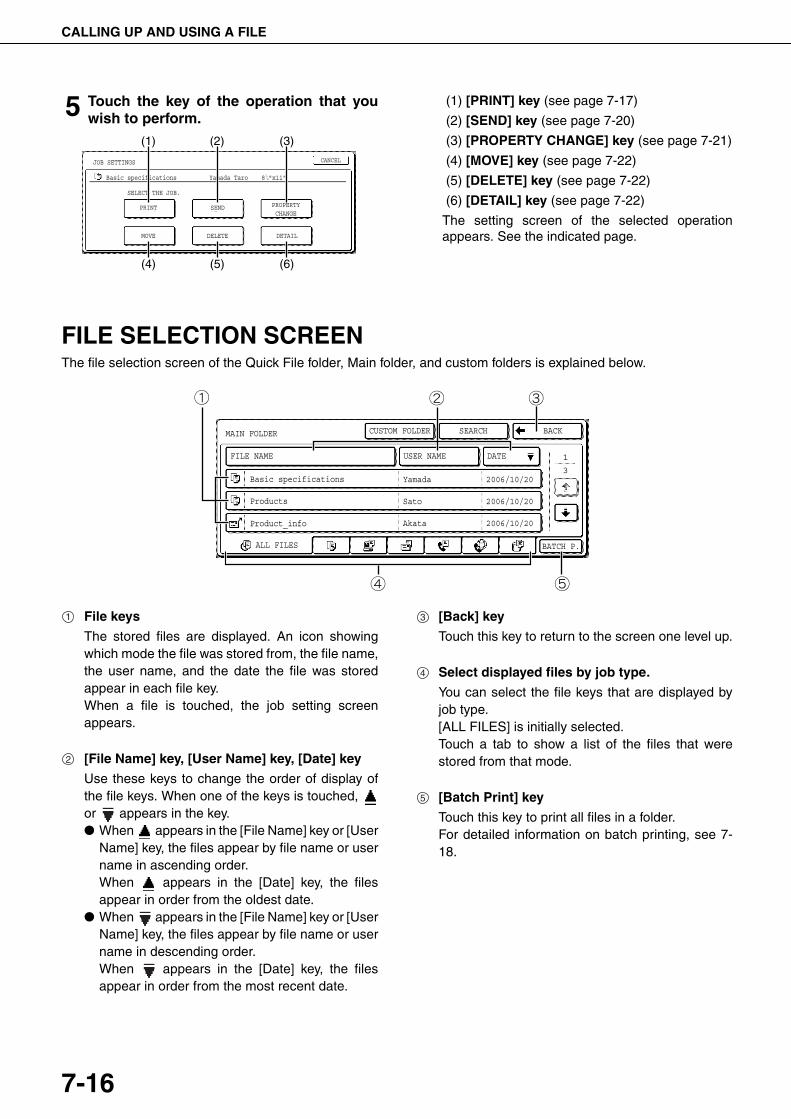
CALLING UP AND USING A FILE
7-16
5 Touch the key of the operation that youwish to perform.
(1) [PRINT] key (see page 7-17)
(2) [SEND] key (see page 7-20)
(3) [PROPERTY CHANGE] key (see page 7-21)
(4) [MOVE] key (see page 7-22)
(5) [DELETE] key (see page 7-22)
(6) [DETAIL] key (see page 7-22)
The setting screen of the selected operationappears. See the indicated page.
FILE SELECTION SCREENThe file selection screen of the Quick File folder, Main folder, and custom folders is explained below.
File keys
The stored files are displayed. An icon showingwhich mode the file was stored from, the file name,the user name, and the date the file was storedappear in each file key.When a file is touched, the job setting screenappears.
[File Name] key, [User Name] key, [Date] key
Use these keys to change the order of display ofthe file keys. When one of the keys is touched, or appears in the key.● When appears in the [File Name] key or [User
Name] key, the files appear by file name or username in ascending order.When appears in the [Date] key, the filesappear in order from the oldest date.
● When appears in the [File Name] key or [UserName] key, the files appear by file name or username in descending order.When appears in the [Date] key, the filesappear in order from the most recent date.
[Back] key
Touch this key to return to the screen one level up.
Select displayed files by job type.
You can select the file keys that are displayed byjob type.[ALL FILES] is initially selected.Touch a tab to show a list of the files that werestored from that mode.
[Batch Print] key
Touch this key to print all files in a folder.For detailed information on batch printing, see 7-18.
(1) (2) (3)
(4) (5) (6)
SELECT THE JOB.
MOVE
SEND
DELETE
PROPERTYCHANGE
DETAIL
JOB SETTINGS
Basic specifications Yamada Taro
CANCEL
8 "x11"1 / 2
CUSTOM FOLDER SEARCH BACKMAIN FOLDER
Basic specifications Yamada 2006/10/20
Products Sato 2006/10/20
Product_info Akata 2006/10/20
3
1
BATCH P.ALL FILES
FILE NAME USER NAME DATE
1
2
3
4
5
dragon_07-2.fm 16 ページ 2006年10月22日 日曜日 午後3時27分
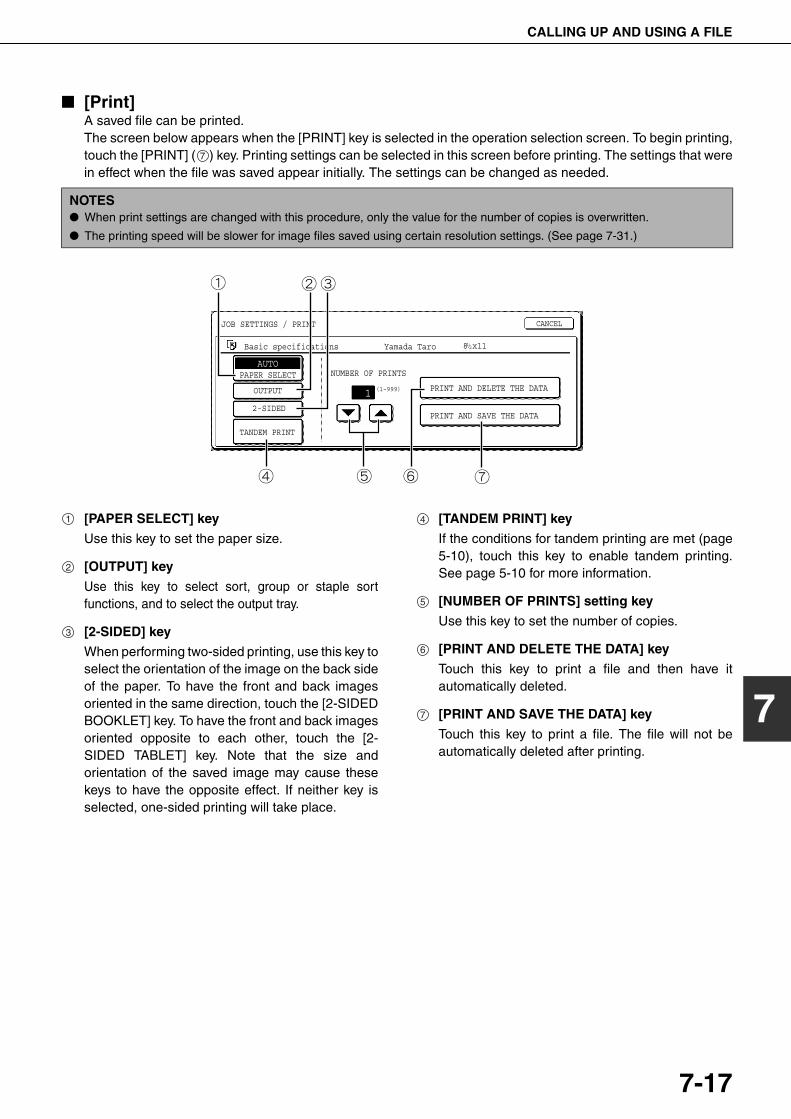
CALLING UP AND USING A FILE
7-17
7
■ [Print]A saved file can be printed.The screen below appears when the [PRINT] key is selected in the operation selection screen. To begin printing,touch the [PRINT] ( ) key. Printing settings can be selected in this screen before printing. The settings that werein effect when the file was saved appear initially. The settings can be changed as needed.
[PAPER SELECT] key
Use this key to set the paper size.
[OUTPUT] key
Use this key to select sort, group or staple sortfunctions, and to select the output tray.
[2-SIDED] key
When performing two-sided printing, use this key toselect the orientation of the image on the back sideof the paper. To have the front and back imagesoriented in the same direction, touch the [2-SIDEDBOOKLET] key. To have the front and back imagesoriented opposite to each other, touch the [2-SIDED TABLET] key. Note that the size andorientation of the saved image may cause thesekeys to have the opposite effect. If neither key isselected, one-sided printing will take place.
[TANDEM PRINT] key
If the conditions for tandem printing are met (page5-10), touch this key to enable tandem printing.See page 5-10 for more information.
[NUMBER OF PRINTS] setting key
Use this key to set the number of copies.
[PRINT AND DELETE THE DATA] key
Touch this key to print a file and then have itautomatically deleted.
[PRINT AND SAVE THE DATA] key
Touch this key to print a file. The file will not beautomatically deleted after printing.
7
NOTES● When print settings are changed with this procedure, only the value for the number of copies is overwritten.
● The printing speed will be slower for image files saved using certain resolution settings. (See page 7-31.)
PRINT AND DELETE THE DATA
PRINT AND SAVE THE DATA
NUMBER OF PRINTS
CANCEL
1 (1~999)
PAPER SELECT
TANDEM PRINT
2-SIDED
OUTPUT
AUTO
JOB SETTINGS / PRINT
Basic specifications Yamada Taro 8 x111 / 2
1
2
3
4
5
6
7
dragonII_copy_sec.book 17 ページ 2006年10月18日 水曜日 午後7時39分
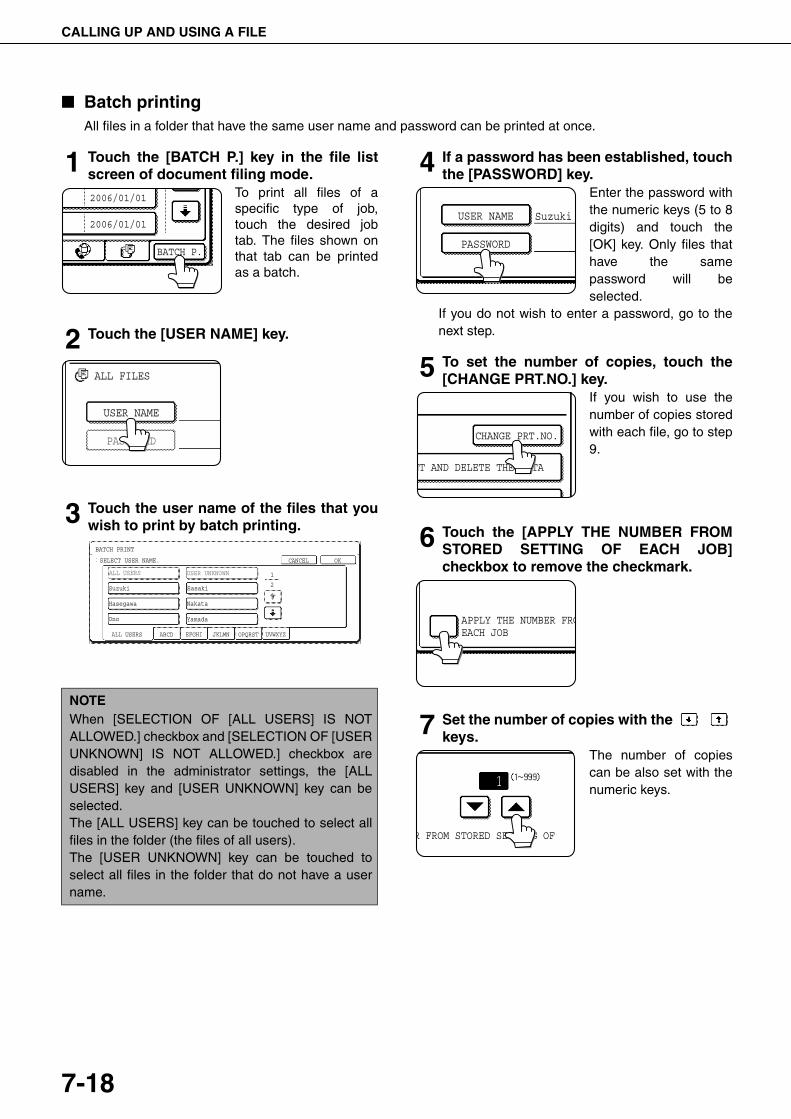
CALLING UP AND USING A FILE
7-18
■ Batch printingAll files in a folder that have the same user name and password can be printed at once.
1 Touch the [BATCH P.] key in the file listscreen of document filing mode.
To print all files of aspecific type of job,touch the desired jobtab. The files shown onthat tab can be printedas a batch.
2 Touch the [USER NAME] key.
3 Touch the user name of the files that youwish to print by batch printing.
4 If a password has been established, touchthe [PASSWORD] key.
Enter the password withthe numeric keys (5 to 8digits) and touch the[OK] key. Only files thathave the samepassword will beselected.
If you do not wish to enter a password, go to thenext step.
5 To set the number of copies, touch the[CHANGE PRT.NO.] key.
If you wish to use thenumber of copies storedwith each file, go to step9.
6 Touch the [APPLY THE NUMBER FROMSTORED SETTING OF EACH JOB]checkbox to remove the checkmark.
7 Set the number of copies with the keys.
The number of copiescan be also set with thenumeric keys.
NOTEWhen [SELECTION OF [ALL USERS] IS NOTALLOWED.] checkbox and [SELECTION OF [USERUNKNOWN] IS NOT ALLOWED.] checkbox aredisabled in the administrator settings, the [ALLUSERS] key and [USER UNKNOWN] key can beselected.The [ALL USERS] key can be touched to select allfiles in the folder (the files of all users).The [USER UNKNOWN] key can be touched toselect all files in the folder that do not have a username.
2006/01/01
2006/01/01
BATCH P.
USER NAME
PASSWORD
ALL FILES
BATCH PRINT
SELECT USER NAME.
ALL USERS
Hasegawa
Ono
Suzuki
USER UNKNOWN
CANCEL
UVWXYZOPQRSTJKLMNEFGHIABCDALL USERS
OK
Nakata
Yamada
Sasaki2
1
USER NAME
PASSWORD
Suzuki
CHANGE PRT.NO.
NT AND DELETE THE DATA
APPLY THE NUMBER FROEACH JOB
R FROM STORED SETTING OF
dragon_07-2.fm 18 ページ 2006年10月20日 金曜日 午後3時28分
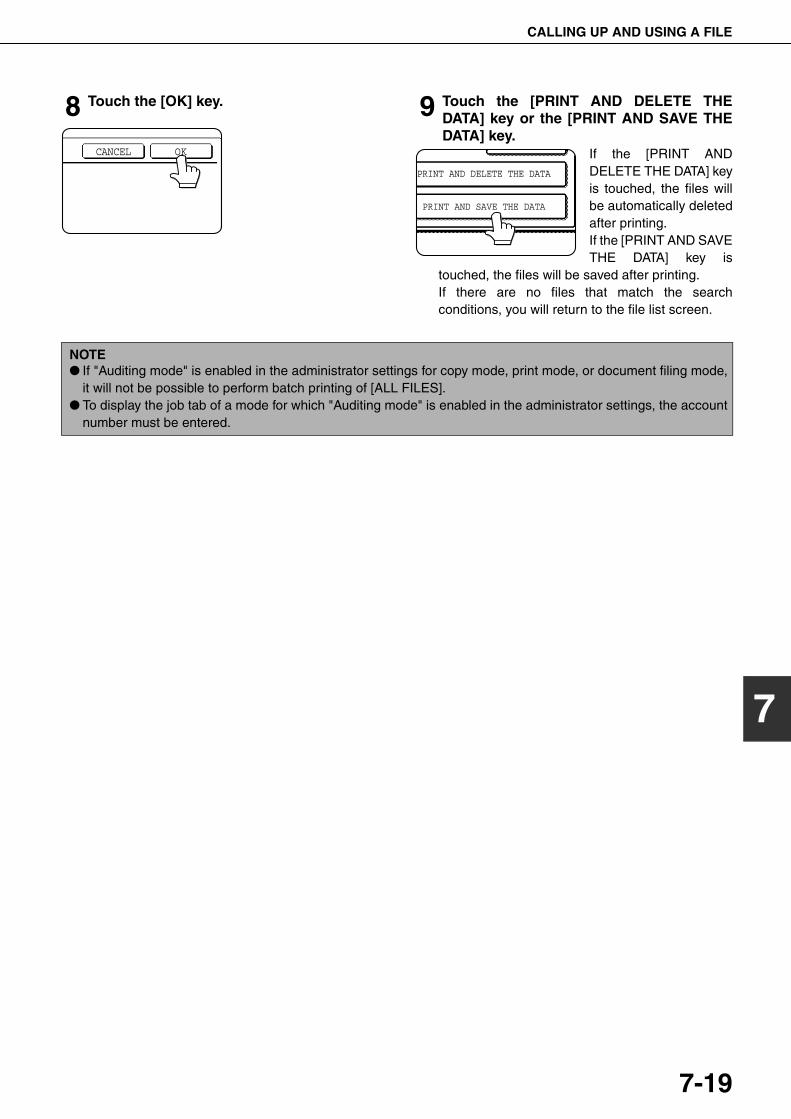
CALLING UP AND USING A FILE
7-19
7
8 Touch the [OK] key. 9 Touch the [PRINT AND DELETE THEDATA] key or the [PRINT AND SAVE THEDATA] key.
If the [PRINT ANDDELETE THE DATA] keyis touched, the files willbe automatically deletedafter printing.If the [PRINT AND SAVETHE DATA] key is
touched, the files will be saved after printing.If there are no files that match the searchconditions, you will return to the file list screen.
CANCEL OK
PRINT AND DELETE THE DATA
PRINT AND SAVE THE DATA
NOTE● If "Auditing mode" is enabled in the administrator settings for copy mode, print mode, or document filing mode,
it will not be possible to perform batch printing of [ALL FILES].● To display the job tab of a mode for which "Auditing mode" is enabled in the administrator settings, the account
number must be entered.
dragonII_copy_sec.book 19 ページ 2006年10月18日 水曜日 午後7時39分
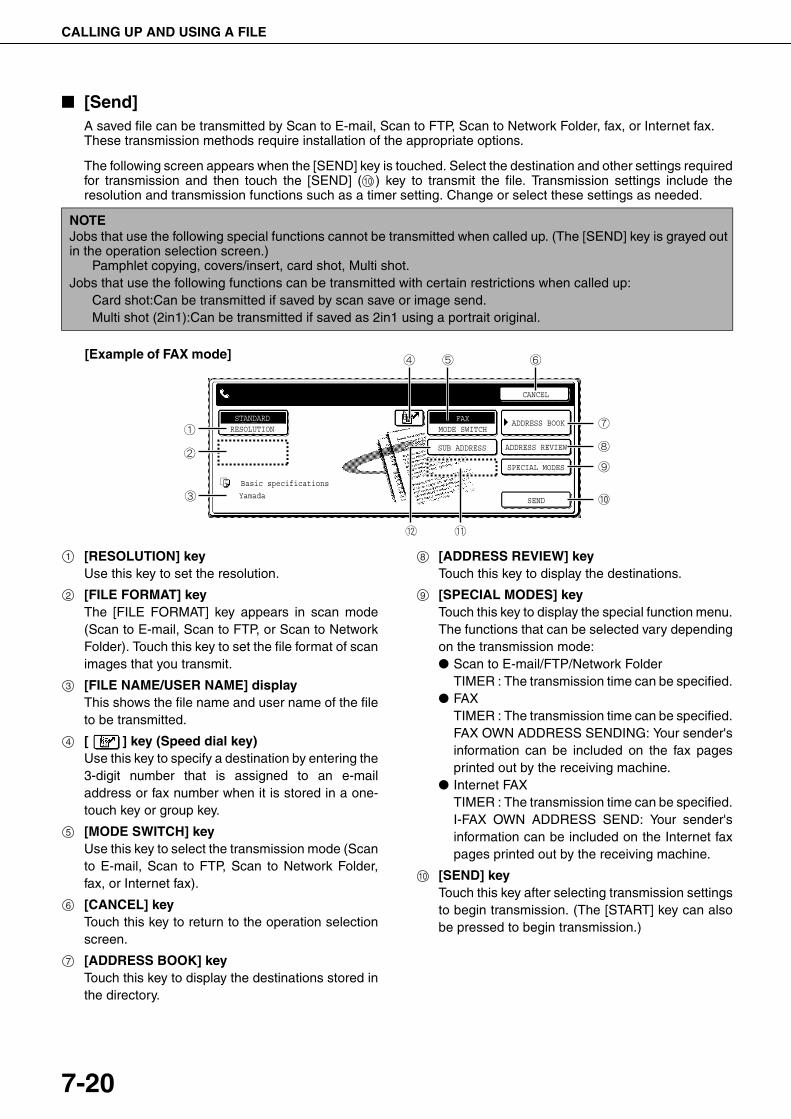
CALLING UP AND USING A FILE
7-20
■ [Send]A saved file can be transmitted by Scan to E-mail, Scan to FTP, Scan to Network Folder, fax, or Internet fax.These transmission methods require installation of the appropriate options.
The following screen appears when the [SEND] key is touched. Select the destination and other settings requiredfor transmission and then touch the [SEND] ( ) key to transmit the file. Transmission settings include theresolution and transmission functions such as a timer setting. Change or select these settings as needed.
[RESOLUTION] keyUse this key to set the resolution.
[FILE FORMAT] key The [FILE FORMAT] key appears in scan mode(Scan to E-mail, Scan to FTP, or Scan to NetworkFolder). Touch this key to set the file format of scanimages that you transmit.
[FILE NAME/USER NAME] displayThis shows the file name and user name of the fileto be transmitted.
[ ] key (Speed dial key)Use this key to specify a destination by entering the3-digit number that is assigned to an e-mailaddress or fax number when it is stored in a one-touch key or group key.
[MODE SWITCH] keyUse this key to select the transmission mode (Scanto E-mail, Scan to FTP, Scan to Network Folder,fax, or Internet fax).
[CANCEL] keyTouch this key to return to the operation selectionscreen.
[ADDRESS BOOK] keyTouch this key to display the destinations stored inthe directory.
[ADDRESS REVIEW] keyTouch this key to display the destinations.
[SPECIAL MODES] keyTouch this key to display the special function menu.The functions that can be selected vary dependingon the transmission mode:● Scan to E-mail/FTP/Network Folder
TIMER : The transmission time can be specified.● FAX
TIMER : The transmission time can be specified.FAX OWN ADDRESS SENDING: Your sender'sinformation can be included on the fax pagesprinted out by the receiving machine.
● Internet FAXTIMER : The transmission time can be specified.I-FAX OWN ADDRESS SEND: Your sender'sinformation can be included on the Internet faxpages printed out by the receiving machine.
[SEND] keyTouch this key after selecting transmission settingsto begin transmission. (The [START] key can alsobe pressed to begin transmission.)
NOTEJobs that use the following special functions cannot be transmitted when called up. (The [SEND] key is grayed outin the operation selection screen.)
Pamphlet copying, covers/insert, card shot, Multi shot.Jobs that use the following functions can be transmitted with certain restrictions when called up:
Card shot:Can be transmitted if saved by scan save or image send.Multi shot (2in1):Can be transmitted if saved as 2in1 using a portrait original.
10
CANCEL
ADDRESS BOOK
ADDRESS REVIEW
SPECIAL MODES
MODE SWITCHFAX
RESOLUTION
Basic specifications
Yamada Taro
STANDARD
SUB ADDRESS
SEND
[Example of FAX mode]
1
2
3
4
5
6
7
8
9
10
dragonII_copy_sec.book 20 ページ 2006年10月18日 水曜日 午後7時39分
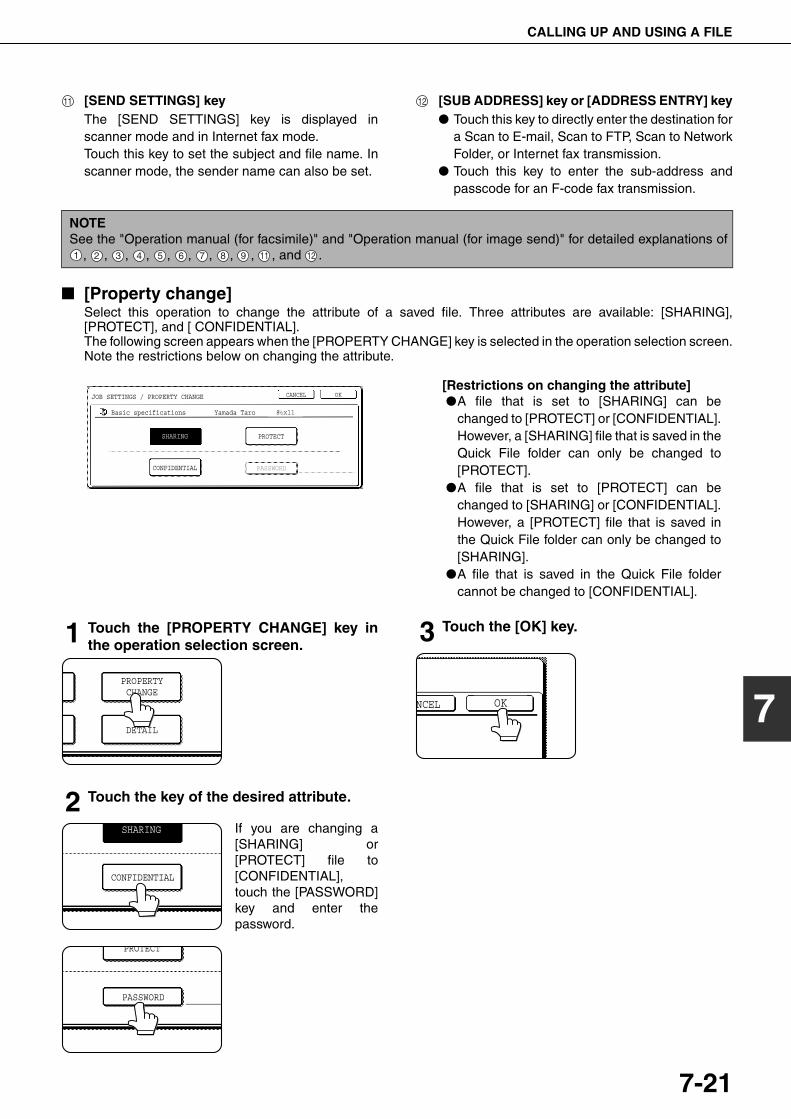
CALLING UP AND USING A FILE
7-21
7
[SEND SETTINGS] keyThe [SEND SETTINGS] key is displayed inscanner mode and in Internet fax mode.Touch this key to set the subject and file name. Inscanner mode, the sender name can also be set.
[SUB ADDRESS] key or [ADDRESS ENTRY] key● Touch this key to directly enter the destination for
a Scan to E-mail, Scan to FTP, Scan to NetworkFolder, or Internet fax transmission.
● Touch this key to enter the sub-address andpasscode for an F-code fax transmission.
■ [Property change]Select this operation to change the attribute of a saved file. Three attributes are available: [SHARING],[PROTECT], and [ CONFIDENTIAL].The following screen appears when the [PROPERTY CHANGE] key is selected in the operation selection screen.Note the restrictions below on changing the attribute.
[Restrictions on changing the attribute]●A file that is set to [SHARING] can be
changed to [PROTECT] or [CONFIDENTIAL].However, a [SHARING] file that is saved in theQuick File folder can only be changed to[PROTECT].
●A file that is set to [PROTECT] can bechanged to [SHARING] or [CONFIDENTIAL].However, a [PROTECT] file that is saved inthe Quick File folder can only be changed to[SHARING].
●A file that is saved in the Quick File foldercannot be changed to [CONFIDENTIAL].
1 Touch the [PROPERTY CHANGE] key inthe operation selection screen.
2 Touch the key of the desired attribute.
If you are changing a[SHARING] or[PROTECT] file to[CONFIDENTIAL],touch the [PASSWORD]key and enter thepassword.
3 Touch the [OK] key.
11 12
NOTESee the "Operation manual (for facsimile)" and "Operation manual (for image send)" for detailed explanations of
, , , , , , , , , , and .1 2 3 4 5 6 7 8 9 11 12
JOB SETTINGS / PROPERTY CHANGE
Basic specifications Yamada Taro
CANCEL OK
SHARING
CONFIDENTIAL
PROTECT
PASSWORD
8 x111 / 2
PROPERTYCHANGE
DETAIL
SHARING
CONFIDENTIAL
PROTECT
PASSWORD
OKNCEL
dragonII_copy_sec.book 21 ページ 2006年10月18日 水曜日 午後7時39分
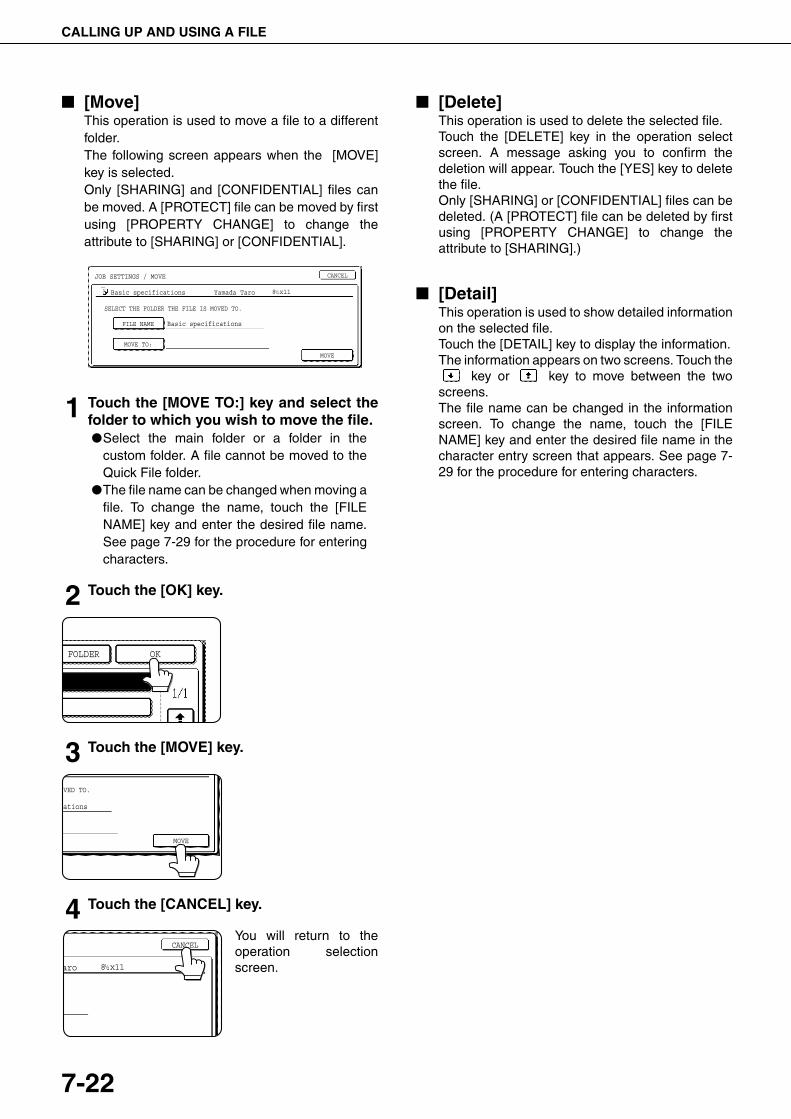
CALLING UP AND USING A FILE
7-22
■ [Move]This operation is used to move a file to a differentfolder.The following screen appears when the [MOVE]key is selected.Only [SHARING] and [CONFIDENTIAL] files canbe moved. A [PROTECT] file can be moved by firstusing [PROPERTY CHANGE] to change theattribute to [SHARING] or [CONFIDENTIAL].
1 Touch the [MOVE TO:] key and select thefolder to which you wish to move the file.●Select the main folder or a folder in the
custom folder. A file cannot be moved to theQuick File folder.
●The file name can be changed when moving afile. To change the name, touch the [FILENAME] key and enter the desired file name.See page 7-29 for the procedure for enteringcharacters.
2 Touch the [OK] key.
3 Touch the [MOVE] key.
4 Touch the [CANCEL] key.
You will return to theoperation selectionscreen.
■ [Delete]This operation is used to delete the selected file.Touch the [DELETE] key in the operation selectscreen. A message asking you to confirm thedeletion will appear. Touch the [YES] key to deletethe file.Only [SHARING] or [CONFIDENTIAL] files can bedeleted. (A [PROTECT] file can be deleted by firstusing [PROPERTY CHANGE] to change theattribute to [SHARING].)
■ [Detail]This operation is used to show detailed informationon the selected file.Touch the [DETAIL] key to display the information.The information appears on two screens. Touch the
key or key to move between the twoscreens.The file name can be changed in the informationscreen. To change the name, touch the [FILENAME] key and enter the desired file name in thecharacter entry screen that appears. See page 7-29 for the procedure for entering characters.
JOB SETTINGS / MOVE
SELECT THE FOLDER THE FILE IS MOVED TO.
FILE NAME
MOVE TO:
CANCEL
Basic specifications
Basic specifications
Yamada Taro A4
MOVE
8 x111 / 2
N FOLDER OK
OVED TO.
ations
amada Taro A4
MOVE
CANCEL
aro A48 x111 / 2
dragonII_copy_sec.book 22 ページ 2006年10月18日 水曜日 午後7時39分
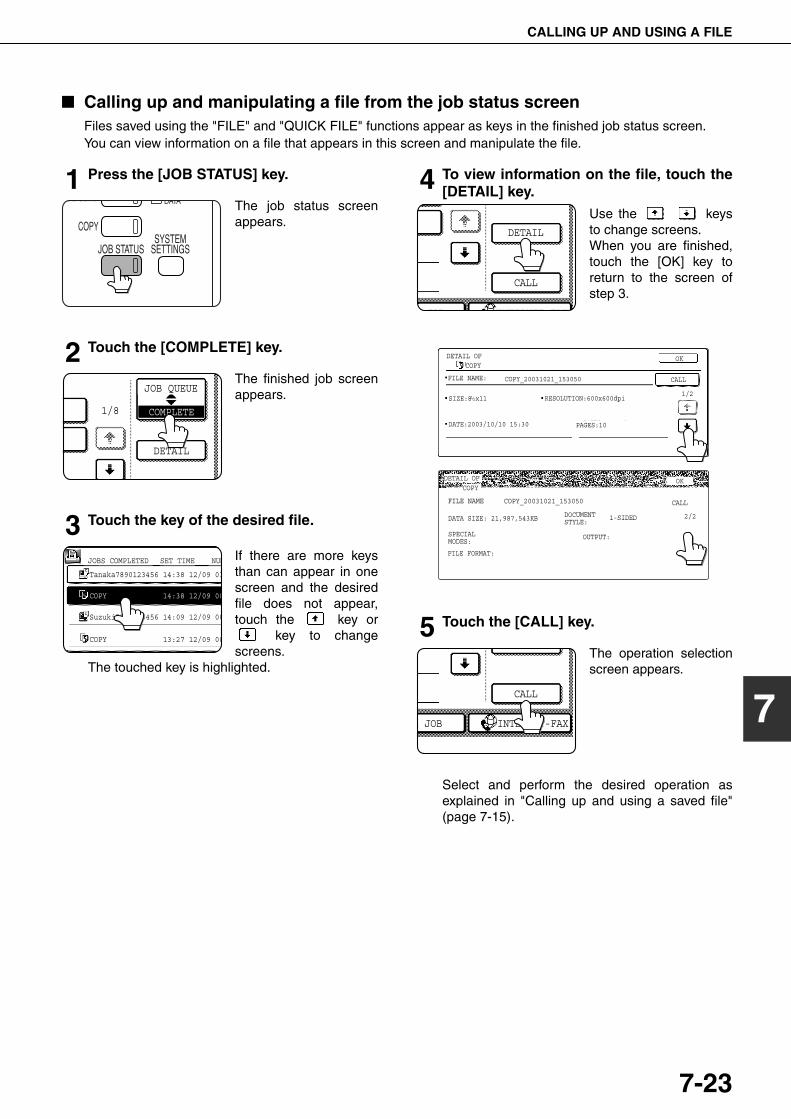
CALLING UP AND USING A FILE
7-23
7
■ Calling up and manipulating a file from the job status screenFiles saved using the "FILE" and "QUICK FILE" functions appear as keys in the finished job status screen.You can view information on a file that appears in this screen and manipulate the file.
1 Press the [JOB STATUS] key.
The job status screenappears.
2 Touch the [COMPLETE] key.
The finished job screenappears.
3 Touch the key of the desired file.
If there are more keysthan can appear in onescreen and the desiredfile does not appear,touch the key or
key to changescreens.
The touched key is highlighted.
4 To view information on the file, touch the[DETAIL] key.
Use the keysto change screens.When you are finished,touch the [OK] key toreturn to the screen ofstep 3.
5 Touch the [CALL] key.
The operation selectionscreen appears.
Select and perform the desired operation asexplained in "Calling up and using a saved file"(page 7-15).
AGE SEND
COPY
JOB STATUSSYSTEM
SETTINGS
DATA
JOB QUEUE
DETAIL
1/8 COMPLETE
JOBS COMPLETED
Suzuki7890123456 14:09 12/09 00
COPY 13:27 12/09 00
COPY 14:38 12/09 00
Tanaka7890123456 14:38 12/09 01
SET TIME NUM
DETAIL
CALL
INTERNET FAXX JOB
FILE NAME:
DETAIL OFCOPY
COPY_20031021_153050
SIZE:8 x11
DATE:2003/10/10 15:30
RESOLUTION:600x600dpi
PAGES:10
OK
CALL
1 / 21/2
FILE NAME
DETAIL OF
DATA SIZE: 21,987,543KB 1-SIDED
OUTPUT:SPECIALMODES:
DOCUMENTSTYLE:
FILE FORMAT:
OK
COPY_20031021_153050 CALL
COPY
2/2
CALL
INTERNET-FAXX JOB
dragonII_copy_sec.book 23 ページ 2006年10月18日 水曜日 午後7時39分
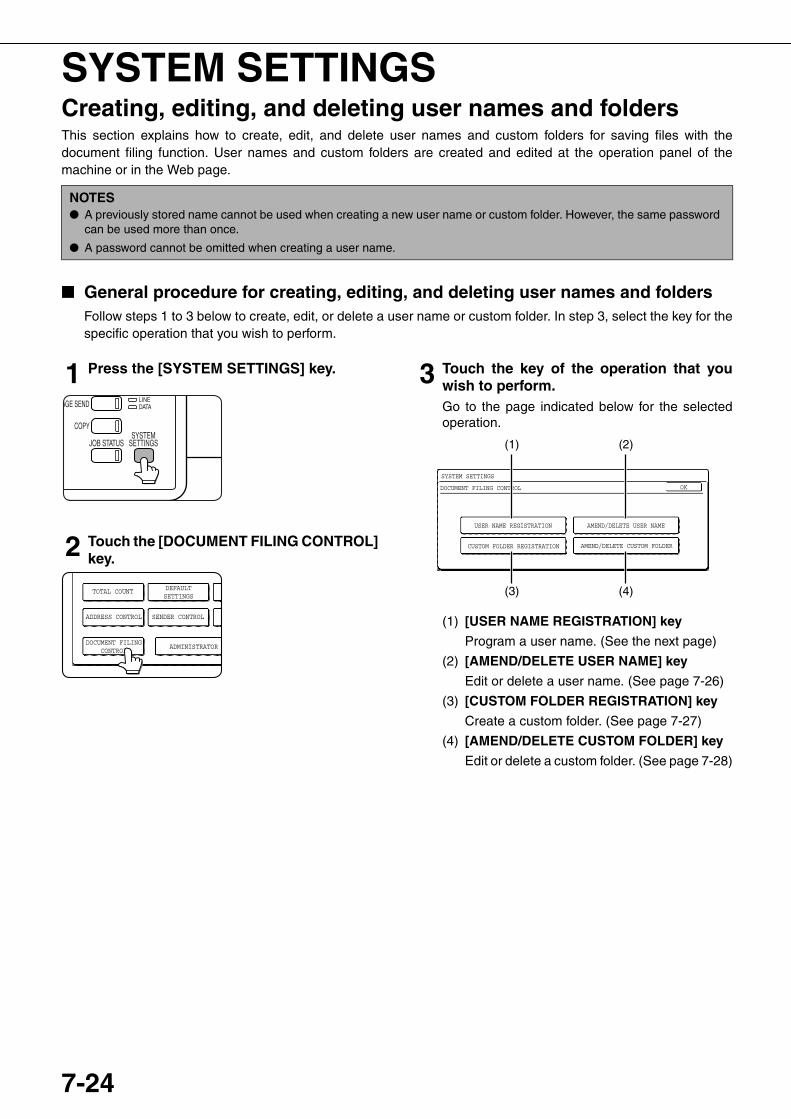
7-24
SYSTEM SETTINGSCreating, editing, and deleting user names and foldersThis section explains how to create, edit, and delete user names and custom folders for saving files with thedocument filing function. User names and custom folders are created and edited at the operation panel of themachine or in the Web page.
■ General procedure for creating, editing, and deleting user names and foldersFollow steps 1 to 3 below to create, edit, or delete a user name or custom folder. In step 3, select the key for thespecific operation that you wish to perform.
1 Press the [SYSTEM SETTINGS] key.
2 Touch the [DOCUMENT FILING CONTROL]key.
3 Touch the key of the operation that youwish to perform.Go to the page indicated below for the selectedoperation.
(1) [USER NAME REGISTRATION] key
Program a user name. (See the next page)
(2) [AMEND/DELETE USER NAME] key
Edit or delete a user name. (See page 7-26)
(3) [CUSTOM FOLDER REGISTRATION] key
Create a custom folder. (See page 7-27)
(4) [AMEND/DELETE CUSTOM FOLDER] key
Edit or delete a custom folder. (See page 7-28)
NOTES● A previously stored name cannot be used when creating a new user name or custom folder. However, the same password
can be used more than once.
● A password cannot be omitted when creating a user name.
AGE SEND
COPY
JOB STATUSSYSTEM
SETTINGS
LINEDATA
DEFAULTSETTINGS
SENDER CONTROL
ADMINISTRATOR
ADDRESS CONTROL
TOTAL COUNT
DOCUMENT FILINGCONTROL
SYSTEM SETTINGS
DOCUMENT FILING CONTROL
USER NAME REGISTRATION
CUSTOM FOLDER REGISTRATION
AMEND/DELETE USER NAME
AMEND/DELETE CUSTOM FOLDER
OK
(1) (2)
(3) (4)
dragonII_copy_sec.book 24 ページ 2006年10月18日 水曜日 午後7時39分
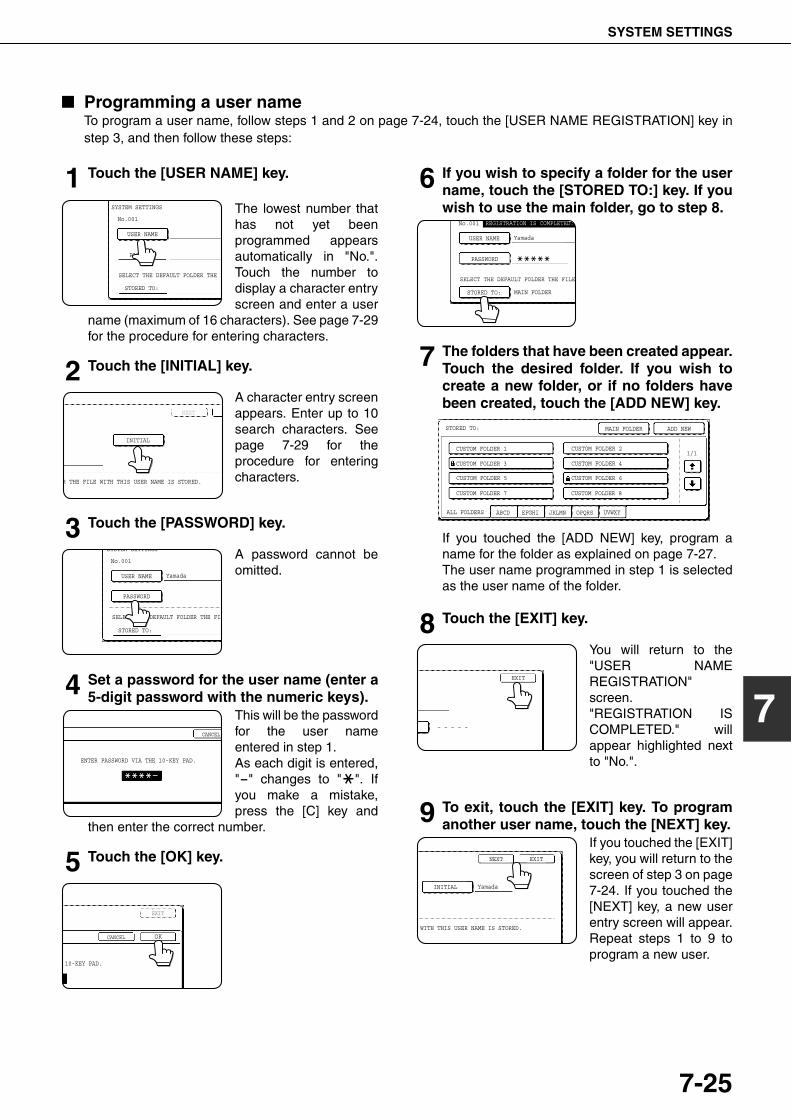
SYSTEM SETTINGS
7-25
7
■ Programming a user nameTo program a user name, follow steps 1 and 2 on page 7-24, touch the [USER NAME REGISTRATION] key instep 3, and then follow these steps:
1 Touch the [USER NAME] key.
The lowest number thathas not yet beenprogrammed appearsautomatically in "No.".Touch the number todisplay a character entryscreen and enter a user
name (maximum of 16 characters). See page 7-29for the procedure for entering characters.
2 Touch the [INITIAL] key.
A character entry screenappears. Enter up to 10search characters. Seepage 7-29 for theprocedure for enteringcharacters.
3 Touch the [PASSWORD] key.
A password cannot beomitted.
4 Set a password for the user name (enter a5-digit password with the numeric keys).
This will be the passwordfor the user nameentered in step 1.As each digit is entered,"-" changes to " ". Ifyou make a mistake,press the [C] key and
then enter the correct number.
5 Touch the [OK] key.
6 If you wish to specify a folder for the username, touch the [STORED TO:] key. If youwish to use the main folder, go to step 8.
7 The folders that have been created appear.Touch the desired folder. If you wish tocreate a new folder, or if no folders havebeen created, touch the [ADD NEW] key.
If you touched the [ADD NEW] key, program aname for the folder as explained on page 7-27.The user name programmed in step 1 is selectedas the user name of the folder.
8 Touch the [EXIT] key.
You will return to the"USER NAMEREGISTRATION"screen."REGISTRATION ISCOMPLETED." willappear highlighted nextto "No.".
9 To exit, touch the [EXIT] key. To programanother user name, touch the [NEXT] key.
If you touched the [EXIT]key, you will return to thescreen of step 3 on page7-24. If you touched the[NEXT] key, a new userentry screen will appear.Repeat steps 1 to 9 toprogram a new user.
SYSTEM SETTINGS
No.001
USER NAME
PASSWORD
STORED TO:
SELECT THE DEFAULT FOLDER THE F
INITIAL
NEXT
R THE FILE WITH THIS USER NAME IS STORED.
SYSTEM SETTINGS
No.001
USER NAME
PASSWORD
STORED TO:
SELECT THE DEFAULT FOLDER THE FIL
Yamada
CANCEL
ENTER PASSWORD VIA THE 10-KEY PAD.
CANCEL
EXIT
OK
10-KEY PAD.
REGISTRATION IS COMPLETED.No.001
USER NAME
PASSWORD
STORED TO:
SELECT THE DEFAULT FOLDER THE FILE
Yamada
MAIN FOLDER
STORED TO:
ALL FOLDERS
CUSTOM FOLDER 1
CUSTOM FOLDER 3
CUSTOM FOLDER 5
CUSTOM FOLDER 7
CUSTOM FOLDER 6
CUSTOM FOLDER 4
CUSTOM FOLDER 2
CUSTOM FOLDER 8
ABCD EFGHI JKLMN OPQRS UVWXY
MAIN FOLDER ADD NEW
1/1
– – – – –
EXIT
INITIAL
EXITNEXT
WITH THIS USER NAME IS STORED.
Yamada
dragonII_copy_sec.book 25 ページ 2006年10月18日 水曜日 午後7時39分
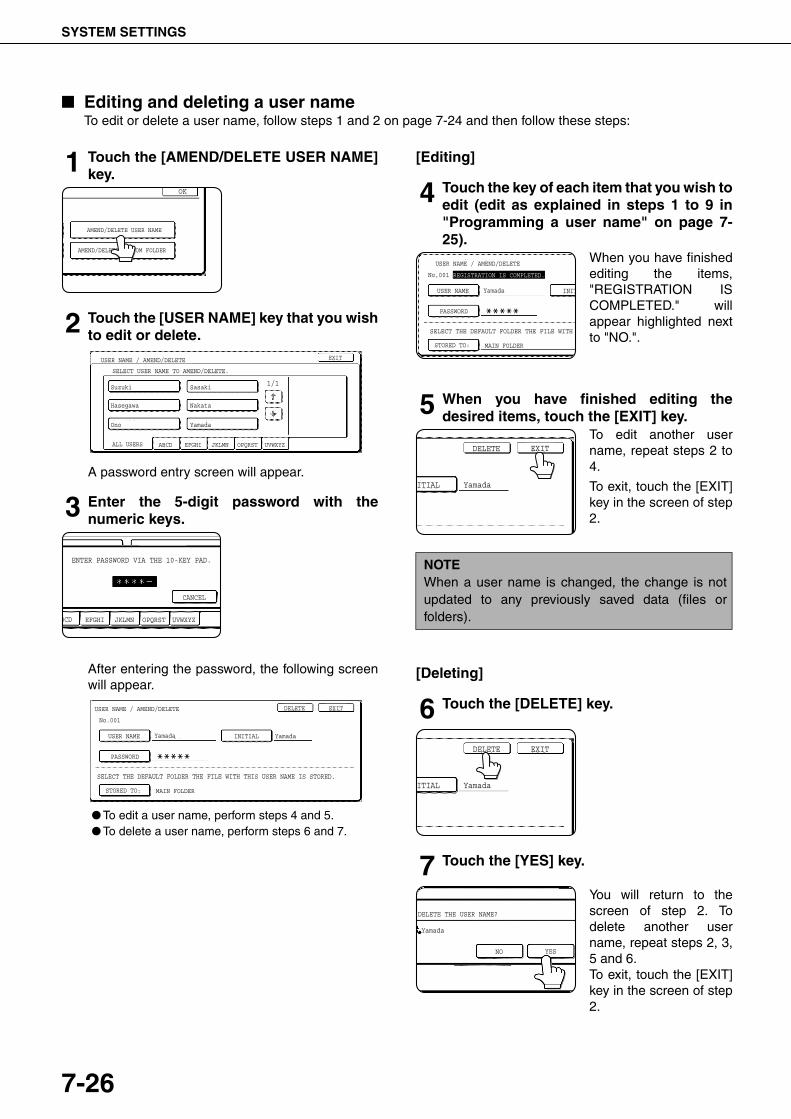
SYSTEM SETTINGS
7-26
■ Editing and deleting a user nameTo edit or delete a user name, follow steps 1 and 2 on page 7-24 and then follow these steps:
1 Touch the [AMEND/DELETE USER NAME]key.
2 Touch the [USER NAME] key that you wishto edit or delete.
A password entry screen will appear.
3 Enter the 5-digit password with thenumeric keys.
After entering the password, the following screenwill appear.
● To edit a user name, perform steps 4 and 5.● To delete a user name, perform steps 6 and 7.
[Editing]
4 Touch the key of each item that you wish toedit (edit as explained in steps 1 to 9 in"Programming a user name" on page 7-25).
When you have finishedediting the items,"REGISTRATION ISCOMPLETED." willappear highlighted nextto "NO.".
5 When you have finished editing thedesired items, touch the [EXIT] key.
To edit another username, repeat steps 2 to4.
To exit, touch the [EXIT]key in the screen of step2.
[Deleting]
6 Touch the [DELETE] key.
7 Touch the [YES] key.
You will return to thescreen of step 2. Todelete another username, repeat steps 2, 3,5 and 6.To exit, touch the [EXIT]key in the screen of step2.
OK
AMEND/DELETE USER NAME
AMEND/DELETE CUSTOM FOLDER
USER NAME / AMEND/DELETE
SELECT USER NAME TO AMEND/DELETE.
Suzuki
Ono
Hasegawa
Sasaki
EXIT
UVWXYZOPQRSTJKLMNEFGHIABCDALL USERS
Yamada
Nakata
1/1
ENTER PASSWORD VIA THE 10-KEY PAD.
CANCEL
BCD EFGHI JKLMN OPQRST UVWXYZ
USER NAME / AMEND/DELETE
No.001
USER NAME INITIAL YamadaYamada
MAIN FOLDER
PASSWORD
STORED TO:
SELECT THE DEFAULT FOLDER THE FILE WITH THIS USER NAME IS STORED.
DELETE EXIT
NOTEWhen a user name is changed, the change is notupdated to any previously saved data (files orfolders).
USER NAME / AMEND/DELETE
No.001 REGISTRATION IS COMPLETED.
USER NAME INITYamada
MAIN FOLDER
PASSWORD
STORED TO:
SELECT THE DEFAULT FOLDER THE FILE WITH
ITIAL Yamada
THIS USER NAME IS STORED
DELETE EXIT
ITIAL Yamada
H THIS USER NAME IS STORED
DELETE EXIT
DELETE THE USER NAME?
Yamada
NO YES
dragonII_copy_sec.book 26 ページ 2006年10月18日 水曜日 午後7時39分

SYSTEM SETTINGS
7-27
7
■ Creating a custom folderUp to 500 custom folders can be created. When no further folders can be created, delete unneeded folders (page7-28) and then create a new folder. A password can be omitted when creating a folder. To create a custom folder,follow steps 1 and 2 on page 7-24, touch the [CUSTOM FOLDER REGISTRATION] key in step 3, and then followthe steps below.
1 Touch the [FOLDER NAME] key.
The lowest number thathas not yet beenprogrammed appearsautomatically in "No.".Touch the number todisplay a character entryscreen and enter a folder
name (maximum of 28 characters). See page 7-29for the procedure for entering characters.
2 Touch the [INITIAL] key.
A character entry screenappears. Enter up to 10search characters. Seepage 7-29 for theprocedure for enteringcharacters.
3 If you wish to set a password for the newfolder, touch the [PASSWORD] key.
A password can beomitted.If you are omitting apassword, go to step 6.
4 Set a password for the folder (enter a 5-digit password with the numeric keys).
This will be the passwordfor the folder nameentered in step 1.
5 Touch the [OK] key.
6 Touch the [USER NAME] key.
You will select a username that will beassociated with thefolder name you areprogramming.Selection of a user namecannot be omitted.
7 The programmed user names appear.Touch the desired user name. If you do notwish to use any of the user names thatappear, touch the [ADD NEW] key toprogram a new user name.
When you touch a user name, a password entryscreen appears.If you touched the [ADD NEW] key, program a username as explained on page 7-25. The folder nameprogrammed in step 1 will be selected as the folderfor the user.
8 Enter the 5-digit password of the selecteduser name with the numeric keys.
CUSTOM FOLDER REGISTRATION
No.001
FOLDER NAME
INITIAL
USER NAME
CUSTOM FOLDER REGISTRATION
No.001
FOLDER NAME
INITIAL
USER NAME
USER FOLDER 1
P
CUSTOM FOLDER REGISTRATION
No.001
FOLDER NAME
INITIAL
USER NAME
USER FOLDER 1
PASSWORD
CANCEL
ENTER PASSWORD VIA THE 10-KEY PAD.
CANCEL
ENTER PASSWORD VIA THE 10-KEY PAD.
CANCEL
EXIT
OK
10-KEY PAD.
No.001
FOLDER NAME USER FOLDER 1
INITIAL USER1
USER NAME
PAS
CUSTOM FOLDER REGISTRATION
SELECT USER NAME. OK
ALL FOLDERS ABCD EFGHI JKLMN OPQRST UVWXYZ
ADD NEW
1/1 Suzuki Sasaki
Nakata
Yamada
Hasegawa
Ono
ENTER PASSWORD VIA THE 10-KEY PAD.
CANCEL
BCD EFGHI JKLMN OPQRST UVWXYZ
dragonII_copy_sec.book 27 ページ 2006年10月18日 水曜日 午後7時39分

SYSTEM SETTINGS
7-28
9 Touch the [OK] key. 10To exit, touch the [EXIT] key. To createanother folder, touch the [NEXT] key.
If you touched the [EXIT]key, you will return to thescreen of step 3 on page7-24. If you touched the[NEXT] key, a new folderscreen will appear.Repeat steps 1 to 10 to
create a new folder.
■ Editing/deleting a custom folderTo edit a previously created folder (change the folder name, initial, password, or user name), or to delete a folder,follow steps 1 and 2 on page 7-24 and then follow the steps below.
1 Touch the [AMEND/DELETE CUSTOMFOLDER] key.
2 Touch the [FOLDER NAME] key that youwish to edit or delete.
If a password has been set for the folder, apassword entry screen will appear. Enter thecorrect 5-digit password with the numeric keys.
3 Edit or delete the folder.
●To edit the folder, perform steps 4 and 5.●To delete the folder, perform steps 6 and 7.●To exit, touch the [EXIT] key.
[Editing]
4 Touch the key of each item that you wish toedit (edit as explained in steps 1 to 10 of"Creating a custom folder" on page 7-27).
After editing the items and returning to the screen ofstep 3, "REGISTRATION IS COMPLETED." will behighlighted to the right of "No.".To stop using a password, touch the[PASSWORD] key and then touch the [OK] keywithout entering anything for the password. [-] willappear and the password will be canceled.
5 When you have finished editing the items,touch the [EXIT] key.To edit another folder, repeat steps 2 to 5.
[Deleting]
6 Touch the [DELETE] key.
7 Touch the [YES] key.
You will return to thescreen of step 2.To delete another folder,repeat steps 2, 6, and 7.To exit, touch the [EXIT]key in the screen of step2.
OK
JKLMN OPQRST UVWXYZ
ADD NEW
1/1
SWORD
EXITNEXT
When deleting a folder...A folder that contains files cannot be deleted. Either move the files to a different folder or delete them before deleting the folder.: [MOVE] (see page 7-22) : [DELETE] (see page 7-22)
AMEND/DELETE USER NAME
AMEND/DELETE CUSTOM FOLDER
CUSTOM FOLDER 1
CUSTOM FOLDER 3
CUSTOM FOLDER 5
CUSTOM FOLDER 7
ALL FOLDERS
CUSTOM FOLDER / AMEND/DELETE
SELECT CUSTOM FOLDER TO AMEND/DELETE.
CUSTOM FOLDER 6
CUSTOM FOLDER 8
CUSTOM FOLDER 4
CUSTOM FOLDER 2
ABCD EFGHI JKLMN OPQRST UVWXYZ
EXIT
1/2
CUSTOM FOLDER / AMEND/DELETE
No.001
FOLDER NAME USER FOLDER 1
INITIAL USER1 *****
YamadaUSER NAME
EXITDELETE
PASSWORD
No.001
FOLDER NAME USER FOLDER 1
INITIAL USER1
YamadaUSER NAME
EXITDELETE
PASSWORD
REGISTRATION IS COMPLETED.
CUSTOM FOLDER / AMEND/DELETE
– – – – –
EXIT
ORD
DELETE
DELETE THE FOLDER?
USER FOLDER 1
NO YES
dragonII_copy_sec.book 28 ページ 2006年10月18日 水曜日 午後7時39分
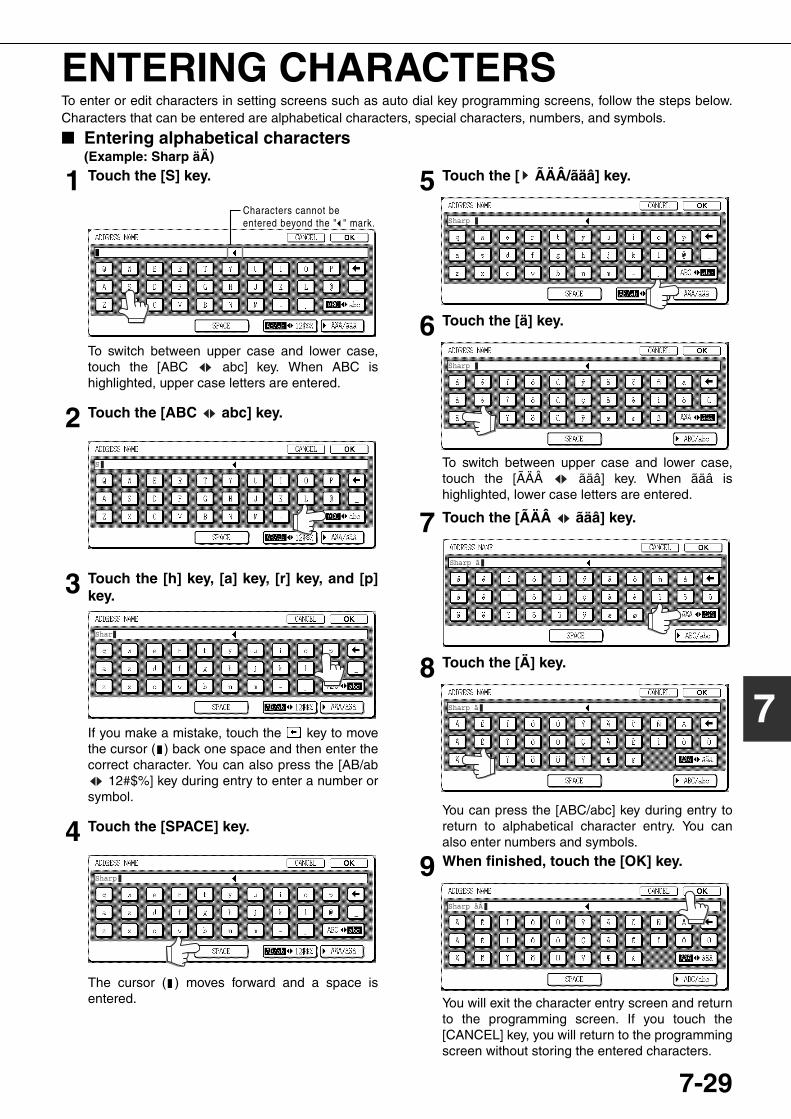
7-29
7
ENTERING CHARACTERSTo enter or edit characters in setting screens such as auto dial key programming screens, follow the steps below.Characters that can be entered are alphabetical characters, special characters, numbers, and symbols.
■ Entering alphabetical characters(Example: Sharp äÄ)
1 Touch the [S] key.
To switch between upper case and lower case,touch the [ABC abc] key. When ABC ishighlighted, upper case letters are entered.
2 Touch the [ABC abc] key.
3 Touch the [h] key, [a] key, [r] key, and [p]key.
If you make a mistake, touch the key to movethe cursor ( ) back one space and then enter thecorrect character. You can also press the [AB/ab
12#$%] key during entry to enter a number orsymbol.
4 Touch the [SPACE] key.
The cursor ( ) moves forward and a space isentered.
5 Touch the [ ÃÄÂ/ãäâ] key.
6 Touch the [ä] key.
To switch between upper case and lower case,touch the [ÃÄÂ ãäâ] key. When ãäâ ishighlighted, lower case letters are entered.
7 Touch the [ÃÄÂ ãäâ] key.
8 Touch the [Ä] key.
You can press the [ABC/abc] key during entry toreturn to alphabetical character entry. You canalso enter numbers and symbols.
9 When finished, touch the [OK] key.
You will exit the character entry screen and returnto the programming screen. If you touch the[CANCEL] key, you will return to the programmingscreen without storing the entered characters.
Characters cannot be entered beyond the " " mark.
S
Shar
Sharp
Sharp
Sharp
Sharp ä
Sharp ä
Sharp äÄ
dragonII_copy_sec.book 29 ページ 2006年10月18日 水曜日 午後7時39分
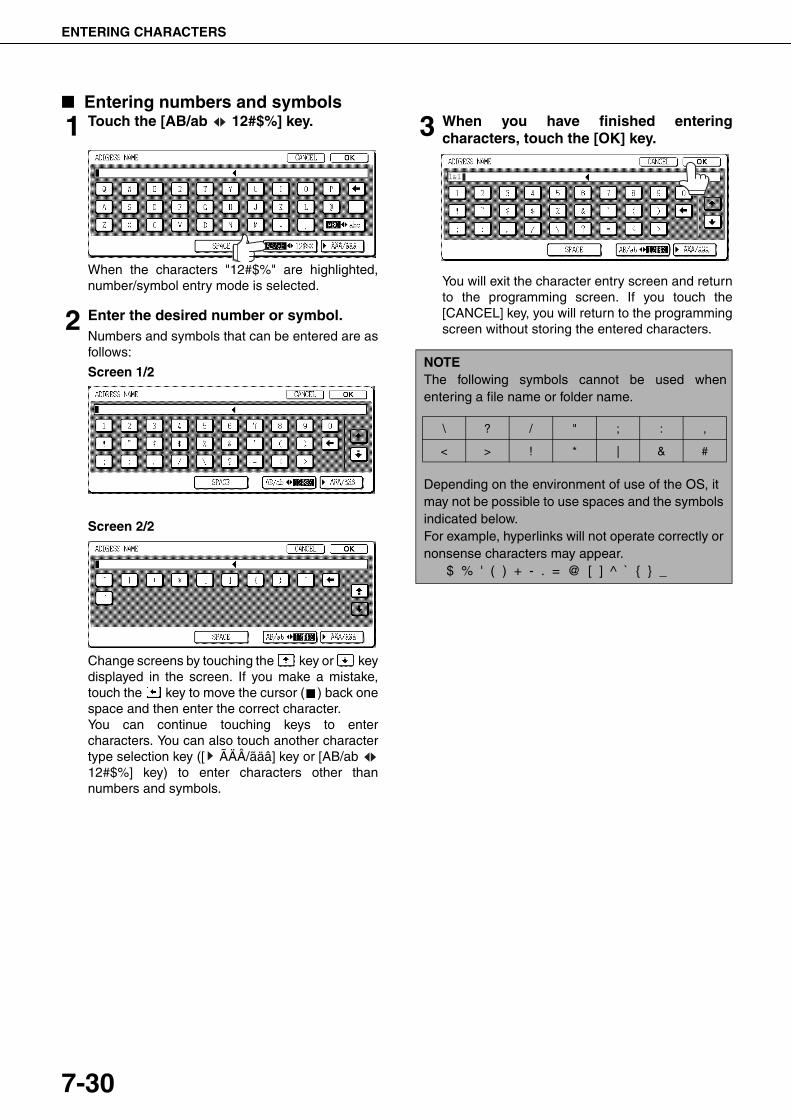
ENTERING CHARACTERS
7-30
■ Entering numbers and symbols
1 Touch the [AB/ab 12#$%] key.
When the characters "12#$%" are highlighted,number/symbol entry mode is selected.
2 Enter the desired number or symbol.Numbers and symbols that can be entered are asfollows:
Screen 1/2
Screen 2/2
Change screens by touching the key or keydisplayed in the screen. If you make a mistake,touch the key to move the cursor ( ) back onespace and then enter the correct character.You can continue touching keys to entercharacters. You can also touch another charactertype selection key ([ ÃÄÂ/ãäâ] key or [AB/ab 12#$%] key) to enter characters other thannumbers and symbols.
3 When you have finished enteringcharacters, touch the [OK] key.
You will exit the character entry screen and returnto the programming screen. If you touch the[CANCEL] key, you will return to the programmingscreen without storing the entered characters.
NOTEThe following symbols cannot be used whenentering a file name or folder name.
Depending on the environment of use of the OS, it may not be possible to use spaces and the symbols indicated below.For example, hyperlinks will not operate correctly or nonsense characters may appear.
$ % ' ( ) + - . = @ [ ] ^ ` { } _
1&1
\ ? / " ; : ,
< > ! * | & #
dragon_07-3.fm 30 ページ 2007年2月16日 金曜日 午後1時33分
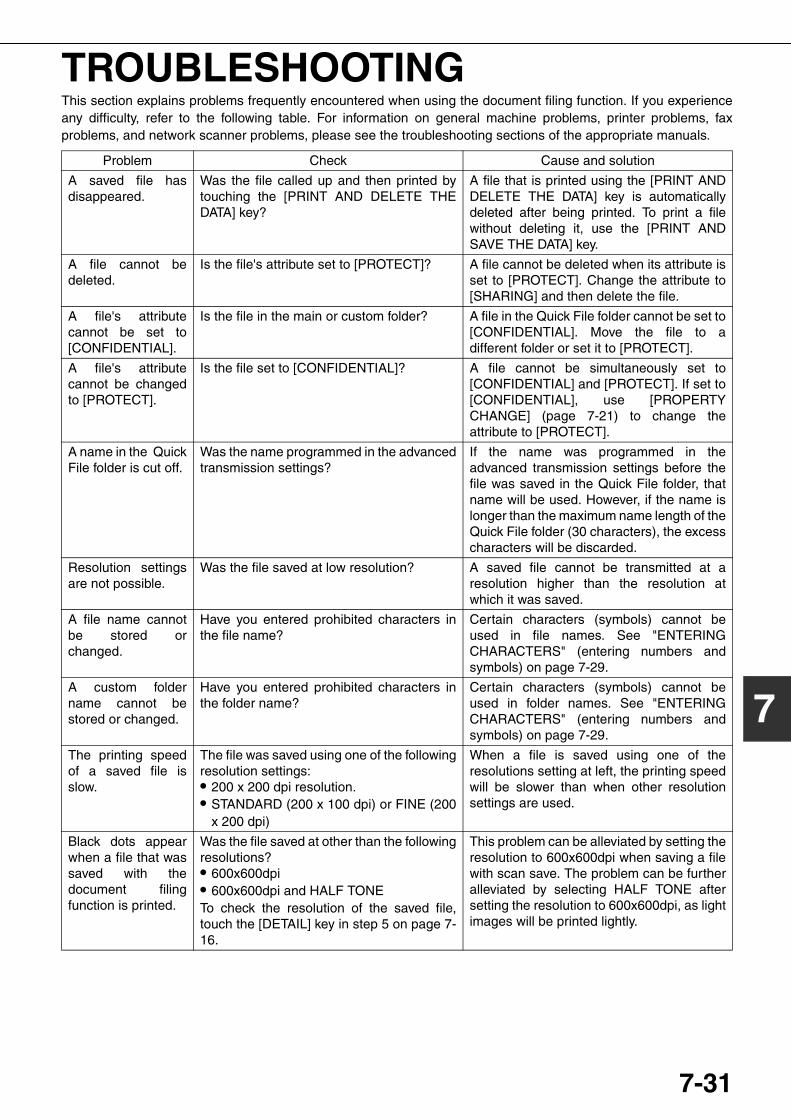
7-31
7
TROUBLESHOOTINGThis section explains problems frequently encountered when using the document filing function. If you experienceany difficulty, refer to the following table. For information on general machine problems, printer problems, faxproblems, and network scanner problems, please see the troubleshooting sections of the appropriate manuals.
Problem Check Cause and solution
A saved file hasdisappeared.
Was the file called up and then printed bytouching the [PRINT AND DELETE THEDATA] key?
A file that is printed using the [PRINT ANDDELETE THE DATA] key is automaticallydeleted after being printed. To print a filewithout deleting it, use the [PRINT ANDSAVE THE DATA] key.
A file cannot bedeleted.
Is the file's attribute set to [PROTECT]? A file cannot be deleted when its attribute isset to [PROTECT]. Change the attribute to[SHARING] and then delete the file.
A file's attributecannot be set to[CONFIDENTIAL].
Is the file in the main or custom folder? A file in the Quick File folder cannot be set to[CONFIDENTIAL]. Move the file to adifferent folder or set it to [PROTECT].
A file's attributecannot be changedto [PROTECT].
Is the file set to [CONFIDENTIAL]? A file cannot be simultaneously set to[CONFIDENTIAL] and [PROTECT]. If set to[CONFIDENTIAL], use [PROPERTYCHANGE] (page 7-21) to change theattribute to [PROTECT].
A name in the QuickFile folder is cut off.
Was the name programmed in the advancedtransmission settings?
If the name was programmed in theadvanced transmission settings before thefile was saved in the Quick File folder, thatname will be used. However, if the name islonger than the maximum name length of theQuick File folder (30 characters), the excesscharacters will be discarded.
Resolution settingsare not possible.
Was the file saved at low resolution? A saved file cannot be transmitted at aresolution higher than the resolution atwhich it was saved.
A file name cannotbe stored orchanged.
Have you entered prohibited characters inthe file name?
Certain characters (symbols) cannot beused in file names. See "ENTERINGCHARACTERS" (entering numbers andsymbols) on page 7-29.
A custom foldername cannot bestored or changed.
Have you entered prohibited characters inthe folder name?
Certain characters (symbols) cannot beused in folder names. See "ENTERINGCHARACTERS" (entering numbers andsymbols) on page 7-29.
The printing speedof a saved file isslow.
The file was saved using one of the followingresolution settings:● 200 x 200 dpi resolution.● STANDARD (200 x 100 dpi) or FINE (200
x 200 dpi)
When a file is saved using one of theresolutions setting at left, the printing speedwill be slower than when other resolutionsettings are used.
Black dots appearwhen a file that wassaved with thedocument filingfunction is printed.
Was the file saved at other than the followingresolutions?● 600x600dpi● 600x600dpi and HALF TONETo check the resolution of the saved file,touch the [DETAIL] key in step 5 on page 7-16.
This problem can be alleviated by setting theresolution to 600x600dpi when saving a filewith scan save. The problem can be furtheralleviated by selecting HALF TONE aftersetting the resolution to 600x600dpi, as lightimages will be printed lightly.
dragonII_copy_sec.book 31 ページ 2006年10月18日 水曜日 午後7時39分

dragonII_copy_sec.book 32 ページ 2006年10月18日 水曜日 午後7時39分
8-1
CHAPTER 8SPECIFICATIONS
This chapter contains useful information about the machine.
Page
SPECIFICATIONS................................................................................... 8-2
INDEX ..................................................................................................... 8-4
dragonII_copy_sec.book 1 ページ 2006年10月18日 水曜日 午後7時39分
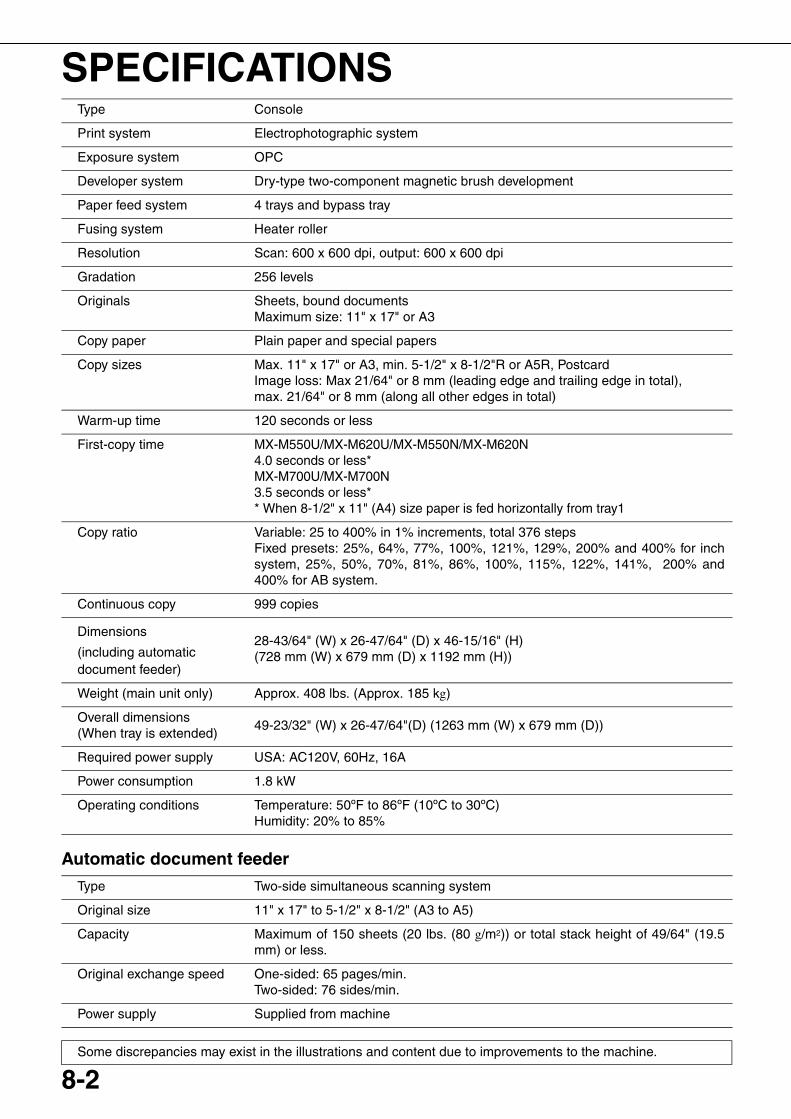
8-2
SPECIFICATIONS
Automatic document feeder
Type Console
Print system Electrophotographic system
Exposure system OPC
Developer system Dry-type two-component magnetic brush development
Paper feed system 4 trays and bypass tray
Fusing system Heater roller
Resolution Scan: 600 x 600 dpi, output: 600 x 600 dpi
Gradation 256 levels
Originals Sheets, bound documentsMaximum size: 11" x 17" or A3
Copy paper Plain paper and special papers
Copy sizes Max. 11" x 17" or A3, min. 5-1/2" x 8-1/2"R or A5R, PostcardImage loss: Max 21/64" or 8 mm (leading edge and trailing edge in total), max. 21/64" or 8 mm (along all other edges in total)
Warm-up time 120 seconds or less
First-copy time MX-M550U/MX-M620U/MX-M550N/MX-M620N4.0 seconds or less*MX-M700U/MX-M700N3.5 seconds or less** When 8-1/2" x 11" (A4) size paper is fed horizontally from tray1
Copy ratio Variable: 25 to 400% in 1% increments, total 376 stepsFixed presets: 25%, 64%, 77%, 100%, 121%, 129%, 200% and 400% for inchsystem, 25%, 50%, 70%, 81%, 86%, 100%, 115%, 122%, 141%, 200% and400% for AB system.
Continuous copy 999 copies
Dimensions
(including automaticdocument feeder)
28-43/64" (W) x 26-47/64" (D) x 46-15/16" (H)(728 mm (W) x 679 mm (D) x 1192 mm (H))
Weight (main unit only) Approx. 408 lbs. (Approx. 185 kg)
Overall dimensions(When tray is extended)
49-23/32" (W) x 26-47/64"(D) (1263 mm (W) x 679 mm (D))
Required power supply USA: AC120V, 60Hz, 16A
Power consumption 1.8 kW
Operating conditions Temperature: 50ºF to 86ºF (10ºC to 30ºC)Humidity: 20% to 85%
Type Two-side simultaneous scanning system
Original size 11" x 17" to 5-1/2" x 8-1/2" (A3 to A5)
Capacity Maximum of 150 sheets (20 lbs. (80 g/m2)) or total stack height of 49/64" (19.5mm) or less.
Original exchange speed One-sided: 65 pages/min.Two-sided: 76 sides/min.
Power supply Supplied from machine
Some discrepancies may exist in the illustrations and content due to improvements to the machine.
dragon_08.fm 2 ページ 2006年11月29日 水曜日 午後9時11分
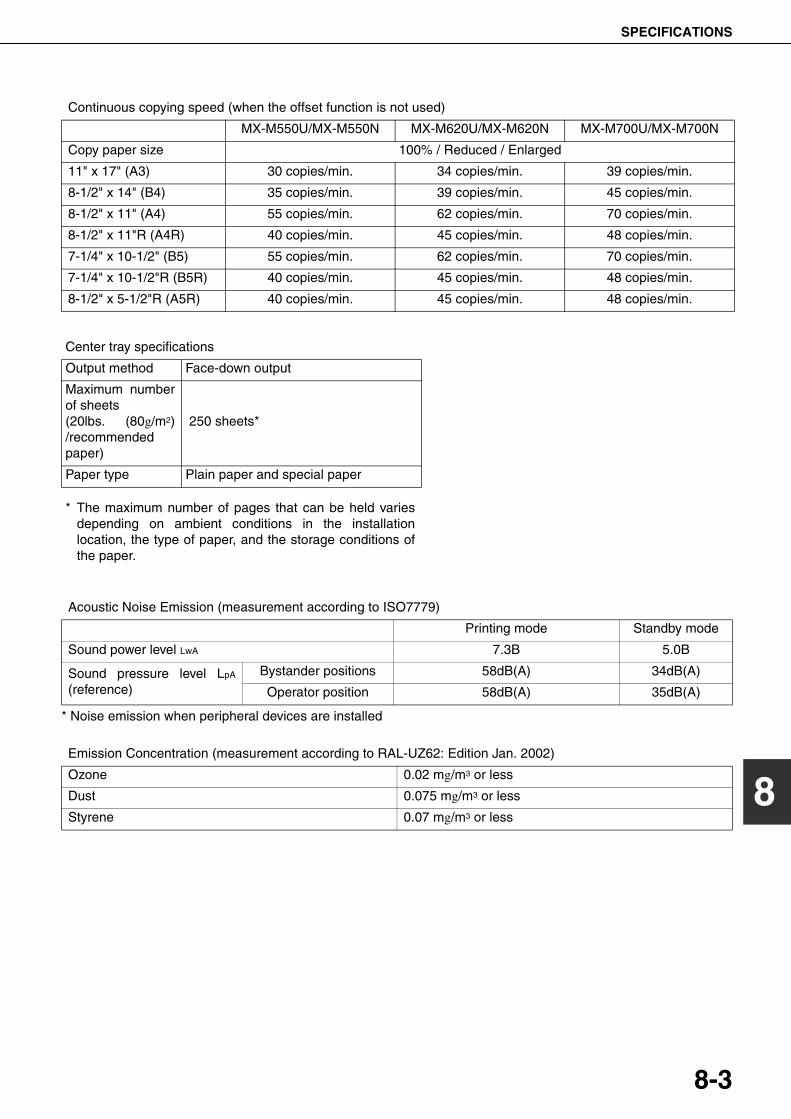
SPECIFICATIONS
8-3
8
* Noise emission when peripheral devices are installed
Continuous copying speed (when the offset function is not used)
MX-M550U/MX-M550N MX-M620U/MX-M620N MX-M700U/MX-M700N
Copy paper size 100% / Reduced / Enlarged
11" x 17" (A3) 30 copies/min. 34 copies/min. 39 copies/min.
8-1/2" x 14" (B4) 35 copies/min. 39 copies/min. 45 copies/min.
8-1/2" x 11" (A4) 55 copies/min. 62 copies/min. 70 copies/min.
8-1/2" x 11"R (A4R) 40 copies/min. 45 copies/min. 48 copies/min.
7-1/4" x 10-1/2" (B5) 55 copies/min. 62 copies/min. 70 copies/min.
7-1/4" x 10-1/2"R (B5R) 40 copies/min. 45 copies/min. 48 copies/min.
8-1/2" x 5-1/2"R (A5R) 40 copies/min. 45 copies/min. 48 copies/min.
Center tray specifications
Output method Face-down output
Maximum numberof sheets(20lbs. (80g/m2)/recommendedpaper)
250 sheets*
Paper type Plain paper and special paper
* The maximum number of pages that can be held variesdepending on ambient conditions in the installationlocation, the type of paper, and the storage conditions ofthe paper.
Acoustic Noise Emission (measurement according to ISO7779)
Printing mode Standby mode
Sound power level LwA 7.3B 5.0B
Sound pressure level LpA
(reference)Bystander positions 58dB(A) 34dB(A)
Operator position 58dB(A) 35dB(A)
Emission Concentration (measurement according to RAL-UZ62: Edition Jan. 2002)
Ozone 0.02 mg/m3 or less
Dust 0.075 mg/m3 or less
Styrene 0.07 mg/m3 or less
dragonII_copy_sec.book 3 ページ 2006年10月18日 水曜日 午後7時39分
8-4
INDEX[ ] key................................................................. 1-13[#/P] key ............................................................... 1-13
■ Numerics1-sided copy.................................................. 4-7, 4-111-sided copy-Automatic document feeder .............. 4-71-sided copy-Document glass .............................. 4-11256MB expansion memory board ........................ 1-122in1 ............................................................. 5-24, 7-122-sided copy.........................................1-3, 4-10, 4-13
■ AAcceptable originals ............................................... 4-2Account number ................................................... 1-18Additional fax memory.......................................... 1-12Address control .................................................... 2-18Adjusting the exposure.................................. 1-3, 4-14Administrator settings........................................... 2-18Alarm display........................................................ 3-16All custom setting list............................................ 2-20Application communication module............. 1-12, 3-19Application integration module ............................. 1-12Attributes ................................................................ 7-3Auditing mode ...................................................... 1-18Auto image ........................................................... 4-15Auto power shut-off mode ...................................... 1-9Automatic copy image rotation ............................... 4-4Automatic document feeder .................1-10, 2-31, 4-2Automatic document feeder .........................................
-1-sided copies.................................................... 4-7-Acceptable originals........................................... 4-2-Automatic two-sided copying ........................... 4-10-Misfeed original................................................ 2-31-Setting originals ................................................. 4-3-User maintenance.............................................. 6-2
Automatic exposure adjustment ........................... 4-14Automatic selection .............................................. 4-15Automatic two-sided copying
-Automatic document feeder ............................. 4-10-Document glass ............................................... 4-13
Automatic two-sided printing ................................ 2-13Auxiliary tray......................................................... 2-10
■ BB/W reverse............................................ 1-6, 5-2, 5-31Barcode font kit .................................................... 1-12Binding change .................................................... 4-13Book copy ..............................................1-5, 5-2, 5-26Book original .......................................................... 5-5Bypass tray......................................... 1-10, 2-28, 4-20
■ C[C] key ........................................................... 1-13, 7-4[CA] key......................................................... 1-13, 7-4Call for service ..................................................... 2-32[CALL] key............................................................ 1-16Calling up and using a file .................................... 7-13
Calling up and using a saved file.......................... 7-15-Delete............................................................... 7-22-Detail ................................................................ 7-22-Move ................................................................ 7-22-Print.................................................................. 7-17-Property change .............................................. 7-21-Send................................................................. 7-20-Card shot ..................................1-6, 5-2, 5-29, 7-12
Centre erase........................................................... 5-4Centre tray..................................................... 1-10, 4-9[CENTRE TRAY] key.............................................. 3-6Changing the paper size in paper tray ......... 2-3 to 2-6Clear all key................................................... 1-13, 7-4Clear key ....................................................... 1-13, 7-4Clock .................................................................... 2-18Confidential ............................................................ 7-3Contents ....................................................... 0-5 to 0-6Continuous copying speed ..................................... 8-3[COPY] key........................................................... 1-13Cover of the duplex unit........................................ 1-11Covers/inserts ........................................1-5, 5-2, 5-12Creating a custom folder ...................................... 7-27Custom folder ...........................7-3, 7-24, 7-27 to 7-28
■ DData security kit.................................................... 1-12Default settings..................................................... 2-20[DETAIL] key......................................................... 1-16Display contrast.................................................... 2-20Display switching keys.......................................... 1-16Disposal of hole punch scrap ............................... 3-10Document feeder tray ...................................... 4-2, 4-3Document filing control......................................... 2-18Document filing function.................................. 1-8, 7-1Document filing user / folder list ........................... 2-20[DOCUMENT FILING] key ............................ 1-13, 7-4Document glass
-1-sided copies.................................................. 4-11-Automatic two-sided copying ........................... 4-13-Placing originals................................................. 4-3-User maintenance.............................................. 6-2
Document transfer cover ............................... 2-31, 4-3Dual page copy ........................................1-4, 5-2, 5-5DUAL PAGE SCAN .............................................. 7-12Duplex unit ........................................................... 1-11
■ EEditing and deleting
-Custom folder................................................... 7-28-User names...................................................... 7-26
Energy saving features........................................... 1-9Energy Star guidelines ........................................... 1-9Enlargement ......................................................... 4-15Entering characters .................................. 7-29 to 7-30Erase...............................................1-4, 5-2, 5-4, 7-12
dragon_08.fm 4 ページ 2006年10月22日 日曜日 午後7時40分
INDEX
8-5
8
Examples of covers and inserts ............... 5-17 to 5-22-Covers.................................................. 5-18 to 5-21-Inserts .............................................................. 5-22
External account module............................. 1-12, 3-20
■ FFacsimile expansion kit ........................................ 1-12Fax data receive/forward ...................................... 2-18[FAX JOB] key ...................................................... 1-16Features ................................................................. 1-3[FILE FOLDER] key................................................ 7-5Finisher ......................................................... 1-10, 3-2[FINISHER TRAY] key............................................ 3-6Front cover .................................................... 1-10, 3-2Fusing unit..........................................1-11, 2-23, 2-24
■ GGeneral procedure for using special functions ....... 5-2Grayed out............................................................ 1-14Group .......................................................1-3, 3-4, 4-9[GROUP] key.......................................................... 3-6
■ H[HDD STATUS] key................................................. 7-5Heavy paper................................................ 2-12, 2-13Highlighted ........................................................... 1-14Hole punching ................................................. 1-8, 3-5
■ IIcon ......................................................1-14, 5-17, 7-5[IMAGE SEND] key .............................................. 1-13Information ........................................................... 2-23Inserter.................................................1-8, 1-10, 3-14Installation requirements ........................................ 0-2Interior .................................................................. 1-11Internet fax expansion kit ..................................... 1-12[INTERNET-FAX] key ........................................... 1-16Interrupting a copy run .................................. 1-7, 5-46
■ JJob build ..........................................1-5, 5-2, 5-8, 7-12Job programs ....................................1-6, 5-44 to 5-45
-Calling up ......................................................... 5-45-Deleting............................................................ 5-45-Storing ............................................................. 5-44
Job status screen ................................................. 1-15[JOB STATUS] key ............................................... 1-13
■ KKeyboard select.................................................... 2-20
■ LLabels................................................................... 2-12Landscape.............................................................. 1-2Large capacity tray (AR-LC6)...............1-10, 2-7, 2-29Large capacity tray (AR-LC7)...............1-10, 2-8, 2-30Left cover of paper drawer ................................... 1-11Left side cover release ......................................... 1-11List print................................................................ 2-20
Loading paper ........................................................ 2-2-bypass tray....................................................... 2-10-tray 1 - tray 2 ...................................................... 2-2-tray 3 .................................................................. 2-5-tray 5 ........................................................ 2-7 to 2-9
LOGOUT .............................................................. 1-13[LOGOUT] key............................................. 1-13, 1-18Lower cover ............................................................ 3-2
■ MMain features................................................ 1-3 to 1-8Main folder.............................................................. 7-3Main power switch....................................... 1-11, 1-17Main screen............................................................ 5-2Manual exposure adjustment ............................... 4-14Manual selection .................................................. 4-16Margin Shift ..............................................1-4, 5-2, 5-3Meaning of "R" ....................................................... 1-2Mirror image ...........................................1-6, 5-2, 5-31Misfeed...................... 2-23 to 2-31, 3-11 to 3-12, 3-18Misfeed in the paper feed area................. 2-26 to 2-30Misfeed original .................................................... 2-31Misfeed removal ................................................... 2-23
-Tray 1 - tray 2 ................................................... 2-26-Tray 3 - tray 4 ................................................... 2-27-Automatic document feeder ............................. 2-31-Bypass tray ...................................................... 2-28-Finisher/saddle stitch finisher........................... 3-11-Inserter............................................................. 3-17-Transport area, fusing area, and exit area ....... 2-24-Tray 5 ................................................... 2-29 to 2-30-Duplex unit ....................................................... 2-25
Mode select key ................................................... 1-15Mode select keys........................................... 1-13, 7-4More information on plain paper........................... 2-13More information on special media ...................... 2-13Multi shot ................................................1-5, 5-3, 5-24
■ NNetwork expansion kit .......................................... 1-12Network scanner expansion kit ............................ 1-12Non-standard sizes .....................2-12, 2-14, 2-17, 4-5Number of pages printed...................................... 1-18number of pages transmitted (scanned)............... 1-18Numeric keys................................................. 1-13, 7-4
■ OOffset............................................................... 1-7, 3-4[OFFSET] key......................................................... 3-6Operation panel........................................... 1-10, 1-13
-Document filing function..................................... 7-4-Inserter............................................................. 3-15
Original guides ....................................................... 4-3Original orientation .......................................... 3-5, 4-4Original size .............................................4-2, 4-5, 4-6Output .............................................3-4, 3-6, 4-9, 4-12Output tray..................................................... 1-10, 4-9
dragon_08.fm 5 ページ 2006年10月23日 月曜日 午後12時2分
INDEX
8-6
■ PPamphlet copy..........................................1-4, 5-2, 5-6Paper curled......................................................... 2-33Paper tray settings ...................................... 2-14, 2-20Part names
-Exterior ............................................................ 1-10-Finisher and the saddle stitch finisher................ 3-2-Inserter............................................................. 3-14-Interior.............................................................. 1-11-Operation panel ...............................1-13, 3-15, 7-4-Trays................................................................... 2-2
Password................................................................ 7-8Peripheral devices....................................... 1-10, 1-12Photo.................................................................... 4-14Photoconductive drum ......................................... 1-11Placing originals ..................................................... 4-3Plain paper ............................................... 2-12 to 2-13Portrait.................................................................... 1-2Postcards ........................................2-10 to 2-11, 4-20Power .......................................................... 1-17, 2-32Power switch ............................................... 1-11, 1-17Preheat mode......................................................... 1-9Preset copy ratios................................................. 4-16[PRINT JOB] key .................................................. 1-16PRINT mode indicators ........................................ 1-13Printer condition ................................................... 2-18Printer test page................................................... 2-20[PRIORITY] key.................................................... 1-16Proper storage ..................................................... 2-22Protect.................................................................... 7-3PS3 expansion kit ................................................ 1-12Punch module ............................................... 1-11, 3-2[PUNCH] key ................................................. 3-6, 3-15
■ QQuick File folder ..................................................... 7-3[QUICK FILE FOLDER] key ................................... 7-5
■ R[READ-END] key .................................4-12, 5-8 to 5-9Reduction ............................................................. 4-15Reduction/Enlargement................................. 1-4, 4-15Replacing the toner cartridges ............................. 2-21Right side cover.................................................... 1-11Rotation copying .................................................... 4-4
■ SSaddle stitch.................................................... 1-8, 3-5Saddle stitch finisher ..................................... 1-10, 3-2Saddle stitch tray.................................................... 3-2[SADDLE STITCH] key .......................................... 3-6Saving a document image file .................... 7-6 to 7-12
-Filing ........................................................ 7-7 to 7-8-Print jobs............................................................ 7-9-Quick file ............................................................ 7-6-Scan save ............................................ 7-10 to 7-11
[SCAN TO] key..................................................... 1-15[SCAN TO HDD] key .............................................. 7-5[SEARCH] key........................................................ 7-5Searching for a file ................................... 7-13 to 7-14
Selecting a function.............................................. 1-14Selecting the exposure level................................. 4-14Selecting the exposure mode............................... 4-14Selecting the output tray......................................... 4-9Sender control ...................................................... 2-18Sender control list ................................................ 2-20Sending address list ............................................. 2-20Setting the paper size............................... 2-14 to 2-17Setting the paper type .............................. 2-14 to 2-16Sharing................................................................... 7-3Sharp OSA ........................................................... 3-19Sort...........................................................1-3, 3-4, 4-9[SORT] key ............................................................. 3-6Special modes (Copier operation).......................... 5-2Special modes (Document filing function) ............ 7-12Special paper ........................................... 2-12 to 2-13Special papers ..................................................... 4-20Specifications ............................................... 8-2 to 8-3
-Finisher/saddle stitch finisher................... 3-2 to 3-3-Inserter............................................................. 3-14-Large capacity tray (AR-LC6)............................. 2-7-Large capacity tray (AR-LC7)............................. 2-8-Punch module .................................................... 3-3
Specifications of paper trays ................................ 2-12Standard sizes............................................... 1-2, 2-13Standard sizes in both the inch and AB systems ... 1-2Staple cartridge...................................................... 3-3Staple cartridge replacement ....................... 3-7 to 3-8Staple jam removal..................................... 3-9 to 3-10Staple sort ....................................................... 1-7, 3-4[STAPLE SORT] key............................................... 3-6[STAPLE] key ....................................................... 3-15Stapler compiler ..................................................... 3-2Stapling positions ................................................... 3-4[START] key................................................. 1-13, 3-15[STOP/DELETE] key ............................................ 1-16Storage of supplies............................................... 2-22System settings........................................... 2-18, 7-24[SYSTEM SETTINGS] key ............................ 1-13, 7-4
■ TTab copy .................................................1-6, 5-2, 5-26Tabbed paper....... 2-6, 2-10, 2-12 to 2-13, 3-15, 4-20, 5-12, 5-27Tandem copy ..........................................1-5, 5-2, 5-10Text....................................................................... 4-14Text/photo............................................................. 4-14The machine does not operate...................... 2-32, 6-3Toner cartridge ............................................ 1-11, 2-21Top cover ................................................................ 3-2Total count ............................................................ 2-20Total number of originals ........................................ 4-2Touch panel ...................................1-13, 1-14, 7-4, 7-5Transparency film .............. 2-6, 2-12, 2-13, 4-20, 5-23Transparency inserts ..............................1-5, 5-2, 5-23Tray................................................................ 1-10, 3-2Tray 1..........................................1-10, 2-2 to 2-4, 2-26Tray 2..........................................1-10, 2-2 to 2-4, 2-26Tray 3....................................................1-10, 2-5, 2-27Tray 4....................................................1-10, 2-6, 2-27Tray 5................................... 1-10, 2-7, 2-8, 2-29, 2-30
dragon_08.fm 6 ページ 2006年12月1日 金曜日 午前8時53分
INDEX
8-7
8
Troubleshooting-Copier operation ................................................ 6-3-Document filing function................................... 7-31-Finisher/saddle stitch finisher........................... 3-13-General information ............................. 2-32 to 2-34-Inserter............................................................. 3-18
Types and sizes of paper ......................... 2-12 to 2-13Types and sizes of paper that can be used.......... 2-12
■ UUpper cover of large capacity tray........................ 1-11User maintenance .................................................. 6-2User name................................................ 7-24 to 7-26
■ WWarming up.......................................................... 2-32
■ XXY Zoom ....................................................... 1-4, 4-18
■ ZZoom.................................................................... 4-16
dragon_08.fm 7 ページ 2006年10月19日 木曜日 午後1時4分

dragonII_copy_sec.book 10 ページ 2006年10月18日 水曜日 午後7時39分

NOTICEBE SURE TO ASK YOUR AUTHORIZED SHARP DEALER ABOUT THE WAR-RANTY THAT YOURSELLING DEALER EXTENDS TO YOU. In order to assure you, the end-user, of warranty protection,Sharp extends a limited warranty to each of its authorized dealers and, in turn, requires each of itsauthorized dealers to extend its own warranty to you on terms that are no less favorable than thosegiven to the dealer by Sharp. You should be aware, however, that Sharp does not itself extend anywarranties, either express or implied, directly to you, the end-user and no one is authorized to makeany representations or warranties on behalf of Sharp. Specifically, SHARP DOES NOT EXTEND TOYOU, THE END-USER, ANY EXPRESS WARRANTY OR ANY IMPLIED WARRANTY OFMERCHANTABILITY, FITNESS FOR USE OR FITNESS FOR ANY PARTICULAR PURPOSE INCONNECTION WITH THE HARDWARE, SOFTWARE OR FIRMWARE EMBODIED IN, OR USEDIN CONJUNCTION WITH THIS PRODUCT. Sharp is not responsible for any damages or loss, eitherdirect, incidental or consequential, which you, the end-user, may experience as a result of yourpurchase or use of the hardware, software or firmware embodied in or used in conjunction with thisProduct. Your sole remedy, in the event that you encounter any difficulties with this Product, isagainst the authorized dealer from which you purchased the Product. In the event that thisauthorized dealer does not honor its warranty commitments, please contact the General Manager,Business Products Group, Sharp Electronics Corporation, Sharp Plaza, Mahwah, NJ 07430-1163,so that Sharp can try to help assure complete satisfaction of all the warranty rights to which you areentitled from the authorized dealer.
In the event that this authorized dealer does not honor its warranty commitments, please contact theGeneral Manager, Business Products Group, Sharp Electronics Corporation, Sharp Plaza, Mahwah,NJ 07430-1163, so that Sharp can try to help assure complete satisfaction of all the warranty rightsto which you are entitled from the authorized dealer.
dragonII_copy_sec.book 1 ページ 2006年10月18日 水曜日 午後7時39分

PRINTED IN CHINA2007C KS1TINSE3584FCZ1
SHARP ELECTRONICS CORPORATIONSharp Plaza, Mahwah, New Jersey 07430-1163.
www.sharpusa.com
SHARP ELECTRONICS OF CANADA LTD. 335 Britannia Road East, Mississauga, Ontario, L4Z 1W9
This manual has been printed using a vegetable-based soy oil inkto help protect the environment.Printed on 100% post-consumer recycled paper
MX
-M550U
/MX
-M620U
/MX
-M700U
/MX
-M550N
/MX
-M620N
/MX
-M700N
OP
ER
ATIO
N M
AN
UA
L (for general information and copier operation)
cover4.fm 1 ページ 2007年2月16日 金曜日 午後12時55分