Model KS PortableTM Portable Chargers with Charging Tray · Portable Chargers with Charging Tray...
22
Portable Chargers with Charging Tray TIMER SET TIMER NONE 30MIN 60MIN 90MIN POWER User Guide Please read these instructions completely before operating this product. Model KS Portable TM
Transcript of Model KS PortableTM Portable Chargers with Charging Tray · Portable Chargers with Charging Tray...

Portable Chargers with Charging Tray
TIMER
SET TIMER
NONE 30MIN 60MIN 90MINPOWER
User GuidePlease read these instructions completely
before operating this product.
Model KS PortableTM


— 1 —
TABLE OF CONTENTS
IMPORTANT SAFETY INSTRUCTIONS .............................................................................2
INTRODUCTION ..................................................................................................................4
Getting to Know the Portable Units ....................................................................................4
Getting to Know the Charging Tray ....................................................................................6
OPERATION ........................................................................................................................7
Kensington® Lock Installation - Example 1 .........................................................................7
Kensington® Lock Installation - Example 2 .........................................................................8
Threaded Security Bolt Installation - Example 1 .................................................................9
Threaded Security Bolt Installation - Example 2 ...............................................................10
Turning the Portable Unit(s) On or Off...............................................................................10
AC Connection ................................................................................................................11
Setting The Usage Timer .................................................................................................11
Charging via Qi Wireless Charging ...................................................................................13
Charging Via Wired USB Plugs ........................................................................................14
Charging Via USB Ports ...................................................................................................14
TROUBLESHOOTING ...................................................................................................... 15
SPECIFICATIONS ............................................................................................................. 17
Charging Tray ..................................................................................................................17
Portable Units ..................................................................................................................17
KUBE SYSTEMS PRODUCTS LIMITED WARRANTY .................................................... 18

— 2 —
IMPORTANT SAFETY INSTRUCTIONS
CAUTION: To reduce the risk of electric shock do not remove cover (or back). No user serviceable parts inside. Refer servicing to qualified service personnel.
DANGEROUS VOLTAGE: The lightning flash with arrowhead, within an equilateral triangle, is intended to alert the user to the presence of uninsulated dangerous voltage within the product’s enclosure that may be of sufficient magnitude to constitute a risk of electric shock to persons.
ATTENTION: The exclamation point within an equilateral triangle is intended to alert the user to the presence of important operating and maintenance (servicing) instructions in the literature accompanying the appliance.
This Class B digital apparatus complies with European Union CE – EMC Directive (2004/108/EC) and European Union CE – Low Voltage Directive (2006/95/EC). This Bluetooth module is in compliance with the essential requirements and other relevant provisions of R&TTE Directive (1999/5/EC). This product is marked with the CE logo and uses radio frequency bands that are harmonized throughout the European Community.
PRODUCT SAFETY: When used in the directed manner, this unit has been designed and manufactured to ensure your personal safety. Improper use of this product can result in potential electrical shock or fire hazards. Please read all safety and operating instructions carefully before installation and use, and keep these instructions handy for future reference.
WARNING: TO PREVENT FIRE OR SHOCK HAZARD, DO NOT EXPOSE THIS UNIT TO RAIN OR MOISTURE.
CAUTIONRISK OF ELECTRIC SHOCK
DO NOT OPEN
FCC Compliance Statement: This device complies with Part 15 of the FCC rules. Operation is subjected to the following two conditions: (1) this device may not cause harmful interference, and (2) this device must accept any interference received, including interference that may cause undesired operation.
FCC WARNINGThis equipment has been tested and found to comply with limits for a Class B digital device, pursuant to Part 15 of the FCC rules. These limits are designed to provide reasonable protection against harmful interference in residential installations. This equipment generates, uses, and can radiate radio frequency energy, and if not installed and used in accordance with the instructions, may cause harmful interference to radio communications. However, there is no guarantee that interference will not occur in a particular installation. If this equipment does cause interference to radio or television equipment reception, which can be determined by turning the equipment off and on, the user is encouraged to try to correct the interference by one or more of the following measures:• Reorient or relocate the receiving Antenna.• Move the equipment away from the receiver.• Plug the equipment into an outlet on a circuit different from that to which the receiver is connected.• Consult the dealer or an experienced radio/television technician for additional suggestions.
CAUTION: Any changes or modifications to this equipment not expressly approved by the party responsible for compliance could void your authority to operate the equipment.
WARNING: STRANGULATION HAZARD: Infants have STRANGLED in power cords. Keep power cords more than 3 feet away from cribs, bassinets, play yards, and other safe sleep environments for infants.

— 3 —— 2 —
IMPORTANT SAFETY INSTRUCTIONS
IMPORTANT SERVICE SAFETY INSTRUCTIONSDamages caused by non-compliance with this operating manual will void the warranty! 1. Read and Follow Instructions - All the safety and operating instructions should be read before
the product is operated. Follow all operating instructions.2. Retain Instructions - The safety and operating instructions should be retained for future
reference.3. Heed Warnings - Comply with all warnings on the product and in the operating instructions.4. Power Sources - This product should be operated only from the type of power source
indicated on the marking label. If you are not sure of the type of power supplied to your location, consult your video dealer or local power company. For products intended to operate from battery power, or other sources, refer to the operating instructions.
5. Overloading - Do not overload wall outlets or extension cords as this can result in the risk of fire or electric shock. Overloaded AC outlets, extension cords, frayed power cords, damaged or cracked wire insulation, and broken plugs are dangerous. They may result in a shock or fire hazard. Periodically examine the cord, and if its appearance indicates damage or deteriorated insulation, have it replaced by your service technician.
6. Power-Cord Protection - Power supply cords should be routed so that they are not likely to be walked on or pinched by items placed upon or against them. Pay particular attention to cords at plugs, convenience receptacles, and the point where they exit from the product.
7. Surge Protectors - It is highly recommended that the video equipment be connected to a surge protector. Doing so will protect the equipment from damage caused by power surges. Surge protectors should bear the UL listing mark or CSA certification mark.
8. Uninterruptible Power Supplies (UPS) - It is recommended that you connect the product to an uninterruptible power supply. An uninterruptible power supply has an internal battery that will keep the product running in the event of a power outage. Uninterruptible power supplies should bear the UL listing mark or CSA certification mark.
CAUTION: Maintain electrical safety. Power line operated equipment or accessories connected to this product should bear the UL listing mark or CSA certification mark on the accessory itself and should not be modified so as to defeat the safety features. This will help avoid any potential hazard from electrical shock or fire. If in doubt, contact qualified service personnel.9. Ventilation - Slots and openings in the case are provided for ventilation to ensure reliable
operation of the product and to protect it from overheating. These openings must not be blocked or covered. The openings should never be blocked by placing the video equipment on a bed, sofa, rug, or other similar surface. This product should never be placed near or over a radiator or heat register. This product should not be placed in a built-in installation such as a bookcase or rack unless proper ventilation is provided and the product manufacturer’s instructions have been followed.
10. Attachments - Do not use attachments unless recommended by the product manufacturer as they may cause a hazard.
11. Water and Moisture - Do not use receivers or video monitors near water — for example, near a bath tub, wash bowl, kitchen sink or laundry tub, in a wet basement, near a swimming pool and the like.
12. Heat - The product should be situated away from heat sources such as radiators, heat registers, stoves, or other products (including amplifiers) that produce heat.
13. Accessories - Do not place this video equipment on an unstable cart, stand, tripod, or table. The video equipment may fall, causing serious damage to the product. Use this product only with a cart, stand, tripod, bracket, or table recommended by the manufacturer or sold with the product. Any mounting of the product should follow the manufacturer’s instructions and use a mounting accessory recommended by the manufacturer.

— 4 —
INTRODUCTION
Getting to Know the Portable Units
Power ButtonQi Wireless Charging
Apple® Lightning Connector
Illuminated Logo
Display
USB Jack 1
Qi Wireless Charging
USB Jack 2Apple® 30-pin Connector
Kensington LockAttachment Point
Micro USB Connector
®
FRONT/LEFT SIDE
REAR/RIGHT SIDE

— 5 —— 4 —
INTRODUCTION
Getting to Know the Portable Units
Charging Terminal(Under Flap)
Dust CoverDust cover must be rotated to this
position for charging in the Charging Tray and should be rotated back into position when in use to protect the charging contacts.
Threaded Security Bolt SocketUsed to connect a security lanyard
or retractor.
BOTTOM

— 6 —
INTRODUCTION
Getting to Know the Charging Tray
NOTE: • Keep ventilation areas at the rear of the Charging Station clear, as there is a fan that will activate when
several Portable Units are charging. It is recommended to have at least 1 inch clearance from a wall or other obstacle.
POWER Indicator
TIMER
SET TIMER
NONE 30MIN 60MIN 90MINPOWER
Charging Indicator Credit Card HolderSET TIMER Button
TIMER LEDs Charging BayTerminals
DC In JackFan Fan*
FRONT
REAR

— 7 —— 6 —
OPERATION
If desired, tether to a wall or piece of furniture by attaching a Kensington® security cable to the Kensington® Lock Attachment Point. Note that there are many types of Kensington® security cables, the next two pages just show a couple of examples. Refer to the owner’s manual that came with the security cable.
u TO ATTACH TO A TABLE LEG USING KENSINGTON® KEYED LOCK:
Route the Kensington® security cable around the leg of a table (or similar) and then through the loop.
v Insert the Kensington® Lock into the Kensington® Lock Attachment Point.
Lock the Kensington® Lock using the supplied key.
w The unit is now secure.
Kensington® Lock Installation - Example 1
NOTE: Security cable/bolt/hardware not included.

— 8 —
OPERATION
u TO ATTACH TO A PIECE OF FURNITURE OR WALL:
Insert the Kensington® Combo Lock into the Kensington® Lock Attachment Point.
Scramble Combo Lock combination to lock.
v Place the loop under a U-Bracket and secure using the hardware included with the Kensington® Kit (not included).
Kensington® Lock Installation - Example 2
NOTE: Security cable/bolt/hardware not included.

— 9 —— 8 —
OPERATION
If desired, tether to a wall or piece of furniture by attaching a security cable to the Threaded Security Bolt Socket on the bottom of the unit. Note that there are many types of installations, the next two pages just show a couple of examples. Refer to the owner’s manual that came with the Security Cable Kit.
u TO ATTACH USING STANDARD TETHER:
Bolt the eyelet of the cable into the bottom of the unit using a Drilled Spanner Screwdriver (shown below).
v Secure using the hardware included with the Kit (not included).
Threaded Security Bolt Installation - Example 1
NOTE: Security cable/bolt/hardware not included.

— 10 —
Turning the Portable Unit(s) On or Off
u Press the Power button to turn the unit on; the Battery Status Indicator will appear to show the amount of battery capacity remaining, from one bar (5-25% capacity) to four bars (75-100% capacity). When under 5% capacity, one bar will blink, and when almost empty the Charging Unit will turn itself off.
Charge as shown on the next page when needed.
NOTE: • A fully charged Portable Unit will charge devices connected to every outlet/connector (drawing 1 amp) for one
hour, or charge one device for six hours.
OPERATION
u TO ATTACH USING RETRACTOR WITH EYELET:
Bolt the eyelet side of the cable into the bottom of the unit using a Drilled Spanner Screwdriver (shown below).
v Secure using the hardware included with the Kit (not included).
Threaded Security Bolt Installation - Example 2
NOTE: Security cable/bolt/hardware not included.

— 11 —— 10 —
OPERATION
AC Connection
Setting The Usage Timer
u Insert the power supply plug into the DC In jack on the rear of the Charging Station.
u To charge a Portable Unit, rotate the rubber flap covering the Charging Terminals to expose them.
v Insert Portable Unit into one of the Charging Bays by sliding it straight and downward into the slot as shown; the Charging LED will light red (charging) or green (charged). A quick beep will be heard when inserting Unit into the Charging Station.
v Insert the AC plug into an AC outlet having 100-240, 50-60Hz; the unit will automatically turn on and the Power indicator will light.

— 12 —
OPERATION
Setting The Usage Timer
w To set the portable units so they will have no limits on charging a device, press the SET TIMER button to select NONE and the Charging Station will charge the Portable Units until fully charged and allow the Portable Unit(s) to charge devices until it is out of power. The timer has no effect on how long the charging tray will charge a portable unit
x To set a limit on how long the Portable Units will charge a device, press the SET TIMER button to select the desired time (30/60/90 minutes). For example, if you select 30MIN, the Portable Unit will be set to allow 30 minutes of charging a user’s device and then turn off.
TIMER
SET TIMER
NONE 30MIN 60MIN 90MINPOWER
TIMER
SET TIMER
NONE 30MIN 60MIN 90MINPOWER
RESETTING THE PORTABLE UNIT TIME: • The Portable Unit time can be reset by docking in the tray and pressing the SET TIMER button until the desired
timer setting is reached. One the desired setting is reached, programing only takes approx. 2 seconds.
CREDIT CARD HOLDER: • Utilize the Credit Card holder (see Getting to Know the Charging Tray on page 8 for location) to hold
the item used for collateral (credit card, driver’s license, hotel room key, etc.).

— 13 —— 12 —
Setting The Usage Timer
y When done charging, the Charging indicator will light green. However, you can leave the Portable Unit(s) in the Charging Bay as there is no risk of over-charging.
TIMER
SET TIMER
NONE 30MIN 60MIN 90MINPOWER
NOTES: • Keep ventilation areas at the rear of the Charging Station clear, as there is a fan that will activate when several
Portable Units are charging. It is recommended to have at least 1 inch clearance from a wall or other obstacle.• When the Portable Unit has turned off due to the Timer being completed, it must be returned to the Charging
Station to recharge and reset timer.• After removing the Portable Unit from the Charging Station, rotate the rubber flap back on to protect the
terminals.• The charging time set by the timer is the actual charging time, meaning that if the Portable Unit is turned off,
the timer will pause and continue when turned back on.• The timer is not affected by the amount of devices being charged.
Charging via Qi Wireless Charging
u Designed with inductive charging capabilities, this unit allows you to place your Qi-compatible device on top of the unit for wireless charging. It’s that simple! Make sure your device is Qi-compatible or utilizes a Qi case or other Qi charging option (both available separately), then place your device on top of the Portable Unit. After placing your device on the Qi pad, you will hear the “beep handshake” and the device’s charging icon to indicate it is charging.
OPERATION

— 14 —
OPERATION
Charging Via USB Ports
u Charge up to two additional devices using the two USB ports on the rear of the unit. These ports can output 1 Amp each. Each outlet has its own intelligent auto-configuring USB circuit that allows any device to charge properly.
Charging Via Wired USB Plugs
u Charge up to three devices using the built-in Charging Cables. Simply pull out the desired connector and insert it into your device.
Apple® Lightning Connector: Used for charging newer Apple devices with the Lightning jack.
Apple® 30-Pin Connector: Used for charging older Apple devices with the 30-pin jack.
Micro USB Connector: Used for charging devices that utilize the Micro USB jack.
Apple®
Lightning Connector
Apple®
30-pin Connector
Micro USB Connector
Apple®
Lightning Connector
Apple®
30-pin Connector
Micro USB Connector
— 15 —— 14 —
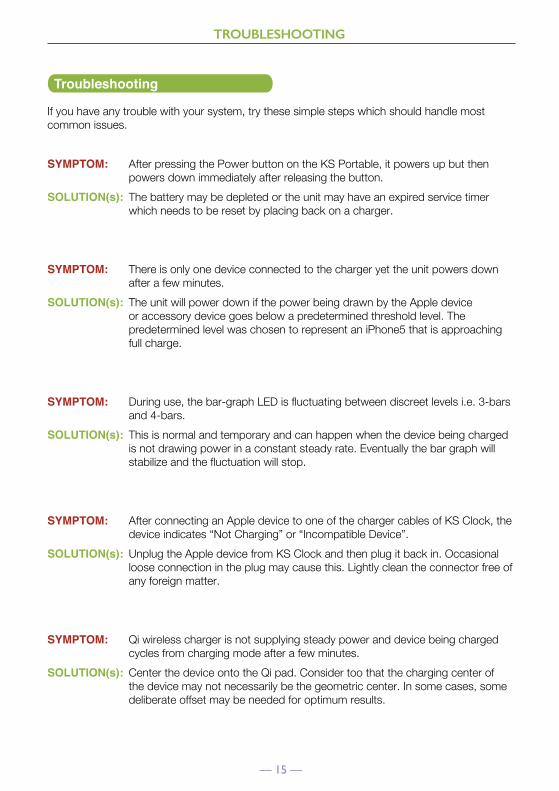
TROUBLESHOOTING
If you have any trouble with your system, try these simple steps which should handle most common issues.
SYMPTOM: After pressing the Power button on the KS Portable, it powers up but then powers down immediately after releasing the button.
SOLUTION(s): The battery may be depleted or the unit may have an expired service timer which needs to be reset by placing back on a charger.
SYMPTOM: There is only one device connected to the charger yet the unit powers down after a few minutes.
SOLUTION(s): The unit will power down if the power being drawn by the Apple device or accessory device goes below a predetermined threshold level. The predetermined level was chosen to represent an iPhone5 that is approaching full charge.
SYMPTOM: During use, the bar-graph LED is fluctuating between discreet levels i.e. 3-bars and 4-bars.
SOLUTION(s): This is normal and temporary and can happen when the device being charged is not drawing power in a constant steady rate. Eventually the bar graph will stabilize and the fluctuation will stop.
SYMPTOM: After connecting an Apple device to one of the charger cables of KS Clock, the device indicates “Not Charging” or “Incompatible Device”.
SOLUTION(s): Unplug the Apple device from KS Clock and then plug it back in. Occasional loose connection in the plug may cause this. Lightly clean the connector free of any foreign matter.
SYMPTOM: Qi wireless charger is not supplying steady power and device being charged cycles from charging mode after a few minutes.
SOLUTION(s): Center the device onto the Qi pad. Consider too that the charging center of the device may not necessarily be the geometric center. In some cases, some deliberate offset may be needed for optimum results.
Troubleshooting

— 16 —
TROUBLESHOOTING
SYMPTOM: The KS Portable is inserted properly onto the Charger Bay but the Charging indicator of the charger bay is flashing Red.
SOLUTION(s): When the ambient temperature is below 0 Celsius or above 45 Celsius, charging will be suspended and the flashing Red Charging indicator will occur. When the ambient temperature is very near the thresholds, some KS Portable may stop charging and other may continue charging. This is due to variations in the temperatures and sensor readings between KS Portables.
Continued charging outside these recommended operating temperatures is detrimental to the life expectancy of the battery. KS Portable is for indoor use only. Please do not use outdoors and avoid exposure to temperatures beyond specifications.
SYMPTOM: What do I do in the following scenario? Two KS portables are needed, a 30-minute KS Portable and a 60-minute KS Portable. However, there is only one charger bay.
SOLUTION(s): Set the charger bay to 30 minutes, wait 1 second and then pull out one KS portable; this is the 30-minute KS Portable. Next set the charger bay to 60 minutes, wait 1 second then pull out the 2nd KS portable; this becomes the 60-minute KS Portable. The procedure may also be done in reverse by selecting the 60-minute first and then the 30-minute next.

— 17 —— 16 —
SPECIFICATIONS
Charging voltage (from Charging Bay) .................................................................. 19vdc typical
Charging current (from Charging Bay) ................................................................ 0.9 Amps max
Charging time (from Charging Bay) ....................................................................... 6 hours max
Power Requirements ............................................................................................. 120V/ 60Hz
Operating Temperature .........................................................................................XX° to XX° F
Weight .............................................................................................................2.95 lbs (1.3 kg)
Dimensions (L x W x H) ........................................ 18.1 x 6.5 x 3.5 inches (460 x 165 x 90 mm)
Primary Power source .............................................................................Rechargeable battery
Battery Type ............................................................................................................Lithium-ion
Capacity of each cell .....................................................2100mah minimum - 2200mah typical
Total capacity of cells ............................................................................17,600mah, 65.12 Wh
Battery pack output ..................................................................................... 14.8v @ 4400mah
Service life with 6 devices charging at full power ...........................1 hour (20C +/- 5C ambient)
Service life with 1 device charging at full power..............................6 hours (1 device at 1 Amp)
Charging current (from Charging Bay) ................................................................ 0.9 Amps max
Charging time (from Charging Bay) ....................................................................... 6 hours max
Power Outlets:Apple 30-pin connector, Apple Lightning connector, USB Type-A outlet #1, USB Type-A outlet #2, Qi Wireless charging pad
Operating Temperature .........................................................................................15° to 95° F
Weight ..............................................................................................................1.5 lbs (0.68kg)
Dimensions (L x W x H) .................................... 4.13 x 4.13 x 2.28 inches (105 x 105 x 58 mm)
Charging Tray
Portable Units
— 18 —
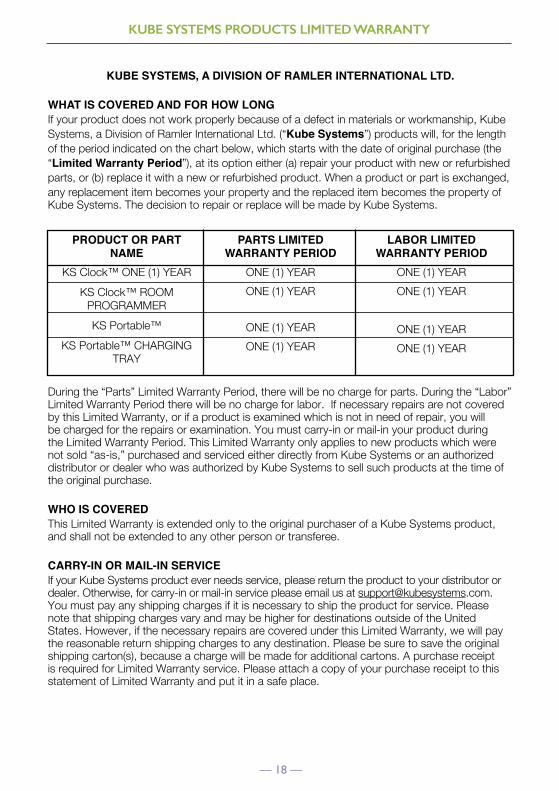
KUBE SYSTEMS PRODUCTS LIMITED WARRANTY
KUBE SYSTEMS, A DIVISION OF RAMLER INTERNATIONAL LTD.
WHAT IS COVERED AND FOR HOW LONGIf your product does not work properly because of a defect in materials or workmanship, KubeSystems, a Division of Ramler International Ltd. (“Kube Systems”) products will, for the lengthof the period indicated on the chart below, which starts with the date of original purchase (the“Limited Warranty Period”), at its option either (a) repair your product with new or refurbishedparts, or (b) replace it with a new or refurbished product. When a product or part is exchanged,any replacement item becomes your property and the replaced item becomes the property of Kube Systems. The decision to repair or replace will be made by Kube Systems.
During the “Parts” Limited Warranty Period, there will be no charge for parts. During the “Labor” Limited Warranty Period there will be no charge for labor. If necessary repairs are not covered by this Limited Warranty, or if a product is examined which is not in need of repair, you will be charged for the repairs or examination. You must carry-in or mail-in your product during the Limited Warranty Period. This Limited Warranty only applies to new products which were not sold “as-is,” purchased and serviced either directly from Kube Systems or an authorized distributor or dealer who was authorized by Kube Systems to sell such products at the time of the original purchase.
WHO IS COVEREDThis Limited Warranty is extended only to the original purchaser of a Kube Systems product, and shall not be extended to any other person or transferee.
CARRY-IN OR MAIL-IN SERVICEIf your Kube Systems product ever needs service, please return the product to your distributor or dealer. Otherwise, for carry-in or mail-in service please email us at [email protected]. You must pay any shipping charges if it is necessary to ship the product for service. Please note that shipping charges vary and may be higher for destinations outside of the United States. However, if the necessary repairs are covered under this Limited Warranty, we will pay the reasonable return shipping charges to any destination. Please be sure to save the original shipping carton(s), because a charge will be made for additional cartons. A purchase receipt is required for Limited Warranty service. Please attach a copy of your purchase receipt to this statement of Limited Warranty and put it in a safe place.
PRODUCT OR PART NAME
KS Clock™ ONE (1) YEAR
KS Clock™ ROOM PROGRAMMER
KS Portable™
KS Portable™ CHARGING TRAY
PARTS LIMITED WARRANTY PERIOD
ONE (1) YEAR
ONE (1) YEAR
ONE (1) YEAR
ONE (1) YEAR
LABOR LIMITED WARRANTY PERIOD
ONE (1) YEAR
ONE (1) YEAR
ONE (1) YEAR
ONE (1) YEAR
— 19 —— 18 —
KUBE SYSTEMS PRODUCTS LIMITED WARRANTY
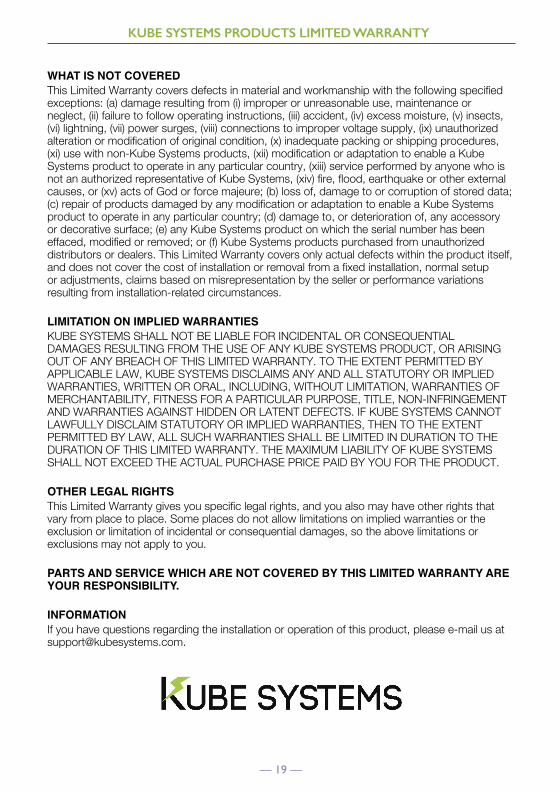
WHAT IS NOT COVEREDThis Limited Warranty covers defects in material and workmanship with the following specified exceptions: (a) damage resulting from (i) improper or unreasonable use, maintenance or neglect, (ii) failure to follow operating instructions, (iii) accident, (iv) excess moisture, (v) insects, (vi) lightning, (vii) power surges, (viii) connections to improper voltage supply, (ix) unauthorized alteration or modification of original condition, (x) inadequate packing or shipping procedures, (xi) use with non-Kube Systems products, (xii) modification or adaptation to enable a Kube Systems product to operate in any particular country, (xiii) service performed by anyone who is not an authorized representative of Kube Systems, (xiv) fire, flood, earthquake or other external causes, or (xv) acts of God or force majeure; (b) loss of, damage to or corruption of stored data; (c) repair of products damaged by any modification or adaptation to enable a Kube Systems product to operate in any particular country; (d) damage to, or deterioration of, any accessory or decorative surface; (e) any Kube Systems product on which the serial number has been effaced, modified or removed; or (f) Kube Systems products purchased from unauthorized distributors or dealers. This Limited Warranty covers only actual defects within the product itself, and does not cover the cost of installation or removal from a fixed installation, normal setup or adjustments, claims based on misrepresentation by the seller or performance variations resulting from installation-related circumstances.
LIMITATION ON IMPLIED WARRANTIESKUBE SYSTEMS SHALL NOT BE LIABLE FOR INCIDENTAL OR CONSEQUENTIAL DAMAGES RESULTING FROM THE USE OF ANY KUBE SYSTEMS PRODUCT, OR ARISING OUT OF ANY BREACH OF THIS LIMITED WARRANTY. TO THE EXTENT PERMITTED BY APPLICABLE LAW, KUBE SYSTEMS DISCLAIMS ANY AND ALL STATUTORY OR IMPLIED WARRANTIES, WRITTEN OR ORAL, INCLUDING, WITHOUT LIMITATION, WARRANTIES OF MERCHANTABILITY, FITNESS FOR A PARTICULAR PURPOSE, TITLE, NON-INFRINGEMENT AND WARRANTIES AGAINST HIDDEN OR LATENT DEFECTS. IF KUBE SYSTEMS CANNOT LAWFULLY DISCLAIM STATUTORY OR IMPLIED WARRANTIES, THEN TO THE EXTENT PERMITTED BY LAW, ALL SUCH WARRANTIES SHALL BE LIMITED IN DURATION TO THE DURATION OF THIS LIMITED WARRANTY. THE MAXIMUM LIABILITY OF KUBE SYSTEMS SHALL NOT EXCEED THE ACTUAL PURCHASE PRICE PAID BY YOU FOR THE PRODUCT.
OTHER LEGAL RIGHTSThis Limited Warranty gives you specific legal rights, and you also may have other rights that vary from place to place. Some places do not allow limitations on implied warranties or the exclusion or limitation of incidental or consequential damages, so the above limitations or exclusions may not apply to you.
PARTS AND SERVICE WHICH ARE NOT COVERED BY THIS LIMITED WARRANTY ARE YOUR RESPONSIBILITY.
INFORMATIONIf you have questions regarding the installation or operation of this product, please e-mail us at [email protected].

http://www.kubesystems.comhttp://www.kubesystems.com