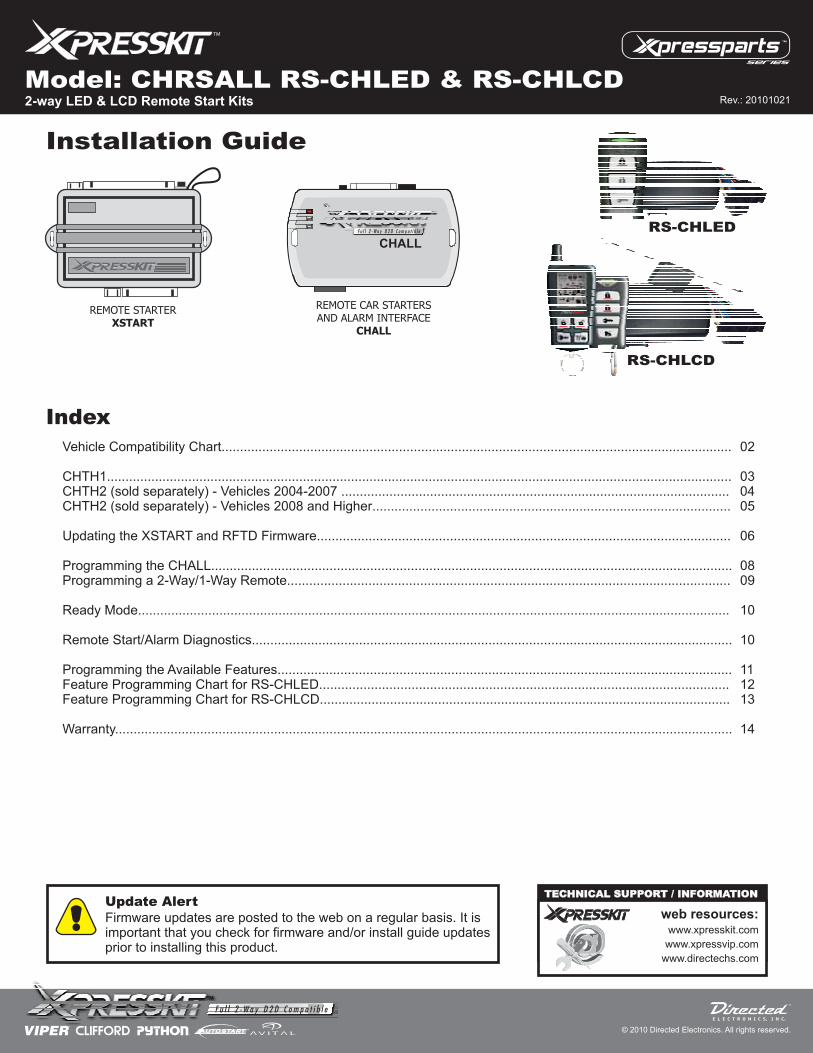
Model: CHRSALL RS-CHLED & RS-CHLCD - .NET Framework
14
RS-CHLCD TECHNICAL SUPPORT / INFORMATION TECHNICAL SUPPORT / INFORMATION web resources: www.xpresskit.com www.xpressvip.com www.directechs.com Vehicle Compatibility Chart.......................................................................................................................................... Vehicles CHTH2 (sold separately) - Vehicles 2008 and Higher................................................................................................. Updating the XSTART and RFTD Firmware................................................................................................................ Programming a 2-Way/1-Way Remote........................................................................................................................ Ready Mode................................................................................................................................................................ Remote Start/Alarm Diagnostics.................................................................................................................................. Programming the Available Features........................................................................................................................... Feature Programming Chart for RS-CHLED............................................................................................................... Feature Programming Chart for RS-CHLCD............................................................................................................... CHTH1......................................................................................................................................................................... CHTH2 (sold separately) - 2004-2007 ......................................................................................................... Programming the CHALL............................................................................................................................................. Warranty ....................................................................................................................................................................... 02 03 04 05 06 08 09 10 10 11 12 13 14 Index RS-CHLED Installation Guide tm Update Alert Firmware updates are posted to the web on a regular basis. It is important that you check for firmware and/or install guide updates prior to installing this product. REMOTE STARTER XSTART CHALL REMOTE CAR STARTERS AND ALARM INTERFACE CHALL 2-way LED & LCD Remote Start Kits Rev.: 20101021 © 2010 Directed Electronics. All rights reserved. Model: CHRSALL RS-CHLED & RS-CHLCD
Transcript of Model: CHRSALL RS-CHLED & RS-CHLCD - .NET Framework
RS-CHLCD
TECHNICAL SUPPORT / INFORMATIONTECHNICAL SUPPORT / INFORMATION
web resources:www.xpresskit.com
www.xpressvip.com
www.directechs.com
Vehicle Compatibility Chart..........................................................................................................................................
VehiclesCHTH2 (sold separately) - Vehicles 2008 and Higher.................................................................................................
Updating the XSTART and RFTD Firmware................................................................................................................
Programming a 2-Way/1-Way Remote........................................................................................................................
Ready Mode................................................................................................................................................................
Remote Start/Alarm Diagnostics..................................................................................................................................
Programming the Available Features...........................................................................................................................Feature Programming Chart for RS-CHLED...............................................................................................................Feature Programming Chart for RS-CHLCD...............................................................................................................
CHTH1.........................................................................................................................................................................CHTH2 (sold separately) - 2004-2007 .........................................................................................................
Programming the CHALL.............................................................................................................................................
Warranty.......................................................................................................................................................................
02
030405
06
0809
10
10
111213
14
Index
RS-CHLED
Installation Guide
tm
Update Alert
Firmware updates are posted to the web on a regular basis. It isimportant that you check for firmware and/or install guide updatesprior to installing this product.
REMOTE STARTERXSTART
CHALL
REMOTE CAR STARTERSAND ALARM INTERFACE
CHALL
2-way LED & LCD Remote Start Kits Rev.: 20101021
© 2010 Directed Electronics. All rights reserved.
Model: CHRSALL RS-CHLED & RS-CHLCD

Vehicle Compatiblity ChartPage 2
Guide
d'Application des
Véhicules
2010
2009
2008
2007
2006
2005
2004
DL
-A
rmfa
cto
ryse
cu
rity
DL
-D
isa
rmfa
cto
ryse
cu
rity
DL
-D
oo
rlo
ck
co
ntr
ol
DL
-D
oo
ru
nlo
ck
DL
-D
rive
rp
rio
rity
un
lock
DL
-S
lid
ing
do
or
co
ntr
ol
dri
ve
r
DL
-S
lid
ing
do
or
co
ntr
ol
pa
sse
ng
er
DL
-T
run
k/h
atc
hre
lea
se
KI-
Ke
y&
ign
itio
nsw
itch
inte
rfa
ce
PK
-Im
mo
biliz
er
Byp
ass-
Da
tan
oke
yre
q'd
PK
-P
ush
-To
-Sta
rtig
nitio
n
co
mp
atib
le
RS
-R
AP
sh
utd
ow
n
(re
mo
teA
CC
po
we
r)
RS
-T
ach
/RP
Mo
utp
ut
SS
-E
ntr
ym
on
ito
rin
gA
LL
do
or
pin
s
SS
-E
ntr
ym
on
ito
rin
gd
rive
r
do
or
pin
SS
-E
ntr
ym
on
ito
rin
gfr
on
t
do
or
pin
s
SS
-E
ntr
ym
on
ito
rin
gh
oo
d
pin
SS
-E
ntr
ym
on
ito
rin
g
tru
nk/h
atc
hp
in
ST
-B
rake
sta
tus
(fo
ot
bra
ke
)
ST
-H
an
db
rake
sta
tus
Chrysler
300/300c 1 1 2 2 2 2 • • • • • • W • • • • • • • • D W
Aspen 2 2 2 • • • • • • W • • • • • • • • D W
Crossfire 2 • • • • • • W • • • • • • • • D W
Sebring 2 2 2 2 • • • • • • W • • • • • • • • D W
Town & Country 1 1 1 • • • • • • • • W • D • • • • • • D W
Dodge 10 09 08 07 06 05 04
Avenger 2 2 2 • • • • • • W • • • • • • • • D W
Caliber 2 2 2 2 • • • • • • W • • • • • • • • D W
Challenger 1 1 1 • • • • • • W • D • • • • • • D W
Charger 1 1 1 2 2 • • • • • • W • • • • • • • D W
Dakota 2 2 2 2 2 2 • • • • • • W • • • • • • • • D W
Durango 2 2 2 2 2 2 • • • • • • W • • • • • • • • D W
Grand Caravan 1 1 1 • • • • • • • • W • D • • • • • • D W
Journey 1 1 • • • • • • W • • • • • • • D W
Magnum 2 2 2 2 • • • • • • W • • • • • • • • D W
Nitro 2 2 2 2 • • • • • • W • • • • • • • • D W
RAM 1 1 2 2 2 • • • • • • W • • • • • • • • D W
Jeep 10 09 08 07 06 05 04
Commander 1 1 1 2 2 • • • • • • W • • • • • • • D W
Compass 2 2 2 2 • • • • • • W • • • • • • • • D W
Grand Cherokee 1 1 1 2 2 2 • • • • • • W • • • • • • • D W
Liberty 2 2 2 • • • • • • W • • • • • • • • D W
Patriot 2 2 2 2 • • • • • • W • • • • • • • • D W
Wrangler 2 2 2 2 • • • • • • W • • • • • • • • D W
Volkswagen 10 09 08 07 06 05 04
Routan 1 1 • • • • • • • • W • D • • • • • • D W
1 : Utilisez le Harnais-en-T inclus. 2 : Utilisez le Harnais-en-T vendu séparément.
* Porte coulissante en mode D2D seulement.
Légende:
D: Data-to-Data (D2D) seulement.
W: Wire-to-Wire (W2W) seulement.
•: D2D et W2W.
2-way LED & LCD Remote Start Kits Rev.: 20101021
© 2010 Directed Electronics. All rights reserved.
Model: CHRSALL RS-CHLED & RS-CHLCD

CHTH1Page 3
D2D
XOVER CABLE
Black
Red
Brown
Pink
Black/White
Grey/Black
Light Blue
White
Purple
Blue
Parking Light
Horn
IGNITION BARREL
CHTH1
IGNITION PLUG
FEMALE
MALE
INPUT
OUTPUT
CHALL
White
Pink
Pink/Black
Hood Pin
Antenna
n.c.
n.c.
n.c.
n.c.
n.c.
n.c.
n.c.
n.c.
n.c.
n.c.
A
B C
D
Cut the loop for automatictransmission mode.
Disconnect the immobilizer connector, which
is located at the key cylinder.
Connect the male connector of the T-Harness
to the immobilizer module.
Connect the immobilizer connector to the
female connector of the T-Harness.
Press the CHALL programming button
Go to page 8.
while inserting the T-harness into the CHALL
module.
The Red LED will illuminate to indicate you
are in programming mode, release the
programming button.
A
B
C
D
CONN. 2
Light Blue
White
Pink
Blue
Orange
Purple
Yellow
Lt. Blue/Black
White/Black
Pink/Black
Green
Orange/Black
Purple/White
Yellow/Black
n.c.
n.c.
Unlock
n.c.
n.c.
n.c.
n.c.
n.c.
n.c.
n.c.
n.c.
n.c.
n.c.
n.c.
Programmingbutton
This wire is ONLY requiredduring the programming phaseof the installation.
2-way LED & LCD Remote Start Kits Rev.: 20101021
© 2010 Directed Electronics. All rights reserved.
Model: CHRSALL RS-CHLED & RS-CHLCD

Page 4
CHTH2 (sold separately) - 2004-2007VehiclesVehicle with a positive starter wire.
Disconnect the immobilizer connector,
which is located at the key cylinder.
Connect the male connector of the T-
Harness to the immobilizer module.
Connect the immobilizer connector to the
female connector of the T-Harness.
Press the CHALL programming switch
Go page 8.
while inserting the T-harness into the
CHALL module.
The Red LED will illuminate to indicate
you are in programming mode, release
the programming button.
A
B
C
D
D2D
CHALL
CONN. 2
Lt.Blue | Bleu Pâle
White | BlancPink | Rose
Blue | Bleu
Orange
Purple | Mauve
Yellow | Jaune
Lt. Blue/Black | BleuPâle/Noir
White/Black | Blanc/NoirPink/Black | Rose/Noir
Green | Vert
Orange/Black | Orange/Noir
Purple/White | Mauve/Blanc
Yellow/Black | Jaune/Noir
n.c.
CONN. 2
n.c.
n.c.n.c.
n.c.
n.c.
n.c.
n.c.
n.c.
n.c.
n.c.
CHTH2NOT INCLUDEDNON INCLUS
FEMALEFEMELLEMALE
MÂLE
5 PIN CONN.
(+)Starter
Ignition plug
Back view | Vue de dos
Ground
Start (-)
IMM
OB
ILIZ
ER
MO
DU
LE
MUX
PURPLE/BROWN | MAUVE/BRUN
12VBattery
INPUT | ENTRÉE
OUTPUT | SORTIE
Pink | Rosen.c.
Pink/Black | Rose/NoirWhite | BlancHood Pin | Pin de Capot
AntennaAntenne
Cut the loop for automatic transmission modeCoupez la boucle pour le mode de transmissionautomatique
Black
Red
Brown | Brun
Pink
Black/White
Grey/Black | Gris/Noir
Lt. Bleu | Bleu pâle
White | Blanc
Purple | Mauve
Blue | Bleu
Parking LightLumières de Stationnement
Horn | Klaxon
Parking Light (-)Lumières deStationnement (-)
Programmingbutton
Bouton deprogrammation
A
B
C
D
MUX
XOVER CABLE
HARDWARE 4FIRMWARE V 2.02
V
(and higher | et plus)
While Running
n.c.
(+) Start IN
30
8685 87
87a
30
8685 87
87a
(+) 12VBattery
CHALL : HARDWARE 4FIRMWARE VERSION: 2.02(and higher)
VERSION
Ground*
Ignition*
Brake*
Trunk*
Lock*
Unlock*
* Optional wiring connections.
12V*
Fuse 7A
2-way LED & LCD Remote Start Kits Rev.: 20101021
© 2010 Directed Electronics. All rights reserved.
Model: CHRSALL RS-CHLED & RS-CHLCD

CHTH2NOT INCLUDED
FEMALEMALE
IMM
OB
ILIZ
ER
MO
DU
LE
D2D
Black
Red
Brown
Pink
Black/White
Grey/Black
Light Blue
White
Purple
Blue
Parking Light
Horn
CHALL
CONN. 2NOT USED
White
Pink
Pink/Black
*Hood Pin
Antenna
n.c.
n.c.
n.c.
n.c.
n.c.
n.c.
n.c.
n.c.
n.c.
n.c.
Programmingbutton
A
BC
D
XOVER CABLE
* If the vehicle does not have an OEM Hood Pin, the installer must add one.
Page 5
CHTH2 (sold separately) - 2008 and HigherVehiclesVehicle without a positive starter wire.
INPUT
OUTPUT
Disconnect the immobilizer connector, which
is located at the key cylinder.
Connect the male connector of the T-
Harness to the immobilizer module.
Connect the immobilizer connector to the
female connector of the T-Harness.
Press the CHALL programming button
Go to page 8.
while inserting the T-harness into the CHALL
module.
The Red LED will illuminate to indicate you
are in programming mode, release the
programming button.
A
B
C
D
Cut the loop for automatictransmission mode.
2-way LED & LCD Remote Start Kits Rev.: 20101021
© 2010 Directed Electronics. All rights reserved.
Model: CHRSALL RS-CHLED & RS-CHLCD

Page 6
Updating the XSTART and RFTD Firmware
Connect the XKLOADER to the computer.
Only one XKLOADER must be used.
Connect the XSTART to the XKLOADERusing the D2D cable.
Click on the button to update XSTART.
A message will be displayed to confirm when the operation will be completed successfully.
Flash
Update the XSTART firmware:
1
2a
The current software is listed under. Choose the version you
want to update from thedrop-down menu list.
UnitInformation
AvailableUpdates
2c
2d
Required components:
XSTART.XKLOADER.Directed Electronics D2D cable.
�
�
�
USB Port
USB Connector
XKLOADER
Part #XKD2D65
4-PIN D2DXKLOADER
USBConnector
XSTART
Close all applications on your computer and open theOptimax Flash interface software.
Make sure no other application is using the sameCOM port.
2b
2-way LED & LCD Remote Start Kits Rev.: 20101021
© 2010 Directed Electronics. All rights reserved.
Model: CHRSALL RS-CHLED & RS-CHLCD

Update the RFTD firmware:
Connect the XSTART to the XKLOADER using the D2D cable.
Press the Programming button on the XSTARTand hold
Press and hold the Programming button on the XSTART module, then click on the button in XpressVIP. Once the progress bar appears, you can release the Programming button.
A message will be displayed when the flash operation has been completed successfully.
Flash
3b
3a
3e
Part #XKD2D65
4-PIN D2DXKLOADER
USBConnector
XSTART
Close all applications on your computer andopen the Xpress VIP software.
The current RFTD firmare is listed underin Xpress VIP.Current Information
Choose the firmware version by clicking on the or .Browse Refresh Information
3c
3d
Page 7
2-way LED & LCD Remote Start Kits Rev.: 20101021
© 2010 Directed Electronics. All rights reserved.
Model: CHRSALL RS-CHLED & RS-CHLCD

Programming the CHALLCaution: The module can only be programmed a maximum of 5 times on a vehicle.
Page 8
Check the transmission mode of the vehicle:- cut the loop on the XSTART module.- go to step 2.
Automatic:Manual:1
IGN
IGNITION ON
CHALL
CHALL
PANIC
LOCK UNLOCK
Turn the key to the and hold until the red LED on theCHALL module starts to flash rapidly.
"ON" position
Connect the wire (purple/white) from the CHALL module to Ground.
See the installation on page 3 for more information.
Unlock
CHTH1
The Red LED will continue to flash until you.
The LED will turn off to indicate the module has been programmed.
press the lock button on the OEMremote
If the vehicle is not equipped with the OEM remote: press and release the programmingbutton of the CHALL module once.
The module is now ready for use.
Turn the key to the and remove the key."OFF" position
Continue with the remote-starter programming.
5
4
7
6a
6b
8
9
2 Press the Programming button on the CHALL module.and hold
3CHTCH1 OR CHTCH2
See Vehicle Compatibility Chart (on page 2).
Determine the T-harness required for the vehicle,(included)
See page 3
T-HARNESS:
1) CHTH1 2) CHTH2 (not included)Vehicles 2004-2007, see page 4Vehicles 2008 and higher, see page 5
Vehicles equipped with OEM alarm:
Press the on the remote car starterorPut the Purple/White wire to ground with a jumper for 1 one second.
unlock button remote control.
Vehicles equipped with (+) starter at Ignition:
Note: Ensure that the Lt Blue/Black wire from the module is connected to the vehicles starter wire.
Start the vehicle with the key.The LED on the CHALL module will start to flash twice as fast.
IGN
CHALL
2-way LED & LCD Remote Start Kits Rev.: 20101021
© 2010 Directed Electronics. All rights reserved.
Model: CHRSALL RS-CHLED & RS-CHLCD

1 Turn the Ignition on.IGN
Programming a 2-Way/1-Way RemotePage 9
Press and release the brake pedal once.The parking lights will flash once when you release the brake pedal.4
OFF
6 Turn the Ignition off.
Press and hold the button on the remote for 2 seconds.LOCK
To program extra remotes, repeat steps 1 to 6 for each transmitter.(A maximum of 4 remotes can be programmed.)
5
Press and hold the programming button on the module for 5 seconds,then release.2 2
Press and release the programming button on the module once more.The parking lights will flash and the horn will honk to confirm.3 3
5 5
ORCHLCD CHLED
2-way LED & LCD Remote Start Kits Rev.: 20101021
© 2010 Directed Electronics. All rights reserved.
Model: CHRSALL RS-CHLED & RS-CHLCD

Ready Mode
Remote Start/Alarm Diagnostics
Page 10
Make sure that all doors are closed and the transmission is in the NEUTRAL position. &
While the engine is running, engage the parking brake.
Make sure the brake pedal is released.
Push the remote START button.The parking lights will flash once and then remain on.
Remove the key from the ignition barrel.The vehicle will remain running with the Remote-Starter.
IGN
START
OF
F
Exit the vehicle and close all doors.The Remote Starter will stop running once all the doors are closed.
STANDARD• Open any door(s)
Open the hoodDisengage the parking brake
••
Note : If the parking lights flash 3 times when Remote-Starting, Ready Mode is not enabled.
TO DISABLE READY MODE
WITH NEUTRAL SAFETY SWITCH• Transmission not in neutral position• Open the hood• Disengage the parking brake
1
2
3
4
5
6
4
3x5x6x7x8x9x
Parking Lights Flashes(after disarm)
Door openHood openTrunk openAuxilliary INTilt SensorIgnition
1x3x4x5x6x
Parking Lights Flashes (after starting)
Normal stop Park B ake, BrakeRuntime expired or shut down byNo tachometer signalHood openOver crank threshold seconds
( )remote
(8 )
REMOTE STARTER DIAGNOSTICS
3x4x5x
Parking Lights Flashes (before starting)
Ready mode disabledValet mode activated The LED is onHood open
( )
ALARMDIAGNOSTICS
4
ORCHLCD
CHLED
2-way LED & LCD Remote Start Kits Rev.: 20101021
© 2010 Directed Electronics. All rights reserved.
Model: CHRSALL RS-CHLED & RS-CHLCD

Programming the Available Features
Disarm alarm and disable valet mode, then turn the ignition on.
Press and hold the XSTART Programming button for 5 seconds, then release it.
Press and release the brake pedal once.
Turn the ignition off to exit the programming sequence. The parking lights will flash 4 times.
To select a MODE:
To reset the CHANNEL, go to step 3.
Press and release the XSTART Programming button(refer to pages 12 and 13 for more information).
1-33 times for thedesired CHANNEL
The parking lights will flash and the horn/siren will chirp each time the buttonis pressed to confirm the operation.
1
2
4
6
5
3
IGN
2
3
Press & release 1 time
Press & release 2 times
Press & release 3 timesPress & release 4 times
Press & release 5 times
MODE 1: LOCKpress button
MODE 2: UNLOCKpress button
MODE 3: CHLCD: press button 4 secondsAUX
CHLED: press buttonsLOCK + UNLOCK
MODE 4: STARTpress button
1 X
2 X
3 X
4 X
NUMBER OF TIMESTHE PARKING-LIGHTS
WILL FLASHES
OR
CHLCD CHLED
IGN
START
OF
F
Page 11
2-way LED & LCD Remote Start Kits Rev.: 20101021
© 2010 Directed Electronics. All rights reserved.
Model: CHRSALL RS-CHLED & RS-CHLCD

Feature Programming Chart for RS-CHLEDPage 12
Mode 1 Mode 2 Mode 3 Mode 4
Lock button (default) Unlock button Lock & Unlock buttons Start button
1 Add remote Add remote - - -
2 Configuration output Ignition Accessory Starter (default)
3 Tachless crank time Increase +++++ ++++ +++
4 Runtime gas/diesel Gas 15 mins & Diesel 30 mins Gas 7 mins & Diesel 14 mins Gas 3 mins & Diesel 6 mins -
5 Alarm options Disable all Enable allSimultaneously changes functions 7, 9,
14 & 15.
- -
6 Lock & unlock after
remote start
Disable Lock/Unlock Lock only Lock/Unlock after shut down
7 Ignition locks Disable Lock/Unlock Lock only -
8 Unlock Single 0,25 sec Double 0,25 sec Single 4 secs Single 2,5 secs
9 Active & passive
arming
ActivePress Lock to activate the Alarm or the
starter-kill.
Passive with Lock disabledWhen the engine is OFF and the doors
are closed, the alarm w ill reactivate in
30 secs.
Disable alarm option: w hen the engine is
OFF the starter-kill w ill activate in 30
secs.
Passive with Lock enabledWhen the engine is OFF and all the
doors are closed, the alarm w ill
reactivate and lock. -
10 Not supported - - - -
11 Confirmation Silent Always chirp LED off LED off at ignition
12 Confirmation sound Horn - - -
13 Confirmation time Long Short - -
14 Alarm/Starter Alarm Off Starter On Alarm On Starter On Alarm On Starter Off -
15 Smart arming Disable EnableAutomatically LOCKS if one of the doors
is not opened w ithin 30 secs.
Locks when the starter-kill
activates -
16 Cold start timer 3 hours (15 mins) 1.5 hours (5 mins) - -
17 Dome light delay Disable EnableIgnores the door trigger (dome light)
w hen arming on remote starting.
- -
18 Diesel mode Disable Enable (20)Delay betw een ignition pow er up and
starter (crank).
Enable (10)Delay betw een ignition pow er up and
starter (crank).
-
19 Turbo mode Disable Enable - -
20 Tach mode Supervision only Tachless - Start (crank) 8 secs
21 Start attempts 2 1 3 -
22 Not supported - - - -
23 Master reset Reset - - -
24 Push-to-Start Disable Enable-
Enable securityTurn OFF engine w hen the foot-brake is
pressed.
25 Auxiliary 1 Sliding doors D2D only - - -
26 Not supported - - - -
27 Auxiliary 2 Sliding doors D2D only - - -
28 Not supported - - - -
29 Alarm duration 30 seconds 60 seconds 120 seconds -
30 Valet code Ignition ONValet button x3 times.
Ignition ONValet button x3 times and x1 time 3
secs.
Ignition ONValet button x4 times and x1 time 3
secs.
Ignition ONValet button x5 times and x1 time 3
secs.
31 Not supported - - - -
32 Ground out Active 1 sec. after shut-down Active 3 secs after shut-down - -
33 Ready mode activation
for manual
transmissions
Enabled with:Hand brake (ON) and remote button
(START).
Enabled with:Hand brake (ON) and foot brake (ON�
OFF) Tach must be connected.
- -
# Function
2-way LED & LCD Remote Start Kits Rev.: 20101021
© 2010 Directed Electronics. All rights reserved.
Model: CHRSALL RS-CHLED & RS-CHLCD

Mode 1 Mode 2 Mode 3 Mode 4
Lock button (default) Unlock button AUX button (2 1/2 secs) Start button
1 Add remote Add remote - - -
2 Configuration output Ignition Accessory Starter (default)
3 Tachless crank time Increase +++++ ++++ +++
4 Runtime gas/diesel Gas 15 mins & Diesel 30 mins Gas 7 mins & Diesel 14 mins Gas 3 mins & Diesel 6 mins -
5 Alarm options Disable all Enable allSimultaneously changes functions 7, 9,
14 & 15.
- -
6 Lock & unlock after
remote start
Disable Lock/Unlock Lock only Lock/Unlock after shut down
7 Ignition locks Disable Lock/Unlock Lock only -
8 Unlock Single 0,25 sec Double 0,25 sec Single 4 secs Single 2,5 secs
9 Active & passive
arming
ActivePress Lock to activate the Alarm or the
starter-kill.
Passive with Lock disabledWhen the engine is OFF and the doors
are closed, the alarm w ill reactivate in
30 secs.
Disable alarm option: w hen the engine is
OFF the starter-kill w ill activate in 30
secs.
Passive with Lock enabledWhen the engine is OFF and all the
doors are closed, the alarm w ill
reactivate and lock. -
10 Not supported - - - -
11 Confirmation Silent Always chirp LED off LED off at ignition
12 Confirmation sound Horn - - -
13 Confirmation time Long Short - -
14 Alarm/Starter Alarm Off Starter On Alarm On Starter On Alarm On Starter Off -
15 Smart arming Disable EnableAutomatically LOCKS if one of the doors
is not opened w ithin 30 secs.
Locks when the starter-kill
activates -
16 Cold start timer 3 hours (15 mins) 1.5 hours (5 mins) - -
17 Dome light delay Disable EnableIgnores the door trigger (dome light)
w hen arming on remote starting.
- -
18 Diesel mode Disable Enable (20)Delay betw een ignition pow er up and
starter (crank).
Enable (10)Delay betw een ignition pow er up and
starter (crank).
-
19 Turbo mode Disable Enable - -
20 Tach mode Supervision only Tachless - Start (crank) 8 secs
21 Start attempts 2 1 3 -
22 Not supported - - - -
23 Master reset Reset - - -
24 Push-to-Start Disable Enable-
Enable securityTurn OFF engine w hen the foot-brake is
pressed.
25 Auxiliary 1 Sliding doors D2D only - - -
26 Not supported - - - -
27 Auxiliary 2 Sliding doors D2D only - - -
28 Not supported - - - -
29 Alarm duration 30 seconds 60 seconds 120 seconds -
30 Valet code Ignition ONValet button x3 times.
Ignition ONValet button x3 times and x1 time 3
secs.
Ignition ONValet button x4 times and x1 time 3
secs.
Ignition ONValet button x5 times and x1 time 3
secs.
31 Not supported - - - -
32 Ground out Active 1 sec. after shut-down Active 3 secs after shut-down - -
33 Ready mode activation
for manual
transmissions
Enabled with:Hand brake (ON) and remote button
(START).
Enabled with:Hand brake (ON) and foot brake (ON�
OFF) Tach must be connected.
- -
# Function
Feature Programming Chart for RS-CHLCDPage 13
2-way LED & LCD Remote Start Kits Rev.: 20101021
© 2010 Directed Electronics. All rights reserved.
Model: CHRSALL RS-CHLED & RS-CHLCD

Limited One-year Consumer Warranty
For a period of ONE YEAR from the date of purchase of a Directed Electronics remote start or security product, DirectedElectronics. (“DIRECTED”) promises to the original purchaser, to repair or replace with a comparable reconditioned piece, thesecurity or remote start accessory piece (hereinafter the “Part”), which proves to be defective in workmanship or materialunder normal use, provided the following conditions are met: the Part was purchased from an authorized DIRECTED dealer;and the Part is returned to DIRECTED, postage prepaid, along with a clear, legible copy of the receipt or bill of sale bearing thefollowing information: consumer’s name, address, telephone number, the authorized licensed dealer’s name and completeproduct and Part description.
This warranty is nontransferable and is automatically void if the Part has been modified or used in a manner contrary to itsintended purpose or the Part has been damaged by accident, unreasonable use, neglect, improper service, installation orother causes not arising out of defect in materials or construction.
TO THE MAXIMUM EXTENT ALLOWED BY LAW, ALL WARRANTIES, INCLUDING BUT NOT LIMITED TO EXPRESSWARRANTY, IMPLIED WARRANTY, WARRANTY OF MERCHANTABILITY, FITNESS FOR PARTICULAR PURPOSE ANDWARRANTY OF NON INFRINGEMENT OF INTELLECTUAL PROPERTY,ARE EXPRESSLY EXCLUDED;AND DIRECTEDNEITHER ASSUMES NOR AUTHORIZES ANY PERSON OR ENTITY TO ASSUME FOR IT ANY DUTY, OBLIGATION ORLIABILITY IN CONNECTION WITH ITS PRODUCTS. DIRECTED HEREBY DISCLAIMS AND HAS ABSOLUTELY NOLIABILITY FOR ANY AND ALL ACTS OF THIRD PARTIES INCLUDING DEALERS OR INSTALLERS. IN THE EVENT OF ACLAIM OR A DISPUTE INVOLVING DIRECTED OR ITS SUBSIDIARY, THE PROPER VENUE SHALL BE SAN DIEGOCOUNTY IN THE STATE OF CALIFORNIA. CALIFORNIASTATE LAWSANDAPPLICABLE FEDERAL LAWS SHALLAPPLYAND GOVERN THE DISPUTE. THE MAXIMUM RECOVERY UNDER ANY CLAIM AGAINST DIRECTED SHALL BESTRICTLY LIMITED TO THE AUTHORIZED DIRECTED DEALER’S PURCHASE PRICE OF THE PART. DIRECTED SHALLNOT BE RESPONSIBLE FOR ANY DAMAGES WHATSOEVER, INCLUDING BUT NOT LIMITED TO, ANYCONSEQUENTIAL DAMAGES, INCIDENTAL DAMAGES, DAMAGES FOR THE LOSS OF TIME, LOSS OF EARNINGS,COMMERCIAL LOSS, LOSS OF ECONOMIC OPPORTUNITY AND THE LIKE. NOTWITHSTANDING THE ABOVE, THEMANUFACTURER DOES OFFERALIMITED WARRANTY TO REPLACE OR REPAIRAT DIRECTED’S OPTION THE PARTAS DESCRIBEDABOVE.
Some states do not allow limitations on how long an implied warranty will last or the exclusion or limitation of incidental orconsequential damages. This warranty gives you specific legal rights and you may also have other rights that vary fromState to State. DIRECTED does not and has not authorized any person or entity to create for it any other obligation,promise, duty or obligation in connection with this Part.920-0007 07-06
This Interface kit / Data Bus Interface part has been tested on the listed vehicles. Other vehicles will be added to the select
vehicle list upon completion of compatibility testing. Visit website for latest vehicle application guide. : Under no
circumstances shall the manufacturer or the distributors of the bypass kit / data bus interface part(s) be held liable for any
consequential damages sustained in connection with the part(s) installation. The manufacturer and it’s distributors will not,
nor will they authorize any representative or any other individual to assume obligation or liability in relation to the interface kit /
data bus interface part(s) other than its replacement.
DISCLAIMER
N.B.:Under no circumstances shall the manufacturer and distributors of
this product be liable for consequential damages sustained in connection with this product and neither assumes nor
authorizes any representative or other person to assume for it any obligation or liability other than the replacement of this
product only.
PROTECTED BY U.S. PATENTS:
CDN.PATENT:EUROPEAN PATENT: PAT. PENDING: MADE IN CANADA2,291,306;
5,719,551; 6,011,460 B1 *;6,243,004 B1; 6,249,216 B1; 6,275,147 B1; 6,297,731 B1;6,346,876 B1; 6,392,534 B1; 6,529,124 B2; 6,696,927 B2; 6,756,885 B1; 6,756,886 B2; 6,771,167 B1; 6 , 8 1 2 , 8 2 9 B 1 ;6,924,750 B1; 7,010,402 B1; 7,015,830 B1; 7,031,826 B1; 7,046,126 B1; 7,061,137 B1; 7,068,153 B1; 7,205,679 B1;
2,320,248; 2,414,991; 2,415,011; 2,415,023; 2,415,027; 2,415,038; 2,415,041; 2,420,947; 2,426,670; 2 ,454 ,0891,053,128
Page 14
2-way LED & LCD Remote Start Kits Rev.: 20101021
© 2010 Directed Electronics. All rights reserved.
Model: CHRSALL RS-CHLED & RS-CHLCD