ML17939/17959 Two-line corded telephone/ answering system with
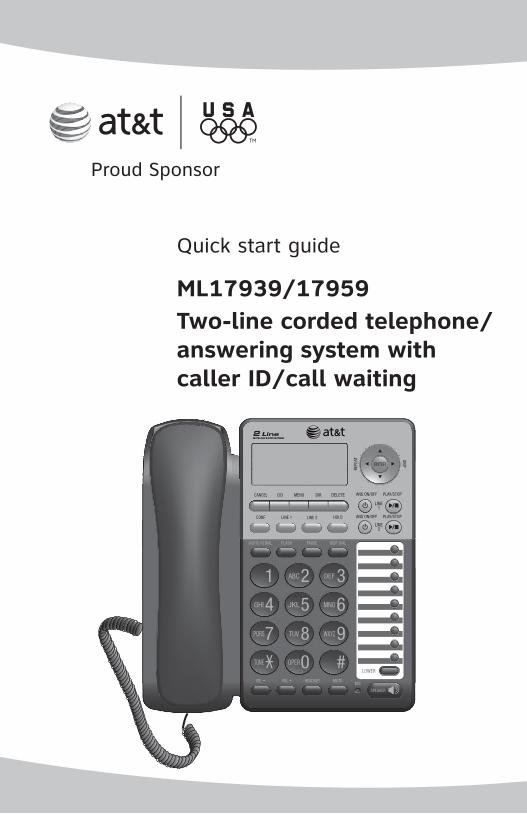
Quick start guide
ML17939/17959Two-line corded telephone/answering system with caller ID/call waiting
�
Installation preparation
You must install the power adapter before using the telephone.
If you subscribe to high speed Internet service (DSL - digital subscriber line) through your telephone line, you must install a DSL filter between each telephone line cord and telephone wall jack (pages 4 and 5). The filter prevents noise and caller ID problems caused by DSL interference. Please contact your DSL service provider for more information about DSL filters.
Your product may be shipped with a protective sticker covering the telephone base display - remove it before use.
For customer service or product information, visit our website at
www.telephones.att.com or call 1 (800) 222-3111. In Canada, dial
1 (866) 288-4268.
Avoid placing the telephone base too close to:
Communication devices such as television sets, VCRs, or cordless telephones.
Excessive heat sources.
Noise sources such as a window with traffic outside, motors, microwave ovens, refrigerators, or fluorescent lighting.
Excessive dust sources such as a workshop or garage.
Excessive moisture.
Extremely low temperature.
Mechanical vibration or shock such as on top of the washing machine or work bench.
•
•
•
•
•
•
•
See pages 4-5 for easy instructions.
�
Optional backup battery installation
Install three AA alkaline batteries (purchased separately) to use this telephone in the event of a power failure. If power fails with working batteries installed, all functions work properly except for the display illumination.
If power fails and no batteries are installed, you can make or answer calls on line � using only the handset. Last number redial and speed dialing are also supported, but the screen display will be dimmer than usual.
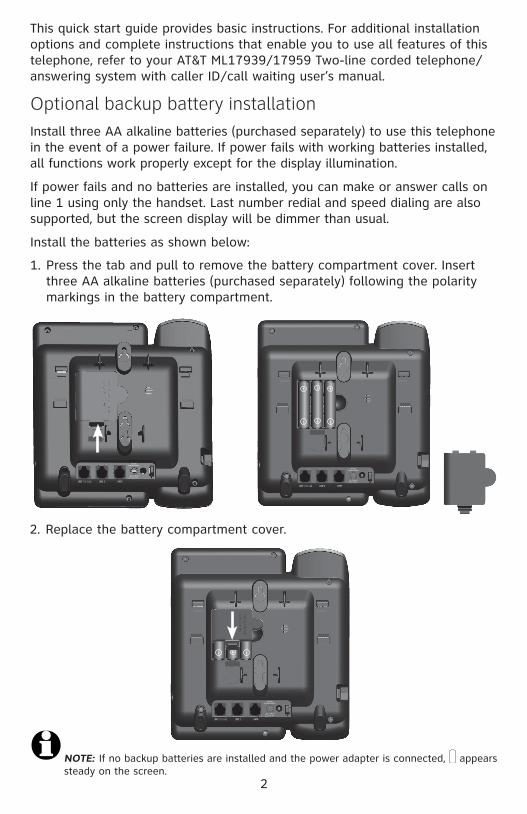
Install the batteries as shown below:
This quick start guide provides basic instructions. For additional installation options and complete instructions that enable you to use all features of this telephone, refer to your AT&T ML�7939/�7959 Two-line corded telephone/answering system with caller ID/call waiting user’s manual.
Press the tab and pull to remove the battery compartment cover. Insert three AA alkaline batteries (purchased separately) following the polarity markings in the battery compartment.
�.
Replace the battery compartment cover. �.
NOTE: If no backup batteries are installed and the power adapter is connected, appears steady on the screen.
3
Telephone installation
Telephone base installation
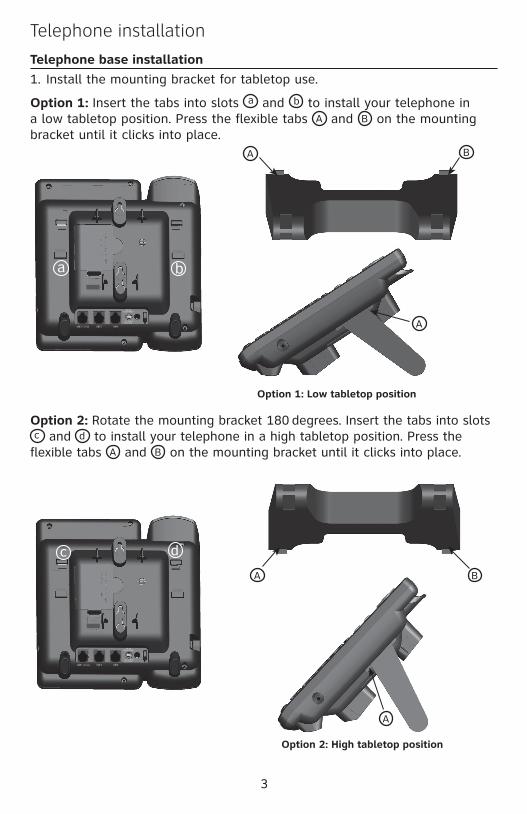
Install the mounting bracket for tabletop use.
Option 1: Insert the tabs into slots a and b to install your telephone in a low tabletop position. Press the flexible tabs A and B on the mounting bracket until it clicks into place.
�.
A B
A B
c
Option 1: Low tabletop position
Option 2: Rotate the mounting bracket �80 degrees. Insert the tabs into slots c and d to install your telephone in a high tabletop position. Press the flexible tabs A and B on the mounting bracket until it clicks into place.
A
A
Option 2: High tabletop position
4
Telephone installation
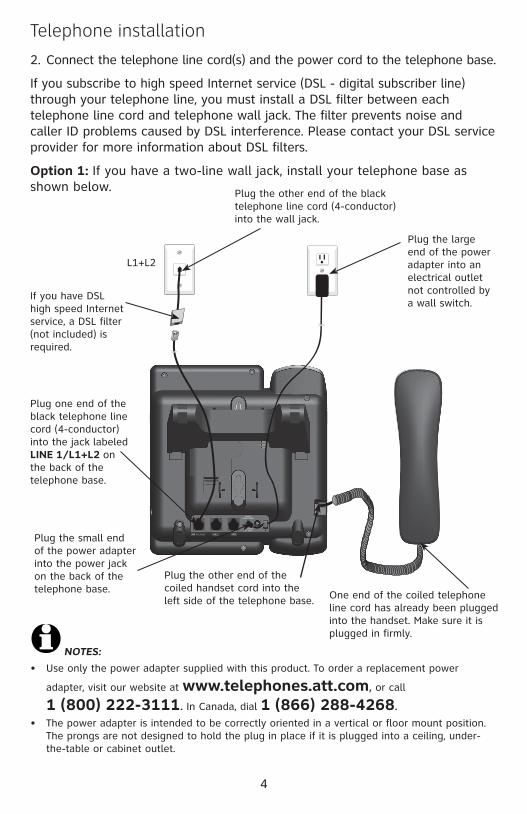
Connect the telephone line cord(s) and the power cord to the telephone base.
If you subscribe to high speed Internet service (DSL - digital subscriber line) through your telephone line, you must install a DSL filter between each telephone line cord and telephone wall jack. The filter prevents noise and caller ID problems caused by DSL interference. Please contact your DSL service provider for more information about DSL filters.
Option 1: If you have a two-line wall jack, install your telephone base as shown below.
�.
Plug the other end of the coiled handset cord into the left side of the telephone base.
Plug the small end of the power adapter into the power jack on the back of the telephone base.
Plug one end of the black telephone line cord (4-conductor) into the jack labeled LINE 1/L1+L2 on the back of the telephone base.
Plug the other end of the black telephone line cord (4-conductor) into the wall jack.
Plug the large end of the power adapter into an electrical outlet not controlled by a wall switch.
If you have DSL high speed Internet service, a DSL filter (not included) is required.
NOTES:
Use only the power adapter supplied with this product. To order a replacement power
adapter, visit our website at www.telephones.att.com, or call
1 (800) 222-3111. In Canada, dial 1 (866) 288-4268.The power adapter is intended to be correctly oriented in a vertical or floor mount position. The prongs are not designed to hold the plug in place if it is plugged into a ceiling, under-the-table or cabinet outlet.
•
•
L�+L�
One end of the coiled telephone line cord has already been plugged into the handset. Make sure it is plugged in firmly.
5
Telephone installation
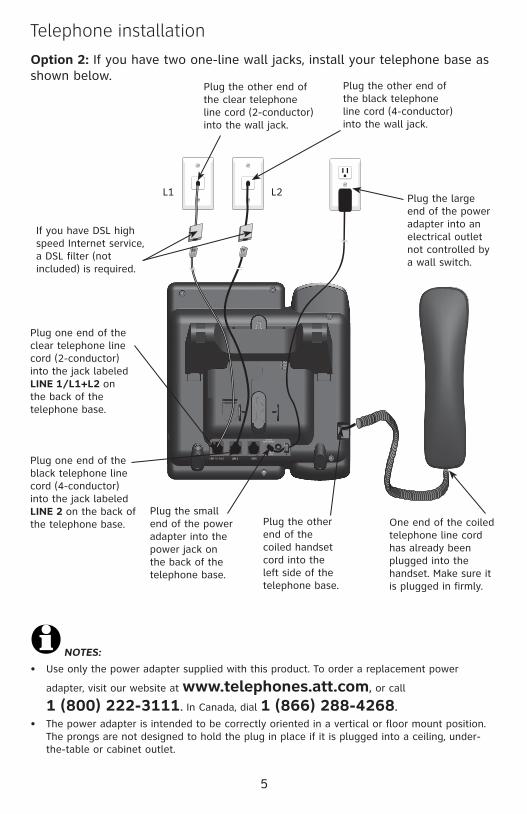
Option 2: If you have two one-line wall jacks, install your telephone base as shown below.
Plug one end of the clear telephone line cord (�-conductor) into the jack labeled LINE 1/L1+L2 on the back of the telephone base.
Plug the other end of the clear telephone line cord (�-conductor) into the wall jack.
Plug one end of the black telephone line cord (4-conductor) into the jack labeled LINE 2 on the back of the telephone base.
Plug the other end of the black telephone line cord (4-conductor) into the wall jack.
NOTES:
Use only the power adapter supplied with this product. To order a replacement power
adapter, visit our website at www.telephones.att.com, or call
1 (800) 222-3111. In Canada, dial 1 (866) 288-4268.The power adapter is intended to be correctly oriented in a vertical or floor mount position. The prongs are not designed to hold the plug in place if it is plugged into a ceiling, under-the-table or cabinet outlet.
•
•
Plug the large end of the power adapter into an electrical outlet not controlled by a wall switch.
If you have DSL high speed Internet service, a DSL filter (not included) is required.
Plug the small end of the power adapter into the power jack on the back of the telephone base.
L� L�
Plug the other end of the coiled handset cord into the left side of the telephone base.
One end of the coiled telephone line cord has already been plugged into the handset. Make sure it is plugged in firmly.

�
Quick reference guide
CANCEL
Press to cancel an operation and go back to the previous menu.
Press and hold to return to idle mode.
CID
Press to display call history information.
MENu
Press to enter the main menu.
DIR
Press to enter the directory.
DELETE
Press to delete the displayed directory, or call history entry.
Press to backspace and erase a digit or character.
During message playback, press to delete the message currently playing.
When the telephone is idle, press to delete all old messages.
CONf
Press to initiate a three-way conference call.
LINE 1, LINE 2
Press to make or answer a call on the selected line.
HOLD
Press to place a call on hold.
ENTER
Press to select a menu item or to save a setting.
/REPEAT
While playing messages, press to repeat the message, or press twice to hear the previous message.
While entering names or numbers, press to move the cursor to the left.
Press to go back to the previous menu.
/ANS ON/Off LINE1/LINE2
Press to turn the built-in answering system on or off. /PLAY/STOP LINE1/LINE2
Press to start or stop message playback.
Press to stop recording a memo.
/
While in the menu, press to scroll up or down.
While reviewing the directory or call history, press to scroll through entries or press and hold to scroll continuously.
/SKIP
Press to skip to the next message.
While entering names or numbers, press to move the cursor to the right.
7
Quick reference guide
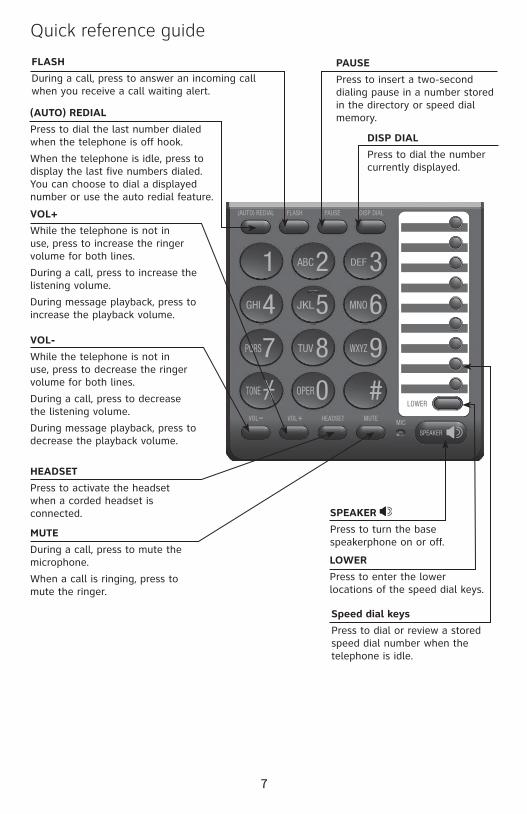
vOL-
While the telephone is not in use, press to decrease the ringer volume for both lines.
During a call, press to decrease the listening volume.
During message playback, press to decrease the playback volume.
HEADSET
Press to activate the headset when a corded headset is connected. SPEAKER
Press to turn the base speakerphone on or off.
LOwER
Press to enter the lower locations of the speed dial keys.
(AuTO) REDIAL
Press to dial the last number dialed when the telephone is off hook.
When the telephone is idle, press to display the last five numbers dialed. You can choose to dial a displayed number or use the auto redial feature.
fLASH
During a call, press to answer an incoming call when you receive a call waiting alert.
PAuSE
Press to insert a two-second dialing pause in a number stored in the directory or speed dial memory.
DISP DIAL
Press to dial the number currently displayed.
MuTE
During a call, press to mute the microphone.
When a call is ringing, press to mute the ringer.
vOL+
While the telephone is not in use, press to increase the ringer volume for both lines.
During a call, press to increase the listening volume.
During message playback, press to increase the playback volume.
Speed dial keys
Press to dial or review a stored speed dial number when the telephone is idle.
8
The telephone is set to use line � by default for making calls. To change the primary line, see Set the primary line on page �8 of the user’s manual. When you answer a call, the telephone automatically selects the ringing line.
Making, answering or ending a call
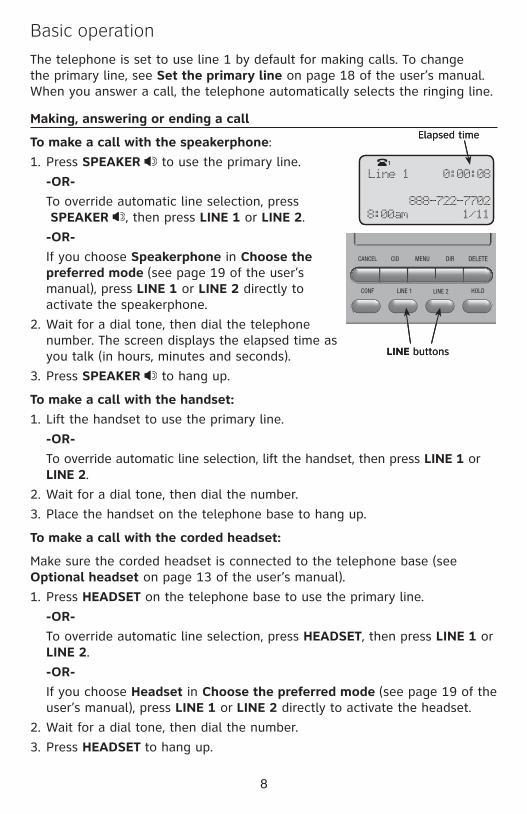
To make a call with the speakerphone:
Press SPEAKER to use the primary line.
-OR-
To override automatic line selection, press SPEAKER , then press LINE 1 or LINE 2.
-OR-
If you choose Speakerphone in Choose the preferred mode (see page �9 of the user’s manual), press LINE 1 or LINE 2 directly to activate the speakerphone.
Wait for a dial tone, then dial the telephone number. The screen displays the elapsed time as you talk (in hours, minutes and seconds).
Press SPEAKER to hang up.
To make a call with the handset:
Lift the handset to use the primary line.
-OR-
To override automatic line selection, lift the handset, then press LINE 1 or LINE 2.
Wait for a dial tone, then dial the number.
Place the handset on the telephone base to hang up.
To make a call with the corded headset:
Make sure the corded headset is connected to the telephone base (see Optional headset on page �3 of the user’s manual).
Press HEADSET on the telephone base to use the primary line.
-OR-
To override automatic line selection, press HEADSET, then press LINE 1 or LINE 2.
-OR-
If you choose Headset in Choose the preferred mode (see page �9 of the user’s manual), press LINE 1 or LINE 2 directly to activate the headset.
Wait for a dial tone, then dial the number.
Press HEADSET to hang up.
�.
�.
3.
�.
�.
3.
�.
�.
3.
LINE buttonsLINE buttons
Line 1 0:00:08
888-722-77028:00am 1/11
Elapsed time
Line 1 0:00:08
888-722-77028:00am 1/11
Elapsed time
Basic operation
9
To answer a call:
Lift the handset, press SPEAKER or HEADSET.
-OR-
Press the LINE button of the ringing line to answer the call with the preferred mode (see Choose the preferred mode on page �9 of the user’s manual).
On hook dialing (predialing)
Press the dialing keys to enter a telephone number. Press DELETE to make corrections when entering the telephone number.
Lift the handset or press SPEAKER or HEADSET.
-OR-
To dial the number using your preferred mode (see Choose the preferred mode on page �9 of the user’s manual):
Press DISP DIAL.
Press LINE 1 or LINE 2 to override automatic line selection.
Clearspeak™ dial-in-base speakerphone
During a call, press SPEAKER , then hang up the handset. This allows you to use the telephone hands free and lets more people participate in the conversation.
Turn the answering system on or off
By default, the answering system is on and ready to record messages on each telephone line. When the answering system of the corresponding line is on, the corresponding /ANS ON/Off indicator light is on. If you turn the answering system off, the answering system does not answer calls and record incoming messages.
Press /ANS ON/Off LINE 1 or /ANS ON/Off LINE 2 to turn the corresponding answering system on or off. When the answering system is turned on, it announces “Calls will be answered.” The /ANS ON/Off LINE 1 or /ANS ON/Off LINE 2 indicator light turns on. When the answering system is turned off, it announces “Calls will not be answered.” The /ANS ON/Off LINE 1 or /ANS ON/Off LINE 2 indicator light turns off.
•
�.
�.
•
•
•
Clearspeak™ is a trademark of Advanced American Telephones.
NOTE: To turn the answering system on or off in the menu, see page �� of the user’s manual.
Basic operation
�0
Message playback
Press /PLAY/STOP LINE 1/LINE 2 to listen to messages on the corresponding line.
Options during message playback:
Press vOL- or vOL+ to adjust the speaker volume.
Press /SKIP to skip to the next message.
Press /REPEAT to repeat the message currently playing. Press /REPEAT twice to listen to the previous message.
Press DELETE to delete the current message. The system announces “Message deleted” and advances to the next message.
Press /PLAY/STOP to end the message playback.
•
•
•
•
•
Basic operation

© 2010 Advanced American Telephones. All Rights Reserved. AT&T and the AT&T logo are trademarks of AT&T Intellectual Property licensed to
Advanced American Telephones, San Antonio, TX 78219. Printed in China. Issue 3 AT&T 07/10.
www.telephones.att.com
Clearspeak™ is a trademark of Advanced American Telephones.