Mixmaster - Sunbeam
16
Please read these instructions carefully and retain for future reference. Mixmaster ® Hand Mixer with a powerful 350 watt motor Instruction Booklet JM6600
Transcript of Mixmaster - Sunbeam

Please read these instructions carefully and retain for future reference.
Mixmaster®
Hand Mixer with a powerful 350 watt motor
Instruction Booklet JM6600

Important instructions – retain for future use.
Sunbeam’s Safety Precautions 1
Features of your Mixmaster Hand Mixer 2
Using your Mixmaster Hand Mixer 4
Mixing Guide 5
Mixing Tips 5
Oven Temperature Guide 6
Care and Cleaning 7
Recipes 8
Icing, Fillings, Frosting and Creams 12
Contents
Sunbeam’s Safety Precautions
SAFETYPRECAUTIONSFORYOURSUNBEAMMIXMASTERHANDMIXER.
• Neverejectbeaters,doughhooksorballoonwhiskswhentheapplianceisinoperation.
• Ensurefingersarekeptwellawayfrommovingbeaters,doughhooksandballoonwhisks.
• Whenmixingextremelyheavyloadstheapplianceshouldnotbeoperatedformorethan
1minute30seconds.Thisdoesnotapplytoanyoftherecipesdetailedinthisbooklet.
IMPORTANT:Inthecaseofthemixeroverheatingduetoexcessiveload,thesafetycutoutwillactivate,preventingthemixerfromoperating.Shouldthisoccur,switchthemixeroffatthepoweroutletandallowthemixertocoolfor10minutesbeforeswitchingitbackon.
Ifyouhaveanyconcernsregardingtheperformanceanduseofyourappliance,pleasevisitwww.sunbeam.com.auorcontacttheSunbeamConsumerServiceLine.
Ensuretheabovesafetyprecautionsareunderstood.
Sunbeam is very safety conscious when designing and manufacturing consumer products, but it is essential that the product user also exercise care when using an electrical appliance. Listed below are precautions which are essential for the safe use of an electrical appliance:
• Readcarefullyandsavealltheinstructionsprovidedwithanappliance.
• Alwaysturnthepoweroffatthepoweroutletbeforeyouinsertorremoveaplug.Removebygraspingtheplug-donotpullonthecord.
• Turnthepoweroffandremovetheplugwhentheapplianceisnotinuseandbeforecleaning.
• Donotuseyourappliancewithanextensioncordunlessthiscordhasbeencheckedandtestedbyaqualifiedtechnicianorserviceperson.
• Alwaysuseyourappliancefromapoweroutletofthevoltage(A.C.only)markedontheappliance.
• Thisapplianceisnotintendedforusebypersons(includingchildren)withreducedphysical,sensoryormentalcapabilities,orlackofexperienceandknowledge,unlesstheyhavebeengivensupervisionorinstructionconcerninguseoftheappliancebyapersonresponsiblefortheirsafety.
• Childrenshouldbesupervisedtoensurethattheydonotplaywiththeappliance.
• Thetemperatureofaccessiblesurfacesmaybehighwhentheapplianceisoperating.
• Neverleaveanapplianceunattendedwhileinuse.
• Donotuseanapplianceforanypurposeotherthanitsintendeduse.
• Donotplaceanapplianceonornearahotgasflame,electricelementoronaheatedoven.
• Donotplaceontopofanyotherappliance.• Donotletthepowercordofanappliancehang
overtheedgeofatableorbenchtoportouchanyhotsurface.
• Donotoperateanyelectricalappliancewithadamagedcordoraftertheappliancehasbeendamagedinanymanner.Ifdamageissuspected,returntheappliancetothenearestSunbeamAppointedServiceCentreforexamination,repairoradjustment.
• Foradditionalprotection,Sunbeamrecommendtheuseofaresidualcurrentdevice(RCD)withatrippingcurrentnotexceeding30mAintheelectricalcircuitsupplyingpowertoyourappliances.
• Donotimmersetheapplianceinwateroranyotherliquidunlessrecommended.
•Appliancesarenotintendedtobeoperatedbymeansofanexternaltimerorseparateremotecontrolsystem.
•Thisapplianceisintendedtobeusedinhouseholdandsimilarapplicationssuchas:staffkitchenareasinshops,officesandotherworkingenvironments;farmhouses;byclientsinhotels,motelsandotherresidentialtypeenvironments;bedandbreakfasttypeenvironments.
1

2
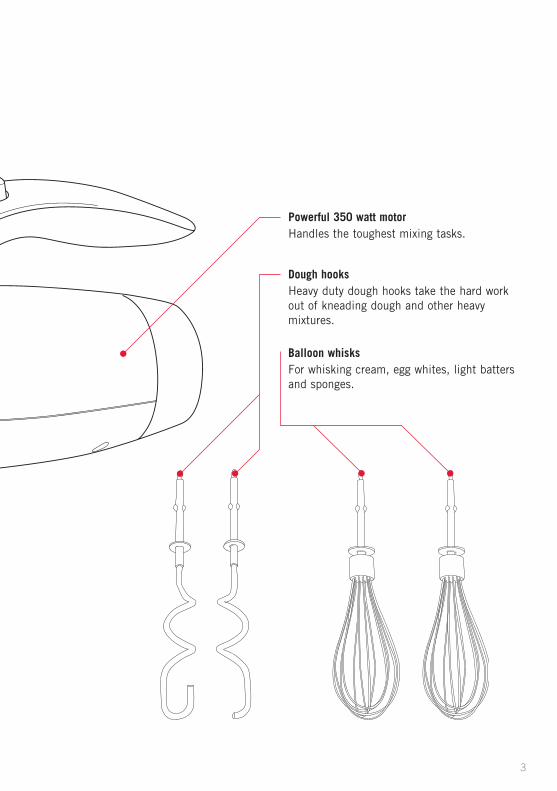
Features of your Mixmaster Hand Mixer
Boost buttonProvidesanextraburstofpowerforthoseextratoughmixingtasks.
Eject buttonToeffortlesslyreleasethebeaters,doughhooksorwhisksforeasycleaning,pressthespeeddialbuttondownwards.
Speeds6speedsettingsforevenandthoroughmixing.
'V-groove' beatersHeavyduty'V-groove'beatersforcreamingbutterandsugar,plusmixingcakemixes.
3
Powerful 350 watt motorHandlesthetoughestmixingtasks.
Dough hooksHeavydutydoughhookstakethehardworkoutofkneadingdoughandotherheavymixtures.
Balloon whisksForwhiskingcream,eggwhites,lightbattersandsponges.

4
Before using your MIXMASTER Hand MixerBefore fitting the beaters, dough hooks or balloon whisks, be sure the power cord is unplugged from the power outlet and the speed control switch is in the ‘OFF’ position.1. Select the desired attachments, depending
on the mixing task to be performed: • Beaters for creaming butter and sugar, plus
mixing cake mixes.• Dough hooks for kneading dough and other
heavy mixtures.• Balloon whisks for whisking cream, egg
whites, light batters and sponges.2. Inserting selected attachment;
Beaters: Beaters can be inserted into either socket as the beaters are identical.
Dough hooks: Take the dough hook – illustrated as dough hook ( ). Insert dough hook ( ) into the left hole on the underside of the mixer head. Take the dough hook that is hooked at the bottom – illustrated as dough hook ( ), and insert it into the right hole.Note: Be sure both dough hooks click firmly in place, you may need to twist the dough hook slightly to engage it in position prior to pushing it in place.
Balloon Whisks: Balloon whisks can be inserted into either socket as they are identical.
Using your MIXMASTER Hand Mixer1. With the speed control switch in the
‘OFF’ position, plug the power cord into a 230-240V AC power outlet.
2. Place the beaters, dough hooks or balloon whisks into the bowl of ingredients to be mixed and using the speed control switch select the desired mixing speed.
Clearly marked instructions for correct mixing speeds for each type of mixture are shown in the mixing guide on page 5.
Tip: Always start mixing at slow speeds and increase the speed gradually to prevent ingredients splashing out of the mixing bowl. When adding dry ingredients, particularly flour, lower the speed to prevent the ‘snow storm’ effect.
3. Once you have finished mixing, turn the speed switch to the ‘OFF’ position and unplug the cord from the power outlet.
4. To remove the beaters/dough hooks/balloon whisks, place fingers loosely around the spindles and press the eject button.
Note: Never eject the beaters, dough hooks or balloon whisks when the Mixmaster Hand Mixer is in operation.
Using your Mixmaster Hand MixerUsing your Beatermix Hand Mixer
5
Mixing Guide
1. For even and thorough mixing, slowly guide the beaters/dough hooks/balloon whisks around the sides and through the centre of the bowl in the same direction. Do not overmix.
2. Always stop the mixer by moving the speed control switch to the ‘OFF’ position before raising the beaters/dough hooks/balloon whisks out of the mixing bowl.
3. When adding ingredients or scraping the bowl, stop the mixer and rest it on its base with the bowl below the beaters/dough hooks/balloon whisks to catch any mixture draining from them.
4. When folding dry ingredients into delicate mixtures such as sponge cake, use speed 1-2. Do not overmix.
5. Always start mixing at slow speeds. Gradually increase to the recommended speed as stated in the recipe.
Beating Egg WhitesSeparate the yolk and white carefully ensuring there is no yolk in the egg white. If some egg yolk is in the egg white, use the egg shell to scoop the yolk out. Even the slightest amount of yolk will prevent the whites beating.Best results are achieved when using a glass or stainless steel mixing bowl. If using a plastic mixing bowl, rub the inside of the bowl with ½ a lemon. (This helps remove any grease.) Then wash and dry thoroughly.For best result always ensure that the beaters/balloon whisks and mixing bowl are thoroughly clean and dry.For maximum volume, beat egg whites at room temperature.Beat egg whites using 5-6 setting. Beating time can vary depending on the freshness of the eggs.
Mixing Tips
Mixing Task Recommended Speed(s)
Kneading, Folding & Blending 1 - 2 (low)
Light Mixing 2 - 3 (low/med)
Creaming & Beating 4 - 5 (med/high)
Whipping & Aerating 5 - 6 (high)

6
Mixing Tips continued
Whipping CreamThickened cream gives the best results.For maximum volume use well chilled cream. For best results, chill the bowl and beaters/balloon whisks before whipping.Use a deeper bowl to prevent splatter. Start
by mixing on speed 2, then increase to speed 5-6 as the cream thickens.If intending to use the cream for piping, add approximately 2 teaspoons of icing sugar per 300ml of cream before mixing. This will help the cream hold its shape.
For your information, the following temperature settings are included as a guide. These settings may need to be adjusted to suit the individual range.
Thermostat Settings Description of Oven Temperatures Degrees Celcius (°C) Degrees Farenheit (°F) Gas Mark
Very Slow 120 250 ½
Slow 140-150 300 1-2
Moderately Slow 160 325 3
Moderate 180 350 4
Moderately Hot 200 400 6
Hot 220 425 8
Very Hot 240 475 9
Note: If using fan forced ovens be sure to turn the temperature down by 20°C. Also check recipes at the back of this book.
Oven Temperature Guide

77
Before cleaning your Sunbeam Mixmaster Hand Mixer, ensure that the power is turned off at the power outlet, then remove the plug.Wipe over the outside area of the Mixmaster Hand Mixer with a dampened cloth and polish with a soft dry cloth. Wipe any excess food particles from the power cord.Do not immerse the motor housing in water or any other liquid. Do not use harsh detergents or abrasive cleaners to clean the motor housing as these will scratch and damage the surface.
Wash the beaters/dough hooks/balloon whisks in warm soapy water with a cloth or sponge. Rinseand dry thoroughly. Do not use scouring pads or abrasive cleaners. The beaters/dough hooks/balloon whisks can also be placed in a dishwasher.Note: Never wind the power cord around the motor after use as the warmth of the motor may cause damage to the power cord.
Care and Cleaning

88
Recipes
Butter CakeServes: 8-10 Preparation: 15 minutes Cooking: 1 hour
175g butter, softened1 teaspoon vanilla extract1 cup caster sugar3 eggs2 ¼ cups self-raising flour¾ cup milk
1. Preheat oven to moderate (180°C/160°C fan-forced). Grease and line a 20cm round cake pan.
2. Place all ingredients in a large bowl. Using the beaters, beat on Low speed (1-2) until combined. Increase speed to Medium-High (4-5) and beat for about 1 minute or until smooth.
3. Pour mixture into prepared pan.4. Bake for about 1 hour or until a skewer
inserted into the centre comes out clean. Stand cake for 5 minutes then turn onto a wire rack to cool.
Serving suggestion: Ice and decorate your cake with fluffy butter frosting (recipe on page 12)
Variations:CupcakesLine a 12-hole muffin pan with patty cases. Spoon ¼ cup mixture into each case. Bake for about 12-15 minutes or until skewer inserted into the centre comes out clean.Lemon or Orange CakeReplace the vanilla extract with the finely grated rind of 1 lemon or orange.
Marble CakeDivide batter into 2 portions, leave one plain, and add pink food colour to the second portion. Drop spoonfuls of alternate colours into prepared pan. Use a skewer or knife to swirl slightly and create a marbled effect.Berry CakeFold 1 cup of fresh or frozen mixed berries through the cake batter.
Buttermilk PikeletsMakes: 24Preparation: 5 minutesCooking: 15 minutes
1 egg¼ cup caster sugar1 cup self-raising flour, siftedpinch salt½ teaspoon bicarbonate of soda¾ cup buttermilk30g butter, meltedCooking oil sprayLemon juice and sugar, to serve
1. Place egg and sugar in a small bowl. Using the balloon whisks, beat on Medium/High (4-5) until light and creamy.
2. Add flour, salt, bicarbonate of soda, buttermilk and butter and beat on Medium/High speed (4-5) until smooth.
3. Heat a frypan over medium heat. Spray with cooking oil spray. Add tablespoons of mixture and cook for about 2-3 minutes each side or until golden.
4. Serve pikelets warm or cold with lemon juice and sprinkle with sugar.

99
Recipes continued
Chocolate Chip CookiesMakes: about 30Preparation: 15 minutesCooking: 10-15 minutes per batch
125g butter, softened½ cup firmly packed brown sugar½ cup caster sugar1 teaspoon vanilla extract1 egg1 ¾ cup self raising flour1 cup choc chips
1. Preheat oven to moderate (180°C/160 fan-forced). Grease and line baking trays with baking paper.
2. Place butter, sugars and vanilla in a bowl. Using the beaters, beat on Low speed (1-2) until combined. Increase speed to Medium/High (4-5) and beat until light and creamy.
3. Add egg and beat until combined. Reduce speed to Low (1-2). Add flour and chocolate chips. Beat until combined.
4. Roll tablespoons of mixture into balls and place onto prepared trays. Press lightly with the back of a fork. Ensure that the cookies are well spaced to allow for spreading.
5. Bake cookies in batches for about 10 -15 minutes or until golden. Cool on trays.
Meringue kissesMakes: about 24Preparation: 30 minutesCooking: 30 minutes
1 egg white¼ cup caster sugar½ teaspoon white vinegar2 teaspoons icing sugarWhipped cream, to serve
1. Preheat oven to very slow (120°C/100°C fan-forced). Grease baking trays and dust with corn flour. Shake off excess.
2. Place egg white in a small bowl. Using the balloon whisks, beat on High speed (5-6) until soft peaks form. Gradually add the caster sugar and vinegar. Continue beating until sugar dissolves. Fold in sifted icing sugar.
3. Spoon the mixture into a piping bag fitted with a small star shaped nozzle. Pipe small meringues (about 1.5cm) onto the prepared baking trays.
4. Bake for about 30 minutes or until crisp and dry. Cool meringues on trays.
5. Sandwich cooled meringues with with chantilly cream (recipe on page 12), basic butter cream (recipe on page 12), or chocolate ganache (recipe on page 12)
Tip: If you do not have a piping bag, use two teaspoons to spoon rounds of meringue mixture onto prepared trays.
.

1010
Recipes continued
Classic Sponge Cake Serves: 8Preparation: 20 minutesCooking: 20 minutes
4 eggs ¾ cup caster sugar1 cup wheaten cornflour 1 teaspoon cream of tartar ½ teaspoon bicarbonate of soda Whipped cream and jam, to serve
1. Preheat oven to moderate (180°C/160°C fan-forced). Grease and line two 22cm round cake pans.
2. Place eggs in a small bowl. Using the balloon whisks, beat on High speed (5-6) until thick and creamy (about 5 minutes). Continue beating, gradually adding the sugar until dissolved.
3. Sift flour, cream of tartar and bicarbonate of soda twice onto baking paper. Sift into egg mixture and use a large metal spoon to fold until combined.
4. Divide mixture evenly among cake pans. Bake for about 20 minutes or until skewer inserted into the centre comes out clean.
5. Turn cakes immediately onto a baking paper lined wire rack.
6. Serve cool sponges sandwiched together with whipped cream and jam. Dust with icing sugar.
.
White Chocolate cheesecakeServes: 10Preparation: 30 minutes (plus refrigeration
time)
250g plain sweet biscuits125g butter, melted2 teaspoons gelatine¼ cup water375g cream cheese, softened½ cup caster sugar1 teaspoon vanilla extract300ml thickened cream150g white chocolate, meltedMixed berries and grated white chocolate, to garnish
1. Grease and line a 22cm spring form tin with baking paper.
2. Place biscuits in a food processor. Process until fine. Add melted butter. Process until combined. Press mixture onto the base of the prepared tin. Refrigerate for 30 minutes.
3. Sprinkle gelatine over water in a heatproof jug. Stand jug in a small saucepan of simmering water. Stir until gelatine dissolves. Cool slightly.
4. Place cream cheese, sugar and vanilla extract in a large bowl. Using the beaters, beat on Low speed (1-2) until just combined. Increase to Medium/High speed (4-5) and beat until smooth.
5. Add cream. Continue beating until just combined. Add chocolate and gelatine mixture. Beat until just combined. Pour mixture into prepared tin. Refrigerate overnight or until firm.
6. Serve garnished with mixed berries and grated chocolate.
11
Recipes continued
Chocolate mousseServes: 8Preparation: 20 minutes
300ml thickened cream3 eggs, separated2 tablespoons caster sugar200g dark chocolate, chopped30g unsalted butter, choppedWhipped cream and extra chocolate to garnish
1. Place cream in a bowl. Using the beaters, beat on High speed (5-6) until soft peaks form.
2. Place egg whites in a clean bowl. Using the balloon whisks, beat on High speed (5-6) until soft peaks form. Add sugar and beat until sugar dissolves.
3. Place chocolate in a heatproof bowl. Place bowl over a saucepan of simmering water. Stir with a metal spoon until melted. Remove from heat, add butter and stir until melted.
4. Add egg yolks and stir until smooth.5. Fold cream and egg whites into chocolate
mixture in two batches. 6. Spoon mixture into 8 serving glasses. Cover
and refrigerate overnight. 7. Serve with extra whipped cream and
garnish with shaved chocolate.

1110
Recipes continued
Classic Sponge Cake Serves: 8Preparation: 20 minutesCooking: 20 minutes
4 eggs ¾ cup caster sugar1 cup wheaten cornflour 1 teaspoon cream of tartar ½ teaspoon bicarbonate of soda Whipped cream and jam, to serve
1. Preheat oven to moderate (180°C/160°C fan-forced). Grease and line two 22cm round cake pans.
2. Place eggs in a small bowl. Using the balloon whisks, beat on High speed (5-6) until thick and creamy (about 5 minutes). Continue beating, gradually adding the sugar until dissolved.
3. Sift flour, cream of tartar and bicarbonate of soda twice onto baking paper. Sift into egg mixture and use a large metal spoon to fold until combined.
4. Divide mixture evenly among cake pans. Bake for about 20 minutes or until skewer inserted into the centre comes out clean.
5. Turn cakes immediately onto a baking paper lined wire rack.
6. Serve cool sponges sandwiched together with whipped cream and jam. Dust with icing sugar.
.
White Chocolate cheesecakeServes: 10Preparation: 30 minutes (plus refrigeration
time)
250g plain sweet biscuits125g butter, melted2 teaspoons gelatine¼ cup water375g cream cheese, softened½ cup caster sugar1 teaspoon vanilla extract300ml thickened cream150g white chocolate, meltedMixed berries and grated white chocolate, to garnish
1. Grease and line a 22cm spring form tin with baking paper.
2. Place biscuits in a food processor. Process until fine. Add melted butter. Process until combined. Press mixture onto the base of the prepared tin. Refrigerate for 30 minutes.
3. Sprinkle gelatine over water in a heatproof jug. Stand jug in a small saucepan of simmering water. Stir until gelatine dissolves. Cool slightly.
4. Place cream cheese, sugar and vanilla extract in a large bowl. Using the beaters, beat on Low speed (1-2) until just combined. Increase to Medium/High speed (4-5) and beat until smooth.
5. Add cream. Continue beating until just combined. Add chocolate and gelatine mixture. Beat until just combined. Pour mixture into prepared tin. Refrigerate overnight or until firm.
6. Serve garnished with mixed berries and grated chocolate.
11
Recipes continued
Chocolate mousseServes: 8Preparation: 20 minutes
300ml thickened cream3 eggs, separated2 tablespoons caster sugar200g dark chocolate, chopped30g unsalted butter, choppedWhipped cream and extra chocolate to garnish
1. Place cream in a bowl. Using the beaters, beat on High speed (5-6) until soft peaks form.
2. Place egg whites in a clean bowl. Using the balloon whisks, beat on High speed (5-6) until soft peaks form. Add sugar and beat until sugar dissolves.
3. Place chocolate in a heatproof bowl. Place bowl over a saucepan of simmering water. Stir with a metal spoon until melted. Remove from heat, add butter and stir until melted.
4. Add egg yolks and stir until smooth.5. Fold cream and egg whites into chocolate
mixture in two batches. 6. Spoon mixture into 8 serving glasses. Cover
and refrigerate overnight. 7. Serve with extra whipped cream and
garnish with shaved chocolate.

12
Icing, Fillings, Frosting and Creams
Chantilly Cream300ml thickened cream2 tablespoons icing sugar1 teaspoon vanilla extract
1. Place all ingredients in a bowl. Using the balloon whisks, beat on High speed (5-6) until soft peaks form.
Fluffy Butter Frosting100g butter, softened 4 cups pure icing sugar1/3 cup milk1 teaspoon vanilla extract
1. Place all ingredients in a bowl. Using the beaters, beat on Low speed (1-2) until smooth.
Tip: Add a few drops of food colour while beating to achieve the desired colour.
Glaze Icing¼ cup caster sugar¼ cup water1 teaspoon gelatine
1. Place all ingredients in a small saucepan. Stir over low-medium heat until sugar has just dissolved.
2. Brush warm on top of baked sweet goods.Tip: Do not allow the mixture to boil. This will
de-activate the gelatine.
Whipped chocolate ganache200g dark chocolate, chopped 2/3 cup thickened cream
1. Place chocolate and cream in a small saucepan. Stir over low heat with a metal spoon until smooth. Transfer to a bowl. Cover and refrigerate for about 1 hour or until spreadable. Using beaters, beat on Low speed (1-2) until light and paler in colour.
12

Shouldyouexperienceanydifficultieswithyourappliance,pleasephoneourcustomerservicelineforadviceon1300881861inAustralia,or0800786232inNewZealand.Alternatively,youcansendawrittenclaimtoSunbeamattheaddresslistedbelow.Onreceiptofyourclaim,Sunbeamwillseektoresolveyourdifficultiesor,iftheapplianceisdefective,adviseyouonhowtoobtainareplacementorrefund.
YourSunbeam12MonthReplacementGuaranteenaturallydoesnotcovermisuseornegligenthandlingandnormalwearandtear.
Similarlyyour12MonthReplacementGuaranteedoesnotcoverfreightoranyothercostsincurredinmakingaclaim.Pleaseretainyourreceiptasproofofpurchase.
Thebenefitsgiventoyoubythisguaranteeareinadditiontoyourotherrightsandremediesunderanylawswhichrelatetotheappliance.
OurgoodscomewithguaranteesthatcannotbeexcludedundertheAustralianConsumerLawandundertheNewZealandConsumerGuaranteesAct.
InAustraliayouareentitledtoareplacementorrefundforamajorfailureandforcompensationforanyotherreasonablyforeseeablelossordamage.Youarealsoentitledtohavethegoodsrepairedorreplacedifthegoodsfailtobeofacceptablequalityandthefailuredoesnotamounttoamajorfailure.
Shouldyourappliancerequirerepairorserviceaftertheguaranteeperiod,contactyournearestSunbeamservicecentre.
ForacompletelistofSunbeam’sauthorisedservicecentresvisitourwebsiteorcall:
Australiawww.sunbeam.com.au
1300881861Units5&6,13LordStreetBotanyNSW2019Australia
New Zealandwww.sunbeam.co.nz
080078623226VesteyDrive,MtWellingtonAuckland,NewZealand
In the unlikely event that this appliance develops any malfunction within 12 months of purchase (3 months commercial use) due to faulty materials or manufacture, we will replace it for you free of charge.
12 Month Replacement Guarantee

is a registered trademark.
Need help with your appliance?Contactourcustomerserviceteamorvisitourwebsiteforinformationandtipsongettingthemostfromyourappliance.
In Australia
Visit www.sunbeam.com.au
Or call 1300 881 861
In New Zealand
Visit www.sunbeam.co.nz
Or call 0800 786 232
‘Mixmaster’ is a trademark of Sunbeam Corporation.Made in China. Due to minor changes in design or otherwise, the product may differ from the one shown in this leaflet. © Copyright. Sunbeam Corporation Limited 2011.ABN 45 000 006 771
Units 5 & 6, 13 Lord Street Botany NSW 2019 AustraliaUnit 3, Building D 26 Vestey Drive Mt Wellington Auckland New Zealand Sunbeam Corporation is a division of GUD Holdings Ltd. 8/11