
miStore Implementation and Configuration Guide · Table 2-6: Version of Products Product Version...
52
Micros miStore POS Mobile Software (miStore) Implementation and Configuration Guide Release 7.0 February 2015
Transcript of miStore Implementation and Configuration Guide · Table 2-6: Version of Products Product Version...

Micros miStore POS Mobile Software (miStore)Implementation and Configuration GuideRelease 7.0
February 2015

Micros miStore POS Mobile Software (miStore), Implementation and Configuration Guide, Release 7.0
Copyright © 2015, Oracle and/or its affiliates. All rights reserved.
This software and related documentation are provided under a license agreement containing restrictions on use and disclosure and are protected by intellectual property laws. Except as expressly permitted in your license agreement or allowed by law, you may not use, copy, reproduce, translate, broadcast, modify, license, transmit, distribute, exhibit, perform, publish, or display any part, in any form, or by any means. Reverse engineering, disassembly, or decompilation of this software, unless required by law for interoperability, is prohibited.
The information contained herein is subject to change without notice and is not warranted to be error-free. If you find any errors, please report them to us in writing.
If this software or related documentation is delivered to the U.S. Government or anyone licensing it on behalf of the U.S. Government, the following notice is applicable:
U.S. GOVERNMENT END USERS: Oracle programs, including any operating system, integrated software, any programs installed on the hardware, and/or documentation, delivered to U.S. Government end users are “commercial computer software” pursuant to the applicable Federal Acquisition Regulation and agency-specific supplemental regulations. As such, use, duplication, disclosure, modification, and adaptation of the programs, including any operating system, integrated software, any programs installed on the hardware, and/or documentation, shall be subject to license terms and license restrictions applicable to the programs. No other rights are granted to the U.S. Government.
This software or hardware is developed for general use in a variety of information management applications. It is not developed or intended for use in any inherently dangerous applications, including applications that may create a risk of personal injury. If you use this software or hardware in dangerous applications, then you shall be responsible to take all appropriate fail-safe, backup, redundancy, and other measures to ensure its safe use. Oracle Corporation and its affiliates disclaim any liability for any damages caused by use of this software or hardware in dangerous applications.
Oracle and Java are registered trademarks of Oracle and/or its affiliates. Other names may be trademarks of their respective owners.
Intel and Intel Xeon are trademarks or registered trademarks of Intel Corporation. All SPARC trademarks are used under license and are trademarks or registered trademarks of SPARC International, Inc. AMD, Opteron, the AMD logo, and the AMD Opteron logo are trademarks or registered trademarks of Advanced Micro Devices. UNIX is a registered trademark of The Open Group.
This software or hardware and documentation may provide access to or information on content, products, and services from third parties. Oracle Corporation and its affiliates are not responsible for and expressly disclaim all warranties of any kind with respect to third-party content, products, and services. Oracle Corporation and its affiliates will not be responsible for any loss, costs, or damages incurred due to your access to or use of third-party content, products, or services.

Chapter 1: Getting Started ............................................... 1Xservices Architecture ........................................................................................... 2
Who Should Use This Guide ................................................................................... 3
Chapter 2: Implementing miStore .................................... 5Overview ............................................................................................................... 5
Intended Use of Application .................................................................................. 5
Deployment Models Overview and Hardware Integrations .................................... 6
Receipt Printers ................................................................................................... 7
Report Printer ..................................................................................................... 7
Barcode Support.................................................................................................. 7
Integration with Other Products ........................................................................... 8
miStore Functions ................................................................................................. 9
miStore Configurable Options .............................................................................. 13
Global Options................................................................................................... 13
Tender Authorizer(s) ........................................................................................... 14Selling Options .................................................................................................. 14
Transaction Options ........................................................................................... 15
Loyalty Cards and Awards Options ....................................................................... 15
Send Sale Options ............................................................................................. 16
Receiving Options .............................................................................................. 16
Shipping Options ............................................................................................... 16
miStore Security (User Roles and Permissions) ................................................... 17
miStore Customizations ....................................................................................... 19
Chapter 3: Installing or Updating miStore Components ................................................................... 21Overview ............................................................................................................. 21
C O N T E N T S
Table of Contents i

Implementation and Configuration Guide Version 7.0
Requirements ...................................................................................................... 21
Determine Java Version ...................................................................................... 22
Installing or Updating Xservices .......................................................................... 22
Xstore Build InstallX Components ........................................................................ 22
Installing Xservices for the First Time ................................................................... 22
Updating or Re-installing Xservices ...................................................................... 24
Restarting or Stopping Xservices.......................................................................... 24
Installing miStore for the First Time ................................................................... 25
Updating miStore ................................................................................................ 28
Chapter 4: Configure User Specific Settings .................. 29Customer ID Settings ......................................................................................... 30Location Settings ................................................................................................. 30
Primary Database Settings .................................................................................. 31
Replication Database Settings ............................................................................. 31
Xcenter Database Settings .................................................................................. 32
Store Backup Database Settings .......................................................................... 32
Receipt Printer Settings ...................................................................................... 32
Email Settings .................................................................................................... 33
Relate Settings .................................................................................................... 33
Locate Settings .................................................................................................... 33
Locate Settings for Orders .................................................................................. 33
Authorization Settings ......................................................................................... 34
Appendix A: Distribution Certificate & Provisioning Profile ............................................................................ 35Introduction ........................................................................................................ 35
Create a Certificate Signing Request ................................................................... 36Generate and Download the Certificate ............................................................... 36
Create the Application ID for miStore .................................................................. 40
Create the Provisioning Profile ............................................................................ 43
Appendix B: Additional Information ............................... 47Wireless Network ................................................................................................ 47
Mobile Device Management (MDM) ...................................................................... 47
ii Table of Contents

Getting Started
The Implementation and Configuration Guide provides general information about miStore product architecture, the technical landscape, the enterprise flow for your store systems, and the procedures and instructions necessary to install or upgrade miStore and its components using Xservices. You will need to purchase an iOS Developer Enterprise Program membership. See “Distribution Certificate & Provisioning Profile” on page 35.
Xservices manage all communication to corporate systems on behalf of miStore. This could include real-time lookups to CRM (Relate). As is done in Xstore®, the corporate systems push
C H A P T E R
The rebranding for the latest version of this documentation set is in development as part of post MICROS acquisition activities. References to former MICROS product names may exist throughout this existing documentation set.
1

CHAPTER 1: Getting Started Version 7.0
data in near real time as transactions occur in the stores. Monitoring/support information is published from the miStore client through the services layer to the corporate systems.
Figure 1-1: Xservices Communication
Xservices ArchitectureXservices:
is a group of web services for Xstore.
was developed for the miStore mobile POS application.
utilizes JAX-WS/Metro for its web service provider.
normally is built on top of Xstore code.
This document is intended only as a guide for a typical implementation. Since implementations will differ from customer to customer, it is up to the person performing the implementation to know when and how to deviate from this guide.
2 Xservices Architecture

Version 7.0 Implementation and Configuration Guide
refers to the Jetty-based, in-store installation of xstore-services.
Figure 1-2: Xservices Architecture
Who Should Use This GuideThis guide is intended for anyone responsible for miStore installation, configuration, or updates, including Operations Technical Support, and Customer Technical Support.
Anyone using this guide should have a working knowledge of XML, the network system being used and, depending upon the environment and system you are using, SQL Server or Oracle database, and the Windows or the Linux operating system.
Who Should Use This Guide 3

CHAPTER 1: Getting Started Version 7.0
4 Who Should Use This Guide

Implementing miStoreOverviewThis chapter will help you to collect information about the miStore technical landscape. It contains questions for you to complete in order to determine the flow of the store.
Intended Use of ApplicationComplete the following questions to determine the intended use of the application:
C H A P T E R
Table 2-1: Intended Use of Application
Intended Use Question Answer
What devices will run miStore? (iPod, iPhone, or iPad)?
How many stores will miStore be used in?
How many mobile devices will be running per store?
What kinds of registers are running in the stores?
Is there a dedicated server in each store?
Provide a projected number of transactions anticipated per miStore device.
Will miStore be used for multiple brands?
Will miStore be used in the same way across brands?
Overview 5

CHAPTER 2: Implementing miStore Version 7.0
Deployment Models Overview and Hardware Integrations
Refer to the miStore Supported Hardware List document and indicate which devices will be required:
Indicate which capabilities are required:
Will miStore be used internationally? Are there requirements to support additional languages (beyond English)?
Not all capabilities are available on all of the supported devices. Your requirement selections will determine the sled that would best meet your needs.
Table 2-2: Required Hardware and Sled
Required Hardware Sled (if applicable)
Table 2-3: Required Capabilities
Capabilities Required?
Additional battery
Debit/Pin Pad
EMV/Smart Card reader
Near Field Communication (NFC)1 Wireless Support
1.Passes data from one device to another.
Table 2-1: Intended Use of Application
Intended Use Question Answer
6 Deployment Models Overview and Hardware Integrations

Version 7.0 Implementation and Configuration Guide
Receipt PrintersAny printers attached to the POS registers can be “shared” by miStore. Additionally, standalone (Ethernet) receipt printers can be directly managed by miStore. In the table below, list the make and model of receipt printers (will need to support JPOS).
Report PrinterReport printers are commonly used for things like shipping/packing slips and labels. If the printer works with the POS system, it will work with miStore.
Barcode SupportIndicate in the table below which barcode symbologies need to be supported:
Table 2-4: Receipt Printer Select List
Make and Model of Receipt Printers Should these display in a select list?1
1.Requires additional setup in the Xservices HardwareConfig.xml file.
1.
2.
3.
4.
Table 2-5: Barcode Symbologies
Barcode Symbologies Need to be supported?
Code 39
Code 93
Code 128
UPC-A
Interleaved 2 of 5
Other
Deployment Models Overview and Hardware Integrations 7

CHAPTER 2: Implementing miStore Version 7.0
Integration with Other ProductsUse the table below to indicate the versions of the MICROS products you are currently using or plan on licensing within the next six months.
In the table below, indicate other third-party (Non-MICROS) Systems intended for integration with miStore:
Table 2-6: Version of Products
Product Version
Xstore
Store211
1.Not included in miStore base.
TradeWind1
Relate2
2.Customer and Gift Cards are included in base.
Xpay
OCP1
Locate
CWSerenade1
Table 2-7: Non-MICROS Systems
Third-Party (Non-MICROS) Systems System/Vendor Name and Version
Customer Relationship Management (CRM)
Payment System Gateway/Authorizations
Cross Channel Ordering
Product Catalog/Product Images
Product Reviews
Other (please list)
8 Integration with Other Products

Version 7.0 Implementation and Configuration Guide
miStore FunctionsIn the table below, indicate which miStore functions you will be using:Table 2-8: miStore Functions
Function Description Yes/No Required Field(s) (if applicable)
Line Item Level
Change Quantity
Change Price
Add Discount
Remove Discount
Add to Gift Receipt
Change Commission
Change the line item’s commissioned associate(s).
Void Item Remove the line item from the transaction.
Change Tax
Change Tax Location
Change Tax Amount
Change Tax Percent
Add to Send Sale Convert the line item to a send sale (ship to customer).
Locate Order
Transaction Level
Payment
Credit Card
Debit Card
miStore Functions 9

CHAPTER 2: Implementing miStore Version 7.0
Private Label Credit Card
Gift Card
Suspend Transaction
Suspend the transaction and resume it at the register.
Void Transaction Cancel the transaction.
Add Group Discount
Apply a discount to two or more line items.
Add Transaction Discount
Change Commission
Change the commissioned associate(s) of all items on the transaction.
Gift Receipt Items
Send Sale Select the item on the transaction to ship (Send Sale) to the customer.
Gift Card Balance
Receipt Options
Print the Receipt
Print and Email
Email to Customer
Item Lookup
Non Merchandise
Table 2-8: miStore Functions
Function Description Yes/No Required Field(s) (if applicable)
10 miStore Functions

Version 7.0 Implementation and Configuration Guide
Gift Cards
Activate Gift Card
Reload Gift Card
Time Clock
Clock In
Clock Out
Work Code Change the Clock In work code.
History View employee Clock In/Out times for the payroll week.
Inventory
Receiving
Express Quickly receive items by scanning the Document ID or Carton ID or PO Number.
Shipping Ship items to another store, warehouse, vendor, or customer.
Adjustment Move item quantity between inventory locations (Display area, Back room, etc.) and inventory buckets (On Hand, Damaged, etc.)
Transfer Transfer one or more items between inventory locations and buckets.
Table 2-8: miStore Functions
Function Description Yes/No Required Field(s) (if applicable)
miStore Functions 11

CHAPTER 2: Implementing miStore Version 7.0
Gift Card Gift card balance inquiry.
Customer
Add New INDICATE REQUIRED FIELDS:
First Name
Last Name
Address
City
State
Postal Code
Country
Home Phone
Work Phone
Mobile Phone
Email Address
Customer Groups
Edit
Name & Address
Groups
Contact Information
Display Account Information
Display Purchase History
Admin
Open Register
Close Register
Table 2-8: miStore Functions
Function Description Yes/No Required Field(s) (if applicable)
12 miStore Functions

Version 7.0 Implementation and Configuration Guide
miStore Configurable OptionsThis section contains several tables with questions to determine configurable options.
Global OptionsIn the table below, answer the following questions to determine global options:
Reprint Receipt
Table 2-9: Global Options
Global Question Answer
Should the system automatically log out after the system idle time exceeds a configurable wait time?
How long (in seconds) should the system remain in idle state before automatically logging out?
Should the system automatically log out after transactions?
Should the system default to the numeric key pad for the login user ID?
Should the system default to the numeric key pad for the login password?
What is the minimum length of the Item ID (SKU)?
What is the maximum length of the Item ID (SKU)?
What is the minimum length of the item’s serial number?
What is the maximum length of the item’s serial number?
Table 2-8: miStore Functions
Function Description Yes/No Required Field(s) (if applicable)
miStore Configurable Options 13

CHAPTER 2: Implementing miStore Version 7.0
Tender Authorizer(s)Your customer may have different settings for various tenders. In the table below, indicate which tender authorizer(s) will be used and if they require different settings:
Selling OptionsIn the table below, answer the questions to determine selling options:
Table 2-10: Tender Authorizer(s)
Tender Authorizer(s) Different Setting?1
1.Requires a different setup in the Xservices AuthConfig.xml file.
Credit Card
Debit Card
Gift Card
Private Label Credit Card
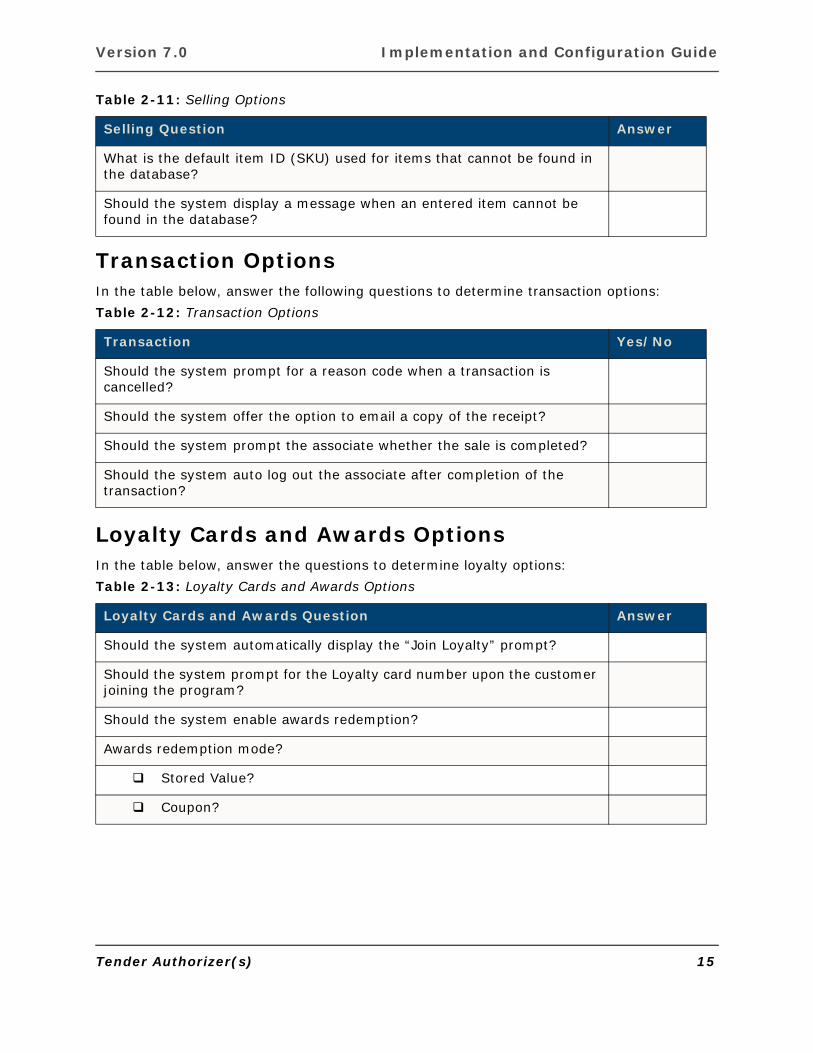
Table 2-11: Selling Options
Selling Question Answer
Prompt for commissioned associates at start of sale?
Prompt for commissioned associates for each item?
What is the minimum number of commissioned associates required for each item?
What is the maximum number of commissioned associates allowed for each item?
Is the current cashier allowed to be the commissioned associate?
If so, should they appear first on the list?
Should the system check the total discount amount or percentage applied to an item against a configured threshold?
Item Discount Threshold Amount?
Item Discount Threshold Percent?
Should the system allow selling of items that are not found in the database?
If yes, should miStore notify that the item is not on file?
14 Tender Authorizer(s)
Version 7.0 Implementation and Configuration Guide
Transaction OptionsIn the table below, answer the following questions to determine transaction options:
Loyalty Cards and Awards OptionsIn the table below, answer the questions to determine loyalty options:
What is the default item ID (SKU) used for items that cannot be found in the database?
Should the system display a message when an entered item cannot be found in the database?
Table 2-12: Transaction Options
Transaction Yes/No
Should the system prompt for a reason code when a transaction is cancelled?
Should the system offer the option to email a copy of the receipt?
Should the system prompt the associate whether the sale is completed?
Should the system auto log out the associate after completion of the transaction?
Table 2-13: Loyalty Cards and Awards Options
Loyalty Cards and Awards Question Answer
Should the system automatically display the “Join Loyalty” prompt?
Should the system prompt for the Loyalty card number upon the customer joining the program?
Should the system enable awards redemption?
Awards redemption mode?
Stored Value?
Coupon?
Table 2-11: Selling Options
Selling Question Answer
Tender Authorizer(s) 15

CHAPTER 2: Implementing miStore Version 7.0
Send Sale OptionsIn the table below, answer the question to determine Send Sale Options:
Receiving OptionsIn the table below, answer the questions to determine Receiving Options:
Shipping OptionsIn the table below, answer the questions to determine Shipping Options:
Table 2-14: Send Sale Options
Send Sale Question Answer
Enable Send Sale?
Table 2-15: Receiving Options
Receiving Question Answer
Allow receiving of multiple shipments?
Multiple cartons per document?
Should the system prompt to confirm to save the document?
Should the system prompt to close the document upon exiting the document?
Should the system display the expected items and quantities to receive?
Should Express Receiving default to receiving by carton?
Should Express Receiving prompt for a PO number?
Should Express Receiving accept cartons not in the document?
Table 2-16: Shipping Options
Shipping Question Answer
Should the system prompt for a tracking number?
Should the system prompt for the Shipper?
Should the system prompt to confirm to save the document?
Should the system prompt to close the document upon exiting the document?
Should the system prompt to ship the items upon exiting the document?
Should the system prompt to print the packing slip?
16 Tender Authorizer(s)

Version 7.0 Implementation and Configuration Guide
miStore Security (User Roles and Permissions)miStore will inherit some of Xstore’s user security. Please verify the customer’s Xstore Security Privilege matrix for its applicability to miStore. Complete the table below indicating the security privilege level for each miStore Function.
Number of packing slips the system should print?
Should the system prompt to print shipping labels?
Default number of shipping labels to print?
Table 2-17: miStore Privilege Levels
Function Privilege Level
Line Item Level
Change Quantity
Change Price
Add Discount
Remove Discount
Add to Gift Receipt
Change Commission
Void Item
Change Tax
Change Tax Location
Change Tax Amount
Change Tax Percent
Add to Send Sale
Transaction Level
Payment
Credit Card
Debit Card
Table 2-16: Shipping Options
Shipping Question Answer
miStore Security (User Roles and Permissions) 17

CHAPTER 2: Implementing miStore Version 7.0
Private Label Credit Card
Gift Card
Suspend Transaction
Void Transaction
Add Group Discount
Add Transaction Discount
Change Commission
Gift Receipt Items
Send Sale
Gift Card Balance
Item Lookup
Non Merchandise
Gift Cards
Activate Gift Card
Reload Gift Card
Inventory
Receiving
Express
Shipping
Adjustment
Transfer
Gift Card
Balance Inquiry
Customer
Add New
Edit
Table 2-17: miStore Privilege Levels
Function Privilege Level
18 miStore Security (User Roles and Permissions)

Version 7.0 Implementation and Configuration Guide
miStore Customizations
Name & Address
Groups
Contact Information
Display Account Information
Display Purchase History
Admin
Open Register
Close Register
Reprint Receipt
XStore customizations are not automatically inherited by miStore.
Table 2-18: Customization Options
Customization Question List Customization
Are there customizations to Xstore which need to be supported in miStore?
1.
2.
3.
4.
5.
6.
7.
8.
9.
10.
Table 2-17: miStore Privilege Levels
Function Privilege Level
miStore Customizations 19

CHAPTER 2: Implementing miStore Version 7.0
Are there new features not currently included in miStore that will need to be included?
1.
2.
3.
4.
5.
6.
7.
8.
9.
10.
Table 2-18: Customization Options
Customization Question List Customization
20 miStore Customizations

Installing or Updating miStore Components
OverviewThere are two components to installing miStore:
Xservices – Runs on the store server: this is the miStore services layer.
miStore – Runs on mobile devices.
RequirementsThe following are miStore requirements:
The installer for miStore requires that the server uses at least Windows XP SP4 for the operating system.
Java version 5 is required (see Determine Java Version below).
The customer must purchase an iOS Developer Enterprise Program membership and enroll in the Apple Enterprise Program (https://developer.apple.com/programs/ios/enterprise/). The miStore application must be signed with a certificate based on the program enrollment see “Distribution Certificate & Provisioning Profile” on page 35.
C H A P T E R
The customer must provide the certificate (key) to MICROS before the miStore build can begin.
Overview 21

CHAPTER 3: Installing or Updating miStore Components Version 7.0
Determine Java VersionTo determine your Java version:
1. Open a DOS window.
2. Navigate to the C drive and type java -version. This will provide the version number as 1.x...
3. If the version number is less than 1.5, download java version 1.5 or later and install it. To install java 1.5, open http://www.oracle.com/technetwork/java/javasebusiness/downloads/java-archive-downloads-javase5-419410.html and download jre-1_5_0_22-windows-i586-p.exe. Place the executable file on your C drive and double click to install.
Installing or Updating XservicesXservices is an application that communicates with miStore in order to process data entered by Associates.
Xstore Build InstallX ComponentsWithin the XST_xstore_(build)-installx.zip file for upgrades you will see the following subdirectories:
The Xservices file contains the following:
ant.install.properties
xservices - parameters for xservices
Installing Xservices for the First Time1. Download the XST_xstore_(build)-installx.zip file to your C drive.
2. Open the Xservices folder (see “Xstore Build InstallX Components” on page 22).
3. Open and modify the ant.install.properties with store specific information.
The miStore installer does not support installing to a drive other than C at this time.
22 Installing or Updating Xservices

Version 7.0 Implementation and Configuration Guide
4. Save the ant.install.properties file.
5. From the Xservices folder, open a DOS window.
6. Enter “java-jar x.jar”, where x.jar is the name of the installation jar file. For example, java -jar xservices-6.5.0.389-0.0.0-XST-install.jar. The installation will run and when finished, it displays if the install was successful or not. All of the information that displays on the screen during the installation is also saved to a file named xservices-install.log. This log file is located in the same directory as the installation jar file.
Once installed, navigate to the C:\xservices-configs directory and open the xservices.properties file in a text editor and modify the database connection properties.
The installation jar file may be an upgrade file if Xservices is coming from an Xstore update. For example, Xservices-6.5.13-0.0.9-xst-upgrade.jar.
If the Xservices installation fails, send the xservices-install.log file to MICROS for review.
For Windows systems, the Xservices installer creates a log file named installx-xservices.log in the c:\xservices\installx\log folder.
For Linux systems, the Xservices installer creates a log file named installx-xservices.log in the /opt/xservices/installx/log folder.
The following changes are made to the Xstore database after installing Xservices:
New registers and tills are automatically created to be used for each iPod/iPad. The default is to add registers 21 to 29 and their tills. Contact MICROS if you would like the register numbers to be different. Records will be added to loc_wkstn to add the register and tsn_tnd_repository for the till.
Earlier versions of miStore (version 1.2 and 1.3) add records to the com_sequence_part table for miStore to operate properly.
If tenders in miStore are accepted, records are added to the tnd_tndr_availability table for each tender.
Installing or Updating Xservices 23

CHAPTER 3: Installing or Updating miStore Components Version 7.0
Updating or Re-installing XservicesIf you currently have Xservices installed, you may want to save the xservices.properties file which should be located in the c:\xservices-config directory. This file configures several settings and you may want to refer to it after installing the new version.
Follow the same steps for “Installing Xservices for the First Time” on page 22. The difference is that your current installation will be saved to a backup directory named BACKUPxservices.
Restarting or Stopping XservicesOnce Xservices is installed, there will be a service added to the machine named Xstore Services.
If needed, this service can be stopped and restarted as follows:
1. From Xenvironment, press CTRL + ALT + X.
2. Select Yes to confirm that you want to open the TS (Technical Services) menu.
3. Select the Start Xservices or Stop Xservices option and then press [Enter].
Figure 3-1: Menu Options
Your current settings will not be overwritten but any new ones will be added, which may require you to edit the xservices.properties file to set the correct values for new settings.
Xenvironment’s system.properties file (located in the c:\environment directory) must have Xservices enabled via the xservices-hh.disabled property being set to False.
24 Installing or Updating Xservices

Version 7.0 Implementation and Configuration Guide
4. Select Yes to confirm that you wish to start or stop Xservices.
5. Enter the system password and press [Enter].
Installing miStore for the First TimeTo install for the first time on a device, perform the following steps:
1. Make sure Xservices is running on the server.
2. Start Safari.
3. Navigate to the following address: https://<xservices.machine.name>:8443/install. (where xservices.machine.name is the name of the machine hosting Xservices.) For example: https://xst1717r01:8443/install.
4. Select the Password field and enter the code (usually your Xenvironment password).
5. Select Install.
6. Select Install again to confirm.
7. The waiting status bar indicates progress. After installation is complete, the waiting icon will change to the miStore icon.
8. Open miStore. The System Settings page displays in Demo mode. Enter the following information:
Primary Host (the host name of the Xservices server, for example xst1717r01)
Backup Host (if applicable)
Org ID
Store #
Reg#
Locale
The installer and the auto updater will only work in an SSL environment installation of Xservices.
A Configuration Profile must be installed on the device which contains the CA certificate of the xservices server.
To change to live mode, see step 10 below.
Installing miStore for the First Time 25

CHAPTER 3: Installing or Updating miStore Components Version 7.0
Figure 3-2: System Settings
9. Select Done.
10. To change Demo mode to Live mode:
a. From the miStore main screen, select About.
b. Select Settings.
Figure 3-3: About Screen
c. Enter the passcode.
Verify the build number is correct.
26 Installing miStore for the First Time

Version 7.0 Implementation and Configuration Guide
d. Select Misc Configuration.
Figure 3-4: System Options
e. Select Live.
Figure 3-5: Misc Configuration Screen
f. Select Done.
Installing miStore for the First Time 27

CHAPTER 3: Installing or Updating miStore Components Version 7.0
Updating miStoreOnce the new version has been installed on the device, any updates can be installed with the above process or the following process:
1. Install the new Xservices build on the server.
2. Start miStore on the device.
3. miStore will recognize a new version is available and prompt to install it. Select Ok.
Figure 3-6: New Version Prompt
4. miStore prompts to confirm if you would like to install. Select Install.
The icon indicates it is installing with a progress bar. When it is complete, you can open miStore.
Figure 3-7: Installing Progress Bar
28 Updating miStore
Configure User Specific SettingsThe settings that you will want to be aware of and may need to update are located in the Xservices properties file (C:\xservices-config\xservices.properties).
The settings available in Xservices properties include:
“Customer ID Settings” on page 30
“Location Settings” on page 30
“Primary Database Settings” on page 31
“Replication Database Settings” on page 31
“Xcenter Database Settings” on page 32
“Store Backup Database Settings” on page 32
“Receipt Printer Settings” on page 32
“Email Settings” on page 33
“Relate Settings” on page 33
“Locate Settings” on page 33
“Authorization Settings” on page 34
C H A P T E R
During the initial install, miStore will look at Xstore properties and replicate matching configurations. However, after installation, if Xstore updates configurations, miStore will not replicate the configurations. You will need to manually modify the configurations.
29

CHAPTER 4: Configure User Specific Settings Version 7.0
Customer ID Settings
Location Settings
Parameter Example Value
dtv.CustomerId XST
dtv.CustomerId.salt DTV
Parameter Example Value
dtv.location.organizationId 1000
xservices.org.id 1000
xcenter.org.id 1000
xservices.rtl_location.id 101
dtv.location.storeNumber 101
xservices.currency.id USD
xservices.base.terminalNumber 21
dtv.update.configpath.from.Xcenter false
xservices.log.path c\:\\xservices-log
dtv.data2.replication.enabled ON
30 Customer ID Settings

Version 7.0 Implementation and Configuration Guide
Primary Database SettingsXservices will map these to its Local datasource.
Replication Database SettingsThe Replication database is where the ctl_replication_queue is located.
Parameter Example Value
dtv.primary.db.driver com.microsoft.sqlserver.jdbc.SQLServerDriver
dtv.primary.db.url jdbc\:sqlserver\://localhost;databaseName\=xstore;sendStringParametersAsUnicode\=false
dtv.primary.db.user Pj4+MAAAAABEJKQVOAJI+5sGlAQ30XIQ
dtv.primary.db.password Pj4+MAAAAABEJKQVOAJI+5sGlAQ30XIQ
dtv.local.db.driver com.microsoft.sqlserver.jdbc.SQLServerDriver
dtv.local.db.url jdbc\:sqlserver\://localhost;databaseName\=xstore;sendStringParametersAsUnicode\=false
dtv.local.db.user Pj4+MAAAAABEJKQVOAJI+5sGlAQ30XIQ
dtv.local.db.password Pj4+MAAAAABEJKQVOAJI+5sGlAQ30XIQ
Parameter Example Value
dtv.repl.db.driver com.microsoft.sqlserver.jdbc.SQLServerDriver
dtv.repl.db.url jdbc\:sqlserver\://localhost;databaseName\=xstorereplication;sendStringParametersAsUnicode\=false
dtv.repl.db.user Pj4+MAAAAABEJKQVOAJI+5sGlAQ30XIQ
dtv.repl.db.password Pj4+MAAAAABEJKQVOAJI+5sGlAQ30XIQ
Primary Database Settings 31

CHAPTER 4: Configure User Specific Settings Version 7.0
Xcenter Database Settings
Store Backup Database Settings
Receipt Printer Settings
Parameter Example Value
dtv.xcenter.url https\://xcenter\:8443
dtv.xcenter.host xcenter
dtv.xcenter.port 8443
dtv.xcenter.user Pj4+MAAAAABEJKQVOAJI+5sGlAQ30XIQ
dtv.xcenter.password Pj4+MAAAAABEJKQVOAJI+5sGlAQ30XIQ
dtv.xcenter.keystore.location C\:/xservices-config/res/ssl/.keystore
dtv.xcenter.keystore.password Pj4+MAAAAADetYYsih3QujIgrdUp8blv
dtv.xcenter.truststore.location C\:/xservices-config/res/ssl/.truststore
dtv.xcenter.truststore.password Pj4+MAAAAADetYYsih3QujIgrdUp8blv
Parameter Example Value
dtv.storebackup.db.driver com.microsoft.sqlserver.jdbc.SQLServerDriver
dtv.storebackup.db.url jdbc\:sqlserver\://localhost;databaseName\=xstore;sendStringParametersAsUnicode\=false
dtv.storebackup.db.user Pj4+MAAAAABEJKQVOAJI+5sGlAQ30XIQ
dtv.storebackup.db.password Pj4+MAAAAABEJKQVOAJI+5sGlAQ30XIQ
Parameter Example Value
xservices.receipt.printer.portname localhost
xservices.receipt.printer.name Epson-Printer-XstoreSharing
Note: Any printers attached to the POS registers can be “shared” by miStore.
32 Xcenter Database Settings

Version 7.0 Implementation and Configuration Guide
Email Settings
Relate Settings
Locate Settings
Locate Settings for OrdersFor the Locate Order feature:
Parameter Example Value
xservices.email.host 172.28.41.4
xservices.email.port 25
xservices.email.useSmtpAuth false
xservices.email.user [email protected]
xservices.email.password Depends on your company
Parameter Example Value
dtv.relate.host relate
dtv.relate.port 8084
dtv.relate.protocol http
dtv.relate.customerId xst
Parameter Example Value
xservices.locate.wsdl.location http\://localhost\:8080/Locate/LocateServices?WSDL
xservices.locate.user [email protected]
xservices.locate.password Depends on your company
Parameter Value
dtv.locate.XstoreSystemCode This is configurable and defaults to Xstore.
xservices.config.locate.enabled Set to true to support Locate Order integration.
Email Settings 33

CHAPTER 4: Configure User Specific Settings Version 7.0
Authorization Settings
xservices.config.OrderSaleEnabled Set to true in order to support Locate order integration.
dtv.locate.enableSoapLogging Set to true. Xservices logs the actual XML request and response to and from Locate. Use this for troubleshooting issues.
xservices.config.updaterProtocol Set to https. This allows the auto updater to work.
xservices.config.updaterPort Enter the configurable port number of the auto updater (for example, 8443). This must match the Xservice’s port number.
The Authorization settings automatically populate from Xstore. You should not have to configure these unless there is an update.
Parameter Example Value
dtv.auth.Host1 https\://localhost\:8443/soap;timeout\=60000;urn\=uri\:xpay
dtv.auth.Host2 https\://localhost\:8443/soap;timeout\=60000;urn\=uri\:xpay
dtv.auth.organizationName Micros
dtv.auth.SiteID 74E8RVX2
dtv.auth.credit.MerchantNumber 00000
dtv.auth.credit.TerminalID 001
dtv.auth.credit.ClientID 0001
dtv.auth.giftcard.MerchantNumber 00000
dtv.auth.giftcard.TerminalID 001
dtv.auth.giftcard.ClientID 0001
Parameter Value
34 Authorization Settings

Distribution Certificate & Provisioning Profile
IntroductionIn order for miStore to be compiled, each customer is required to create a distribution certificate and provisioning profile. There are several steps required to complete this process:
1. “Create a Certificate Signing Request” on page 36
2. “Generate and Download the Certificate” on page 36
3. “Create the Application ID for miStore” on page 40
4. “Create the Provisioning Profile” on page 43
A P P E N D I X
Introduction 35

APPENDIX A: Distribution Certificate & Provisioning Profile Version 7.0
Create a Certificate Signing RequestThe first step is to create a Certificate Signing Request. For this, use the KeyChain Access tool provided by Apple. You can usually find this in the Applications/Utilities folder. Once the tool is opened, perform the following:
1. Under the Keychain Access menu, select Certificate Assistant and then Request a Certificate From a Certificate Authority.
2. In the dialog box that appears, enter an appropriate email address and Common Name. The Common Name is typically the name of your company.
3. Select the option to Save to disk and select Continue.
4. Name the file and select a location to save the certificate.
5. Confirm the certificate file has been saved where you specified. It will also display under Keys as both a public key and private key.
Generate and Download the Certificate1. Open Safari and navigate to https://developer.apple.com/.
2. Select Member Center and log in with your Apple ID. You must log in with the Team Leader account. This is an account you would have created when setting up your iOS Developer Enterprise Program. The Team Leader is the only member that will have access to the appropriate sections of the website to create the distribution certificate and provisioning profile.
3. Select Certificates, Identifiers, & Profiles.
Figure A-1: Apple Developer Main Menu
36 Create a Certificate Signing Request

Version 7.0 Implementation and Configuration Guide
4. Select Certificates.
5. Select the Production option.
Figure A-2: Production Option
Only the team leader will have access to the Production option.
Generate and Download the Certificate 37

APPENDIX A: Distribution Certificate & Provisioning Profile Version 7.0
6. Select In-House and Ad Hoc.
Figure A-3: In House and Ad Hoc Options
7. Select Continue.
Figure A-4: Creating A CSR
38 Generate and Download the Certificate

Version 7.0 Implementation and Configuration Guide
8. Upload the signing certificate created through the Keychain Access tool. Select Choose file and select the certificate from your machine.
9. Select Generate.
Figure A-5: Generate Certificate
10. Select Download and then Done.
Figure A-6: Download Certificate
Generate and Download the Certificate 39

APPENDIX A: Distribution Certificate & Provisioning Profile Version 7.0
Create the Application ID for miStore1. Select App IDs under the identifiers section.
Figure A-7: App Ids Option
2. Select the plus sign located on the upper right portion of the screen to create a new App ID.
3. Enter an appropriate description. Typically this consists of your company name and the word miStore.
4. The App ID prefix value will be defaulted to Team ID and that value displays.
5. Under App ID Suffix, select Explicit App ID.
Figure A-8: Registering an App ID
40 Create the Application ID for miStore

Version 7.0 Implementation and Configuration Guide
6. Enter the Bundle ID as “com.micros.retail.XXX-iStore” where XXX is your capitalized three-character company code.
Figure A-9: App ID Suffix
7. A prompt to enter your App ID displays. Review the information.
If modifications are needed select the Back button.
If the information is correct, select Submit.
Figure A-10: App ID Confirmation
Create the Application ID for miStore 41

APPENDIX A: Distribution Certificate & Provisioning Profile Version 7.0
8. Select Done.
Figure A-11: Registration Complete
9. The new Application ID is available in the list.
Figure A-12: New App ID
42 Create the Application ID for miStore

Version 7.0 Implementation and Configuration Guide
Create the Provisioning Profile1. Select Distribution under Provisioning Profiles.
Figure A-13: Provisioning Profiles Distribution
2. Select the plus sign located on the upper right portion of the screen.
3. Select In House.
4. Select Continue.
Create the Provisioning Profile 43

APPENDIX A: Distribution Certificate & Provisioning Profile Version 7.0
5. Select the App ID just created from the drop-down list and then select Continue.
Figure A-14: Select App ID
6. Select the certificate you just created from the list.
7. Select Continue.
Figure A-15: Select Certificates
Make sure the App ID created displays in the App ID field.
44 Create the Provisioning Profile

Version 7.0 Implementation and Configuration Guide
8. Enter a profile name of “xxx miStore Provisioning Profile” where xxx is your company name.
9. Select Generate.
10. Select the Download button for the certificate created. The file will be downloaded and will have an extension of “.mobileprovision.”
Figure A-16: Download and Install
11. Select Done.
12. Open the Keychain Access tool and select the My Certificates section.
13. Drag and drop the downloaded certificate into the Keychain Access. You should now see the certificate listed and expanding it will show that there is a private key associated with it.
14. Right-click on the certificate from within Keychain Access and select the Export option.
15. Set the name and location and select Save.
16. You will be prompted to enter a password. Enter a password for the file and select OK. The file will be saved to disk with a “.p12” extension.
17. Both the exported .p12 and .mobileprovision files need to be incorporated into the miStore build process. Upload these files to the MICROS SFTP site and the password used when exporting the .p12 file should be provided, preferably by phone. Once MICROS has the files, they will be incorporated into the miStore build for the customer, so a custom version of miStore can be delivered.
Create the Provisioning Profile 45

APPENDIX A: Distribution Certificate & Provisioning Profile Version 7.0
46 Create the Provisioning Profile

Additional InformationWireless NetworkiOS devices (and, more generally, low-power WiFi devices) impose additional constraints on wireless infrastructure. Refer to the Apple guidelines at http://support.apple.com/kb/HT4199 for network device configuration recommendations.
Mobile Device Management (MDM)miStore is designed to update itself through the web services layer. However, miStore does not manage the configuration of a device, or its settings outside of the miStore application. For full device management, Apple exposes a set of MDM capabilities. Various third party software providers support these capabilities.
A P P E N D I X
Wireless Network 47

APPENDIX B: Additional Information Version 7.0
48 Mobile Device Management (MDM)


![[]Oracle® Retail Xstore Point-of-Service for Grocery User ... … · Oracle Retail Xstore Point-of-Service for Grocery/User Guide, Release 15.0.1 Oracle welcomes customers' comments](https://static.fdocuments.net/doc/165x107/5ecc369a3b23a768ed191a51/oracle-retail-xstore-point-of-service-for-grocery-user-oracle-retail.jpg)

