MiniMed 640G - FCC ID · CareLink™, Guardian™, Bolus Wizard™, Enlite™, MiniLink™, Dual...
42
MiniMed ™ 640G System User Guide MP6025958-022 / A RELEASED
-
Upload
hoangkhanh -
Category
Documents
-
view
225 -
download
0
Transcript of MiniMed 640G - FCC ID · CareLink™, Guardian™, Bolus Wizard™, Enlite™, MiniLink™, Dual...

MiniMed™ 640GSystem User Guide
MP6025958-022 / A
RELEASED

MP6025958-022 / A
RELEASED

MiniMed™ 640GSystem User Guide
MP6025958-022 / A
RELEASED

Copyright & trademarks
©2014 Medtronic MiniMed, Inc. All rights reserved.
CareLink™, Guardian™, Bolus Wizard™, Enlite™, MiniLink™, Dual Wave™, Square Wave™, MiniMed™, andSmartGuard™ are trademarks of Medtronic MiniMed, Inc.
Bayer™ is a trademark of Bayer.
Humalog™ is a trademark of Eli Lilly and Company.
NovoLog™ and NovoRapid™ are trademarks of Novo Nordisk A/S.
6025958-022_a
REF MMT-1512 MMT-1712
MP6025958-022 / A
RELEASED

Contacts:
Africa: Medtronic Africa (Pty) Ltd.Tel: +27 (0) 11 677 4800
Australia: Medtronic Australasia Pty.Ltd.Tel: 1800 668 670 (product orders)Tel: 1800 777 808 (customer help)
Azerbaijan: IsomedTel: +994 (12) 464 11 30
Bangladesh: Sonargaon HealthcarePvt Ltd.Mobile: (+91)-9903995417or (+880)-1714217131
Belarus: Badgin LtdTel: +375 17 313 0990
België/Belgique: N.V. MedtronicBelgium S.A.Tel: 0800-90805
Bosnia and Herzegovina: Medimpexd.o.o.Tel: +387 33 476 444or +387 33 476 400Fax: +387 33 476 401or +387 33 432 241
Brasil: Medtronic Comercial Ltda.Tel: +(11) 3707-3707
Bulgaria: Interagro-90 LtdTel: +359 888 636 033
Canada: Medtronic of Canada Ltd.Tel: 1-800-284-4416 (toll free/sans-frais)
China: Medtronic (Shanghai) Ltd.24 Hour Help (Cell): +86400-820-198124 Hour Help (Landline): +86800-820-1981
Croatia: Oktal PharmaTel: +385 1 659 57 77
Croatia: Medtronic Adriatic d.o.o.Tel: +385 1 488 11 20Fax: +385 1 484 40 60
Danmark: Medtronic Danmark A/STel: +45 32 48 18 00
Deutschland: Medtronic GmbHGeschäftsbereich DiabetesTelefon: +49 2159 8149-370Telefax: +49 2159 8149-11024-Stdn-Hotline: 0800 6464633
Eire: Accu-Science LTD.Tel: +353 45 433000
España: Medtronic Ibérica S.A.Tel: +34 91 625 05 42Fax: +34 91 625 03 9024 horas: +34 901 120 335
Europe: Medtronic Europe S.A. Europe,Middle East and Africa HeadquartersTel: +41 (0) 21-802-7000
France: Medtronic France S.A.S.Tel: +33 (0) 1 55 38 17 00
Hellas: Medtronic Hellas S.A.Tel: +30 210677-9099
Hong Kong: Medtronic InternationalLtd.Tel: +852 2919-1300To order supplies: +8522919-132224-hour helpline: +852 2919-6441
India: India Medtronic Pvt. LtdTel: (+91)-80-22112245 /32972359Mobile: (+91)-9611633007
Indonesia: Medtronic International Ltd.Tel: +65 6436 5090or +65 6436 5000
Israel: AgentekTel: +972 3649 3111
Italia: Medtronic Italia S.p.A.Tel: +39 02 24137 261Fax: +39 02 24138 210Servizio assistenza tecnica:Nº verde 24h: 800 20 90 20
Japan: Medtronic Japan Co. Ltd.Tel: +81-3-6430-201924 Hr. Support Line:0120-56-32-56
Kazakhstan: Medtronic BV inKazakhstanTel: +7 727 311 05 80 (Almaty)Tel: +7 717 224 48 11 (Astana)
Latin America: Medtronic, Inc.Tel: 1(305) 500-9328Fax: 1(786) 709-4244
Latvija: Ravemma Ltd.Tel: +371 7273780
Macedonia: Alkaloid Kons DooelTel: +389 2 3204 430
Magyarország: Medtronic HungáriaKft.Tel: +36 1 889 0688
Malaysia: Medtronic International Ltd.Tel: +603 7946 9000
Middle East and North Africa:Regional OfficeTel: +961-1-370 670
Montenegro: GlosarijTel: +382 20 642 495Fax: +382 20 642 540
Nederland, Luxembourg: MedtronicB.V.Tel: +31 (0) 45-566-8291Gratis: 0800-3422338
New Zealand: Medica PacificaPhone: 64 9 414 0318Free Phone: 0800 106 100
Norge: Medtronic Norge A/STel: +47 67 10 32 00Fax: +47 67 10 32 10
POCCИЯ: Medtronic B. V.Tel: +7 495 580 73 7724h: 8-800-200-76-36
Philippines: Medtronic InternationalLtd.Tel: +65 6436 5090or +65 6436 5000
Polska: Medtronic Poland Sp. Z.o.o.Tel: +48 22 465 6934
Portugal: Medtronic Portugal LdaTel: +351 21 7245100Fax: +351 21 7245199
Puerto Rico: Medtronic Puerto RicoTel: 787-753-5270
Republic of Korea: Medtronic Korea,Co., Ltd.Tel: +82.2.3404.3600
Romania: Trustmed SRLTel: +40 (0) 21 220 6477
Schweiz: Medtronic (Schweiz) AGTel: +41 (0)31 868 016024-Stunden-Hotline: 0800 633333Fax Allgemein: +41 (0)318680199
MP6025958-022 / A
RELEASED
Serbia: EpsilonTel: +381 11 311 5554Fax: +381 11 311 5554
Serbia: Medtronic B.V. SerbiaTel: +381 11 2095 900Fax: +381 11 2095 985
Singapore: Medtronic InternationalLtd.Tel: +65 6436 5090or +65 6436 5000
Slovenija: Zaloker & Zaloker d.o.o.brezplačna številka: 080 1880
Tel: +386 1 542 51 1124-h pomoč: 386 51 316 560
Slovenská republika: MedtronicSlovakia, s.r.o.Tel: +421 26820 6942HelpLine: +421 26820 6986
Sri Lanka: Swiss Biogenics Ltd.Mobile: (+91)-9003077499or (+94)-777256760
Suomi: Medtronic Finland OyTel: +358 20 7281 200Help line: +358 400 100 313
Sverige: Medtronic ABTel: +46 8 568 585 20Fax: +46 8 568 585 11
Taiwan: Medtronic-Taiwan Ltd.Tel: +886.2.2183.6068Toll Free: +886.0800.005.285
Thailand: Medtronic (Thailand) Ltd.Tel: +662 232 7400
Turkiye: Medtronic Medikal TeknolojiTicaret Ltd. Sirketi.Tel: +90 216 4694330
USA: Medtronic Diabetes GlobalHeadquartersTel: +1-800-646-463324 Hour HelpLine:+1-800-826-2099To order supplies:+1-800-843-6687
Ukraine: Med EK Service Ltd.Tel: +380 44 545 7705
United Kingdom: Medtronic Ltd.Tel: +44 1923-205167
Österreich: Medtronic ÖsterreichGmbHTel: +43 (0) 1 240 44-024 – Stunden – Hotline:0820 820 190
Česká republika: Medtronic Czechias.r.o.Tel: +420 233 059 401Non-stop help line:+420 233 059 059
MP6025958-022 / A
RELEASED

Contents
■ Before you begin3 Using this user guide
4 Emergency kit
5 User safety
5 Indications
6 Contraindications
6 General warnings
8 General precautions
10 Adverse reactions
10 Notice
12 Keeping track of your system information
13 Insulin guidelines
13 Consumables
14 Optional devices
15 Accessories
15 Ordering supplies and accessories
■ First steps19 Your pump
20 Using the buttons
21 About batteries
22 Inserting the battery
23 Removing the battery
Contents v
■ contents
MP6025958-022 / A
RELEASED
24 Getting to know your pump
24 Entering your startup settings
26 Unlocking your pump
26 Home screen
28 Status bar
31 Status screens
32 Using the Menu screen
34 Scroll bar
34 Power modes
35 If you remove your pump
■ Basal39 Basal rate
40 Basal insulin settings
41 Max Basal Rate
41 Basal patterns
42 Adding a new basal pattern
46 Editing, copying, or deleting a basal pattern
46 Changing from one basal pattern to another
47 Temporary basal rates
47 About Temp Basal rates
48 Starting a Temp Basal rate
49 Preset Temp basal rates
52 Canceling a Temp Basal or Preset Temp basal rate
52 Viewing your basal information
54 Stopping and resuming your insulin delivery
■ Bolus59 About bolus deliveries
59 Bolus types
60 Bolus type example
61 Bolus delivery options
vi Contents
MP6025958-022 / A
RELEASED
62 Bolus settings
63 Max Bolus
64 Bolus Increment
64 Bolus Speed
65 Bolus Wizard
65 Understanding your Bolus Wizard settings
66 Setting up the Bolus Wizard feature
69 Changing your Bolus Wizard settings
71 Turning off the Bolus Wizard feature
71 About active insulin
72 Bolus Wizard warnings
73 Normal bolus
73 Delivering a Normal bolus with the Bolus Wizard
75 Delivering a Normal bolus using Manual Bolus
76 Square Wave bolus
76 Turning on or off Square Wave bolus
77 Delivering a Square Wave bolus with the Bolus Wizard
78 Delivering a Square Wave bolus using Manual Bolus
79 Dual Wave bolus
79 Turning on or off Dual Wave bolus
79 Delivering a Dual Wave bolus with the Bolus Wizard
81 Delivering a Dual Wave Bolus using Manual Bolus
82 Easy Bolus
83 Understanding Easy Bolus step sizes
83 Setting up Easy Bolus
84 Delivering a bolus using Easy Bolus
85 Preset Bolus
85 Setting up and managing Preset Bolus deliveries
87 Delivering a Preset Bolus
88 Stopping a bolus delivery
■ contents
Contents vii
MP6025958-022 / A
RELEASED

■ Reservoir and infusion set93 Setting up the reservoir and infusion set
107 Disconnecting and reconnecting your infusion set
■ Meter111 About your compatible Bayer meter
112 Wirelessly connecting your pump and meter
112 Setting up Remote Bolus
112 Deleting a meter from your pump
■ History and events117 History
117 Summary screen
118 Understanding the Summary screen
121 Daily History
122 Alarm History
122 Using Sensor Glucose Review
124 ISIG History
124 Event Markers
■ Reminders129 Personal reminders
130 Bolus BG Check reminder
131 Missed Meal Bolus reminder
132 Low Reservoir reminder
133 Set Change reminder
133 Calibration reminders
■ General settings137 Airplane Mode
138 Audio Options
139 Auto Suspend
viii Contents
MP6025958-022 / A
RELEASED

139 Block Mode
140 Carb Unit
141 Display Options
141 Language
142 Managing your pump settings
145 Self Test
146 Sensor Demo
148 Time and date
■ Setting up Continuous Glucose Monitoring151 Understanding Continuous Glucose Monitoring (CGM)
152 SmartGuard
152 Home screen with CGM
155 Understanding glucose settings
156 High settings
157 Low settings
167 Turning on the Sensor feature
167 Setting up the High Settings
171 Setting up the Low Settings
174 Manually resuming basal delivery during a suspend by sensor event
175 Wirelessly connecting your pump and transmitter using Auto Connect
178 Wirelessly connecting your pump and transmitter using Manual Connect
181 Deleting the transmitter from your pump
181 Inserting the sensor
182 Connecting the transmitter to the sensor
182 Starting the sensor
183 Calibrating your sensor
184 Setting up Auto Calibration
185 Where to enter your calibration BG meter reading
186 When to calibrate
186 Guidelines for calibrating
187 Disconnecting the transmitter from the sensor
■ contents
Contents ix
MP6025958-022 / A
RELEASED
187 Removing the sensor
187 Turning off Sensor Settings
■ Using continuous glucose monitoring191 The sensor graph
192 Identifying rapid changes in sensor glucose
193 Silencing Glucose Alerts
■ Alarms, alerts, and messages199 About alarms, alerts, and messages
200 Alarms
201 Alerts
202 Messages
202 Pump alarms, alerts, and messages
216 CGM (sensor) alarms, alerts, and messages
225 CareLink alert and message
■ Troubleshooting229 Troubleshooting pump issues
230 What is a Check Settings alarm?
230 My pump is asking me to rewind
230 I dropped my pump
231 I cannot get to the Manage Settings screen
231 My pump display times out too quickly
231 Where is my pump status screen?
232 My pump is asking me to enter my settings
234 Troubleshooting sensor issues
234 My pump cannot find the sensor signal
236 Calibration not accepted
236 Why does the SmartGuard suspend by sensor icon on my Home screenappear gray?
x Contents
MP6025958-022 / A
RELEASED

■ Maintenance241 Cleaning your pump
242 Cleaning your transmitter
242 Storing your pump
243 Storing your transmitter
■ Product specifications and safety information247 Product specifications
247 Alarm and alert escalation
248 Altitude range
248 Audio frequency
249 Backlight
249 Basal delivery
250 BG Target
250 BG meter value
250 Bolus delivery
251 Bolus Wizard feature default settings
251 Bolus Wizard feature specifications
254 Carb ratios
254 Delivery accuracy
255 Easy Bolus
255 Environmental conditions
256 Filling the infusion set and cannula
256 Infusion pressure
256 Insulin delivery default settings
257 Insulin sensitivity factor
257 Low Reservoir reminder
258 Max Bolus
258 Normal bolus
258 Occlusion detection
259 Percent temp basal
■ contents
Contents xi
MP6025958-022 / A
RELEASED

259 Program safety checks
259 Pump dimensions
259 Pump memory
259 Pump weight
260 Sensor default settings
262 Guidance and manufacturer's declaration
268 Wireless communication
268 Quality of service
269 Radio frequency (RF) communications specifications
269 Data security
270 Icon table
■ Appendix A: End user software license agreement273 End user software license agreement
■ Glossary
■ Index
xii Contents
MP6025958-022 / A
RELEASED

before you begin
MP6025958-022 / A
RELEASED

MP6025958-022 / A
RELEASED

Before you beginThis user guide is designed to help you understand the operation of yourMiniMed™ 640G system. Work closely with your healthcare professional whenstarting insulin pump therapy.
Using this user guideThis user guide contains valuable information about using your new insulin pump.To help you find the information you need, you can use the table of contents atthe beginning of the user guide and the index at the end of the user guide. Thereis also a glossary of terms, which starts on page 277.
The following table describes certain terms, conventions, and concepts used in thisuser guide.
Convention What it means
Select To activate a screen item, accept a value, or initiate an action.
Select and
hold
To perform an action using your pump screen, press the Select
button and hold until the action is complete.
Press To push and then release a button.
Press and
hold
To push and keep pressure on a button.
Bold text To indicate screen items and buttons. For example, "Select Next to
continue."
Before you begin 3
■ before you
beginMP6025958-022 / A
RELEASED

Convention What it means
NoteNote: A note provides helpful information.
CautionCaution: A caution notifies you of a potentialhazard which, if not avoided, may result in minoror moderate injury or damage to the equipment.
WARNINGWARNING: A warning notifies you of apotential hazard which, if not avoided, couldresult in death or serious injury. It may alsodescribe potential serious adverse reactions andsafety hazards.
Emergency kitKeep an emergency kit with you at all times to make sure that you always havenecessary supplies. Tell a family member, co-worker, or friend where you keep youremergency kit.
It is important that you test your blood glucose (BG) more frequently while you aretraveling. The routine hassle of travel, including stress, changes in time zones,schedules and activity levels, meal times and types of food, can all affect yourdiabetes control. Be extra attentive to monitoring your BG frequently, and beprepared to respond if needed.
Your emergency kit should include these items:
• Fast-acting glucose tablets.
• Blood glucose monitoring supplies.
• Urine or blood ketone monitoring supplies.
• Extra MiniMed-compatible infusion set and MiniMed reservoir.
• Extra new AA lithium or alkaline batteries, or fully charged NiMH batteries.
4 Chapter 1
MP6025958-022 / A
RELEASED

• Insulin syringe and fast-acting insulin (with dosage instructions from yourhealthcare professional).
• Wallet card (packaged with your pump accessories).
• Adhesive dressing.
• Glucagon emergency kit.
WARNING: Do not use the Bolus Wizard™ to calculate a bolus for aperiod of time after giving a manual injection of insulin by syringeor pen. Manual injections are not accounted for in the active insulinamount. Therefore, the Bolus Wizard could prompt you to delivermore insulin than needed. Too much insulin may causehypoglycemia. Consult with your healthcare professional for howlong you need to wait after a manual injection of insulin before youcan rely on the active insulin calculation of your Bolus Wizard.
For details on pump safety, see User safety, on page 5.
User safety
IndicationsMiniMed 640G system
The MiniMed 640G system is indicated for the continuous delivery of insulin, at setand variable rates, for the management of diabetes mellitus in persons requiringinsulin. In addition, the system is indicated for continuous or periodic monitoringof glucose levels in the fluid under the skin, and detecting possible low and highglucose episodes. When using a sensor and transmitter, the pump displayscontinuous sensor glucose values and stores this data so that it can be analyzed totrack patterns and improve diabetes management. This data can be uploaded to acomputer for analysis of historical glucose values.
The continuous sensor glucose values provided by the MiniMed 640G system arenot intended to be used directly for making therapy adjustments. Rather, theyprovide an indication that a confirmation fingerstick measurement may berequired. All therapy adjustments should be based on measurements obtainedusing a home blood glucose monitor and not based on the value displayed by thepump.
■ before you
begin
Before you begin 5
MP6025958-022 / A
RELEASED

ContraindicationsPump therapy is not recommended for people who are unwilling or unable toperform a minimum of four blood glucose tests per day.
Pump therapy is not recommended for people who are unwilling or unable tomaintain contact with their healthcare professional.
Pump therapy is not recommended for people whose vision or hearing does notallow recognition of pump signals and alarms.
General warningsPump
The pump is not suitable for use in the presence of a flammable anestheticmixture with air, oxygen, or nitrous oxide.
Never rely on the pump beeps or vibrations alone to navigate through the pumpscreens or menus because this may result in incorrect menu selection or setting.
Do not rely on preset pump alarms or reminders alone to prompt you to checkyour blood glucose. Set additional reminders on other devices, such as your cellphone, to avoid forgetting to check your blood glucose.
Standard Luer sets are not compatible with the MiniMed 640G insulin pump.MiniMed reservoirs and MiniMed-compatible infusion sets are specifically designedfor use with the MiniMed 640G insulin pump. Do not modify your MiniMedreservoir or MiniMed-compatible infusion set.
Only use U100 insulin that has been prescribed by your healthcare professional foruse with an infusion pump. Do not put any other drugs or medications inside yourreservoir for use with this pump.
Make sure the infusion set is disconnected from your body before you rewind yourpump or fill the infusion set tubing. Never insert the reservoir into the pump whilethe tubing is connected to your body. Doing so could result in an accidentalinfusion of insulin.
Do not insert the reservoir in the pump if you did not rewind your pump. Doingso could result in an accidental infusion of insulin.
While the infusion set is connected to your body, do not unscrew or retighten thetubing connector on the reservoir.
6 Chapter 1
MP6025958-022 / A
RELEASED

Do not use the MiniLink™ transmitter (MMT-7703) with the MiniMed 640G insulinpump as this device does not communicate with this insulin pump.
Do not modify this product, as modification could result in a safety hazard.
Do not use your pump if the screen appears broken or unreadable. In someinstances, impact to the pump can damage the screen while the buttons continueto function. If the screen is broken or unreadable, do not press any buttons.Remove the pump and begin using your backup insulin plan per the direction ofyour healthcare professional. If the pump is accidentally programmed while thescreen is broken or unreadable, this could result in high or low blood glucoselevels. If your screen is damaged, contact the 24 Hour HelpLine or your localrepresentative to arrange for shipment of a replacement pump.
Exposure to magnetic fields and radiation
WARNING: Keep the pump away from magnetic fields and avoiddirect contact with any magnets.
If you are going to have an X-ray, MRI, diathermy treatment, CT scan, or other typeof exposure to radiation, take off your pump, sensor, transmitter, and meter beforeentering a room containing any equipment of this kind. The magnetic fields andradiation in the immediate vicinity of this equipment can make your devicesnonfunctional or damage the part of the pump that regulates insulin delivery,possibly resulting in over delivery and severe hypoglycemia.
Do not expose your pump to a permanent magnet, such as pump cases that havea magnetic clasp. Exposure to a permanent magnet may interfere with the motorinside the pump.
Reservoir and infusion sets
Only use reservoir and infusion sets manufactured by Medtronic Diabetes. Thepump has undergone extensive testing to confirm appropriate operation whenused with compatible reservoirs and infusion sets manufactured or distributed byMedtronic Diabetes. We cannot guarantee appropriate operation if the pump isused with reservoirs or infusion sets offered by third parties. We are notresponsible for any injury or malfunctioning of the pump that may occur inassociation with such use.
■ before you
begin
Before you begin 7
MP6025958-022 / A
RELEASED
Only use U100 insulin that has been prescribed by your healthcare professional foruse with an infusion pump. Do not put any other drugs or medications inside yourreservoir for use with this pump.
For additional warnings related to the reservoir and infusion set, refer to the userguides provided with those devices.
Sensor
While there is no evidence of an Enlite™ sensor breaking in a patient’s body, if yoususpect that sensor breakage has occurred, do not attempt to remove the sensoryourself. Contact your healthcare professional for assistance in removing thesensor.
For warnings related to the sensor, refer to the user guide provided with thatdevice.
Transmitter
Keep the transmitter away from children. This product contains small parts andmay pose a choking hazard.
For warnings related to the transmitter, refer to the user guide provided with thatdevice.
Meter
For warnings related to compatible Bayer™ meters, refer to the user guideprovided with that device.
General precautionsAlthough the pump has multiple safety alarms, it cannot notify you if the infusionset is leaking or the insulin has lost its potency. It is essential, that you test yourblood glucose levels at least four times per day. If your blood glucose is out ofrange, check the pump and the infusion set to ensure that the necessary amountof insulin is being delivered.
Waterproof capabilities
At the time of manufacture and when the reservoir and tubing are properlyinserted, your pump is waterproof. It is protected against the effects of beingunderwater to a depth of up to 3.6 meters (12 feet) for up to 24 hours.
8 Chapter 1
MP6025958-022 / A
RELEASED

If the pump is dropped, hit against a hard object, or otherwise damaged, thewaterproof characteristics of the outer casing of the pump may be compromised.If your pump has been dropped or you suspect your pump is damaged, carefullyinspect your pump to ensure there are no cracks before exposing your pump towater.
If you believe that water has entered your pump or you observe any otherpossible pump malfunction, check your blood glucose, and treat high bloodglucose as necessary, using an alternative source of insulin. Contact your localrepresentative for further assistance. Always contact your healthcare professional ifyou experience excessively high or low blood glucose levels or if you have anyquestions about your care.
Electrostatic discharge
Although your MiniMed 640G insulin pump is designed to be unaffected by typicallevels of electrostatic discharge (ESD), very high levels of ESD can result in a resetof the pump's software and a pump error alarm. After clearing the alarm, verifythat your pump is set to the correct date and time and that all other settings areprogrammed to the desired values because the software reset could erase yourpreviously programmed settings.
For more information on pump alarms, see Pump alarms, alerts, and messages, onpage 202. For more information on re-entering your pump settings, see My pumpis asking me to enter my settings, on page 232. If you are unable to re-enter yourpump settings, or otherwise believe there is a problem with your pump, contactyour local representative.
Avoid extreme temperatures
Exposure to extreme temperatures can damage your device, which can adverselyaffect safety and effectiveness of your device. Avoid the following conditions:
1. Avoid exposing your pump to temperatures above 40 °C (104 °F) or below 5°C (41 °F) because this may damage your device.
2. Insulin solutions freeze near 0 °C (32 °F) and degrade at high temperatures. Ifyou are outside in cold weather, wear your pump close to your body andcover it with warm clothing. If you are in a warm environment, take measuresto keep your pump and insulin cool.
■ before you
begin
Before you begin 9
MP6025958-022 / A
RELEASED

3. Do not steam, heat, sterilize, or autoclave your pump. Exposure to hightemperatures may damage your device.
Lotion, sunscreen, and insect repellent
Some skin care products, such as lotion, sunscreen, and insect repellents, cancause damage to plastics, which is a material used in your pump case. After usingsuch products, be sure to wash your hands prior to handling your pump. If youget any skin care products or insect repellents on your pump, wipe them off assoon as possible with a damp cloth and mild soap. For instructions on cleaningyour pump, see Cleaning your pump, on page 241.
Infusion sets and sites
For precautions related to the infusion sets and sites, refer to the user guidesprovided with those devices.
Sensor
For precautions related to the sensor, refer to the user guide provided with thatdevice.
Transmitter
For precautions related to the transmitter, refer to the user guide provided withthat device.
Meter
For precautions related to compatible Bayer™ meters, refer to the user guideprovided with that device.
Adverse reactionsFor adverse reactions related to the sensor, refer to the user guide provided withthat device.
NoticeRadio Frequency (RF) communication
This device complies with the United States Federal Communications Commission(FCC) and international standards for electromagnetic compatibility.
10 Chapter 1
MP6025958-022 / A
RELEASED

This device complies with Part 15 of the FCC Rules. Operation is subject to thefollowing two conditions: (1) This device may not cause harmful interference, and(2) this device must accept any interference received, including interference thatmay cause undesired operation.
These standards are designed to provide reasonable protection against excessiveradio frequency interference, and prevent undesirable operation of the devicesfrom unwanted electromagnetic interference.
This equipment has been tested and found to comply with the limits for a Class Bdigital device, pursuant to Part 15 of the FCC rules. These limits are designed toprovide reasonable protection against harmful interference in a residentialinstallation. This equipment generates, uses, and can radiate radio frequencyenergy and, if not installed and used in accordance with the instructions, maycause harmful interference to radio communications. However, there is noguarantee that interference will not occur in a particular installation. If thisequipment does cause harmful interference to radio or television reception, whichcan be determined by turning the equipment off and on, the user is encouragedto try to correct the interference by one or more of the following measures:
• Reorient or relocate the receiving antenna.
• Increase the separation between the equipment and the receiver.
This device can generate, use, and radiate radio frequency energy and, if installedand used in accordance with the instructions, may cause harmful interference toradio communications. If the device does cause interference to radio or televisionreception, you are encouraged to try to correct the interference by one or more ofthe following measures:
• Decrease the distance between the transmitter and the insulin pump to 1.8meters (6 feet) or less.
• Decrease the distance between the meter and the insulin pump to 1.8 meters(6 feet) or less.
• Increase the separation between the transmitter and the device that isreceiving/emitting interference.
If other devices that employ radio frequencies are in use, such as cell phones,cordless phones, and wireless networks, they may prevent communicationbetween the transmitter and the insulin pump. This interference does not cause
■ before you
begin
Before you begin 11
MP6025958-022 / A
RELEASED

any incorrect data to be sent and does not cause any harm to your devices.Moving away from, or turning off, these other devices may enable communication.If you continue to experience RF interference, please contact your localrepresentative.
Caution: Changes or modifications to the internal RF transmitter orantenna not expressly approved by Medtronic could void the user'sauthority to operate this insulin delivery system.
Directive 1999/5/ECMedtronic declares that this product is in conformity with the essentialrequirements of Directive 1999/5/EC on Radio and Telecommunications TerminalEquipment.
For additional information, contact Medtronic MiniMed at the address or phonenumber provided on the back cover.
For Canada only
This device complies with Industry Canada licence-exempt RSS standard(s). Operation is subject to the following two conditions: (1) this device may not cause interference, and (2) this device must accept any interference, including interference that may cause undesired operation of the device. Le présent appareil est conforme aux CNR d'Industrie Canada applicables aux appareils radio exempts de licence. L'exploitation est autorisée aux deux conditions suivantes : (1) l'appareil ne doit pas produire de brouillage, et (2) l'appareil doit accepter tout brouillage radioélectrique subi, même si le brouillage est susceptible d'en compromettre le fonctionnement.
Keeping track of your system informationThe serial number (SN) is located on the back of your pump. If you are using thebelt clip, you need to remove the belt clip to view the serial number. It alsodisplays in your Pump status screen. For more details on the status screens, seeStatus screens, on page 31. For future reference, enter the serial number of yourpump and the purchase date in the following table:
12 Chapter 1
MP6025958-022 / A
RELEASED

Pump serial number and purchase date
Serial Number:
Purchase Date:
Insulin guidelines
WARNING: Never start on insulin until directed by your healthcareprofessional. Doing so could result in an unintended delivery ofinsulin, which may cause hypoglycemia.
The pump is intended for use with U100 insulin. The following insulins have beentested by Medtronic Diabetes and found to be safe for use with the MiniMed 640Ginsulin pump:
• Humalog™
• NovoLog™
• NovoRapid™
Before using different insulin with this pump, check the insulin label to make surethe insulin can be used with the pump.
ConsumablesThe pump uses disposable (single-use) MiniMed reservoirs and infusion sets forinsulin delivery.
WARNING: Only use reservoir and infusion sets manufactured byMedtronic Diabetes. The pump has undergone extensive testing toconfirm appropriate operation when used with compatiblereservoirs and infusion sets manufactured or distributed byMedtronic Diabetes. We cannot guarantee appropriate operation ifthe pump is used with reservoirs or infusion sets offered by thirdparties and therefore we are not responsible for any injury ormalfunctioning of the pump that may occur in association with suchuse.
■ before you
begin
Before you begin 13
MP6025958-022 / A
RELEASED

• Reservoirs – Use only Medtronic reservoirs. For the MMT-1512 pump model,use the MMT-326A, 1.8 ml (180-unit) reservoir.
Look on the back of your pump for your model number.
For the MMT-1712 pump model, use either the MMT-332A, 3.0 ml (300-unit)reservoir or the MMT-326A, 1.8 ml (180-unit) reservoir, depending on yourinsulin needs.
• Infusion sets – Medtronic Diabetes provides a variety of infusion sets to fityour needs. Contact your healthcare professional for help in choosing aninfusion set. Change your infusion set every two to three days per yourinfusion set manufacturer's instructions.
Optional devices• Compatible Bayer blood glucose meter – The 640G system comes with a
compatible Bayer blood glucose meter. It wirelessly connects to your pump,allowing you to send BG meter readings to your pump. The Remote Bolusfeature allows you to use your meter to start a bolus on your pump. You canalso use this meter to upload system data to your diabetes managementsoftware using the USB port on your computer. For more details, see yourmeter user guide.
Note: The compatible Bayer meter may not be available in allcountries.
• Guardian™ 2 Link transmitter (MMT-7731) – used with your pump for
Continuous Glucose Monitoring (CGM). A device that connects to a glucosesensor. The transmitter collects data measured by the sensor and wirelesslysends this data to monitoring devices.
• Enlite glucose sensor (MMT-7008) – used with your pump for CGM. Thesmall part of the continuous glucose monitoring system that you insert justbelow your skin to measure glucose levels in your interstitial fluid. The sensoris a single-use device.
• CareLink™ USB (MMT-7306) – used to upload system data to the diabetesmanagement software using a USB port on your computer.
14 Chapter 1
MP6025958-022 / A
RELEASED
AccessoriesThe following accessories may be used with your MiniMed 640G system.
• Belt clip (ACC-1599) – used to wear the pump on your belt. Also, you can usethe tip of the belt clip to open the battery compartment on your pump.
• Activity guard (ACC-1520) – used if you are active in sports, or if a child iswearing the pump. Using the activity guard prevents the reservoir from beingrotated or removed from the pump.
• Skins – used to personalize the look of your pump. Skins are decorativeoverlays. Your pump is designed to have skins attached to the back of thepump and the front of the belt clip. Skins also provide additional protectionagainst surface scratches.
Ordering supplies and accessoriesTo order supplies or accessories, contact your local representative.
■ before you
begin
Before you begin 15
MP6025958-022 / A
RELEASED

16 Chapter 1
MP6025958-022 / A
RELEASED

first stepsMP6025958-022 / A
RELEASED

MP6025958-022 / A
RELEASED

First stepsThis chapter gives you an overview of your pump so you can become familiar withthe buttons and screens. Read this entire chapter to understand the basic featuresand initial setup before using your pump to deliver insulin.
Your pumpThe following illustration shows the different parts of your pump. The reservoir,with the tubing connector attached, is inserted into the reservoir compartment.
battery compartment
screen
reservoir compartment
buttons
tubing connector
First steps 19
■ first steps
MP6025958-022 / A
RELEASED

Using the buttons
Caution: Do not use sharp objects to press the buttons on yourpump. Using sharp objects can damage your pump.
The following picture shows the buttons, the notification light, and the light sensoron your pump. The notification light flashes when your pump has an alarm oralert. The notification light is not visible unless flashing.
The keypad has a backlight that lights up the buttons when in use.
menu
select
right
down
left
notification light
backup
light sensor
Note: Do not cover the light sensor with your finger while using yourpump. Covering the light sensor may adjust the brightness on the screenwhen brightness is set to Auto. See Display Options, on page 141 for moreinformation.
20 Chapter 2
MP6025958-022 / A
RELEASED
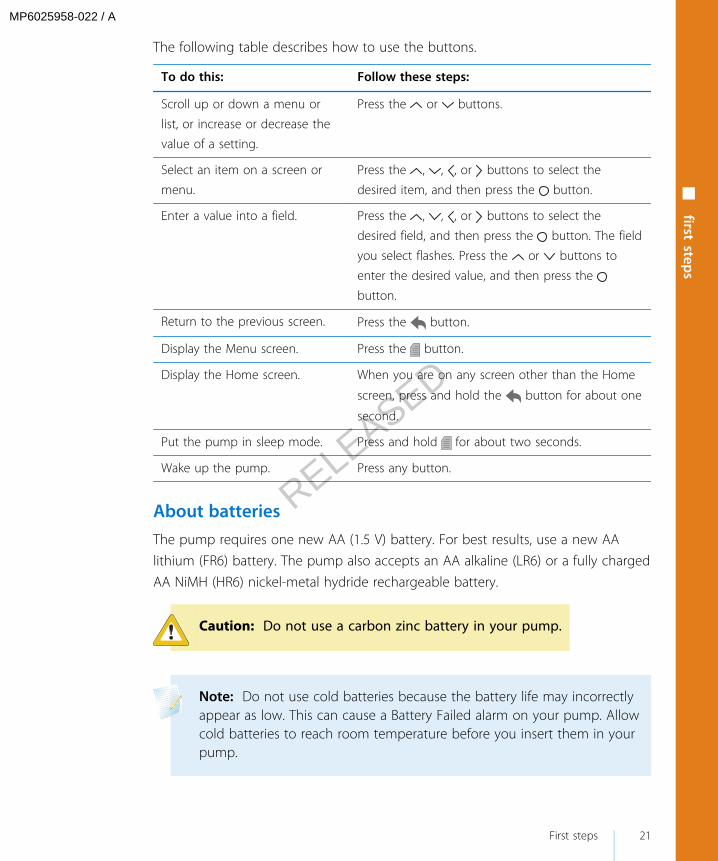
The following table describes how to use the buttons.
To do this: Follow these steps:
Scroll up or down a menu or
list, or increase or decrease the
value of a setting.
Press the or buttons.
Select an item on a screen or
menu.
Press the , , , or buttons to select the
desired item, and then press the button.
Enter a value into a field. Press the , , , or buttons to select the
desired field, and then press the button. The field
you select flashes. Press the or buttons to
enter the desired value, and then press the
button.
Return to the previous screen. Press the button.
Display the Menu screen. Press the button.
Display the Home screen. When you are on any screen other than the Home
screen, press and hold the button for about one
second.
Put the pump in sleep mode. Press and hold for about two seconds.
Wake up the pump. Press any button.
About batteriesThe pump requires one new AA (1.5 V) battery. For best results, use a new AAlithium (FR6) battery. The pump also accepts an AA alkaline (LR6) or a fully chargedAA NiMH (HR6) nickel-metal hydride rechargeable battery.
Caution: Do not use a carbon zinc battery in your pump.
Note: Do not use cold batteries because the battery life may incorrectlyappear as low. This can cause a Battery Failed alarm on your pump. Allowcold batteries to reach room temperature before you insert them in yourpump.
■ first steps
First steps 21
MP6025958-022 / A
RELEASED

Inserting the batteryYour pump does not ship with the battery cap on. The battery cap is located inthe pump box, separate from the pump. To insert the battery:
1. Insert the new or fully charged AA battery, making sure to insert the negativeend (−) first. After you insert the battery, the positive end (+) is visible.
2. Use the belt clip to tighten the battery cap.
Caution: Do not overtighten or undertighten the battery cap.Overtightening the battery cap can cause damage to your pumpcase. Undertightening the battery cap will prevent the pump fromrecognizing the new battery. Turn the battery cap clockwise untilthe cap is aligned horizontally with the pump case, as shown inthe following example.
22 Chapter 2
MP6025958-022 / A
RELEASED

3. If this is the first time you have inserted a battery in your pump, the StartupWizard begins. For more information about the Startup Wizard, see Enteringyour startup settings, on page 24. If this is not the first time you have inserteda battery into your pump, the Home screen appears and the pump resumesyour basal delivery.
Removing the battery
Caution: Do not remove the battery unless you are inserting a newone, or if you are storing your pump. Your pump cannot deliverinsulin while the battery is removed. After removing an old battery, besure to replace it with a new battery within 10 minutes to clear theInsert battery alarm and avoid a Power loss alarm. If power lossoccurs, you must re-enter your time and date settings.
To remove the battery:
1. Before removing a battery from your pump, clear any active alarms or alerts.
2. Use the belt clip to loosen and remove the battery cap.
Note: Use your belt clip to remove and retighten the battery cap. Ifthe belt clip is unavailable, you may use a coin.
3. Remove the battery.
4. Dispose of old batteries according to local disposal requirements.
5. After removing your battery, wait until the Insert Battery screen appearsbefore inserting a new battery.
■ first steps
First steps 23
MP6025958-022 / A
RELEASED
If you are removing the battery to place your pump in storage, see Storingyour pump, on page 242 for more information.
Getting to know your pumpThis section shows you how to navigate through the screens and menus on yourpump. It also helps you learn how to enter information and view the status of yourpump.
Entering your startup settingsYour pump has a Startup Wizard that begins when you insert your battery for thefirst time. The Startup Wizard guides you through setting the language, the timeformat, the current time, and the current date.
Note: Use this procedure when you are entering your settings for thefirst time. If this is not the first time you are entering your pump settings,and your pump is asking you to re-enter your settings, see My pump isasking me to enter my settings, on page 232.
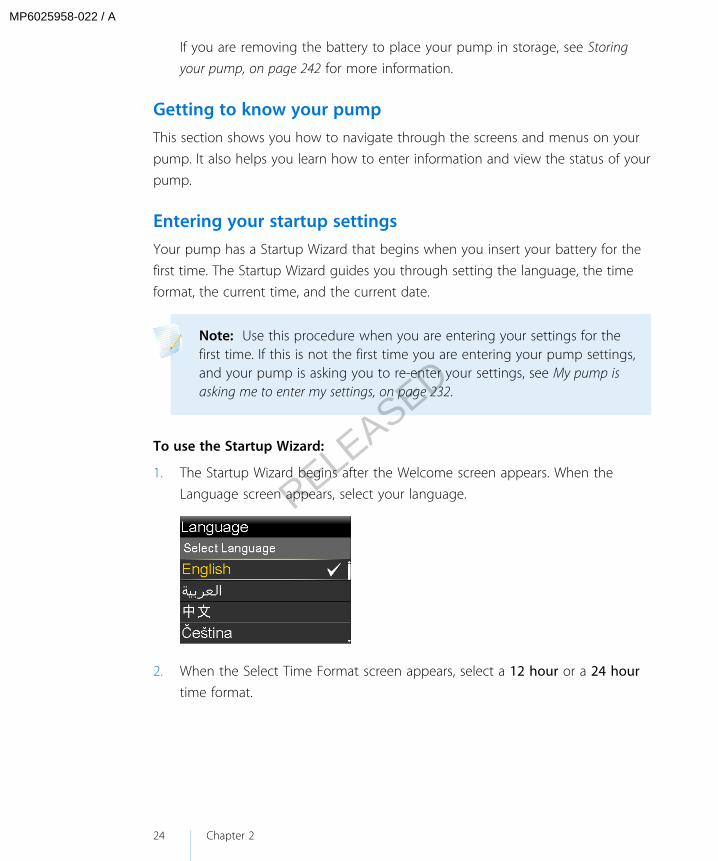
To use the Startup Wizard:
1. The Startup Wizard begins after the Welcome screen appears. When theLanguage screen appears, select your language.
2. When the Select Time Format screen appears, select a 12 hour or a 24 hourtime format.
24 Chapter 2
MP6025958-022 / A
RELEASED

3. When the Enter Time screen appears, adjust the setting to the current time. Ifyou are using a 12-hour clock, be sure to specify AM or PM. Select Next.
4. When the Enter Date screen appears, adjust the Year, Month and Day to thecurrent date. Select Next.
A message confirms that your initial setup is complete, and then the Homescreen appears.
After you enter your initial settings, see the following sections in this chapterto become familiar with the buttons and screens on your pump.
■ first steps
First steps 25
MP6025958-022 / A
RELEASED
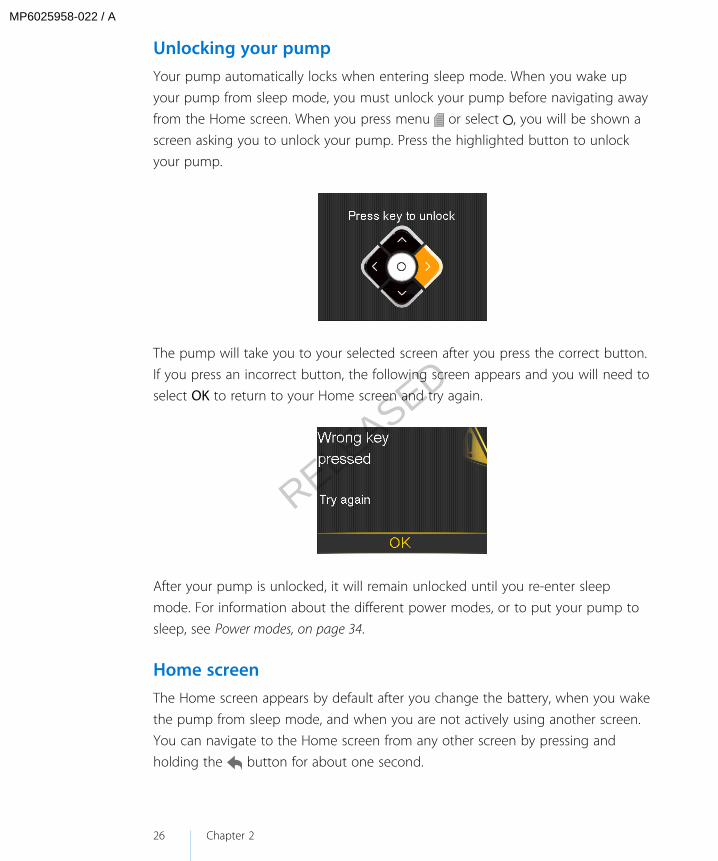
Unlocking your pumpYour pump automatically locks when entering sleep mode. When you wake upyour pump from sleep mode, you must unlock your pump before navigating awayfrom the Home screen. When you press menu or select , you will be shown ascreen asking you to unlock your pump. Press the highlighted button to unlockyour pump.
The pump will take you to your selected screen after you press the correct button.If you press an incorrect button, the following screen appears and you will need toselect OK to return to your Home screen and try again.
After your pump is unlocked, it will remain unlocked until you re-enter sleepmode. For information about the different power modes, or to put your pump tosleep, see Power modes, on page 34.
Home screenThe Home screen appears by default after you change the battery, when you wakethe pump from sleep mode, and when you are not actively using another screen.You can navigate to the Home screen from any other screen by pressing andholding the button for about one second.
26 Chapter 2
MP6025958-022 / A
RELEASED
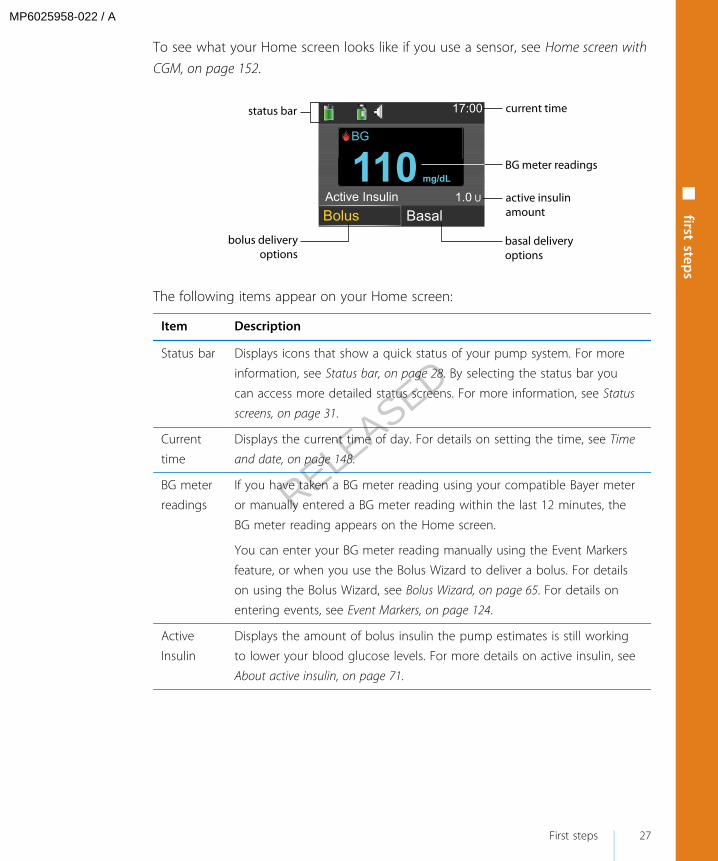
To see what your Home screen looks like if you use a sensor, see Home screen withCGM, on page 152.
17:00
Bolus Basal
110 mg/dL
Active Insulin 1.0 U
BG
current timestatus bar
bolus delivery options
basal delivery options
active insulin amount
BG meter readings
The following items appear on your Home screen:
Item Description
Status bar Displays icons that show a quick status of your pump system. For more
information, see Status bar, on page 28. By selecting the status bar you
can access more detailed status screens. For more information, see Status
screens, on page 31.
Current
time
Displays the current time of day. For details on setting the time, see Time
and date, on page 148.
BG meter
readings
If you have taken a BG meter reading using your compatible Bayer meter
or manually entered a BG meter reading within the last 12 minutes, the
BG meter reading appears on the Home screen.
You can enter your BG meter reading manually using the Event Markers
feature, or when you use the Bolus Wizard to deliver a bolus. For details
on using the Bolus Wizard, see Bolus Wizard, on page 65. For details on
entering events, see Event Markers, on page 124.
Active
Insulin
Displays the amount of bolus insulin the pump estimates is still working
to lower your blood glucose levels. For more details on active insulin, see
About active insulin, on page 71.
■ first steps
First steps 27
MP6025958-022 / A
RELEASED

Item Description
Bolus Allows you to access your bolus delivery options, and provides access to
all of your insulin settings. For details about entering your bolus settings
and delivering bolus insulin, see the Bolus chapter on page 59.
If you have not set up the Bolus Wizard and Preset Bolus features, you
only have access to Manual Bolus from this screen. For details about
setting up the Bolus Wizard feature, see Bolus Wizard, on page 65. For
details about setting up the Preset Bolus feature, see Preset Bolus, on
page 85.
Basal Allows you to access your basal delivery options, and provides access to
all of your insulin settings. For details about entering your basal settings
and delivering basal insulin, see the Basal chapter on page 39.
To access all of your basal options from this screen, you must have set up
a Preset Temp basal rate. For details about setting up Preset Temp basal
rates, see Preset Temp basal rates, on page 49.
Status barThe status bar appears at the top of the Home screen to provide a way for you toquickly check the status of your system. The status bar contains the icons that aredescribed in the following table, along with the current time. For information onviewing detailed status screens, see Status screens, on page 31.
Icon Icon name What it means
Battery The charge level of your pump battery. The color and
the fill level of the icon indicate the status. When your
battery is full, the icon is solid green. As your battery
life is used, the icon changes, as shown in the following
example. For more details about batteries, see About
batteries, on page 21.
28 Chapter 2
MP6025958-022 / A
RELEASED